

Dip powder nails deliver that gorgeous, long-lasting manicure look — but when it comes time to remove them, many people panic. Aggressive removal methods can leave your natural nails thin, brittle, and damaged, sometimes setting back nail health for months. The good news? With the right approach and a little patience, you can safely remove dip powder nails at home without causing any real damage to your nail beds.
The key is understanding that dip powder creates a much stronger bond than regular polish, which means you can’t just peel or pick it off. Your natural nails will suffer if you try. Instead, you need a systematic process that gently dissolves the powder while protecting the delicate keratin layers beneath. What takes 15 minutes to damage can take 20-30 minutes to remove safely — and that’s a trade worth making.
This guide walks you through every step of the removal process, from preparation through recovery. Whether you’re removing dips for the first time or dealing with the aftermath of an aggressive removal, you’ll find exactly what you need to keep your nails healthy and strong.
Why Proper Removal Matters More Than You Think
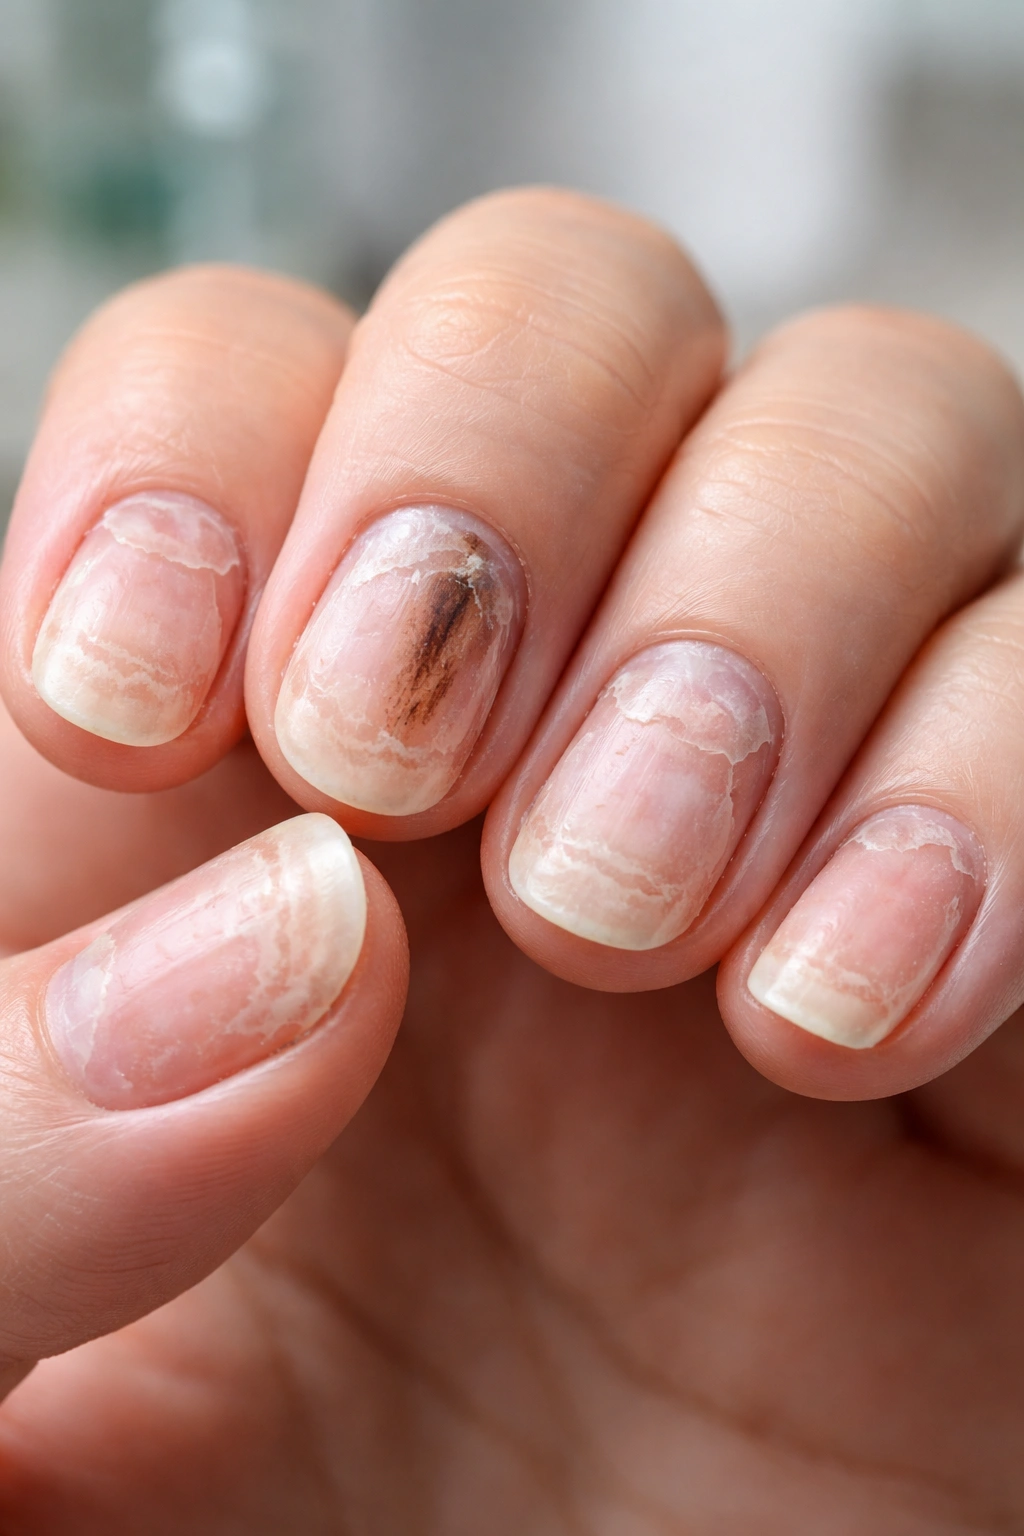
Most people underestimate how much damage careless dip removal can cause. When you rip or peel off dip powder nails, you’re not just removing polish — you’re potentially stripping away layers of your actual nail plate. Your natural nails are made of keratin proteins layered like shingles on a roof. Force off dip powder the wrong way, and you can separate those layers, causing peeling, cracking, and brittleness that can take months to grow out.
The nails that appear paper-thin and fragile after bad removal aren’t permanently damaged — they’re just exposed. As new nail grows out and the damaged portion eventually reaches your fingertips where you trim them off, your nails will return to normal. But that healing timeline is typically 3-6 months, depending on how fast your nails naturally grow.
The real cost isn’t just cosmetic. Nails that have been stripped and separated become vulnerable to infection, break more easily during everyday activities, and can’t be styled properly until they fully recover. Taking an extra 15 minutes during removal to do it properly saves you months of dealing with damaged nails afterward.
Professional nail technicians understand this, which is why reputable salons use solvents and careful technique rather than aggressive scraping. You can replicate that same care at home once you know the right method.
Understanding Dip Powder’s Chemical Composition
Dip powder isn’t just regular nail polish — it’s a hybrid system that creates a much stronger bond with your nail plate. Most dip powders consist of a base coat, colored powder, and a top coat that’s typically a cyanoacrylate (the same ingredient in super glue). That’s why it lasts so much longer than traditional manicures but also why it requires a completely different removal process.
The powder itself is ground color pigment mixed with adhesive resins. When you apply the base coat and dip your finger into the powder, the powder clings to that sticky base. Each layer builds up, and then the top coat seals everything together, creating an incredibly durable finish that won’t chip or peel under normal wear.
Understanding this chemistry is important because it explains why soaking and gentle dissolution work better than scraping or filing. You’re working to break down those cyanoacrylate bonds chemically rather than trying to force the coating off physically. The more you understand the process, the more patient you’ll be when it takes 20 minutes instead of five.
Gather Everything You Need Before Starting
Having all your supplies ready before you begin is essential — you don’t want to stop mid-removal and hunt for something, which inevitably leads to rushing the rest of the process. A good dip removal session requires specific tools and products, and using the right ones genuinely makes a difference.
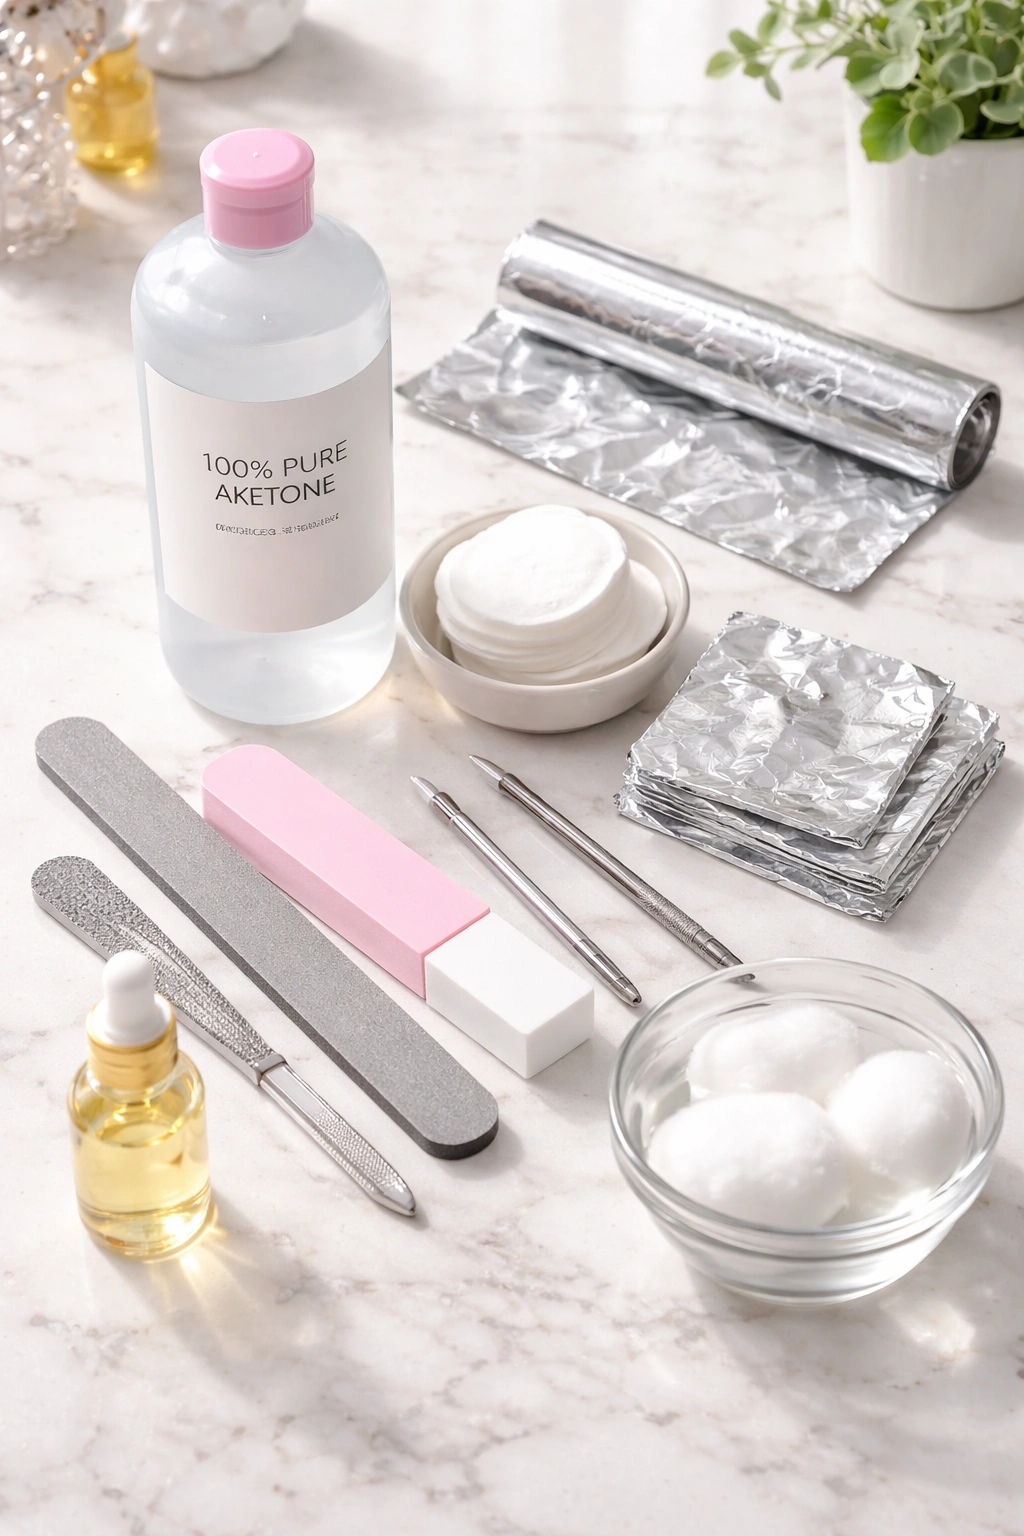
You’ll need acetone, which is the solvent that actually breaks down dip powder. Regular rubbing alcohol won’t work — it’s not strong enough. You need pure acetone (100%), which you can find at any drugstore or beauty supply store in the nail care section. Some people swear by acetone nail polish remover, but pure acetone is more effective because it doesn’t have added oils or conditioning agents that slow down the dissolution process.
Get a few pairs of cotton pads — regular flat cotton rounds work, but the thicker cosmetic pads tend to work better because they hold more liquid and stay saturated longer. You’ll need 10-20 pads depending on how thick your dip application was, so grab a big pack.
Aluminum foil is non-negotiable. This is how you keep acetone in contact with your nails long enough for it to work without having to hold saturated pads in place for 20 minutes straight. You can also use pre-made acetone wraps designed for dip removal, which are convenient and reusable, but foil works just as well.
Get a nail file and a soft buffer. The file should be medium-grit (180-220 grit), not a rough metal file that can damage nail beds. A soft three-sided buffer is perfect for the final smoothing step. You’ll also want a wooden or soft plastic cuticle pusher — never metal — to gently separate powder from the nail edge without gouging your nail plate.
Invest in a good moisturizing oil or cuticle cream for the aftercare phase. During removal, your nails will be exposed to acetone, which is extremely drying. You’ll need to rehydrate them immediately after.
Prepare Your Workspace and Protect Your Skin
Before you start soaking, set up your space properly. You’re working with acetone, which has strong fumes and can dry out your skin rapidly if it sits in direct contact for extended periods.
Work in a well-ventilated area — an open window, a fan running, or ideally a room you can leave during the soak time. Acetone fumes aren’t pleasant, and prolonged exposure can cause headaches. If you’re sensitive to strong chemical smells, wearing a basic dust mask can help.
Protect the skin around your nails by applying a thin layer of cuticle oil, hand cream, or even petroleum jelly to the skin surrounding each nail. Acetone will dry out your skin aggressively, and this barrier prevents that drying effect. You don’t need much — just enough to create a protective seal. Reapply after each soak if you’re doing multiple nails.
Wear old clothes you don’t care about — acetone can damage some fabrics, particularly synthetics. If you spill, it’s not a disaster if you’re wearing something you’ve already written off.
Have paper towels or old cotton cloths nearby for any drips. Keep acetone away from wood furniture, which it can damage. Work over a bathroom sink or a small tray that contains any spills.
The Soaking Method: The Safest, Most Effective Approach
The soaking method is the gold standard for at-home dip removal because it’s the gentlest on your nails while still being highly effective. This method dissolves the dip powder slowly rather than forcing it off, which is why it takes longer but causes virtually no damage when done correctly.
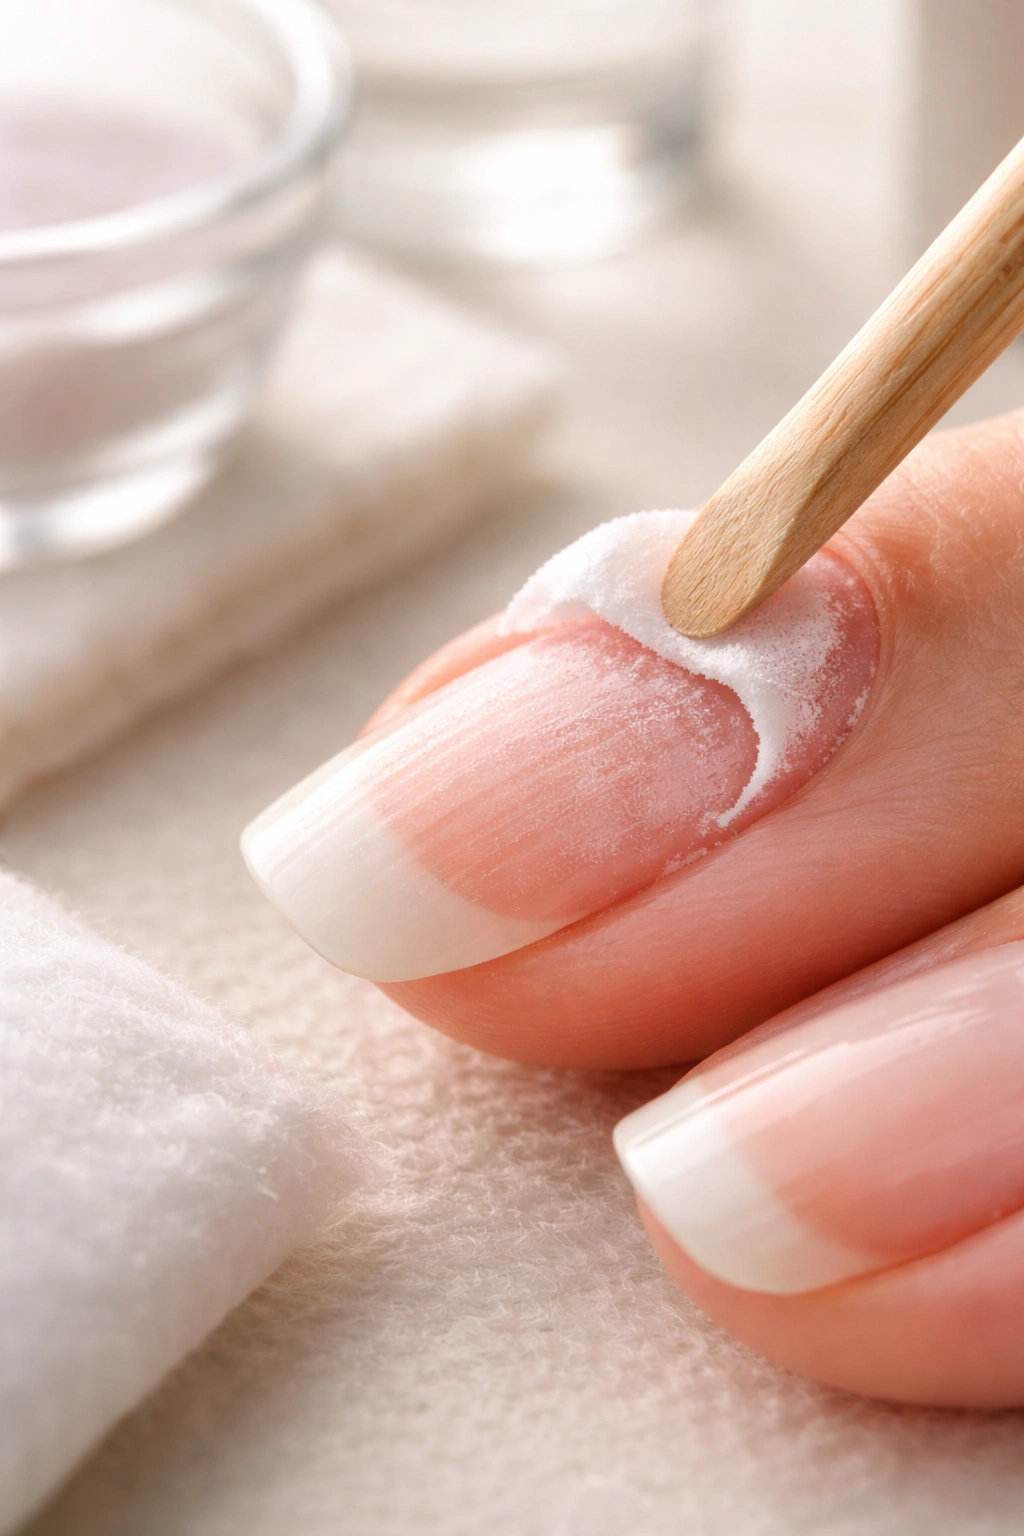
Start by filing the top layer of shiny top coat. This is a crucial but often-skipped step that dramatically speeds up the soaking process. Using your medium-grit file, gently file across the surface of each nail to dull the shine and create tiny scratches in the top coat. You’re not trying to file off the entire dip coating — you’re just breaking through that sealed top layer so acetone can penetrate beneath it.
This step should take 2-3 minutes per hand, and it’s not aggressive. Light strokes are enough; you’re not bearing down hard. If you skip this step, the acetone will take much longer to work because it has to seep through a perfectly sealed coating, which can take 30-45 minutes instead of 15-20 minutes.
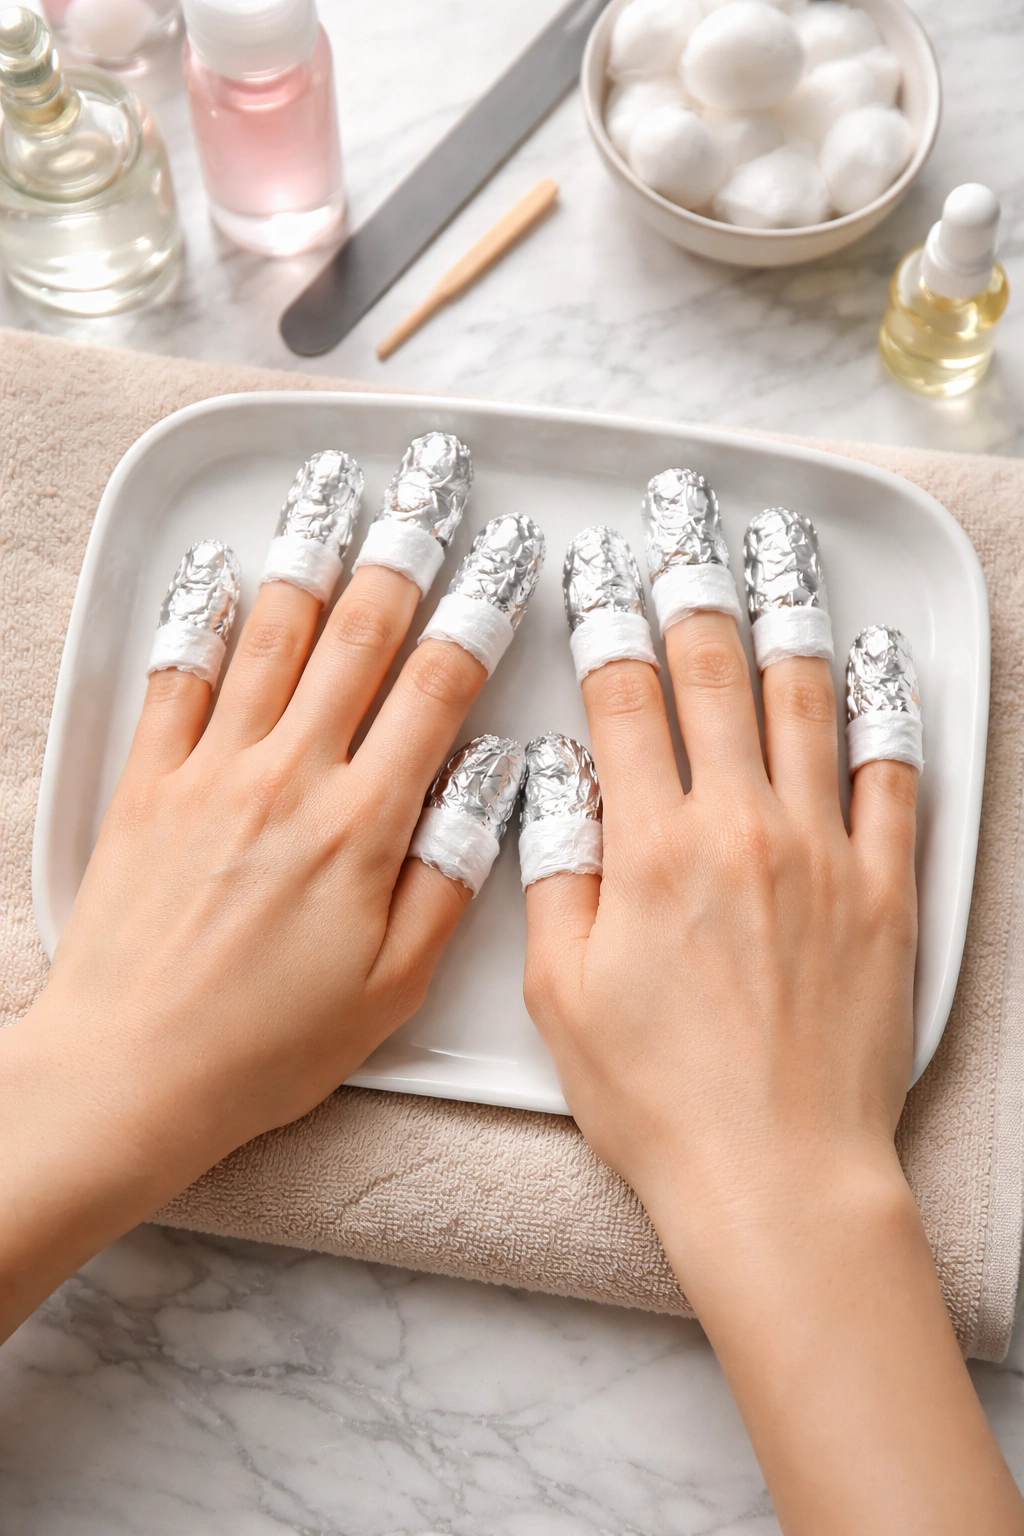
Cut your cotton pads into smaller pieces that will fit on individual nails. You don’t need full-size pads — nail-sized squares work better because they use less acetone and create a better seal.
Pour acetone into a small bowl — about 1/4 cup is enough for a full manicure. This doesn’t need to be deep; you’re not going to soak your fingers completely. The acetone will warm up from your body heat and your fingers’ warmth as you work, which actually helps the dissolution process.
Soak each nail for 15-20 minutes. Place a piece of saturated cotton pad directly on top of each nail, then wrap the finger tightly with aluminum foil to hold the pad in place and trap heat. Work on one hand at a time or recruit someone to help wrap both hands if you have patience for that.
The warmth matters — it speeds up the chemical process. Some people put their foil-wrapped hands under a towel or hold a warm cloth over them to maintain heat. As you wait, you’ll actually feel the acetone working; your nails will start to feel soft and the coating will begin separating from the nail plate.
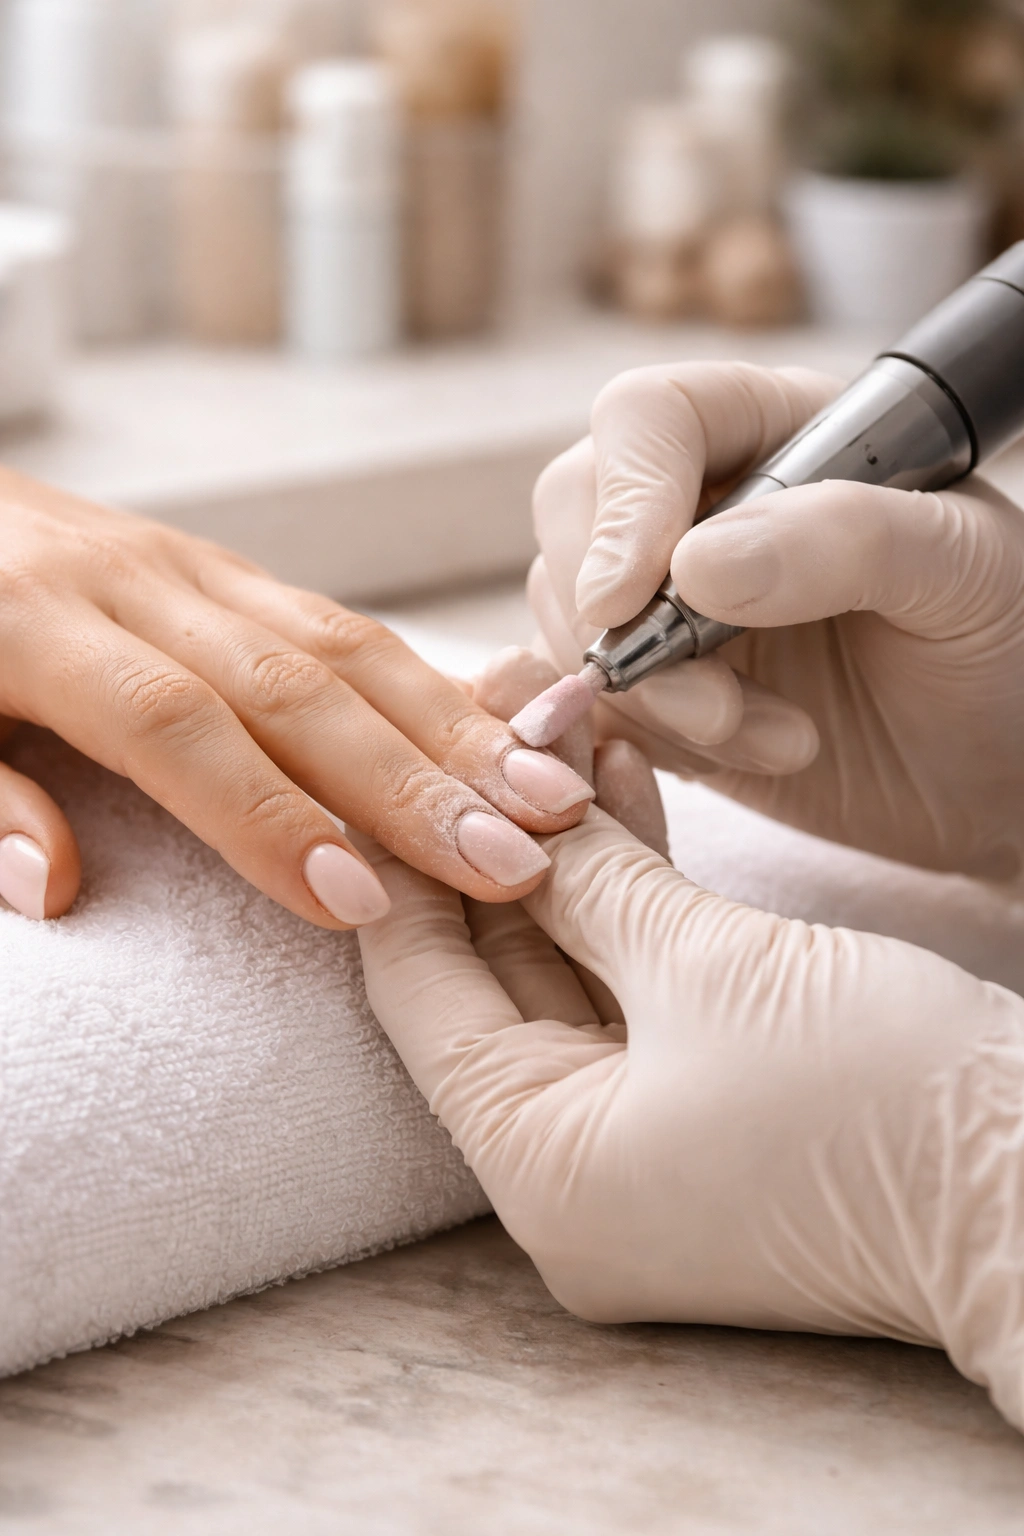
Check progress every few minutes after the 12-minute mark. Gently lift the foil and cotton on one nail and use your wooden cuticle pusher to test whether the powder is soft enough to separate. You should be able to gently push the dip away from the edge of the nail — if it’s still rock-hard, wrap it back up and check again in a couple minutes.
Different dip brands dissolve at slightly different rates. Some are fully soft after 15 minutes; others need the full 20-25 minutes. This is why checking is important rather than following a rigid timer.
The Gentle Scraping Process: Patience Is Everything
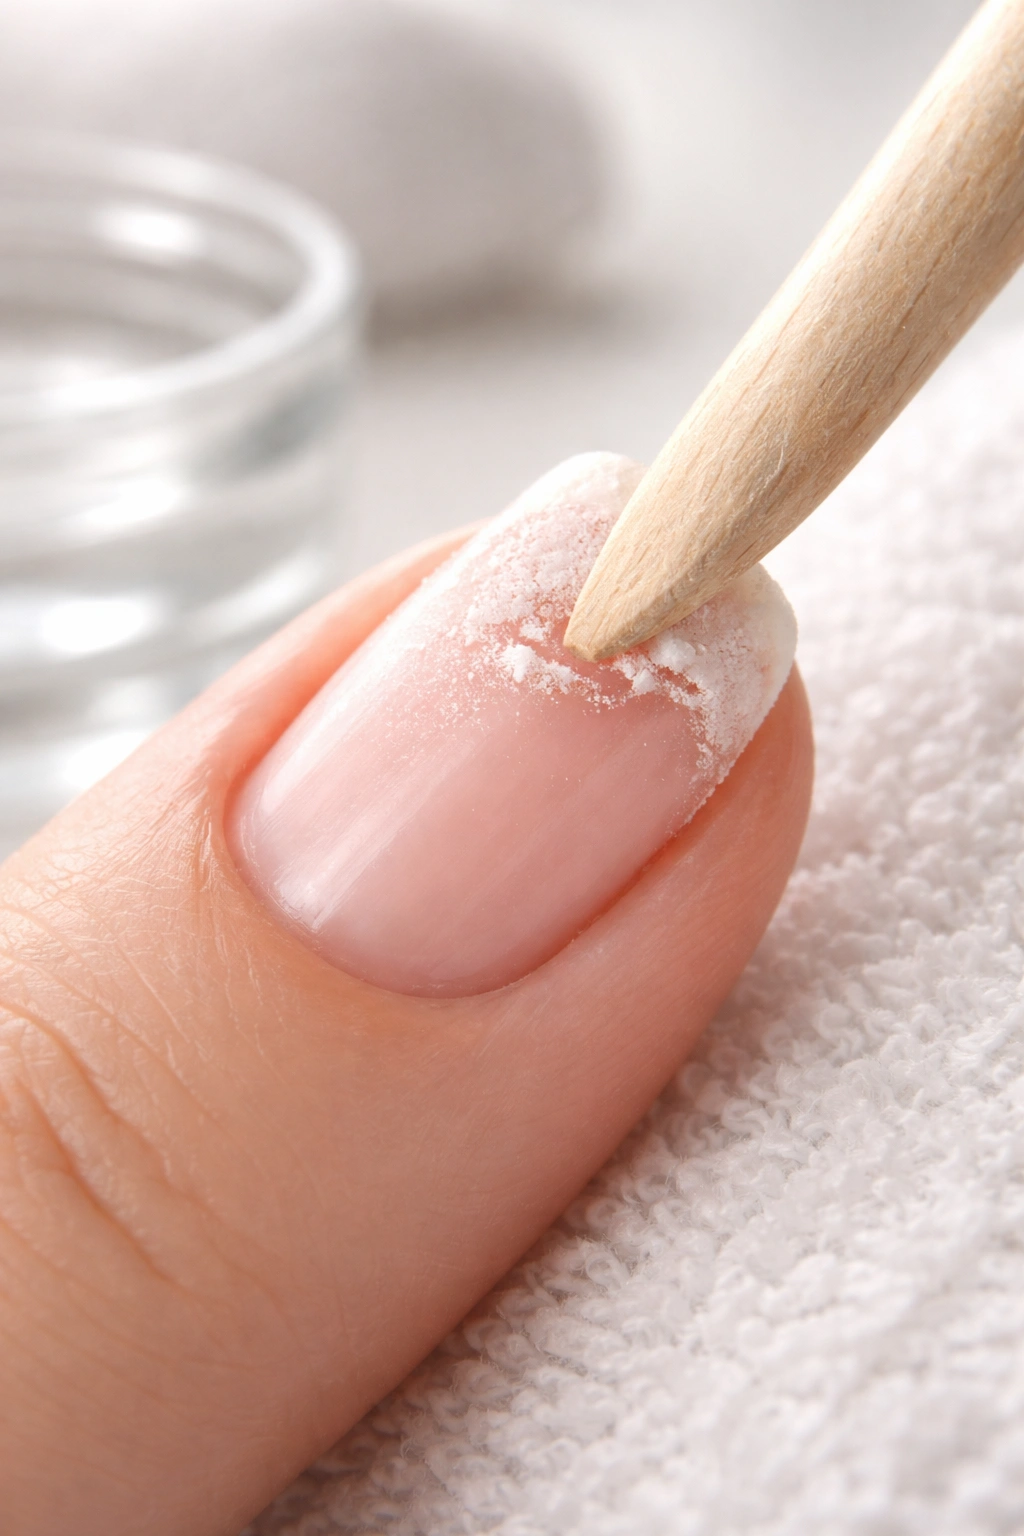
Once the dip powder has been sufficiently softened by acetone, the actual removal becomes easy — but this is exactly where most people rush and cause damage. You can feel how soft the coating is and get excited to finish, but speed here is what ruins nails.
Use only a wooden or soft plastic cuticle pusher — never a metal nail file or tool, and absolutely never a sharp metal scraper. Metal tools will gouge and scratch your nail plate if you slip, and your nails are at their most vulnerable when saturated with acetone.
Gently push the softened dip away from the edges and sides of each nail, starting from the free edge (the part that extends past your fingertip). Use light pressure — you’re barely touching the nail. The powder should separate easily; if it’s not coming off without pressure, it’s not ready yet, and you need to soak longer.
Work from the outer edges toward the center of the nail. Push the loosened powder toward the tip of your nail rather than toward your skin, which keeps you away from sensitive cuticle areas. This is a 3-4 minute process per nail, not 30 seconds.
Re-soak if necessary. If you hit a stubborn patch that isn’t separating easily, stop trying to force it, re-apply the cotton and foil, and soak for another 2-3 minutes. A quick second soak is much less damaging than aggressive scraping.
Watch for any nails that don’t separate cleanly. Sometimes one or two nails seem more resistant than others. Don’t assume it’s laziness on your part — dip applications can be uneven, and some nails may have received thicker layers. Just give those ones extra soaking time while you finish the easier ones.
Buffing and Final Cleanup: Finishing What You Started
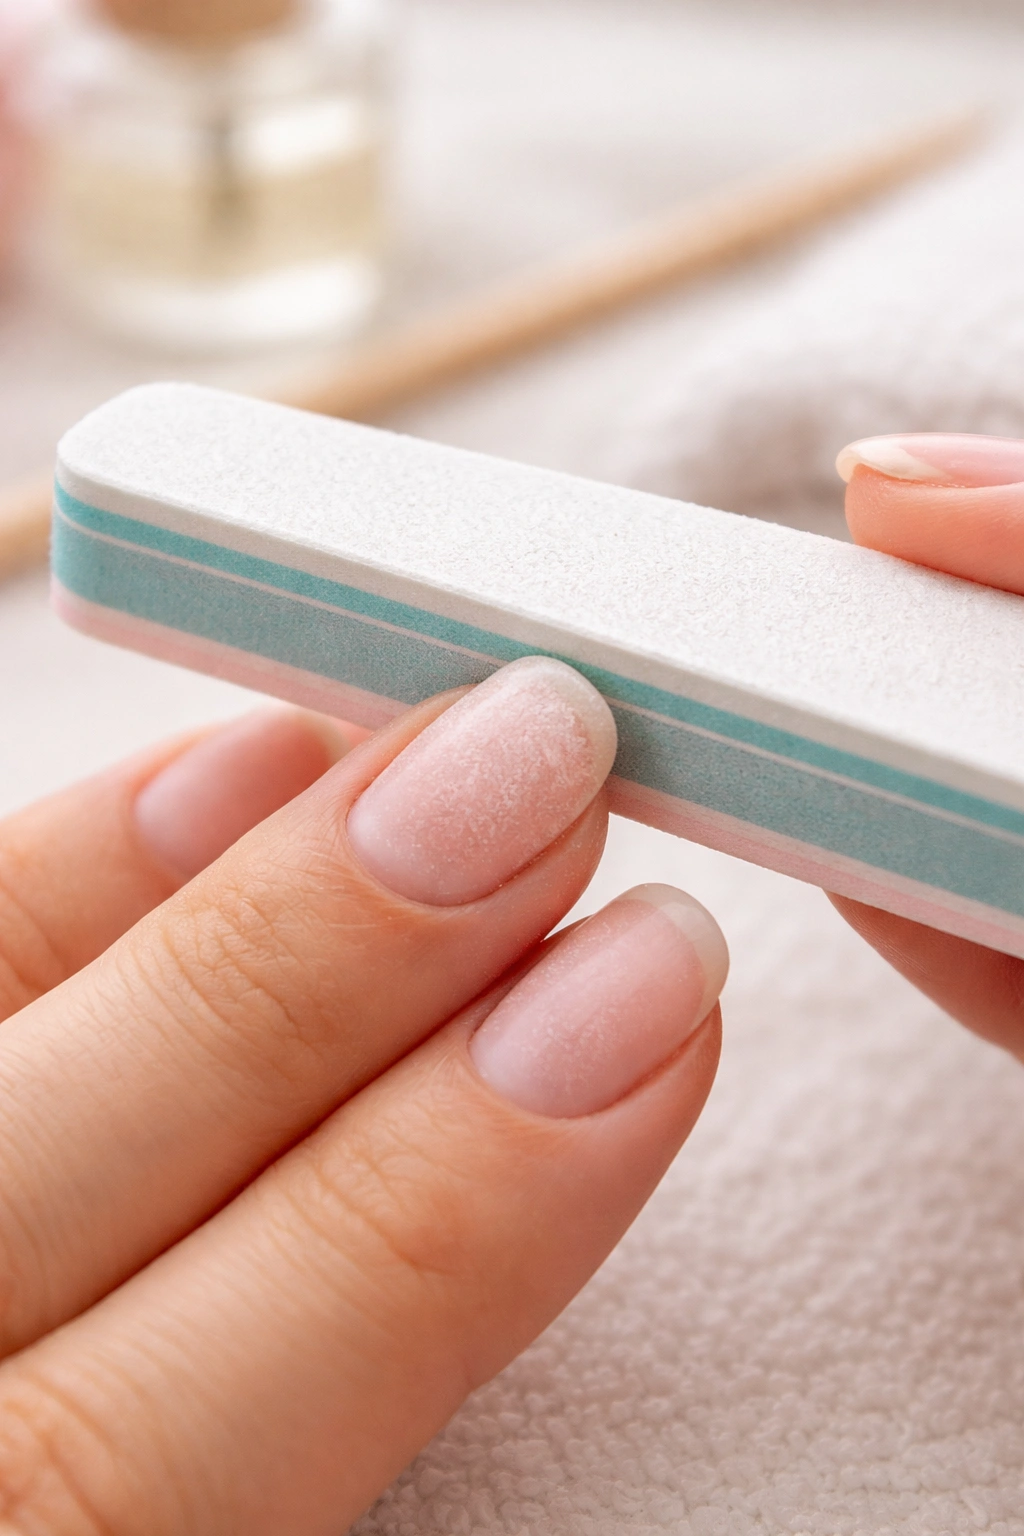
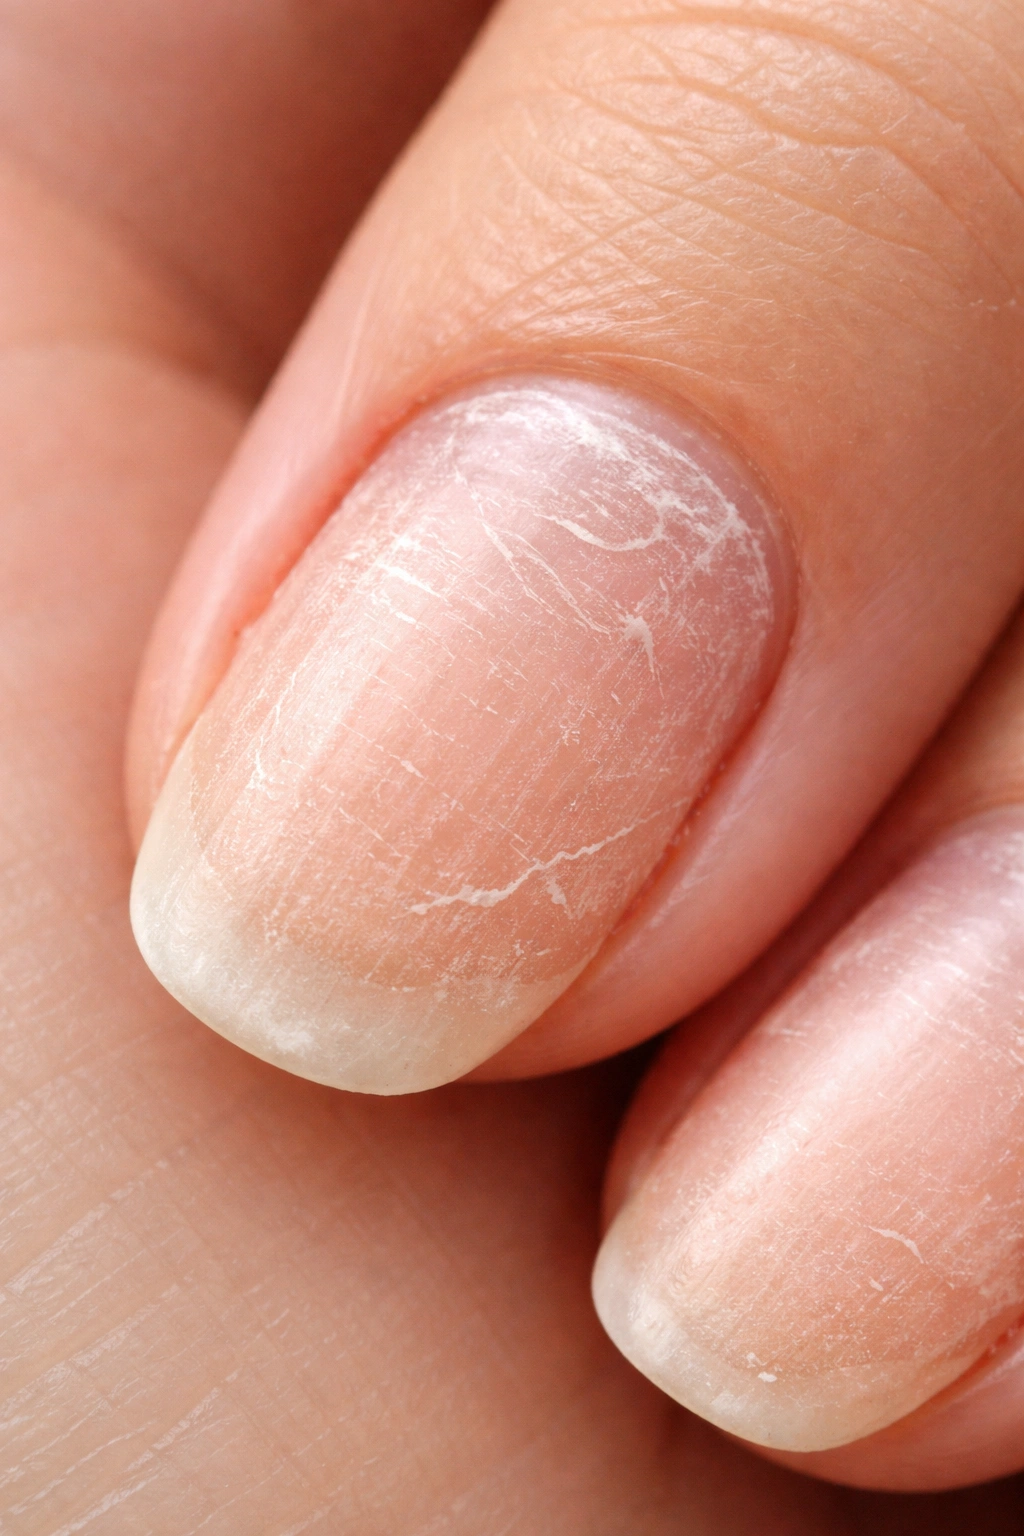
Once all the dip powder is removed, your nail surface will likely feel slightly rough and may have some residual powdery coating. This is completely normal — your natural nails just need a final gentle buffing to smooth the surface and remove any remaining particles.
Use your soft three-sided buffer, not your nail file. A buffer is gentler and specifically designed for final smoothing. Work gently across the entire surface of each nail in one direction — don’t use back-and-forth sawing motions, which can damage the nail surface. You’re just smoothing out any ridges left behind from the acetone exposure or the removal process itself.
This buffing step should take about 2-3 minutes total per hand. You’re not trying to shape your nails or create a perfect finish — you just want to erase any visible roughness. If your nails feel smooth and look reasonably uniform, you’re done with this step.
Check the edges and around the cuticles for any remaining powder particles or sticky residue. Sometimes there’s a thin line of powder remaining right at the cuticle area or along the edge. You can use a damp cloth or soft brush to gently remove these particles. If any resist, a very light second soak of just the cuticle area gets them off.
Wash your hands thoroughly with soap and warm water to remove all remaining acetone, powder particles, and foil residue. Your nails will feel almost plasticky at this point — completely normal. As they rehydrate over the next few hours, they’ll return to their normal feel and flexibility.
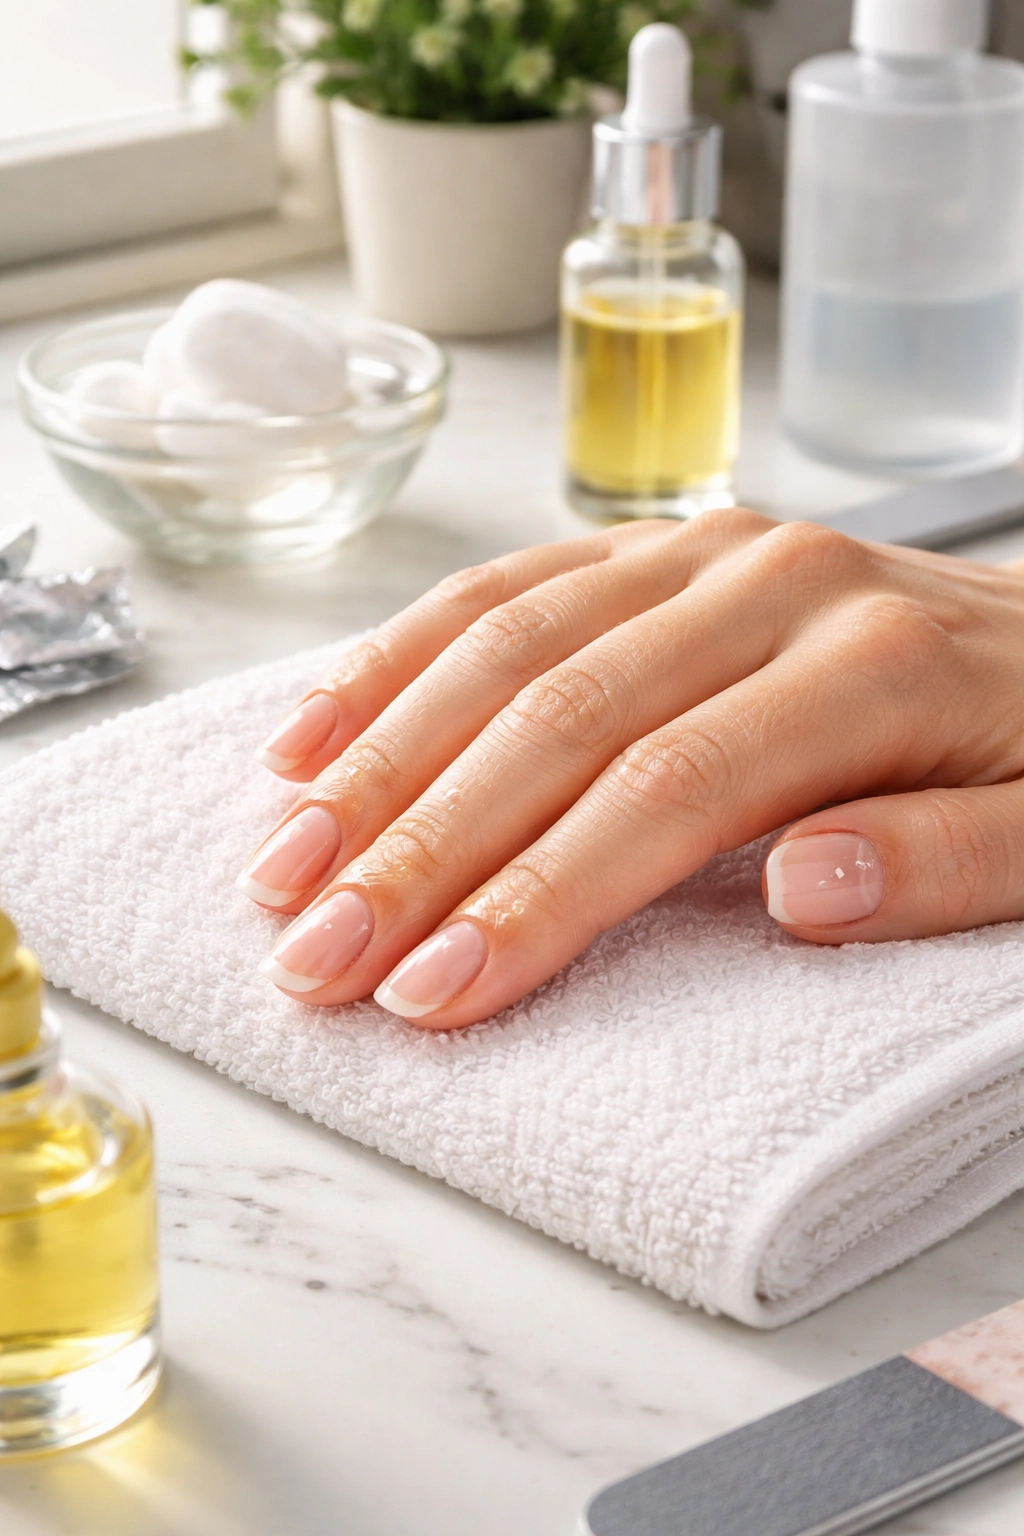
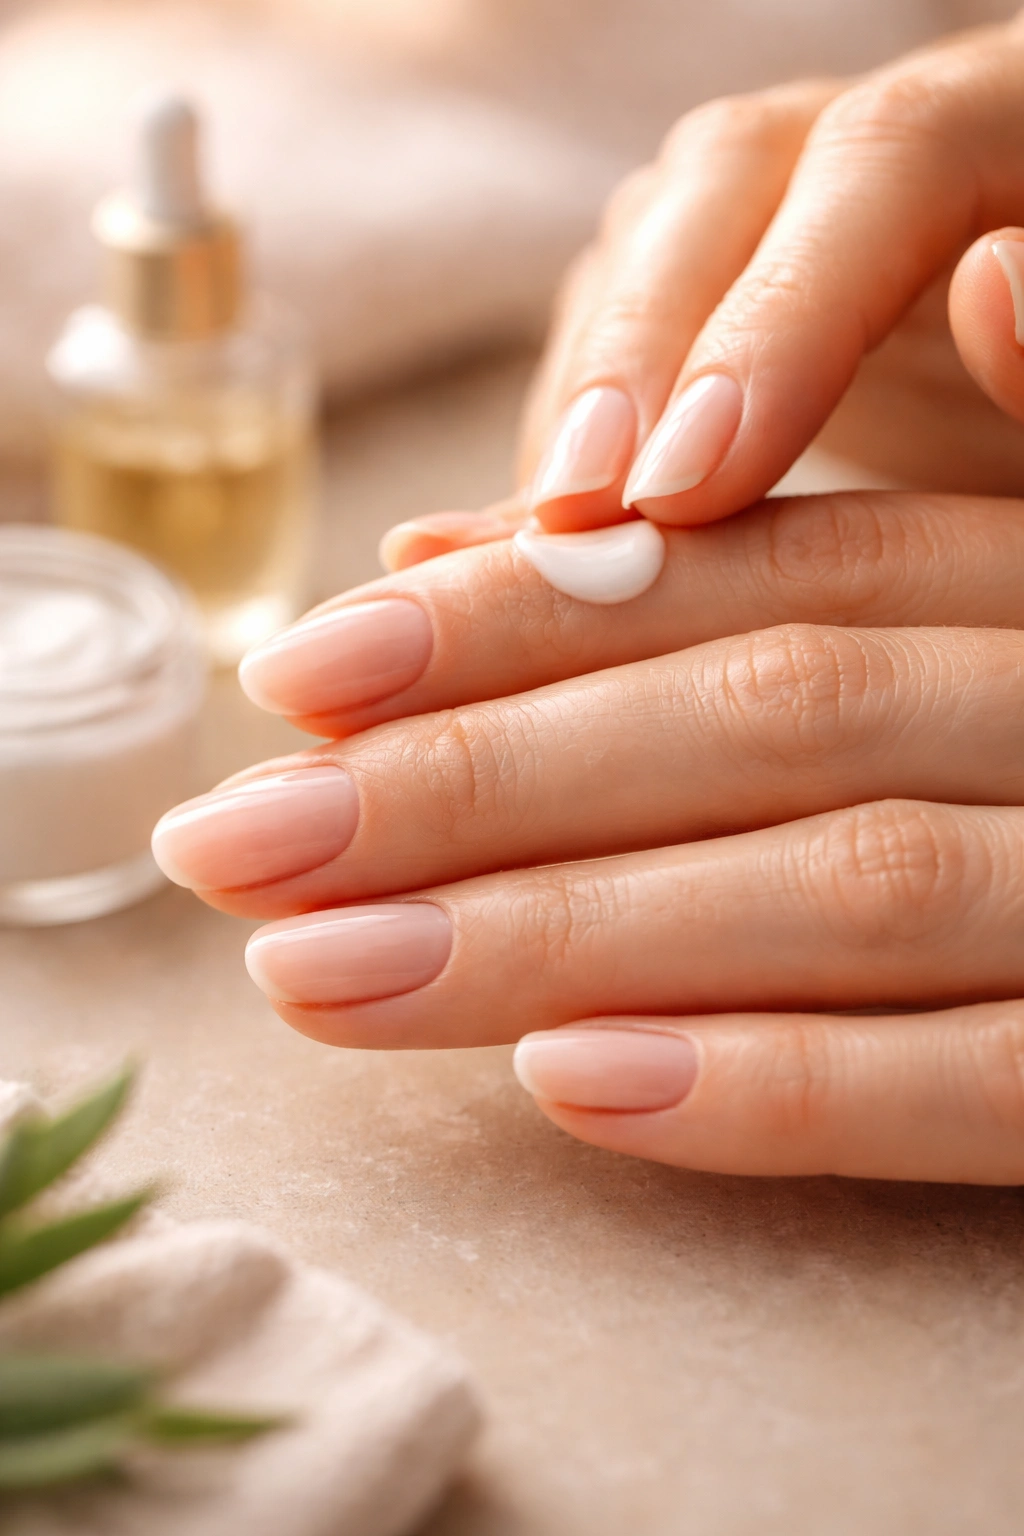
Moisturizing Your Nails Immediately After Removal
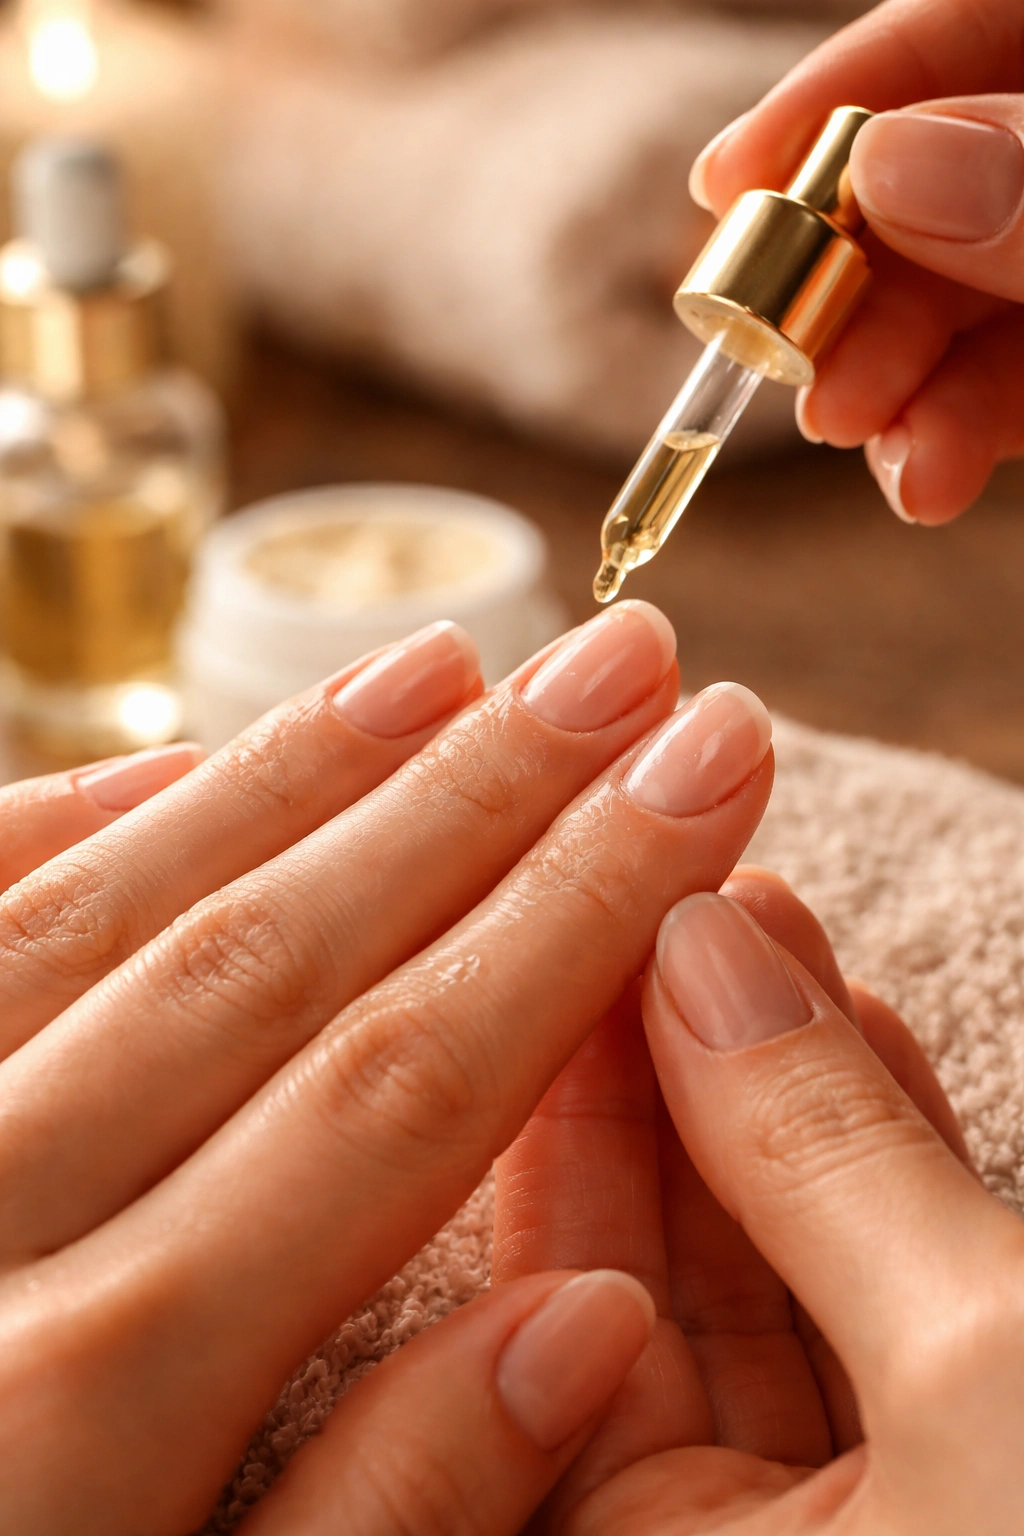
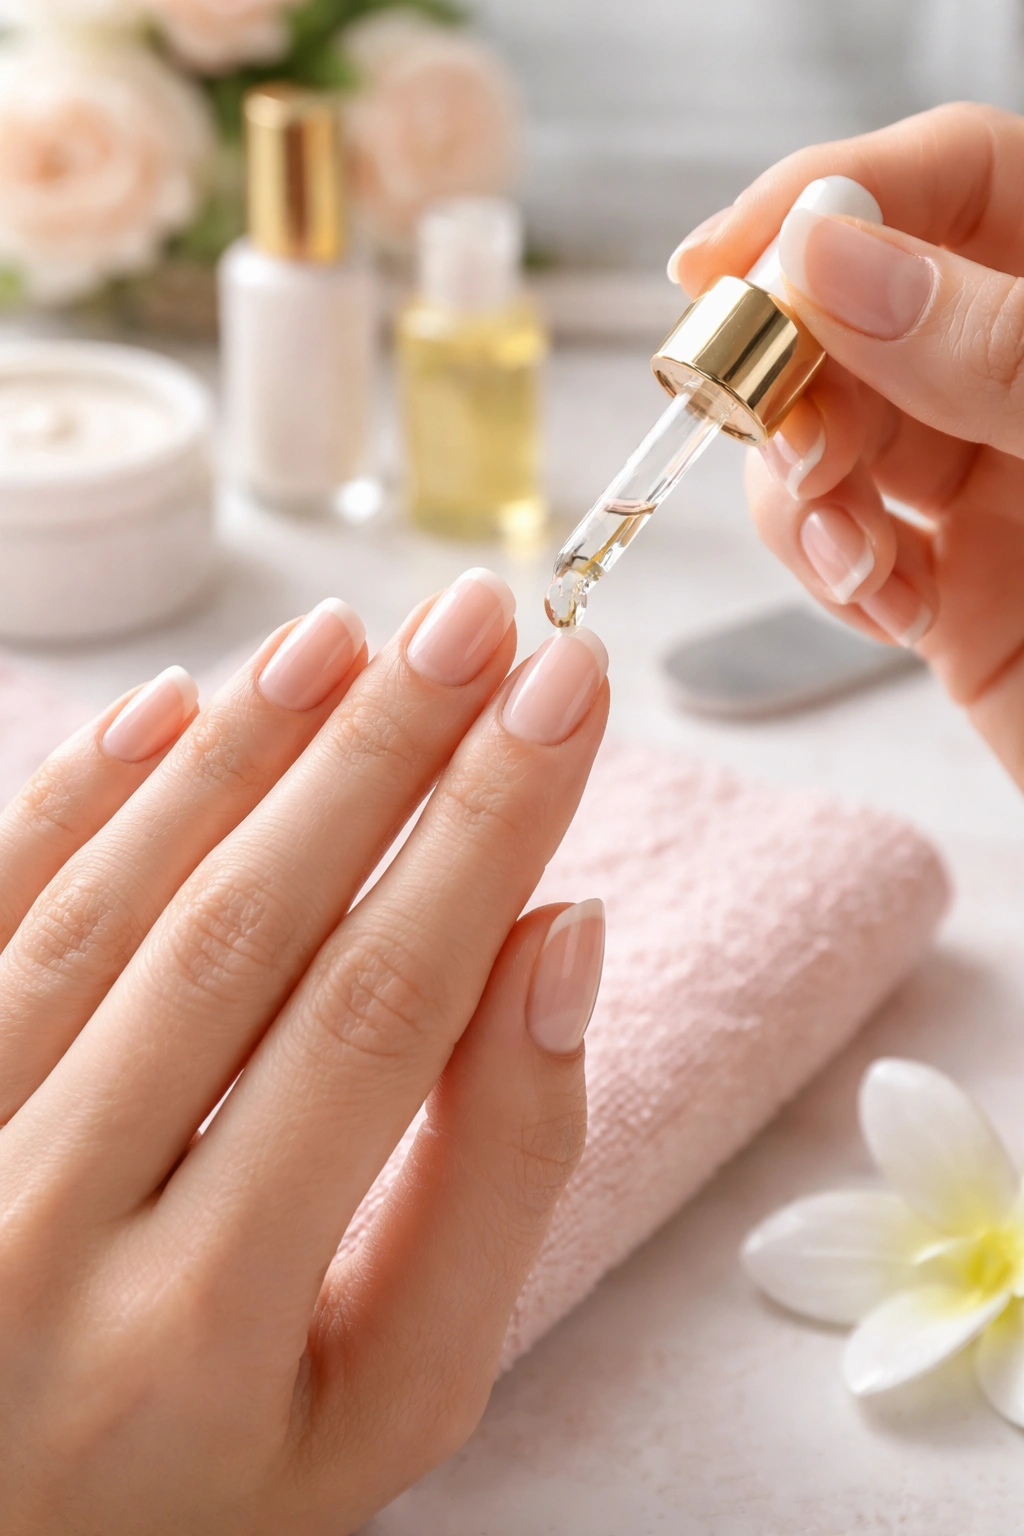
The moment you finish washing your hands after removal, it’s time to moisturize — and this is not optional if you want to prevent damage. Acetone has stripped all natural oils from your nails and the surrounding skin. Without immediate rehydration, your nails will be brittle and your cuticles will crack.
Apply a thick cuticle oil or hand cream generously to your nails and the skin around them. Work it in with a gentle massage, paying special attention to the cuticles and the skin immediately adjacent to your nail beds. This is actually one of the most important steps in preventing post-removal damage.
Don’t ignore this step thinking your nails will “bounce back” on their own. They will eventually, but you dramatically speed up recovery and minimize brittleness by moisturizing immediately and often for the first few days.
Reapply moisturizer every couple hours for the rest of the day if possible. Before bed, use a heavier cream or oil — some people apply their moisturizer and then put cotton gloves on overnight to lock in hydration. This intensive first night makes a noticeable difference in how your nails feel the next morning.
For the next 3-5 days, keep your nails moisturized multiple times daily. Your nail beds will gradually reabsorb natural oils and return to their normal hydration level, but aggressive moisturizing during this window prevents the peeling and brittleness that acetone exposure can cause.
When Professional Removal Is the Better Choice
Despite having all the right tools and information, there are situations where professional removal is genuinely the better option. If your nails are already compromised, or if you’ve had multiple dip applications without breaks between them, a salon removal might be worth the investment.
Professional technicians have access to professional-grade solvents that can be gentler than acetone while still being highly effective. Some salons use a product called “dip remover” that’s specifically formulated for this purpose and works slightly faster and more gently than pure acetone.
Techs also have more experience reading nails and knowing exactly when powder is ready to come off versus when it needs more time. They can feel the difference in pressure needed for different nail types, which prevents the overzealous scraping that causes damage.
Go professional if your nails are already thin, peeling, or brittle from previous damage. Your natural nails need recovery time, and applying another dip coating immediately — or removing one hastily — will make things worse. A professional can assess the actual condition of your nails and advise whether you should take a break from dips entirely.
Book a professional removal if you’re removing dips more frequently than every 4-6 weeks. If you’re reapplying dips every 2-3 weeks without breaks, your nails don’t have time to recover between applications. A professional can at least ensure the removal portion doesn’t compound the problem.
Cost-wise, professional removal typically runs $15-25, which is worthwhile if it saves your nail health. Some salons include removal free with a new dip application, so factor that into the total cost of the service.
Common Mistakes That Damage Nails
Understanding what not to do is just as important as knowing the right process. Most nail damage during dip removal comes from a handful of preventable mistakes.
Peeling or picking is the number one culprit. Your dip nails will eventually start lifting slightly at the edges if you’ve worn them for several weeks. The urge to “help” them along by peeling is nearly irresistible, but that’s exactly when damage happens. Those lifted edges can peel away entire layers of your nail plate if you’re not careful.
Skipping the initial file step seems harmless, but it turns a 15-minute removal into a 35-minute ordeal because acetone can’t penetrate that sealed top coat. The longer soak time exposes your nails to more acetone overall, which is drying and can contribute to brittleness.
Using the wrong tools — metal scrapers, old metal files, or metal cuticle tools — will gouge your nail plate if you slip even slightly. Wooden or soft plastic tools are cheap and prevent the worst-case scenario of permanent nail plate damage.
Rushing the process because acetone fumes are unpleasant is tempting but counterproductive. If you’re working too fast, you skip the soaking and start scraping before the powder is fully soft. Those last couple minutes of acetone exposure might be unpleasant, but skipping them means you’ll be scraping harder and longer, which is far more damaging.
Applying new dip powder immediately after removal without letting your nails recover is perhaps the most common long-term mistake. Your nails need at least 3-5 days, ideally a week or two, to fully rehydrate and recover from acetone exposure. Immediately reapplying dips means you’re not giving your nails any break from the chemicals and adhesives involved.
Ignoring post-removal moisturizing leads to brittle, peeling nails in the days following removal. This isn’t permanent damage, but it looks and feels terrible and makes you think the removal process itself damaged your nails when really it’s just dehydration.
Recovery Timeline: What to Expect in the Days After
Your nails will go through a visible transformation over the week following removal. Understanding what’s normal helps you avoid panic and unnecessary extra treatments.
Immediately after removal (0-2 hours): Your nails feel soft and slightly rubbery from the acetone saturation. They might look slightly dull instead of shiny. This is completely normal and will resolve as your nails dry. Keep applying moisturizer — this is the most critical window.
First 24 hours: Your nails will feel much more normal, though they might seem slightly softer than usual. You may notice your natural nail texture more prominently — the ridges and imperfections that were hidden under dip powder. This is just your real nails, not damage.
Days 2-3: This is when you might see the most dramatic peeling or flaking, particularly if you didn’t moisturize heavily in the first 24 hours. The outer keratin layers are shedding because they’re over-saturated and drying out too rapidly. Continue moisturizing frequently. This peeling is not permanent damage — it’s surface-level shedding that will resolve in a few days.
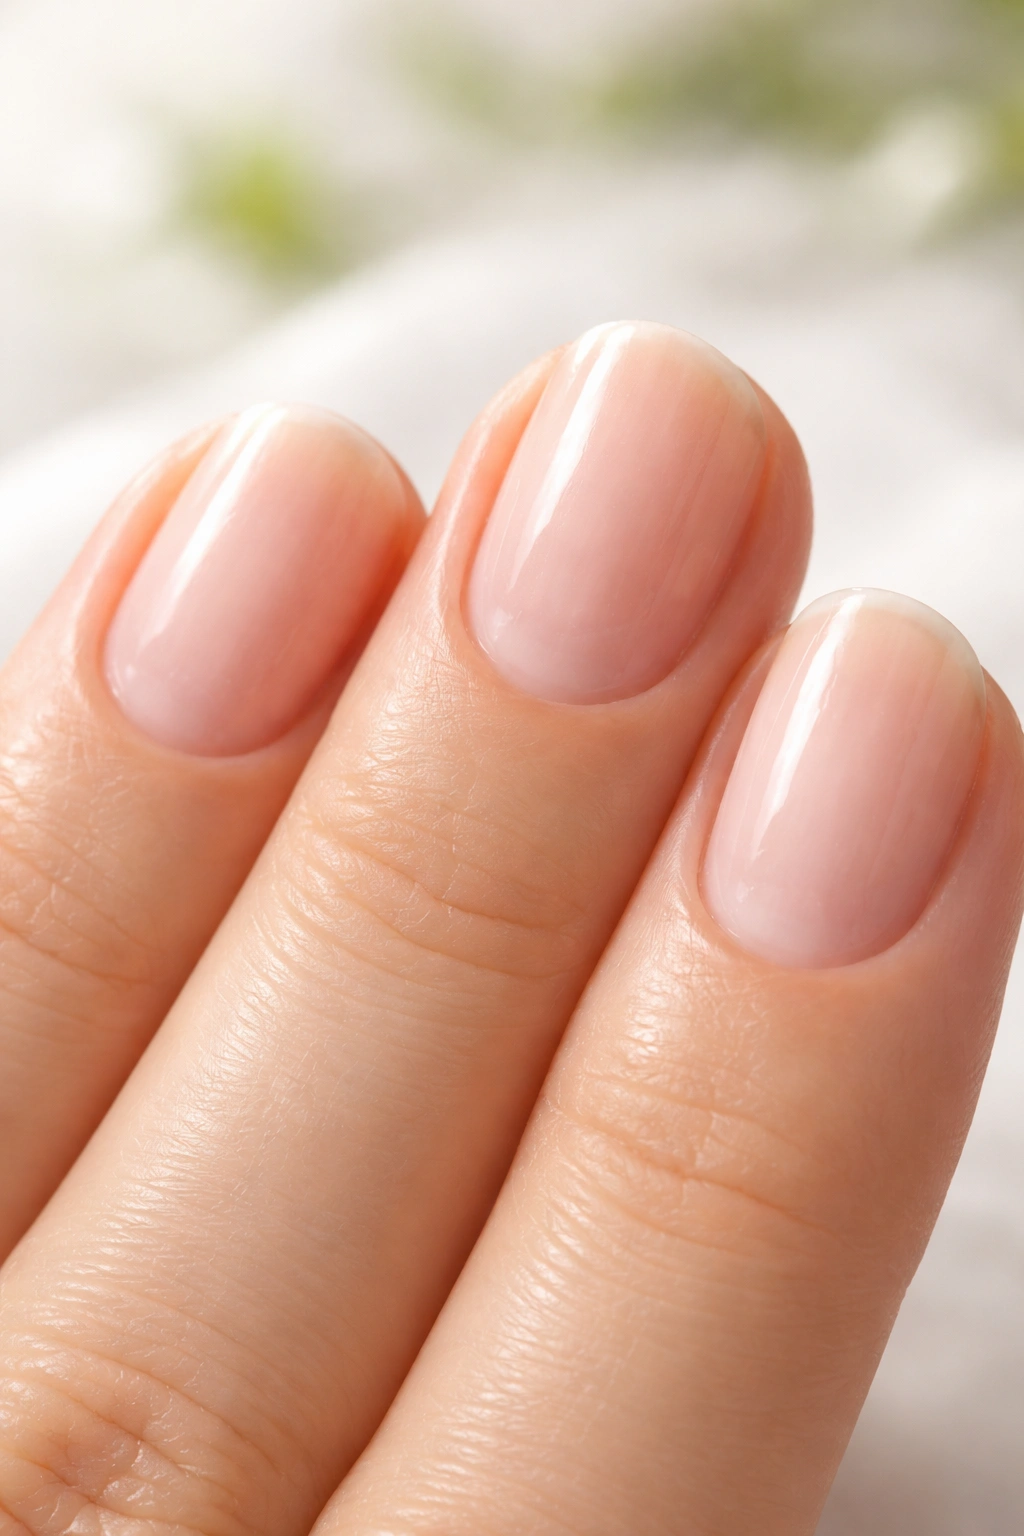
Days 4-7: The peeling stabilizes and then gradually stops. Your nails will feel increasingly normal. They may still be slightly softer than usual, but the brittleness improves rapidly as they rehydrate.
One week and beyond: Your nails should feel back to normal, with normal flexibility and no remaining brittleness. If you continue moisturizing regularly (which is just good nail care in general), your nails will be completely recovered.
If you’re seeing obvious damage like deep ridges, severe peeling that doesn’t resolve after a week, or nails that feel paper-thin: You either had a previous injury to those nails that’s now revealed, or the removal process was too aggressive. Give your nails 2-3 weeks of consistent moisturizing before deciding whether permanent damage occurred. In most cases, what looks like damage at 48 hours after removal is just dehydration and resolves quickly.
Taking Care of Your Nails Between Dip Applications
The best way to prevent removal damage is to maintain healthy nails overall and give them proper breaks between applications.
Wait at least one week between dip removals and new applications. Your nails need time to fully recover their natural oils and flexibility. If you absolutely love dips and want them on constantly, alternate with regular polish or bare nails for one week every month or two.
Keep your nails moisturized every single day, dip powder or not. A good cuticle oil or hand cream is inexpensive and makes a massive difference in nail health. Healthy, well-hydrated nails are more resilient and recover faster from any removal process.
Be gentle with your nails during the week after removal. Avoid harsh chemicals, aggressive scrubbing, and activities that put pressure on your nail edges. Wearing gloves during dishwashing protects your fresh, freshly-exposed nails from unnecessary stress.
Pay attention to your cuticles. Your cuticle area is where moisture gets into your nails, and healthy cuticles mean healthier nails overall. Don’t cut your cuticles; instead, push them back gently and keep them moisturized.
Consider biotin supplements or nail-strengthening products if you’re doing dips frequently. These won’t dramatically transform your nails, but they can provide marginal support for nail health if you’re subjecting them to repeated dip cycles.
Red Flags: When to Seek Professional Help
Most nail issues after dip removal resolve on their own within a week or two with proper care. However, certain signs indicate a more serious problem that warrants professional attention.
Severe peeling that persists beyond one week suggests either the removal was unusually aggressive or there was underlying nail damage that wasn’t apparent before. A dermatologist or experienced nail technician can assess whether there’s actual damage to the nail plate versus just surface-level peeling.
Pain or tenderness around the nail bed is not normal and suggests possible damage to the tissue beneath the nail plate. If pressing on or around your nail causes pain, that’s worth getting checked out.
Discoloration, dark streaks, or spots appearing on your nails after removal can indicate bleeding under the nail or an infection. These aren’t caused by proper removal technique and suggest something else is going on. See a dermatologist to rule out infection.
Nails that feel permanently soft or thin even after several weeks of recovery might indicate damage to the nail plate structure itself. A dermatologist can confirm whether there’s actual damage that will need to grow out (which takes months) or whether it’s reversible with specialized nail care.
Signs of infection like redness, swelling, pus, or warmth around the cuticle require prompt attention. If the removal process caused a tear in your skin or compromised your cuticle, infection can set in. Don’t wait on this — see a doctor or dermatologist.
Most of these serious issues can be prevented by using the proper removal technique outlined here, which is why the slower, more careful approach is worth the extra 10 minutes of your time.
Final Thoughts
Removing dip powder nails safely is entirely within reach if you approach it with patience and the right tools. The entire process — soaking, gentle scraping, buffing, and initial moisturizing — takes about 45 minutes to an hour for both hands, and that investment in care pays off with healthy nails that remain strong and beautiful.
The key is remembering that your natural nails are more delicate than they feel under all that dip powder. Acetone and careful technique can remove the coating without ever touching your actual nail plate. Speed is the enemy of nail health during removal — those 20 minutes of soaking and gentle work prevent months of dealing with brittle, peeling nails afterward.
Give your nails the same care and attention during removal that you would if you were getting a professional manicure. Apply plenty of moisturizer immediately after, avoid reapplying dips for at least a week, and let your nails fully recover before starting the cycle again. Your future self — the one looking at strong, healthy nails a month from now — will absolutely thank you for taking the extra time to do this right.
