

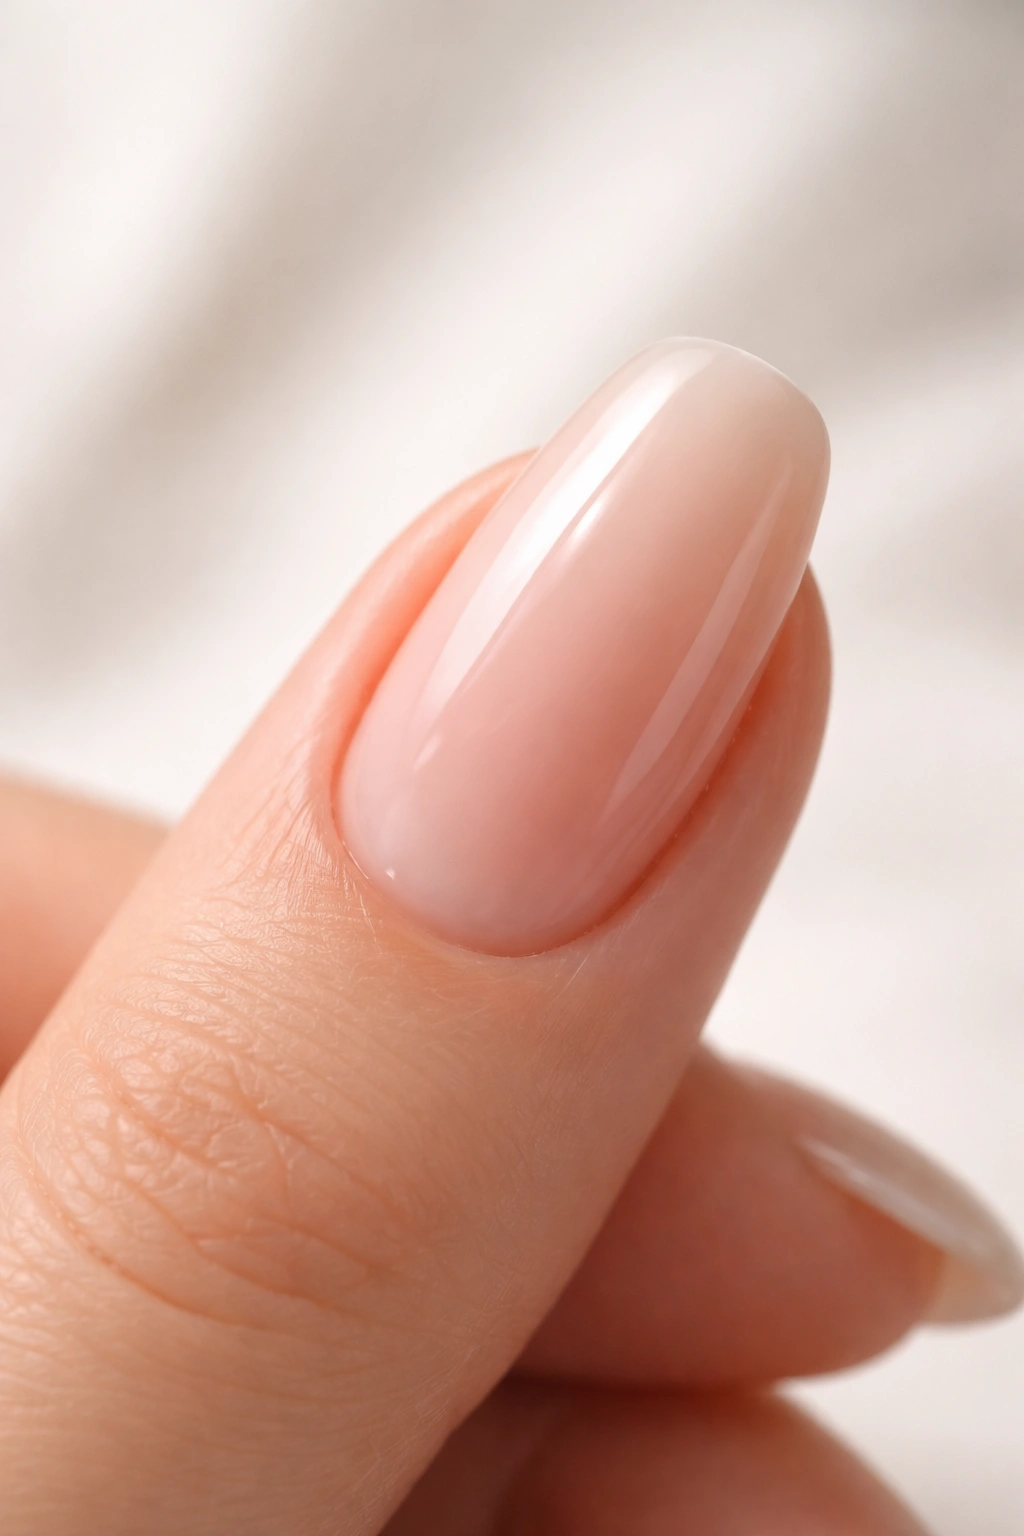
A peeling acrylic nail is one of those beauty emergencies that catches you off guard. One moment you’re admiring your perfectly sculpted nails, and the next, you notice an edge starting to lift away from your natural nail, threatening the entire aesthetic. That gap between the acrylic and your nail bed isn’t just an eyesore—it’s a gateway for moisture, bacteria, and potential infection to hide underneath. The sensory annoyance of hair getting tangled under lifted acrylic, the snagging on clothes, and the cosmetic disappointment all pile up to ruin an otherwise flawless manicure.
But here’s the thing: not every lifted nail requires a professional fix or complete removal. If you catch the lifting early and know the right technique, you can repair it at home without dismantling your entire set. The key is understanding what’s actually happening beneath the surface and applying the correct fix for your specific situation.
Whether your acrylics are peeling at the tips, lifting from the cuticle area, or separating along the sidewalls, this guide will walk you through every step of the repair process. You’ll learn exactly what causes lifting to happen, how to assess whether your nails can be salvaged at home, and the precise techniques professionals use to bring nails back to flawless condition.
Understanding Why Acrylic Nails Lift
Lifting doesn’t just appear out of nowhere. It’s the result of a breakdown in the bond between your natural nail and the acrylic product. When acrylic begins to separate from the nail bed, it’s because something has either prevented proper adhesion from the start or compromised the seal after application.
The most common culprit is improper nail preparation. If your natural nail wasn’t thoroughly cleaned, dehydrated, and buffed before acrylic was applied, the product has nothing to grip onto. Natural oils, residual lotion, dust particles, or moisture sitting on the nail plate create a slippery barrier that acrylic simply cannot bond with—no matter how high-quality the product is.
Another major cause is an incorrect ratio of liquid monomer to acrylic powder. Too much liquid and the mixture becomes too thin and runny, spreading unevenly and weakening the overall structure. Too little liquid and the mixture is too dry, resulting in poor flow and inadequate adhesion to the nail.
Applying acrylic too close to the cuticle or skin is another classic problem. When product contacts live tissue, it can’t create a secure mechanical bond. Additionally, as your natural nails grow out underneath, this thick application near the base creates a pressure point that causes lifting to spread.
Moisture exposure after application is equally destructive. Frequent hand washing, dishwashing without gloves, or prolonged water exposure causes the natural nail to swell and then shrink as it dries. This repeated expansion and contraction weakens the acrylic-to-nail bond over time, creating gaps where moisture can become trapped.
How to Identify Lifting Early
Catching lifting early is absolutely crucial. The sooner you address the problem, the easier the repair and the lower the risk of infection or permanent damage to your natural nail.
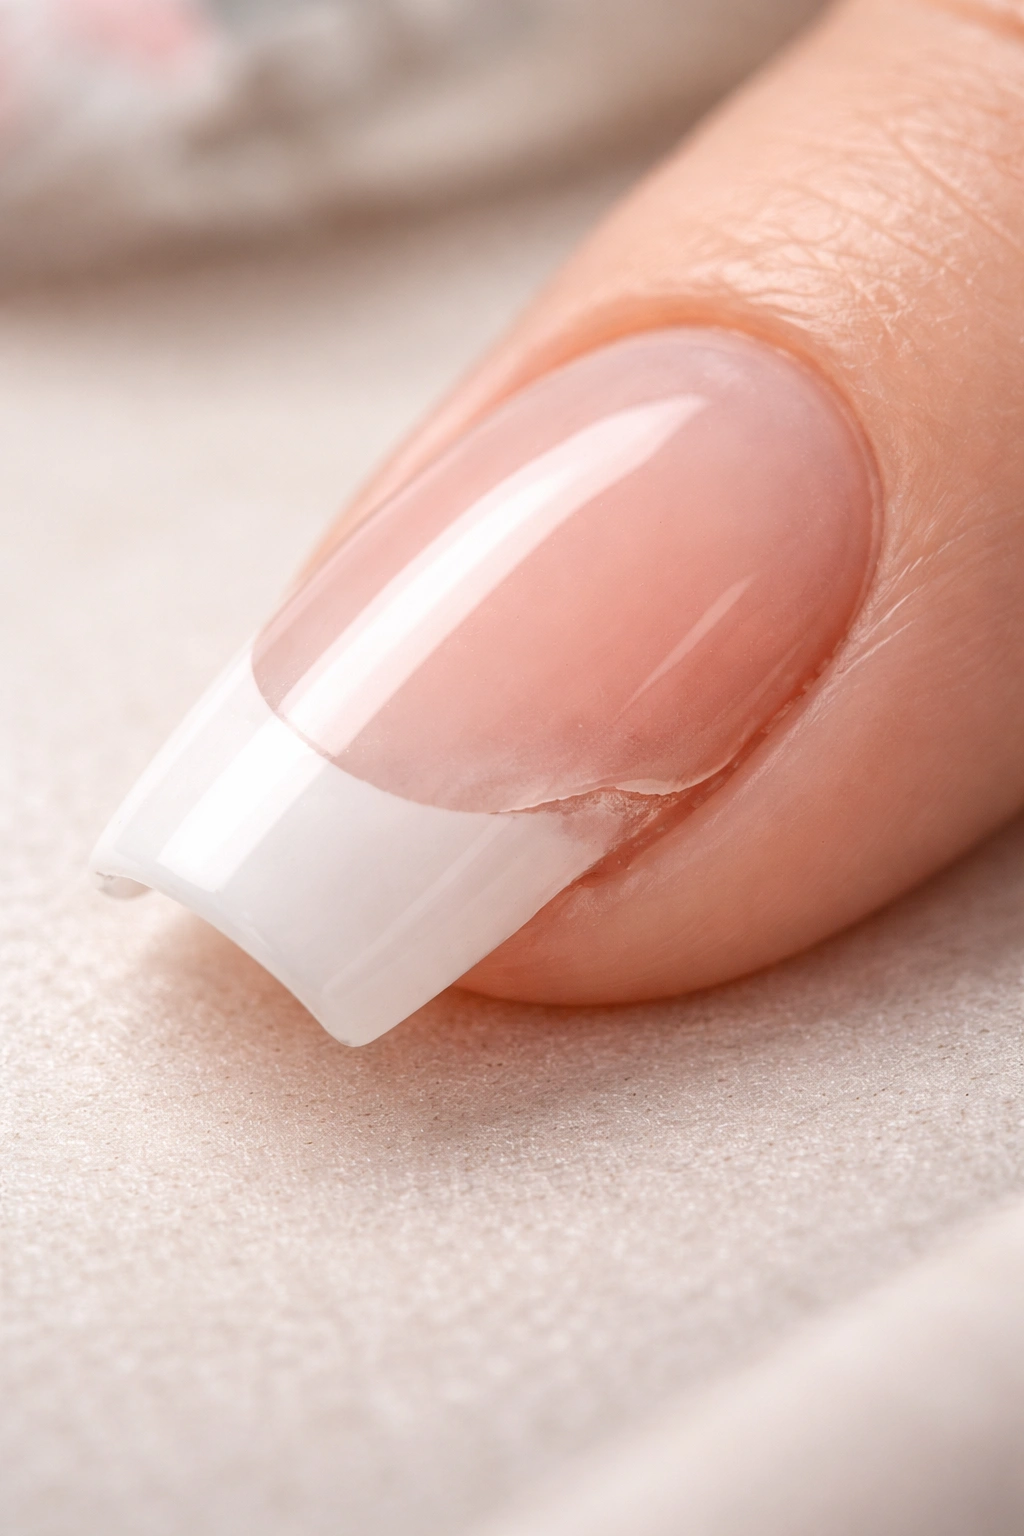
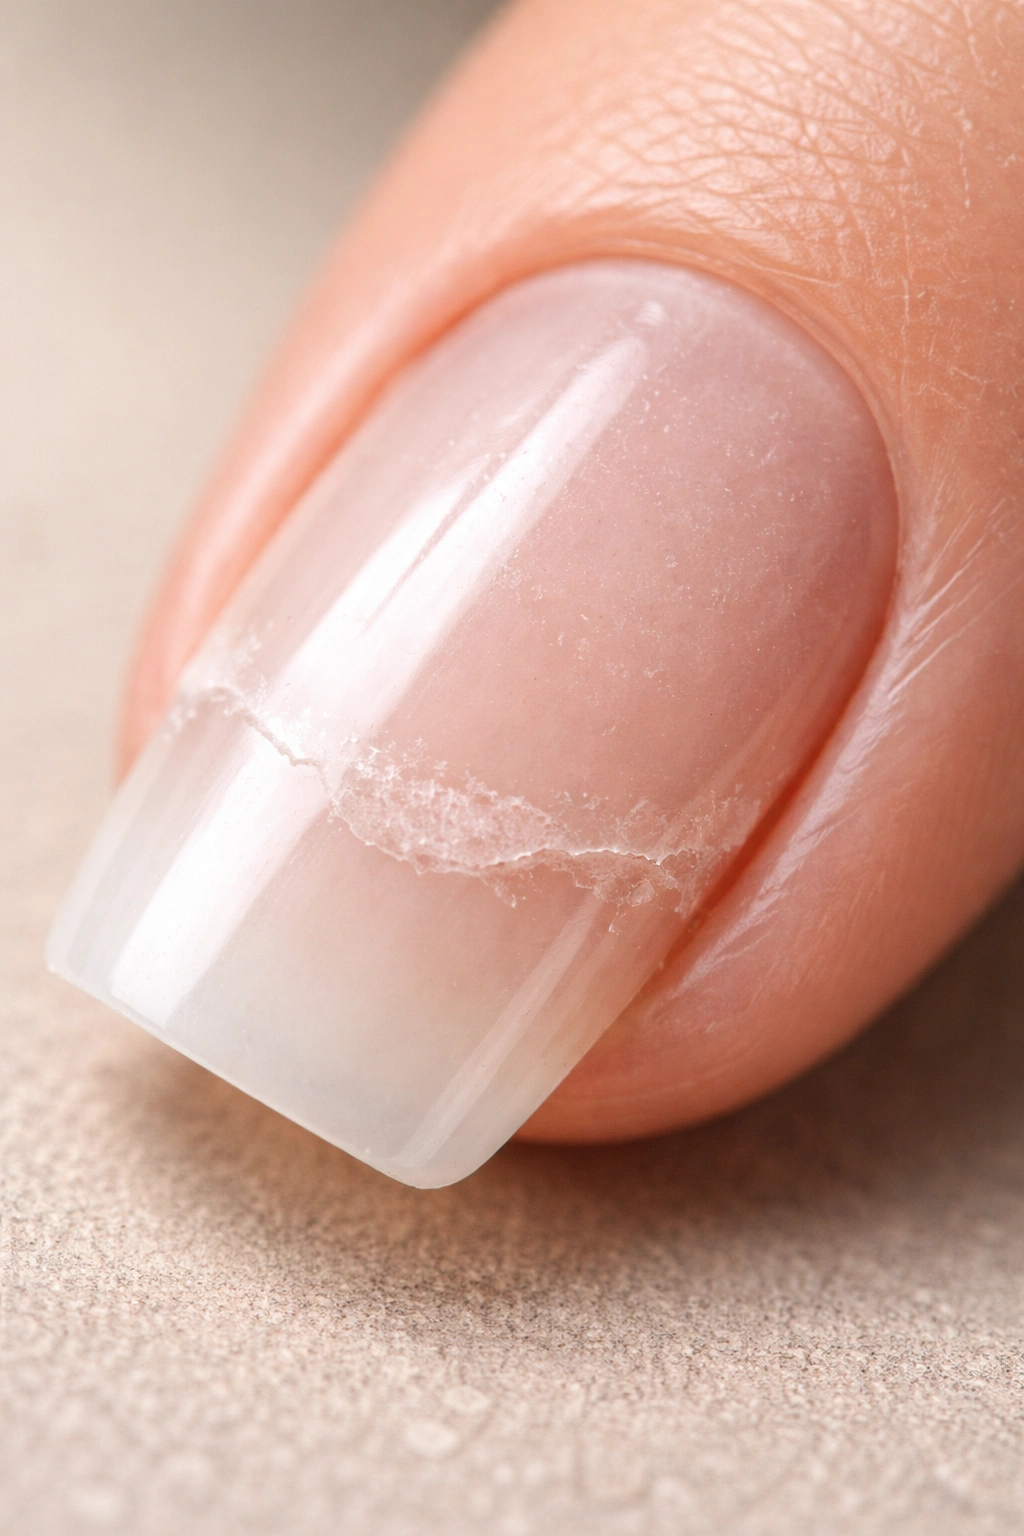
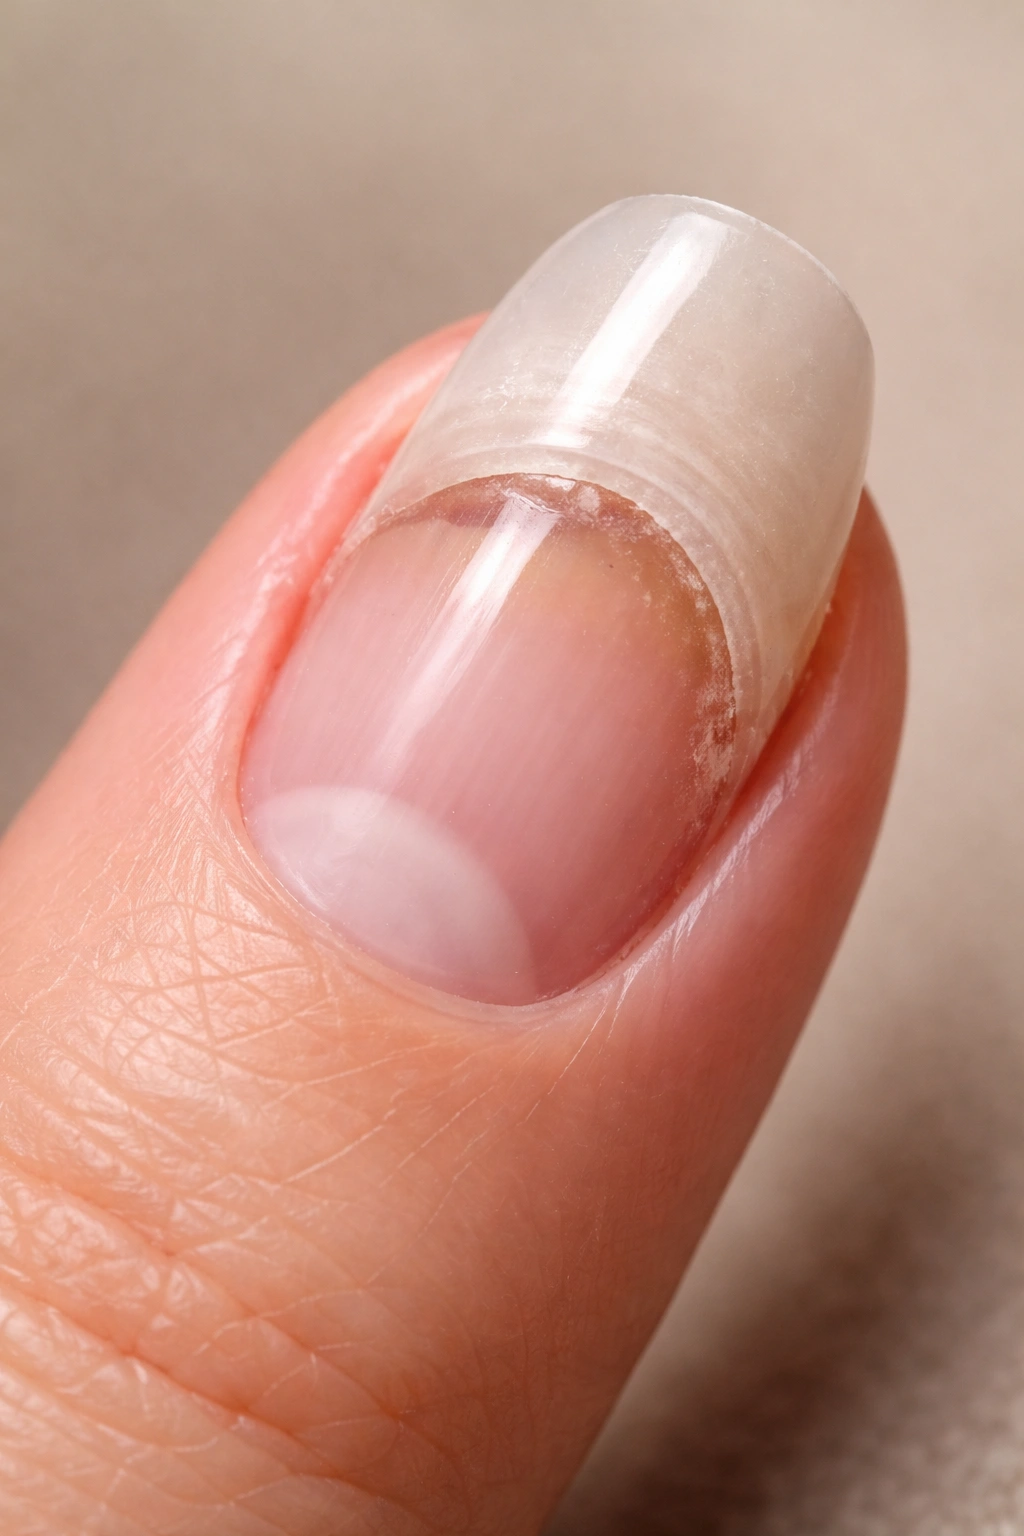
Visible separation is the most obvious sign. Look closely at your nails in bright light. Do you see any gaps between the acrylic and your natural nail? Check along the free edge (the tip), the sidewalls, and especially around the cuticle area where lifting often begins. Sometimes the gap is translucent at first, then gradually becomes more opaque as air fills the space.
Pay attention to any discoloration under the acrylic. A yellowish, greenish, or dark tint indicates that moisture and potentially bacteria or fungus have started accumulating in that space. This is a red flag that you need to address the problem immediately, because the longer bacteria sits between your natural nail and the acrylic, the greater the risk of infection.
Listen to your nails, too. If you notice any clicking or hollow sounds when you tap your nails together, that’s a sign of separation. A healthy acrylic nail sounds solid when you tap it. A clicking sound means air is in the gap.
Trust your fingers as well. If you feel tenderness, warmth, or any pain around the lifted area, stop and assess carefully. Discomfort can indicate inflammation, infection, or pressure from the gap itself. If you notice an unpleasant odor coming from under the acrylic, that’s a serious signal that bacterial or fungal growth has begun, and you should see a professional rather than attempt a home fix.
Gather Your At-Home Repair Materials
Before you start, assemble everything you’ll need. Attempting a repair without the right tools leads to frustration, poor results, and potential damage to your natural nails.
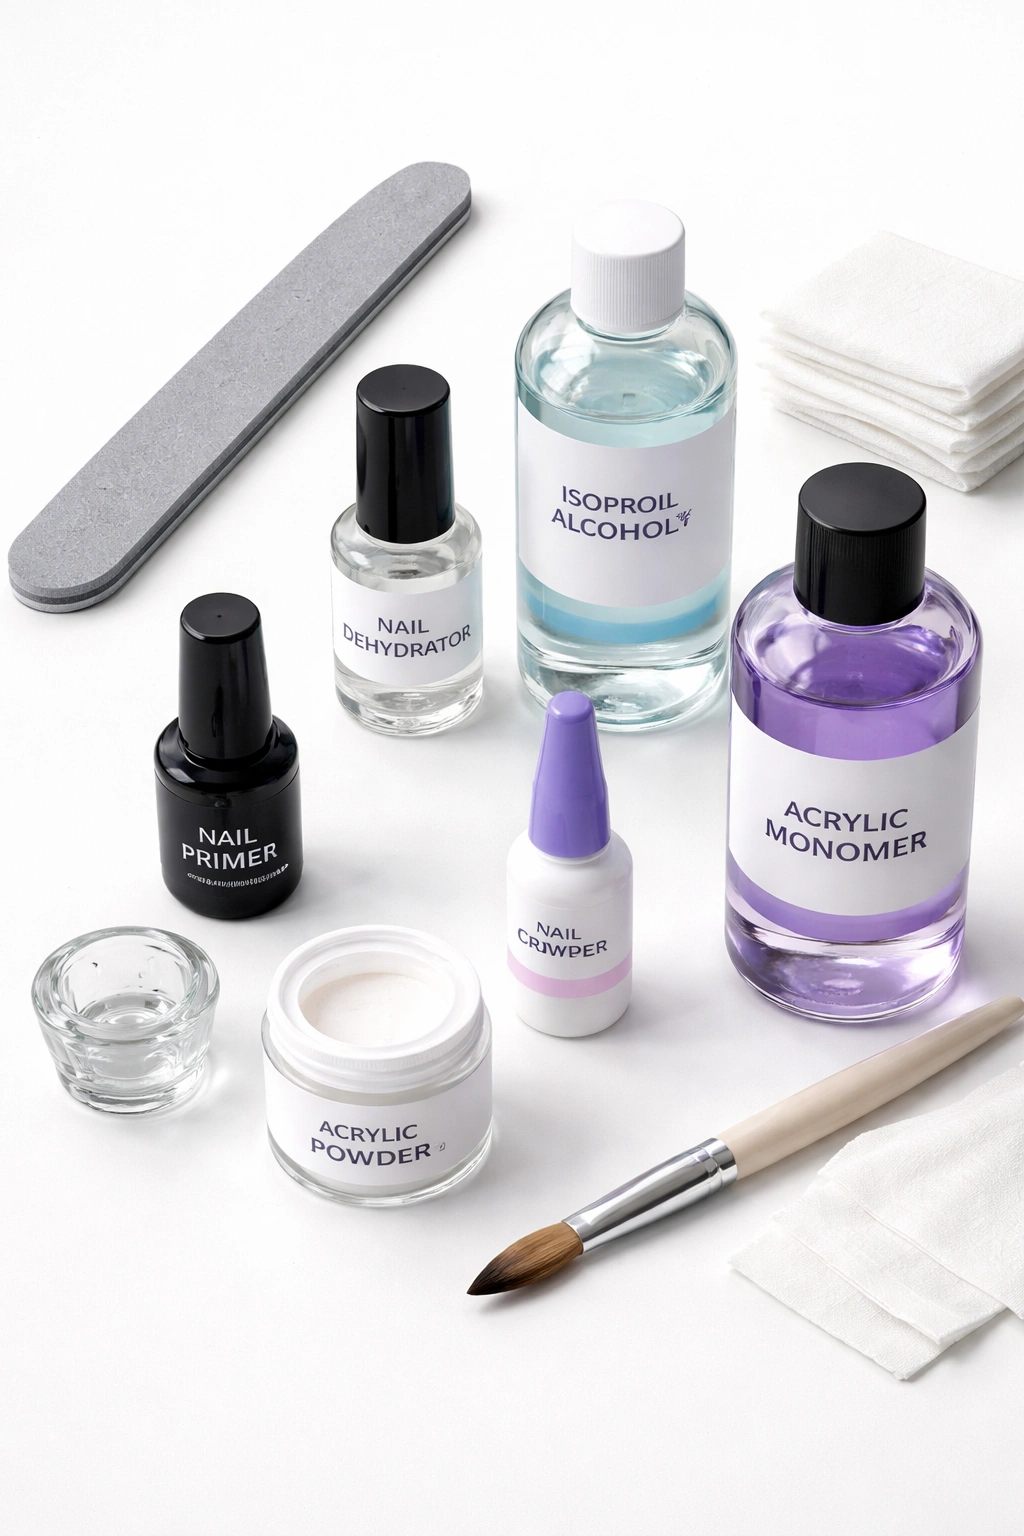
You’ll need a fine-grit nail file—specifically, something in the 180-220 grit range. This removes shine and smooths the nail surface without causing excessive damage. Skip anything coarser, as heavy abrasion weakens the nail plate and makes lifting worse, not better.
A dehydrator or isopropyl alcohol is essential for removing oils and moisture from the nail. Nail dehydrators are specially formulated to strip away everything that would prevent acrylic from bonding. Isopropyl alcohol works in a pinch, though it’s slightly less aggressive.
You’ll want nail primer or a protein bond. These products chemically prepare the nail surface so the new acrylic will stick reliably. Not all primers are created equal—look for ones specifically labeled as anti-lift or designed to prevent lifting.
For the actual repair, have either nail glue (for small lifts) or a fresh acrylic powder and liquid monomer (for larger lifts). A small bowl or dappen dish helps you work with the acrylic mixture. You’ll also need an acrylic brush, though a detail brush gives you better control than a larger application brush.
Finish with a top coat or gel sealant to lock everything in place, and keep a nail buffer nearby for smoothing and blending. A cuticle stick or wooden pusher helps you clean edges without gouging the nail. Keep cotton pads or alcohol wipes on hand for cleansing.
Clean and Prepare the Lifted Area
Before you touch any acrylic or adhesive, you need to see exactly what you’re working with and ensure the area is completely clean.
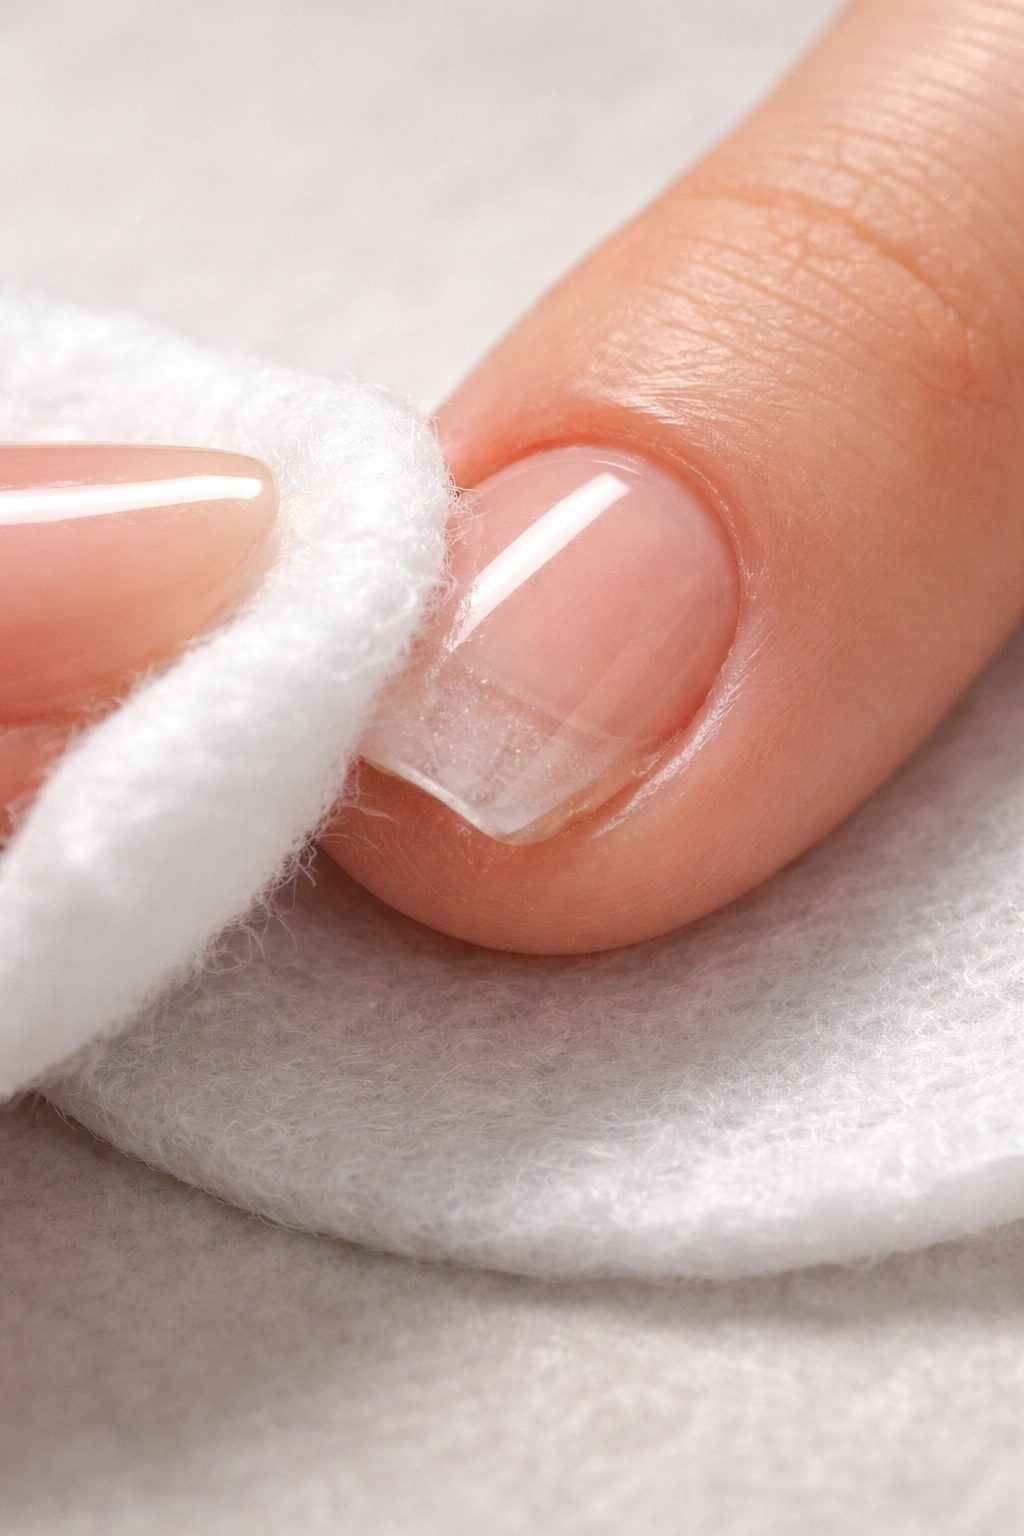
Soak a cotton pad in isopropyl alcohol and press it firmly against the lifted section for 10-15 seconds. This removes oils, bacteria, and debris from the gap. Don’t rush this step. Really let the alcohol penetrate and dissolve what’s underneath.
After the alcohol treatment, dry the nail completely. Any remaining moisture will sabotage your repair. Use a fresh, lint-free cloth or paper towel and press it against the nail to absorb all the liquid.
Inspect the area carefully now. If you see dark discoloration, a greenish tint, or smell anything unpleasant, stop here. This indicates infection or fungal growth that’s beyond a home fix. A professional needs to assess this and possibly treat it medically. Pushing forward risks spreading the infection deeper into your natural nail.
If the area looks clean, gently use your nail file to smooth any rough edges around the lifted section. Hold the file at a 45-degree angle and use light, gentle strokes. The goal is to smooth, not to strip away material. This creates a better surface for adhesion.
Remove Loose Edges Safely
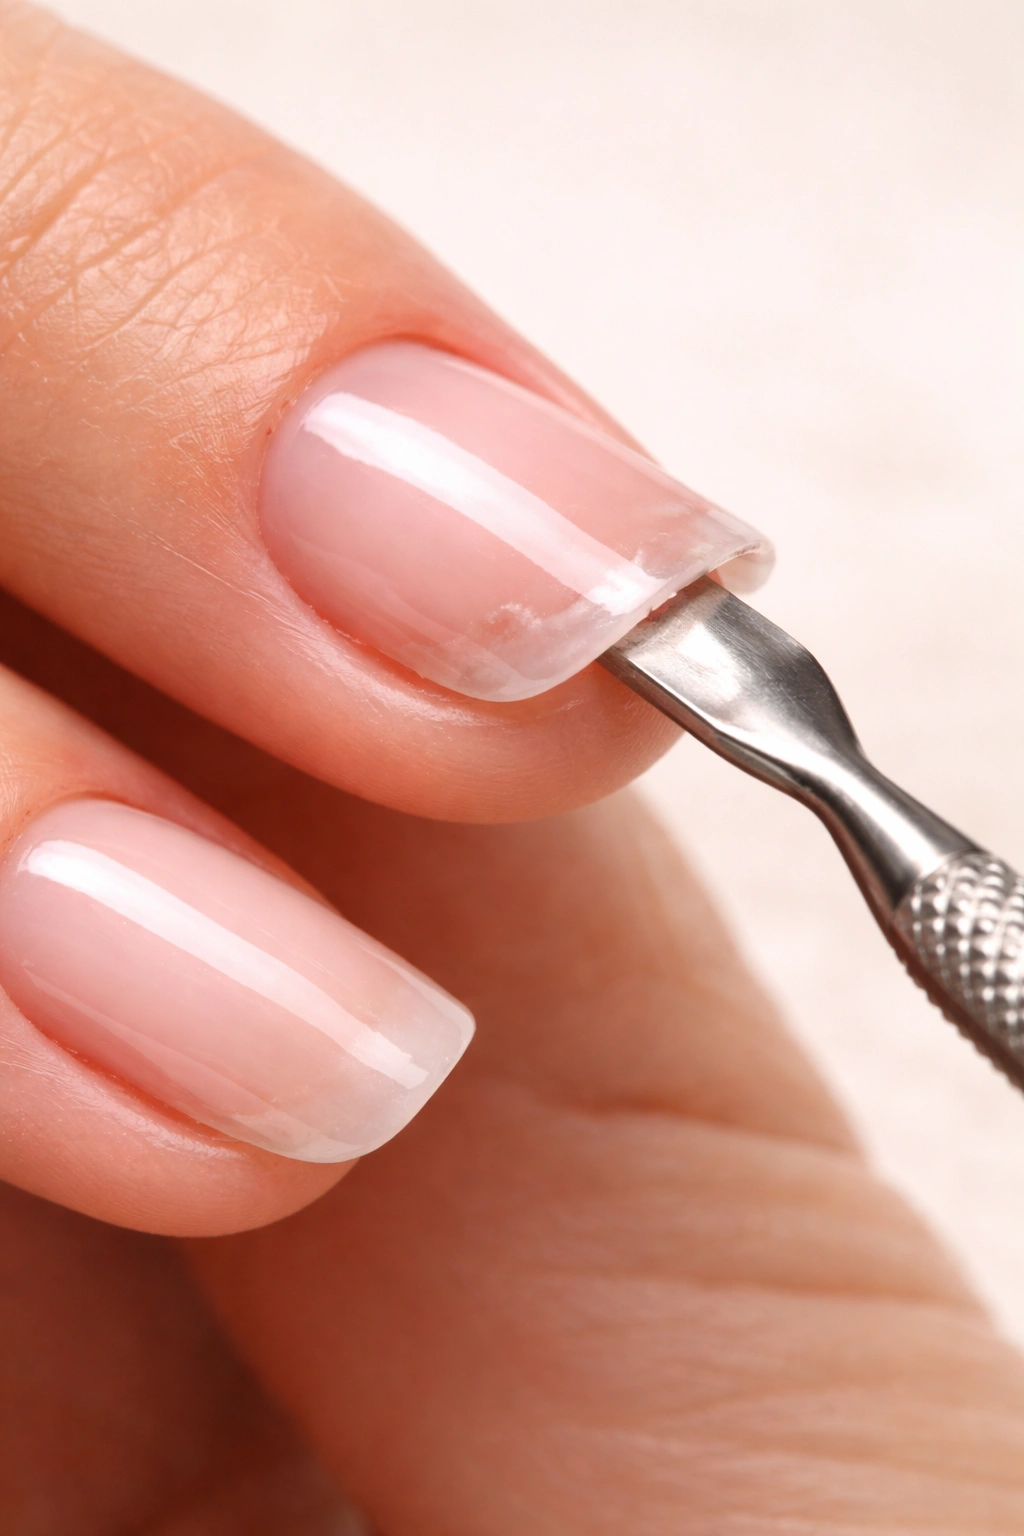
This step is about clearing away any acrylic that’s already separated or hanging by a thread. You’re not removing a huge section—just the parts that are already unstable.
Use a sanitized cuticle pusher or the flat end of a wooden stick, not a sharp tool. Press gently underneath the lifted acrylic edge and slowly work it back and forth. You’re testing how far the separation extends, not forcefully prying.
If the acrylic lifts away easily, let it come off gradually. Resist the urge to yank or pull aggressively. Rough removal damages your natural nail underneath, weakening it and making the repair harder.
For areas where the acrylic is still firmly attached, leave it alone. You’re only removing what’s already loose. Forcing acrylic away that still has a grip will cause unnecessary trauma to your nail bed.
Once you’ve removed the obviously loose pieces, use a fine-grit file to gently trim any sharp edges left behind. Smooth everything into a natural transition between the remaining acrylic and your natural nail. File in one direction only, never sawing back and forth, which creates more damage.
File and Blend the Lifted Section
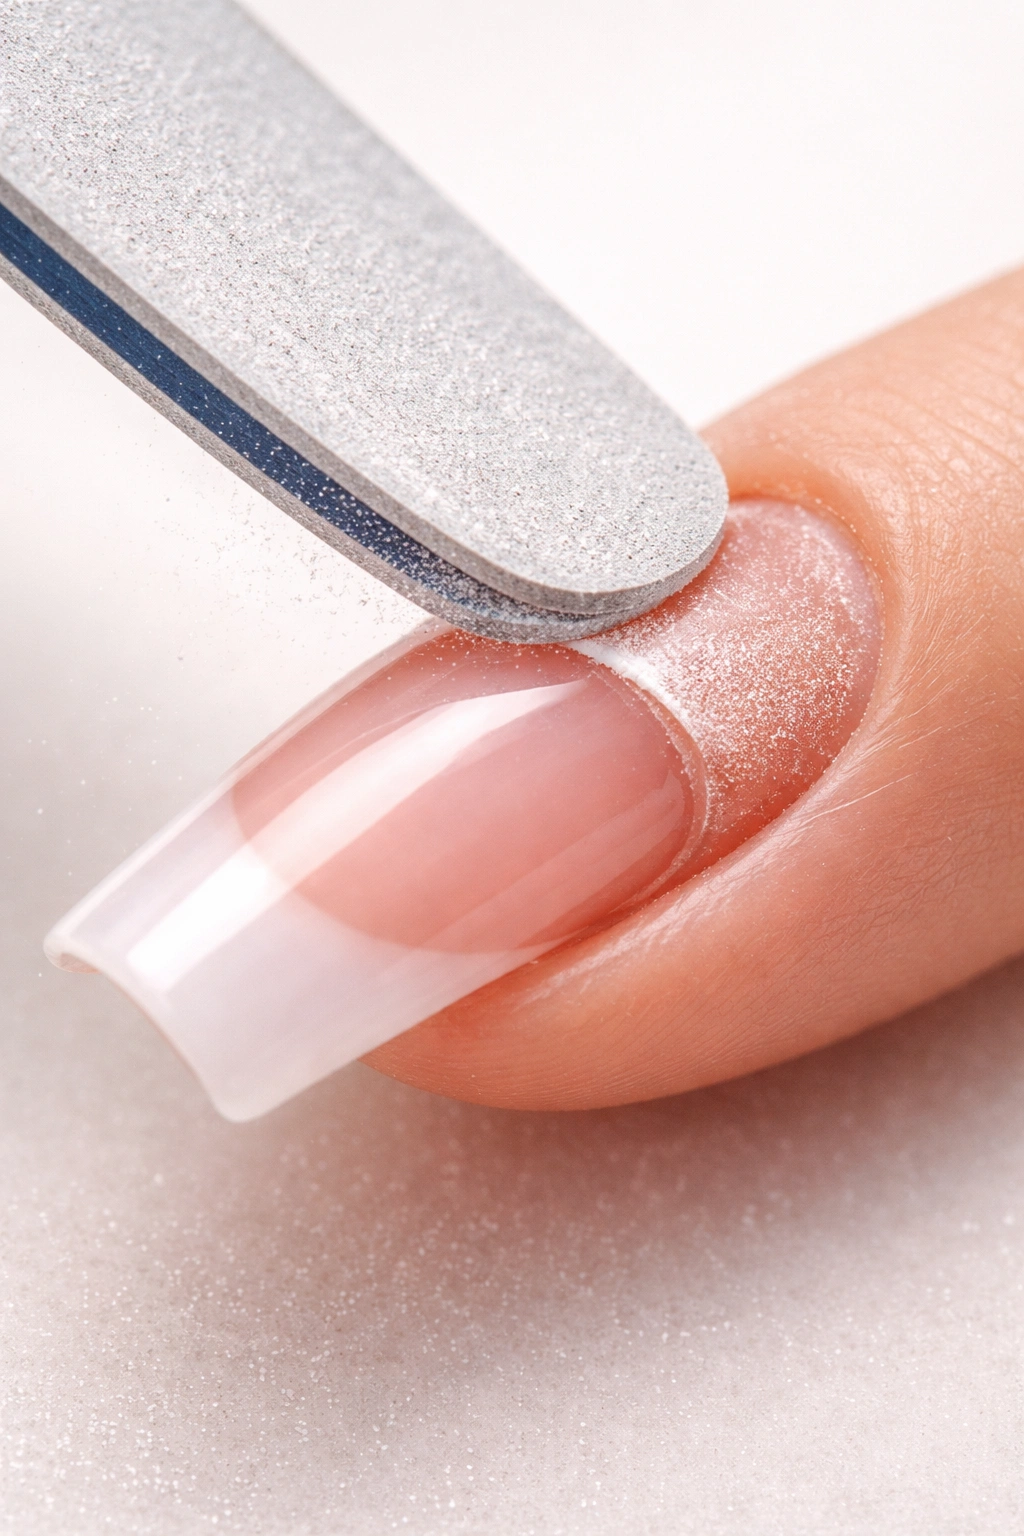
Blending is what makes the repair look intentional rather than like a patch job. This step transforms a visible gap into a seamless transition.
Take your fine-grit file and, holding it at a 45-degree angle, very gently file the edge of the lifted area. Your goal is to create a subtle slope rather than an abrupt edge. Light pressure is everything here—you’re feathering the acrylic, not grinding it away.
Work slowly and check frequently by running your fingertip across the area. You should feel a smooth, gradual transition. If you feel any sharp ridge or bump, keep filing gently until it disappears.
Blend not just the edge where lifting occurred, but also slightly into the surrounding acrylic. This creates visual continuity so the repair isn’t the obvious focal point of your nail. Think of it like blending makeup—you want no harsh lines.
After filing, buff the area with a soft buffer or buffing block. This removes the matte finish left by the file and prepares the surface for the new acrylic you’re about to apply. Buffing also helps the new product bond better with the old.
Reapply Acrylic or Use Nail Glue
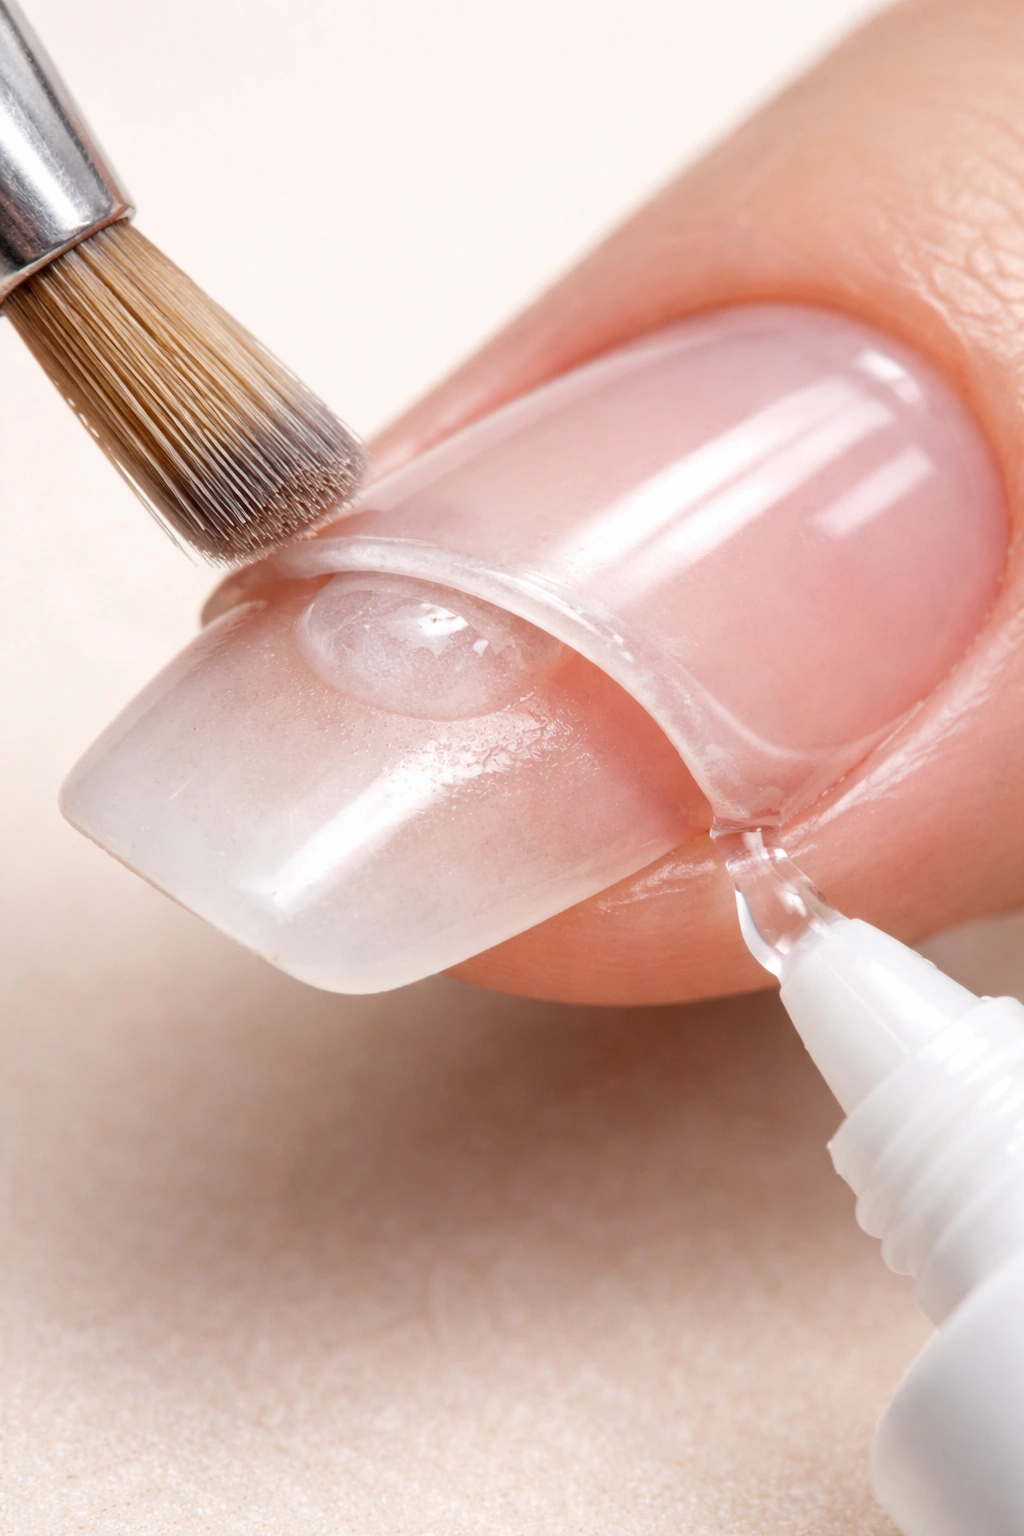
For small lifts caught very early, a quick nail glue fix might work. For anything more substantial, you’ll need to reapply actual acrylic product.
If you’re using nail glue: Apply just a few small drops of high-quality nail glue underneath the lifted area. Press the acrylic down firmly and hold it in place for 20-30 seconds to ensure the glue sets. Wipe away any excess glue immediately with a wet cloth before it hardens. This is a temporary fix that typically buys you a week or two, but it’s not a permanent solution. Glue alone won’t handle serious lifting because it doesn’t have the structural integrity of actual acrylic.
If you’re using acrylic powder and liquid: This is the more robust repair for lifting that’s progressed beyond the very edge. Mix your acrylic bead to a slightly thicker consistency than normal—you want something that will flow gently but hold its shape. Too wet and it will spread everywhere; too dry and it won’t bond properly.
Using your acrylic brush, apply a small bead of acrylic directly to the area where lifting occurred. Start in the middle of the gap and let gravity pull the bead toward the cuticle. Never apply acrylic directly against the cuticle or skin—leave a tiny gap. Work with the bead for 30-40 seconds, using your brush to sculpt and smooth it into the surrounding acrylic.
The key is thin, controlled application. A thick pile of new acrylic will trap moisture and cause the same lifting problem to recur. You’re filling the gap with just enough product to restore the seal, not building a ridge.
Seal and Reinforce the Repair
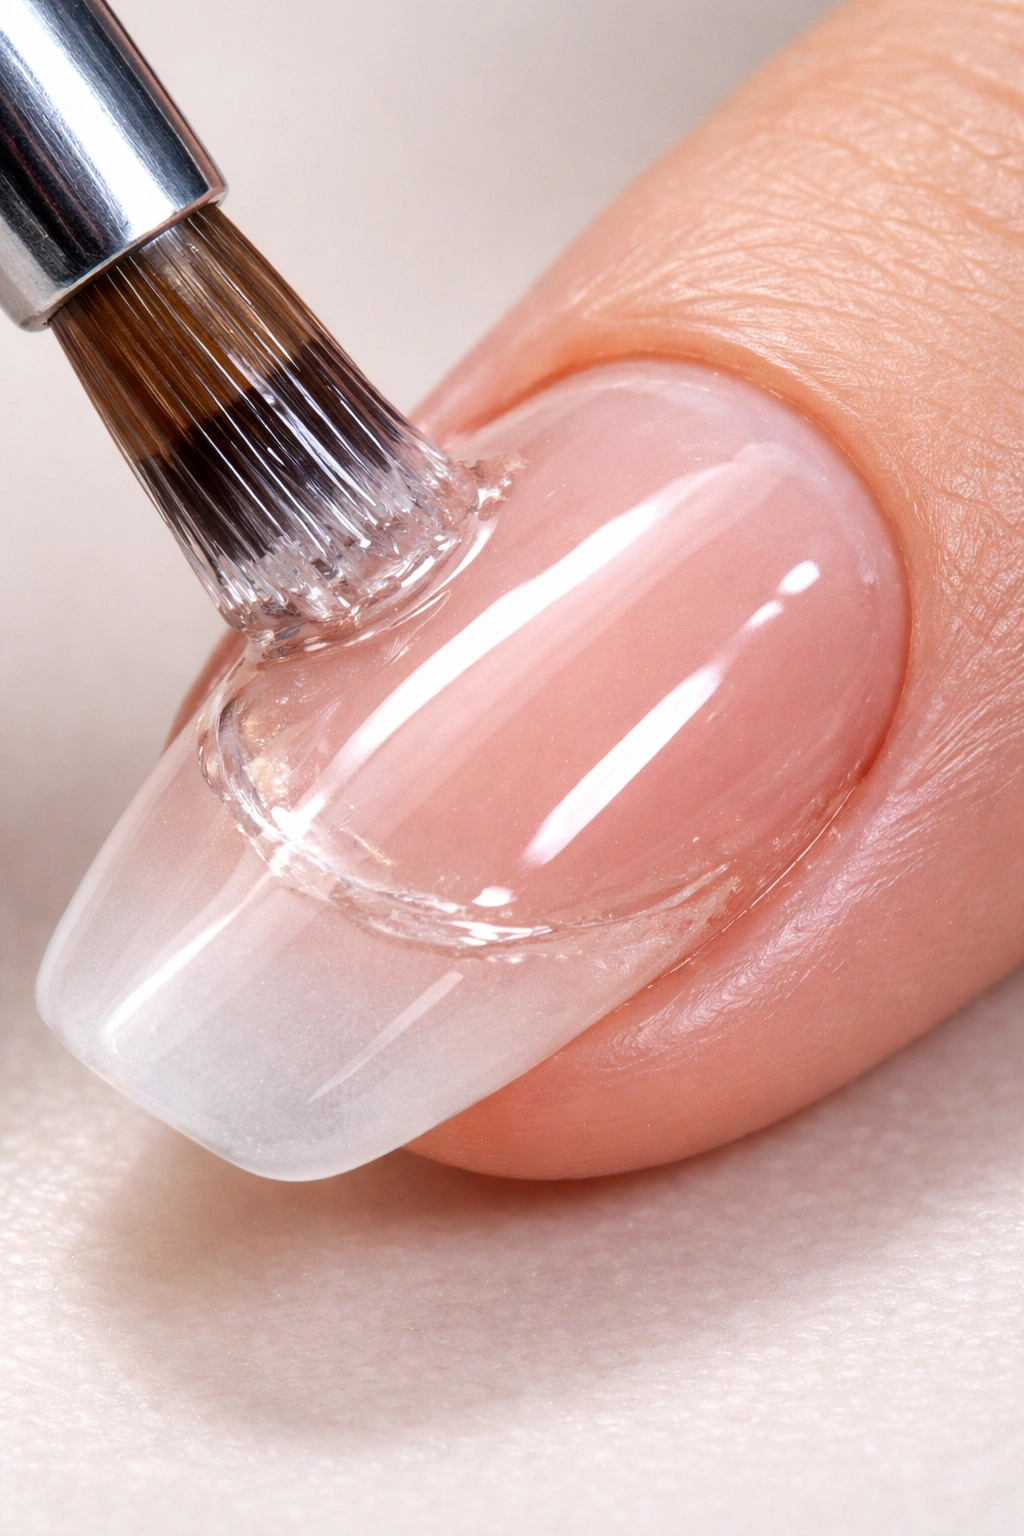
Once your acrylic is set, it’s time to lock everything in place with a reinforcing layer.
Apply a coat of gel builder or hard gel over the repaired area, extending slightly beyond it onto the healthy acrylic around it. This creates a protective shell that holds the repair in place and prevents moisture from seeping back into the gap. Use your brush to spread the gel evenly, creating a smooth transition between the repair zone and the rest of your nail.
If you’re using UV or LED curable products, follow the lamp timing for your specific product—typically 30 seconds for LED lamps or 2-3 minutes for UV. This hardens the gel and bonds everything together.
If you don’t have gel, a thick coat of high-quality top coat works, though it’s less durable. Top coat alone won’t provide the structural reinforcement that gel does, so you may need to reapply it every few days to maintain the seal.
Pay special attention to sealing the edges of the repair where the new acrylic meets the old. This edge is where moisture will try to enter again. Make sure it’s completely sealed with either gel or top coat.
Buff and Smooth the Repaired Area
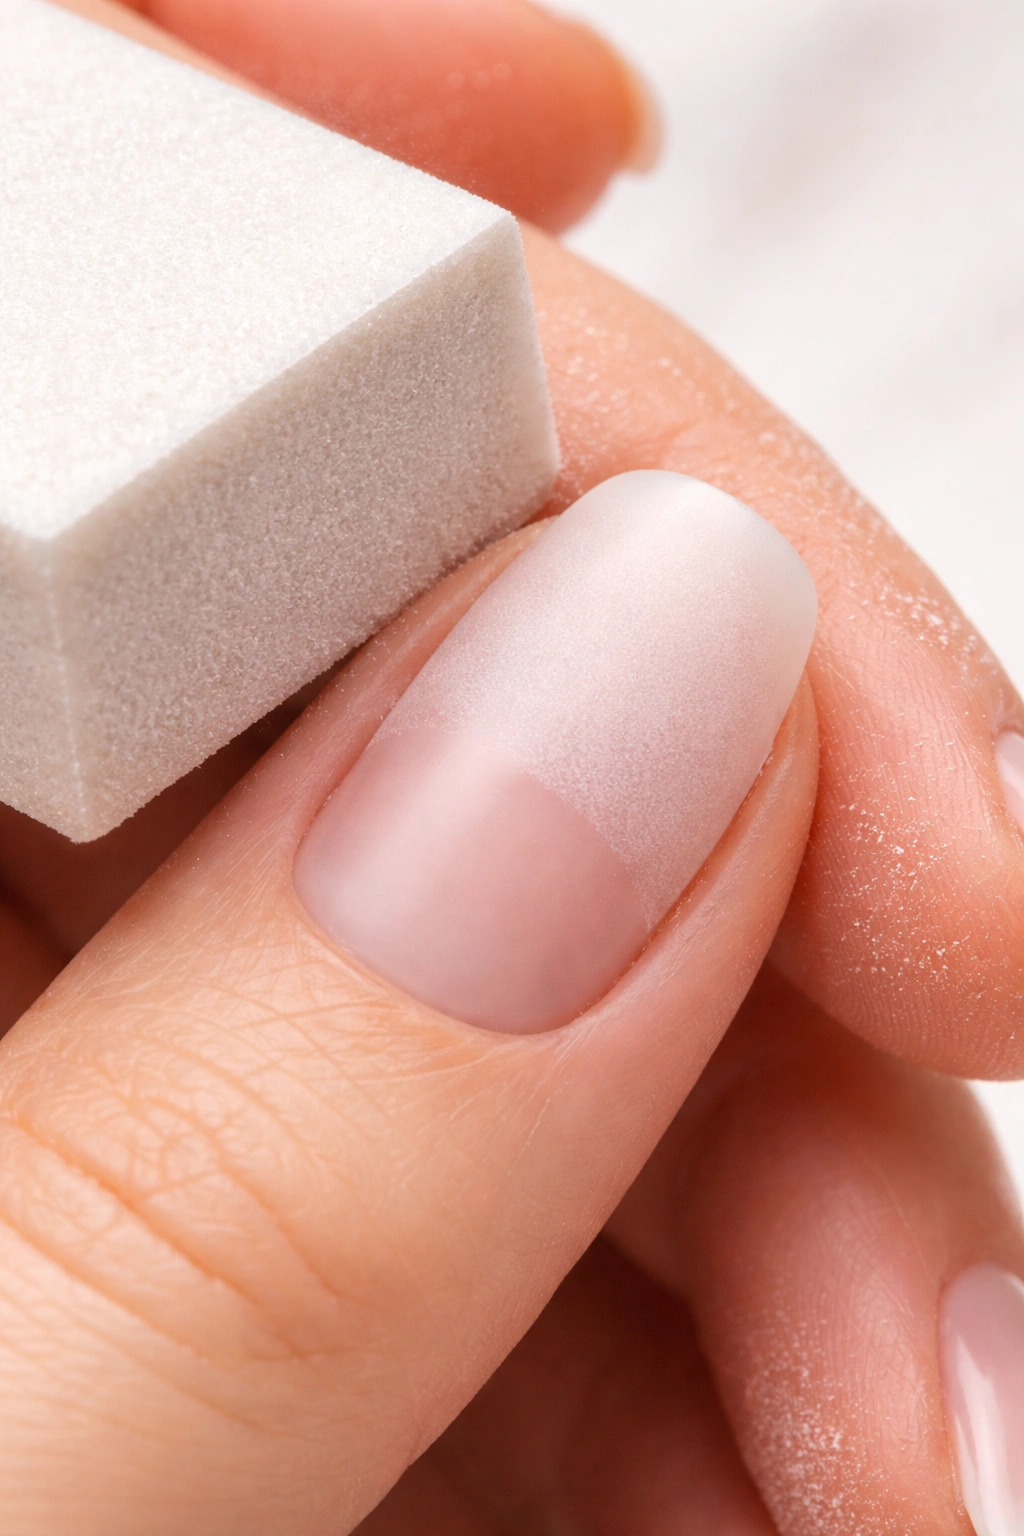
Now that everything is set, it’s time to make the repair invisible.
Use a soft buffing block to gently buff the entire nail, paying special attention to the area you just repaired. This removes any shine differences between the old acrylic, the new acrylic, and the gel or top coat. A matte finish blends the repair better than a shiny one.
Buffer in the direction of your nail growth, not back and forth. This prevents creating scratches. Use light pressure and circular motions rather than harsh strokes.
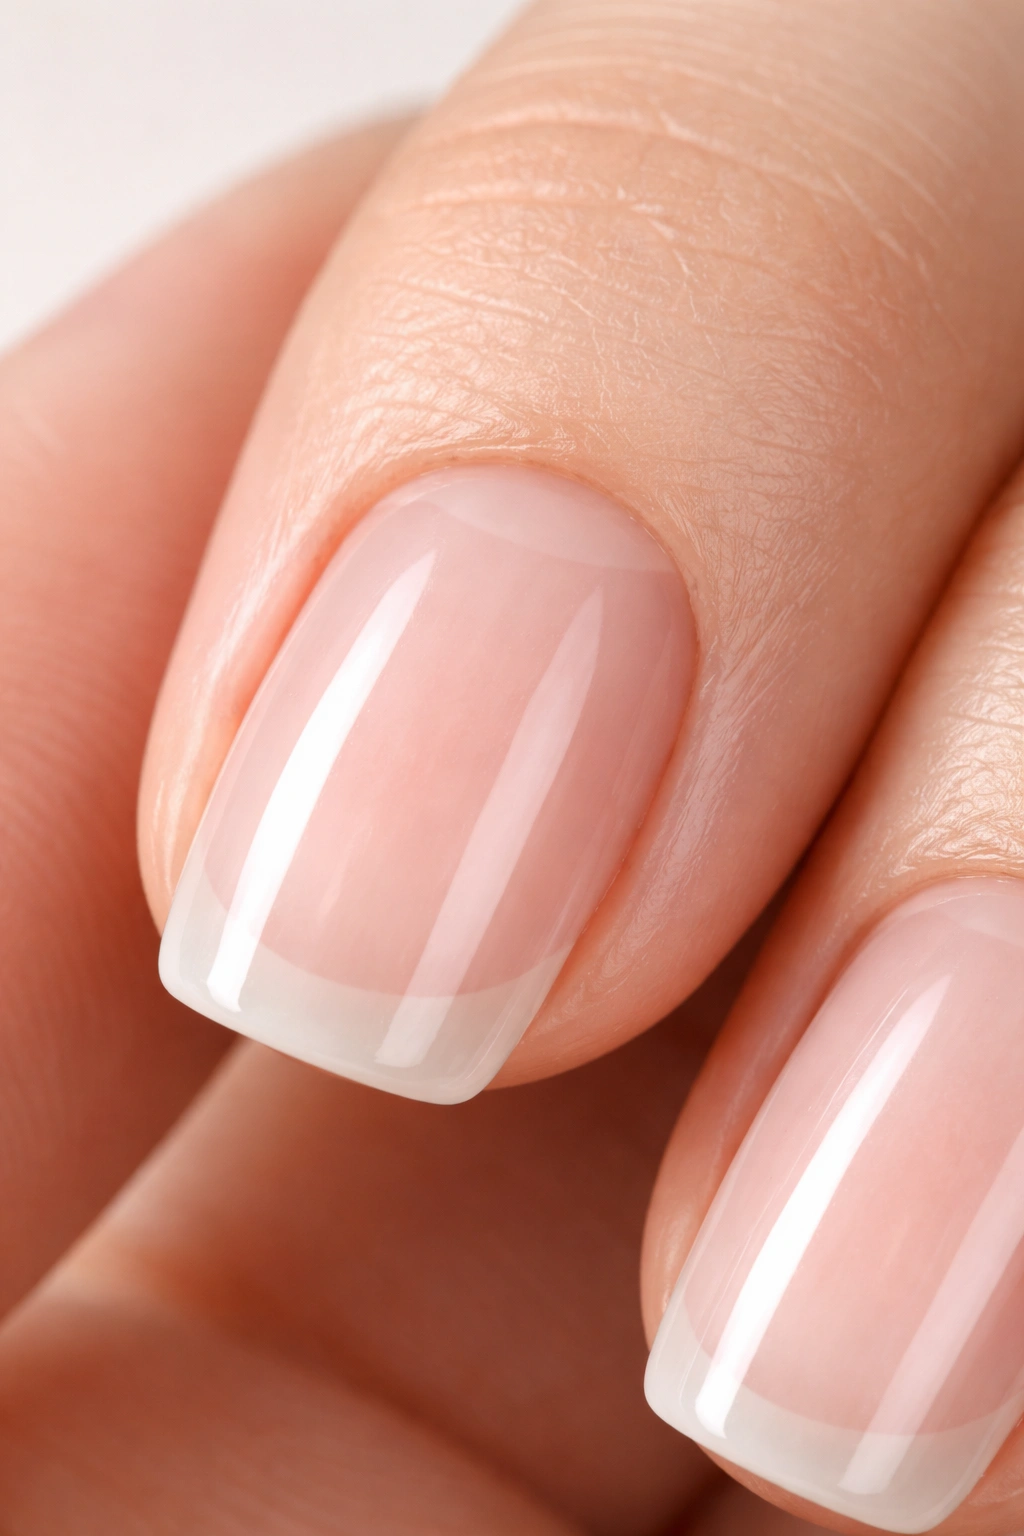
Check the transition point carefully. If you can still feel or see where the old and new acrylic meet, keep buffing gently until it’s seamless. This is the difference between a visible repair and one that looks like the nail never lifted.
After buffing, wipe the nail with a damp cloth to remove all the fine dust. A clean surface is essential for applying color or finishing polish that will hide any remaining imperfections.
Common Mistakes to Avoid When Fixing Lifting
Even when you understand the steps, certain habits sabotage the repair before it even has a chance to work.
Oversaturating with primer is a trap many people fall into. Yes, primer is essential, but more isn’t better. One thin coat is enough. Excess primer actually prevents adhesion because the product becomes too slippery. Apply it sparingly, let it dry fully, and resist the urge to layer it on.
Over-filing the natural nail weakens the structure underneath. Remember, you’re working with the already-compromised nail that lifting occurred on. Aggressive filing thins the nail plate, making it more brittle and prone to future lifting. Light, gentle strokes only.
Applying acrylic to a still-moist nail guarantees failure. Even if you can’t see moisture, it’s there. After cleaning with alcohol, make absolutely sure the nail is bone dry. If necessary, wait an extra minute and press a fresh cloth against it again.
Ignoring the cuticle area causes lifting to recur. Push back your cuticles completely and remove the pterygium (the thin layer of cuticle tissue that adheres to the nail plate). If you skip this, the primer can’t reach the actual nail, and adhesion suffers.
Flooding the cuticle with acrylic is equally problematic. When acrylic touches skin, the bond fails. Leave a tiny gap between the acrylic and the cuticle line. This gives the acrylic room to bond to the nail plate without contacting skin.
Using incompatible products causes chemical failures. Don’t mix acrylic powder from one brand with liquid monomer from another. The formulations may be chemically incompatible, resulting in poor polymerization and weak bonds. Stick with a matched system.
Applying products near heat weakens them before they even cure properly. Keep lamps away from the area while primer is setting. Heat causes primer to weaken, reducing its bonding ability.
Preventing Future Lifting
Once you’ve gone through the trouble of repairing a lifted nail, the obvious next step is preventing it from happening again.
Establish a bulletproof prep routine. Every time you get acrylic—whether at a salon or at home—demand proper preparation. Natural nail should be thoroughly cleaned, buffed with medium grit to remove shine (not polished smooth with a buffer), and dehydrated. The pterygium must be completely removed. This foundation is everything.
Keep your hands dry. Moisture is acrylic’s enemy. Wear gloves when doing dishes, cleaning, gardening, or any activity involving water or chemicals. The constant swelling and shrinking of your nail from moisture exposure is one of the biggest causes of lifting.
Avoid using your nails as tools. Opening cans, prying off stickers, typing with force, or scratching at surfaces puts pressure on the acrylic-to-nail bond. This physical stress eventually causes failure. Treat your nails like the manicure they are, not like utility tools.
Maintain regular fills. As your natural nail grows, a gap develops between the new growth and the acrylic. This growth makes the acrylic unstable, and lifting follows. Fills every 2-3 weeks prevent this problem from developing.
Moisturize wisely. Hydrate your cuticles with cuticle oil once or twice daily, but apply it to the skin, not to the nail plate itself. Oils on the nail plate weaken adhesion over time. A healthy cuticle and nail bed is more resistant to lifting.
Limit your nail length. Longer nails experience more physical stress and pressure points. If you’re a chronic nail lifter, try a shorter length for your next set. You might find that the reduced stress prevents the problem entirely.
Inspect regularly. Check your nails weekly for any early signs of lifting. The sooner you catch separation, the easier the fix. Early intervention can prevent minor lifting from becoming a major problem.
When to See a Professional Instead
Not every lift can or should be fixed at home. Know when to seek professional help.
If you see discoloration beneath the acrylic—yellowing, green, or dark tints—this indicates bacterial or fungal infection. A professional can properly clean the area and monitor it for safety. Attempting a home repair on infected nails can spread the problem deeper.
If there’s significant pain, warmth, or swelling around the lifted area, something more serious is happening. You might have inflammation or infection that needs professional assessment and possibly medical treatment.
If lifting is affecting more than 30-40% of the nail, complete removal and reapplication is usually the better choice. When that much of the nail is compromised, a patch repair won’t hold long-term. A fresh set addresses the root cause and gives you a clean foundation.
If lifting happens repeatedly with every set, the issue might be with your nail health, the products being used, or the application technique. A skilled professional can diagnose whether this is a technician issue, product incompatibility, or something about your specific nails that needs different handling.
If you’re unsure whether the lifting is safe to fix at home, err on the side of caution and see a professional. A 30-minute appointment costs less than damaging your natural nails trying to DIY a repair that was beyond your comfort level.
If you’ve attempted a home repair and it’s gotten worse, stop and call a professional. More intervention at that point will only compound the damage.
Final Thoughts
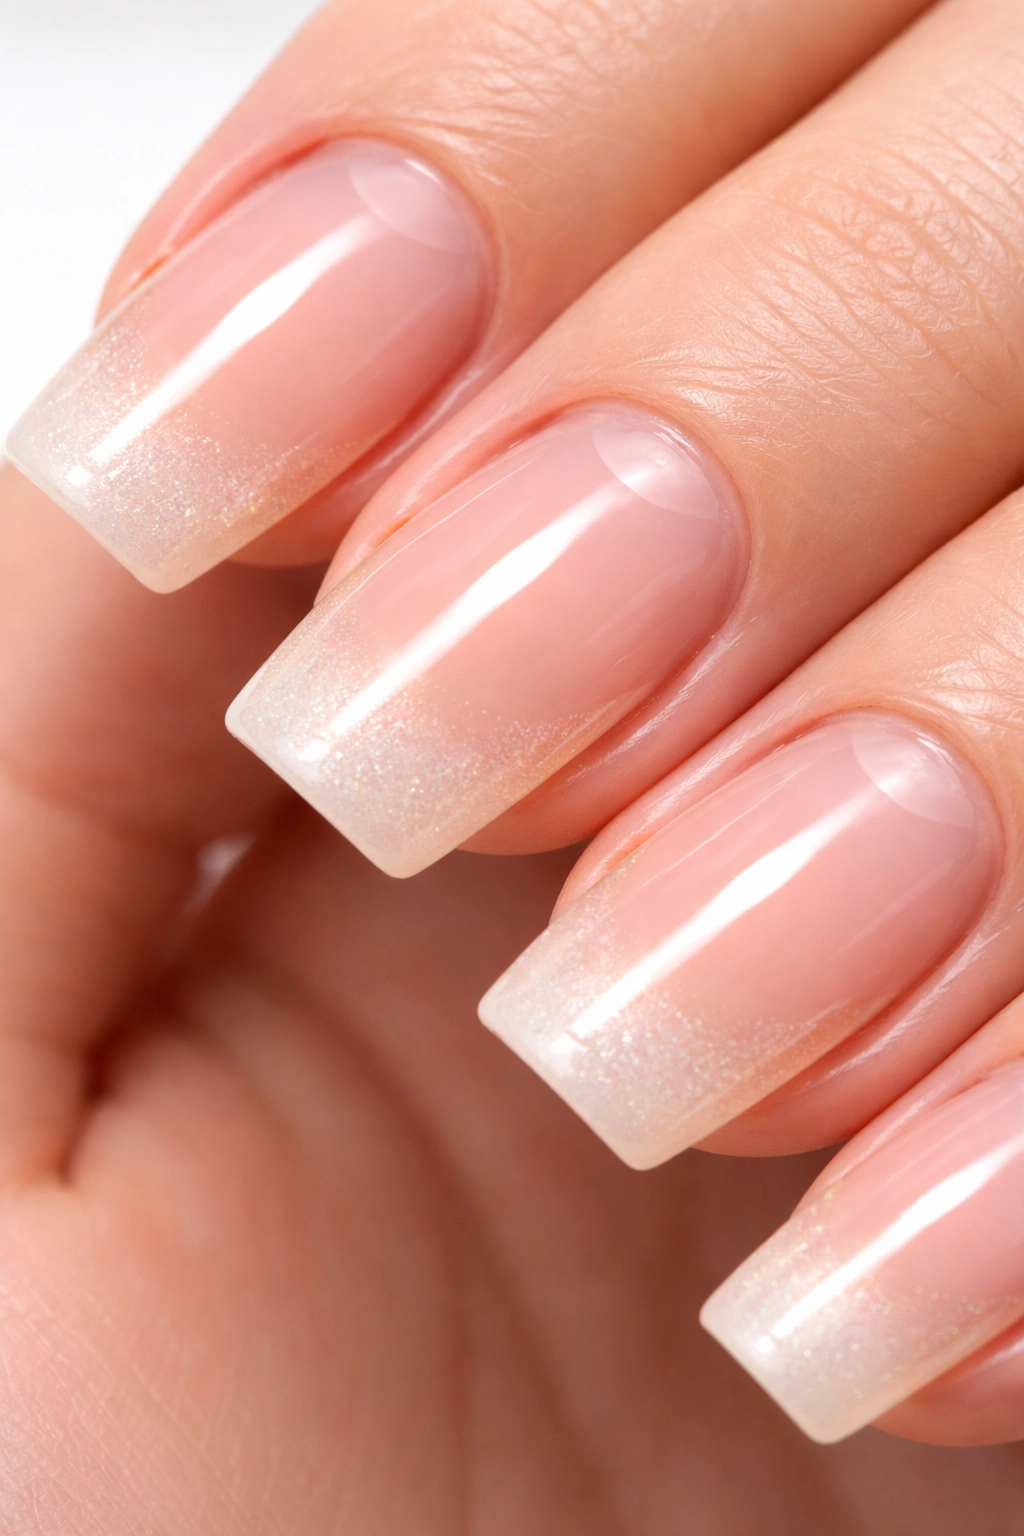
Lifting acrylic nails is frustrating, but it’s not automatically a manicure death sentence. With the right approach—clean preparation, controlled reapplication of product, proper sealing, and careful blending—you can fix lifting at home and get your nails looking flawless again. The key is patience, precision, and knowing the limits of what you can safely handle on your own.
The real victory, though, is prevention. Once you understand what causes lifting and commit to proper nail care and maintenance habits, you’ll find yourself dealing with this problem far less often. Protect your hands from excessive water, keep your nails maintained on a regular schedule, avoid treating them like tools, and trust the process. A little preventive care goes a long way toward keeping your acrylic nails looking salon-perfect for weeks at a time.
