

Cat eye nails have become one of the most captivating nail trends, and unlike many fleeting beauty fads, they’re actually accessible to anyone willing to spend a few minutes learning the technique. The mesmerizing effect that seems almost impossible to create at first glance is actually surprisingly straightforward once you understand the science behind it and have the right supplies on hand. Whether you’re a seasoned nail enthusiast or picking up a brush for the first time, this guide will walk you through every single step to achieve that luxurious, light-catching look that keeps people staring at your fingers.
The beauty of cat eye nails lies in their versatility. They work on every skin tone, suit both minimalist and maximalist aesthetics, and can be adapted to match virtually any color preference or nail shape. What’s more, you don’t need expensive salon equipment or professional training—just a few specific products, some patience, and a willingness to experiment. Let’s break down exactly how to create this stunning effect from start to finish.
What Cat Eye Nails Actually Are
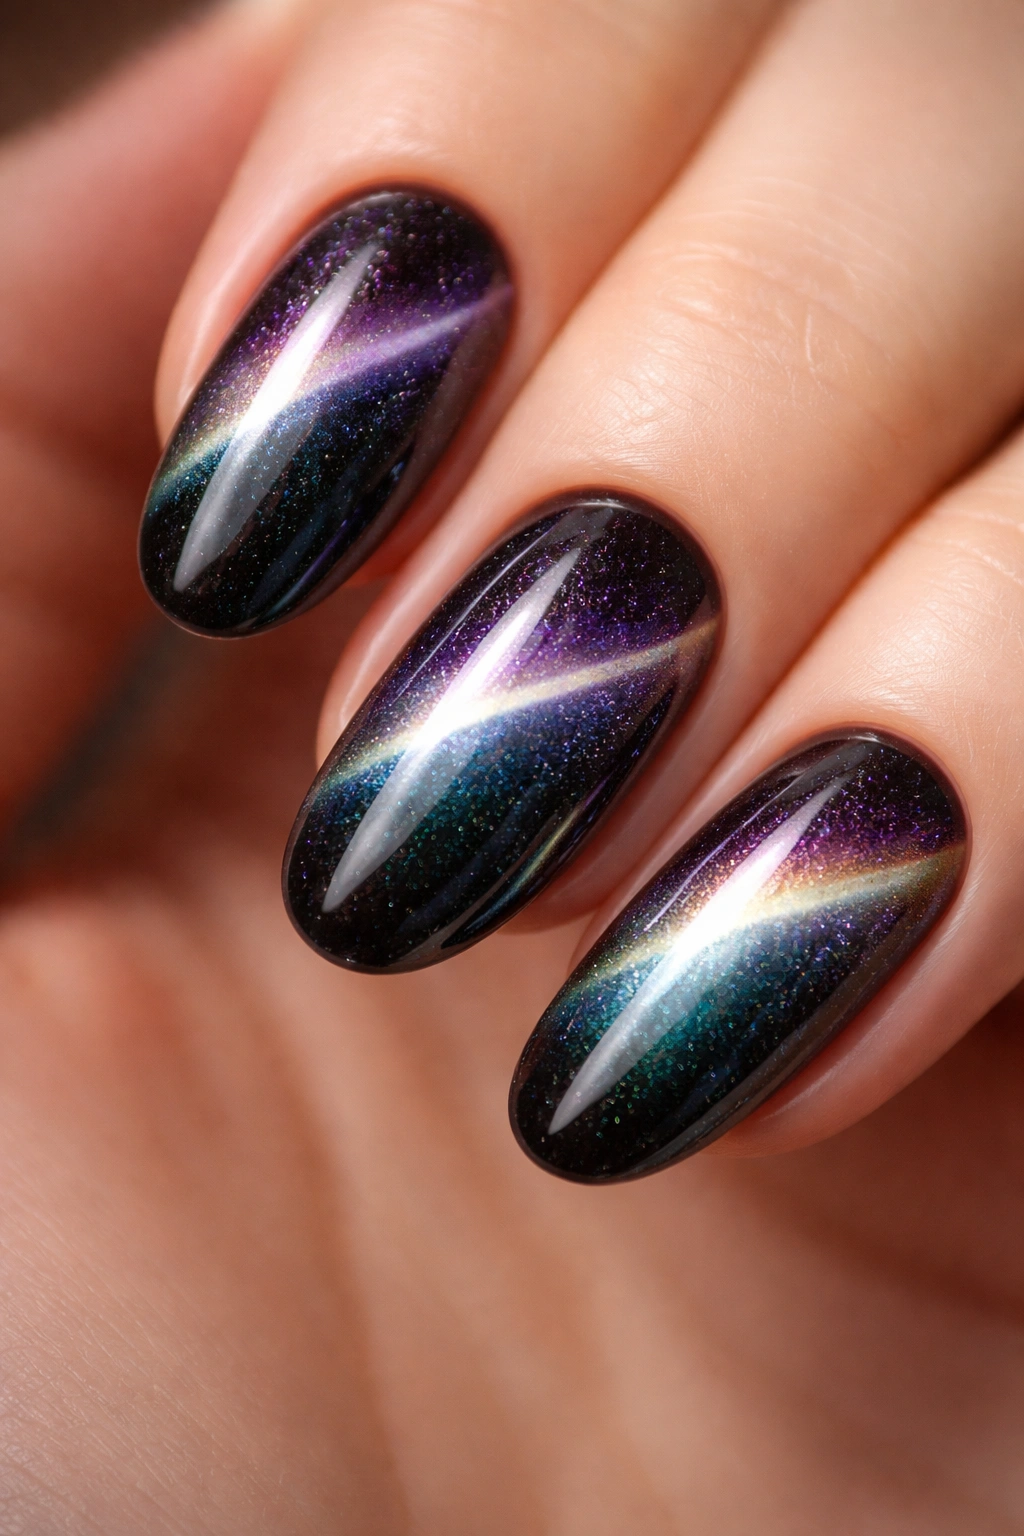
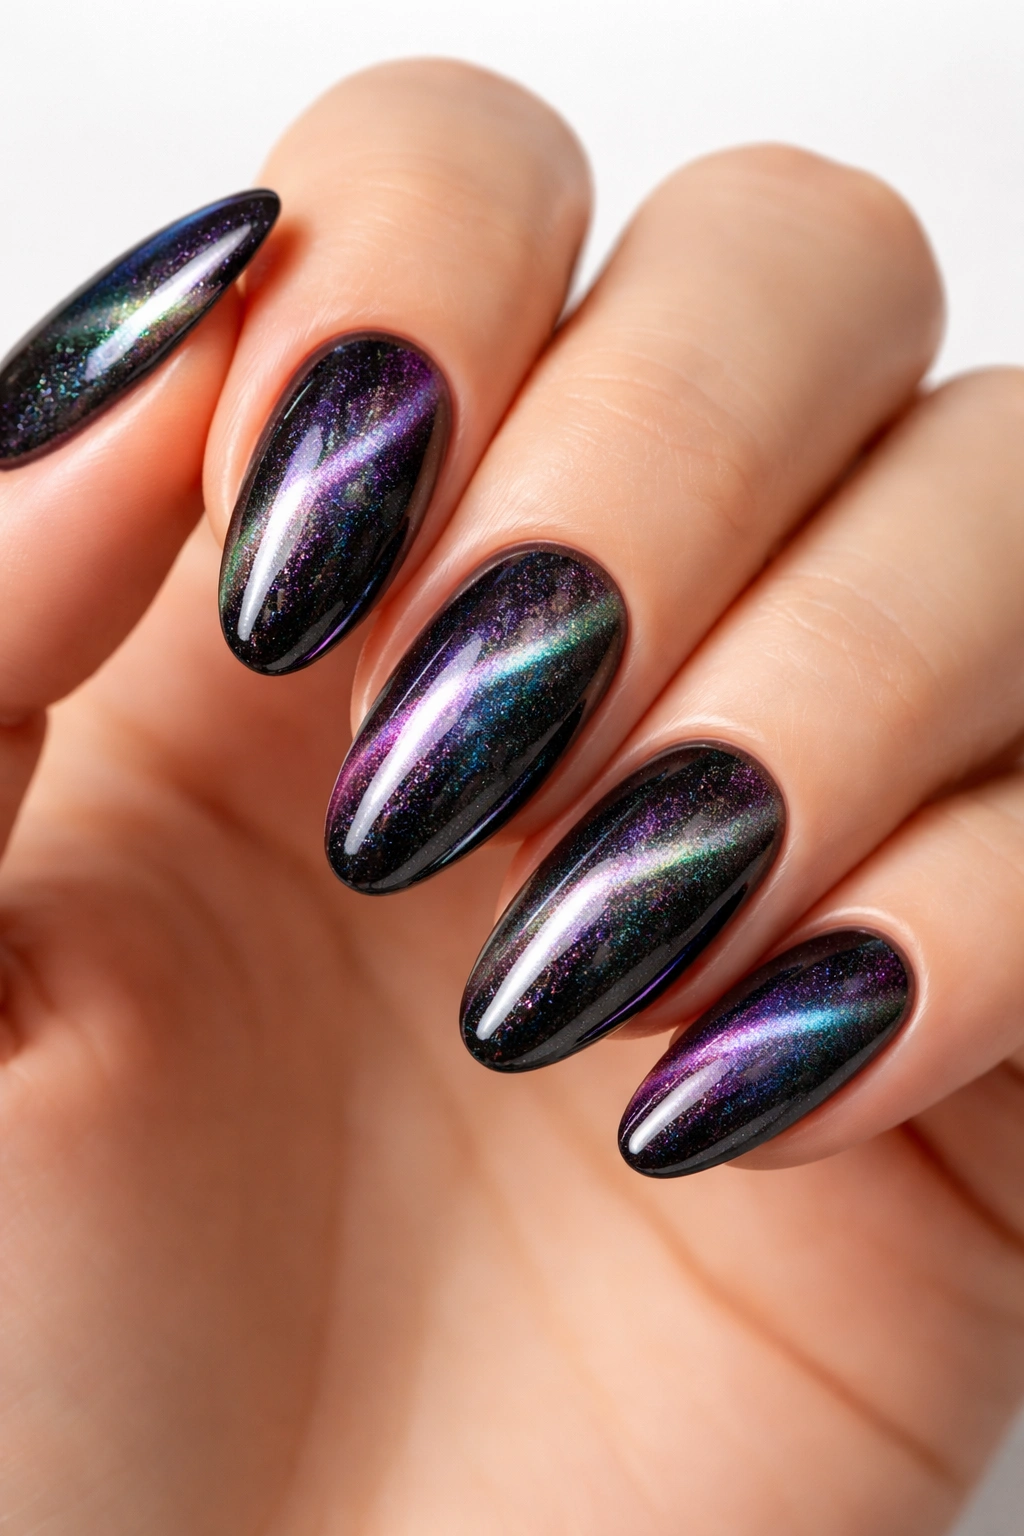
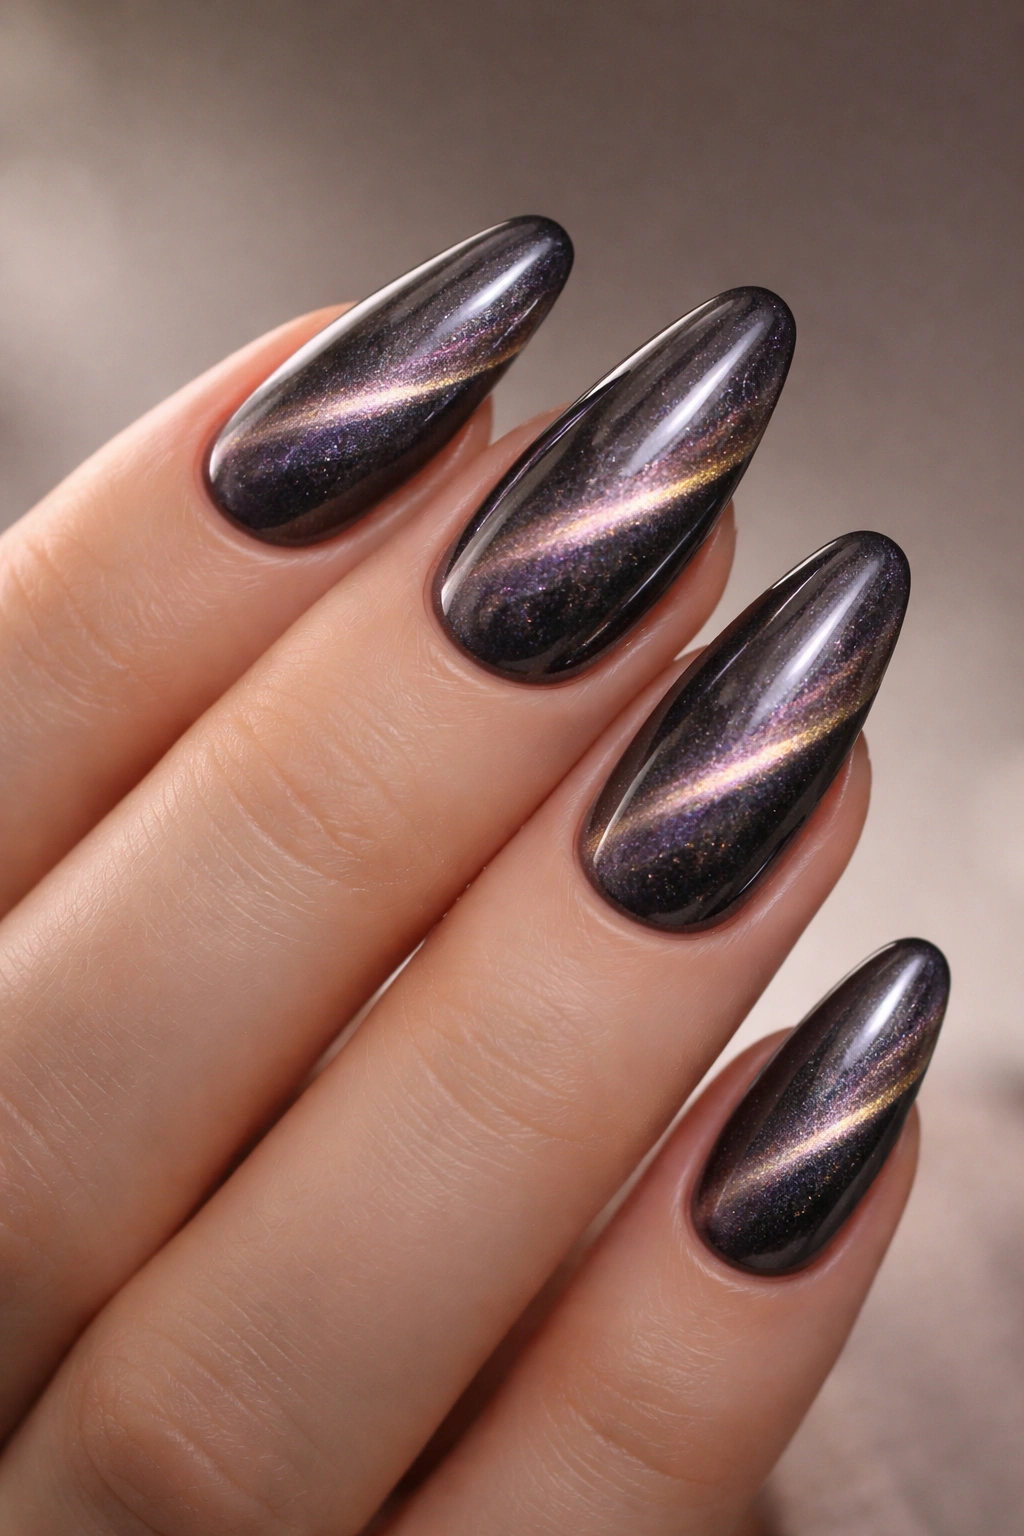
Cat eye nails get their distinctive name from their resemblance to the reflective, dimensional iris of a feline. When light hits your nails at different angles, the effect shifts and moves, creating an almost hypnotic, ever-changing shimmer that mimics the way a cat’s pupil catches and reflects light. This isn’t achieved with regular glitter or standard metallic polish—it requires a specific type of product that contains magnetic particles suspended in gel.
The technology behind cat eye nails is elegantly simple. The gel polish contains tiny bits of iron or metallic particles that respond to a magnetic field. When you apply the polish to your nail and then hover a magnet nearby, these particles instantly align toward the magnetic pull, creating visible lines and patterns on your nail surface. You’re essentially using magnetism to move the metallic content around until it creates exactly the effect you want.
What makes this different from other trendy nail finishes is that you have complete creative control over the final look. The same bottle of cat eye gel can create a sleek, minimalist stripe down the center of your nail, a full glittering surface effect, a frame around the edge, a French tip, or even abstract designs depending on how you manipulate the magnet. The effect ranges from subtle and sophisticated to bold and eye-catching depending on your base color choice and the intensity of the magnetic gel you select.
The Essential Tools You’ll Need
Before you attempt your first cat eye manicure, gathering the right supplies is non-negotiable. Unlike some DIY nail projects that you can semi-improvise, cat eye nails require specific products because regular nail polish simply won’t work—it doesn’t contain the magnetic particles necessary to create the effect.
You absolutely need these three core items:
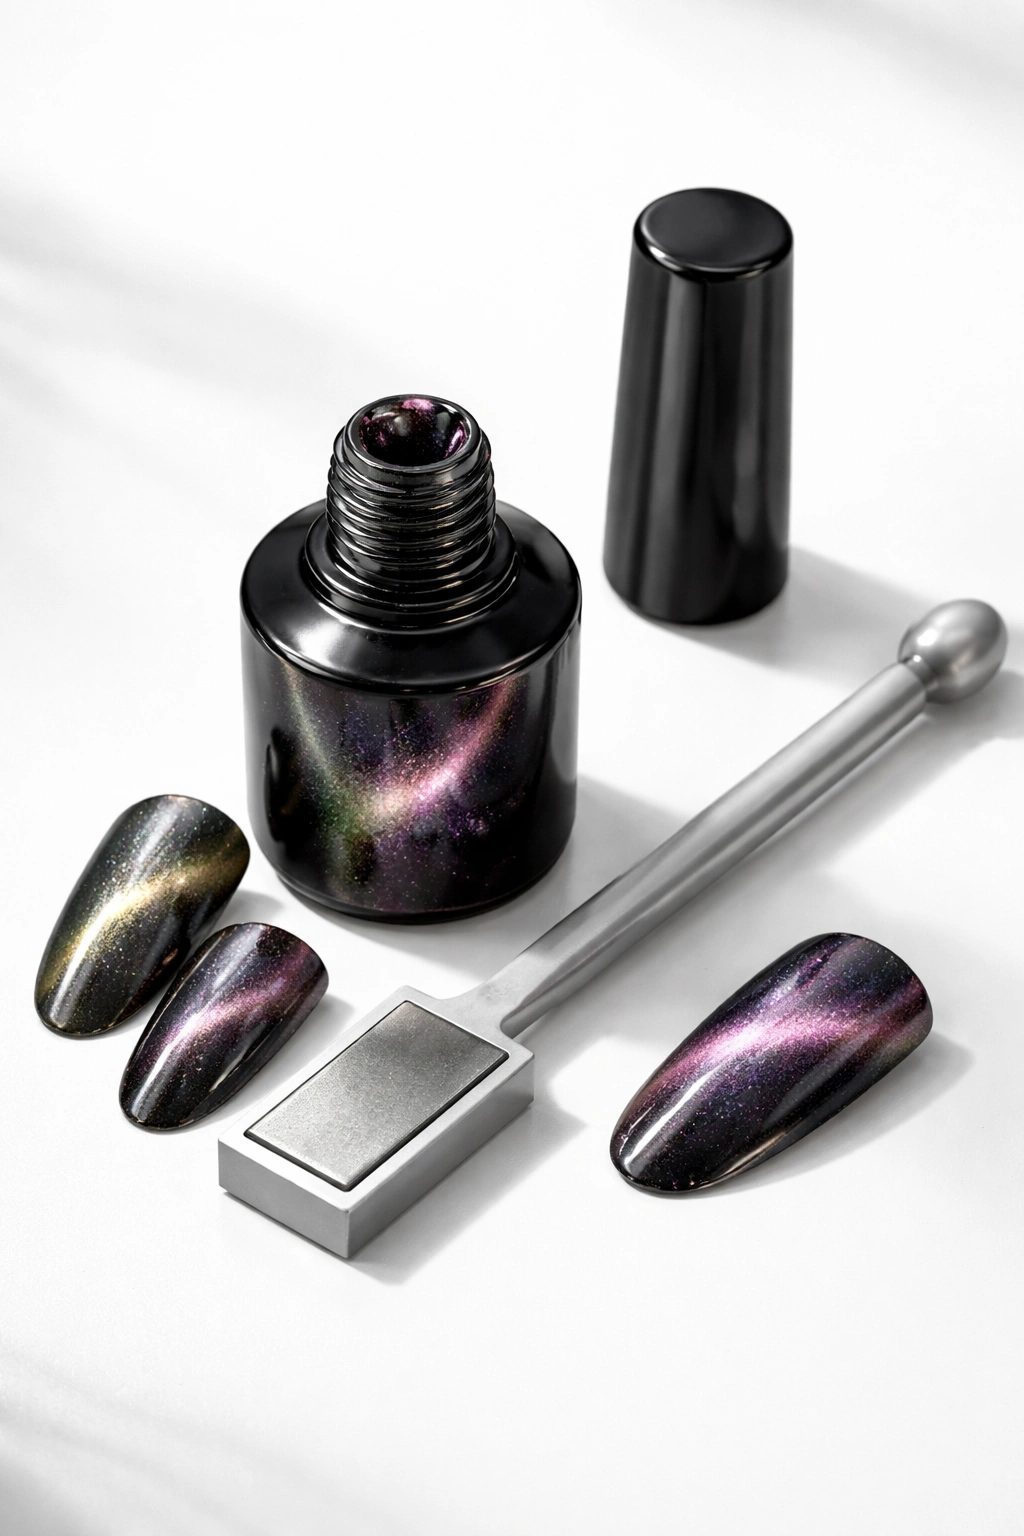
The most critical supply is magnetic gel polish itself. This comes in dozens of colors and finishes, from soft pastels to bold jewel tones, metallic silvers, holographic rainbow shifts, and even translucent glass-like formulas. Most brands that produce magnetic gel polish include a magnet with the bottle, often built right into the cap. Reputable brands include Lavis, LDS (Lilycute), Kokoist, F Gel, and various professional salon suppliers. The quality of the gel matters—cheaper formulas may not contain enough iron particles to create a visible effect, so invest in a brand with proven results.
The magnet tool is equally essential. While many magnetic gel polishes come with a magnet attached to the bottle cap, a dedicated magnet tool gives you far more control and flexibility. These tools often feature dual ends: a flat rectangular side and a rounded circular side. Some premium magnets even have different shapes like S-curves or elongated ovals for creating specific designs. The magnet’s strength matters significantly—a weak magnet won’t pull the particles effectively, while an overly strong one can work too aggressively. Most professional-grade magnetic tools fall in a sweet spot that’s been tested and proven to work with magnetic gels.
An LED or UV nail lamp is essential for curing gel products. LED lamps typically cure faster (30-60 seconds), while UV lamps take about 1-2 minutes. A 48-watt lamp is standard and works reliably. This isn’t optional—without proper curing, your design won’t set and will smudge immediately.
Additional supplies you’ll want on hand:
A quality base coat protects your natural nails and provides adhesion for the gel to grip. Some professionals recommend a specific gel base coat designed for magnetic polishes, though standard gel base coats work fine. A top coat seals your design and adds shine and protection—many nail professionals prefer no-wipe gel top coats because they don’t require cleansing with rubbing alcohol before the next step, creating a seamless finish.
You’ll need standard nail prep tools: a nail file (220-grit or higher for smoothness), a buffer to gently texture the nail surface, a cuticle pusher, and nail clippers or a nail file for shaping. A lint-free wipe and rubbing alcohol or a specialized nail cleanser remove oils and dust that would prevent proper adhesion. Finally, cuticle oil nourishes your nails and surrounding skin after you’re finished—this prevents drying and cracking that can happen with gel manicures.
Preparing Your Nails for the Perfect Canvas
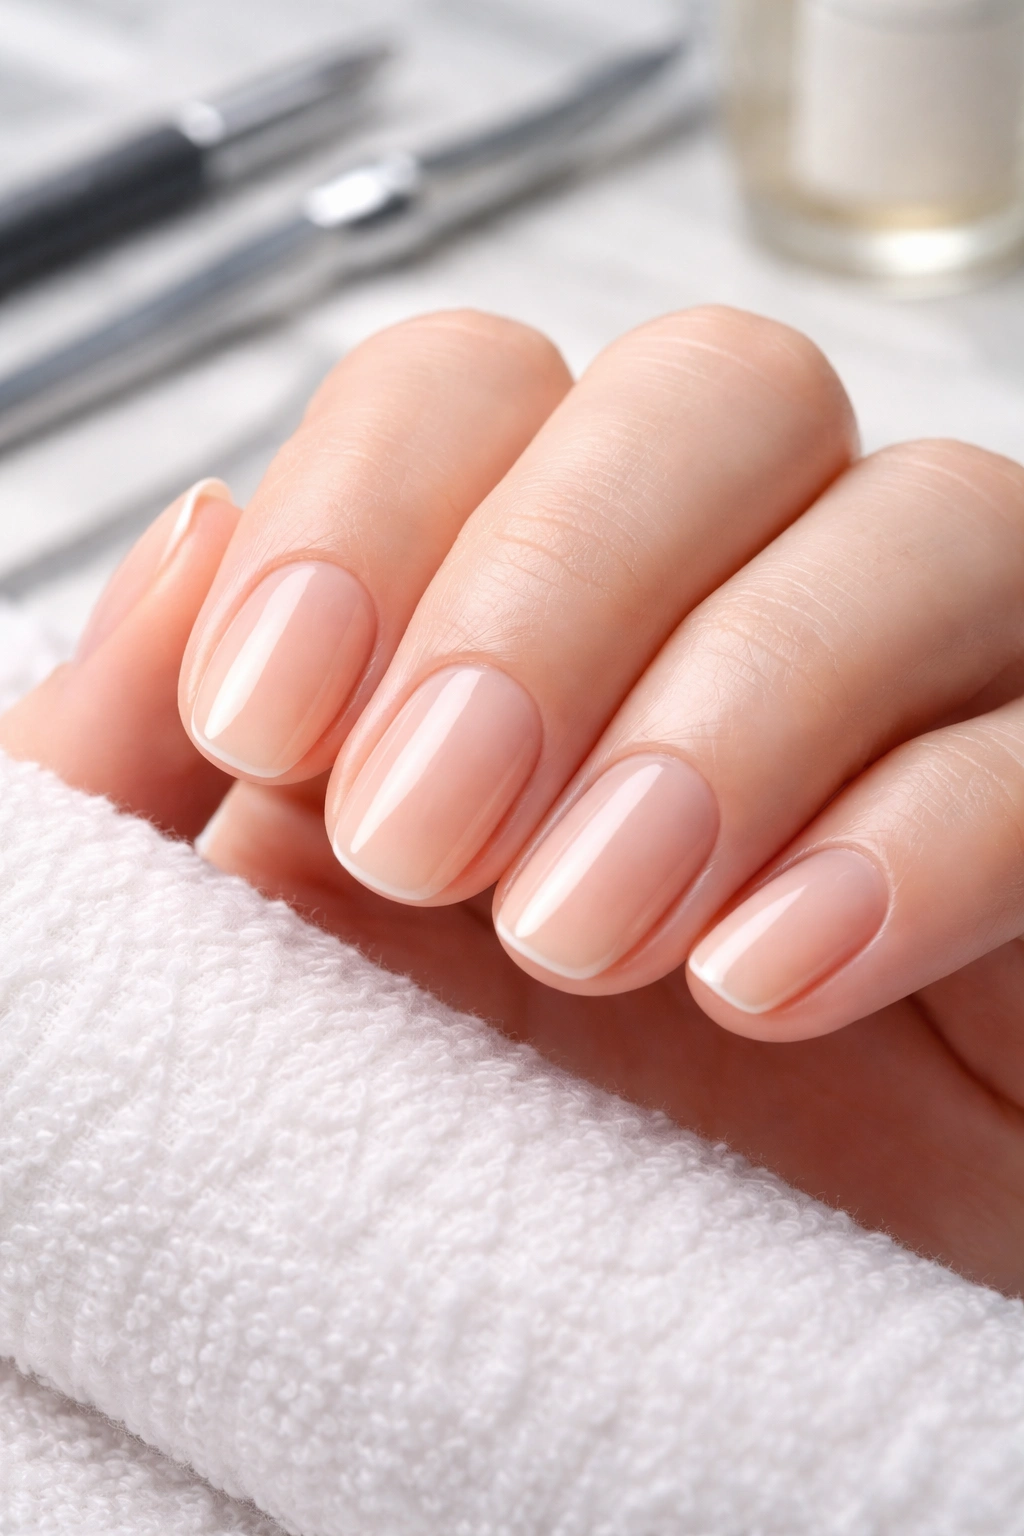
Nail preparation is the most underrated step in achieving professional-looking cat eye nails, yet it’s honestly the difference between a manicure that lasts three weeks and one that starts peeling after five days. Don’t skip this stage, even though it feels tedious. The work you do now determines everything that comes after.
Start by removing any old polish from your nails. If you’re wearing regular polish, use a standard remover. If you have gel polish on your nails already, soak your fingers in a bowl of acetone for 10-15 minutes until the gel softens, then gently scrape it away with a wooden stick or cuticle pusher. Never rush this—forcing off gel damages your nail plate and makes the surface weak and prone to peeling.
Once your nails are bare, clean them thoroughly with soap and water, then dry them completely. Any moisture left on your nails will interfere with product adhesion. Use a nail file to shape your nails to your preferred length and style. Whether you prefer short and rounded, medium and oval, or longer and pointed is entirely your choice—the cat eye effect works beautifully on all shapes. What matters is that all ten nails are shaped consistently and have smooth, even edges. File in one direction rather than sawing back and forth, which can cause splitting and splintering at the edge.
Push back your cuticles gently using a cuticle pusher. You’re not removing them—you’re just moving them back to expose more of your nail plate for polish application. Aggressive cuticle removal can cause infection and pain, so be gentle. If your cuticles are particularly thick or overgrown, soak your fingers in warm water for a few minutes first to soften them.
The next step is crucial for adhesion: lightly buff the surface of each nail with a buffer. You’re not trying to sand your nails down—just removing the natural shine from your nail plate and creating a slightly textured surface that gel can grip onto. Work gently in one direction, taking just a few passes across the surface. Over-buffing weakens your nails, so less is more here.
Finally, wipe your nails clean with a lint-free wipe soaked in rubbing alcohol or nail cleanser. This removes all the dust from buffing, any remaining oils from your skin, and any residue from the previous steps. This is the final detail that makes an enormous difference in how well your gel adheres and how long your manicure lasts. Many people skip this step and wonder why their polish starts lifting within a week.
Applying Your Base Coat
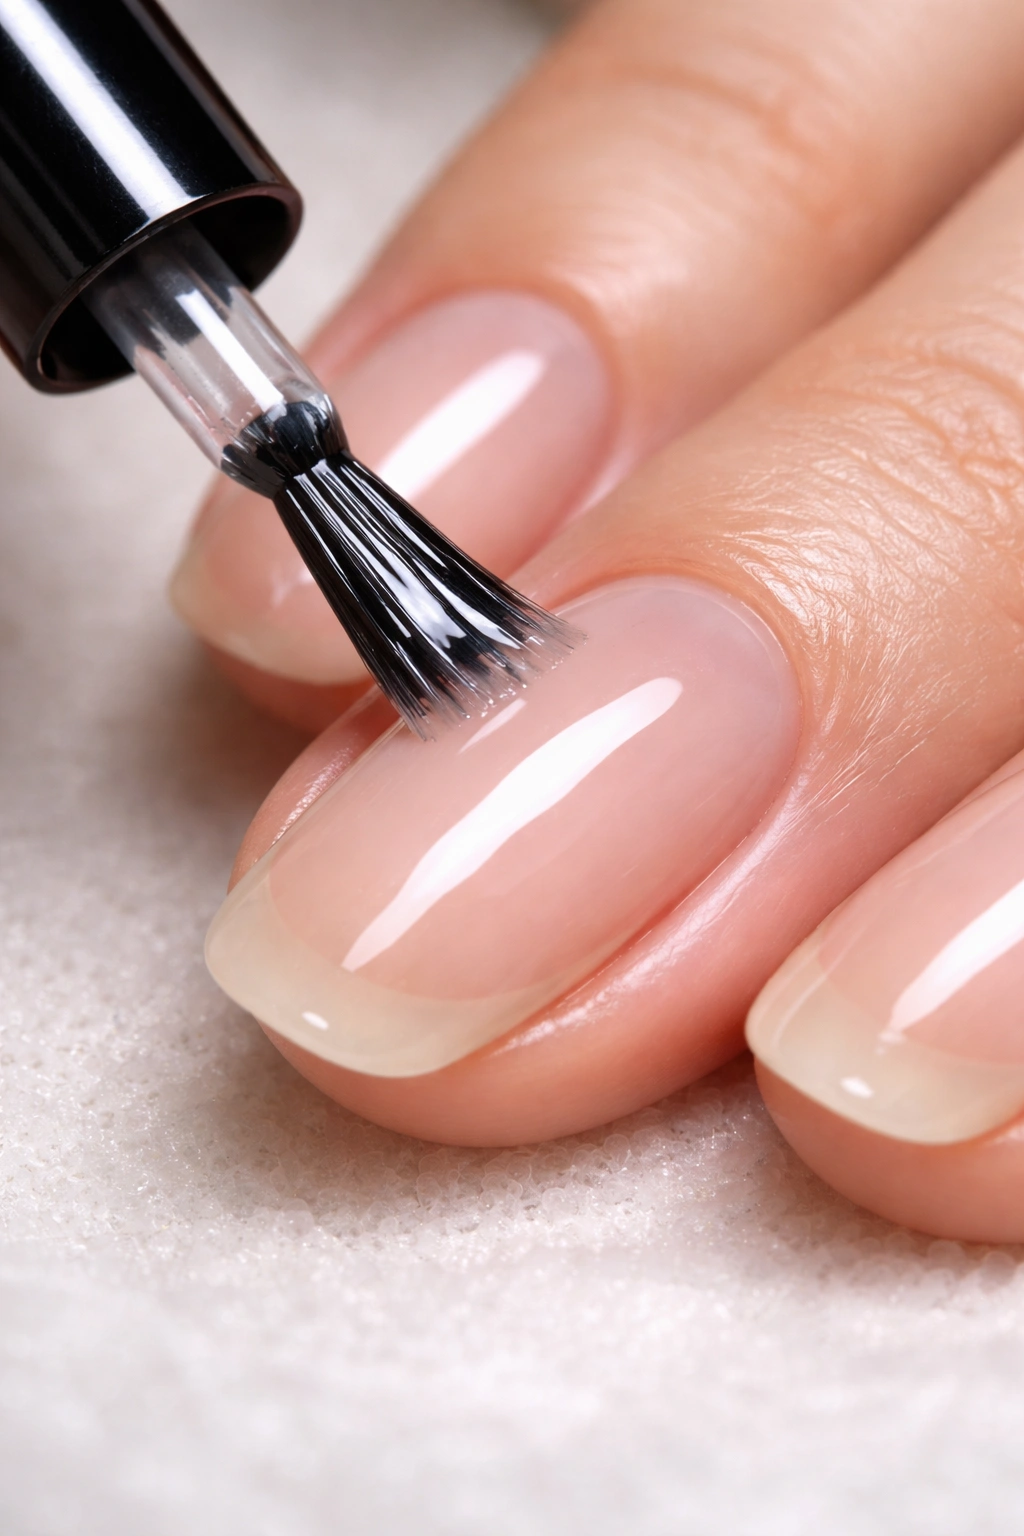
The base coat is your foundation, and foundation matters for long-lasting results. Choose a gel base coat designed specifically for your gel system—if you’re using an LED lamp, use an LED-compatible base coat, and so on. Some people use a builder gel as their base coat if they have thin or brittle nails that need extra strength and support.
Apply a thin, even layer of base coat to each nail, being careful to avoid touching the skin around the nail. The goal is coverage without excess product. Leave a tiny margin—about 1-2mm—from your cuticle and sidewalls to prevent the gel from sealing your skin. Once you’ve applied base coat to all ten nails, seal the free edge (the white tip of your nail) by running the brush along the underside of the nail tip. This prevents water and moisture from getting underneath the polish and causing lifting.
Cure under your LED or UV lamp according to the manufacturer’s instructions. LED lamps typically cure for 30-60 seconds, while UV lamps take 1-2 minutes. Don’t rush this step or under-cure your base coat—it needs to be fully hardened before you apply the next product.
Working with Magnetic Cat Eye Gel Polish
This is where the magic begins. Before you apply the magnetic gel to your nails, take a moment to prepare the bottle. Magnetic gel polish should never be shaken because shaking creates bubbles that will show up in your design. Instead, gently roll the bottle between your hands back and forth several times. This redistributes the magnetic particles that naturally settle to the bottom of the bottle, ensuring even distribution throughout the gel. If you’ve stored the polish for a while, you may need to roll it for longer to fully reactivate the particles.
The key to success with magnetic gel is working one nail at a time. This is non-negotiable. If you apply magnetic gel to multiple nails before using the magnet on them, the magnetic particles in the uncured gel will start responding to each other and shifting around unpredictably. Working nail by nail gives you complete control and prevents this unwanted activation.
Apply a thin, even layer of magnetic gel to one nail. The amount matters—too little and you won’t have enough particles to create a visible effect, but too much creates a thick, clunky appearance and takes longer to cure properly. Think of the consistency of a standard gel polish application. As with your base coat, avoid the skin around your nail and focus the product on the nail plate itself.
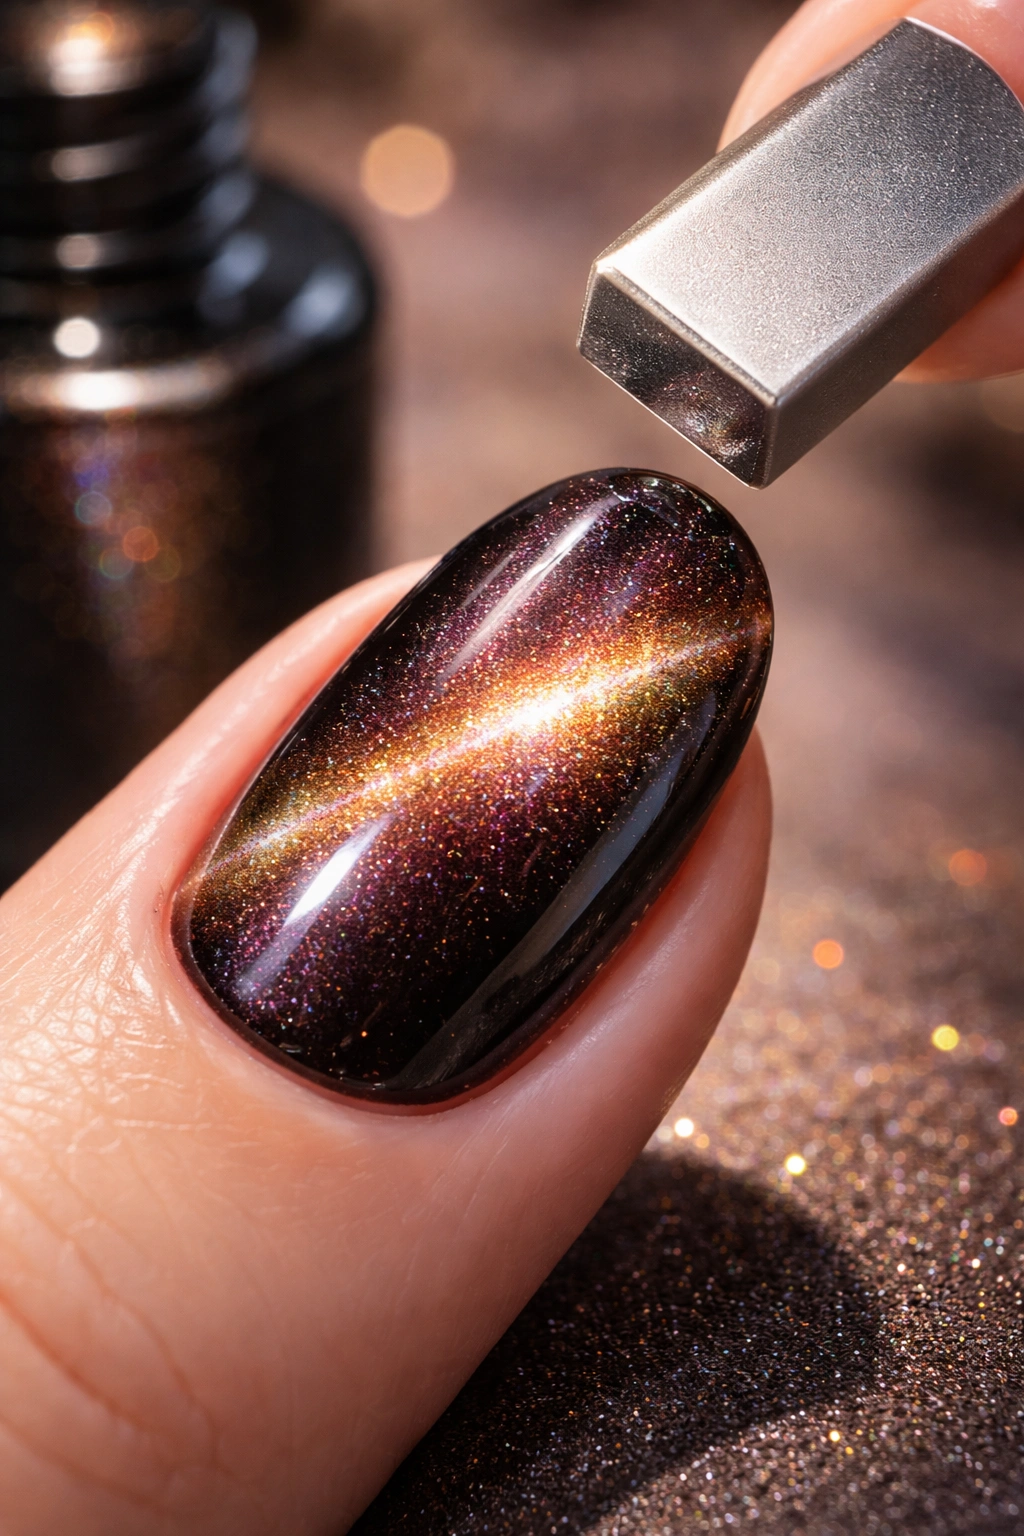
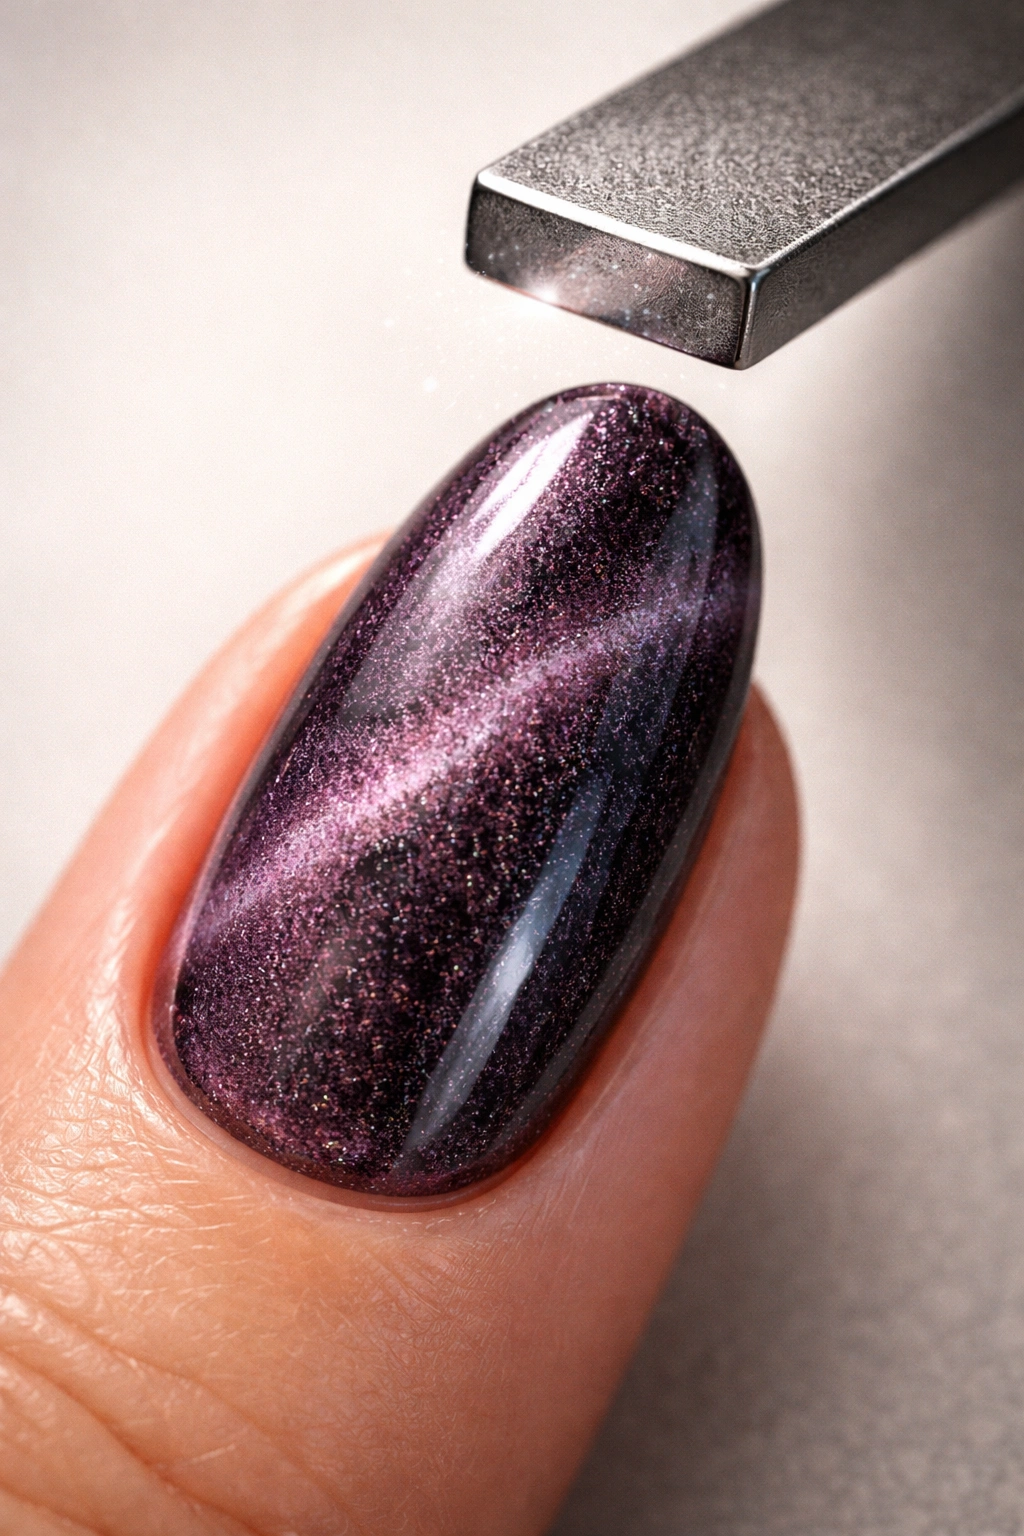
Here’s the critical timing point: immediately after applying the gel, pick up your magnet. You have a window of time before the gel begins to set where the particles are most responsive and easy to move. This window varies depending on your lamp and gel formula, but generally you have 10-30 seconds of workable time. Don’t cure yet—the magnet won’t work on cured gel, and if you wait too long, the particles start settling back down.
Mastering the Magnet Technique
The magnet is your creative tool, and understanding how it works transforms the entire process from intimidating to genuinely fun. Most magnets have two different ends with different shapes and strengths. The flat rectangular side typically creates linear, directional effects, while the rounded circular end creates rounder, softer patterns. Some magnets have even more specialized shapes for creating French tips, S-curves, or other designs.
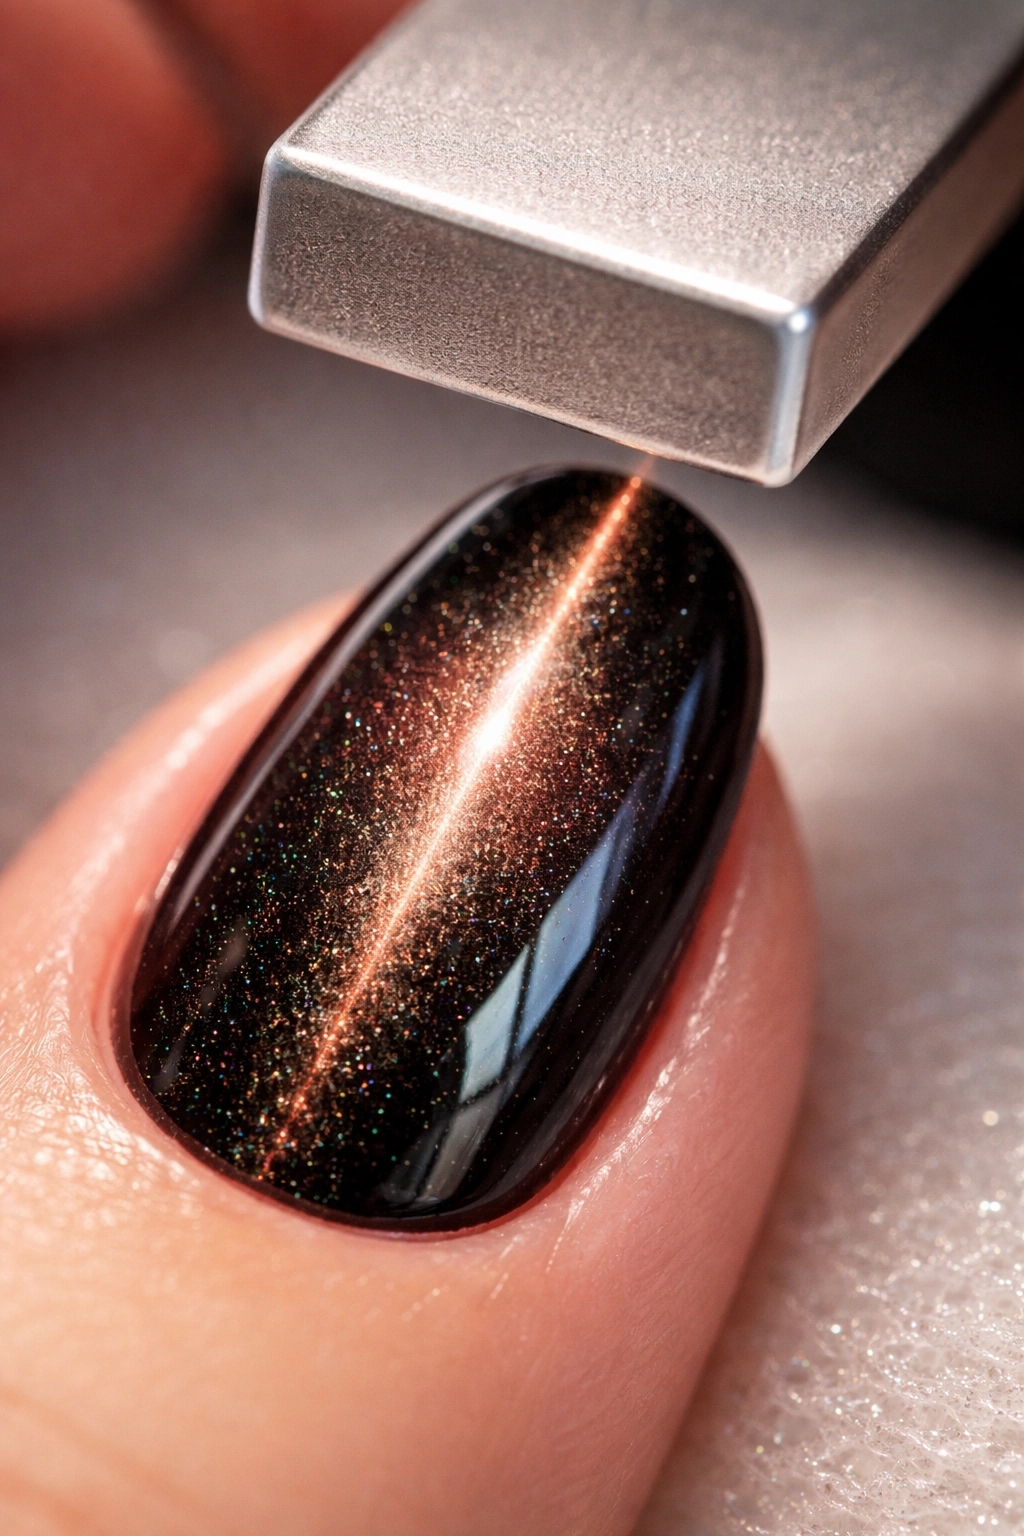
When you first apply the magnetic gel, the particles are distributed throughout the product in a somewhat random fashion. Your first step is to activate the magnet over the entire nail surface by hovering it about 1-2mm above the wet gel and moving it slowly across the whole nail. This wakes up all the particles and draws them toward the surface. You’ll see the nail start to sparkle as the particles align. This activation step takes just a few seconds but is essential for getting a visible effect.
Once the particles are activated and you can see the shimmer, move the magnet to create your desired effect. For the classic cat eye look, hold the magnet along the center or side of the nail and keep it steady in place for 5-10 seconds. The longer you hold it in one spot, the more defined the line becomes and the more particles gather in that area. The particles will visibly shift and move as the magnet pulls them, and you’ll see a concentration of shimmer forming exactly where you’re holding the magnet.
The distance between magnet and nail matters significantly. Hold it too far away (more than 3-4mm) and the magnetic pull weakens and becomes less visible. Hold it too close (touching or nearly touching the wet gel), and you risk disturbing the layer or getting product on your magnet. The sweet spot is about 1-2mm away from the nail surface. You want the magnet close enough to exert strong pull but far enough that you’re not making direct contact with the uncured gel.
Experiment with different magnet positions to create varied effects. Move the magnet in a circular motion to create a full shimmer effect across the entire nail. Drag it from one corner to another for a diagonal stripe. Hold it at the center to create a spotlight effect. Use the edge of the magnet for a thin, defined line. The beauty of this technique is that you have complete creative freedom—the same bottle of magnetic gel can create dozens of different looks depending on how you manipulate the magnet.
One important thing to understand: magnets both attract and repel, depending on which end you use and how you position them. If you’re not seeing the effect you want, try flipping the magnet or using the opposite end. If the particles seem to be moving away from where you want them rather than toward the magnet, you might be experiencing the repelling side of the magnet—flip it around and try again.
If you make a mistake, don’t panic. This is one of the huge advantages of gel work—as long as you haven’t cured it yet, you can completely start over. Simply wipe the wet gel off the nail with a lint-free wipe and reapply fresh product. You have unlimited do-overs until you hit that lamp.
Curing Your Design Properly
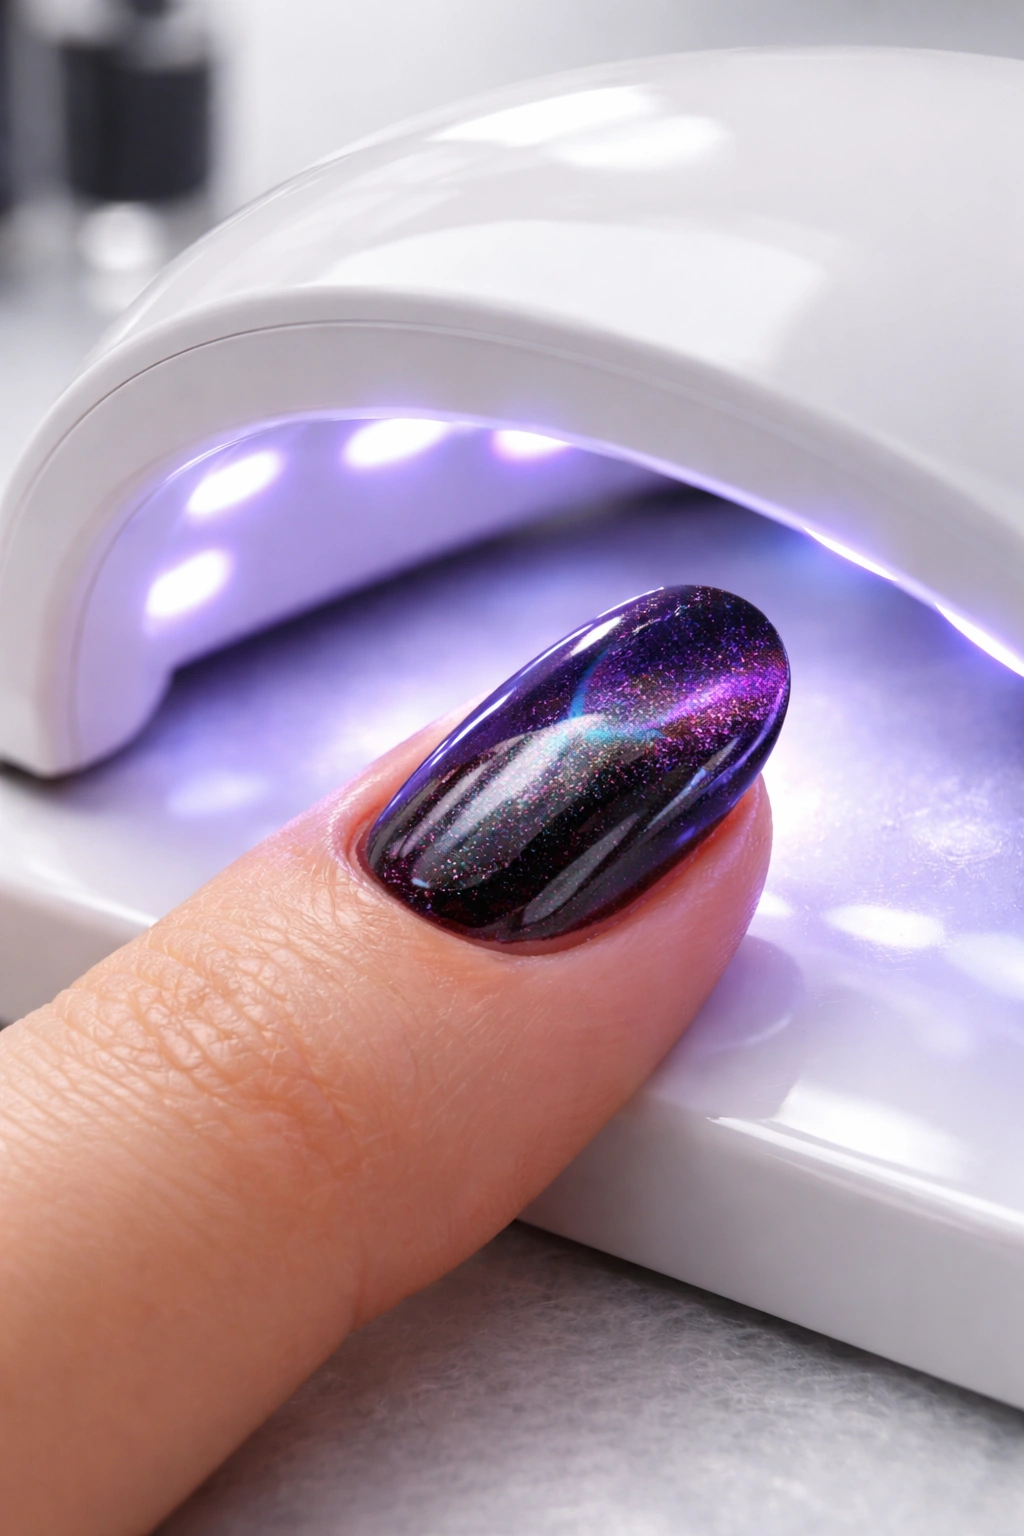
Once you’re completely happy with how the magnetic effect looks on that nail, it’s time to cure it under the lamp to lock the design in place. This is where many people make mistakes by trying to cure a full set of nails simultaneously. Cure one nail at a time, especially when working with magnetic gels. This prevents the magnet from unexpectedly activating the gel on your other nails while they’re sitting next to the one you’re curing, which would shift the designs you’ve already created.
Place one hand under the lamp with just one nail positioned in the light. Close the lamp (if it’s a tabletop model with a door) or position your finger under the light. Cure for the full time recommended—don’t cut it short even by a few seconds. LED lamps typically need 30-60 seconds, while UV lamps need 1-2 minutes. Check the instructions for your specific lamp and gel brand, as times vary.
You’ll know the gel is fully cured when it no longer feels tacky or soft to the touch. The cured surface should be hard and smooth. Once that nail is done, move to the next nail and repeat the entire process: apply fresh magnetic gel, use the magnet to create your design, then cure under the lamp.
Working through all ten nails takes patience, but rushing this step undermines everything you’ve done. Taking your time now ensures a manicure that looks professionally done and lasts for weeks.
Sealing with a Top Coat
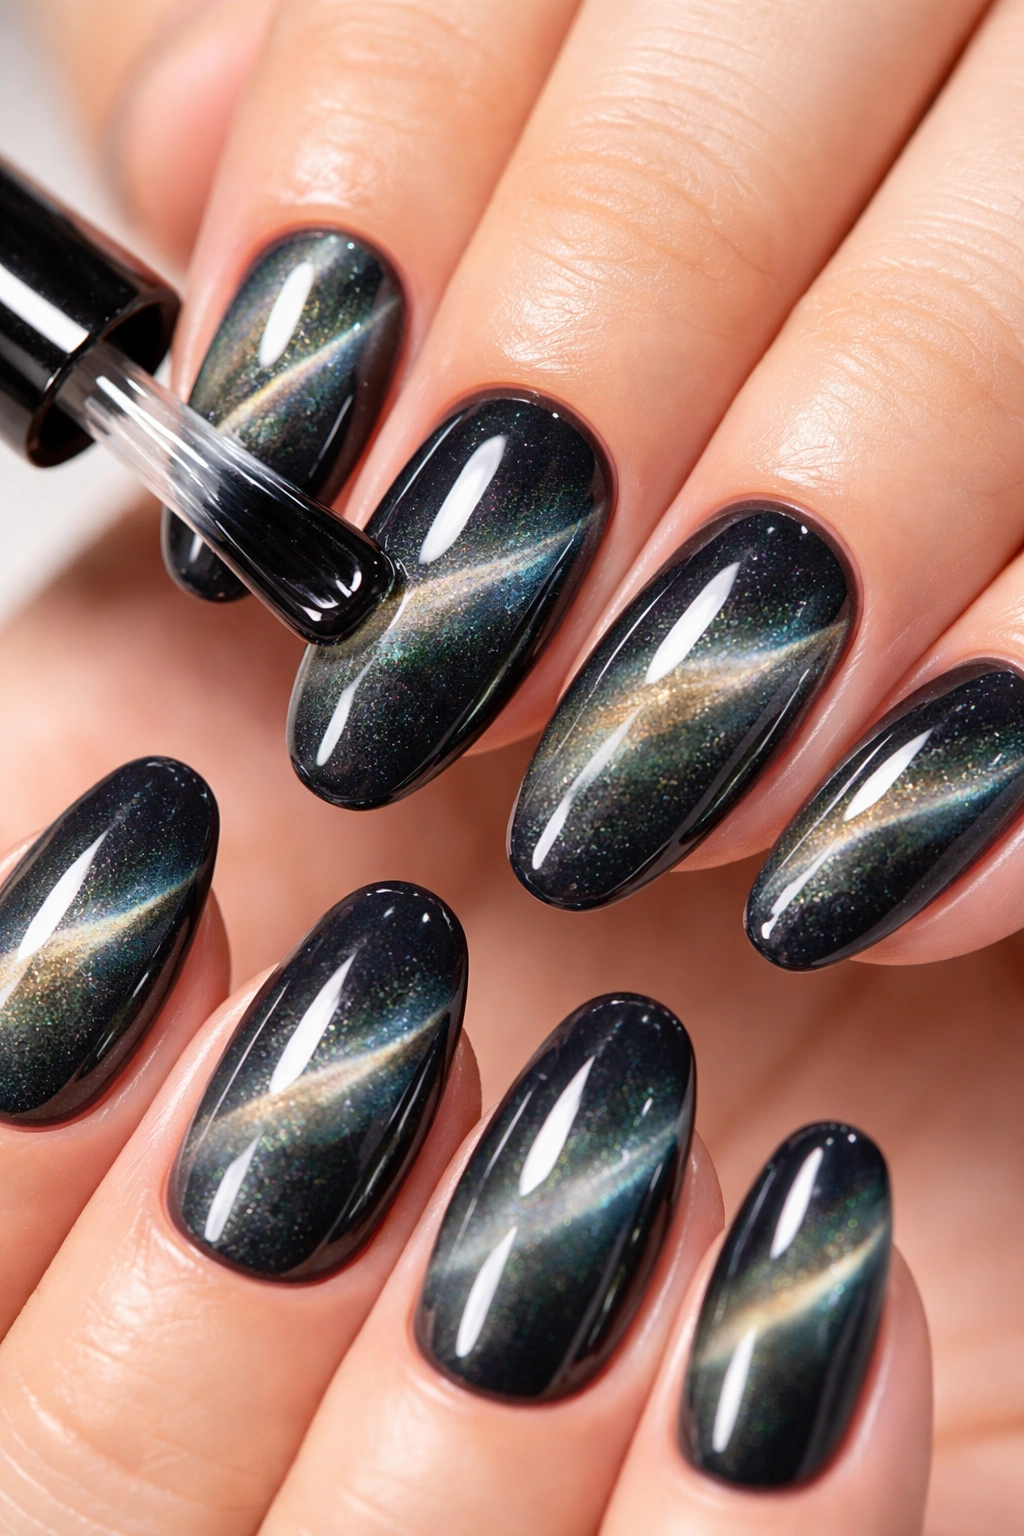
After all your nails are cured with their magnetic designs complete, it’s time to apply a top coat to seal and protect your work. The top coat serves multiple purposes: it adds a protective layer that prevents chipping and scratching, it enhances the shine and adds depth to your design, and it gives your nails a finished, polished appearance.
Apply a thin, even layer of top coat over all ten nails, working quickly so the product doesn’t start setting before you finish. Again, avoid the skin and focus on the nail plate. You don’t need to worry about the magnet at this stage—the magnet only works on the magnetic gel, not on the top coat.
Cure the top coat under the lamp for the recommended time. Most top coats cure in similar timeframes to your base and color coats—30-60 seconds for LED, 1-2 minutes for UV. Once this is cured and hardened, your manicure is technically complete.
Some nail professionals use a no-wipe top coat, which doesn’t require cleansing afterward and leaves a high-shine finish immediately. Others prefer a traditional top coat that requires removing the sticky residue layer with alcohol on a lint-free wipe—this also leaves a beautiful finish but requires one extra step. Both approaches work equally well; it’s purely a matter of personal preference and which products you’ve chosen.
Common Mistakes and How to Avoid Them
Even with a solid understanding of the process, certain mistakes trip up people repeatedly. Not fully activating the magnetic particles before shaping your design is perhaps the most common culprit. You might apply the magnet, create what you think is a line, then realize the effect is patchy or barely visible. The fix is simple: always wave the magnet over the entire nail first to activate all the particles across the full surface, then position it to create your specific effect.
Holding the magnet too far away from the nail prevents you from seeing a strong effect. If you’re not getting visible results and you’ve properly activated the gel, try moving the magnet closer—aim for that 1-2mm sweet spot. Some people find that adjusting the distance even slightly makes an enormous difference in how dramatically the effect shows.
Using too little product means you don’t have enough particles to create a visible line or pattern. If your first coat looks thin or weak, simply apply a second coat of magnetic gel (cure between coats) and use the magnet again to intensify the effect. This is actually a common technique for achieving more opacity or depth.
Touching the uncured gel with your magnet can disturb the surface and create unwanted texture. Keep that magnet hovering, not touching. Similarly, bumping your hand or moving unexpectedly while the magnet is working can mess up your design. Stay still and focused while you’re manipulating the particles.
Not curing fully leaves your design vulnerable to smudging and shifting. Undercured gel stays slightly soft and tacky, and the particles can shift if something touches your nail. Follow the exact curing times for your specific lamp and products.
Working on multiple nails before curing any of them causes the magnetic particles in neighboring uncured nails to respond to each other, creating unintended effects. Always cure one nail before moving to the next.
Variations and Design Techniques
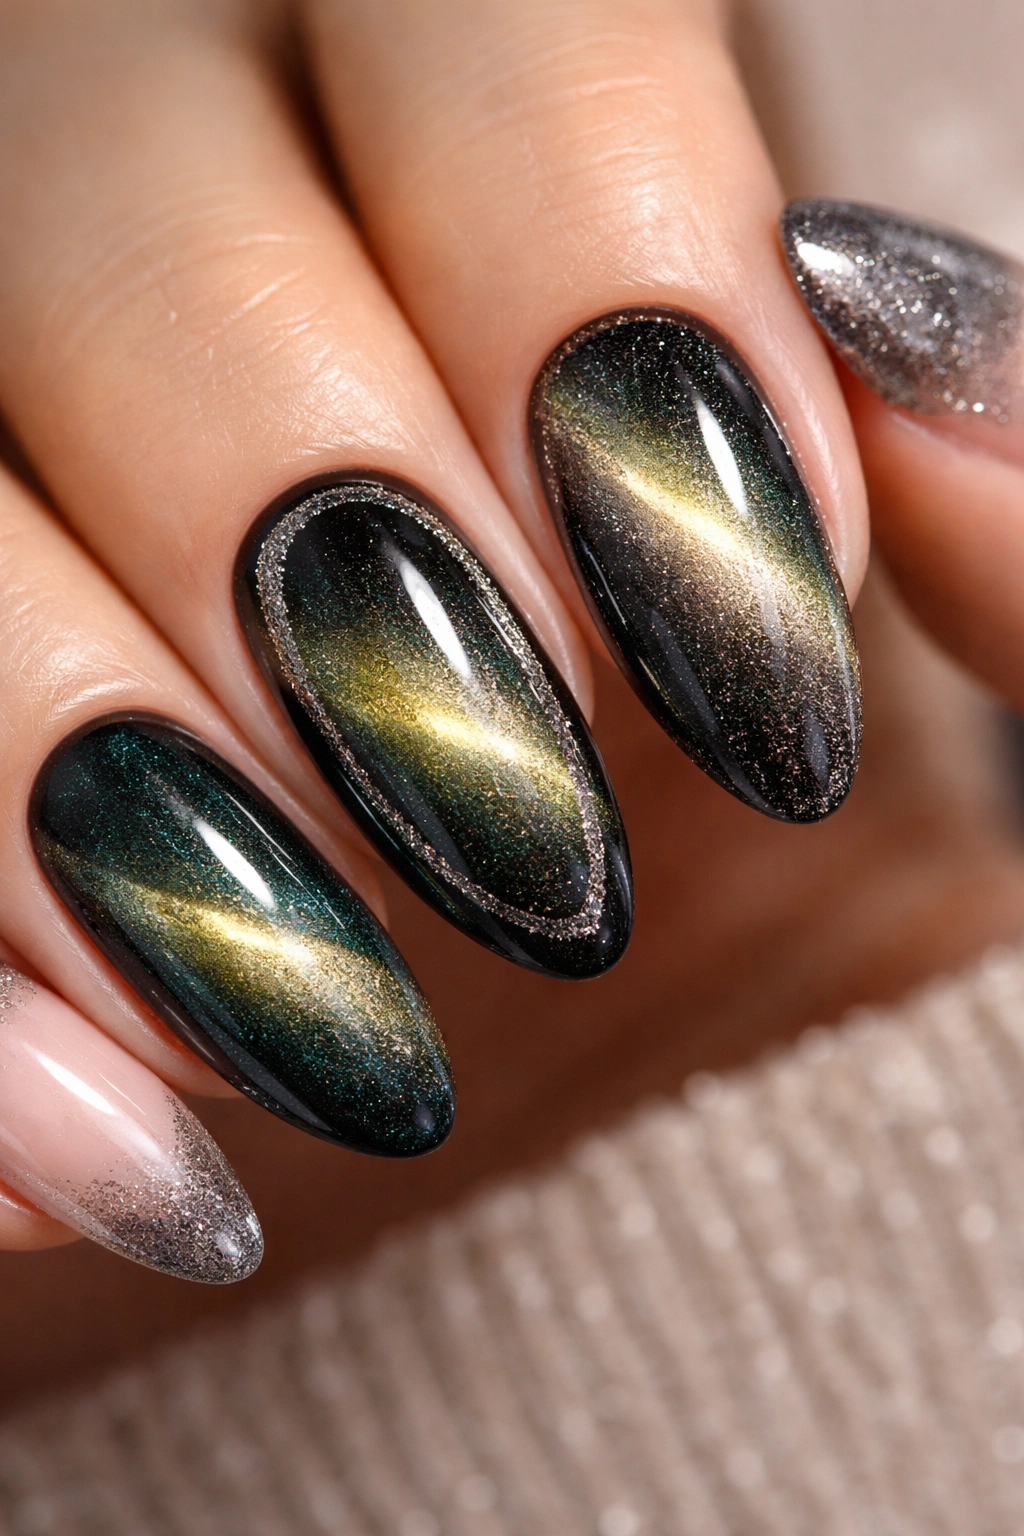
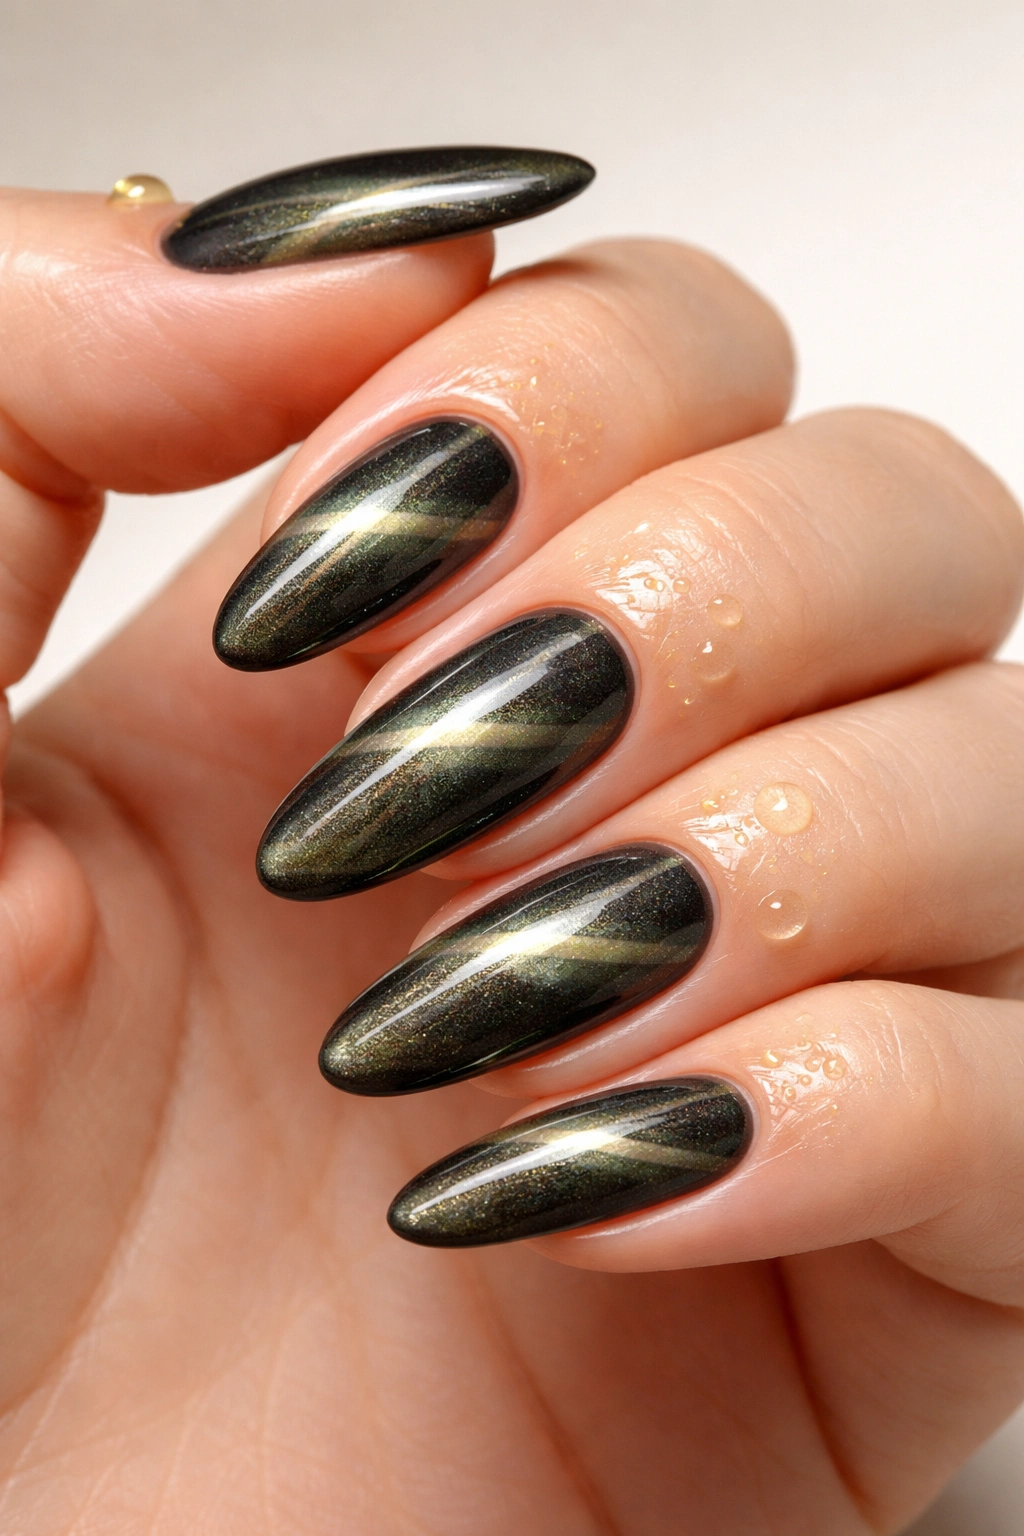
Once you’ve mastered the basic cat eye effect, you can explore endless variations. The fully activated look involves activating the magnetic particles across the entire surface of the nail, then moving your fingers back and forth to watch the effect shift and play with the light. This creates that hypnotic “now you see me, now you don’t” quality that’s so captivating.
The framed cat eye concentrates the shimmer effect in a circle or geometric frame in the center or corner of the nail, leaving the rest of the nail showing your base color. This creates a more understated, elegant effect while still capturing the light beautifully.
The French tip cat eye applies the magnetic gel only to the tip of your nail, using the magnet to create a shimmer line at the French tip area. This works particularly well with contrasting base colors.
Layering with translucent colors adds another dimension to magnetic gels. Apply your magnetic gel, cure it, then apply a thin layer of translucent gel in a different color over top. This creates a glass-like, depth-filled effect that’s genuinely stunning.
Combining magnetic gel with other nail art opens up creative possibilities. You can use magnetic gel as an accent on only two or three nails while keeping the others solid. You can layer decals or stamped designs over magnetic gel. You can even use multiple different colors of magnetic gel on the same nail for a complex, multi-colored effect.
Making Your Cat Eye Nails Last
Cat eye nails made with gel polish typically last 2-3 weeks before needing to be touched up or removed, but this timeline depends entirely on your lifestyle and nail habits. Wearing gloves during household chores protects your manicure from harsh chemicals and hot water that can cause gel to lift at the edges. This is especially important when washing dishes or cleaning bathrooms.
Avoid using your nails as tools. Don’t pry open cans, scrape off labels, or use your nails for any job that a proper tool would handle better. Every time you use your nails as a tool, you risk creating a small chip that can expand into larger damage or cause the entire manicure to lift.
Reapply top coat every few days to maintain shine and add a protective layer. You don’t need to cure it if you’re just doing this for appearance—you can use a regular, non-gel top coat for this maintenance step. Some people prefer using cuticle oil on top of their nails between applications, which keeps the design looking fresh while also nourishing the surrounding skin.
Moisturize your nails and cuticles every single day with a good quality cuticle oil. Gel manicures can dry out your nails and the skin around them, and hydration prevents cracking and splitting that can cause your manicure to fail. Apply oil at night before bed and in the morning after showering.
If you notice lifting starting at the edges, gently push the lifted gel back down (don’t pry at it aggressively), then seal that edge with a bit of top coat and cure it. This can extend the life of your manicure by several days if you catch it early.
When it’s time to remove your cat eye nails, soak your fingers in a bowl of acetone for 10-15 minutes until the gel softens, then gently scrape it away. Never force gel off your nails—this damages the underlying nail plate and makes it weak and prone to peeling and breaking for weeks afterward.
Color Selection and Base Combinations
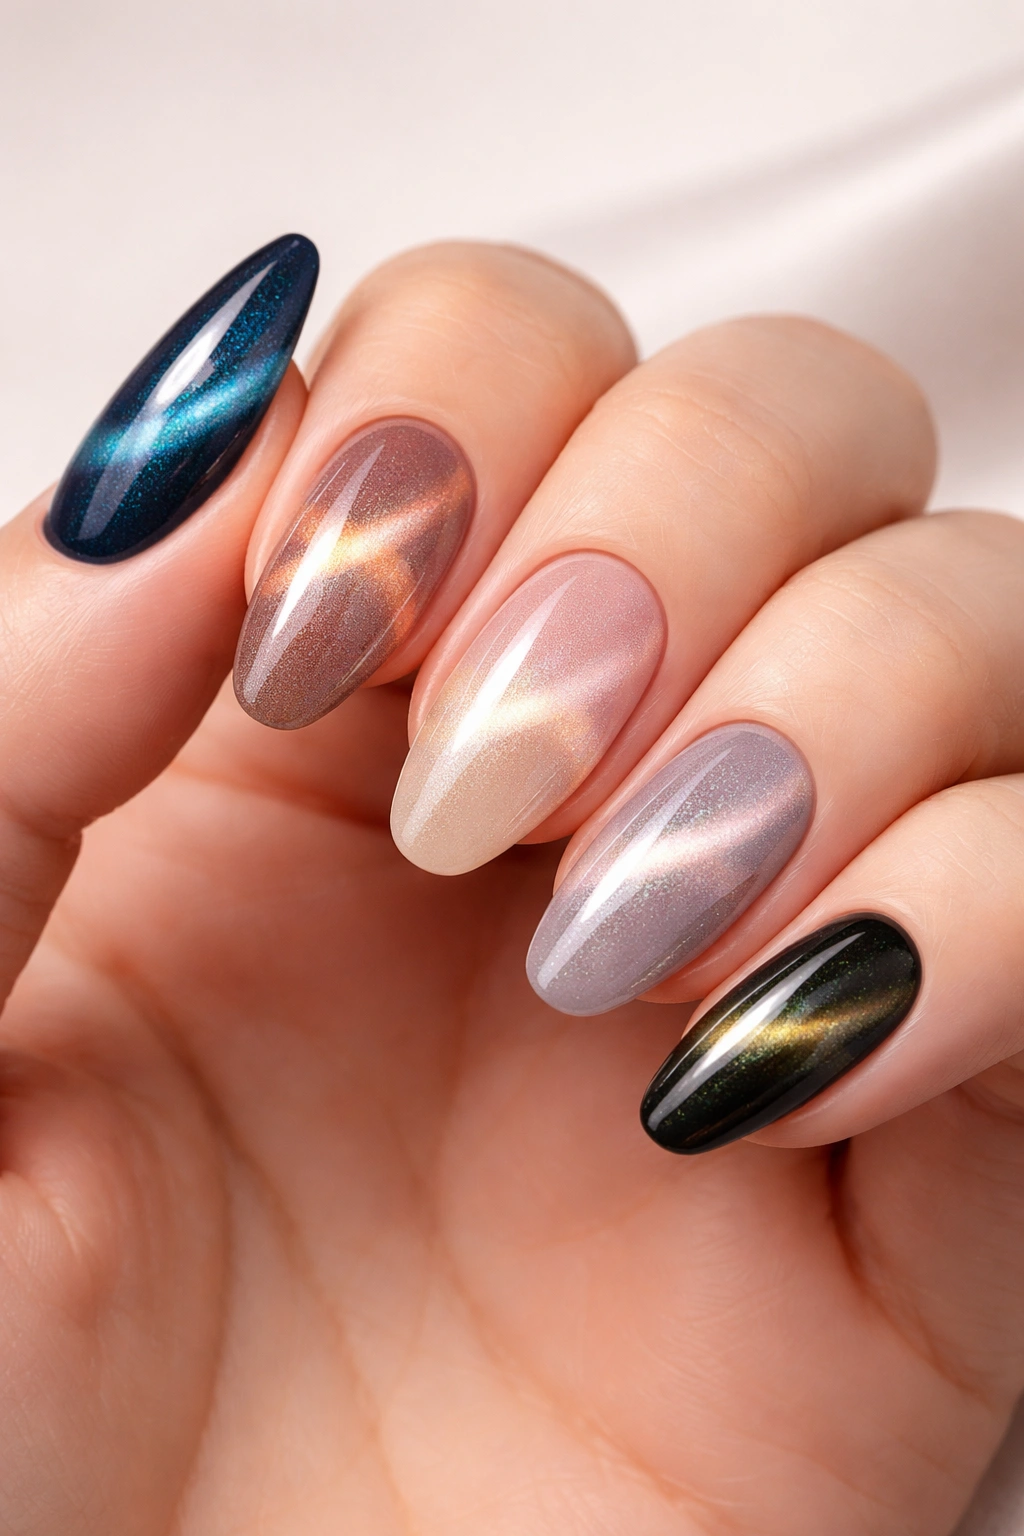
The base color you choose under your magnetic gel dramatically affects how the cat eye effect appears. Dark base colors like black, navy, deep purple, or forest green make the shimmer effect more dramatic and visible. The contrast between the dark base and the lighter metallic particles creates maximum impact. These are ideal if you want a bold, statement-making manicure.
Light and neutral base colors like soft pinks, nudes, pale yellows, or whites create a more subtle, sophisticated effect. The shimmer is still present and beautiful, but it’s understated and elegant. This approach works wonderfully for professional settings or if you prefer a less dramatic look.
Translucent or jelly base colors are increasingly popular and offer a unique aesthetic. Apply a translucent gel first, then apply your magnetic gel over it. The see-through quality of the base creates a glass-like, dimensional effect that’s genuinely captivating. These work especially well with silver or holographic magnetic gels.
Using no base color at all—applying the magnetic gel directly over your prepped natural nails—creates a sheer, delicate effect. The natural pink of your nail plate shows through the translucent magnetic gel, creating a soft, barely-there shimmer. This is perfect if you love the effect but prefer a minimal aesthetic.
You can even layer different colored magnetic gels on top of each other (curing between layers) to create multi-dimensional, multi-colored effects. The possibilities are genuinely limitless—the only constraint is your imagination.
Frequently Asked Questions About Cat Eye Nails
Can you do cat eye nails with regular nail polish instead of gel? No, regular nail polish doesn’t contain the magnetic particles necessary to create the cat eye effect. Cat eye nails specifically require magnetic gel polish. There are some traditional polishes that have a similar shimmer or iridescent quality, but they don’t create the actual magnetic effect you get with proper cat eye gel.
Do you need a special lamp to cure cat eye nails? No, any standard LED or UV nail lamp works perfectly fine for curing cat eye gels. You don’t need anything specialized—just a lamp that works with gel polish in general. Most professional nail lamps are 48 watts and work great.
Can you use any magnet for cat eye nails? Technically yes, but practically no. While a regular fridge magnet might create a small effect, it won’t be strong or reliable enough to give you consistent results. Professional cat eye magnets are engineered with the correct strength and shape to work optimally with magnetic gel polish. Most magnetic gels come with a magnet, so you’re covered.
How long does it take to do cat eye nails at home? Plan on 45 minutes to an hour for your first attempt, including nail prep. As you get more experienced, you can cut this down to 30-40 minutes. The process itself isn’t complicated, but attention to detail and working carefully on each step takes time.
Can you apply cat eye gel over an existing gel manicure? Yes, absolutely. If you already have gel polish on your nails, you can apply cat eye gel directly over it (assuming the underlying gel is in good condition). You don’t need to remove everything and start from scratch.
How many coats of magnetic gel do you need? One coat is typically sufficient to see a visible effect, especially if you use a generous amount of product. For a more intense, opaque, or deeply colored effect, you can apply a second coat (cure between coats). Most people find one coat gives them exactly the look they want.
Can you mix cat eye gel with other gel polishes to create custom colors? This is generally not recommended because mixing products can affect how the magnetic particles respond and might cause curing issues. Stick with the formulas as the manufacturers intended them.
Is cat eye nail polish safe? Yes, magnetic gel polish is safe when used as directed. It’s non-toxic and no different in safety profile than any other gel polish. Simply follow the standard precautions: don’t let the uncured gel contact your skin, cure for the full recommended time, and use proper removal techniques when it’s time to take it off.
What should you do if the magnet effect doesn’t show up? First, make sure you’re using actual magnetic gel polish and not a regular gel. Second, roll the bottle thoroughly to redistribute the particles. Third, ensure you’re working quickly while the gel is still wet. Finally, try holding the magnet closer to the nail. If you’ve done all these things and still see no effect, your gel might be old or stored improperly (magnetic gels should be kept in a cool, dark place), or you might need a stronger magnet.
Final Thoughts
Cat eye nails transform an ordinary manicure into something genuinely special—a design that catches light, changes with movement, and generates compliments. What’s remarkable is how achievable this look is once you understand the basic principles and have the right supplies. You’re not relying on complicated brush skills or artistic ability; you’re using physics and magnetism to create an effect that looks far more complex than it actually is.
The first time you hover a magnet over magnetic gel and watch the particles shift into place, it’s genuinely magical. That moment makes the learning curve worth it. The subsequent times, as you refine your technique and develop your preferred designs, it becomes genuinely fun—a form of creative expression that’s accessible to anyone. Start with the classic cat eye effect, master the basic technique, then branch out into variations and custom designs that reflect your personal style.
Remember that every manicure you do teaches you something. Your first attempt might not be perfect, and that’s completely fine. The particles might not move exactly as you expected, or your design might be less refined than you hoped. But unlike complicated nail art that requires steady brushwork and artistic skill, magnetic gel technique improves rapidly with just a little practice. By your third or fourth attempt, you’ll be creating effects that look genuinely professional.
The investment in quality magnetic gel polish and a good magnet pays dividends because you’ll be creating salon-quality manicures at home whenever you want. Whether you’re maintaining a cat eye manicure every few weeks for yourself or creating them for friends and family, this skill becomes a reliable go-to technique in your beauty arsenal. Start today, be patient with the learning process, and prepare to fall in love with this stunning nail art effect.
