

Want Instagram-worthy nails without the salon price tag? Marble nails deliver that high-end look through surprisingly straightforward methods you can master at home. Whether you’re completely new to nail art or looking to expand your DIY manicure skills, there’s a marble technique that’ll work for your comfort level and available supplies. The best part? You don’t need any special artistic talent—just a little patience and the willingness to embrace some beautiful “happy accidents” along the way.
What Are Marble Nails and Why They’re So Popular
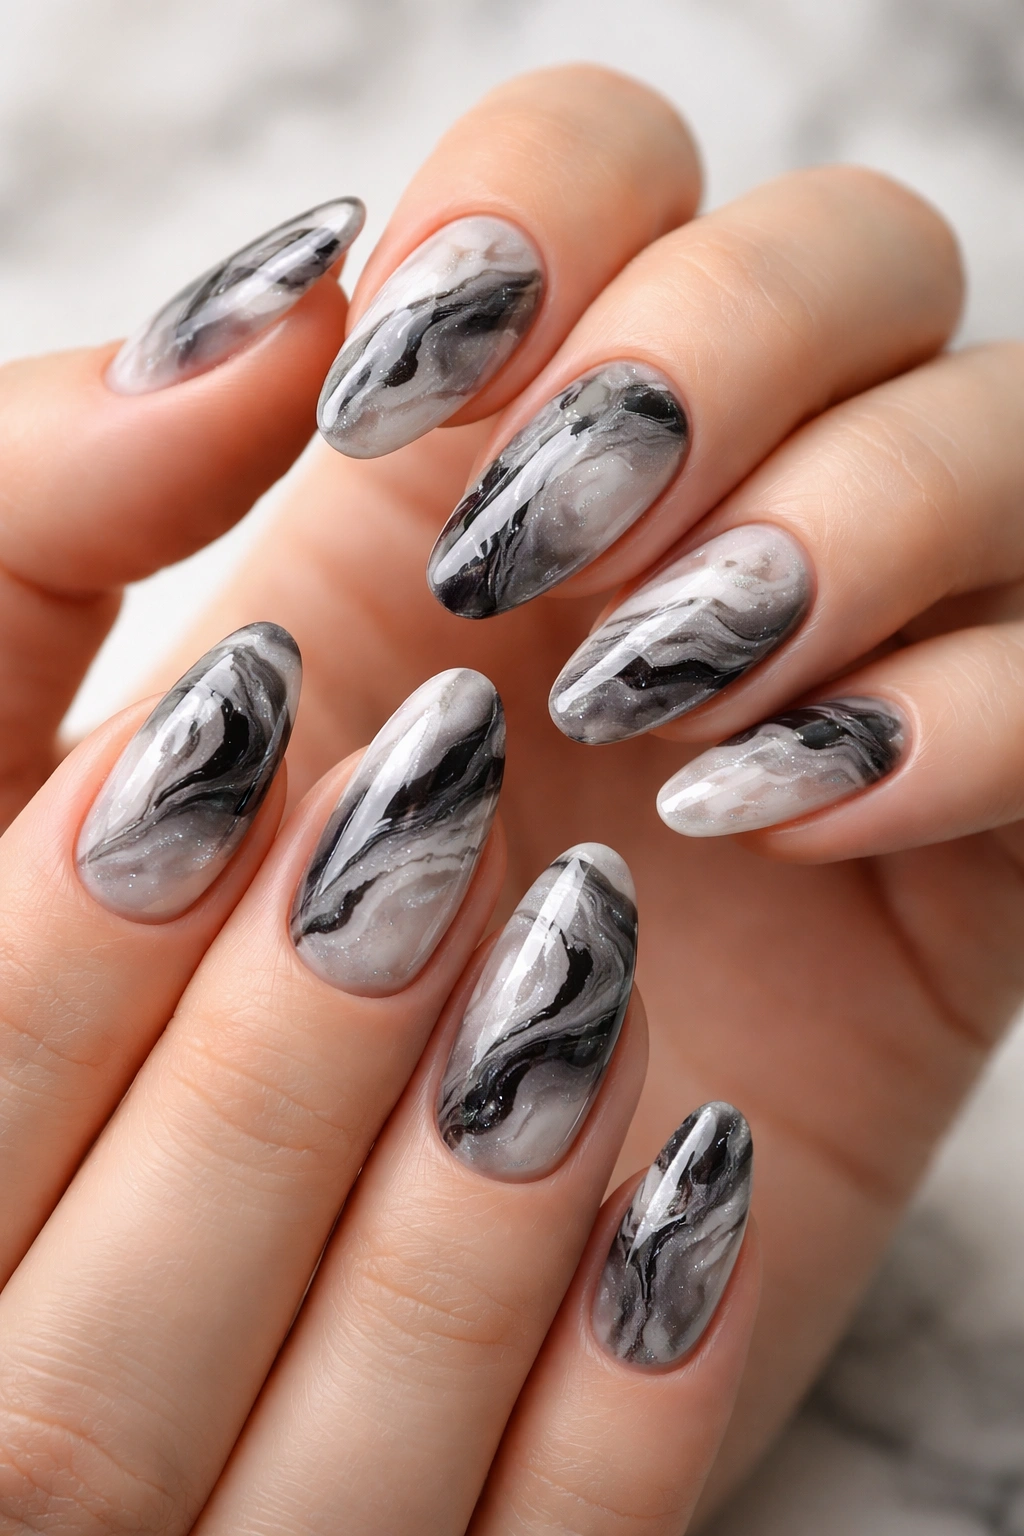
Marble nails perfectly mimic the natural stone that inspired them, featuring swirling patterns of color that blend together in unique ways every single time. No two manicures look exactly identical, which is part of their appeal—your nails become a one-of-a-kind creation that reflects your personal style. This nail art technique combines a blend of different colors to create the captivating appearance of marble, complete with the smoky, sophisticated effect characteristic of the natural stone itself.
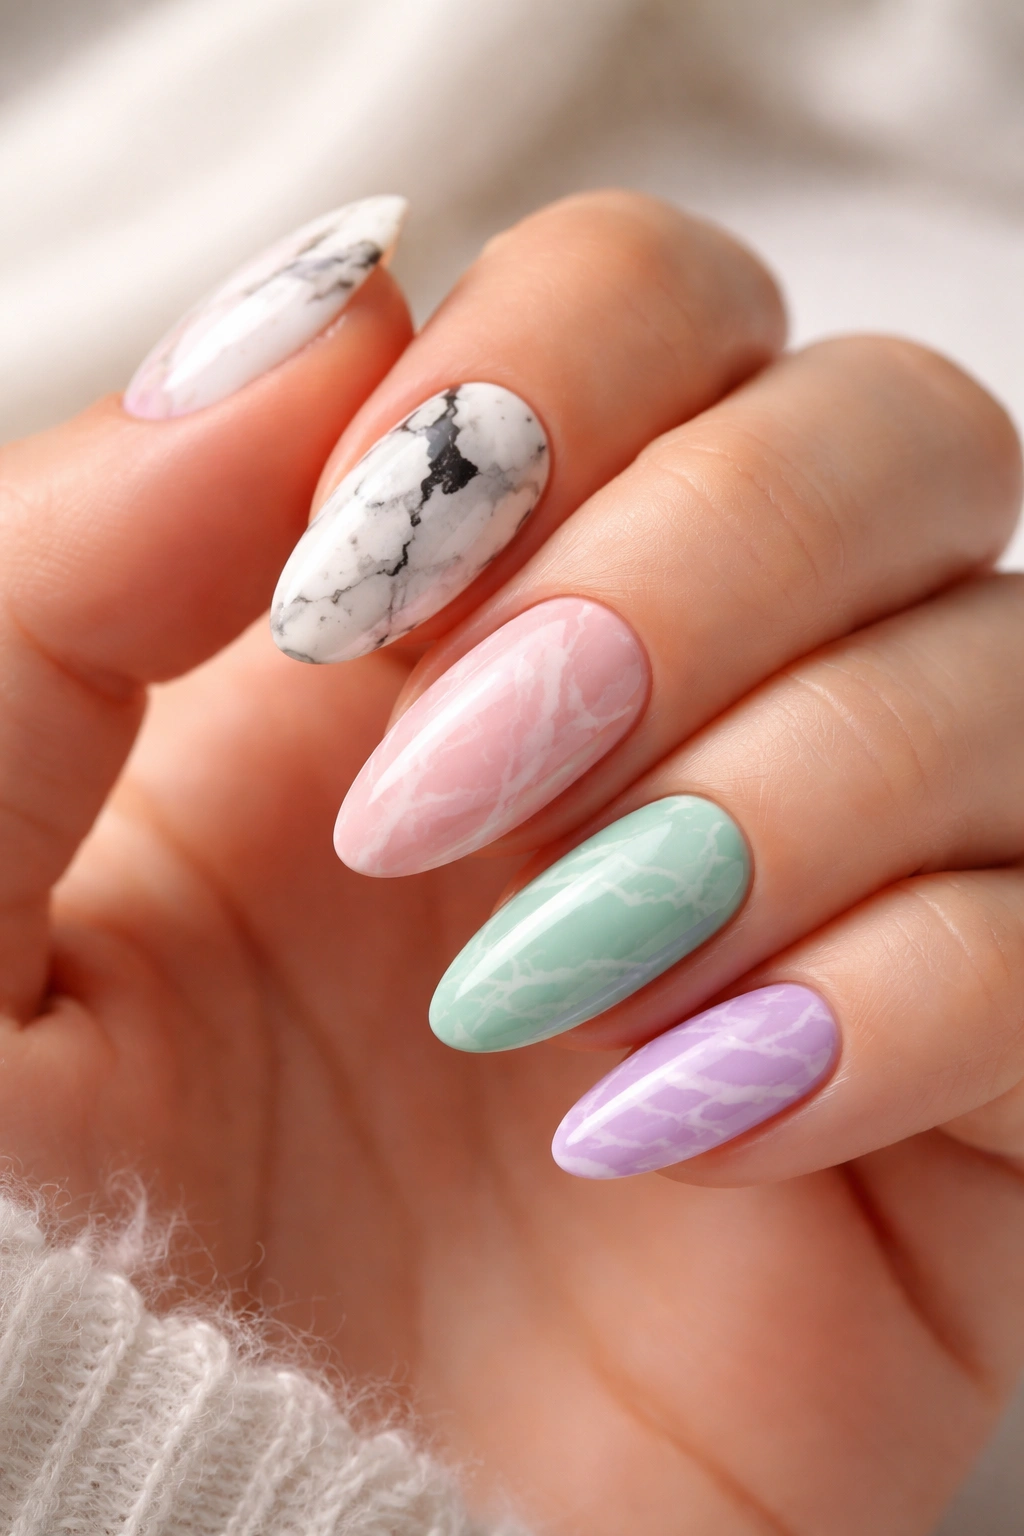
What makes marble nails particularly appealing is their versatility. You can execute them in classic black and white for an elegant, timeless look, soft pastels for a delicate aesthetic, vibrant jewel tones for bold drama, or practically any color combination your heart desires. They work beautifully on any nail length or shape—whether you’re rocking short, practical nails or long, dramatic ones. This design is exceptionally versatile, allowing you to tailor its boldness or subtlety according to your preference and the occasion you’re dressing your nails for.
Choosing Your Colors and Design Style
The color combination you select makes an enormous difference in the final appearance of your marble nails. Light base colors enhance the marble effect dramatically—white, pale pink, soft gray, or light blue all make your design patterns pop and appear more pronounced. The contrast between your base and the accent colors creates that striking, luxurious marble aesthetic.
Consider these popular combinations: classic white with black and gray for timeless elegance, soft pink with white and nude for a romantic feel, deep purple with green accents for unexpected sophistication, or minty green with white for a fresh, contemporary vibe. Neon shades mixed with bright colors create eye-catching, playful designs perfect for festival season or when you want your nails to make a statement.
The number of colors you use matters too. Starting with three colors—one light, one medium, and one dark—gives you plenty of opportunity to create visual depth without becoming chaotic. Once you’ve mastered the basic technique, feel free to experiment with four or five colors for even more intricate patterns.
Essential Supplies and Tools You’ll Need
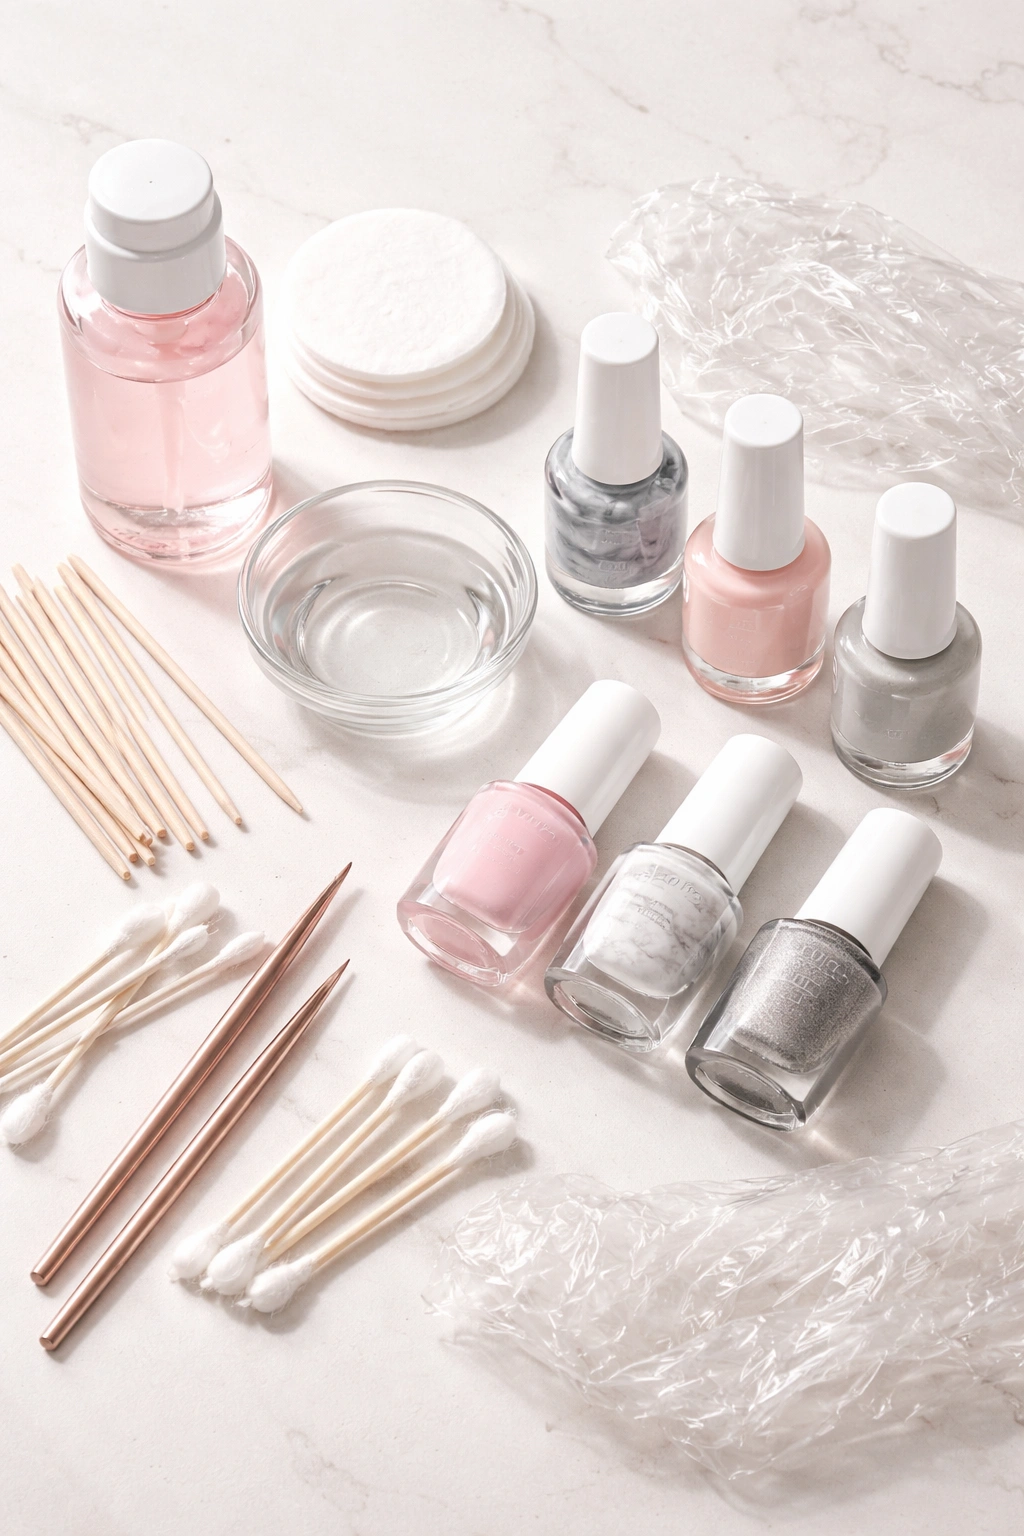
Before you dive into creating marble nails, gather everything you need so you can work efficiently without interruptions. Having all your supplies prepped and ready makes the actual marbling process significantly less stressful.
For the Water Marble Method: Nail polish in your chosen colors (minimum 3-4 shades), a base coat, a top coat, a small bowl or cup, room-temperature water, a toothpick or dotting tool, nail polish remover, and cotton swabs for cleanup. You’ll also want acetone or dedicated nail polish remover on hand since this method does get messy.
For the Plastic Wrap Method: Nail polish in your base color and 2-3 accent colors, a base coat, a top coat, plastic wrap (the kind you have in your kitchen), a nail file, cuticle pusher, and nail polish remover for cleanup.
General supplies for any marble technique: A nail file for shaping, a buffer for smoothing the nail surface, a cuticle pusher for pushing back cuticles, cuticle oil for nourishment, liquid latex or petroleum jelly to protect skin around nails from excess polish, and clean-up brushes (an old eyeshadow brush works perfectly). Consider having nail polish thinner on hand too—if any of your polishes have thickened over time, a few drops of thinner will restore them to the right consistency for marbling.
How to Prep Your Nails for Success
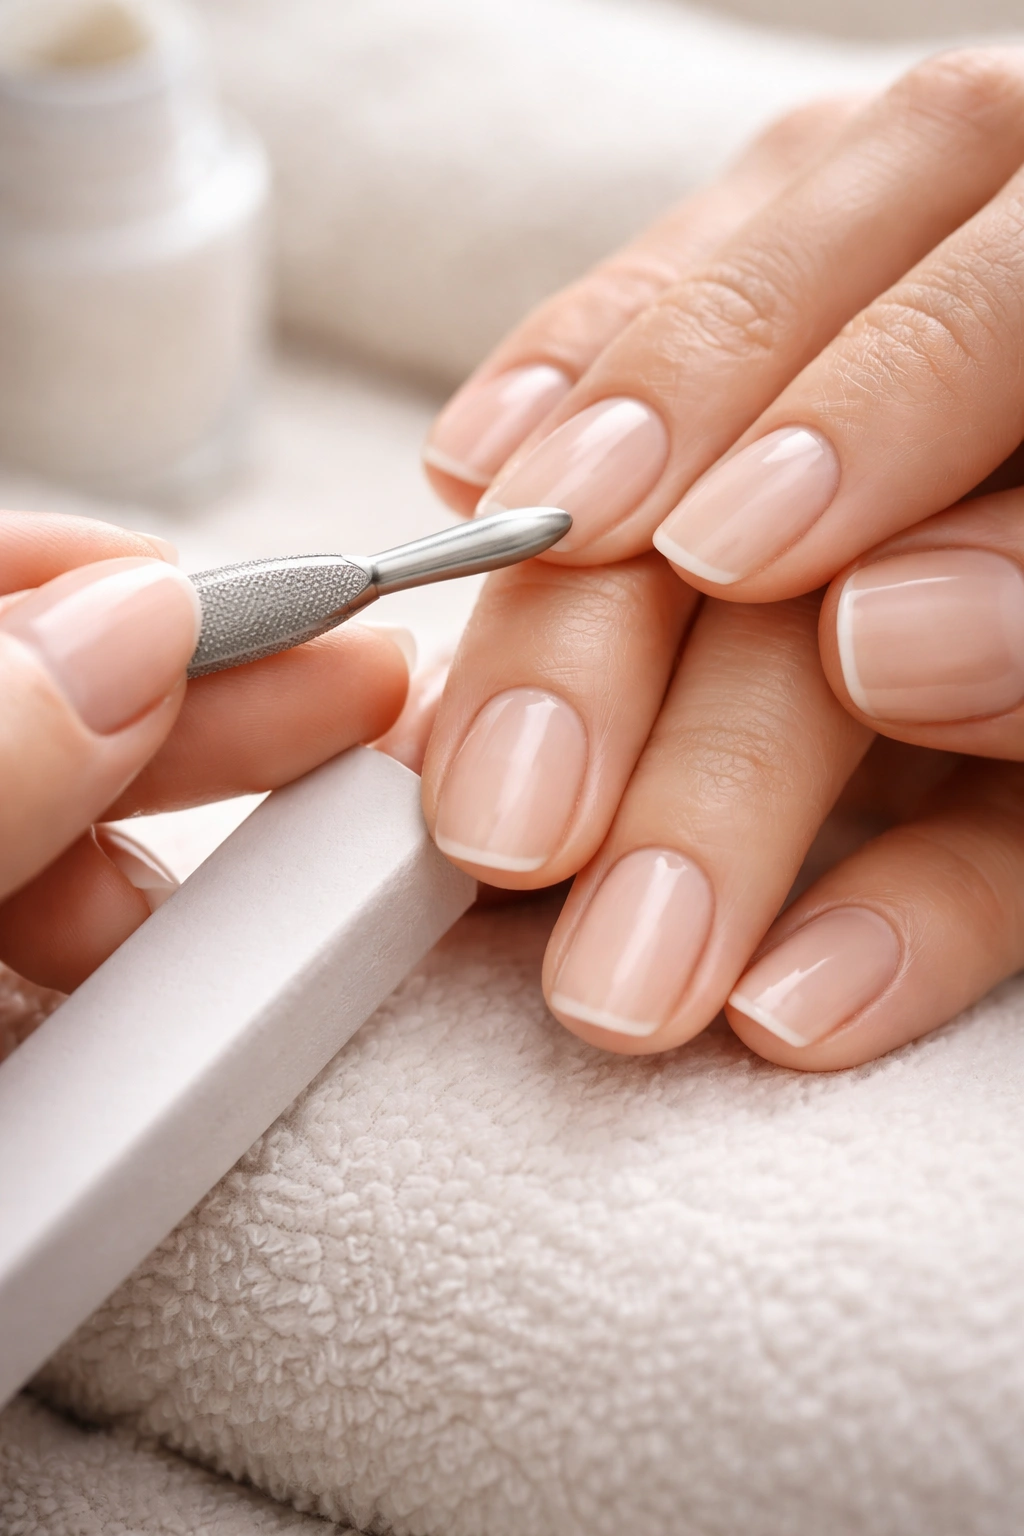
Proper nail preparation is absolutely crucial for a successful marble manicure. Nails that are clean, filed, and shaped consistently will allow your polish to adhere smoothly and evenly, giving you the best possible canvas for your marble design.
Start by removing any existing nail polish completely. Use a reliable nail polish remover and allow it to sit for a moment so the polish softens before you wipe it away. Wash your hands thoroughly with soap and warm water to eliminate oils, dirt, and any product residue that might interfere with polish adhesion. Pat your hands completely dry—any moisture on your nails will cause polish to bubble or peel.
Next, gently push back your cuticles using a cuticle pusher. Push slowly and carefully, never forcing or trying to remove cuticles completely. This reveals more of your nail plate and creates a smooth foundation for polish application. If your cuticles need extra care, apply cuticle oil or cream first and let it soften them for a minute.
File your nails to your desired shape—square nails give a modern, sleek appearance, while oval or round shapes feel softer and more elegant. File in one direction rather than sawing back and forth, which can cause splitting and breakage. Once you’ve achieved your desired shape, buff the surface of your nails very lightly with a buffer. This creates a slightly textured surface that helps polish stick better and prevents it from peeling early.
Apply a thin, even base coat to all nails and let it dry completely. This protective layer not only prevents staining but also helps your marble design last longer.
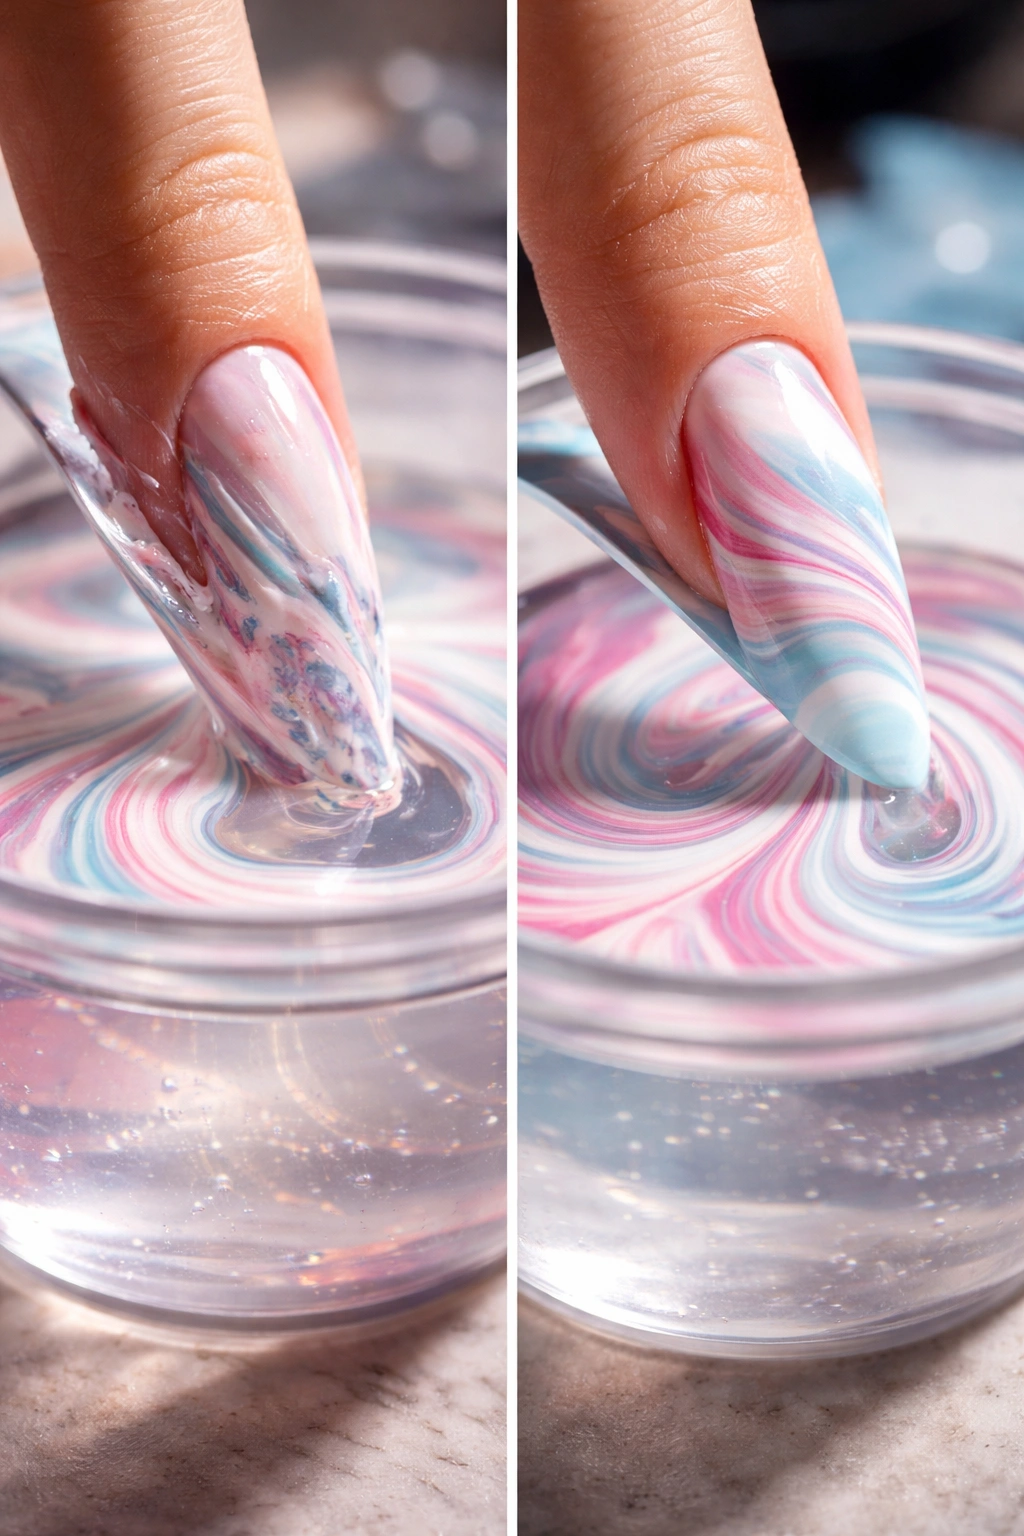
1. Water Marble Nails Technique
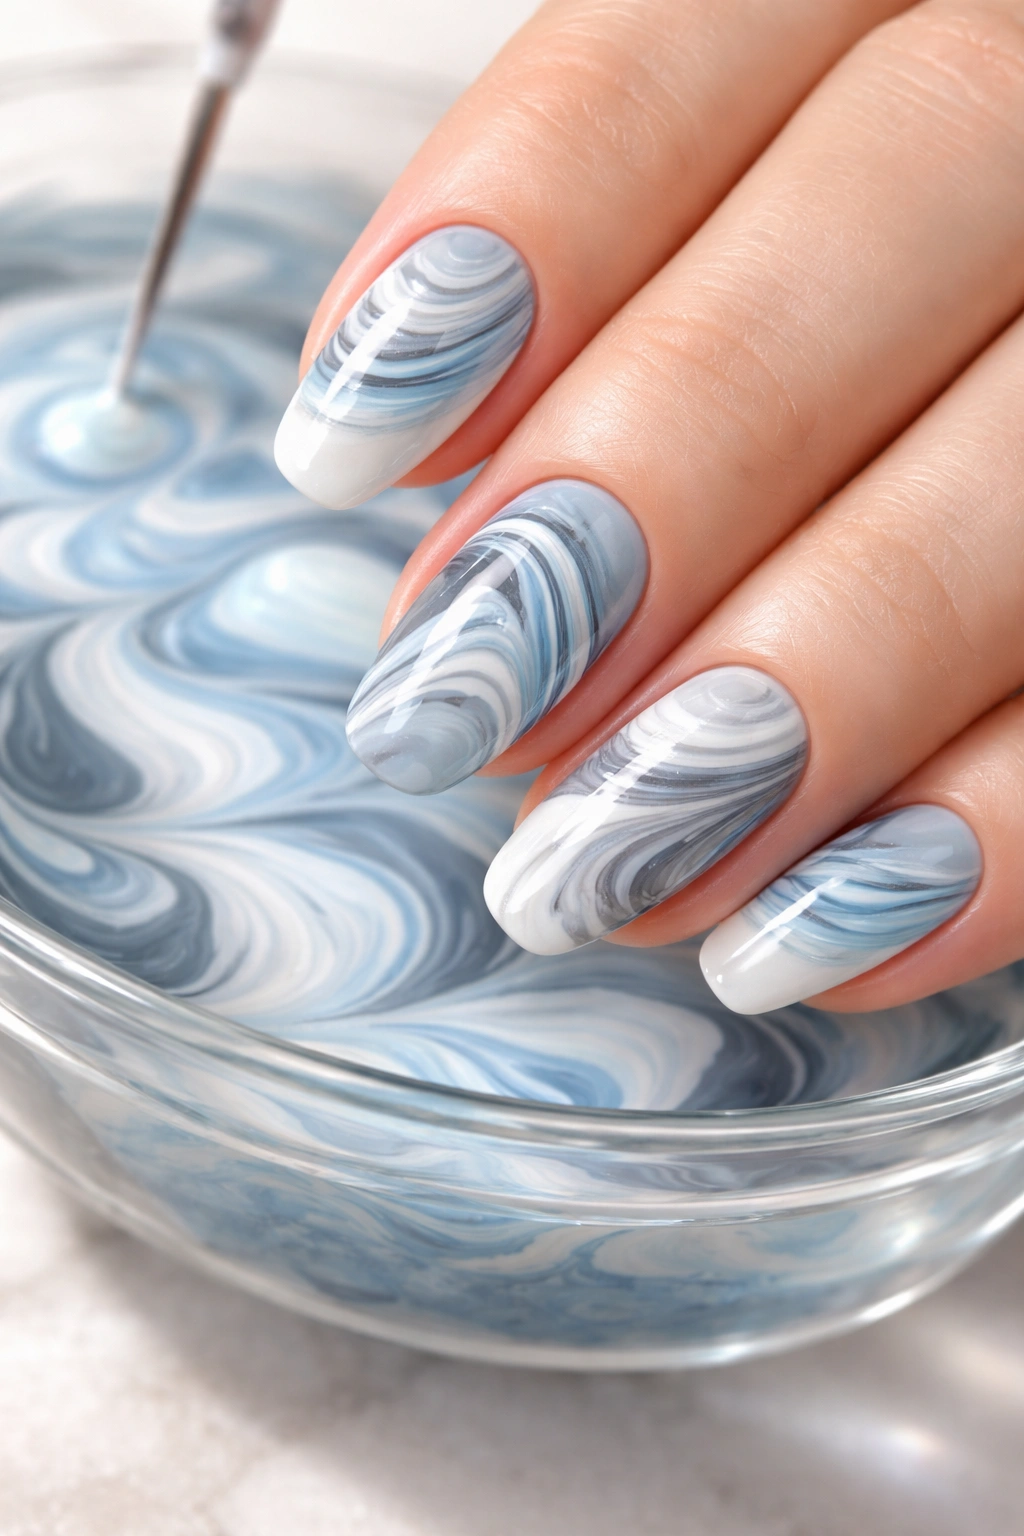
The water marble method is the traditional approach that originally sparked the marble nails trend. Yes, it’s messier than some alternatives, but the results are absolutely stunning, and once you understand the process, it becomes much more manageable.
Prepare your base coat and color. Apply one or two coats of your chosen base color—white is the most popular choice because it makes the marble patterns incredibly vivid and easy to see. Light colors generally work best for this technique. Allow your base to dry completely before moving forward.
Fill your bowl with room-temperature water. This step is genuinely important—use water that’s warm to the touch but not hot, and definitely not cold. Cold water causes nail polish to dry too quickly on the surface, preventing the colors from spreading properly and ruining the swirl effect. If possible, use distilled or filtered water, as it tends to help the polish spread more smoothly than tap water.
Drop your nail polish colors onto the water one by one. Hold the brush of your first nail polish color just barely above the water surface and let a drop fall. The polish should spread outward in a circle. Immediately drop your second color into the very center of the first circle—it should create concentric rings of color. Continue with your remaining colors, alternating where you drop them to build up layers of color that will create dimension in your final design.
Use a toothpick to swirl and create the marble pattern. This is where the magic happens. Take a clean toothpick and gently drag it through the nail polish rings, starting from the center and moving outward, or vice versa. Create a pattern that appeals to you—some people prefer straight lines, others create waves, spirals, or feathered patterns. The beautiful thing about this technique is that every swirl is unique. Don’t overthink it; let your hand move naturally. Just remember that you need to work fairly quickly because the polish will start to dry on the water’s surface.
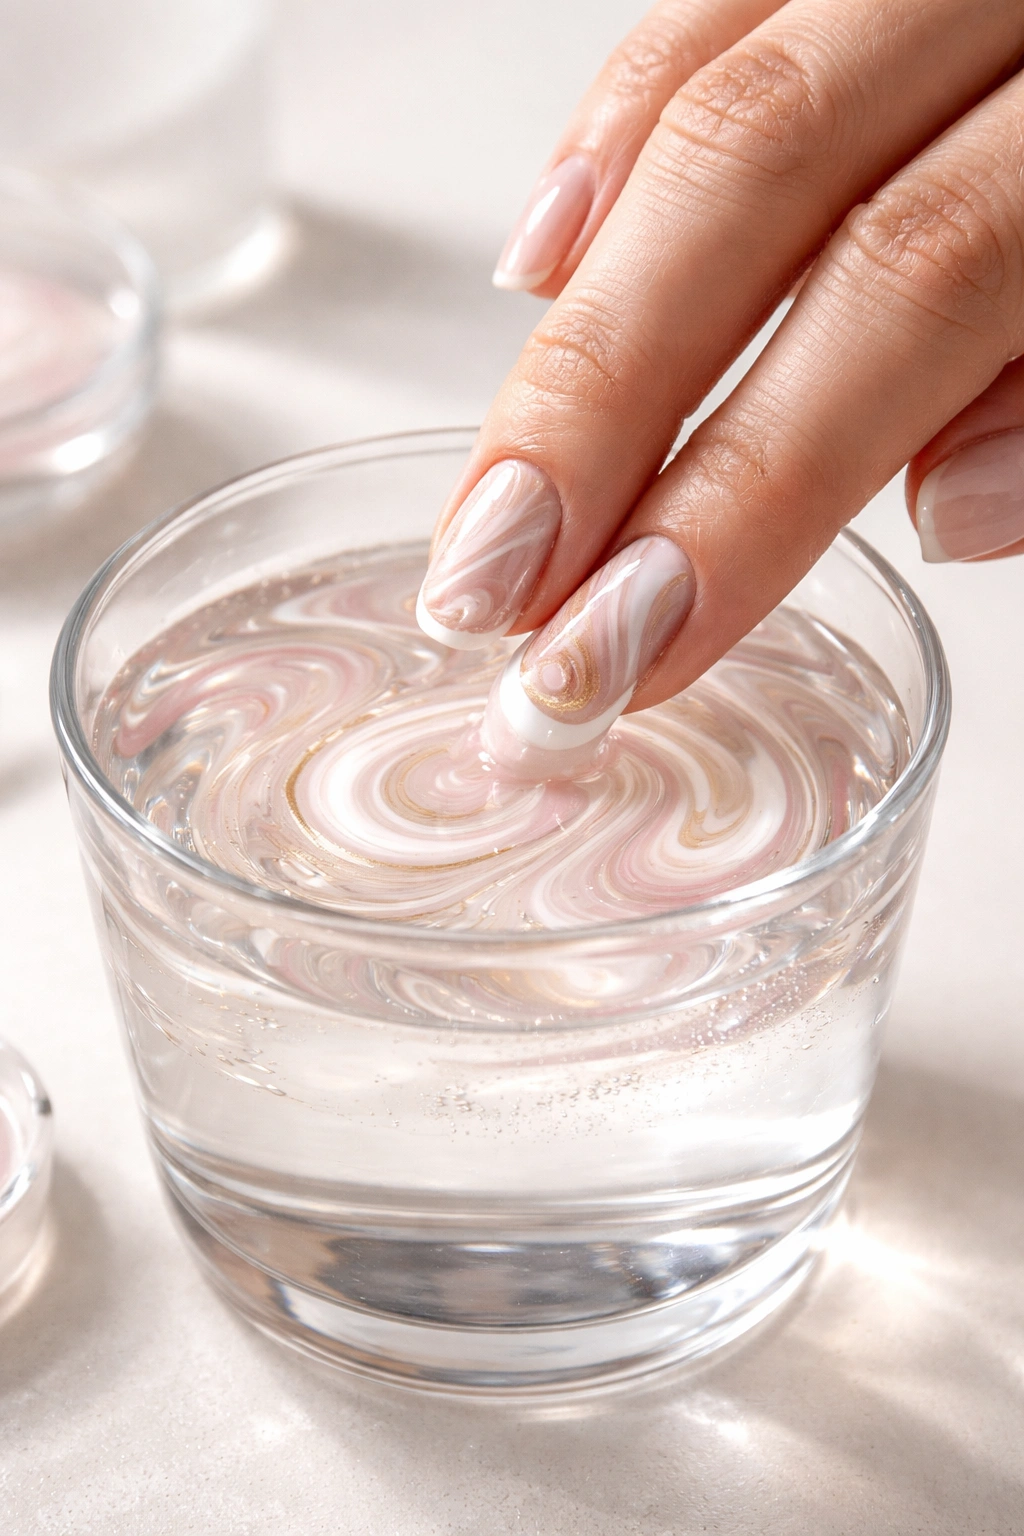
Dip your nail into the design using the right technique. Position your finger above the swirled pattern at a slight angle (about 45 degrees). In one smooth motion, dip your nail straight down into the water, submerging it completely to cover the entire nail. Keep your finger in the water for just a second or two—you want the polish to transfer to your nail without picking up too much excess water.
Remove excess polish from the water surface before lifting your finger. While your nail is still submerged, use a clean toothpick to swipe away the excess polish floating on the water’s surface around your submerged finger. This prevents the excess from sticking to your skin as you lift your finger out. Gently raise your finger straight up and out of the water, keeping it level so the design doesn’t slide off.
Clean up the edges immediately. Your finger will likely have polish on the surrounding skin, and that’s completely normal. Dip a small brush or cotton swab into nail polish remover and carefully trace around the nail, removing the excess polish from your skin and cuticles. Be gentle so you don’t disturb the marble design on your nail itself.
Repeat for each nail. Continue this process for all ten nails. Yes, you’ll use up some of your nail polish colors, but you can always refresh the design by swirling again or adding more drops of color to the water.
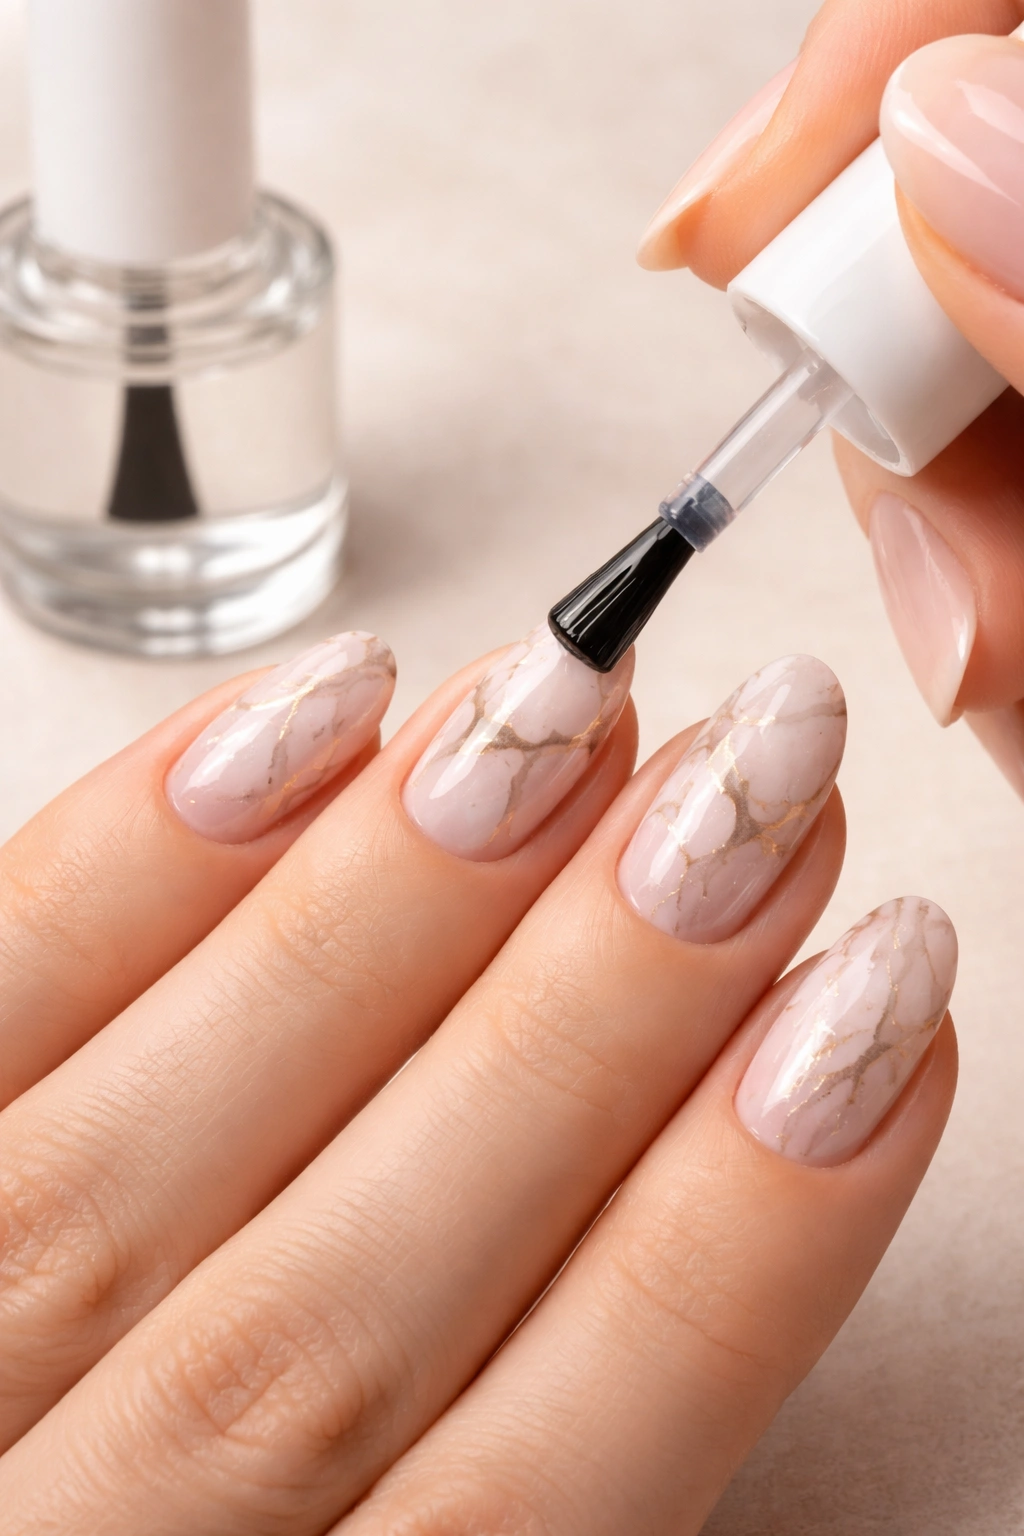
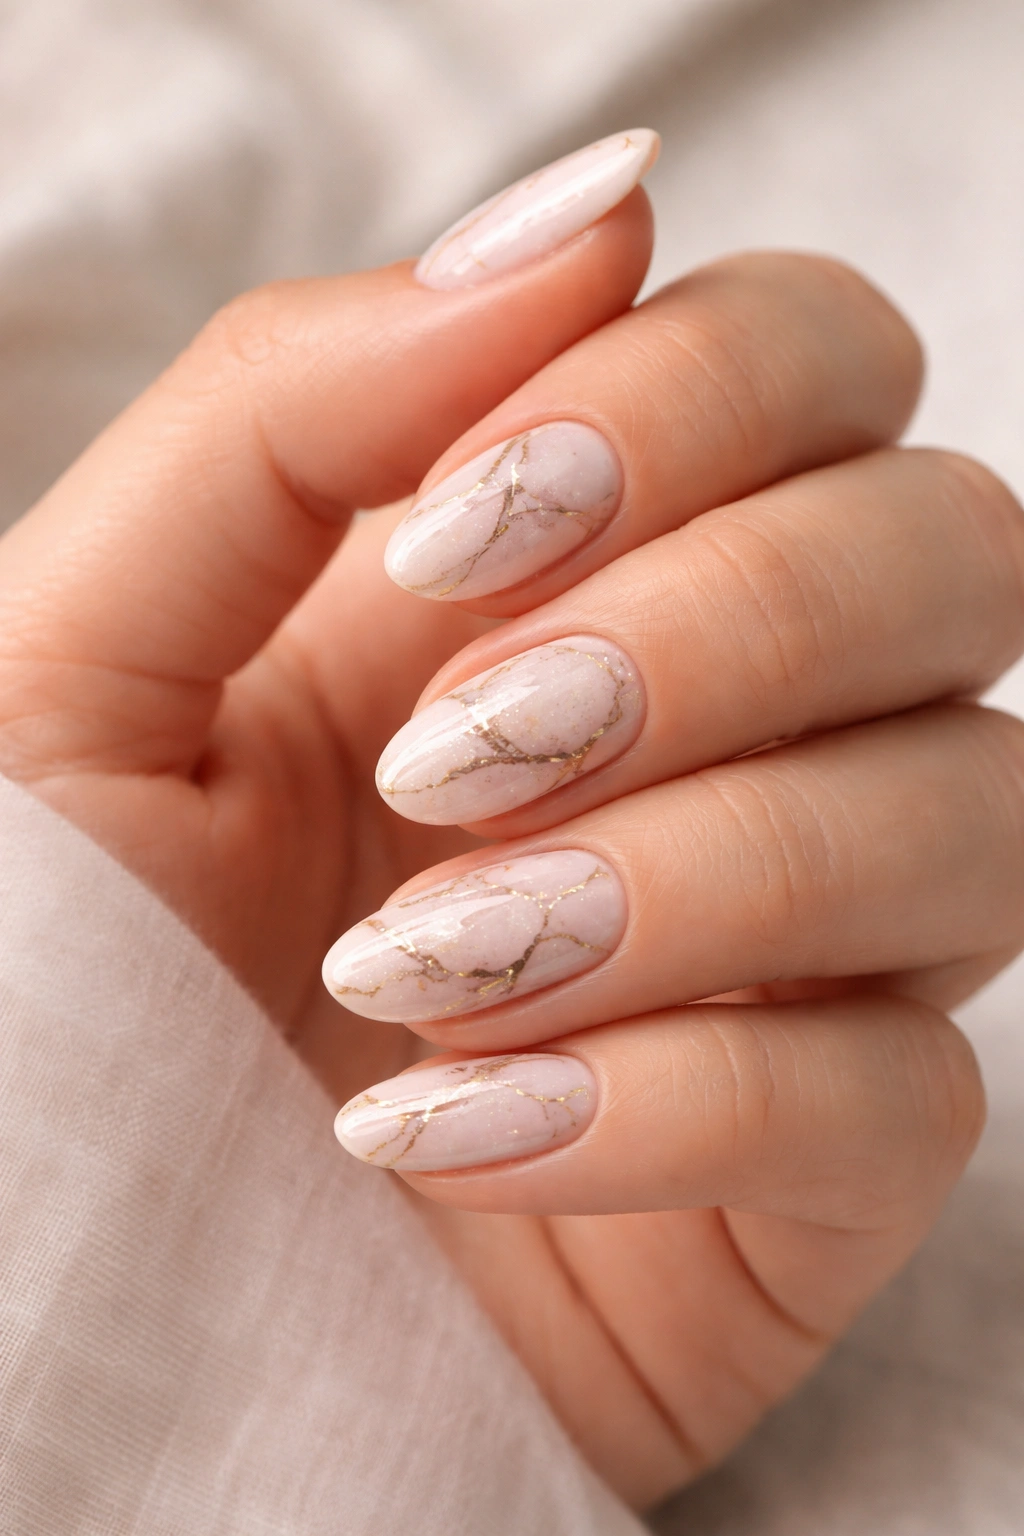
Seal with a top coat once all nails are dry. Wait a few minutes for your nails to air dry completely, then apply a clear top coat. This protects your marble design, prevents chipping, and adds a beautiful glossy finish that makes the colors appear even more vibrant.
2. Plastic Wrap Marble Technique
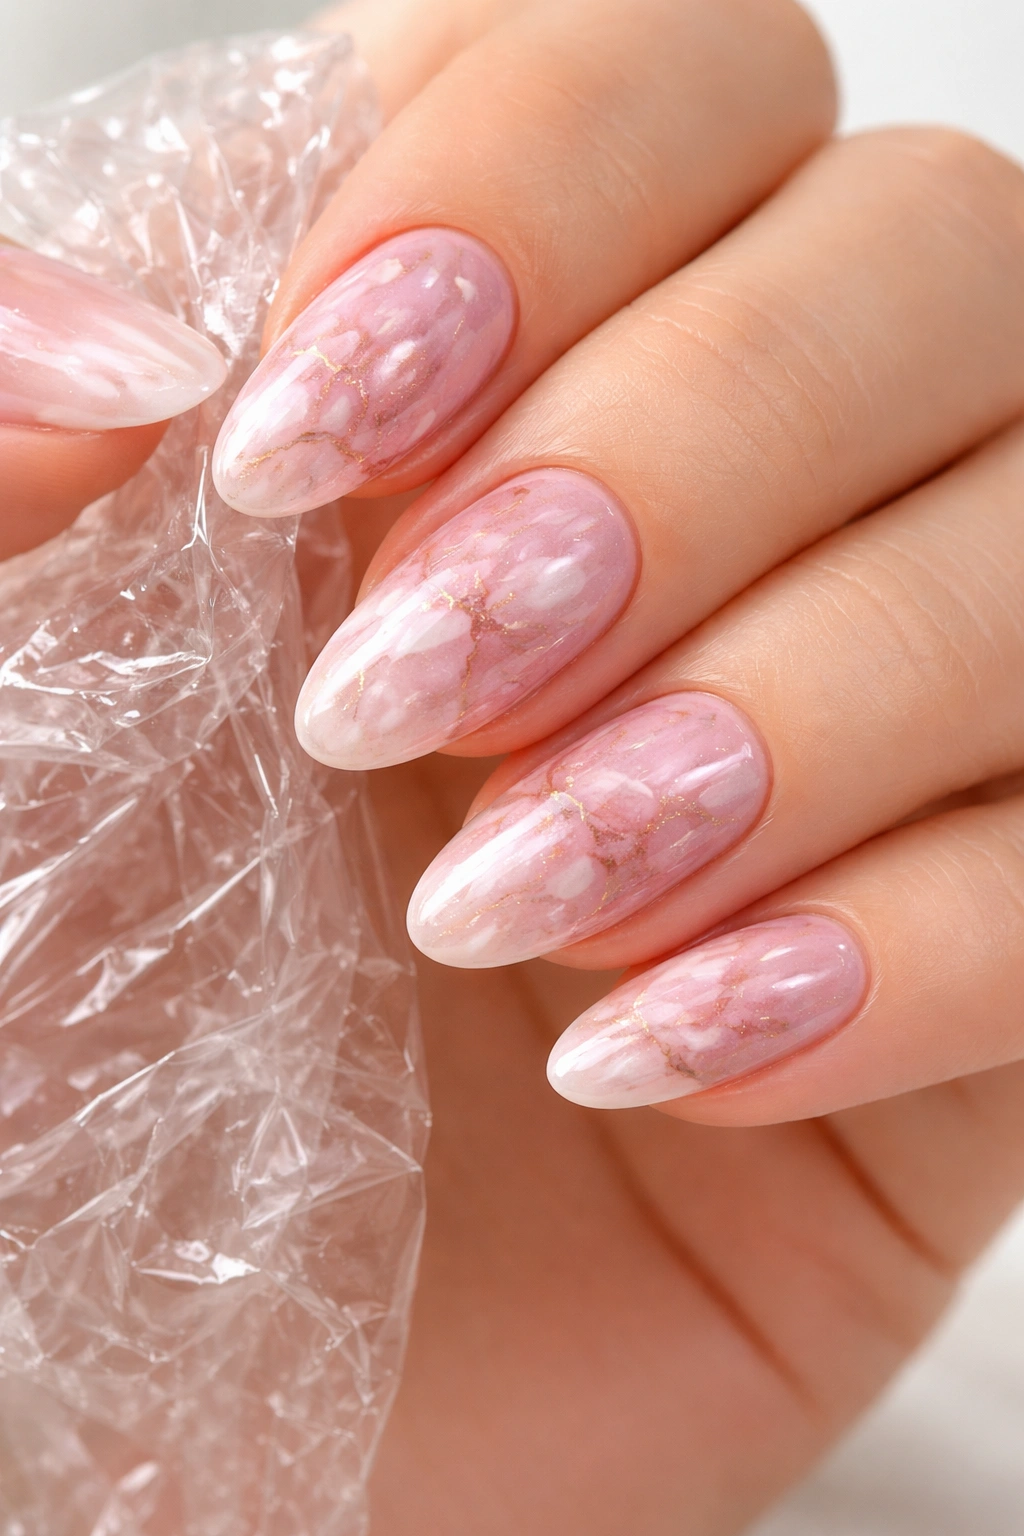
If the water marble method sounds too messy or complicated, the plastic wrap technique delivers a similar marbled effect with far less chaos. This approach is genuinely simpler for beginners because there’s no water involved and you have more control over where the colors land.
Apply your base color smoothly and completely. Use two thin coats of your chosen base shade, allowing each to dry fully. Let this base layer dry completely—it needs to be totally set before you move forward.
Wad up a piece of plastic wrap into a loose ball. Don’t pack it too tightly; you want it to have texture and some loose edges. The wrinkles and creases in the plastic wrap are what create the marbled effect, so the more irregular the texture, the better.
Dab your accent colors directly onto the plastic wrap. Put a small dab of your first accent color directly onto the surface of your plastic wrap ball. Add dabs of your other accent colors nearby, but don’t mix them together—you want them to remain separate for now. You’re creating a little palette right on the plastic wrap itself.
Press and roll the plastic wrap onto your nail. Gently press the colored side of the plastic wrap against your nail, then roll it slightly to create texture and transfer the color. The wrinkles in the plastic create an interesting, organic pattern that mimics marble. You have control over which areas get darker color and which stay lighter.
Lift the plastic wrap away carefully. Gently peel the plastic wrap off your nail. You’ll immediately see a textured, marbled effect that’s surprisingly sophisticated. The irregular pattern created by the plastic wrap’s texture gives it an authentic marble stone appearance.
Repeat on all nails. Since the plastic wrap ball holds the polish, you can use it on multiple nails before the colors dry out. The beauty of this method is that each nail comes out slightly different but cohesive, just like the water marble technique.
Finish with a top coat. Once the colors have dried, apply your top coat to seal the design and add shine.
Common Mistakes to Avoid
Understanding what typically goes wrong helps you sidestep problems before they happen. Using water that’s too cold is the number-one reason water marble fails. Cold water causes the polish to set up too quickly, preventing it from spreading and creating those beautiful rings. Conversely, water that’s too hot can actually make the polish behave unpredictably. Aim for that room-temperature sweet spot.
Don’t let the polish sit too long on the water before dipping. If you spend too much time perfecting your swirl design, the polish begins to dry and won’t transfer properly to your nail. Practice creating your swirl quickly and confidently, then immediately dip.
Avoid pressing your nail at the wrong angle when dipping. A 45-degree angle works best—too vertical and you might not pick up enough polish, too horizontal and you’ll submerge too much skin. The angle matters more than you’d think.
Don’t skip the cleanup step while your nails are still slightly wet. Polish is far easier to remove when it’s still damp. Once it dries completely, cleaning up becomes tedious. Use that small window right after you lift your finger out of the water to quickly remove excess polish from your skin.
Never try water marbling with gel polish. Regular nail polish has the specific viscosity needed to spread on water. Gel polish simply won’t work with this method—it’s formulated entirely differently and will just sink or ball up.
Avoid overcrowding the water with too many colors. Three to four colors create visual interest without becoming chaotic. Once you go beyond that, the design often looks muddy and muddled rather than beautifully marbled.
Troubleshooting Your Marble Nails
If your polish sinks to the bottom of the bowl instead of spreading on the surface, your water temperature is likely too cold, or your nail polish might be too old or thick. Try warming the water slightly and ensure you’re using fresh, newer polish. Adding a drop or two of nail polish thinner to thick polish restores the right consistency.
If your swirl pattern isn’t transferring to your nail cleanly, you might be dipping too slowly or at the wrong angle. Practice dipping more confidently in one smooth, quick motion rather than hesitantly. You’re basically scooping the design off the water’s surface onto your nail.
If your plastic wrap design looks too subtle or faint, apply more color to your wrap before pressing it onto your nail. You can also make multiple passes with fresh wrapping if needed—the plastic doesn’t dry out like water eventually does.
If your marble design is streaky or uneven on your base coat, ensure your base coat is completely dry and applied smoothly. A bumpy or tacky base coat creates uneven results.
Creative Color Combinations to Try
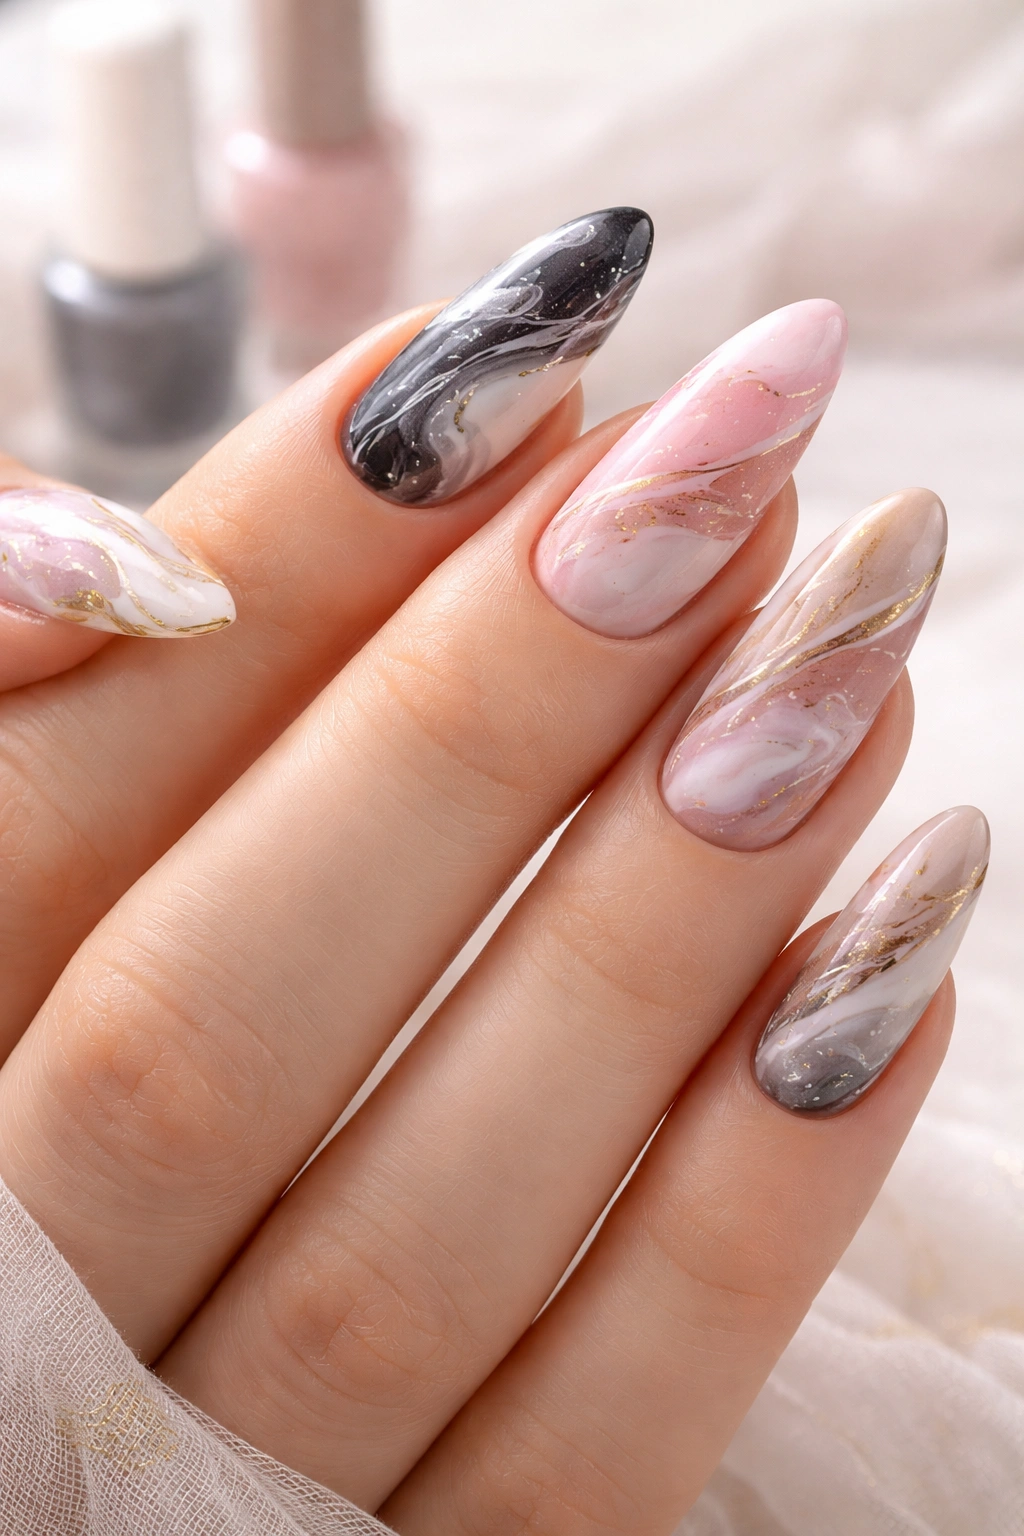
Classic elegance: White base with black and gray marbling creates a sophisticated, timeless look that works with any outfit or occasion. Add a touch of gold accent with a thin brush for extra glamour.
Soft and romantic: Pale pink base with white and nude accent colors produces an incredibly delicate, feminine aesthetic. This combination particularly flatters those with warmer skin tones.
Cool and moody: Deep purple or navy base with emerald green and white creates striking contrast and a luxurious feel. This combination suits cooler skin tones beautifully and pairs wonderfully with silver jewelry.
Bright and playful: Mint green base with white and a pop of coral or peachy tone delivers a fresh, contemporary vibe perfect for spring and summer. This look feels youthful and fun without being childish.
Matcha-inspired: Soft sage green with white and hints of pale pink creates that trendy matcha aesthetic that’s been popular. It’s modern, slightly trendy, yet timeless enough to wear year-round.
Jewel tone drama: Burgundy or deep red base with black and gold creates rich, luxurious-looking nails that photograph beautifully. This combination feels expensive and sophisticated.
Design Variations and Accent Nail Ideas

You don’t have to marble all ten nails if you prefer a more subtle look. Try marbling just one accent nail while keeping the others solid, creating visual interest without overwhelming your hands. Many people find this balanced approach more wearable for professional environments.
Consider a marble French tip where you create the traditional white tip, then add the marble swirl to the base of the nail for a modern twist on the classic French manicure. This hybrid design feels elegant and contemporary.
Create an ombre marble effect by using shades that gradually transition from light to dark across the nail. This requires more intentional color placement but creates a beautifully flowing design.
Try marble on nude or sheer bases instead of white. This creates a more subtle, natural-looking marbled effect that’s perfect if you prefer understated elegance.
Experiment with matte top coats instead of glossy for a completely different vibe. Matte marble nails have a sophisticated, almost velvet-like appearance that’s becoming increasingly popular.
Maintenance and Making Your Manicure Last
Apply a fresh layer of top coat every three to four days to maintain shine and extend the lifespan of your design. This simple step prevents chipping and keeps your nails looking freshly done.
Be mindful when doing dishes, gardening, or other water-intensive activities. Prolonged exposure to water can cause polish to lift and peel at the edges. Wearing gloves during these activities protects your manicure significantly.
Avoid prolonged exposure to harsh chemicals and chlorine. If you’re planning a swimming session, protect your nails by applying a barrier of petroleum jelly around them before getting in the water.
Gently buff away any signs of wear or chipping rather than letting them grow worse. A light touch-up with your base and accent colors restores the look of your manicure if small chips appear.
Store your nail polish properly in a cool, dry place away from direct sunlight. Heat and sun exposure can cause polish to thicken or separate. Keep bottles upright and ensure caps are sealed tightly.
Final Thoughts
Marble nails prove that stunning, sophisticated nail art is completely achievable at home without professional training or expensive tools. Whether you choose the traditional water marble method for its beautiful, unpredictable swirls or the simpler plastic wrap approach for more control and less mess, you’re creating a gorgeous manicure that’s uniquely yours. The best part about marble nails is that no two designs are ever identical—each manicure becomes a one-of-a-kind work of art that reflects your creativity and personal style. Start with whichever method feels most comfortable, practice without pressure, and remember that small imperfections actually add to the authentic marble stone aesthetic. Your nails are ready to become a beautiful canvas for your next marble masterpiece.
