

If you’re a nail polish enthusiast, you’ve probably experienced that moment of pure frustration: standing in front of your bathroom drawer or cabinet, staring at dozens of bottles, and having absolutely no idea which color you actually own. You know you’ve got the perfect shade somewhere in that chaos, but finding it feels like searching for a needle in a haystack. Meanwhile, you’re spending precious manicure time digging through bottles instead of actually painting your nails.
Here’s the reality: an unorganized polish collection doesn’t just waste your time—it damages your polish. Bottles left on their sides get clumpy and separated. Polishes stored in humid bathrooms dry out faster than they should. And when you can’t see what you have, you end up buying duplicates or letting bottles expire without ever using them. The good news? Organizing your nail polish collection is completely doable, and it can actually become something you enjoy rather than dread.
Whether you’ve got five bottles or five hundred, whether you want everything on display or tucked away hidden, there’s an organization system that’ll work perfectly for your space and your habits. Let’s walk through exactly how to create a nail polish collection that’s both beautiful to look at and actually functional.
Understanding Why Organization Really Matters
Before diving into the how, it’s worth understanding the why. An organized nail polish collection offers tangible benefits that go beyond just aesthetics. When your polishes are properly sorted and visible, you can instantly see what colors you actually own—which means you’ll stop accidentally buying duplicates of shades you already have. This saves real money, especially if you’re someone who loves collecting polishes regularly.
Beyond the financial angle, organization transforms your actual nail-painting experience. Instead of spending ten minutes hunting for that specific coral-pink, you know exactly where it is and grab it in seconds. This makes spontaneous manicures actually appealing instead of feeling like a chore. You’re more likely to actually paint your nails when the process feels easy and enjoyable rather than frustrating.
There’s also a genuine preservation benefit. When you can see and access your entire collection easily, you’re more likely to actually use the polishes you own. This matters because nail polish doesn’t last forever—it has a shelf life, typically around 18-24 months for regular polish and up to 36 months for gel. An organized system means you’ll naturally rotate through your collection and use polishes before they expire, rather than discovering six-month-old bottles that have turned into unusable gunk.
Finally, many people find that having their nail polish collection organized actually inspires creativity. When all your colors are visible and accessible, you’re more likely to experiment with new combinations, try nail art designs, and enjoy the process of choosing colors. It’s the difference between viewing your collection as a chaotic mess versus viewing it as a curated set of creative tools.
Assessing Your Current Collection and Making Tough Decisions
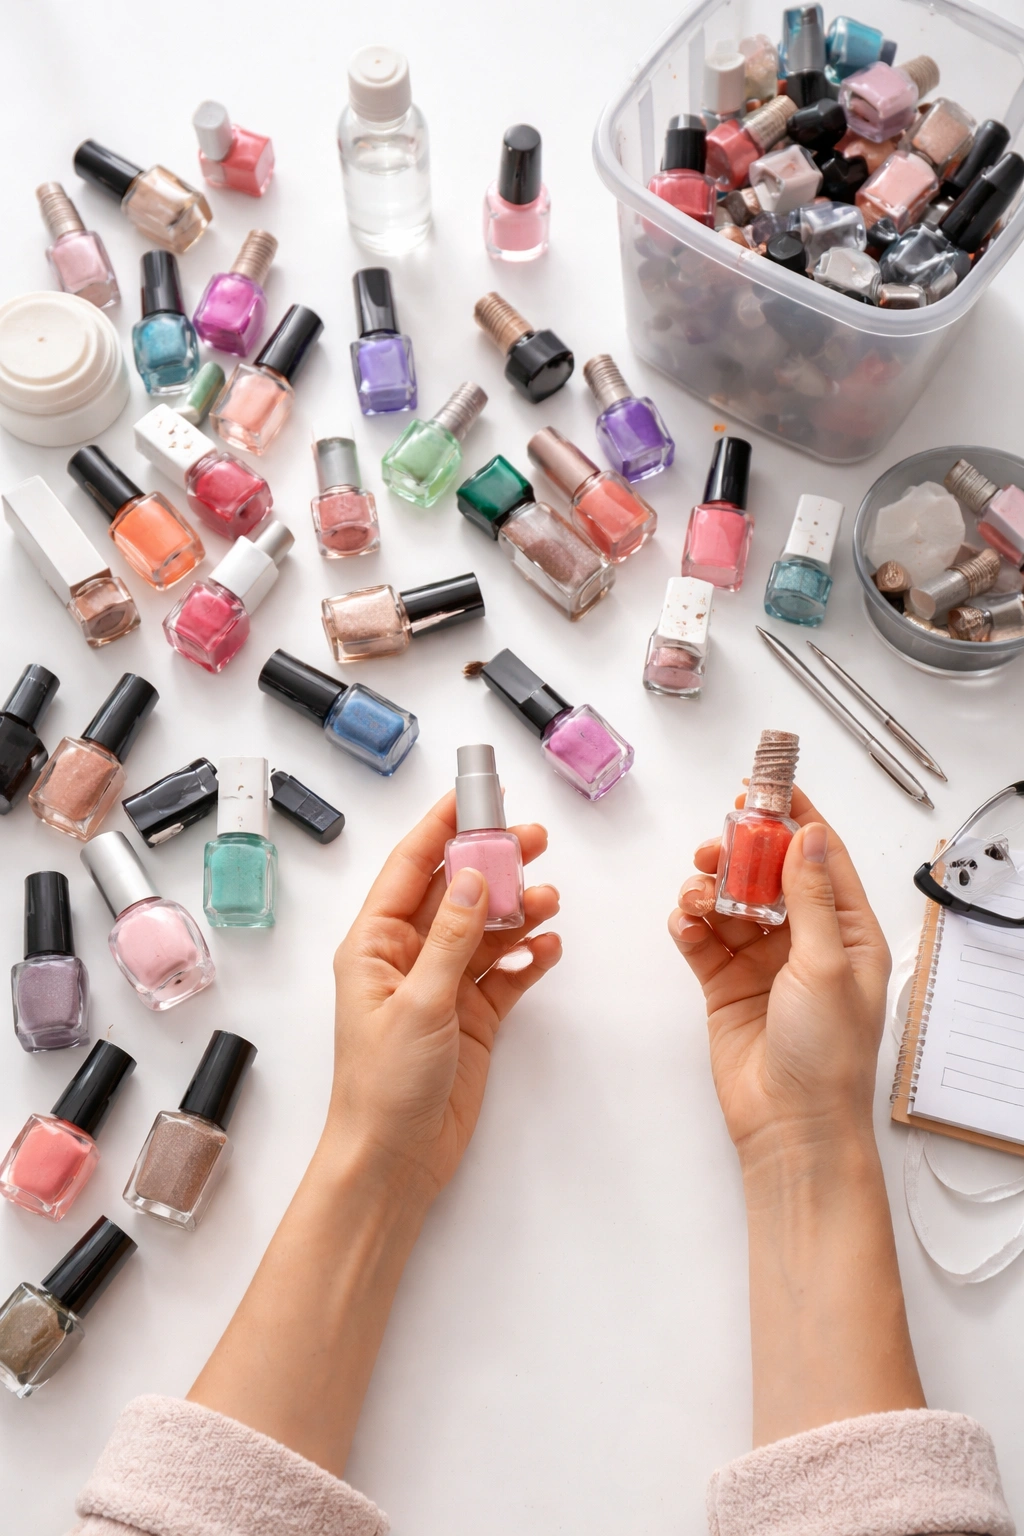
Before you invest in any storage system, you need to be honest about what you actually own and what you’re willing to keep. This step is critical—it determines which organizational method will work best for your space and prevents you from buying storage that’s either too large or too small.
Start by gathering every single nail polish bottle you own. Check your medicine cabinet, nightstand drawer, that purse you used last summer, under the bathroom sink, and anywhere else polish might be hiding. Put them all in one place so you can see the full scope of what you’re dealing with. This visual shock is often what motivates people to actually follow through with organizing rather than just thinking about it.
Once everything’s in one spot, it’s time to make decisions about what stays and what goes. The first criterion is age. Plain nail polish typically lasts 18-24 months, while gel polish lasts a bit longer at around 36 months. If you have bottles you can’t remember purchasing or haven’t used in years, they’ve likely expired. An expired polish will be clumpy, separated, and difficult or impossible to apply evenly. These belong in the trash.
Next, evaluate each remaining polish based on whether you’d actually wear it again. This requires honest self-assessment. Maybe you bought a shade that looked amazing in the store but looks terrible on you once you got home. Or perhaps it’s a seasonal color you genuinely do only wear once a year, but you’re willing to store it for that one time. Be realistic. If you haven’t used something in over a year and you don’t see yourself using it in the future, let it go. You’re not wasting the polish by getting rid of it—you’re wasting space and mental energy by keeping something you won’t use.
If you’re having trouble parting with polishes, consider these alternatives to throwing them away. Donate them to someone with young children (nail polish is great for craft projects like painted rocks). Gift them to a friend who loves nail color or to someone learning to do nail art. Some beauty schools also accept donations of unused products. These options let you feel good about passing along polishes you won’t use rather than feeling guilty about throwing them away.
Choosing the Right Storage Location and Conditions
Where you store your nail polish matters just as much as how you store it. The wrong location can cut your polish’s lifespan in half and cause the kind of separation and thickening that makes bottles unusable.
The ideal storage location is cool, dry, and away from direct sunlight. Temperature fluctuations are nail polish’s enemy—they cause the formula to separate and the color to change. This means your bathroom is actually one of the worst places to store polish, despite the convenience factor. Bathroom humidity from showers and baths creates temperature and moisture fluctuations that degrade polish quality faster than almost any other household environment. If you absolutely must store polish in your bathroom, choose a cabinet or drawer rather than leaving bottles sitting on the counter or near the shower.
Instead, aim for a cool drawer in your bedroom, a cabinet in a cool closet, or a dedicated storage area in a hallway or living space. If you want to display your collection, choose a wall away from windows and heating vents. Make sure the area stays consistently cool—avoid storing polish near heaters, radiators, or anywhere that gets direct sunlight throughout the day.
One surprising myth worth addressing: you don’t need to refrigerate your nail polish, despite what you might have heard. While some people swear their polish lasts longer in the fridge, the reality is that refrigeration is unnecessary and can actually be counterproductive. The temperature changes from taking polish in and out of the fridge, plus the condensation that can develop, may actually cause more problems than it solves. Room temperature storage in a cool, dark location is ideal.
Before storing bottles, do a quick maintenance check. Remove any dried polish stuck around the neck or cap—this prevents the lid from sealing properly and lets air inside the bottle, which causes thickening and separation. Make sure each cap is screwed on tightly. Wipe down dusty bottles with a soft cloth so your collection looks attractive whether it’s on display or tucked away.
Deciding How to Organize: What System Works Best for You
There’s no single “right” way to organize nail polish—the best system is the one you’ll actually use consistently. That said, most people fall into a few primary organizational methods, and you might find that combining two or three approaches works best for your situation.
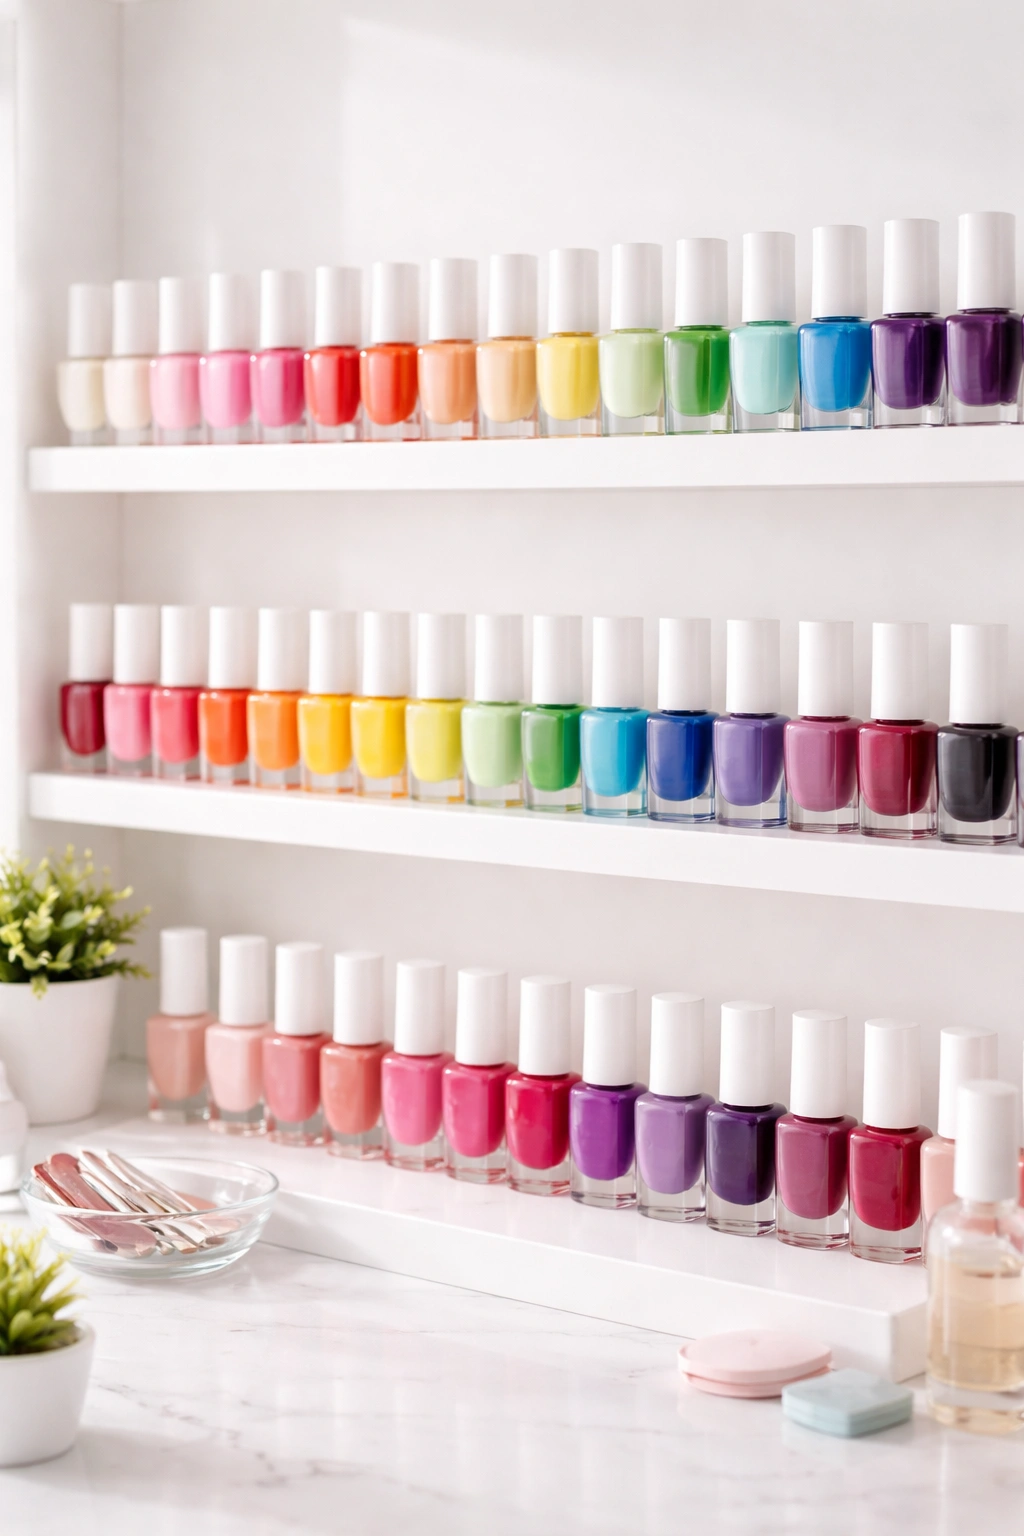
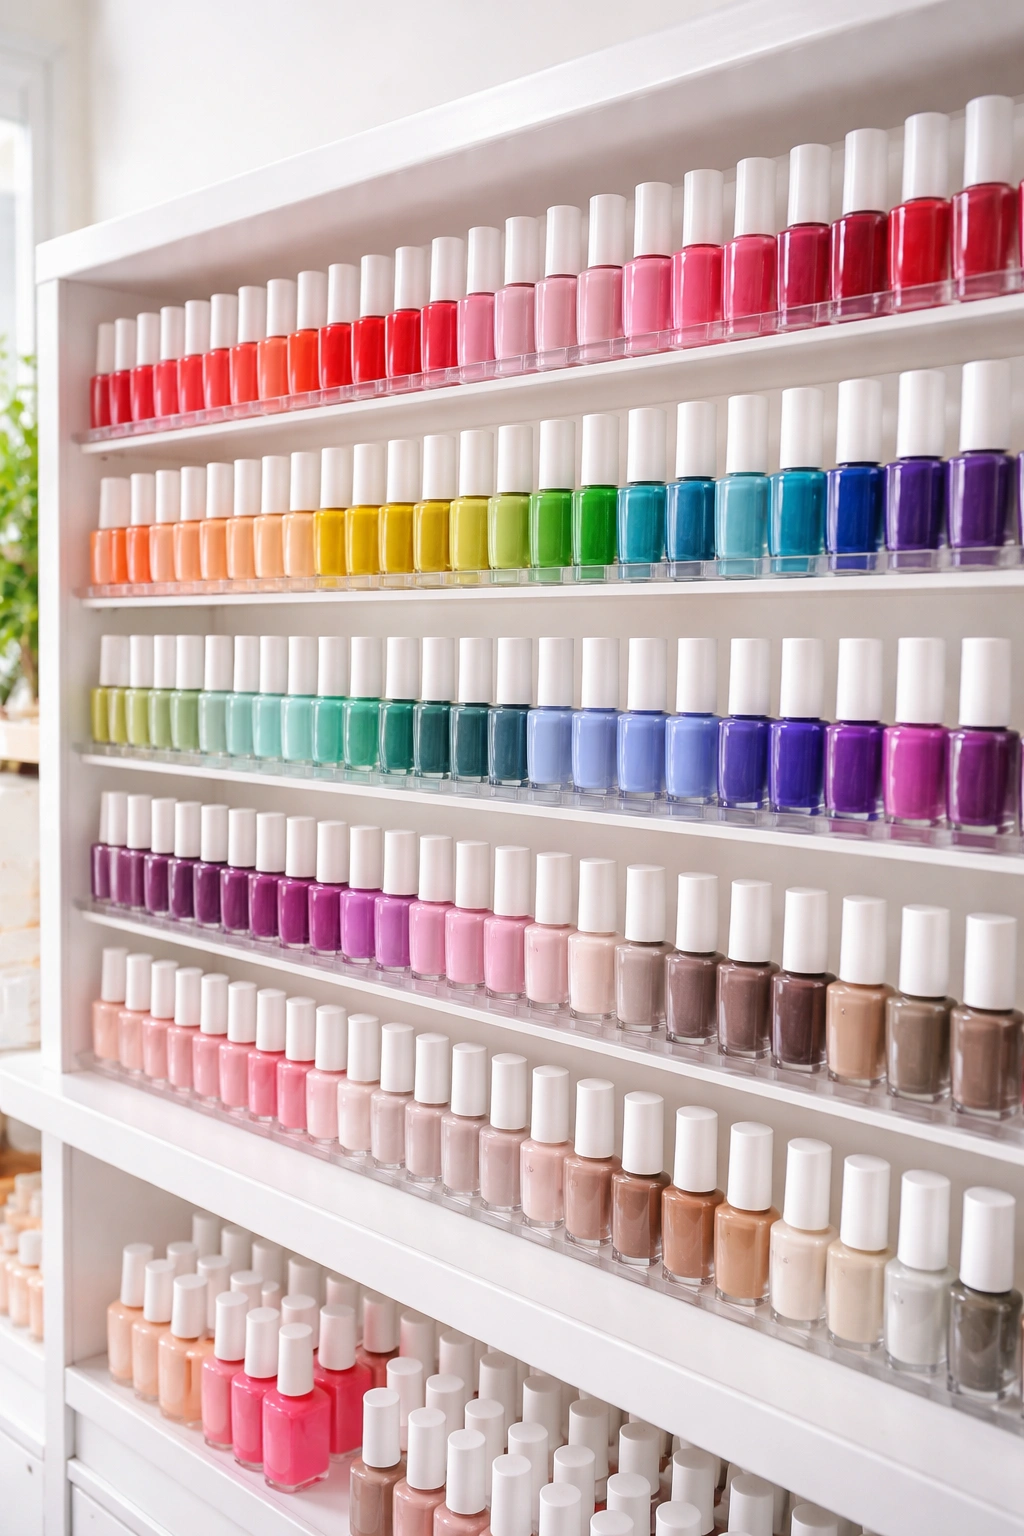
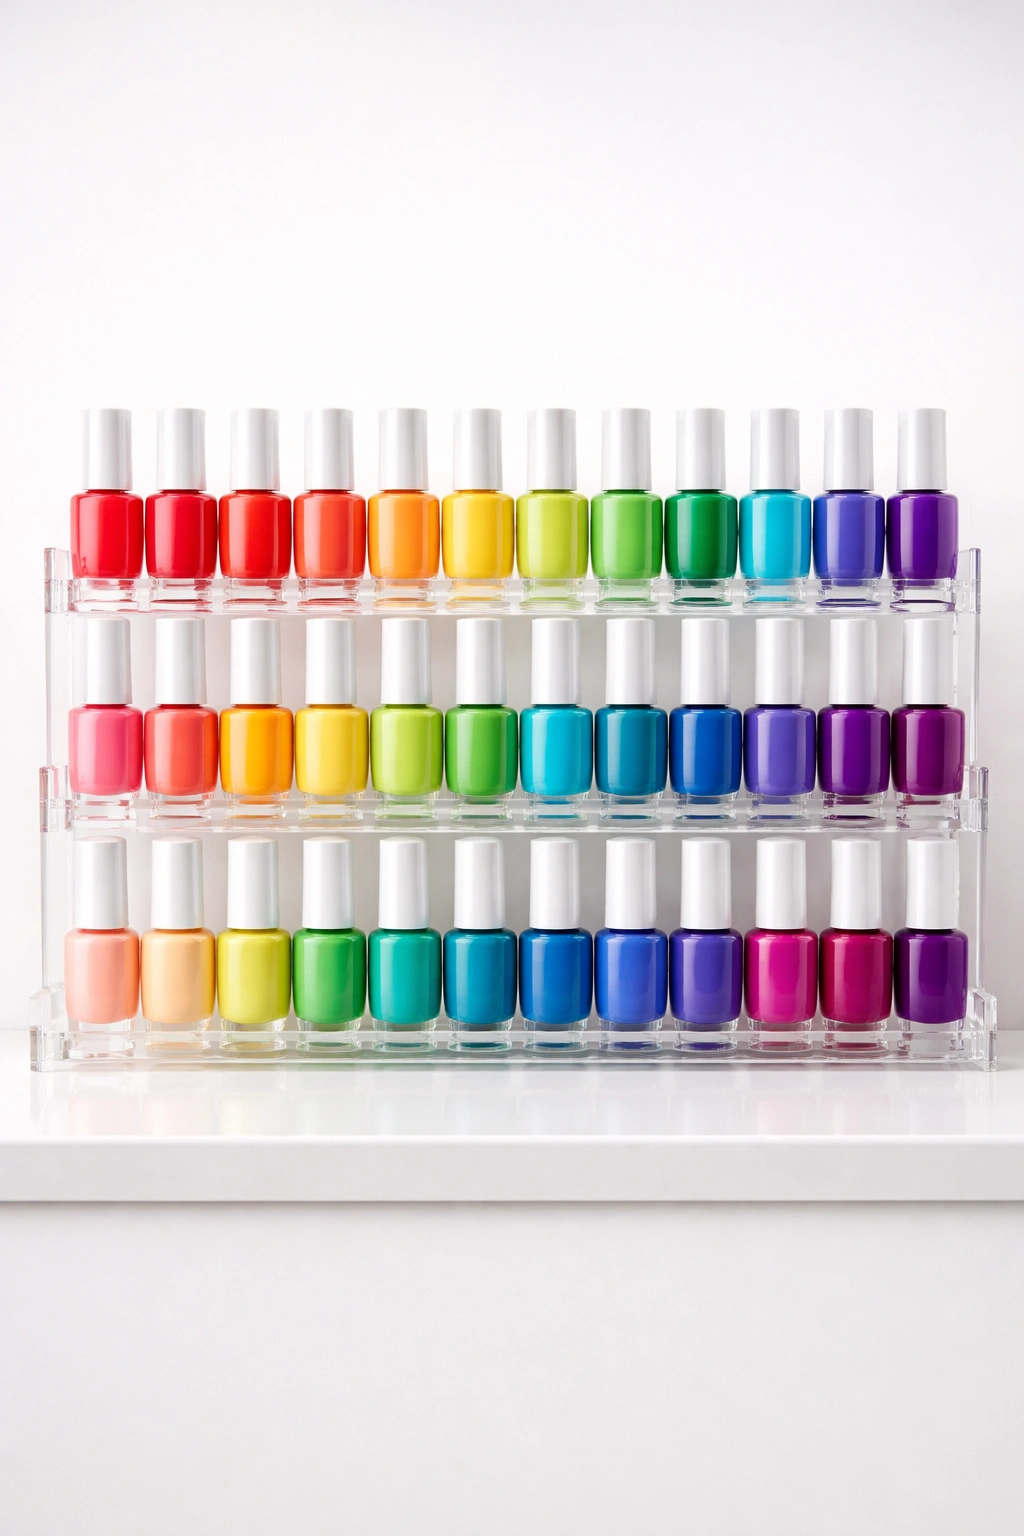
Organizing by color is the most popular method, and it’s easy to see why. Arranging polishes in color families—all the reds together, all the pinks together, all the neutrals, all the blues, etc.—makes finding a shade incredibly fast. If you’re looking for a warm red versus a cool red, you know exactly which section to check. This system also creates a visually beautiful display if your collection is on show, with a rainbow effect that genuinely looks like art. The downside is that it requires enough space to maintain color groupings, so it works better for medium to large collections.
Organizing by frequency of use means keeping your go-to colors front and center, with occasional-use polishes stored farther back. If you have five everyday shades you rotate between regularly, store those in the most accessible spot. Seasonal colors, special-occasion shades, and experimental finishes go in less accessible storage. This system maximizes convenience for your most-used polishes while still keeping everything organized.
Some people organize by brand, keeping all OPI bottles together, all Essie bottles together, and so on. This works well if you have strong brand loyalty and if most of your collection comes from just two or three brands. The downside is that it can make it harder to find a specific color if you only remember what it looks like, not which brand makes it.
Another approach is organizing by finish or type—all your glitters in one section, all your shimmers in another, all your cremes elsewhere, and all your gel polishes in a separate container. This system makes sense if you like to choose based on mood or occasion rather than by specific color.
The reality is that most people benefit from a hybrid system. You might organize primarily by color family but keep your five most-used everyday shades in an easily accessible spot. Or organize by color but with sub-categories by finish within each color family. The key is choosing a system that makes sense to your brain and matches how you actually think about choosing nail polish.
Wall-Mounted Display Options for Visible Storage
If you want your nail polish collection to function as décor, wall-mounted display is the way to go. The beauty of a visible display is that it keeps your polishes accessible, serves as constant inspiration for manicure ideas, and honestly looks stunning. Your collection becomes a visual focal point rather than a hidden clutter problem.
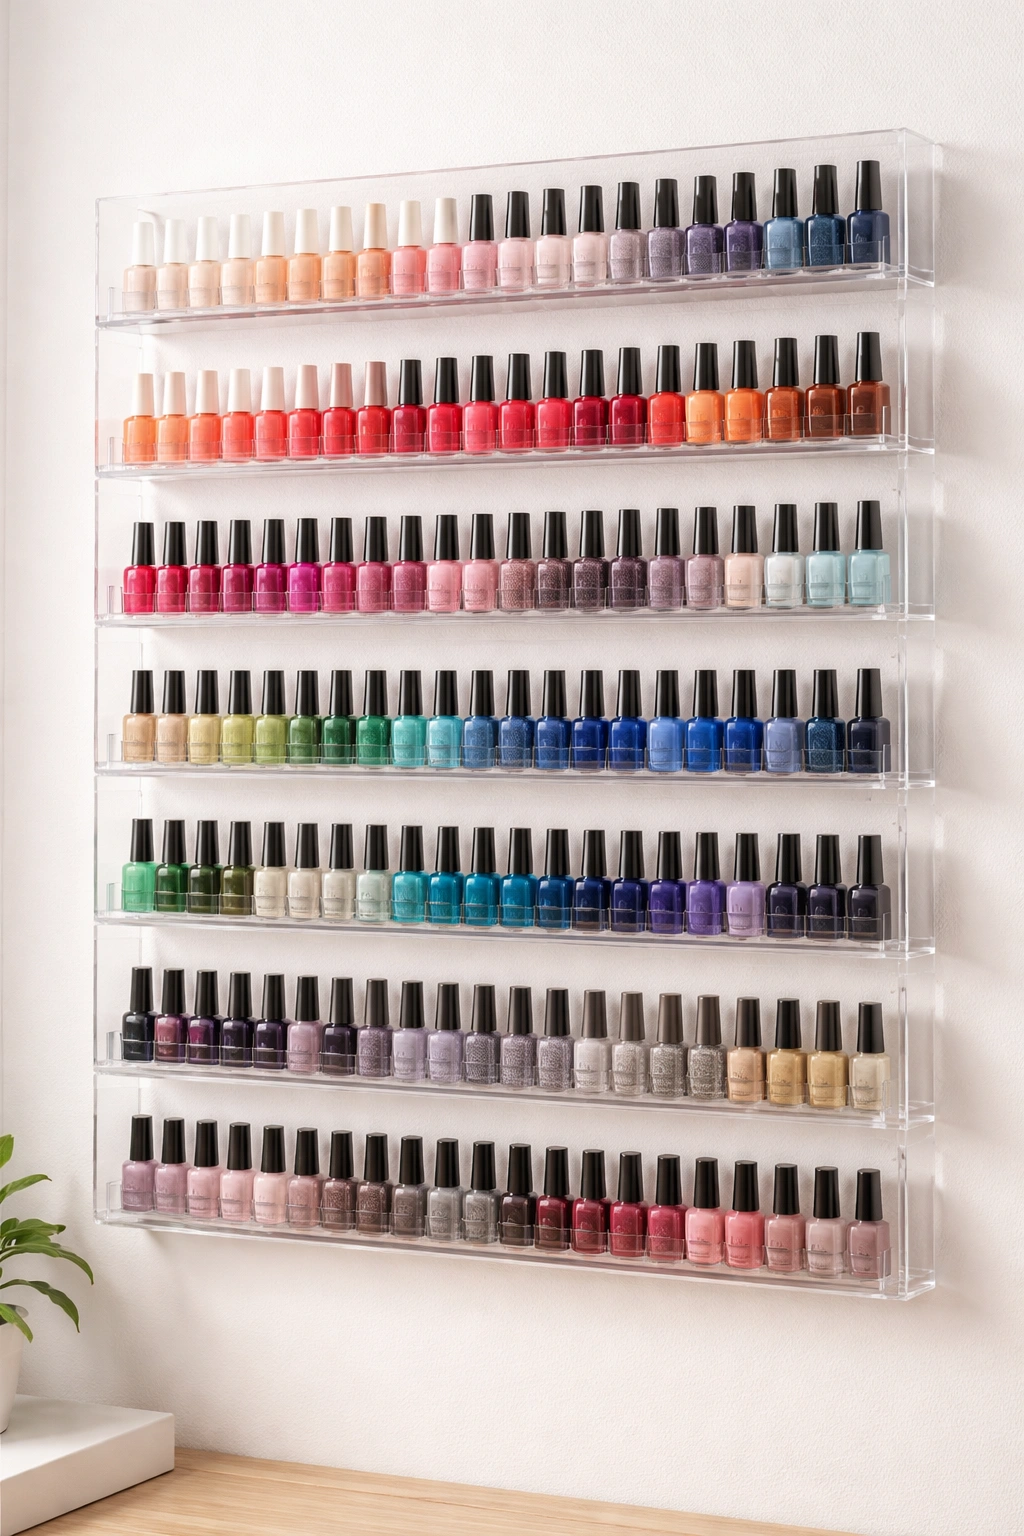
Wall-mounted acrylic racks are the most straightforward option. These clear or colored racks are specifically designed for nail polish and come in various sizes, from small racks holding 30-40 bottles to massive displays that hold 90+ bottles. They’re affordable, durable, and you can mount them directly on any wall. The clear design means you can see every color at a glance, and the vertical arrangement means you don’t waste any valuable wall space. When choosing an acrylic rack, measure your bottle heights carefully—brands like OPI, Essie, Butter, and China Glaze have different bottle dimensions, and you want to make sure your preferred brands actually fit in the spaces provided.
Floating shelves offer more flexibility and a softer aesthetic. Rather than a dedicated polish rack, install 2-3 floating shelves and arrange your bottles on them. This gives you more creative control over the display and lets you mix in other decorative items like small plants, candles, or nail art tools alongside your polish. The downside is that bottles can potentially fall off if the shelf isn’t deep enough, so choose shelves that are at least 6-8 inches deep and place bottles toward the back.
Repurposed spice racks have become surprisingly popular for polish storage, and for good reason. These tiered racks are compact, affordable, and hold bottles at an angle that makes colors easy to see. They work particularly well for medium-sized collections or if you want to dedicate just one small wall area to polish display. You can find tiered spice racks at IKEA, Amazon, or kitchen supply stores, and they work just as well for nail polish as they do for spices.
DIY frame shelves are a great project if you’re feeling creative. Mount a picture frame on your wall, then attach small wooden dowels or foam rods horizontally inside the frame at intervals that match your bottle height. This creates a custom rack that matches your décor perfectly. Many people spray-paint their frames to coordinate with their room’s color scheme, creating a truly personalized display.
Wall-mounted magnetic boards offer a modern alternative. Attach small magnets to your bottle caps, then mount a metal sheet or magnetic board on your wall. Your bottles stick right to it, creating a sleek, minimalist display that’s easy to rearrange whenever you want. This method works best for collections that aren’t too heavy, since you’re relying on magnet strength to hold the bottles.
The key to any wall display is choosing a location that stays cool and out of direct sunlight. An interior wall away from windows is ideal. Avoid displaying polish on walls opposite windows where sunlight reflects throughout the day, or near heating vents and radiators.
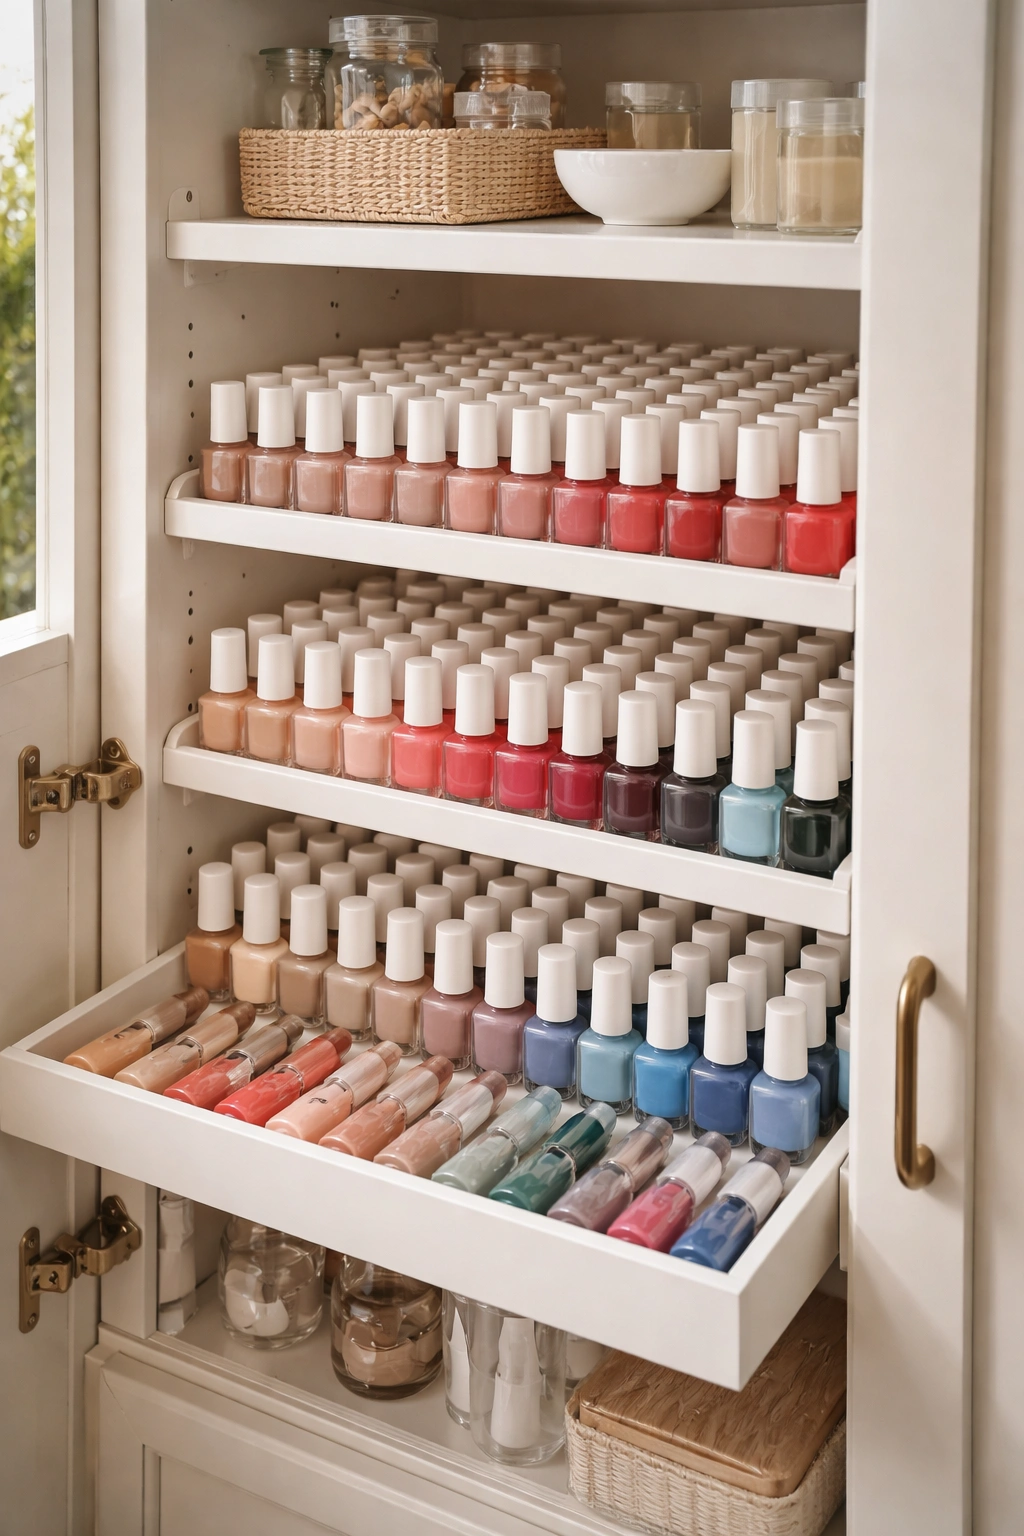
Drawer and Cabinet Storage for Hidden Organization
Many people prefer keeping their nail polish collection tucked away, and that’s completely valid. Hidden storage means your bathroom or bedroom doesn’t become dominated by polish bottles, and you avoid the humidity issues that come with visible bathroom displays.
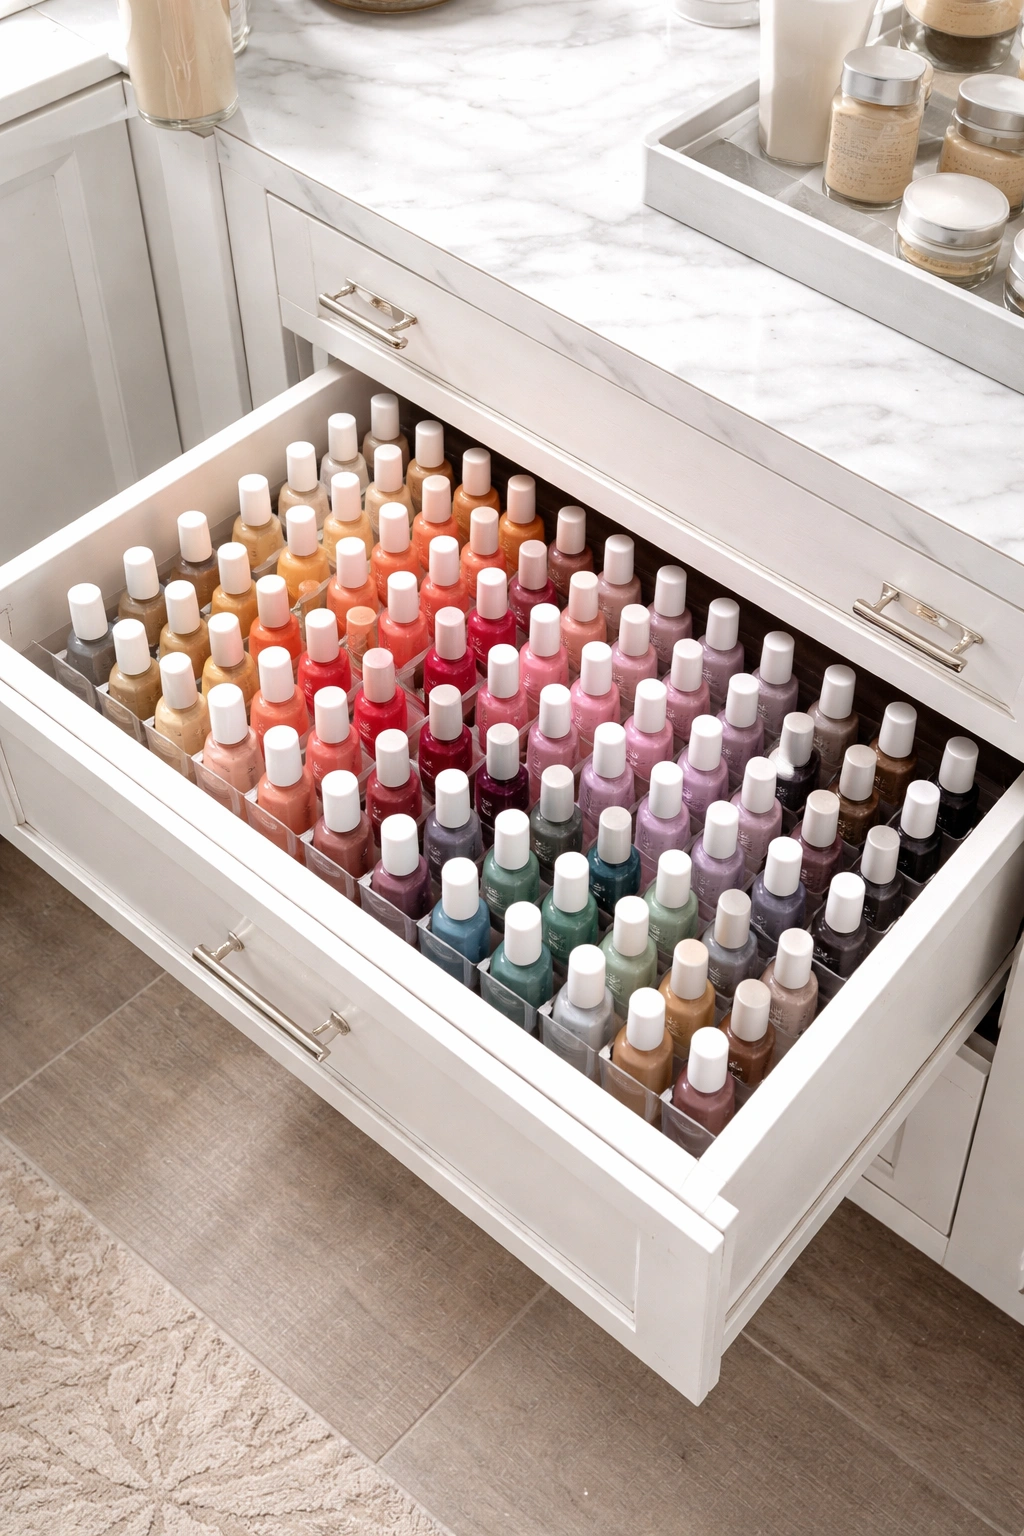
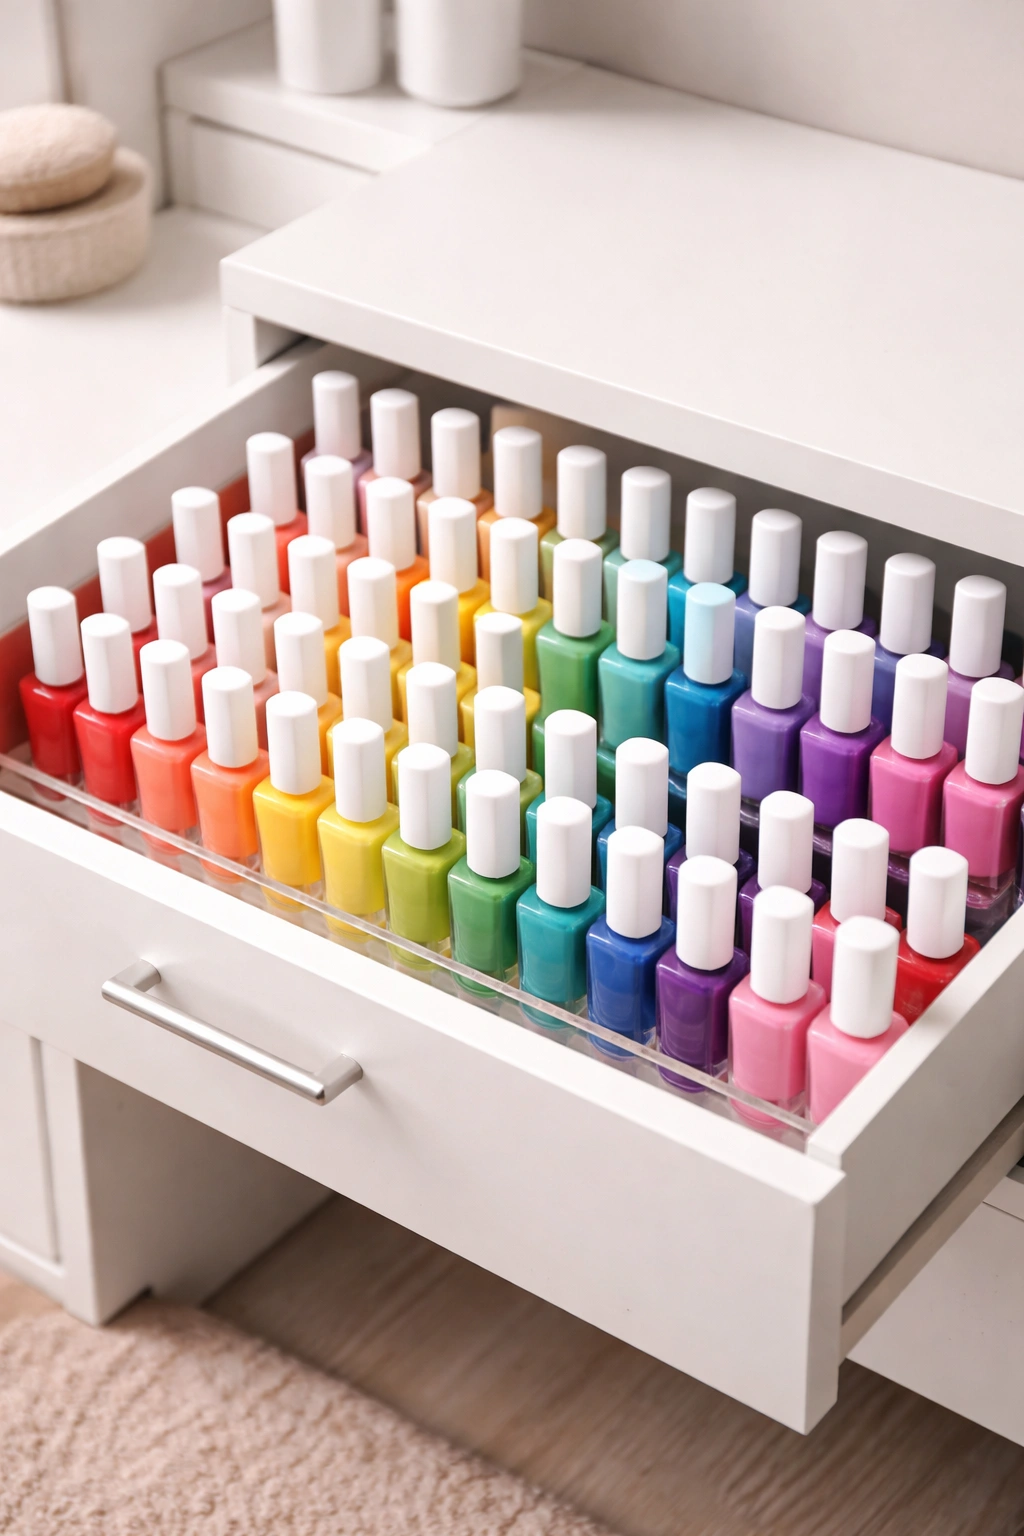
Drawer dividers are the simplest approach if you have the drawer space. Use dividers to create sections within a deep drawer—you can buy plastic dividers, use a silverware organizer, or make your own from cardboard. Arrange bottles upright so labels are visible, and organize by color or preference. A clever trick that readers have shared: paint small dots on bottle caps with the actual polish colors, then mark these dots on your drawer dividers. This lets you see color at a glance without lifting bottles out of the drawer.
Clear drawer organizers with shelves work beautifully for larger collections. These stackable organizers with multiple compartments let you arrange polishes upright and visible, and they maximize vertical space within a drawer. Choose one with adjustable compartments so you can customize shelf heights to fit your bottles perfectly.
The IKEA Helmer has become legendary among serious nail polish collectors. This five-drawer metal cabinet holds an impressive number of bottles and looks sleek sitting in a closet or corner. Each drawer is deep enough for upright bottles, and you can see everything at once by opening a drawer. At a very reasonable price point, it’s become the go-to storage solution for people with 100+ bottle collections.
Plastic storage bins with compartments offer a budget-friendly option. Clear bins let you see what’s inside without opening them, and compartments keep different colors separated. You can stack these under the sink, in a closet, or in a cabinet. Choose bins with secure lids if you’re worried about spills, and make sure compartments are appropriately sized for your bottle dimensions.
Under-the-sink storage works well if you have the space. A fabric bin or small shelving unit tucked under your bathroom sink keeps polish accessible but out of sight. Just make sure the area stays relatively dry and cool—direct water exposure or excessive humidity will degrade polish quality.
Baskets and containers are perfect if you want an attractive storage solution that doesn’t scream “nail polish.” Store polish in decorative baskets or attractive containers that match your décor, then stash them in a closet, cabinet, or under a vanity. The downside is that you lose the visual organization benefit, so you’ll need to remember what you have or pull out the basket each time you want to choose a color.
Portable Cases for Travel and On-the-Go Use
If you do your nails in different locations or travel frequently, portable storage is essential. The right case keeps bottles from breaking and prevents spills that could damage your belongings.
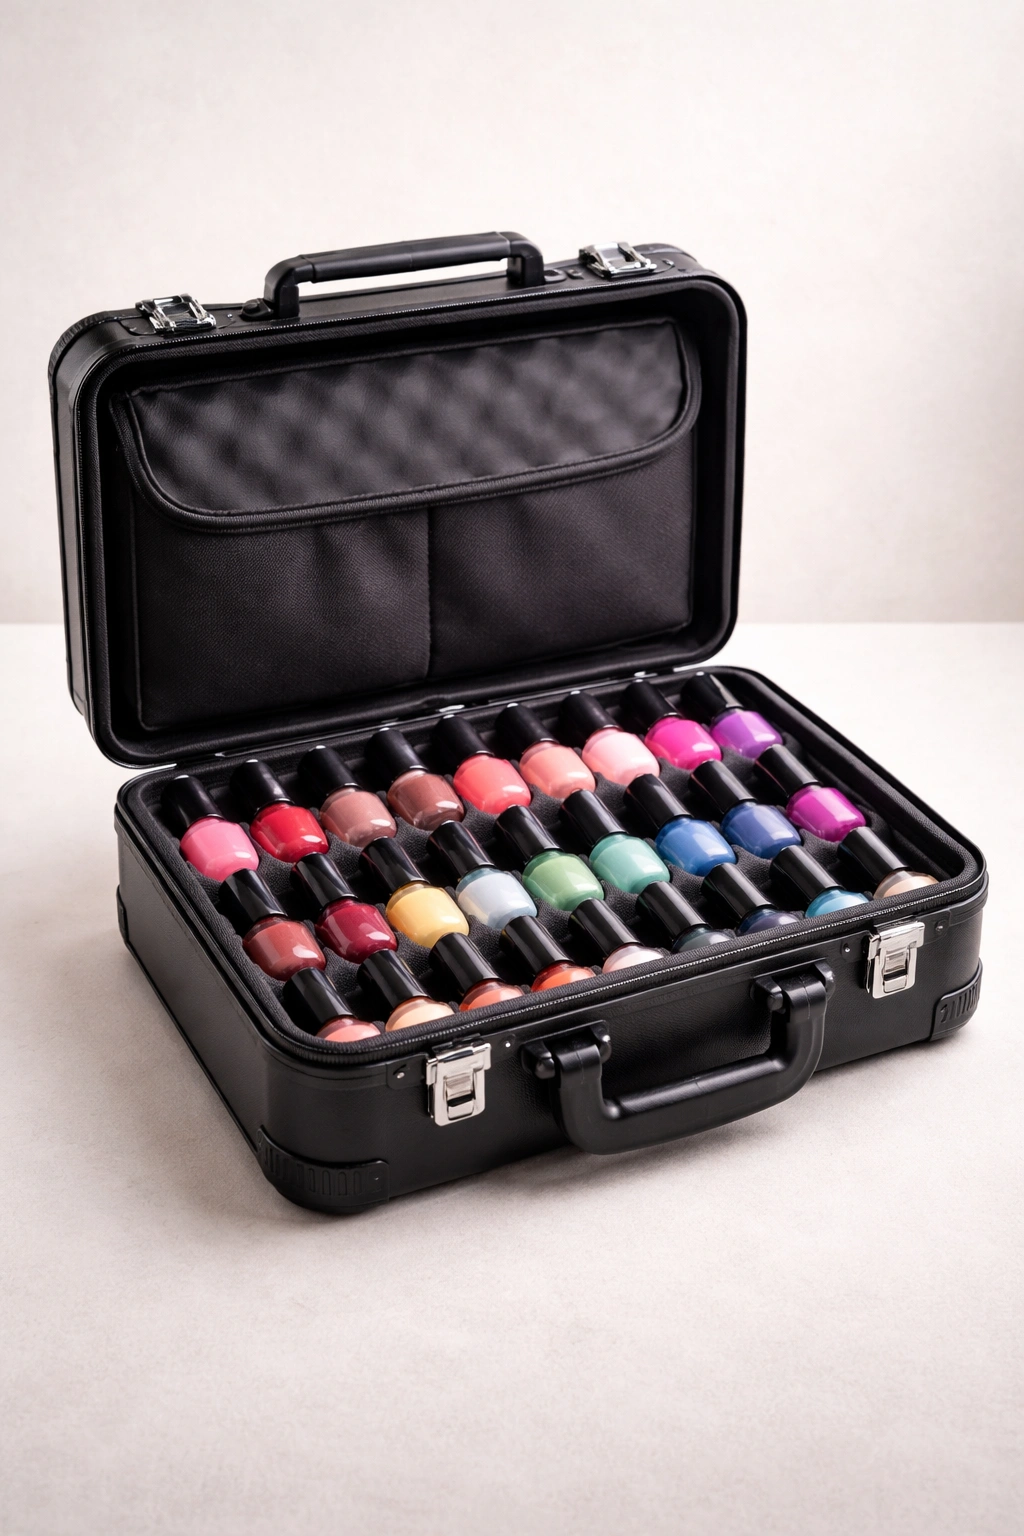
Nail artist storage cases are specifically designed for this purpose. These typically feature padded interiors, adjustable compartments, and secure closure systems. Look for cases with locking latches, reinforced corners, and enough compartment organization to keep bottles from jostling around. Professional-grade cases often have a handle and come in a variety of sizes—some hold 20-30 bottles, while larger ones accommodate 50+.
Soft-sided carrying cases offer a more flexible option. These fabric cases compress easily to fit in small spaces and are lighter than hard cases, which is ideal if you’re traveling. Look for ones with individual pockets or compartments for each bottle to prevent movement and breakage.
Clear acrylic organizer boxes with handles work if you’re only transporting a small collection. These let you see colors at a glance and are sturdy enough for regular transport. Just make sure to choose one with secure closures so bottles don’t shift.
Makeup train cases or cosmetic organizers can be repurposed for polish storage. Many professional makeup artists use these cases for their nail polish collections, and they offer multiple compartments and drawers. Look for one with a secure handle and latches.
When transporting polish, always keep bottles upright to prevent leaks from improperly seated caps. Never stack heavy items on top of your case, and avoid extreme temperature changes if possible. If you’re flying, pack your polish case in checked luggage rather than carry-on to avoid any liquid restrictions.
DIY Organization Hacks Using Everyday Items
Creating your own storage solution can be fun, cost-effective, and gives you complete customization. These DIY approaches work particularly well if you have a specific vision for how you want your collection to look.
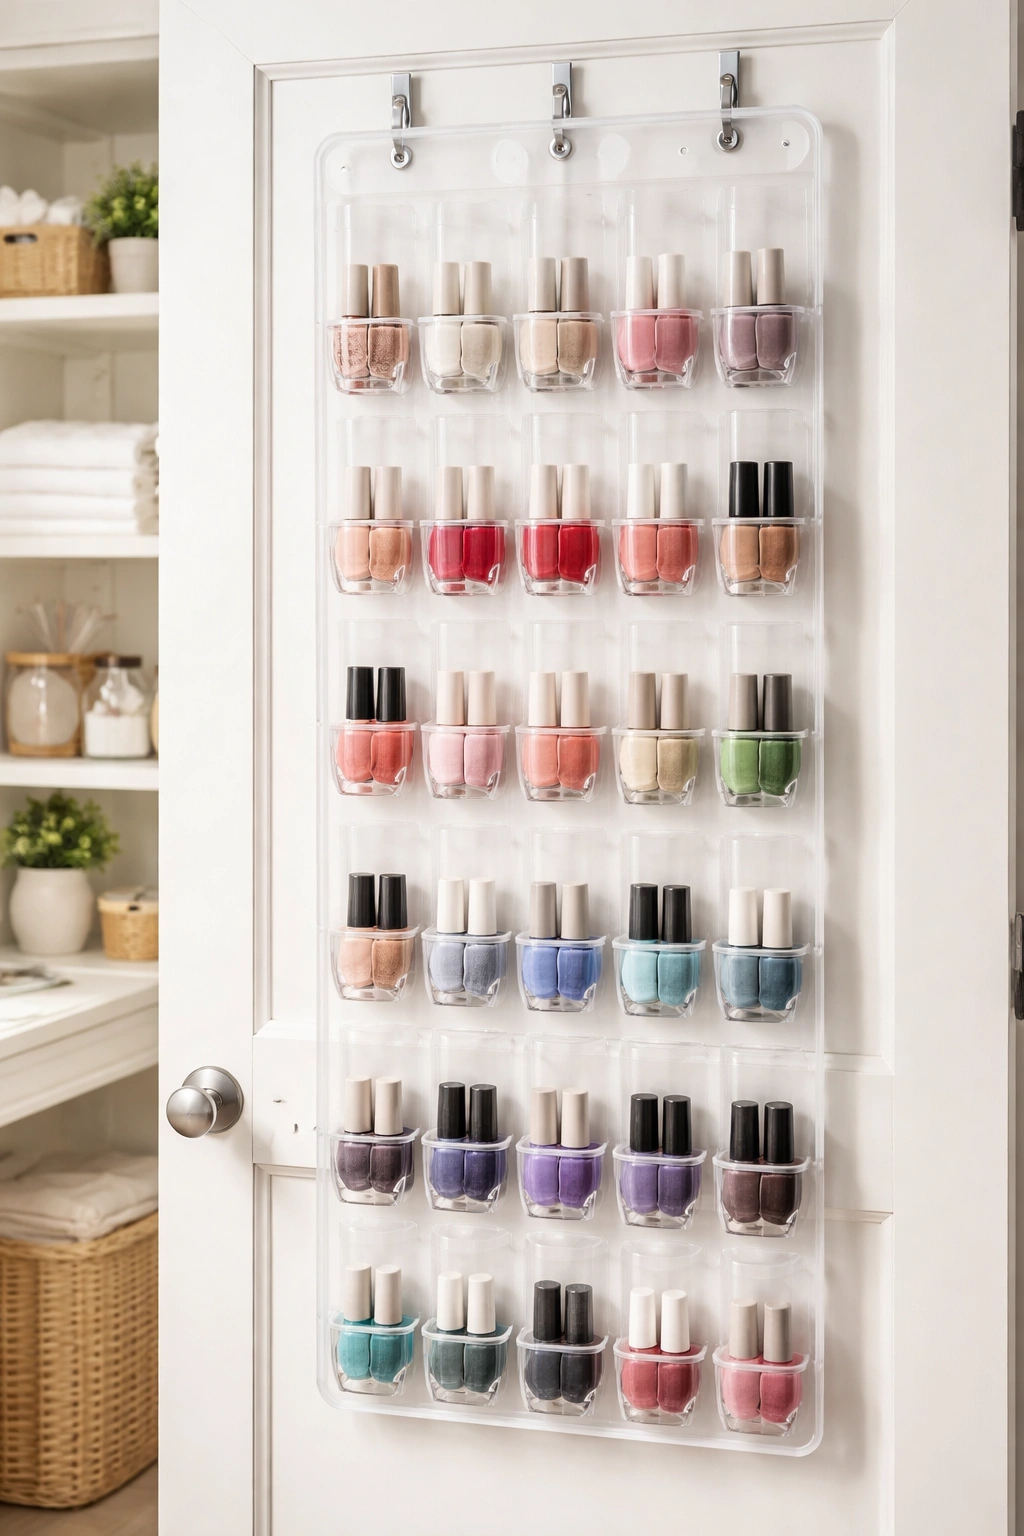
Repurposed shoe organizers are brilliant. Hang a clear over-the-door shoe organizer on the back of your closet door or bathroom door and use the pockets to store polish. Each pocket holds one or two bottles, and you can organize by color or however else makes sense. It takes advantage of space you’re probably not using anyway, and the clear pockets mean you can see everything without opening anything.
Picture frame shelves are simple to make. Mount a picture frame on your wall, then use wooden dowels or foam rods—the same size as closet rods, just shorter—attached horizontally with small brackets or glued in place. Space the rods according to your bottle height. Paint or stain the frame to match your décor. This creates a custom display that looks far more intentional than a basic rack.
Spice rack DIYs go beyond just buying a spice rack. Mount tiered spice racks inside a cabinet or closet, or create your own tiered display using shelving brackets and wood. The angle that spice racks create naturally displays polish colors beautifully.
Magnetic displays work great if you’re handy. Mount a metal sheet to a frame or directly to a wall, then attach small magnets to your bottle caps. Arrange bottles however you like. You can even get creative with layouts—create a color wheel, arrange by rainbow, or organize however feels right.
Drawer dividers from scratch can be customized perfectly. Use foam board, cardboard, or even wooden dowels to create dividers in any configuration you want. This lets you make sections that fit your specific bottles and collection size.
Floating shelves with edge guards prevent bottles from falling off. Install floating shelves and add small edge guards (thin wooden strips or even thick wire) to the front edge. Your bottles stay secure while remaining visible and accessible.
The best DIY projects are ones that solve a specific problem you have. If your collection is too large for standard storage, build a custom display. If you want a particular aesthetic, create something that matches your style. If you need it portable, make a lightweight system you can move easily.
Ready-Made Products That Actually Work
If DIY isn’t your thing, plenty of excellent commercial storage solutions exist. These products are designed specifically for nail polish storage and solve common problems like bottle shifting and color visibility.
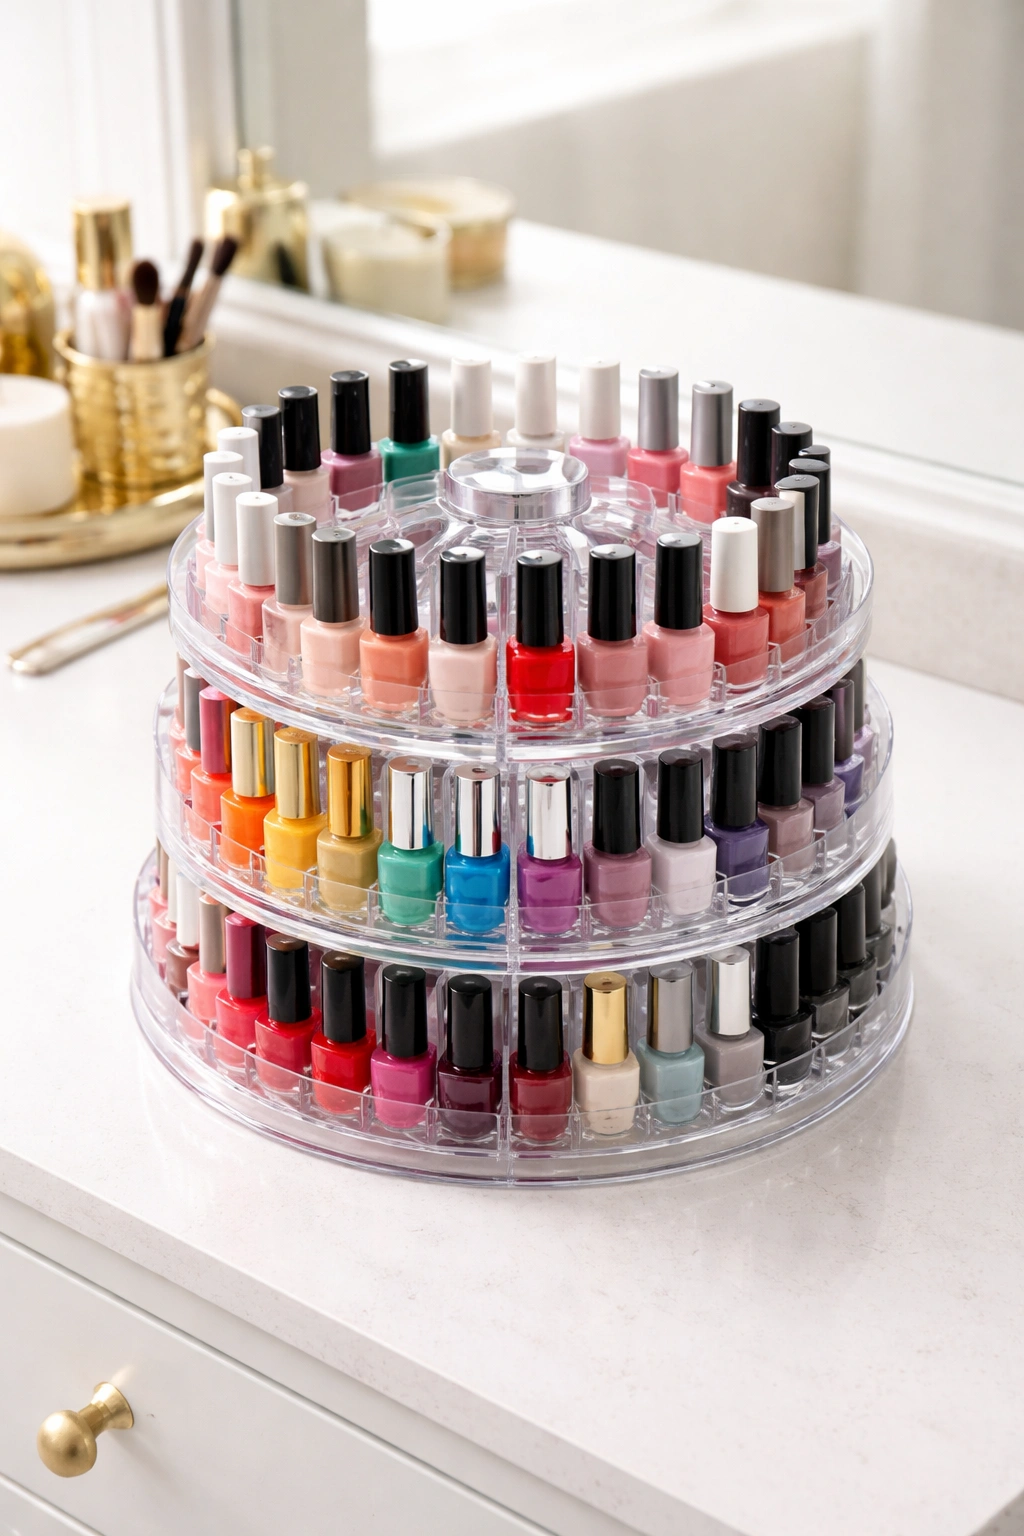
Acrylic rotating carousels hold an impressive number of bottles in a small footprint. These spinner organizers let you rotate through your collection easily, and they work great on vanities, dressers, or shelves. Some models are tiered, meaning different shelf levels hold bottles at angles that maximize visibility. The main limitation is that very large collections might not fit on a single carousel.
Acrylic tiered shelf organizers stack beautifully and maximize vertical space. These work on countertops, vanities, or shelves and often come with adjustable tiers so you can customize spacing for different bottle sizes. They’re clear, so you see every bottle, and they’re sturdy enough to hold fairly heavy collections.
Stackable drawer organizers from brands like The Container Store or IKEA create a modular system. Buy one, buy five, stack them up—they grow with your collection. Many have adjustable compartments and come in clear plastic so you can see everything inside.
Polish bottles with built-in labels or markers work alongside any storage method. Some systems include small chalkboard markers or label tape so you can mark color names directly on bottles, making it easier to find what you want even in drawer storage.
Small vintage trunks or decorative boxes can store polish while looking intentional and stylish. Just make sure they’re deep enough to store bottles upright and that the interior stays cool and dry.
When choosing ready-made products, always check that your preferred nail polish brands actually fit. Read the reviews and see if people with OPI, Essie, Butter, or China Glaze bottles (the brands with trickier bottle shapes) confirm they fit. Nothing’s more frustrating than buying storage and discovering your bottles don’t quite fit properly.
Creating an Effective Color-Coding System
If you’re organizing by color, developing a clear system makes finding polish incredibly fast and helps inspire new color combinations.
The traditional rainbow spectrum arranges polish from red through orange, yellow, green, blue, purple, pink, and then neutrals. This is visually stunning and intuitive—most people can mentally navigate a rainbow easily. Within each color family, arrange from lightest to darkest or most saturated to least saturated.
Warm versus cool tones is another excellent system, especially if you’re interested in color theory. Group all warm-toned polishes (warm reds, warm pinks, warm neutrals, warm oranges) together, then organize the cool-toned section (cool reds, cool pinks, cool neutrals, cool blues) separately. This system helps you quickly find colors that’ll coordinate with your undertone.
Color families with finish types combines organization methods. Keep all your red cremes together, all your red shimmers together, all your red glitters together. This makes it easy to find not just a color you want but a finish that matches your mood.
Palettes by inspiration or theme might mean grouping together all your “spring” colors, all your “jewel tones,” all your “metallics,” or all your “nudes.” This can be particularly helpful if you think about getting dressed and choosing nail colors to match your vibe.
A practical tip that many collectors use: paint tiny dots on the caps of bottles using the actual polish color. This makes color visible from above when bottles are stored upright in a drawer, saving you from having to pull bottles out to see the color. Alternatively, use clear sticky dots (available at office supply stores) and paint them with polish, then stick them to the top of caps.
If you’re creating a physical color swatch display, swatch wheels or sticks are invaluable. Apply a small amount of each polish to a swatch stick or color wheel, label it with the polish name and brand, then reference this when selecting colors. This saves you from having to swatch the same colors repeatedly.
Maintaining Your Organized Collection Long-Term
Organization is only useful if you can maintain it. The key is making maintenance easy enough that you’ll actually do it consistently.
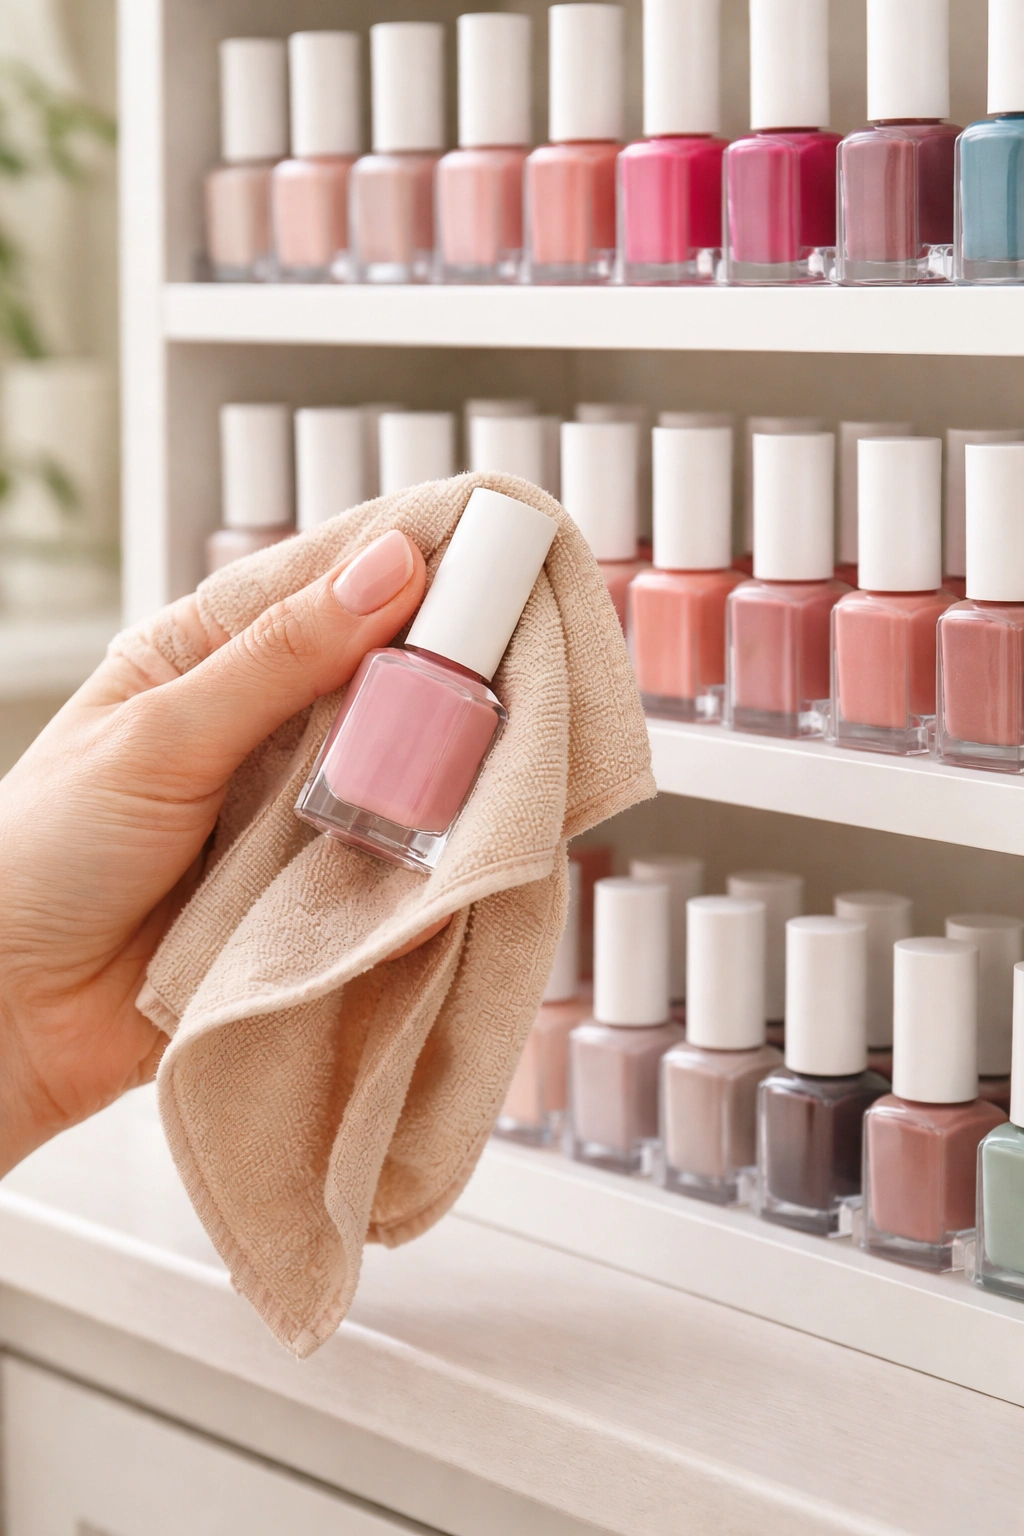
Regular cleaning and dusting prevents your polish from looking dingy. Once a month or so, quickly wipe down your bottles and shelves with a soft cloth to remove dust. If polish has hardened around bottle necks, gently scrape it away with a plastic tool—never use metal, which can scratch bottles. Make sure caps screw on tightly after cleaning.
Quarterly audits help you catch problems early. Go through your collection every three months and look for signs of expiration or separation. If a polish has become clumpy or separated beyond recovery, toss it. This prevents expired polish from taking up space in your organized system.
Updating your system as your collection grows keeps organization from becoming chaotic. When you buy new polishes, immediately categorize them and find their place in your system rather than letting them pile up. If you’ve organized by color, sort the new shade into the appropriate color family. If you’ve organized by frequency of use, decide whether it’s an everyday shade or occasional use and place it accordingly.
Rotating old polishes into your active collection prevents them from sitting unused until they expire. If you have seasonal shades, actually swap them out seasonally rather than just adding new polishes and never touching old ones. Set a goal to use every polish in your collection at least once a year.
Labeling everything clearly saves future you massive amounts of time. Whether you use chalkboard labels, printed labels, or simply organized your colors so logically that labels aren’t necessary, invest a few minutes in labeling. This is especially important if you have a very large collection.
Creating a simple inventory system sounds excessive but actually saves time and money. A simple spreadsheet or note on your phone listing what polishes you own prevents accidental duplicates and helps you remember what you have when shopping. Some collectors use phone apps specifically designed to track nail polish collections.
Breathing New Life Into Dried-Out Polish
You’ve organized your collection beautifully, and then tragedy strikes: you find a polish that’s become thick and clumpy. Before you trash it, know that you might be able to save it.
Polish thinner (not remover) is specifically designed to restore dried polish to its original consistency. A few drops of quality thinner can bring thickened polish back to life. You’ll find thinner at most beauty supply stores for just a few dollars, and a bottle lasts forever since you only use a few drops per polish. Add drops gradually and shake well—you can always add more, but you can’t take it out.
Polish remover can temporarily thin polish in a pinch, but it’s not ideal for long-term storage. While acetone-based remover will thin thick polish, it breaks down the formula and causes it to degrade more quickly afterward. It’s a temporary fix, not a permanent solution.
Proper preventive storage is your best defense against needing to rescue polish. Keep bottles upright, store in a cool location, and make sure caps are sealed tightly. Bottles stored properly will maintain their consistency far longer than those stored haphazardly.
Shaking your collection regularly prevents separation and thickening. Professional manicurists shake their polish bottles at least weekly to keep the formula mixed. If you have a larger collection you’re not using constantly, try shaking all your bottles once a week. It takes just a few minutes and significantly extends polish life.
Final Thoughts
Creating an organized nail polish collection isn’t a one-time project—it’s an investment in your daily experience. When finding the perfect polish takes seconds instead of minutes, when you can see your entire color range at a glance, when your polish lasts longer because it’s stored properly, the whole experience of doing your nails becomes more enjoyable.
The best organization system is the one that works with your habits and your space rather than against them. If you love looking at beautiful displays, go for wall-mounted visible storage. If you prefer minimal visual clutter, choose drawers and cabinets. If you travel frequently, invest in a quality portable case. There’s no wrong choice—only what’s right for you.
Start by assessing what you actually own and honestly deciding what stays. Then choose a storage location that keeps polish cool, dry, and away from direct sunlight. Select an organization method that makes sense to your brain and matches how you think about choosing colors. Invest in good storage—whether DIY or ready-made—that actually holds your collection properly and keeps bottles upright. Finally, commit to maintaining your system with regular cleaning and occasional audits.
A well-organized nail polish collection is genuinely something to celebrate. You’ve moved from chaos to clarity, from frustration to inspiration. Every time you open your perfectly arranged collection, you’ll feel that small satisfaction of knowing exactly what you have and being able to find exactly what you want. That’s the magic of good organization: it transforms something from a source of stress into a source of joy.
