

Snake print nails have evolved far beyond a simple trend—they’ve become a staple for anyone who wants to inject personality and edge into their manicure routine. Whether you’re drawn to the mysterious allure of reptilian scales, the bold statement of serpentine patterns, or the sophisticated sheen of chrome finishes, snake nail designs offer an incredible range of possibilities. The beauty of this aesthetic is that it works just as well on short, natural nails as it does on long acrylics, making it accessible to everyone from minimalist enthusiasts to maximalist nail art lovers.
The appeal of snake nails lies in their versatility. You can go subtle with a single snake accent on one nail, or go full reptilian with an entire set covered in scales and patterns. From matte finishes that evoke a sophisticated, understated vibe to glittering, 3D embellishments that practically leap off your fingertips, there’s a snake nail interpretation for every mood, occasion, and personal style. The patterns mimic real snake species—from the emerald greens of a green mamba to the deep blacks of a black mamba—or they venture into abstract, artistic territory with impossible colors and creative interpretations.
What makes snake nails particularly compelling is that they strike the perfect balance between edgy and elegant. Unlike some bold nail trends that can feel costume-like or dated, snake prints have a timeless quality rooted in nature’s own artistry. They pair beautifully with both casual and formal outfits, and they work year-round. Plus, there’s something undeniably empowering about wearing nails that command attention and express your fearless approach to beauty.
1. Classic Black and White Snake Scales
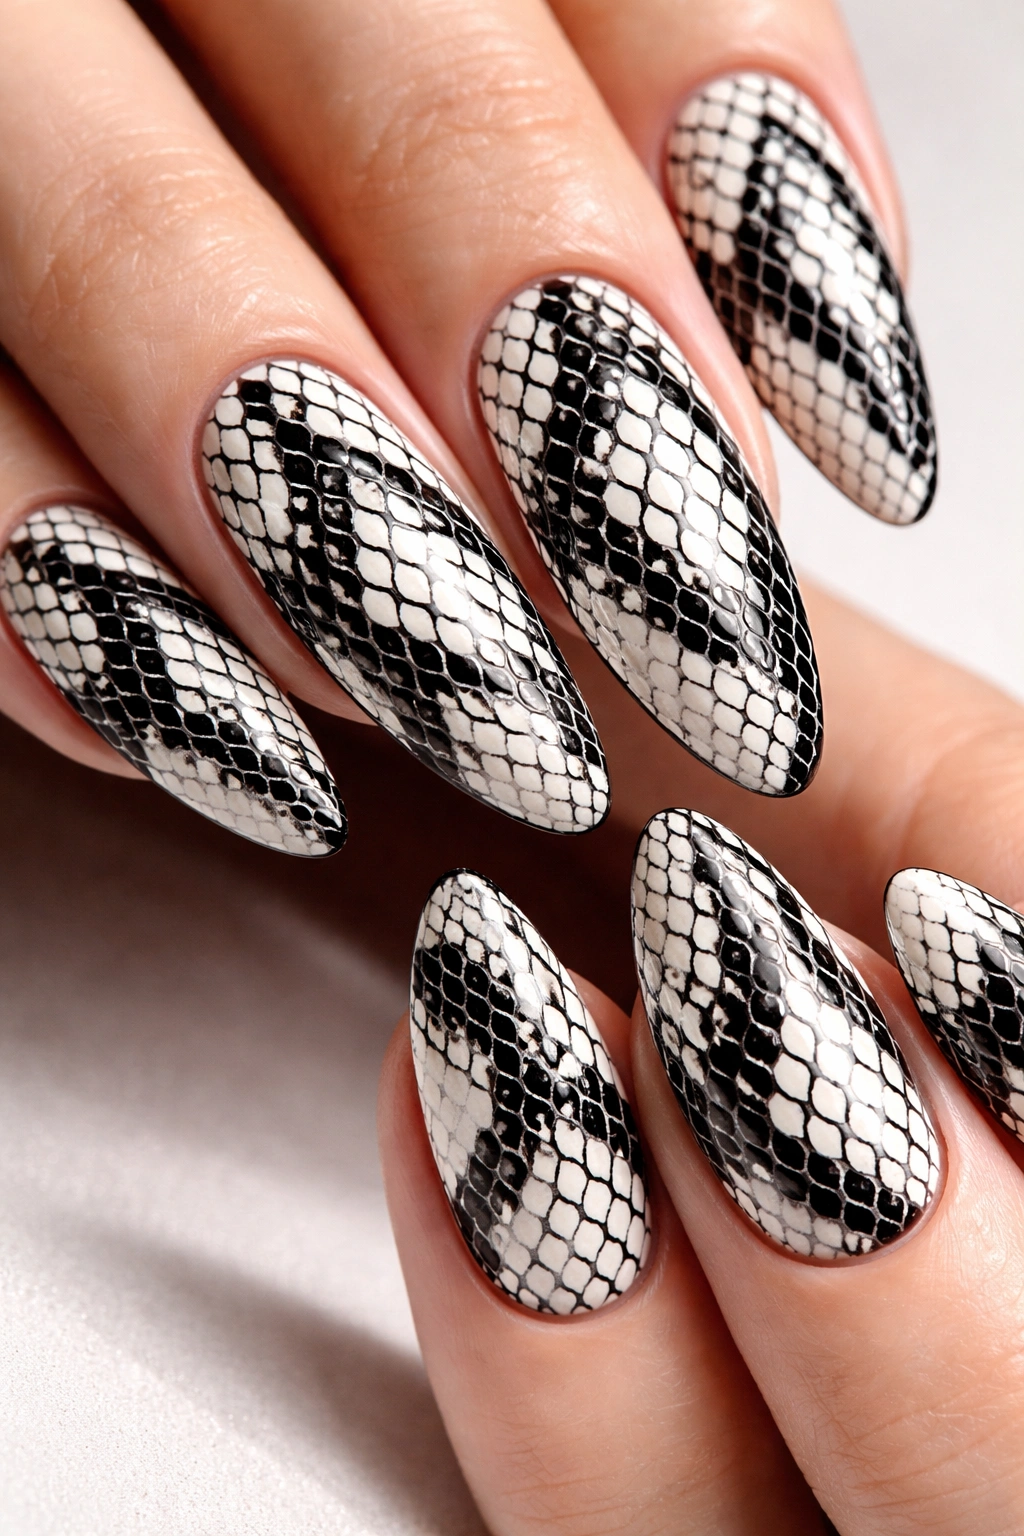
The timeless appeal of black and white never gets old, and when applied to snake nail art, it becomes an instantly recognizable, effortlessly chic design. This is the design you reach for when you want impact without overwhelming your look. The high contrast between the two colors creates visual drama while maintaining a sophisticated, understated elegance that works for any setting—whether you’re heading to the office or out for a night on the town.
Start with a crisp white base coat applied to all nails, allowing it to dry completely. Once dry, use a fine-tipped brush or nail art pen to carefully paint the intricate scale pattern in glossy black. The key to pulling off this design is precision and patience. Draw thin, overlapping curved lines that mimic the texture of real snake skin, creating a honeycomb-like pattern across each nail. Some nail artists recommend using a dotting tool to create circular variations within the scale pattern, which adds depth and realism to the design.
Why This Design Works
The classic black and white combination has enduring appeal because it’s inherently sophisticated. There’s no trend-chasing involved—this design looks good whether you’re wearing it this season or five years from now. The monochromatic palette means it pairs with literally any outfit in your wardrobe, from minimalist blacks and whites to bold statement colors. It’s also genuinely forgiving for DIY application because imperfections often blend into the overall pattern rather than standing out.
How to Apply It at Home
If you’re attempting this design yourself, invest in a quality thin brush with excellent control. Practice your scale pattern on a piece of paper or a nail wheel first to build muscle memory and confidence. Work in a well-lit space and take your time with each nail. Some people find it easier to draw guidelines lightly in pencil first (yes, on actual nails), then trace over them with black polish. Use a matte top coat if you want a sophisticated, understated finish, or opt for a glossy top coat for more dramatic shine that really makes those scales pop.
Pro tip: If your hand isn’t steady enough for freehand work, use a nail stamping kit designed for scale patterns. Many brands offer pre-made stamps that create perfect snake skin textures in seconds. There’s no shame in using tools to achieve the look you want.
2. Metallic Gold Snake on Deep Green
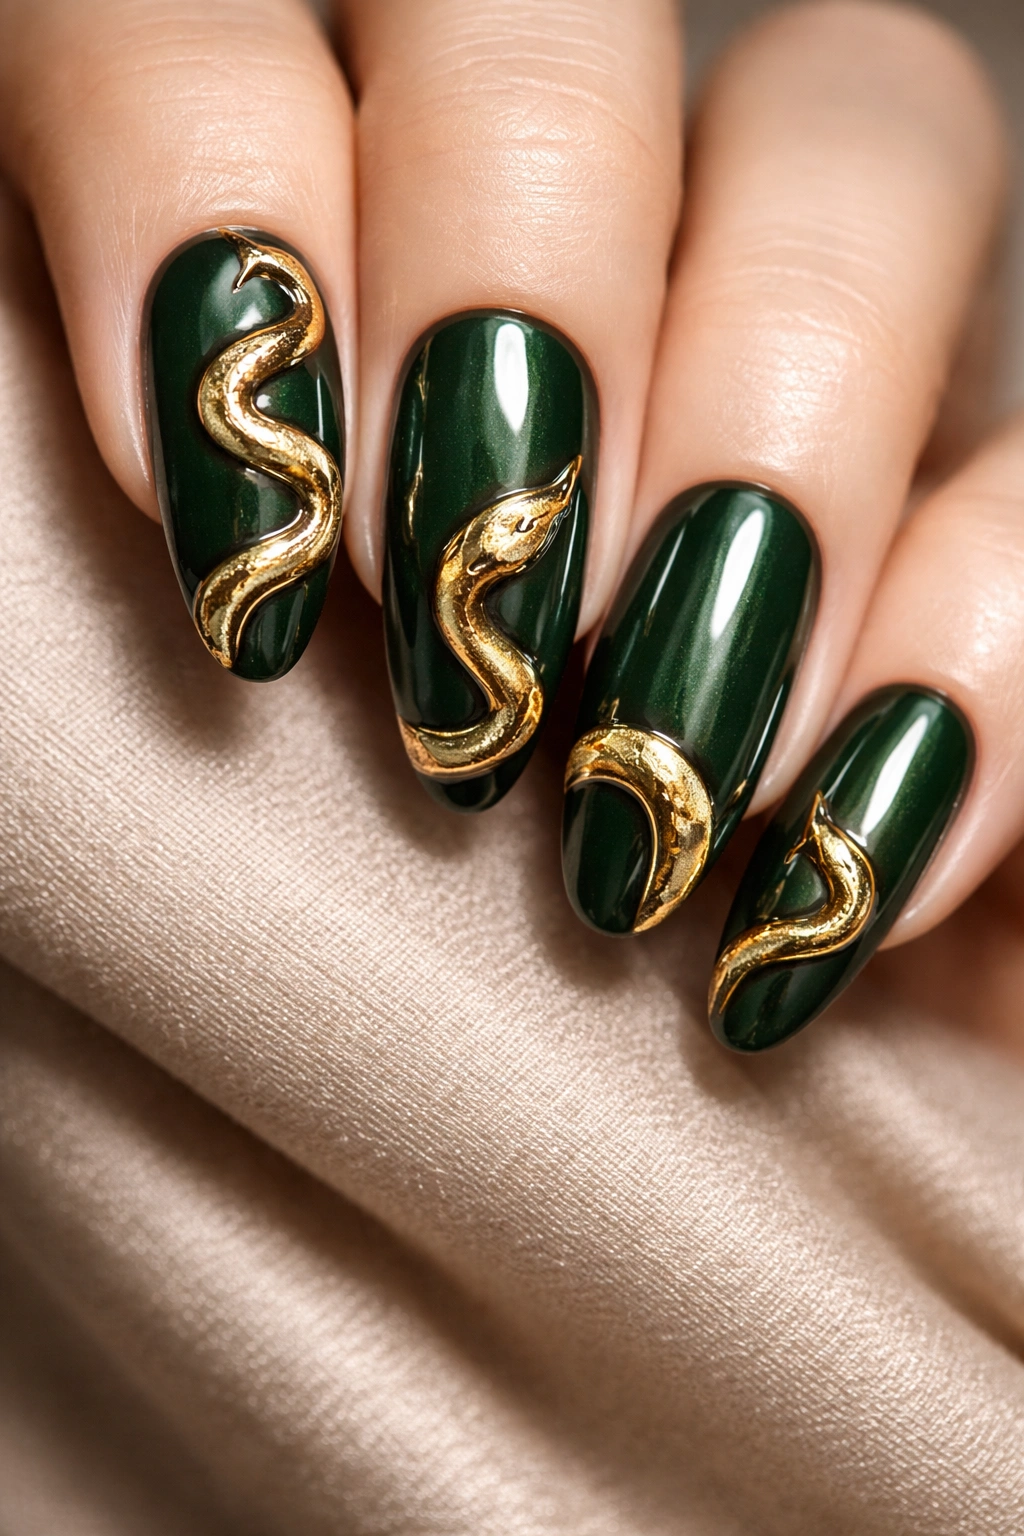
This combination channels both luxury and nature, creating a manicure that feels simultaneously sophisticated and daring. The deep forest green base evokes the natural habitat of snakes, while the gleaming metallic gold coiled snake creates an opulent, high-end finish. This design works beautifully on medium to long nails and pairs especially well with autumn and winter wardrobes.
Begin by applying two coats of a rich, deep forest green polish to all nails, allowing each coat to dry completely between applications. The goal is full opacity and a beautiful, jewel-toned depth. Once dry, use a thin brush and metallic gold polish to paint a serpent coiling across the nails. Rather than depicting individual scales, this approach focuses on the snake’s form—a sinuous, winding body that might start on one nail and continue across several others. Add fine details like a tiny golden head on the final nail, perhaps with a subtle line representing the snake’s mouth.
Why This Design Works
The green-and-gold pairing hits the sweet spot between natural and luxurious. Green immediately reads as earthy and sophisticated, while gold adds glamour without feeling overdone. This combination flatters a wide range of skin tones and works equally well whether you prefer understated elegance or subtle luxury. The design itself tells a story across your nails, creating visual interest and movement.
How to Customize This Look
If deep forest green feels too intense for your preference, try sage green, olive, or even a muted teal for a slightly softer take on the same concept. You can also switch up the metallic accent—rose gold offers a warmer, more delicate vibe, while silver creates a cooler, more modern aesthetic. For extra luxury, add tiny crystals or rhinestones along the snake’s body to create a jeweled serpent effect.
Pro tip: Metallic polishes work best over a slightly tacky base. If you find your gold polish sliding around on the green base, use a thin matte top coat as your base layer before applying the metallic gold, which gives it better grip and control.
3. Neon Pink and Black Cobra Design
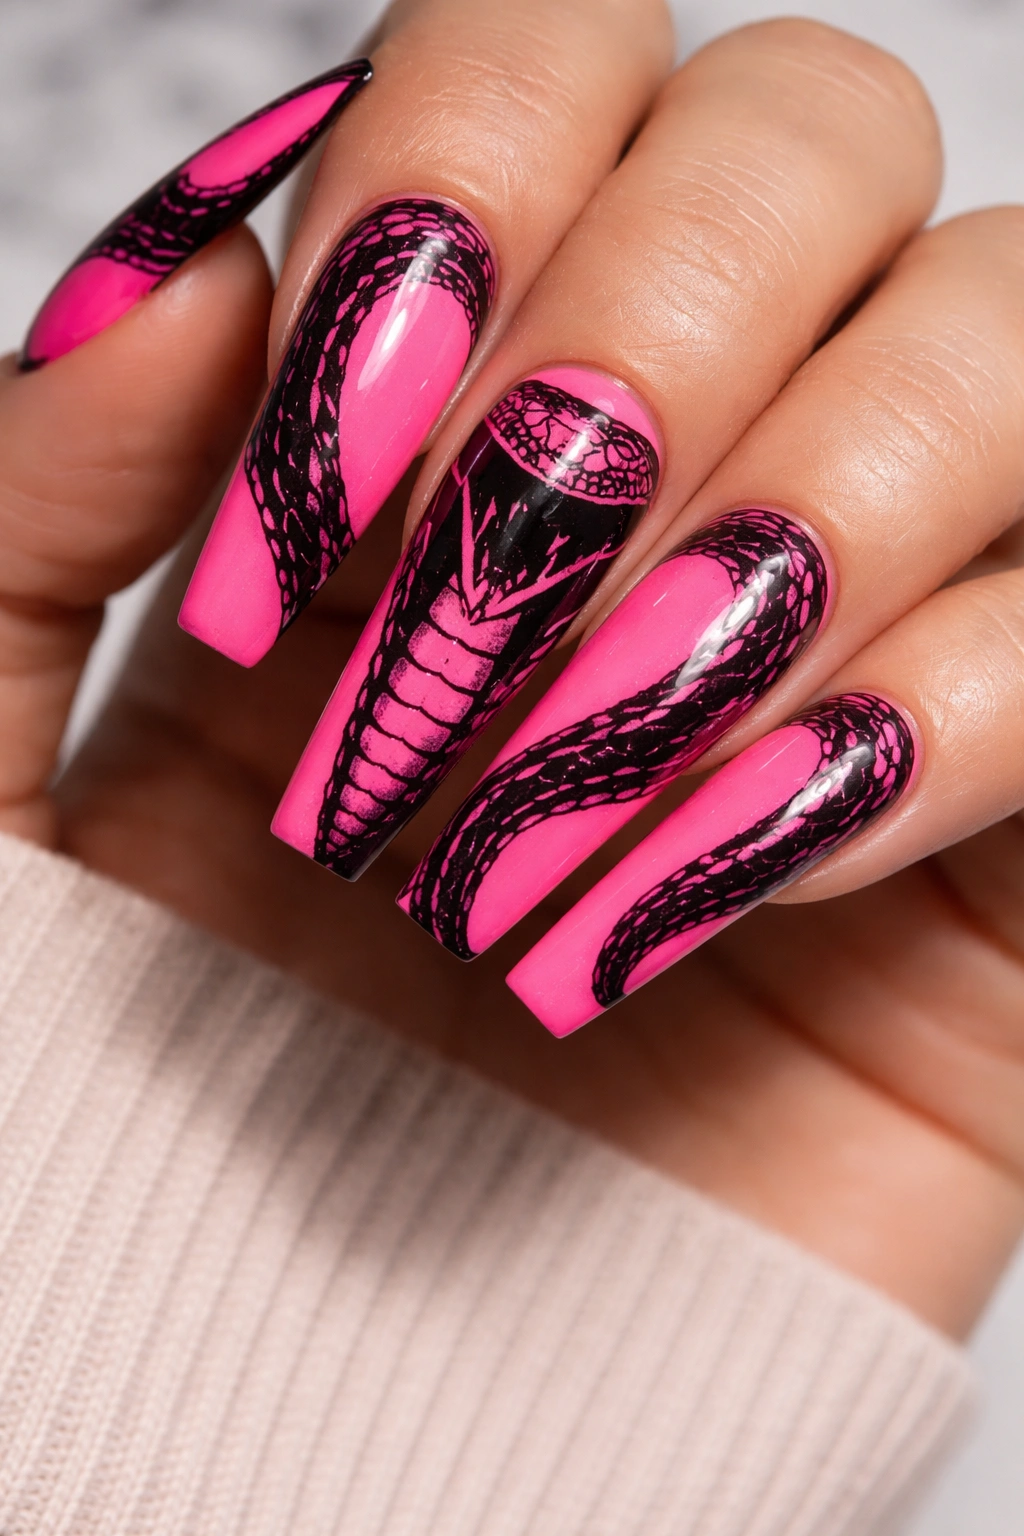
If you want your nails to make absolutely zero apologies for taking up space, this is your design. The electric neon pink paired with stark black creates visual impact from across the room. This is the manicure for when you’re feeling bold, confident, and unapologetically yourself. It’s especially striking on coffin-shaped or stiletto nails, which give the cobra design room to truly shine.
Paint a bold neon pink base across all nails using a quality formula that provides full coverage in one or two coats. Once completely dry, use black polish and a thin brush to paint a detailed cobra design on each nail. Focus on creating a menacing yet beautiful cobra head with fangs, perhaps with the hood flared open for maximum drama. The body of the snake can flow down the nail in elegant curves, or you can create a more geometric, abstract cobra design depending on your artistic preference.
Why This Design Works
Neon pink is impossible to ignore, and that’s precisely the point. This color combination works because it’s inherently attention-grabbing but still fashion-forward and modern. The stark black lines create definition and prevent the neon from feeling chaotic, instead channeling that energy into a focused, intentional design. It’s a design that works for people who love making statements and aren’t concerned with blending in.
Creating Visual Impact
To intensify the drama, consider using a matte finish for the neon base and a glossy finish for the black cobra. This contrast between finishes adds another layer of visual interest. Alternatively, add fine white highlights or details to the cobra to create dimension and depth, making it appear almost three-dimensional. Tiny rhinestones on the cobra’s eyes can add an extra touch of edge.
Pro tip: Neon polishes can be tricky to work with because they often have thinner consistency than regular polishes. Use a good base coat to protect your nails, and apply thin, even layers rather than one thick coat. This prevents streaking and gives you better control over the color intensity.
4. Matte Finish Snake Skin in Earth Tones
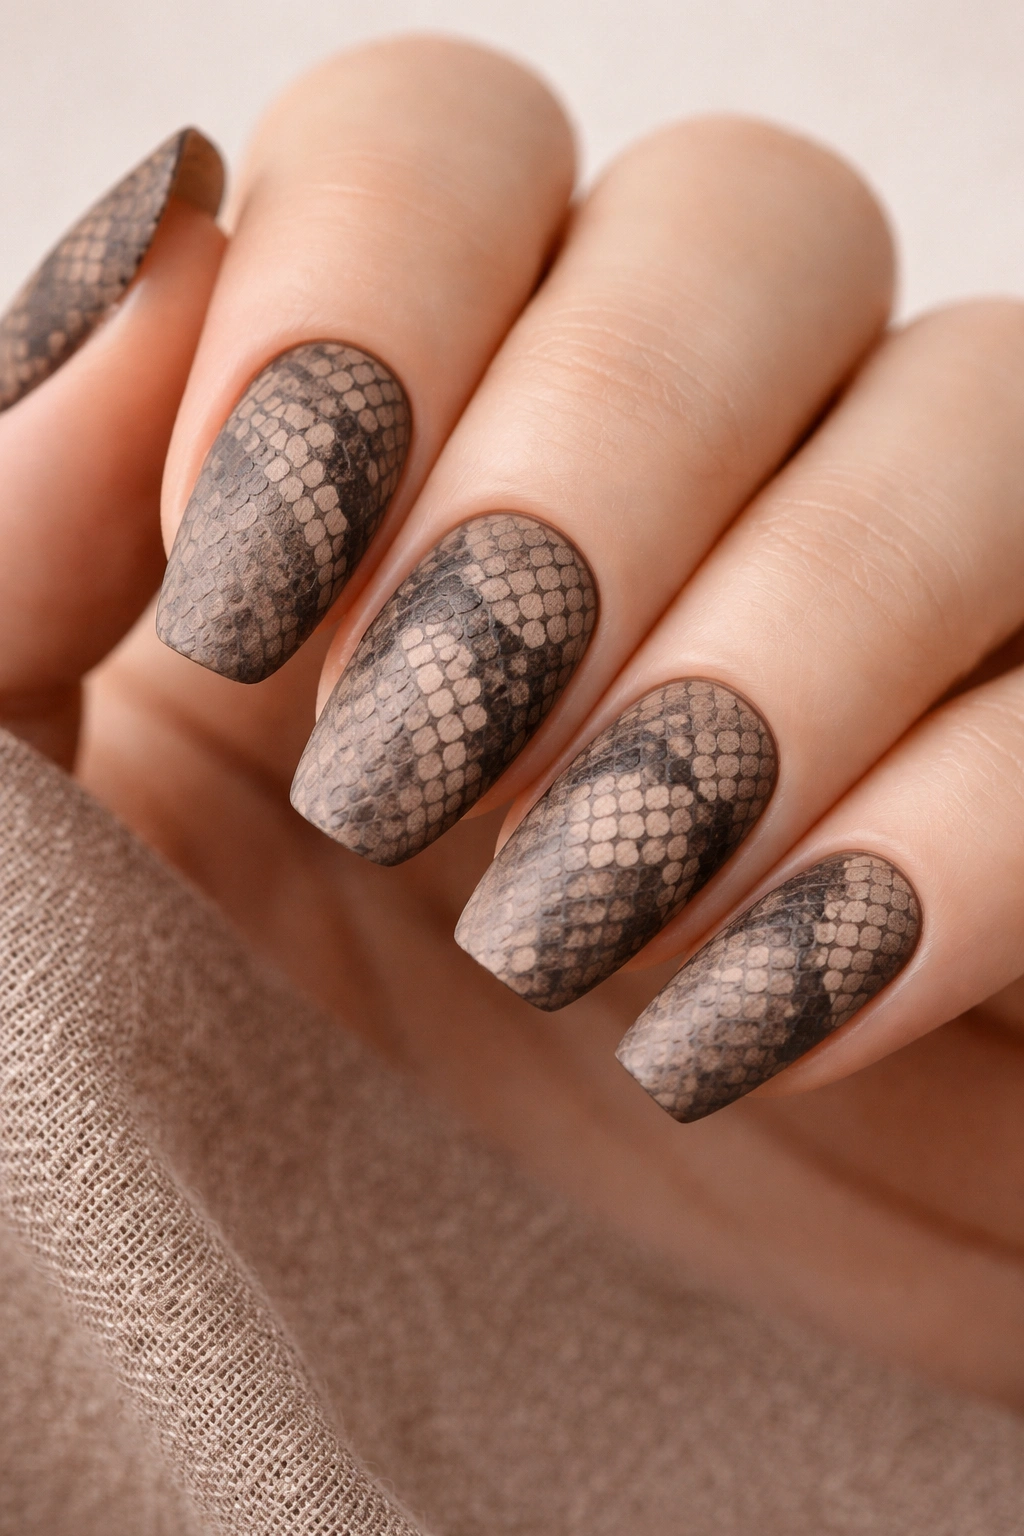
For those who prefer sophistication over sparkle, matte finish snake nails offer an understated elegance that feels mature and intentional. Earth tones—warm browns, taupes, creams, and charcoal grays—create a design that reads as refined rather than flashy. This is the option for people who love edgy aesthetics but prefer to express them quietly rather than loudly.
Start with a matte base coat in a warm beige or soft taupe. Once dry, use slightly darker tones—perhaps a warm brown or deep tan—to create the scale pattern across each nail. The matte finish naturally creates a softer appearance than glossy finishes, so even intricate scale work feels subtle and sophisticated. Many people find that matte finishes are actually easier to work with because small imperfections blend seamlessly into the texture rather than reflecting light and drawing attention to them.
Why This Design Works
Matte finishes have a luxurious, high-end feel that instantly elevates any manicure. The earth tone palette is inherently wearable—it goes with virtually any outfit and flatters every skin tone. This design reads as intentional and thoughtful rather than trendy, making it perfect for people who want their nails to reflect a curated aesthetic rather than chasing the latest viral trend.
Technique for Matte Finishes
Creating a matte effect is actually quite straightforward. You can either use matte top coat over any polish design, or work entirely with matte polishes from the start. If you’re using regular glossy polish, simply finish with a quality matte top coat. Some people prefer to partially matte their design—applying matte finish only to the scale pattern while keeping the base glossy, or vice versa. This mixed approach adds visual interest and prevents the design from feeling flat.
Pro tip: Matte finishes are more prone to chipping than glossy ones, so consider applying an extra layer of matte top coat for durability. Also, matte finishes tend to hide imperfections better, making them ideal if you’re doing freehand nail art at home.
5. 3D Snake Embellishment with Gel Polish
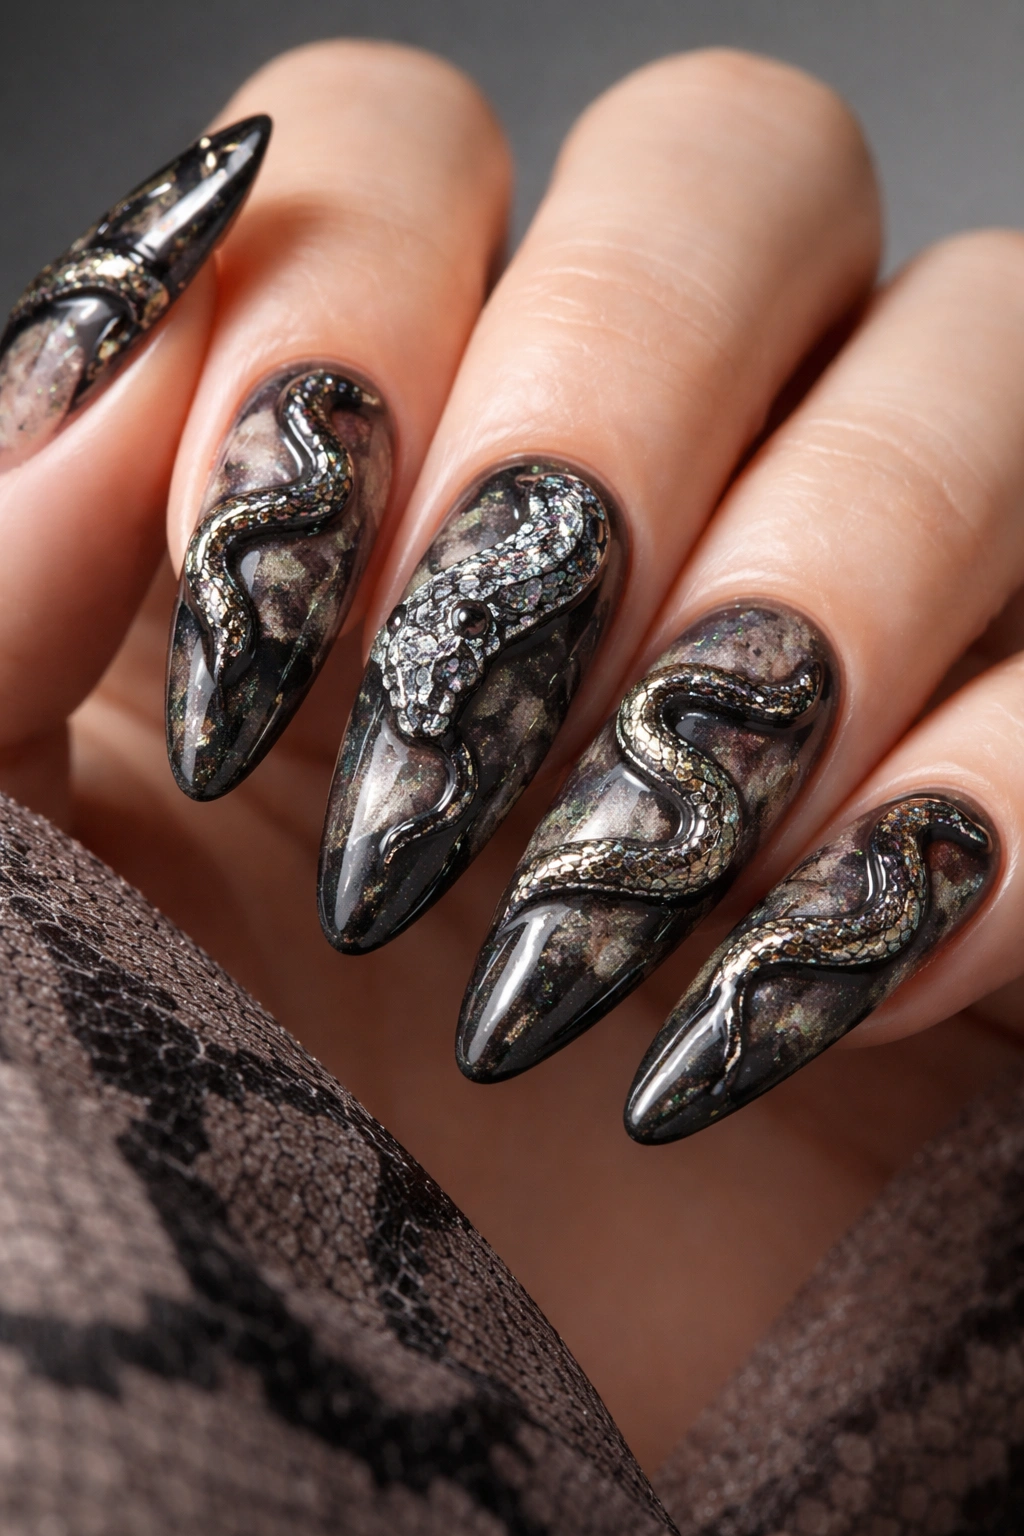
For maximum drama and texture, 3D snake embellishments take nail art into genuinely sculptural territory. Using builder gel or acrylic, you can create raised snake forms that literally stand out from the nail surface. This approach transforms your nails from flat designs into wearable art installations, perfect for people who love statement pieces and aren’t afraid of bold texture.
This technique requires either gel and UV curing capabilities or acrylic application skills. Using a builder gel formulated for 3D work, carefully sculpt a snake shape directly onto the nail surface. Start with a colored base coat, then apply the builder gel in the shape of a coiled or straight snake, building up layers to create dimension and height. Once cured under UV light, you can paint over the gel sculpture with additional colors or apply metallic accents to enhance the effect. Seal everything with a glossy top coat to create shine and protect the design.
Why This Design Works
3D nails are literally impossible to ignore, and that visual drama translates to serious confidence-building. The texture adds an element of luxury and craftsmanship that flat designs simply can’t match. People will ask about your nails, compliment them, and want to touch them. This design works particularly well for special occasions, nights out, or anytime you want to feel genuinely elevated and special.
Managing 3D Nails
While these nails are absolutely stunning, they do require some lifestyle adjustments. They’re more fragile than standard manicures and require careful handling, especially during the first few days after application when the gel is still settling. Avoid rough activities, washing dishes without gloves, and excessive pressure on the nails. With proper care, though, 3D snake nails can last 2-3 weeks without chipping or peeling.
Pro tip: If you’re having 3D nails done professionally, communicate clearly with your nail artist about the final design. Bring reference photos showing exactly what you’re envisioning. If you’re DIY-ing this, practice on nail tips first before working on your actual nails—3D work is genuinely challenging and takes skill to execute cleanly.
6. Holographic Snake Print with Chrome Effect
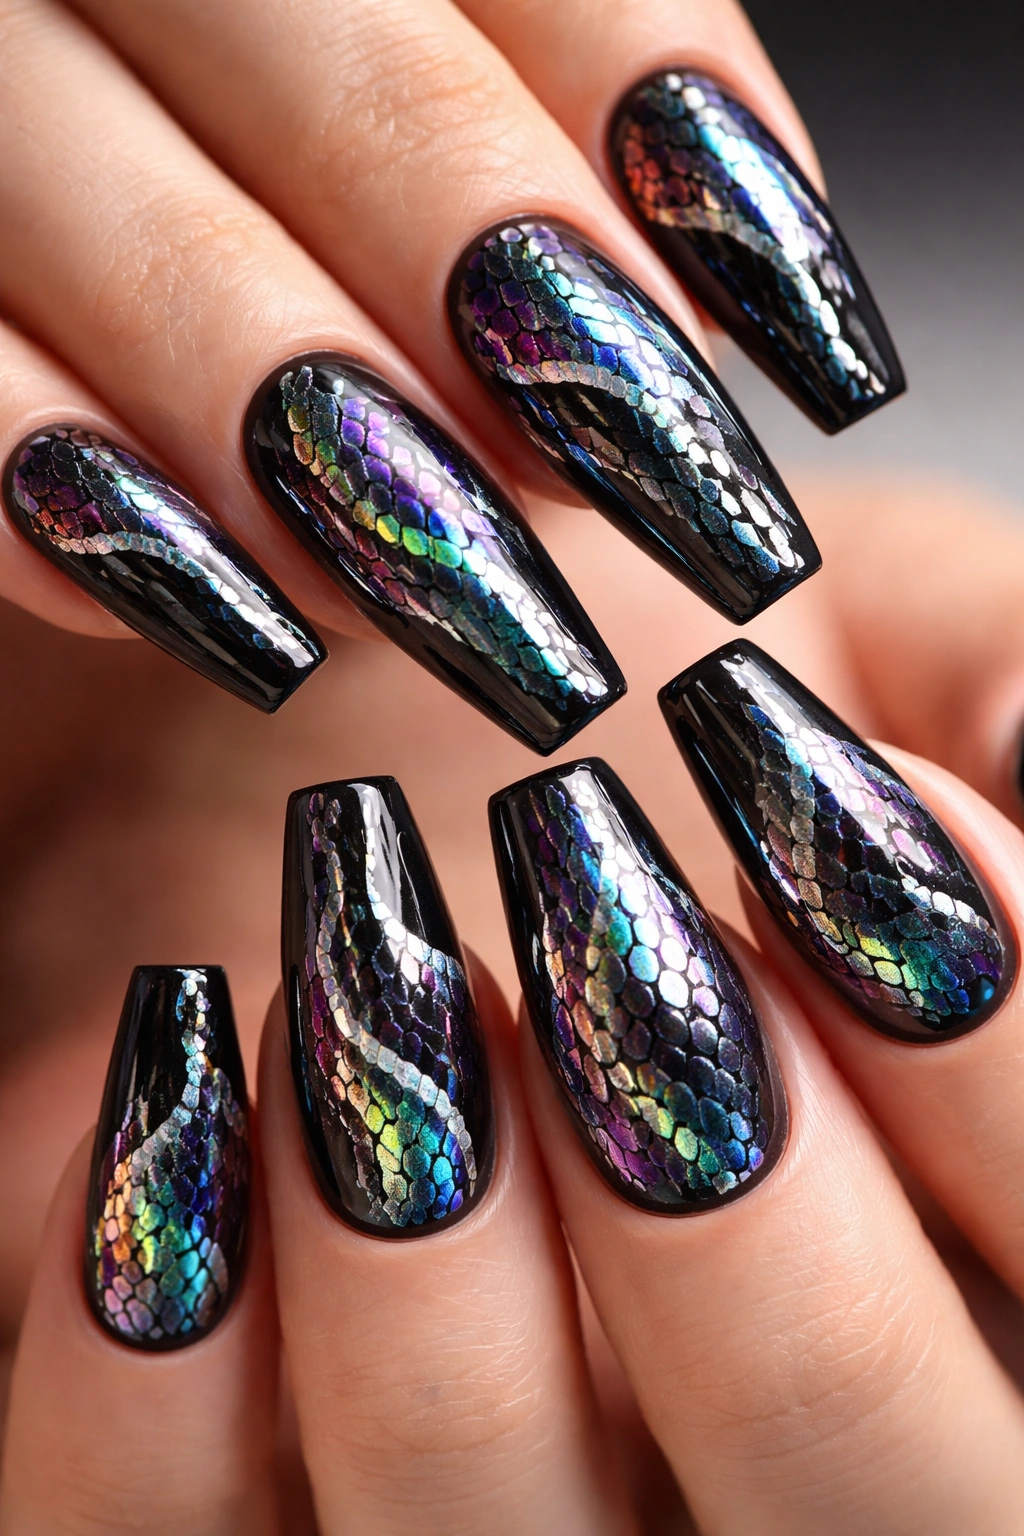
Holographic and chrome finishes create an otherworldly, almost iridescent snake nail design that shifts colors and catches light in mesmerizing ways. This aesthetic feels modern, futuristic, and utterly luxe. When light hits these nails from different angles, the colors seem to dance and shift, creating an effect that’s genuinely captivating. This design works beautifully on both short and long nails.
Begin with a dark base coat—black, deep blue, or charcoal work particularly well—allowing it to dry completely. Once your base is ready, you can apply holographic nail foil or chrome powder to create the snake print. Many nail artists recommend using a sticky top coat before applying foil, which helps it adhere properly to the nail surface. Work in sections, applying the foil and pressing gently to ensure full contact. Alternatively, use chrome powder applied with a specialized brush or sponge, which requires a bit more technique but creates a similarly stunning effect.
Why This Design Works
Holographic and chrome effects feel incredibly luxurious and modern. They appeal to people who love technology-forward beauty and appreciate the cutting-edge side of nail art. The fact that the design shifts colors depending on the lighting angle makes it endlessly interesting—you’re essentially wearing a nail design that never looks quite the same twice. It’s perfect for people who love having their nails be a conversation starter.
Application Tips and Tricks
Holographic foil can be finicky, so take your time with application. Press gently but firmly to ensure the foil adheres without slipping. If you’re using chrome powder, invest in a good-quality powder and proper application tools—cheap chrome products often look chalky or dull rather than truly reflective. Some people find that applying chrome over a semi-matte finish works better than over a fully glossy finish, as it prevents the powder from sliding around.
Pro tip: These finishes are best sealed with a generous layer of top coat to protect them and prevent the foil or powder from flaking off. Consider using a gel top coat for maximum durability if you’re working with gel polish.
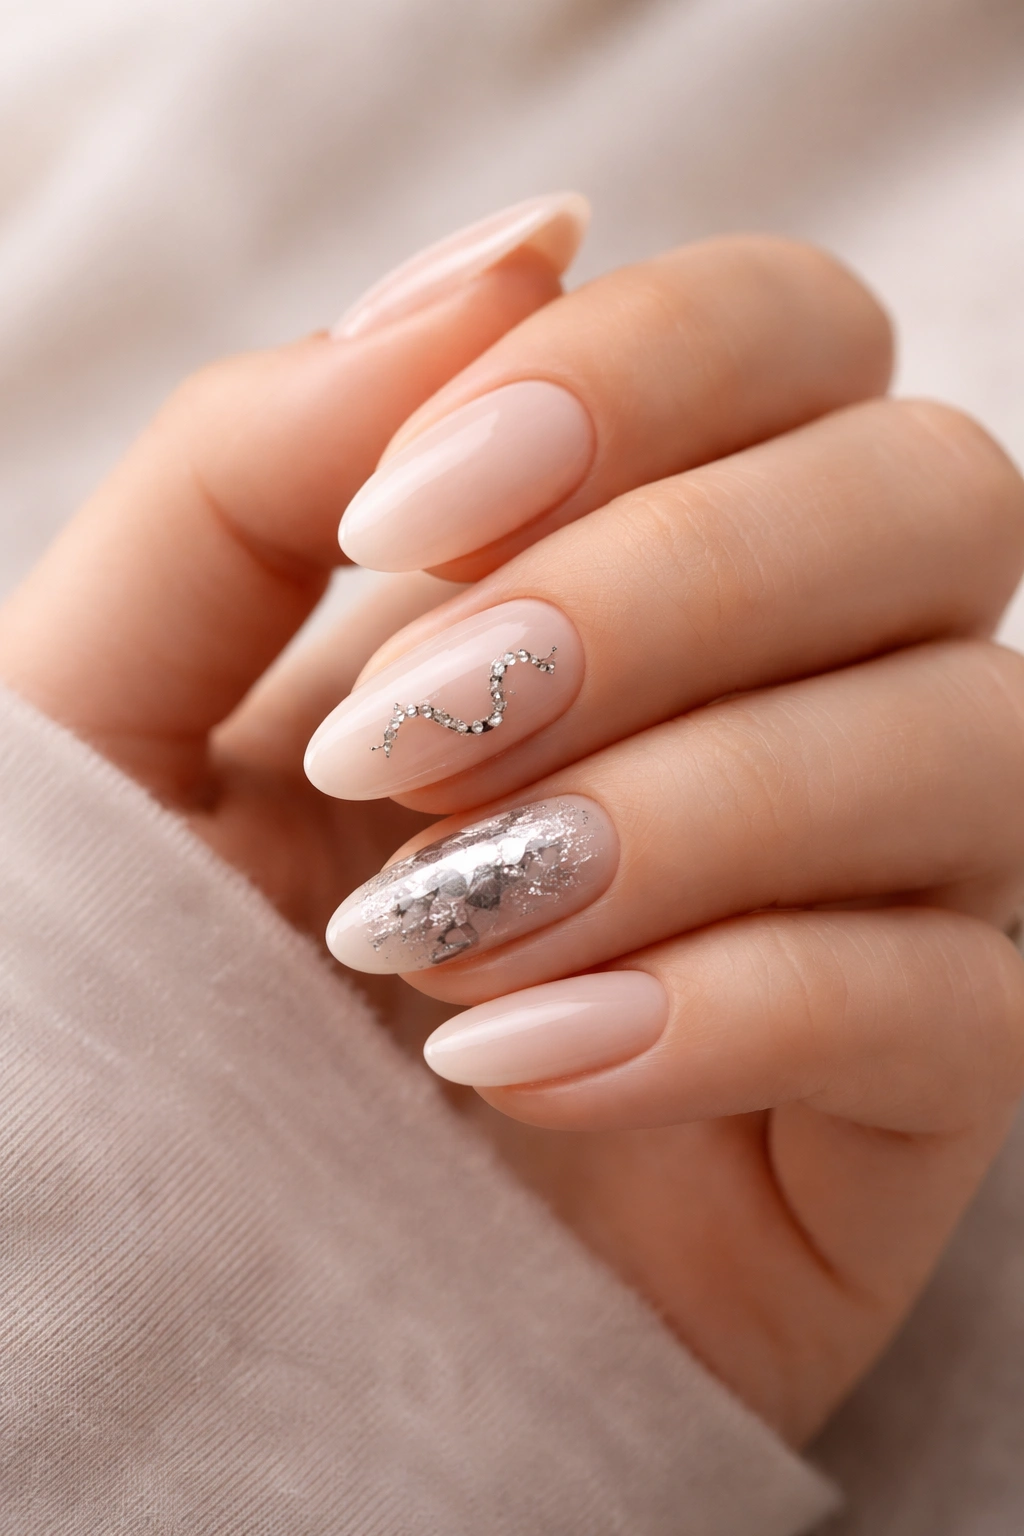
7. Minimalist Snake Accent on Nude Nails
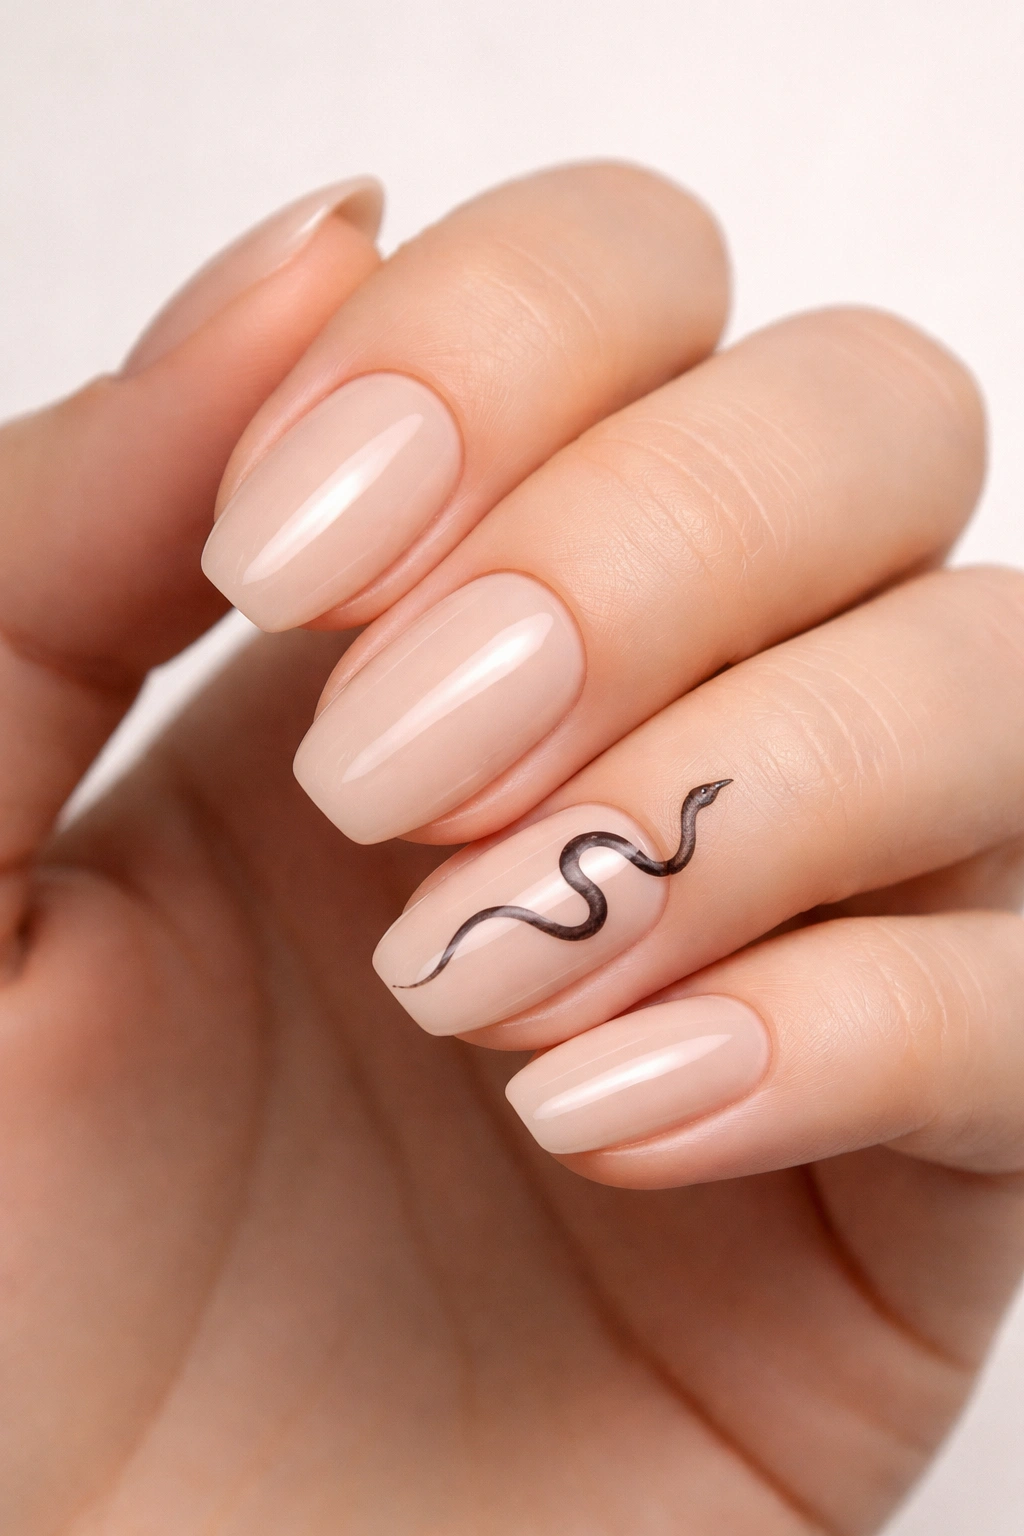
Sometimes less is genuinely more, and a minimalist approach to snake nails delivers sophisticated impact without overwhelming your overall aesthetic. This design features a simple snake silhouette or minimal scale pattern on just one or two accent nails, while the remaining nails stay in a clean, neutral nude shade. It’s the perfect choice for professional settings, understated personal style, or anyone who appreciates the power of restraint.
Paint all nails with a neutral nude or warm beige polish that complements your skin tone. Allow this to dry completely. On one or two accent nails—typically the ring finger or thumb—use a thin brush and black, charcoal, or a contrasting metallic polish to paint a single, minimalist snake. This could be a simple line drawing of a coiled snake, a single serpent silhouette, or just a few graceful curved lines that suggest a snake’s movement without being literal.
Why This Design Works
Minimalist design is inherently sophisticated and timelessly elegant. By keeping most of your nails neutral and reserving the snake design for accent nails, you create a manicure that works in virtually any context—from a corporate office to a casual coffee date. The restraint actually makes the design more striking because it forces the eye to focus on those carefully executed accent nails. This approach also makes the design more approachable for people who love snakes nails but want something they can wear daily.
Customizing the Minimal Approach
You can play with this design in several ways. Try different accent colors—metallic gold, rose gold, or silver all work beautifully against nude bases. You could also reverse the concept, using nude accent nails with one or two nails in a bold color featuring the snake design. Some people love adding a single tiny rhinestone to the snake’s eye, which adds just enough sparkle to make the design feel special without being flashy.
Pro tip: When working with minimalist designs, precision becomes extra important. Because there’s so little visual information, any wobbles or imperfections become more noticeable. Take your time, work in good lighting, and consider using a nail art pen rather than a brush for cleaner lines.
8. Multicolored Skittle Snakes with Metallic Details
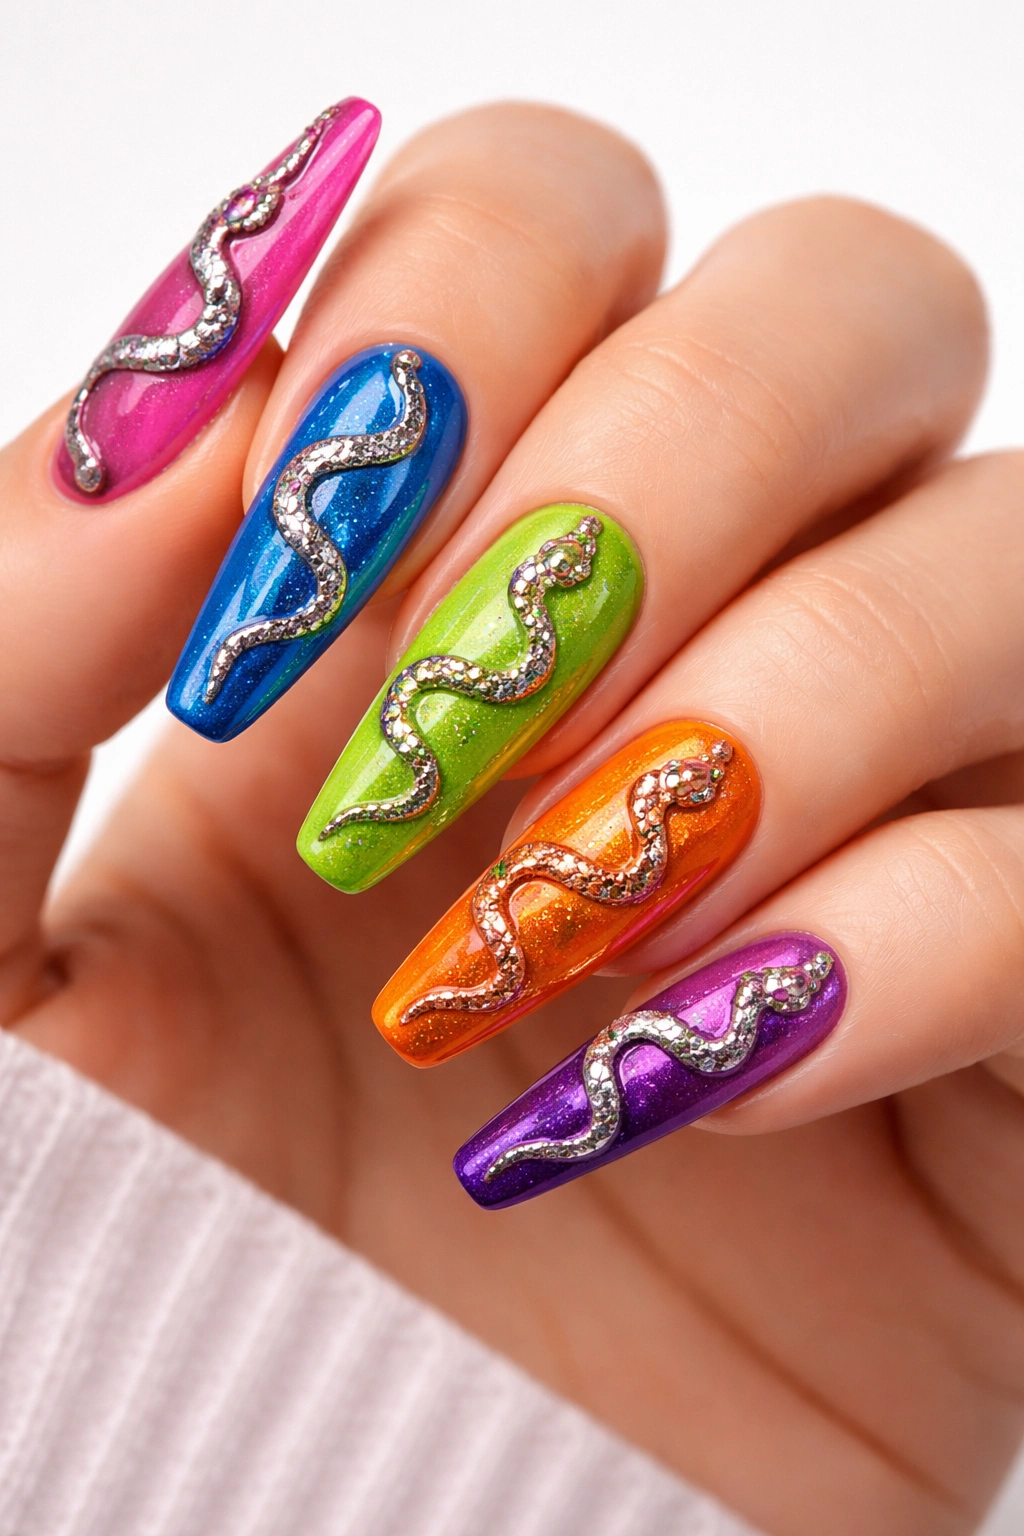
For the maximalist who loves color and isn’t concerned with cohesion in the traditional sense, multicolored skittle snakes offer pure, joyful nail art expression. This design features different colors on each nail—perhaps a purple snake on one nail, teal on another, pink on a third—creating a rainbow effect across your fingertips. Add metallic details, glitter, or sparkly finishes for extra glamour and dimension.
The technical approach here is flexible because the goal is expressive rather than perfectly coordinated. Paint each nail a different color base—jewel tones work particularly well for this design, but you can also use pastels, neons, or any colors that make you happy. Once each base color dries, add a snake design in a complementary or contrasting color on each nail. For extra visual impact, consider adding metallic accents, glitter, or rhinestones that coordinate with each color but aren’t identical across all nails.
Why This Design Works
This design is pure self-expression. It’s for people who reject the idea that a manicure needs to be perfectly coordinated or “match.” Instead, this approach celebrates individual creativity and joy. Interestingly, while the concept seems chaotic, the cohesion comes from the consistent snake element across all nails—the repetition of that theme ties everything together despite the color variation.
Making It Feel Intentional
The key to pulling off multicolored nail art is intentionality. Rather than randomly selecting colors, choose a palette—perhaps all jewel tones, or all pastels, or all neons—that creates a sense of harmony despite the variation. Alternatively, use metallics and glitter as the unifying element, making sure every nail features at least some metallic detailing. This creates visual coherence even when the base colors are wildly different.
Pro tip: Skittle nail designs actually hide imperfections beautifully because the eye is so busy taking in all the color variation that small mistakes blend right in. This makes it a surprisingly forgiving design for at-home nail art experiments.
Final Thoughts
Snake print nails represent so much more than a simple design trend—they’re a form of self-expression that allows you to communicate your style, confidence, and personality through your fingertips. Whether you’re drawn to the timeless elegance of black and white scales, the luxurious appeal of metallics and earth tones, or the bold statement of neon colors and 3D embellishments, there’s genuinely a snake nail aesthetic for everyone.
The beauty of this particular trend is its incredible versatility and longevity. Unlike some nail designs that feel dated after a single season, snake nails feel just as relevant and compelling year after year. They work across contexts, seasons, and personal styles, making them a genuinely wearable choice rather than just a fleeting trend. Whether you’re getting them done professionally or attempting them at home, the key is choosing the design that resonates most with how you want to feel—edgy, sophisticated, playful, or all of the above combined into one stunning manicure.
Start with whichever design speaks to you most, gather your supplies or book your appointment, and embrace the confidence that comes with wearing nails that make a statement.
