

Cherry blossom nails have a timeless appeal that goes far beyond a single season. These delicate floral designs capture something magical—the brief, beautiful moment when nature bursts into bloom—and transform it into wearable art on your fingertips. Whether you’re drawn to soft pastels, bold graphics, or intricate hand-painted details, cherry blossom nail designs offer incredible versatility that works for casual days, special events, or whenever you want your nails to make a thoughtful statement.
The beauty of cherry blossom designs lies in their adaptability. You can wear them minimalist and understated on a nude base, or go full-expression with layered petals, metallic accents, and textured elements. Unlike trends that feel fleeting, cherry blossoms have a sophisticated, evergreen quality. They photograph beautifully, complement every skin tone, and work across different nail shapes and lengths. Real talk though—not every cherry blossom design is created equal, and some approaches are genuinely easier to execute or maintain than others.
We’ve curated ten cherry blossom nail ideas that span different skill levels, aesthetics, and occasions. These aren’t random designs; they’re carefully selected options that have genuinely resonated with people who want their nails to look thoughtful and polished. From the simplicity of accent nails to elaborate 3D sculptural pieces, there’s something here for everyone. Let’s dive into the designs worth your time and attention.
1. Soft Pink Aura with Delicate Blossoms
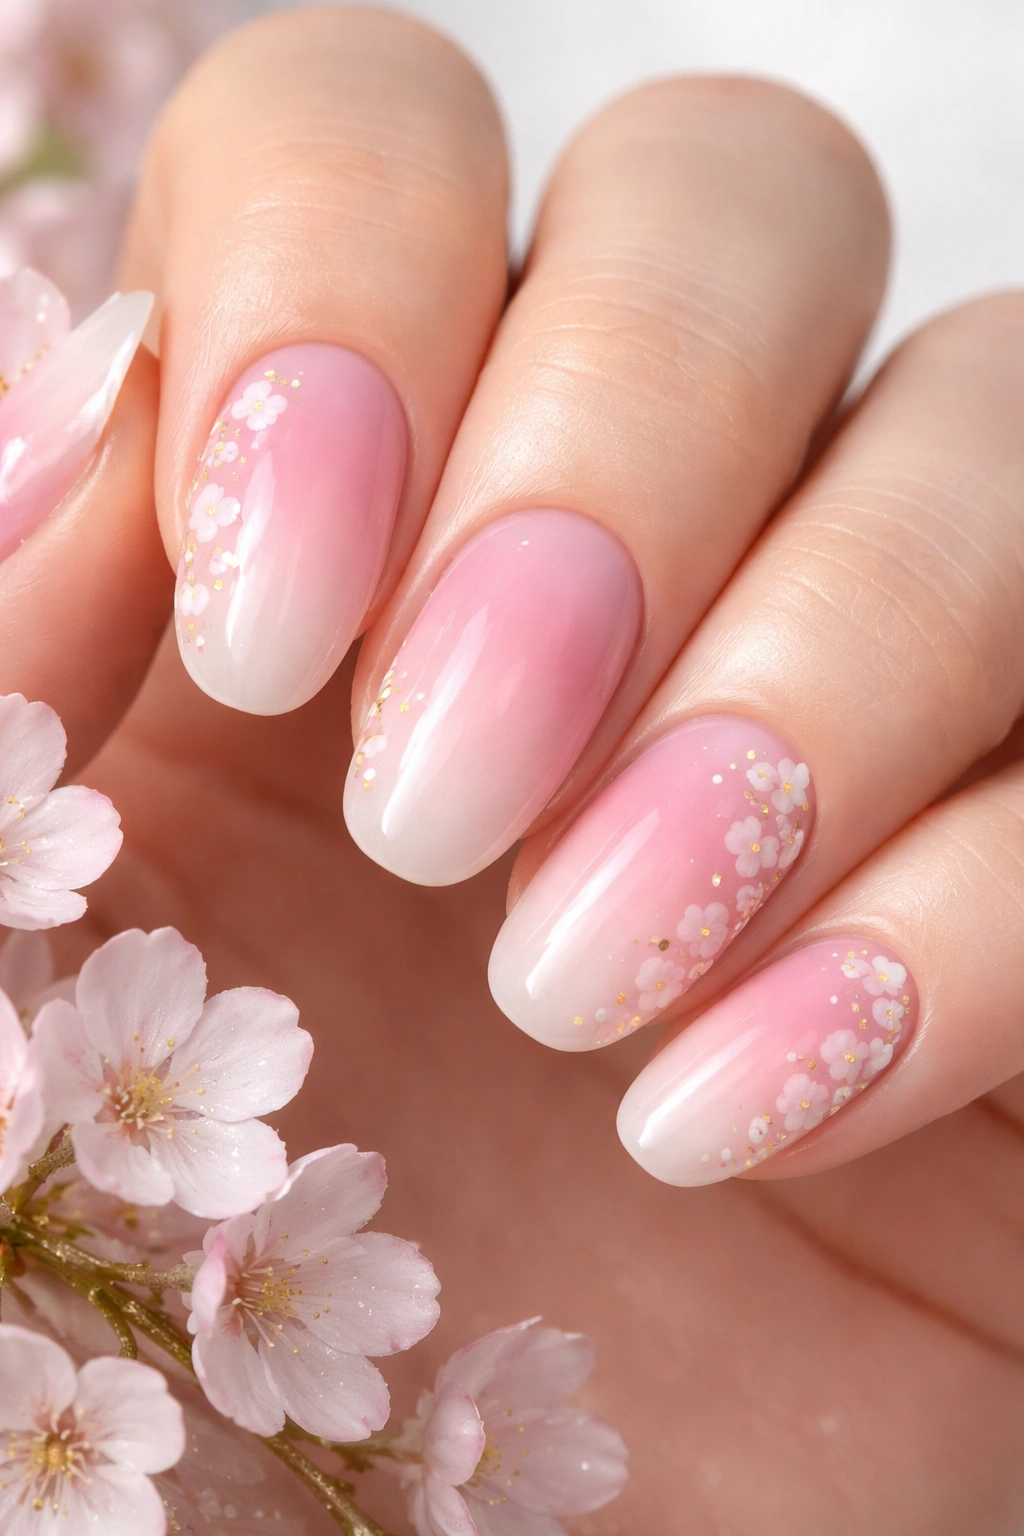
This design takes the trending aura nail look and gives it a cherry blossom twist. Start with a light pink base coat, then use a damp sponge to dab a slightly deeper shade of pink onto the center of each nail, creating that signature gradient effect that looks almost ethereal. Once that’s set, add tiny cherry blossoms in soft white or pale pink around the edges, so they frame the aura without overwhelming it.
Why This Works
The aura technique creates dimension and depth naturally, which makes even delicate floral details pop. The color transition from light to medium pink feels soft and romantic without being saccharine. This design works beautifully across all nail shapes and lengths, and it looks equally stunning in person and on camera. The genius of this combination is that if you’re not confident in hand-painting flowers, the aura effect is forgiving—slight imperfections actually add to the dreamy, watercolor quality. This is one of those designs that looks more complicated than it actually is to execute.
How to Make It Yours
- Start with a quality base coat to prevent staining, especially important with lighter pinks
- Apply two thin coats of your light pink polish, allowing proper dry time between layers
- Use a cosmetic sponge (the tiny triangular ones work best) slightly dampened with a touch of water to blend the darker pink into the center of each nail
- Let the sponged gradient dry completely before adding florals to prevent smudging
- A high-gloss top coat will enhance the aura effect and make the entire mani look polished and cohesive
Pro tip: If the aura effect feels too subtle on your first try, you can build it up gradually across multiple nails rather than perfecting it immediately.
2. Minimalist White Base with Gold-Outlined Blossoms
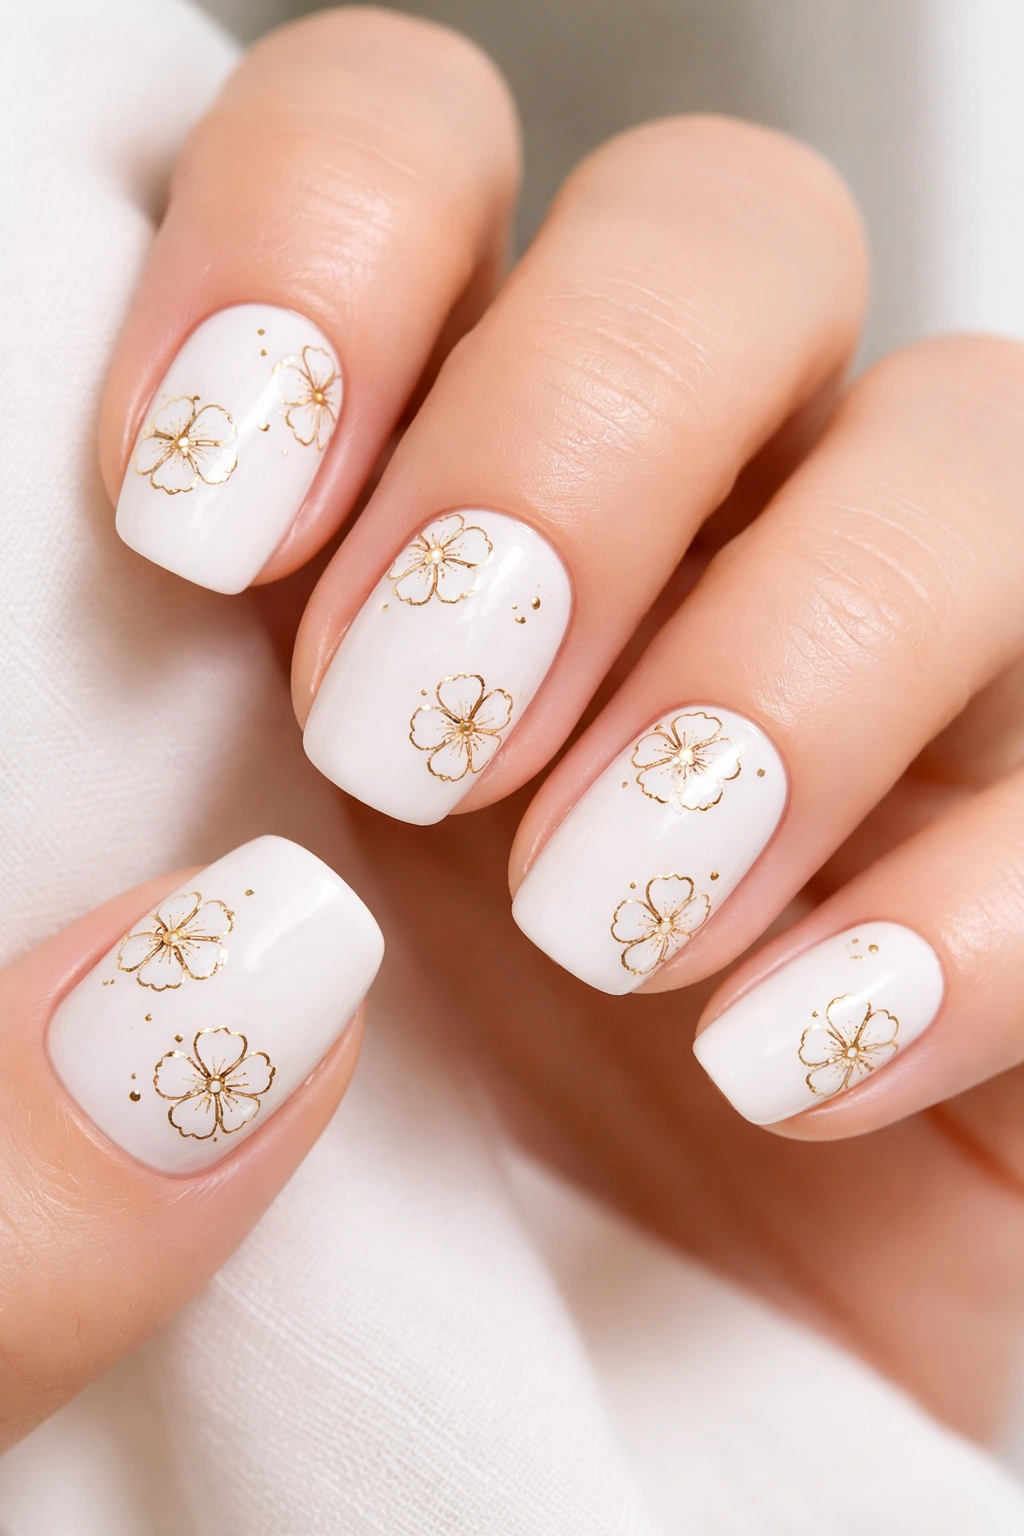
Sometimes restraint is the ultimate luxury. This design starts with a crisp, clean white base—either glossy or matte, depending on your preference—and then adds cherry blossoms outlined delicately in gold. The flowers themselves can be solid white with gold outlines, or you can create them as simple line drawings in gold with white fill. The key is keeping the blossoms small and intentional, perhaps one or two per nail positioned thoughtfully rather than scattered.
Why This Works
The stark contrast between white, gold, and negative space creates something visually striking without feeling busy. This design reads as elevated and sophisticated because it respects whitespace. It’s perfect for professional settings, formal events, or anyone who loves minimalist aesthetics. The white base acts as a blank canvas that lets the gold really sing, and gold detailing automatically elevates any design into luxury territory. Because the design is so minimal, it’s also forgiving—slightly uneven gold lines actually add to the hand-drawn charm.
How to Make It Yours
- Use a quality white polish that provides full opacity in two coats (cheap whites often look chalky)
- For gold outlines, invest in a good quality gold gel or metallic polish—drugstore brands often lack the pigmentation you need
- A very fine brush (or even a toothpick in a pinch) is essential for crisp lines
- Practice your flower shape on a piece of paper or a practice wheel before committing to your nails
- Seal everything with a glossy top coat to make the gold really pop against the white
Worth knowing: This design actually looks better with some imperfection—if your gold lines are slightly shaky or asymmetrical, it reads as intentional hand-painted artistry rather than a mistake.
3. Milky Pink with 3D Sculpted Petals
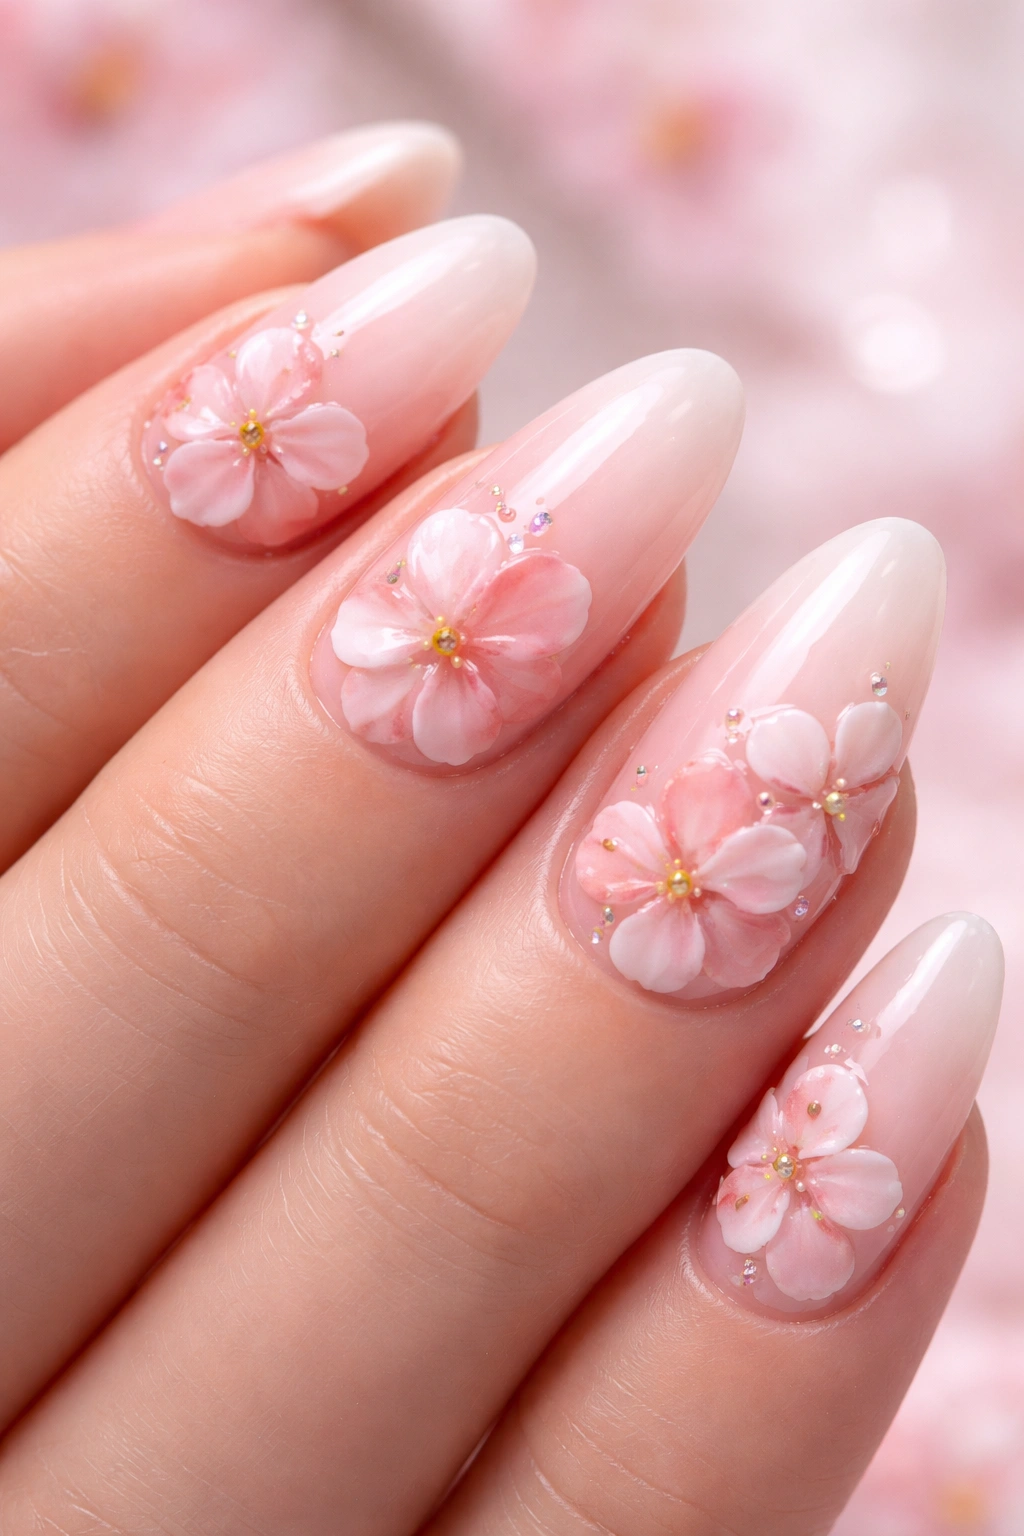
If you want your cherry blossom nails to literally have dimension you can feel, this is the route to take. Using acrylic or hard gel, sculpt tiny raised petals directly on the nail surface. Start with a milky pink base—that trendy “natural but better” shade that’s been everywhere—and then build delicate three-dimensional blossoms on top. The petals should rise slightly above the nail surface, and you can paint them in complementary pinks, whites, or even soft peach tones.
Why This Works
3D florals are pure visual impact. They catch light differently than flat designs, they feel luxurious, and they demonstrate genuine nail artistry. The milky pink base is forgiving—it’s essentially a neutral that works on every skin tone and complements the delicate flowers without competing for attention. Because the blossoms are dimensional, they remain the focal point even with minimal additional detailing. This design has longevity too; the 3D structure means the florals stay looking intentional even as your nails grow out, unlike designs that rely entirely on positioning.
How to Make It Yours
- Work with an experienced nail technician if this is your first time with 3D elements; the sculpting technique requires skill
- Choose pre-colored acrylic or gel materials if you can find them, or tint clear materials with polish pigments before applying
- Each petal should be roughly the size of a rice grain—anything larger risks catching on fabric or breaking
- Seal the 3D elements with a glossy top coat that won’t yellow over time
- These nails require a bit more care to prevent damage, so avoid using them as tools
Real talk: 3D nails are stunning but do require maintenance and a bit of extra care. They’re worth it for special events or if you’re willing to be gentle with your hands.
4. Watercolor Cherry Blossoms on Neutral Base

This design leans into artistic expression. Start with a soft neutral base—think pale beige, warm taupe, or soft grey—and then use diluted nail polish or watercolor techniques to paint delicate cherry blossoms. The flowers should have that characteristic watercolor bleeding effect, where colors soften into each other rather than maintaining hard edges. Soft pinks, pale whites, and hints of green for leaves all blend together on the nail in loose, painterly strokes.
Why This Works
Watercolor designs automatically feel artistic and intentional. They photograph beautifully because the soft gradients read well in photos and in person. The neutral base ensures the design doesn’t compete with your outfit or the occasion—these nails work equally well with professional clothing or weekend wear. The technique is inherently forgiving; watercolor effects hide imperfections beautifully, and slight irregularities just add to the hand-painted appeal. This is one of the few designs where “perfect” actually looks less interesting than “beautifully rendered.”
How to Make It Yours
- Start with a base that’s truly opaque; one or two coats of quality polish is essential
- To achieve watercolor effects, you can dilute regular nail polish with a solvent or use nail-specific watercolor products
- Test your color mixing on a practice nail or paper first—diluted polish behaves differently than full-strength
- Use a soft brush with fine bristles and work quickly before the diluted polish dries
- Seal everything with a glossy top coat, which will enhance the watercolor effect and add protection
Insider note: If you’re not confident in your painting skills, you can achieve similar effects by sponging colors onto the nail rather than brushing them—it’s more forgiving and still looks intentionally artistic.
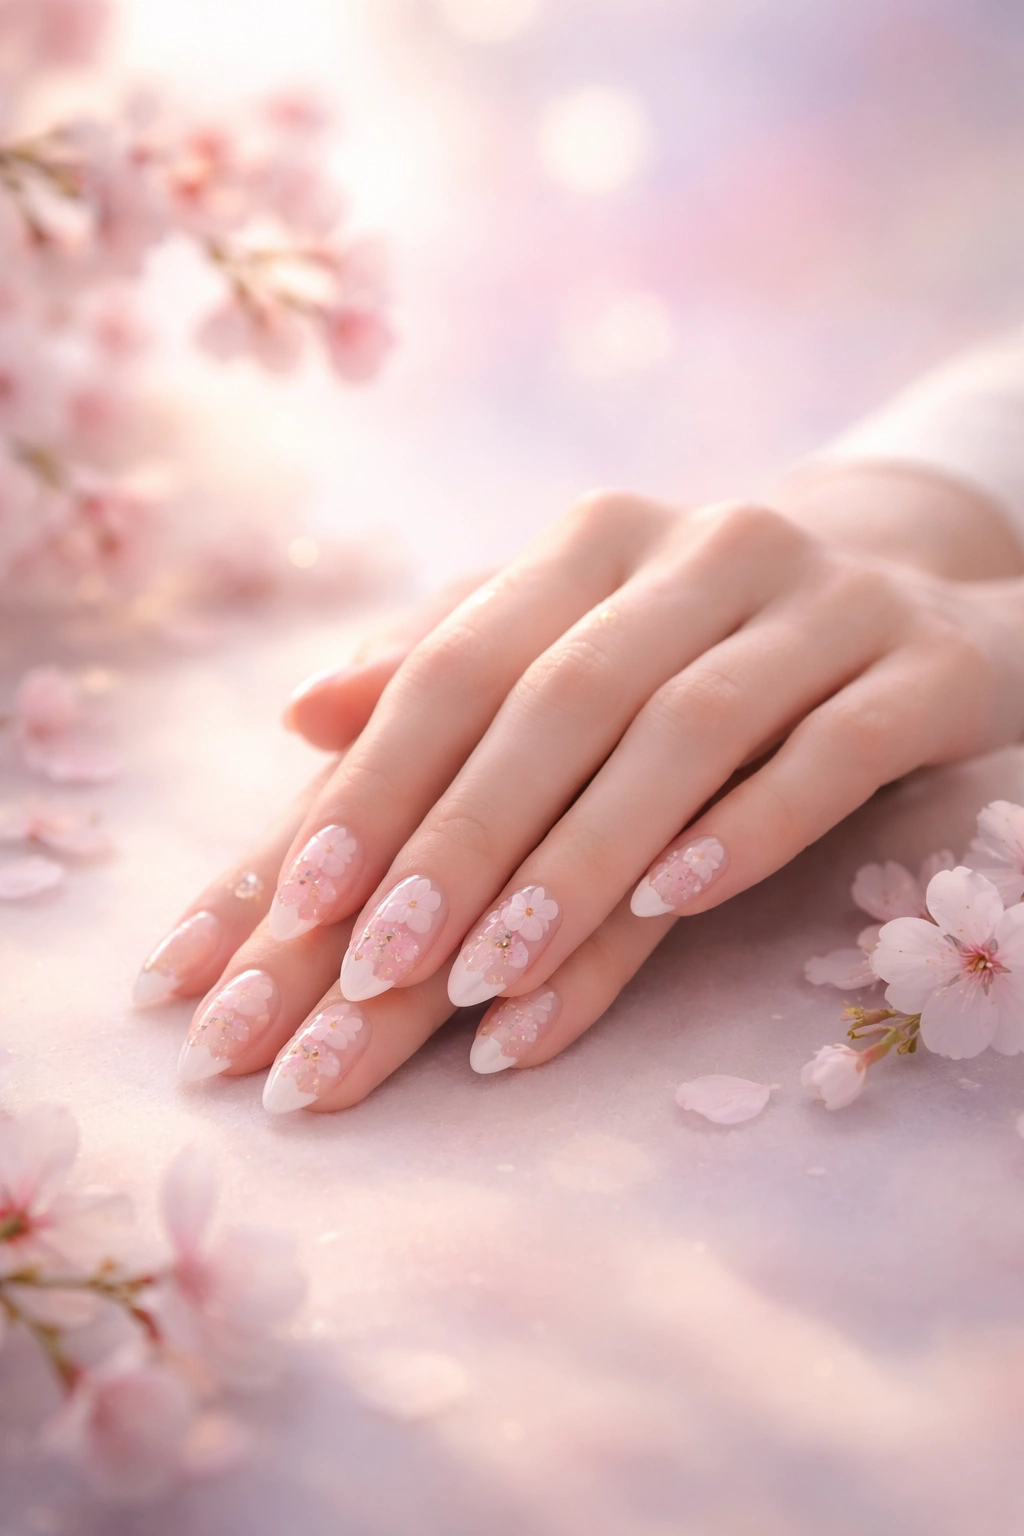
5. Cherry Blossom French Tips with Soft Accents
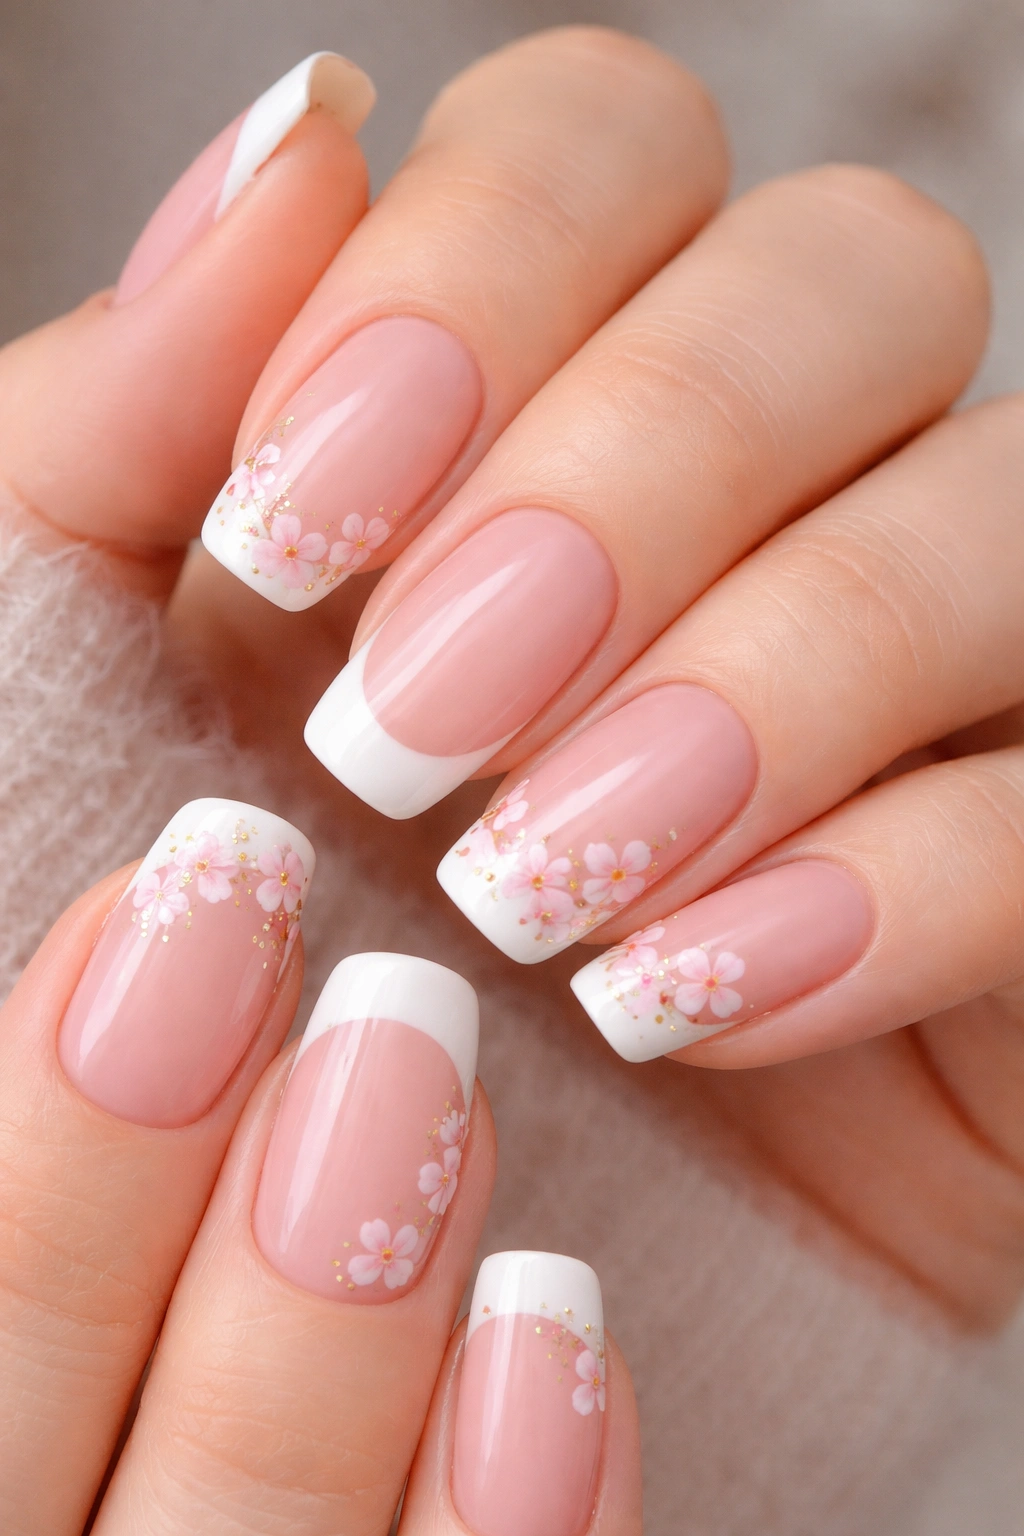
A timeless classic gets a floral update. Rather than keeping French tips strictly white or nude, incorporate cherry blossoms into the tips themselves. You might do white tips with a delicate pink blossom at the very edge, or soft pink tips adorned with tiny flowers. Some versions keep the blossoms contained to the tips, while others have tiny flowers scattered up the sides of the nail as well. The key is balance—the design should feel like an accent to classic French polish, not like you’re trying to do two separate designs on one nail.
Why This Works
French tips are eternally sophisticated, and adding cherry blossoms makes them feel fresh and seasonal without losing their classic appeal. This design works on every nail shape and length, from short classic nails to long almond or coffin shapes. Because the base is just standard French polish, this is actually one of the easier cherry blossom designs to execute or have maintained. It’s perfect for people who love structure and clean lines but want a hint of floral femininity. The design also transitions beautifully through seasons and occasions—it works for brunch, weddings, professional events, or casual wear.
How to Make It Yours
- Use quality white or nude polish for the tips to ensure clean, opaque coverage
- You can freehand the blossom placement or use tiny nail stickers for precise positioning
- If hand-painting, use a very thin brush and steady hand—imperfections are visible on French tips more than other designs
- Keep blossom details small and intentional; a few delicate flowers beat many overcrowded ones
- A glossy top coat is essential to make the white pop and add a refined finish
Pro tip: If you’re nervous about freehand placement, nail sticker flowers (especially micro ones) look completely professional and take the pressure off perfect hand-painting.
6. Nude Base with Cherry Blossom Branch and Leaves
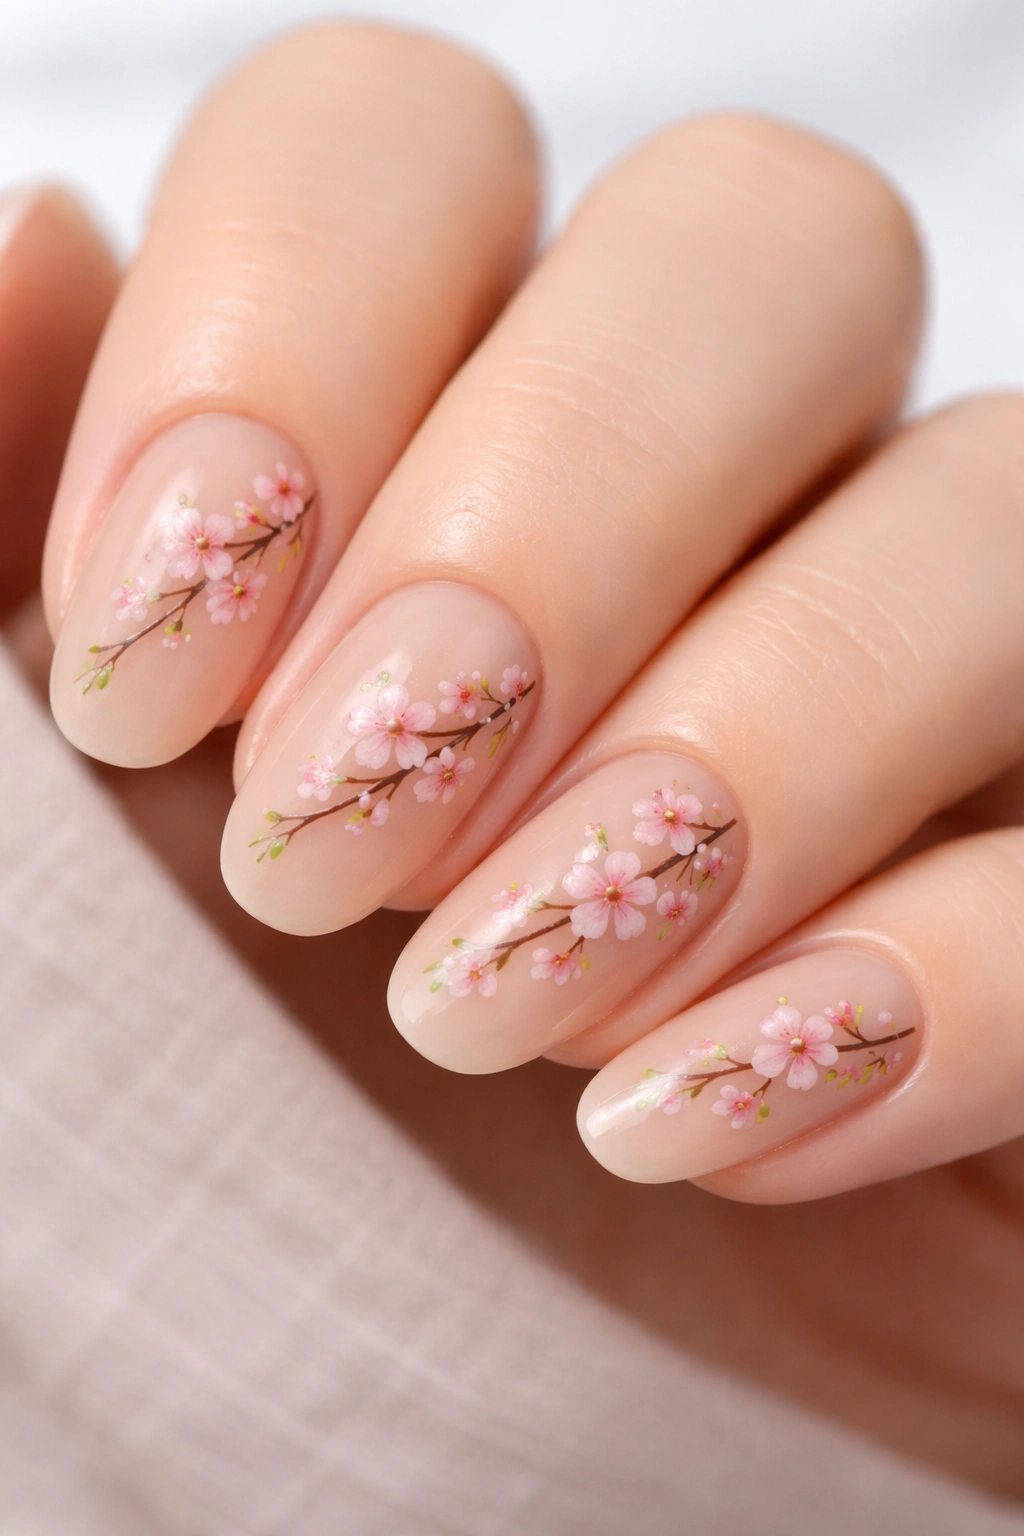
This design feels botanical and intentional. Start with a warm, flattering nude base—something between beige and warm pink depending on your skin tone—and then paint a delicate branch structure across your nails, complete with tiny leaves and cherry blossoms clustered along the branches. The branches can cascade from the tip toward the base, or follow the natural curve of your nail, giving the impression of a living tree captured on your fingertips.
Why This Works
A complete scene rather than scattered flowers feels more sophisticated and artistic. The branch structure gives the design direction and visual interest. A nude base is universally flattering and means the design pairs seamlessly with any outfit or occasion. This approach works beautifully on longer nails where there’s more real estate to tell a visual story. Because the nude base keeps things neutral, even elaborate branch-and-flower designs feel refined rather than busy. This design is particularly stunning on almond or coffin shapes, where the elongated nail provides a natural canvas for flowing branches.
How to Make It Yours
- Choose a nude shade that’s truly flattering to your skin tone—test it on a single nail first if possible
- For branches, use a taupe or soft brown polish and a very fine brush; slightly shaky lines actually enhance the natural appearance
- Blossoms can be small dots in pink and white clustered at branch endpoints
- Add tiny green leaves along the branches using a dotting tool or fine brush
- Matte top coat can create an elegant, sophisticated finish, or glossy top coat if you prefer shine
Worth knowing: This design benefits from different execution on each nail—vary the branch direction and flower placement slightly so it doesn’t feel repetitive or overly symmetrical.
7. Jelly Pink with Translucent Florals
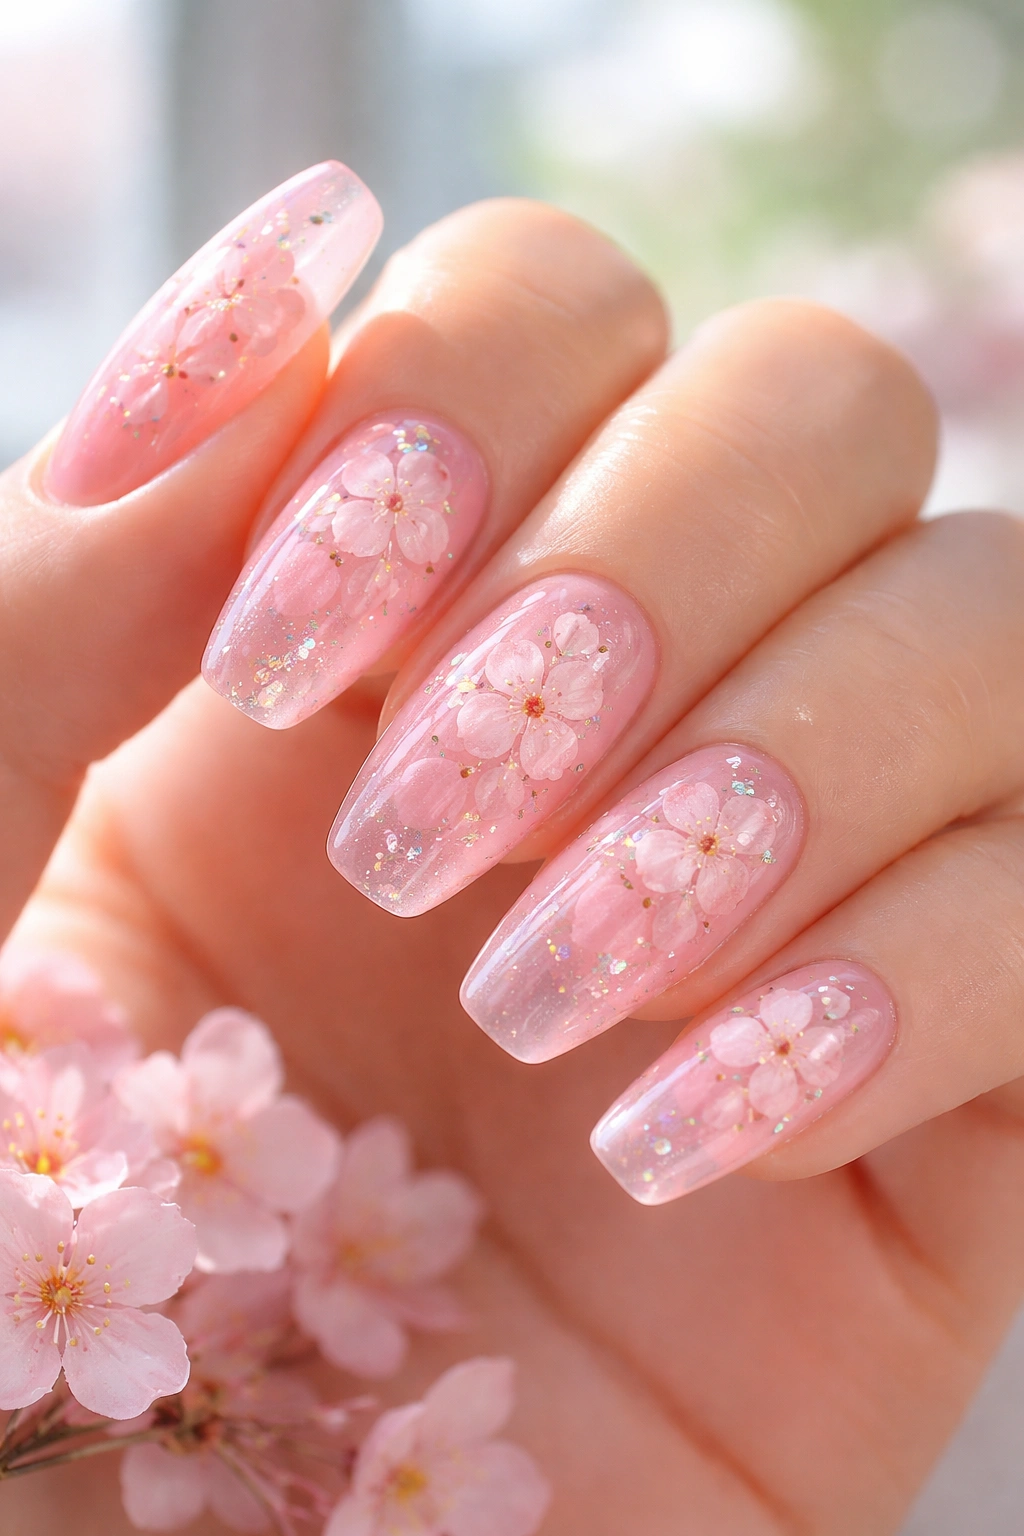
For people who love that trendy jelly nail aesthetic, cherry blossoms translate beautifully into this translucent, almost edible-looking finish. Use a semi-transparent pink jelly base that’s thick enough to provide opacity but thin enough to maintain that gorgeous glowing quality. Then add cherry blossoms in white or slightly darker pink so they’re visible but blend harmoniously with the jelly effect. The result looks like cherry blossoms suspended in clear pink—dreamy and dimensional.
Why This Works
Jelly nails have a playful, youthful quality that still reads as polished. The translucency creates visual depth automatically, so even simple floral designs look more complex. This design catches light beautifully and looks stunning both indoors and in natural sunlight. The soft pink jelly is incredibly flattering to every skin tone because the transparency means it reflects your actual skin color rather than imposing a single shade. Because jelly finishes are inherently glossy and reflective, they make nails look shinier and longer. This is one of the few designs that actually looks better with a slightly thicker application than you might use for regular polish.
How to Make It Yours
- Invest in a true jelly polish, not just a regular translucent polish—the formulation is specifically designed for this effect
- Apply thicker coats than you would with regular polish; jelly needs that opacity to create the characteristic look
- Add florals while the base is still slightly tacky so they adhere well
- You can use white polish for flowers or slightly thicken the jelly mixture with a touch of white polish
- Seal with a glossy top coat, though many jelly polishes are self-glossing
Pro tip: Jelly nails look best when they’re really shiny; if your top coat isn’t creating serious shine, add another layer or switch to a higher-gloss formula.
8. Multi-Color Skittle Mani with Cherry Blossom Details
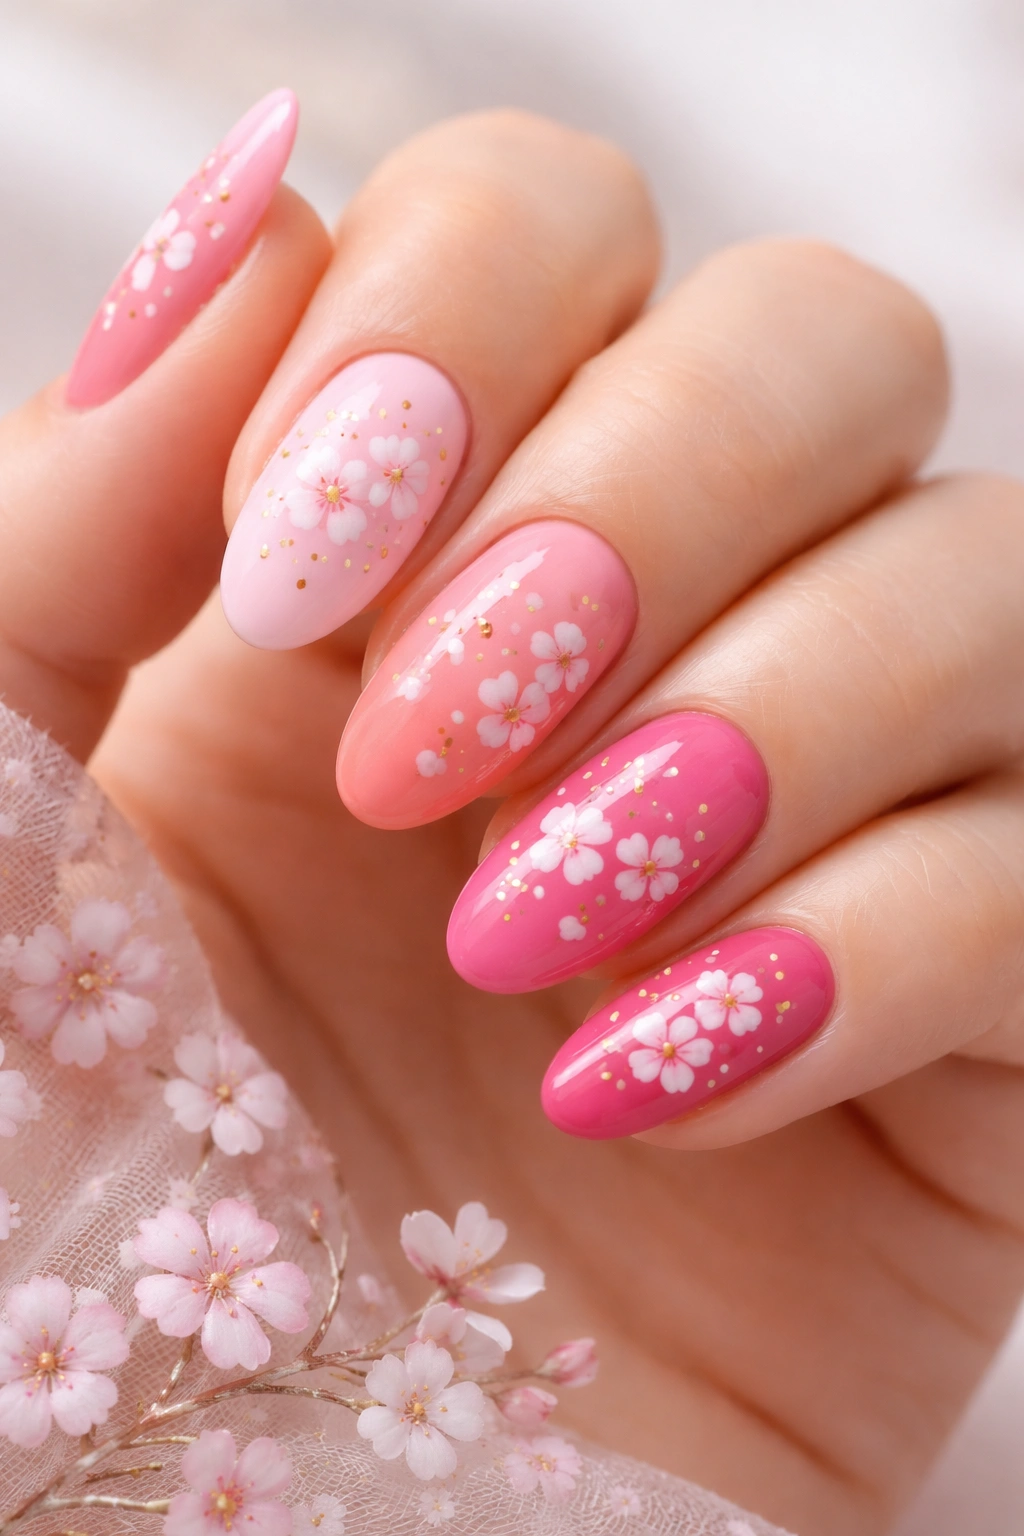
A Skittle manicure (painting each nail a different color from the same palette) works wonderfully with cherry blossom themes. Paint each nail a different shade of pink—from pale blush to hot magenta—and then add tiny cherry blossoms in white or gold to each nail. The different pink shades create a rainbow effect while remaining cohesive, and the blossoms tie everything together visually. This design is bold, colorful, and undeniably eye-catching.
Why This Works
Multi-color designs photograph beautifully and draw genuine compliments. Because all the colors come from the same warm pink family, the effect is cohesive rather than chaotic. The cherry blossoms act as a unifying element across the different colors. This design works particularly well on longer nails where the color variation is more visible and impactful. It’s perfect for people who love color but worry about clashing—this approach guarantees harmony. The varying shades also mean that skittle manicures photograph differently depending on lighting and angle, so you get multiple looks from one design.
How to Make It Yours
- Start with a palette of at least 5-6 pink shades ranging from pale to deep—consider gathering actual polish bottles before committing
- Ensure each shade is opaque enough in two coats; pale pinks sometimes need three layers
- Paint one nail of each shade, establishing your color progression before adding florals
- Add cherry blossoms in white or gold to each nail after the base colors are fully set
- Use a glossy top coat to make the color variation really pop
Worth knowing: This design is more forgiving than you might think; slight imperfections on each nail actually add to the handmade charm rather than detracting from it.
9. Black Base with Pink Cherry Blossoms and Gold Accents
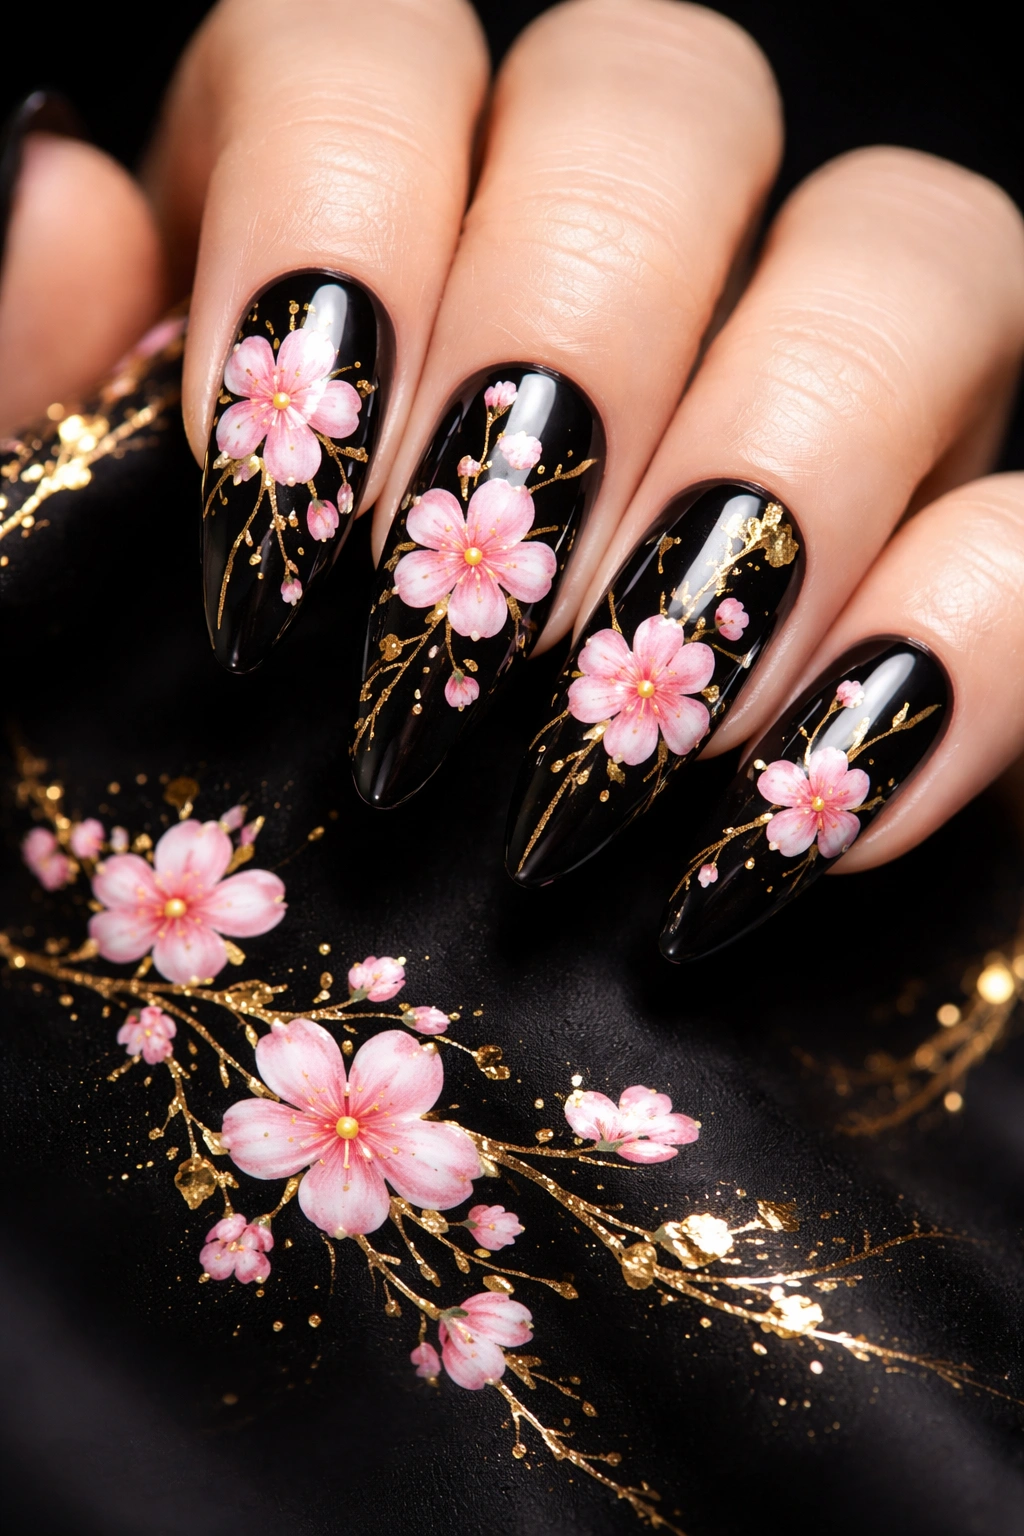
For people who love drama and contrast, this design is pure sophistication. A deep black base—matte or glossy depending on preference—provides stark contrast for pink and white cherry blossoms. Add delicate gold leaf accents, small gold branches, or gold outlines around the florals to elevate the design into luxury territory. The black creates a gallery-quality backdrop for the florals, making them appear to float.
Why This Works
Black is a bold choice that immediately reads as sophisticated and artistic. The contrast between deep black and soft pink creates visual drama that’s undeniably eye-catching. Gold accents automatically add luxury and refinement to any design. This approach works beautifully for evening events, special occasions, or anyone with a bold personal style. The high contrast means even small, delicate flowers are clearly visible and impactful. Black base designs are also incredibly forgiving—slight imperfections in floral details vanish against the dark background. This design photographs exceptionally well and definitely stands out in group photos.
How to Make It Yours
- Use a true black polish with excellent opacity; some blacks have a slightly transparent quality that undermines the design
- Allow the black to dry completely before adding florals, as pink can sometimes bleed into wet black polish
- Cherry blossoms should be bright pink or pure white for maximum contrast
- Gold accents can be hand-painted, applied with gold leaf, or done with gold polish using a fine brush
- Seal with a glossy top coat to make the contrast even more dramatic
Real talk: This design requires either very steady hands for hand-painting or access to quality nail stickers, as imprecision is more visible on a black base than lighter backgrounds.
10. 3D Nail Charms with Cherry Blossom Theme
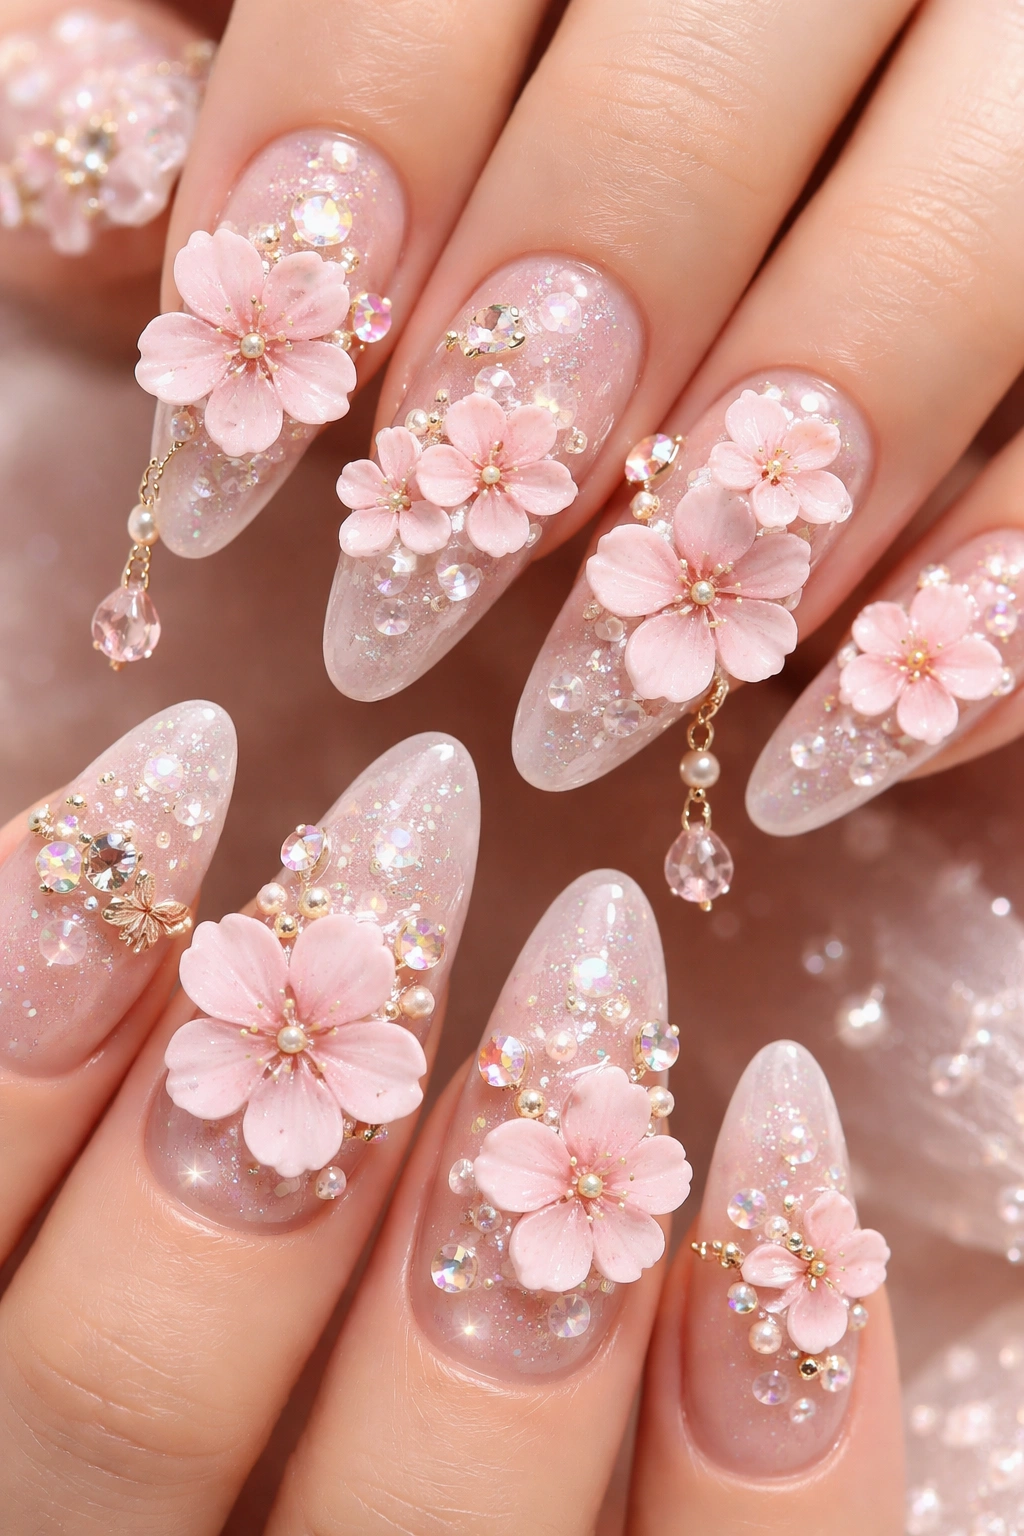
If you want jewelry-level embellishment on your nails, this design takes things to the next level. Combine sculpted 3D cherry blossoms with tiny rhinestones, microbeads, or dedicated nail charms. Some variations use pre-made cherry blossom charms that are affixed to the nail, while others build everything from scratch using acrylic or gel. The overall effect is incredibly glamorous—your nails literally become miniature works of jewelry.
Why This Works
This design is pure luxury and statement-making. It’s perfect for special occasions, prom, weddings, or anyone who loves maximum glamour. The combination of textured 3D elements with sparkly embellishments creates dimension and light-catching properties that are stunning in person and photographs beautifully. Because the design is visually complex, even a simple color base looks elevated. These nails are conversation starters—people will genuinely ask about them. The embellishment approach also means that if any individual 3D element isn’t perfect, the overall complexity of the design hides minor imperfections.
How to Make It Yours
- Work with a skilled nail technician for this design; the execution requires genuine expertise
- Choose complementary embellishments carefully; sometimes less is more even with glamorous designs
- Ensure all stones and charms are securely affixed with appropriate adhesive designed for nail art
- Select a base color that complements your embellishments—champagne, nude, white, or soft pink are safe choices
- Be prepared for maintenance; these nails require careful handling to prevent losing charms
Pro tip: If you’re investing in this level of nail art, take excellent care of the nails—these designs are expensive and deserve to last as long as possible.
Final Thoughts
Cherry blossom nails offer something genuinely special. They’re romantic without being overly feminine, artistic without requiring professional-grade painting skills, and versatile enough to work across different seasons, occasions, and personal styles. Whether you choose delicate minimalism or bold sculptural drama, cherry blossom designs celebrate natural beauty in a way that feels both timeless and thoughtfully intentional.
The real magic of cherry blossom nail design isn’t in following someone else’s exact approach—it’s in finding the version that genuinely resonates with your aesthetic and lifestyle. Some of these designs are best executed by skilled professionals, while others are absolutely achievable at home with patience and the right tools. There’s zero shame in choosing what works for your situation, your comfort level, and your actual daily life.
Start with a design that genuinely excites you, invest in quality products if you’re doing them yourself, and remember that your nails are a canvas for self-expression. Cherry blossoms have represented renewal, beauty, and the transient nature of perfection for centuries. Wearing them on your fingertips is a daily reminder to appreciate small beautiful moments. That’s what makes these designs worth your time and attention.
