

If you’ve scrolled through any nail inspiration feed and spotted cow print designs, you already know this playful animal pattern has taken the nail world by storm. Whether you’re looking for something bold and dramatic or soft and subtle, cow print nails offer incredible versatility that works with almost any aesthetic. The beauty of cow print is that it’s not just black and white spots on a basic base—there are dozens of creative ways to interpret this classic pattern, from pastel takes to neon twists to elegant French tip variations. What makes cow print nails so appealing is their ability to feel both timeless and trendy at the same time, fun enough for a night out yet neutral enough to work in most everyday settings. The pattern itself creates natural visual interest without requiring advanced nail art skills, making it achievable whether you’re visiting a salon or creating designs at home. In this guide, we’ll walk through eight different cow print nail ideas that’ll help you find the perfect version for your style, along with practical tips for pulling off each look successfully.
1. Classic Black and White Cow Print Nails

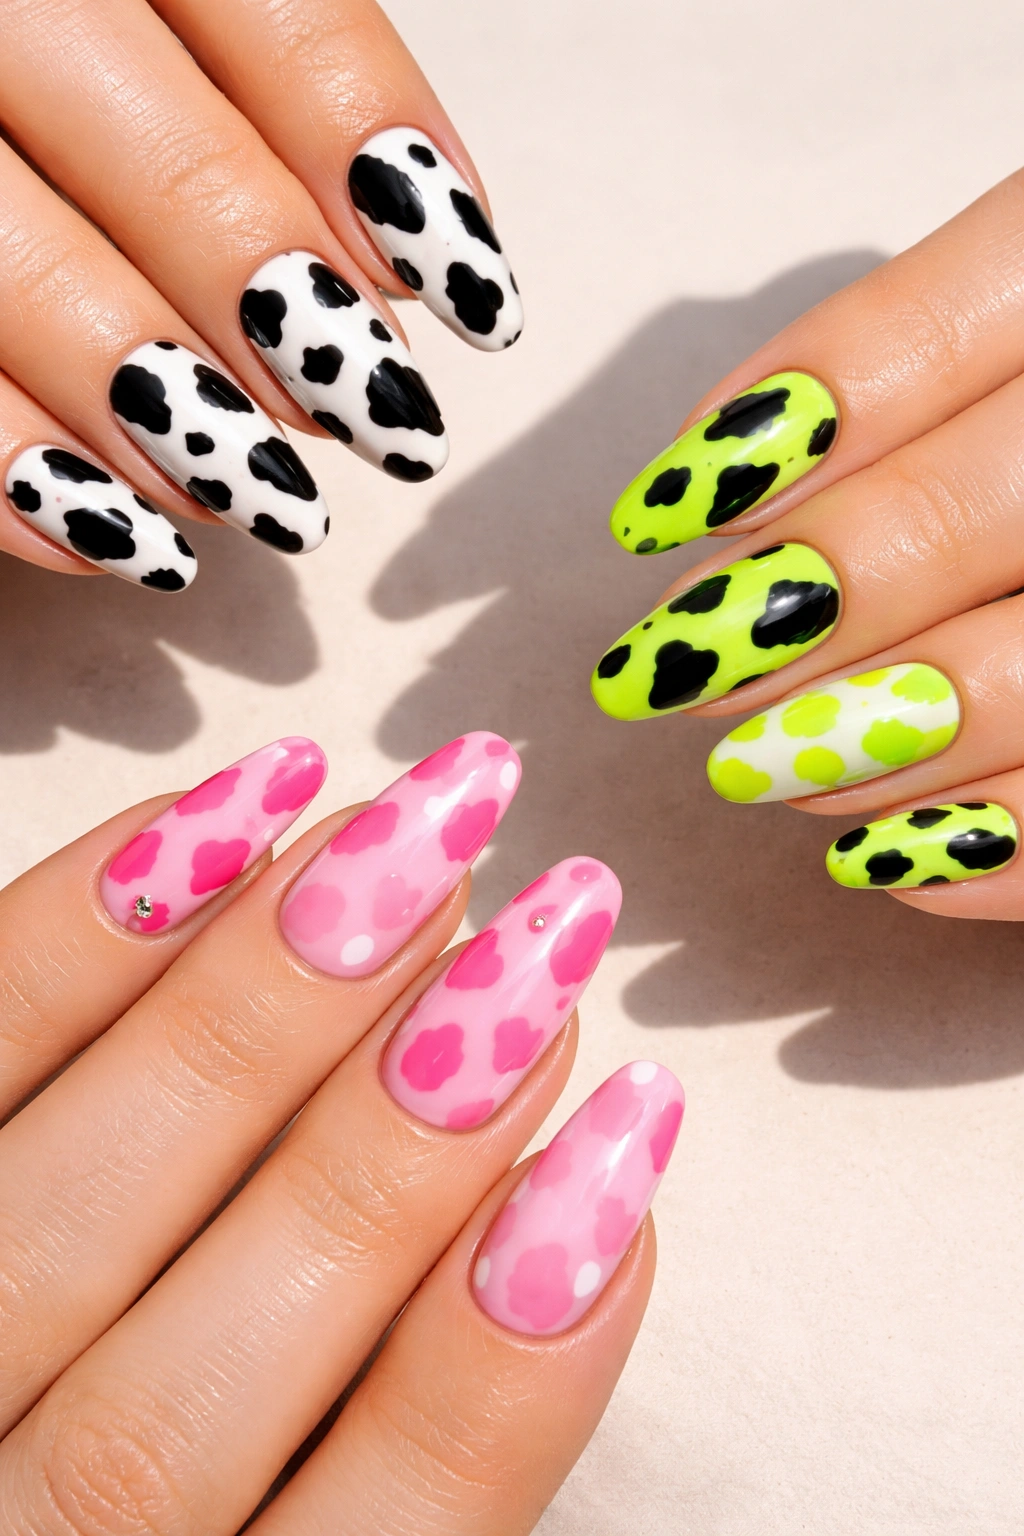
The original black and white combination remains the gold standard for cow print designs, and there’s a reason this pairing never goes out of style. Pure white serves as a clean canvas that makes the black spots pop with maximum contrast, creating a look that reads as sophisticated rather than cutesy. This timeless combination works on every nail shape—from short, practical nails to long, dramatic coffin shapes—and looks equally striking on both fingers and toes.
Why This Design Works
Black and white offers maximum visual impact with minimal effort. The high contrast between the two colors makes the spotted pattern instantly recognizable and eye-catching from a distance. You don’t need perfect spotting technique with this combo because slight irregularities in the spot shapes and sizes actually enhance the authentic, natural feel of the design. The simplicity also means this look suits professional environments while still making a statement, so it transitions beautifully from work to weekend.
Application and Styling Tips
- Start with two smooth coats of white polish as your base, allowing complete drying between coats
- Use a thin art brush or dotting tool to create black spots in random sizes and placement patterns across the nail
- Leave some white space visible between spots to mimic the natural negative space you’d see on actual cow hide
- Seal with a glossy top coat for shine, or mattify the entire design for a more modern aesthetic
- This design pairs beautifully with minimalist jewelry and lets your nails be the focal point of your whole look
2. Pink Cow Print with White Tips
Trading traditional black for a softer pink creates an instantly cheerful, more feminine interpretation of the cow print trend. This variation pairs dark pink or hot pink spots with pure white nails, delivering the same pattern recognition as classic cow print but with a playful energy that feels youthful and fun. The contrast is slightly softer than black and white, giving the design a more romantic, approachable quality that works wonderfully for those who want animal print without the boldness.
Why Pink Replaces Black
Pink cow print nails appeal to anyone who loves the pattern but prefers warmer, softer color palettes. Dark pink or hot pink spots create enough contrast against white to keep the cow print readable, but the overall effect feels less dramatic and more wearable for everyday occasions. This version also photographs beautifully, with the pink tones creating visual warmth that flatters skin tones in photos and in person. The combination feels slightly more elegant than black and white while losing none of the playfulness.
How to Get the Pink Cow Print Look
- Apply 2-3 coats of brilliant white as your base, building opacity gradually
- Select a pink shade with enough pigment and depth to stand out—pastels won’t work here; you need true hot pink or deep rose pink
- Use your dotting tool to create organic, irregular spots across the nail surface in varying sizes
- Add a clear top coat for shine, or use a matte topcoat to soften the entire design
- Paint the very tips with a cherry red polish and blend slightly where it meets the pink-and-white body for a French ombre effect if you want added dimension
3. Pastel Ombre Cow Print Nails
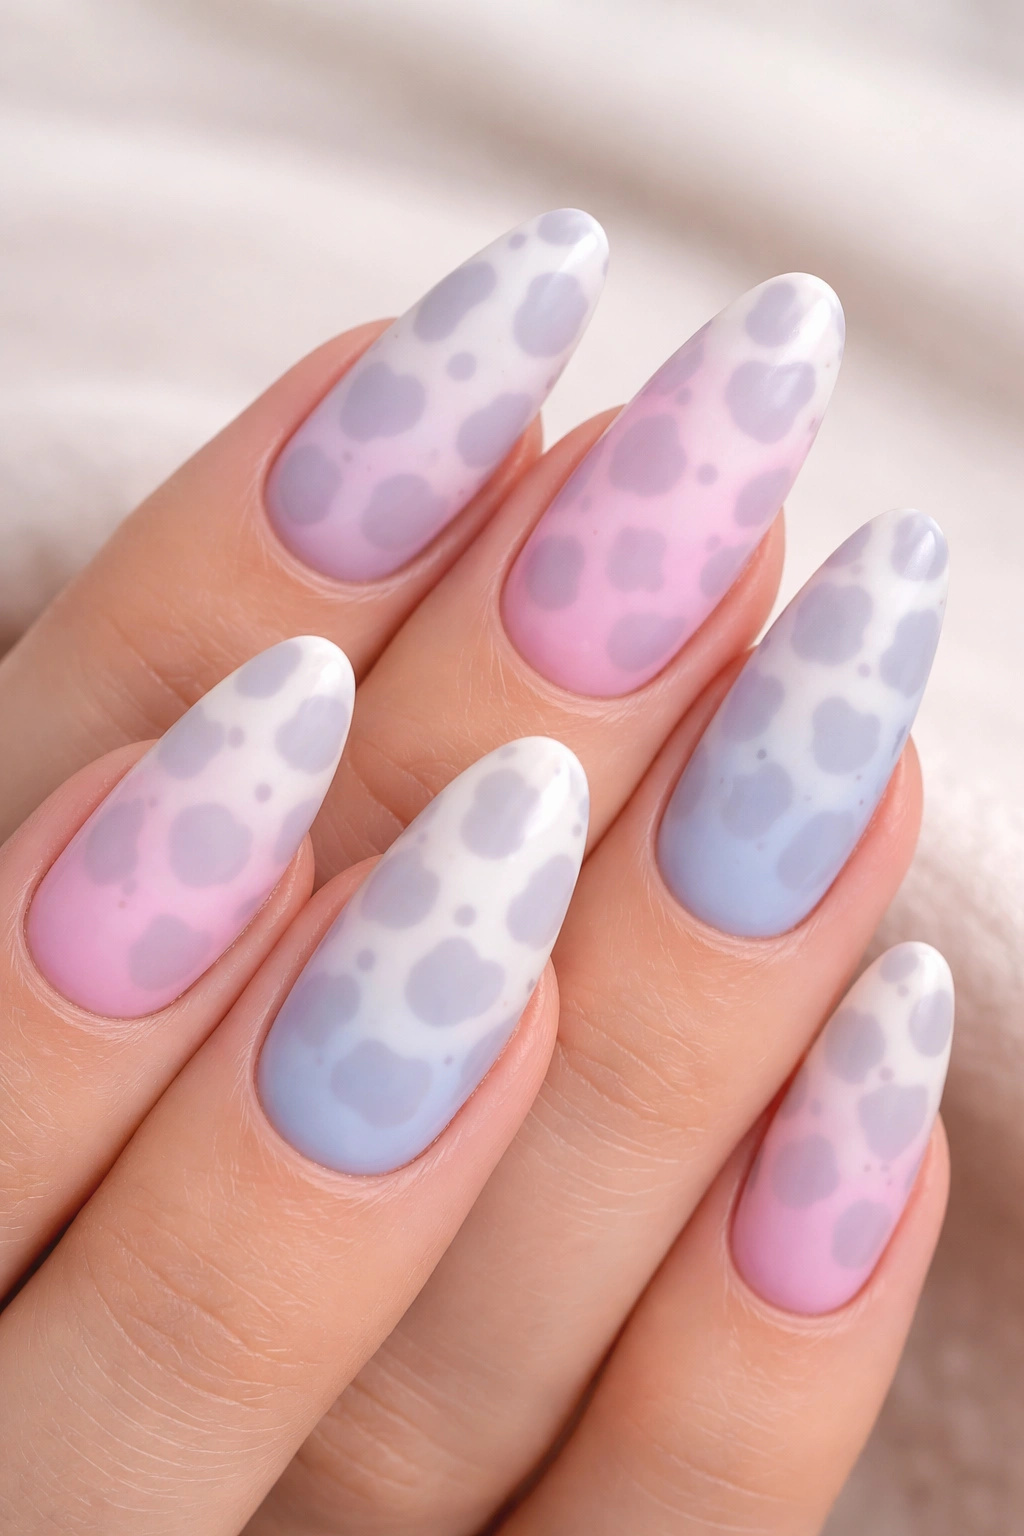
For a softer, more artistic take on cow print, pastel ombre versions layer a gentle color gradient with muted spotted detailing. Instead of stark contrast, this design uses pale lavender, soft pink, or dusty blue as a gradient background with light gray or muted tan spots, creating an almost watercolor effect. This approach appeals to anyone who loves the cow print concept but prefers subtle, dreamy aesthetics over bold statements.
The Gradient Base Technique
Building an ombre foundation transforms standard cow print into gallery-worthy nail art. Use a makeup sponge to gently dab multiple pastel shades across the white base, blending where the colors meet to create a soft gradient. The sponging technique creates a dreamy, diffused effect that’s impossible to achieve with a brush. Once your ombre gradient is set and sealed with a clear top coat, add your cow print spots using a muted complementary shade—the spots should be visible but not jarring against the gradient backdrop.
Creating Soft Pastels
- Choose 2-3 pastel shades that sit in the same color family (all cool pinks, all blues, or all purples work best)
- Paint your entire nail white first as a base for the pastels to sit on
- Dab pastels onto a makeup sponge and gently press onto the nail in an ombre pattern, building from one color at the tip to another at the base
- Allow each layer to dry slightly before adding the next to prevent colors from becoming muddy
- Once your ombre is complete and sealed, add pale gray or tan spots using a fine dotting tool
- Finish with a glossy or matte topcoat depending on whether you prefer shine or a velvety finish
4. Neon Green Cow Print on Black Base
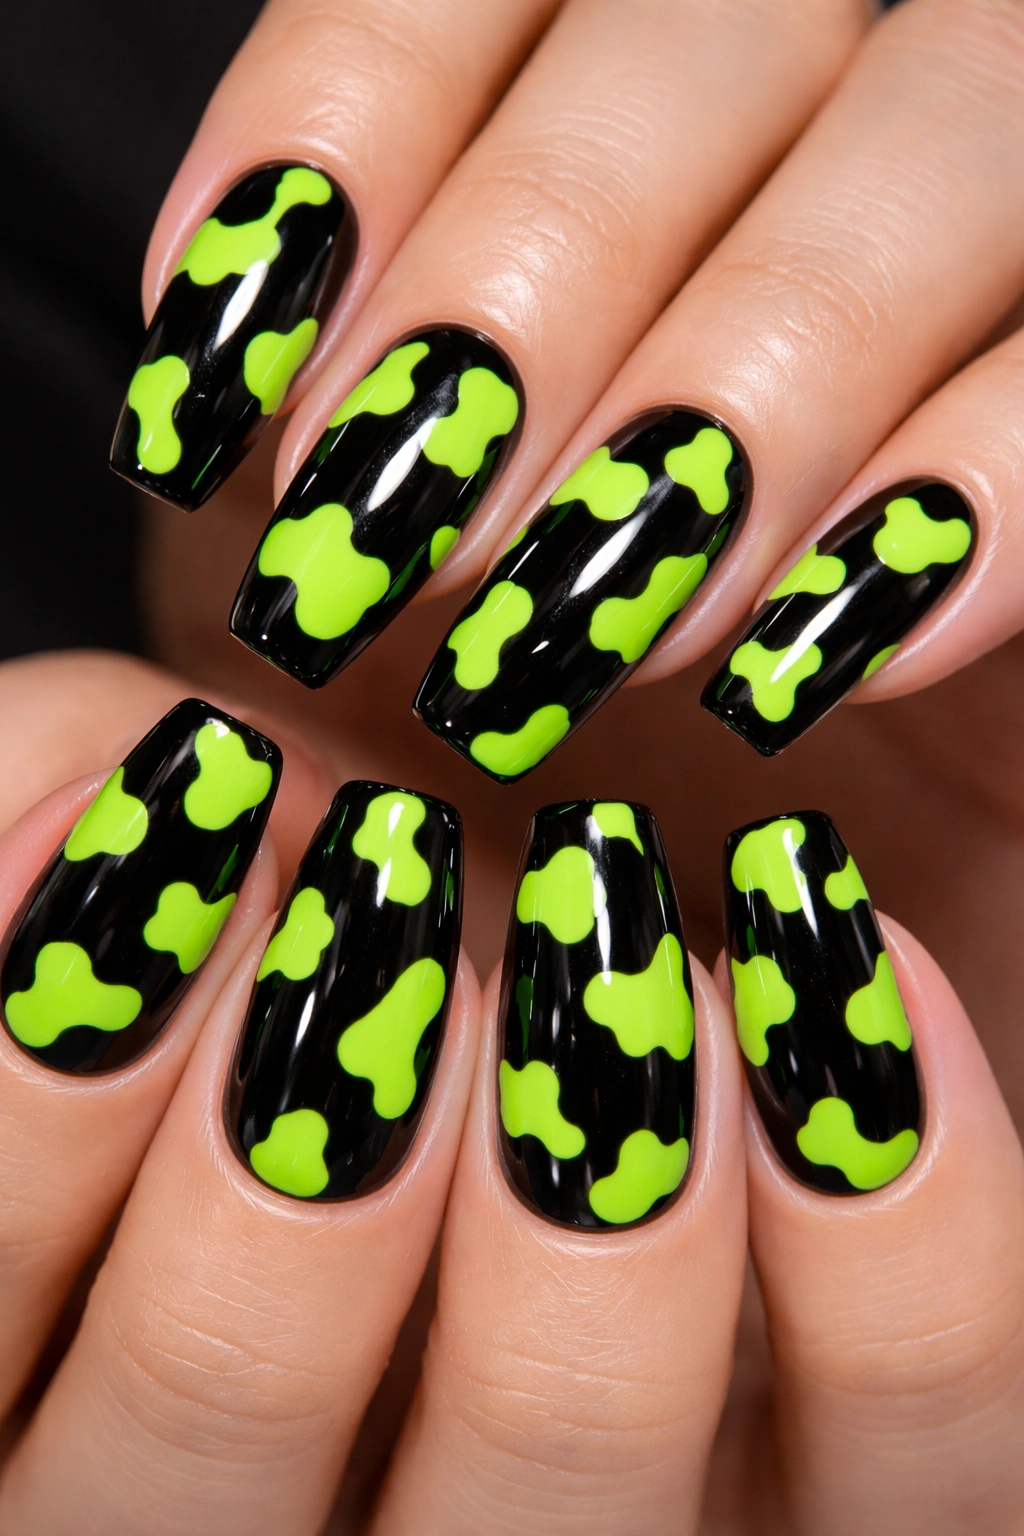
For those who want cow print to make an unmistakable statement, neon green spots against a black background deliver maximum impact and modern attitude. This bold, high-contrast variation leans into the edgy side of the trend, appealing to anyone with a fearless approach to nail color. The combination feels contemporary and slightly rebellious while still maintaining the recognizable cow print pattern that makes it fun rather than just abstract art.
Why Neon Green Stands Out
Neon green creates an eye-stopping contrast that feels fresh and unexpected. Black provides the dark backdrop that makes neon colors truly pop, creating a design that practically glows. This version skews younger and more fashion-forward than traditional cow print, making it ideal for night-out manicures, festival looks, or anytime you want your nails to be the conversation starter. The high-visibility combination also photographs incredibly well, which makes this design social-media-ready.
Application for Neon Brightness
- Paint your entire nail with quality black polish, using 2-3 coats until completely opaque
- Select a true neon green shade rather than a regular bright green—the brightness level matters for the full effect
- Using a fine art brush or thin dotting tool, create spots across the black base in irregular shapes and sizes
- Allow the neon polish to dry completely between coats; neon shades sometimes require extra drying time
- Consider leaving some nails solid black and only adding cow print to 3-4 nails per hand for a mismatched, trendy aesthetic
- Seal with a glossy top coat that won’t dull the neon brightness
5. Gold Accents with Cow Print
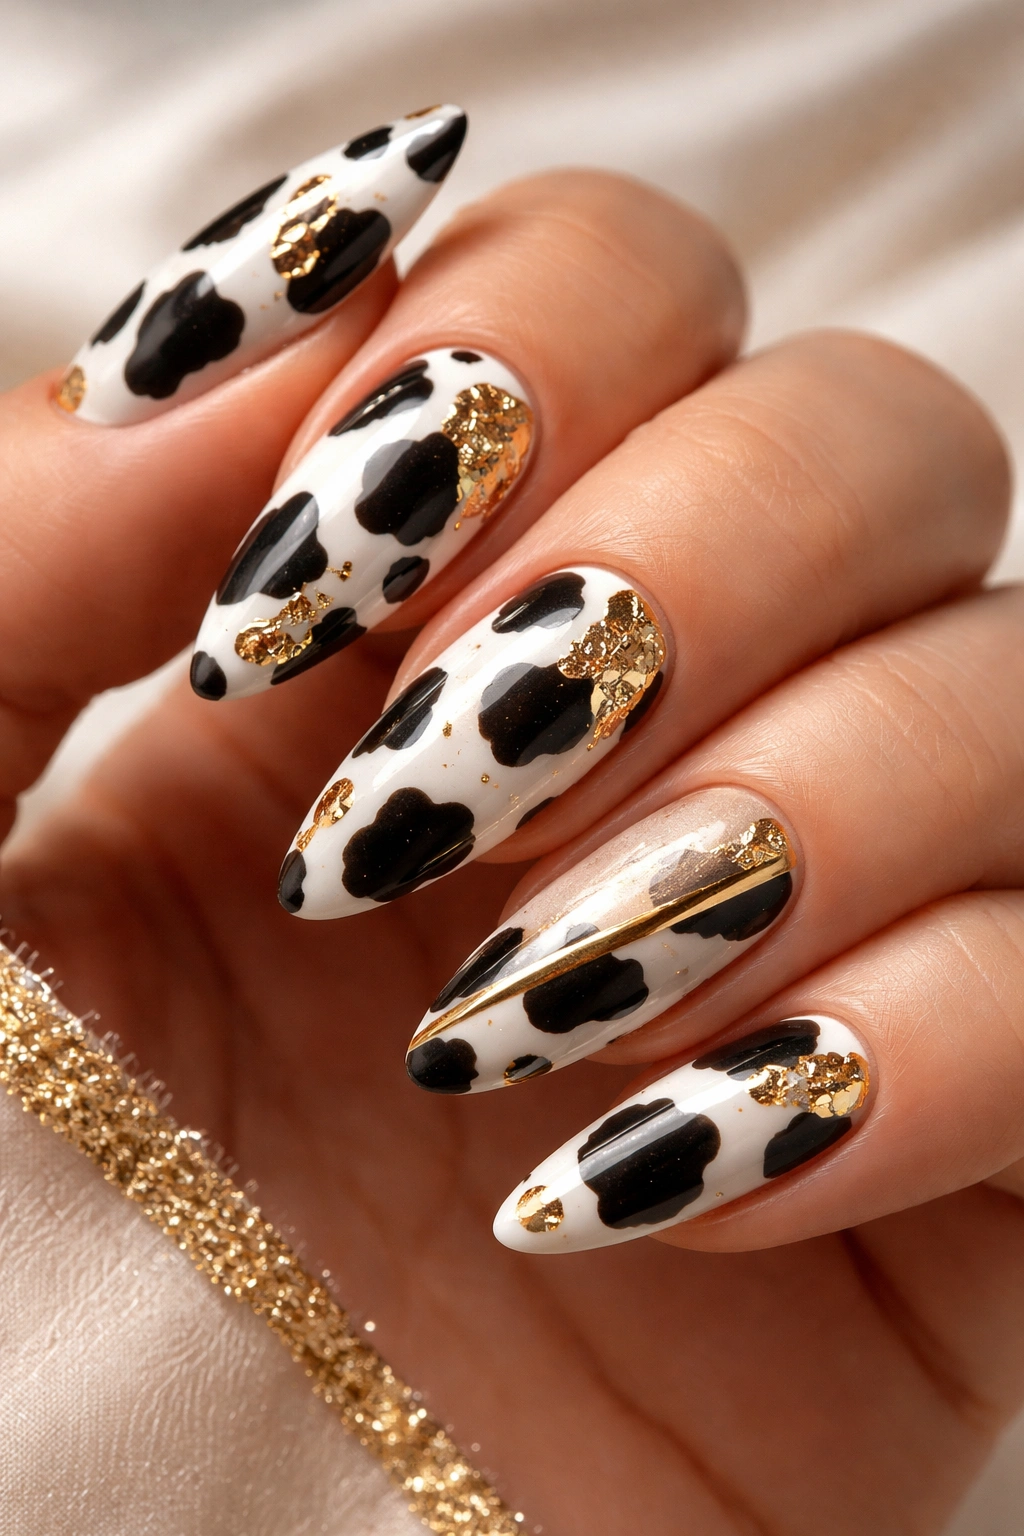
Introducing metallic gold elements into cow print design elevates the entire look from casual to sophisticated. Whether you’re adding a thin gold stripe, scattered gold foil flakes, or gold accents on one accent nail, metallic details transform cow print into something worthy of special occasions. This hybrid design works brilliantly for weddings, date nights, or any time you want your nails to look polished and intentional rather than playfully casual.
Why Gold Complements Cow Print
Metallics add luxury and refinement to animal print patterns. Gold creates visual warmth against both white and neutral base colors, giving the design an elevated feeling without overwhelming the cow print spots. The addition of gold also makes the manicure feel more cohesive if you’re wearing gold jewelry or incorporating gold tones elsewhere in your outfit. This combination proves that cow print isn’t just for casual moments—it can absolutely anchor a glam look.
Adding Gold Details
- Create your cow print base using either black and white or nude and white as described in previous sections
- Once your cow print is complete and sealed with a clear topcoat, add gold accents using one of these methods:
- Paint a thin vertical gold stripe down the center of your nail, overlaying the cow print
- Scatter small pieces of gold foil across the design for a confetti effect
- Use a gold gel or metallic gel pen to outline select spots, creating a 3D effect
- Paint your accent nail (typically the ring finger) entirely in cow print, then add a horizontal gold stripe across the middle
- Finish with a glossy topcoat to make the gold shimmer beautifully
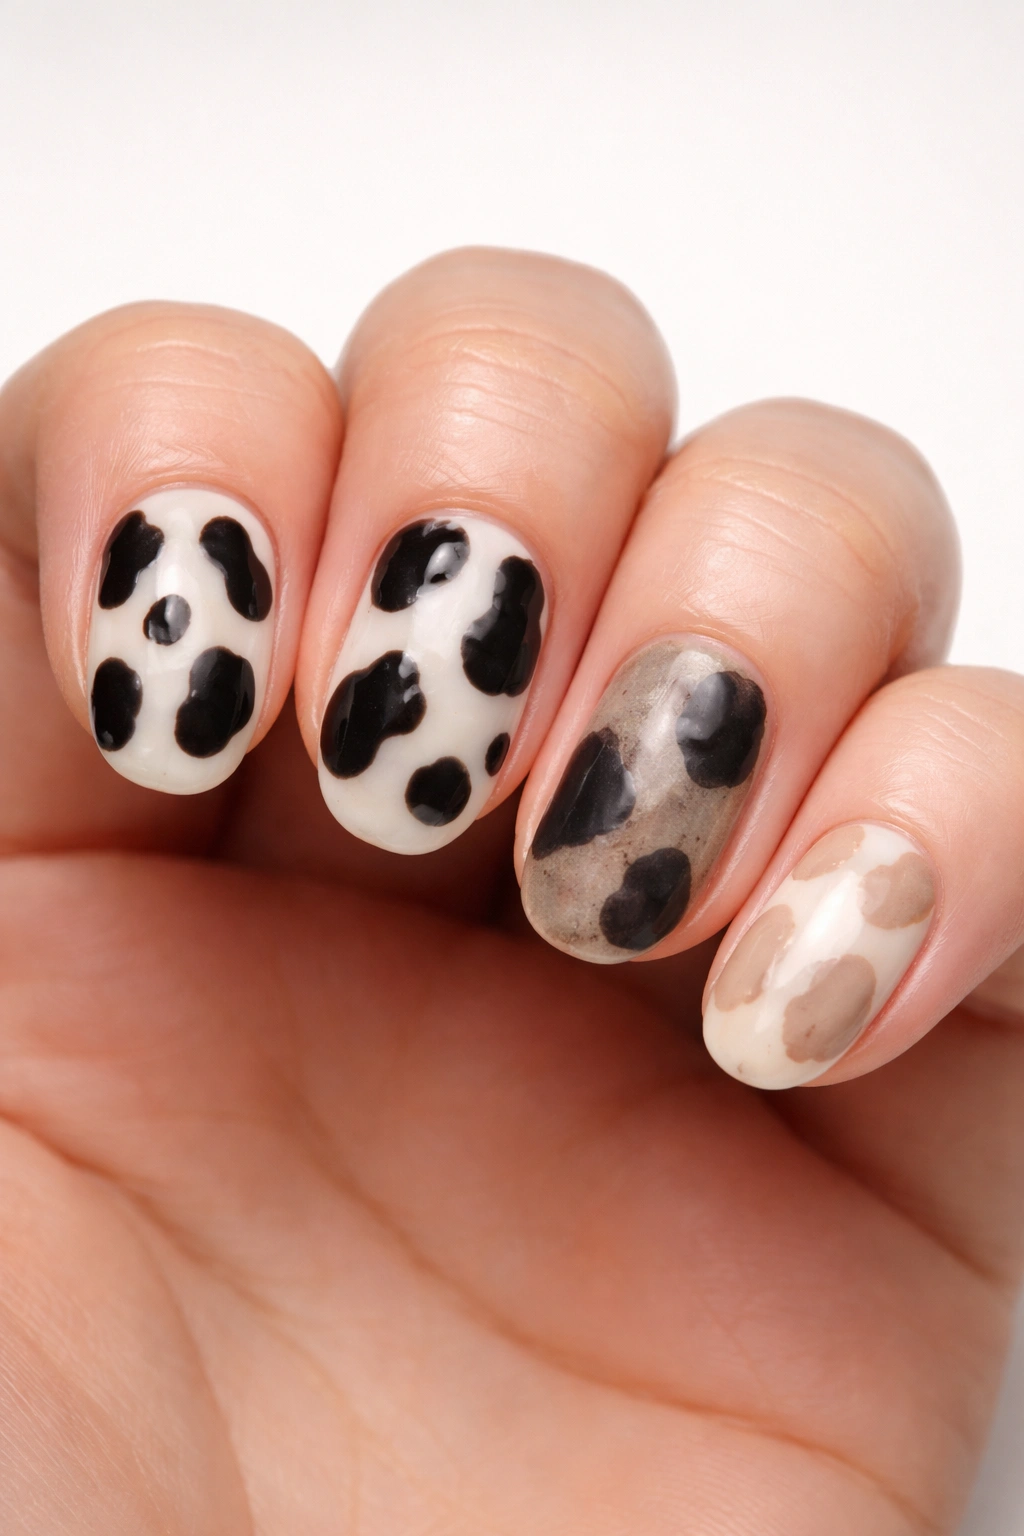
6. Nude and White Cow Print
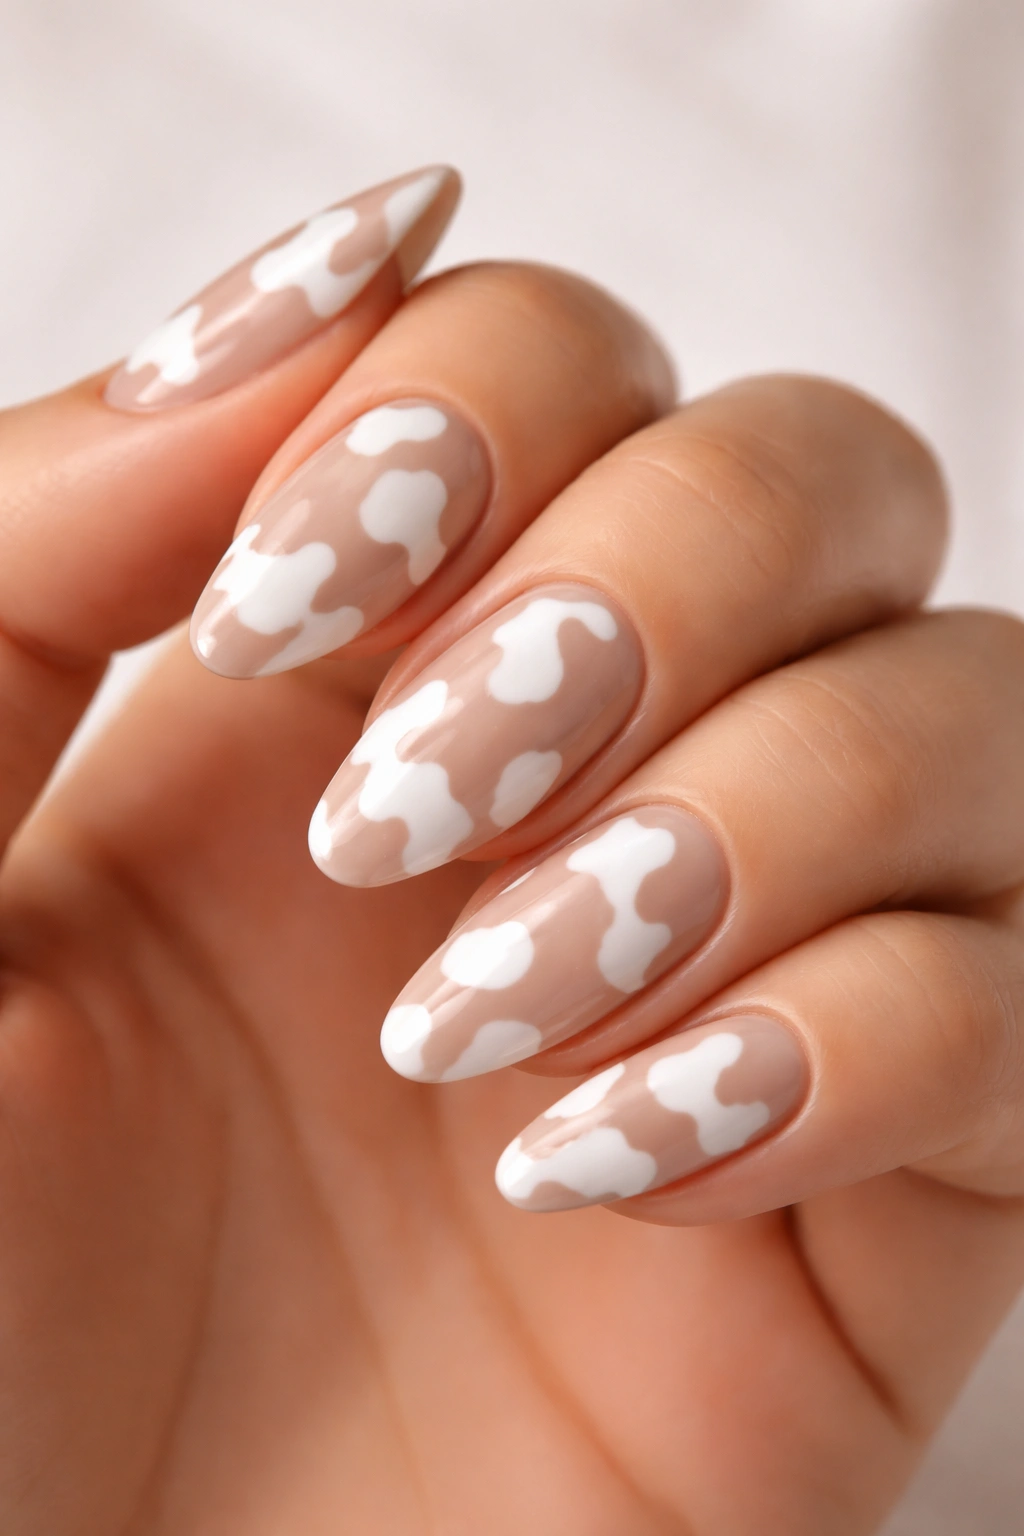
For a sophisticated, understated version of the trend, swapping black for nude or beige creates a subtle design that reads as elegant and refined. This softer interpretation of cow print appeals to professionals, minimalists, and anyone who loves nail art but prefers designs that whisper rather than shout. The neutral palette feels grown-up and wearable while maintaining the playful cow print pattern that makes it interesting.
The Appeal of Neutral Cow Print
Nude and white cow print delivers visual interest without being loud or distracting. The lower contrast between nude and white means the spots are somewhat subtle, making this design feel more understated and sophisticated than stark black and white. This version works beautifully in professional settings where you want personality without making a bold statement. The design also photographs beautifully and photographs especially well on deeper skin tones where white and nude create clear definition.
Creating the Neutral Look
- Paint your entire nail with a warm white or cream polish (avoid pure white, which can look stark with nude; choose something slightly warmer)
- Select a nude shade that’s one to two shades deeper than your base—it should be noticeably darker but still in the neutral family
- Using a thin dotting tool, create organic cow print spots across the white base in varying sizes
- Keep spacing organic and irregular; perfectly uniform spots look less natural
- Consider adding this design only to half your nails and leaving the other half solid white for a chic mixed manicure
- Seal with a glossy topcoat for polish, or matte topcoat for a modern, velvety finish
7. Multi-Color Rainbow Cow Print
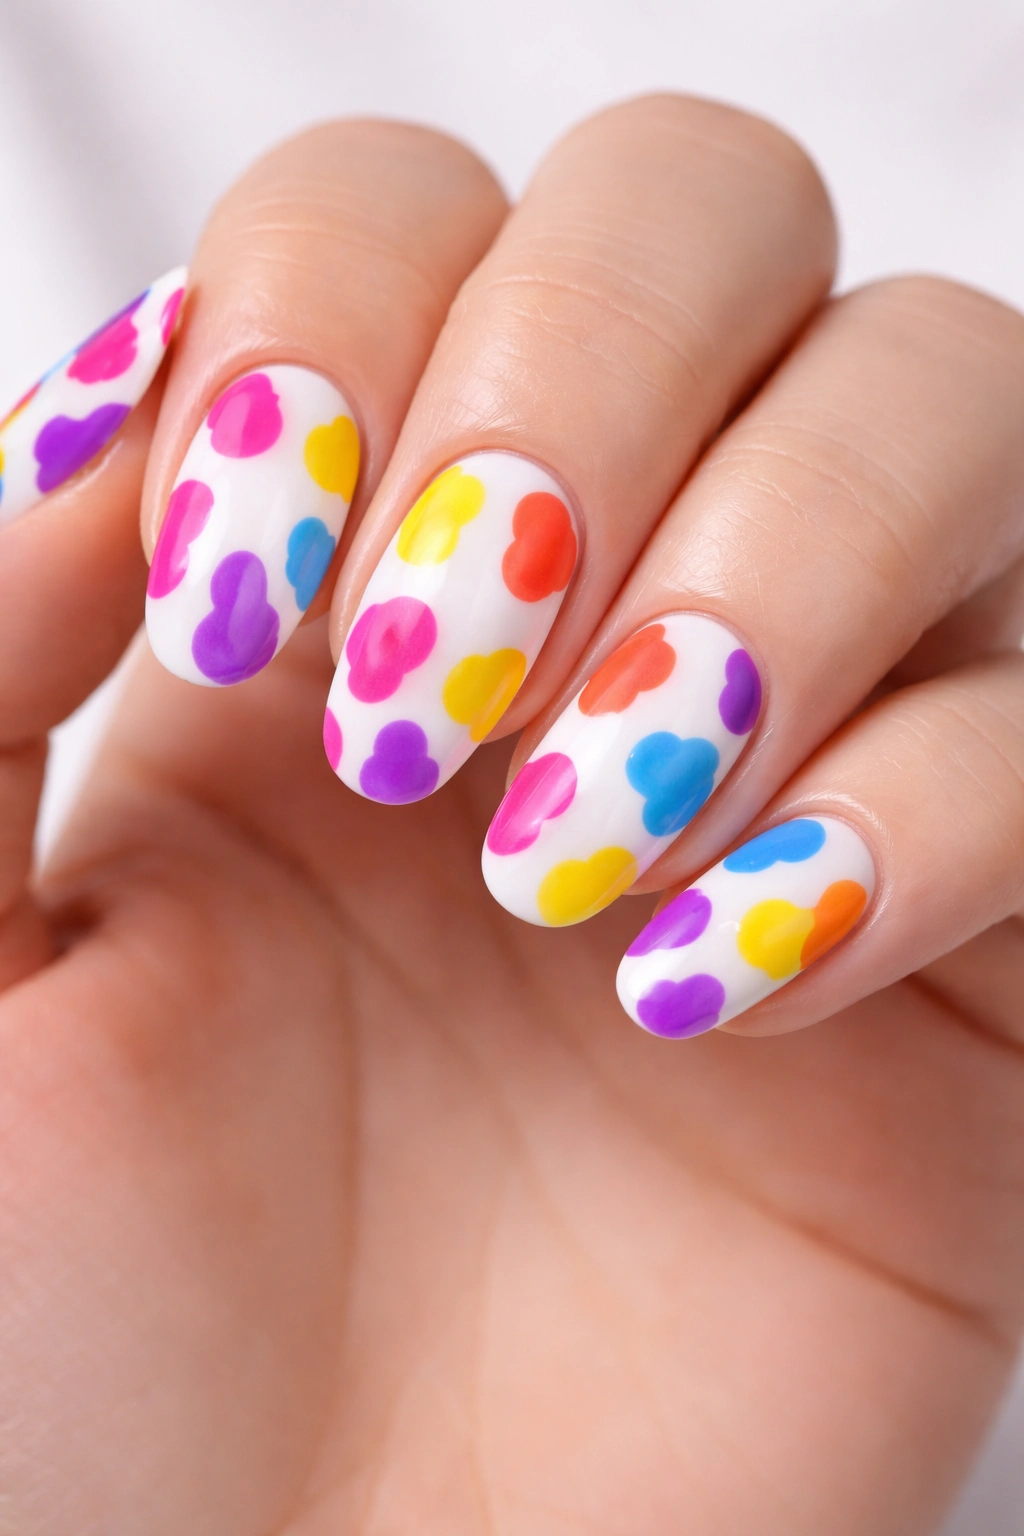
For maximum personality and color play, rainbow cow print uses multiple colors to create spots instead of sticking with a single accent color. Different colored spots—hot pink, yellow, orange, bright blue, and purple—scattered across a white or clear base create a whimsical, artistic design that feels playful and unapologetically fun. This version appeals to creative types who love color and aren’t afraid to let their nails make a bold statement about their personality.
Why Rainbow Cow Print Works
Multiple colors create a design that’s visually busy in the best possible way, feeling creative rather than chaotic. Rainbow cow print maintains the recognizable pattern while injecting maximum personality and joy. This version works wonderfully for special events, artistic professions, creative hobbies, or anytime you want your nails to reflect your colorful personality. The design also feels inherently celebratory and positive, which translates into how people perceive you wearing it.
Creating Rainbow Spots
- Paint your base in white or even a clear base over natural nail (clear base allows the bright colors to pop while feeling more minimalist)
- Select 4-6 bright, fully saturated colors: hot pink, sunshine yellow, bright orange, electric blue, vibrant purple, and hot lime green work beautifully
- Use a thin dotting tool or art brush to create spots in each color, randomly distributing them across the nail
- You might create 3-4 spots of each color per nail, or you might create one large spot in each color—both approaches work
- The key is distribution: scatter the colors so no single color clusters in one area; spread them across the whole nail
- Allow each color to dry before applying the next to prevent colors from bleeding into each other
- Finish with a glossy topcoat that won’t mute the color brightness
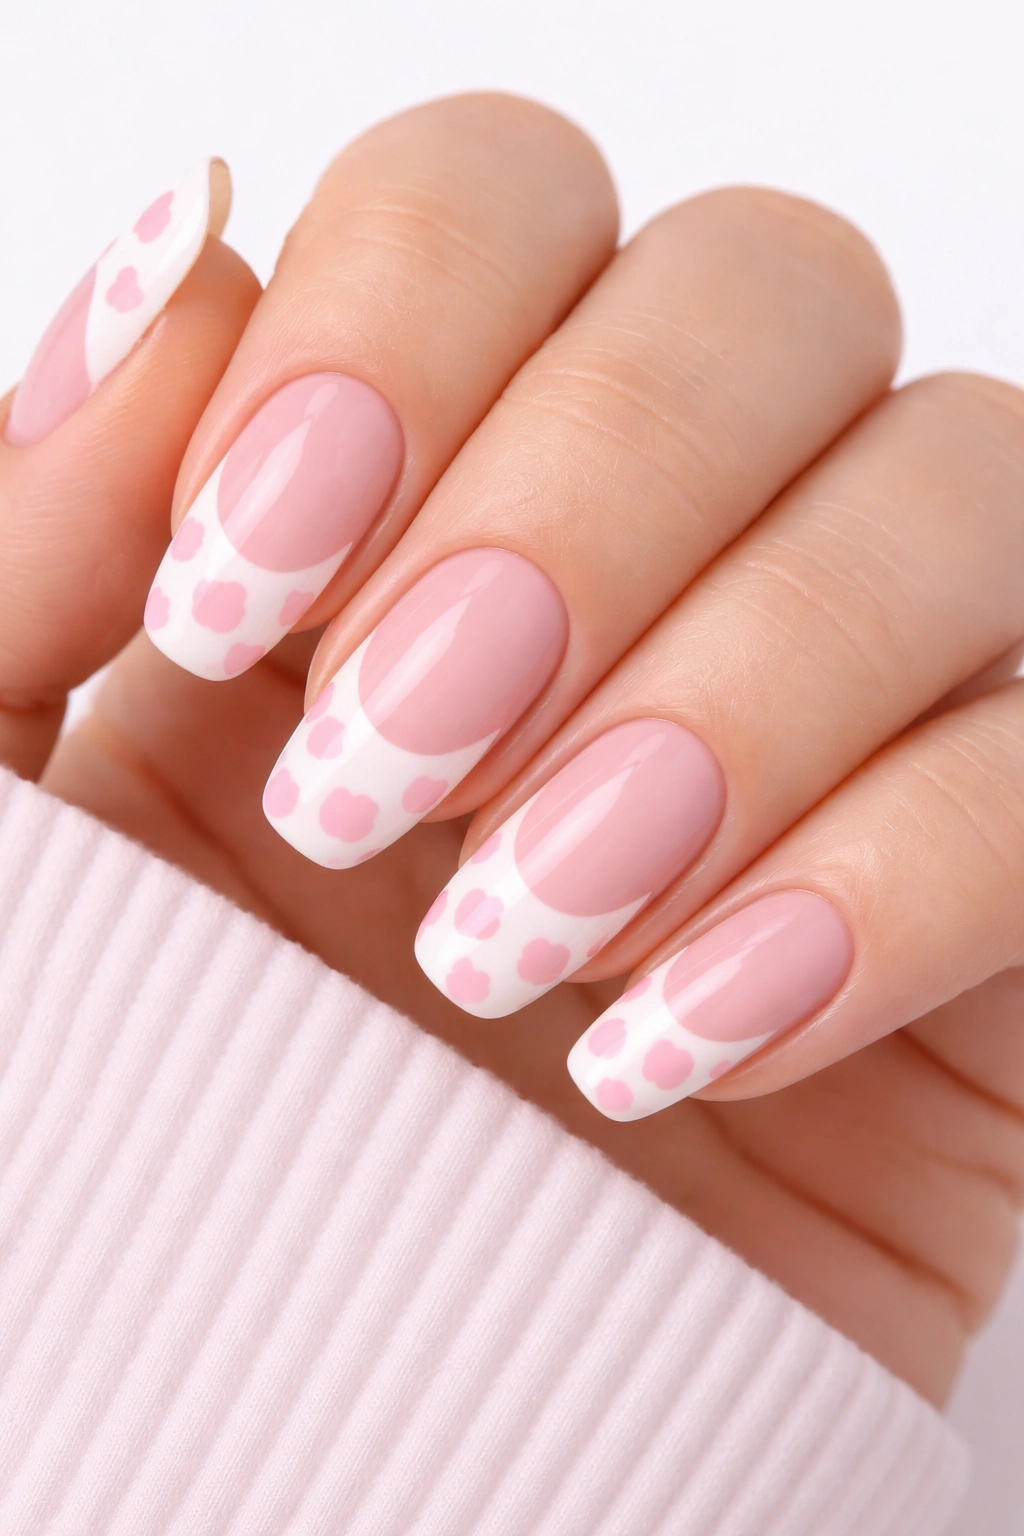
8. Cow Print French Manicure Tips
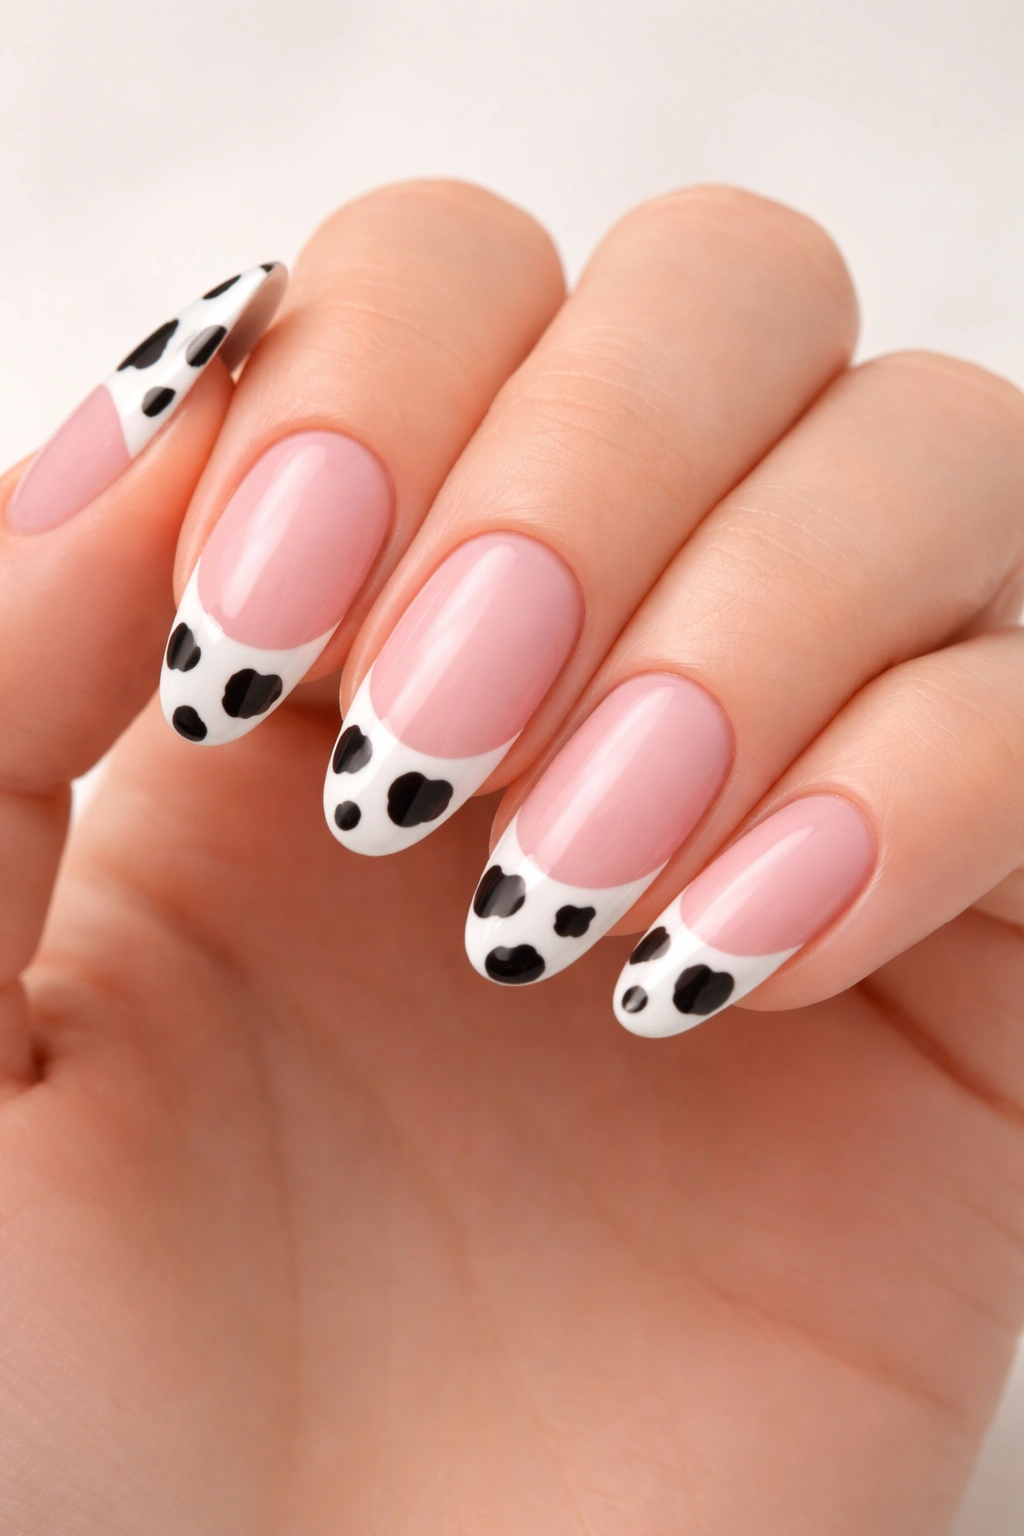
For those who can’t choose between a traditional French manicure and the fun of cow print, this hybrid design adds spots or patterns to the tip section while keeping the nail bed clean. The French manicure structure provides sophistication while the cow print element adds playfulness, creating a design that feels both refined and whimsical. This version gives you the best of both worlds and feels appropriate for both professional and fun occasions.
Why French Manicure Works with Cow Print
The French manicure structure provides a clean, defined space for cow print details to live. Rather than covering the entire nail with spots, this approach confines the pattern to the white tip area, creating a more controlled, intentional design. The clear nail bed remains visible, keeping the overall effect feeling neat and organized despite the pattern. This combination works beautifully on both natural and artificial nails and looks especially sophisticated on longer nail shapes.
Building the French Cow Print Design
- Start with a pale pink or nude base color that covers your entire nail—this creates the classic French manicure foundation
- Paint the tip portion (the last quarter-inch to half-inch of the nail) in clean, bright white using a French manicure guide or steady brush work
- Once the white tip is completely dry, add small black spots or pink spots exclusively within the white tip area
- Keep the spots concentrated in the white section only; avoid spots on the pink base
- You might also reverse this approach: white base with a black tip, then add white spots within the black tip
- Use a very thin brush to outline the french line slightly with black or pink, creating definition between the base and the painted tip
- Seal with a glossy topcoat and take your time with this design; French manicure precision requires patience but delivers elegant results
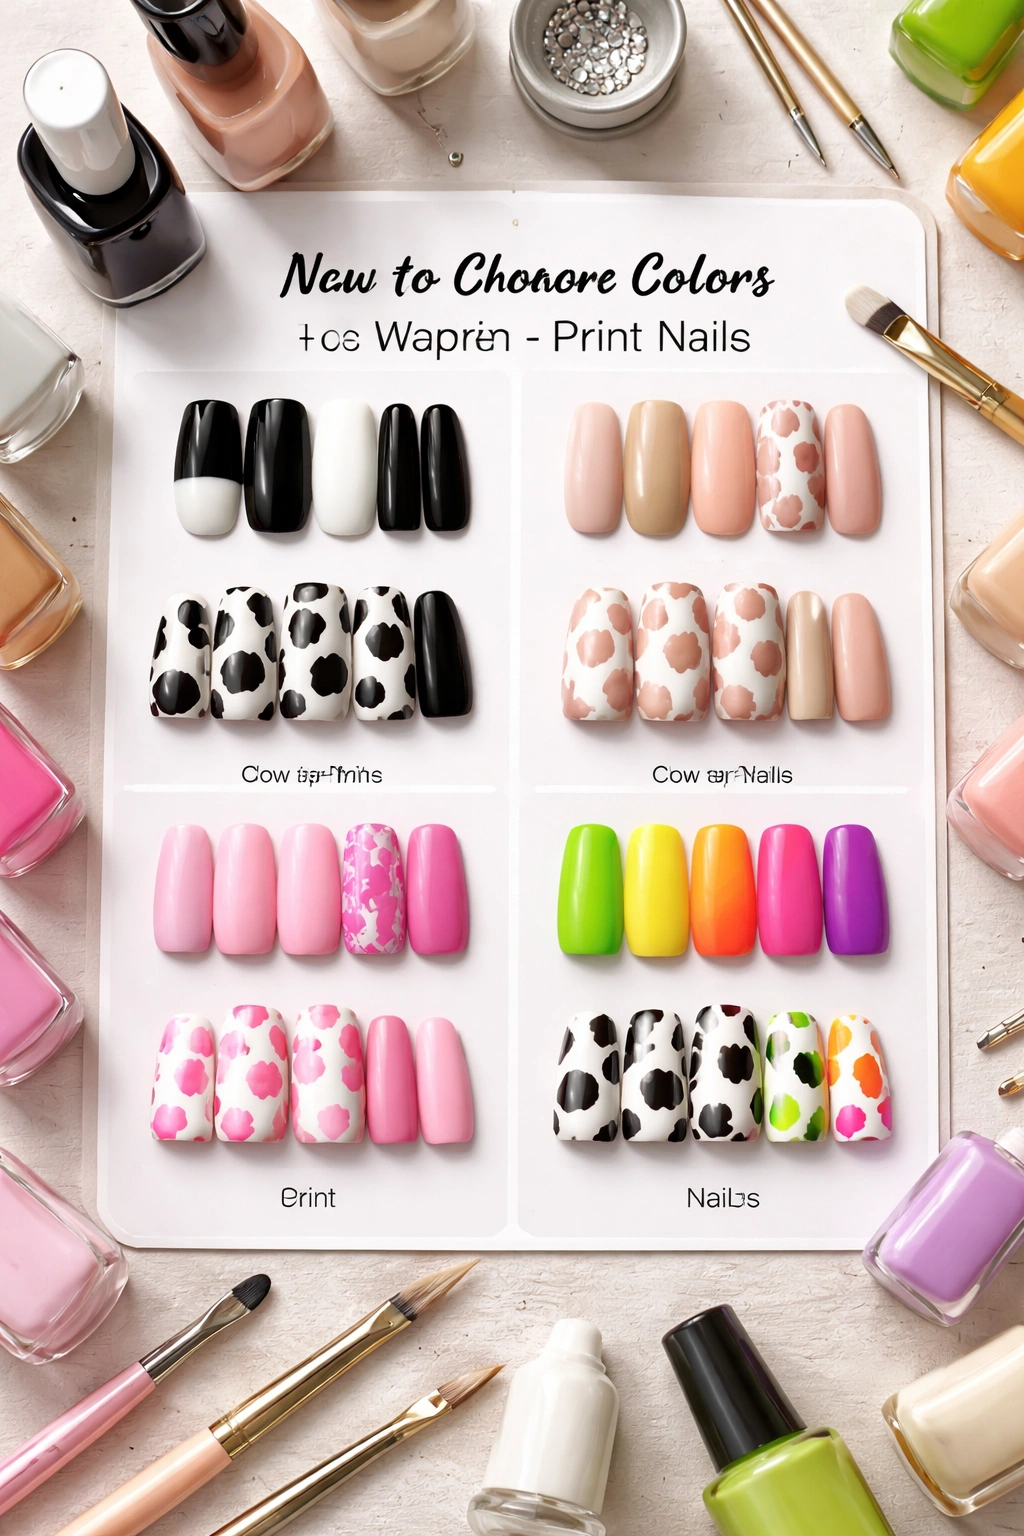
How to Choose Colors for Your Cow Print Nails
The color combination you select makes all the difference in how the final design reads. Black and white offers maximum boldness and works in any context. Pink variations feel younger and more playful. Nude versions feel sophisticated and professional. Neon takes the design from casual to statement-making. Consider your lifestyle, the occasions you typically have your nails done for, and your personal color preferences when choosing your palette. If you’re unsure about committing to a bold color combo, start with classic black and white or try nude and white first—both are universally flattering and work with virtually any outfit or occasion. You can always experiment with bolder or more creative color combinations once you’re comfortable with the basic pattern.
Tools and Materials You’ll Need
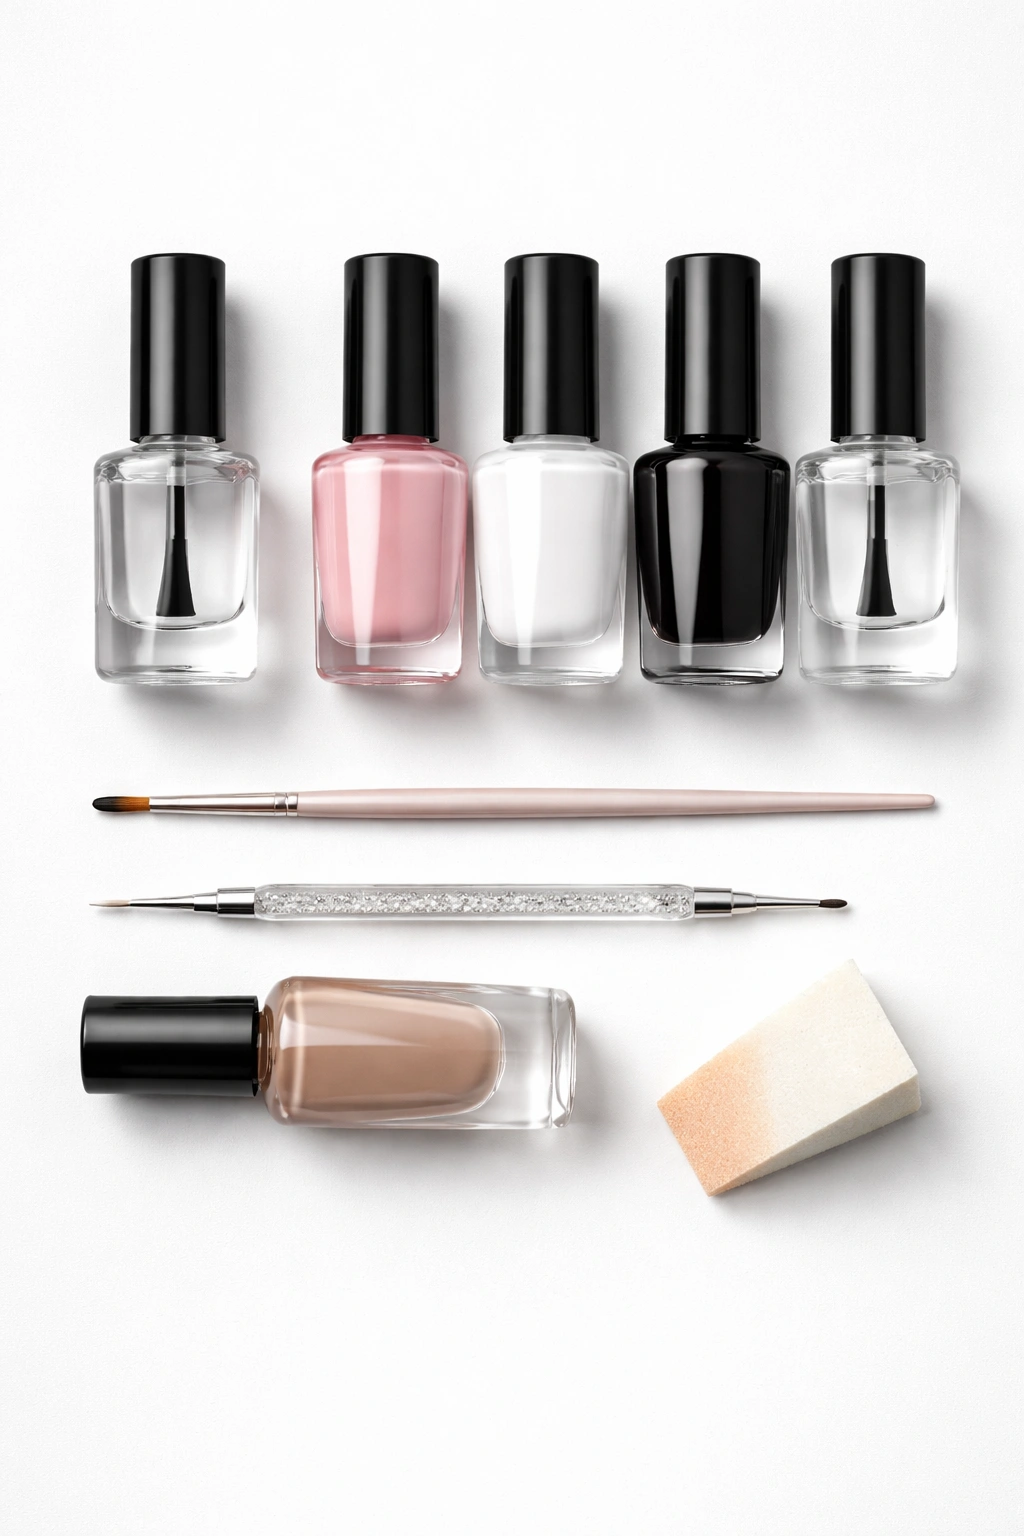
Creating cow print nails at home requires surprisingly minimal supplies. You’ll need quality base coat to protect your nail beds, your chosen nail polish colors, a thin art brush or dotting tool (or even a bobby pin in a pinch) for creating spots, a glossy or matte topcoat depending on your preferred finish, and a makeup sponge if you’re planning to create ombre or gradient effects. Using professional-quality nail polish rather than cheap alternatives makes a huge difference—professional polish has better pigment, applies more smoothly, and lasts much longer without chipping. If you’re unsure about your spotting technique, practice on a makeup sponge or piece of paper first to get a feel for the brush pressure and spot size that works for you.
Common Mistakes to Avoid
Mistake one: making spots too uniform and perfect. Natural cow hide has spots of wildly different sizes scattered randomly. Embrace irregularity and spacing variations—they make your design look more authentic and intentional rather than like you traced from a template. Mistake two: applying polish too thickly, which causes chipping and peeling. Use thin coats and build opacity gradually instead. Mistake three: skipping the topcoat, which compromises both the longevity and the final shine level of your design. A quality topcoat makes every cow print design look more polished and professional. Mistake four: choosing colors with insufficient contrast. If your spot color doesn’t stand out clearly from your base, the design becomes muddy and difficult to read.
Final Thoughts
Cow print nails prove that animal-inspired nail art doesn’t have to be serious, trendy, or complicated—it can simply be fun, versatile, and endlessly adaptable to your personal style. Whether you lean toward the sophistication of classic black and white, the playfulness of pink variations, the boldness of neon, or the artistic expression of rainbow combinations, there’s a cow print version that perfectly matches your aesthetic. The beauty of this pattern is that it works on short nails and long nails, in professional settings and casual settings, on your hands and your feet. Start with whichever design appeals to you most, follow the application tips carefully, and don’t hesitate to experiment once you’re comfortable with the basics. Your cow print nails will turn heads and spark conversations, and you’ll love showing off your creative, personalized take on this playful trend.
