

Creating competition-level nail art isn’t just about having steady hands and good color sense—it’s about understanding what judges look for and pushing your technical skills beyond everyday salon work. Whether you’re entering your first nail competition or refining your portfolio for the big stage, mastering certain design categories can set you apart from other competitors. The nail art pieces that earn high marks at major competitions like Nailympia share common threads: they demonstrate technical mastery, creative originality, precise execution, and an unmistakable “wow factor” that stops judges in their tracks. Let me walk you through 12 nail art designs that genuinely look competition-ready, along with the specific techniques and approach that will make them shine.
1. 3D Sculpture Nails with Dimensional Elements
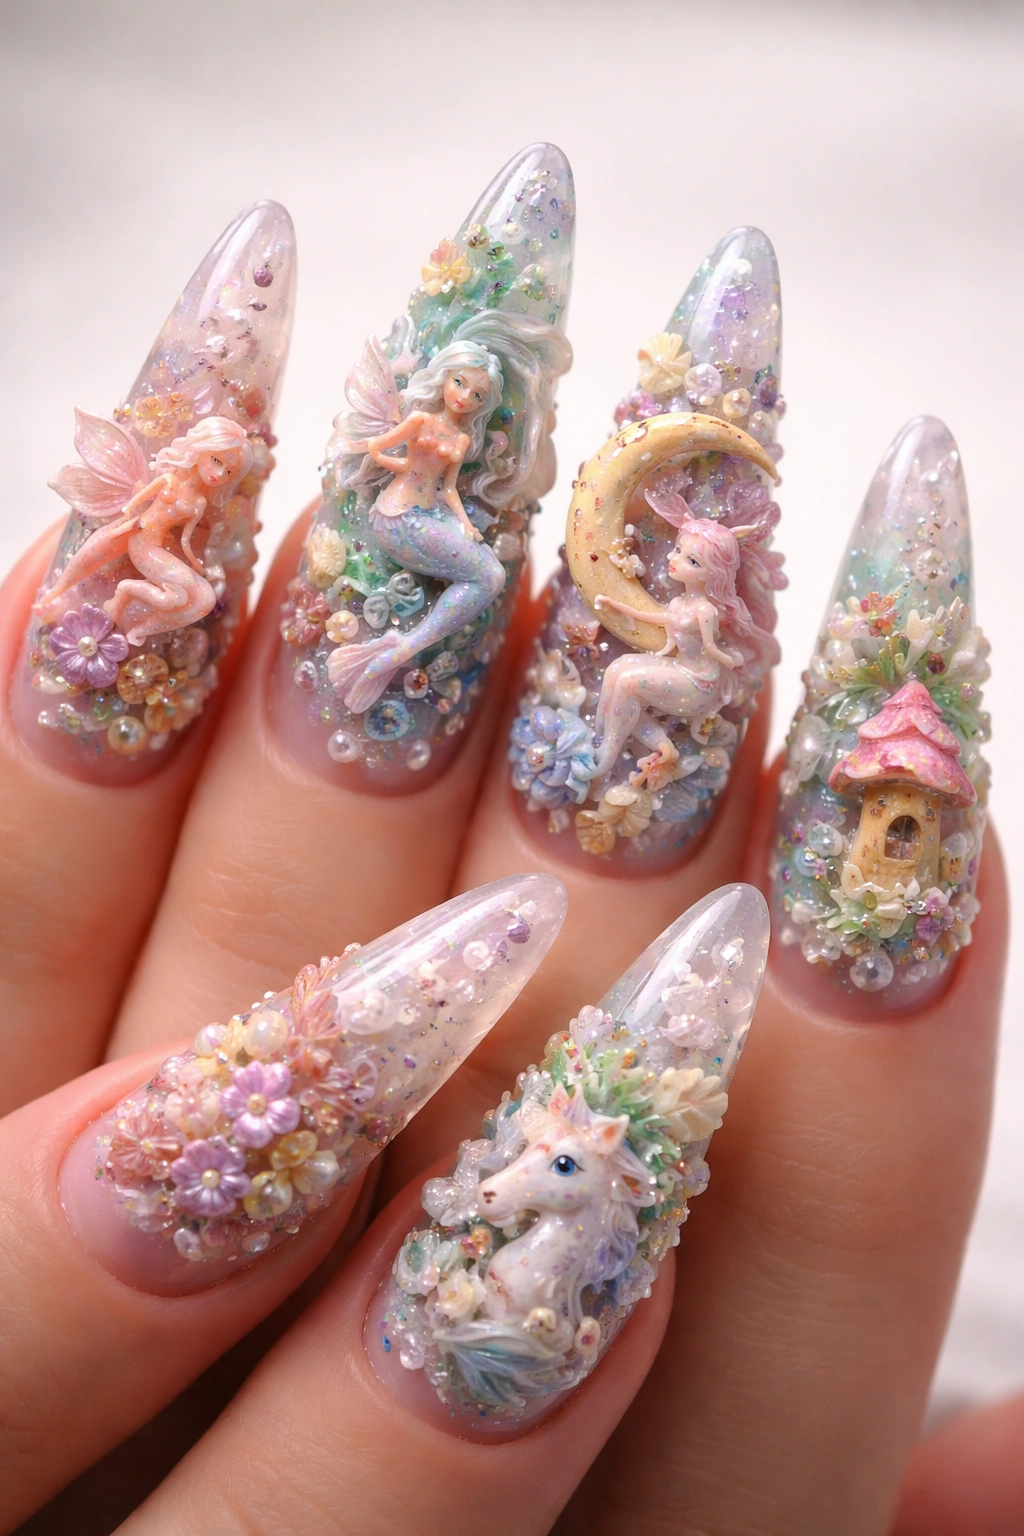
Three-dimensional nail art represents one of the most visually striking categories in nail competitions, and for good reason. These designs take your art literally off the nail surface, creating miniature sculptures from pure nail products that demand serious skill and patience. When done at competition level, 3D nails feature fully sculpted elements that are securely attached to the nail tips and demonstrate complete mastery of acrylic or builder gel application.
Building Your 3D Vision
The foundation of competition-worthy 3D nails starts with your theme interpretation. Think beyond simple charms and gems—successful 3D competition pieces tell a story or create a complete scene. Consider designing pieces like miniature food items (donuts, tacos, sushi), fantasy creatures, or architectural elements. The key is choosing something intricate enough to showcase advanced technique but not so complex that it becomes clunky or poorly executed.
Materials and Technique Excellence
Use high-quality acrylic or hard gel as your sculpting medium, as these give you superior precision and durability compared to soft gels. Build your sculptures in layers, allowing each to cure fully before adding detail. Paint your finished pieces using acrylic paints or gel paints for the finest detail work—acrylics typically give you more control for tiny features like eyes or patterns on miniature animals.
Pro tip: Practice sculpting your 3D elements separately first, away from the nail tips. This lets you perfect the design and refine your technique before committing to the final placement.
Why Judges Love This Design
Judges specifically look for secure attachment, anatomically correct details, and a clear focal point. Whether you’re creating a set of five 3D nails or ten, every piece should be intentional and contribute to the overall composition.
2. Geometric Cat-Eye Nails with Magnetic Polish
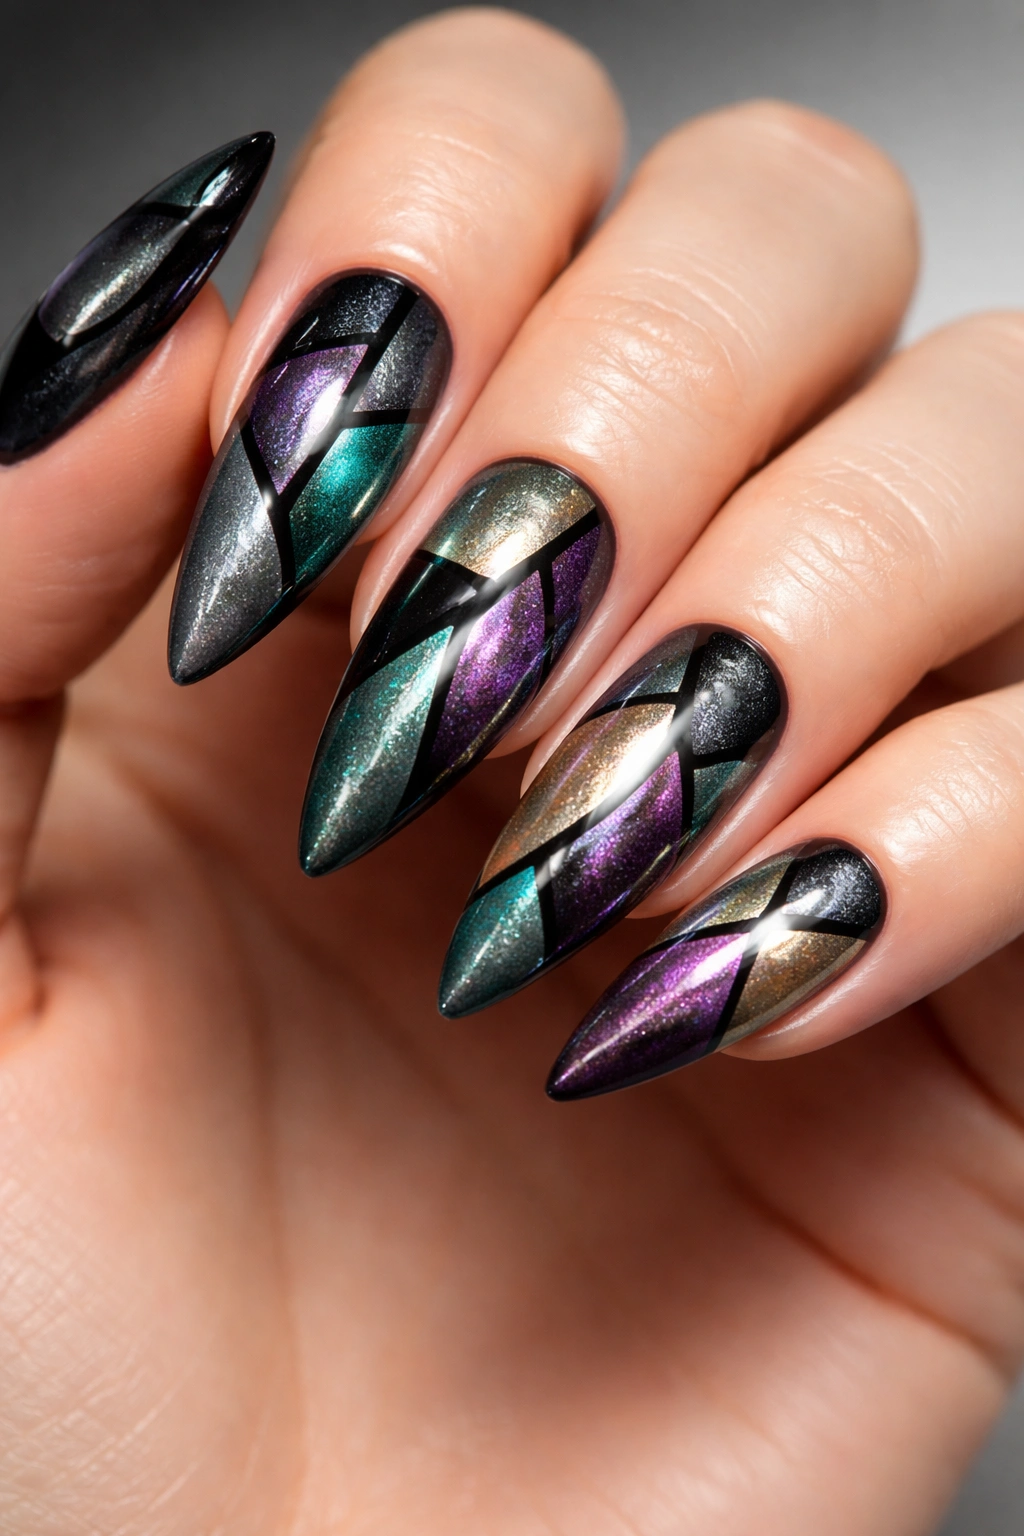
Cat-eye nails have evolved dramatically, and at the competition level, they’re not just simple magnetic stripes—they’re geometric compositions that use magnetic polish to create movement, depth, and light-reflecting complexity. The judges love seeing nail artists master the technical challenge of working with magnetic polish while simultaneously creating a graphically strong design.
Mastering Magnetic Polish Application
The real skill with competition-level cat-eye nails lies in sectional application. Rather than applying one coat of magnetic polish to the entire nail, divide your nail into three to five distinct sections. Apply your magnetic polish one section at a time, use the magnetic wand at different angles for each section, then cure before moving to the next. This layered approach creates multiple directional light reflections that shift as the nail moves, adding serious visual impact.
Design Composition Strategies
Think beyond simple vertical lines. Create diagonal geometric patterns, abstract swirls, or asymmetrical placements of the cat-eye effect. Pair soft neutral magnetic polishes (taupes, silvers, pale pinks) with matte accent stripes or chrome details. The contrast between finishes—glossy magnetic sections against matte lines—elevates the design from pretty to competition-worthy.
Creating Dimensional Effects
Layer your magnetic effects by using different concentrations or different magnetic polish formulas. Some brands offer 9D or even higher-dimensional effects that create more dramatic movement. Combine these with textured gel strokes or clear finishing gel in swirling patterns to add actual raised dimension to your composition.
Key insight: Judges evaluate how well you’ve controlled the magnetic pigments and whether your design reads as intentional composition rather than accidental effect.
3. Hand-Painted Floral Artistry with Precision Detail
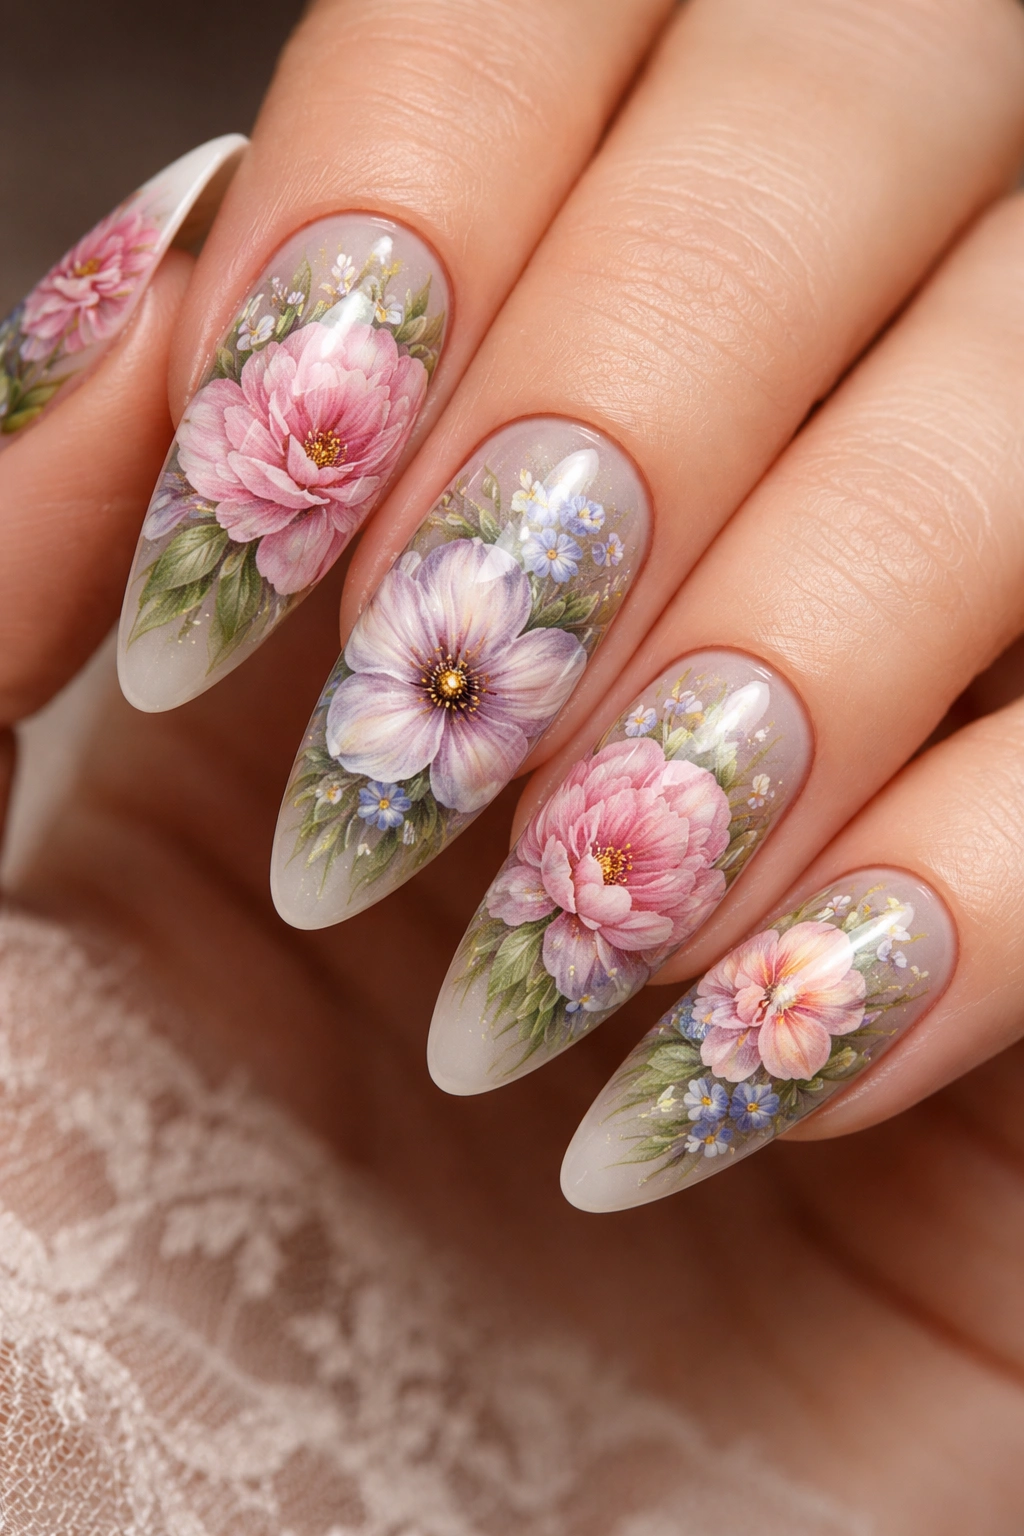
Free-hand painted florals represent the traditional heart of nail competition art, particularly in flat art categories. Competition-level floral designs go far beyond simple daisy or rose sketches—they feature realistic shading, anatomically accurate petal structure, precise gradient transitions, and intricate botanical details that showcase your painting mastery.
Technical Painting Skills You’ll Need
Master your brush control by working with ultra-fine detail brushes and consistently practicing your stroke work. Competition-quality florals demand that you understand light source, shadow, and depth—flowers shouldn’t look flat even when painted on a flat surface. Use techniques like dry brushing for texture, glazing for transparency in petals, and fine linework for veins and details that bring realism to your flowers.
Botanical Accuracy and Composition
Research actual flower structures before painting. Competition judges often recognize when florals are designed with botanical accuracy versus generic flower shapes. Include realistic leaves with veining, varied petal counts specific to different flower types, and natural color variations. Arrange your florals across your nail set with thoughtful composition—don’t randomly scatter them, but create a flowing focal point or narrative.
Color Theory and Shading
Use analogous and complementary color palettes that show your understanding of color harmony. Layer your paints to create realistic shading—the lightest highlights on petal tips, mid-tones on the bulk of the petal, and deeper shadows where petals overlap or recede. This dimensional approach, even on a flat surface, is what elevates amateur work to competition level.
Winning formula: Include at least three florals at different scales, with varying degrees of detail, all executed with consistent precision throughout your set.
4. Chrome and Metallic Layering with Mixed Finishes
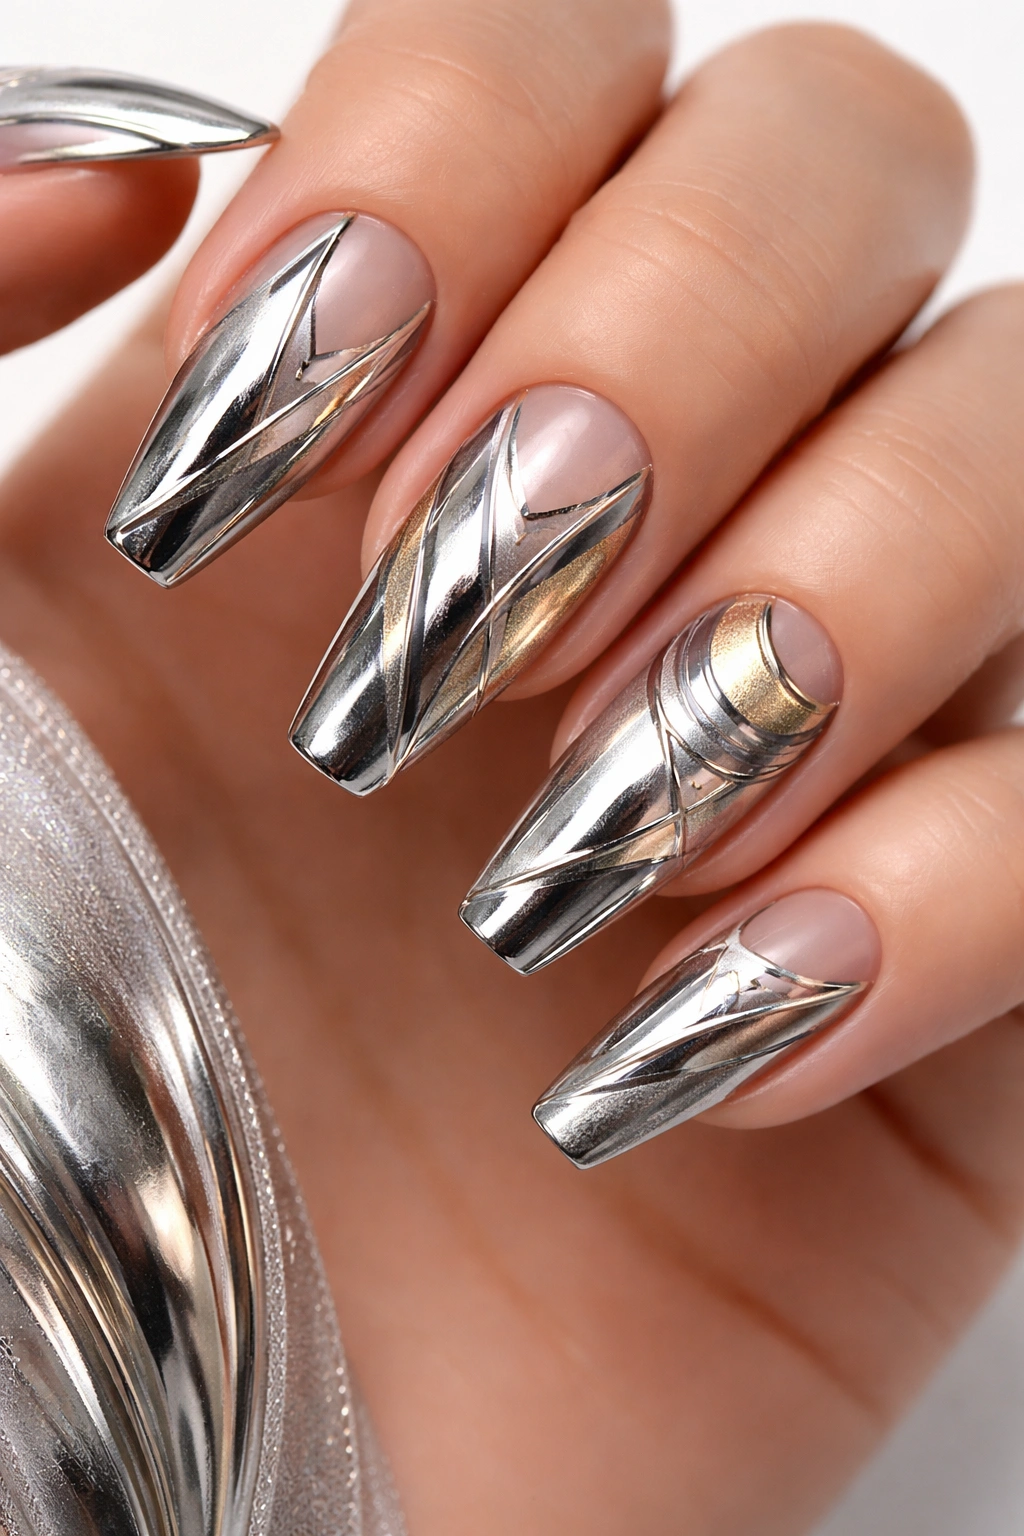
Chrome nails dominate competition entries because they’re visually stunning and technically demanding. At competition level, you’re not just applying chrome powder—you’re strategically layering multiple metallic finishes, combining chrome with different base colors, and creating dimensional metallic compositions that catch light from every angle.
Building Metallic Depth
Start with a carefully chosen base color—this might be a soft pastel, a rich jewel tone, or even a sheer nude. Apply your chrome powder to select areas or create geometric patterns, then consider adding secondary metallic accents using different chrome powders or metallic gel paints in complementary shades. Rose gold chrome layered over silver, or copper elements peeking through rose gold, creates sophisticated visual complexity.
Finish Combinations That Wow
Combine chrome with matte finishes, gloss finishes, and textured gels for maximum impact. A chrome base with matte accent stripes creates striking contrast. Chrome tips on a sheer base with a glossy topcoat versus a satin topcoat create entirely different effects. Competition judges value these intentional finish choices as evidence of your understanding of how different products interact and create visual interest.
Application Precision
Chrome powders require absolute steadiness and precision. Whether you’re creating sharp geometric chrome sections or blended chrome gradients, your edges matter. Use high-quality brushes and take time with application—sloppy chrome work immediately signals amateur status to judges. Some artists use stencils or tape to achieve perfectly clean chrome lines.
Insider secret: Layer glossy clear gel over your chrome work to enhance the reflective quality and create an almost liquid-looking finish that judges consistently reward.
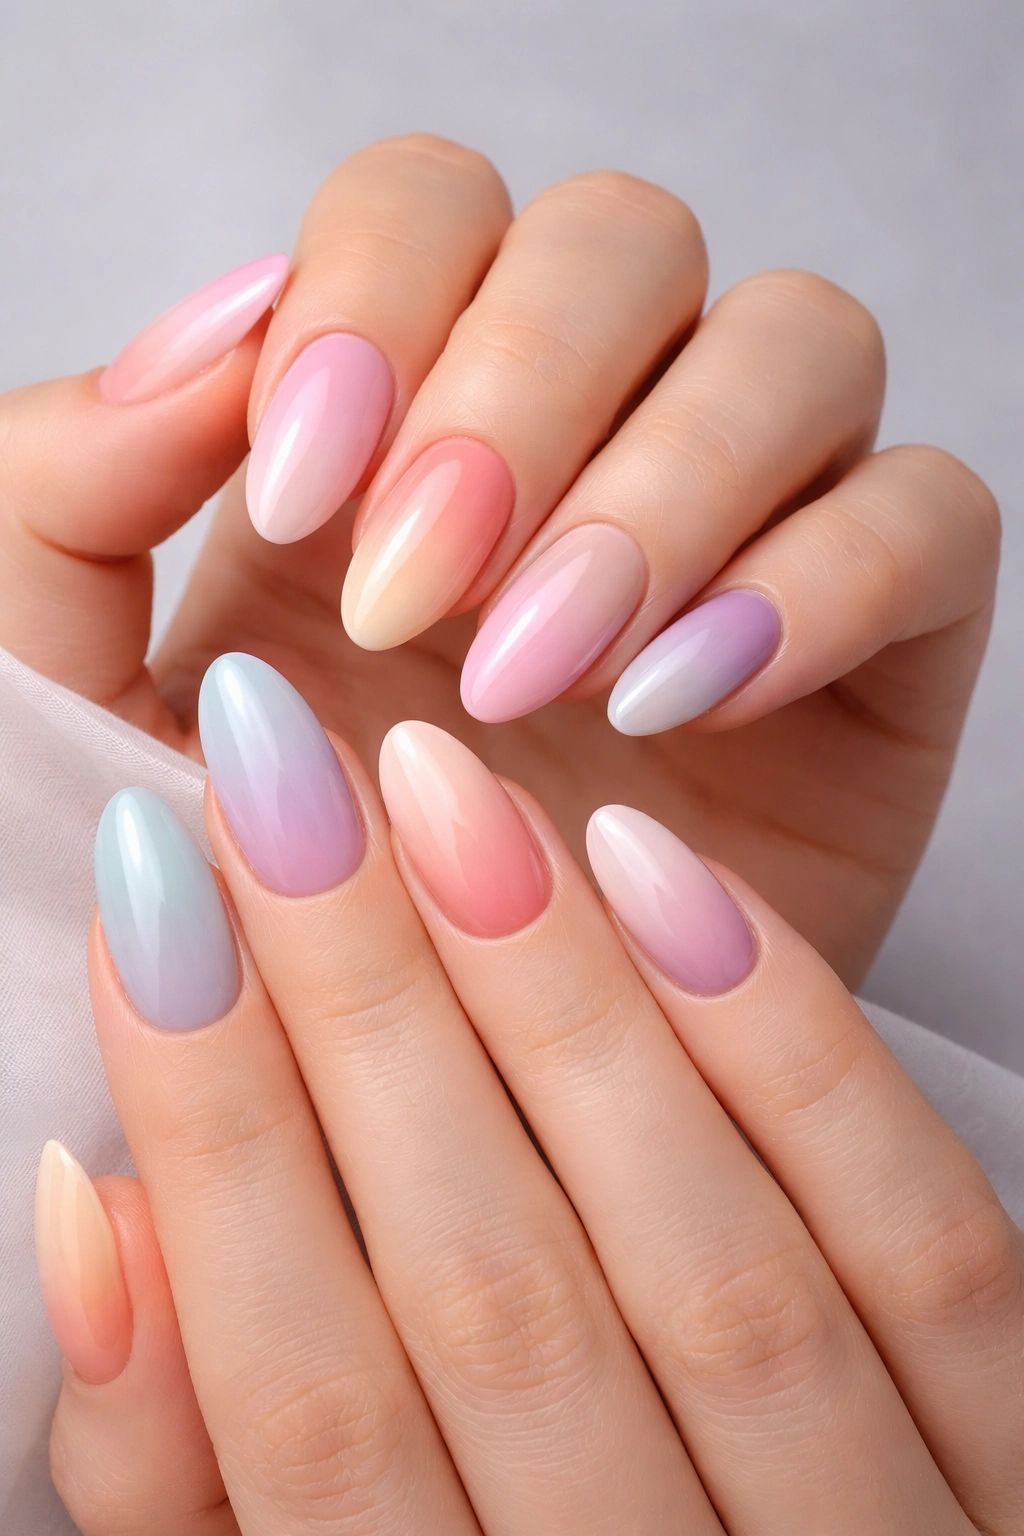
5. Aura Blend Nail Design with Soft Gradient Magic
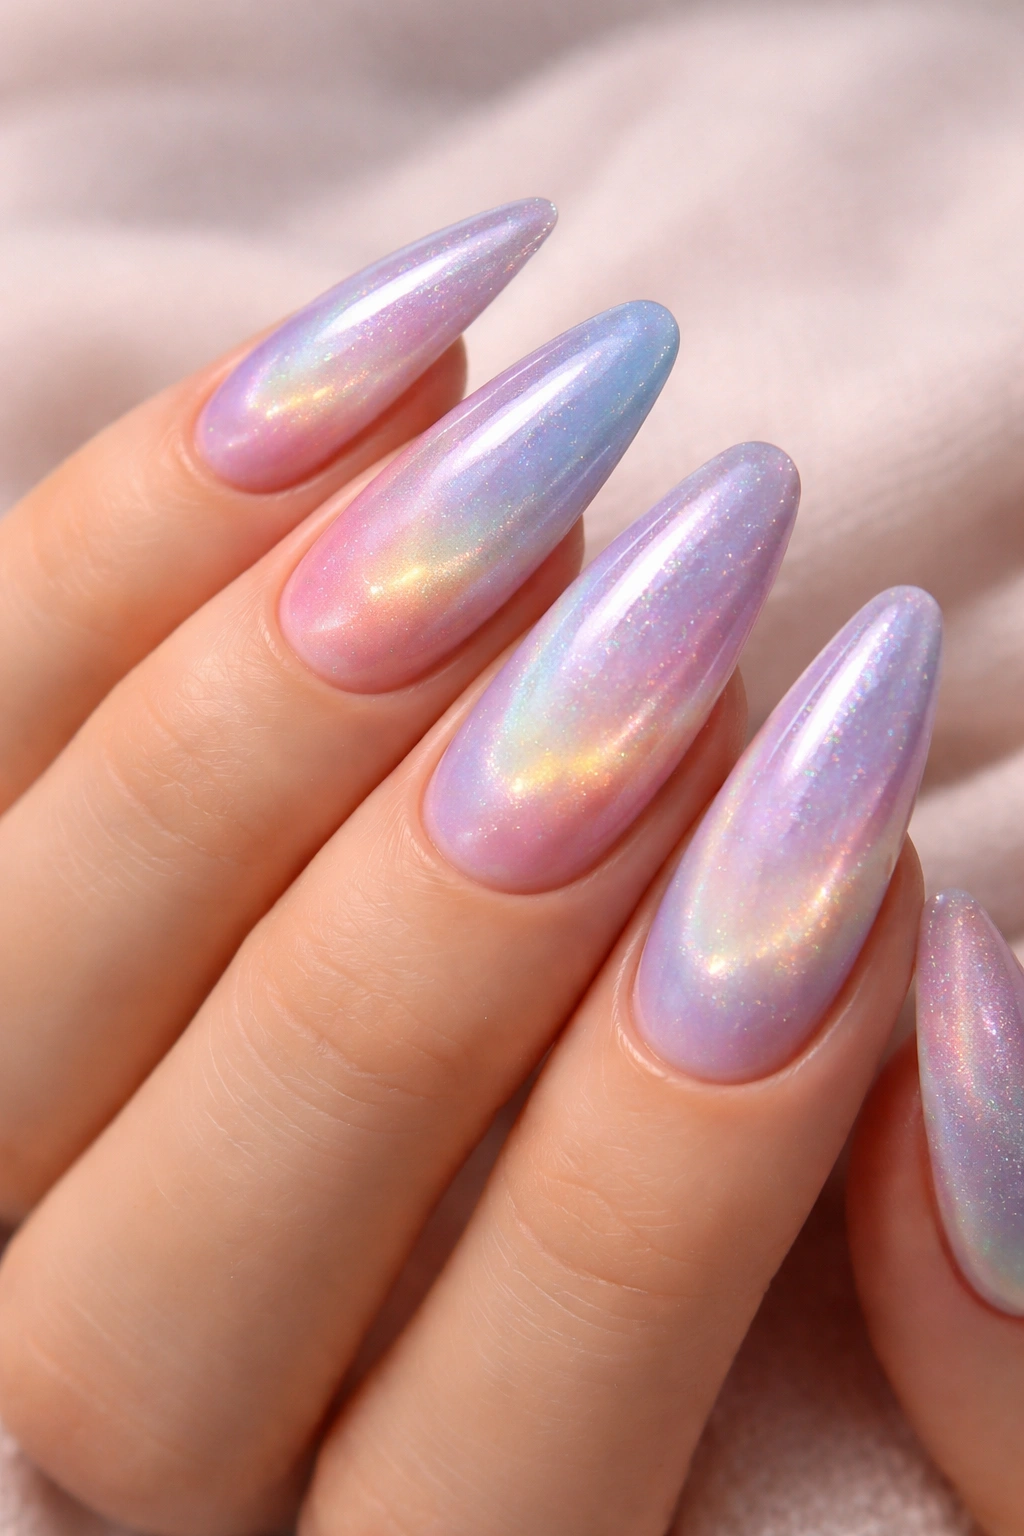
Aura nails represent the art of seamless color blending and gradient creation, and competition-level versions showcase subtle color transitions, perfect gradient flow, and often incorporate multiple techniques (magnetic effects, shimmer, layering) into the aura base. These designs look effortless but demand serious technical skill.
Mastering the Gradient Technique
The foundation of competition aura nails is your gradient work. Use sponge application for smooth color transitions, starting with your lightest shade, sponging increasingly darker tones toward the center or edges, then building back up to light. The colors should blend so seamlessly that you can’t see distinct lines—only a soft, diffused color wash that flows across the nail.
Layering Complexity Within Simplicity
What makes competition aura nails special is subtle added complexity. Apply a magnetic gel over your gradient base for soft cat-eye movement. Add shimmer or pearl effects that interact with the gradient base. Include faint floral or geometric details that suggest composition without overwhelming the gradient. The goal is balance—complex enough to showcase skill, simple enough to read as intentional design.
Color Selection Strategy
Choose color combinations that feel cohesive and intentional. Soft pastel auras (baby blue fading to lavender fading to soft pink) work beautifully, but so do moody versions (deep plum fading to burgundy) or jewel-tone combinations. At competition level, your color choices communicate your artistic sensibility—don’t default to random color combinations, but think about harmonies and emotional impact.
Finishing Touches That Matter
Seal your aura work with a perfectly smooth, glass-like topcoat. Any bumpiness or unevenness in your topcoat application undermines the sophisticated effect you’ve created. Consider matte topcoat over portions of your aura for textured contrast.
Competition edge: Enter aura nail designs when you’re confident in your gradient technique—judges immediately spot uneven or blotchy blending.
6. Negative Space Nail Design with Strategic Precision
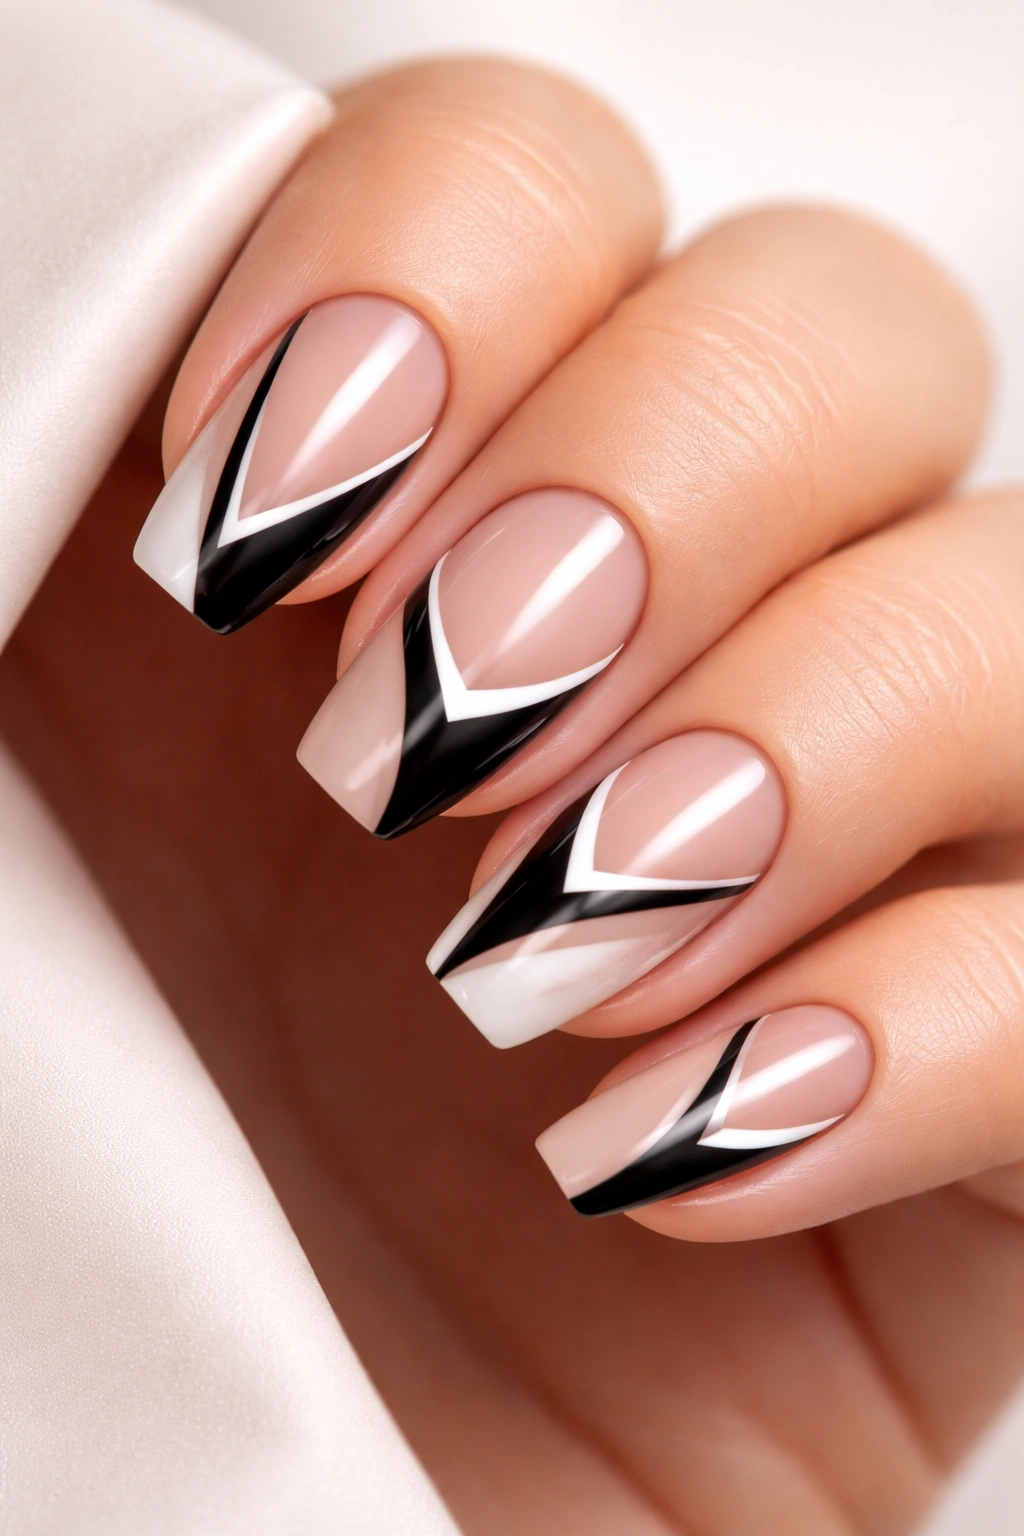
Negative space designs might seem minimalist, but at competition level, they’re exercises in precision, intentional placement, and restraint. These designs showcase your ability to create sophisticated visual impact without covering the entire nail, often incorporating the natural nail or thin base color as part of your composition.
Defining Your Negative Space Strategy
Competition-level negative space designs use cutouts, uncovered sections, or sheer areas as intentional design elements—not accidents or space fillers**. This might mean geometric shapes precisely cut from an opaque base, delicate floral details on a sheer background with the natural nail showing through, or sophisticated line work that uses the negative space to create secondary shapes or optical effects.
Precision and Technique Requirements
Working with negative space demands absolute precision in your edge work. Whether you’re painting clean lines, executing cutouts with a file, or carefully placing decals and details, every edge must be intentional and clean. Use negative space to create optical illusions or secondary images—for instance, the spaces between lines create shapes or patterns that are as important as the painted elements.
Creating Visual Balance
Distribute your design across the nail set thoughtfully. If you’re doing negative space across all ten nails, ensure each nail feels like part of a cohesive set while having its own visual interest. Consider varying your cutout patterns or negative space placement from nail to nail so the overall composition feels curated rather than repetitive.
Judge’s perspective: Negative space designs demonstrate your ability to work with restraint and intention—no hiding mistakes behind excessive detail, just pure technical execution and design sense.
7. Mixed Media Composition with Dimensional Embellishments
Mixed media nails combine multiple materials and techniques in a single composition—3D sculpted elements paired with hand-painted details, chrome accents combined with gems, textured gels layered with flat art. At competition level, mixed media designs must feel cohesive, not chaotic, with each element serving a purpose in your overall composition.
Balancing Multiple Elements
The challenge with mixed media work is preventing it from looking cluttered or overwhelming. Choose three to four distinct elements maximum and ensure they work together thematically or compositionally. For example: a floral base painted with acrylics, chrome accents creating geometric frames around the florals, tiny 3D gems positioned strategically, and matte sections for contrast. Each element should enhance the others rather than compete for attention.
Technical Integration
Understand how different products and techniques layer and interact. Gels that cure under UV light interact differently with paints than acrylics do. Chrome powders applied over certain gel finishes can look muddy or gorgeous depending on your base. Experiment extensively before competition day to ensure your mixed media elements truly work together visually.
Thematic Coherence
The most successful mixed media pieces tell a story or explore a cohesive theme. Rather than randomly combining techniques, think of your design as a unified concept where each element serves the narrative. Perhaps your design is “underwater fantasy”—hand-painted seaweed, 3D sculpted sea creatures, chrome accents suggesting water movement, and gem embellishments as treasure.
Competition advantage: Mixed media entries often stand out because they demonstrate broader skill across multiple techniques, but only if they’re executed with precision and cohesion.
8. Animal Print Nails with Realistic Pattern Work
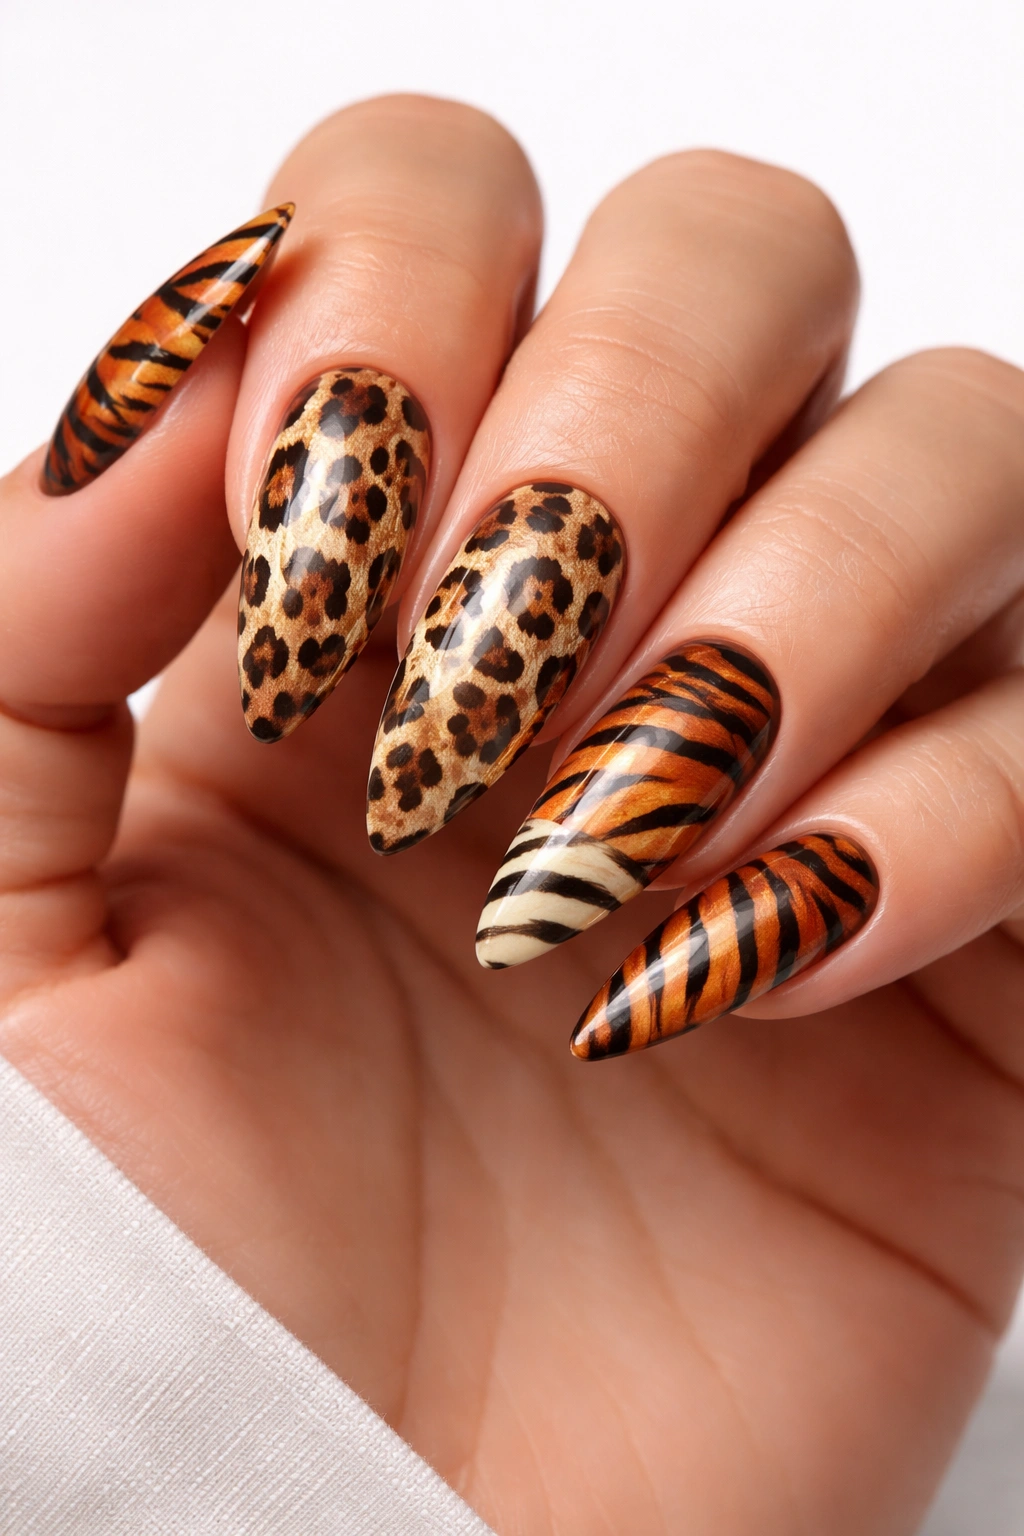
Animal print designs—leopard, tiger, zebra, snakeskin, and more—showcase your ability to create convincing patterns that read realistically even at small scale. Competition-level animal prints go beyond generic spotted patterns; they feature anatomically accurate markings, realistic color gradients, and the specific visual characteristics of real animal fur or skin.
Pattern Research and Accuracy
Study actual animal patterns before you paint. Competition judges recognize when you’ve done your research—realistic leopard spots have specific shapes and cluster patterns, tiger stripes follow particular directional flows, snakeskin features consistent scale and texture. Spend time observing reference images so your patterns feel authentic rather than invented.
Technique for Realistic Rendering
Use fine detail brushes and multiple paint layers to build realistic animal patterns. Start with your base color (perhaps a warm tan for leopard spots), then add shadows and depth with darker shades before applying the primary pattern markings. Include color variation within the pattern itself—spots aren’t all the same intensity or shade, but vary based on light source and depth. This subtlety elevates your work from flat pattern to realistic rendering.
Scaling and Composition Across Nail Sets
One of the challenges with animal print competition nails is maintaining pattern consistency and scale across your entire set. All your leopard spots should feel like they’re from the same animal, not wildly different sizes or patterns on different nails. However, some variation is natural—you might show closer-up detail on some nails and wider views on others.
Combining Animal Print with Other Elements
Competition entries often combine animal prints with complementary techniques—chrome accents, negative space, gradient bases under the animal patterns. These combinations must feel intentional and enhance your design rather than distract from your animal print work.
Judges’ criteria: Animal print designs are evaluated on pattern accuracy, realistic rendering, and technical precision in pattern application. Sloppy or oversimplified patterns immediately signal amateur work.
9. Gradient and Ombré Techniques with Seamless Transitions
Gradient and ombré designs might seem simple, but creating competition-level gradient work means achieving perfectly smooth color transitions with no visible lines or banding, across multiple nails, with consistent technique. These designs showcase your foundational technical skills and your understanding of color.
Gradient Application Methods
Master multiple gradient techniques: sponge application for soft blends, brush application for controlled gradients, and layering thin coats for subtle transitions. Each method creates different effects, and competition artists use the technique that best serves their design vision. Sponge work typically creates softer, cloudier blends, while brush gradients can be more directional and controlled.
Color Selection and Theory
Your gradient colors must work together harmoniously. Monochromatic gradients (light to dark in a single color) showcase your technical blending skill. Analogous color gradients demonstrate color theory knowledge. Even contrasting color gradients work when they’re thoughtfully chosen. At competition level, your color selection communicates intention—you’ve chosen these specific shades for visual reasons, not just grabbed whatever colors were available.
Achieving Smooth, Banding-Free Results
The enemy of perfect gradients is visible bands or lines between color transitions. To achieve seamless work, overlap your applications generously, use thin coats rather than heavy ones, and blend edges thoroughly. Some artists use blending mediums or very light topcoats to blur lines between color transitions.
Scaling Gradients Across the Full Set
Your gradient technique must remain consistent across all ten nails. Each nail should feel like it’s part of the same ombré story, whether you’re creating a gradient that travels across multiple nails or repeating gradient patterns with slight variation on each nail.
Competition-winning approach: Pair your perfect gradient base with subtle additional elements—maybe soft shimmer throughout, minimal hand-painted details, or strategic chrome accents—to elevate from technically perfect to artistically interesting.
10. Textured and Dimensional Surface Designs
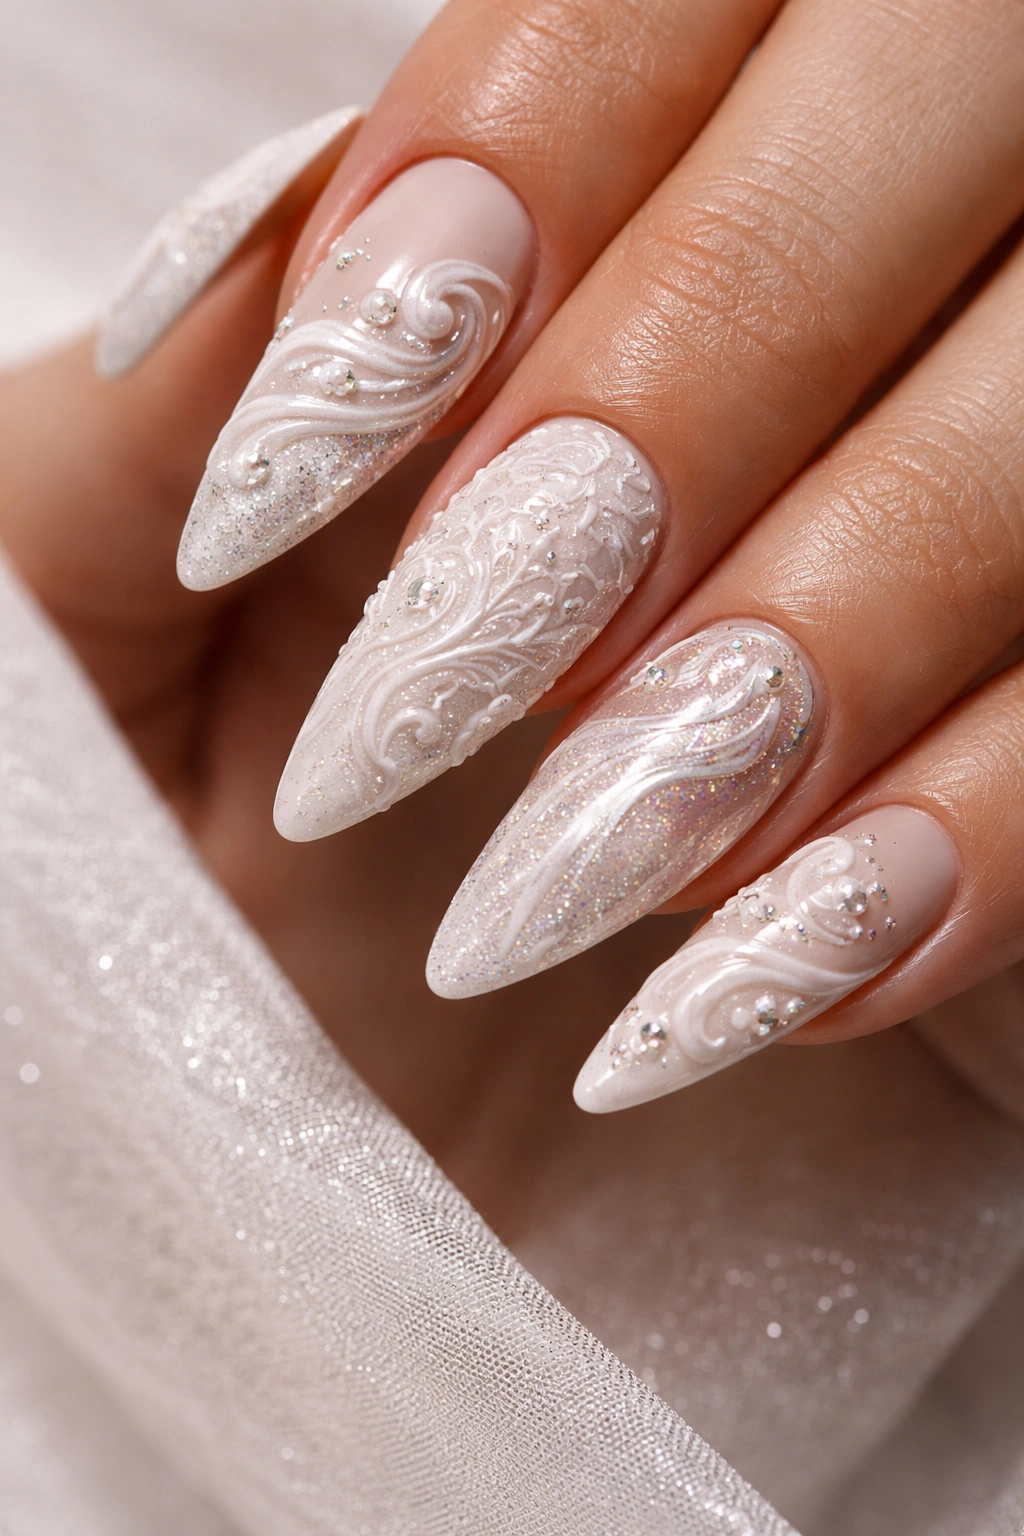
Textured nail designs use raised gels, matte and gloss combinations, fluted surfaces, and dimensional effects to create tactile, visually complex work that’s immediately eye-catching. Competition judges love textured designs because they demonstrate control over product and understanding of how texture interacts with light.
Creating Architectural Texture
Build actual raised texture on your nails using thick builder gels, acrylic, or specialized textured products. Create deliberate patterns—fluted lines, ribbed surfaces, sculptural shapes—that create shadows and highlights. The texture shouldn’t be random or accidental, but part of your intentional design composition. Think of your nail as a miniature sculpture where texture plays a specific visual role.
Finish Combinations for Dimensional Interest
Combine matte finishes with glossy sections, textured matte with chrome accents, or raised gels with smooth gel bases to create visual and tactile interest. The contrast between different finishes makes texture more pronounced and demonstrates your ability to control multiple product types.
Surface Treatment Techniques
Use specialized techniques like spider gel for precise raised lines, thick gel strokes for dimension, or even embedding objects within gel for mixed media texture. Each technique requires practice and precision to execute at competition level.
Lighting Considerations
Remember that texture works best with good lighting and from certain angles. Competition entries are photographed and displayed, so consider how light will reveal or obscure your textured work. Practice photographing your designs to see how they translate to digital images and judging formats.
Textured design advantage: These pieces often photograph beautifully and draw judges’ attention because the dimensional quality is immediately obvious, not subtle.
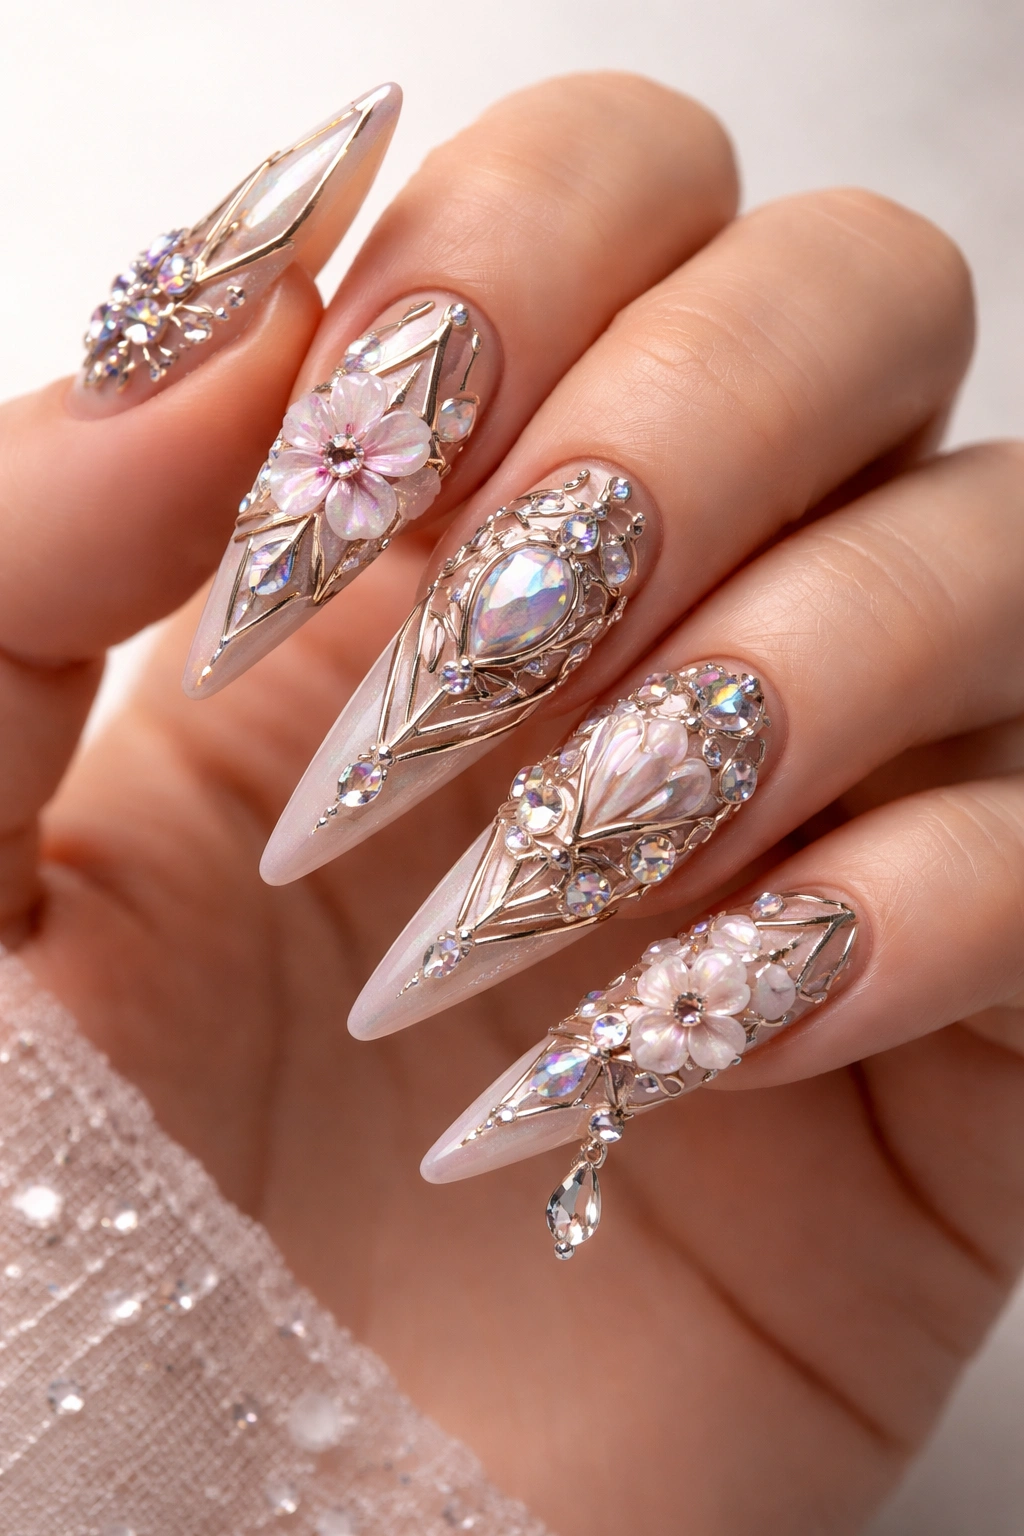
11. Intricate Detail Work with Strategic Gem Placement

Gem and rhinestone designs, when executed at competition level, feature strategically placed embellishments that enhance rather than overwhelm your design, paired with hand-painted or technical artwork that shows your design sense extends beyond just applying sparkly elements. Competition-worthy gem designs are carefully curated, not overly bedazzled.
Design-First Gem Placement
Rather than starting with gems, begin with your underlying design—hand-painted details, chrome accents, gradient bases, or negative space work. Then use gems to enhance specific focal points or create secondary design elements. Competition judges look for evidence that your gem placement was intentional and part of your design vision, not a last-minute sparkle addition.
Gem Variety and Color Selection
Work with multiple sizes and colors of gems and rhinestones to create visual complexity. Use larger statement stones as focal points, smaller stones to add detail and sparkle, and complementary colors that enhance your base design. Some competition artists use iridescent stones, holographic elements, or gems in non-traditional colors (matte, frosted, or ombre stones) for uniqueness.
Secure Application and Durability
At competition level, your gems must be flawlessly adhered with no loose stones or visible glue. Use high-quality nail glue, press firmly and hold for adequate time, and consider sealing gem edges with clear gel to ensure they’ll survive transport and display. Loose or missing gems immediately signal poor craftsmanship.
Balancing Sparkle and Sophistication
The difference between “bedazzled” and “elegantly embellished” lies in restraint and placement. Each gem should have a visual reason for being there. Create negative space around gems so they genuinely stand out. Consider the overall impact—does your design read as cohesive and intentional, or does it feel cluttered?
Competition judges value: Gem designs that demonstrate design skill (not just “add sparkles”), secure and precise application, and thoughtful integration with your overall artistic vision.
12. Complex Pattern Play with Mixed Motifs
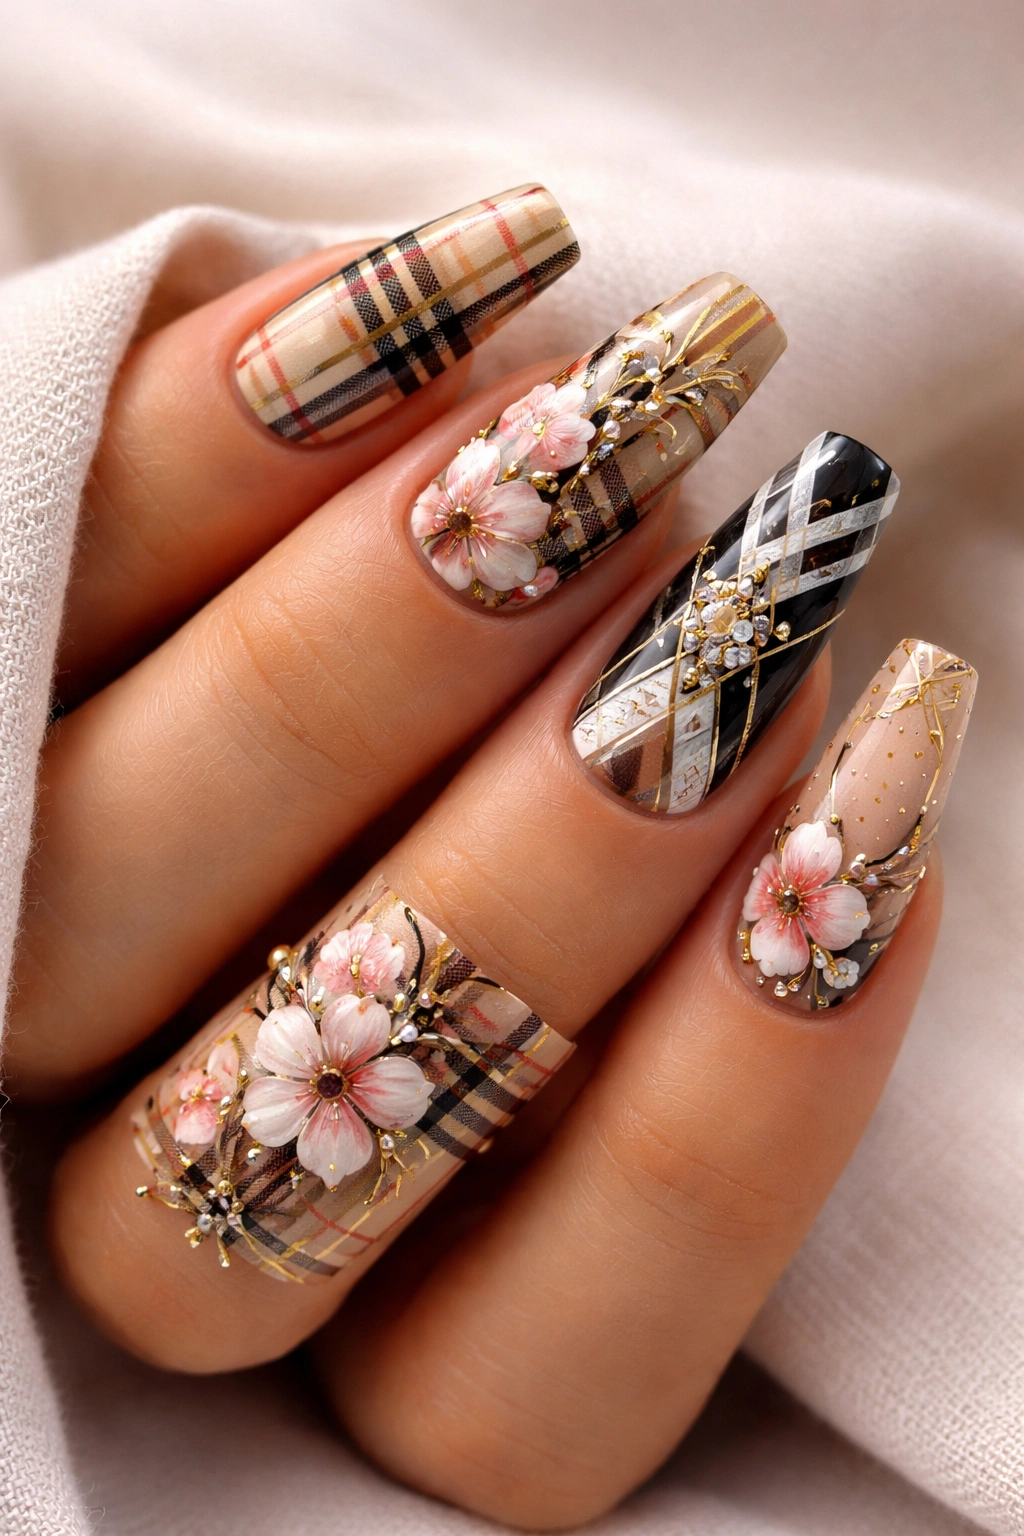
The most challenging competition designs combine multiple patterns, motifs, or design elements across a full set while maintaining cohesion and visual harmony. Think plaid combined with floral accents, geometric patterns paired with hand-painted details, or abstract patterns interspersed with realistic elements. This design type demands exceptional skill in composition, pattern control, and technical execution.
Compositional Planning
Before you begin, sketch your entire design across your ten-nail set. Plan how patterns will interact on adjacent nails, where focal points should be, and how the overall set will read as a unified composition. This pre-planning is what separates chaotic from curated complexity.
Pattern Execution Across Multiple Nails
Each distinct pattern must be executed with precision and consistency. If you’re painting plaid on multiple nails, all your plaids should have the same stripe thickness and angle. If you’re creating geometric patterns, angles should be consistent and intentional. Sloppy pattern work immediately signals amateurism.
Creating Visual Hierarchy
With complex multi-motif designs, establish visual hierarchy to prevent everything from competing equally for attention. Perhaps floral details are your main focus (larger, more detailed) while geometric patterns are secondary accents (smaller, more subtle). Perhaps one or two nails are focal-point nails with maximum detail while others are supporting pieces with simpler pattern work.
Color Cohesion Across Complexity
Use a consistent color palette throughout your set to create unity despite visual complexity. Perhaps all your patterns use variations of the same three to four colors. Perhaps you repeat specific colors across all ten nails even as patterns vary. This color consistency prevents your complex set from feeling chaotic.
Demonstrating Mastery
Pattern play designs showcase your ability to work across multiple techniques, maintain precision across extended application time, think compositionally, and handle visual complexity. These entries often earn high marks because they demonstrate comprehensive nail art skill.
Winning edge: Complex pattern nails succeed when judges see intentionality in every element, precision in every pattern, and thoughtful composition tying everything together. It’s not about quantity of detail, but quality and purpose of every detail you include.
Final Thoughts
Creating competition-level nail art comes down to three interconnected elements: technical mastery, intentional design, and relentless precision. Whether you’re drawn to sculptural 3D work, photorealistic painting, or geometric composition, the designs that earn high marks at competitions share common threads—evidence of extensive practice, thoughtful planning, meticulous execution, and an artistic vision that guides every choice you make.
Start by choosing one design category that genuinely excites you. Rather than trying to master all twelve designs at once, develop deep expertise in the techniques required for one or two categories. Practice that specific design repeatedly, enter smaller local competitions to build confidence and get judge feedback, then refine your technique based on what you learn. Each competition entry teaches you something invaluable—whether you place or not, you’re building the skills and experience that eventually earn you recognition on the competition stage.
Remember that every nail artist whose work you admire started exactly where you are now. The difference between amateur and competition-level work isn’t talent—it’s thousands of hours of dedicated practice, willingness to embrace feedback and critique, and commitment to pushing your skills beyond what’s comfortable. Your competition journey begins the moment you decide that excellence matters more than speed, and intention matters more than decoration.
