

Soft square nails have become the go-to shape for anyone wanting that perfect balance between elegance and wearability — sharp enough to feel modern, but rounded enough to avoid the dreaded breakage that comes with stiletto tips. Now pair that forgiving shape with the mystique of gemstone-inspired designs, and you’ve got nail art that actually makes people stop and ask for your nail artist’s number. The beauty of gemstone nails isn’t just the sparkle factor (though that’s undeniably gorgeous); it’s the way each stone carries its own personality, color palette, and visual interest. Whether you’re drawn to the deep mystique of amethyst, the romantic blush of rose quartz, or the full-on glamour of ruby red with diamond sparkle, there’s a gemstone nail design that feels like it was made specifically for your style.
The soft square shape is particularly forgiving for gemstone nail art because it gives your nail artist a larger canvas to work with compared to stilettos, while still maintaining that contemporary edge. You get actual surface area for intricate details — crystal embeds, metallic leaf accents, gradient transitions, and delicate wire wrapping — without sacrificing durability. These designs work beautifully whether you’re going for subtle everyday elegance or head-turning statement nails for a special occasion. Let’s explore twelve show-stopping gemstone designs that deserve a spot on your nail inspiration board.
1. Amethyst Purple with Gold Leaf Accents
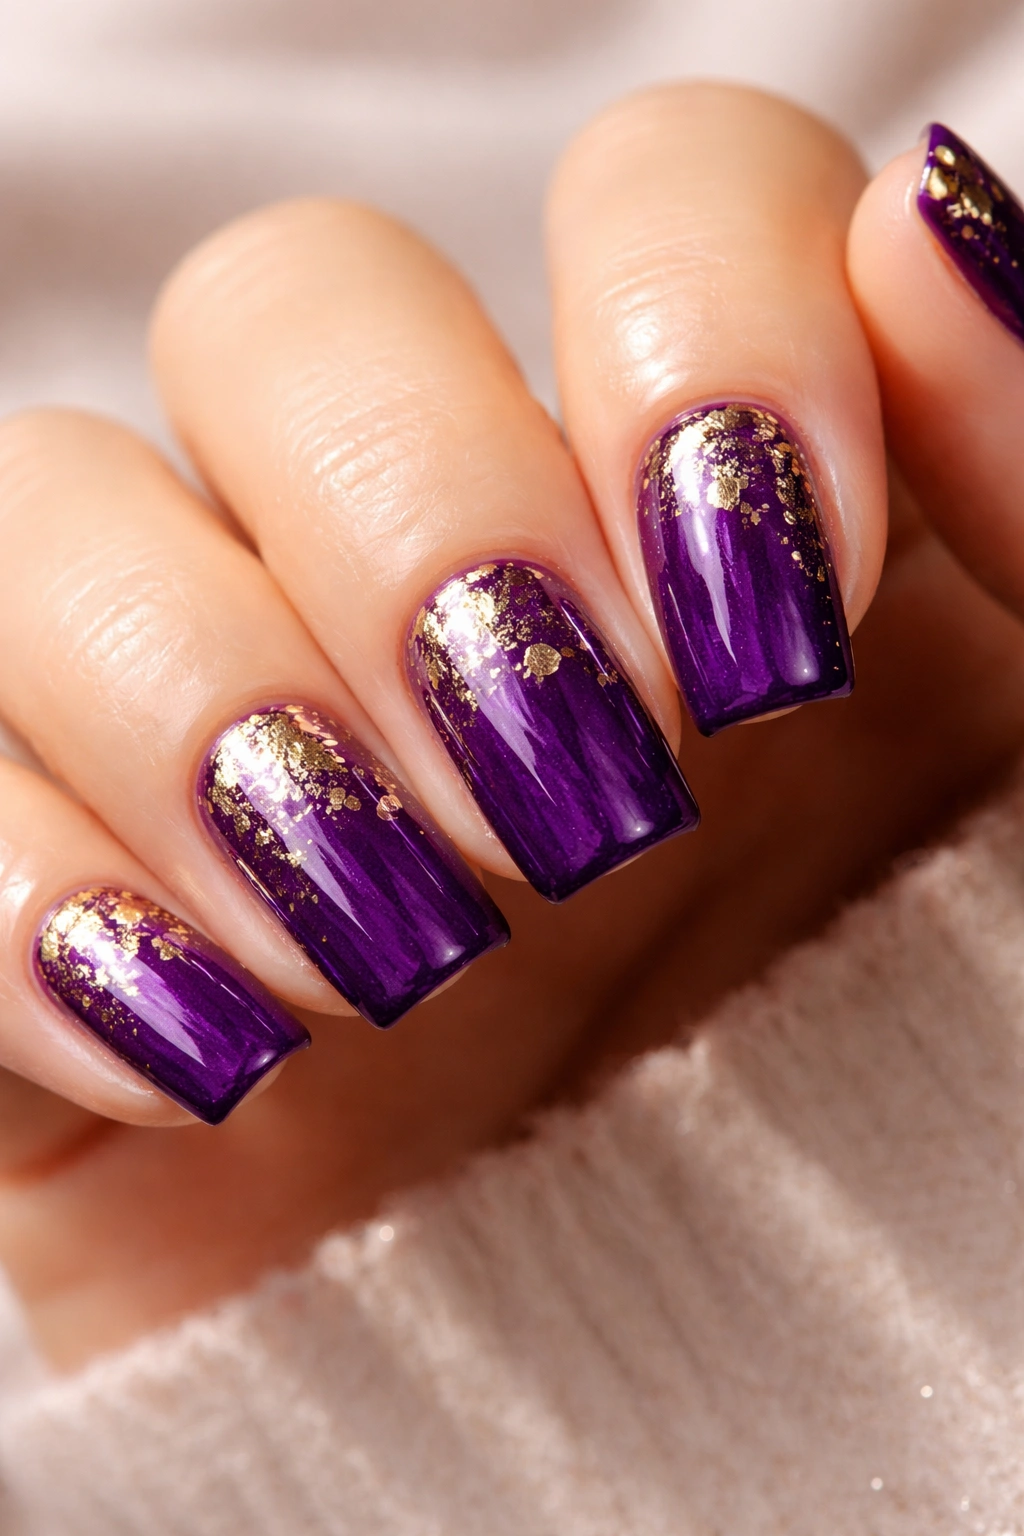
Amethyst nails capture that regal purple energy that feels equally at home at a cocktail party or a casual weekend brunch. This design uses a rich, jewel-toned purple as your base — think the deep purple you’d see in an actual amethyst crystal — with strategic placement of real or faux gold leaf scattered across the nail surface. The gold leaf catches light beautifully and creates dimension that keeps the design from feeling flat or one-dimensional.
What Makes Amethyst Purple So Appealing
Amethyst purple sits in that sweet spot of being dramatic without being overwhelming. It’s sophisticated enough for professional settings yet fun and creative enough for personal expression. The color photograph beautifully in both natural and artificial lighting, which means your nails will look stunning whether you’re indoors under fluorescent lights or catching golden hour sunlight.
How to Achieve This Look
- Start with two coats of a deep purple base (look for shades labeled “amethyst,” “purple reign,” or “royal purple” at any nail polish brand)
- While the second coat is still slightly tacky, carefully apply small pieces of gold leaf using a toothpick or dotting tool
- Seal everything with a high-shine top coat to protect the delicate leaf and amplify the sparkle
- For extra dimension, add tiny gold flecks or dots around the leaf pieces using a thin brush or toothpick
Pro tip: Gold leaf can be fragile, so apply your top coat gently and avoid the temptation to aggressively buff or file around the embellished areas. These nails photograph absolutely gorgeously, so you’ll definitely want them to last through your Instagram moment.
2. Rose Quartz Blush with Diamond Dust

Rose quartz nails embody soft romantic energy — that pale blush pink that makes you think of love, healing, and gentle femininity. This design layers a delicate rose quartz pink base with strategic placement of diamond dust or fine glitter that catches light with every hand movement. The result feels luxurious without screaming for attention; it’s the kind of mani that makes people lean in to take a closer look.
Why This Gentle Approach Works
Rose quartz has been having a major moment in beauty and wellness culture, and for good reason — the color is universally flattering. Unlike hot pink or neon, rose quartz reads as sophisticated and understated. The diamond dust adds just enough sparkle to feel special without the look becoming costume-y or overly glittery. This is the design you wear when you want to feel polished but not overdone.
Application Technique for Perfect Sparkle
- Apply two coats of a soft pink base (aim for a shade that’s almost nude-pink, with just a whisper of color)
- While still slightly wet, press diamond dust or ultra-fine holographic glitter onto the wet surface — you can go full coverage or create a gradient by concentrating more sparkle toward the tip
- Seal with a glossy top coat that will catch light and make the diamond dust absolutely glow
- If you prefer a more controlled sparkle, apply the diamond dust only to the tips or create a stripe down the center nail
This design reads as effortlessly elegant, which is honestly the hardest thing to pull off in nail art.
3. Emerald Green with Crystal Embeds
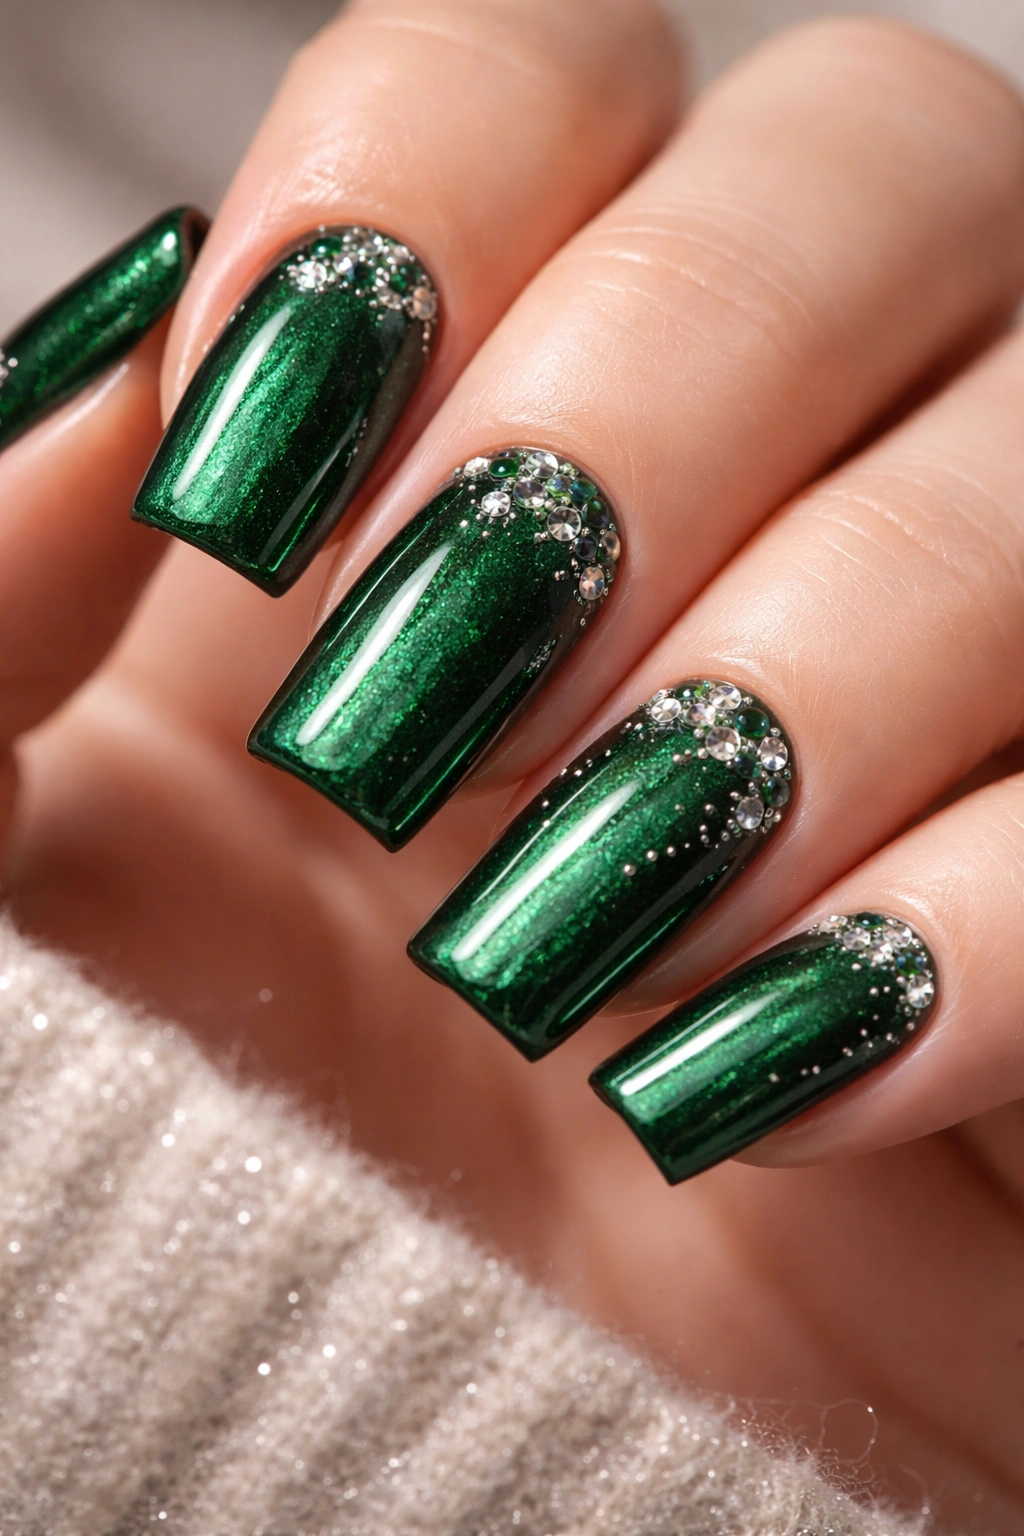
Emerald green nails command attention in the most sophisticated way possible. This design features a rich, jewel-toned green base with actual tiny crystal embeds strategically placed — either clustered at the nail base, scattered across the surface, or concentrated on an accent nail. The crystals catch light from different angles and create a depth of visual interest that flat sparkle simply can’t achieve.
The Power of Dimensional Design
Real crystal embeds (or high-quality faux crystal pieces) add a three-dimensional quality that transforms a standard polish design into wearable art. When light hits these tiny stones, they refract and sparkle in ways that glitter can’t match. Emerald green + crystals is the combination that makes people assume you just left an expensive salon, even if you did these yourself.
Building This Design From Scratch
- Start with two coats of a deep emerald green polish (jewel-tone intensity is key — avoid anything too yellow or too blue)
- While the second coat is still slightly tacky, position tiny crystal pieces or rhinestones using a nail art adhesive or gel polish as your “glue”
- Press each crystal gently but firmly to ensure it adheres properly
- Apply top coat carefully around (not directly over) the crystals so they remain raised and dimensional
- Some nail artists use a clear gel to build up around the crystals, creating a glass-like dome effect that’s absolutely stunning
The emerald green works as a perfect canvas for crystals because the dark, rich tone makes each stone pop visually.
4. Opal Shimmer with Holographic Details
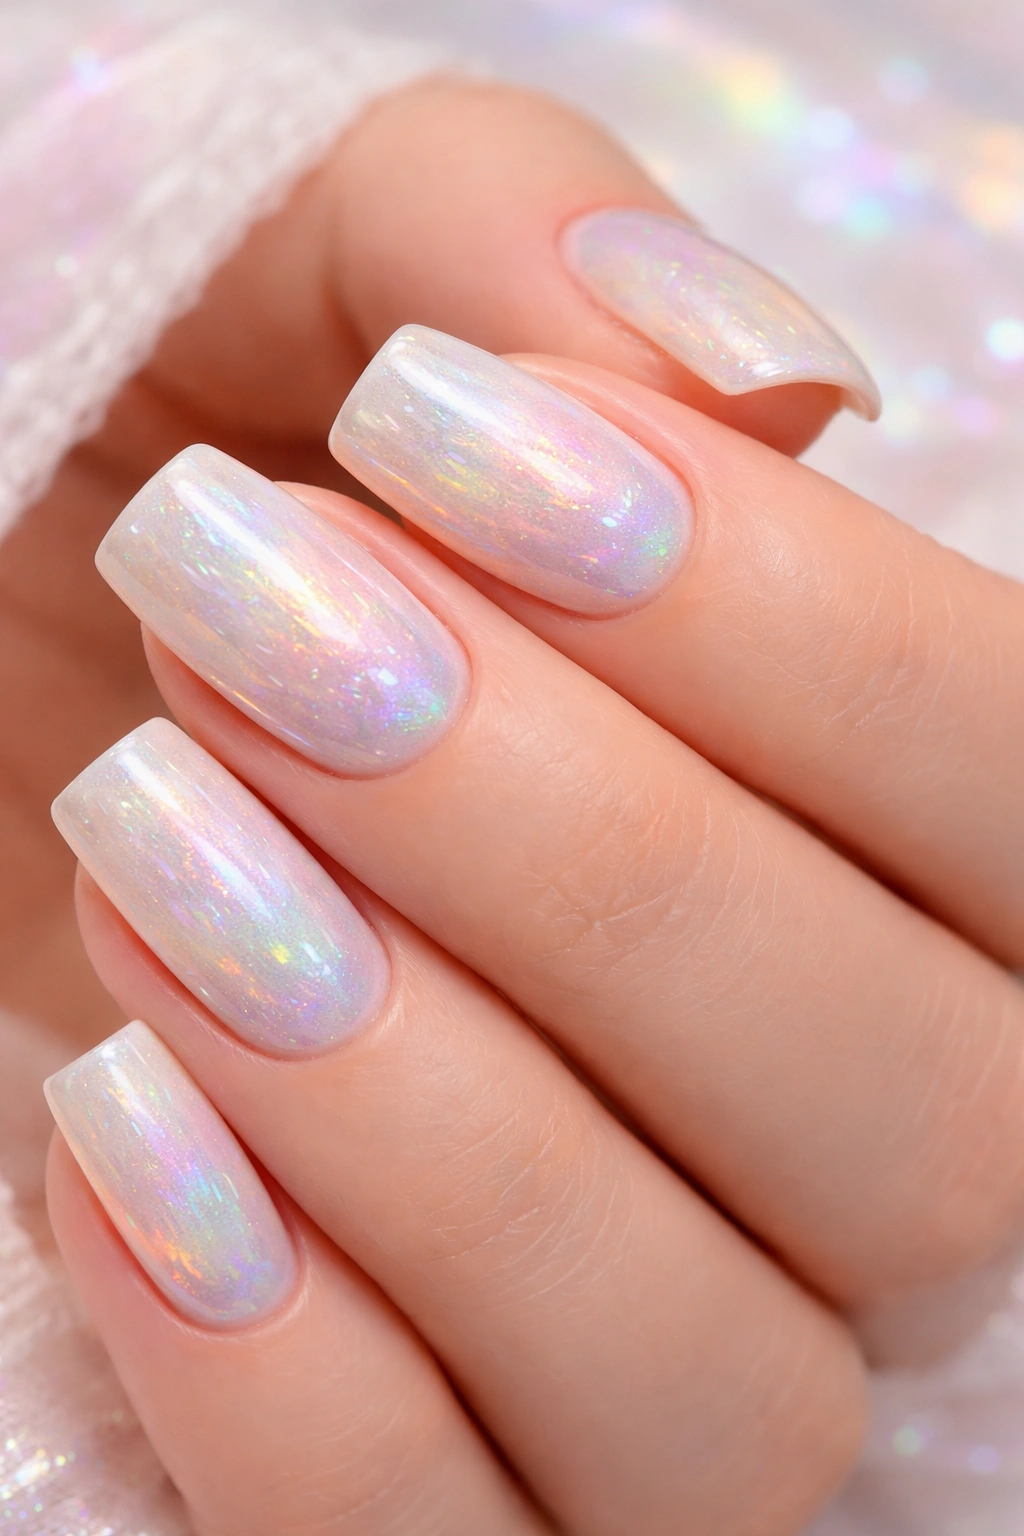
Opal nails capture that magical play-of-light quality you see in actual opal stones — that shifting, iridescent quality where the colors seem to move and change depending on the angle. This design uses a creamy base color (ivory, pale pink, or soft peach) and layers holographic polishes, chrome powders, or specialty iridescent formulas that create that signature opal color-shifting effect. The result feels mystical and modern simultaneously.
Creating the Opal Illusion
True opal polish has become increasingly accessible, and specialty nail brands now make products specifically designed to replicate that opal color-shift effect. The magic happens when light hits the polish from different angles — you’ll see flashes of blue, green, purple, and pink dancing across your nails. It’s the kind of design that’s endlessly mesmerizing to watch and even better to photograph.
Technique for Maximum Iridescence
- Apply a pale, creamy base color as your foundation (this gives the holographic effects something to play against)
- Layer a high-quality holographic or opal-specific polish — these are often semi-transparent, so the base color shows through and creates the iridescent effect
- You can apply the holographic polish full coverage or create a gradient by concentrating it more heavily toward the tips
- Finish with a glossy top coat that will amplify the light-reflecting properties and make the color shift effect even more pronounced
- Consider adding tiny metallic accents or chrome dust for extra dimension if desired
Opal nails work beautifully on soft square tips because the larger surface area lets you really appreciate the color-shifting magic.
5. Sapphire Blue with Pearl Accents
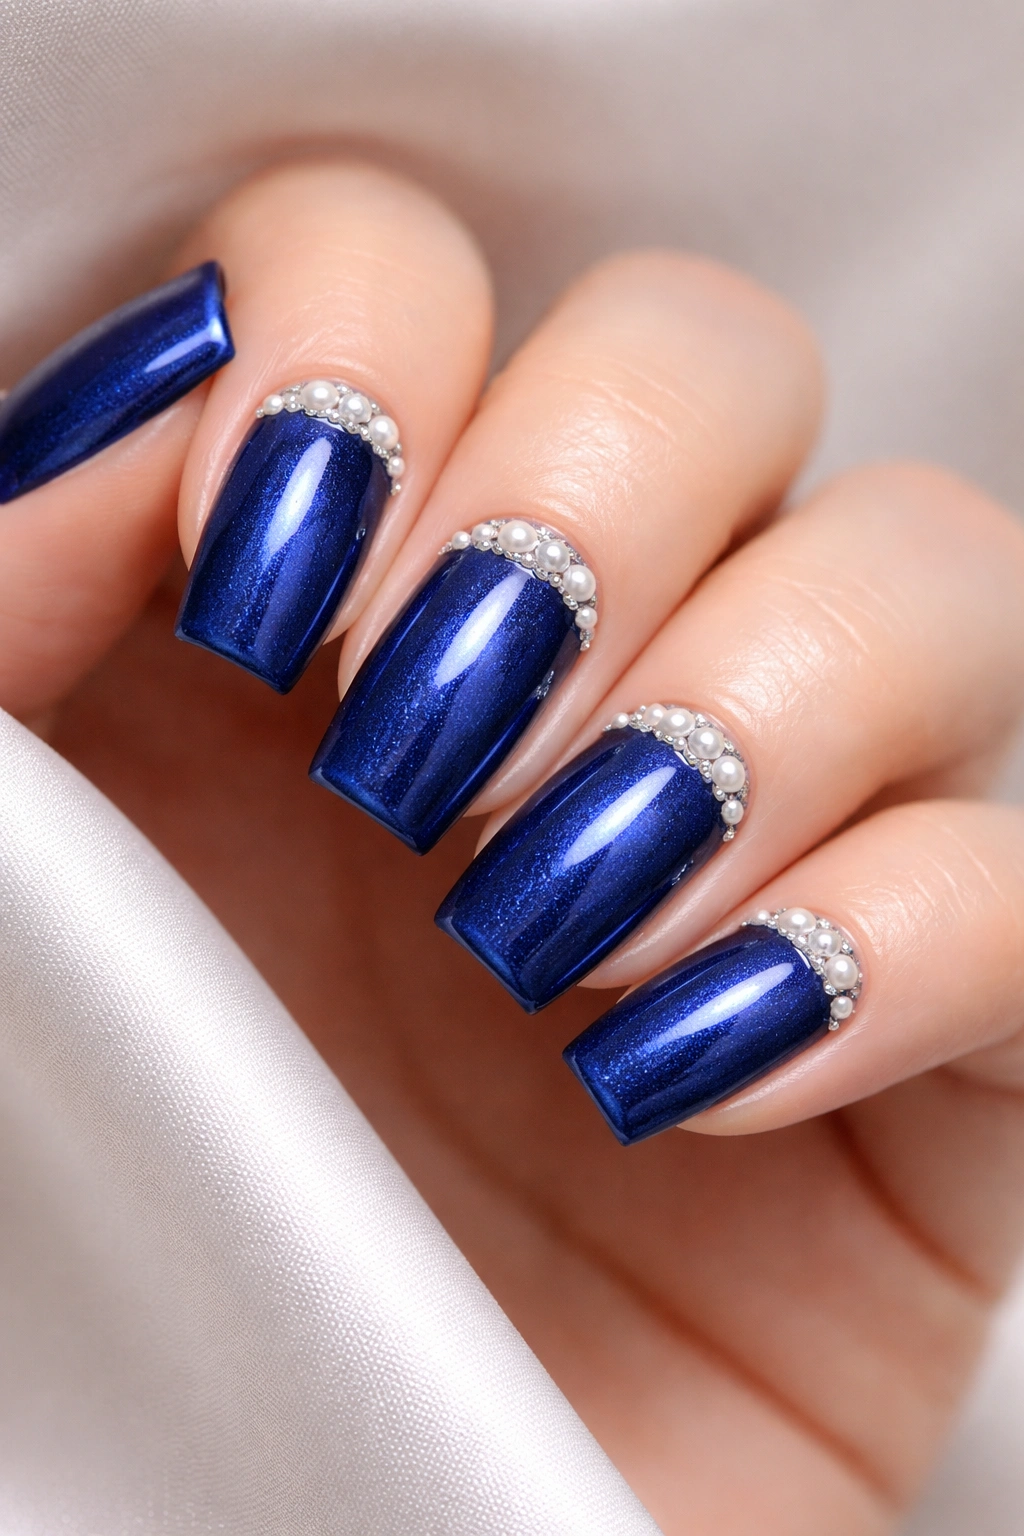
Sapphire blue nails hit that perfect deep blue that feels both elegant and bold. This design combines a rich sapphire blue base with pearl accents — either as a pearl powder mixed into the polish, pearl nail studs placed strategically, or a pearl white accent stripe. The blue and pearl combination feels romantic and sophisticated, like something a royal would wear.
Why Blue and Pearl Is Timeless
Deep blue paired with lustrous white pearl accents creates an inherent sophistication that transcends trends. It’s formal enough for upscale events but wearable enough for everyday professional settings. The pearl elements catch light in a soft, luminous way that feels more refined than standard sparkle. This combination has been a favorite in luxury jewelry for centuries — nail art is just the latest way to wear it.
Pearl Integration Options
- For a pearl nail powder effect: mix fine pearl dust into the blue polish or apply it while the polish is still wet
- For pearl studs: place small pearl rhinestones or nail studs at the base of each nail, creating an elegant gradient from sapphire to pearl
- For pearl accents: create a pearl white stripe down the center of each nail or along the tips, creating a clean, modern contrast against the blue
- For maximum dimension: combine pearl powder in the center of the nail with white pearl studs at the base, creating a gradual transition from white pearl at the bottom to sapphire blue at the tips
The soft square shape gives you enough room to really show off the pearl accents without them looking crowded or busy.
6. Citrine Yellow with Metallic Swirls
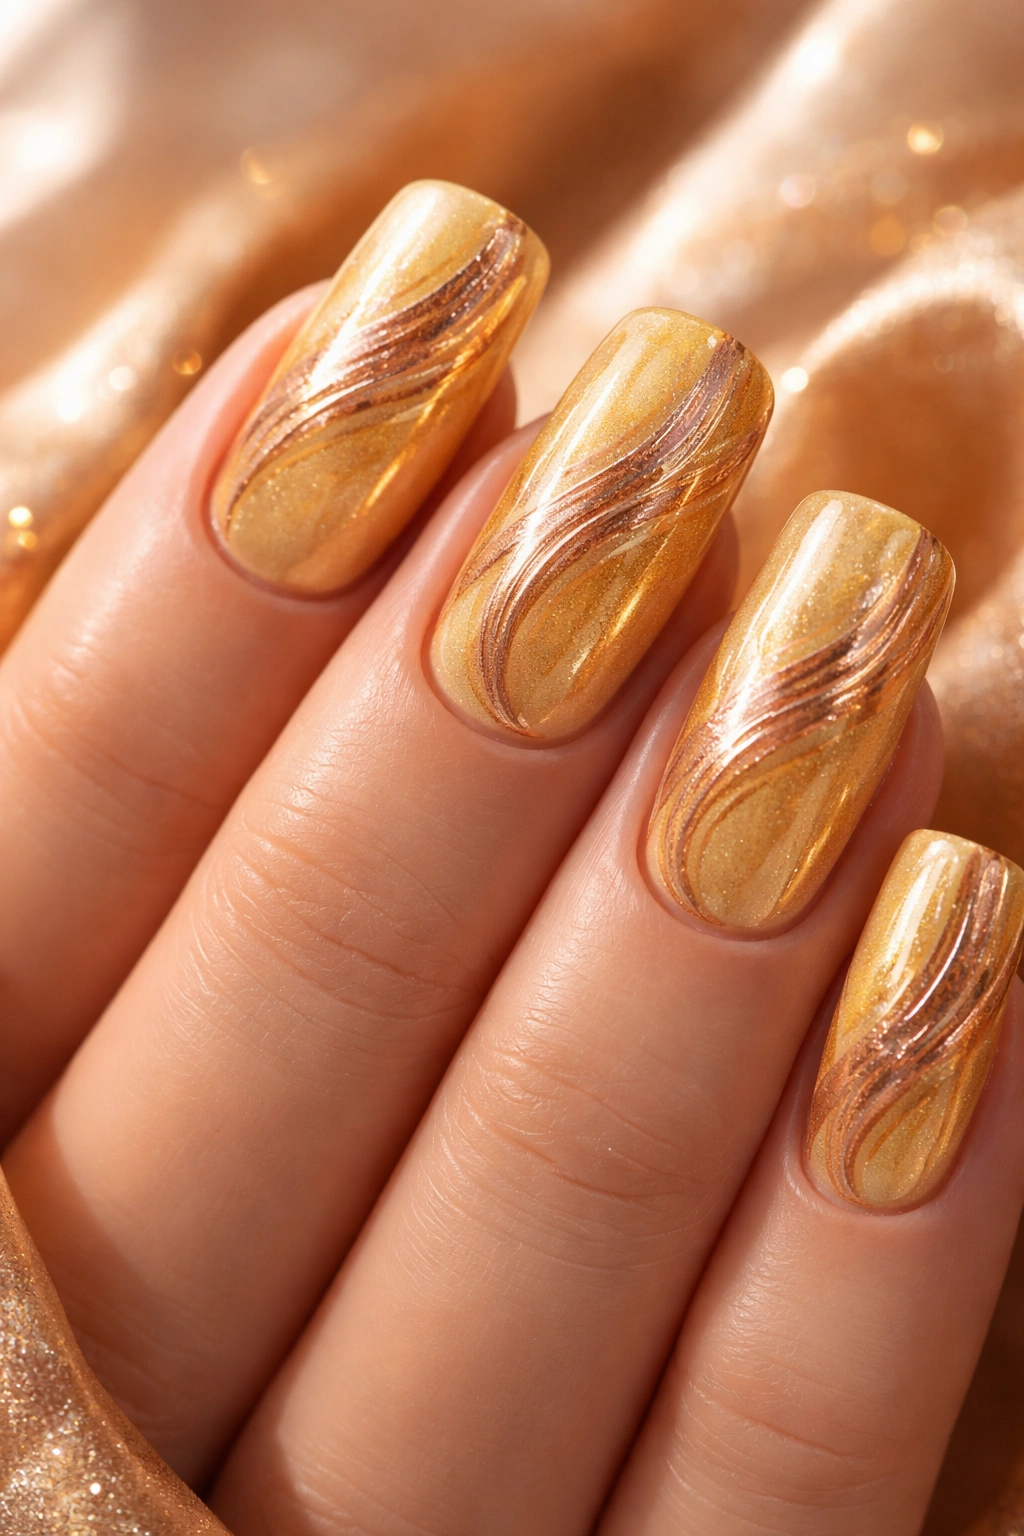
Citrine yellow nails are pure joy translated into nail art. This design uses a warm, golden yellow base (think the sunny yellow of an actual citrine crystal) with metallic swirls in gold, rose gold, or bronze that create movement and visual interest. The swirls can be thin and delicate or thick and bold, depending on your personal style — the design works beautifully either way.
The Confidence of Warm Yellow
Yellow is honestly an underrated nail color, probably because most people have only seen harsh, neon yellows that don’t complement many skin tones. But warm, golden citrine yellow is universally flattering and instantly uplifting. The metallic swirls prevent the design from feeling too simple or childish; instead, they add sophistication and movement. This is the design that makes people smile when they see it.
Creating the Metallic Swirl Effect
- Start with two coats of a warm, golden yellow base (look for shades with slightly peachy or orange undertones rather than bright lemon yellow)
- Using a thin detail brush, paint metallic swirls across the nail surface — you can create loose, organic swirls or more structured geometric patterns
- Metallic gel polish or liquid foil effects work beautifully for this — they catch light differently than regular metallic polish
- Consider varying the metallic colors across your nails (gold on some, rose gold on others) for subtle dimension
- Seal with a glossy top coat that will make the metallics shimmer even more dramatically
Citrine yellow with metallic swirls is the design you choose when you want people to know you’re comfortable taking design risks.
7. Moonstone Glow with Iridescent Top Coat
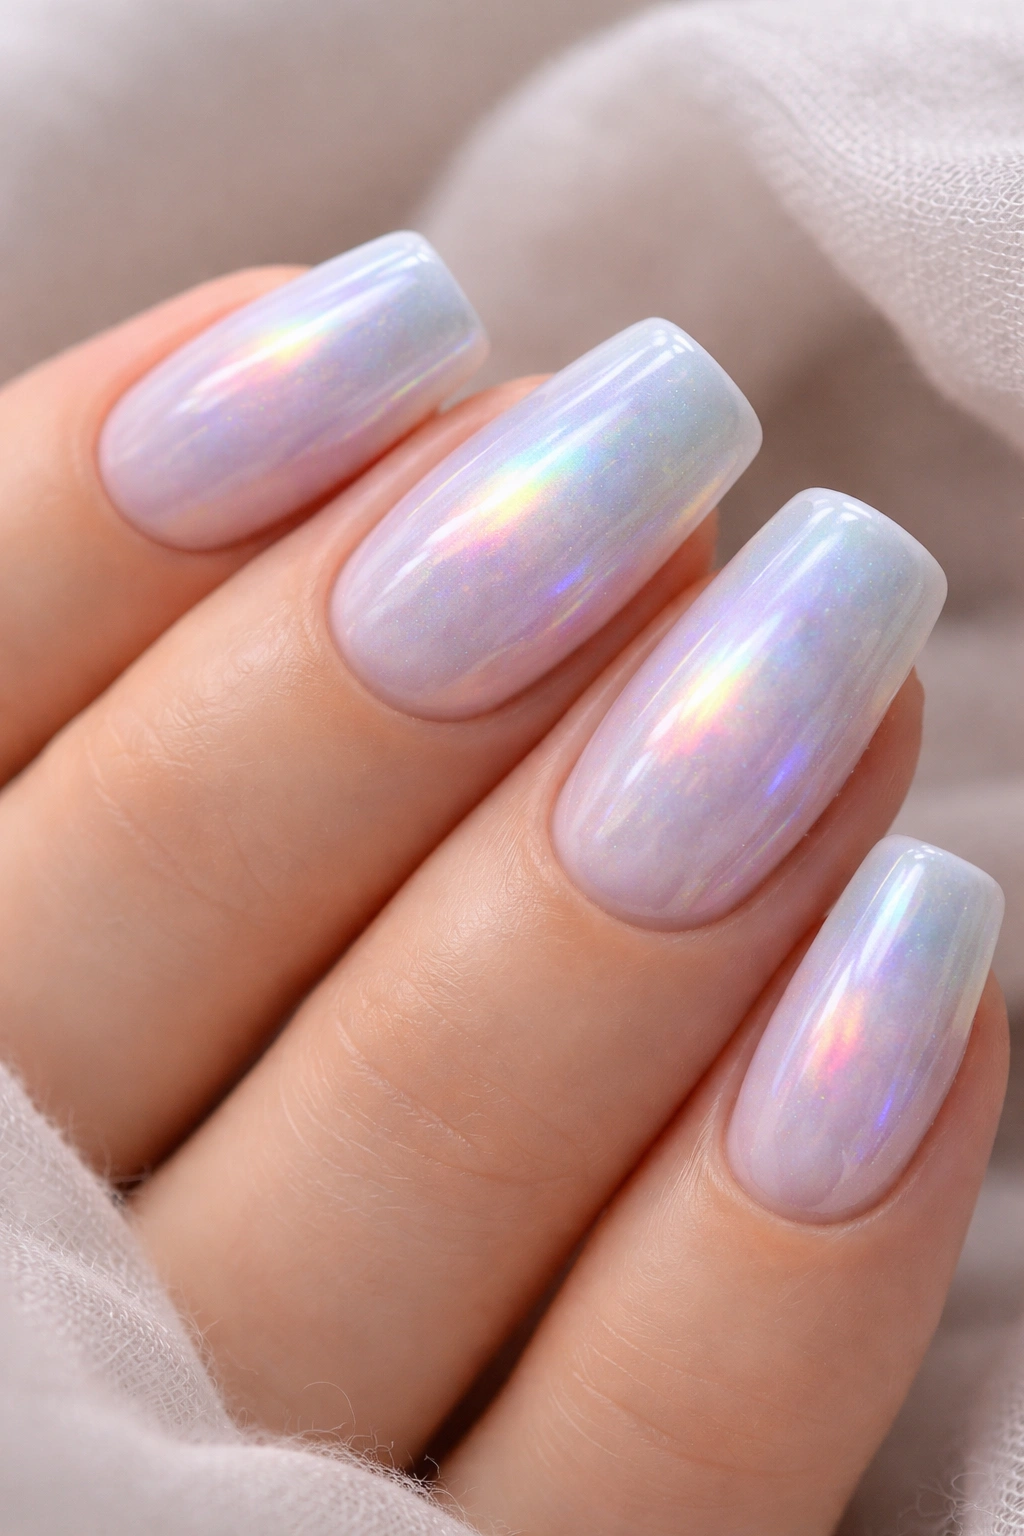
Moonstone nails capture that ethereal, luminous quality of actual moonstone — that soft, milky opalescence that seems to glow from within. This design uses a creamy white or pale gray base with an iridescent top coat that creates an otherworldly sheen. The whole nail appears to have an internal light source, which is honestly one of the most magical effects you can achieve in nail art.
The Science Behind the Glow
Moonstone owes its signature glow to a phenomenon called adularescence — light bouncing inside the crystal structure in a way that creates that floating, luminous effect. While we can’t chemically replicate that exact process in nail polish, iridescent and multichromatic top coats create a similar visual effect by reflecting and refracting light in ways that make the nail appear to glow. It’s subtle but absolutely mesmerizing.
Achieving the Moonstone Effect
- Apply two coats of a pale cream or soft gray base (think the color of milky moonstone stone itself)
- Apply a specialty iridescent or “glow” top coat — brands now make specific products designed to create this luminous effect
- Consider building up multiple thin layers of the iridescent top coat rather than one thick layer for a more sophisticated, subtle glow
- For added dimension, some nail artists add a tiny amount of silver or white pearl dust to the base before sealing
- Avoid matte top coats with this design; the glossy finish is what creates the magical glow effect
The moonstone design works beautifully as an all-nails design or as an accent nail paired with simpler, solid-color designs on the other nails.
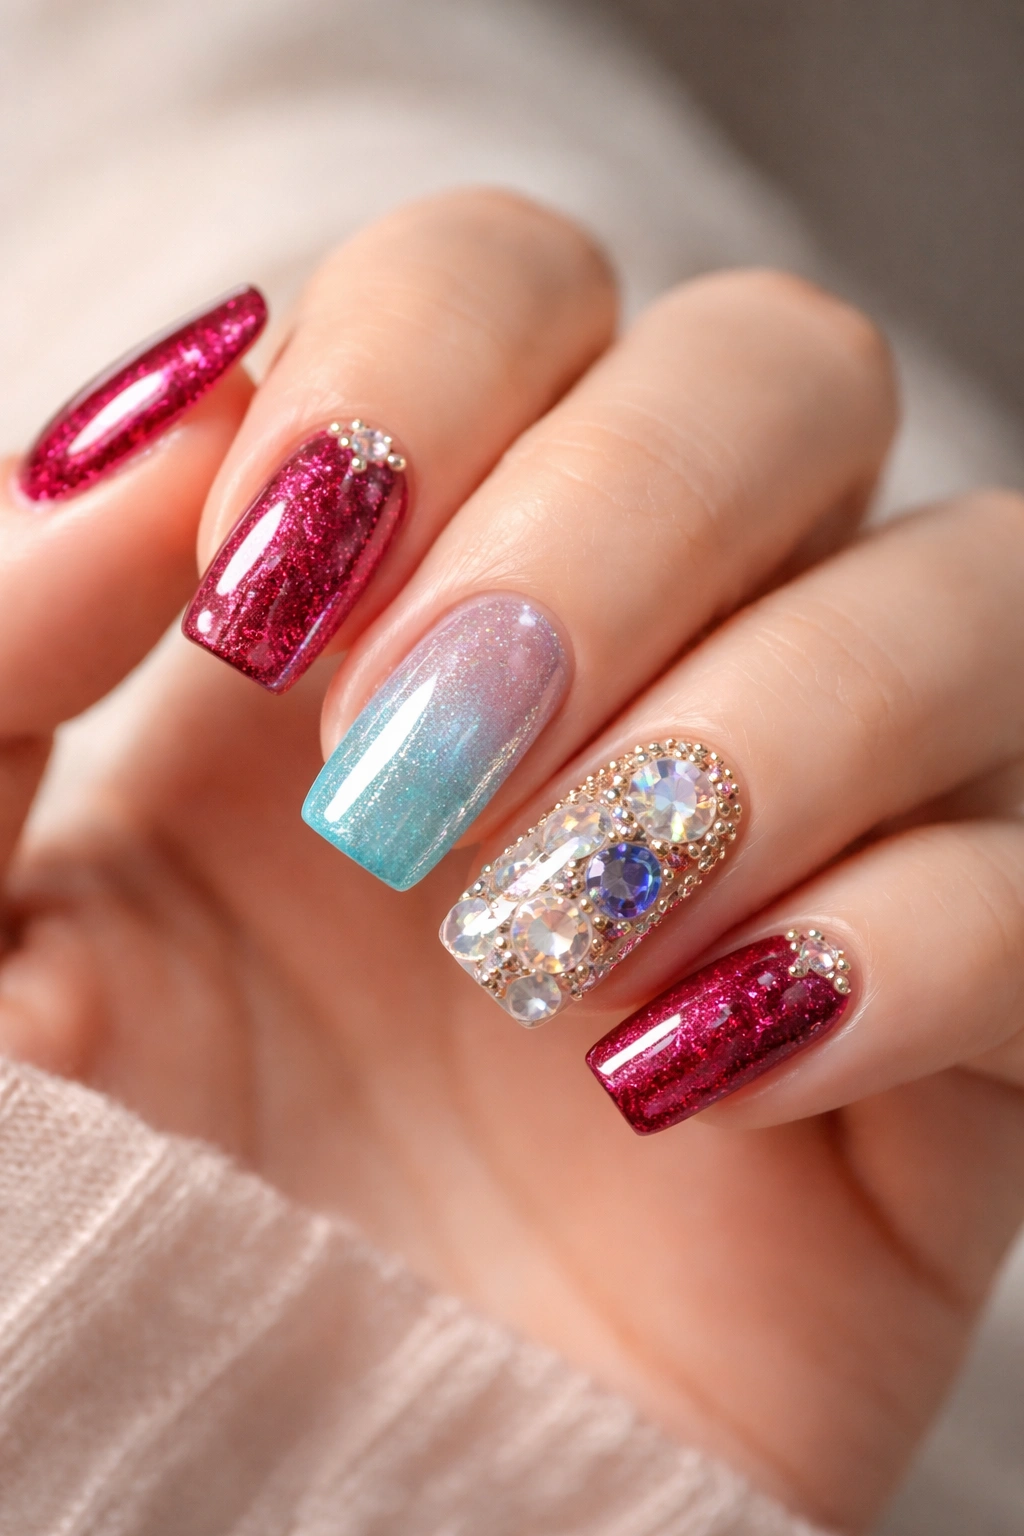
8. Ruby Red with Gemstone Clusters

Ruby red nails are classic, bold, and undeniably luxurious. This design uses a deep, rich ruby red base with actual gemstone clusters — either real tiny rubies (if you’re splurging), faux rubies, or ruby-red rhinestones grouped together at specific points on the nail. The clusters can be arranged at the nail base, scattered across the surface, or concentrated on accent nails. The effect is pure opulence.
The Timeless Power of Red and Rubies
Ruby red nails never go out of style because red is inherently confident, elegant, and universally recognized as a luxury color. Adding actual gemstone clusters elevates the design from simple to seriously statement-making. This is the design that works for date nights, professional events, holiday parties, or whenever you want to feel absolutely fabulous. There’s a reason rubies have been prized for centuries — they’re stunning.
Arranging Gemstone Clusters Beautifully
- Apply two coats of a deep ruby red polish with rich, jewel-tone intensity (avoid anything too orange or too purple)
- Plan your gemstone placement before you start — clusters work best when they’re intentional rather than random
- Popular arrangements: a cluster at the cuticle line with a few scattered toward the tip, a gradient of clusters from pinky finger to thumb, or a concentrated cluster on one accent nail with simple red on the others
- Use a nail-specific adhesive or gel polish as your “glue” to secure each gemstone
- Apply top coat carefully to seal everything while maintaining the dimensional quality of the clusters
Ruby red with gemstone clusters works particularly well on important events when you want nails that photograph beautifully and command attention.
9. Turquoise with Boho Wire Wrapping
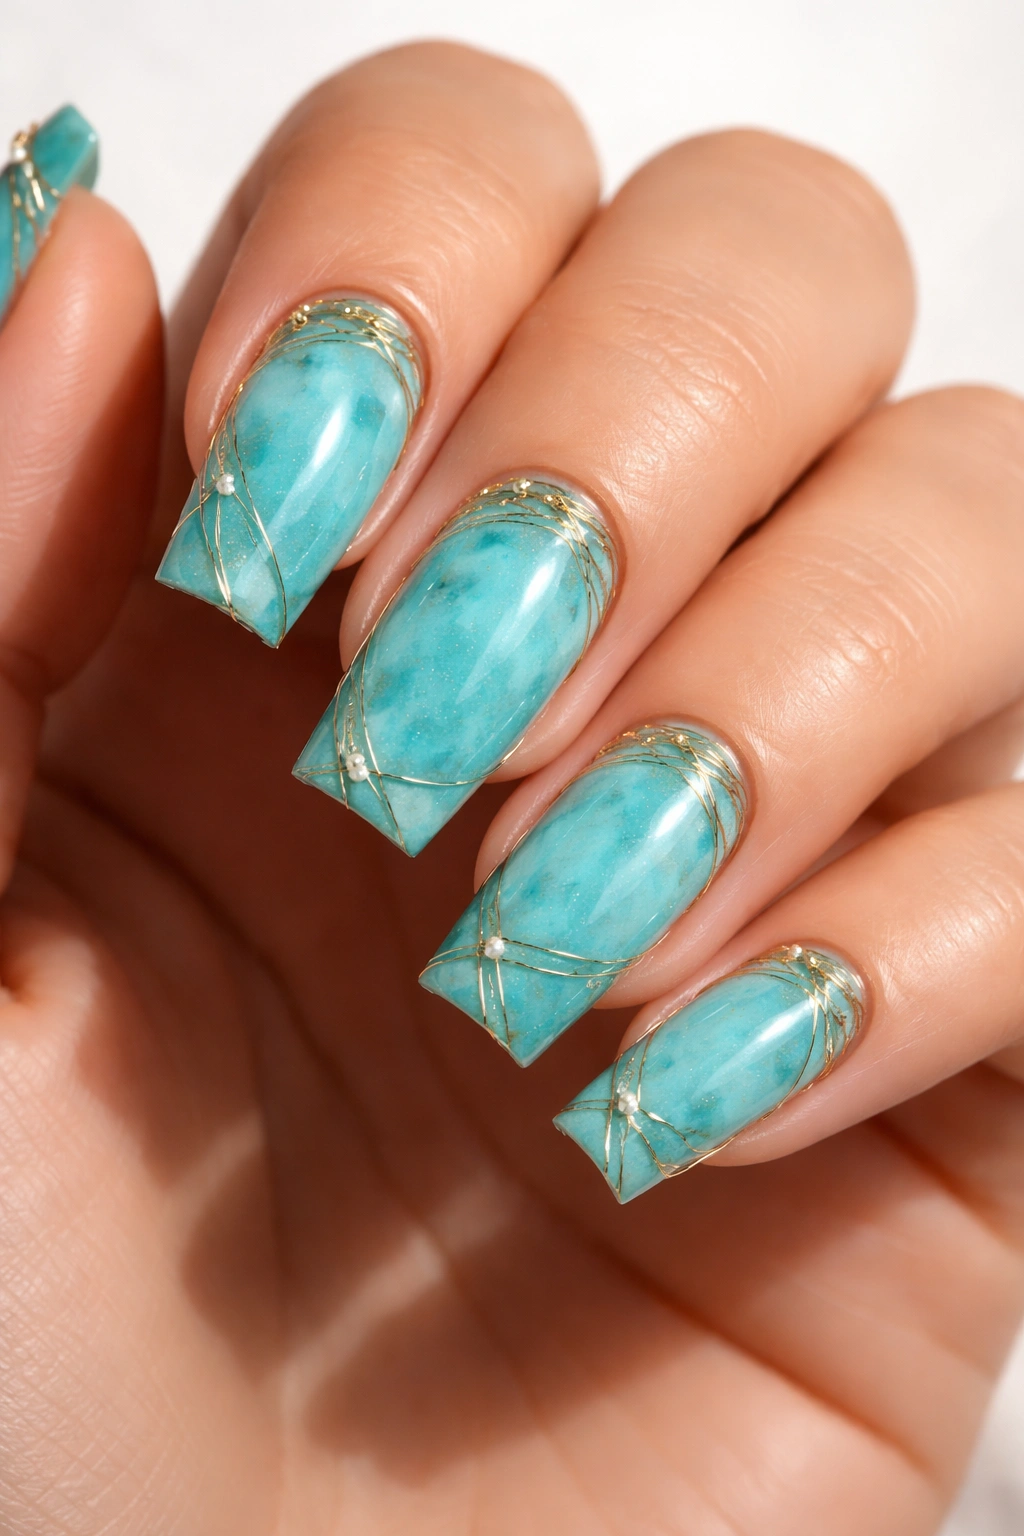
Turquoise nails with delicate wire wrapping create a bohemian, earthy aesthetic that feels artistic and intentional. This design uses a bright, warm turquoise base with thin metallic wire (gold, silver, or copper) wrapped delicately around the nail edges or creating geometric patterns across the surface. The wire adds texture and a handcrafted quality that feels more like wearable art than standard nail polish.
Bringing Boho Vibes to Your Fingertips
Turquoise has been treasured in boho and bohemian design for generations — it’s the color of desert skies, ancient spiritual traditions, and free-spirited creativity. Wire wrapping adds a dimensional, almost jewelry-like quality that transforms a standard turquoise mani into something genuinely special. This design works beautifully for people who love handmade aesthetics and creative expression.
Wire Wrapping Technique and Safety
- Apply two coats of a warm, bright turquoise base (avoid anything too blue or too green — you want that true turquoise tone)
- Using ultra-thin metallic wire (available at craft stores or nail art supply shops), carefully wrap around the nail edges or create loose geometric patterns
- Secure wire ends by carefully tucking them under a final top coat, or use clear nail glue to adhere them before sealing
- Apply top coat gently to protect the wire and keep everything secure
- Important safety note: ensure the wire ends are completely sealed under top coat and smoothed down so they won’t catch on clothing or scratch skin
- Check the wire security periodically as nails grow to ensure nothing is loosening
Wire wrapping takes this design from simple to genuinely artistic and conversation-starting.
10. Black Onyx with Diamond Sparkle
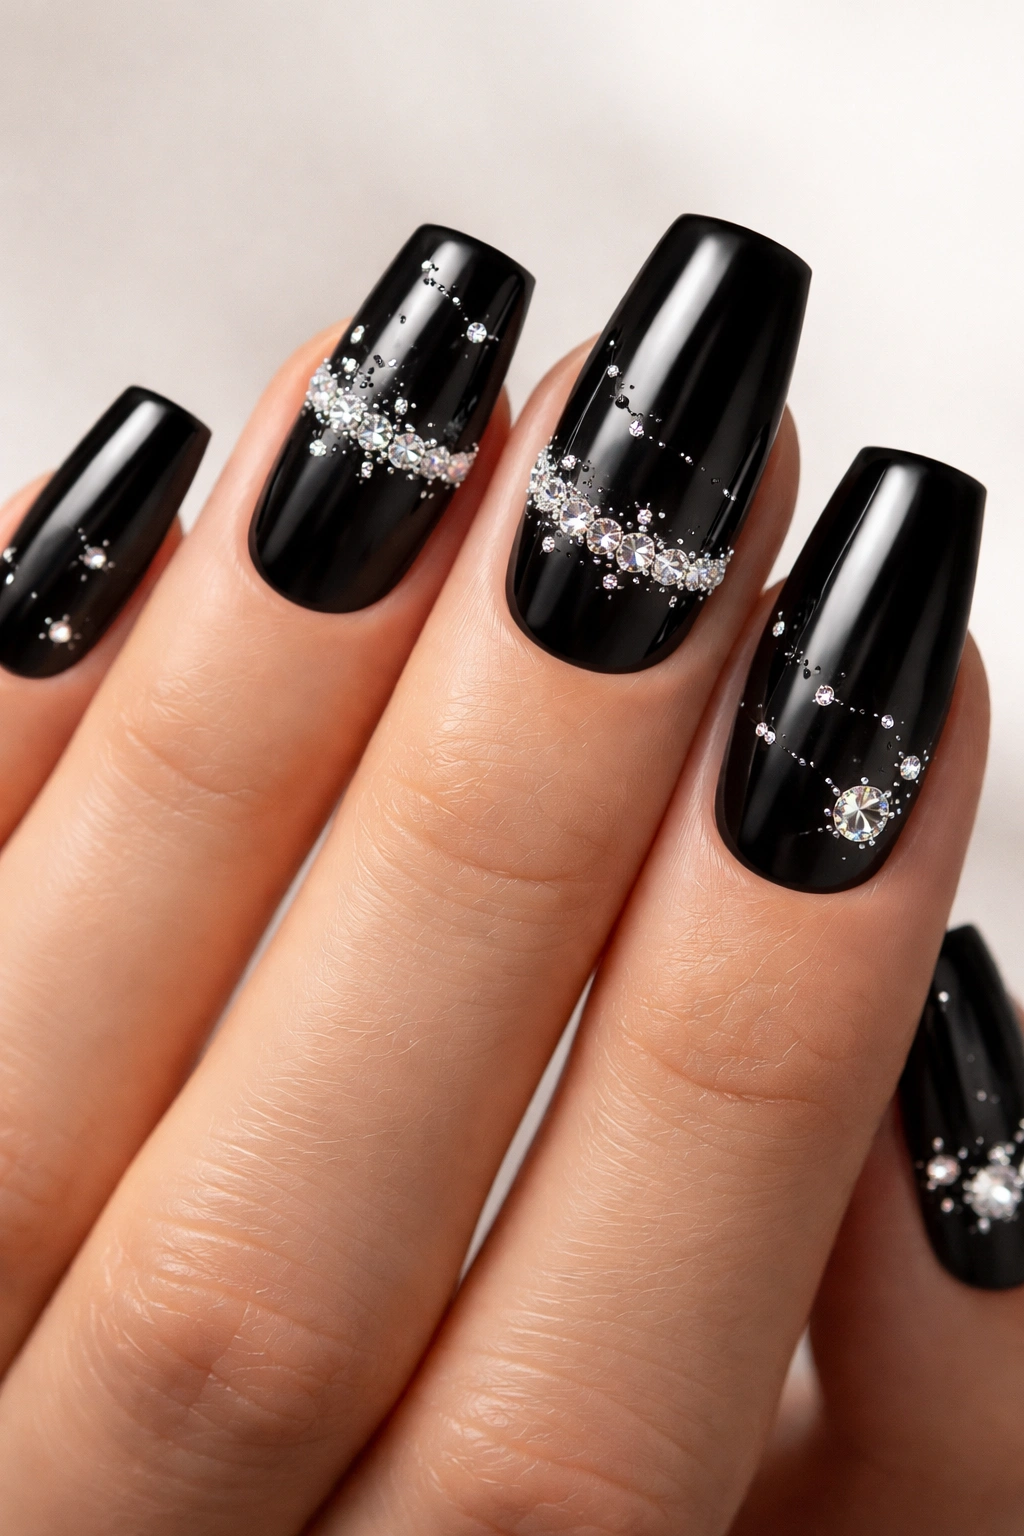
Black onyx nails are the ultimate statement — sleek, sophisticated, and unapologetically bold. This design uses a deep, pure black base with strategically placed diamond accents in the form of crystal embeds, rhinestones, or diamond dust. The contrast between the matte or glossy black and the brilliant sparkle of diamonds is striking and instantly luxurious.
Black and Diamond: Elegant Maximalism
Black onyx paired with diamonds is the nail version of a little black dress with diamond jewelry — it’s timeless, sophisticated, and works in virtually any setting from professional to party. The black creates an elegant canvas that makes every diamond sparkle with maximum impact. This is the design you choose when you want to look polished, powerful, and undeniably put-together.
Diamond Placement Options for Maximum Impact
- Full sparkle effect: apply diamond dust across the entire nail for an all-over glitter look with more sophistication than standard glitter
- Statement accent: place larger diamond rhinestones at the nail tips or base, creating a tiara effect
- Geometric pattern: arrange diamonds in a specific pattern (stripes, chevrons, or scattered constellation-style) for intentional design
- Gradient sparkle: start with scattered diamonds at the tips and gradually increase density toward the base, creating movement and visual interest
- Apply diamonds while base coat is still slightly tacky, or use clear gel as adhesive
- Seal with a glossy top coat that will catch light and amplify the diamond brilliance
Black onyx with diamonds works beautifully on soft square tips because the larger surface area really showcases the diamond accents.
11. Aquamarine with Gradient Shimmer
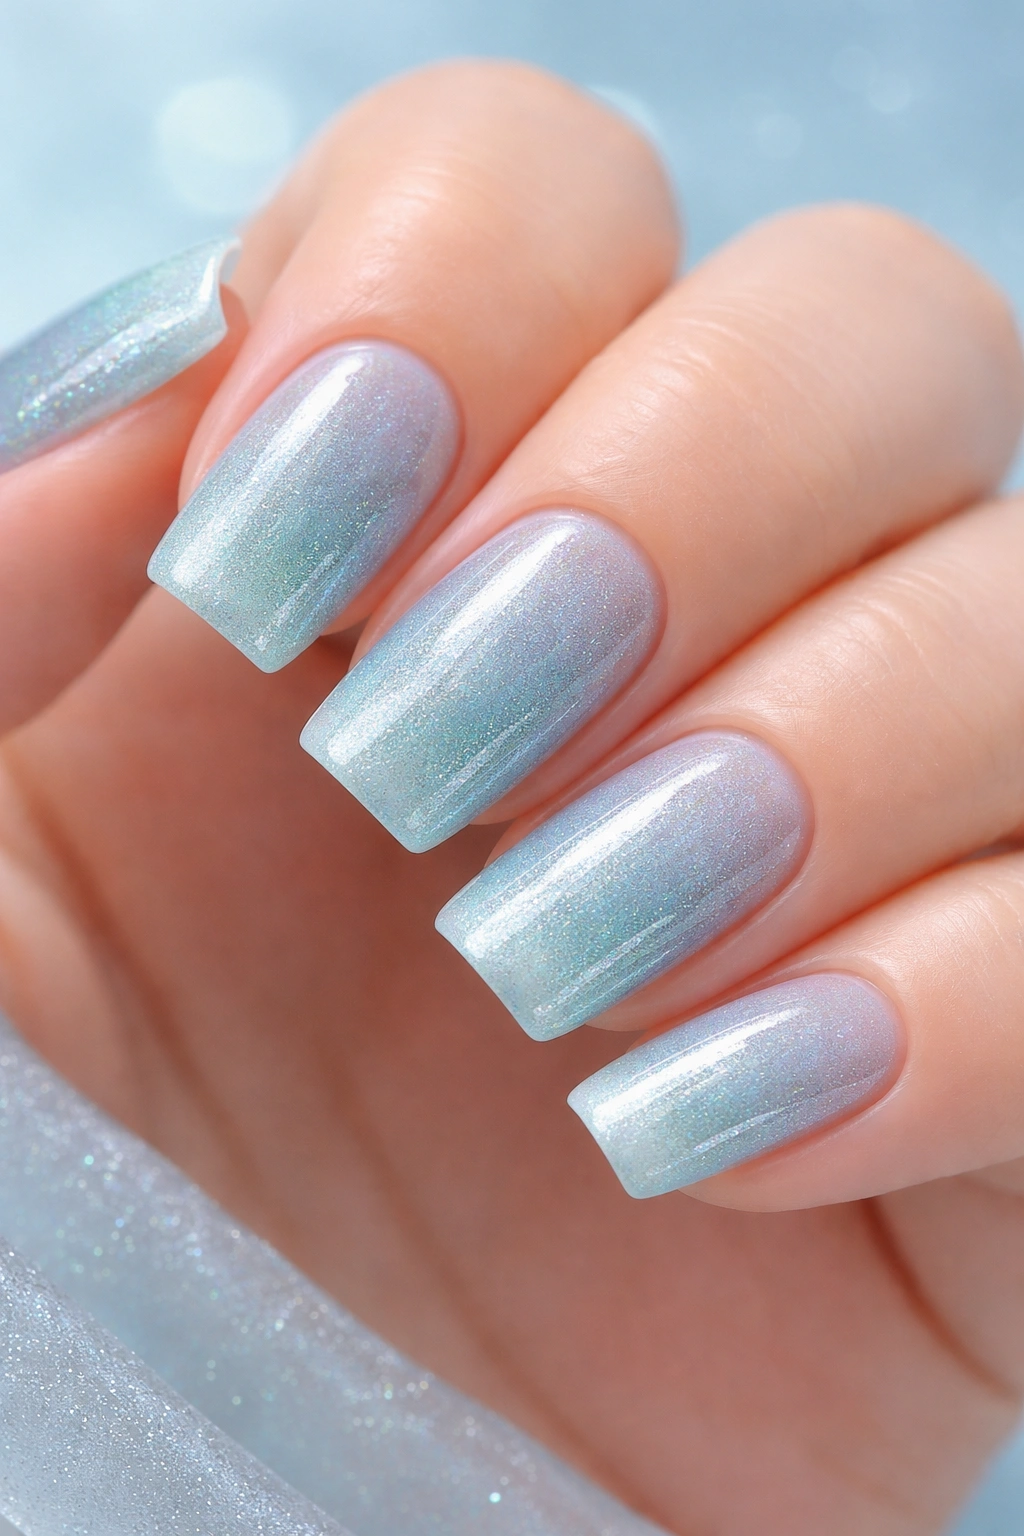
Aquamarine nails capture the serene, oceanic beauty of actual aquamarine stones — a soft, cool blue-green that feels calming and otherworldly. This design uses aquamarine as both a solid base and creates a gradient shimmer effect where the color transitions from deeper aquamarine at the base to lighter, shimmery tones toward the tips. The gradient effect creates dimension and mimics the way light plays through actual aquamarine crystals.
The Calming Power of Aquamarine Tones
Aquamarine occupies a unique space between blue and green, making it flattering on virtually every skin tone. The color is associated with calm, clarity, and serenity — wearing aquamarine nails actually has a subtle psychological calming effect. A gradient shimmer adds depth without adding busy-ness; it’s sophisticated and modern. This is the design that makes people comment “your nails are so soothing to look at.”
Creating the Gradient Shimmer Effect
- Start with a pale aquamarine base (the lighter, almost translucent version of aquamarine)
- Using a second, deeper aquamarine shade with shimmer, create a gradient by applying more concentrated color toward the base, fading to lighter tones at the tips
- Sponge the transition line for a seamless, blended effect rather than a sharp line
- Top coat with a glossy finish that will amplify the shimmer and create that magical play-of-light effect
- Alternative method: start with a solid aquamarine base and layer an iridescent top coat to create dimensional shimmer
The soft square shape allows you to really showcase the gradient effect across a good amount of nail surface.
12. Mixed Gemstone Mosaic Design
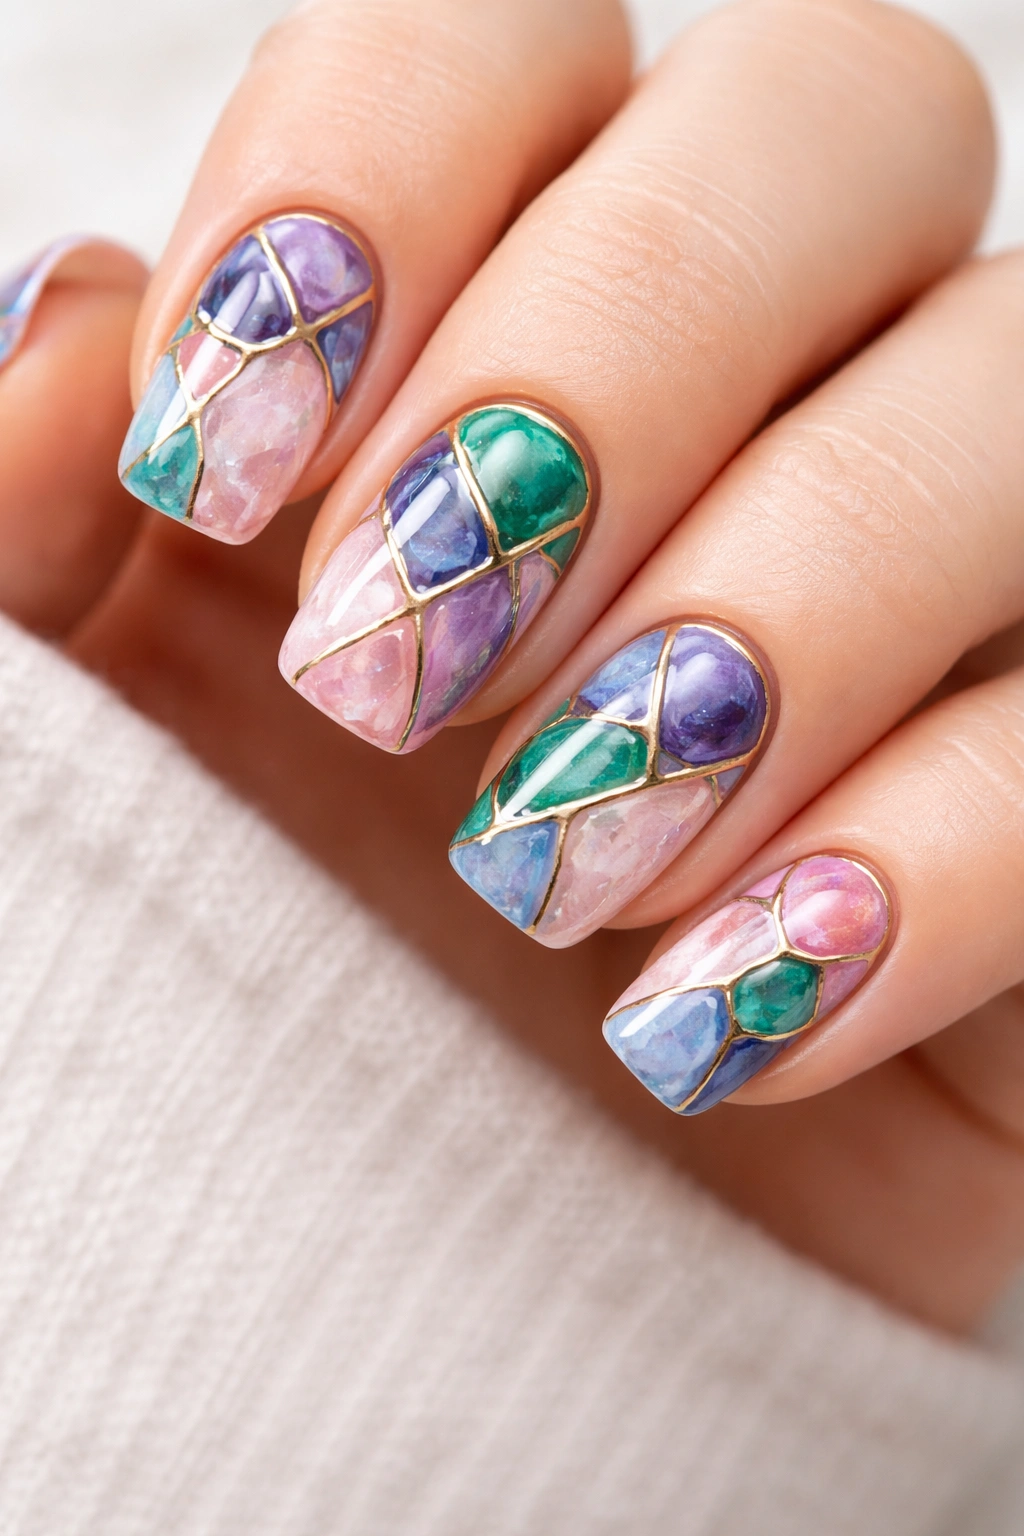
Mixed gemstone mosaic nails are for people who can’t choose just one gemstone — because why should you? This design creates a “mosaic” effect where different gemstone colors and styles are arranged together across multiple nails or across a single nail. You might combine amethyst purple, rose quartz pink, emerald green, and sapphire blue in a balanced, intentional arrangement. The effect is stunning, artistic, and completely unique.
The Art of Gem Mosaic Design
A true gemstone mosaic isn’t random; it’s thoughtfully arranged so that the colors complement rather than clash. The trick is balancing warm and cool tones, varying the saturation levels, and ensuring white space (bare nail or metallic accents) between colors to prevent the design from feeling chaotic. This is the design for creative people who love color, art, and standing out from the crowd.
Planning and Executing Your Gemstone Mosaic
- Start by choosing your color palette — typically 3-4 complementary gemstone colors work better than attempting to include every color of the rainbow
- Sketch a rough layout on paper first, or use reference photos of actual gemstone mosaics for inspiration
- Consider whether you want a gradient (warm colors transitioning to cool colors), a balanced scattered arrangement, or a geometric pattern
- Apply base colors in sections, using painter’s tape or careful brush work to create clean separation between colors
- Add crystal embeds, gemstone accents, or metallic details that complement your chosen gemstone colors
- Metallic accents (gold, silver, or rose gold) work beautifully as “grout” lines that visually separate the different gemstone sections
- Top coat carefully to seal and protect all the different elements
Mosaic designs photograph beautifully and genuinely feel like wearable art.
Final Thoughts
Gemstone nails represent the intersection of natural beauty, creative expression, and personal style. Whether you’re drawn to the regal drama of ruby red and diamonds, the serene calm of aquamarine gradients, or the artistic creativity of a mixed gemstone mosaic, soft square nails provide the perfect canvas for bringing these designs to life. The shape itself offers durability without sacrificing style, making these designs genuinely wearable for everyday life, not just special occasions.
The best part about gemstone nail designs is that they’re endlessly customizable. You can interpret each design in multiple ways, adjusting colors to match your personal undertones, swapping out crystal embeds for nail studs if that works better for you, or combining elements from different designs to create something entirely unique. These twelve designs are starting points, not rigid templates — they’re meant to inspire you to explore the gemstone aesthetic in ways that feel authentic to your style.
When you’re choosing your next gemstone design, think about what draws you personally. Do you gravitate toward warm tones like citrine yellow and ruby red, or do cool sapphire blues and emerald greens speak to you? Are you a maximalist who loves dimension and sparkle, or do you prefer subtle shimmer and understated elegance? Your answers will naturally guide you toward the designs that will make you happiest to wear. The magic of gemstone nails isn’t just in how they look — it’s in how they make you feel when you look down at your hands and see a piece of wearable, shimmering beauty staring back at you.
