

Two-tone nails have become the go-to choice for anyone seeking a polished, contemporary look that’s both sophisticated and creative. Unlike single-color manicures, two-tone designs offer a dynamic way to express your personality while maintaining an air of refined elegance. The beauty of this trend lies in its versatility—whether you’re heading to the office, attending a special event, or just want to elevate your everyday style, a two-tone nail design can adapt to virtually any occasion and aesthetic.
The appeal of two-tone nails extends far beyond mere aesthetics. These designs allow you to play with color psychology, creating combinations that complement your skin tone, wardrobe, and mood. You’re not limited to traditional contrasts either; the magic happens when you experiment with texture combinations, shapes, and application techniques. From classic French tips reimagined in unexpected color pairings to bold geometric patterns and seamless ombre transitions, two-tone nail art opens up a world of creative possibilities without requiring advanced artistic skills.
What makes two-tone designs particularly modern is how they balance minimalism with statement-making impact. You’re using restraint—just two colors—yet creating visual interest through strategic color placement and technique. This approach appeals to contemporary sensibilities that favor intentional design choices over excessive ornamentation. Whether you prefer soft pastels that whisper elegance or bold contrasts that demand attention, there’s a two-tone combination that perfectly reflects your personal style.
The techniques used to create these designs have also evolved significantly. With the right tools, patience, and a bit of practice, you can achieve salon-quality results at home. Makeup sponges for ombre effects, tape for crisp geometric patterns, dotting tools for intricate accents, and various top coat options all play a role in bringing these designs to life.
1. Classic Black and White Geometric Blocks
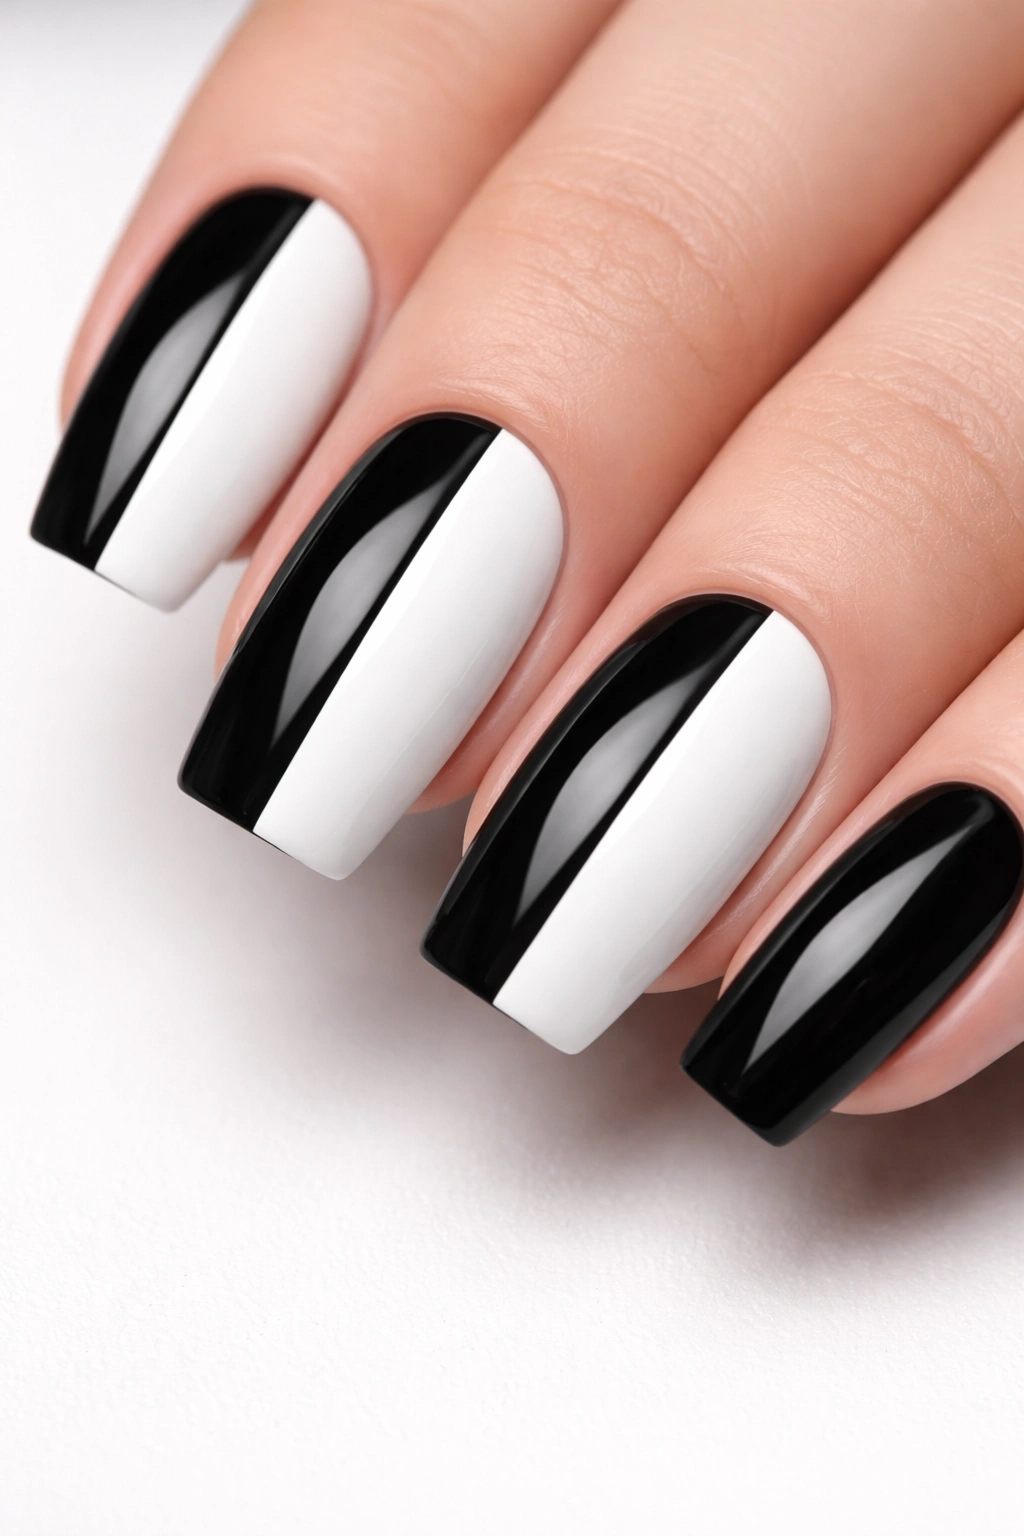
The timeless pairing of black and white transcends trends, offering a look that’s perpetually modern and undeniably chic. A geometric block design—where each half of the nail features a contrasting color—creates a striking visual impact that works for any setting. This design proves that you don’t need a rainbow of colors to make a statement; sometimes the most elegant looks come from the boldest contrasts.
Why This Design Works
The black and white combination is inherently sophisticated, evoking thoughts of tuxedos, formal events, and high-fashion runways. The geometric approach adds a contemporary edge that prevents the design from feeling too classic or dated. This pairing enhances nail shape beautifully—whether your nails are short and square or long and almond-shaped, the geometric split draws attention to the nail’s natural lines and proportions.
How to Create It
Start with a base coat to protect your nails, then apply a solid black polish to one side of your nail and white polish to the other. The key is precision. Use painter’s tape to create a sharp, clean line down the center of each nail. Apply your colors carefully over the tape, then remove the tape while the polish is still slightly tacky. This creates crisp, professional-looking edges that elevate the entire design. Finish with a high-quality top coat for durability and shine.
Pro tip: The split doesn’t have to be perfectly vertical—try diagonal lines, diagonal chevrons, or even a 60/40 split instead of 50/50 for a more dynamic look.
2. Soft Ombre Nude to Blush
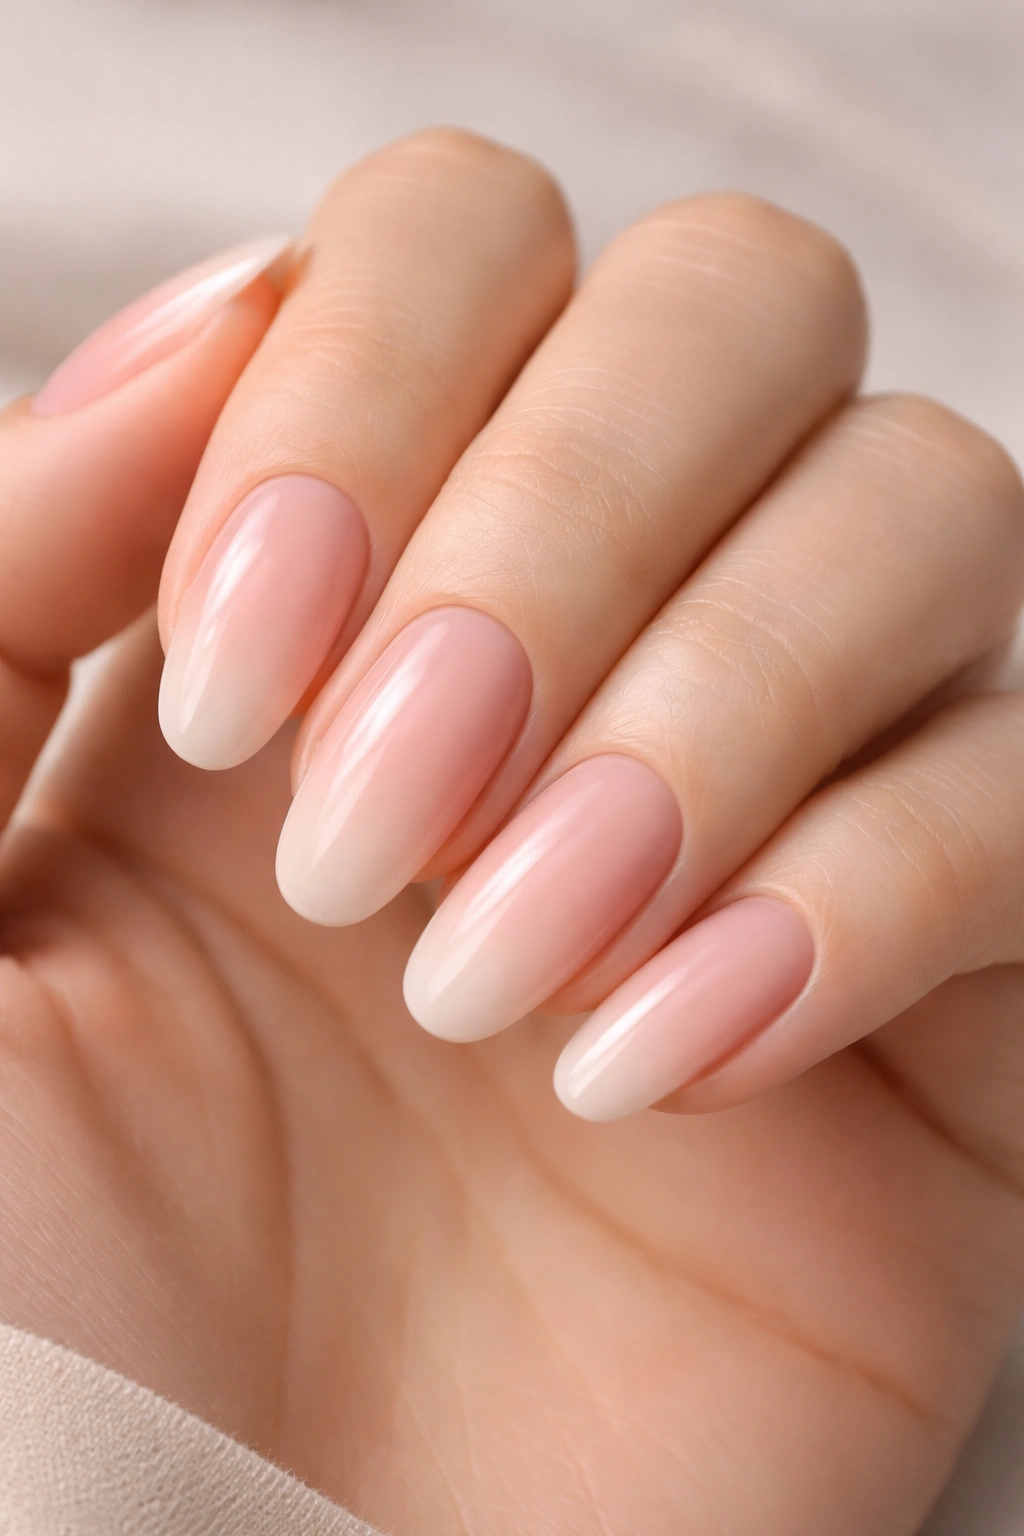
For those who appreciate understated elegance, the ombre transition from nude to soft blush offers sophistication without drama. This design works beautifully across all nail shapes and lengths, providing a subtle gradient that appears almost skin-tone-like at the base before gently warming toward the tips. It’s the kind of manicure that makes people ask, “Is that just your natural nails?” before realizing it’s actually nail art.
Why This Design Works
The nude-to-blush gradient represents modern minimalism at its finest. It creates the illusion of lengthened, more elegant nails while remaining professional and work-appropriate. The warmth of the blush adds a feminine, approachable quality that feels contemporary yet timeless. This combination complements virtually every skin tone, making it universally flattering.
How to Create It
Apply a nude base coat and let it dry completely. Using a makeup sponge, apply blush polish to the tip area of the sponge while also touching the nude on the sponge, creating a color gradient. Lightly dab this onto your nail, starting at the tip and working toward the middle. Build the gradient gradually with multiple light touches rather than one heavy application. This creates a seamless, professional-looking transition. Seal with a glossy top coat to enhance the sophisticated finish.
Pro tip: Let each layer dry slightly between applications for a smoother, more refined gradient that looks airbrushed.
3. Emerald Green with Gold Chrome Tips
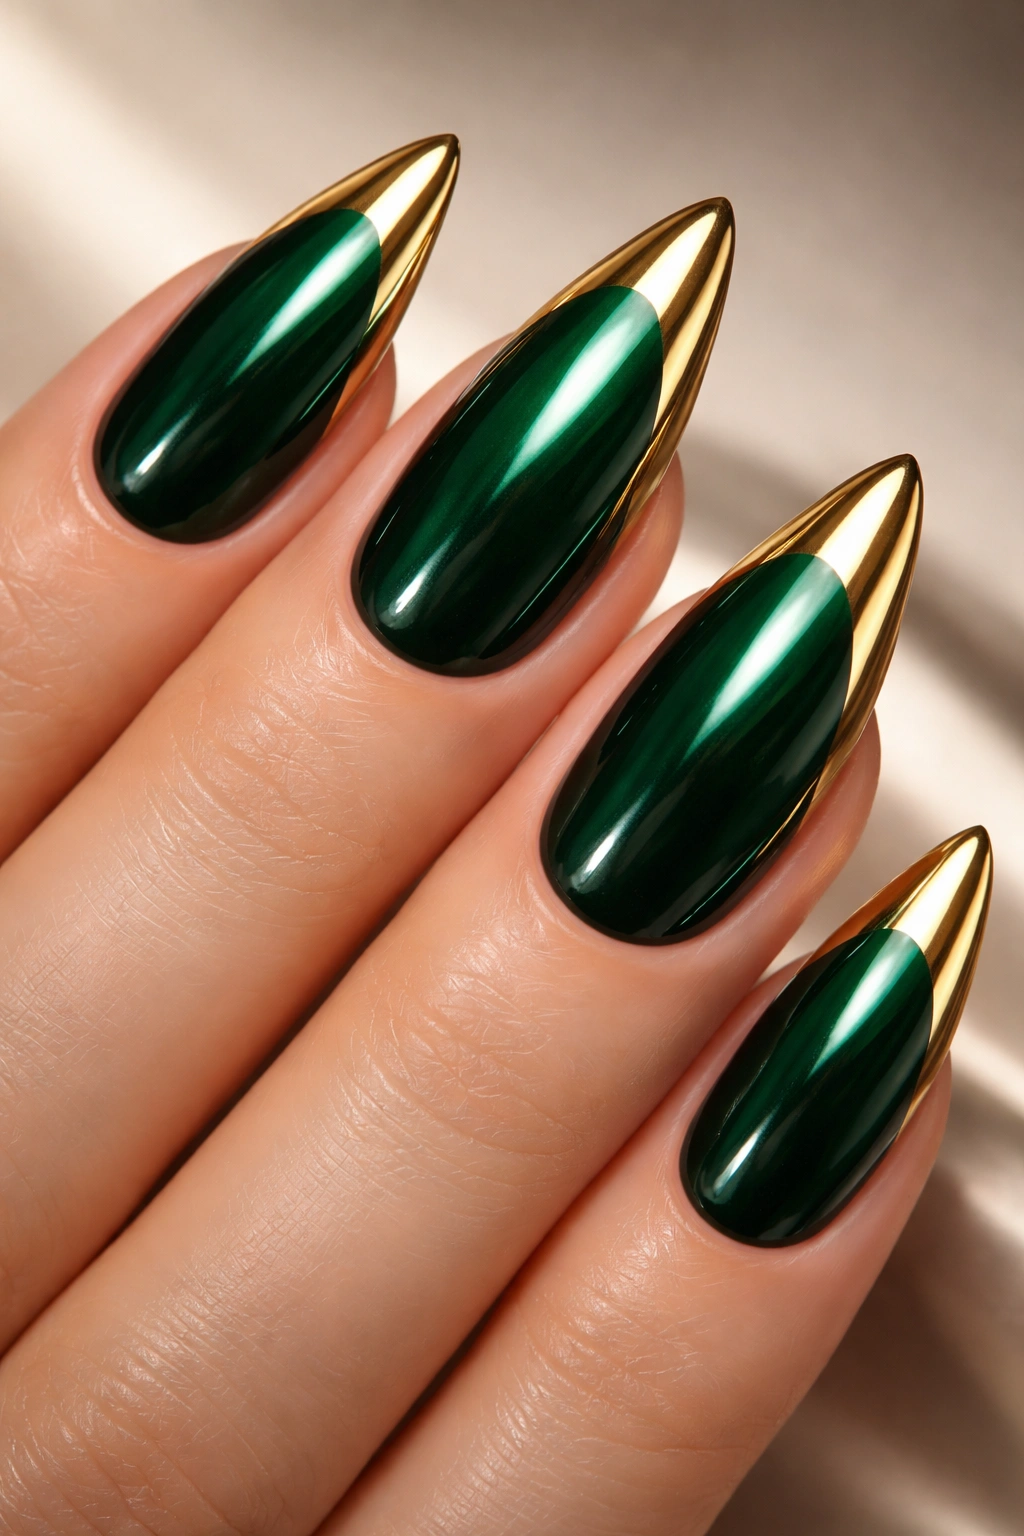
This luxurious two-tone design pairs a rich emerald base with shimmering gold chrome tips, creating a regal aesthetic that demands attention. The combination evokes feelings of luxury and sophistication, making it perfect for evening events, celebrations, or when you simply want to feel elevated and confident. The metallic chrome adds a modern, high-fashion element that prevents the design from feeling too traditional.
Why This Design Works
Emerald green is experiencing a major resurgence in contemporary design, symbolizing growth, luxury, and sophistication. When paired with gold chrome, it creates an undeniably premium appearance that feels both current and timeless. The reflective quality of chrome transforms what could be a simple two-tone design into something that catches light dramatically and maintains visual interest from every angle.
How to Create It
Apply emerald green polish as your base and allow it to cure completely. Apply a chrome base to the tip area of your nails—this is a special adherence layer that makes chrome powder stick properly. While the chrome base is still slightly tacky, press gold chrome powder onto the tips using a velvet buffer or applicator. The powder will transfer onto the tacky surface, creating that signature metallic, mirror-like finish. Seal with a non-sticky top coat to protect the chrome and provide additional shine.
Pro tip: Chrome powder can be applied to just the traditional French tip area or extended further down the nail for a bolder effect depending on your preference.
4. Navy Blue and Coral Striped Pattern
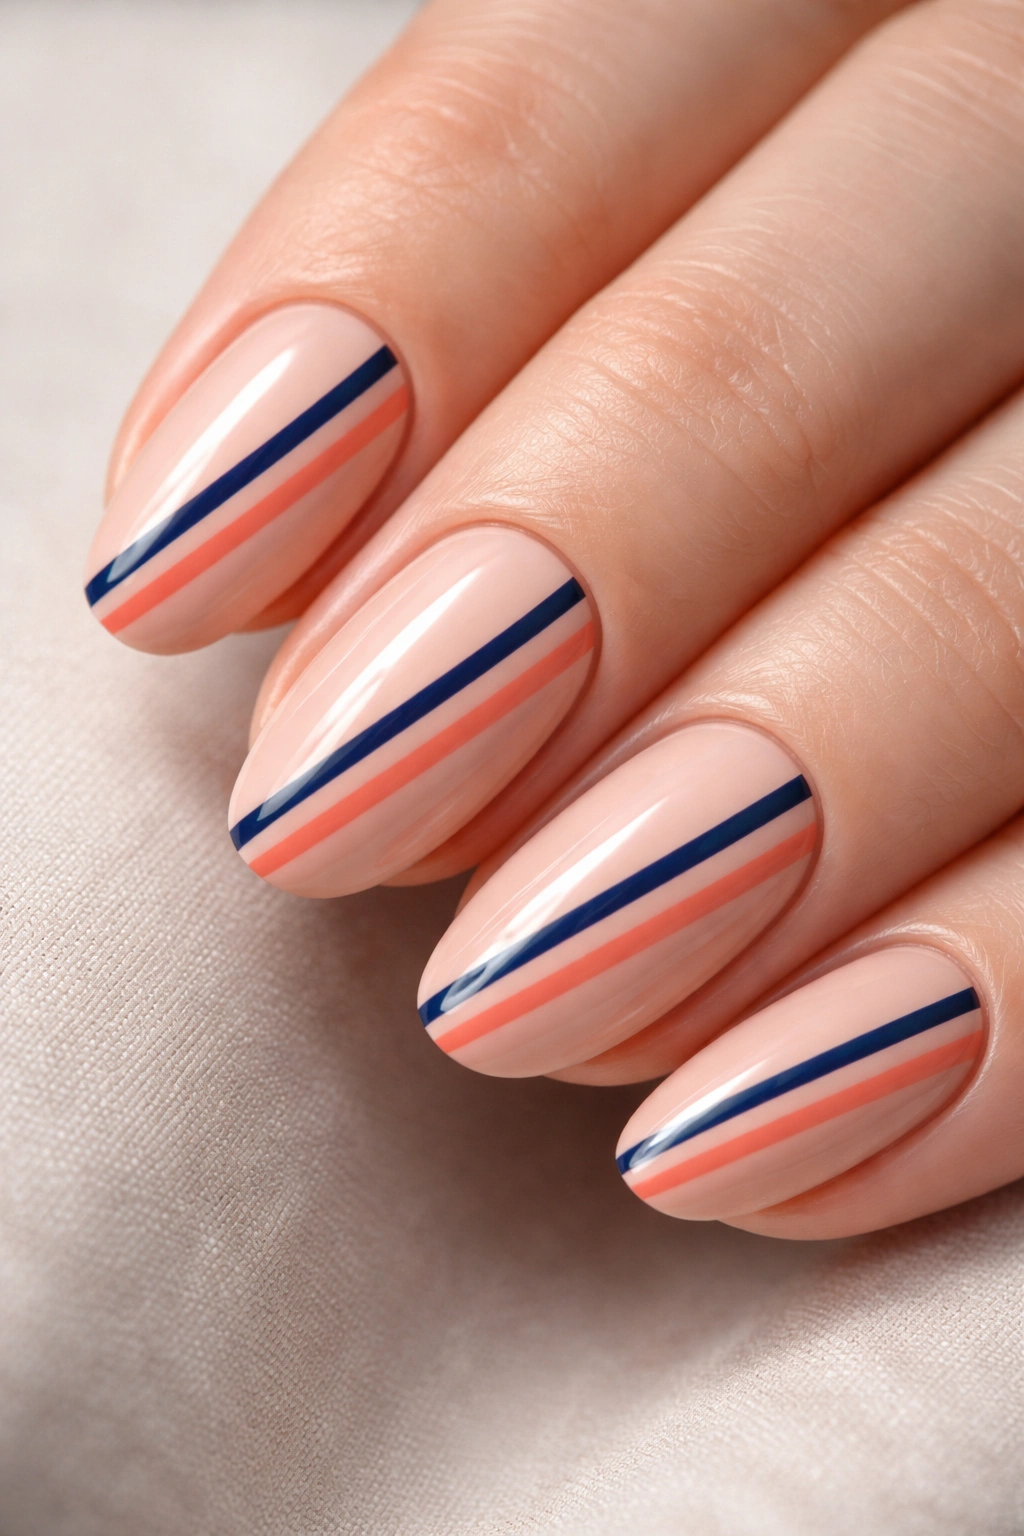
The combination of navy and coral brings energy and personality to your nails while maintaining a polished, intentional appearance. Thin stripes of these two colors create movement and visual interest without overwhelming the nail. This design captures the essence of modern color theory—pairing complementary colors that create harmony through contrast rather than conflict.
Why This Design Works
Navy and coral represent an intersection of cool and warm tones, creating a dynamic balance that’s both visually exciting and surprisingly wearable. The stripe pattern adds geometric interest without being too harsh or aggressive. This design works particularly well for those who want to add personality to their look while maintaining professional credentials.
How to Create It
Apply a white or nude base coat as a neutral foundation. Using thin striping tape or a fine-lined nail art brush, create alternating stripes of navy and coral across each nail. The spacing can be as close or as far apart as you prefer—closer stripes create a busier look, while more spacing creates a minimalist effect. Make sure each color dries slightly before applying the next stripe to prevent colors from bleeding into each other. Finish with a clear top coat to smooth the design and add shine.
Pro tip: Vary the stripe width—alternating between thin and slightly thicker stripes creates visual interest and prevents the design from feeling too uniform or boring.
5. Matte Black Base with Glossy Gold Accents
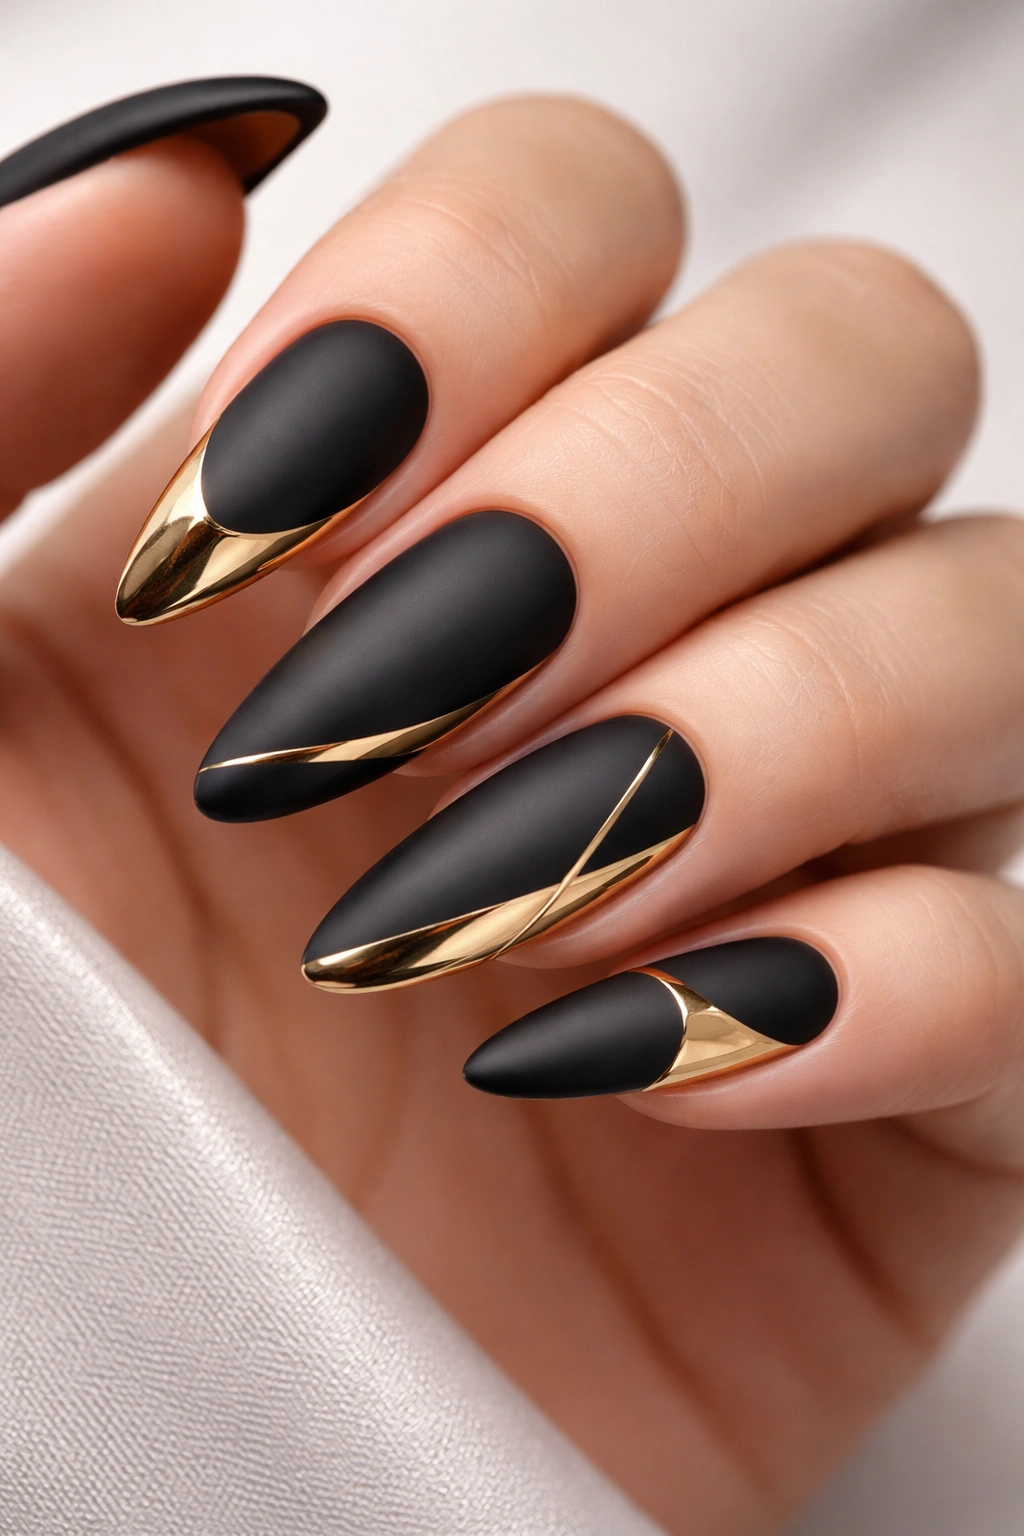
This textural approach combines matte and glossy finishes to create dimension and depth. A matte black base provides a sophisticated foundation, while glossy gold accents—whether as tips, geometric shapes, or decorative elements—add luxury and shimmer. The contrast between finishes makes this design feel far more complex and expensive than it actually is to create.
Why This Design Works
Mixing matte and glossy finishes is a modern design trend that adds tactile interest to nail art. The matte finish provides a velvety, understated quality, while the glossy gold catches light and draws attention. Together, they create a balanced, sophisticated look that reads as intentionally designed rather than accidental. This combination works for both professional settings and evening events.
How to Create It
Apply a standard black polish and then apply a matte top coat to achieve that velvety finish. Once dry, use a fine-lined brush and glossy gold polish to paint tips, geometric accents, or decorative elements. The contrast between the matte and glossy surfaces will be immediately apparent. Seal the entire nail with a glossy top coat, which will make the gold elements shine even brighter while giving the matte areas a subtle sheen.
Pro tip: If you don’t have gold polish, metallic markers designed for nails can create precise, controlled gold accents over the matte base.
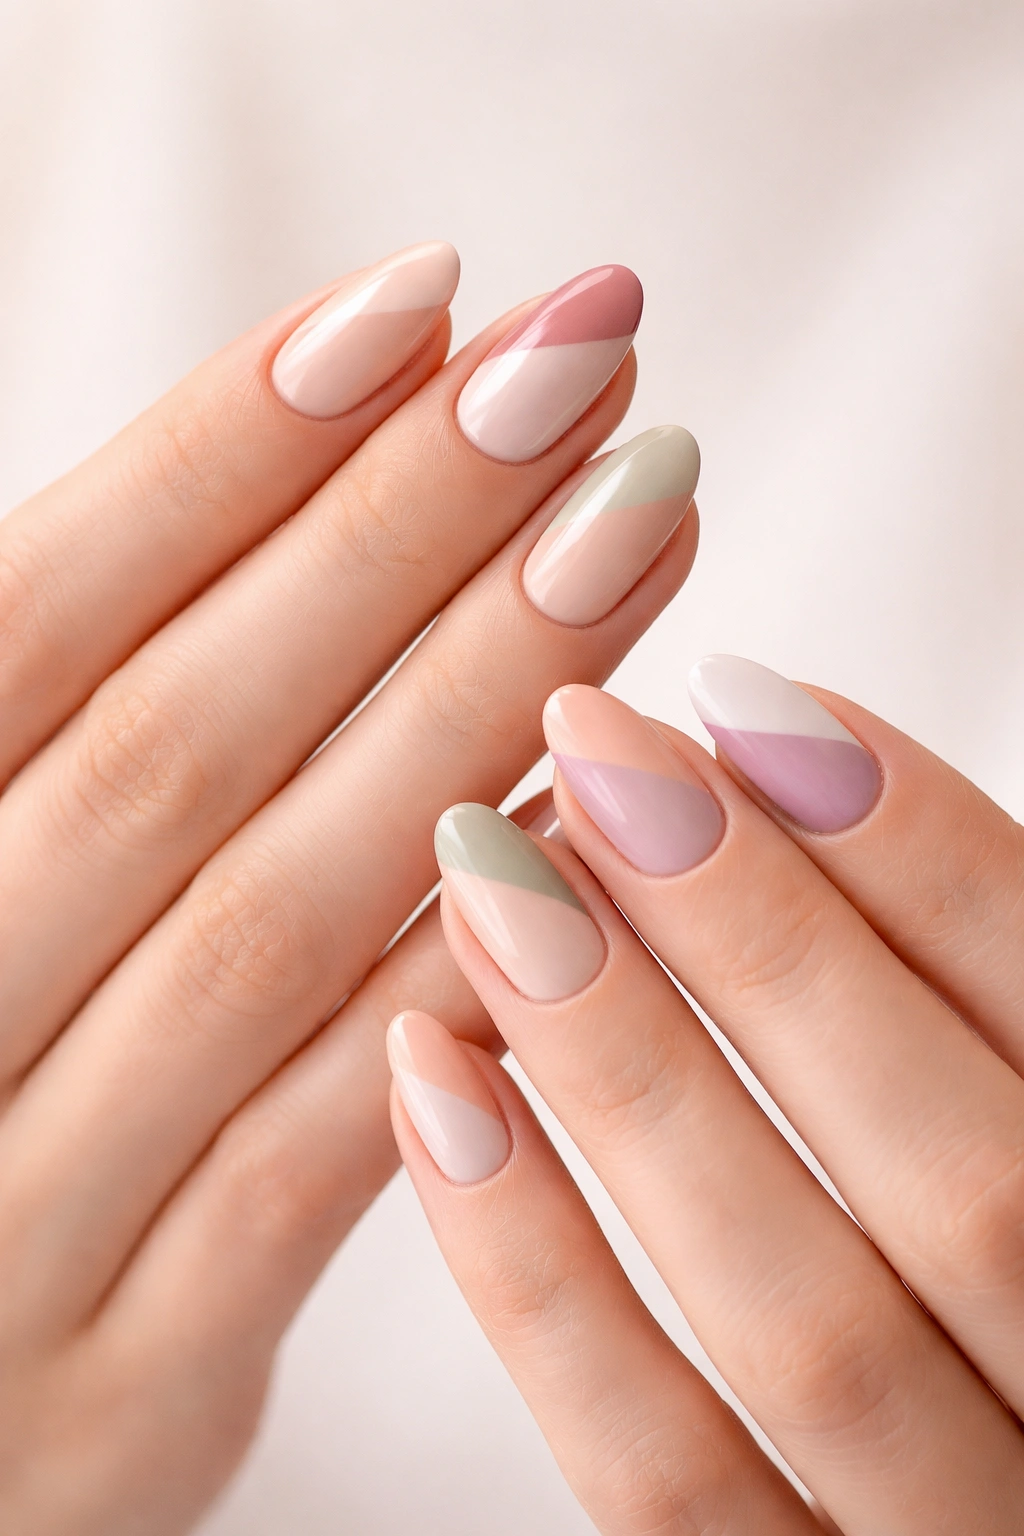
6. Lavender and Lilac Gradient with Micro French Tips
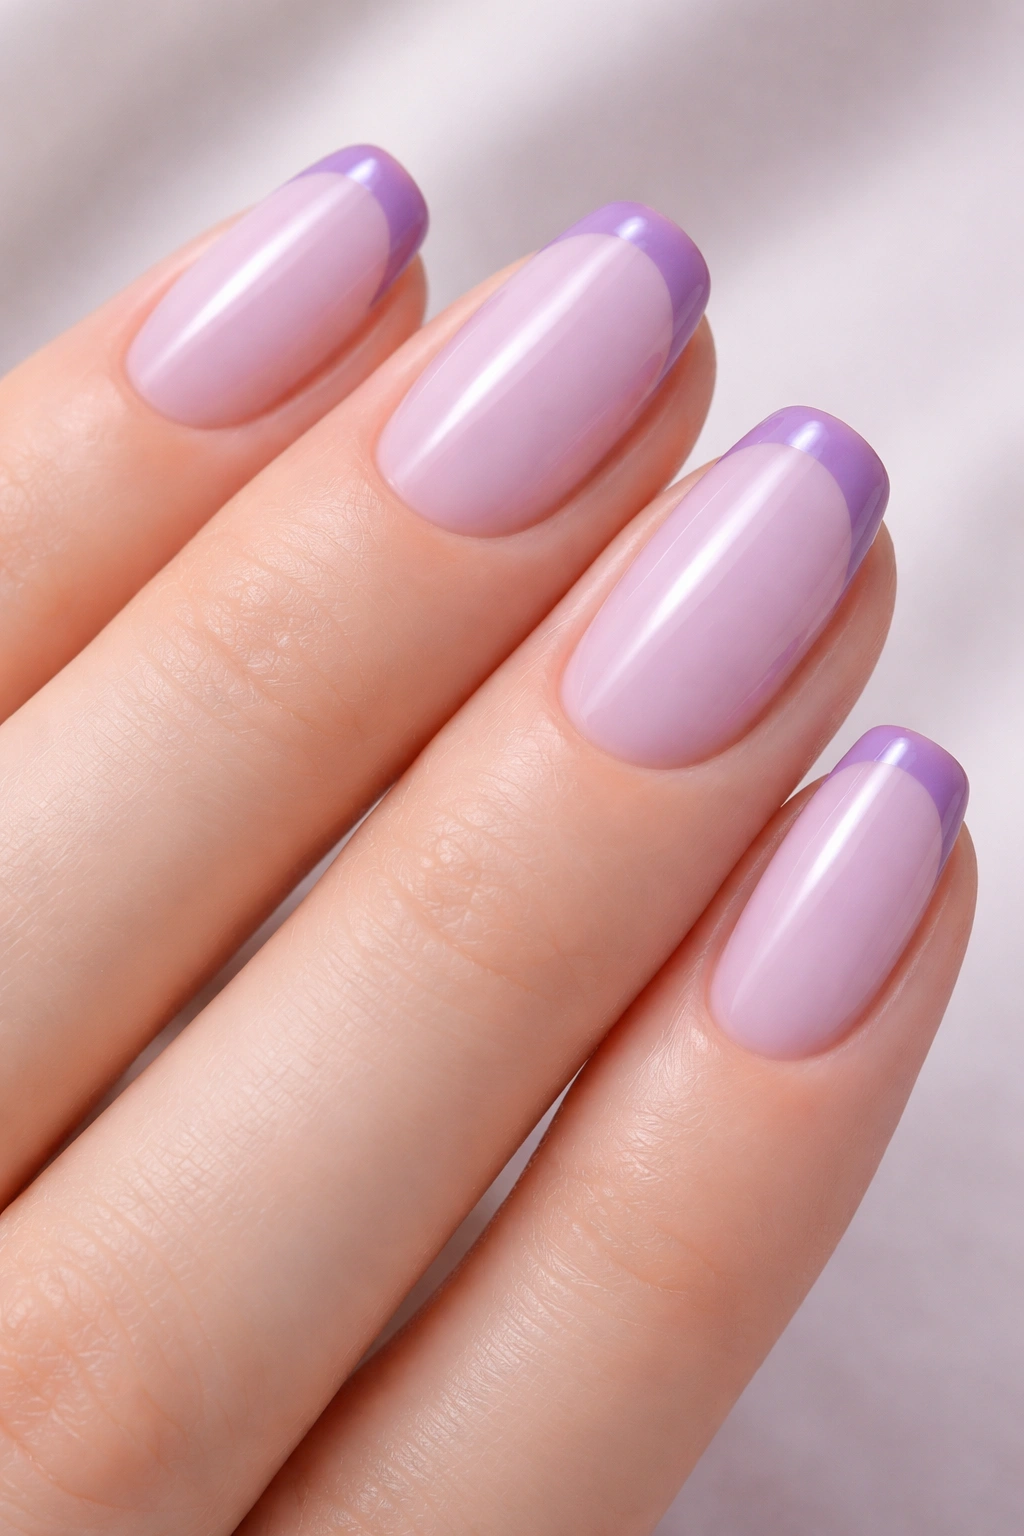
This soft, dreamy combination appeals to those who love pastel aesthetics with a modern twist. The gradient flows from pale lavender at the base to a deeper lilac shade, with microscopic French tips in the deeper shade. This design maintains elegance while incorporating the French manicure element that never truly goes out of style, just keeps evolving.
Why This Design Works
Lavender and lilac together create a monochromatic color story that’s soothing and visually cohesive. The micro French tip adds just enough definition and structure to prevent the design from appearing too soft or blurry. This combination is particularly flattering on shorter nails, as the gradient and micro tips create the illusion of length without requiring actual length.
How to Create It
Begin with a pale lavender base and allow it to dry completely. Using a makeup sponge or blending sponge, apply deeper lilac polish to the tip area while also touching the sponge to the lavender base, creating a gradient effect. Build this slowly with multiple light applications until you achieve a seamless transition. Once the gradient is complete and dry, use a very fine-lined brush to paint microscopic tips in the deep lilac shade. The tips should be barely visible, adding subtle definition without drawing excessive attention.
Pro tip: The micro French tip works best on shorter nails and doesn’t require perfect precision—slightly imperfect tiny tips actually look more modern and intentional than perfectly even larger tips.
7. Blush Pink and Rose Gold Ombre with Glitter Fade
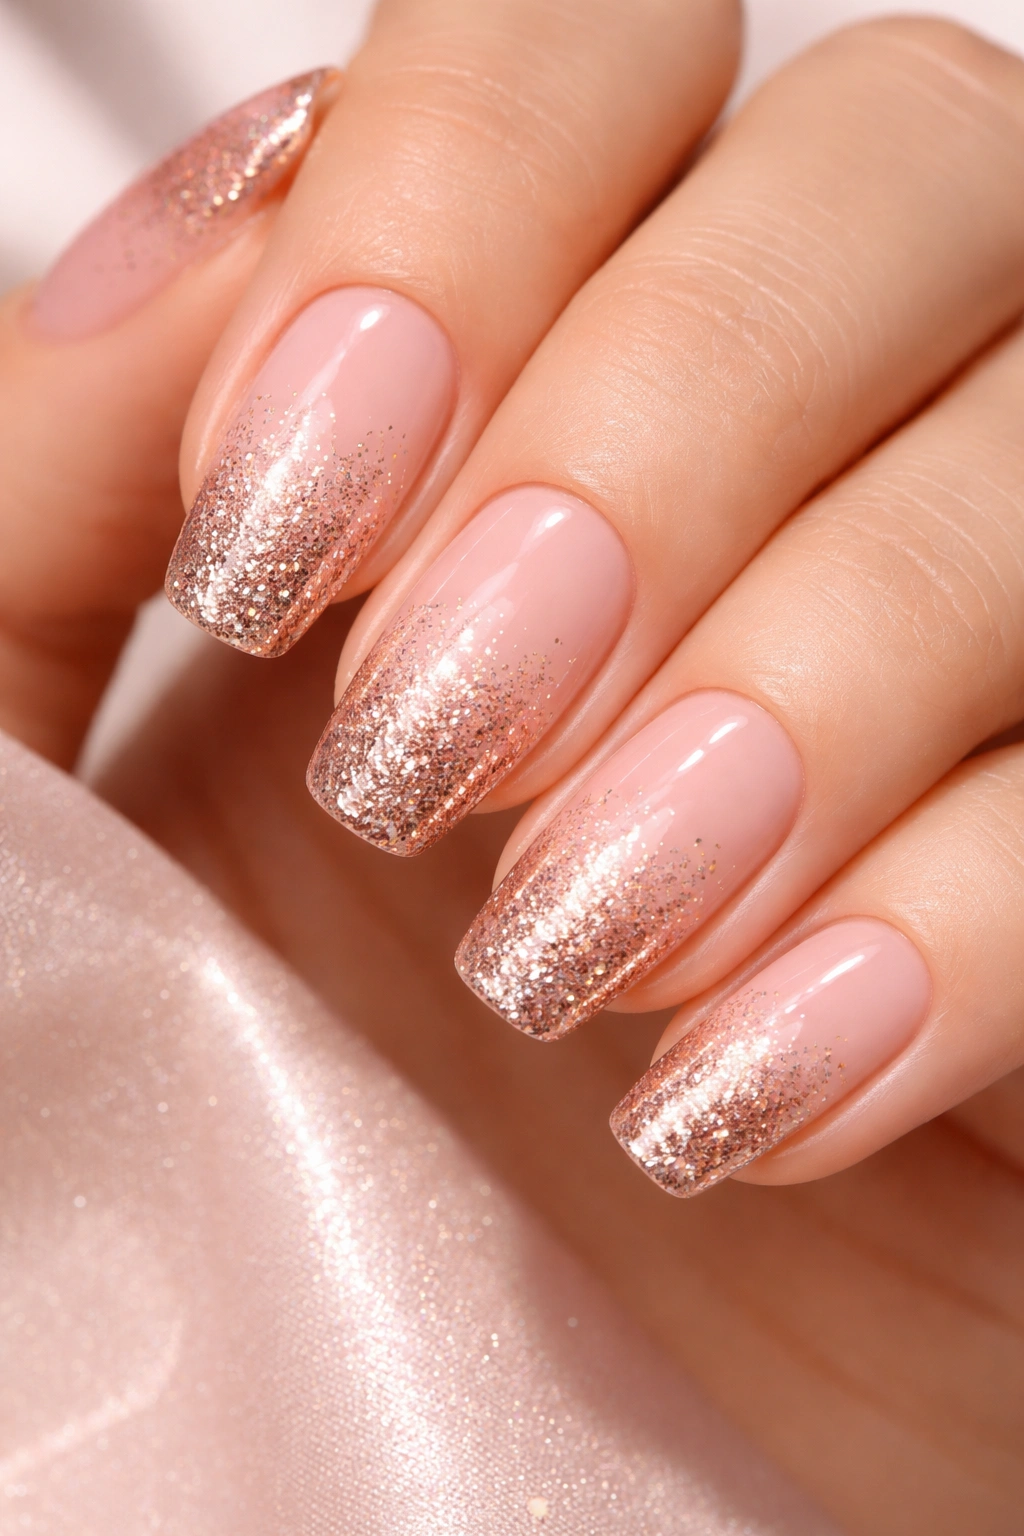
For those who want their nails to sparkle with sophistication, this design combines soft pink hues with rose gold glitter that gradually increases from the base to the tips. The ombre effect from solid color to glitter creates visual movement and catches light beautifully. This design manages to be both feminine and contemporary, playful yet polished.
Why This Design Works
Rose gold has become the preferred metallic for modern design, offering warmth and sophistication that feels current without being trendy. The glitter fade technique creates gradation without requiring multiple polish colors, achieving complexity through strategic glitter placement. Blush pink provides a flattering, universally wearable base that complements virtually all skin tones.
How to Create It
Apply blush pink polish as your base and let it dry completely. Create a glitter fade by applying a very small amount of rose gold glitter polish to the tips, then blending it upward with a makeup sponge or clean brush to create a gradient effect. You can also layer translucent glitter over the solid color, applying thicker concentration at the tips and lighter concentration toward the base. This creates a beautiful fade without requiring precise color matching.
Pro tip: Use a gel-based glitter formula for easier blending and a smoother, more professional finish.
8. Teal and White Half-Moon Design
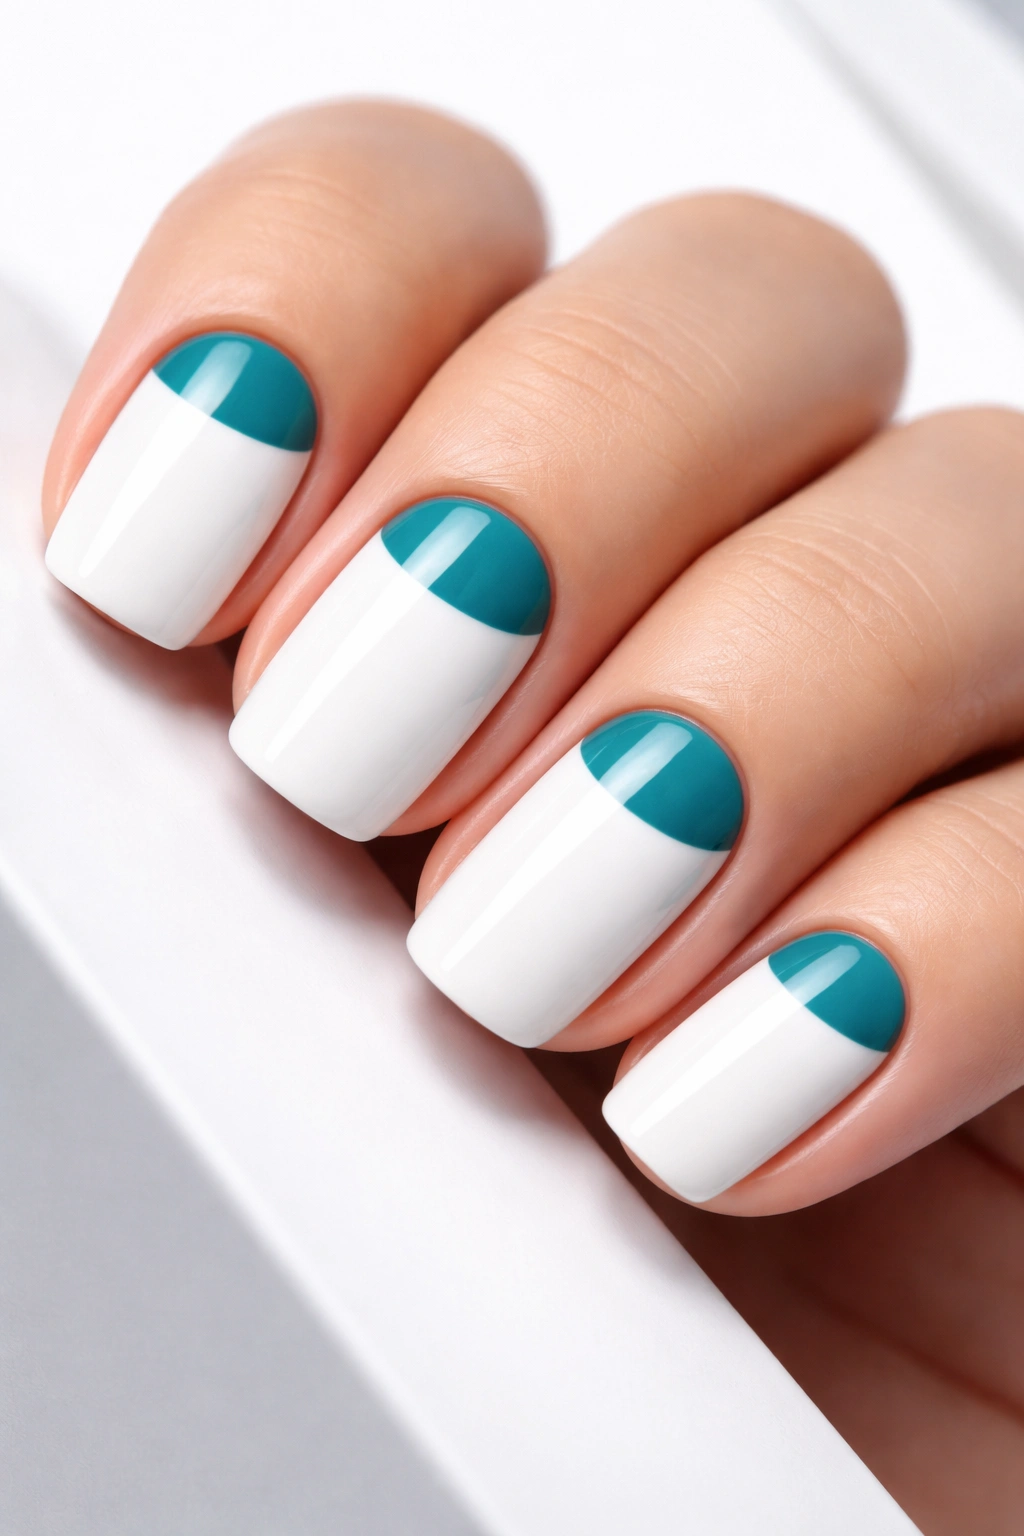
The half-moon design, also called the moon manicure, creates a distinctive look by painting the cuticle area (the “moon”) in one color and the rest of the nail in another. A teal moon against a white nail body creates a modern, architectural appearance that’s simultaneously playful and professional. This design transcends seasons and occasions, working beautifully year-round.
Why This Design Works
The half-moon design is inherently graphic and contemporary, evoking modern art and geometric design. The teal-and-white combination creates enough contrast to be visually striking while maintaining sophistication. This design draws attention upward toward the hand, which many people find flattering. The negative space created by the color blocking makes the design feel intentional and refined.
How to Create It
Apply white polish as your base and let it dry completely. Using a curved striping brush or a small dotting tool covered in curved tape, carefully paint a half-moon shape at the cuticle area in teal polish. Alternatively, apply tape in a curved shape at the cuticle area, paint teal over it, and remove the tape for a cleaner line. The key is precision and patience—use a very fine brush for best results, or practice with tape templates first.
Pro tip: The cuticle area is typically curved, so following that natural curve with your moon design makes it look more intentional and flattering.
9. Burgundy and Nude Diagonal Split
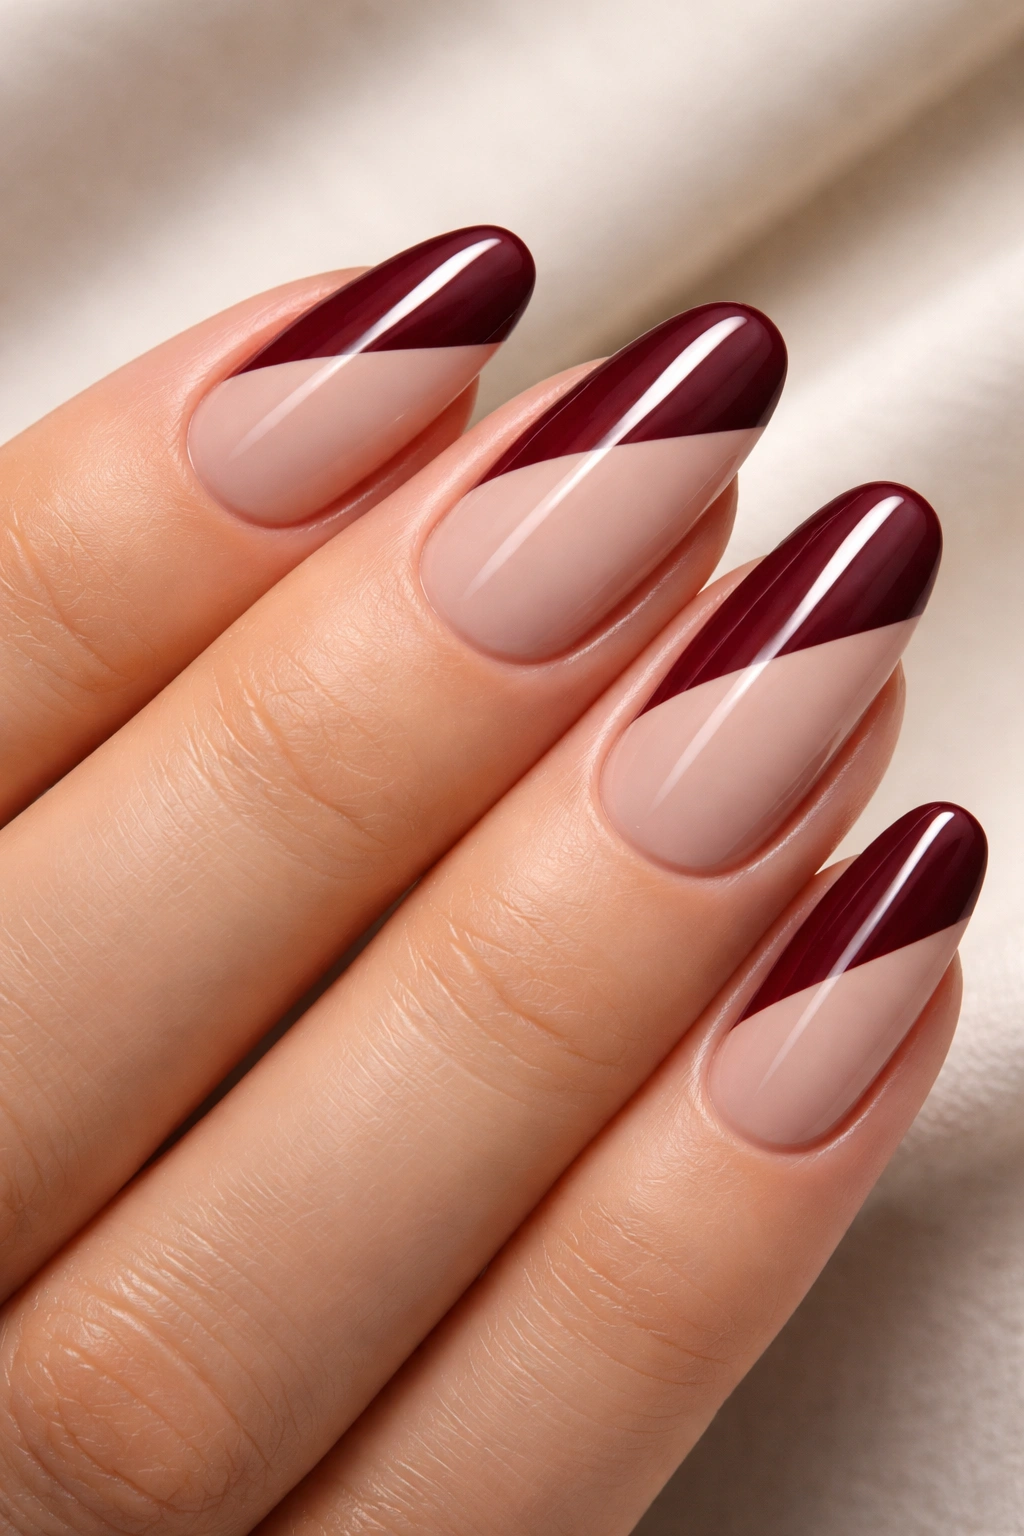
This sophisticated combination pairs warm burgundy with neutral nude in a diagonal split across each nail. The diagonal orientation adds dynamism and movement that a vertical split doesn’t provide, while the color combination feels decidedly upscale and current. This design works beautifully on longer nails where the diagonal line has space to make an impact.
Why This Design Works
Burgundy represents luxury and depth, while nude provides balance and wearability. The diagonal split creates visual interest and prevents the design from feeling too structured or rigid. This combination works for professional settings, evening events, and anyone wanting to add personality to their look without appearing overly bold or playful.
How to Create It
Apply nude polish as your base and let it dry. Using painter’s tape, create a diagonal line across your nail (from upper left to lower right, or vice versa). Apply burgundy polish over the taped area, then carefully remove the tape while the polish is still slightly tacky. This creates a clean, sharp diagonal line. For a softer, more blended diagonal, skip the tape and use a fine-lined brush to paint the diagonal line directly, allowing the colors to slightly blend at the intersection.
Pro tip: The angle of your diagonal affects the overall look—a steeper angle feels more modern and edgy, while a gentler slope feels more classic and elegant.
10. Sage Green with White Geometric Triangles
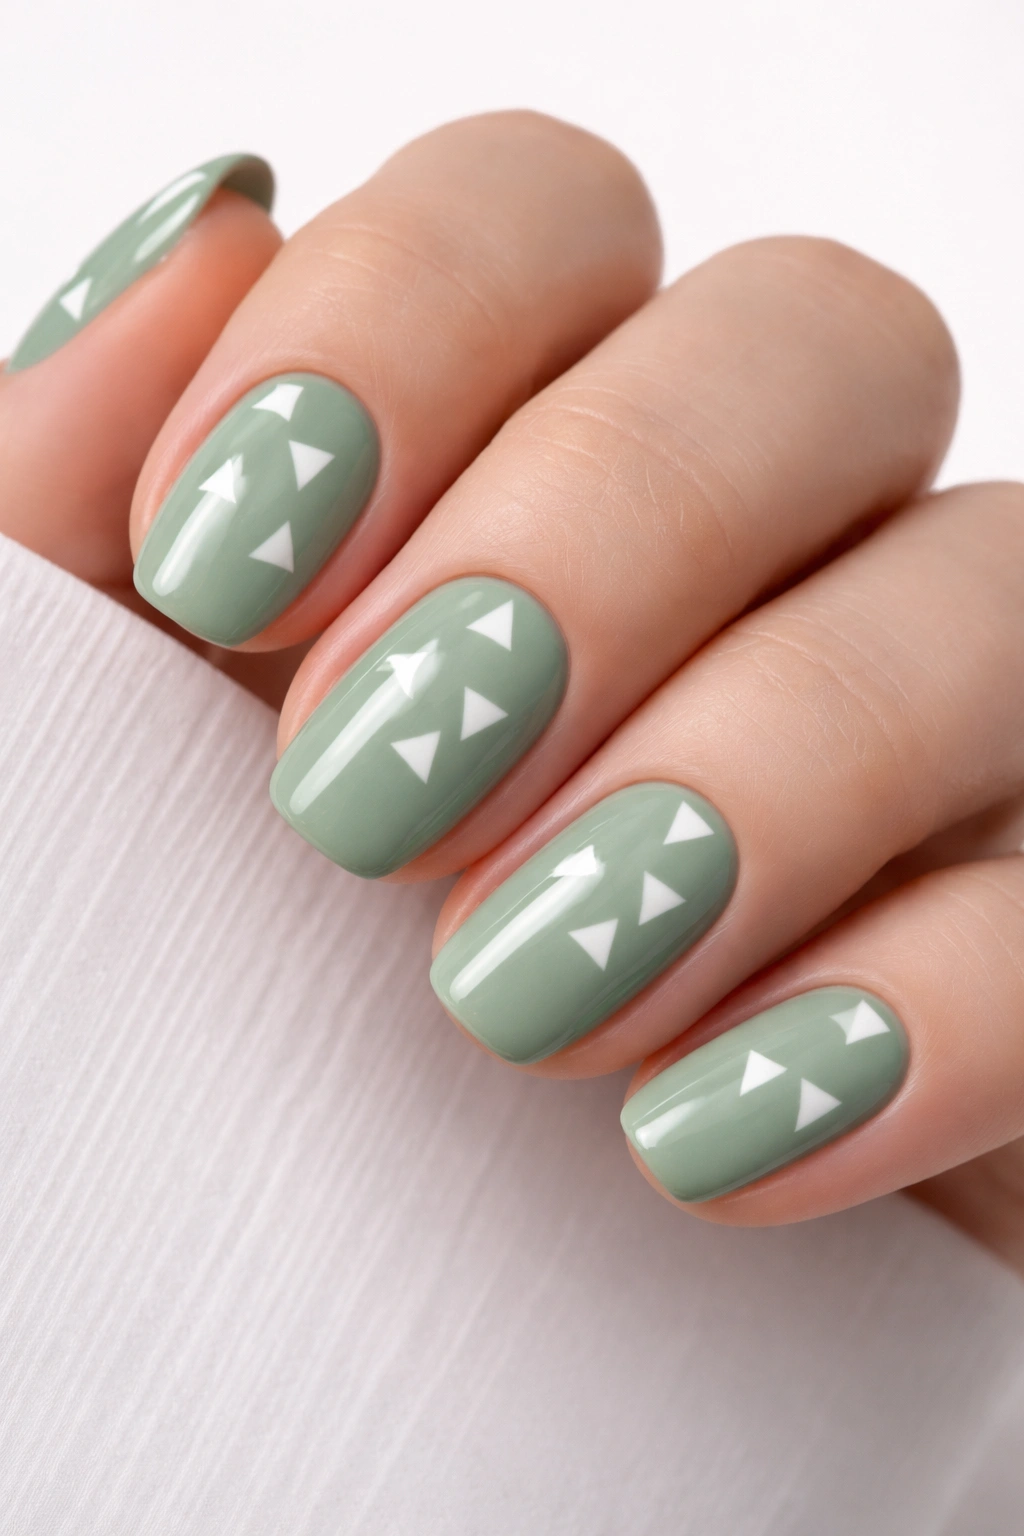
This modern design combines a soft, muted sage green base with crisp white geometric triangles scattered across the nail. The geometric approach feels contemporary and artistic, while the muted color palette remains sophisticated and wearable. This design appeals to those who appreciate minimalist art and contemporary design sensibilities.
Why This Design Works
Sage green is having a significant moment in design, appreciated for its calming quality and sophisticated aesthetic. White triangles create geometric interest without appearing too busy or complicated. The combination feels fresh and modern while avoiding the overly trendy appearance that some bolder color combinations might have. This design works beautifully on any nail shape and length.
How to Create It
Apply sage green as your base color and let it dry completely. Using a very fine-lined brush or a thin striping tool, paint small white triangles in a scattered pattern across the nail. Triangles can point upward, downward, or in various directions—the inconsistency actually adds to the artistic, contemporary feel. Vary the triangle sizes slightly for a more dynamic composition. Seal with a top coat to protect your design.
Pro tip: Lightly sketch triangle placement with a pencil first if you’re worried about symmetry, then paint over the pencil lines with white polish.
11. Dusty Rose and Gold Foil Accents
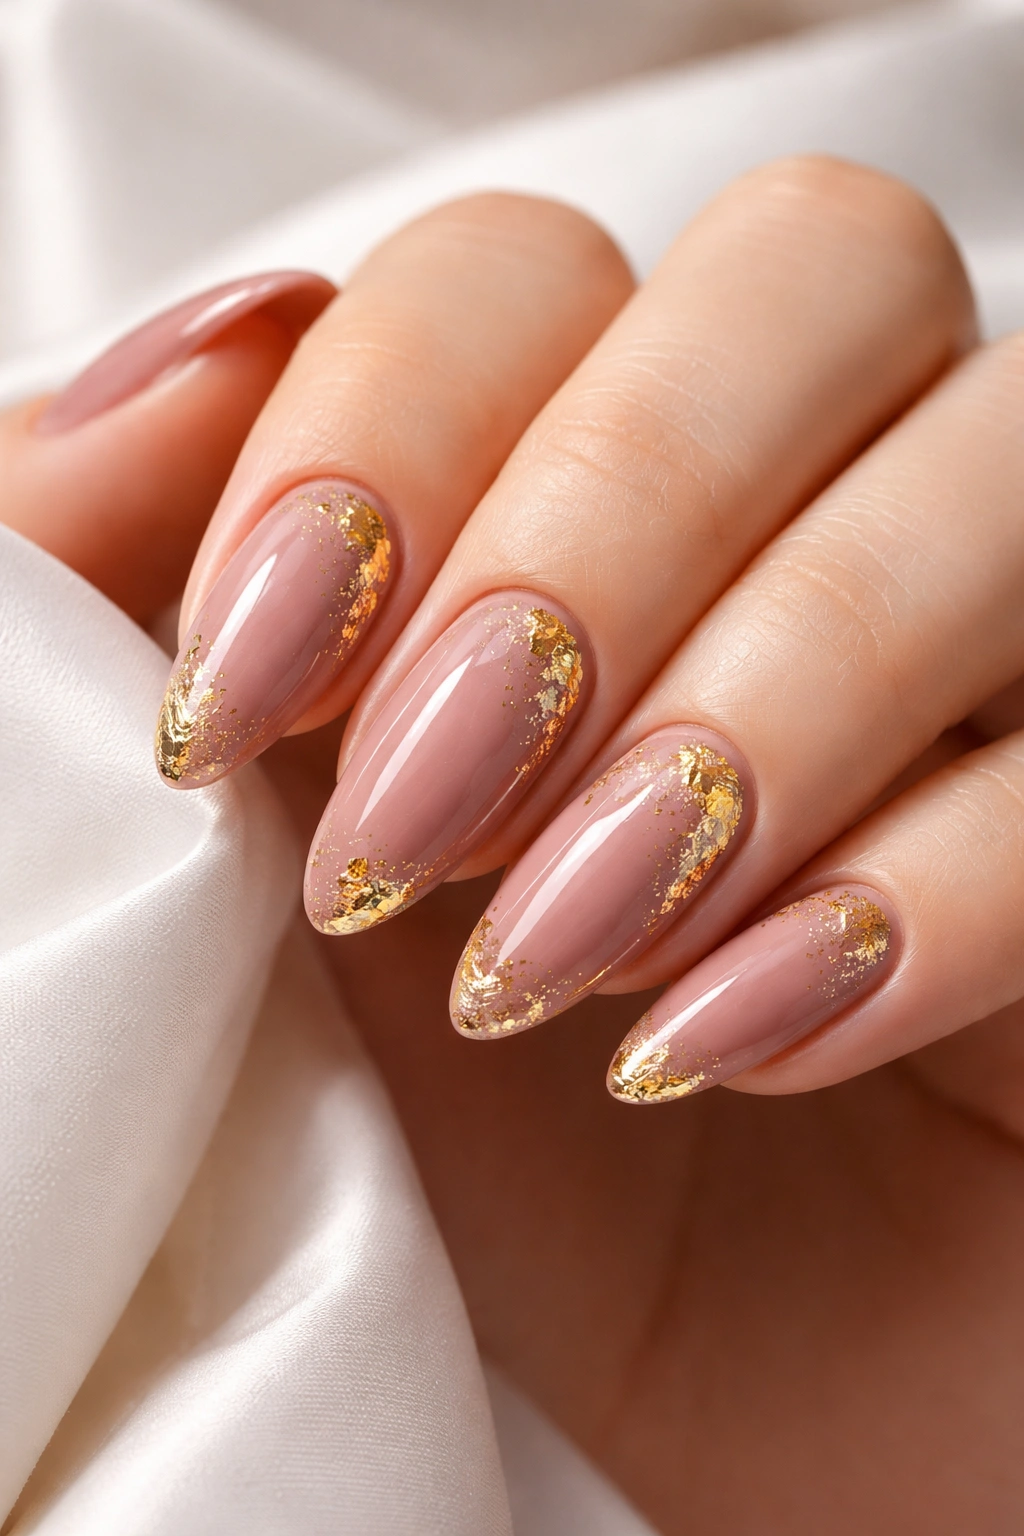
This luxurious design pairs a dusty rose base with delicate gold foil accents that catch light and add shimmer. The foil application creates an elegant, high-fashion appearance while maintaining the simplicity of a two-color design. The muted, sophisticated rose shade combined with warm gold creates a universally flattering, upscale look.
Why This Design Works
Dusty rose has emerged as a beloved color for contemporary nail designs, offering femininity without saccharine sweetness. Gold foil adds texture, dimension, and luxury that feels modern and intentional. The combination is particularly flattering for special occasions, though it remains sophisticated enough for professional settings and everyday wear.
How to Create It
Apply dusty rose as your base and let it dry completely. Apply a tacky top coat (the basecoat formula designed specifically for foil application works best). While the base coat is still slightly sticky, cut small pieces of gold foil and press them gently onto the nail surface. The foil will adhere to the sticky surface, creating a metallic accent. You can apply foil across the entire nail, at the tips, in the center, or in scattered accents depending on your preference. Seal with a clear top coat.
Pro tip: Crinkled foil creates a more interesting, textured appearance than smooth foil, and small scattered pieces look more modern than large, continuous foil areas.
12. Charcoal Grey and Soft Pink Ombre

This sophisticated ombre transitions from deep charcoal grey to soft, delicate pink, creating a gradient that moves from cool to warm across the nail surface. The design manages to be both modern and romantic, professional yet feminine. The wide range of the color transition creates visual interest without requiring multiple colors.
Why This Design Works
Charcoal grey provides depth and sophistication, while soft pink adds warmth and approachability. The ombre technique allows these two seemingly disparate colors to blend harmoniously, creating a design that appeals across aesthetic preferences. This gradient is flattering on all nail shapes and works beautifully for both short and long nails.
How to Create It
Apply charcoal grey polish to your entire nail and let it dry. Using a makeup sponge, apply soft pink polish to the sponge while also touching the grey on the sponge, creating a color gradient. Dab this sponge gently onto your nails starting at the tips and working toward the base, building the gradient gradually. Multiple light applications create a smoother, more blended effect than one heavy application. Seal with a glossy top coat to enhance the gradient.
Pro tip: This ombre works beautifully with a vertical gradient (darker at the top, lighter at the bottom) or a traditional gradient (darker at the tips, lighter at the base)—choose whichever appeals more to you.
13. Copper and Deep Plum Metallic Duo
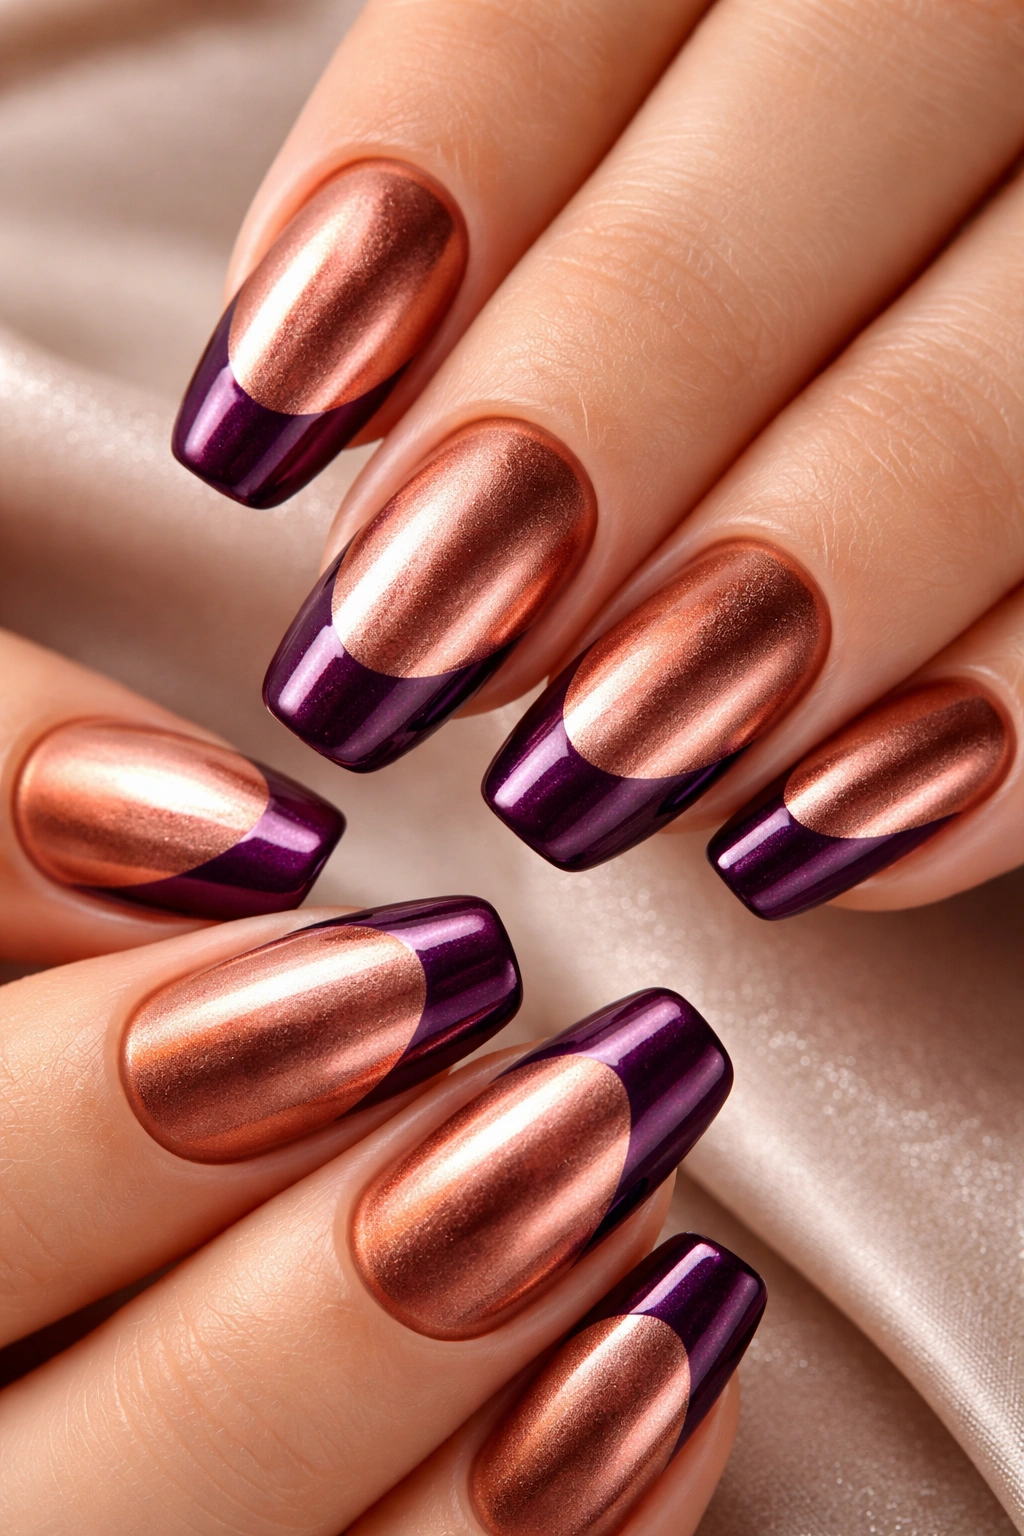
This rich, luxurious combination pairs warm copper with cool deep plum, both in metallic finishes that catch light dramatically. The color combination feels distinctly modern and somewhat unexpected—people aren’t accustomed to seeing plum paired with copper, which makes it feel fresh and contemporary. Both colors’ metallic quality adds glamour and sophistication.
Why This Design Works
Copper and plum together create a sophisticated color story that feels both warm and cool simultaneously. The metallic finishes add dimension and luxury without requiring embellishments or complex techniques. This design is particularly striking under natural light and artificial lighting, making it perfect for both daytime and evening wear.
How to Create It
Apply copper metallic polish as your base and let it dry. Paint deep plum metallic polish onto the tips, creating a French tip effect, or split the nail vertically or diagonally between the two colors. The metallic finishes will create natural dimension and shine without additional products. If desired, seal with a glossy top coat, though metallic polishes often provide sufficient shine without additional top coat.
Pro tip: Metallic polishes sometimes apply more effectively with two thin coats rather than one thick coat, ensuring even color distribution and maximum shine.
14. Cream and Sheer Nude Milky Ombre
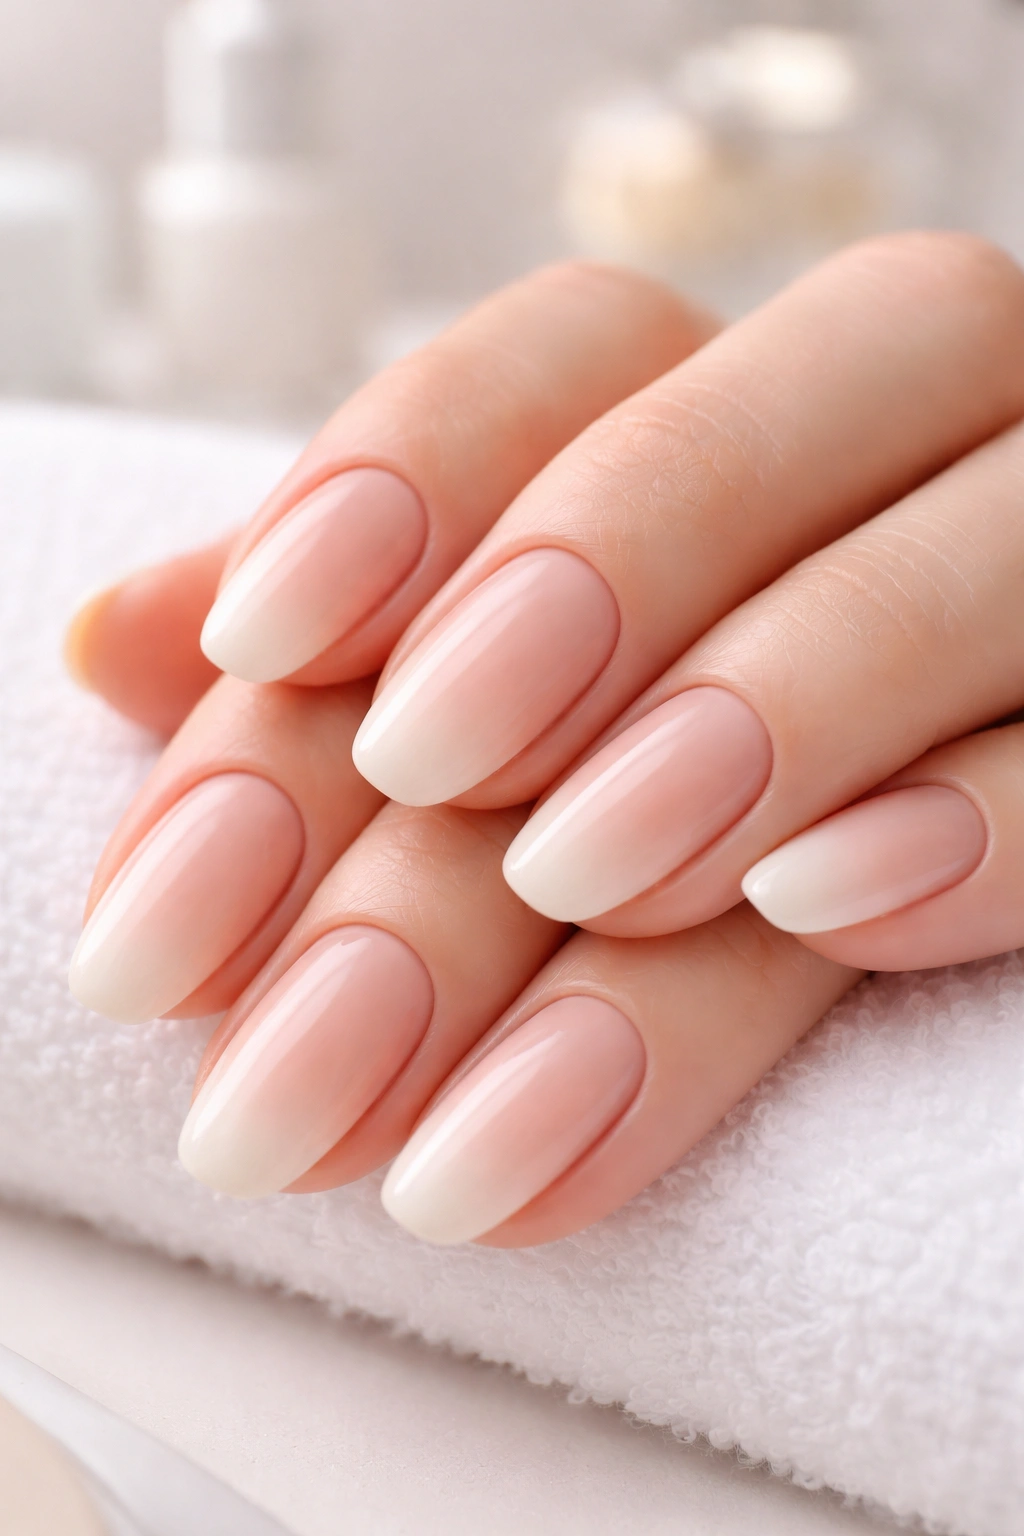
This ultra-refined design creates a barely-there ombre that transitions between creamy white and translucent nude. The effect is so subtle it almost appears to be your natural nails, making it perfect for those who love the appearance of beautiful nails without obvious nail art. This design represents the ultimate in modern minimalism while creating an inherently polished appearance.
Why This Design Works
Milky, sheer finishes have become increasingly popular in contemporary nail design because they create the illusion of health, length, and natural beauty. The cream-to-sheer-nude gradient is particularly flattering, creating shadow and dimension that makes nails appear longer and more elegant. This design works beautifully for professional settings, formal events, and everyday wear.
How to Create It
Apply a creamy white base and let it dry. Using a makeup sponge, apply sheer nude polish while also touching the cream on the sponge, creating a very subtle gradient. Dab this gently onto your nails, focusing the nude concentration at the tips. This creates an extremely soft transition that should be barely noticeable. Seal with a shiny top coat—the glossiness is what actually makes this subtle design visually appear more sophisticated and intentional.
Pro tip: The subtlety of this design is actually its greatest strength. Resistance to create too much contrast makes it feel more modern and refined.
15. Forest Green and Gold Speckle Effect
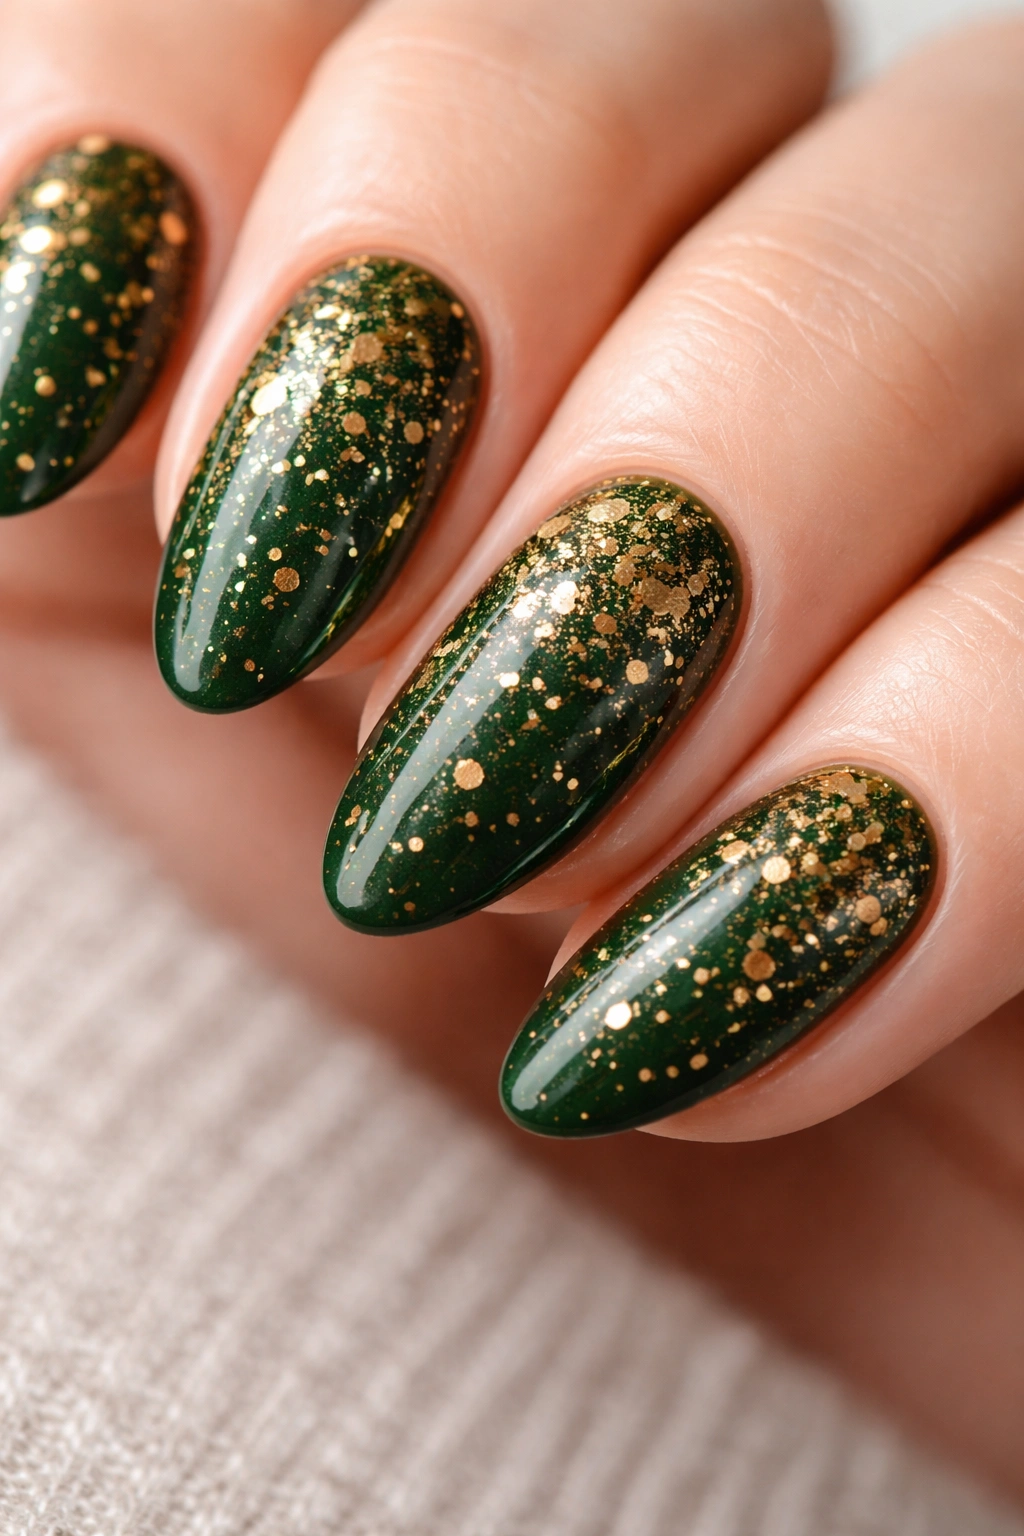
This final modern design features a deep forest green base with random gold speckles scattered across the entire nail surface, creating an organic, artistic appearance. The gold speckles catch light beautifully and add texture without requiring precision or technical skill. The combination feels earthy yet luxurious, natural yet intentional.
Why This Design Works
Forest green pairs beautifully with gold, evoking nature, luxury, and sophistication simultaneously. The speckle effect creates texture and visual interest while remaining forgiving—perfect for those who worry about nail art precision. The random placement prevents the design from appearing too structured or overly planned, maintaining a contemporary, artistic sensibility.
How to Create It
Apply forest green as your base and let it dry completely. Using a fine-lined brush or a dotting tool, paint small gold dots or speckles randomly across the nail surface. Vary the dot sizes and spacing for a more natural, organic appearance. The randomness is actually what makes this design look contemporary and artistic rather than structured or formal. Seal with a top coat to protect the design and enhance the shine of the gold speckles.
Pro tip: Using a metallic gold polish or a shimmery gold top coat instead of solid gold creates an even more luxurious, dimensional speckle effect.
Final Thoughts
Two-tone nail designs represent the perfect intersection of simplicity and sophistication, offering modern style that doesn’t require advanced nail art skills or excessive decoration. Whether you’re drawn to bold geometric contrasts, soft gradient transitions, metallic luxe effects, or minimalist approaches, there’s a two-tone design that perfectly matches your aesthetic and lifestyle.
The beauty of these designs lies in their versatility and intentionality. Rather than throwing every color, texture, and embellishment at your nails hoping something sticks, two-tone designs ask you to make thoughtful color choices and strategic placement decisions. This restraint actually creates more impactful results—your nails look curated, intentional, and undeniably contemporary.
Experiment with these designs, mix and match techniques, and don’t hesitate to adapt them to your preferences. Your nails are a blank canvas for creative expression, and with just two colors, you can create something genuinely stunning that reflects your personal style while maintaining the sophisticated, modern aesthetic that defines contemporary nail art.
