

Three-dimensional nail art has exploded in popularity, and for good reason. It transforms your nails into miniature sculptures that catch light, add dimension, and genuinely turn heads. Unlike flat nail designs, 3D nail art creates an illusion of depth and texture that makes even simple designs feel luxe and artistic. The fascinating part? You don’t need professional experience or years of practice to create stunning 3D nails at home. With the right materials, a clear understanding of the fundamental techniques, and genuine patience, you can absolutely master this skill.
The beauty of 3D nail art for beginners is that it’s more forgiving than many people think. You’re not sculpting marble or working with materials that require perfect precision from the first attempt. Modern nail products—especially clear builder gels and 3D powders—are designed to work with your hands, not against them. This means you can experiment freely, learn from small mistakes, and progressively build more complex designs. Whether you’re creating delicate flowers, textured swirls, or dimensional patterns, the foundation is always the same: understanding how layers work, how to control your materials, and when to apply each element.
The goal of this guide is to walk you through everything you need to know to create 3D nail art that looks salon-quality, right from your first attempt. You’ll learn what separates 3D techniques from standard nail art, which materials actually matter versus which ones are optional, and the specific step-by-step process that works every single time. By the end, you’ll have the knowledge and confidence to design custom 3D nails tailored to your style.
Understanding What 3D Nail Art Actually Is
3D nail art isn’t some mysterious technique reserved for professionals. It’s simply the practice of creating raised, dimensional designs on your nails rather than painting flat patterns on a smooth surface. Think of it like the difference between a printed picture and a sculpture—one is flat, the other has depth and texture you can actually feel when you run your finger across it.
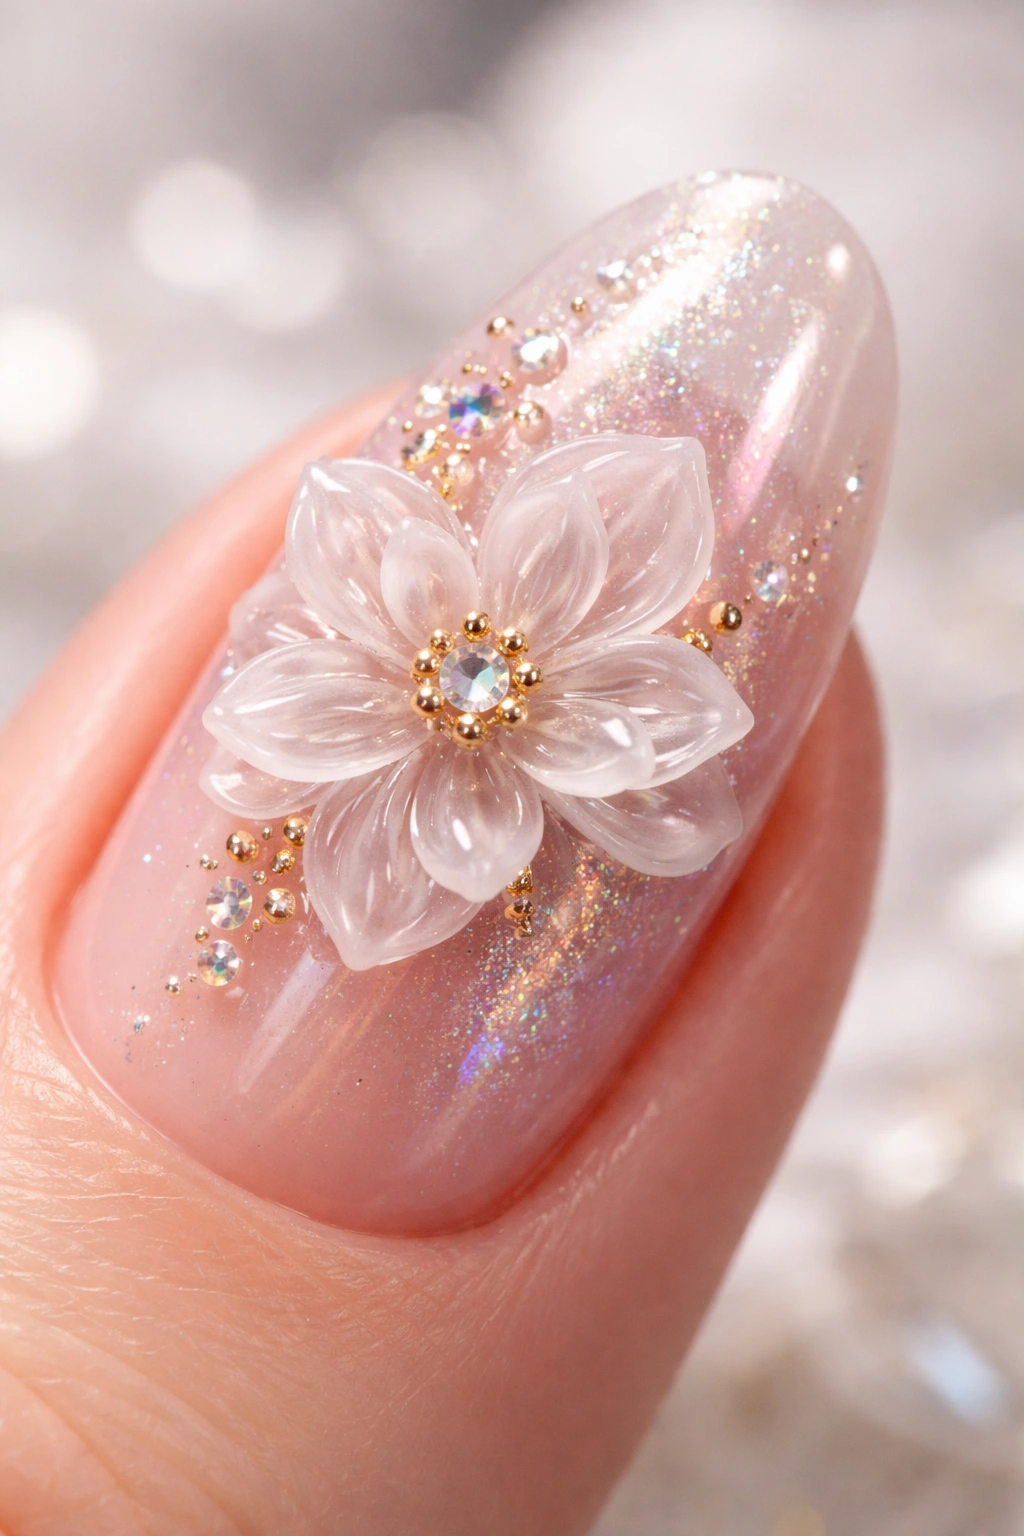
The term “3D” describes the visual and tactile result, not the technique itself. A 3D flower design has petals that literally protrude from the nail surface, casting shadows and reflecting light differently at each angle. A 3D swirl design has high points and valleys, creating shadows and highlights that make the pattern appear to move. A 3D bow has depth, with the ribbon piece sitting distinctly above the nail bed.
What makes 3D nail art particularly appealing is that it combines multiple nail art disciplines into one look. You’re sculpting (building up materials), painting (adding color and detail), embellishing (securing gems or decals), and finishing (sealing everything into place). This variety keeps the creative process fresh and prevents the design from feeling one-dimensional or boring.
The important distinction: 3D nail art uses materials that maintain their shape and height after curing, rather than materials that flatten or level out. This is why acrylic powder, builder gels, and molding gels are the go-to products—they hold structure and don’t slump or lose dimension as they dry.
Essential Tools and Materials You’ll Need
Before you create anything, you need the right supplies. The good news is that you probably don’t need as many products as you think. There’s a core set of essentials, and then there are optional items that expand your creative possibilities. Let’s break down what actually matters.
The Non-Negotiable Base Products:
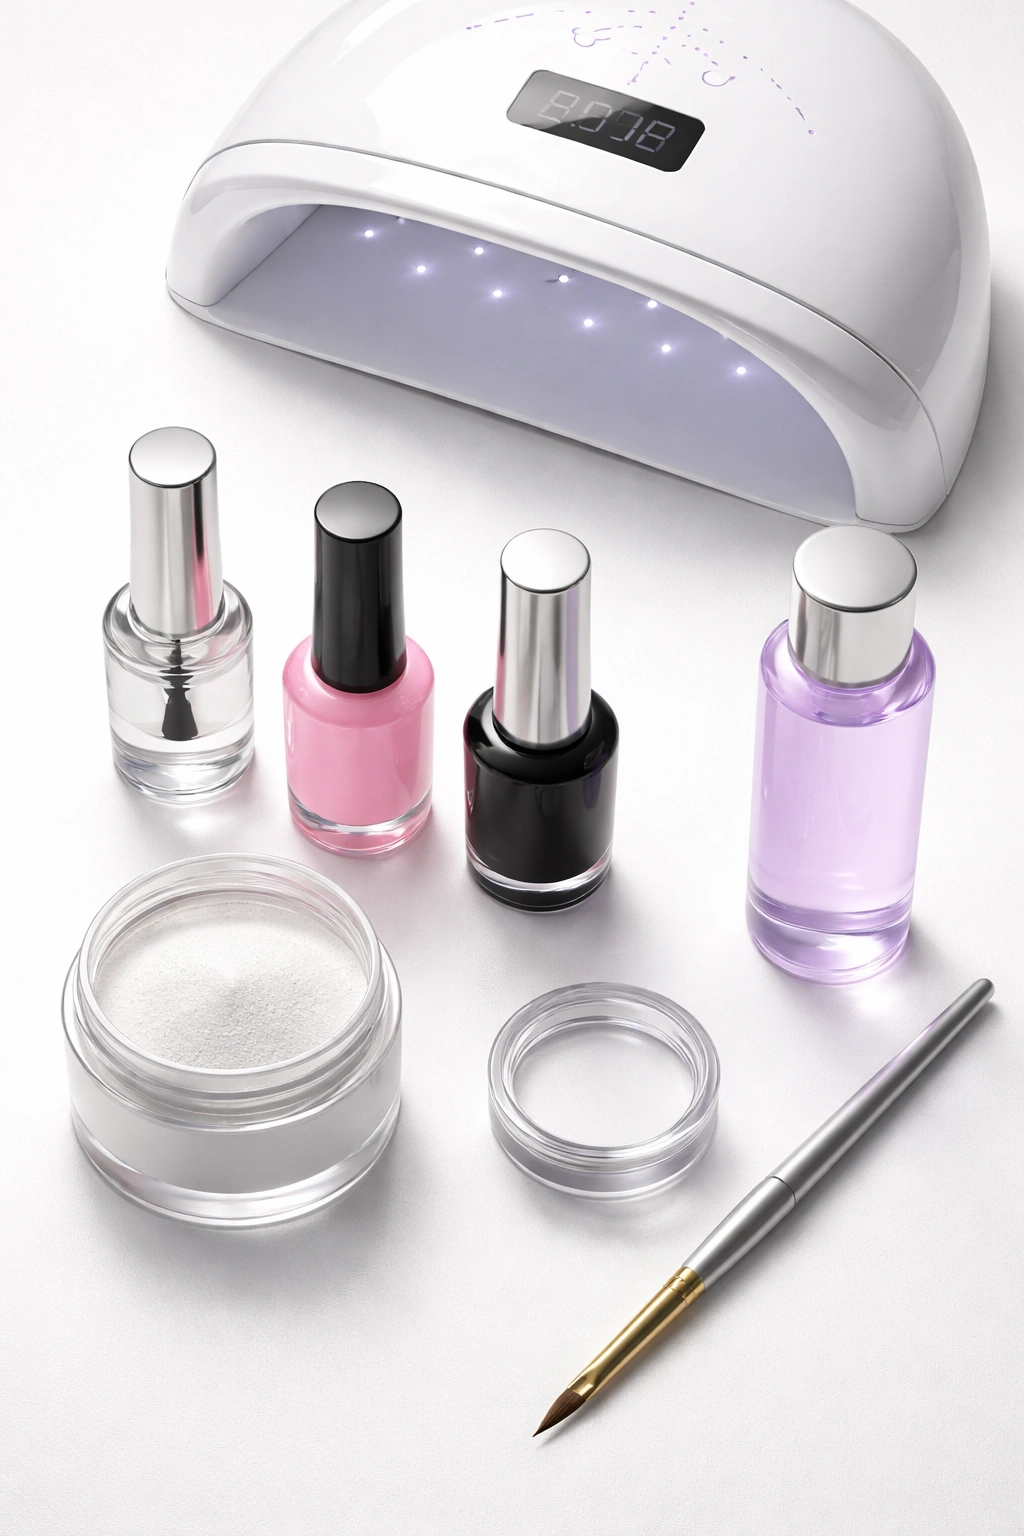
Your foundation starts with standard gel nail supplies. You need a base coat that grips the nail and prevents lifting. A gel polish in your chosen color forms the background for your 3D design—this can be any shade you love. You’ll also need a top coat to seal everything and add durability. Finally, an LED or UV lamp to cure each layer is essential; without it, your gel won’t harden and your designs will smudge or collapse.
If you’re using acrylic powder for 3D effects, you’ll need clear acrylic powder (not colored, which limits flexibility) and acrylic liquid to activate it. The liquid and powder mix to form a moldable bead that hardens quickly, making it ideal for dimensional work.
The Tools That Make Everything Easier:
A detail brush or liner brush (around 9mm or smaller) is where precision happens. This fine-tipped brush lets you paint thin lines, create deliberate shapes, and apply gel exactly where you want it. Thicker brushes spread product too broadly and make detailed work nearly impossible.
A dotting tool with a small round tip helps place tiny dots of gel, position embellishments, and create texture. A tweezers set allows you to pick up and position small 3D elements with complete control. A glitter catcher pot might sound niche, but it’s genuinely useful—it catches excess 3D powder so you don’t waste product or make a mess.
Materials for Creating Dimension:
Clear builder gel is the most versatile product for beginners. It’s thick, holds shape as it cures, and lets you paint directly onto the nail without worrying about it running or dripping. Unlike standard gel polish, builder gel has body—it sits where you place it. You can layer it to create height, cure between layers, and build complex shapes.
3D powder (sometimes called texture powder) is the secret weapon for quick dimensional effects. When you apply it to wet gel, it creates a raised texture and helps gel maintain height. The powder clings to uncured gel and creates an instant 3D effect without requiring sculpting skills.
Magic Extender Gel or molding gel is a specialized product that holds detailed shapes—perfect for creating petals, bows, or other precise 3D elements that need to maintain sharp edges. It’s thicker than standard builder gel and less likely to flatten.
Optional Embellishments:
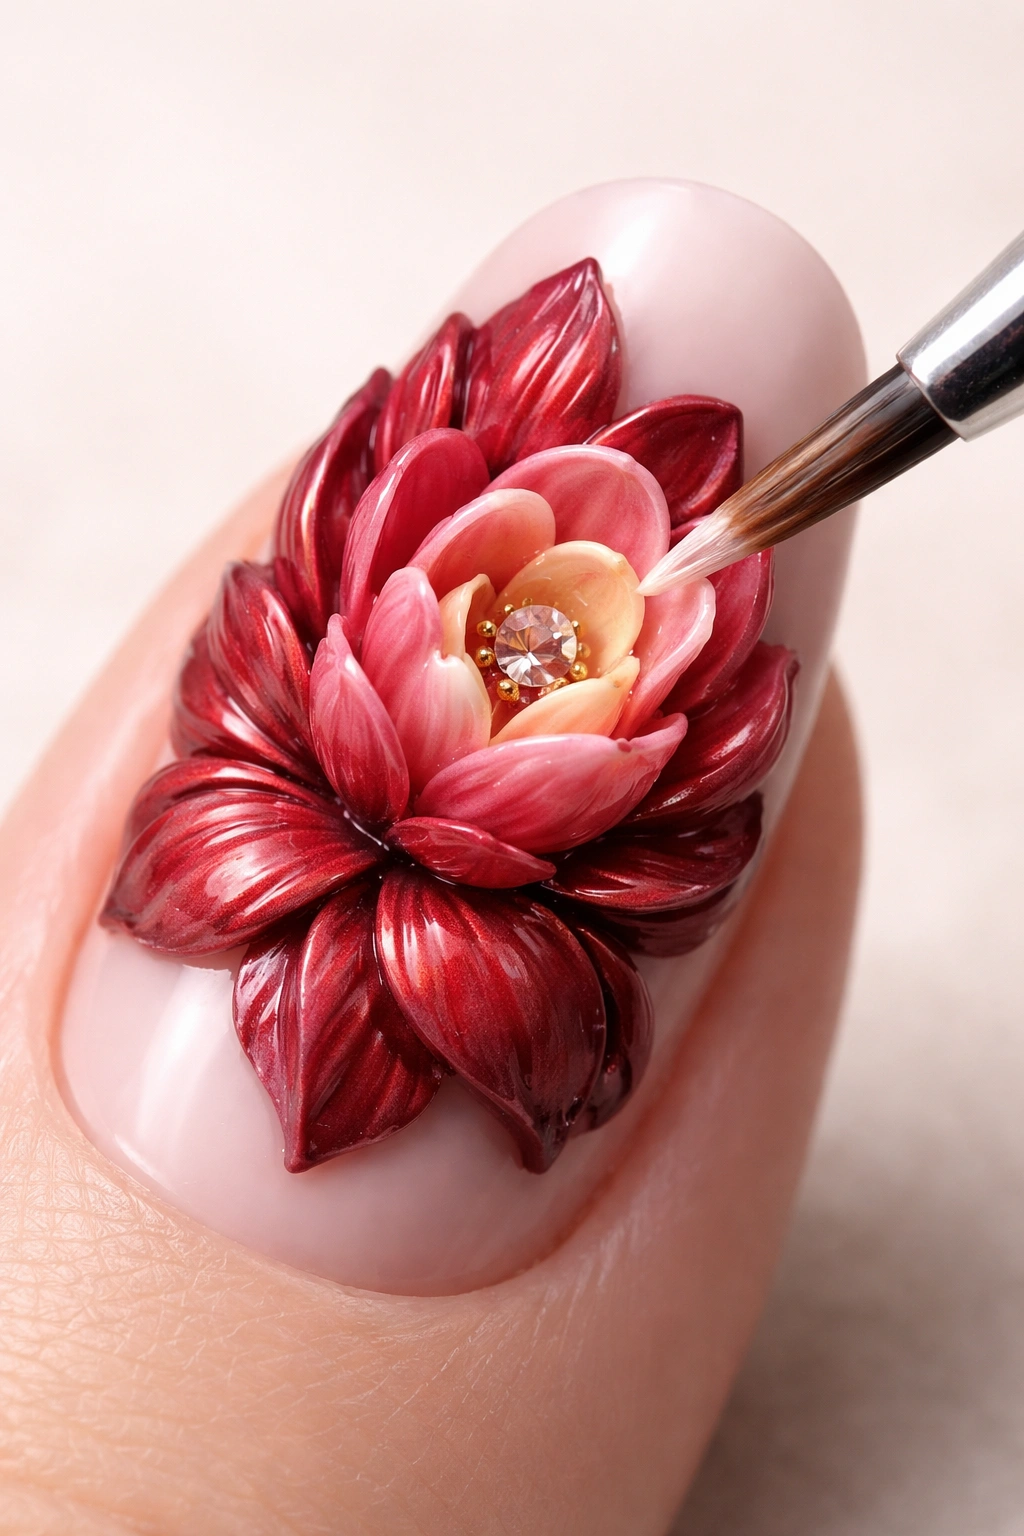
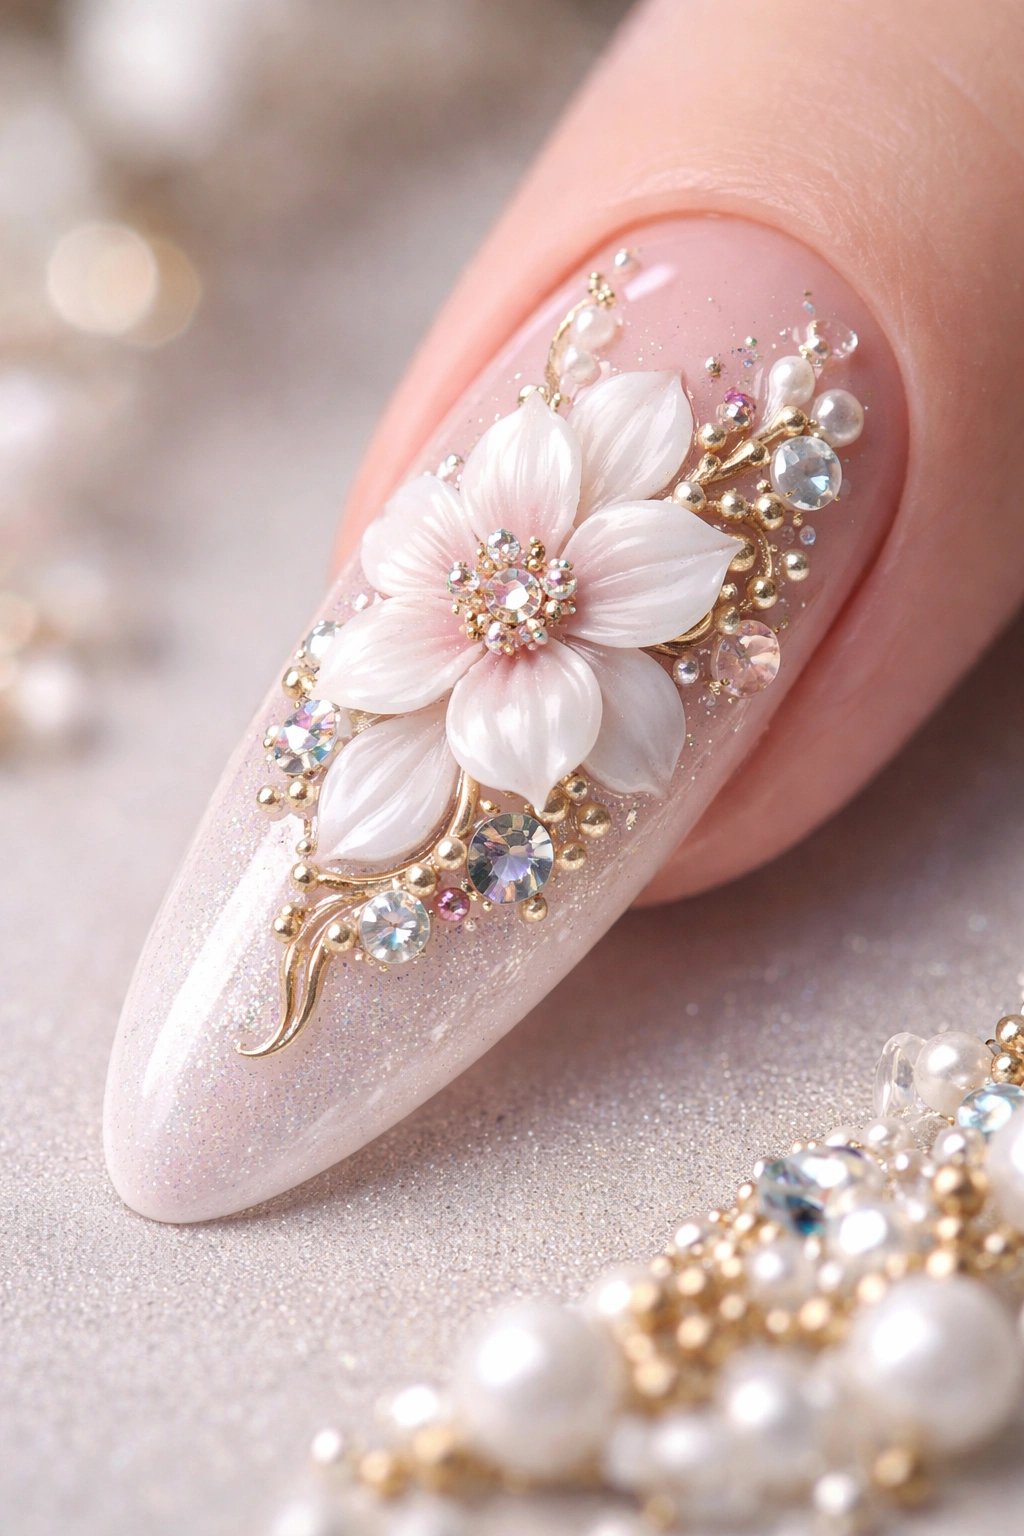
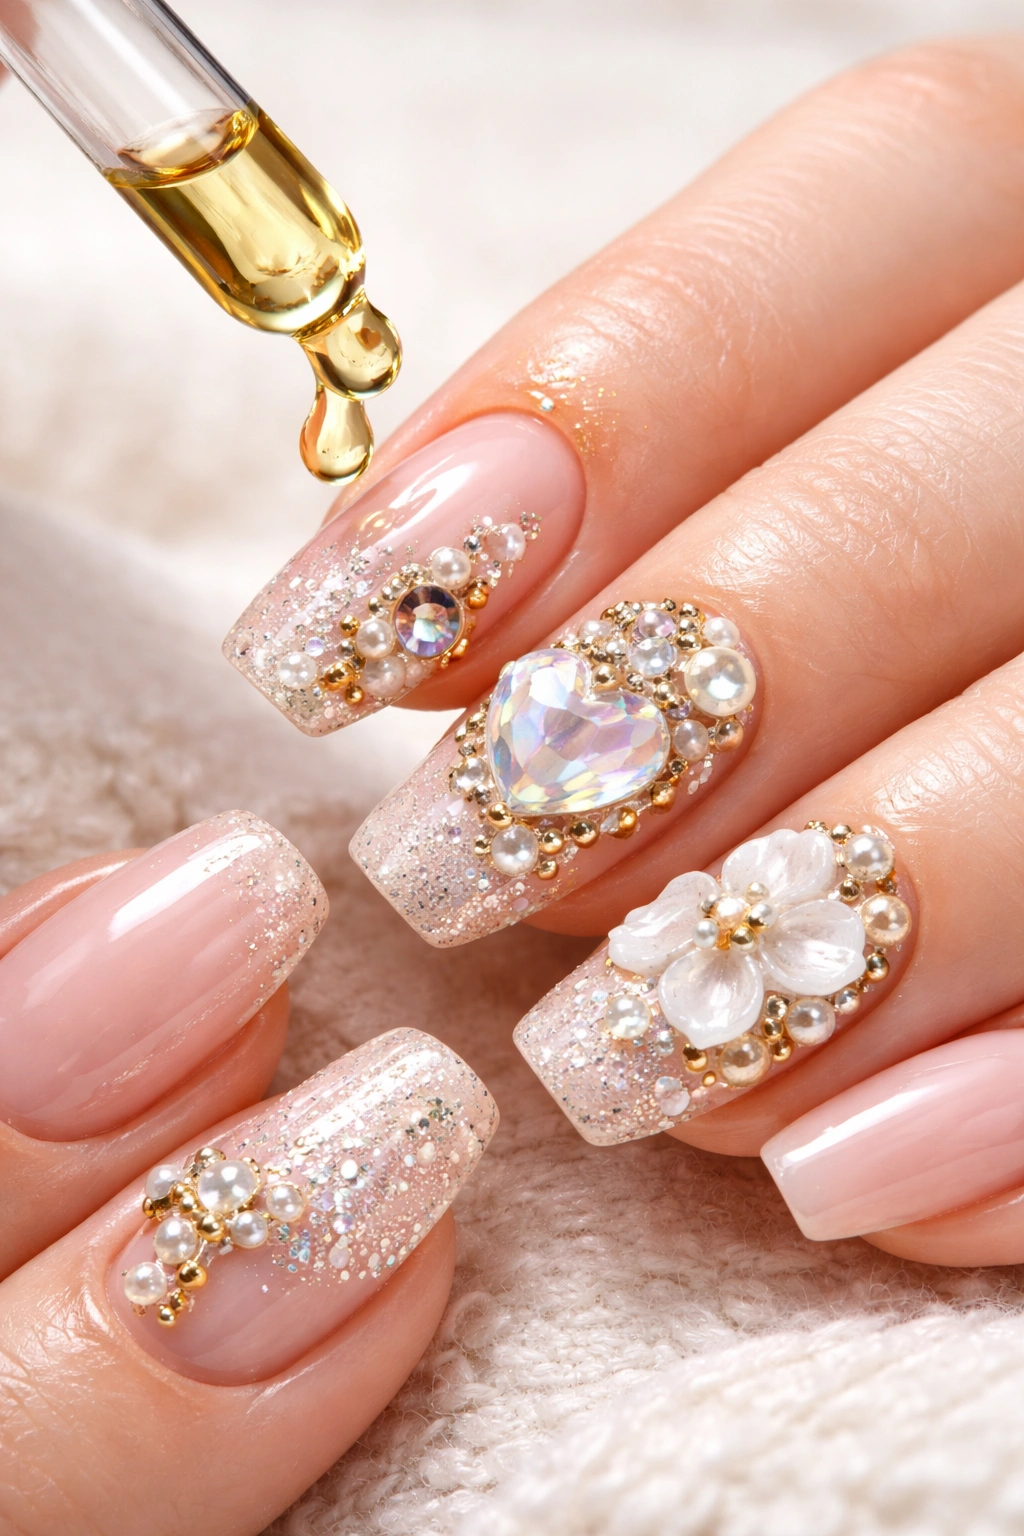
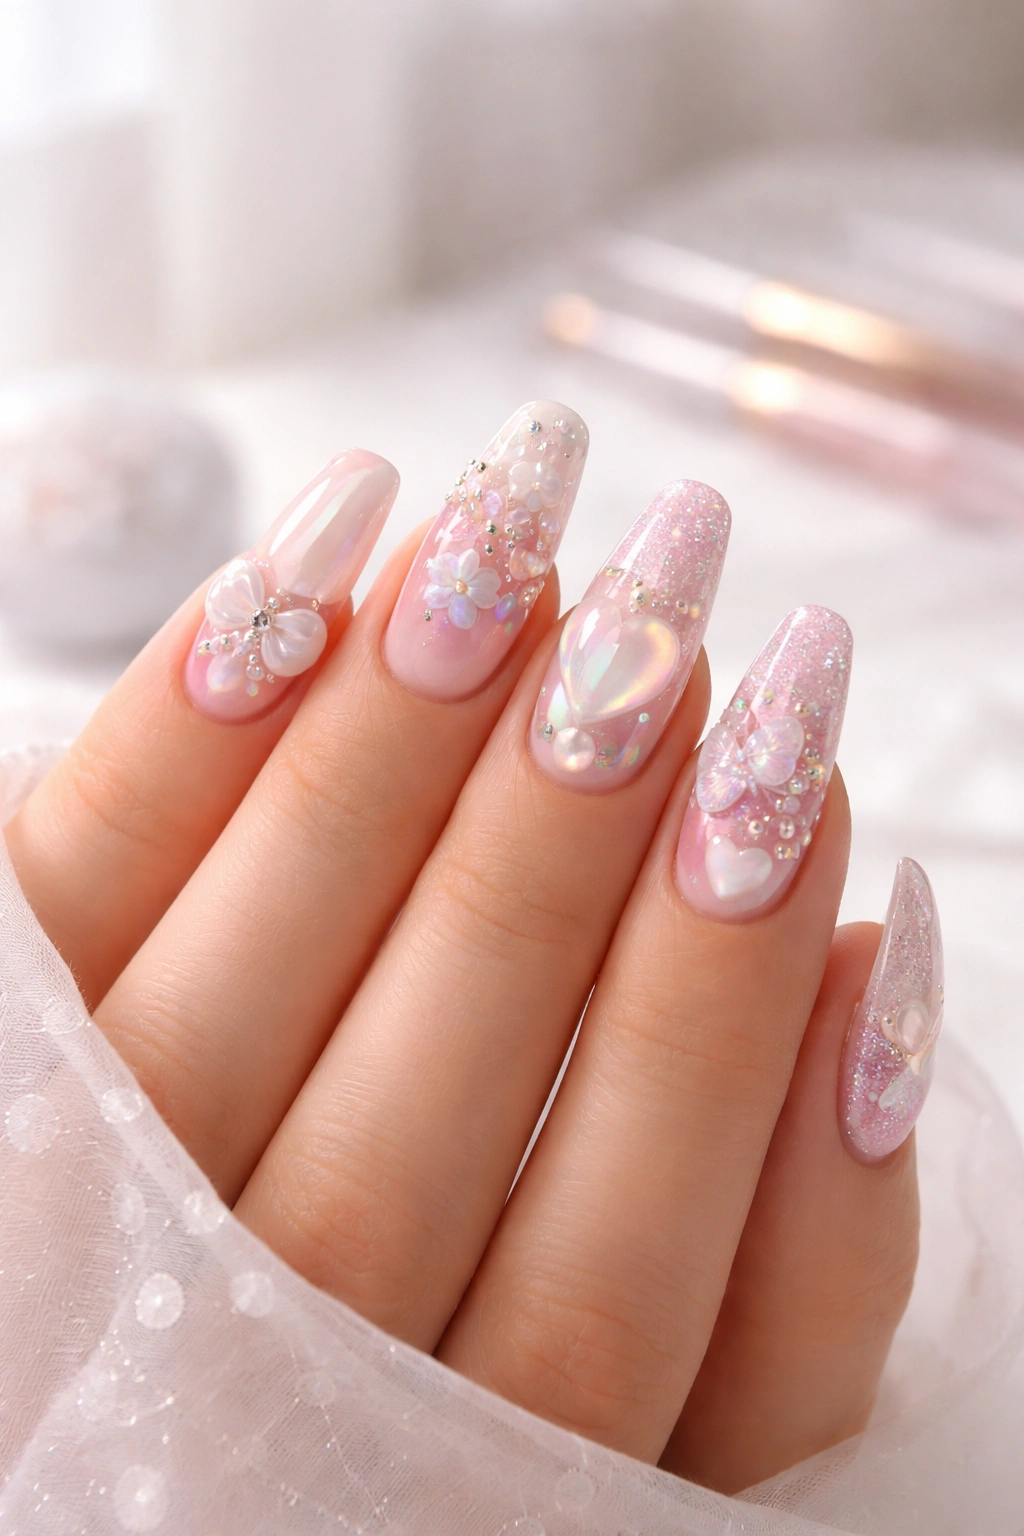
Rhinestones, studs, small beads, and flat-back gems can be attached to 3D elements for extra sparkle and visual interest. Use nail glue specifically formulated for gems, or apply a tiny bead of builder gel to secure them. Dried flowers, foils, and even holographic papers can layer into 3D designs for unique textures.
Preparing Your Nails as the Foundation
The quality of your 3D nail art depends entirely on the foundation beneath it. If your base is uneven, lifting, or improperly prepped, even the most beautiful 3D design will fail. Spend time here—this step absolutely matters.
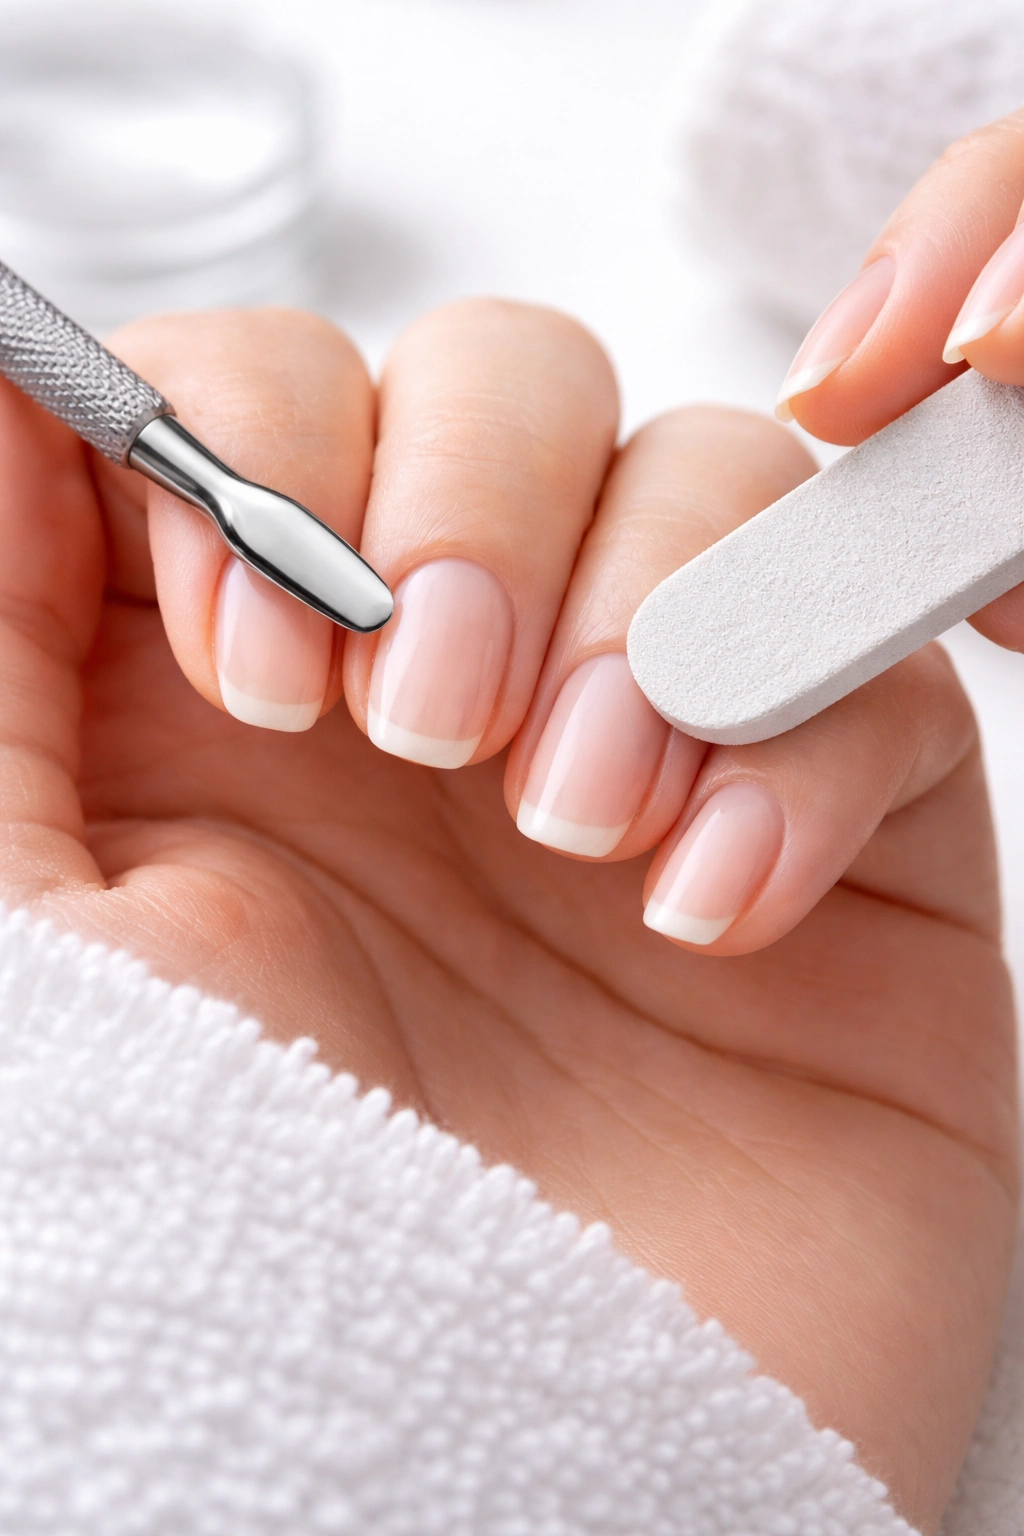
Start by removing any existing polish with an acetone-based remover. If you’re wearing acrylics or extensions, decide whether to remove them first or build 3D art directly on top. For beginners, it’s genuinely easier to work on natural nails or freshly filed tips because you have better control over the canvas size.
File your nails to your preferred shape and length. Short to medium nails (around the tip of your finger or slightly beyond) are easier to work with when learning 3D techniques. Long nails shift the balance and make it harder to control wet gel without accidentally bumping your design. Rounded, oval, or square shapes all work beautifully—choose what feels natural for your hands.
Push back your cuticles gently using a cuticle pusher, being careful not to damage the nail bed. Cuticles left up on the nail prevent base coat from adhering properly, which means your entire design can lift later. This is one of those details that feels tedious but prevents disaster.
Wash your hands thoroughly with soap and water to remove oils, dust, and any residue. This is critical—oils on the nail surface create a slippery foundation that prevents gel adhesion. Pat your hands completely dry; any moisture will interfere with base coat bonding.
Use a nail file with a fine grit to very gently texture the nail surface (a technique called “roughing up” or “scuffing”). This creates micro-scratches that gel grips onto. Don’t oversand—you’re creating texture, not removing the nail surface. Light, gentle passes across the entire nail in one direction are sufficient.
Wipe the nail with a lint-free wipe to remove any dust particles created by filing. Dust particles will create lumps in your base coat and cause adhesion problems later. This wipe-down takes 30 seconds and prevents hours of frustration.
Choosing Your First 3D Design (and Why It Matters)

Beginners often jump straight to the most complicated design they can imagine—and then struggle because the technique doesn’t match their skill level yet. Your first design choice is actually strategic. Pick something achievable that builds confidence and teaches you the fundamentals.
The Best First 3D Designs:
3D Powder Accents are genuinely the easiest entry point. Paint a simple line, swirl, or dot with gel, then shake 3D powder over it while it’s wet. The powder clings to uncured gel and creates instant dimension with minimal effort. This teaches you how powder works and builds your understanding of layering without requiring sculpting skills.
Textured Swirls involve painting free-form curved lines with builder gel, applying powder, curing, and watching them transform into dimensional designs. There’s no “perfect” shape—abstract swirls look intentional and artistic even if your lines aren’t perfectly even.
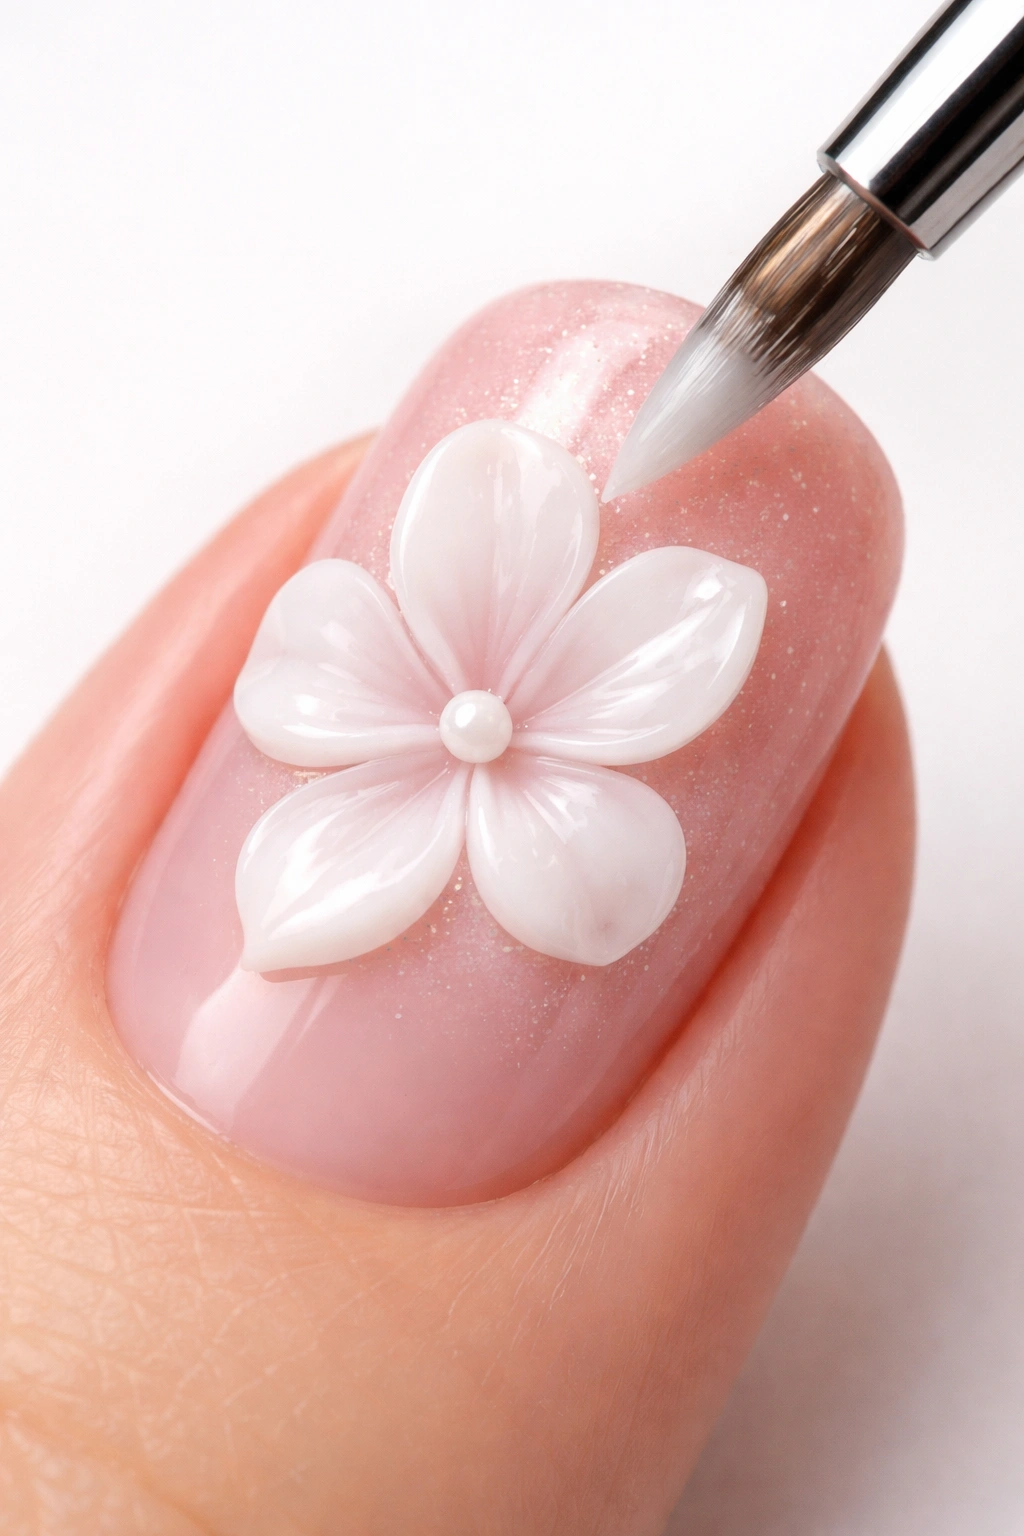
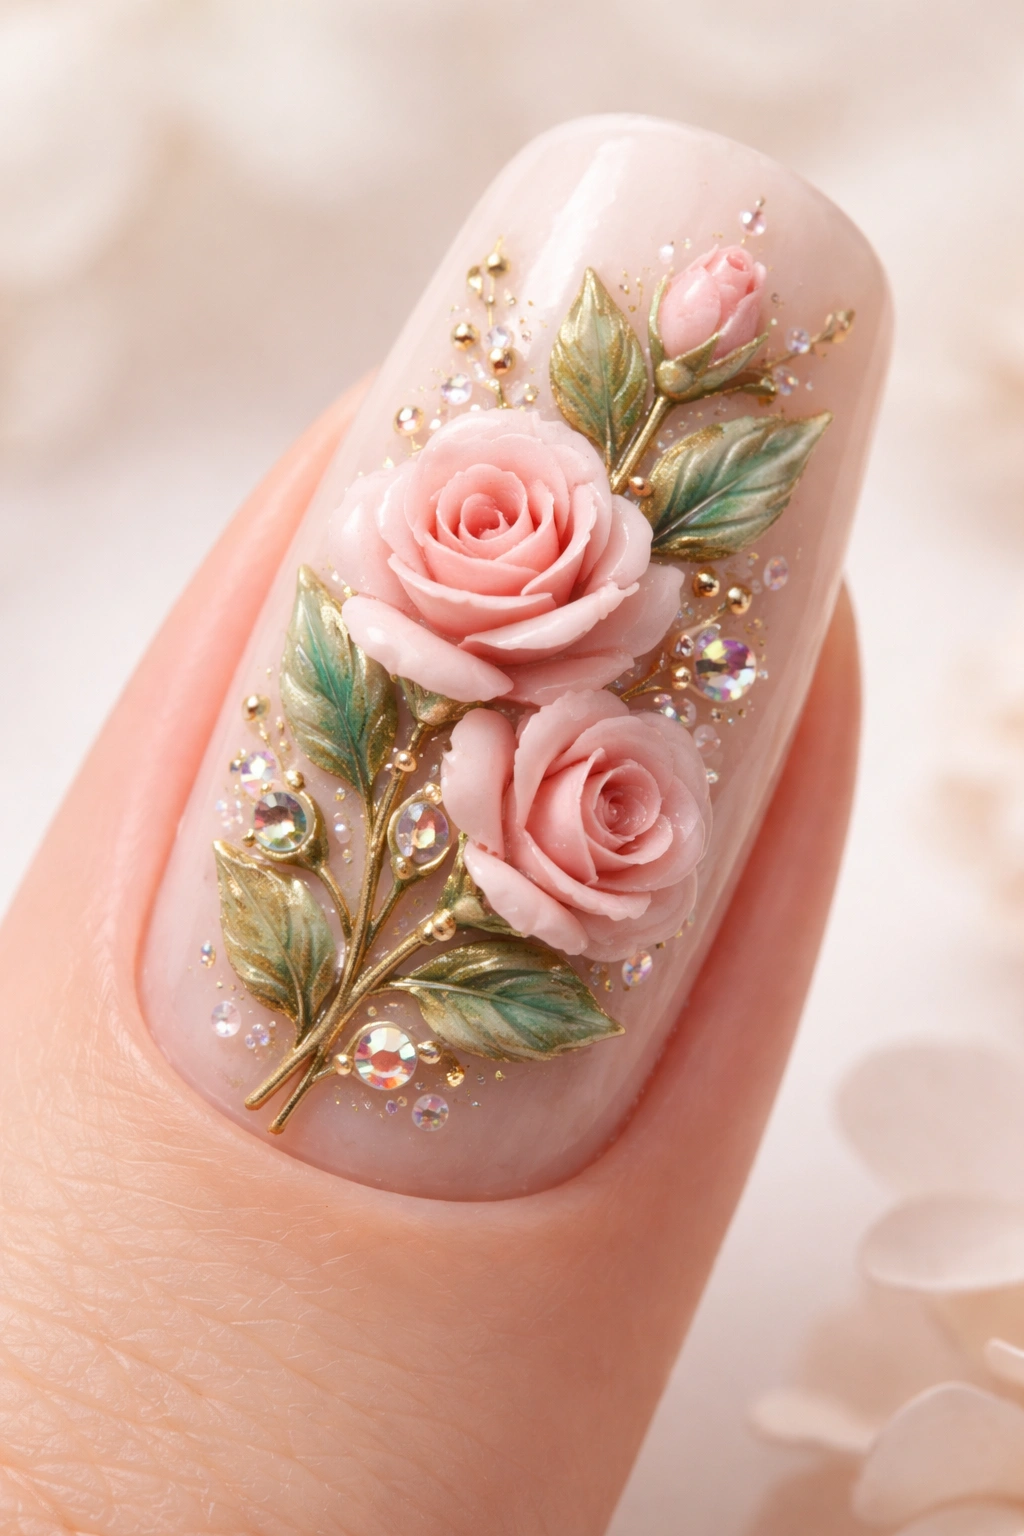
Single 3D Flowers using builder gel are more involved but absolutely doable. You’ll paint petal shapes with a detail brush, apply powder to each petal, cure, then add color and detail on top. This teaches you petal placement, how gel holds shape, and how to add dimension layer by layer.
What to Avoid as a Beginner:
Don’t start with designs requiring hand-sculpted acrylic beads shaped into precise roses or intricate lace patterns. These require understanding how acrylic powder and liquid interact, how long to let them dry before shaping, and precise hand control. You’ll get frustrated and potentially waste materials.
Avoid designs with numerous tiny details all requiring perfect placement. A design with 15 different colored gems, beads, and embellishments is overwhelming when you’re learning to manage curing times and layer placement.
Don’t pick designs that require extensive freehand sculpting of 3D elements before applying them to the nail. This adds complexity that’s easier to tackle after you’ve mastered basic dimensional techniques.
Why Design Choice Matters:
Choosing an appropriate first design doesn’t limit your creativity—it builds your foundation. Once you understand how powder works, how builder gel behaves, how long each layer takes to cure, and how colors layer over raised elements, you can tackle any design you imagine. You’re not limiting yourself; you’re setting yourself up for success.
Creating Dimension with 3D Powder
3D powder is the gateway technique into dimensional nail art, and it’s genuinely simpler than it sounds. This method creates beautiful, dimensional effects without requiring advanced sculpting skills.
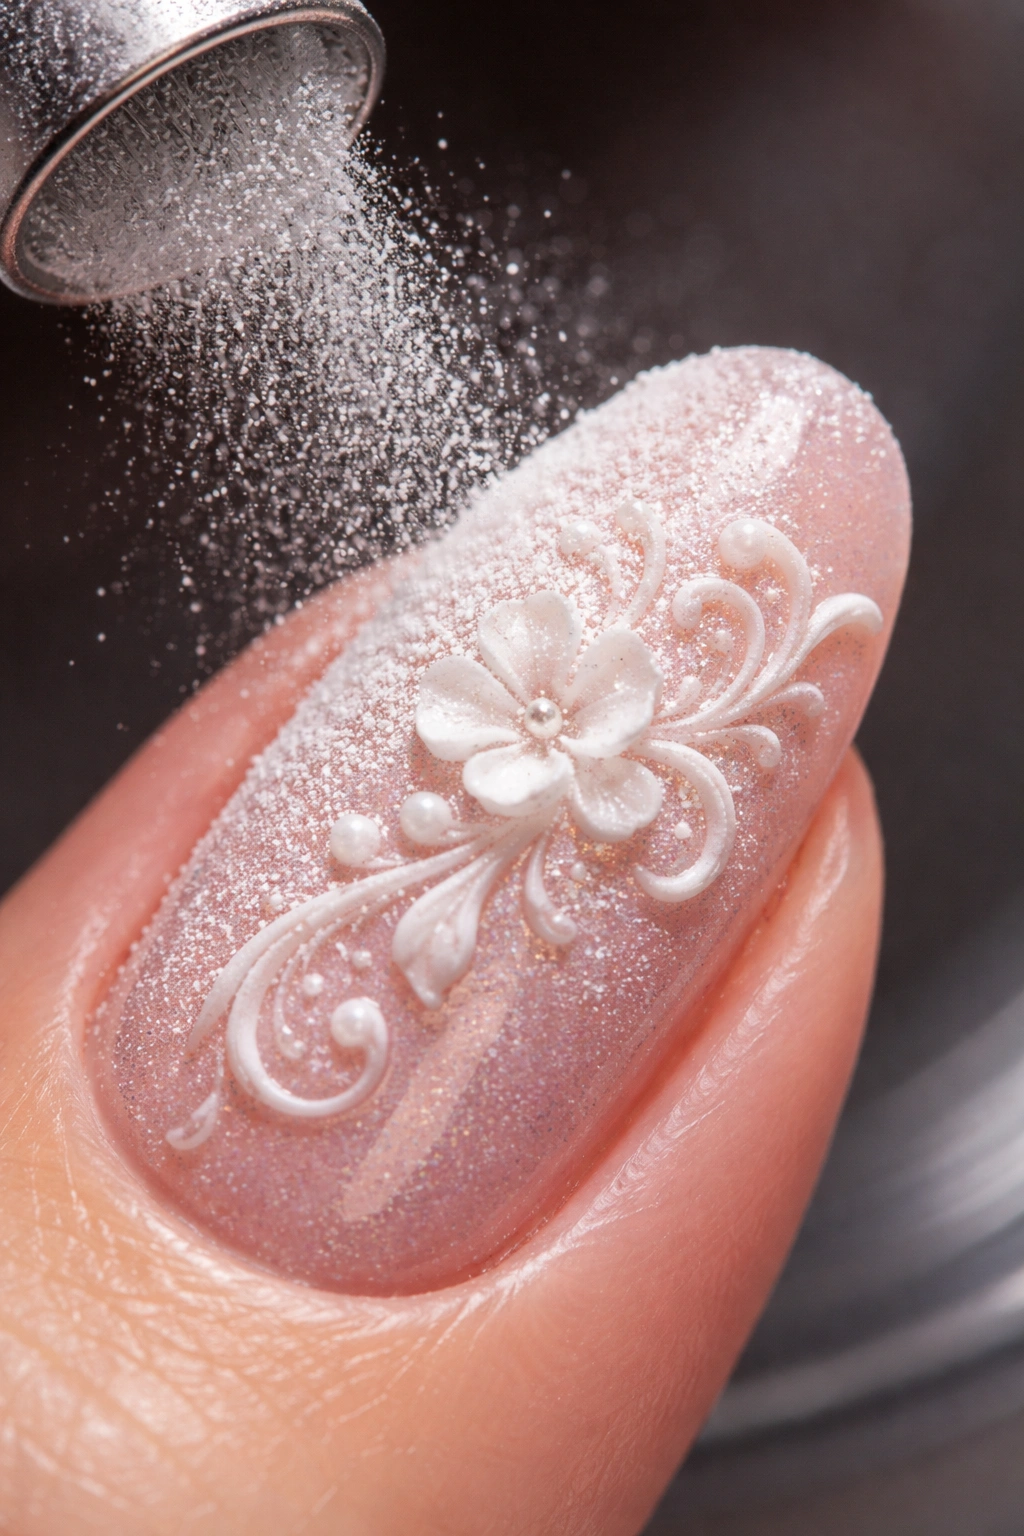
Here’s how it works: You apply wet gel to your nail in whatever shape or pattern you want. While that gel is still uncured and sticky, you shake 3D powder over it. The fine particles cling to the wet gel, creating a raised, textured surface. When you cure the gel under your lamp, the powder sets in place and becomes part of the hardened design.
The Step-by-Step Process:
After your base coat and color are cured, apply a matte or glossy top coat and cure it. This creates a surface that the gel for your 3D design will grip onto. The top coat is essential—without it, your dimensional gel can sink into the base color and lose definition.
Dip your detail brush into gel (ideally a clear or nude builder gel, though any gel works). Paint your design directly onto the cured top coat. This might be a thin line, a swirl, a flower petal, a geometric shape, or whatever pattern you’ve chosen. Don’t overthink this—gel is forgiving, and slight imperfections become part of the texture.
Immediately—and this timing matters—hold your nail over a glitter catcher pot and shake 3D powder over the wet gel. Use a gentle shake, not aggressive, or powder scatters everywhere. The particles instantly cling to uncured gel. Tap gently to remove excess powder that isn’t sticking.
Cure the layer in your LED lamp according to the manufacturer’s time (usually 30-60 seconds). The powder hardens with the gel, becoming a permanent part of the design.
Gently wipe away excess powder using a lint-free wipe or brush. You’ll notice the design now has visible height and texture—that’s the 3D effect working.
If you want more dimension, repeat the process: apply more gel in a second layer, apply powder, cure again. Layering builds height and complexity. Many dimensional designs have 2-3 layers of gel and powder, each adding thickness.
Pro Tip for Powder Success:
The powder only sticks to uncured gel. Once you cure a layer, the surface becomes slick, and powder won’t adhere properly. This is why timing matters—apply powder immediately after painting gel, before the gel has any chance to set. If you miss the window, wait for the layer to fully cure, then paint another layer of gel on top and apply powder to that.
Building 3D Elements with Acrylic or Builder Gel
If powder creates instant dimension, sculpting with acrylic or builder gel creates intentional, detailed 3D shapes. This method requires more finesse but gives you complete control over the final form.
The Acrylic Bead Method:
Traditional 3D nail art uses a wet bead technique with acrylic powder and liquid. Dip your brush into acrylic liquid first, then into acrylic powder. The two combine on the brush, creating a moldable ball. Place this bead on the nail or a non-stick surface (foil or a silicone pad work well) and shape it using your brush.
The timing here is crucial. The bead needs to dry just enough to hold a shape, but still be wet enough to mold. This is usually 20-40 seconds after placement, depending on humidity and room temperature. If you shape it too early, the bead stays too wet and collapses. If you wait too long, it hardens completely and resists reshaping.
To shape a petal, press the brush gently into the bead and drag it to create a tapered point at one end and a rounded, thicker end at the other. The petal should look like a half-moon with a slight curve. Repeat this process for as many petals as your design needs, keeping petals close together so they’re easy to transfer to the nail once dry.
The Builder Gel Method (Easier for Beginners):
Builder gel simplifies the process because it cures under your lamp rather than air-drying. Paint builder gel onto your nail in the shape you want, cure it, then paint another layer on top and cure again. This creates height through layering rather than sculpting.
For a 3D flower petal using builder gel: paint a petal shape with your detail brush, cure, paint another petal in the same spot (slightly offset), cure, continue layering until you have the dimension you want. Each layer adds height and definition.
The advantage is predictability—you see exactly what you’re building at each stage. The disadvantage is that it requires more curing time and takes slightly longer overall.
Creating Recognizable Shapes:
Whether using acrylic beads or builder gel, practice sculpting basic forms before attempting complex designs. Start with simple oval shapes, then progress to petals by tapering one end. Master petals before attempting intricate rose formations.
If creating a 3D flower, make and position petals one at a time rather than all at once. This prevents the structure from collapsing while you work. Apply a tiny amount of wet acrylic or gel between petals to act as an adhesive, securing each piece to the previous one.
For 3D bows, create two identical oval shapes first, then bend each in half to form the “bow ends.” The central dot connects them, and a rectangular piece layered on top completes the structure. Bows look impressive but follow a very logical, simple shape sequence.
Adding Color and Detail to Your 3D Designs
Once you’ve created dimensional structure, color and detail transform raw texture into recognizable, beautiful designs.
Painting Over Raised Elements:
This is where the magic happens. Use a detail brush and gel polish in your chosen color to paint over the 3D shapes you’ve created. The color adheres to the raised surfaces but settles into the valleys and shadows, creating depth and contrast automatically.
When painting a 3D flower, apply color to the petals while leaving the very center slightly lighter or a different shade. This creates visual separation between petals and makes the flower feel more three-dimensional. You don’t need perfect technique here—slight imperfection and color variation actually enhance the dimensional effect.
For more complex designs, use multiple colors in a single element. A 3D rose might have darker red on the outer petals, medium red in the middle, and a lighter shade toward the center. This color progression creates the illusion of form and shadow, making the flower appear even more realistic.
Adding Fine Details:
Use a very fine detail brush or liner brush to add details like flower stamens, leaf veins, or highlights. These thin lines go on top of the dried color and should be a contrasting shade. A bright yellow stamen on a white flower creates visual pop. Fine green lines on a petal suggest texture.
Let each color cure before applying the next to prevent colors from bleeding together or smudging. This means a 3D flower with multiple colors might require 4-5 short curing cycles, but the result is cleaner and more polished.
Perfecting the Top Coat and Seal

The final top coat determines how durable your 3D art will be and whether it maintains its dimensional appearance or gets flattened by a standard glossy finish.
Choosing the Right Top Coat:
Matte top coats emphasize texture and dimension by avoiding reflective shine. They’re ideal for 3D designs because they make raised elements more visually prominent. The lack of shine also means dust and small imperfections are less noticeable.
Glossy or shiny top coats add a polished, professional appearance but can slightly minimize the appearance of dimension by reflecting light uniformly. They’re perfectly fine—it’s a style choice more than a technical issue.
No-wipe top coats don’t leave sticky residue after curing, so you skip the wiping step and go straight from curing to finished nails. Wipe top coats leave a tacky layer that you remove with a lint-free wipe, which actually feels slightly smoother on the nail.
Application Technique for 3D Art:
Apply top coat carefully around raised elements rather than heavily over them. You want a protective layer without filling in the valleys and shadows of your 3D design. Use a light hand and minimal product.
Some nail artists apply top coat only to the nail bed and flat areas, avoiding the raised 3D elements entirely. This keeps the three-dimensional effect most prominent. You can do this if you’re confident, or apply a thin coat overall if you prefer maximum protection.
The Final Cure:
Cure the top coat fully—this is your final protective layer, so don’t rush it. The full cure time (usually 60 seconds under LED) ensures everything hardens completely and your design won’t smudge or lift unexpectedly.
Common Beginner Mistakes (and How to Avoid Them)
Learning happens through mistakes, but you can avoid the most common pitfalls that trip up beginners.
Rushing the Drying Process:
This is mistake number one. Each layer absolutely must cure fully before you apply the next layer or add embellishments. If you rush, layers don’t bond properly, wet gel smudges into previous layers, and your design collapses. The few extra seconds of curing time prevent hours of rework.
Partial curing is actually worse than not curing at all, because the layer becomes sticky and tacky rather than hard, and subsequent layers slip around on it. Set a timer if you’re impatient. The cure time recommended by your product manufacturer is the minimum—not a suggestion.
Using Too Much Product:
More gel doesn’t equal better results. Excess gel spreads, bleeds into adjacent colors, and creates messy edges. Use just enough product to achieve your shape, then stop. With practice, you’ll develop intuition about the right amount.
3D powder is the same—a light shake creates beautiful texture. Aggressive shaking wastes powder and creates clumpy, uneven results. Gentle, measured application is better every single time.
Inconsistent Curing Setup:
If your lamp is old, dimming, or not producing full UV/LED strength, gels cure incompletely and remain sticky or soft. If your cures feel unreliable, consider a new lamp. A budget-friendly LED lamp (around $30-50) is often more reliable than an old UV lamp or a dimming LED.
Place your nails flat in the lamp, not at an angle. Angled placement means some parts cure while others don’t. Consistency in placement ensures consistent curing.
Not Prepping the Nail Surface Properly:
Skipping the cuticle push, oil removal, or surface texture creates adhesion problems that become apparent in 24-48 hours as designs lift or peel. These prep steps feel tedious because they are—but they’re non-negotiable. No prep = failed designs, every time.
Overcomplicating the First Design:
Beginners often attempt roses, lace patterns, or designs with 12 different colors when they should start with powder accents or simple swirls. Start simple, build confidence, then tackle complexity. Every professional nail artist began with basic designs.
Not Protecting Embellishments:
If you apply gems or beads to the design, they absolutely need to be sealed under top coat, or they’ll pop off the moment your nail touches something. Always cure a layer of gel over any embellishment, then apply final top coat on top of that.
Ignoring Humidity and Temperature:
If your workspace is very humid, acrylic beads and gels dry slower and may not set properly. Very dry air makes everything cure faster, which can mean you miss the window for shaping. Room temperature around 70-72°F (21-22°C) is ideal. If your room is much warmer or colder, your timing will be off.
Styling and Caring for Your 3D Nails
Once your 3D art is complete, it deserves proper care to maintain its appearance and longevity.
The First 24 Hours Matter:
Avoid submerging your hands in water for the first 24 hours after completing your design. This allows the gel to fully harden and settle. Washing dishes, doing laundry, or taking a long bath can cause designs to lift or become compromised if you’re right at the edge of curing completion.
After 24 hours, your 3D nails are fully cured and durable. Normal activities won’t damage them, but avoid using your nails as tools. Don’t pry open boxes, scratch off labels, or use your nails to pick things up. This isn’t specific to 3D art—it applies to any gel manicure—but dimensional designs feel more fragile even when they’re not.
Moisturizing and Maintenance:
Use cuticle oil or hand lotion regularly to keep the skin around your nails moisturized. This prevents cracking and peeling that can eventually lead to nail damage. Gel manicures can dry out surrounding skin, so intentional moisturizing makes a real difference.
If a small chip or imperfection appears after a week or two, you can fix it by filing smooth and applying a touch-up layer of gel and top coat just to that area. A full redesign isn’t necessary for minor damage.
Removal Without Damage:
When you’re ready to remove your 3D nails, use acetone-based gel remover (not acetone straight, which is too harsh). Soak your nails in remover for 15-20 minutes, then gently scrape away the softened gel using a wooden stick or plastic scraper—never metal, which damages the nail.
After removal, your nails will feel weak and soft. Give them at least 2-3 weeks of break time before applying gel again. Use strengthening treatments and moisturizing products during this break. Your nails will recover fully and be ready for the next design.
Next Steps: Moving Beyond Basic 3D Designs
Once you’ve successfully created simple 3D designs and have the fundamentals down, the natural progression is tackling more complex creations.
Sculpting Acrylic Flowers and Roses:
Roses are the classic next step after basic flowers. They require layering multiple petals at progressively smaller sizes, creating a spiral or bloom effect. Your understanding of petal shape and curing will serve you perfectly here—roses just apply those skills repeatedly with more precision.
The key to realistic roses is understanding how petals curve and overlap in nature. Outer petals are larger and more open. Inner petals are smaller and more tightly curved. The very center is sometimes a tight spiral rather than distinct petals. Watch detailed tutorials and reference photos, then practice shaping petals until they feel natural.
Combining Multiple 3D Elements:
Instead of a single flower, create designs with multiple flowers, stems, and leaves. This teaches you spatial planning and balance. How do you arrange elements so they complement rather than compete? What colors work together? How do you create cohesion across the entire nail?
Incorporating Advanced Embellishments:
Chains, wires, and larger 3D-printed elements can layer into designs. These require stronger bonding methods (acrylic or builder gel rather than simple glue) and understanding how different materials interact with gel products.
Experimenting with Color Combinations:
Once you’re comfortable with shapes and structures, push yourself with unexpected color combinations. Pastels with metallics. Neon with neutrals. Gradient colors across petals. Color choice dramatically changes the mood and sophistication of a design.
Building Speed and Efficiency:
Professional nail technicians create stunning 3D designs quickly because they’ve practiced enough to move intuitively. They know exactly how much gel to use, precisely how long to cure, and which shortcuts maintain quality while saving time. This speed comes naturally through repetition—not by rushing or cutting corners.
Final Thoughts
3D nail art is genuinely accessible to beginners, and that’s the most important takeaway. You don’t need years of training, expensive equipment, or inherent artistic talent. You need the right materials, clear understanding of basic techniques, genuine patience with the learning process, and willingness to practice.
Your first 3D designs might not be flawless. The petals might be slightly uneven, the colors might not blend perfectly, the proportions might feel slightly off. That’s completely normal and is exactly how every nail artist started. Those early imperfections are practice—they’re teaching your hands what works, what doesn’t, and how to improve.
The confidence that comes from creating something beautiful with your own hands is genuinely remarkable. You’ll take your finished nails and catch yourself looking at them constantly. Every time you use your hands, you’ll notice the dimension, the color, the intricate details you created. And you’ll look forward to your next design because now you know exactly how to make it happen.
Start with something simple—a powder accent or a basic flower. Master that design completely, then move to something slightly more complex. Build your skills incrementally rather than jumping to advanced designs. This measured approach might feel slow, but it actually gets you to impressive results faster than attempting everything at once and getting frustrated.
Most importantly: Have fun with this. Nail art is supposed to be enjoyable creative expression, not stressful perfectionism. If a design isn’t working, you can remove it and start over. If your powder application was uneven, that becomes texture and character. If your color didn’t blend perfectly, that adds dimension and interest. Embrace the imperfections as part of the artistic process.
Your 3D nail art journey starts with a single design. Make that first one count by choosing something achievable, preparing properly, and giving yourself permission to learn. Everything else—the roses, the complex layering, the advanced techniques—naturally follows from that foundation.
