

Red stiletto nails are the ultimate statement of confidence and elegance. There’s something undeniably powerful about walking into a room with sharp, crimson-tipped nails that catch the light with every gesture — they’re bold without trying too hard, and they work whether you’re dressed up for an event or elevating your everyday look. The beauty of red stiletto nails is that they don’t require intricate artwork or hours at the salon to look absolutely stunning. Some of the most striking designs are refreshingly simple, relying on clean lines, subtle textures, or clever negative space rather than elaborate embellishments.
The challenge most people face is finding red stiletto nail designs that feel fresh and personal without being overly complicated. You want something that feels elegant and intentional, not like you’re just copying a photo from a stranger’s Pinterest board. That’s exactly where this collection comes in — these are 20 real, achievable red stiletto nail designs that range from minimalist and modern to subtly glamorous, each one chosen specifically because it works beautifully on the stiletto shape and doesn’t require artistic mastery to execute.
Whether you’re planning a manicure appointment and want to show your nail technician exactly what you’re envisioning, or you’re doing your own nails at home and need clear inspiration that won’t intimidate you, these ideas break down into straightforward approaches. Most of these designs use techniques you can actually master with a steady hand, a thin brush, and a little patience — no advanced nail art skills required. Let’s explore twenty beautiful red stiletto nail designs that prove simplicity can be absolutely spectacular.
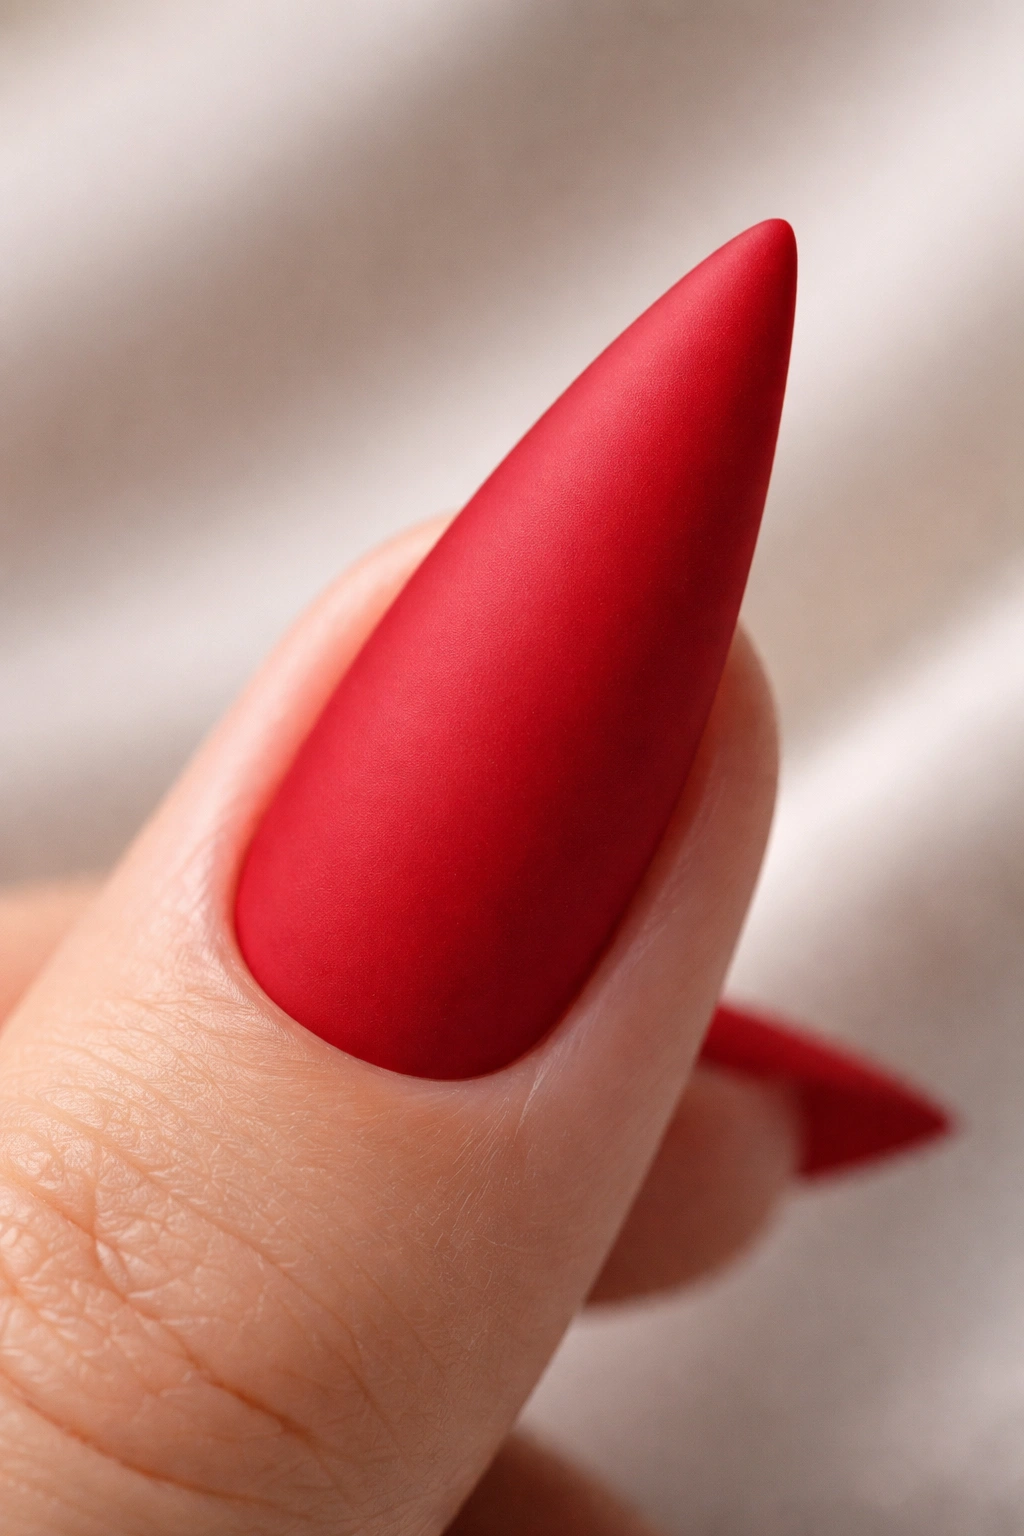
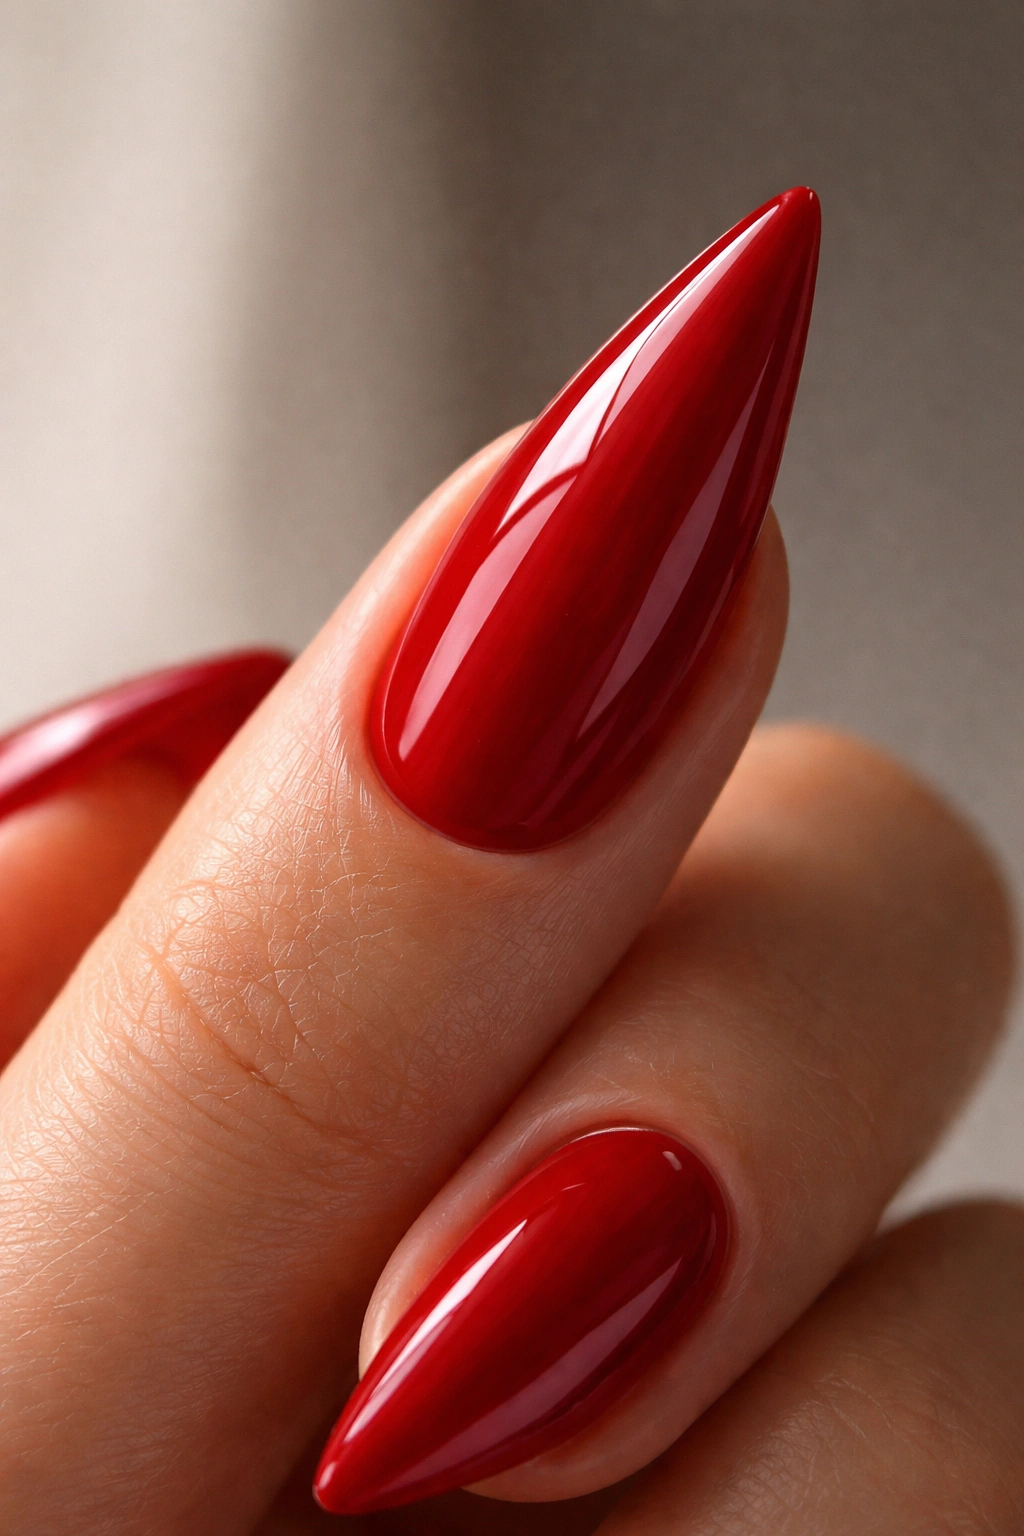
1. Classic Glossy Red
There’s a reason this is the gold standard for a reason — a high-shine, perfectly opaque red is timeless in a way that almost nothing else is. This isn’t boring; it’s the nail equivalent of a white button-up shirt or a tailored blazer. The key to making this work on stilettos is ensuring the red is deep and rich enough to feel intentional rather than thin or washed out.
Why It’s Eternally Elegant
A glossy red stiletto nail catches light beautifully because of the nail’s length and angle. When you apply a quality red with good pigmentation and finish it with a thick, reflective topcoat, the shine amplifies across the curved surface of the nail. This creates depth and dimension without any additional design work. The glossy finish also makes your nails look healthier and more polished than a matte alternative.
Application Tips for Maximum Impact
- Use a creamy red formula rather than a thin, translucent one — you want full opacity in just two coats
- Apply a base coat first to prevent staining and improve longevity
- Use a top-quality topcoat with a thick, glossy finish rather than a thin, watery one — this is what creates the “glass” effect
- Seal the edges under the tip of the stiletto nail for extra protection and a finished look
- If your red chips easily, it might be too thin — switch to a formula with better coverage
Pro tip: A classic red looks even more elevated when your nail beds are healthy and your cuticles are perfectly groomed. The simpler the design, the more any imperfections in prep work will show.
2. Glossy Red with Matte Red Tip Ombre
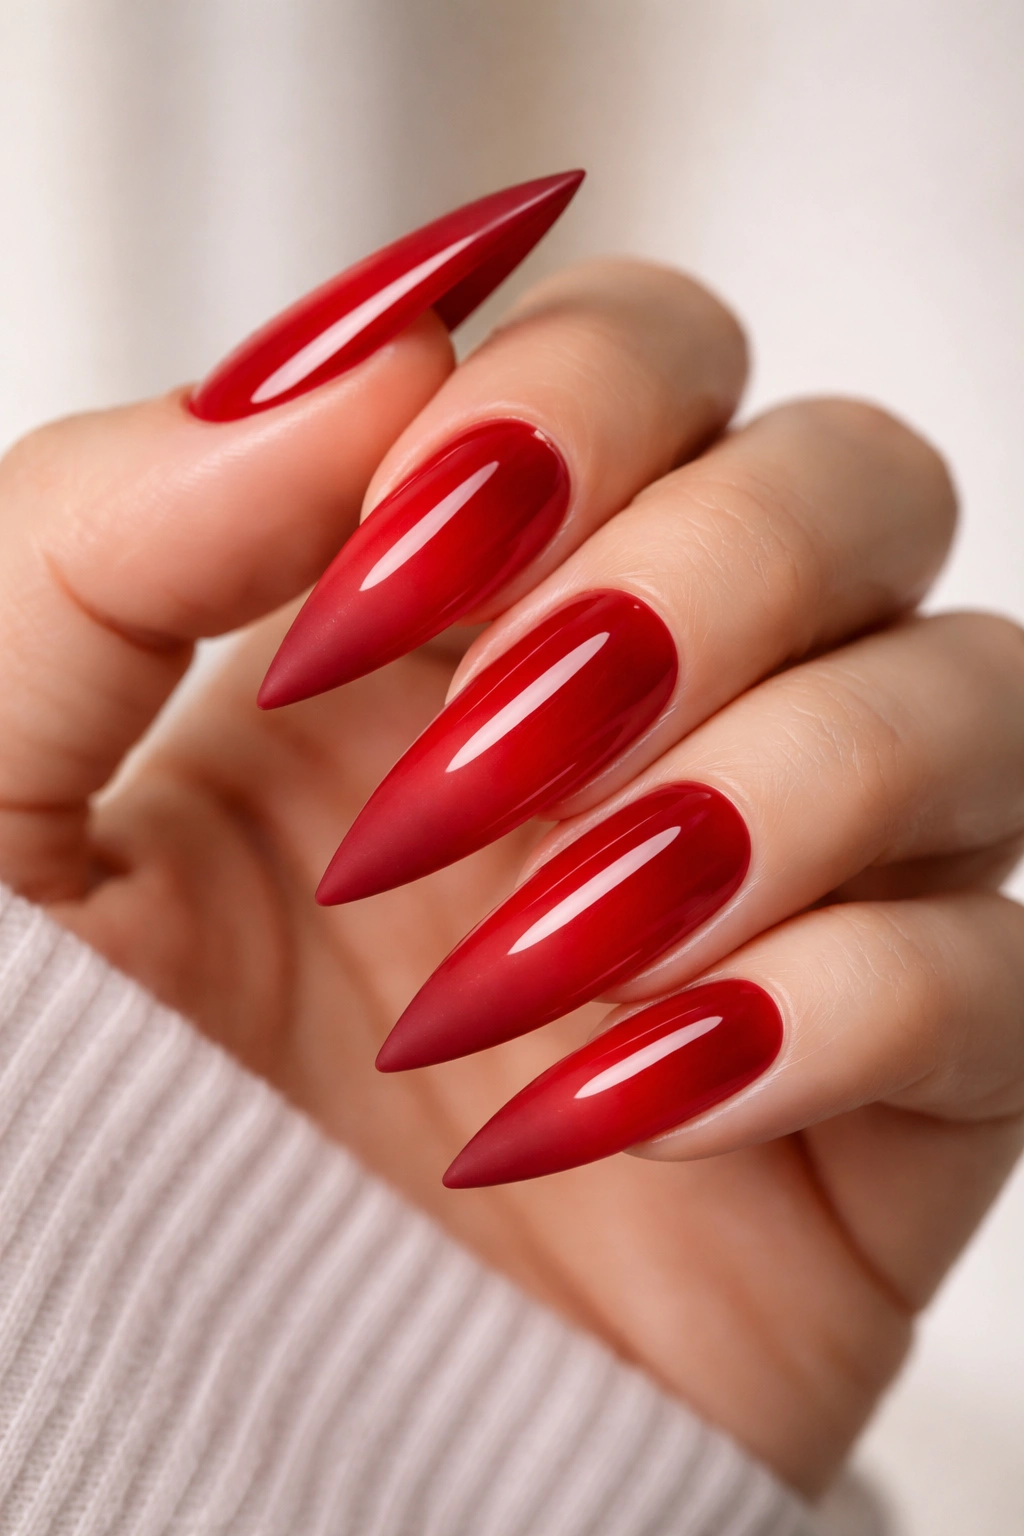
This design takes the classic and adds one sophisticated layer — a gradient from glossy to matte across the tip. It sounds like it requires blending skills, but the beauty of this approach is that matte and glossy finishes naturally create the illusion of depth and movement even without perfect color blending.
What Creates the Visual Impact
The ombre effect works because matte and glossy finishes reflect light completely differently. Where the nail transitions from glossy to matte, your eye naturally reads it as a shadow or gradient, creating dimension that a single finish can’t achieve. On a stiletto, this gradient is especially striking because the angle of the nail elongates the transition zone and makes it impossible to miss.
How to Execute This at Home
- Paint the entire nail with glossy red and let it dry completely
- Using a matte topcoat (or matte nail polish mixed with a bit of topcoat), carefully paint just the tip, blending inward about a third of the way up the nail
- If blending feels intimidating, use a dense brush and feather the matte color by dabbing rather than dragging — this creates a softer transition
- Seal the matte section with a matte topcoat to keep it from getting sticky
- If you want a sharper transition, skip the blending entirely and go for a clean line where matte meets glossy
Insider note: The gradient happens almost automatically if you’re confident with your lines. Most people are surprised at how forgiving this design actually is.
3. Red with Delicate Gold Striping
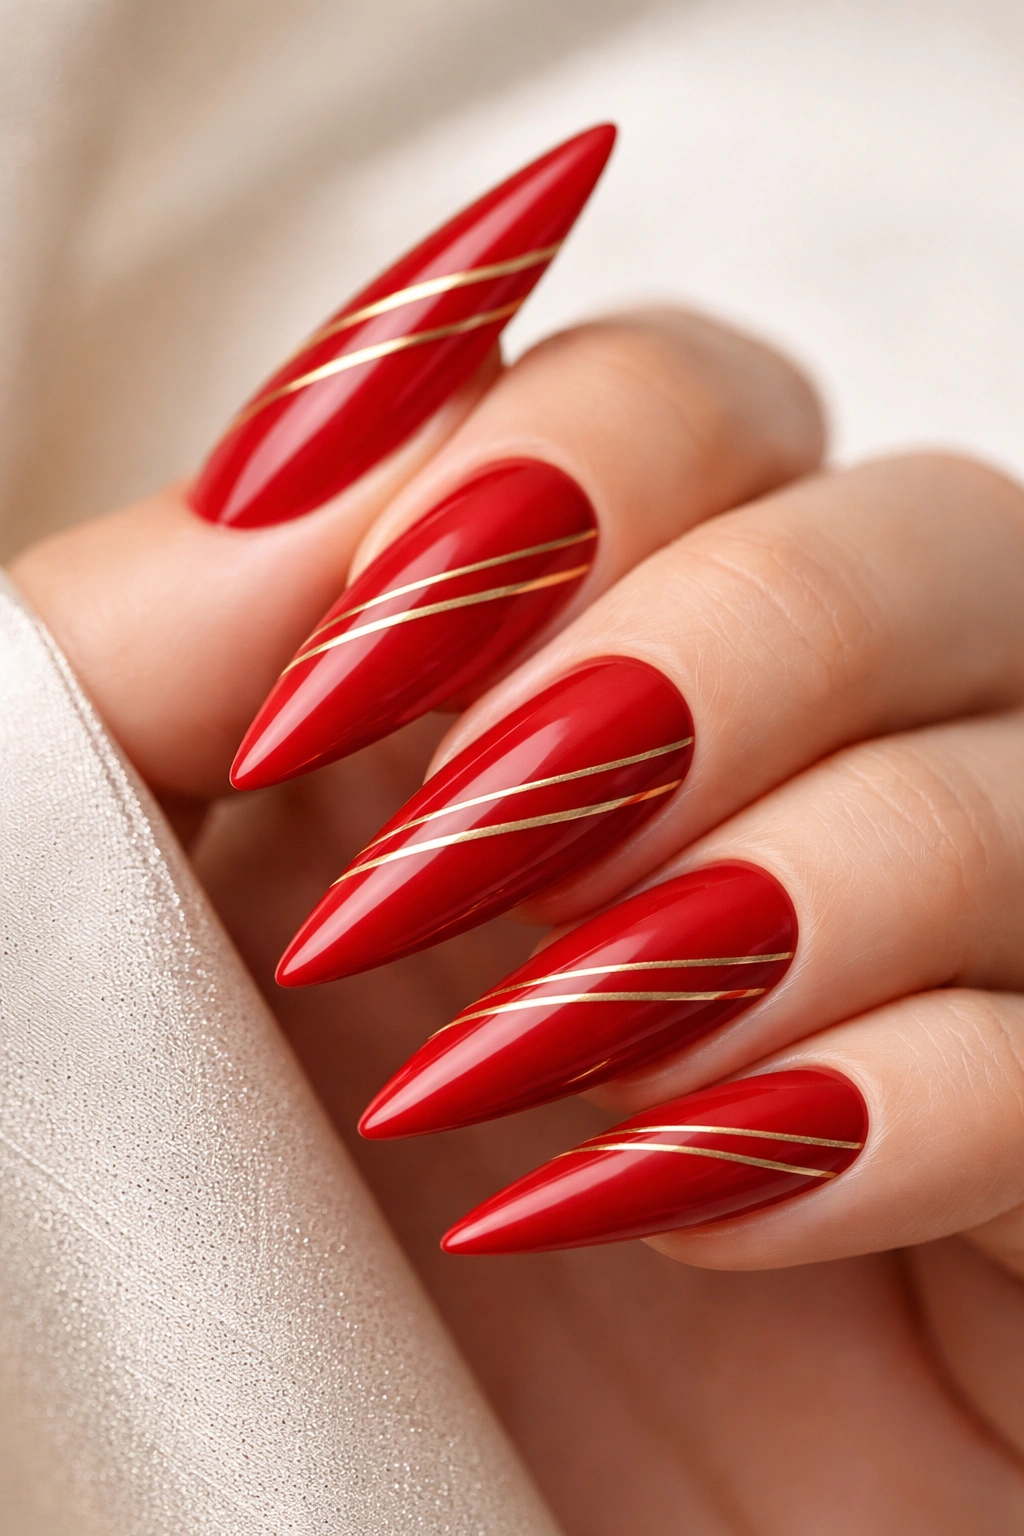
Thin gold lines painted across a red stiletto nail add luxury without looking costume-y. This works best when the stripes are subtle — think minimalist rather than Vegas — and when they’re evenly spaced and precisely applied.
The Elegance of Geometric Simplicity
Three to five thin, parallel gold lines running horizontally or diagonally across the nail create visual interest through pure geometry. Gold complements red in a way that feels warm and sophisticated, and the thin lines avoid overwhelming the nail’s length. This design reads as intentional and designed, not accidental or busy.
Creating Clean Striping
- Use a thin nail art brush or a striping brush — one specifically designed for this kind of detail work
- Thin metallic nail polish with a tiny amount of topcoat if needed; you want it to flow smoothly without being runny
- Practice your line placement on the red base before committing — you might do a few on paper first to get your hand steady
- Horizontal lines work best on stilettos because they emphasize the length; diagonal or vertical lines can fight the nail shape
- Space the lines evenly — measure with your eye and use the width of the brush as a guide for spacing
Worth knowing: If a line wobbles, you can gently drag a toothpick through the wet polish to straighten it, or let it dry and paint over it once.
4. Red Stilettos with Nude or Pink Reverse Ombre
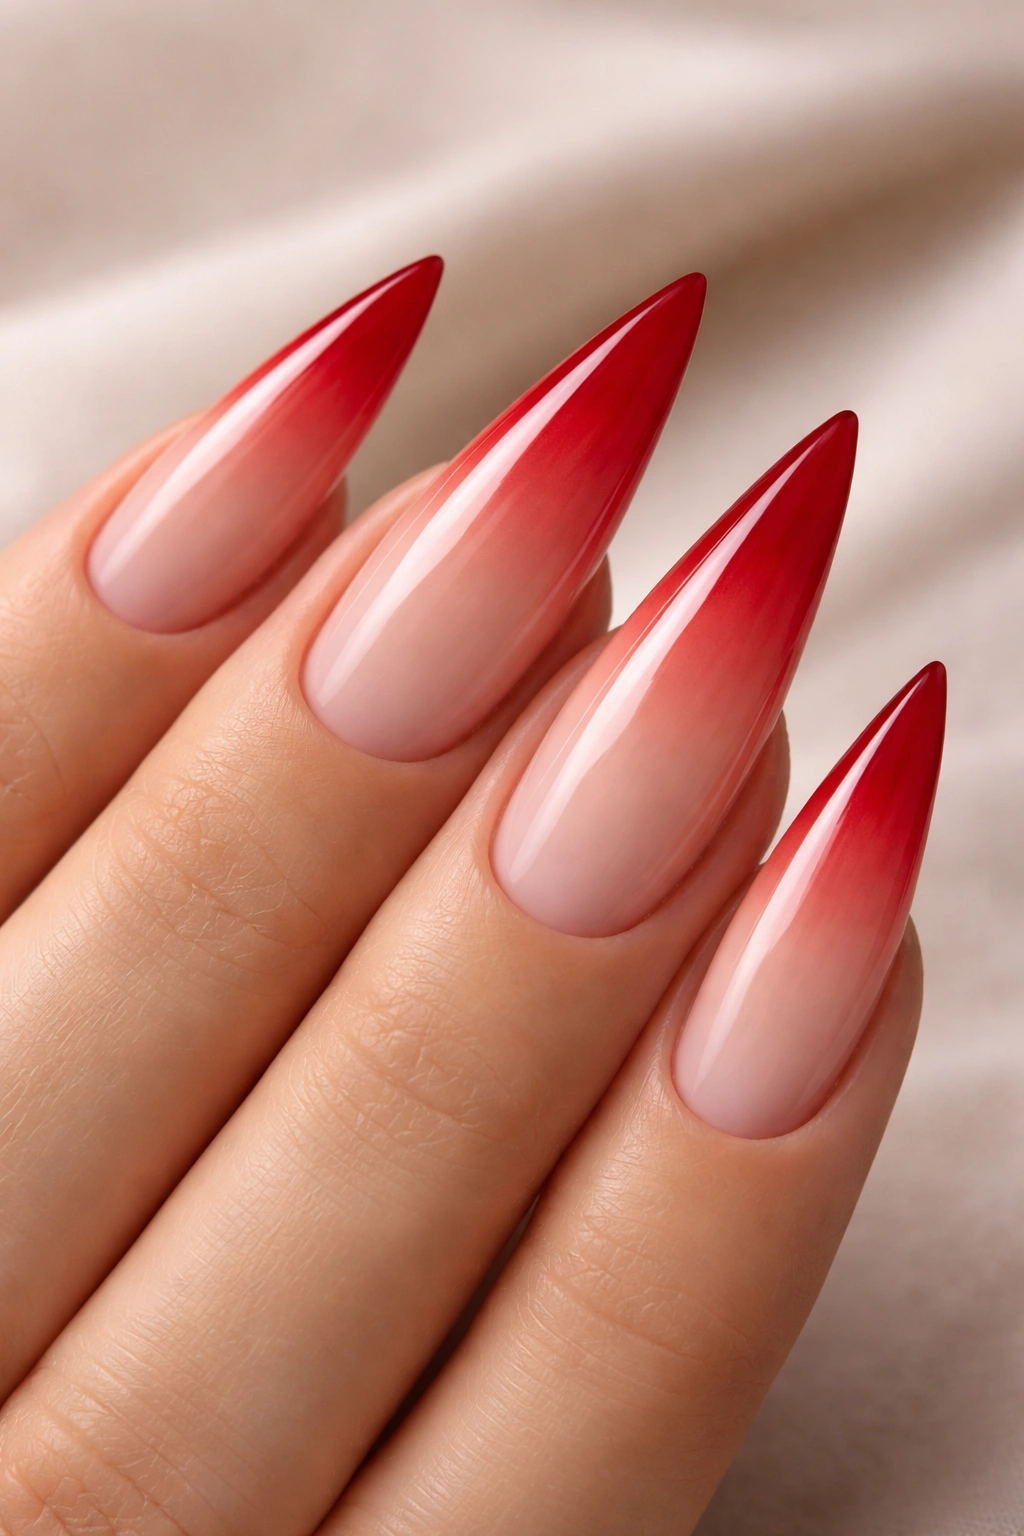
Instead of darkening the tip, reverse the gradient — keep the base of the nail red and fade to a lighter nude, cream, or pale pink at the tip. This creates an elongating effect that makes the nail look even longer and more graceful.
Why Reverse Ombre Flatters the Stiletto Shape
Lighter tones at the tips of nails naturally draw the eye outward and create the illusion of additional length. On a stiletto, which is already elongated, this effect is beautifully maximized. The warmth of red at the base keeps the design grounded, while the fade to a lighter shade feels ethereal and intentional rather than accidentally faded.
Technique for a Smooth Transition
- Start with a red base coat and let it dry completely
- Using a makeup sponge or nail art sponge, dab a nude or light pink shade onto the sponge and press it onto the tip of the nail, moving slightly upward
- Layer the sponge application several times to create a gradual gradient rather than a harsh line
- Seal with a topcoat and the transition will blur even more, creating a naturally soft ombre
- If the nude/pink shade is too opaque, thin it with a bit of topcoat before applying to the sponge
Pro tip: This works especially well if the reverse color is a nude that matches your skin tone — it creates an illusion of even more length.
5. Glossy Red with Subtle White Tip Outline
A thin, crisp white line painted around the very edge of the red nail tip creates a clean, modern look that feels almost architectural. This isn’t a full white tip — it’s just an outline that frames the red.
The Graphic Appeal of Negative Space
An outlined white edge creates definition and makes the red appear more bold by giving it a clear boundary. This technique is especially striking on stilettos because the sharp point of the nail becomes even more prominent when it’s outlined in a contrasting color. The white outline also reflects light, adding subtle brightness without making the nail look fussy.
Painting a Crisp Outline
- Use white gel polish or a high-coverage white nail polish for opacity
- A thin striping brush or a gel pen applicator works best for this kind of precision
- Paint just along the very edge of the red tip — you’re creating a frame, not covering the red
- Go slowly; outline work looks intentional when it’s precise, and rushed when it’s shaky
- A white gel topcoat over everything helps the outline stay crisp and reflective
Worth knowing: If your outline isn’t perfectly straight, that’s actually fine — a slightly imperfect line can read as artfully hand-drawn rather than sloppy if you commit to it.
6. Red Matte Finish
The understated power of a matte red stiletto nail comes from texture and depth. Matte finishes absorb light rather than reflect it, which creates a soft, velvety appearance that feels more sophisticated than glossy in certain contexts.
When Matte Red Feels Right
A matte red works beautifully for professional settings, minimalist aesthetics, or when you want your nails to feel modern rather than classic. The finish makes the color appear richer and more intense because there’s no shine to dilute the pigment. Matte nails also show less dust and debris throughout the day, which can be a practical advantage.
Achieving a Perfect Matte Finish
- Use a high-quality red polish and apply it evenly in two coats
- A matte topcoat is essential — not all topcoats are created equal, and a thin or watery matte topcoat will look streaky
- Some people prefer a matte topcoat over glossy red polish, rather than using inherently matte polish, because the finish is more even
- If the matte finish feels flat, try a topcoat with a slight sheen rather than a completely matte topcoat — this is called a satin finish and adds a touch of subtle shine
- Matte nails require slightly more careful care to avoid chipping because the texture can catch on things
Pro tip: Pair matte red nails with metallic accessories to create contrast and avoid the nails feeling too austere.
7. Red Stilettos with Rose Gold Foil Accents
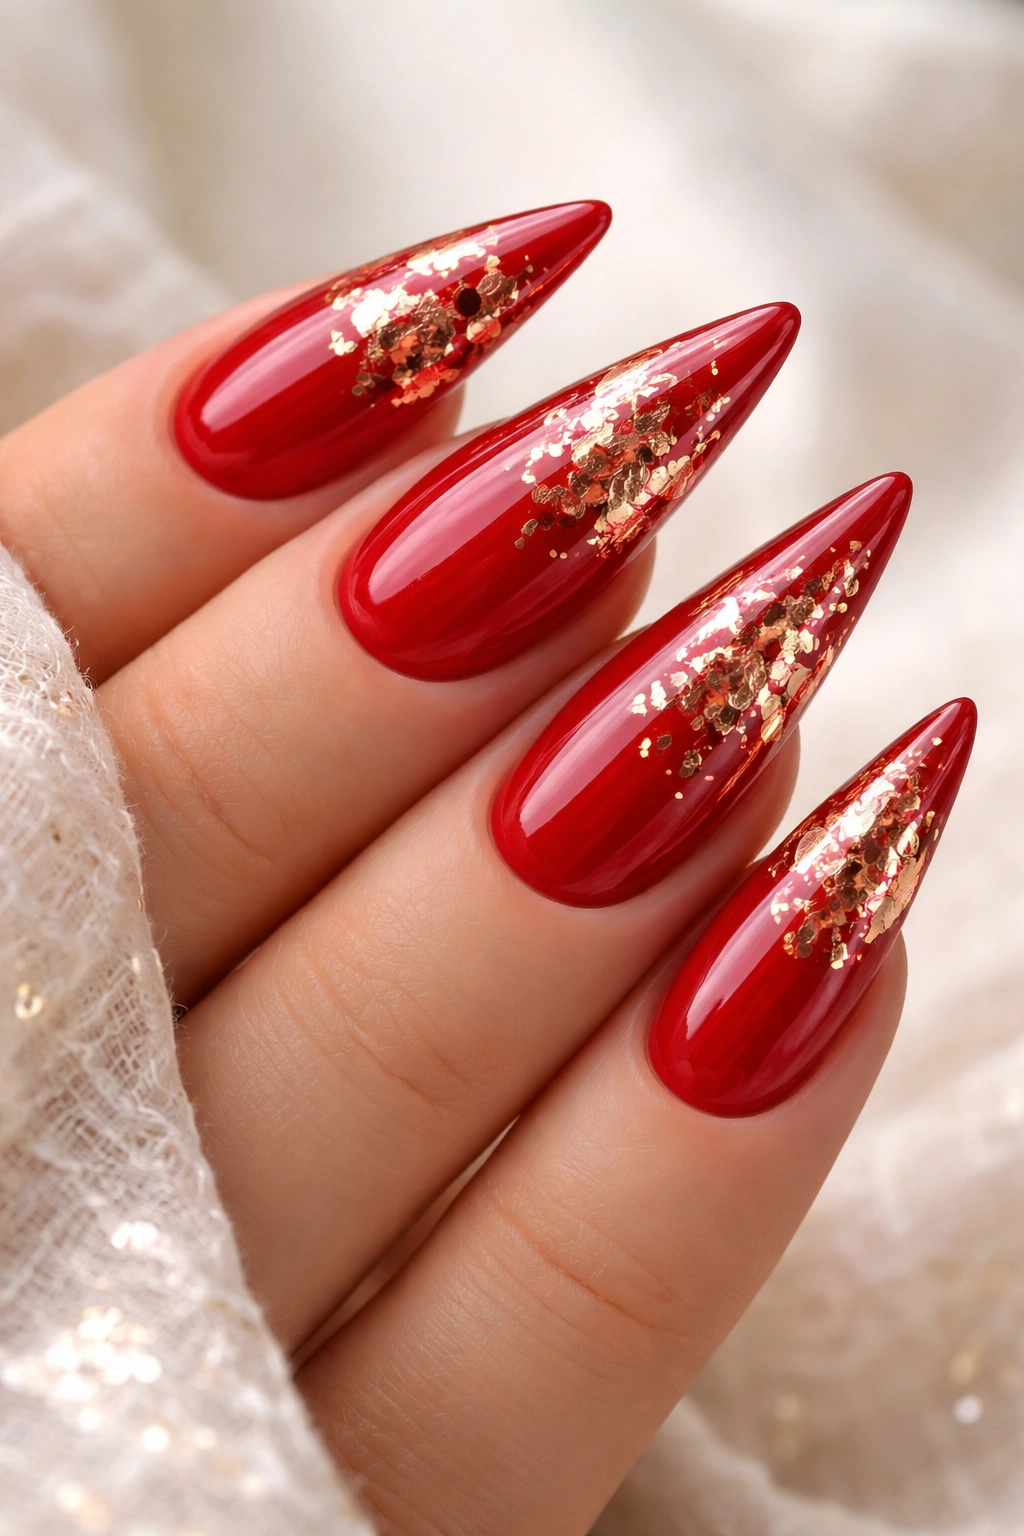
Thin strips or scattered flakes of rose gold foil embedded in the red create a luxe, glittery effect without being over the top. Foil catches light differently than regular glitter and creates a more sophisticated shimmer.
The Difference Foil Makes
Rose gold foil has a metallic, three-dimensional quality that regular glitter can’t replicate. It catches light and reflects it back sharply, creating high-impact sparkle that feels intentional and designed. On a red stiletto, rose gold foil adds warmth and richness without making the nail feel costume-y or overly decorated.
Incorporating Foil Into Your Design
- Apply your red polish base and let it dry completely
- Use a gel adhesive or a sticky topcoat to create a tacky surface on the nail
- Tear rose gold foil into small pieces or thin strips and press them into the tacky surface using a nail art tool or tweezers
- You can scatter the foil randomly, create a gradient with more foil at the tip, or arrange it in a geometric pattern
- Seal everything with a thick topcoat to secure the foil and create a smooth, finished surface
- Foil nail designs last best when sealed under gel polish rather than regular topcoat
Insider note: Rose gold foil is easier to work with than silver foil on red because the warm tone feels more cohesive.
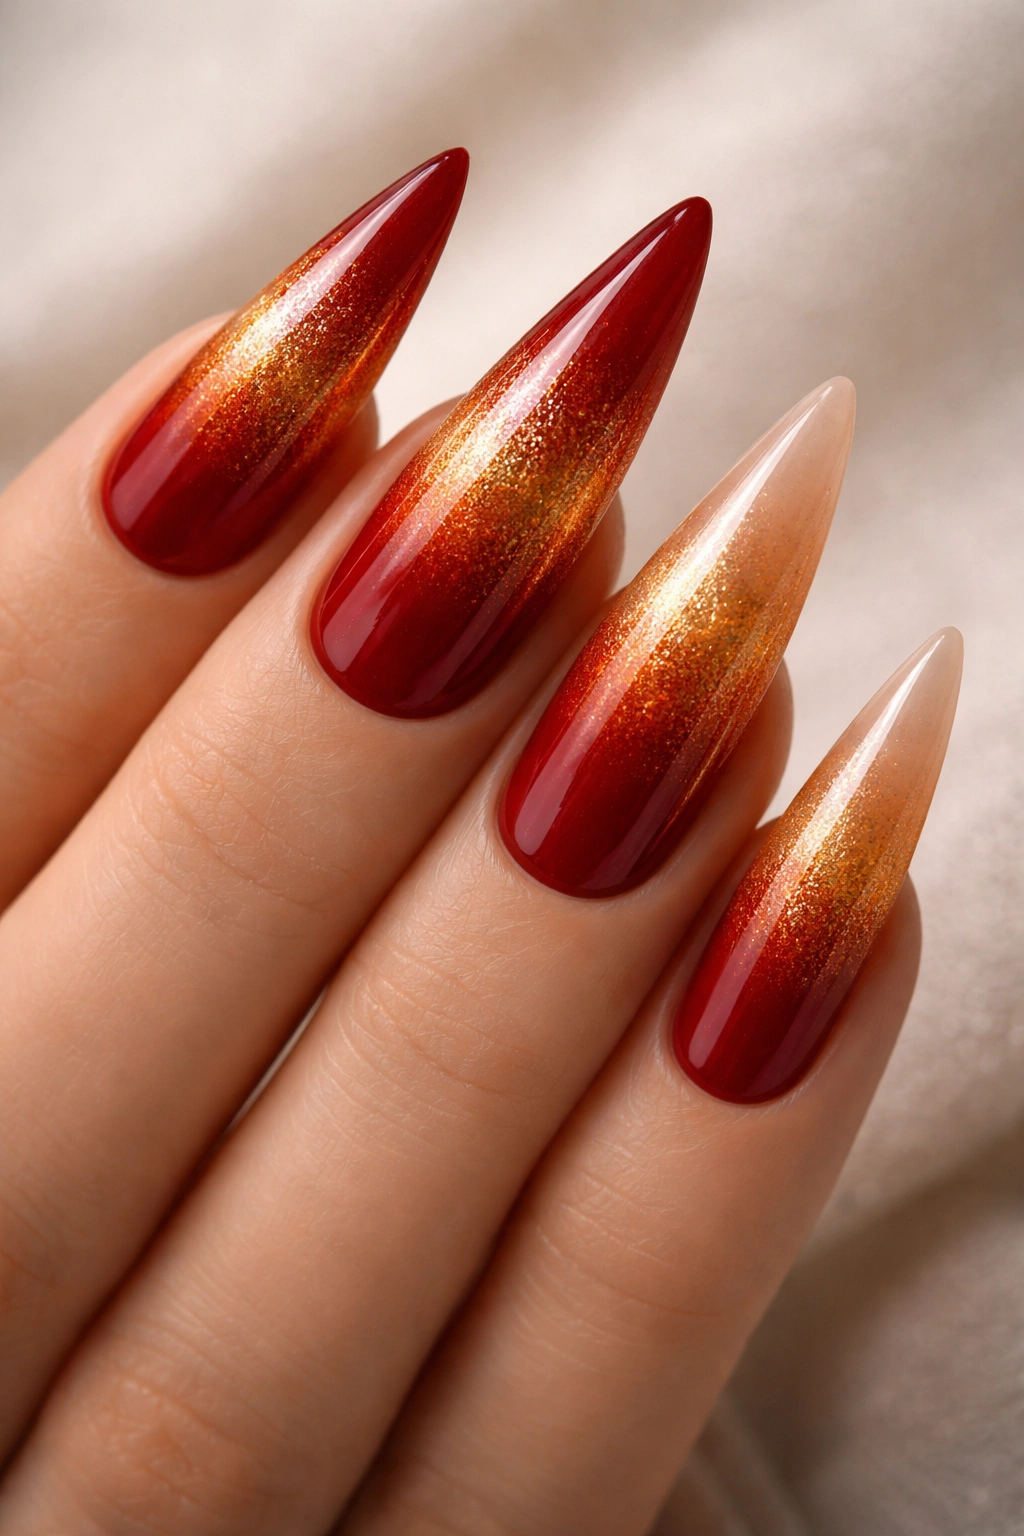
8. Red Ombré From Deep Burgundy to Bright Red
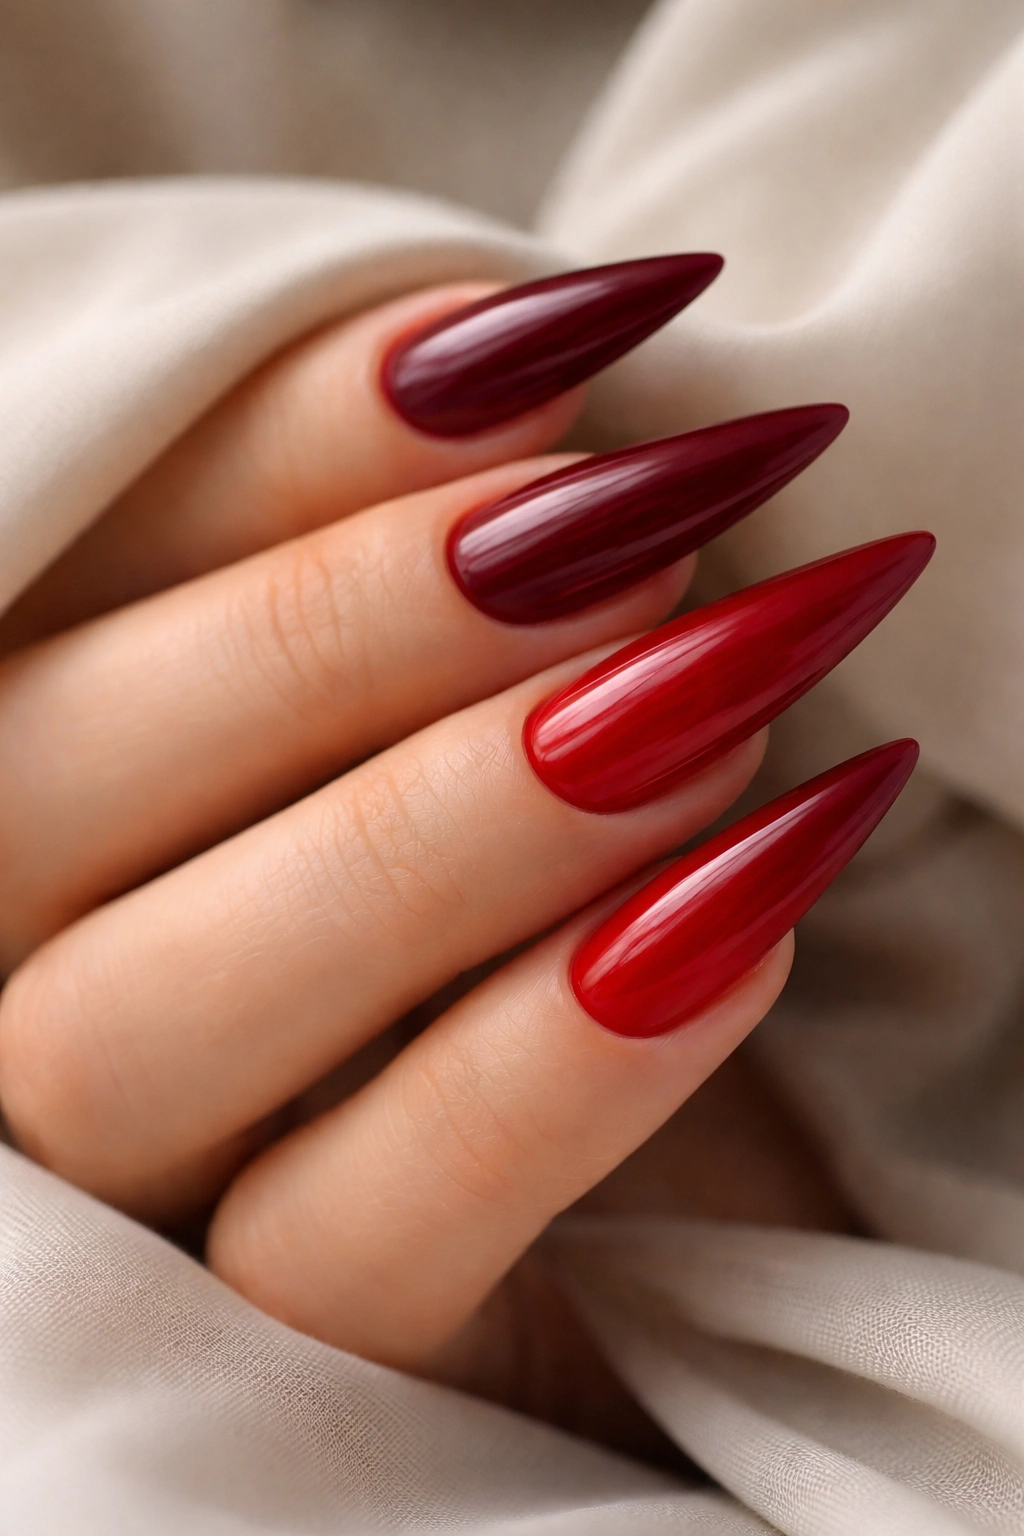
Create depth by blending two shades of red on a single nail — start with a deep, dark burgundy at the base and transition to a brighter, truer red at the tip. This monochromatic ombre reads as sophisticated because it uses color graduation rather than multiple contrasting colors.
The Psychology of Red Ombré
Red-to-red gradients create a three-dimensional effect that makes the nail appear longer and more defined. The darker shade at the base grounds the design, while the brighter shade at the tip draws attention and adds energy. This approach feels more intentional and designed than a single red, but it’s much easier to execute than a red-to-another-color ombre because the colors are closely related.
Blending Two Reds Smoothly
- Choose a burgundy and a true red that have enough contrast to be visible but enough similarity to look intentional
- Apply the burgundy to the base of the nail and let it dry slightly but not completely
- While the burgundy is still tacky, use a makeup sponge to apply the brighter red to the tip and dab it upward into the burgundy, creating a transition zone
- Layer the sponge application a few times to deepen the gradient
- A topcoat will blur the transition even more, creating a naturally soft ombré
- The blend doesn’t need to be perfect — slight color variation reads as artistic rather than sloppy
Pro tip: If blending feels intimidating, let both colors dry completely and use a topcoat to create the illusion of blending — sometimes the topcoat alone is enough to soften the line.
9. Red with Minimalist Black Line Art
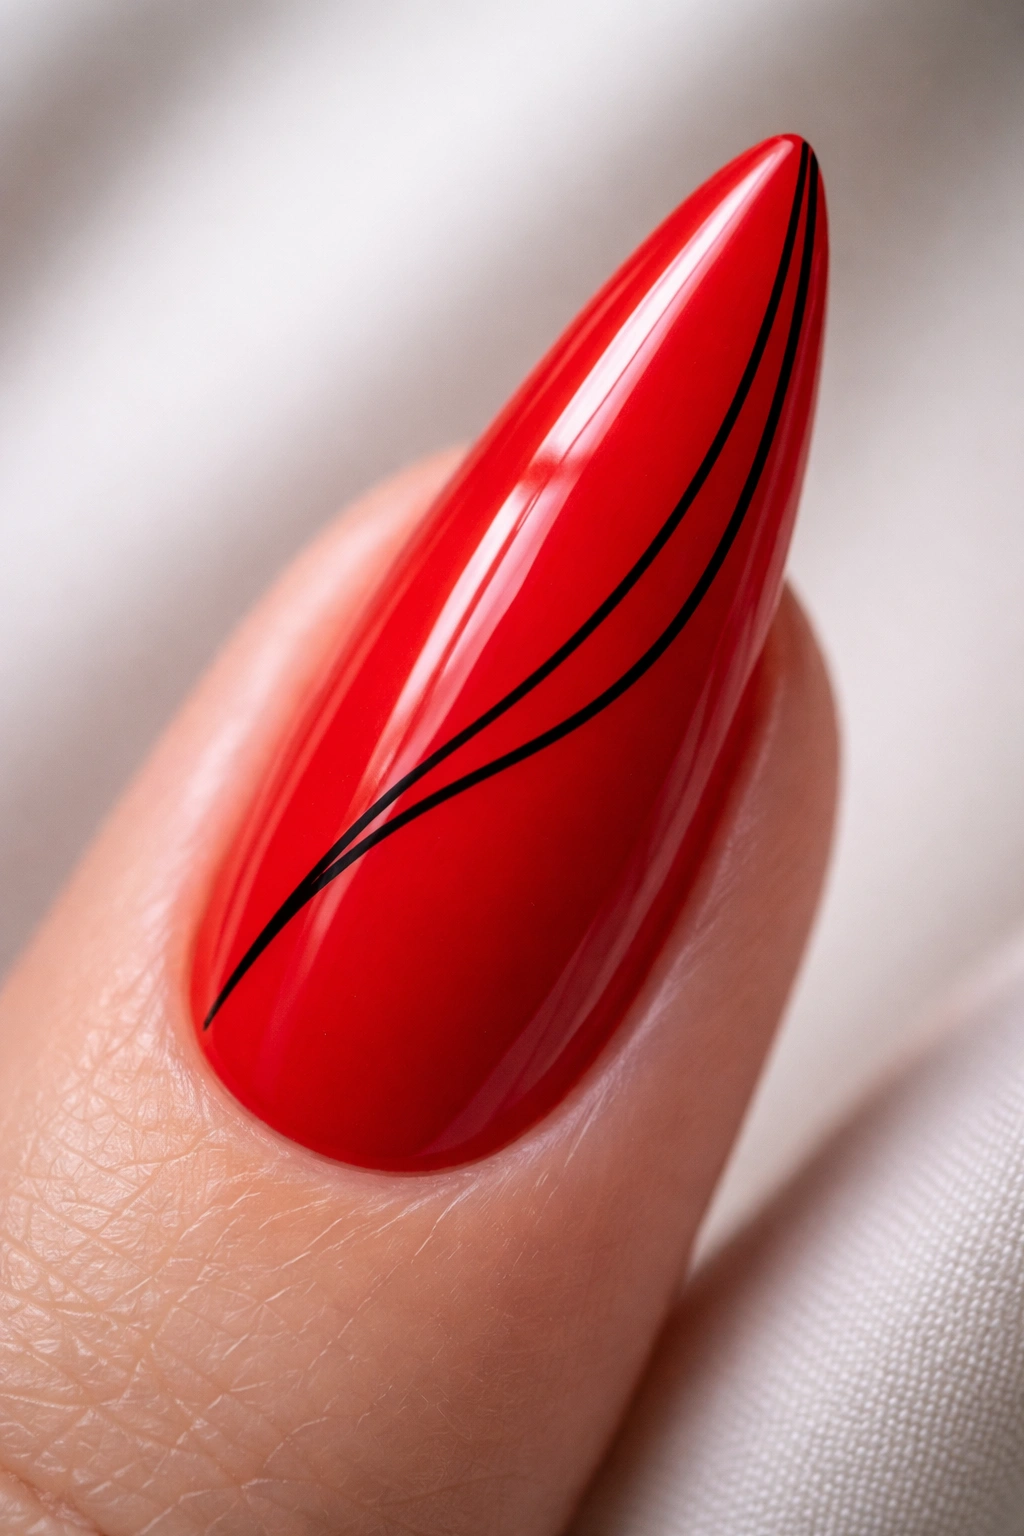
A single thin black line — either straight, curved, or creating a geometric shape — adds graphic interest without making the nail feel busy. This could be a thin vertical line down the center, a curved arc across the nail, or a small geometric outline.
Why Less Is More With Line Art
A minimalist approach to line art requires confidence in the negative space around the design. One clean line is more striking than five muddled ones. On a red stiletto, a single black line cuts through the color and creates contrast that draws the eye without competing with the nail’s natural drama.
Creating Precise Geometric Lines
- Use a thin striping brush or a black gel pen applicator for maximum control
- Plan your line placement by looking at the nail shape and deciding whether vertical, curved, or diagonal works best
- Black gel polish or black polish works equally well, but gel tends to flow more smoothly for thin lines
- A single line should feel intentional and centered or balanced — not accidentally placed
- If you want a second line, keep it parallel or clearly geometric rather than random
Worth knowing: If you make a mistake with black line art, black polish is forgiving because it’s opaque — you can paint over an error once the layer dries.
10. Glossy Red with Silver Glitter Gradient
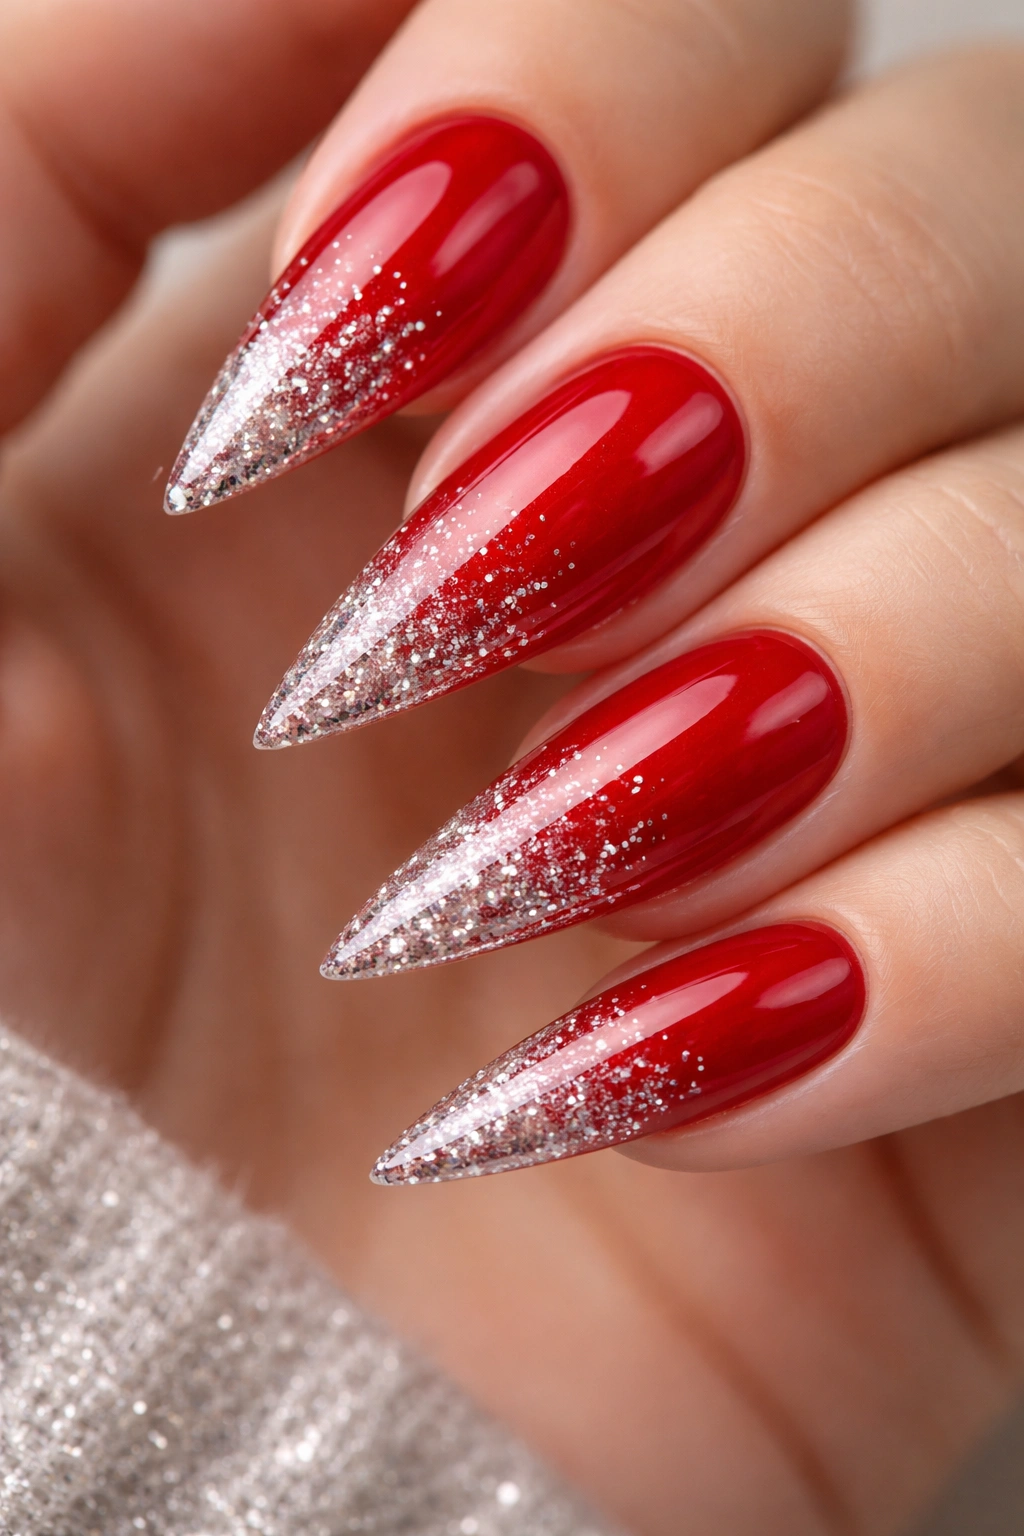
Instead of scattered glitter, create a purposeful gradient where glitter is concentrated at the tip and fades out toward the base. This creates dimension and draws attention to the nail’s point.
How Glitter Gradient Creates Depth
A concentrated glitter gradient at the tip naturally elongates the nail because the eye follows the shimmer toward the point. On a stiletto, this effect is maximized. The transition from solid red to glittery red feels intentional and designed, especially when the glitter starts small and becomes more dense at the very tip.
Building a Glitter Gradient
- Start with a glossy red base and let it dry completely
- Use a glitter-infused polish or apply loose glitter with a sticky topcoat
- Apply your glitter product most densely at the tip of the nail
- Using a clean sponge or brush, gently dab it upward toward the base, gradually reducing the amount of glitter as you move back
- The gradient doesn’t need to be perfectly even — slight variation looks more natural
- Seal everything with a thick topcoat to lock the glitter in place and create a smooth surface
Pro tip: Silver glitter is more versatile than gold on red because it reads as modern and cool-toned rather than warm and classic.
11. Red with Nude Accent Nail
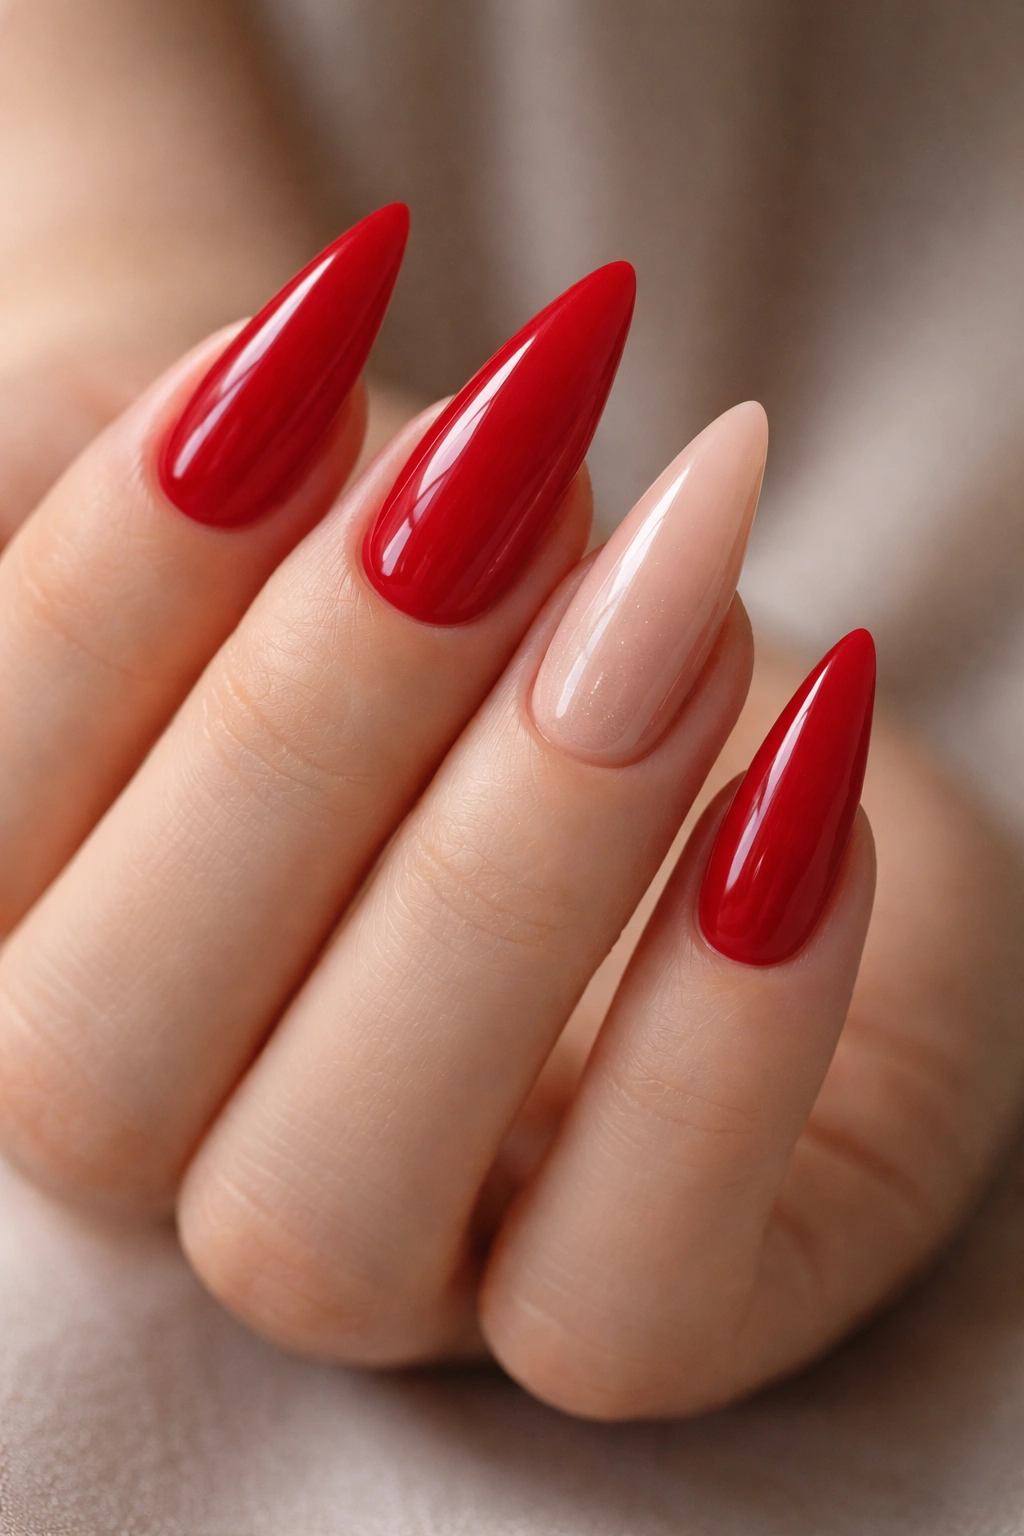
Paint one or two accent nails in a nude, champagne, or blush shade while keeping the rest of the hand red. This breaks up the monochromatic effect while maintaining a sophisticated, coordinated look.
The Strategy Behind Accent Nails
An accent nail draws the eye to a focal point and prevents the design from feeling monotonous. On stiletto nails, accent nails are especially striking because the contrast is so visible. Nude tones on an accent nail create an elongating effect while the red nails ground the overall look.
Choosing Which Nails to Paint Nude
- The ring finger is the most common choice for an accent nail because it’s naturally a focal point
- Alternating accent nails (thumb and ring finger, or middle and pinky) creates a balanced, intentional look
- A single accent nail on the ring finger feels classic; two accent nails feel more modern
- Nude shades should complement your skin tone rather than match it exactly — a slightly darker or lighter nude creates more visual interest
Insider note: Nude accent nails work best when the nude is distinctly different from the red, not just a lighter version of it — think cool nude on warm red, or vice versa.
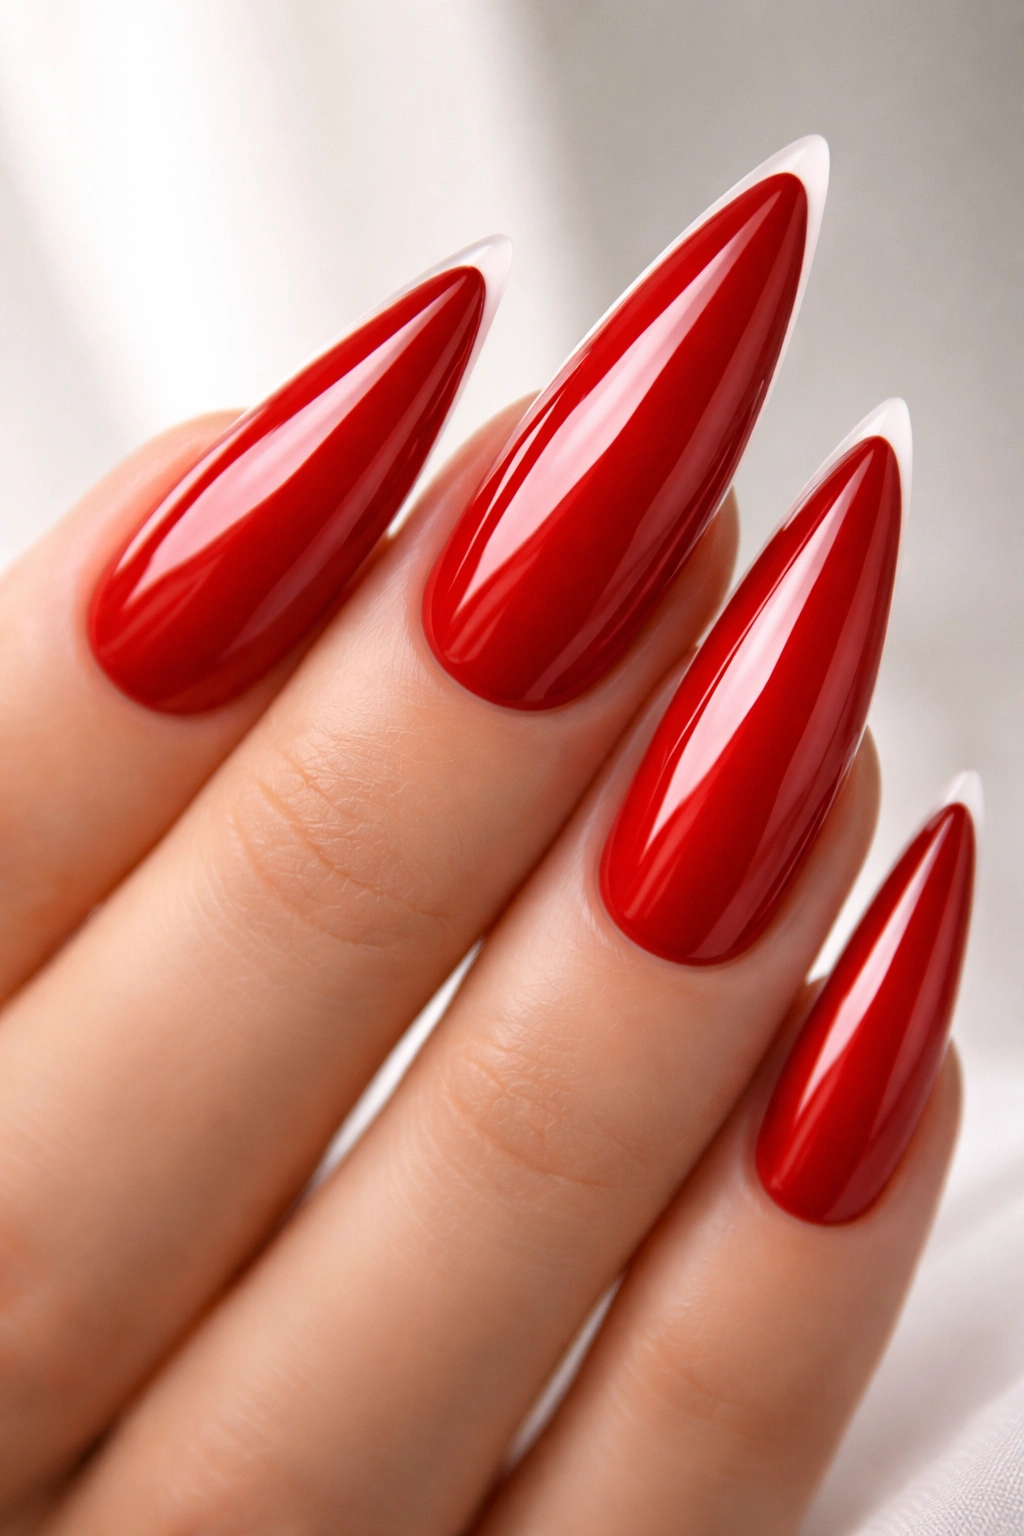
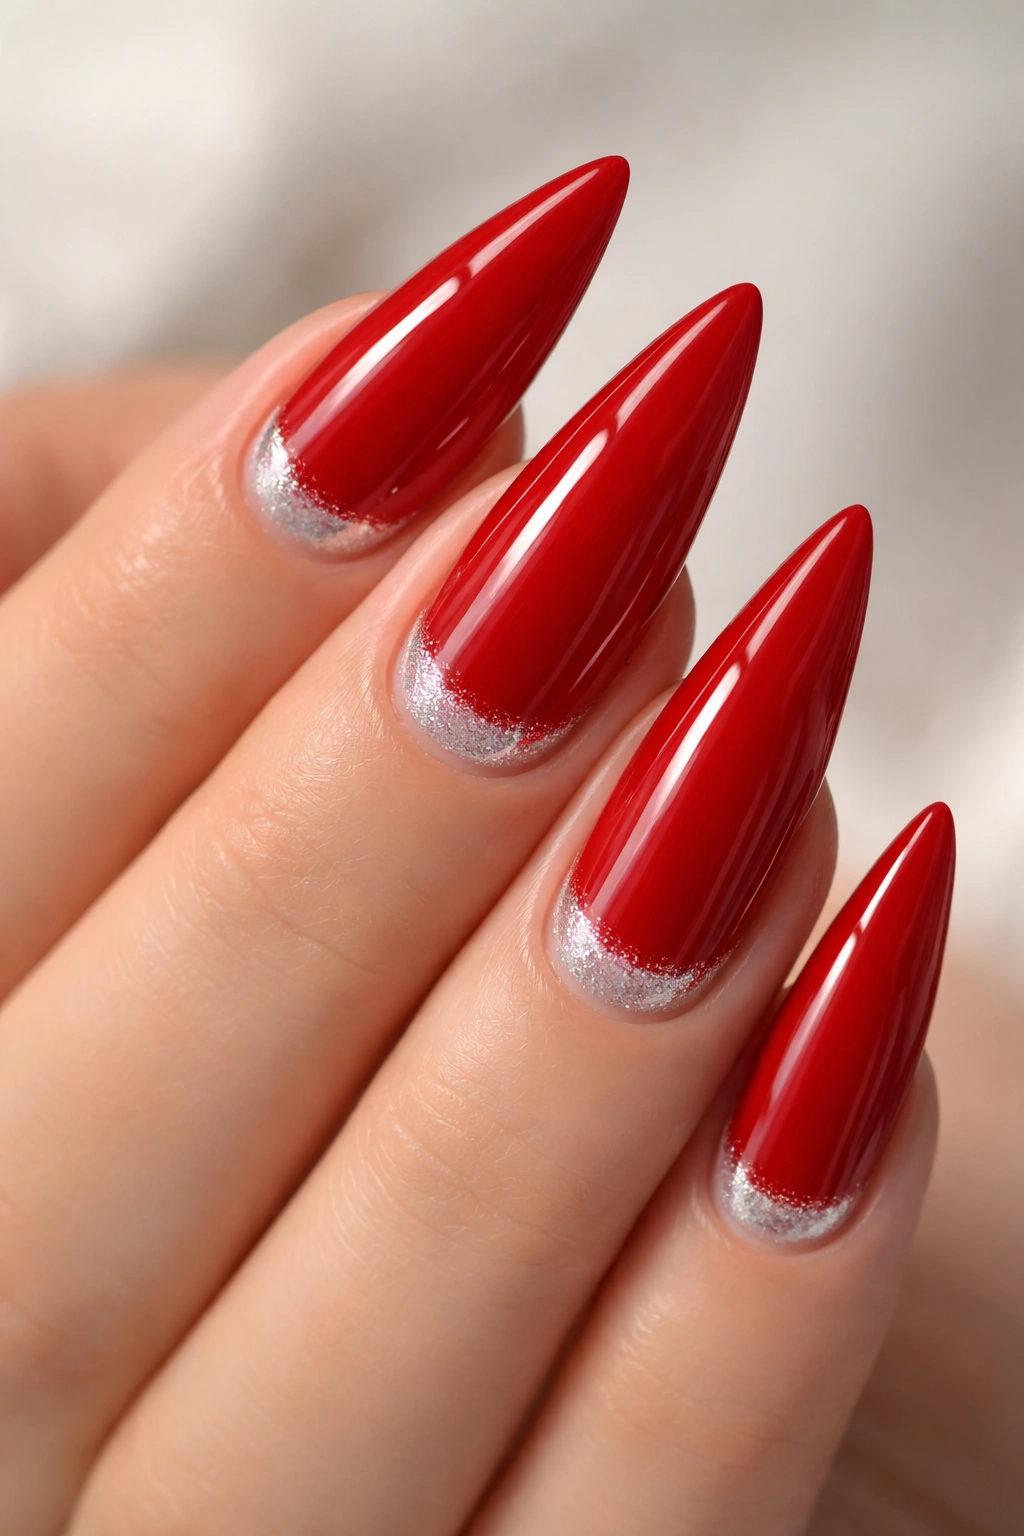
12. Red Stilettos with Thin White French Tip
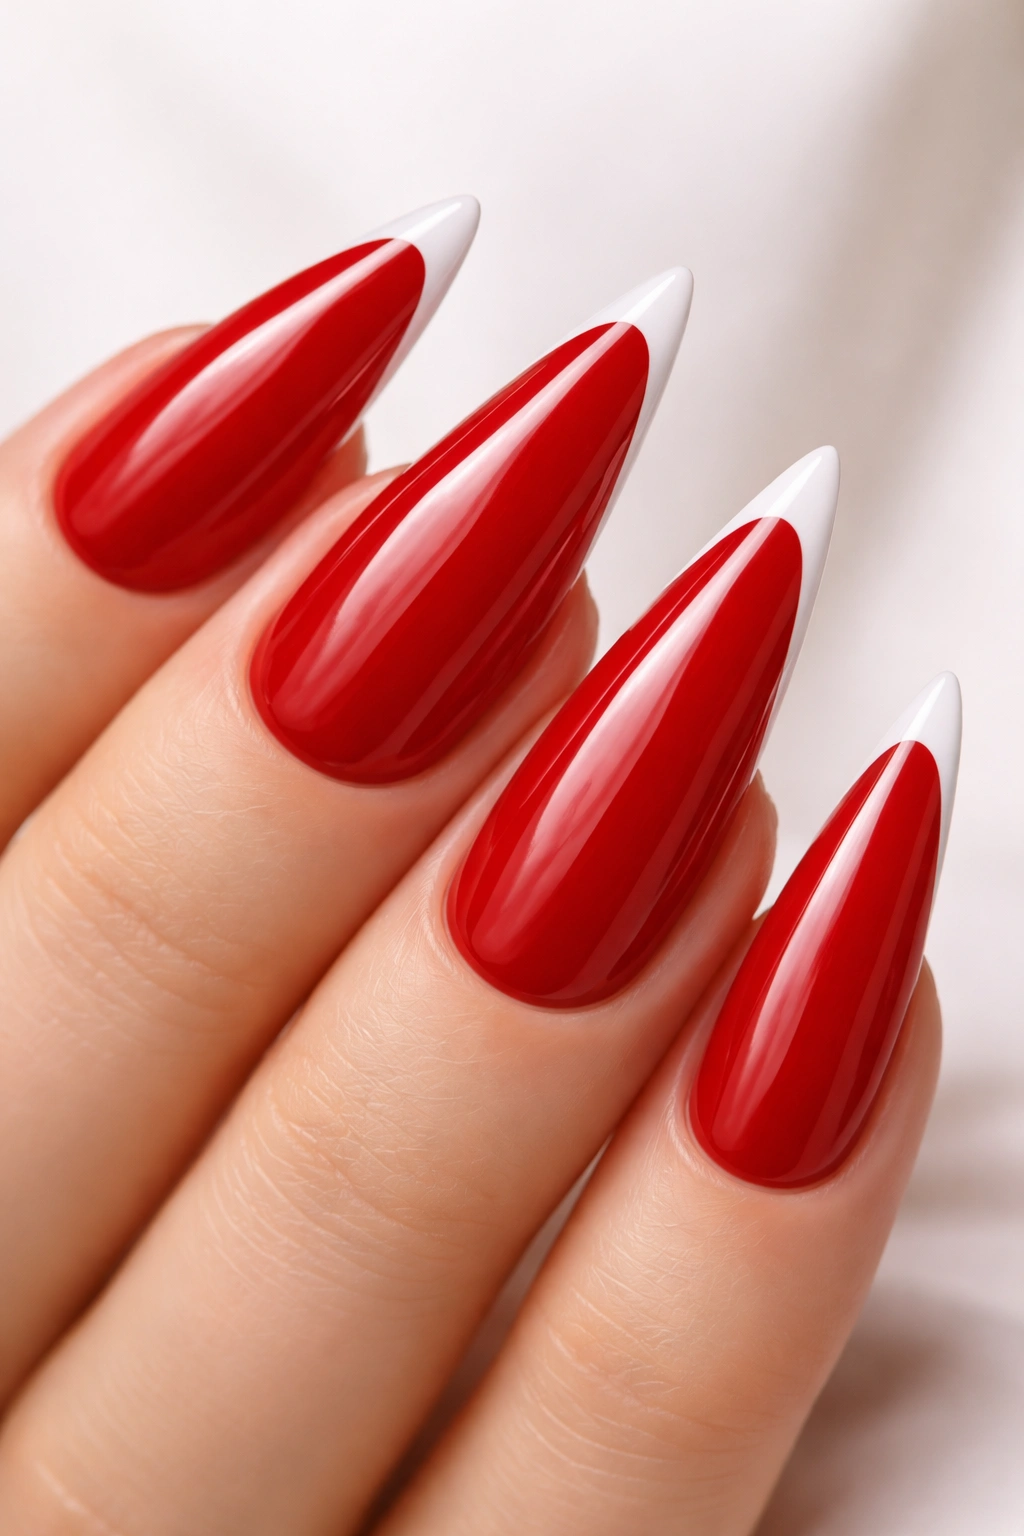
A classic French tip refined for stiletto nails means a thin, delicate white line at the very edge rather than a thick colored cap. This is more subtle than traditional French manicure styling but still gives that clean, timeless edge.
Why Thin French Works on Stilettos
A thick French tip on a stiletto can make the nail look blunt or overwhelming, but a thin line maintains the nail’s elegant point while adding definition. The thin white edge creates a frame for the red, drawing attention to the nail’s length and shape. This is a timeless design that works in any context.
Painting a Thin French Tip
- Use a striping brush or a thin nail art brush to create a precise line
- White gel polish or white polish works equally well; gel flows more smoothly for this kind of detail
- Draw the line just along the tip edge; you’re creating a definition line, not a colored cap
- The line should be thick enough to be visible but not so thick that it shortens the nail
- A white gel topcoat over everything helps the tip stay bright and crisp
Worth knowing: If white feels too stark against your red, try an off-white, cream, or ivory shade for a softer but still classic look.
13. Matte Red with Metallic Gold Top Coat
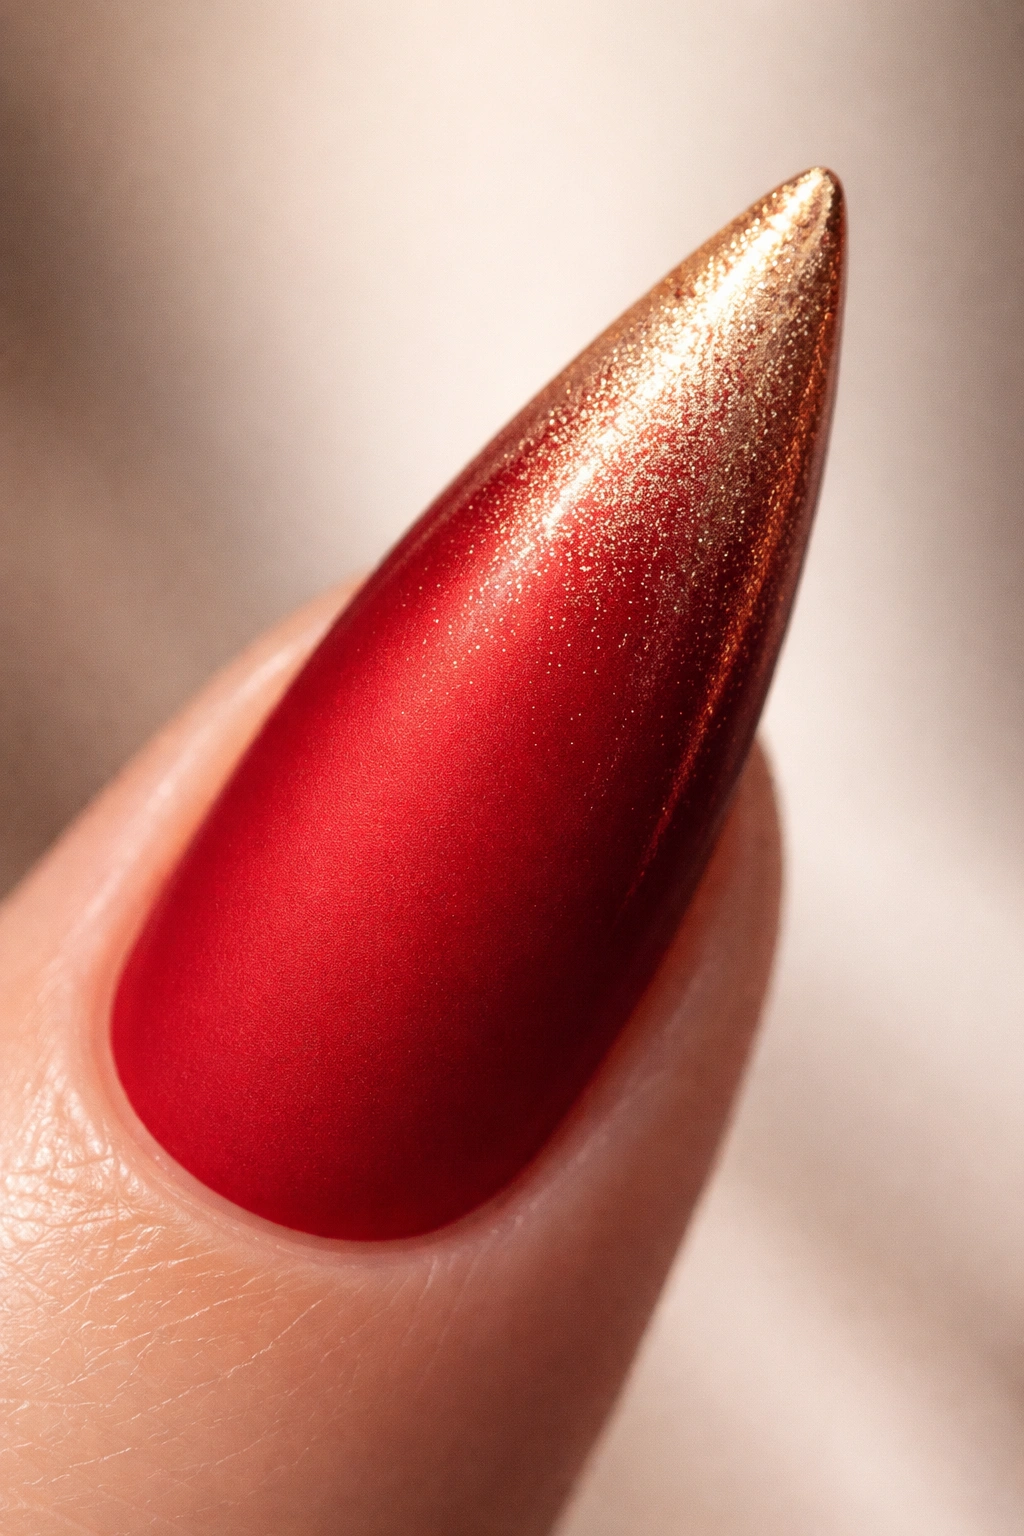
Layer a thin coat of gold metallic topcoat over matte red polish to create a shimmery, luxe finish that’s more subtle than glitter but more interesting than solid matte.
The Magic of Layered Finishes
Metallic topcoats over matte polish create a unique texture that catches light differently depending on the angle. From certain perspectives, the nail looks matte and rich; from others, it glimmers with gold. On a stiletto, this effect is especially beautiful because the curved surface of the nail reveals different finishes as you move your hand.
Applying Metallic Over Matte
- Start with a matte red base and let it dry completely
- Apply a thin layer of gold metallic topcoat over the entire nail
- Don’t use a heavy hand — you want shimmer, not a glittery coating
- If the metallic layer is too thick, it will obscure the matte finish underneath
- A clear topcoat over the metallic layer ensures everything stays smooth and protected
- This design works best with a gold metallic topcoat rather than gold polish, because topcoat applies more thinly
Pro tip: This layered approach works with any metallic shade — try copper for warmth or silver for a cooler effect.
14. Red with Negative Space Design
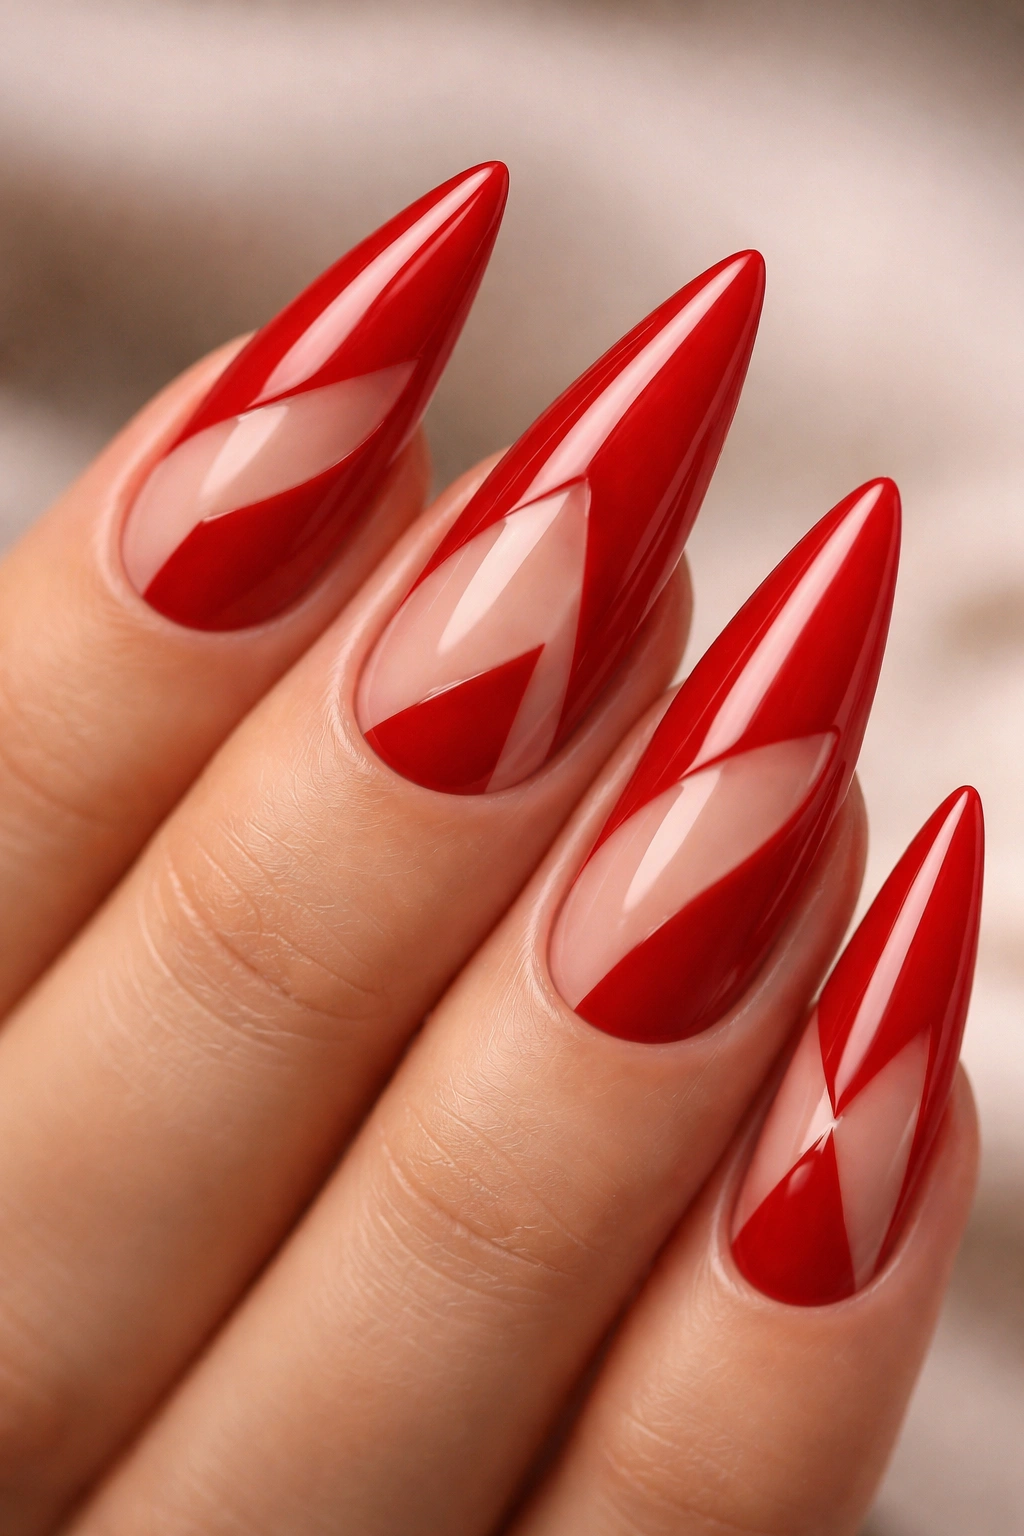
Leave small sections of the nail unpainted to create white space that reveals the nail base underneath. This could be geometric shapes, lines, or abstract areas that contrast with the red.
Creating Intentional Negative Space
Negative space designs feel modern and intentional because they require confidence in what you’re not painting as much as what you are. On a stiletto, negative space can be positioned to frame the nail’s point or create a balanced, off-center design. The unpainted areas create visual rhythm and prevent the nail from feeling solid or heavy.
Planning Negative Space
- Sketch your design lightly on the nail with a light pencil or using nail guides
- Use thin painter’s tape to create clean lines if you want precise geometric shapes
- Paint red around the taped-off areas and let it dry completely before removing the tape
- The natural nail color creates contrast and brightness that draws the eye to your design
- Keep negative space areas small enough that the nail still reads as intentional, not unfinished
Insider note: Negative space works best on longer nails where you have enough surface area to make the design clear.
15. Red with Delicate White Dots
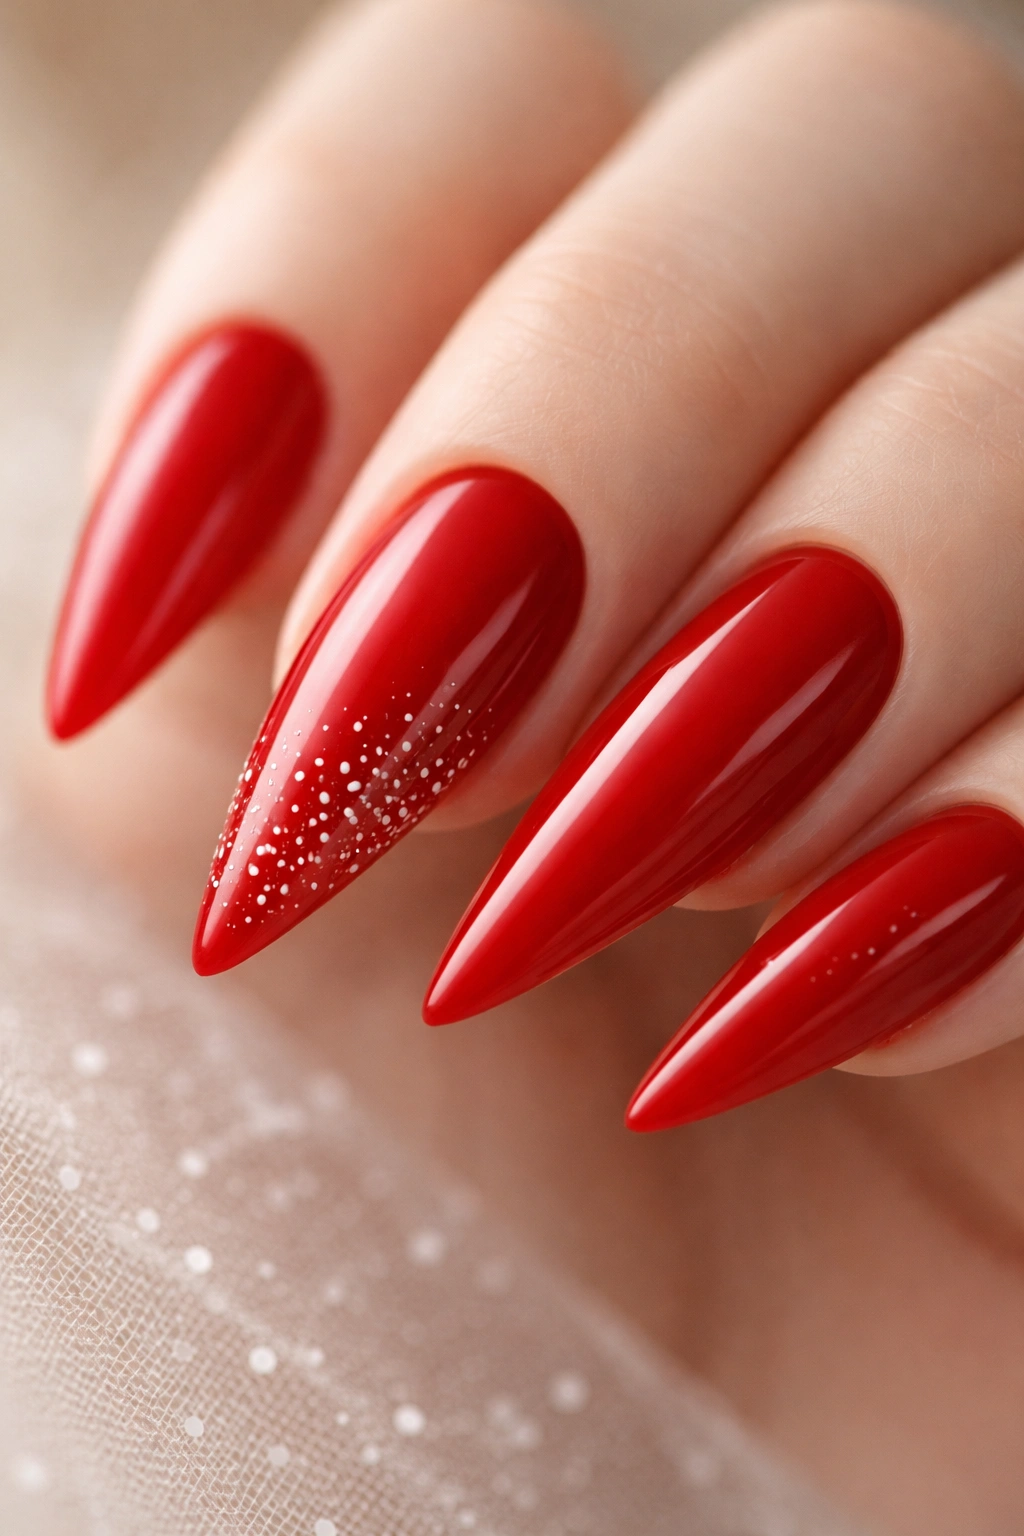
Small white dots scattered across or concentrated on one section of a red stiletto nail create playful sophistication without requiring any complex technique.
The Charm of Repetitive Detail
Dots are one of the easiest decorative elements to execute but create immediate visual interest. Multiple small dots create rhythm and pattern that feels intentional. On a stiletto, dots work especially well when concentrated toward the tip, creating a gradient of detail that emphasizes the nail’s length.
Creating Perfect Dots
- Use a dotting tool or the rounded end of a thin brush dipped in white polish
- Apply dots consistently — aim for similar size by using the same dipping technique each time
- Dots clustered toward the tip create an ombré effect; dots scattered across the entire nail feel more playful
- Space the dots with intention rather than randomly
- Practice on a piece of paper first to get a feel for the size and spacing
Pro tip: Gel dots stay cleaner than polish dots because gel doesn’t dry as quickly and can be repositioned before curing if you’re not happy with placement.
16. Glossy Red with Subtle Shimmer Topcoat
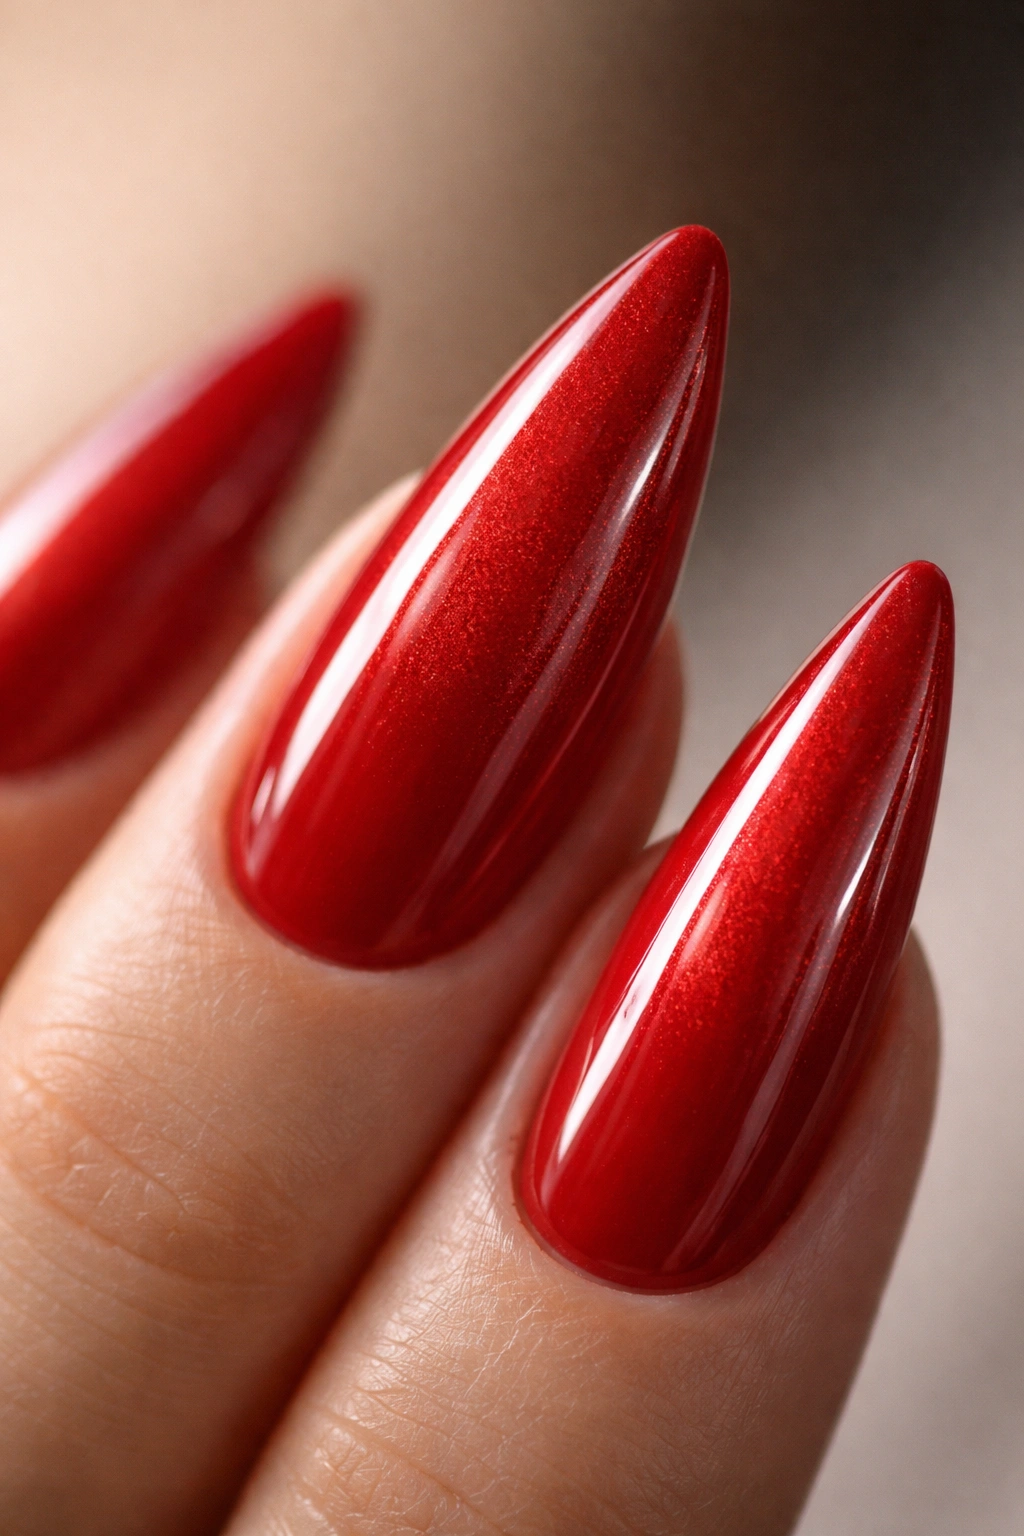
Instead of adding glitter or texture, simply use a shimmer topcoat that creates a barely-there sparkle effect. This adds dimension and luxury without making the nail feel decorated.
The Elegance of Implied Shimmer
A subtle shimmer topcoat catches light just enough to add depth and movement without announcing itself loudly. On a glossy red stiletto, shimmer topcoat creates an almost 3D effect, making the nail appear to glow from within. This is the sophisticated middle ground between solid color and obvious glitter.
Applying Shimmer for Maximum Effect
- Start with a glossy red base and let it dry completely
- Apply a thin layer of shimmer topcoat over the entire nail
- The shimmer should be visible only in certain lighting — if it’s obvious in all light, you’ve applied too much
- Use a thick, high-quality shimmer topcoat rather than a thin, watery one; premium finishes have better pigment
- A clear topcoat over the shimmer helps it last longer and prevents the nail from looking dusty
Worth knowing: Some shimmer topcoats lean more golden or peachy; test on a non-visible nail first to make sure the undertone works with your red.
17. Red with Thin Vertical Black Stripes
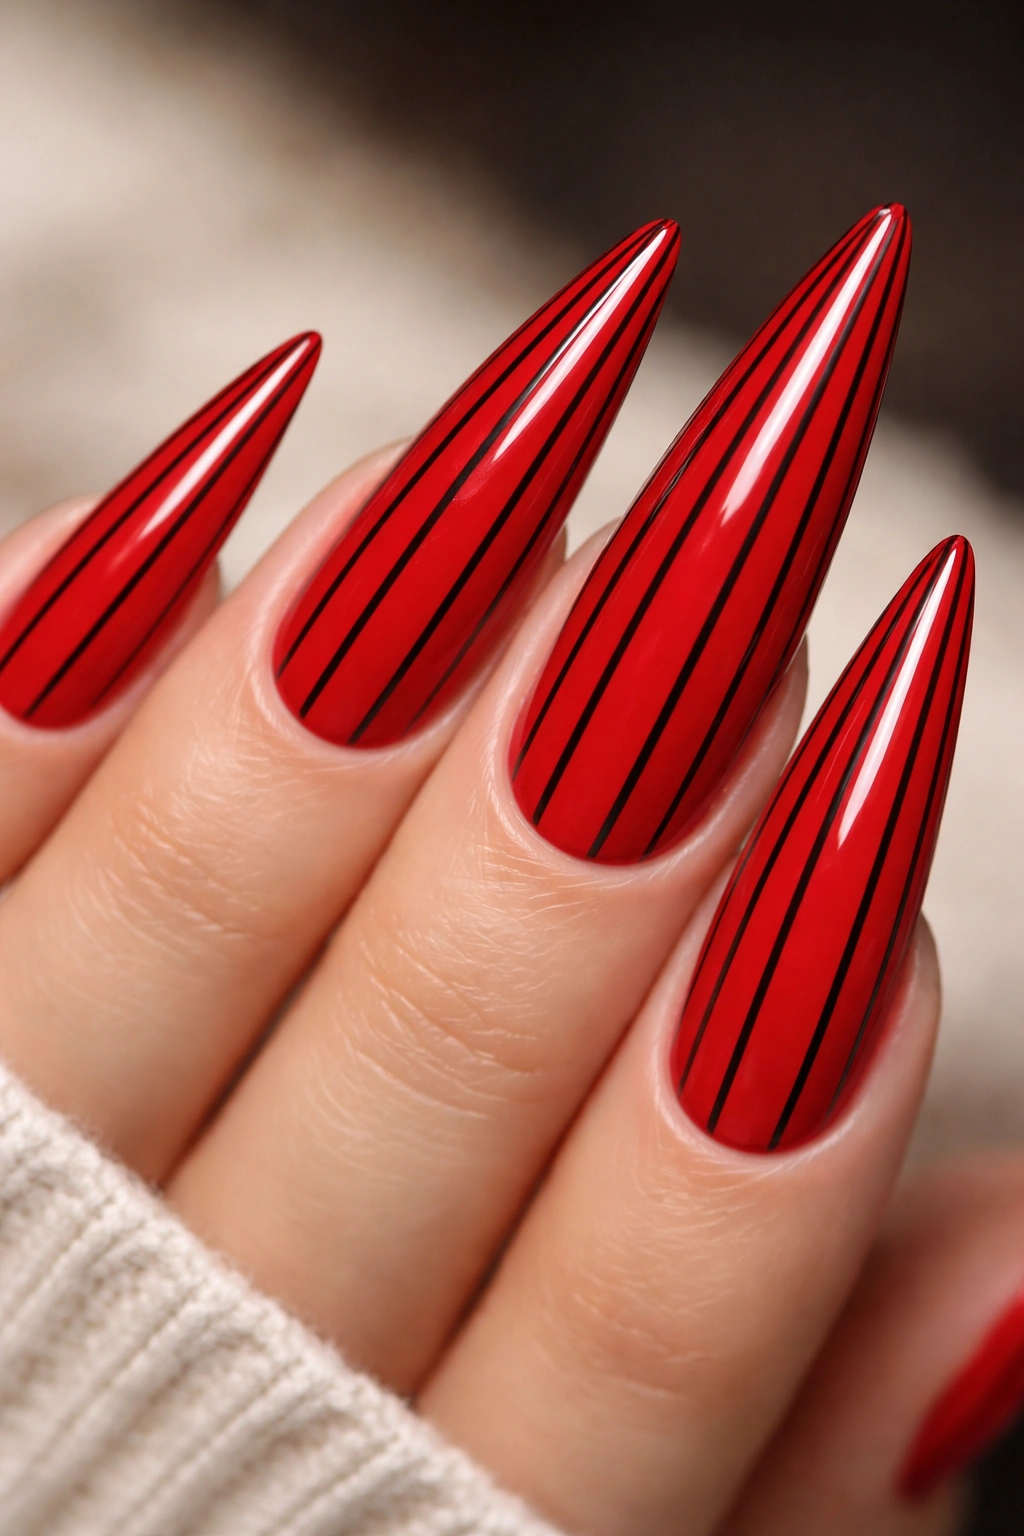
Create thin, evenly-spaced black vertical lines running up the length of the red nail for a modern, graphic look.
Why Vertical Lines Elongate
Vertical lines naturally draw the eye upward and emphasize length. On a stiletto, which is already vertically oriented, this effect is maximized. Black lines on red create high contrast that reads as bold and intentional. This design works best with precision and even spacing, which makes it feel designed rather than random.
Painting Vertical Stripes Precisely
- Use a striping brush or thin nail art brush
- Thin black gel polish or black polish works equally well
- Space the lines evenly by measuring with your eye or using a guide — aim for spacing roughly equal to the width of the lines themselves
- Black is forgiving because it’s opaque; mistakes can be painted over once dry
- Usually three to five thin vertical stripes per nail creates the right balance between pattern and breathing room
Pro tip: If your lines are slightly imperfect, the imperfection can read as artfully hand-drawn if you keep the spacing consistent.
18. Red with Warm Gold Ombre to Nude
Start with deep red at the base and transition through warm gold tones to a soft nude at the tip. This creates a warm, gradient effect that feels luxurious and intentional.
Why Warm-Toned Gradients Feel Luxe
Gradients that move through multiple warm shades create a sunset-like effect that feels rich and intentional. On a stiletto, this gradient is especially striking because the angle of the nail naturally emphasizes the color transition. Warm tones work beautifully together, so the gradient feels cohesive rather than jarring.
Building a Warm Multi-Tone Ombre
- Thin your gold and nude shades with a bit of topcoat to make blending easier
- Using a makeup sponge, apply the red at the base, dab on the gold in the middle, and apply nude at the tip
- The colors should blend slightly where they meet, creating transition zones
- Layer the sponge application several times to deepen the gradient and blur the lines
- A thick topcoat over everything will soften the transitions further and create a more seamless effect
Insider note: The key to a gradient that doesn’t look accidental is commitment — blend thoroughly enough that distinct color blocks don’t appear.
19. Red Stilettos with Metallic Silver Geometric Outline
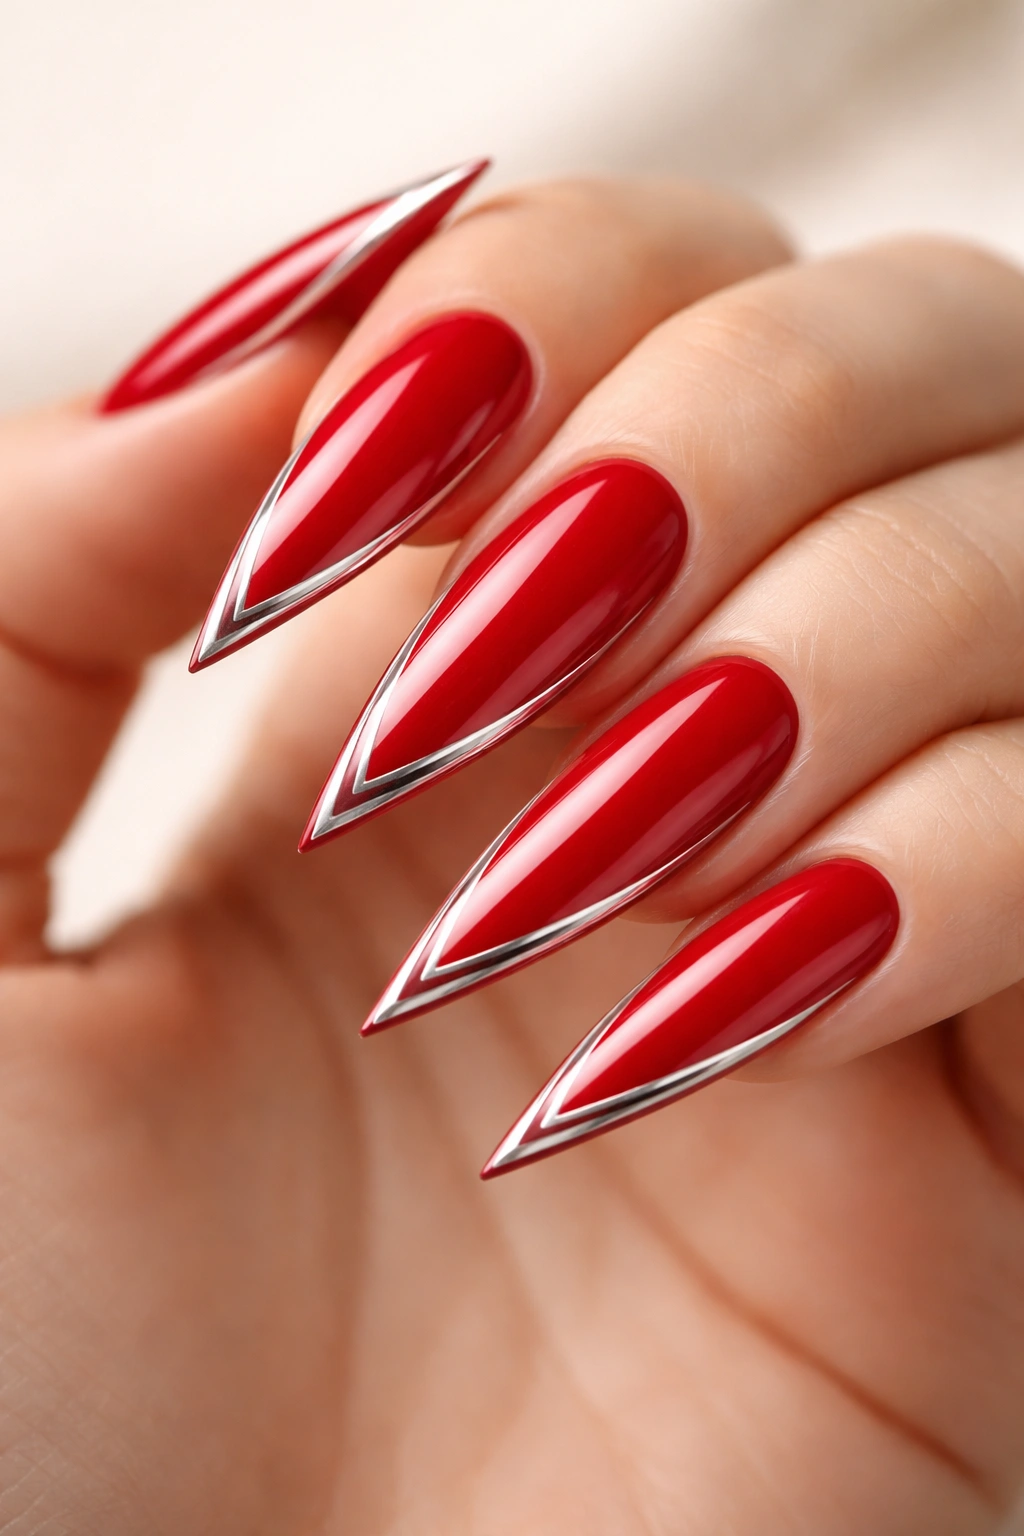
Use a thin silver metallic brush stroke to create a geometric frame — perhaps a triangle at the tip, a diamond shape, or an angular outline — that contrasts with the red.
The Impact of Geometric Framing
Geometric shapes feel modern and intentional, while metallic finishes add luxury. On a stiletto, a geometric frame draws attention to the nail’s shape and emphasizes its length. Silver works beautifully with red because it’s cool-toned and creates clear contrast without competing for attention.
Creating Precise Geometric Shapes
- Plan your shape lightly on the nail or use a guide to ensure precision
- Use a thin striping brush and metallic silver gel or polish for smooth, clean lines
- A geometric outline doesn’t need to be filled — the outline alone creates the visual impact
- Precision matters with geometric designs; slightly wonky lines read as less polished
- A topcoat over everything helps the metallic lines stay sharp and reflective
Pro tip: Keep geometric designs simple — one shape per nail rather than multiple overlapping shapes.
20. Classic Red with Pearl or Chrome Dust Accent at the Cuticle
Polish the base of the nail in glossy red and add a fine shimmer of pearl or chrome dust at the cuticle area, creating a subtle highlight that frames the nail.
The Sophistication of Cuticle Accents
A cuticle accent adds interest without making the nail feel cluttered. The shimmer at the base catches light in a different way than the red, creating a subtle two-tone effect. On a stiletto, this accent highlights the nail’s starting point and draws attention to the overall hand rather than just the tips.
Applying Cuticle Accent Details
- Start with glossy red on the entire nail and let it dry completely
- Using a very thin brush or a detailed applicator, apply pearl or chrome dust in a thin band at the cuticle area
- The accent should be subtle — thick enough to be visible but not so thick that it looks like a stripe
- Chrome and pearl dust work best mixed with a gel adhesive or a sticky topcoat rather than applied dry
- Seal everything with a topcoat to secure the dust and create a smooth finish
- This accent works best with a warm pearl or a cool chrome depending on your skin undertone
Worth knowing: Cuticle accents require precision, so take your time and don’t worry if the first attempt isn’t perfect — you can paint over it and try again.
Final Thoughts
The most beautiful thing about these red stiletto nail designs is how achievable they are. None of these requires professional-level nail art skills or specialized equipment you don’t already have access to. A steady hand, a few quality brushes, some patience, and a clear vision are really all you need to create a manicure that looks polished and intentional.
Red stiletto nails are a confidence statement, and that confidence comes through most clearly in the simplicity and precision of the design. Whether you choose a pure, glossy red or add subtle details like gold foil, ombre, or geometric lines, you’re working with a shape and color combination that does a lot of the heavy lifting for you. The stiletto point naturally elongates and draws attention, and the red color immediately reads as bold and sophisticated.
Pick a design that resonates with how you want to feel, commit to clean execution, and don’t worry about perfection. The most memorable manicures aren’t always the most complicated ones — they’re the ones that were done with intention and care. Your red stiletto nails can be exactly that.
