

Red and green nail designs have transcended their seasonal reputation to become a genuinely versatile pairing that works year-round. Whether you’re drawn to the classic festive combo or you’re looking for modern, sophisticated interpretations of these bold colors, stiletto nails offer the perfect canvas for experimenting with this striking combination. The elongated shape of stilettos naturally amplifies color contrast and makes intricate designs pop—which means red and green nail art that might feel overwhelming on shorter nails becomes absolutely stunning when stretched across this dramatic silhouette.
What makes red and green particularly compelling is their inherent contrast. Red commands attention while green provides balance and depth. Together, they create visual interest that doesn’t rely on flashiness or heavy embellishments. You can dial the sophistication up or down depending on your mood, occasion, and personal style. Matte finishes feel edgy and modern. Gloss and chrome finishes feel glamorous. Metallics and gems elevate the look entirely. The color pairing itself is flexible enough to work with everything from minimalist nail art to intricate holiday-inspired designs.
If you’ve been hesitant about trying red and green nails, thinking they’re too “Christmassy” or too bold, this collection will change your perspective. These fourteen ideas showcase the full spectrum of what’s possible when you combine these two colors thoughtfully—from subtle, sophisticated approaches to show-stopping statement nails that turn heads.
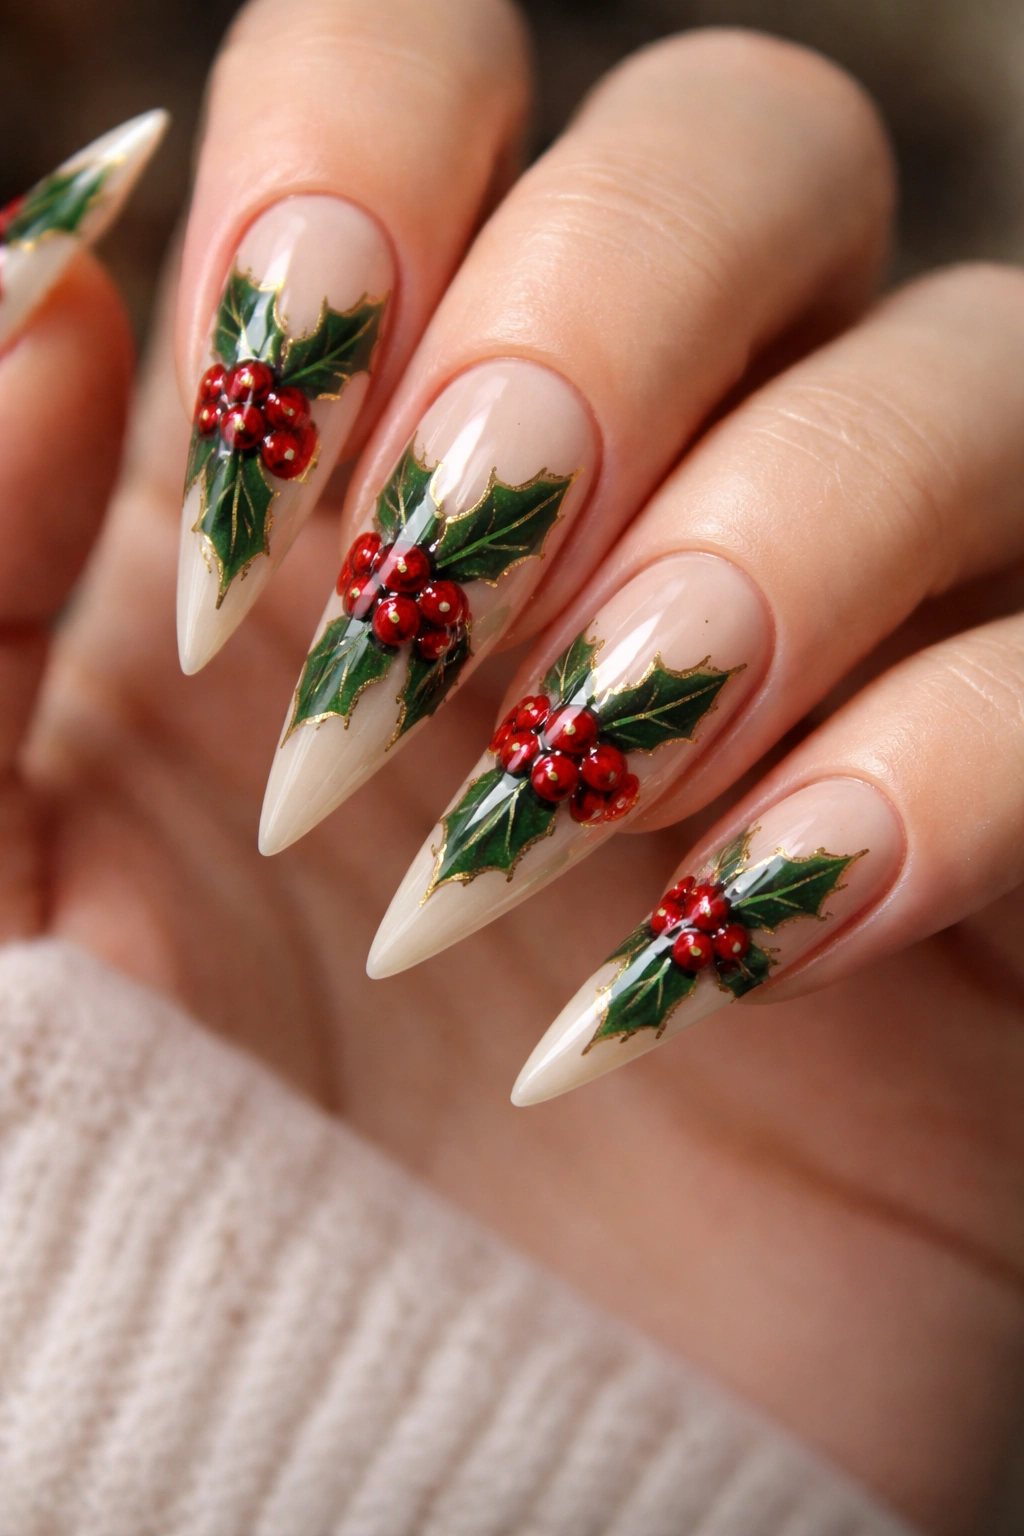
1. Classic Holly Red and Green
The holly berry design is the most iconic red and green nail combination, and for good reason—it’s fundamentally beautiful and reads as intentional no matter when you wear it. This design pairs a cream or nude base with deep forest green leaves and vibrant red circles clustered together to mimic holly berries, typically placed across the nail or concentrated near the tip.
The Artistic Technique
Creating holly berry designs requires a steady hand or the willingness to practice on nail wheels first. You’ll use a thin dotting tool or thin brush to paint red dots in clusters of three or five, then paint elongated leaf shapes in forest green around them. The leaves should have a slight point at the tip and a gentle curve to mimic the natural shape of holly foliage. Seal everything with a glossy top coat to enhance the elegance.
What Makes This Timeless
- Works on any length, but stiletto nails elongate the design beautifully and give you more surface area for detailed leaf placement
- Pairs perfectly with both warm and cool undertones in skin—experiment with cream, ivory, or pale pink bases to find your match
- Can be worn year-round because it reads as botanical rather than explicitly seasonal
- Looks sophisticated on natural nails and equally striking on acrylics or gel extensions
Pro tip: Paint the holly leaves first in a darker forest green, then layer them with a slightly lighter green to create dimension and make the design feel less flat.
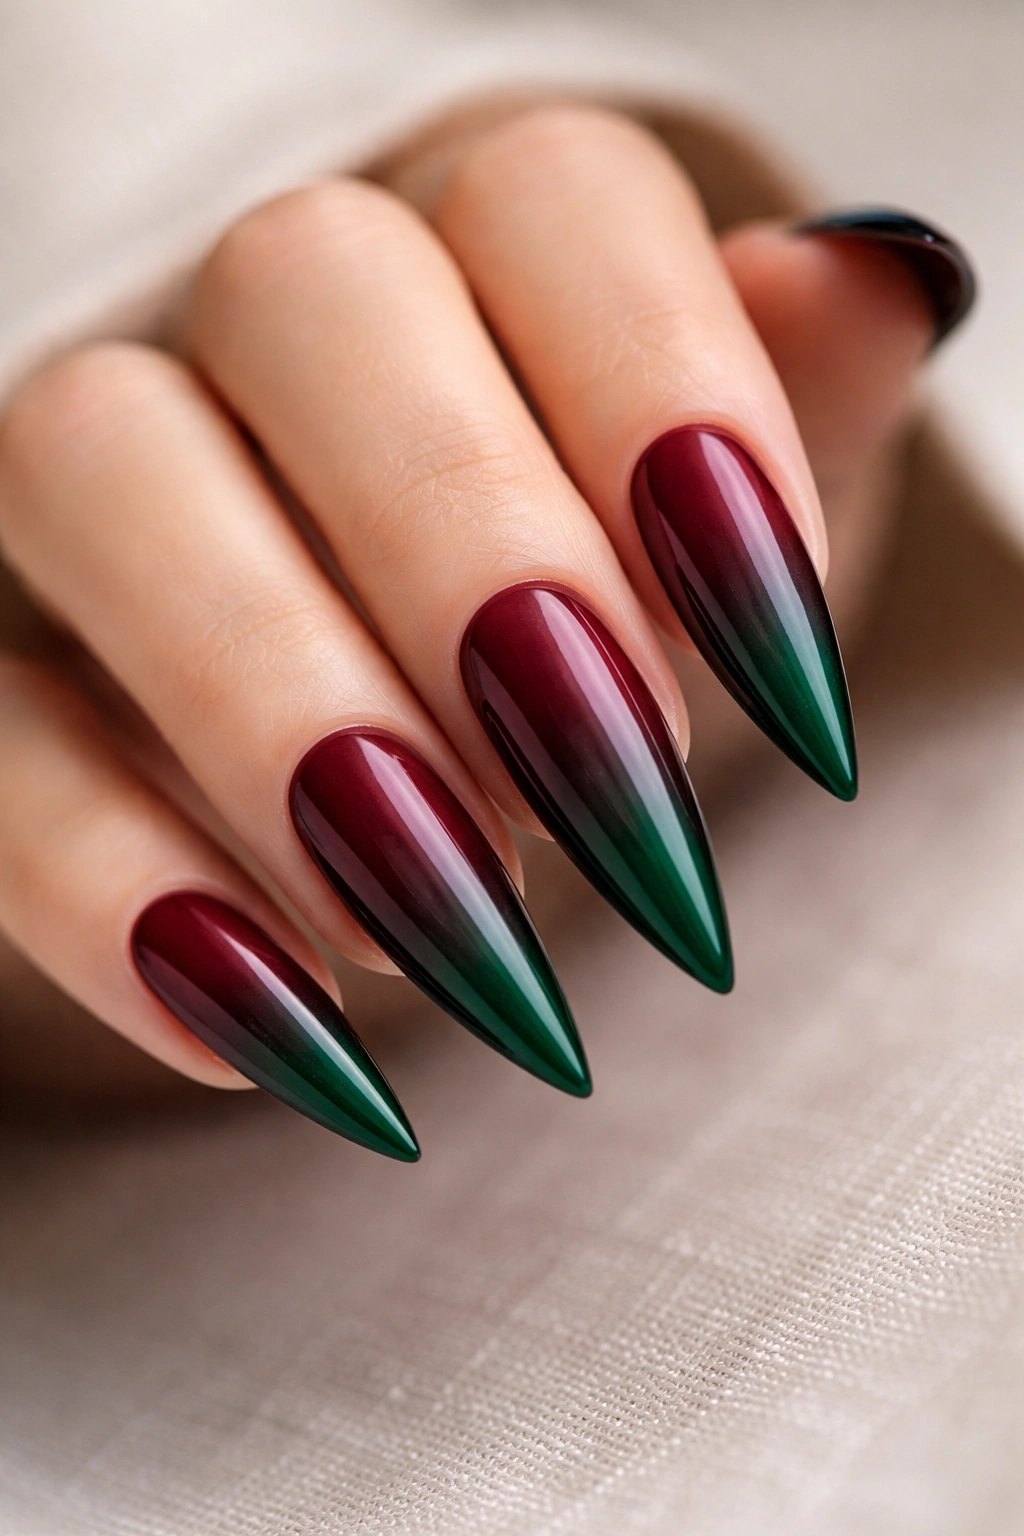
2. Red Ombre with Green Tips
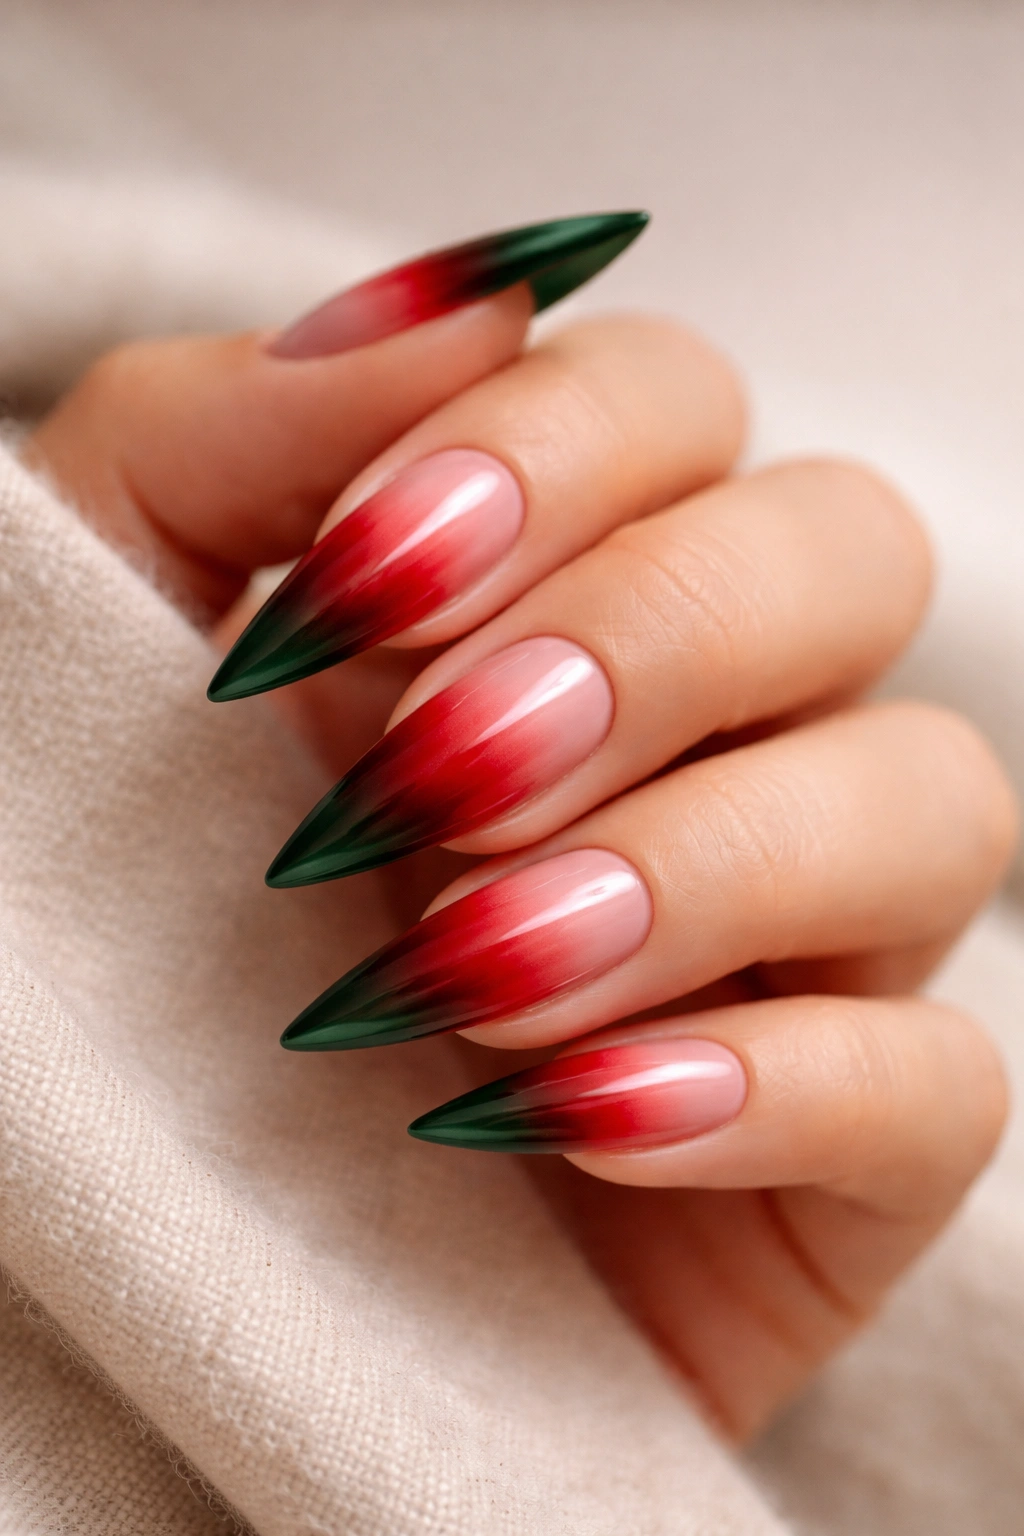
This design flips the traditional approach by using red as the dominant color in an ombre gradient, then transitioning to forest or lime green at the tips. The effect is eye-catching and modern, with the ombre gradient doing most of the visual heavy lifting while the green tip provides a sharp finishing detail.
The Gradient Process
Start with a pale pink or nude base on the nail bed. Using a makeup sponge, dab a medium red into the middle of the sponge, then a deeper crimson red toward one edge. Sponge this gradient onto the nail, building layers until the color transitions smoothly from pale near the cuticle to deep red toward the tip. Once dry, apply green directly to the very tip of the nail—either as a sharp color block or as another blended gradient that flows into the red.
Why This Works
- The ombre effect creates dimension without requiring intricate detail work
- Green tips prevent the red from feeling too monochromatic and add visual interest
- Works beautifully on both matte and glossy finishes—matte feels edgy, glossy feels polished
- Easy to customize the depth of the colors depending on your preference
Insider note: Sponge your ombre layers on a disposable nail wheel before transferring to your actual nails if you’re new to the technique—it’s less stressful and helps you achieve smooth transitions.
3. Christmas Plaid Pattern
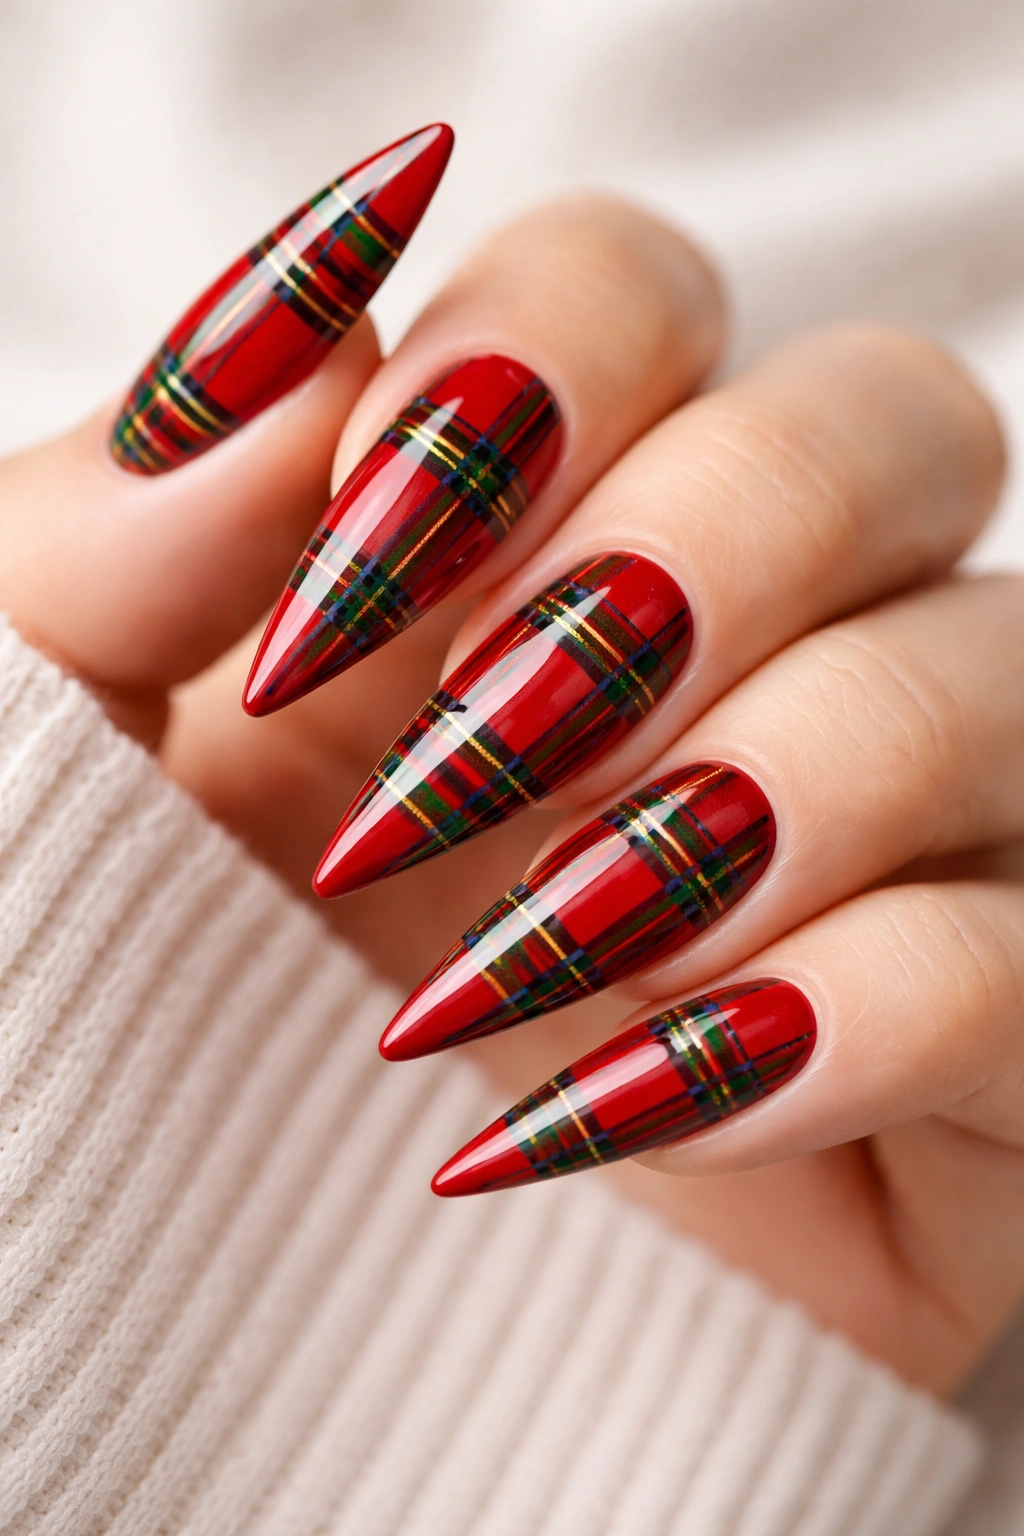
Plaid designs feel preppy and intentional when executed cleanly on stiletto nails. A red or green base with thin contrasting lines in the other color creates a structured, geometric look that reads as fashion-forward rather than overly holiday-specific. The key is clean lines and proportion.
Creating Clean Plaid Lines
Use thin striping tape or a thin brush (0.5mm or smaller) to paint parallel lines in your contrasting color. Space them evenly—typically about 2-3mm apart works well depending on your nail width. Paint horizontal lines first, let them dry completely, then layer vertical lines perpendicular to create the crossed pattern. The intersections create the plaid effect naturally. A glossy top coat makes the lines appear sharper and cleaner.
Design Variations
- Crimson red base with forest green lines feels warm and traditional
- Deep forest green base with ruby red lines feels sophisticated and moody
- Burgundy base with hunter green lines feels more autumn-adjacent and wearable year-round
- Add gold or silver striping tape for a touch of glamour without being overwhelming
Worth knowing: If you’re not confident with free-hand lines, striping tape creates perfectly straight edges—apply it to your nail, paint over it, and remove the tape while the polish is still slightly wet for crisp lines.
4. Red with Gold and Green Accents
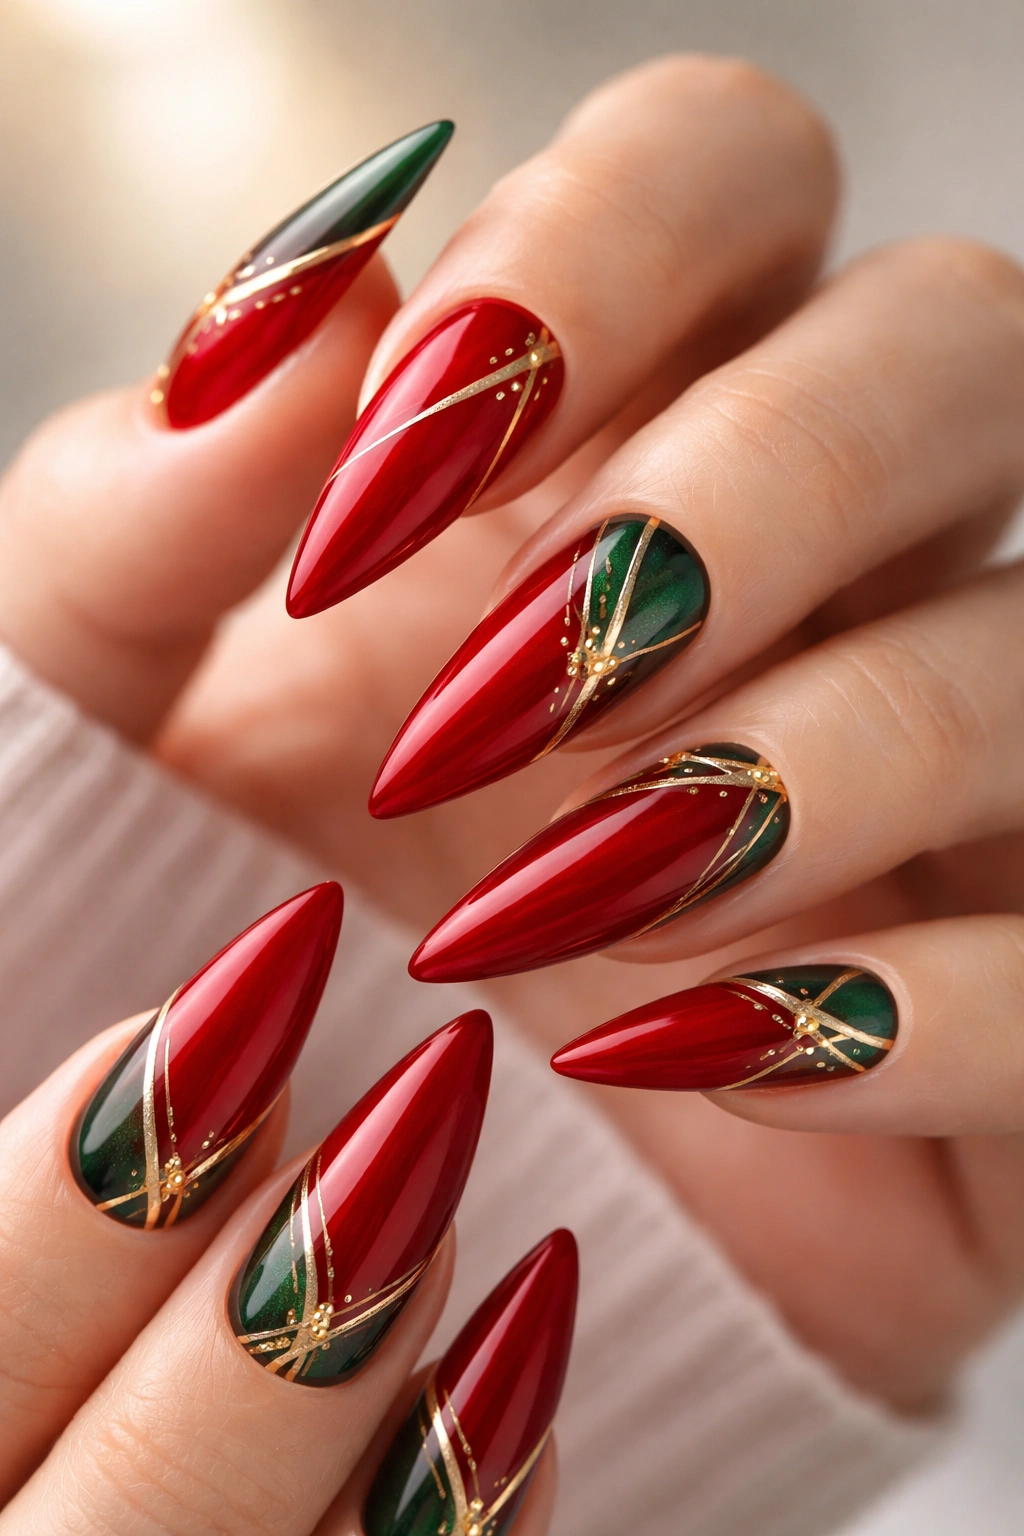
This design elevates the red and green pairing by introducing metallics, creating a more luxe, intentional aesthetic. A glossy red base is interrupted by delicate gold detailing and forest green accent elements—perhaps a thin green line near the cuticle, green geometric shapes, or scattered green leaf motifs.
Layering Metallics and Colors
Paint your base red and allow it to dry completely. Using a thin brush or gold striping pen, add geometric accents—triangles along the edge, a thin line running the length of the nail, or abstract gold shapes scattered across the surface. Add forest green details in between using the same precise application. The metallics should catch light and draw attention without overwhelming the color palette.
Where to Wear This
- Formal events and evening occasions where your nails are part of your total look
- Professional settings if kept minimal and refined—think one delicate gold line near the cuticle and small green leaf clusters rather than heavy coverage
- Paired with metallic jewelry, particularly gold, to tie the whole aesthetic together
- Works beautifully with both warm red tones (coral, tomato) and cool reds (wine, burgundy)
Pro tip: Use gold leaf rather than paint for an ultra-luxe effect—apply it over a tacky gel layer and seal it for a three-dimensional shimmer that’s genuinely striking.
5. Matte Deep Green with Glossy Red Details
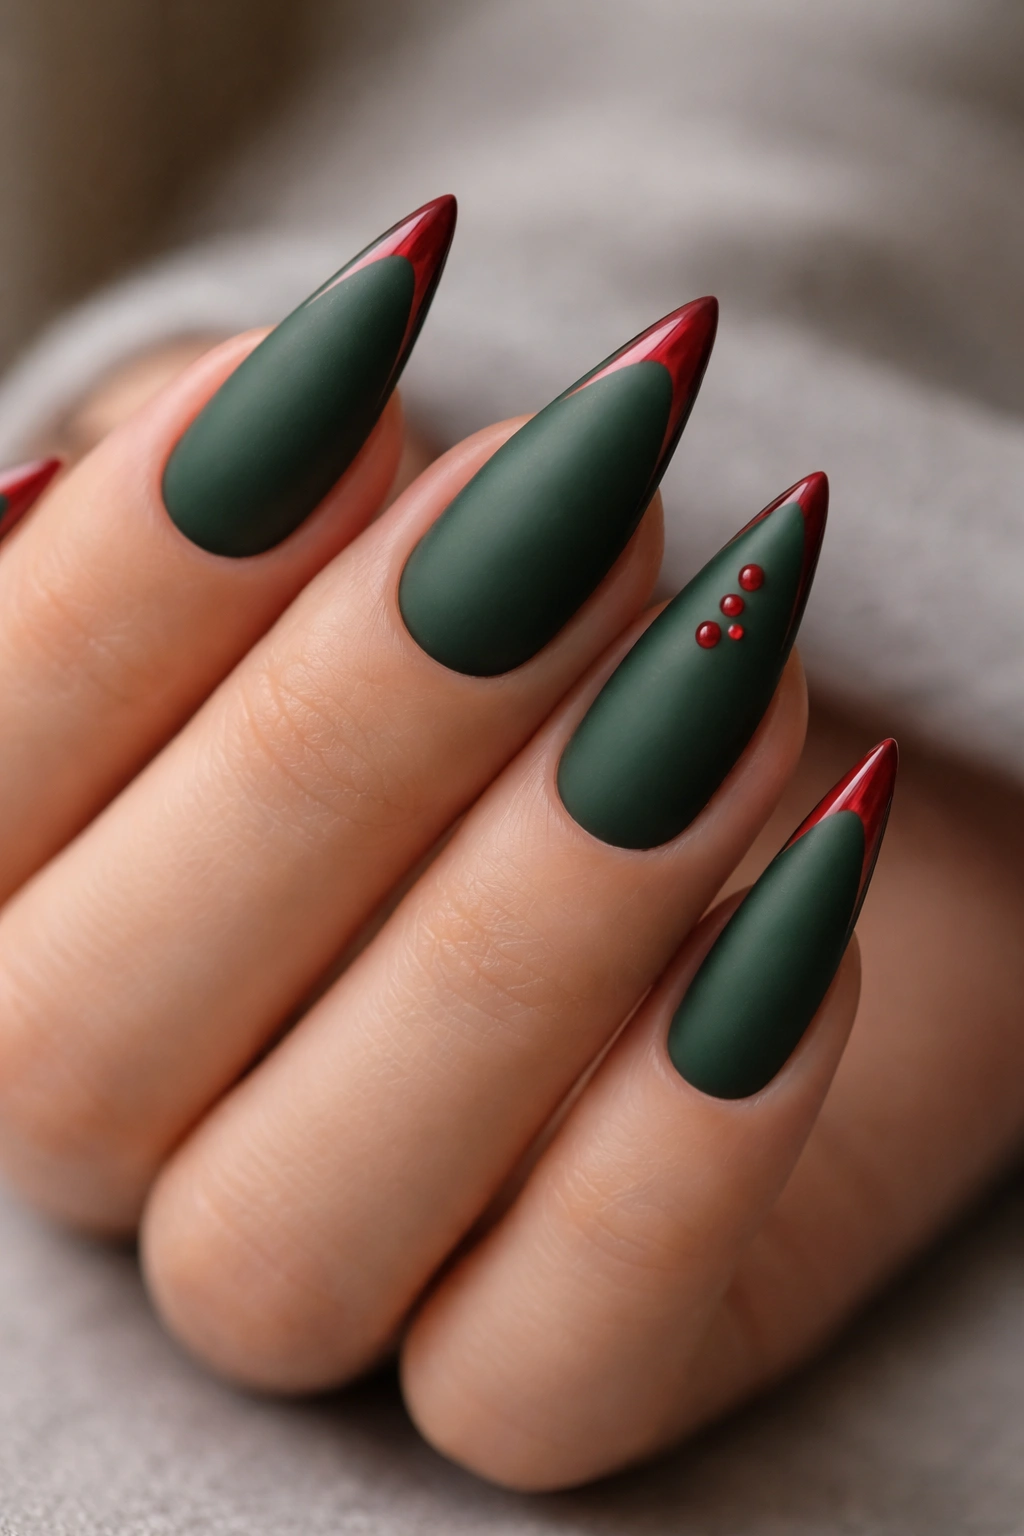
The contrast between matte and glossy finishes creates visual interest without requiring complex patterns. A matte forest or hunter green base is paired with glossy red accents—perhaps a thin red stripe near the tip, red dots scattered across the nail, or a glossy red gradient fading from the tip.
The Finish Contrast Technique
Paint your entire nail in matte deep green—this is your foundation and should be opaque and smooth. Once fully dry, apply a glossy top coat only to your red accent areas using a thin brush. The uneven finish creates visual depth and makes the glossy areas appear to pop forward while the matte areas recede. This technique works best when you have clear contrast between the two finish types.
Why Finish Contrast Works
- Creates dimension without relying on color alone
- Feels contemporary and intentional rather than accidental
- Matte finishes hide dust and fingerprints better than glossy finishes, making this practical for daily wear
- The glossy accents catch light and draw attention strategically rather than all over
What to know: Matte and glossy finishes don’t always play well together if you seal with one uniform top coat—consider using a matte top coat instead and applying glossy polish only where you want the shine, or use gel products that allow you to cure different sections separately.
6. Two-Tone Split Design
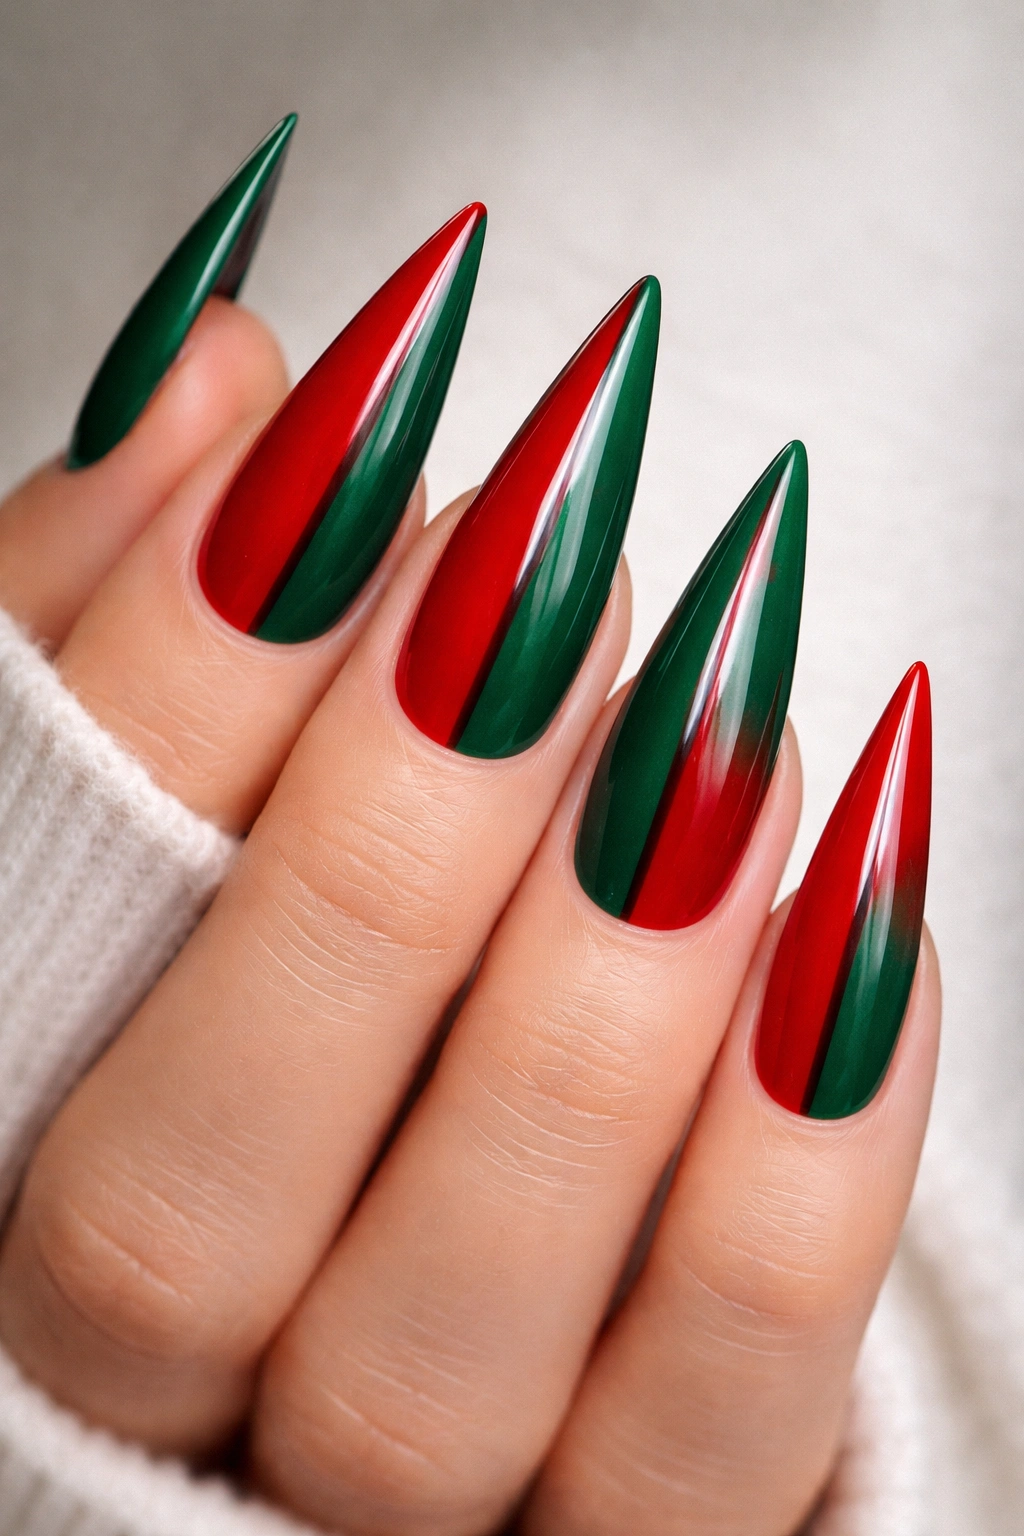
A vertical or diagonal split that divides each nail into red on one side and green on the other creates a bold, graphic statement. This design works particularly well on stiletto nails because the elongated shape emphasizes the division and creates strong visual lines.
Executing a Clean Split
Use striping tape positioned vertically down the center of your nail (or diagonally if you prefer). Paint one side with a glossy red and the other side with a glossy forest green. Once both sides are dry, carefully remove the striping tape to reveal a clean division. Seal with a clear top coat. The result is a striking two-tone effect that looks deliberate and modern.
Split Variations
- Vertical center split: Classic and balanced, works on all nail shapes
- Diagonal split from cuticle to opposite corner: More dynamic and less formal
- Irregular or abstract split: More artistic and less geometric
- Matte and glossy combination: Red matte on one side, green glossy on the other adds finish contrast to the color contrast
Insider note: Pull tape away at a 180-degree angle (straight outward) rather than peeling it at an angle—this prevents the dried polish from pulling away with the tape and keeps your line clean and sharp.
7. Red Glitter with Green Metallic Base
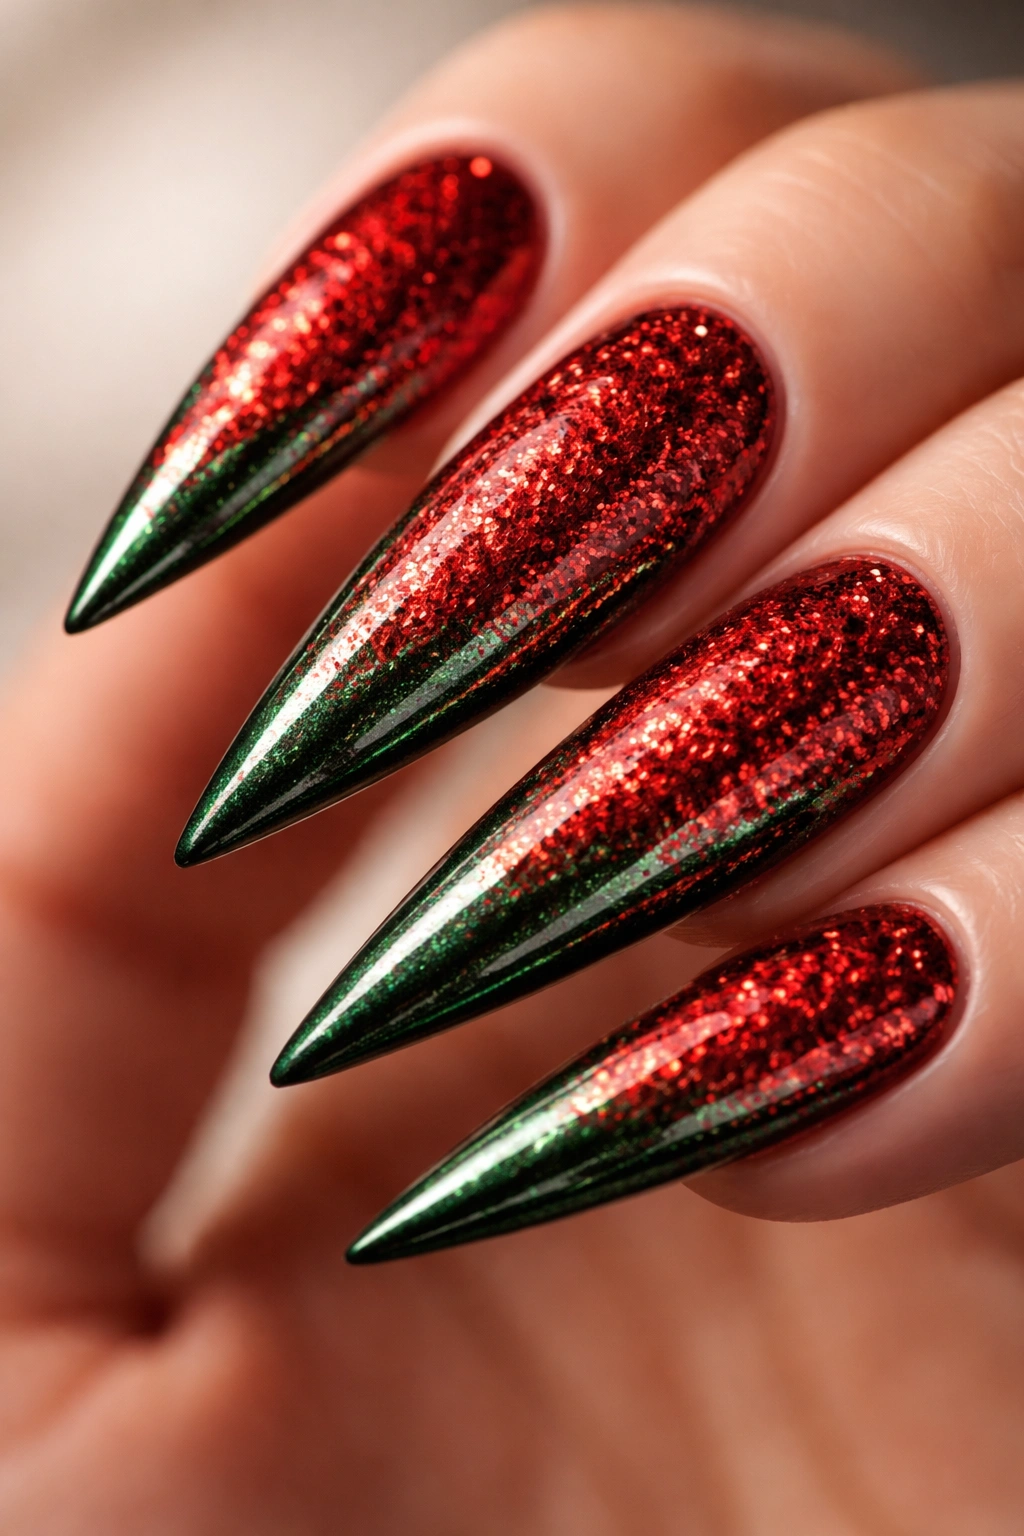
Combining a sparkly finish with a metallic finish creates a dynamic, eye-catching look. A shimmery or metallic green base is covered with red glitter particles that catch light and create texture. This design feels festive and glamorous without being overly themed.
Layering Glitter for Impact
Start with a shimmer or metallic green base—this could be a forest green with subtle shimmer or a true chrome green that reflects light. Once dry, apply a clear or slightly tinted top coat, then while still tacky, apply chunky red glitter or glitter confetti. The confetti should be distributed randomly for an organic, joyful feel. Seal everything with a gloss top coat to smooth the texture and lock the glitter in place.
Texture Considerations
- Chunky glitter creates more visual impact and texture
- Micro glitter feels more refined and less chunky
- Confetti glitter (irregularly shaped pieces) looks playful and less formal
- Scattered glitter looks more intentional than full coverage
Pro tip: Use a clear, slightly sticky glitter gel as your top coat rather than applying loose glitter to a tacky base—it adheres better, lasts longer, and requires no additional sealing.
8. Festive Striped Pattern
Thin alternating stripes in red and green create a bold, graphic design that feels energetic without being complicated to execute. The stripes can run vertically, horizontally, or diagonally depending on your preference and skill level.
Painting Clean Stripes
Use a thin striping brush or striping tape to create parallel lines in alternating colors. Paint your base color (red or green), let it dry, then add thin stripes of the contrasting color using even spacing. If using a brush, steady your hand by resting your pinky on the nail bed. If using tape, apply strips and paint over them, removing the tape while the polish is still slightly tacky for sharp lines. The spacing determines the visual effect—closer stripes feel busier, while spaced-out stripes feel cleaner.
Stripe Variations
- Vertical stripes feel elongating and sophisticated
- Horizontal stripes feel playful and casual
- Diagonal stripes feel dynamic and modern
- Thick stripes with thin stripes mixed creates visual hierarchy
- Matte stripes on glossy base or vice versa adds finish contrast
Worth knowing: Paint your stripes slightly thinner than your eye initially tells you to—they always appear larger once the polish dries and cures, and too-thick stripes can feel overwhelming on a stiletto nail.
9. Red Base with Green Geometric Shapes
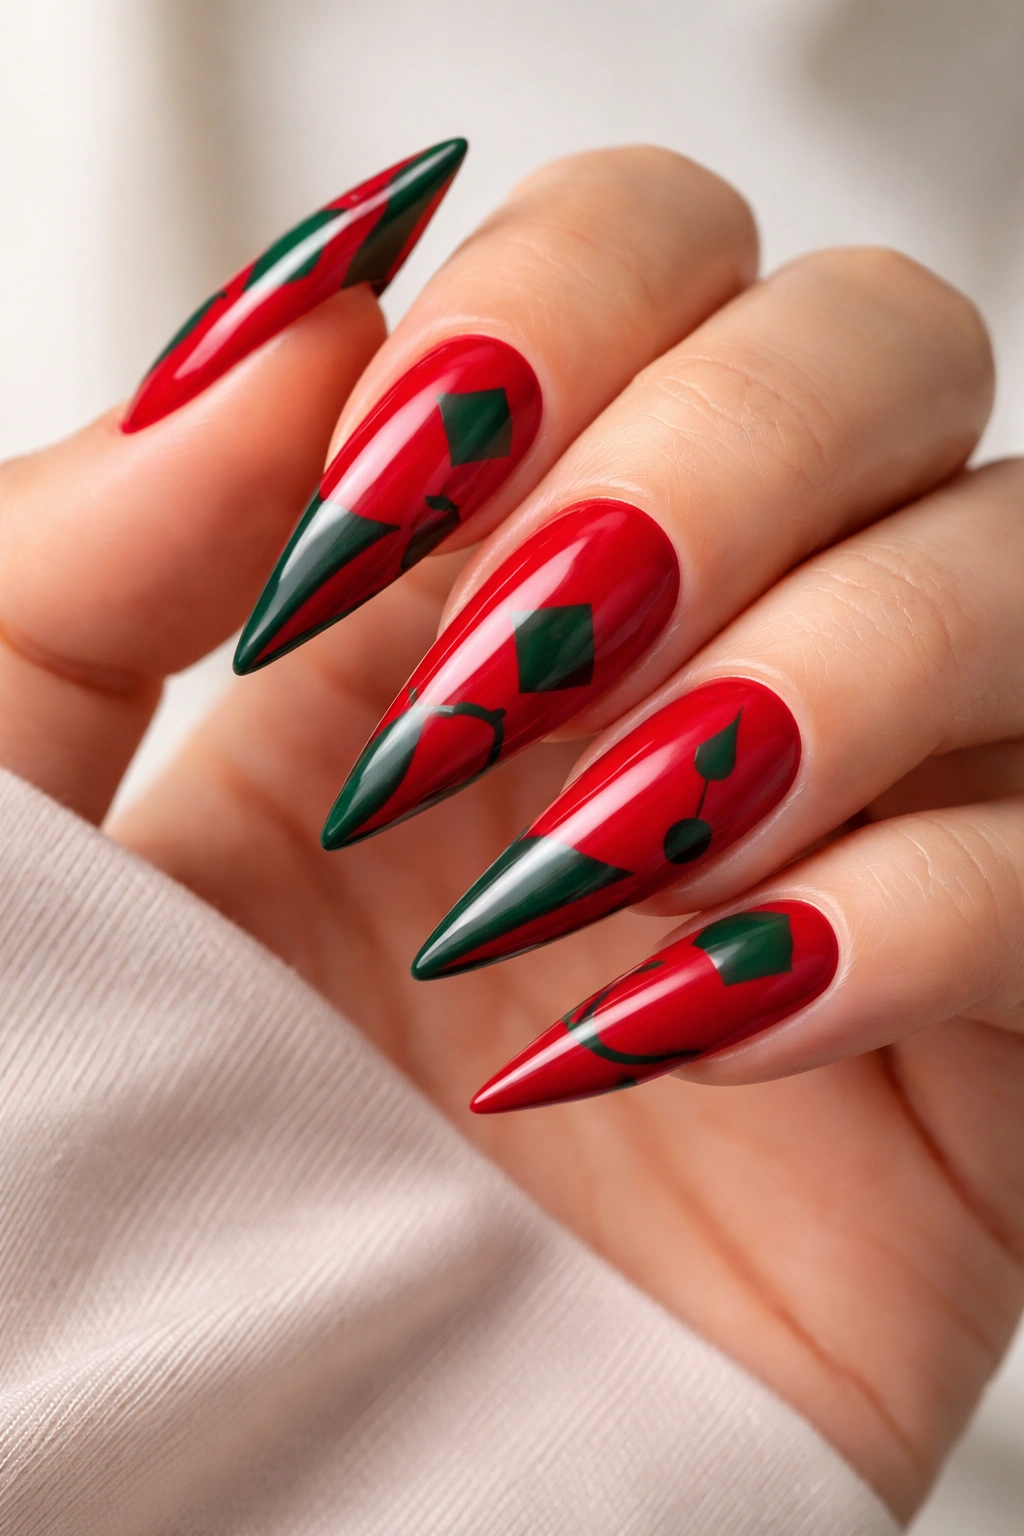
Geometric designs feel modern and intentional. Start with a red base and add geometric shapes in forest green—triangles, hexagons, circles, or abstract angular shapes scattered or clustered across the nail.
Drawing Geometric Shapes
Use a thin brush or a geometric nail stamp (which makes this exponentially easier) to paint clean shapes. If drawing free-hand, use a pencil or marker on your nail first to sketch lightly, then paint over your sketch with precision. Geometric shapes should have clean edges and defined angles—this is what makes them read as intentional rather than random. Spacing matters—clustered shapes feel cohesive, while scattered shapes feel more balanced.
Geometric Options
- Triangle patterns: Paint three or five triangles of varying sizes pointing in different directions
- Hexagon grids: Create a pattern of connected hexagons reminiscent of honeycomb
- Circle gradients: Paint circles in varying sizes clustered toward the tip
- Angular abstract shapes: Create asymmetrical angular forms that look contemporary and artistic
- Color-blocked geometric: Alternate between solid red and green geometric sections
Insider note: Nail stamps designed for geometric patterns make achieving precision infinitely easier—you press the stamped plate and transfer pre-designed patterns instantly rather than hand-painting.
10. Burgundy and Forest Green Gradient
A sophisticated color gradient that transitions from deep burgundy to rich forest green creates a jewel-toned aesthetic that feels luxe and intentional. This design works beautifully on stiletto nails because the gradient has room to develop across the elongated surface.
Creating a Smooth Gradient
Using a makeup sponge, dab burgundy onto one side of the sponge and forest green on the other, with a slight overlap in the middle. Sponge this blend onto your nail in a horizontal or vertical direction—horizontal tends to look more intentional, while vertical follows the natural line of the nail. Layer multiple times to build a smooth, gradual transition. The beauty is in the seamless blend between colors.
Gradient Orientation
- Horizontal gradient from burgundy at cuticle to forest green at tip: Elongating and elegant
- Vertical gradient from burgundy on one side to green on the other: Bold and graphic
- Diagonal gradient from corner to corner: Dynamic and modern
- Reverse gradient from green at cuticle to burgundy at tip: Unexpected and fresh
Pro tip: The more you layer with the sponge, the smoother the transition becomes—be patient and build the gradient gradually rather than trying to achieve it in two applications.
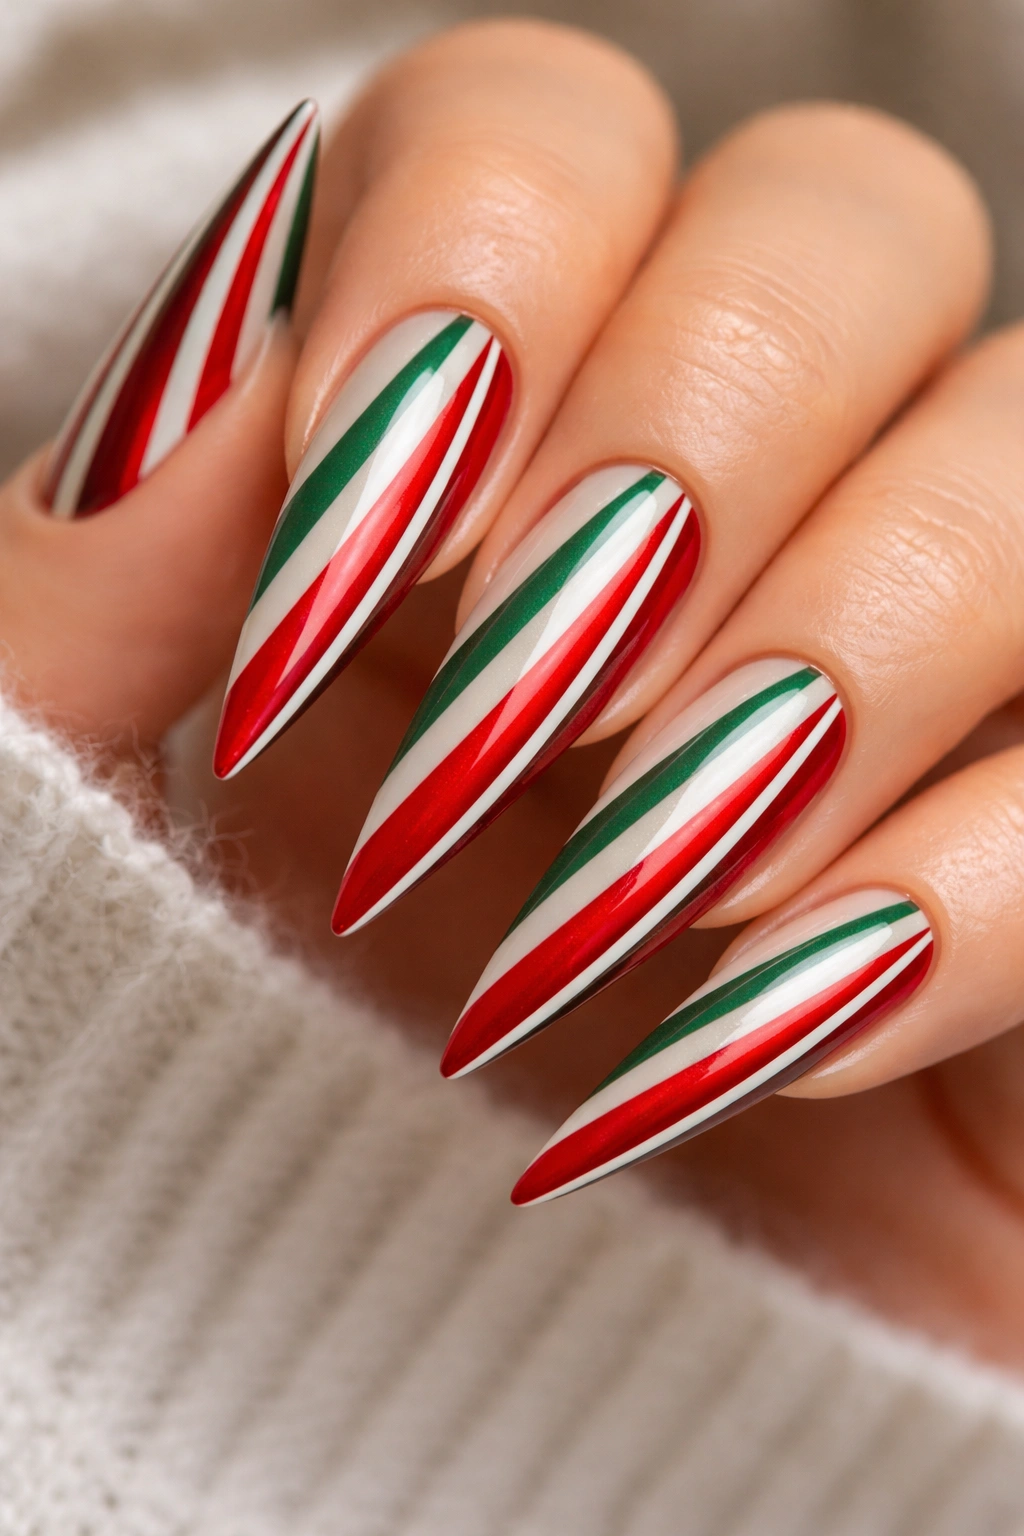
11. Candy Cane Inspired Stilettos
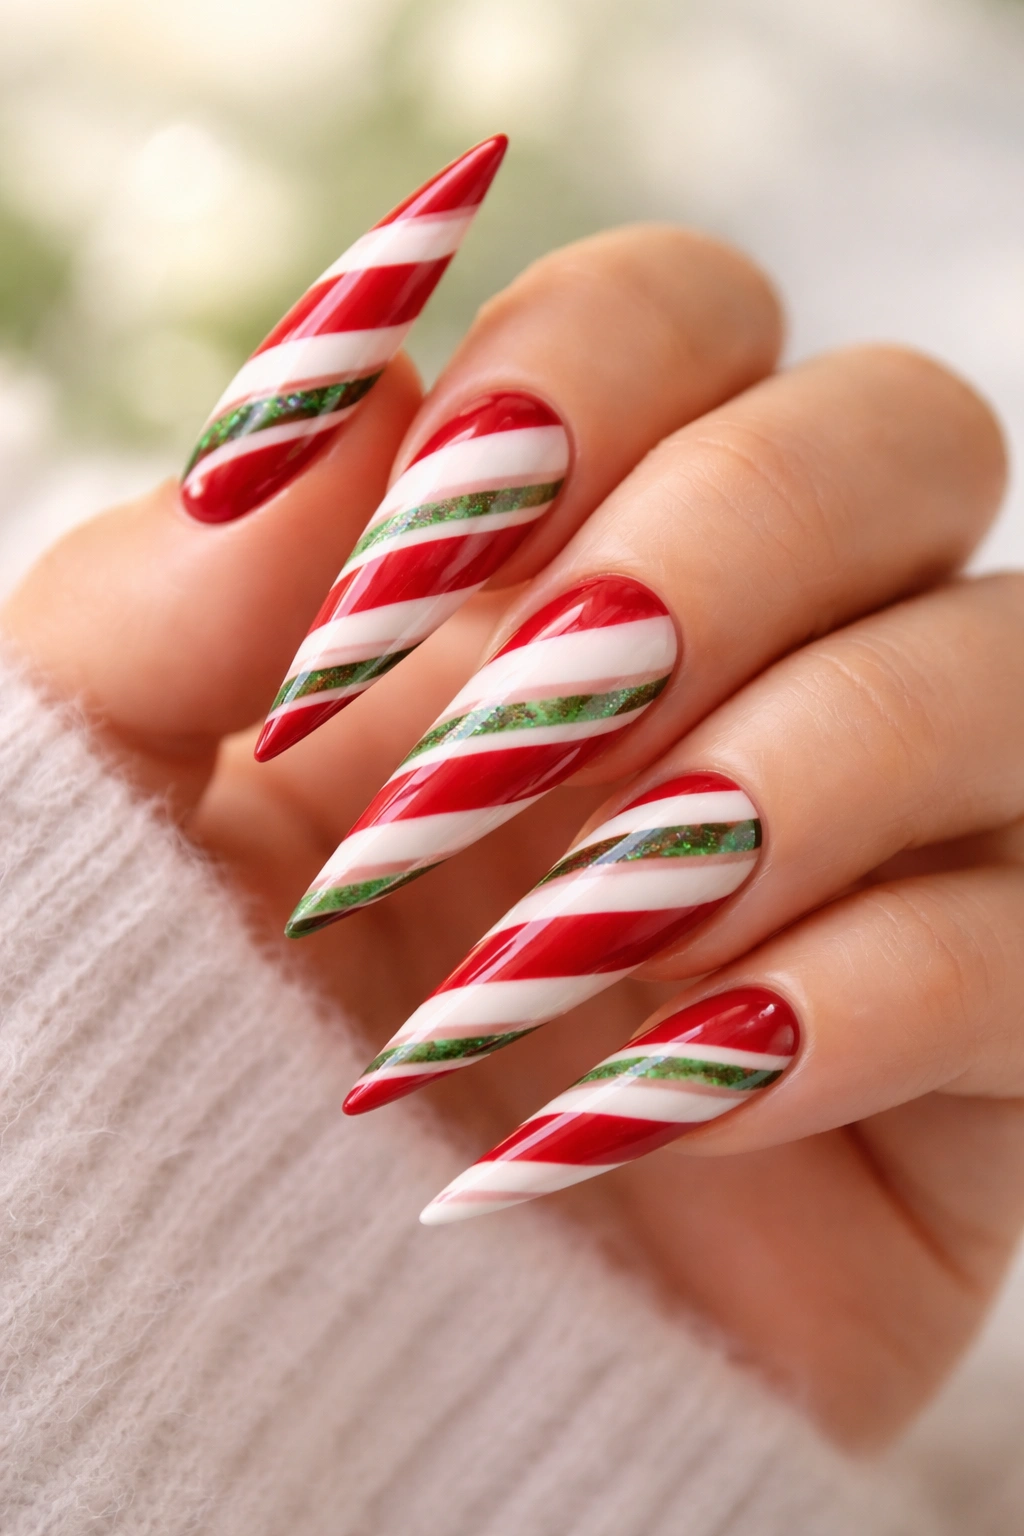
Candy cane designs feature red and white stripes with green accents, creating that classic peppermint aesthetic. Rather than a traditional candy cane shape, horizontal or spiral stripes in red and white with green geometric accents create the visual reference without being too literal.
Striped Base with Green Details
Paint alternating horizontal stripes in red and white across the entire nail. Use striping tape for clean edges—place tape, paint red, let dry, place tape in new positions, paint white, let dry, remove all tape. Once your striped base is complete, add green details: perhaps a thin green line near the cuticle, green dots scattered across the stripes, or a small green geometric shape at the tip.
Peppermint Aesthetic Variations
- Classic horizontal stripes: Clean and balanced
- Diagonal stripes: More dynamic and playful
- Spiral pattern: Mimics an actual candy cane shape
- Thick stripes with thin green accents: Creates hierarchy and sophistication
- Matte white, glossy red, with metallic green accents: Adds finish contrast and elegance
Worth knowing: White polish notoriously stains nails if not properly sealed—use a base coat and top coat with white polish, and avoid exposing your nail tips to water for several hours after application to prevent staining.
12. Red Velvet with Green Gems
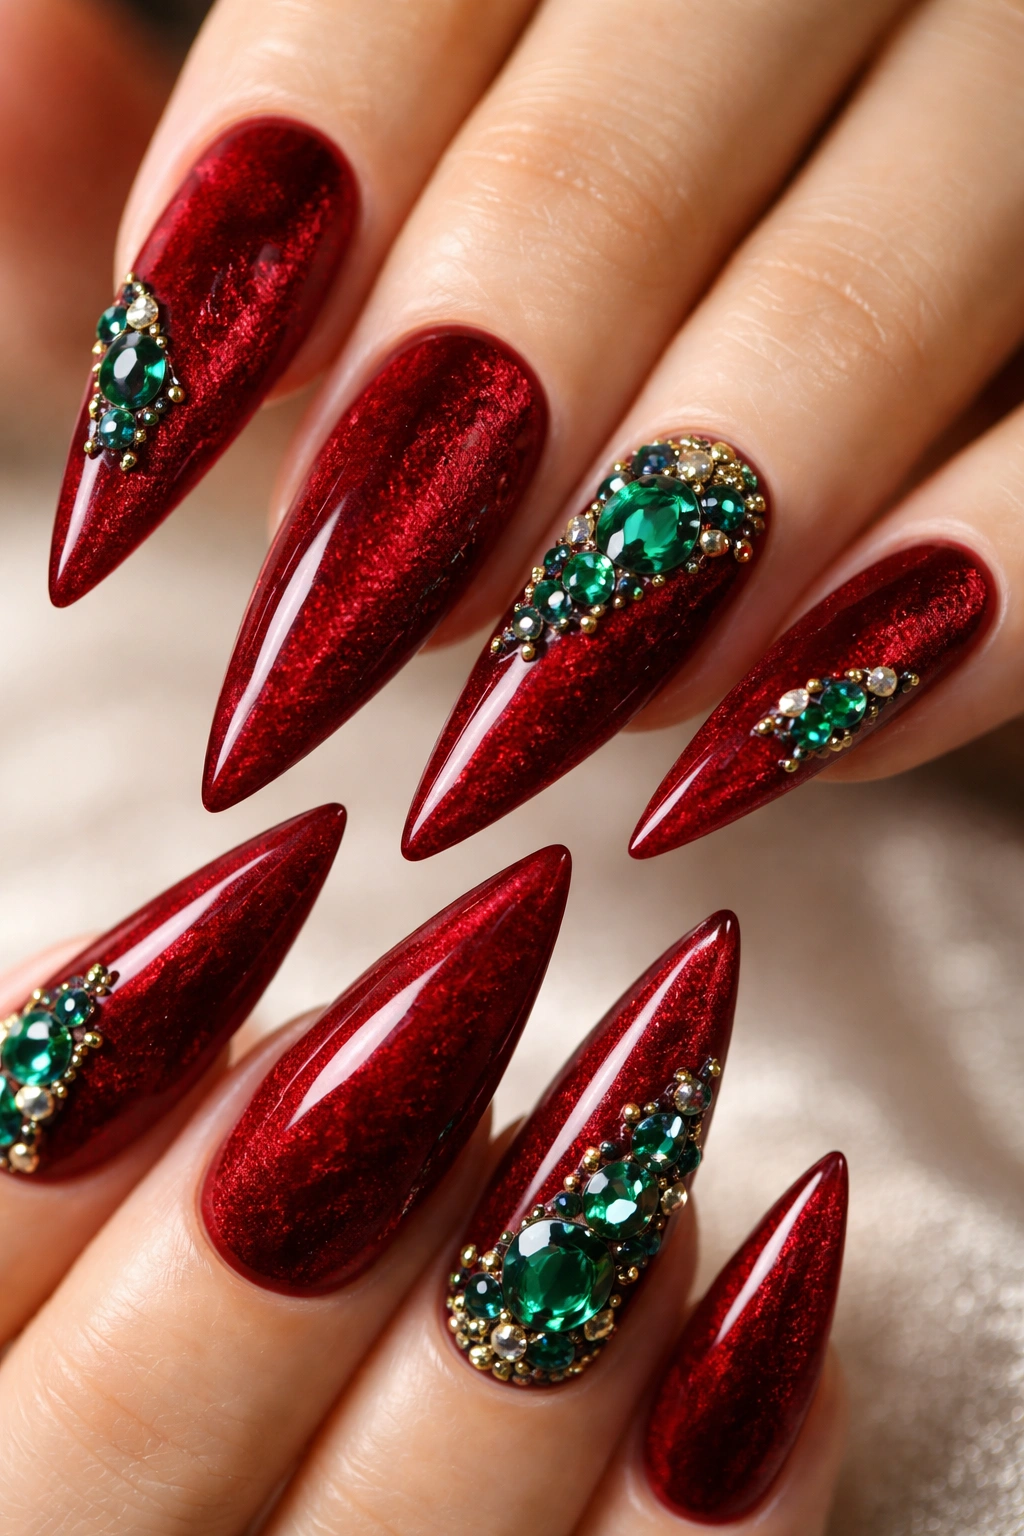
This design combines a luxurious textured finish with strategic gemstone placement. A red velvet or matte red base (created using velvet powder or specialized matte polish) is adorned with small rhinestones, Swarovski crystals, or jade-colored gems clustered or placed deliberately across the nail.
Creating Velvet and Gem Placement
Paint your red base and let it dry. While a clear or tacky top coat is still wet, dust velvet powder over the entire nail surface—this creates the signature velvety texture. Seal with a glossy top coat. Once fully set, apply a clear adhesive or gel to specific areas on your nail and place emerald or green crystals strategically. The gems should catch light without overwhelming the design—consider placing them in small clusters near the tip or along one edge.
Gem and Texture Combinations
- Scattered gems across a velvet base: Glamorous and a bit wild
- Clustered gems at the tip: Elegant and focused
- Gem outline around the perimeter: Sophisticated and structured
- Ombre from many gems to few gems: Creates visual flow from tip to cuticle
Insider note: Use tweezers or crystal-picking tools to place gems rather than your fingers—you’ll have better control and avoid leaving fingerprints or displacing the adhesive.
13. Holly Berry and Leaf Design
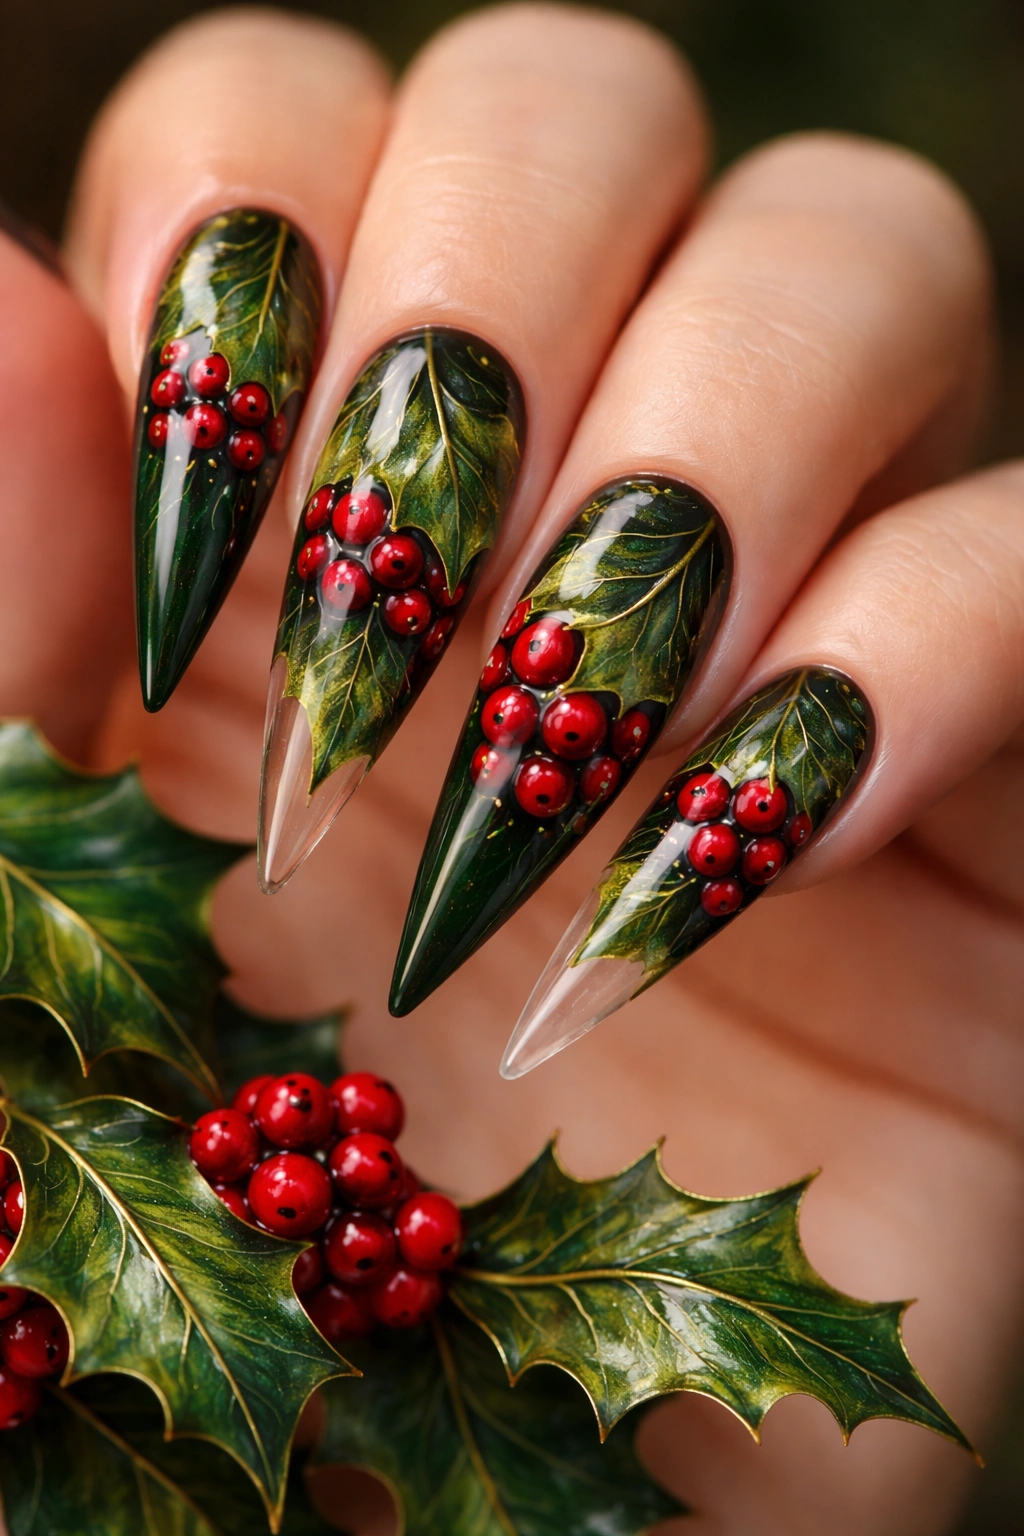
A more intricate variation on the classic holly design that incorporates additional botanical elements. This design features realistic holly leaves in varying shades of green, red berries clustered naturally, and potentially additional botanical elements like small branches or berries in complementary colors.
Detailed Botanical Painting
This design requires a bit more artistic skill or the willingness to practice on nail wheels. Paint elongated, serrated leaves in forest green using varied brush strokes to create natural-looking foliage. Layer some leaves lighter and some darker to create depth. Paint red dots and small circles in clusters mimicking how berries actually grow. Add fine details like tiny branch lines connecting clusters or small leaf veins for realism. Seal with glossy top coat.
Botanical Variations
- Clustered berries with multiple leaf arrangements: Feels abundant and full
- Single berry cluster with fewer leaves: Feels minimalist and modern
- Berries and leaves integrated across entire nail: Creates a landscape effect
- Monochromatic greens with red berries only: Creates strong color contrast while varying foliage
- Multiple botanical elements: Add small branches, additional leaves, or subtle florals beyond holly
Pro tip: Study actual holly plant references before painting—understanding how berries naturally cluster and how leaves are positioned makes your design feel authentic rather than random.
14. Modern Red and Green Marble Effect
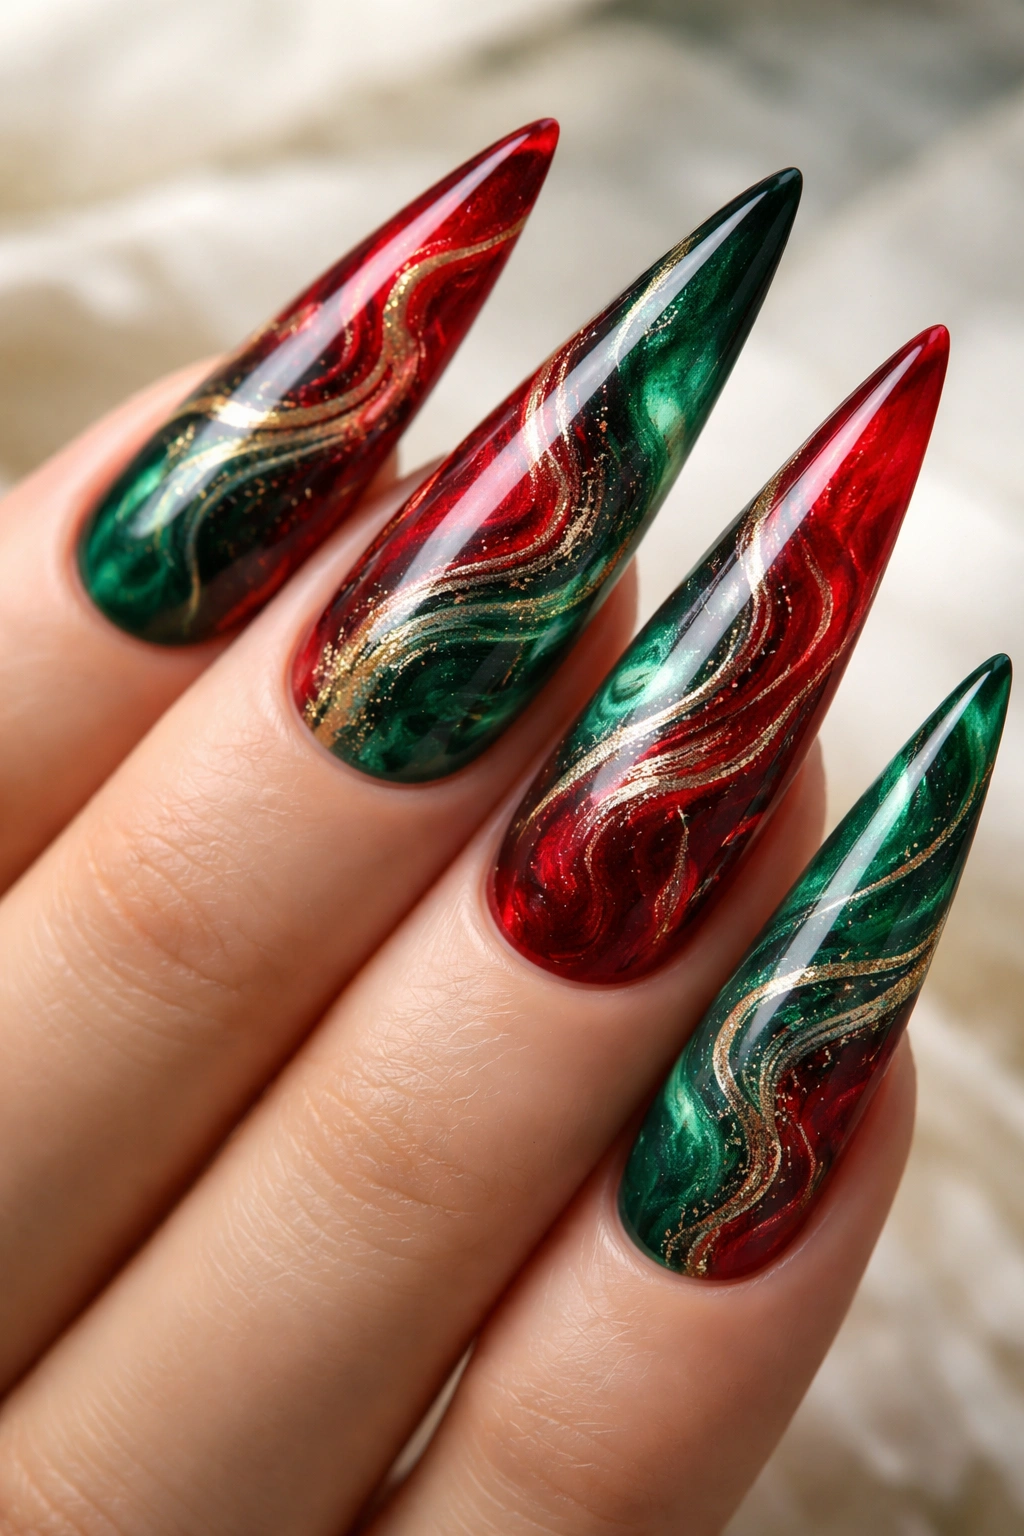
A contemporary take on the color pairing using a marble or water-color effect. Instead of solid colors or geometric patterns, create an abstract marbled surface with red and green swirled and blended organically across the nail for an artistic, unpredictable aesthetic.
Creating Marble Effect
There are several techniques: the water-marble method (dropping polish into water and transferring the pattern), the sponge-blend method (using a makeup sponge to blend colors), or the free-hand swirl method (using a thin brush to create organic swirls). For this design, drop or apply red and green polish in random areas on your nail, then use a thin brush or sponge to swirl and blend the colors where they meet. The effect should feel organic and unrepeatable—no two nails will look exactly the same.
Marble Variations
- Soft blend: Colors mostly stay separate with subtle blending at edges
- Heavy swirl: Colors are thoroughly blended with multiple color interactions across the surface
- Metallic marble: Use metallic red and green polishes for a shimmer marble effect
- Matte marble: Use matte finishes for a more contemporary look
- Two-color with white: Add white or cream to the red and green for more visual interest
Worth knowing: Marble effects are unpredictable and require practice—create designs on nail wheels or sample nails first, and embrace the imperfection as part of the artistic aesthetic rather than a mistake.
Final Thoughts
Red and green nail designs offer more versatility than their seasonal reputation suggests. The color pairing itself—rooted in natural contrast and visual harmony—translates beautifully across countless design approaches, from classic and ornate to minimalist and modern. What makes these designs work is the intention behind them.
Whether you’re drawn to intricate hand-painted details, geometric precision, textured finishes, or subtle metallics, you can find a red and green stiletto nail design that genuinely reflects your personal style. The elongated shape of stiletto nails amplifies whatever design you choose, giving you a larger canvas for creativity and making even simple color combinations feel impactful and intentional.
Start by choosing a design that genuinely excites you rather than one you think you’re “supposed” to wear. If you love bold color blocking, go for the split design. If you appreciate artistry, try the marble effect or detailed holly berries. If you prefer understated elegance, the matte-and-gloss contrast or subtle gold accents will serve you better. Your stiletto nails should feel like an extension of your personality, not a compromise.
