

Stiletto nails have a way of commanding attention, but finding the perfect shade and design when you have deep, rich skin tones requires more thought than just grabbing whatever’s trending. The magic happens when you understand how different colors interact with melanin-rich complexions—some shades that look good on fair skin can wash out or disappear entirely on darker skin, while other colors practically glow against deeper tones. Dark skin is a beautiful canvas that makes jewel tones pop, metallics shimmer with luxury, and deep colors hit with serious sophistication. The key is choosing designs that create contrast, complement your undertones, and make your nails feel like an extension of your overall aesthetic rather than an afterthought.
Stiletto nails are particularly stunning on deeper skin because the length and drama they create become even more striking against rich complexions. Whether you’re drawn to bold, saturated colors, shimmering metallics, elegant neutrals with depth, or intricate nail art, there’s a stiletto design that will make your hands feel like they belong in a magazine spread. This guide walks through 16 specific stiletto nail ideas that are chosen specifically because they create beautiful contrast, enhance rather than compete with your skin tone, and deliver that high-impact look stilettos are famous for.
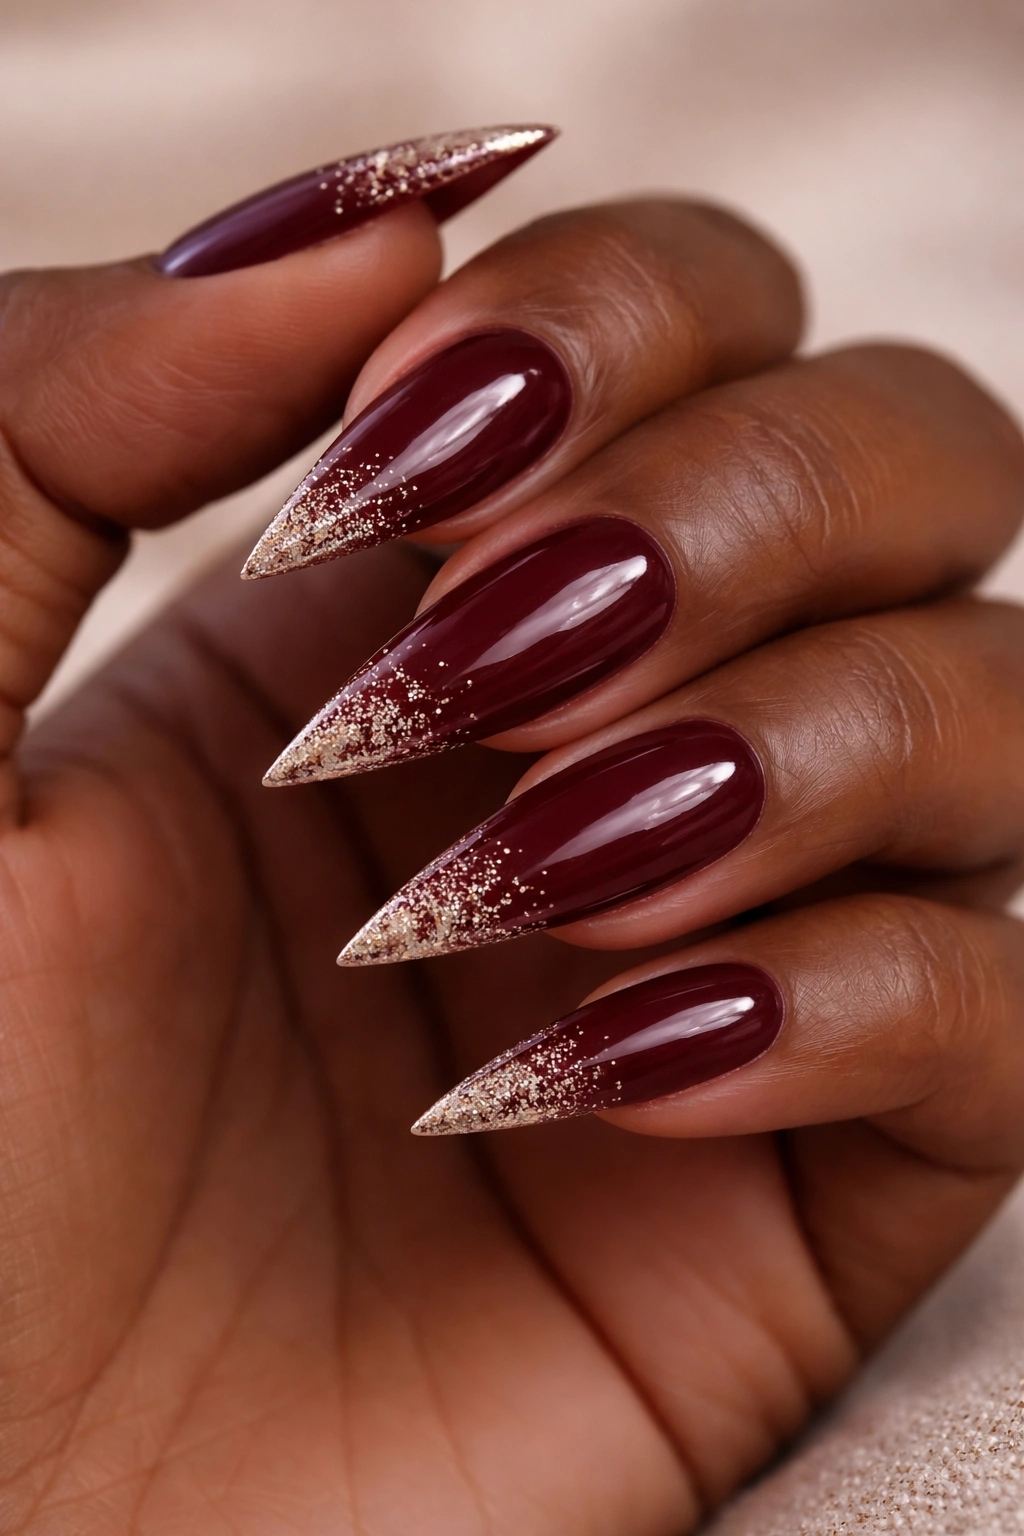
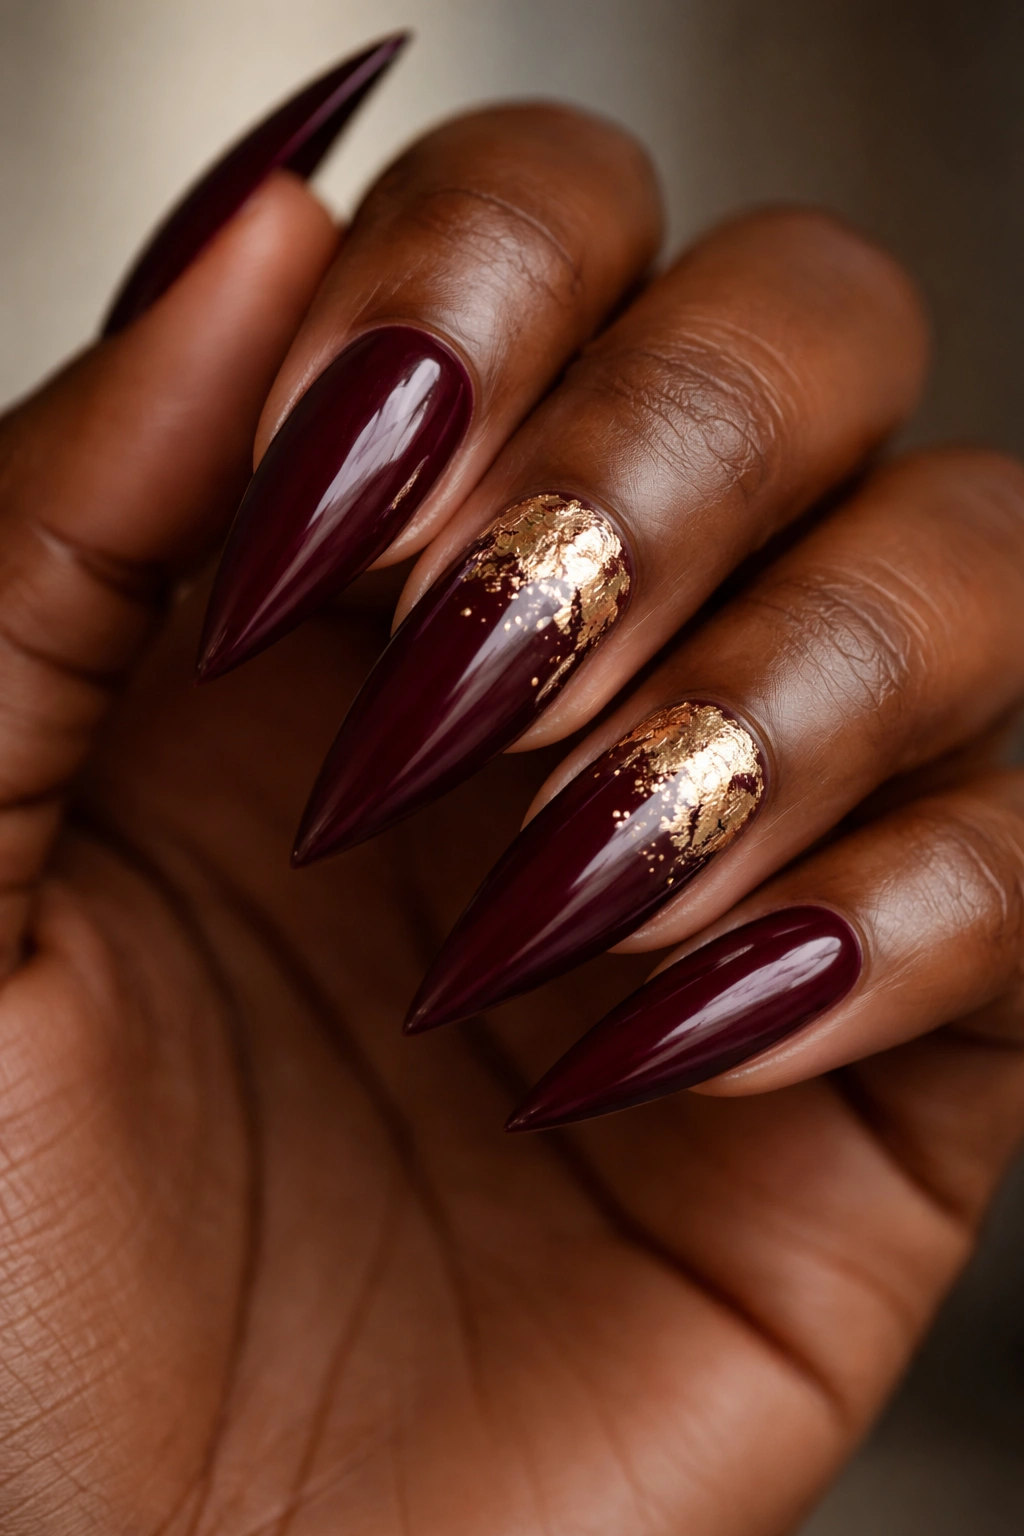
1. Deep Burgundy with Gold Leaf Accents
Burgundy is a color that truly comes alive on dark skin—it’s deep enough to create beautiful contrast while feeling warm and luxurious rather than harsh. Start with a creamy, deep burgundy base (think wine stain rather than bright red), and layer delicate gold leaf pieces sporadically across the nails, concentrating them on the ring and middle fingers for visual interest without overwhelming the design. The shimmer of 24-karat gold leaf against deep burgundy creates an elegant, almost jewel-like effect that photographs beautifully and feels premium without requiring intricate freehand artwork.
Why This Works for Darker Skin Tones
Burgundy has warm undertones that harmonize beautifully with melanin-rich skin. The color sits at a depth that creates clean contrast against dark skin while feeling harmonious rather than clashing. Gold leaf catches light and creates dimension, making your nails appear even more polished and intentional.
Application Tips and Tricks
- Use a sticky base coat before applying gold leaf—it adheres better and lasts longer
- Apply leaf to completely dry polish; wet polish will cause the leaf to wrinkle
- Seal everything with a thick glossy top coat to protect the delicate gold
- The design works beautifully with a matte burgundy base and shiny leaf for texture contrast
Pro tip: This design looks even more luxe if you add one tiny gold accent at the base of each nail—a small line or dot that ties the whole look together.
2. Classic Black with Chrome Powder Finish
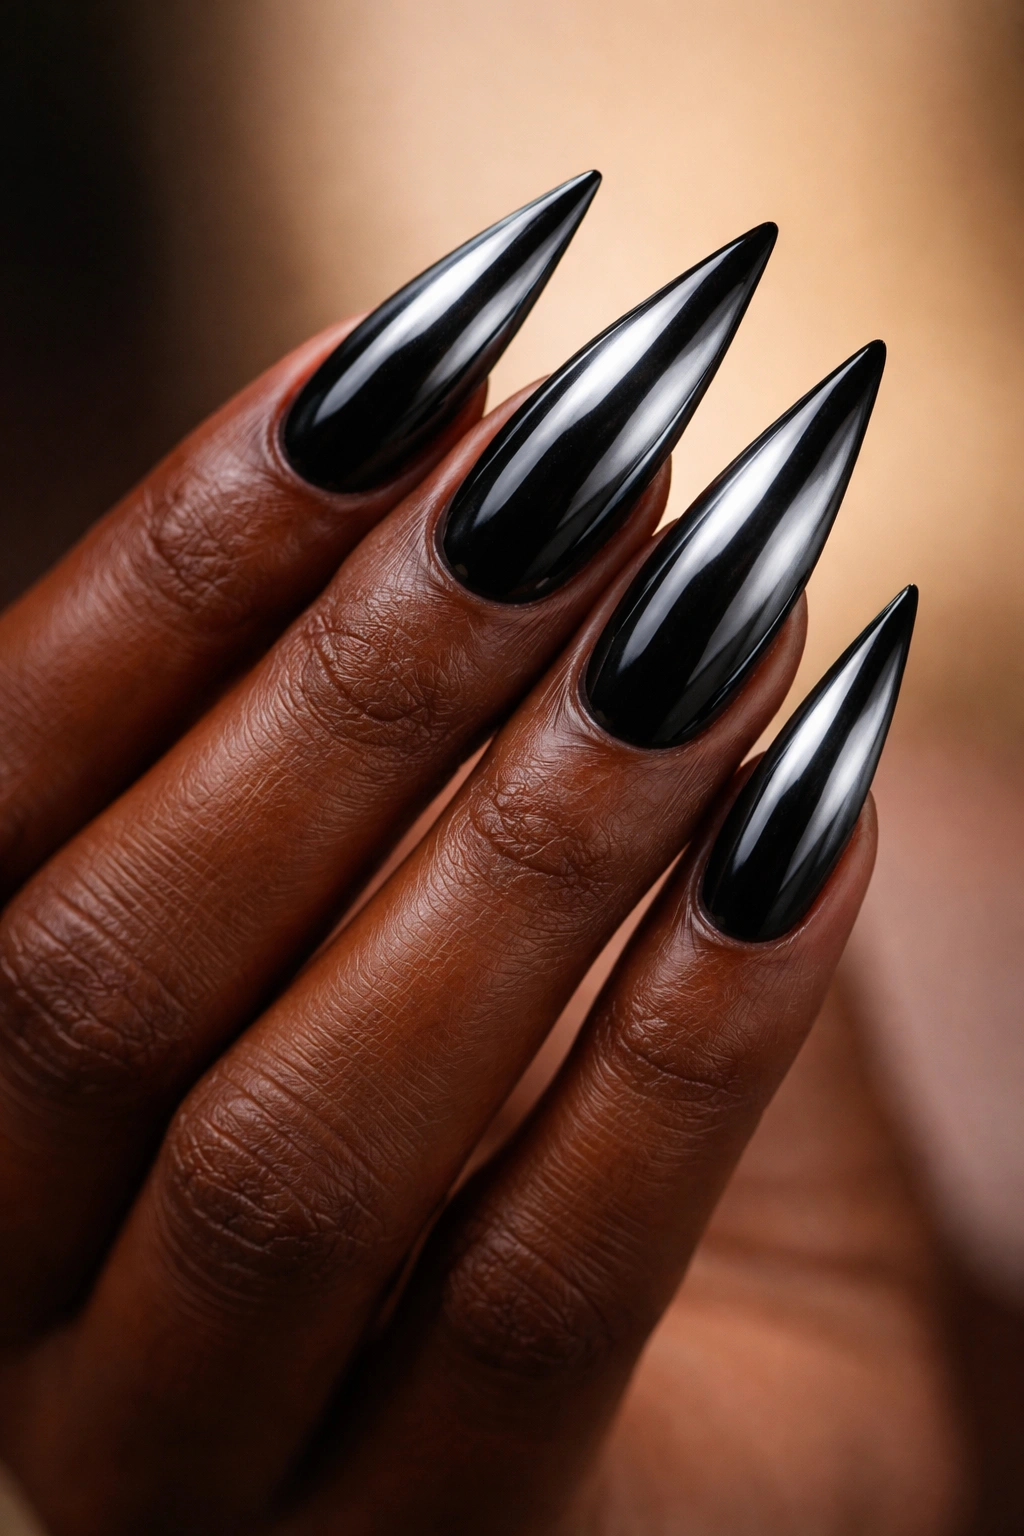
Black is timeless, but black with a mirror chrome finish on dark skin looks absolutely futuristic and fierce. The chrome creates an almost liquid metal effect that makes your nails look like they’re catching light from every angle. This is a minimal, maximalist move—you’re keeping the design simple (just solid color) but making the finish so reflective and dimensional that it becomes the statement piece all on its own.
What Makes This Stand Out
Chrome powder reflects light in ways that solid polish simply cannot, creating depth and movement across your nails. On dark skin, this reflective quality becomes even more dramatic because the contrast between the deep base and the bright mirror effect is so striking.
How to Apply Chrome for Perfect Results
- Paint two coats of a high-quality black gel or regular polish—the base must be perfectly smooth
- Use a dry brush (not the applicator that comes in chrome powder pots) and gently rub the powder onto the wet polish in circular motions
- Don’t press hard; light pressure gives you better control and more even application
- Seal with a clear top coat (chrome can dull under a colored top coat)
- If you want a softer, less reflective look, use chrome on just the tips as an ombre gradient
Worth knowing: Chrome powder comes in various finishes—holographic (rainbow shimmer), rose gold, silver, and pure mirror. For a dark base like black, pure mirror or silver chrome creates the most striking contrast.
3. Rich Emerald Green with Sapphire Ombre
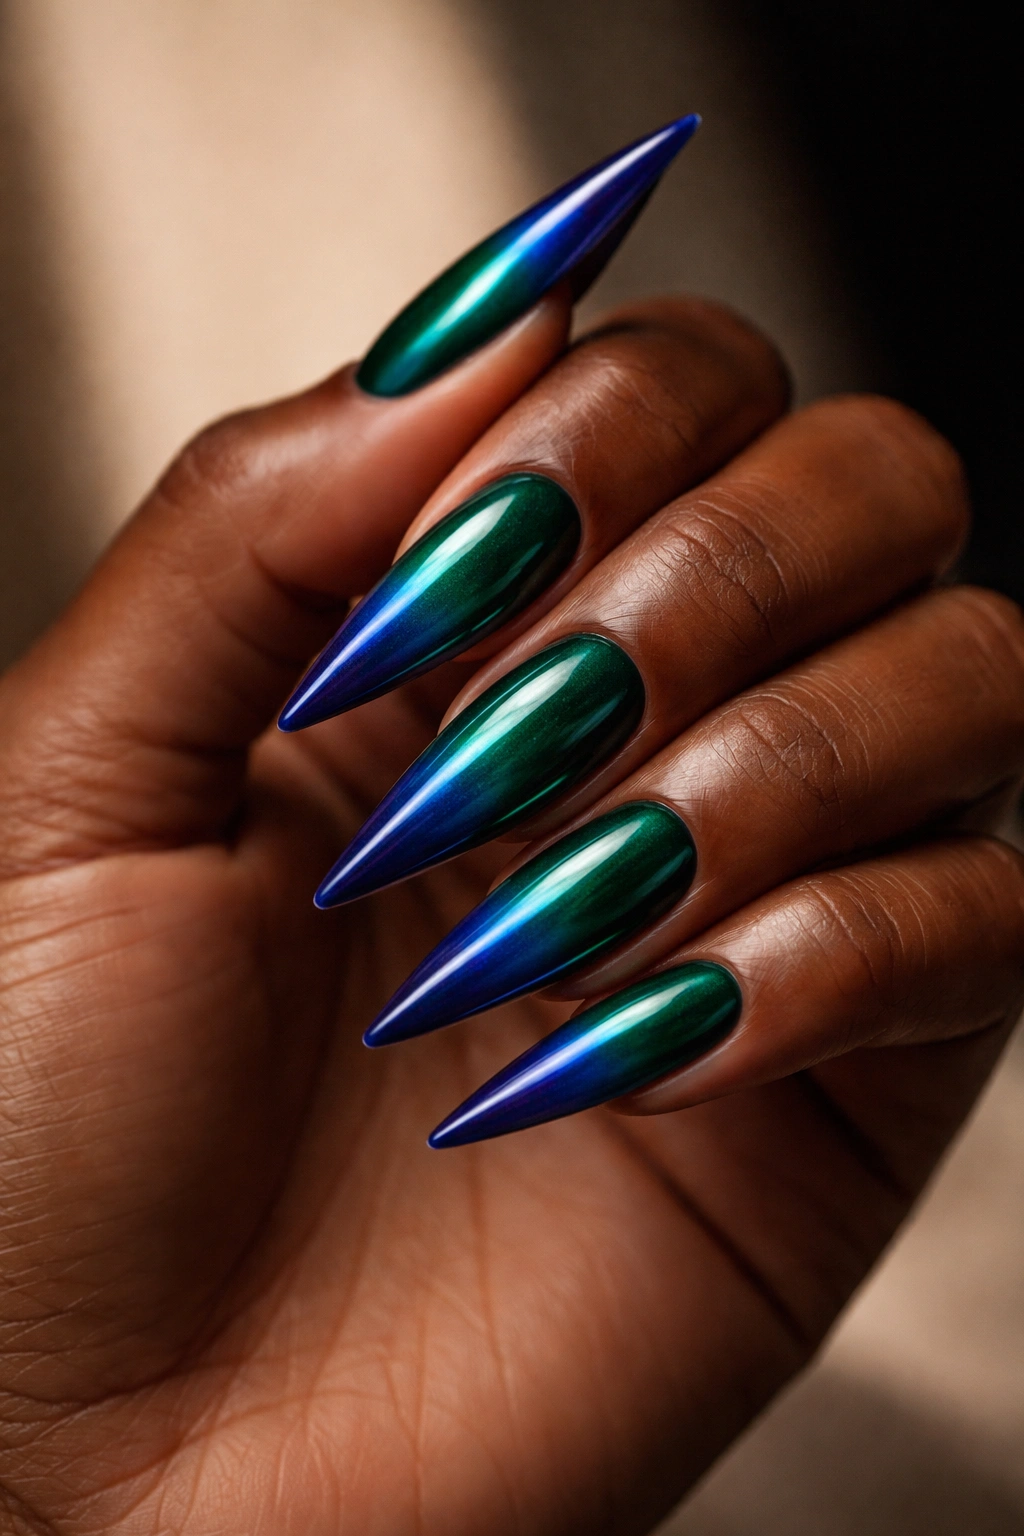
Jewel tones are where dark skin truly gets to shine—emerald is one of the most stunning jewel tones because it feels both regal and wearable. Combine emerald on most of the nail with a sapphire blue gradient flowing into the tips, creating a color transition that’s subtle enough to feel sophisticated but distinct enough to add visual dimension. This design feels expensive and intentional, like you spent time planning it rather than picking something random.
Why Jewel Tones Love Dark Complexions
Jewel tones have depth and saturation that complement darker skin beautifully. Emerald specifically has warm undertones that work with a wide range of skin undertones, while sapphire adds cool-toned richness. Together, they create a multi-dimensional look that feels luxurious.
Creating a Smooth Jewel-Tone Ombre
- Start with an emerald base—two coats for full opacity
- Use a makeup sponge to dab sapphire polish onto the tips while the base is still slightly tacky
- Blend the transition zone gently with a clean, damp sponge for a gradient effect
- If you prefer a more defined ombre, skip the blending and let the colors meet with a subtle but visible line
- Seal with a glossy top coat to make the colors pop even more
Insider note: If you’re doing this in a salon, ask your technician to use gel polish—the colors stay incredibly vibrant and the ombre lasts longer than regular polish without chipping at the blend line.
4. Warm Nude with Rich Undertones
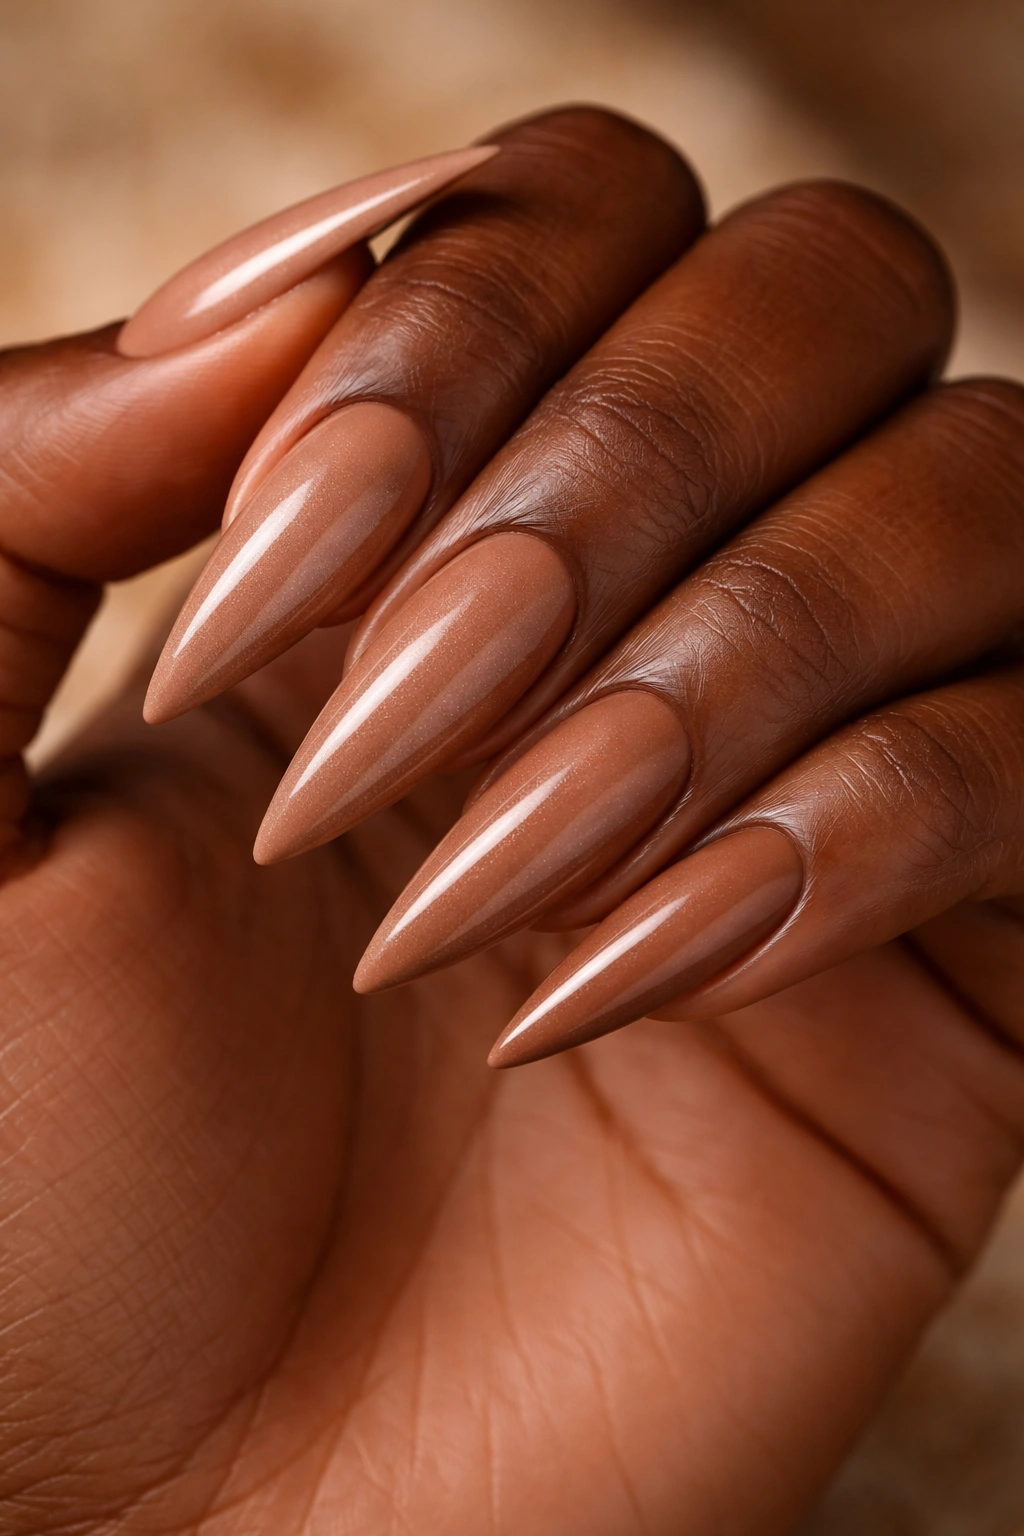
Nude stilettos on dark skin are not about “nude” in the traditional pale-pink sense. Instead, think warm caramel, deep beige, or rich mocha—shades that harmonize with your skin rather than trying to match it exactly. A warm nude with depth creates an elongating effect that makes your nails look impossibly long and elegant. This is the “barely there” design that somehow makes the biggest statement.
Finding Your Nude Shade
Your perfect nude isn’t about matching your exact skin tone—it’s about finding a shade with compatible undertones. If your skin has warm (golden or orange) undertones, go for caramel, warm beige, or mocha nudes. If your skin leans cooler (red or blue undertones), try taupe or cooler beige shades. The goal is a shade that feels like a natural extension of your hand.
Nude Polish That Won’t Disappear
- Avoid translucent nudes that rely on the nail bed showing through—they look thin and weak
- Choose opaque nude polishes with actual pigment and shimmer
- A nude with subtle shimmer (not glitter, but pearl or metallic dust) adds dimension and prevents the flat appearance some nudes get on darker skin
- Apply three thin coats rather than two thick ones for even opacity and a smooth finish
Pro tip: Layer a nude base with a tiny amount of loose pearl powder mixed into the top coat—it creates a luminous finish that makes your nails look expensive and intentional.
5. Metallic Rose Gold Over Warm Caramel Base

Rose gold metallics have an almost magnetic quality on deeper skin tones. Start with a warm, creamy caramel base and apply rose gold metallic polish or powder over top for a finish that catches light warmly without being too cool-toned or washed out. The combination feels luxurious and approachable at the same time—glam without trying too hard.
Why Rose Gold Works When Other Metallics Miss
Rose gold has warm undertones that don’t clash with deeper skin. Silver and white metallics can look harsh or ashy against some darker complexions, but rose gold flatters a wide range of skin tones because of its inherent warmth.
Application for a Flawless Metallic Finish
- Apply your caramel base first—two coats, fully cured if using gel
- For a metallic powder: use a dry brush and gently stipple the powder onto the nail, building coverage gradually for an even finish
- For a metallic polish: apply thin, even coats; metallic polishes tend to look streaky if applied too thickly
- Seal everything with a top coat that won’t dull the metallic shine
Worth knowing: If your rose gold starts looking too pink or ashy on your skin, you might have cooler undertones and should gravitate toward copper or warm bronze metallics instead.
6. Navy Blue with Negative Space Design
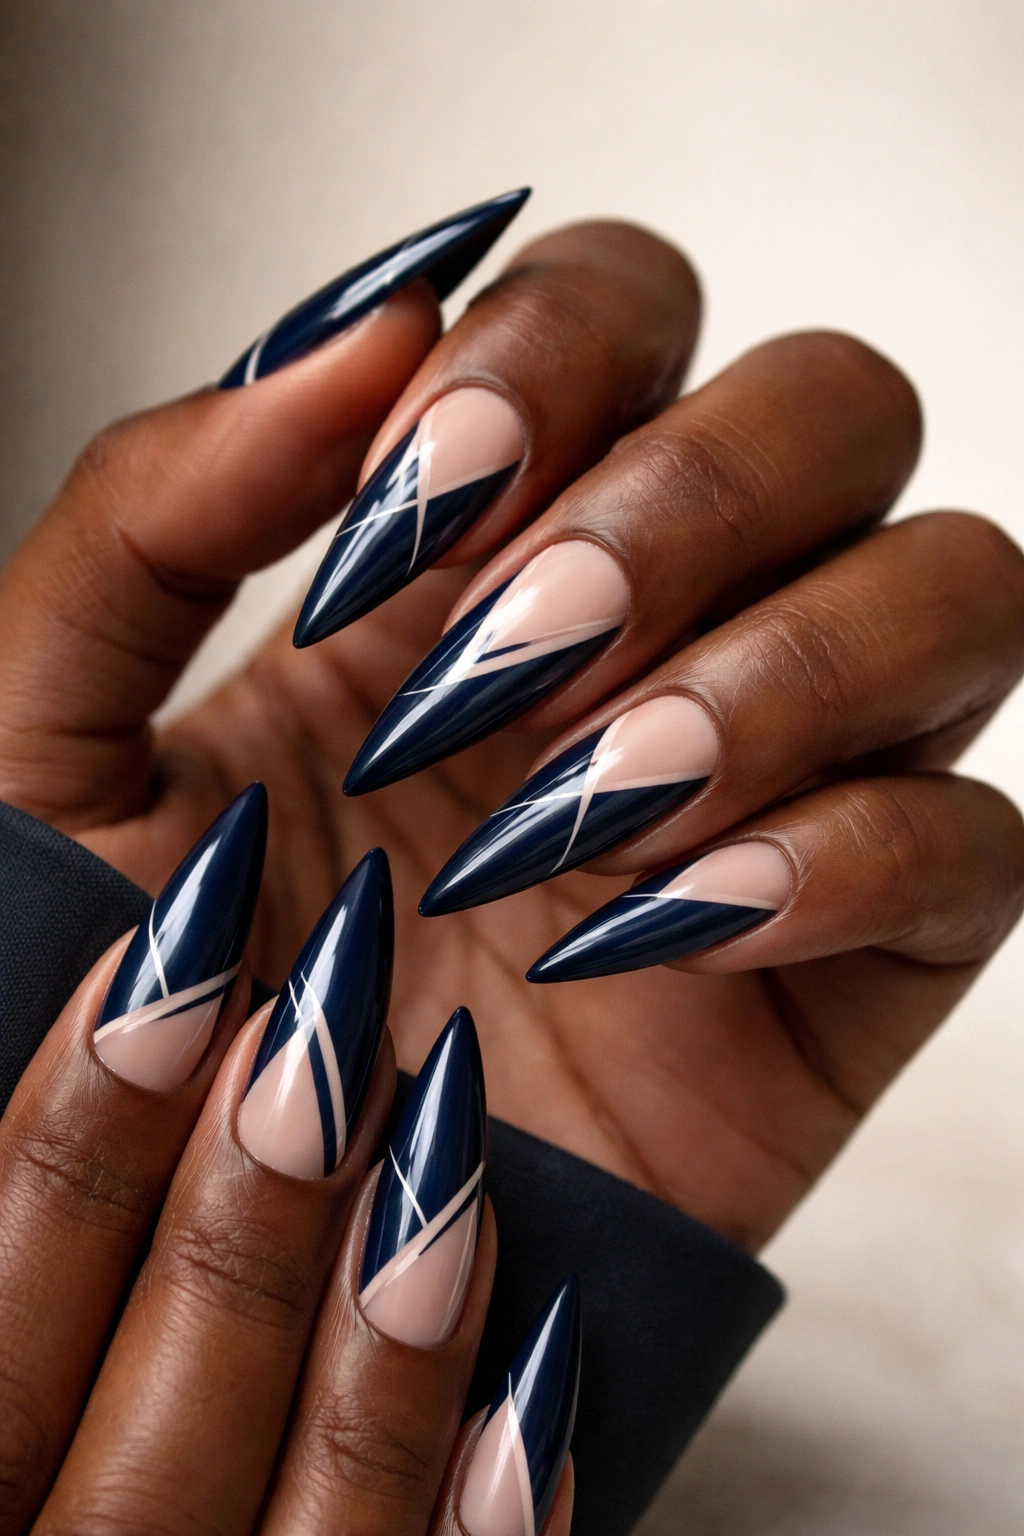
Navy blue stilettos on dark skin have a sophisticated, almost formal quality—think runway ready. Pair the navy base with negative space designs (areas where the nail itself shows through, unpainted) to add contrast and visual interest. You could do a simple geometric pattern, thin white lines dividing sections, or even a geometric cut-out style at the tips. Negative space prevents the design from feeling too heavy while maintaining maximum impact.
Creating Negative Space Without Losing Elegance
- Use a very fine nail art brush or a thin striping tool to paint white lines that create sections
- Alternatively, use nail tape to mask off geometric shapes, then paint over them and remove the tape to reveal the nail underneath
- A simple approach: paint a thin white diagonal line or geometric accent on just two or three nails rather than all ten
- The unpainted portions should still look intentional—sloppy negative space reads as a mistake rather than a design choice
Navy Base That Won’t Look Flat
- Choose a navy with subtle shimmer or pearl rather than a completely matte finish
- If you want matte, use a matte top coat only over the design portions, not the entire nail—a little shimmer keeps the base from feeling dull
- Two coats of navy creates depth; one coat often looks thin and weak on darker skin
Pro tip: This design is versatile enough for professional settings while still feeling modern and editorial.
7. Burgundy Ombre Fading to Nude
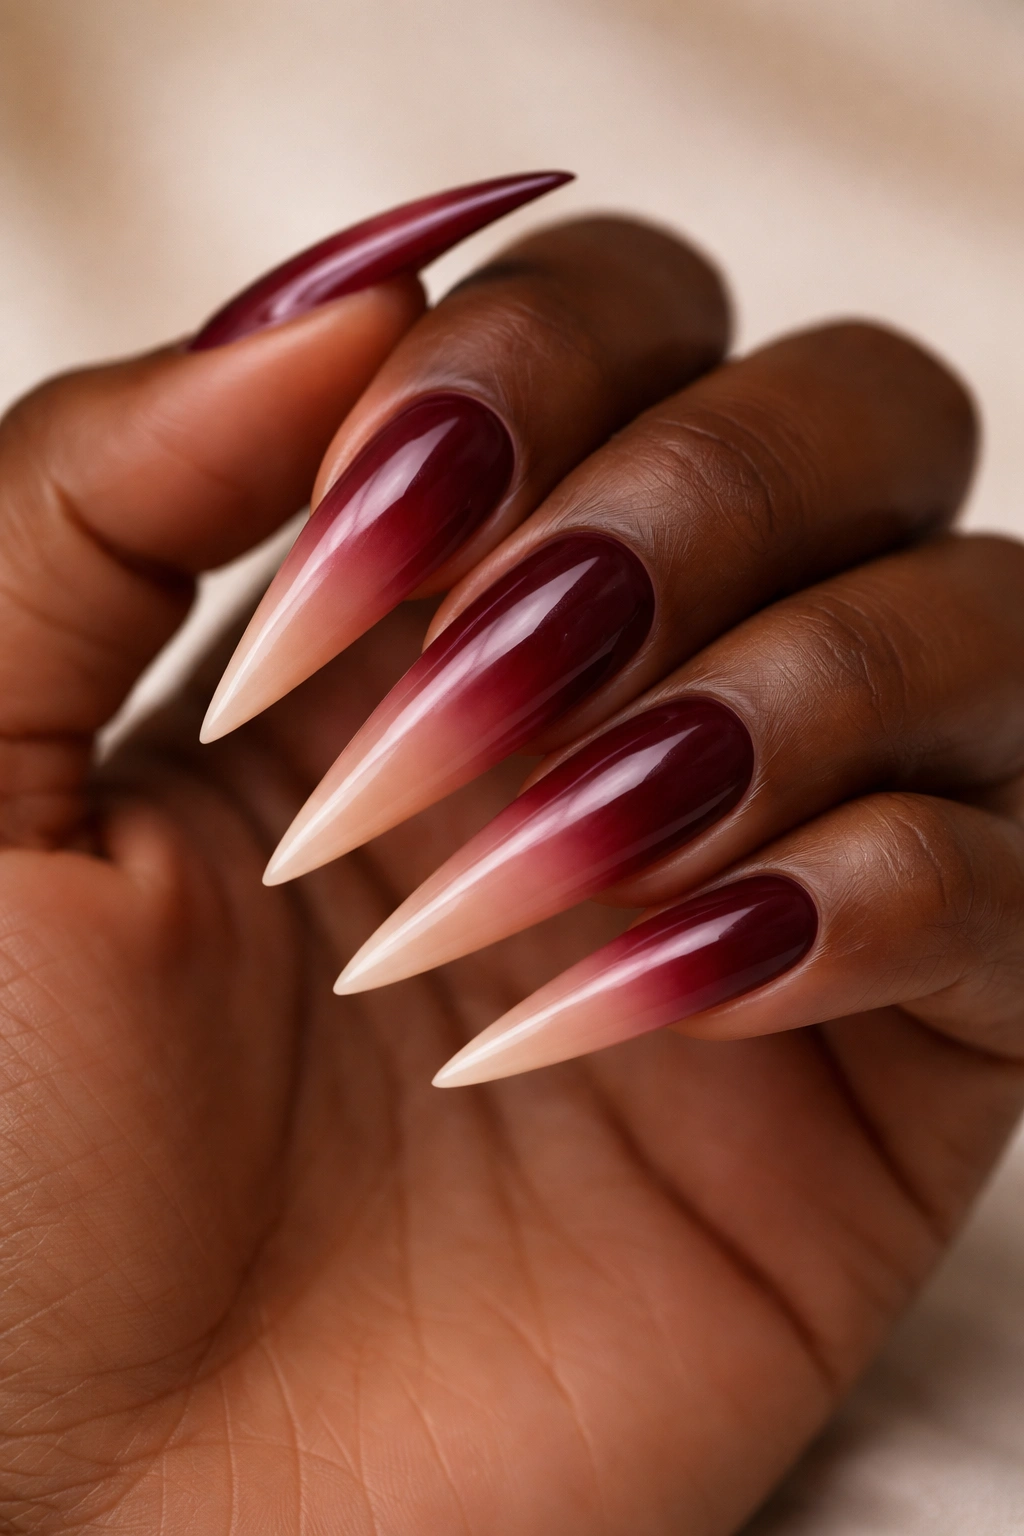
Create a gradient that moves from deep burgundy at the base to a warm nude at the tips—essentially the reverse of most ombre designs. This vertical color journey draws the eye down the length of your nail, emphasizing how long and elegant your stilettos are. The color transition feels sophisticated and intentional, like something from a high-end nail salon rather than a DIY attempt.
Creating an Ombre That Actually Blends Smoothly
- Paint your burgundy base first—the deepest part should be at the base and cuticle area
- Use a sponge technique or a gradient brush to apply nude polish to the tips while maintaining overlap in the middle zone
- The middle section is where the magic happens—this is where colors blend. Use a damp makeup sponge to gently dab and blend the transition zone
- More blending passes create smoother gradients; less blending creates more defined color separation (choose based on your style preference)
- Seal with a glossy top coat to blend everything visually
Ombre Shades That Work on Darker Skin
- Deep burgundy to warm nude creates warmth throughout
- Plum to peachy nude adds dimension while keeping warmth
- Wine red to taupe creates cool-toned elegance
- Avoid pure white nudes for the tips—they can look chalky against deep skin; instead use warm beige or peachy tones
Worth knowing: This gradient works even better if you add a micro-thin gold or rose gold shimmer line right at the blend point—it catches light and makes the transition feel intentional and polished.
8. Matte Black with Nude Gradient Tips
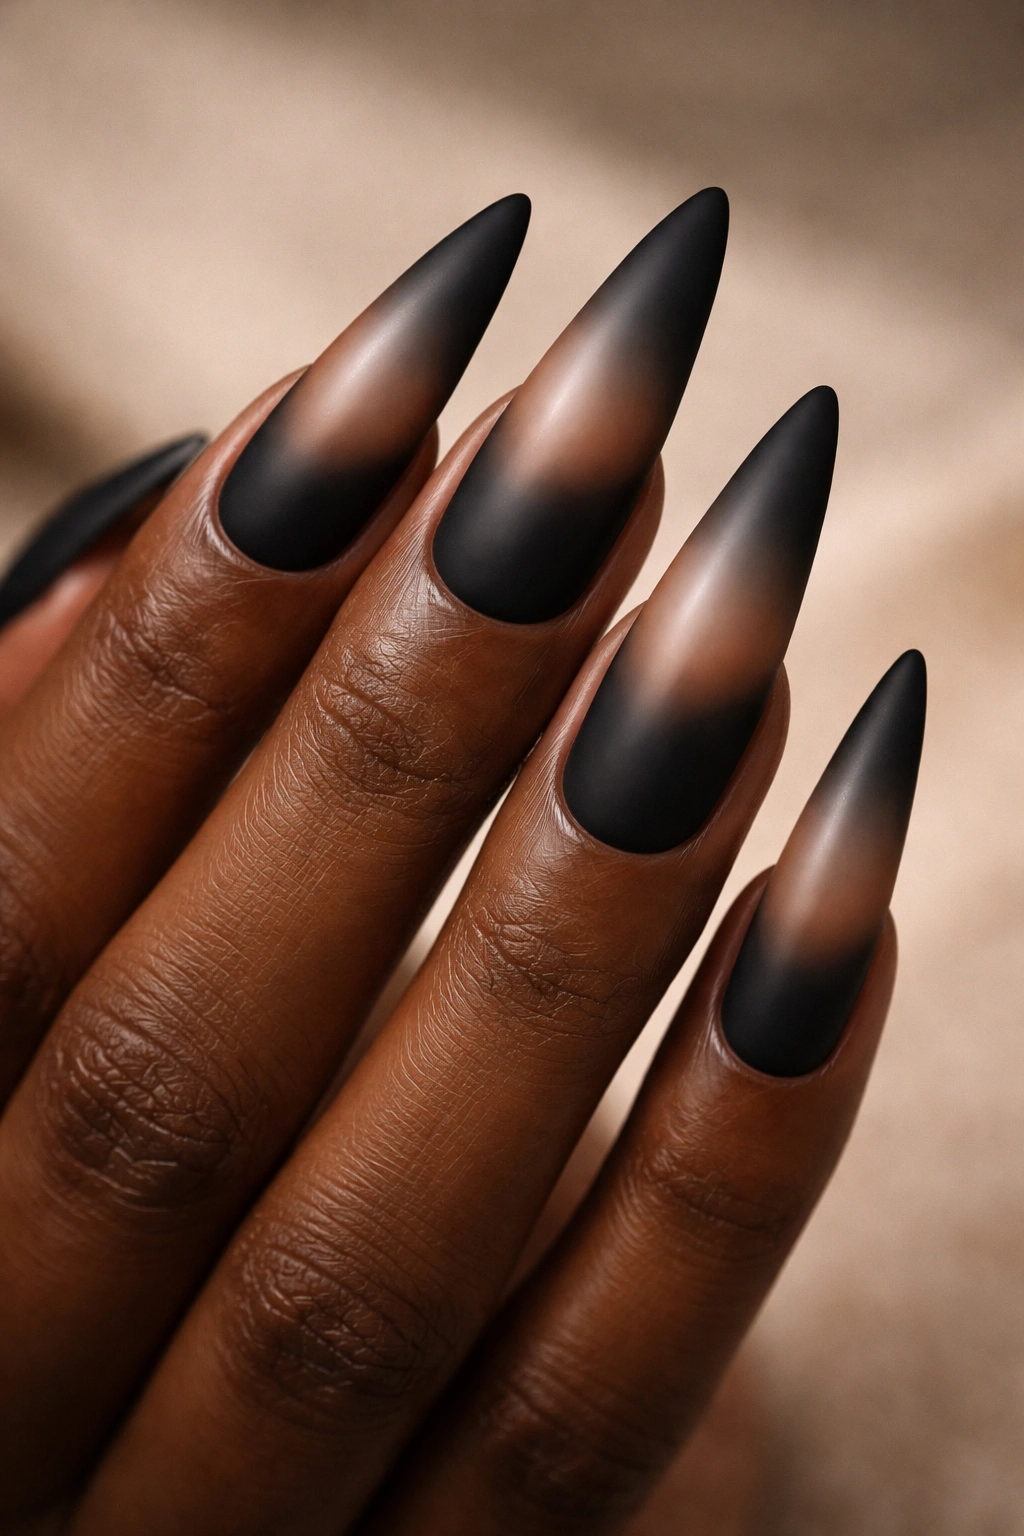
The opposite approach: keep black as your main color but add a nude gradient at the tips for contrast and visual elongation. This design feels edgy and sophisticated, like you’re balancing dramatic with elegant. The matte finish on the black adds texture and prevents the whole look from feeling too shiny or one-dimensional.
Achieving a Perfect Matte Black Base
- Use a high-pigment black gel or regular polish—the opacity needs to be strong so the matte finish looks intentional rather than thin
- Apply matte top coat to the black portions only, after the gradient is complete
- If you seal the entire nail with a glossy top coat first, the matte portions won’t adhere properly
- The contrast between the matte black and glossy nude tips makes the design feel even more intentional
Nude Tips on a Matte Base
- The nude should have some shimmer or luminosity to contrast with the matte black
- The gradient should start roughly at the mid-nail point, giving you enough nude showing to see the color
- A peachy nude or rose-toned nude creates better contrast than a true beige on the matte black base
Insider note: This design photographs beautifully because the matte-versus-glossy texture creates visual depth that shows up in photos.
9. Deep Plum with Holographic Shimmer
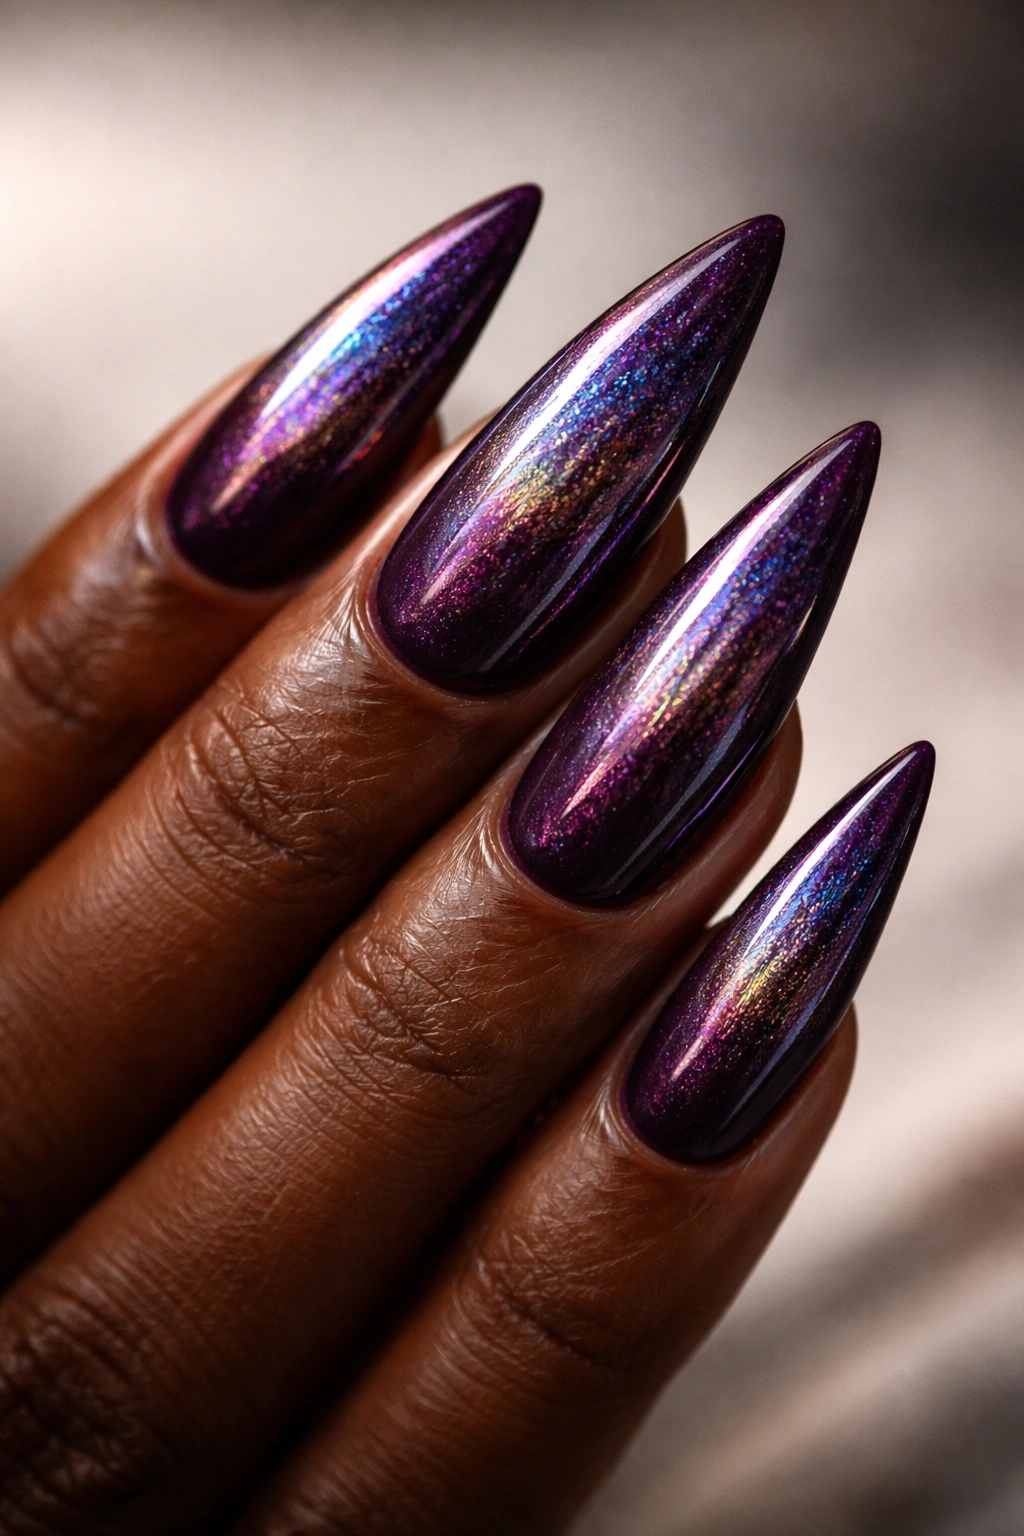
Plum is a color that looks absolutely regal on dark skin—it’s purple-toned but deep enough to feel grounded rather than whimsical. Add a holographic shimmer throughout for a finish that catches light with rainbow shimmer and makes your nails look multi-dimensional. This is glam without being costume-like; sophisticated but with enough shimmer to feel celebratory.
Choosing the Right Plum Shade
- Avoid pale or muted purples—they get lost on darker skin
- Choose a deep, saturated plum with actual depth and richness
- If your skin has warm undertones, a plum with hints of burgundy works better than a plum with hints of true blue
- If your skin leans cooler, a more blue-toned plum creates beautiful contrast
Applying Holographic Shimmer Properly
- Start with your plum base—two coats for full opacity
- Holographic shimmer works best over slightly tacky polish; if your base is completely set, the shimmer won’t adhere as well
- You can either mix holographic powder into a clear top coat or use a holographic polish as your second color layer
- Don’t overdo it—holographic shimmer is very noticeable; a light to medium application reads as elegant, while heavy application can look costume-y
Pro tip: Layer holographic shimmer on just the tips or the upper half of the nail rather than the entire nail for a more wearable version of this look.
10. Gold Leaf on a Nude Base with Accent Nails
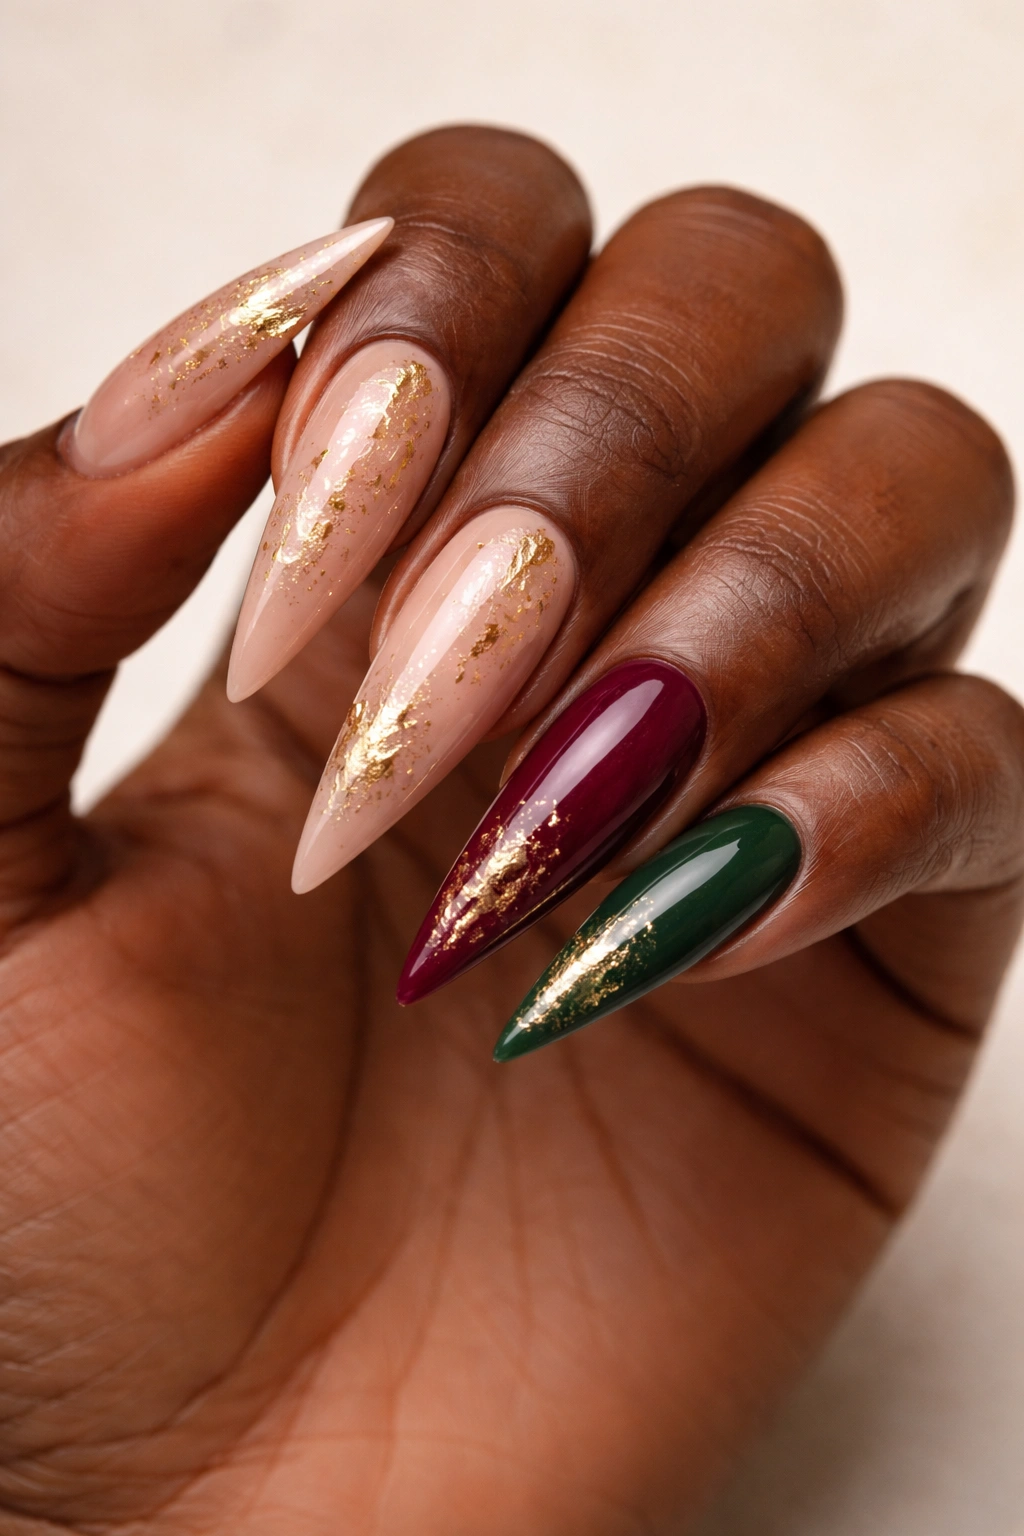
Create a primary design on most nails (gold leaf scattered across a warm nude base) and then use two or three accent nails in a complementary solid color—deep burgundy, forest green, or rich plum work beautifully. This creates a cohesive look that feels intentional and designed rather than like you threw different ideas at your nails. The accent nails pull focus without the whole design feeling chaotic.
Building This Multi-Part Design
- Paint your nude base on most nails—typically all except the ring finger and pinky, or all except the middle finger
- Apply gold leaf accents once the nude is fully dry, concentrating on the tips or one side of the nail
- Paint your accent color on the remaining nails in a completely solid finish
- Choose an accent color that’s noticeably darker than or distinctly different in tone from your nude base
- The contrast between the subtle nude-with-gold and the bold solid accent should feel balanced, not random
Making Accent Nails Feel Intentional
- Use your accent nails symmetrically—either matching nails on each hand or placing them in a deliberate pattern
- The accent color should relate to your outfit or overall look; this isn’t a random color choice
- One thick accent nail (the middle finger, perhaps) with other nails being more subtle creates visual balance
Worth knowing: This design is excellent for work or professional settings because the majority of your nails are neutral-toned while still having visual interest and personality.
11. Wine Red with Scattered Glitter Tips
Deep wine red is a color that makes dark skin look absolutely luminous, and adding scattered glitter to just the tips adds sparkle without making the whole design feel costume-like. Choose fine glitter in gold, rose gold, or even burgundy-toned glitter for a look that catches light elegantly. This is the “special occasion but not over the top” design.
Choosing Wine Red That Glows on Darker Skin
- Wine red should have warm, slightly brownish undertones rather than true bright red
- The color needs to be deep enough to feel luxurious; pale reds can look washed out on darker skin
- A wine red with subtle shimmer in the base adds dimension before you even add glitter
Applying Glitter Without Overdoing It
- Paint your wine red base first—two coats for full opacity
- Apply a layer of clear, sticky base coat to just the tip area; this is where your glitter will live
- Sprinkle fine glitter over the sticky area while it’s still tacky; you can apply it to the entire tip or create a scattered, asymmetrical effect
- Seal everything with a clear top coat, applying it carefully to avoid displacing the glitter
- The glitter should create a gradient effect where it’s concentrated at the very tip and becomes sparser moving toward the middle of the nail
Pro tip: For a more refined look, use a single-shade glitter (all gold, all rose gold) rather than mixing multiple glitter colors.
12. Matte Black with White Geometric Nail Art
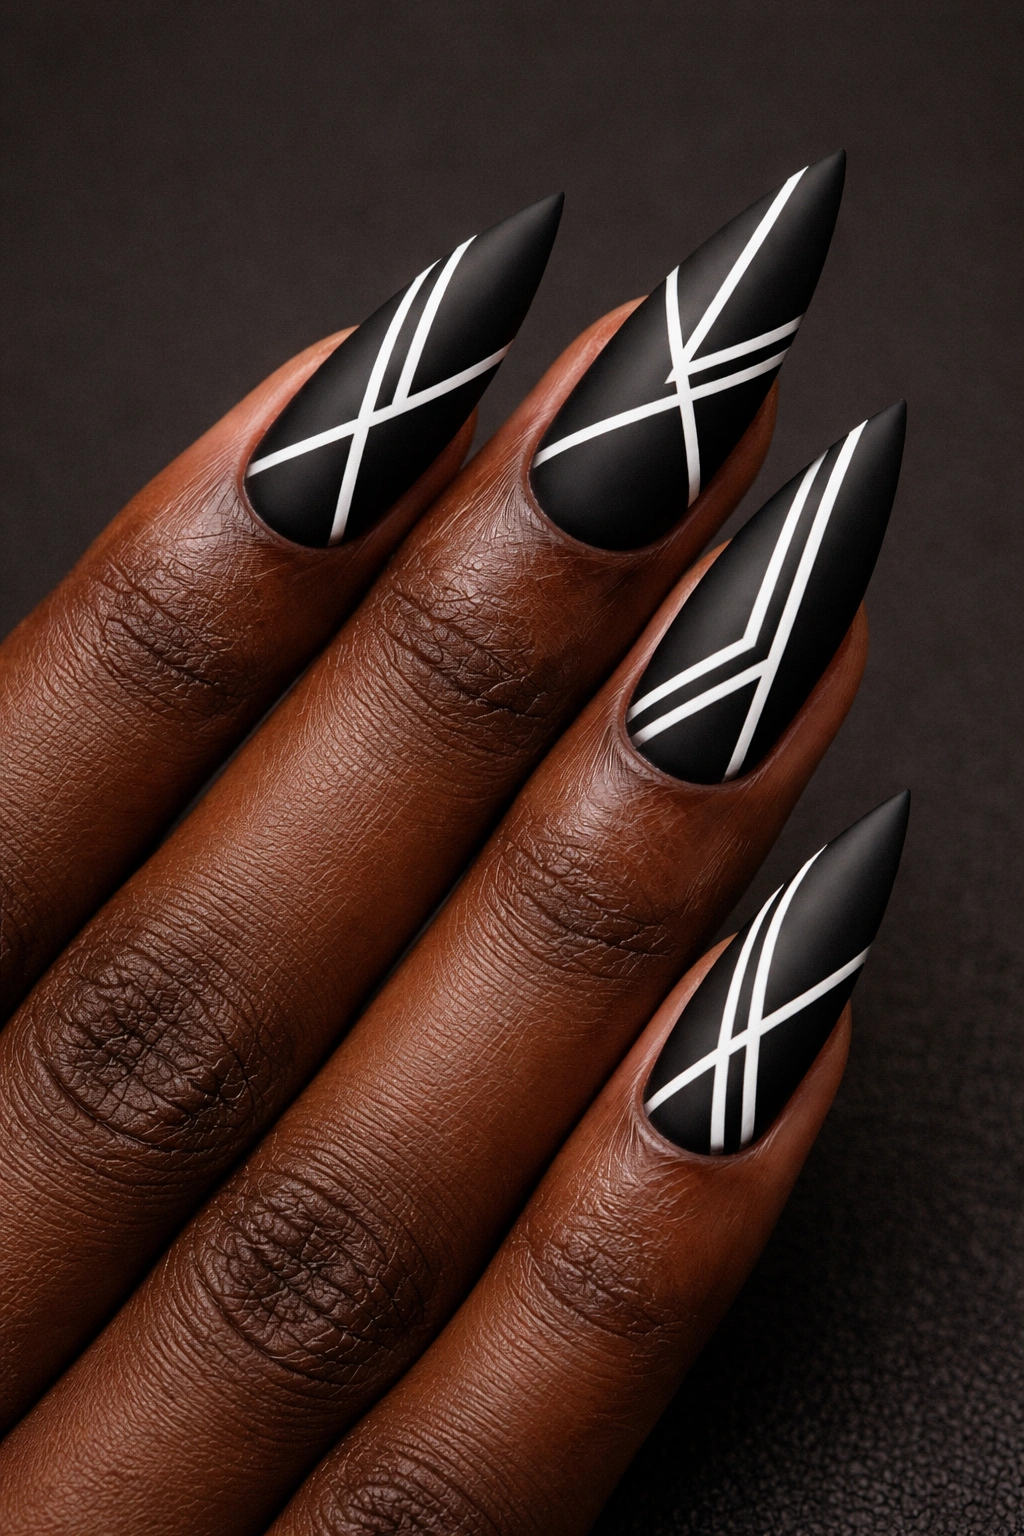
Geometric designs on dark skin create incredible contrast and visual impact, and matte black provides the perfect backdrop for white lines and shapes. Create clean geometric patterns—triangles, lines, negative space designs, or even abstract shapes. The key is precision and intentionality; messy geometry reads as a mistake rather than a design.
Creating Precise Geometric Designs
- Use a very fine striping brush and white gel or regular polish for clean, crisp lines
- Alternatively, use nail tape to mask off geometric shapes, paint white over them, and remove the tape for perfectly clean edges
- The geometric design doesn’t need to be symmetrical; asymmetrical geometry can look even more modern and intentional
- Keep the design to two to three nails rather than all ten for a sophisticated, editorial look
Matte Black as a Canvas
- A matte finish on black creates visual “weight” that makes white geometric designs pop even more
- The contrast between matte and glossy (if your geometric design has a different finish) adds texture and dimension
- Geometric designs work better on matte than on glossy because the surface doesn’t distract from the line work
Worth knowing: Simple geometry is always more effective than complicated designs—a few clean white lines often looks more high-end than a nail covered in intricate detail.
13. Jewel Tone Mix: Sapphire, Emerald, and Amethyst Gradient
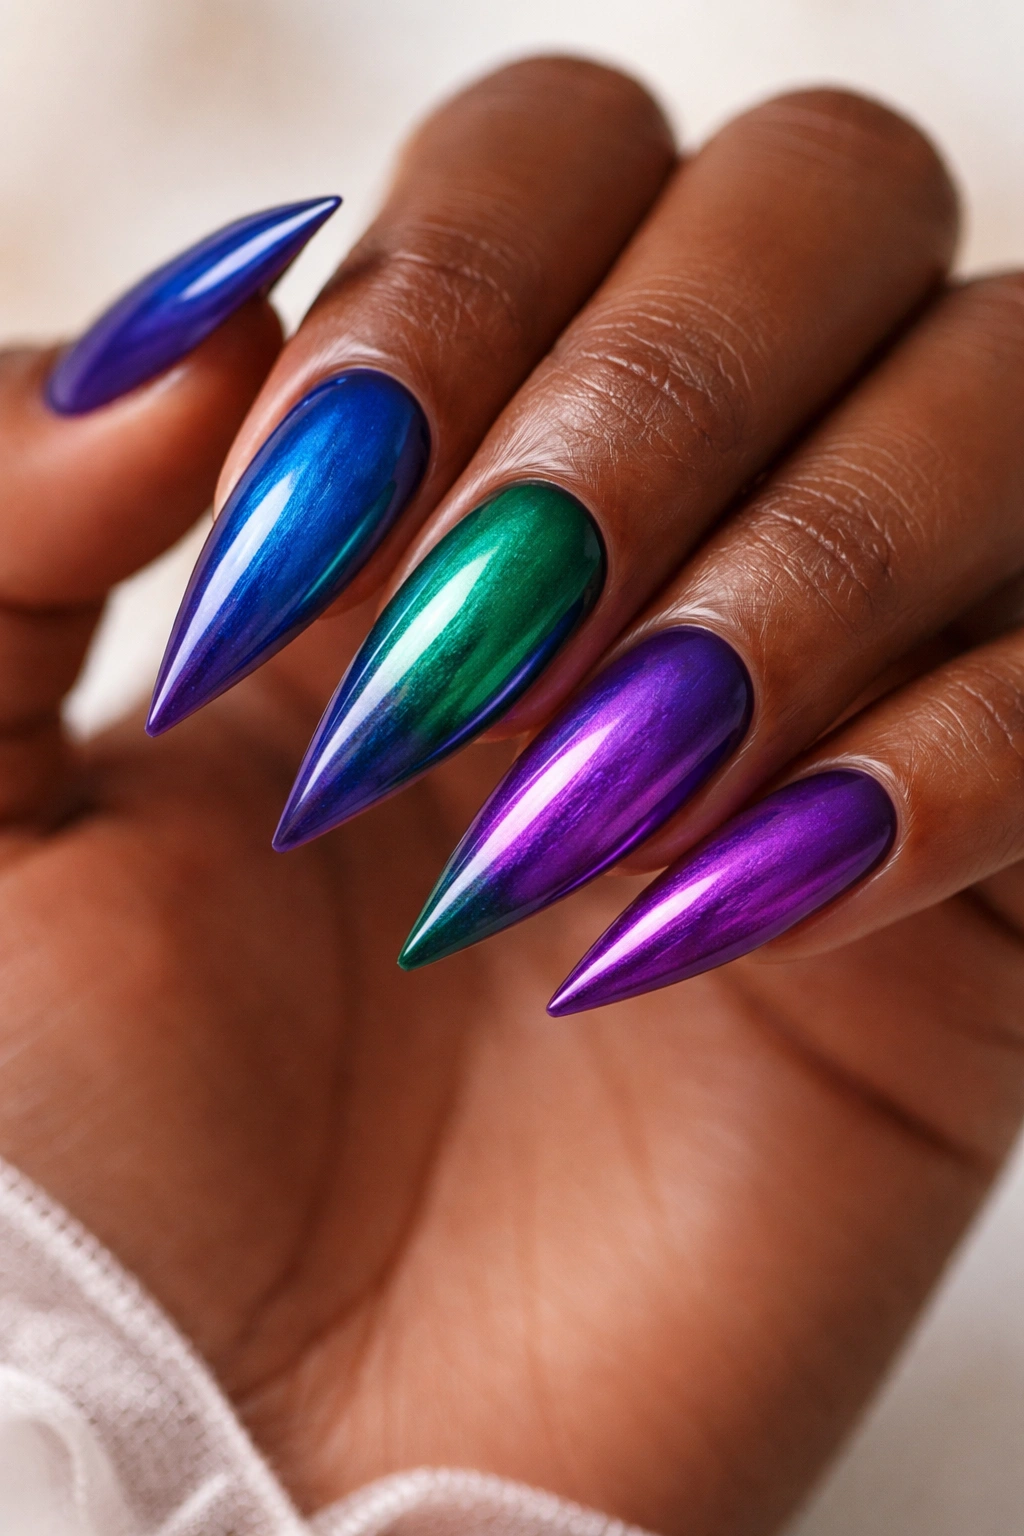
Create a multi-color gradient that flows through sapphire blue, emerald green, and deep amethyst purple across multiple nails. This is a bold, statement-making design that celebrates color and dimension. Each nail could feature a different jewel tone, or you could create a gradient that flows across all the nails as one unified design.
Creating a Multi-Jewel Gradient
- If you’re doing nail-by-nail jewel tones: paint sapphire on your pointer and middle fingers, emerald on your ring finger and pinky, and amethyst on your thumbs
- If you’re creating a flow: apply sapphire to one side, emerge to the center, and amethyst to the other side, using a sponge to blend the transition zones
- This design works best in gel because the colors need to stay vibrant and the blend needs to be smooth
- The nails should feel like they’re all part of one cohesive design, not random color choices
Jewel Tone Vibrancy on Dark Skin
- All three of these colors have depth and saturation that make them visible and stunning on darker skin
- The contrast between the multiple colors makes each one pop individually while creating visual harmony as a group
- This design is maximalist but still sophisticated because you’re using colors that complement each other rather than random shades
Pro tip: Layer a subtle holographic or chrome shimmer over these jewel tones for an even more luxurious, multi-dimensional effect.
14. Deep Red with Rose Gold Metallic Accents
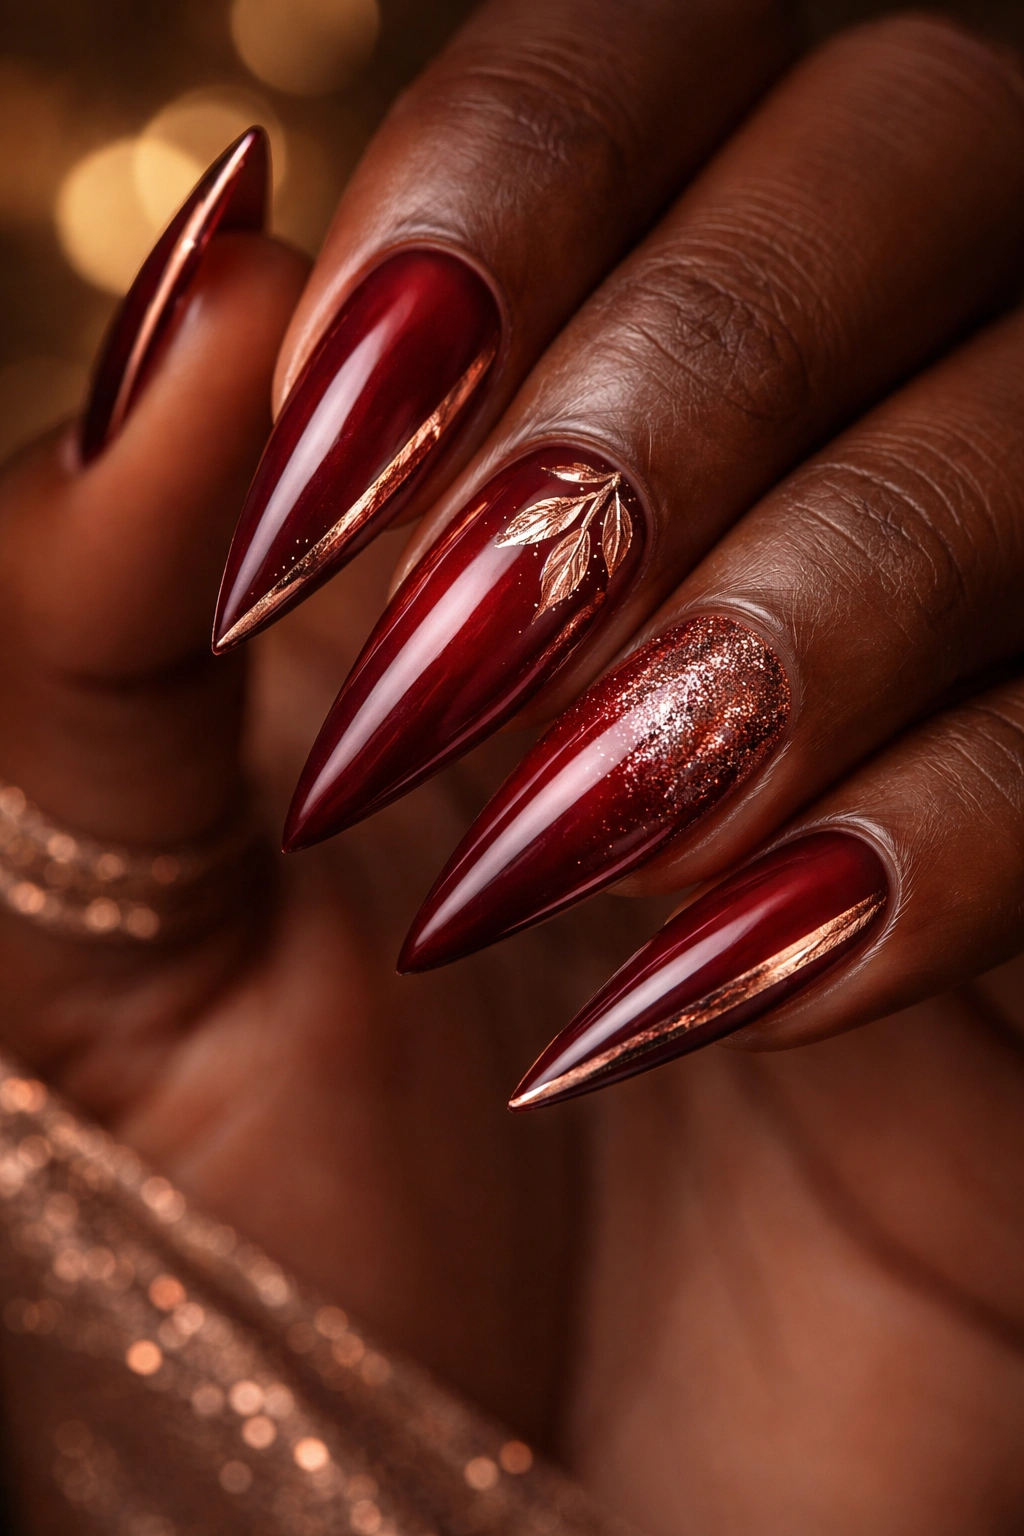
Deep red is a classic that looks absolutely stunning on dark skin, and adding rose gold accents—either as a metallic ombre, as accent stripes, or as leaf details—elevates the whole design. The warmth of rose gold against deep red creates an almost jewelry-like quality that feels expensive and intentional.
Red Shades That Look Best on Darker Skin
- Avoid bright, true reds; instead gravitate toward deep reds with brown or burgundy undertones
- A red with warm undertones (slightly orange or brown-leaning) rather than cool undertones (slightly blue or purple-leaning) creates better harmony
- A red with subtle shimmer in the base adds luxury and prevents the color from feeling flat
Adding Rose Gold Without Overwhelm
- Thin rose gold stripes along the sides of each nail create elegance without competing with the red
- A rose gold ombre that fades from red at the base to rose gold at the tips adds dimension
- Rose gold leaf scattered across red creates a haute couture aesthetic
- A thin rose gold line at the base and tip of each nail frames the design without being busy
Worth knowing: This combination feels both classic and modern, making it perfect for occasions where you want to look polished and intentional.
15. Black and Gold Geometric Pattern
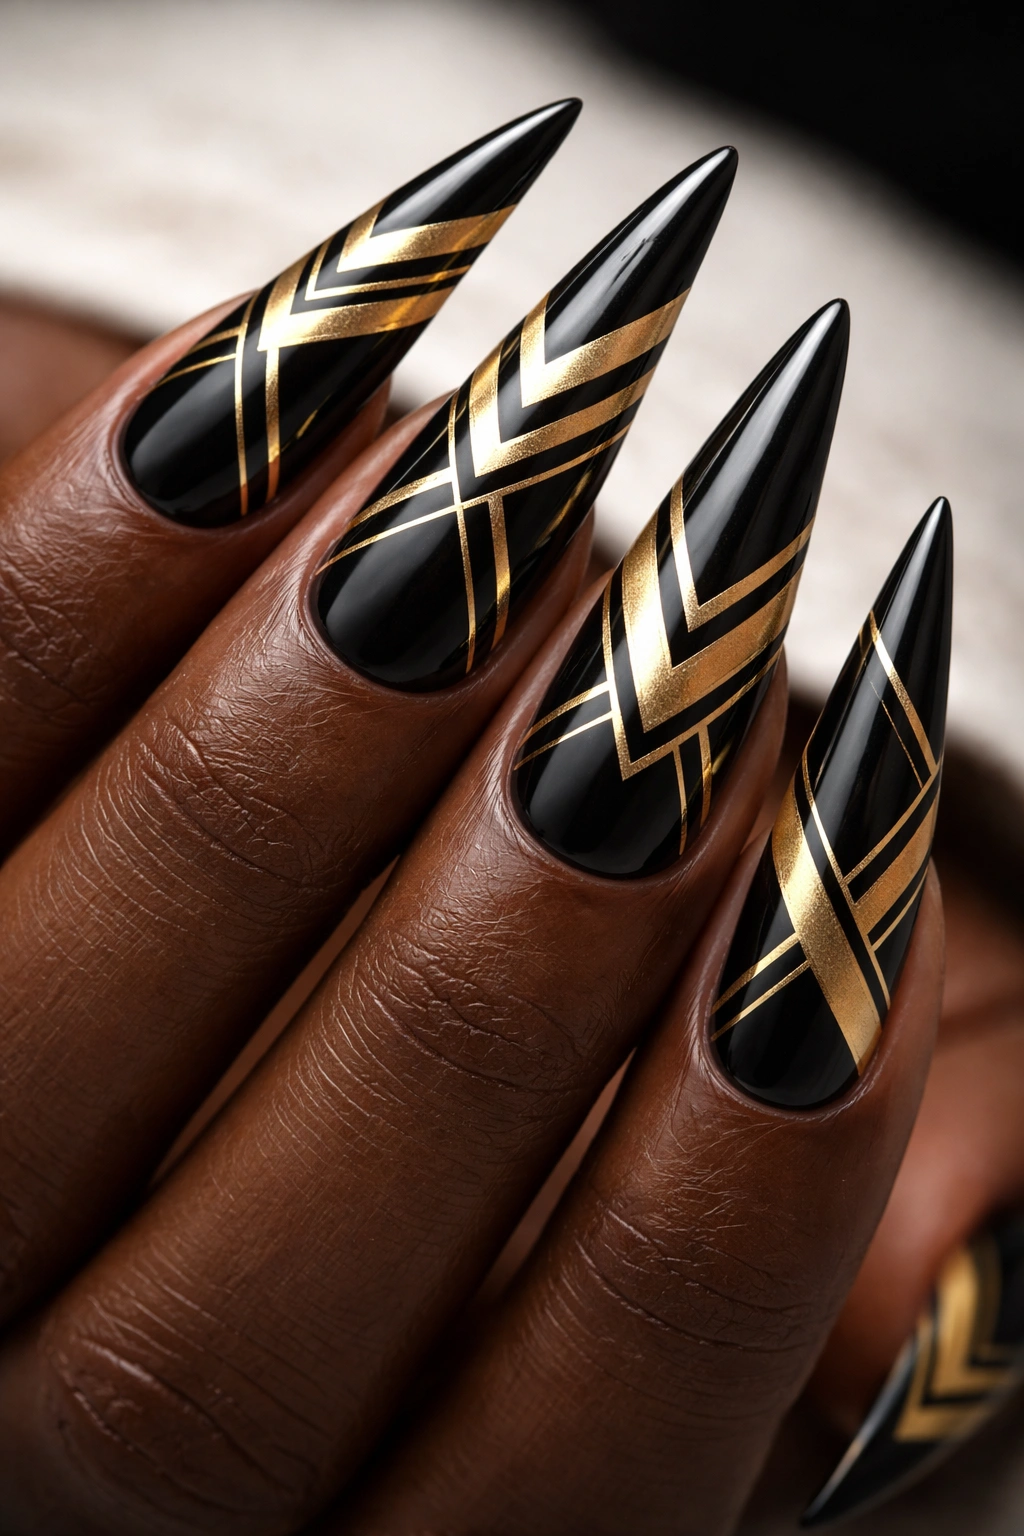
Create a striking geometric pattern using black and gold on your stilettos—think interlocking triangles, chevron stripes, bold lines, or abstract shapes. This is a high-contrast design that feels bold and editorial. The key is making the pattern feel intentional and well-executed rather than random.
Designing Geometry That Works
- Sketch your pattern on paper first if you’re not sure how it will look
- The pattern should either be symmetrical (same design on each nail) or have a clear asymmetrical theme that connects all the nails
- Use a thin striping brush or nail tape for precise lines
- The gold can be metallic polish or metallic powder for maximum shine and contrast
Black and Gold on Dark Skin
- The contrast between deep black and warm gold creates visual drama that reads beautifully from a distance
- This is a design that photographs well and makes a statement
- It works for both casual and formal settings depending on how intricate the geometry is
Insider note: If freehand geometric work intimidates you, use nail tape to mask off the gold areas, paint gold, remove the tape, and let the remaining black be your canvas. The results are precise and professional-looking.
16. Deep Burgundy with Marble Effect
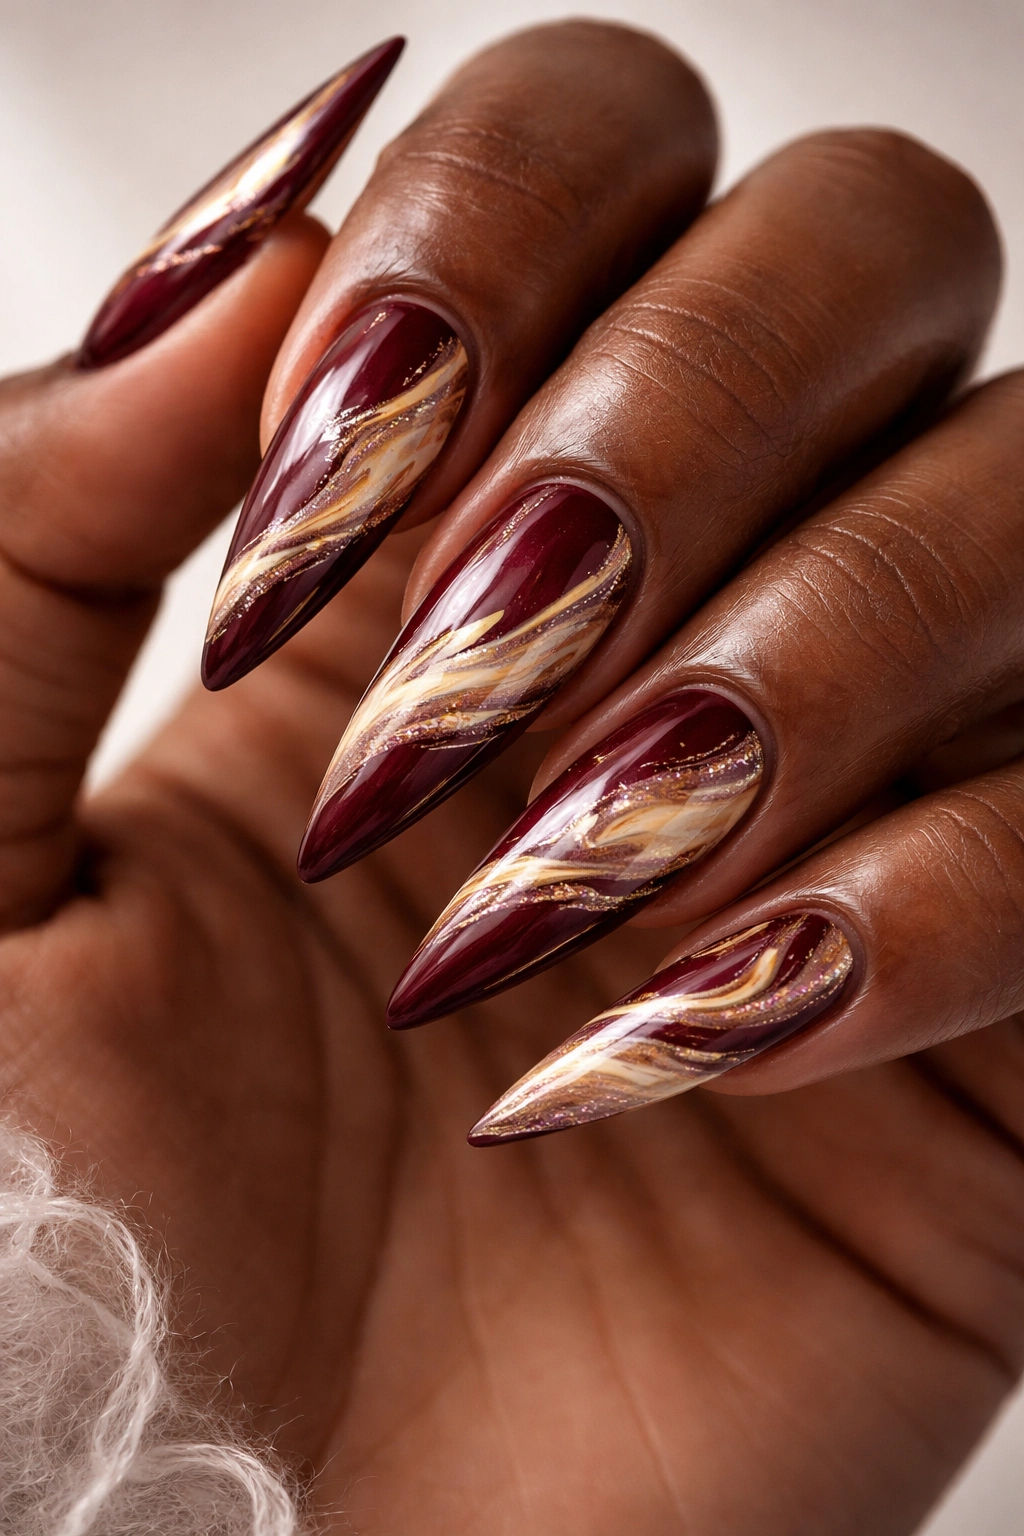
Create a luxe marble effect by layering deep burgundy with swirls of cream, gold, or rose gold to mimic the look of marble stone. This design feels sophisticated, artistic, and completely wearable. The marble effect is dimensional and catches light differently depending on the angle, which adds to the luxury aesthetic.
Creating Marble Effect That Actually Looks Like Marble
- Start with your burgundy base—two coats, fully cured
- Mix a small amount of marble effect polish, white gel, or a mixture of your accent color with clear gel into a separate palette
- Use a thin brush to create organic, flowing lines and swirls that mimic how marble stone naturally patterns
- Don’t be too symmetrical; the most beautiful marbling is organic and slightly unpredictable
- Seal with a glossy top coat that makes the whole design look integrated and luxurious
Marble Colors That Work with Burgundy
- Cream or off-white swirls create soft luxury
- Gold swirls add warmth and opulence
- Rose gold swirls add femininity while maintaining sophistication
- A combination of all three creates the most authentic marble effect
Pro tip: This design works best in gel because the layers need to stay vibrant and not smudge or blur together. The final glossy seal makes everything look integrated and polished.
Final Thoughts
Finding the perfect stiletto nail design isn’t about chasing trends—it’s about understanding what colors and finishes work best with your specific skin tone and what makes you feel confident. Dark skin tones have the incredible advantage of making jewel tones glow, metallics shimmer with intensity, and deep colors feel absolutely regal. Whether you’re drawn to the warmth of burgundy and rose gold, the sophistication of black and chrome, the drama of jewel tone gradients, or the elegance of marble effects, each of these designs is specifically chosen because it creates beautiful contrast and complement with deeper complexions.
The thread running through all of these ideas is intentionality—every shade, every texture, every accent is there because it specifically enhances dark skin rather than working against it. Your stilettos should feel like an extension of your style and your confidence, not a compromise or a design that you wish looked slightly different. Experiment with the colors and finishes that resonate most with you, and don’t hesitate to ask your nail technician about shade variations or application techniques if something isn’t translating quite right.
