

If you think stiletto nails are just for playing it safe, you haven’t seen what’s possible when nail artists decide to abandon subtlety and embrace the dramatic. Stiletto nails are the ultimate canvas for maximalist designs—they’re elongated, sharp, and demand attention. When you pair that bold shape with unrestrained creativity, decadent materials, and over-the-top artistry, you get nails that don’t whisper; they shout. Whether you’re talking about nails so sparkly they catch light from across the room, designs packed with three-dimensional embellishments, or nail art so intricate it looks like miniature paintings, there’s a whole universe of junk stiletto designs that commit fully to the concept of “going all out.”
The beauty of these maximalist stiletto designs is that they work for people who are genuinely confident in their style choices and aren’t interested in blending in. These nails make a statement at every angle—when you’re typing, gesturing, or simply resting your hands on a table. They’re the kind of nails that get noticed, inspire conversation, and make you feel like the most put-together version of yourself. Let’s explore 14 of the most extravagant, unapologetic stiletto nail designs that truly go all out.
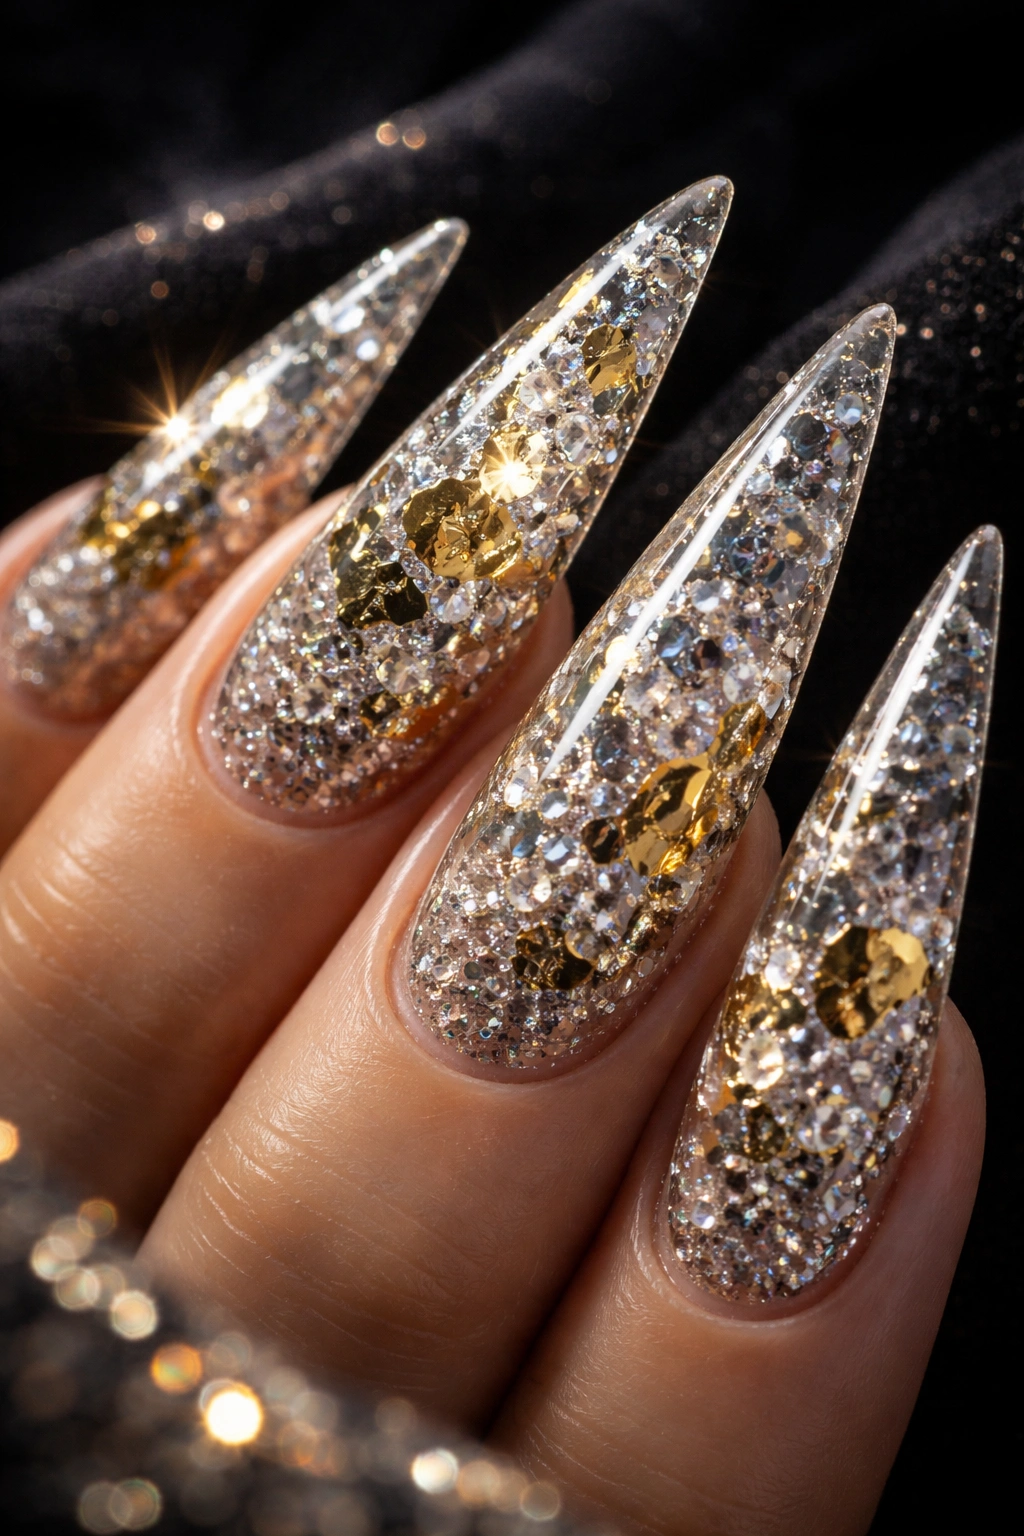
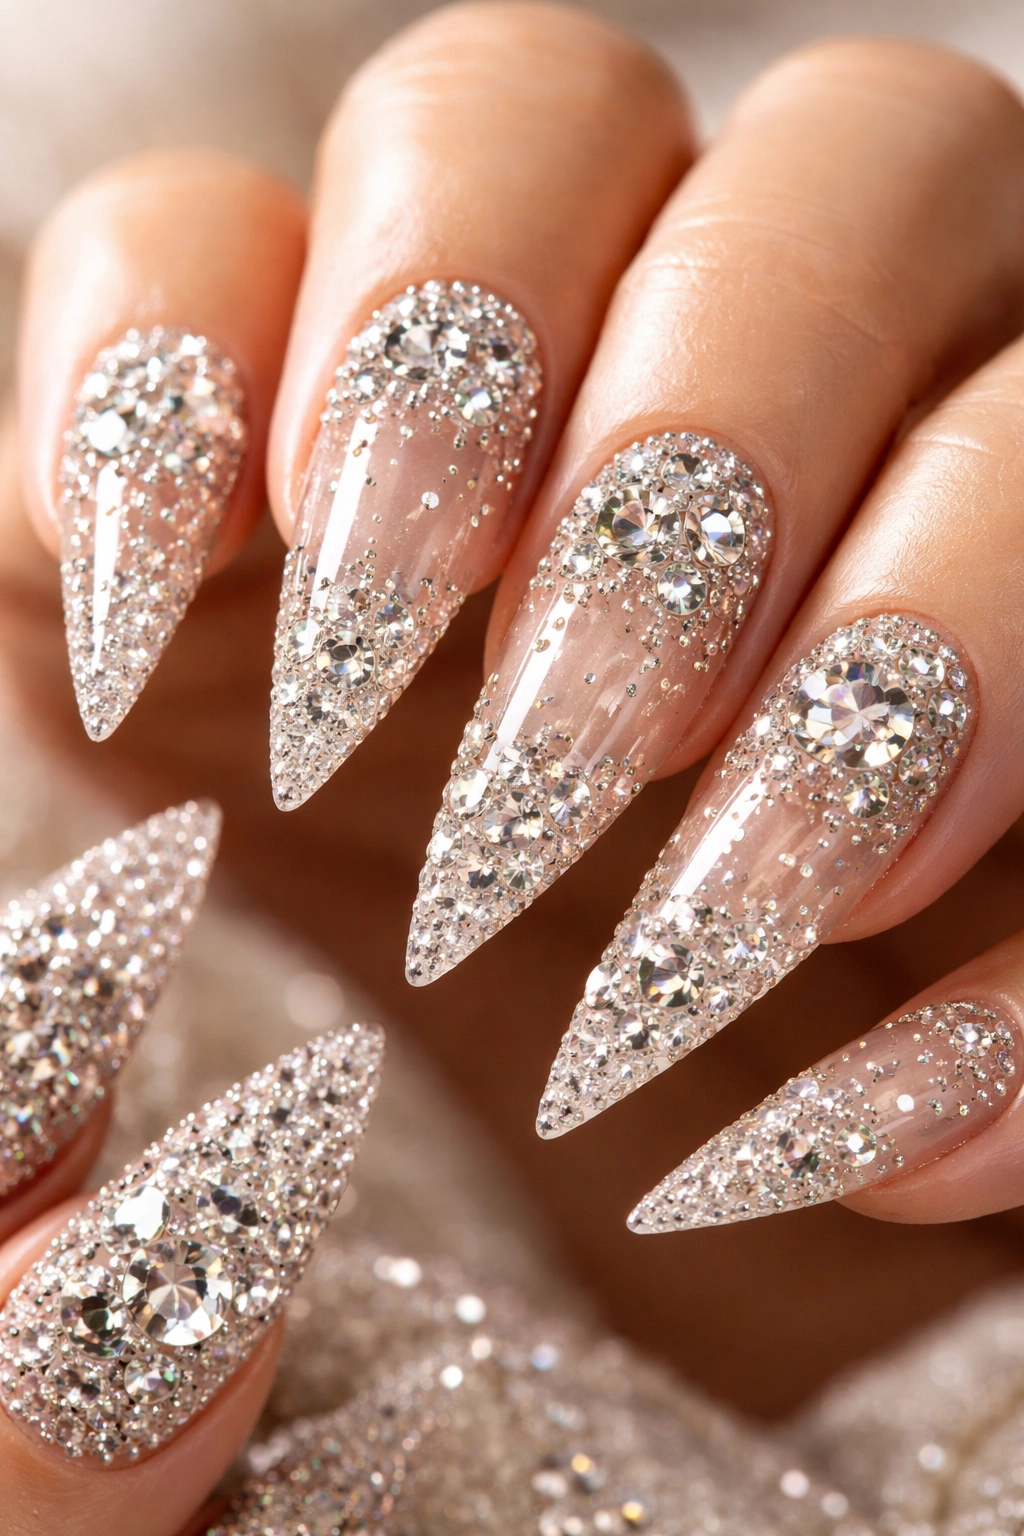
1. Diamond Encrusted Luxury
This design is literally what happens when you decide that regular nail polish isn’t opulent enough—you cover almost every millimeter of the nail with actual crystals, rhinestones, or diamond-shaped gems in graduating sizes. The base is typically a nude, champagne, or nude-to-nude ombre that serves as a backdrop for the crystals, but the crystals are genuinely the main character here. The larger diamonds sit at the tip and gradually decrease in size as you move toward the cuticle, creating a dazzling gradient of sparkle that catches light from every angle.
Why It’s Maximum Glamour
Diamond encrusted nails represent the pinnacle of luxury nail art—this is the design you get when money and audacity meet at the nail salon. The sheer amount of embellishment creates a visual impact that’s impossible to ignore, and the way light bounces off multiple surfaces creates a constantly changing sparkle effect. This design works for special occasions, celebrations, or honestly any day you want to feel like you’re living your best life.
What You’ll Need
- A professional nail technician experienced in gem application
- High-quality nail adhesive that can support the weight of multiple stones
- Rhinestones or lab-created diamonds in multiple sizes (at minimum three different sizes)
- A clear base coat or nude gel polish as your foundation
- Patience—this design takes 45 minutes to over an hour to complete properly
Pro tip: The larger gems should be applied first while the adhesive is freshest, then fill in gaps with progressively smaller stones for a cohesive, intentional look rather than a random scatter pattern.
2. Ombré Rainbow Explosion

Imagine taking every color of the rainbow and somehow fitting it into a single stiletto nail. This design typically features a gradient that transitions from red at the tip through orange, yellow, green, blue, purple, and back to a soft nude at the cuticle. But “explosion” is the key word—the colors are vibrant, saturated, and unapologetic rather than soft or pastel. Some versions include glitter in the same color family sprinkled throughout each color section, creating even more visual chaos (in the best way).
The Technique Behind the Chaos
Creating a smooth ombré across this many colors requires serious skill and typically uses gel polish with a careful layering and blending process. Each color gets its own distinct band, but they blend slightly where they meet rather than creating harsh lines. Some artists use a sponge technique to blend the colors, while others hand-blend with a thin brush—the result is a smooth gradient that looks almost impossible until you realize how intentional the technique actually is.
Making It Work
- Start with a white or very pale nude base to make the colors pop
- Use gel polish in highly pigmented colors rather than regular polish—the colors need serious depth
- Each color section should be roughly equal in width for a balanced look
- Add fine glitter in complementary colors to enhance the celebration-of-color aesthetic
- Seal with a high-shine topcoat to make the gradient look glossy and intentional
Worth knowing: This design is best refreshed every two weeks because the gel polish will start to chip at the tips first, disrupting your beautiful gradient effect.
3. 3D Sculpted Flowers

This is where nail art becomes actual sculpture—literal three-dimensional flowers are built directly on top of the nail using acrylic, gel, or sometimes hard gel extensions that extend beyond the nail itself. We’re talking fully formed petals, intricate details, sometimes with beads or pearls integrated into the flower centers. A single nail might feature a massive rose with dozens of petals, while another showcases a delicate orchid with detailed stamen work. The flowers are typically rendered in shades that complement the base color—soft pinks, deep reds, white, or even metallic tones.
The Artistry Involved
Creating sculptured flowers requires a nail artist with legitimate sculpture and painting skills—this isn’t a quick at-home project. Each petal is hand-formed and shaped; sometimes individual petals are created separately and then attached with precision. The details are painted on afterward: shadows, highlights, veining within petals, and often a gradient from darker at the base to lighter at the petal edges.
What Makes Them Stand Out
- The three-dimensional aspect creates dramatic shadows and depth that flat nail art can’t achieve
- The nails become wearable art pieces—genuinely tiny sculptures on your hands
- They photograph beautifully because of the dimension and detail
- Styling feels intentional; these nails work with elegant dresses, statement jewelry, or simply on their own
Pro tip: Sculpted flowers need maintenance because the delicate petals are vulnerable to catching or bending. Avoid activities that put pressure on your hands for the first few days after application.
4. Mixed Metal Maximalism
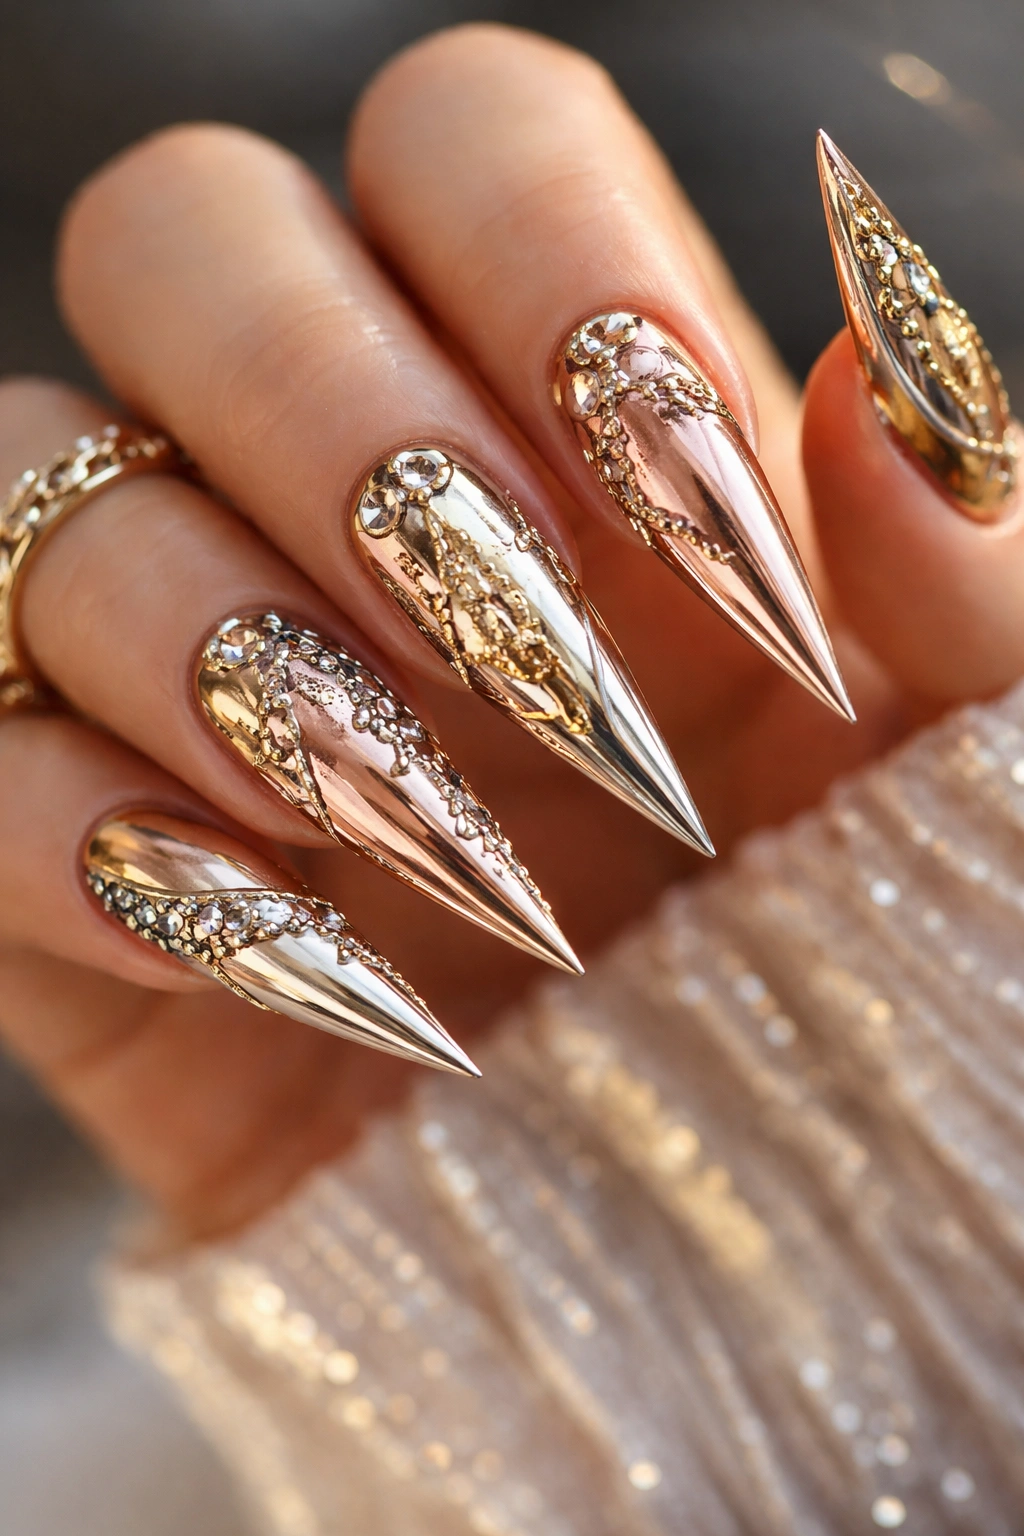
This design embraces the “more is more” philosophy by combining multiple metallic finishes on a single nail or across the set. You might see rose gold, yellow gold, silver, copper, and champagne all on the same manicure in distinct patterns, stripes, geometric shapes, or abstract sections. Some versions use actual metallic foil under gel, while others rely on highly reflective metallic gel polish. The effect is like wearing tiny pieces of jewelry on your fingertips—sophisticated, expensive-looking, and intentionally glamorous.
The Balance Challenge
Mixing multiple metals could easily look chaotic, but when done skillfully, it reads as intentional maximalism rather than accidental mess. The key is using metallic finishes at similar levels of saturation and brightness so one doesn’t overwhelm the others. Complementary metals—rose gold and silver, or copper and gold—work better together than competing metallics that fight for attention.
Design Variations
- Vertical metallic stripes with each nail featuring a different pair of metals
- Geometric patterns where metallic colors fill different sections of negative space
- Chevron designs using alternating metallics for a dynamic, angular look
- Abstract or organic shapes in different metals creating an almost stained-glass effect
Worth knowing: Metallic finishes show fingerprints and smudges more readily than creme or matte polishes, so you’ll want a strong top coat and possibly regular polishing with a nail buffer to keep them looking pristine.
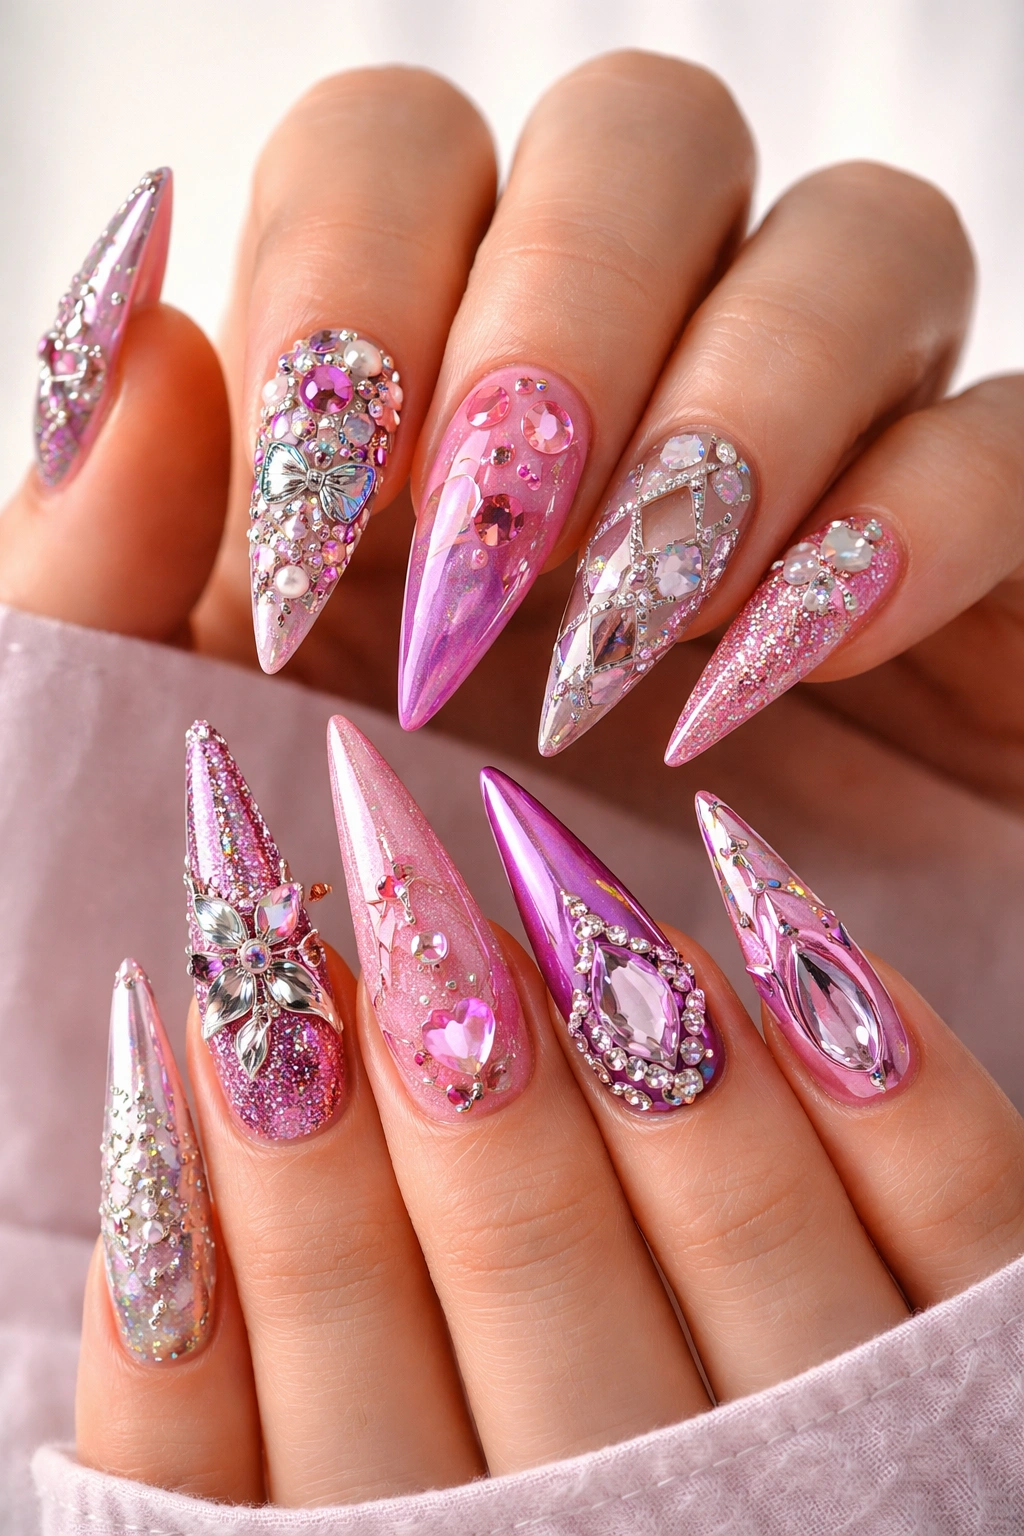
5. Jeweled Gradient Tips
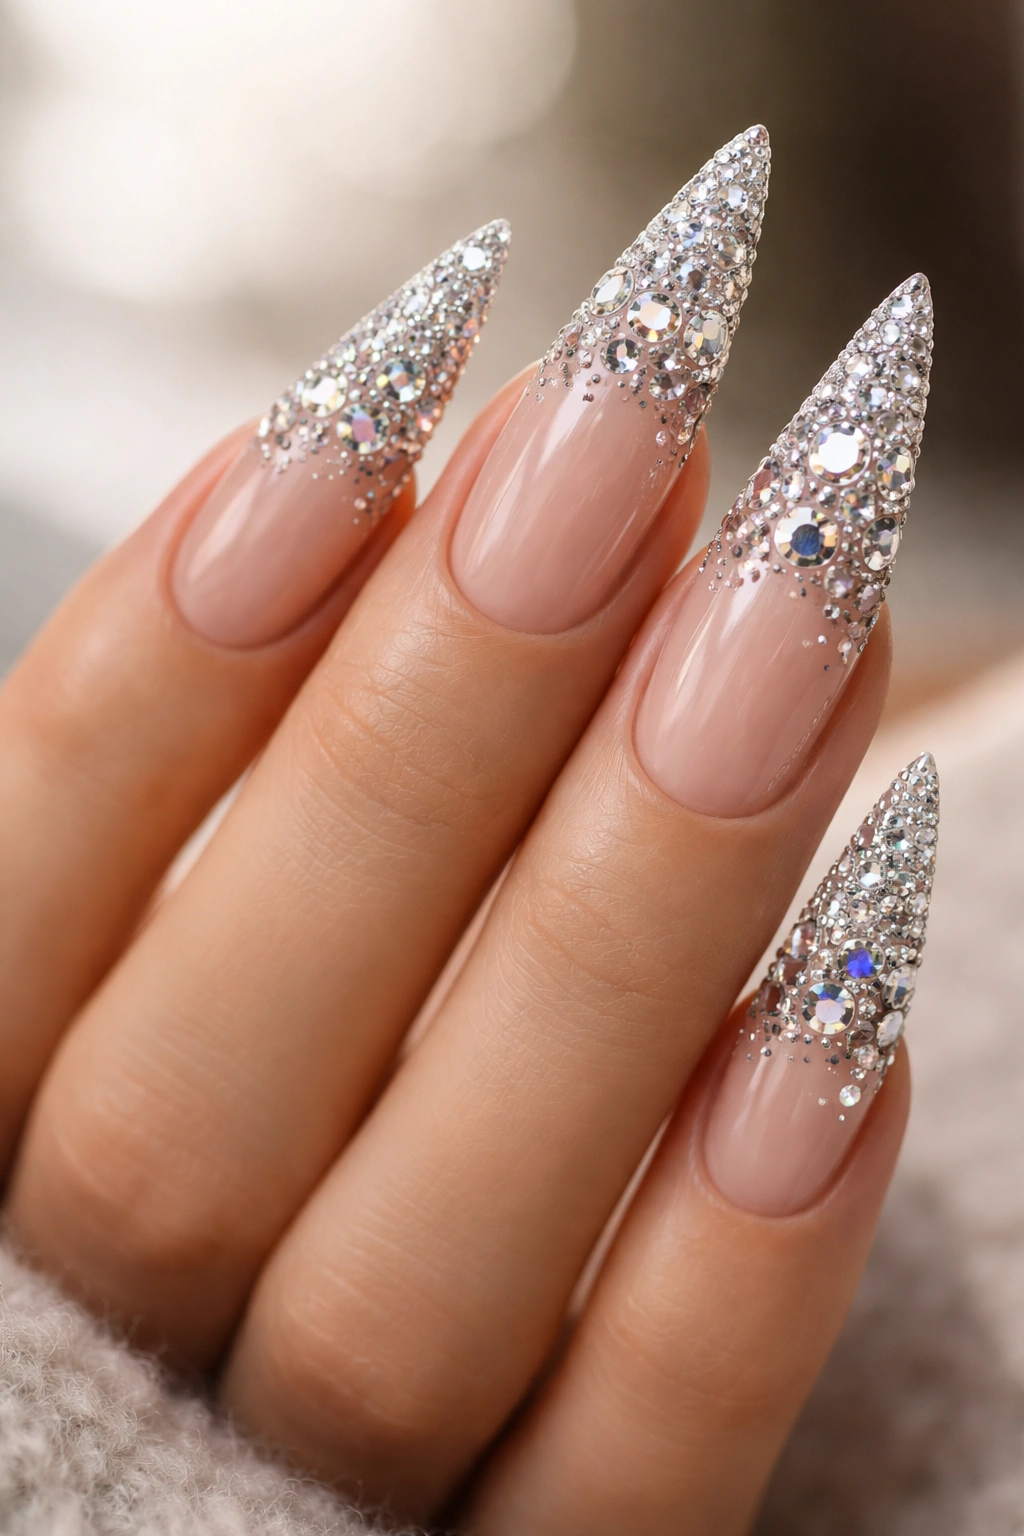
This is specifically about an ombré or gradient that goes from fully bare (a clear or natural nail bed) at the cuticle to an absolute explosion of crystals and gems at the tip. The gradient itself might be a soft color transition—from pale pink to deep burgundy, or from nude to black—but what really matters is how the gems increase in density as you move toward the tip. By the time you reach the very edge of the stiletto point, there’s barely any nail visible because the gems are packed so tightly together.
The Visual Effect
When done correctly, this creates the illusion that the sparkle is literally cascading down the nail like water or stardust frozen in place. The eye naturally follows the gradient and ends up at the dramatic gem-covered tip, which is the focal point. It’s a design that looks chaotic until you realize how thoughtfully the gem density was managed to guide your eye.
Execution Details
- Start with a high-quality base coat and let it cure completely
- Apply your gradient color in layers, building intensity as you move toward the tip
- Begin placing larger gems roughly in the middle of the nail, then increase density toward the tip
- Use smaller gems to fill gaps and create a seamless transition from less gems to more gems
- Finish with a strong top coat that fully encases the gems for longevity
Pro tip: Use a nail glue specifically designed for gem application rather than regular gel polish under your gems—it provides better hold for the extended wear period these nails demand.
6. Holographic Chrome Everything
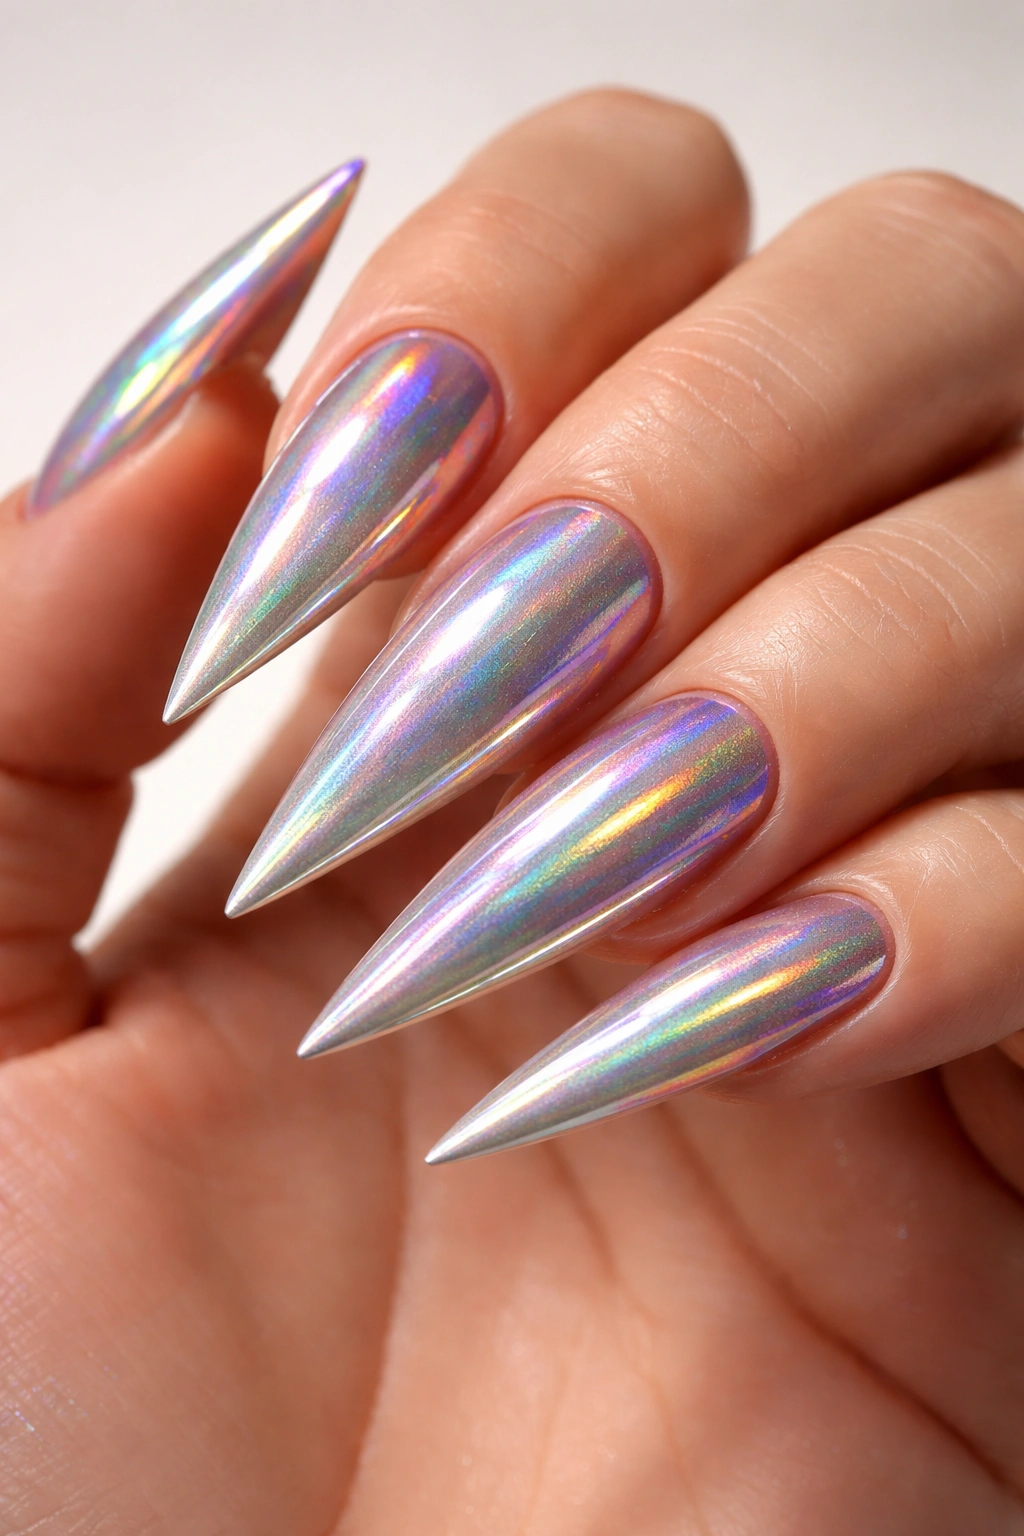
This is the design for people who want their nails to look like they’re reflecting light from another dimension. Holographic chrome powder creates a shifting, iridescent effect that changes color depending on the angle and light source. In bright sunlight, the nails might appear one color; under artificial indoor light, they shift to something completely different. Some versions layer holographic powder over a colored base (like hot pink or emerald green) to create a shifting dual-tone effect, while others go full holographic silver-to-rainbow.
The Technical Process
Holographic effect typically requires a sticky base or specialized gel polish designed to accept the fine chrome powder. The powder is applied while the gel is still slightly tacky, then sealed with a layer of topcoat. The result is a nail that looks almost metallic but with an otherworldly, shifting quality that feels innovative and futuristic. Some nail artists add additional layers of chrome powder in different colors (like adding blue over the holographic silver) to create extra complexity.
Why It Goes All Out
- The sheer novelty factor—these nails look like they’re straight from a sci-fi movie
- The constantly shifting appearance means the design never gets boring (you see something new depending on lighting)
- It photographs incredibly well, especially with flash or in multiple lighting conditions
- The chrome powder can be expensive, which adds to the luxury feeling
Worth knowing: Holographic chrome nails are at their most stunning when freshly applied. The effect can dull slightly over 2-3 weeks, so scheduling a refresh before they get too dull helps maintain the otherworldly appearance.
7. Stacked Color Blocking

This design divides each stiletto nail into distinct horizontal or vertical color blocks—typically 3-5 different colors per nail, each occupying its own clearly defined section. The colors are usually bright, saturated, and chosen for contrast: neon pink next to electric blue, hot orange next to lime green. Some versions create a rainbow stack (all the colors in order), while others are more artfully chosen color combinations. The lines between colors are clean and crisp, either perfectly straight or following geometric patterns.
The Strategic Color Pairing
What separates interesting color blocking from chaotic color blocking is intentionality in how the colors are chosen and paired. The best versions either follow a clear logic (rainbow order, warm-to-cool gradient, analogous colors) or tell a coherent story through the color choice. The nails don’t need to match perfectly across all ten fingers—some of the most striking versions feature different color combinations on different nails.
Application Method
- Map out your design on paper first so you know exactly where each color starts and ends
- Use striping tape or painter’s tape to create perfectly straight lines between colors
- Apply gel polish in each color section, removing tape immediately after each color dries
- Some artists hand-paint the lines without tape for a slightly more organic, intentional look
- Seal the entire design with a strong topcoat and cure thoroughly
Pro tip: Use colors with similar opacity levels so you don’t need different numbers of coats in different sections—this prevents uneven texture and ensures clean color lines.
8. Encapsulated Flowers and Foliage
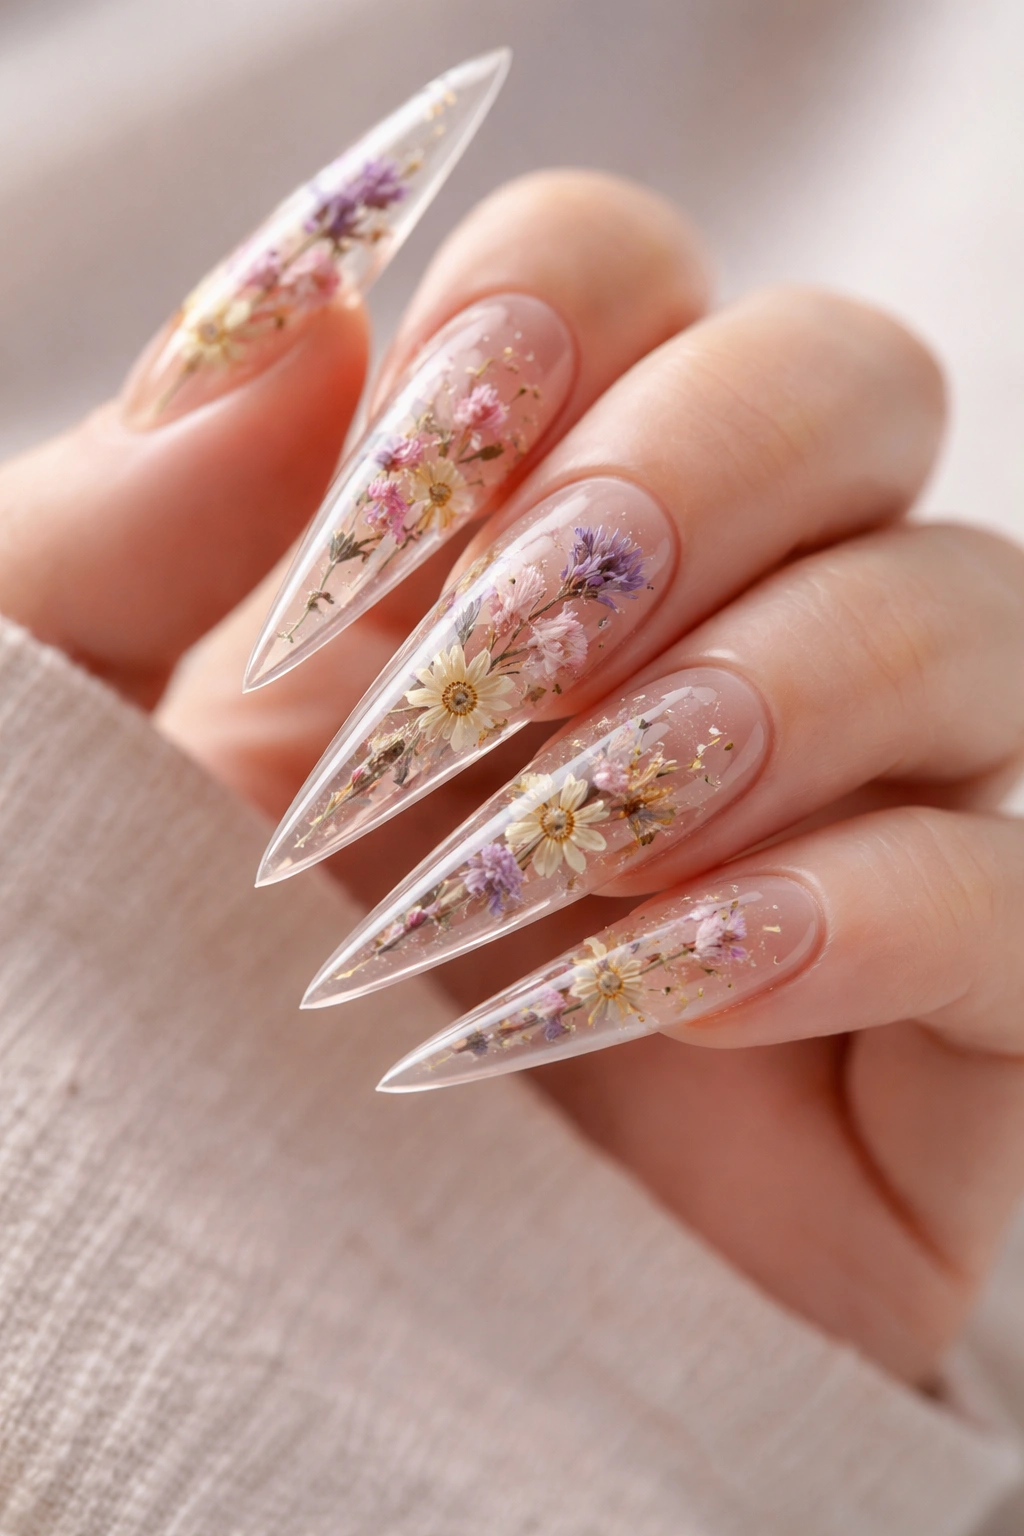
Unlike sculpted flowers that sit on top of the nail, encapsulated designs have dried flowers, leaves, botanicals, or floral elements literally enclosed between layers of gel or acrylic. You might see delicate baby’s breath preserved under clear gel, tiny rose petals captured mid-nail, or actual pressed leaves creating an organic pattern suspended inside the nail structure. The effect is like looking through glass at a preserved botanical specimen on your fingertip—elegant, natural, but also distinctly surreal because flowers aren’t supposed to be made of nail material.
The Preservation Aspect
For this design to work, the botanical elements need to be either already dried or quickly dried before encapsulation. Some artists use flowers from dried flower arrangements, others dry fresh flowers specifically for nail art. The encapsulation process traps them perfectly, which means they stay preserved and don’t deteriorate—the same flower petal could theoretically stay beautiful for months under the gel seal.
Why It’s Maximalist
- The concept itself is audacious: actual flowers inside your nails
- It combines multiple interests—nail art, fashion, and botanicals—into one wearable piece
- The level of detail and the organic nature of the flowers mean each set is genuinely unique
- They’re conversation starters because people often can’t figure out how the flowers got trapped inside
Worth knowing: These nails require a light touch when it comes to hand activities. Water, humidity, and warm environments can cause the gel to expand and contract slightly, which could theoretically affect the botanical elements, though well-encapsulated designs are typically quite durable.
9. Negative Space Geometric Madness
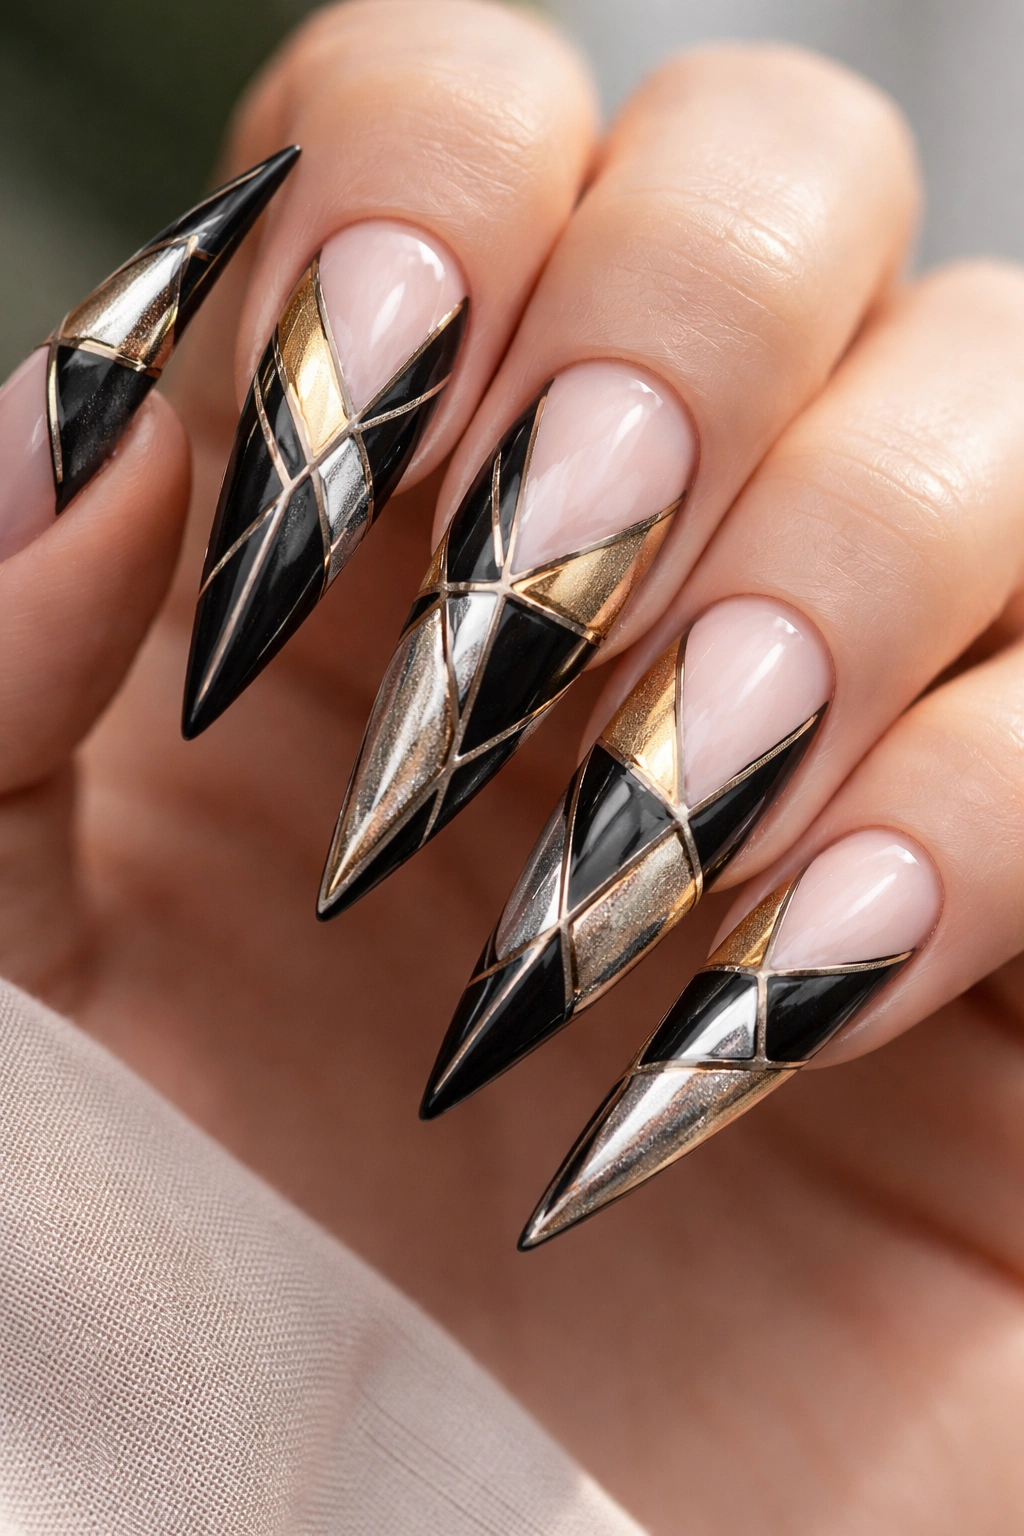
This design embraces the idea that what you don’t paint can be just as striking as what you do. Geometric patterns—triangles, lines, angular shapes, tessellations—are created using the nail’s natural color or a nude base as the negative space, with bold colors (often black, metallic, or jewel tones) filling in the other sections. One nail might feature a pattern that looks like shattered glass or fragmented geometry; another could showcase intricate linework that travels across the nail at different angles. The overall effect is modern, intentional, and visually complex without being garish.
The Design Philosophy
Negative space designs work because they create visual interest through contrast and pattern rather than just through color. A nude stiletto with minimal design elements might be elegant but quiet; the same nail with intricate negative space geometric work becomes a showcase of nail art skill and design sense. The geometry forces the eye to actually trace the patterns, which engages the viewer more deeply.
Popular Geometric Patterns
- Angular linework creating the illusion of 3D depth
- Tessellating shapes that create an almost tile-like pattern
- Fragmented designs where thick lines create the impression of broken glass
- Minimalist line work across the nail surface
- Negative space that creates recognizable shapes (stars, arrows, hexagons) within the overall pattern
Pro tip: If you’re doing this at home, use thin striping brushes or nail art pens for the colored portions, and let the natural nail do the work for the negative space. The contrast between the natural nail and the bold lines is what makes this design sing.
10. Sunset Ombré with Glitter Gradient
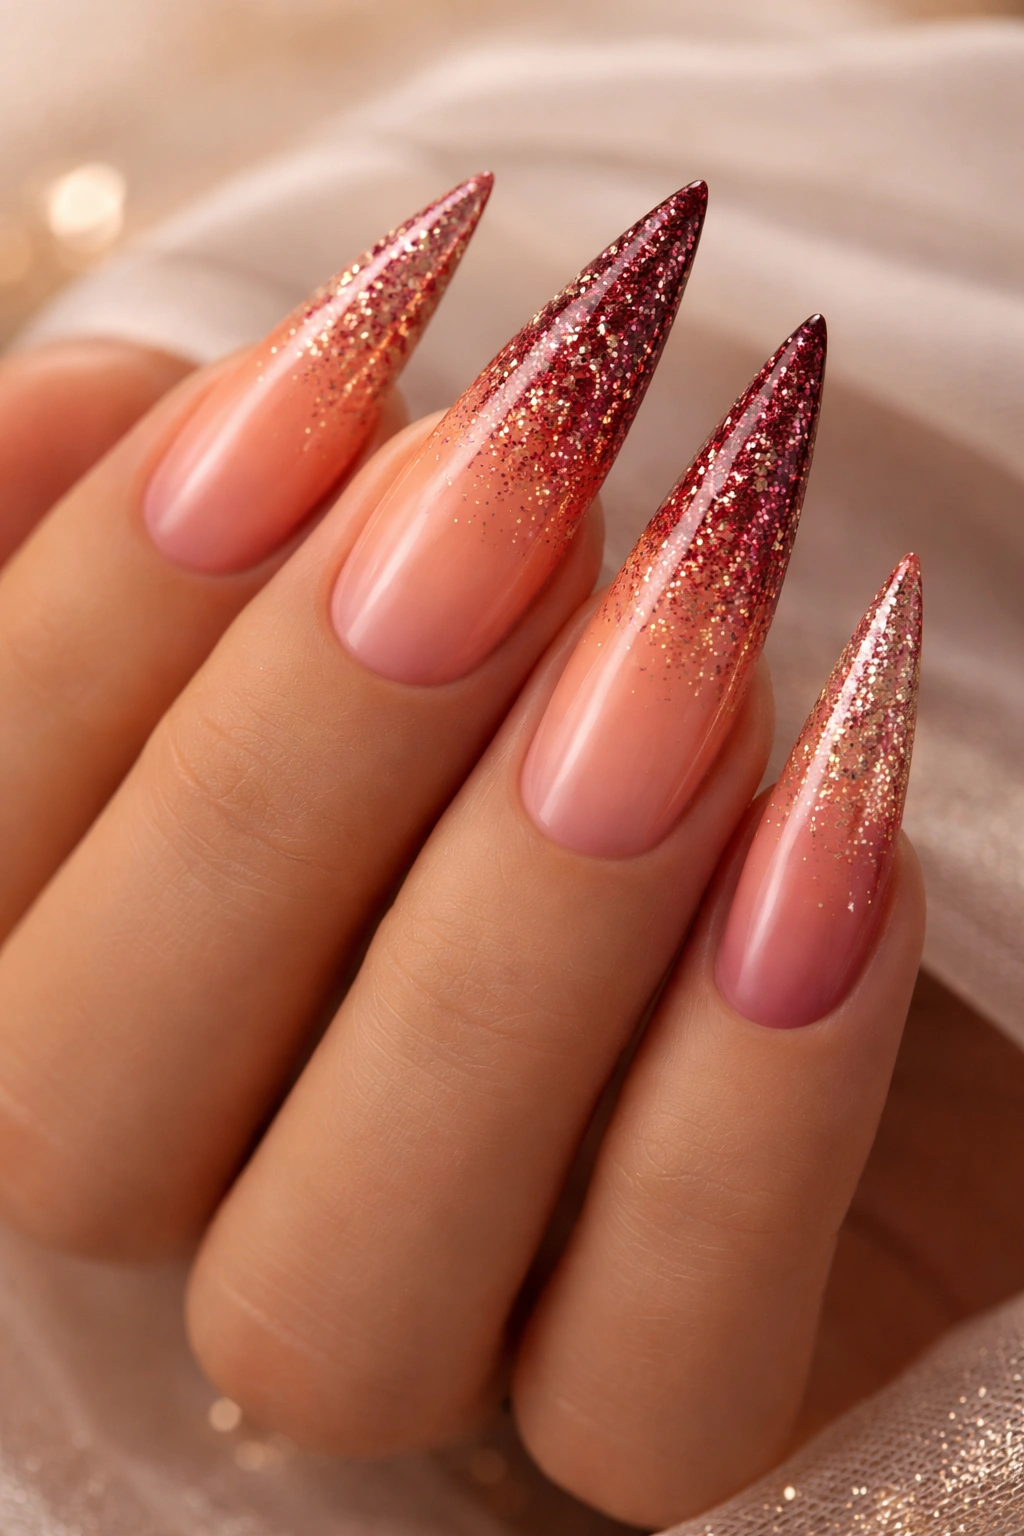
This is a specific color story designed to evoke the feeling of watching a sunset from your fingertips. The ombré typically starts with warm peachy tones at the tip, transitions through coral and orange in the middle, then shifts to purple and deeper burgundy tones toward the cuticle. But here’s where the “junk” part comes in—scattered throughout this beautiful gradient is glitter that also follows the same color progression: gold glitter in the peachy section, copper and rose gold in the middle, and purple or champagne glitter near the cuticle. It’s romantic and maximalist simultaneously.
Creating the Gradient Base
This design works best with gel polish where you can create smooth color transitions. The technique usually involves applying one color, then blending the next color into it using a sponge or brush before the gel cures, creating that seamless gradient effect. Each color should spend enough time on the nail to be fully visible, typically occupying about 20-30% of the nail’s length.
Incorporating the Glitter
- Use multiple glitter sizes to create visual interest within the ombré
- Apply glitter while each gel layer is still tacky so it adheres properly
- Let the glitter density vary—more glitter in some areas creates a sense of movement
- Use glitter that coordinates with the specific color zones so it looks intentional rather than random
Worth knowing: This design benefits from high-quality glitter rather than craft glitter. Professional nail art glitter has better opacity, more sparkle, and won’t separate from your nails the way cheap glitter can.
11. Mismatched Maximalist Statement Nails
Instead of trying to make all ten nails match or even complement each other, this design embraces complete chaos by giving each nail its own bold, unrelated design. One nail might be a solid chrome holographic, the next a heavily gemmed explosion, the next a geometric negative space pattern, the next a gradient, and so on. The only connecting element is usually the nail shape (all stilettos) and sometimes a consistent color family, but each nail is genuinely its own statement piece. When all ten are displayed together, the overall effect is audacious maximalism.
The Confidence Required
This design genuinely works only if you commit to it fully. The moment you second-guess the mismatched concept and try to tie things together too much, it looks confused rather than intentionally chaotic. The best mismatched sets have clear, distinct designs on each nail, executed with professional quality and unapologetic boldness.
Creating Cohesion Within Chaos
- Choose a consistent color palette across all the nails (all jewel tones, all neons, all pastels)
- Ensure the nail shape and length are consistent so the nails read as a coordinated set despite the different designs
- Use similar quality of finish (all shiny, all matte, all textured) to unify the look
- Space out the most dramatic designs so two incredibly busy nails aren’t adjacent
Pro tip: Document your designs so if you need to touch them up before they’re fully grown out, you have a reference photo for each nail’s unique design.
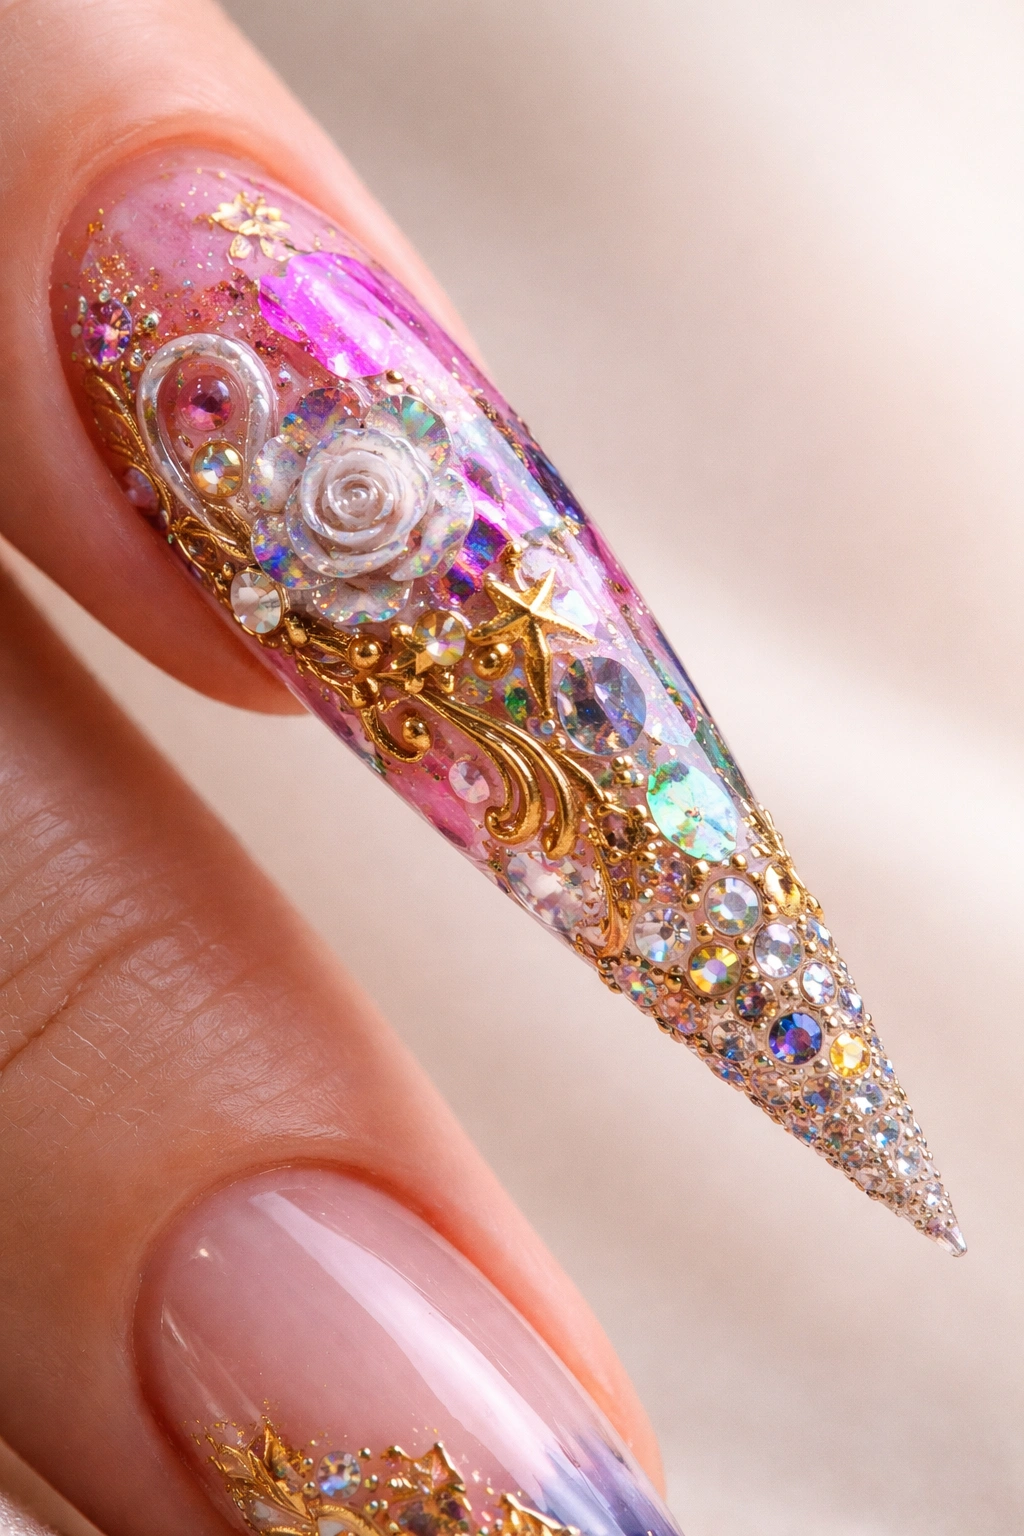
12. Encapsulated Luxury (Diamonds + Foil)
This design layers two premium elements into a single nail: actual diamond dust or crushed diamond particles encapsulated between layers of gel, combined with metallic foil also suspended in the gel. The result is a nail that literally contains layers of luxury—you can see the metallic foil beneath the diamond dust, creating a multi-dimensional sparkle effect. It’s the kind of design that makes you want to stare at your nails because something new catches your eye every time light hits them.
The Encapsulation Technique
Creating this requires at least three gel layers: a base color, then a layer containing the foil or other flat elements, then another layer with the diamond dust or sparkle particles, then a final seal coat. Each layer needs to cure fully before the next layer is applied. The precision required is significant because you need the layers to be visible but also fully sealed and protected.
What Makes It Maximum
- You’re literally wearing crushed diamonds on your nails, which feels luxurious even if the “diamonds” are lab-created
- The multi-layered construction creates depth and visual interest that’s almost 3D
- The combination of different sparkle types (flat foil plus particulate diamonds) creates more complex light reflection
- It genuinely looks expensive and exclusive
Worth knowing: Diamond dust and high-quality foils add cost to your manicure, so be prepared for this design to fall on the pricier end of the nail art spectrum. Make sure your nail technician has experience with encapsulation work to ensure the quality is worth the investment.
13. Marble Chaos with Veining
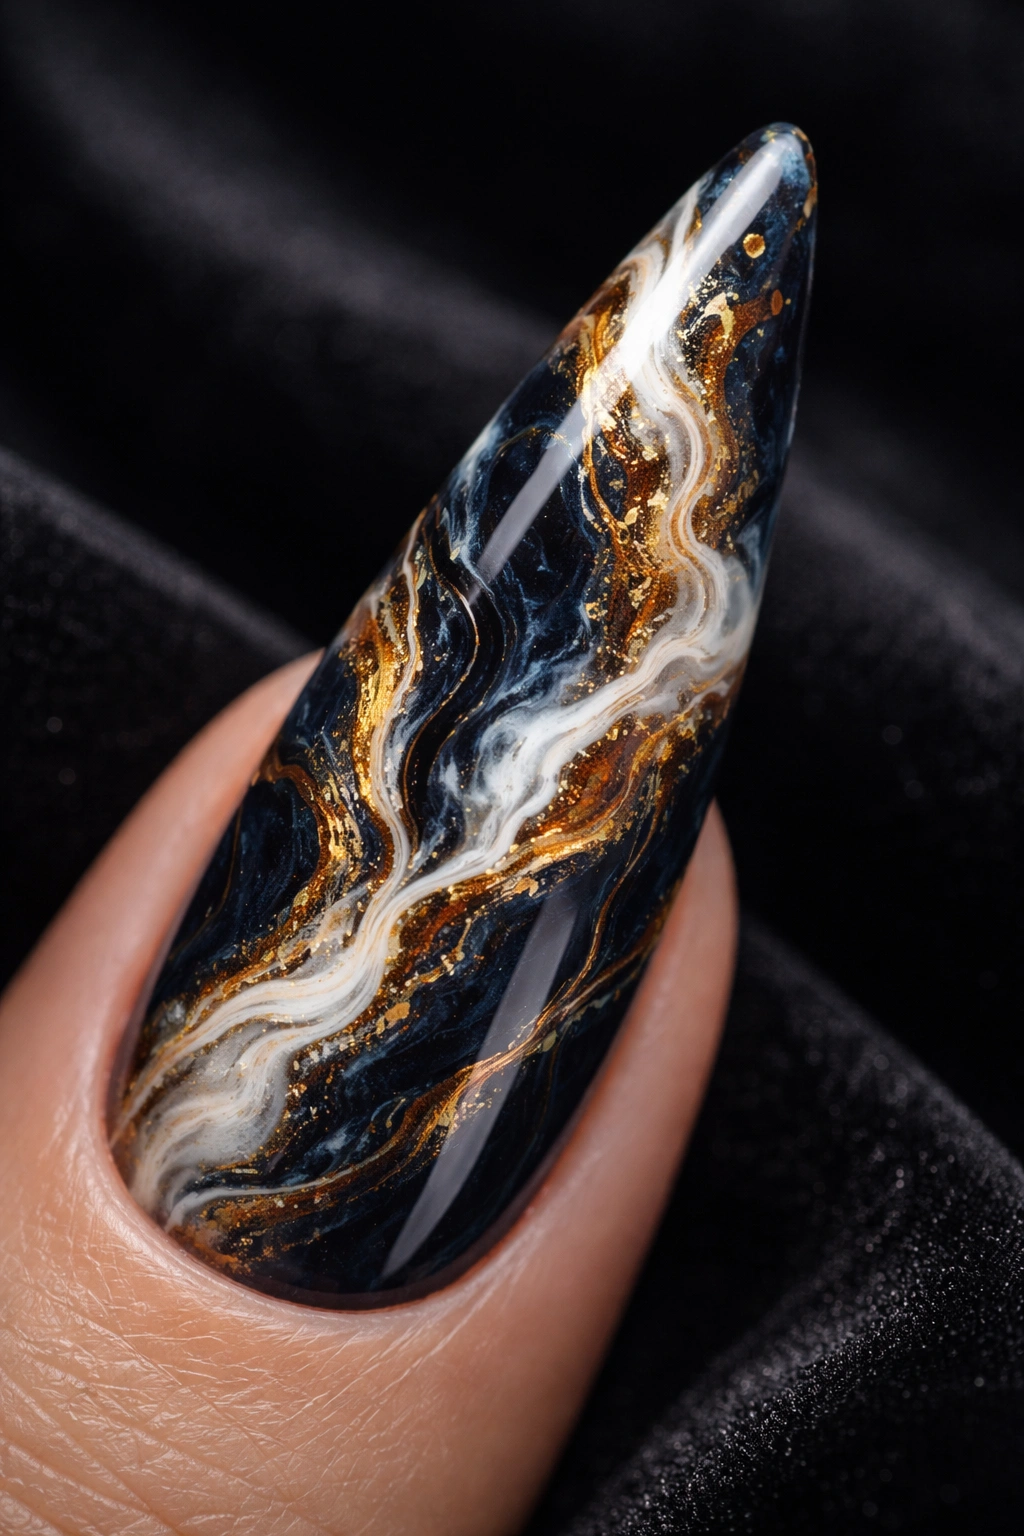
Take traditional marble nail art and amplify it to maximum intensity. Instead of subtle swirling veining on a neutral base, imagine dramatically thick, high-contrast veining that covers most of the nail surface, often in combinations that are anatomically impossible (like white veining on a black base with gold veining on top of that). Some versions incorporate multiple colors in the marble pattern itself: white, black, gold, and copper all flowing together. The thickness and density of the “veining” is the key to this being maximum rather than subtle—these nails read as marble at first glance, not as subtle nail art.
Creating Bold Marble Patterns
Professional marble designs are usually created using a specialized liquid or gel and a marbling technique where colors are dropped onto a surface and manipulated to create the pattern, or it’s hand-painted using thin brushes and strategic color placement. The boldest versions don’t worry about looking like real marble so much as capturing the feeling of marble with dramatic veining.
The Color Combinations
- White or gold veining on a deep navy, black, or emerald base
- Black veining on pale pink, nude, or white
- Multi-color veining with gold, silver, and copper metallic lines on a single base color
- “Negative” marble where the veining becomes the dominant visual element rather than the background color
Pro tip: If you’re getting this done professionally, bring reference images of marble patterns you love. Describe not just the colors but the density of the veining—whether you want it thick and bold or more delicate.
14. Multi-Dimensional Mixed Media Finale
This is the absolute maximum: a nail that combines multiple techniques and materials into a single wearable art piece. Picture a stiletto nail where the base is a bold color, sections are encapsulated with foil, some areas have 3D sculpted elements (maybe small studs or tiny shapes), the tip features densely packed gems, and there’s hand-painted nail art detail work throughout. Every possible nail art technique is represented on this single nail. It’s chaotic, it’s over the top, and it’s absolutely uncompromising in its commitment to going all out.
When to Go Full Maximum
This design is perfect for someone who genuinely loves nails and sees them as wearable art first, fashion second. It works for special occasions where you want to make a genuine statement, for nail art enthusiasts who want to challenge their artist’s creativity, or for anyone who’s never met an embellishment they didn’t love. These nails absolutely demand attention in every situation.
Element Combinations That Work
- Encapsulation + gems + hand-painted details
- Sculpted 3D elements + chrome + glitter gradient
- Metallic foil + multiple colors + geometric hand-painted overlay
- Gems + flower encapsulation + metallic base + high-shine topcoat
- Marbling + micro gems + metallic accents + holographic chrome powder
Worth knowing: These ultra-complex nails require several hours to create and represent significant investment in terms of time and materials. They’re also most dramatic when freshly done, so scheduling a full appointment specifically for these nails rather than adding them to another service makes sense. The payoff is nails that genuinely feel like jewelry, art, and personality all combined into something completely unique.
Final Thoughts
Stiletto nails were always meant for people who don’t play it safe with their style, and when you commit fully to maximalist design concepts, they become something more than just manicure—they become wearable declarations of confidence and creativity. Whether you choose diamond encrusted glamour, explosive color blocking, or wildly complex mixed media art, these designs exist to make a statement.
The thing about going all out with stiletto nails is that it works best when you genuinely love the design, not because you feel like you’re supposed to commit to something extreme. These nails should make you feel powerful, gorgeous, and unapologetically yourself every single time you look at your hands. Find the design that speaks to your personal style, trust your nail artist’s expertise, and enjoy the fact that you’re wearing something genuinely creative and bold.
