

If you’re looking to elevate your festive manicure beyond the standard red polish, stiletto nails offer the perfect canvas for bold, eye-catching holiday designs. The elongated almond shape naturally draws attention to intricate details, glitter, and layered art that might get lost on shorter nails — making stilettos the ideal choice for anyone wanting their holiday nails to make a real statement.
Whether you’re heading to a cocktail party, family gathering, or just want to feel extra glamorous during the season, stiletto nails deserve a design that matches their dramatic flair. The good news? Festive nail art on stilettos doesn’t have to mean sacrificing elegance or practicality. From minimalist metallic accents to full-coverage 3D embellishments, there’s a festive stiletto design for every personality and occasion.
What makes stilettos particularly special during the holidays is how they frame nail art. The extra length gives you more real estate to work with, allowing for detailed patterns, multi-color gradients, and dimensional effects that shorter nails simply can’t accommodate. You can do intricate snowflake work, delicate holly leaf designs, or bold geometric patterns that actually have space to shine.
Let’s walk through sixteen festive stiletto nail ideas that range from sophisticated and subtle to bold and unapologetically glamorous. Each one includes specific techniques and color combinations you can recreate at home or show your nail technician for your next appointment.
1. Deep Red and Gold Geometric Holiday
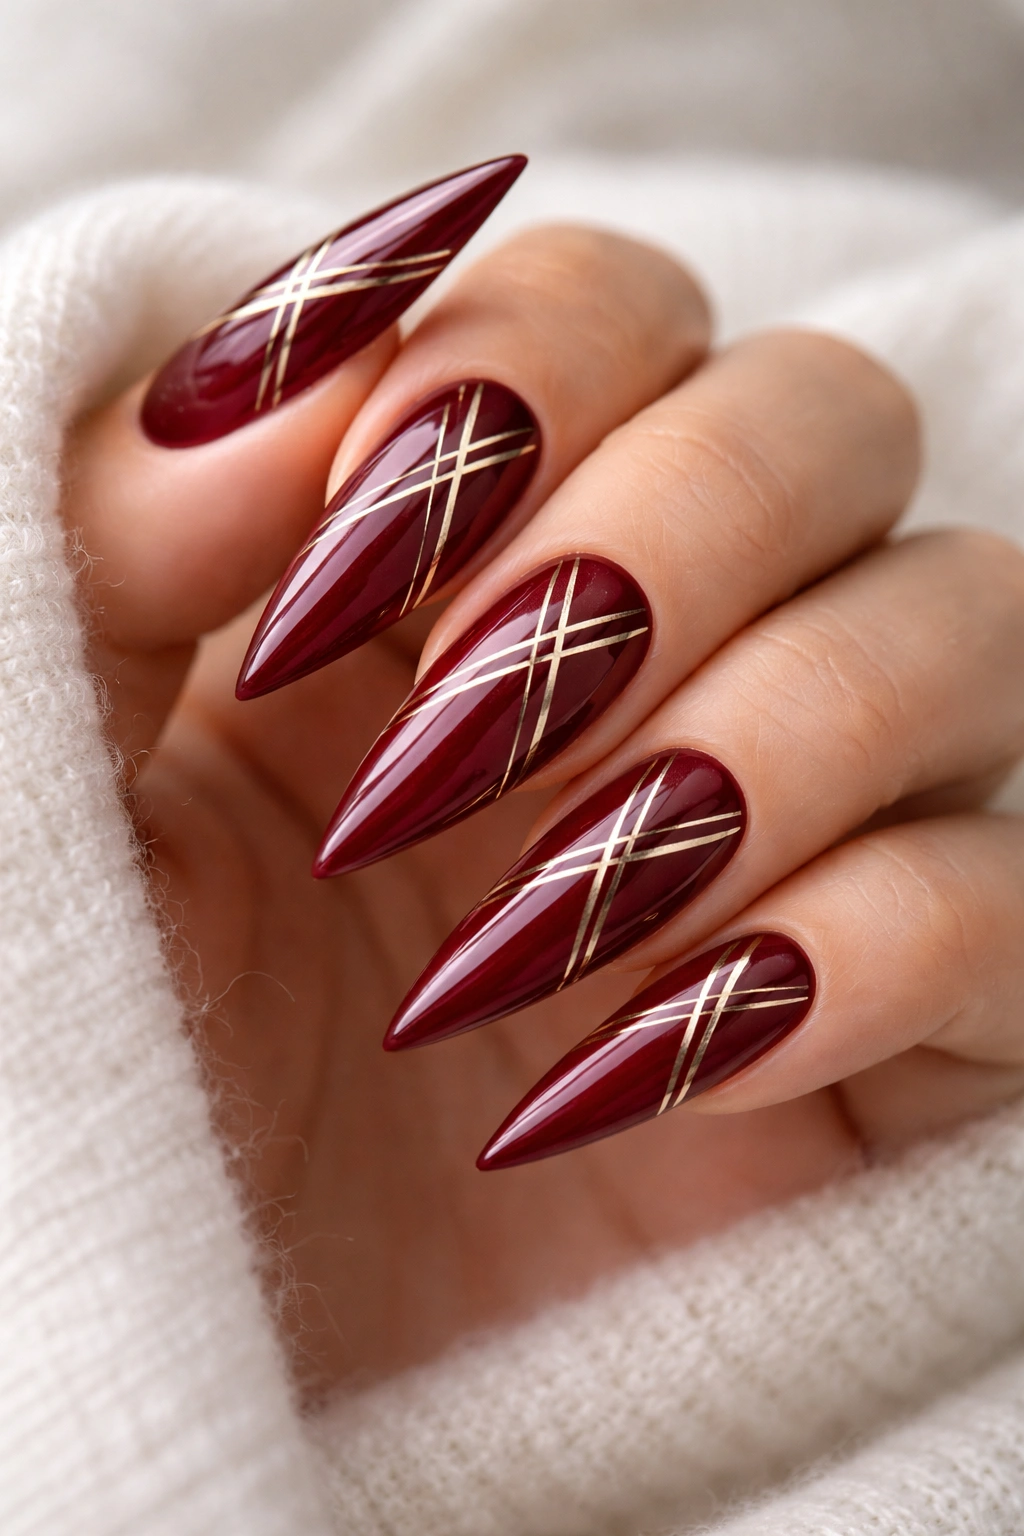
Deep burgundy or forest red polish paired with geometric gold accents creates a look that’s both classic and contemporary. Paint the base in a rich red shade — think of a high-end lipstick finish — and use a thin gold liner or gold striping tape to create clean triangles, lines, or chevron patterns down the center of each nail.
Why This Design Works for the Holidays
The contrast between warm gold and deep red reads as unmistakably festive without feeling costume-y. Gold adds sophistication while the geometric pattern keeps it modern rather than themed. This design works for formal events, casual gatherings, or even professional settings during the holiday season.
How to Execute It Perfectly
Start with two coats of your deep red base and allow it to dry completely. Use a thin striping brush or gold gel pen to create your geometric pattern. If you’re not confident in your steady hand, apply gold striping tape before painting and remove it for crisp, perfect lines. Seal with a glossy topcoat to make the gold really pop and protect your design. The key is letting the red be the star — the gold should accent, not overwhelm.
Pro tip: If you make a mistake with the gold, use a thin brush dipped in your red base color to clean it up before the gold fully sets.
2. Emerald Green with Diamond-Shaped Gems
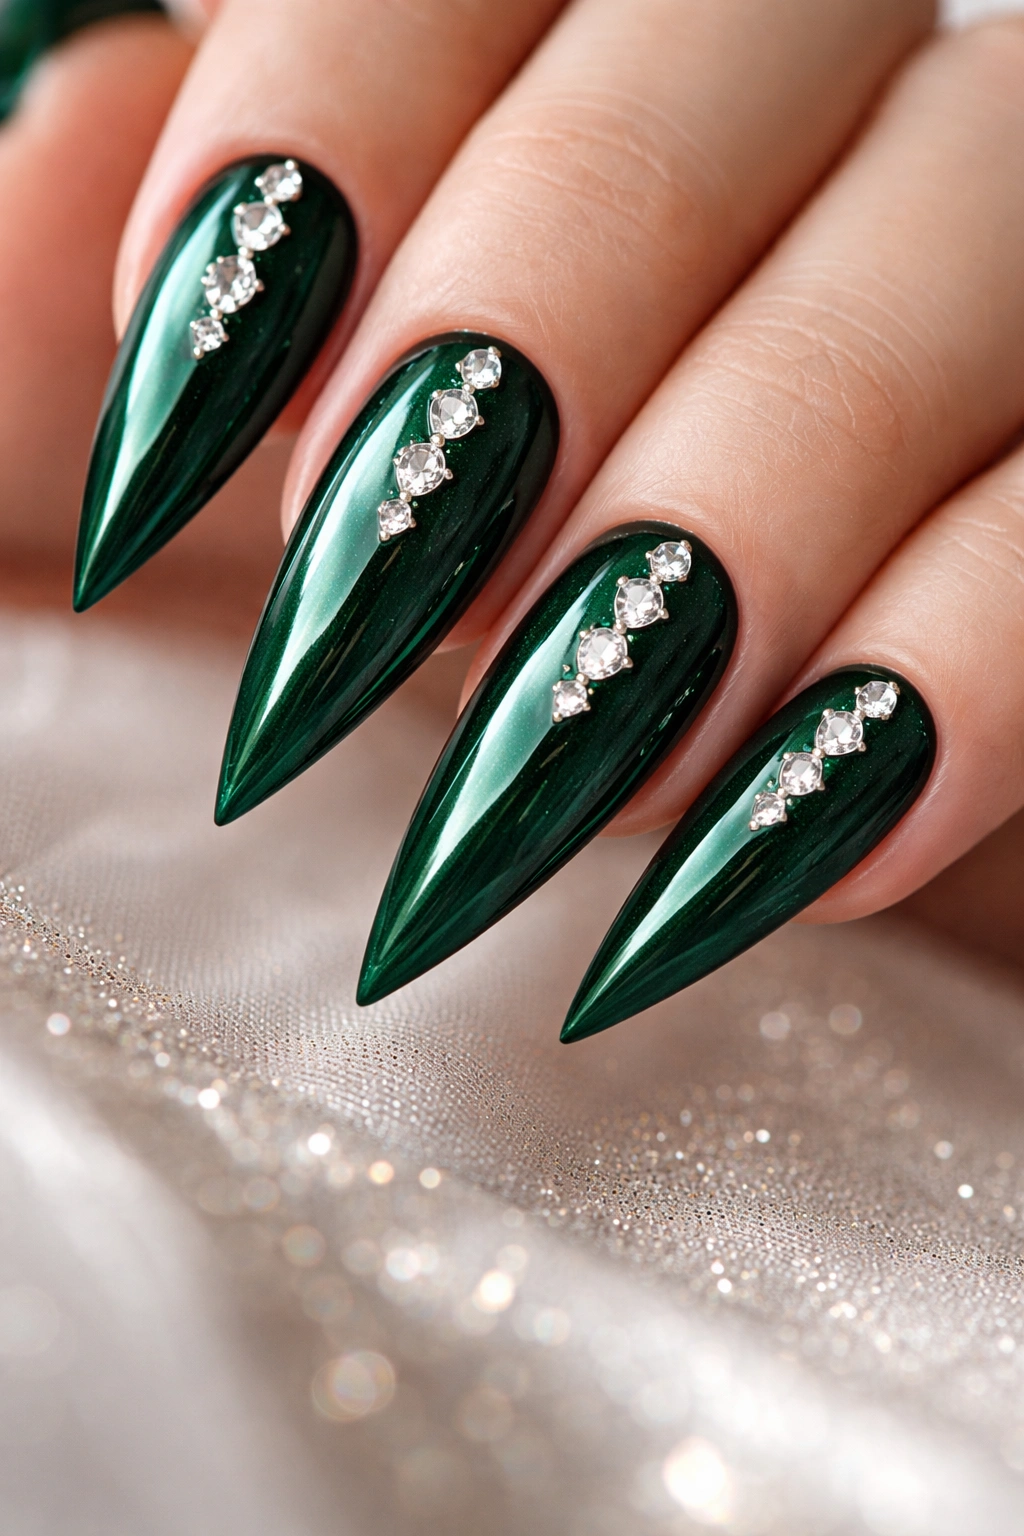
Emerald green stilettos look inherently luxurious, and adding strategically placed gems takes them to another level. Use an emerald gel or regular polish as your base, then apply small diamond-shaped crystals or rhinestones in a vertical line down the center of each nail or clustered on one accent nail.
The Appeal of Emerald for Festive Season
Green is quintessentially holiday without being obvious. It’s the color of pine trees, holly, and evergreens — bringing that natural festive feeling to your nails. When you pair it with shimmering gems, you’re elevating it beyond casual into genuinely elegant territory.
Technique for Lasting Gem Application
Use a clear gel or nail glue specifically designed for rhinestones to secure your gems. If you’re using regular polish, apply a bit of clear topcoat to the area where you want to place the gem, press the rhinestone in, and seal it again with another layer of topcoat once the base layer dries. For gel manicures, cure after placing each gem to ensure it stays put through the entire week.
For a more subtle look, place three to four small diamonds vertically down the center. For drama, create a cluster of different-sized gems on your ring finger accent nail. Either approach reads as festive and intentional.
3. Candy Cane Stripes on White Base

A true holiday classic doesn’t stay classic for no reason. Paint your stiletto nails white or off-white as your base, then add red or pink and white diagonal stripes to create the iconic candy cane effect. The elongated stiletto shape actually makes these stripes more visually interesting than they’d be on shorter nails.
Why Candy Cane Design Translates to Stilettos
The striping pattern follows the natural line of a stiletto nail, elongating your fingers even further. The contrast between the bright white and bold red creates visual pop that’s instantly recognizable as festive. This design is playful without being silly and works equally well for casual holiday outings or themed holiday parties.
Creating Perfectly Even Stripes
Use a thin striping brush or gel polish in a pen format for better control. Paint your stripes at a slight diagonal angle (about 30-45 degrees) from the cuticle toward the tip. Make each stripe roughly the same width — about 2-3 millimeters for most stiletto nails. The diagonal direction matters because it creates movement and follows the natural line of the nail.
If you’re not steady with freehand stripes, use nail striping tape to create guides before painting. Remove the tape while the polish is still slightly tacky for the cleanest lines.
4. Burgundy with Matte Gold Leaf Accents
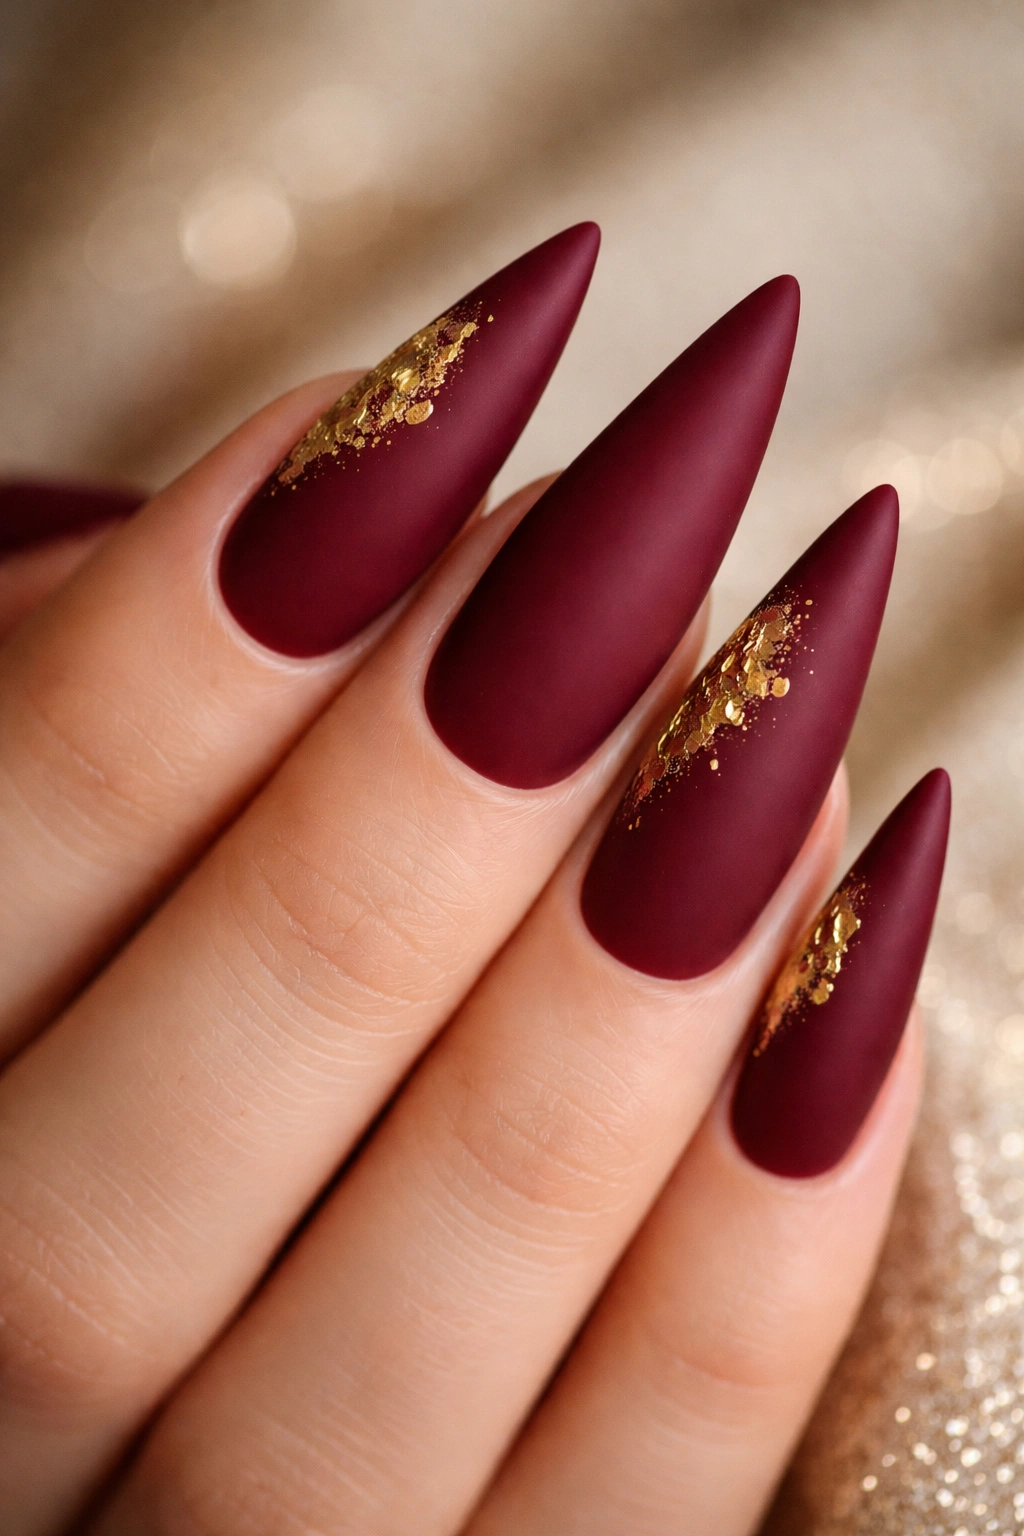
Matte finishes are having a major moment, and they’re particularly striking on stiletto nails. Paint your base in rich burgundy, then create small gold leaf accents in the upper corner of each nail or scattered across the surface for an organic, luxurious appearance.
The Sophistication of Matte with Metallic
The contrast between a matte burgundy surface and shiny gold leaf creates dimensional interest without being loud. It reads as high-end and intentional. This is the kind of design that makes people ask where you got your nails done.
Applying Gold Leaf for Best Results
Gold leaf requires a bit of finesse but creates a stunning effect. Apply your burgundy polish and let it dry completely. Use a clear topcoat or special adhesive layer on the areas where you want the gold leaf. Gently press the gold leaf onto the tacky surface, and once it sets, seal the entire nail with a matte topcoat. The matte finish over the shiny gold leaf creates beautiful contrast and dimension.
Professional nail artists often use gel formulas with gold leaf because the curing process locks everything in place, but it’s absolutely doable with regular polish if you’re careful and patient.
5. Ombre from Dark Burgundy to Champagne
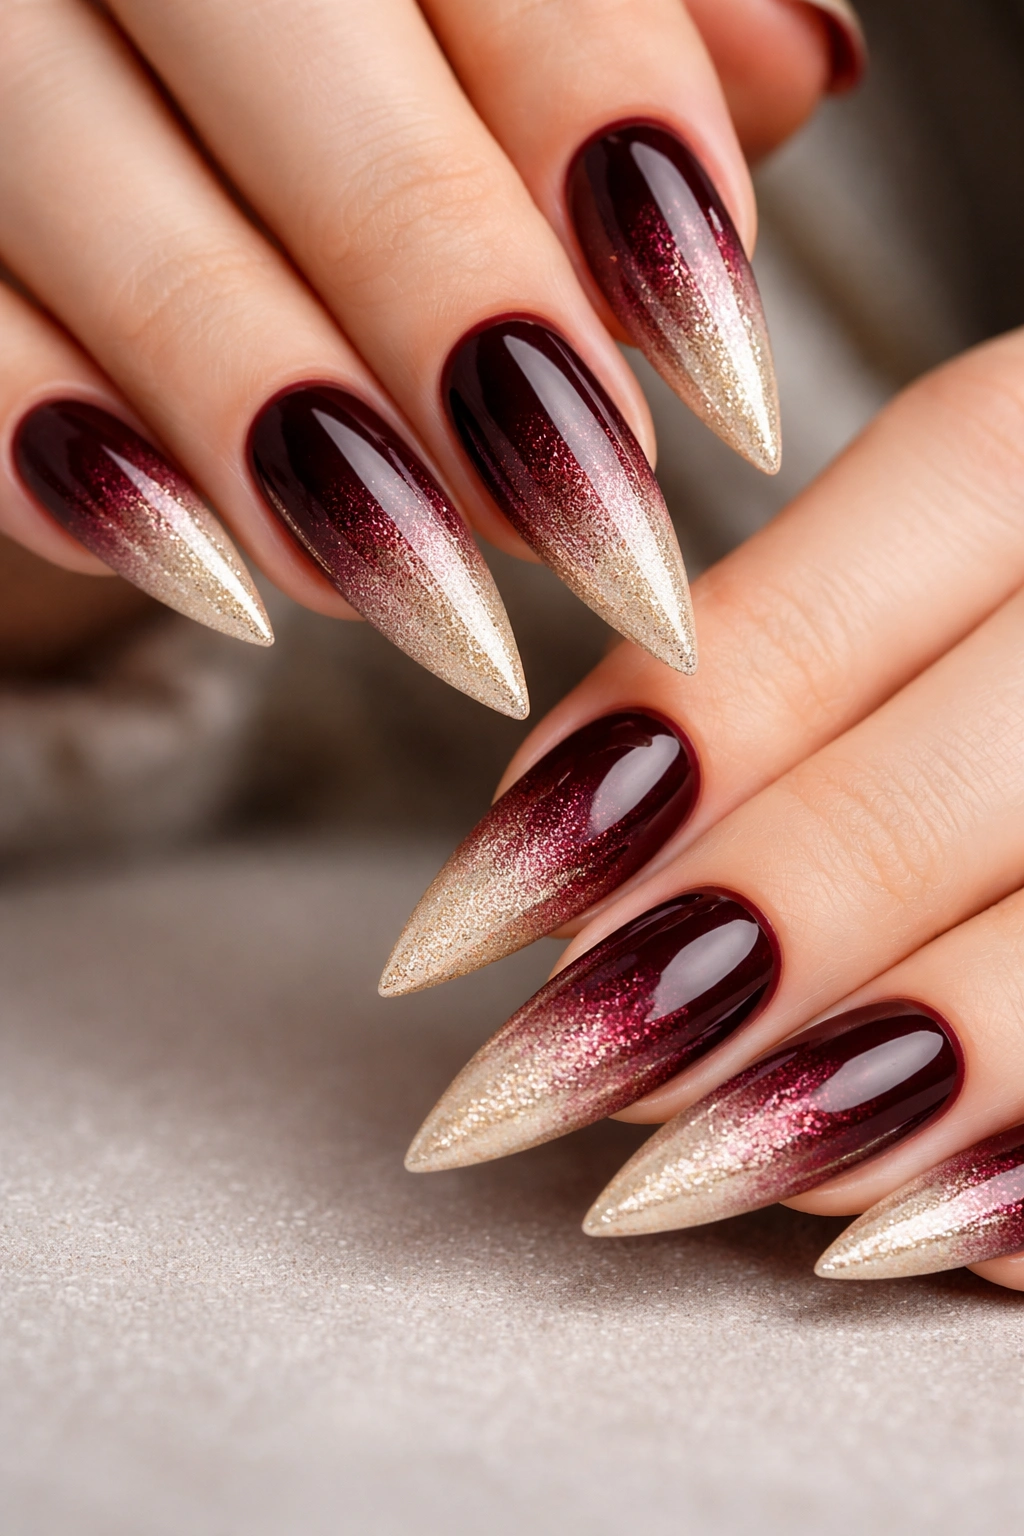
An ombre effect on stiletto nails is stunning and surprisingly easier to achieve than you might think. Start with a dark burgundy at the base, gradually transitioning to champagne, rose gold, or light pink toward the tip. This creates a sophisticated gradient that feels festive without being literal or themed.
Why Ombre Shades Work on Stilettos
The length of stiletto nails gives you plenty of space to show off the color transition. An ombre that would barely be visible on a short nail becomes the focal point on a stiletto. The gradual color shift creates visual interest and feels modern and elegant.
Two Methods to Create the Ombre Effect
Sponge method: Mix your two colors on a makeup sponge in slightly overlapping sections, then dab the sponge gently onto your nail in a stippling motion. Build up the color gradually until you achieve the intensity you want. Use a very fine makeup sponge for the smoothest results.
Brush blending method: Apply your dark color to the base, then use a clean, slightly damp blending brush to soften the transition as you introduce the lighter shade toward the tip. This takes more practice but gives you more control over exactly where the transition occurs.
Either method works beautifully on stilettos. The key is having patience and building the color gradually rather than trying to create a dramatic shift in one or two applications.
6. Forest Green Base with White Snowflake Details
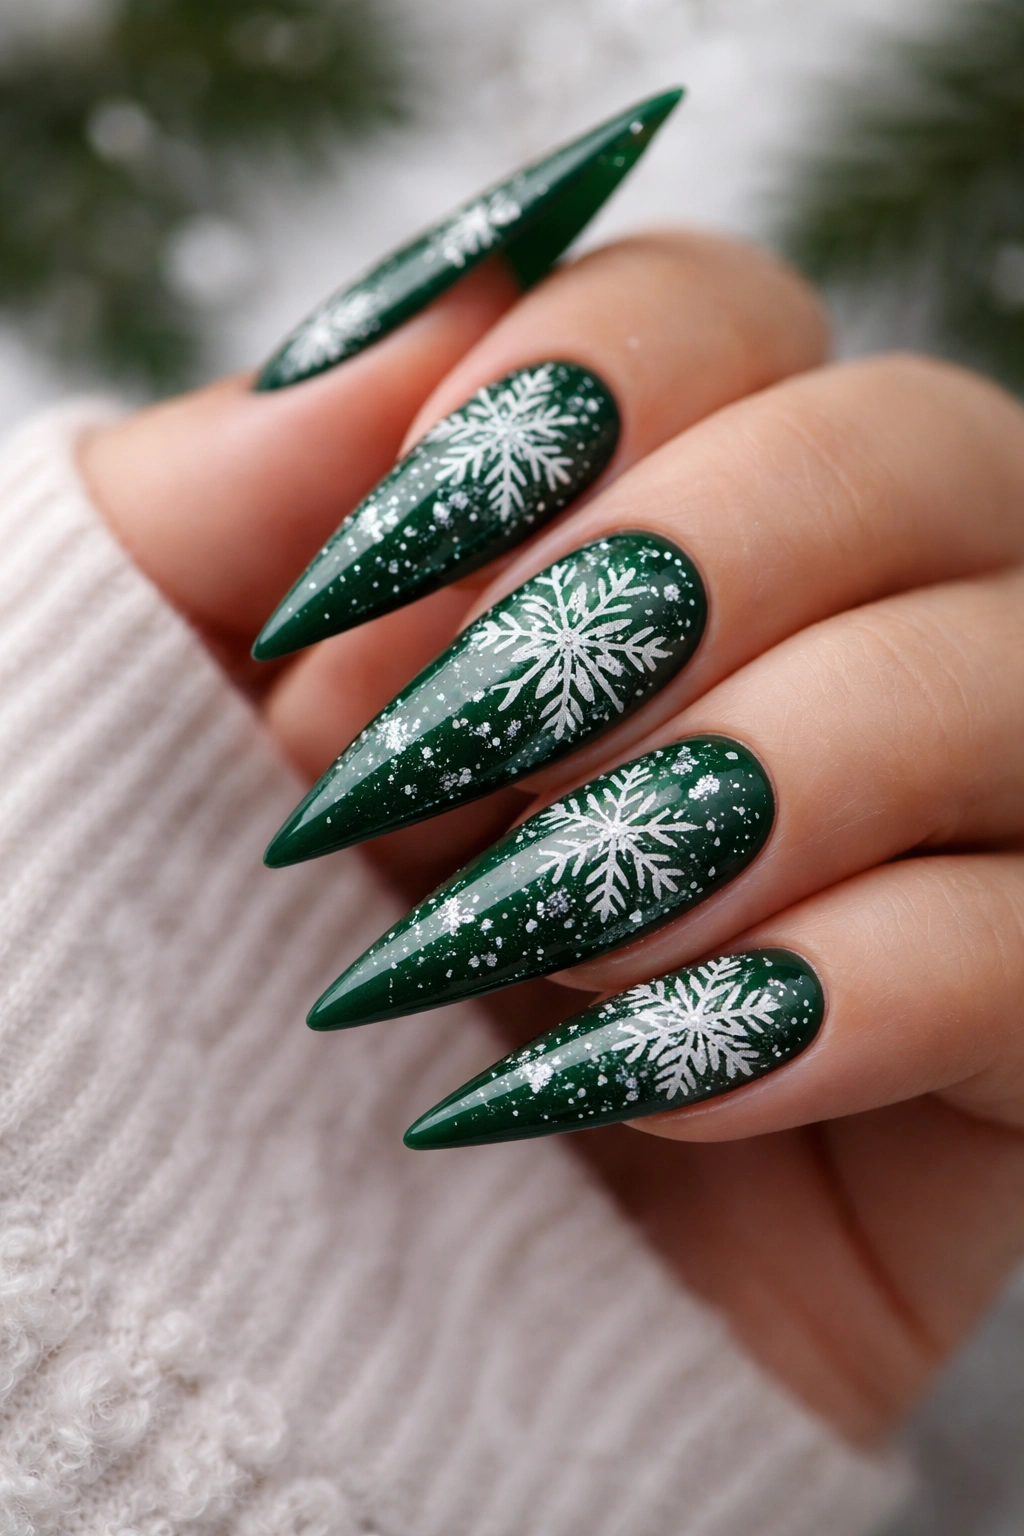
A forest or hunter green base provides a rich, jewel-toned backdrop for delicate white snowflake artwork. Use a thin brush or white gel pen to paint intricate snowflake designs across each nail, leaving some areas bare for balance and visual breathing room.
Creating Convincing Snowflake Patterns
Real snowflakes have symmetry and geometric precision, which is what makes them visually satisfying on nails. Start by painting a small star shape in white, then add branching lines extending from the points. Add smaller branches off those lines, maintaining symmetry on opposite sides. Each snowflake doesn’t need to be identical — variation actually looks more natural.
If freehand snowflakes intimidate you, use snowflake nail stamps designed for this purpose. They’re inexpensive and take the guesswork out of symmetry.
Why Green and White Feels Festive
The combination reads as pine trees dusted with snow — bringing the natural beauty of winter to your nails without being literal about it. It’s refined and elegant while remaining unmistakably festive.
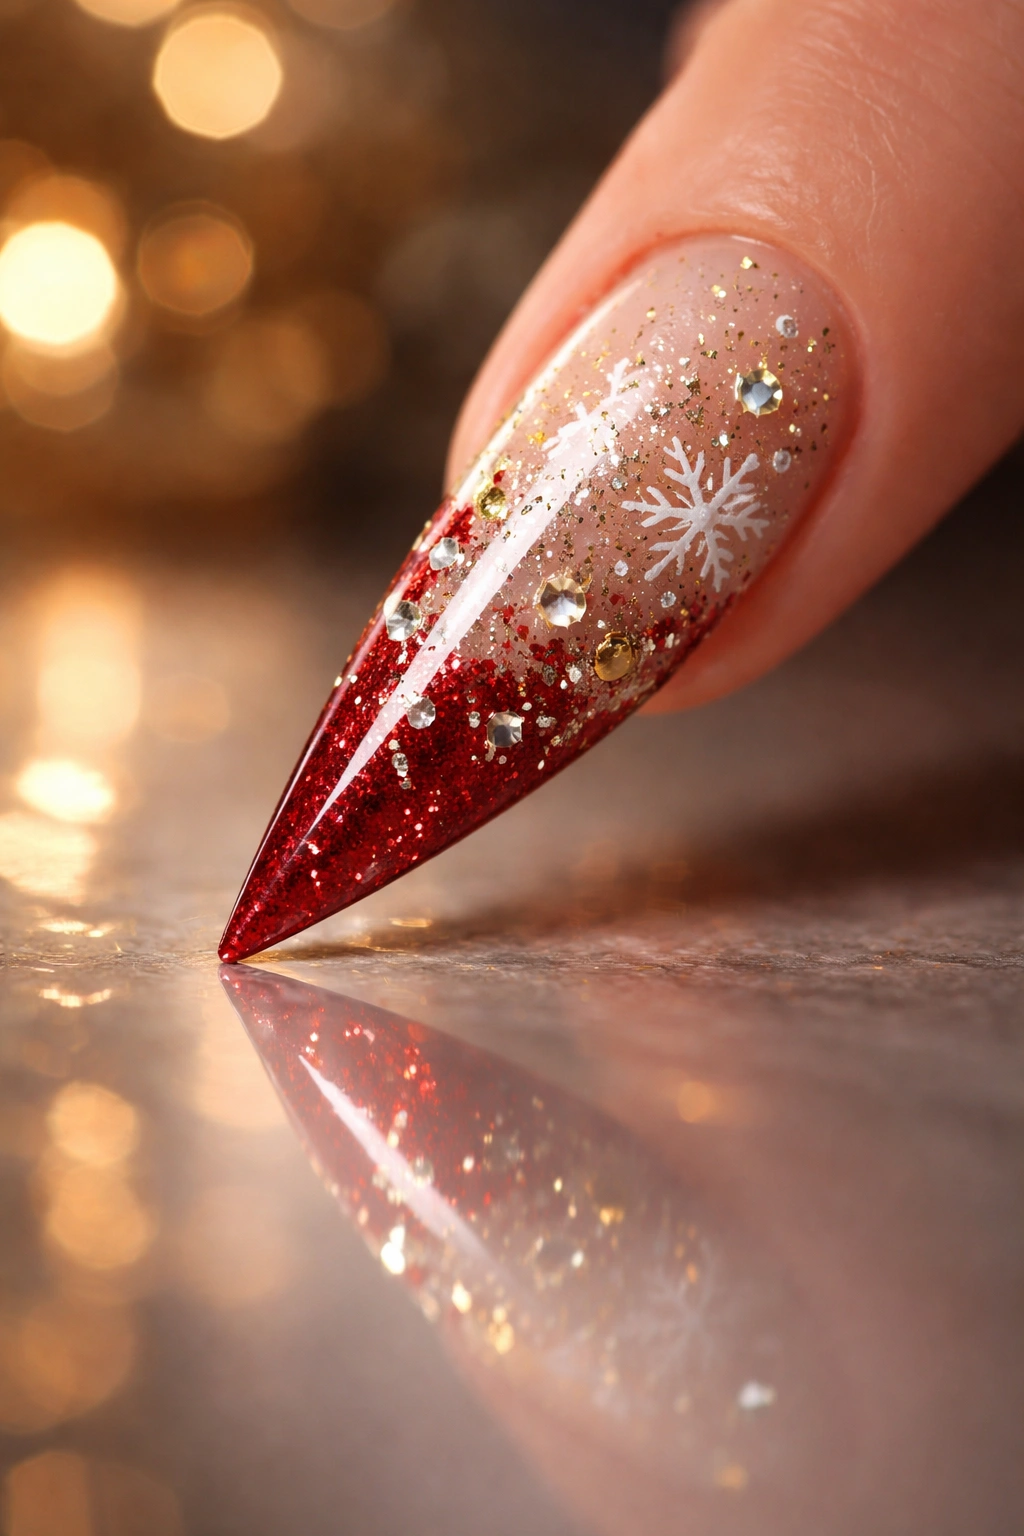
7. Nude Base with Scattered Gold Glitter

For a sophisticated, wearable option that still reads as holiday festive, start with a neutral nude or beige base and scatter fine gold glitter across the surface. This creates subtle sparkle that catches the light without being overwhelming or costume-like.
The Magic of Glitter Restraint
Sometimes the most elegant nail art comes from knowing when to pull back. Gold glitter on a nude base is festive because of the association with celebration and glamour, but it’s also timeless and wearable. You can wear this design to the office, to a holiday party, or anywhere in between.
Applying Glitter for a Polished Look
Apply your nude base in two coats and let it dry completely. Instead of covering the entire nail in glitter, apply a clear topcoat to just the tip or to scattered areas where you want glitter to adhere. Press fine gold glitter onto the tacky topcoat and let it dry. Seal the entire nail with another layer of clear topcoat to ensure the glitter stays put and gets smoothed down.
The scattered approach (rather than full coverage) is what makes this feel elevated and intentional rather than accidentally sparkly.
8. Classic Red with Gold Metallic Tips

A red and gold ombre creates the ultimate festive stiletto. Paint your nails a classic red, then blend gold polish into the tips using either a sponge or brush technique. The result is a design that’s unmistakably holiday while remaining sophisticated.
Why Red and Gold Is Timeless
Red and gold are the color combination of celebration, luxury, and festivity across virtually every culture and tradition. On stiletto nails, this pairing becomes even more striking because the shape creates an elegant frame for the metallic finish.
Execution Details That Matter
Use a gel formula if possible — the cure process locks in the color transition and prevents the gold from muddying or looking muddy. If you’re using regular polish, work quickly with a damp blending brush to soften the transition between red and gold before either color fully sets. The smoother your transition, the more luxurious the finished look.
Add a glossy topcoat to make both the red and gold shine. Matte finishes work here too, but gloss amplifies the festive sparkle.
9. Black Base with Silver Snowflakes and Rhinestones
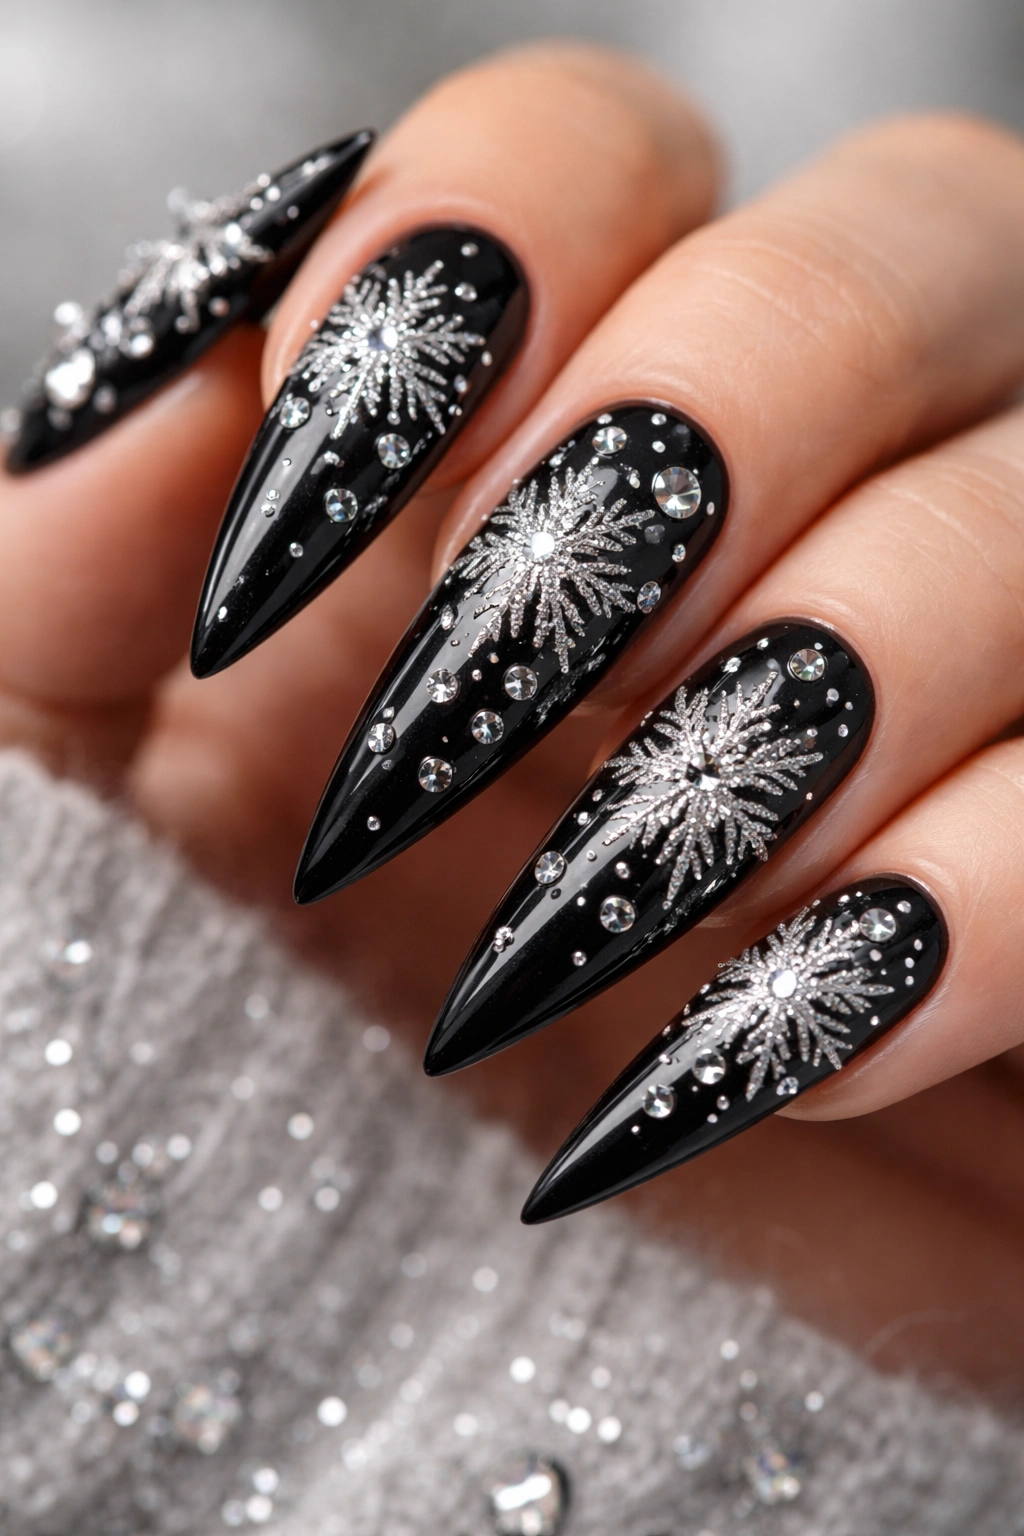
For a more dramatic, edgy take on festive stilettos, combine a black base with fine silver snowflakes and accent rhinestones. This design appeals to anyone who wants to celebrate the season without going full pink or red.
Making Black Feel Festive
Black can absolutely feel festive when paired with the right accents. Silver snowflakes and rhinestones bring sparkle and elegance to a dark base, creating a look that’s sophisticated and slightly rebellious.
Layering Snowflakes with Gems
Paint your snowflake designs in silver gel or silver polish first. Once dry, add rhinestones to strategic points — perhaps the tips of some snowflakes or clustered near the center of the nail. The combination of delicate line work and dimensional gems creates visual texture and interest.
This design particularly flatters deeper skin tones, where the contrast makes the silver pop even more vividly.
10. Champagne Ombre with Pearl Accents
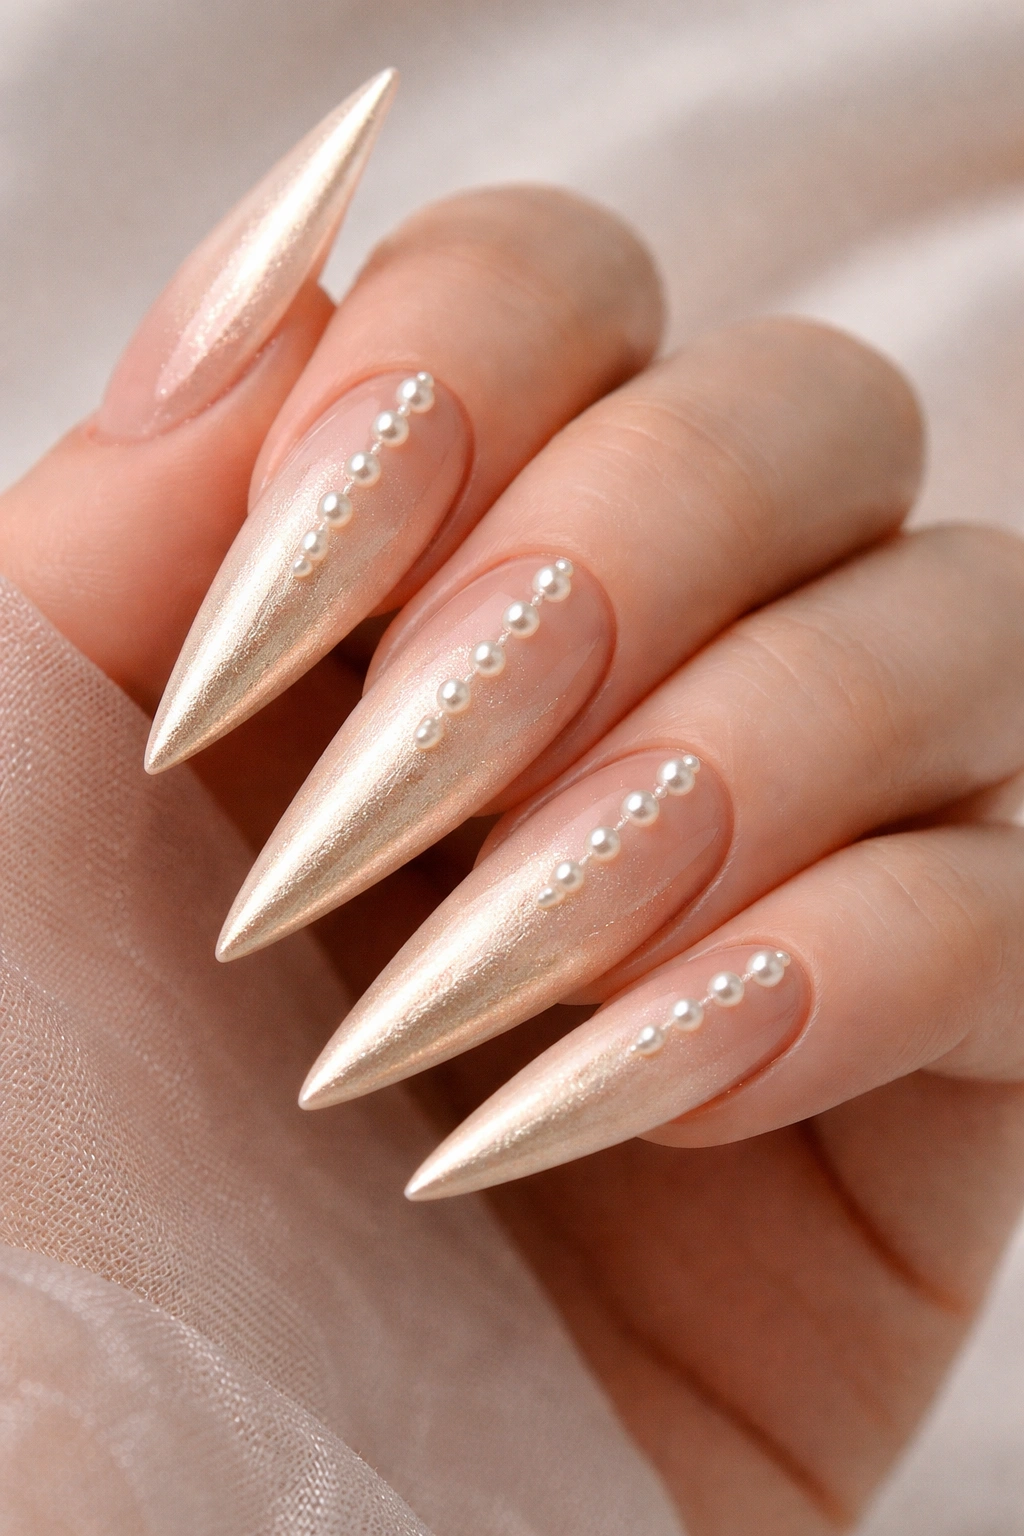
Champagne and pearls create an inherently luxurious feeling that works beautifully on stilettos. Create an ombre that transitions from champagne at the base to pale pink or white at the tips, then add small pearl beads or pearl-finish rhinestones down the center of each nail.
The Understated Elegance of Pearl
Pearls feel refined and timeless rather than trendy. When you combine them with a champagne ombre on stilettos, you create a design that’s festive through its association with celebration and special occasions, but elegant enough to wear to almost anywhere during the holiday season.
Securing Pearl Accents for Durability
Pearl beads need to be secured with a strong adhesive or gel formula. If you’re using regular polish, apply a clear topcoat to your nail, press the pearl bead in, and seal it with another layer once it dries. For gel nails, cure after placing each bead to ensure it stays put.
Space the pearls vertically down the center of the nail, or cluster them on your accent nail for a focal point.
11. Deep Plum with Rose Gold Geometric Lines
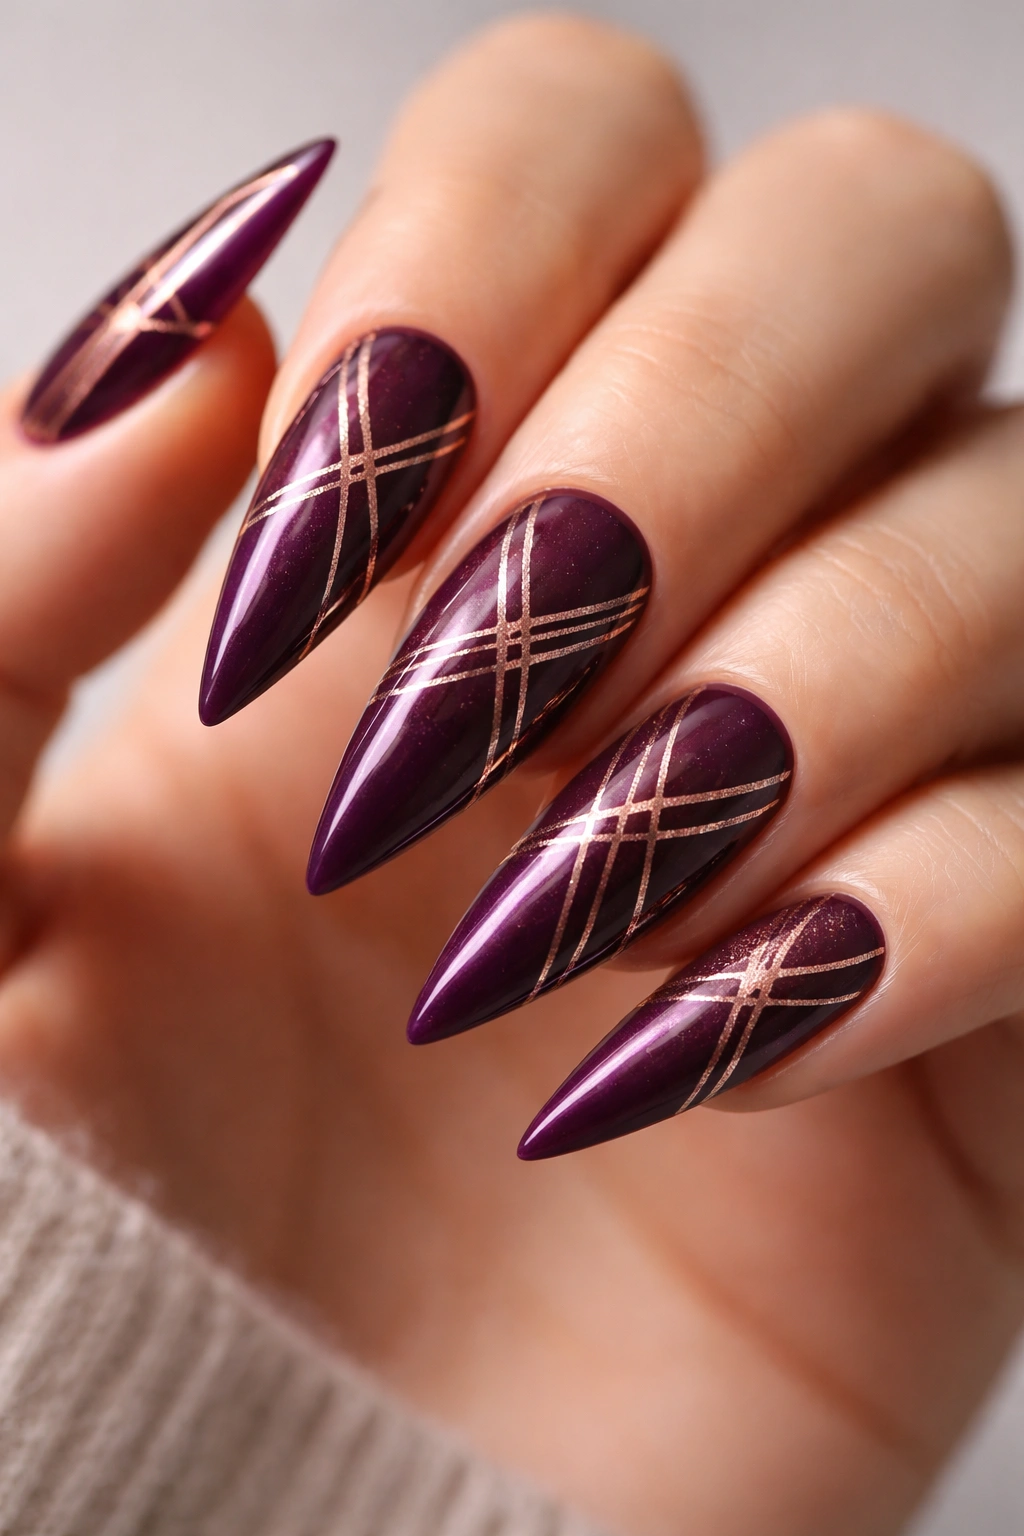
Deep plum is a jewel tone that feels distinctly festive while remaining sophisticated. Pair it with rose gold geometric patterns — thin lines, triangles, or abstract shapes — for a design that’s contemporary and polished.
The Richness of Plum Tones
Plum sits between burgundy and purple, offering a luxurious depth that photographs beautifully and looks flattering against most skin tones. When you add rose gold geometry, you’re creating a design that feels intentional and modern.
Creating Crisp Geometric Patterns
Use a thin striping brush, nail pen, or striping tape to create your geometric designs. Geometric patterns require clean lines, so use tape or a very steady hand. The beauty of stilettos is that the length of the nail gives you space for patterns without them feeling cramped or busy.
Consider doing different patterns on different nails for a more dynamic look, or repeat the same pattern across all ten nails for a cohesive, intentional design.
12. White Base with Red and Green Holly Leaf Design
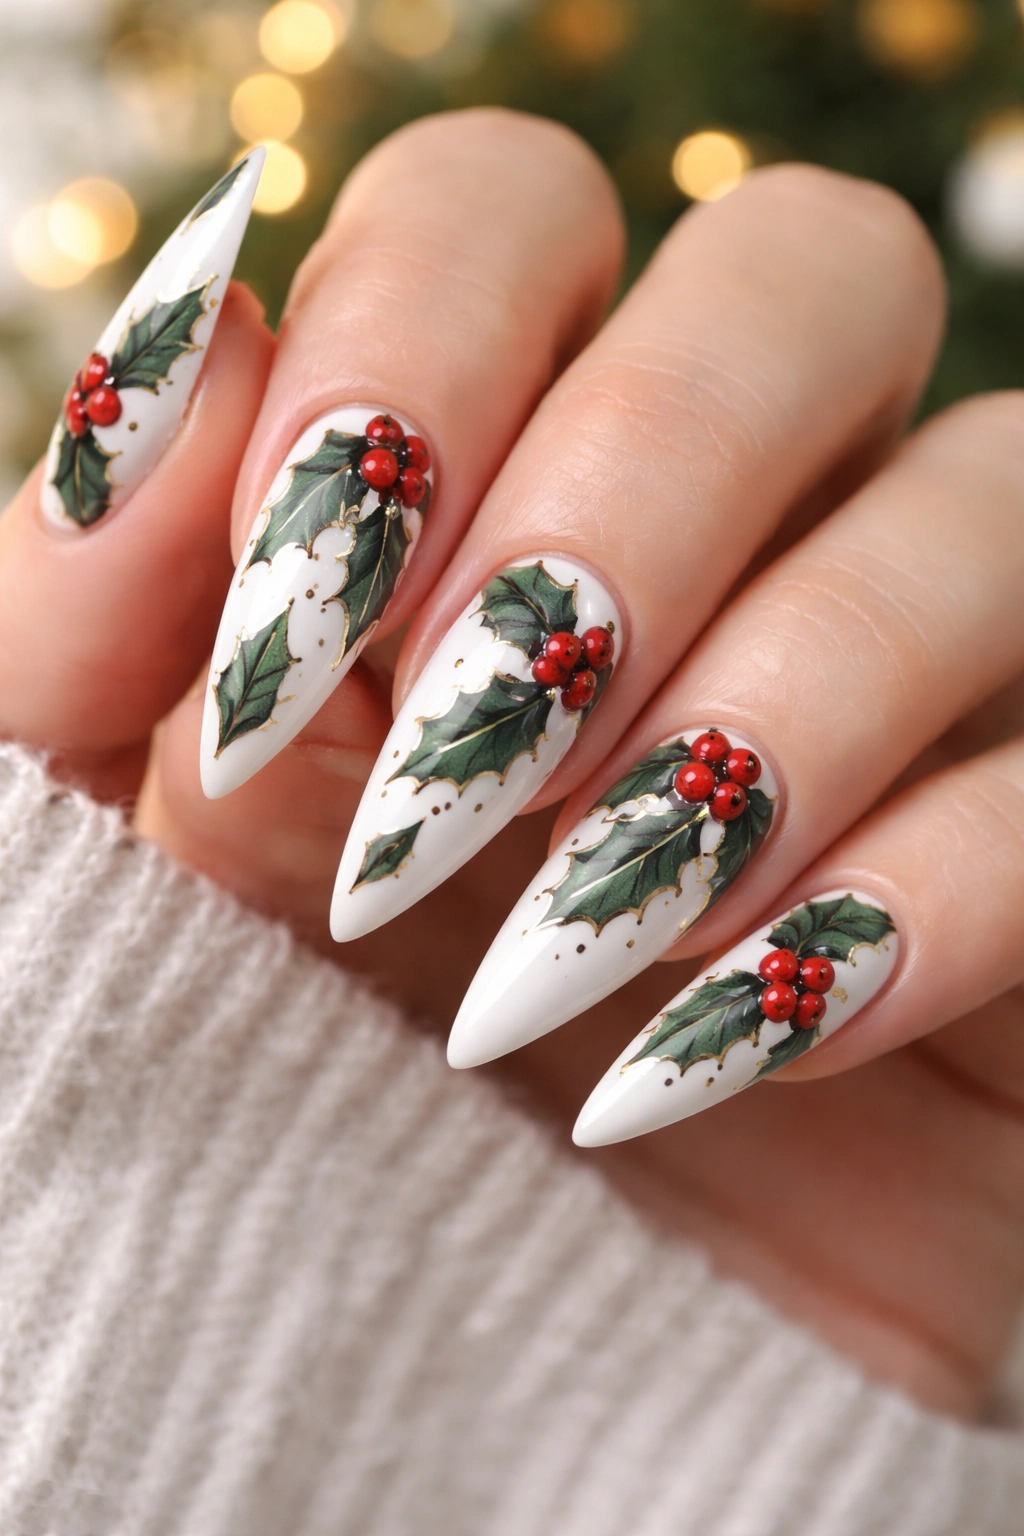
For a more traditional festive look, white stilettos decorated with holly leaves and berries create immediate holiday recognition. Paint your base white, then use thin brushes to paint holly leaves in dark green with small red berries clustered nearby.
Why Holly Imagery Feels Festive
Holly is one of the most recognizable holiday plants — associated with wreaths, garland, and holiday décor across the Western world. Even simple, stylized holly leaves and berries instantly evoke festivity without being costume-like when executed with care.
Painting Holly Leaves With Confidence
Holly leaves have pointed edges and an organic shape. Start by painting the basic leaf shape in dark green, then add lighter green veining down the center and along the sides using a very thin brush. Add small bright red circles nearby to represent holly berries. The key is not making them too realistic — slightly stylized holly works beautifully on nails.
If freehand botanical art isn’t your strong suit, use nail stamps with holly designs or work with a technician who specializes in nail art.
13. Burgundy with Negative Space Snowflake
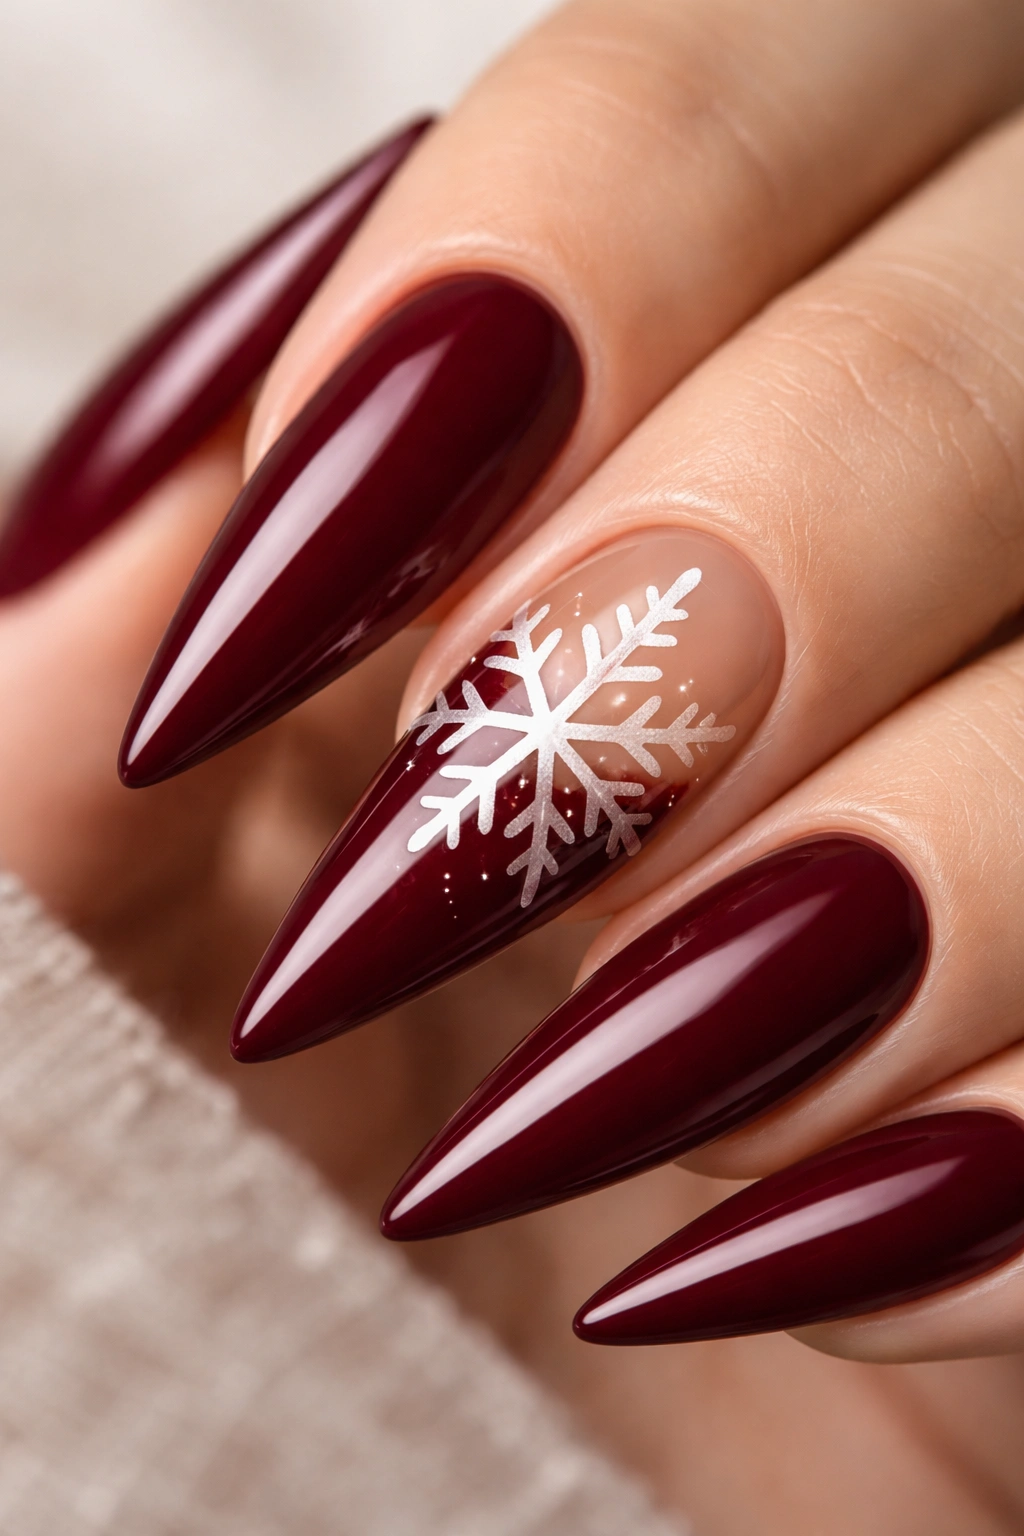
Negative space nail art has become increasingly popular, and it’s particularly striking on stilettos. Paint your nails burgundy, then use a snowflake shape to create an unpainted area where the nail or a lighter color shows through, creating a snowflake silhouette.
The Modern Appeal of Negative Space
Negative space designs feel contemporary and intentional rather than simply decorated. The contrast between the painted and unpainted areas creates visual interest without adding any embellishment. It’s elegant and sophisticated.
Executing Negative Space Designs
Use a snowflake stencil or sticker to mark out where your negative space should be, then paint carefully around it. Alternatively, paint a thin outline of a snowflake shape in black or dark burgundy against the burgundy base — the outline creates the snowflake silhouette without needing to leave bare space.
This design works equally well on any color base. Green with white negative space, black with gold negative space, or burgundy with negative space are all beautifully festive options.
14. Silver with Iridescent Glitter Gradient

An all-silver design sounds monochromatic until you add an iridescent glitter gradient that shifts color as your nails catch the light. Start with a silver base, then gradually add iridescent glitter toward the tips, creating a sparkly gradient effect.
How Iridescent Glitter Creates Dimension
Iridescent glitter shifts between different colors depending on light and angle — catching blue, purple, pink, and green tones. Against a silver base, this creates movement and visual depth. When you concentrate the glitter toward the tips of your stiletto nails, you create a gradient effect that’s absolutely eye-catching.
Building Your Glitter Gradient
Apply your silver base in two coats. Once dry, apply a clear topcoat to the upper half of each nail. Sprinkle iridescent glitter onto the tacky topcoat, concentrating it most heavily at the tips and gradually reducing the concentration as you move toward the base. Once dry, apply another layer of clear topcoat to seal everything and smooth out any rough edges.
The result is a design that looks different and equally beautiful from every angle.
15. Deep Navy with Gold Confetti Pattern
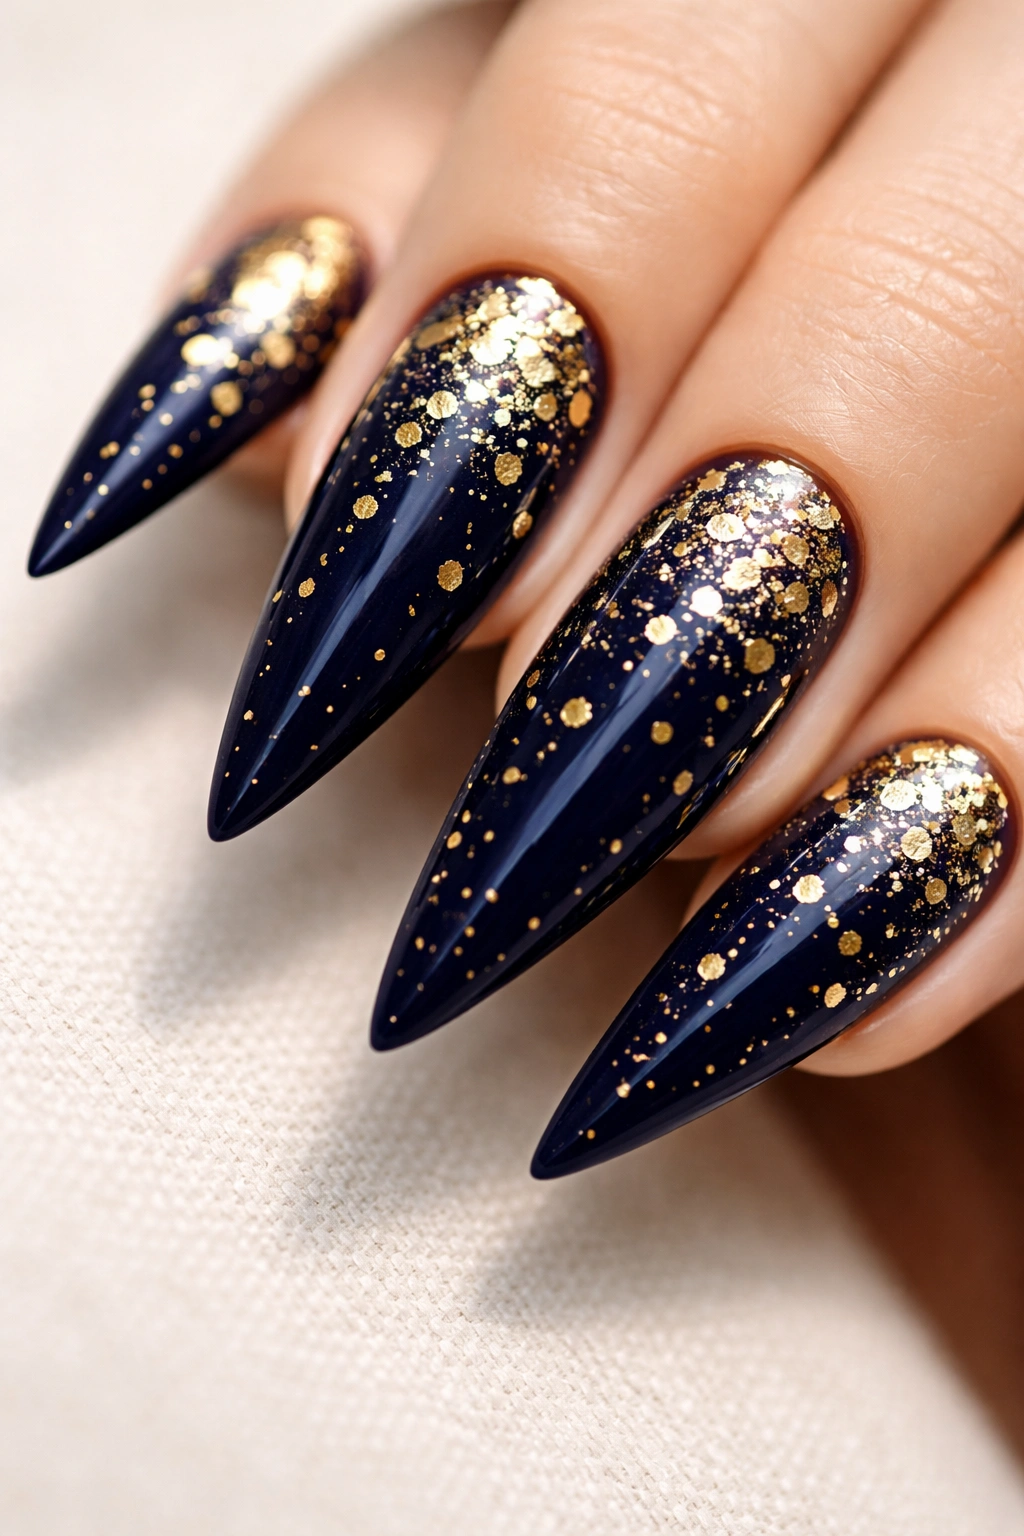
Deep navy blue stilettos feel elegant and understated until you add a playful gold confetti pattern scattered across the surface. This design brings together sophistication and celebration perfectly.
Navy’s Versatility for Holiday Nails
Navy is blue without being sad, formal without being boring. It’s a color that works for every season but feels especially lovely during the holidays when paired with warm metallics. Gold confetti against navy reads as festive without being loud.
Creating Confetti Scattered Art
Rather than a concentrated pattern, true confetti is scattered organically across the nail. Paint small gold shapes — squares, circles, tiny dots, short lines — in a random pattern across your navy base. Vary the sizes and angles for a more authentic confetti look. Use a very thin brush or toothpick for this detail work.
Don’t overcrowd the nail — leave plenty of negative space so the navy base shows through and the confetti reads as playful decoration rather than overwhelming pattern.
16. Red with Gradient to Silver Tips and Pearl Crown
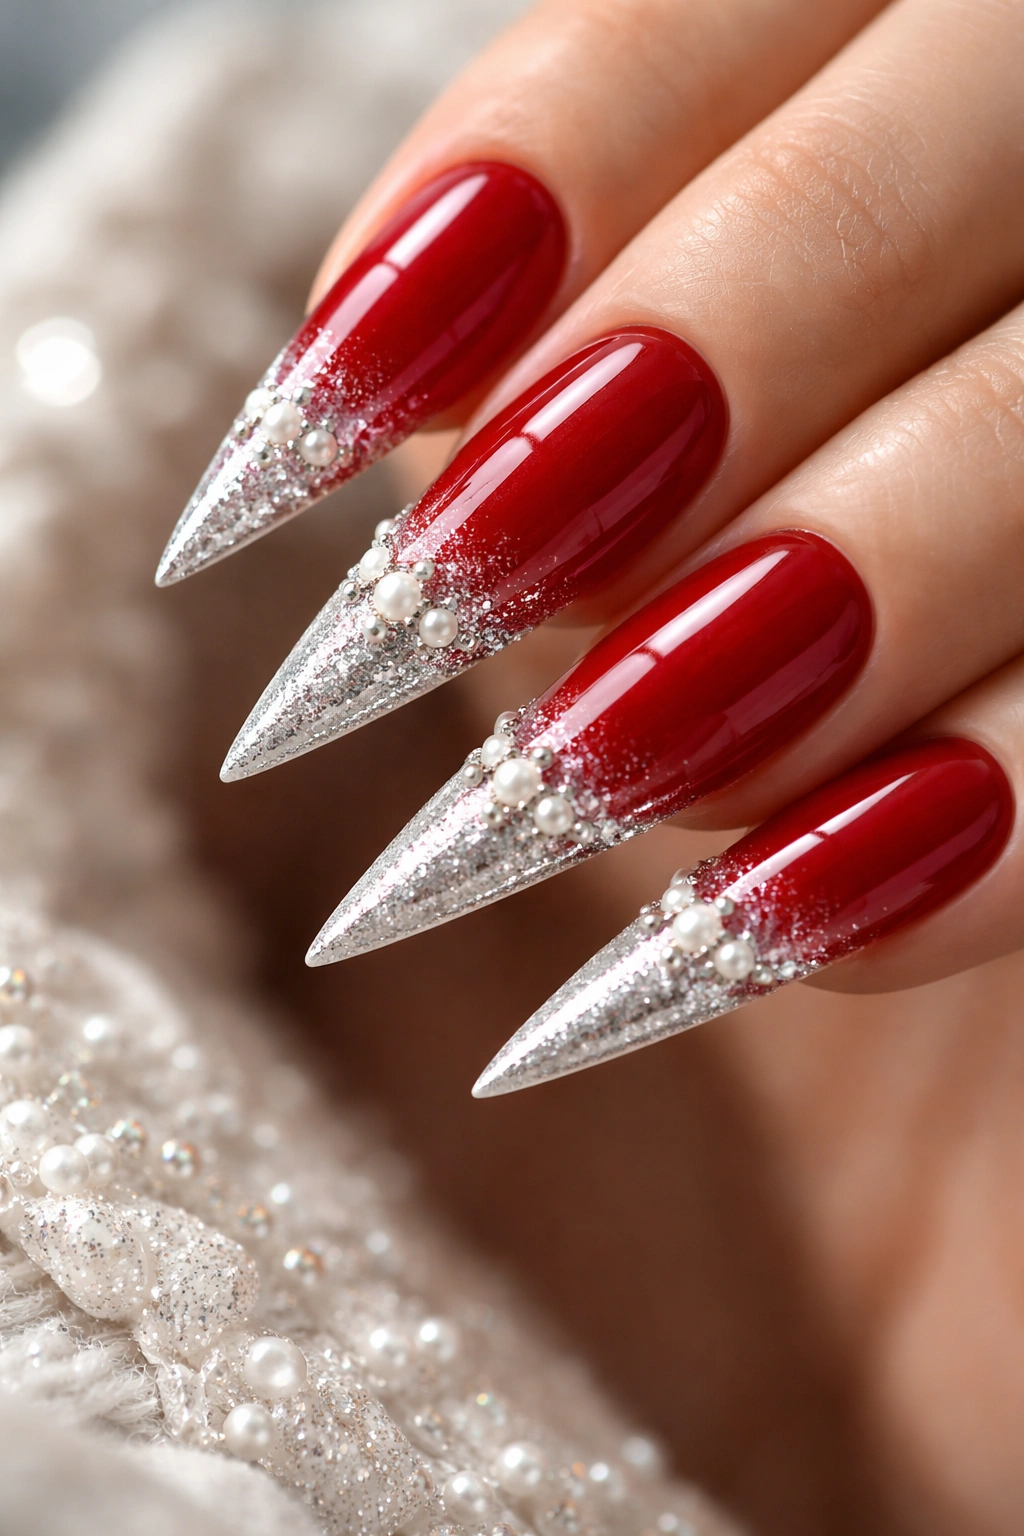
For a truly statement-making design that combines multiple techniques, create red stiletto nails that gradually transition from red to silver at the tips, then add a delicate pearl or diamond “crown” design at the base of each tip.
The Drama of Multi-Element Design
This design brings together color gradient, metallics, and dimensional accents — creating maximum visual impact while maintaining coherence. It’s the design you’d choose if you wanted your nails to be the centerpiece of your entire look.
Building Layers for Maximum Impact
Start with your red base in two coats. Create a gradient toward silver tips using either the sponge or brush blending method. Once that’s dry and sealed, use a nail pen or thin brush to paint a crown shape (tiny triangles arranged in a row) at the point where the red transitions to silver. Add micro rhinestones or pearl beads along the crown line for dimensional sparkle.
Seal everything with a glossy topcoat to make the gradient, metallic, and gems all shine together. This design requires patience and multiple layers, but the finished result is genuinely stunning.
Final Thoughts
Festive stiletto nails are your opportunity to express the joy and glamour of the season through a medium that’s uniquely yours. Whether you’re drawn to classic color combinations like red and gold, more unconventional pairings like navy and gold, or detailed nail art like snowflakes and holly leaves, there’s a festive stiletto design that matches your personality and skill level.
The beauty of stiletto nails specifically is that their length and shape provide a perfect canvas for whatever design you choose. That extra real estate means even simpler designs like scattered glitter or geometric stripes look more impactful and intentional. If you’re new to stilettos, start with designs that use solid colors and one simple accent element — like the emerald green with diamonds or champagne ombre with pearls — and work your way up to more complex multi-element designs as you get comfortable.
Remember that you don’t need to be a professional nail artist to achieve these looks. Many of these designs work beautifully with regular polish and basic tools, and there’s absolutely no shame in bringing your design inspiration to a professional technician who can execute it perfectly. However you choose to wear your festive stiletto nails, the most important thing is that they make you feel confident, celebratory, and ready to take on whatever holiday gatherings come your way.
