

White stiletto nails are having a moment—and for good reason. There’s something about the sharp, elegant silhouette of a stiletto that demands a sophisticated color, and white delivers that in spades. Whether you’re drawn to minimalist elegance, maximalist sparkle, or everything in between, white stilettos offer a blank canvas for endless creativity. The beauty of white as a base is that it photographs beautifully, complements nearly every skin tone, and works for everything from boardroom meetings to weekend adventures. But white doesn’t have to mean boring—the right design, finish, and embellishment can transform it into a statement that’s uniquely yours.
The challenge isn’t finding white stiletto ideas—it’s choosing which one fits your vibe. Do you want understated sophistication or head-turning glam? Are you in the mood for texture, shine, or intricate details? The range of possibilities might feel overwhelming if you’re staring at a blank nail canvas. That’s where this guide comes in. I’ve rounded up 20 white stiletto nail ideas that span different aesthetics, skill levels, and occasions. Some are perfect for everyday wear with their clean, minimal approach, while others are designed to be conversation starters. Each idea includes the specific details you need to recreate it or request it from your nail technician—no guesswork required.
Let’s dive into these designs and find your next nail obsession.
1. Classic Pearl White with Glossy Shine
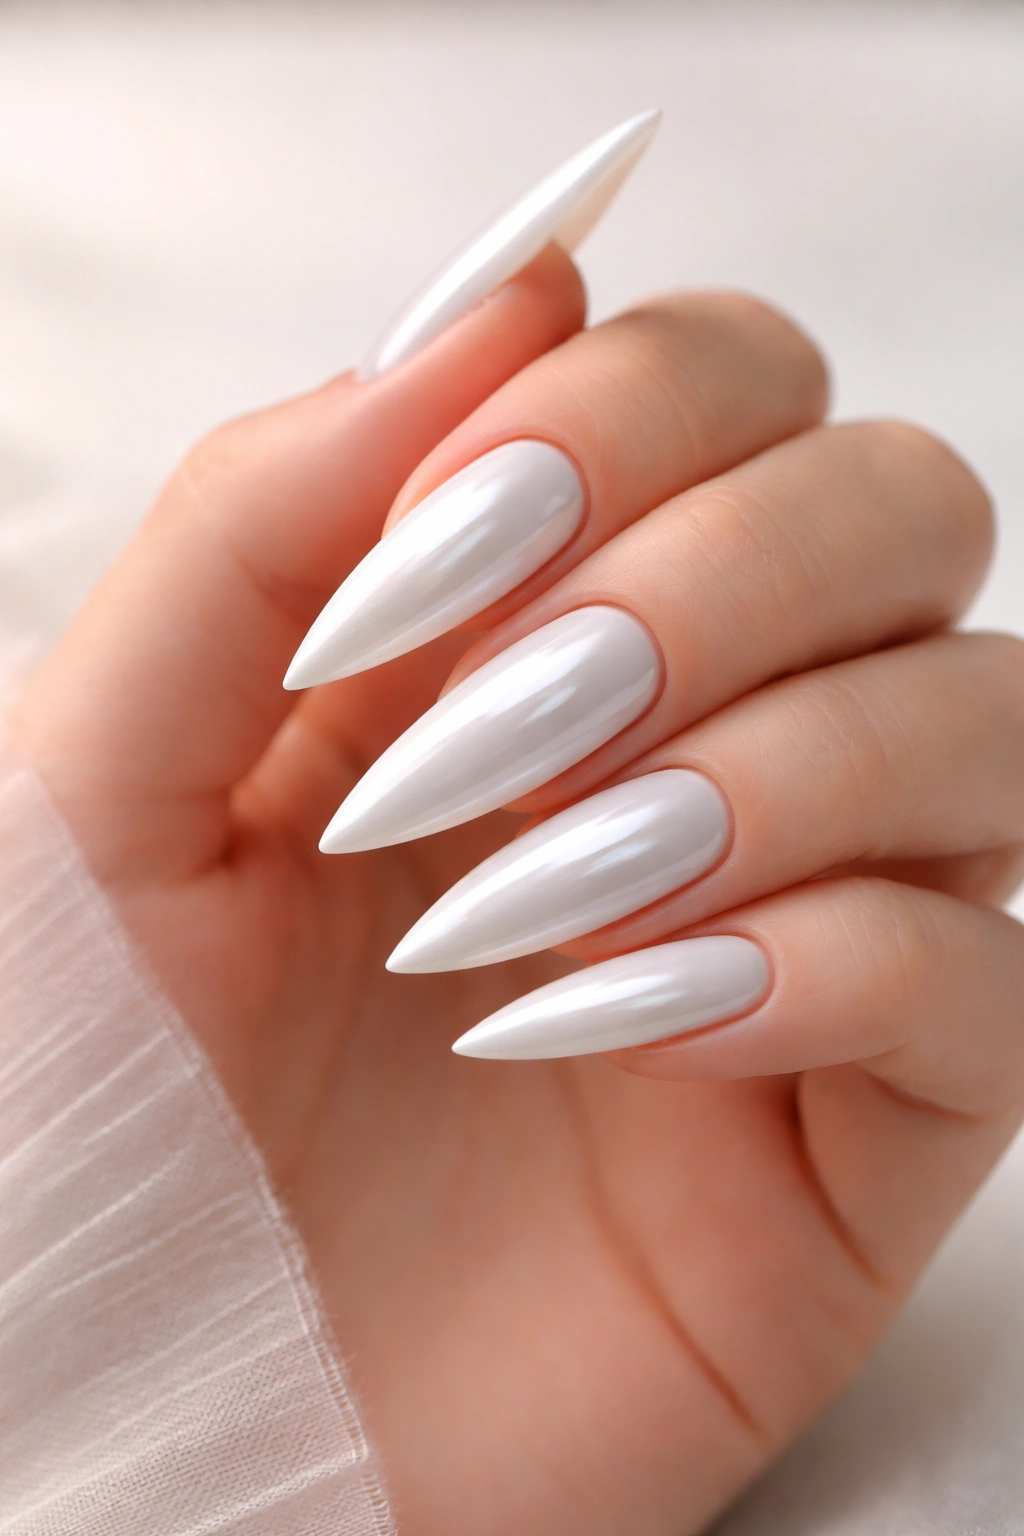
There’s a reason this look never goes out of style. A pristine pearl white with a high-gloss finish is the definition of elegant simplicity, catching light beautifully without any additional embellishment. The key to nailing this look is using a pearl-toned white rather than a stark, bright white—pearls have subtle warmth and depth that make them feel more luxurious and sophisticated.
Why This Works Every Time
Pearl white stilettos create an intentionally polished appearance that reads as intentional, never rushed. The glossy finish amplifies the shine on the elongated stiletto shape, and because there’s no competing design, the focus stays on the nail shape itself and your nail health. This is the design that makes people ask if you got your nails done professionally, even if you painted them yourself.
What You Need to Know
- A quality base coat is essential—it prevents yellowing and extends the manicure’s lifespan dramatically
- Pearl white needs two coats for true opacity and that coveted luminous quality
- Top coat should be a high-shine formula to maximize the glossy effect
- This style suits any occasion, from casual to black-tie events
- The simplicity means any chips or imperfections show immediately, so maintenance matters
Pro tip: Use a nail file with a 180-grit or higher for the smoothest stiletto point—rough edges can catch on clothing and feel cheap.
2. Ombre White to Nude Gradient
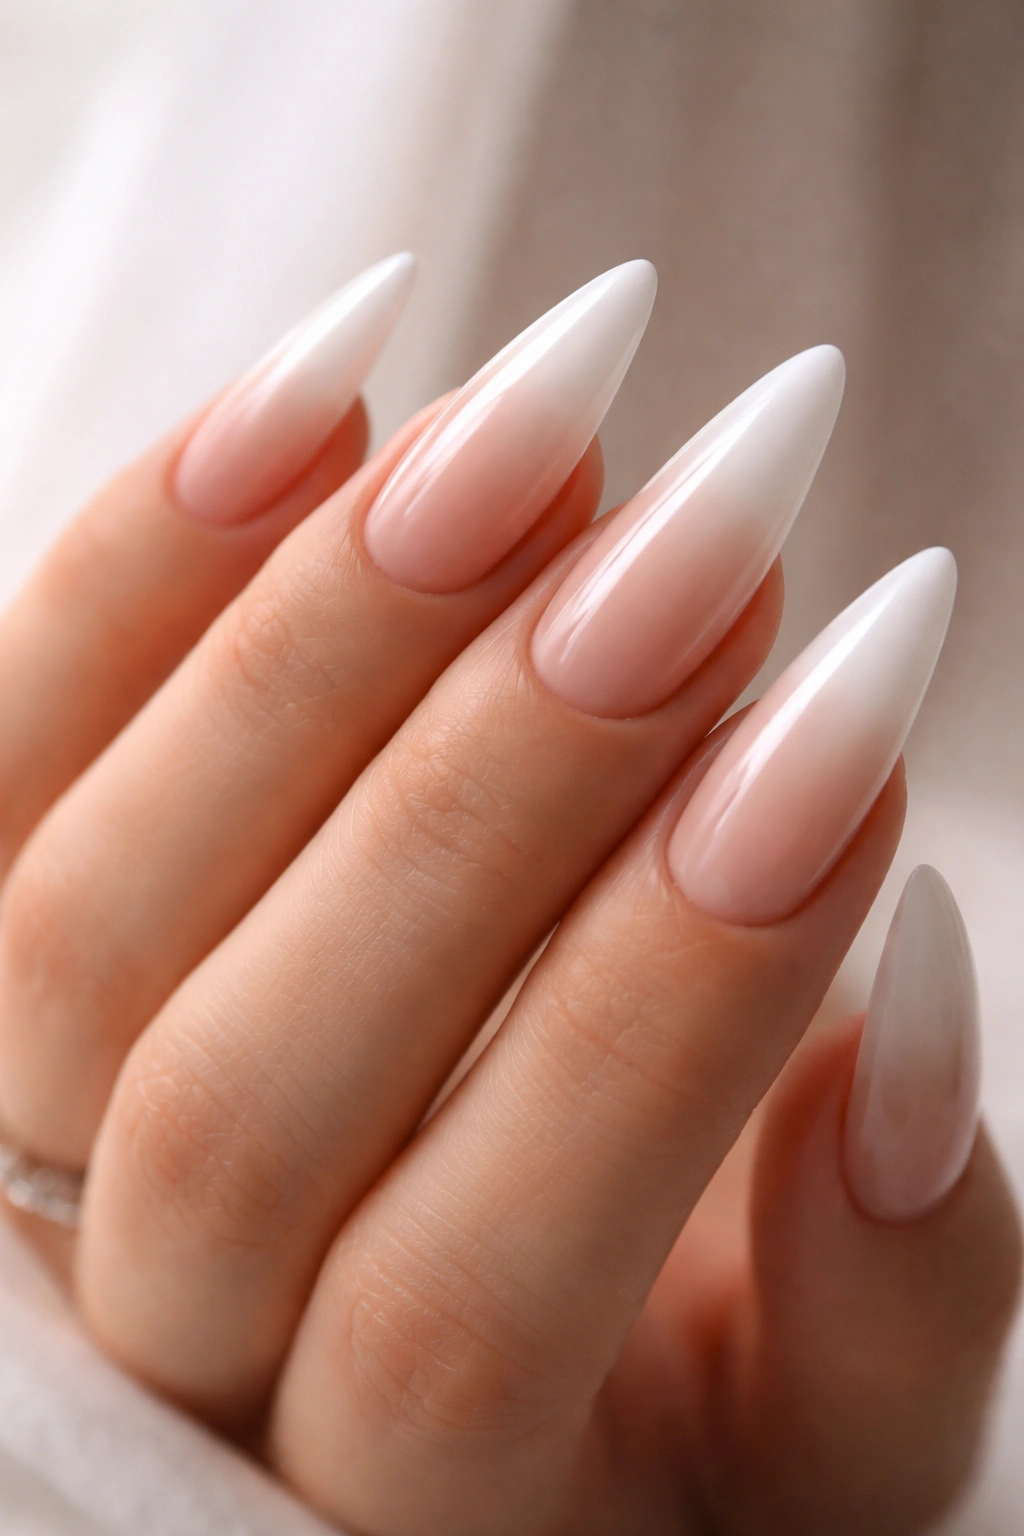
This design creates a subtle transition from crisp white at the tips down to soft nude at the base, blending two complementary shades in one cohesive look. The gradient effect makes the nail appear longer while maintaining sophistication. This is the kind of design that looks effortlessly chic because it works with, not against, your natural nail color story.
What Makes This Design Stand Out
The ombre gradient is forgiving in a way that full white isn’t—minor imperfections blend into the color transition and become part of the design rather than obvious mistakes. It also creates visual interest without requiring advanced nail art skills or steady hands for precise detail work. The white-to-nude transition is universally flattering because it honors your skin tone while still delivering that crisp white accent.
Application Details
- Use a makeup sponge or gradient tool to blend the transition, not a brush (brushes create lines rather than soft fades)
- Start with nude as your base coat, then layer white on the tip and blend backward
- Three to four thin layers of color work better than two thick ones for a seamless gradient
- This design works best with a glossy top coat that unifies the colors visually
- Nude should be warm-toned if your skin is warm, cool-toned if your skin is cool
Worth knowing: This design photographs even better than it looks in person because cameras pick up the subtle color blending that your eye might not fully register.
3. White with Diamond Embellishments

Strategically placed diamond-shaped gems or rhinestones elevate white stilettos from simple to stunning. Whether you choose a scattered pattern, a single statement diamond on one accent nail, or a geometric arrangement, diamonds add luxury and sparkle without overwhelming the design. This approach gives you glamour with precision.
How to Rock This Look
Diamond embellishments work best when they’re intentional rather than random—a pattern feels deliberate and editorial, while scattered stones can look like an accident. Place them vertically down the center of the nail for an elongating effect, or create a geometric shape like a triangle or linear arrangement. The contrast between the clean white base and the sharp, reflective diamonds creates visual drama.
Implementation Guide
- Adhesive-backed gems are easier for at-home application than gel versions
- Quality matters with gems—cheap rhinestones look dull and cloud over time
- Position stones before the top coat fully sets so they bond securely
- Use 2-3 larger diamonds for impact rather than dozens of tiny ones
- Clear top coat over diamonds keeps them secure and prevents snagging
Insider note: Placing diamonds slightly offset from dead center creates a more modern, editorial feel than centering them perfectly.
4. Marble White and Gray Swirls
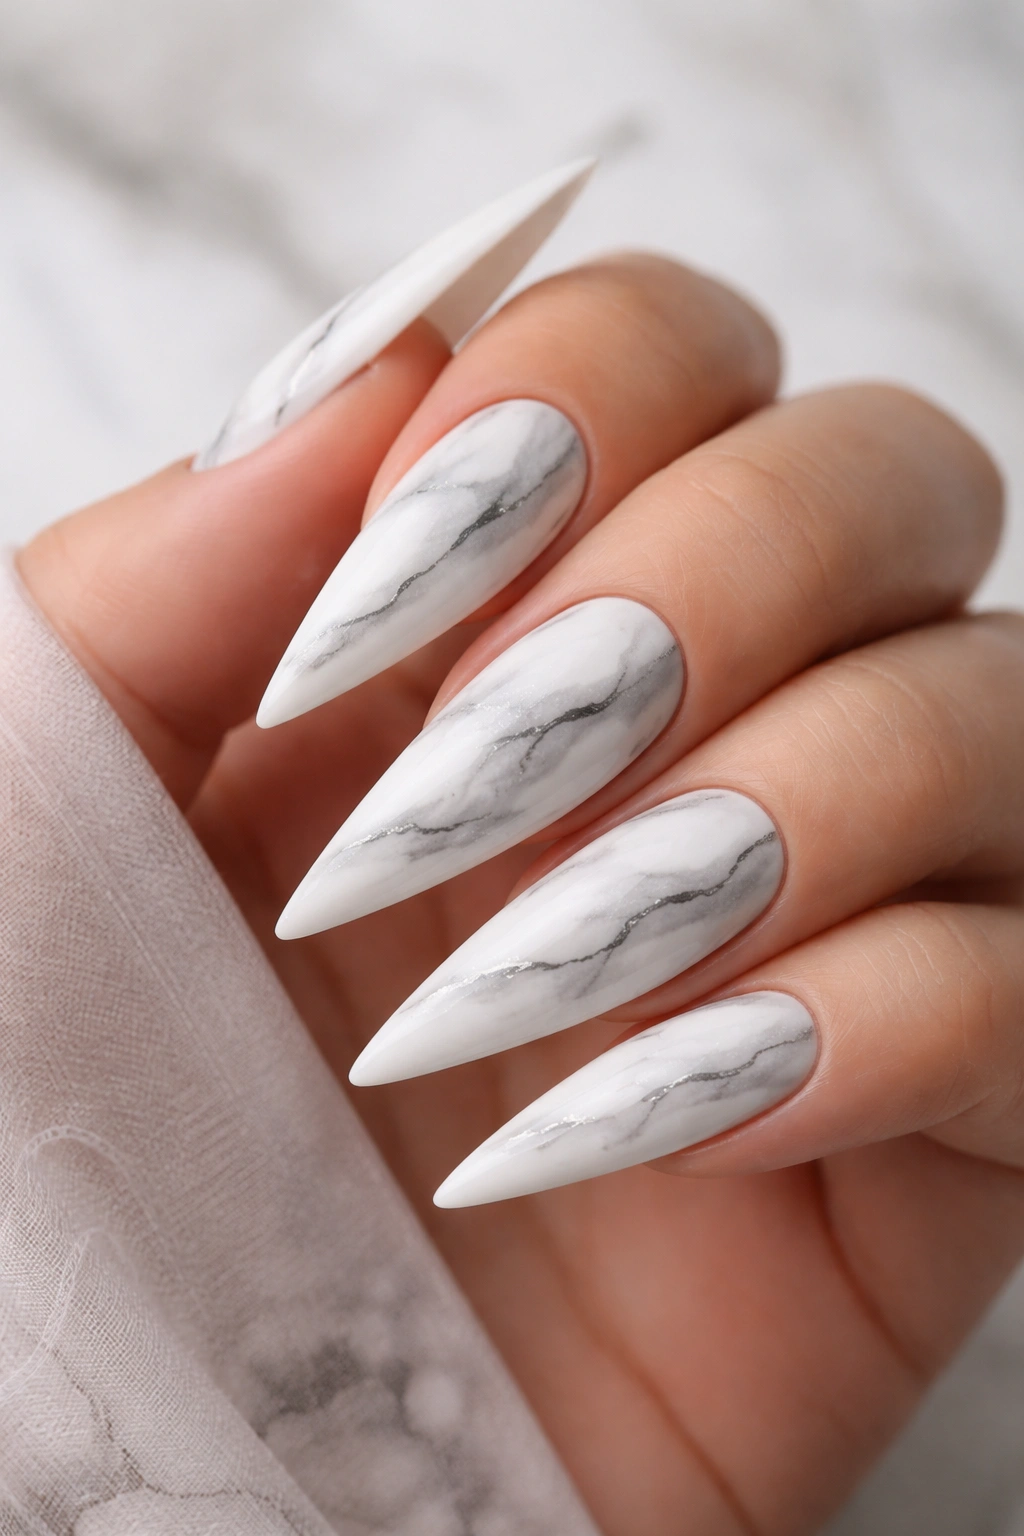
This design mimics natural marble stone with organic white and gray swirling patterns across the nail. The key is keeping the swirls loose and asymmetrical—too-perfect patterns look artificial and trendy rather than timeless. Real marble has randomness and flow, and your nail should too.
Why Marble Reads as Sophisticated
Marble is inherently luxurious—it’s been associated with wealth and elegance for centuries. When you translate that texture to your nails, you’re borrowing that sophistication. The white and gray combination is classic and works across seasons and situations. Unlike trend-specific designs, marble feels timeless because it references actual stone, which doesn’t go out of style.
Creating the Effect
- Use white as your base, then add gray with a thin brush or nail art pen in loose, wavy lines
- Don’t overthink the pattern—let your hand move naturally for organic swirls
- A water-color effect (blending colors with a damp brush before they fully set) creates a softer marble look
- Matte top coat looks more like actual stone than glossy
- Adding one vein-like line of black for depth mimics real marble even more
Quick tip: Practice on a paper towel first—once you see how loose and organic real marble patterns are, you’ll feel more confident improvising on your nails.
5. White French Tips on Stilettos
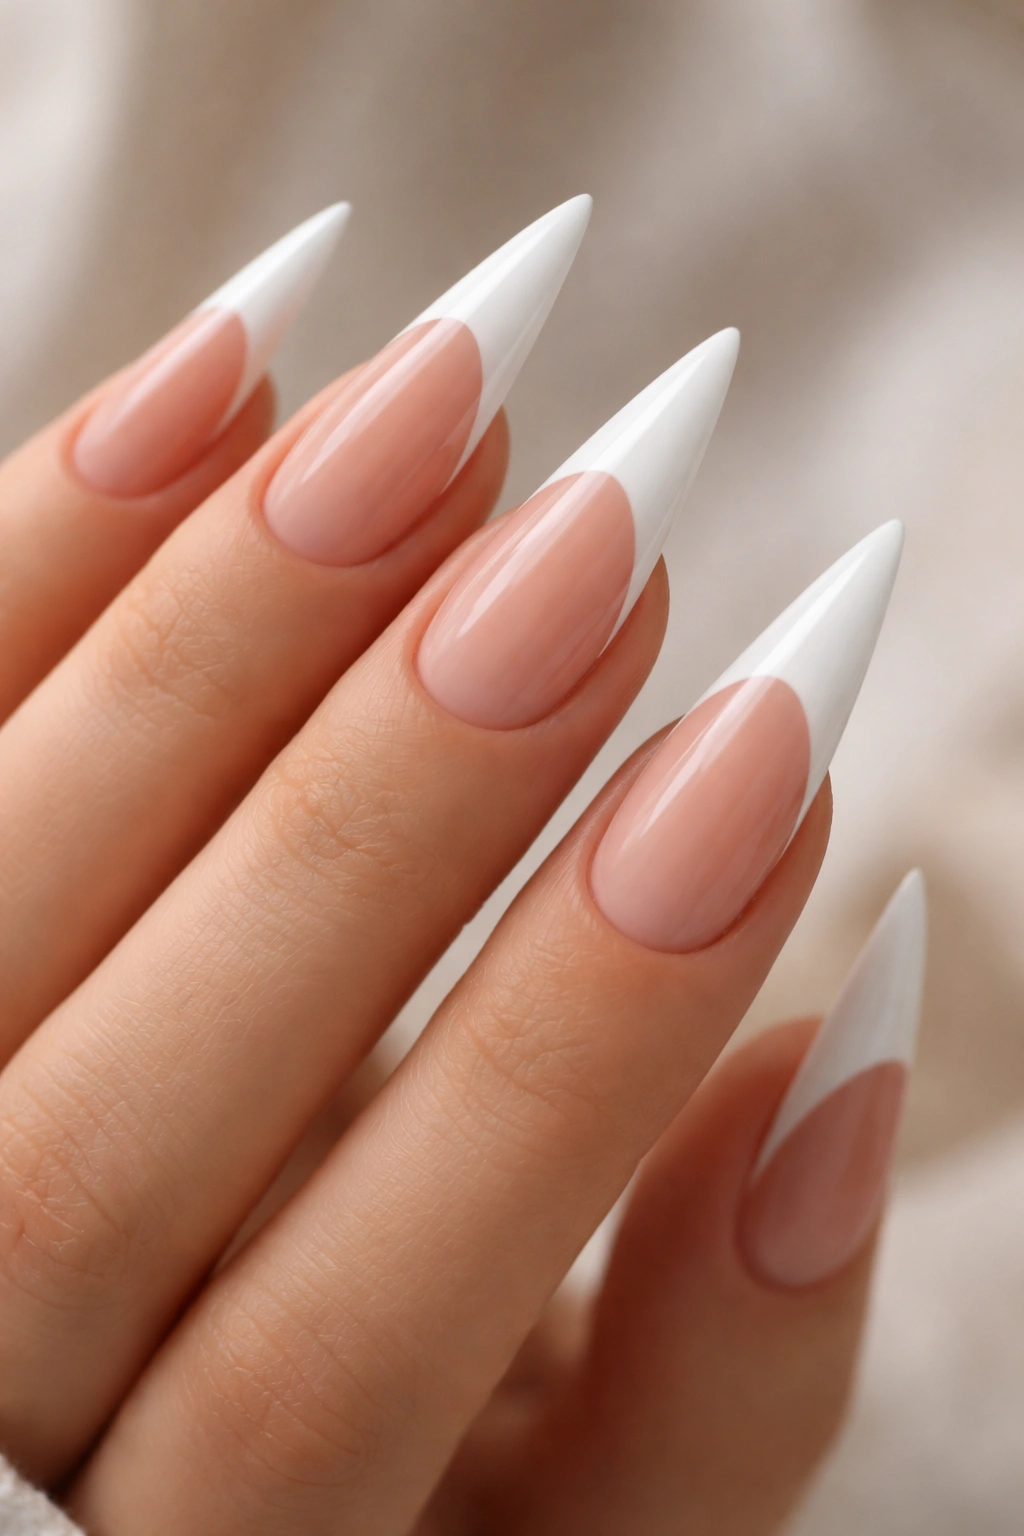
The ultimate classic: white tips with a sheer or nude base, but elongated to stiletto length. This timeless design never gets old because it balances clean elegance with that statement elongation. The white tip creates a sharp visual break that emphasizes the nail’s length and your nail shape.
The Enduring Appeal
French tips work because they’re universally flattering and professionally appropriate everywhere. On stilettos, the white tip creates an even more dramatic line that makes your fingers look longer and more refined. This is the design you can wear to a job interview, your cousin’s wedding, or a casual weekend hangout without worrying if it fits the setting.
Getting It Right
- Precision is key—use nail guides or tape to create a clean tip line
- The white should be opaque but not thick; one careful coat is ideal
- Ensure the sheer base is truly sheer (you should see your nail color through it) for the most elegant effect
- The tip-to-base ratio matters; aim for the white tip to be about one-third of the nail length
- A glossy finish emphasizes the clean line and creates an ultra-polished look
Pro tip: If free-handing feels risky, adhesive French tip guides are more foolproof than tape and leave no residue.
6. White with Gold Accents and Detailing
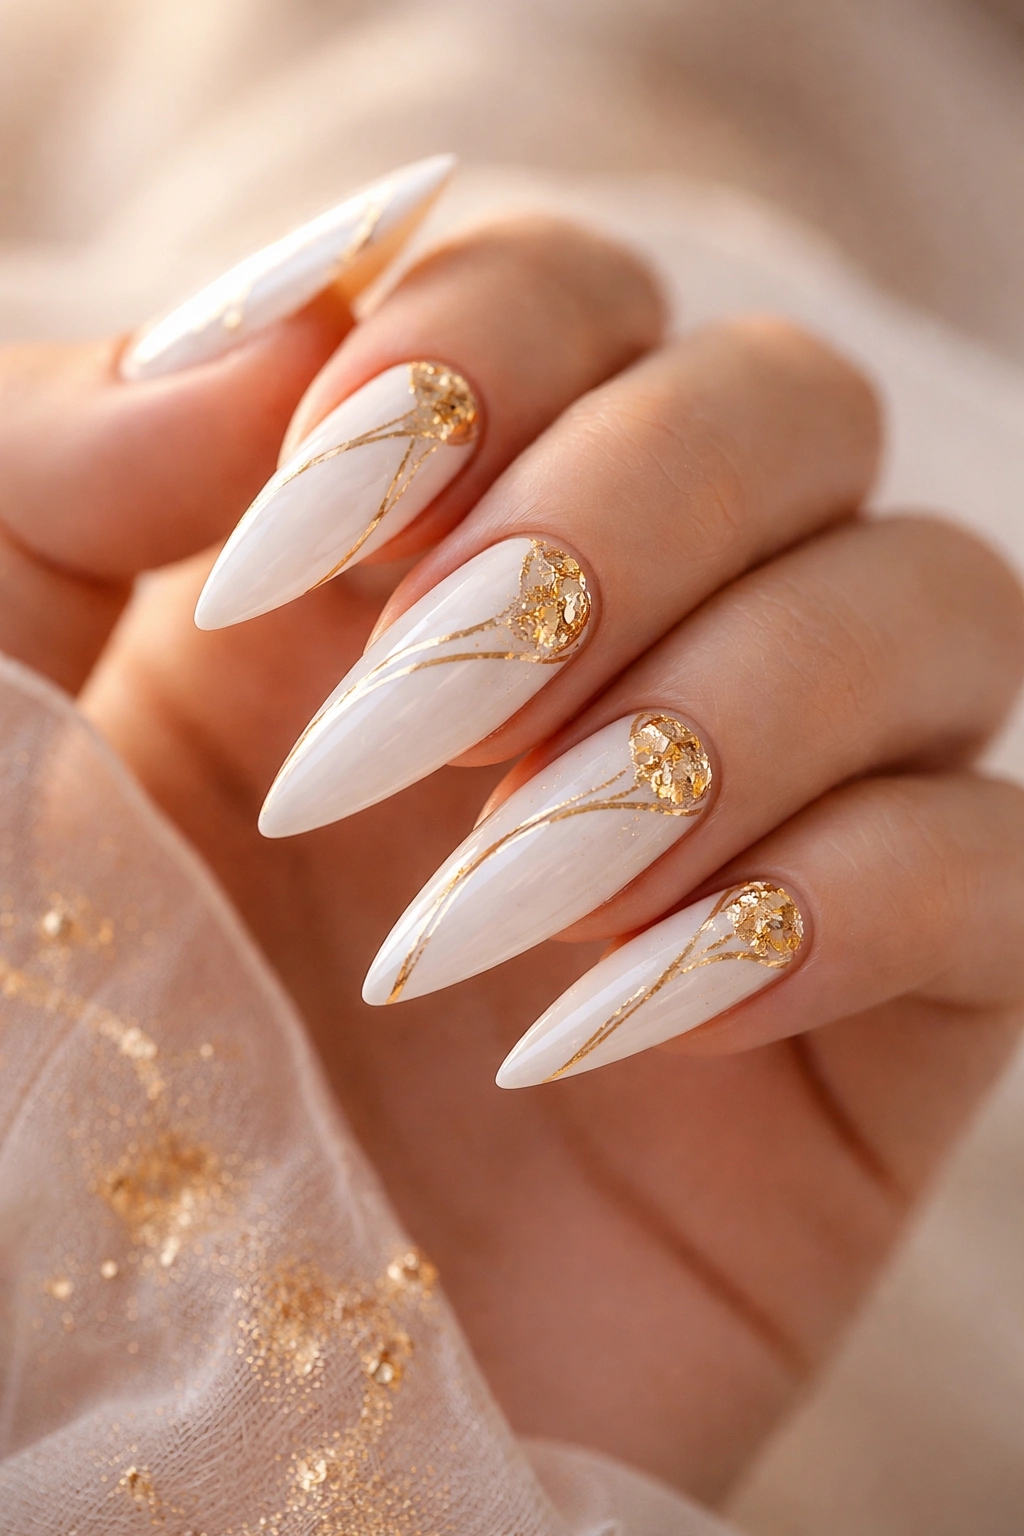
Gold and white is a time-honored luxury pairing, and it translates beautifully to stiletto nails. Whether you choose thin gold lines, gold foil accents, or gold leaf detailing, the metal adds warmth and visual richness to the cool white base. This design feels upscale and intentional without requiring intricate nail art.
Why Gold Elevates White
White alone is clean and minimal; white with gold feels curated and luxe. Gold catches light differently than white, creating depth and dimension. The pairing also works across skin tones—warm gold complements warm undertones, while the white keeps it from feeling heavy on cooler undertones. This balance is why the combination feels universally elegant.
Gold Application Methods
- Thin gold lines created with a striper brush or gold pen are the easiest to execute
- Gold foil (applied with a special adhesive) creates a more dramatic, textured effect
- Gold leaf creates organic, beautiful imperfection that looks expensive
- Mixing gold with white in specific areas (like a gold half-moon at the cuticle) feels very current
- One or two gold accents per nail prevents the look from feeling overdone
Worth knowing: 24k gold leaf is more forgiving than foil because it molds to the nail shape without cracking.
7. Frosted White with Matte Finish

A frosted white matte is like taking that pearl white gloss and applying a velvet texture instead. The matte finish creates a soft, sophisticated look that feels unexpected and modern. Frosted white reads as intentional and editorial in a way that’s different from glossy—it’s the choice of someone who’s thought about their aesthetic.
The Appeal of Matte White
Matte finishes create a softer appearance while still being clean and minimal. The frosted effect (using a frosted powder or matte top coat over white) adds subtle texture that reads as refined rather than rough. This finish photograph beautifully because it doesn’t have shine-related glare, and it feels luxurious because it’s unexpected—most people go for gloss.
Achieving the Frosted Look
- Matte white polish exists, but you can also apply matte top coat over regular white
- Frosted powder, applied while the base is still slightly sticky, creates more texture
- Seal with a matte top coat to prevent the frosted effect from being rubbed off
- This finish shows dust and debris more than gloss, so more frequent cleaning is necessary
- Matte finishes chip more visibly, so maintenance is slightly more demanding
Insider note: A matte finish makes the stiletto shape appear even sharper because there’s no shine softening the edges.
8. White with Rhinestone Application
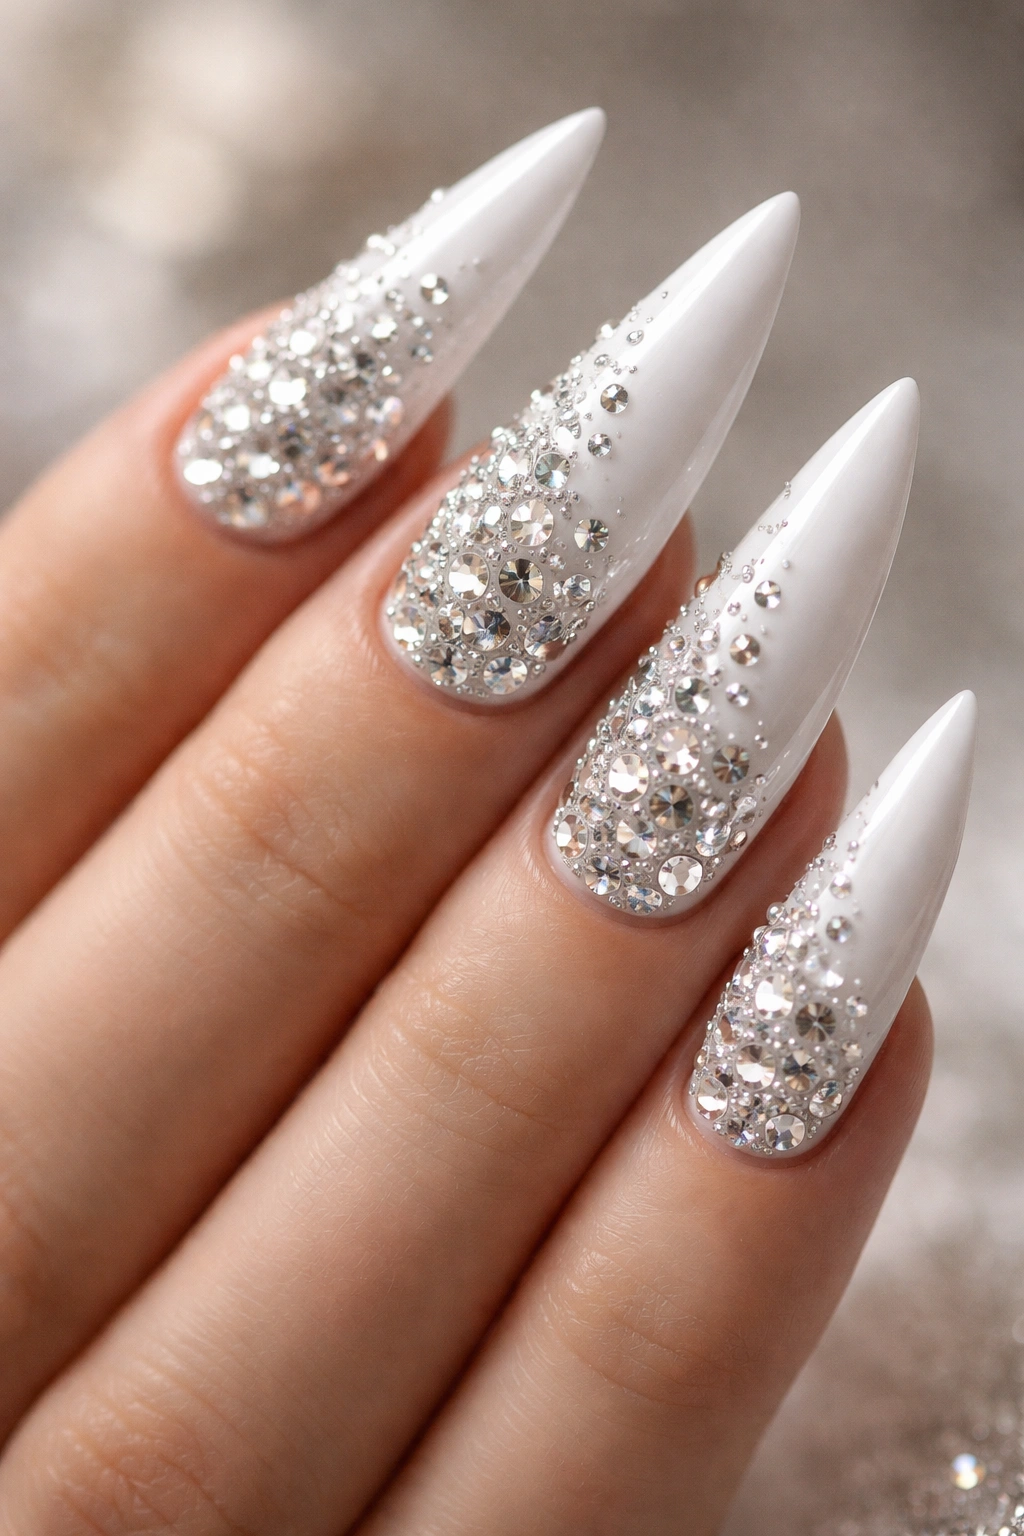
Unlike diamonds (which are geometric and precise), rhinestones create a more sparkly, dimensional effect that catches light from every angle. A white base absolutely glowing with rhinestones creates a look that’s glamorous and statement-making. You can go subtle with a scattered few stones or bold with a full rhinestone coverage.
When to Choose Rhinestones Over Diamonds
Rhinestones have more facets than diamonds, so they throw light in more directions and create more sparkle. If you want visible shine and glamour that reads from across a room, rhinestones are your answer. They also come in more colors and sizes, giving you more creative flexibility. The catch is that they’re less durable if you’re rough on your nails—they can chip or pop off with hard impact.
Rhinestone Application Strategy
- Apply adhesive-backed rhinestones to completely dry polish
- Start with the largest stones first, then fill in smaller gaps if desired
- Avoid placing stones directly on the very tip where they’ll catch on clothing
- Seal everything with a strong top coat—this is non-negotiable for durability
- A single statement accent nail with rhinestones looks more modern than doing all ten nails equally
Pro tip: Combine matte white with rhinestones for maximum sparkle contrast—the matte base makes stones appear to pop forward.
9. Chrome White Metallic Finish
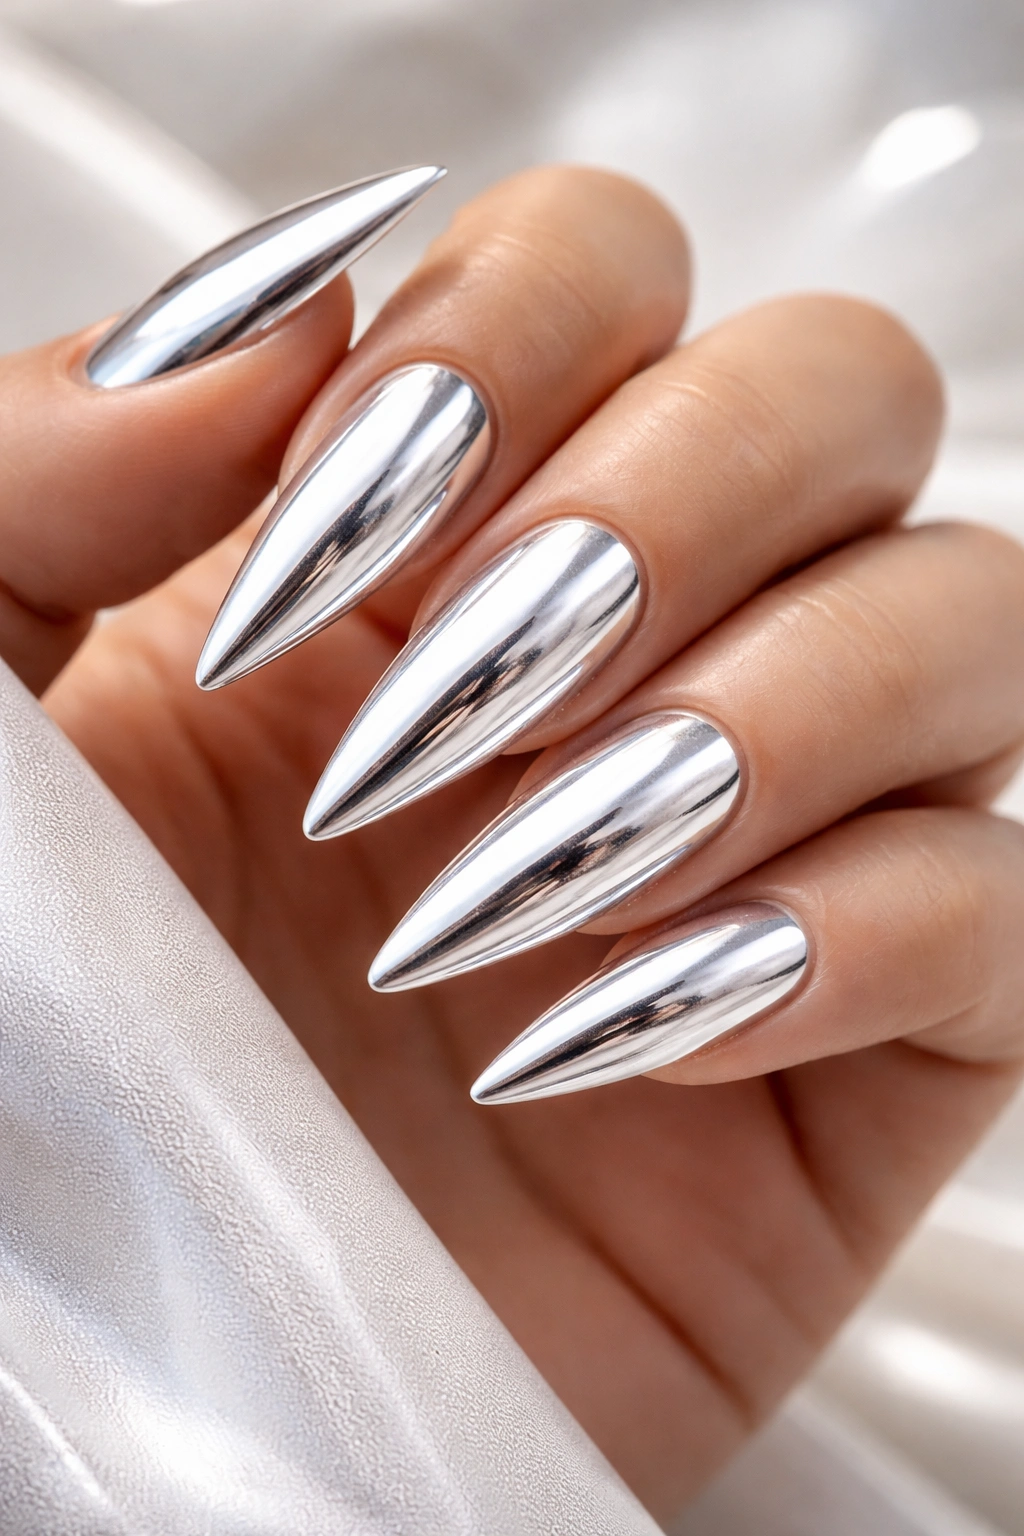
Chrome nail polish creates an ultra-reflective, mirror-like finish that’s unlike anything else. Chrome white is softer than chrome silver but with more shine and dimension than regular white. This is the finish that makes people ask “how did you do that?” because it looks almost impossible in person.
The Chrome Effect Explained
Chrome powder applied to a special base coat creates the reflective quality—it’s not the same as metallic glitter or shimmer. The finish is so reflective that your nail essentially becomes a mirror, which creates an otherworldly effect. Chrome white specifically is trendy right now but works as a forever finish because it’s just another way to apply color.
Getting Chrome to Work
- Chrome requires a specific base coat designed for chrome powder (regular polish won’t work)
- The application process is slightly different from standard polish—research the specific brand’s instructions
- Chrome can look streaky or patchy if not applied correctly, so technique matters
- Chrome doesn’t last as long as regular polish, so plan for 2-week manicures instead of 3
- Matte top coat over chrome creates an even more interesting effect than glossy
Worth knowing: Chrome is easier to apply at a salon than at home unless you’re already experienced with specialized finishes.
10. White with Glitter Tips
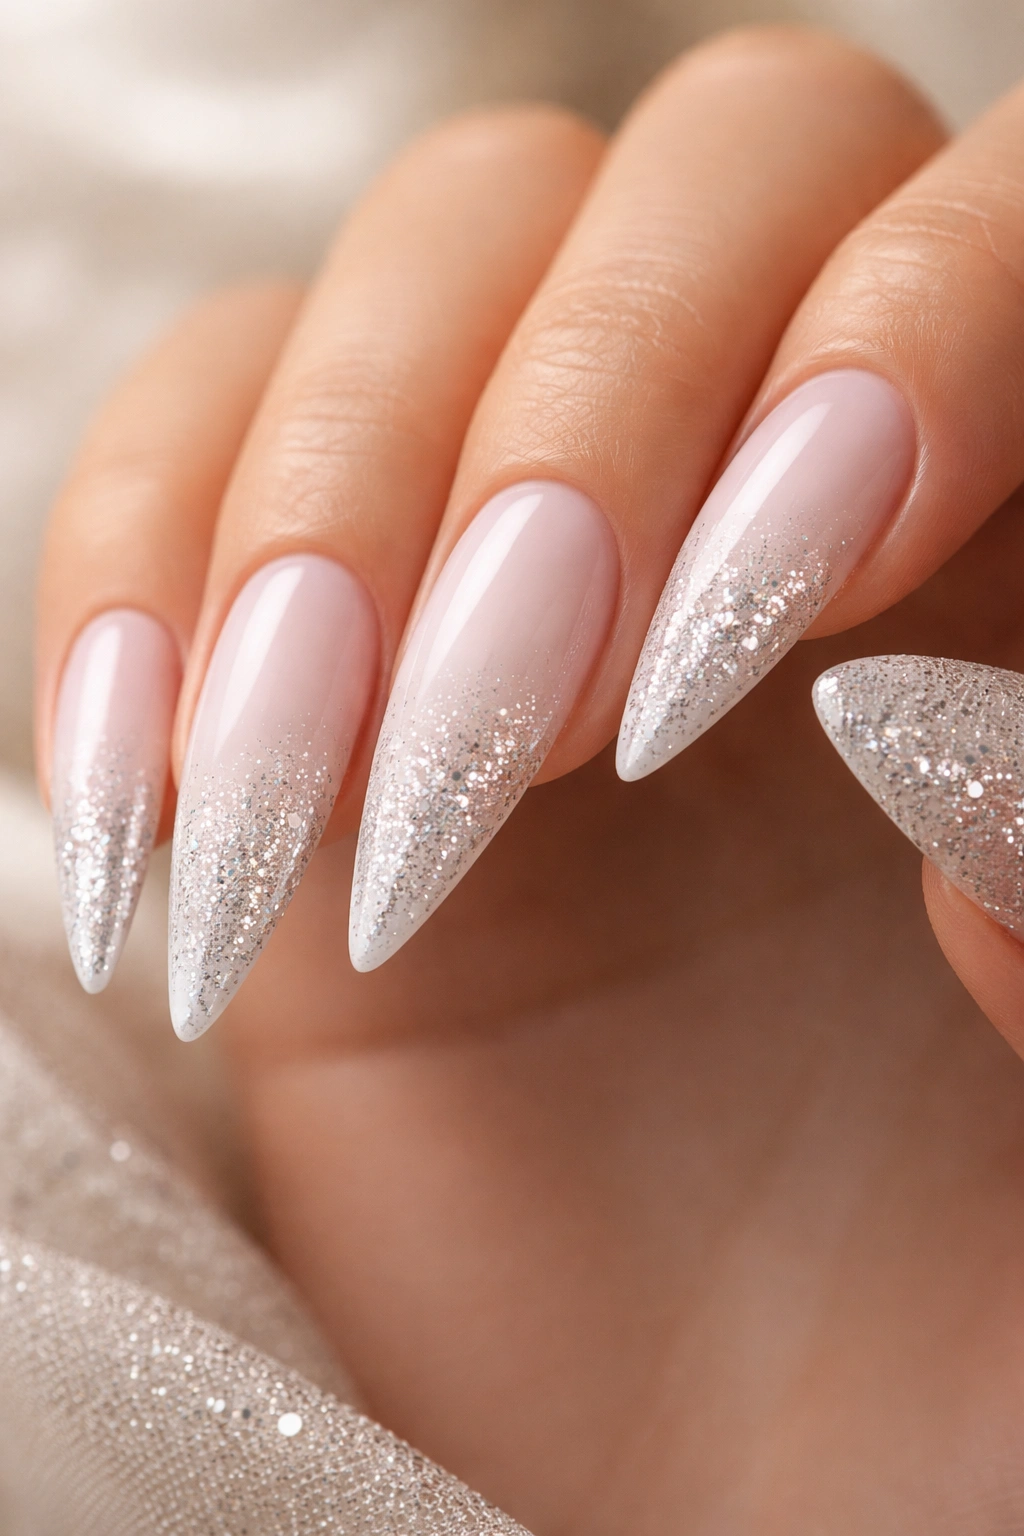
Transitioning from solid white to a glitter gradient at the tips combines elegance with just the right amount of party. The glitter starts sparse near the base and concentrates toward the tip, creating movement and dimension. This design is perfect for when you want impact without going full glitter coverage.
Why Gradient Glitter Works
Glitter gradient designs hit a sweet spot between minimal and glamorous. They’re fancy enough for special occasions but not so over-the-top that they feel costume-y. The white base keeps the overall look refined while the glitter adds personality and sparkle. The gradient effect also works with nearly every outfit and skin tone because the white anchors the design.
Glitter Application
- Use a makeup sponge to dab glitter on progressively thicker toward the tip
- Start with sparse application near the base and build density as you move toward the tip
- Fine cosmetic glitter looks more sophisticated than chunky craft glitter
- Clear or white glitter is most versatile, but gold or silver also pairs beautifully with white
- Seal with a thick, clear top coat to prevent glitter from catching on clothing
Pro tip: Apply a layer of clear polish before sprinkling glitter, then top coat—this encapsulates the glitter and protects it from snagging.
11. White with 3D Nail Art Elements
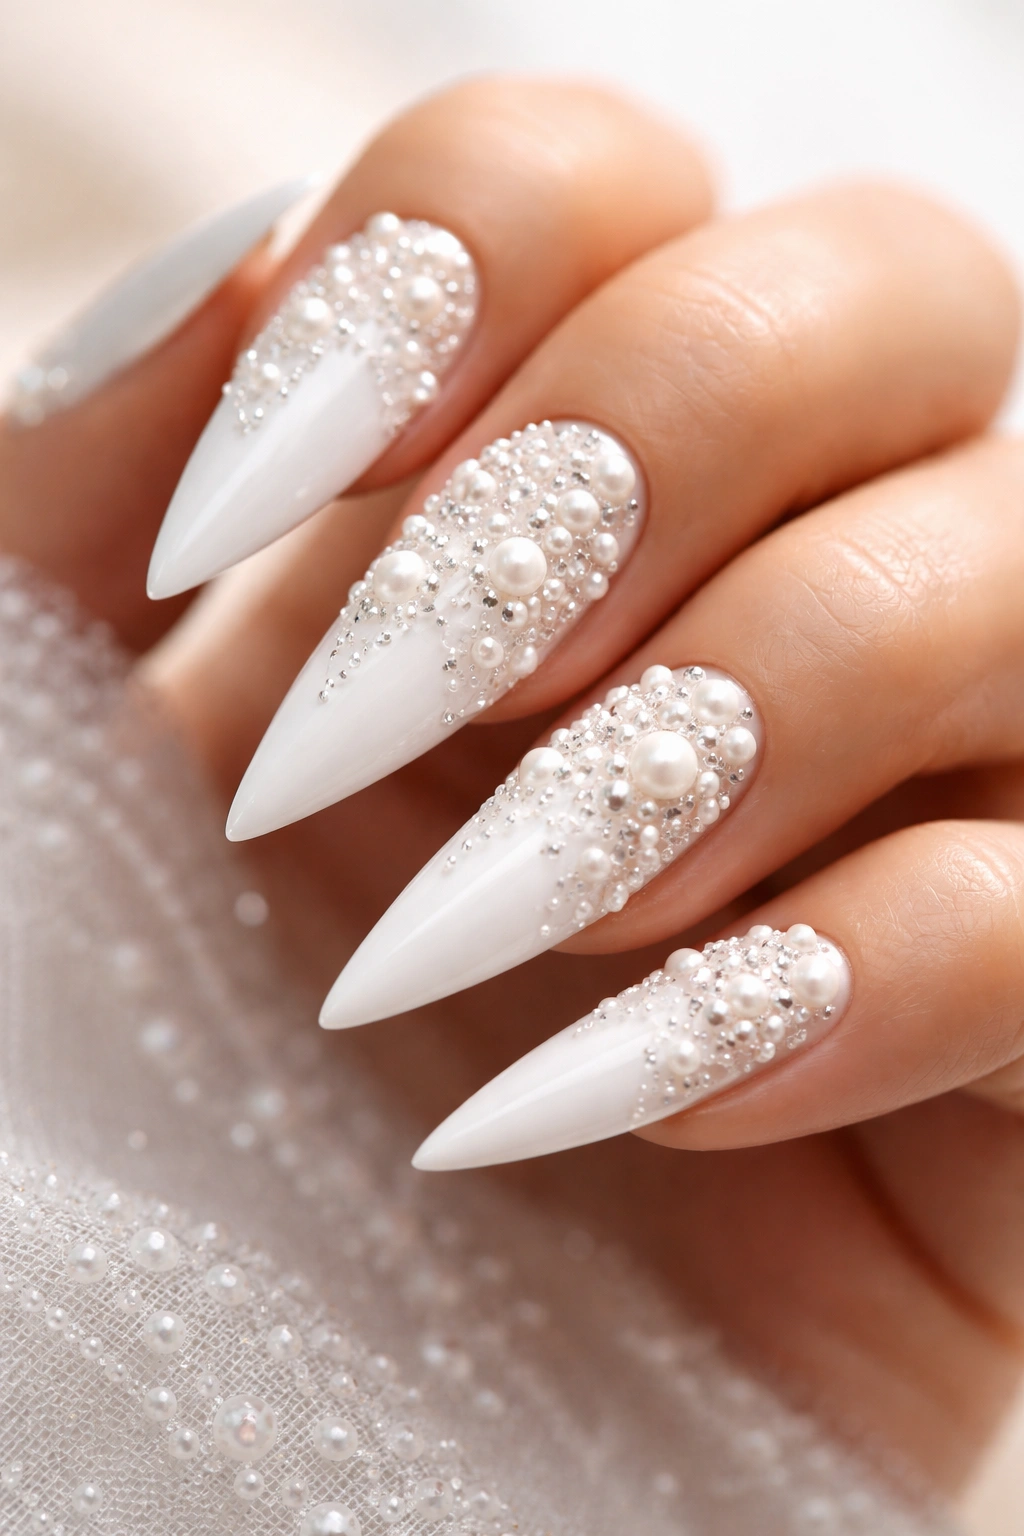
Three-dimensional embellishments like tiny pearls, beads, or sculpted elements create visual interest and texture that photograph beautifully. Unlike flat gems, 3D elements create shadow and depth that make your nails look professionally done. This is the choice when you want people to look twice.
The 3D Advantage
3D elements make nails instantly eye-catching because they catch light differently than flat designs. They also feel more luxurious and expensive than flat alternatives. The downside is that they’re less durable for daily wear—if you type a lot or use your hands roughly, 3D elements will snag and pop off. They’re perfect for special events, photos, or lower-impact activities.
3D Application Options
- Pre-made 3D embellishments (tiny pearls, beads, flowers) are easiest for beginners
- Sculpted 3D elements are more impressive but require advanced nail art skills
- Placement matters—concentrate them toward the tips and away from areas that brush against things
- Use gel base and top coat rather than regular polish for better adhesion
- One or two 3D accents per nail prevents overwhelming the design
Insider note: 3D elements are most comfortable on shorter stilettos because longer nails are more likely to catch on hair and fabric.
12. Pure White Minimal and Clean
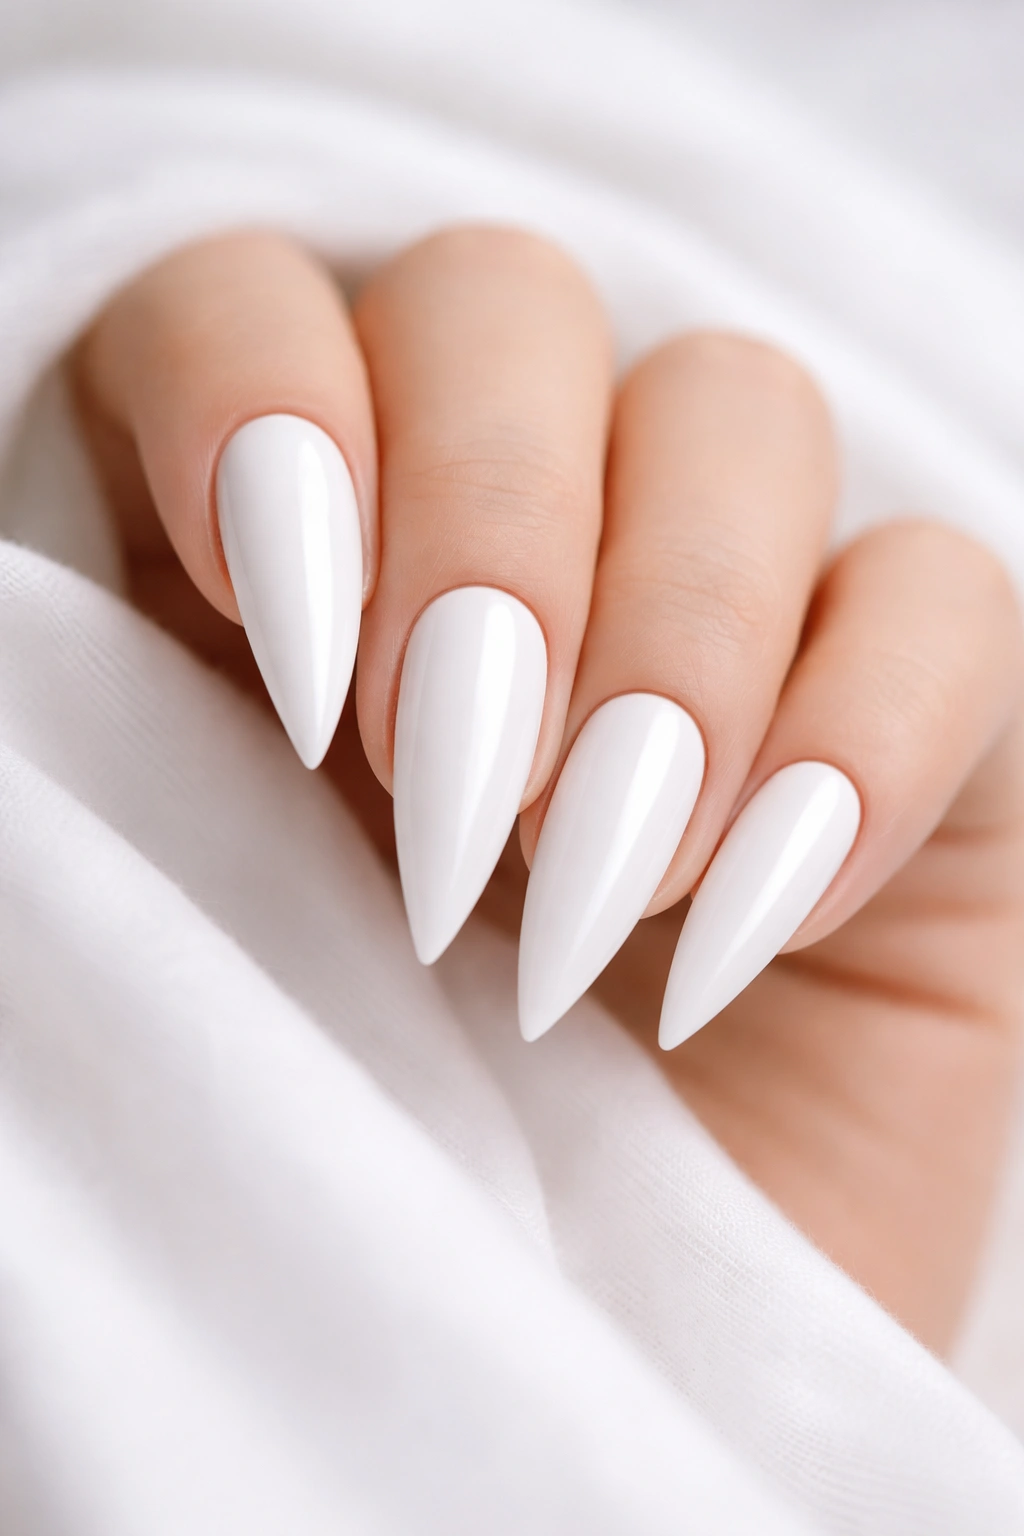
Sometimes the most powerful design is the simplest: pure white with nothing else. No embellishment, no finish variation, just flawless white color on a beautifully shaped stiletto. This is the design for anyone who believes nails should showcase your nail health and shape, not distract from your overall appearance.
The Confidence of Simplicity
Minimal design requires perfect execution because there’s nowhere to hide. But that’s also its power—a flawless minimal nail commands respect and reads as intentional. It’s the equivalent of wearing a crisp white shirt and perfect jeans; the simplicity actually demands more of you because imperfections show. This is the nail design for people who nail their manicure maintenance.
Executing Pure White
- Use a true white rather than cream or off-white—the purity is part of the aesthetic
- Two coats for opacity, but never a thick, lumpy application
- Glossy finish emphasizes the pristine quality
- Regular maintenance is essential because chips become immediately obvious
- Cuticle care is crucial because there’s no design to distract from the nail bed
Pro tip: If perfect white feels boring, add a single clear coat with a pearl shimmer—it’s still minimal but adds subtle dimension.
13. White Base with Nude Tips
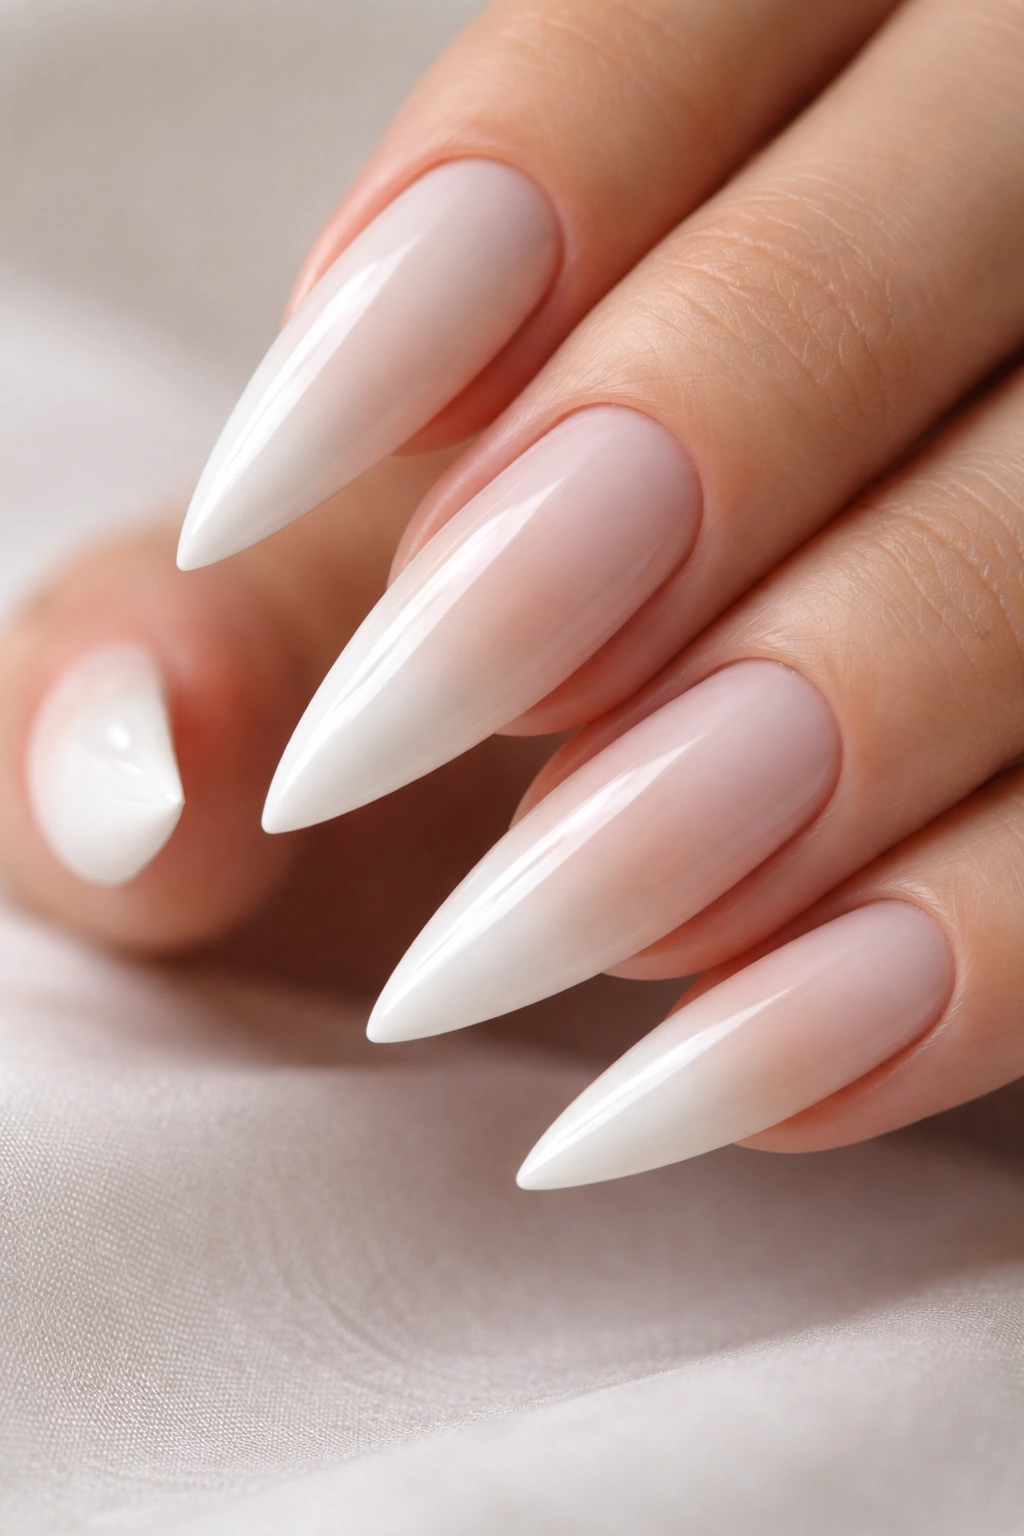
This reverses the French tip concept: a solid white base with slightly nude tips that blend into the white rather than contrasting sharply. The effect is elegant and elongating while feeling less formal than traditional French tips. It’s a design that works across settings and skin tones because the nude is customized to your natural tone.
Why This Works Better Than Traditional French
This design feels more modern and personalized than standard French tips. By using your skin tone as the transition color rather than white, you’re creating harmony rather than contrast. The effect is sophisticated without feeling stuffy or corporate. It also works better on deeper skin tones where bright white tips can feel harsh.
Creating the Blend
- Start with white as your base coat
- Apply your matching nude shade to just the tips
- Blend slightly where white meets nude for a gradient effect (don’t leave a harsh line)
- Glossy finish unifies the colors and makes the transition even softer
- The nude should be exactly one shade darker than your natural nail or skin tone for the best effect
Worth knowing: This design actually requires more precision than a sharp French tip because you need to blend two colors seamlessly.
14. White with Black Line Details

Black lines on white create graphic, editorial interest without requiring advanced nail art skills. You can choose thin lines down the center, geometric shapes, or abstract strokes—the key is letting the clean white be the dominant element with black as accent detail. This design is modern, sophisticated, and works with minimalist aesthetics.
The Power of Contrast
Black and white is the highest contrast combination possible, which makes it visually striking without being loud. The simplicity of the color pairing keeps it from feeling trendy—it’s architectural rather than decorative. This design photographs beautifully and looks intentional even if the lines aren’t perfectly precise.
Line Application
- Use a thin striping brush or nail art pen for control
- One or two lines per nail looks more modern than multiple lines
- Vertical lines elongate the nail, while horizontal lines create structure
- A single geometric shape (triangle, line, dot) per nail looks more editorial than freehand patterns
- Matte finish on the lines with glossy white creates interesting texture contrast
Pro tip: Slightly imperfect lines actually look more artistic and modern than perfectly precise ones.
15. White with Rose Gold Accents
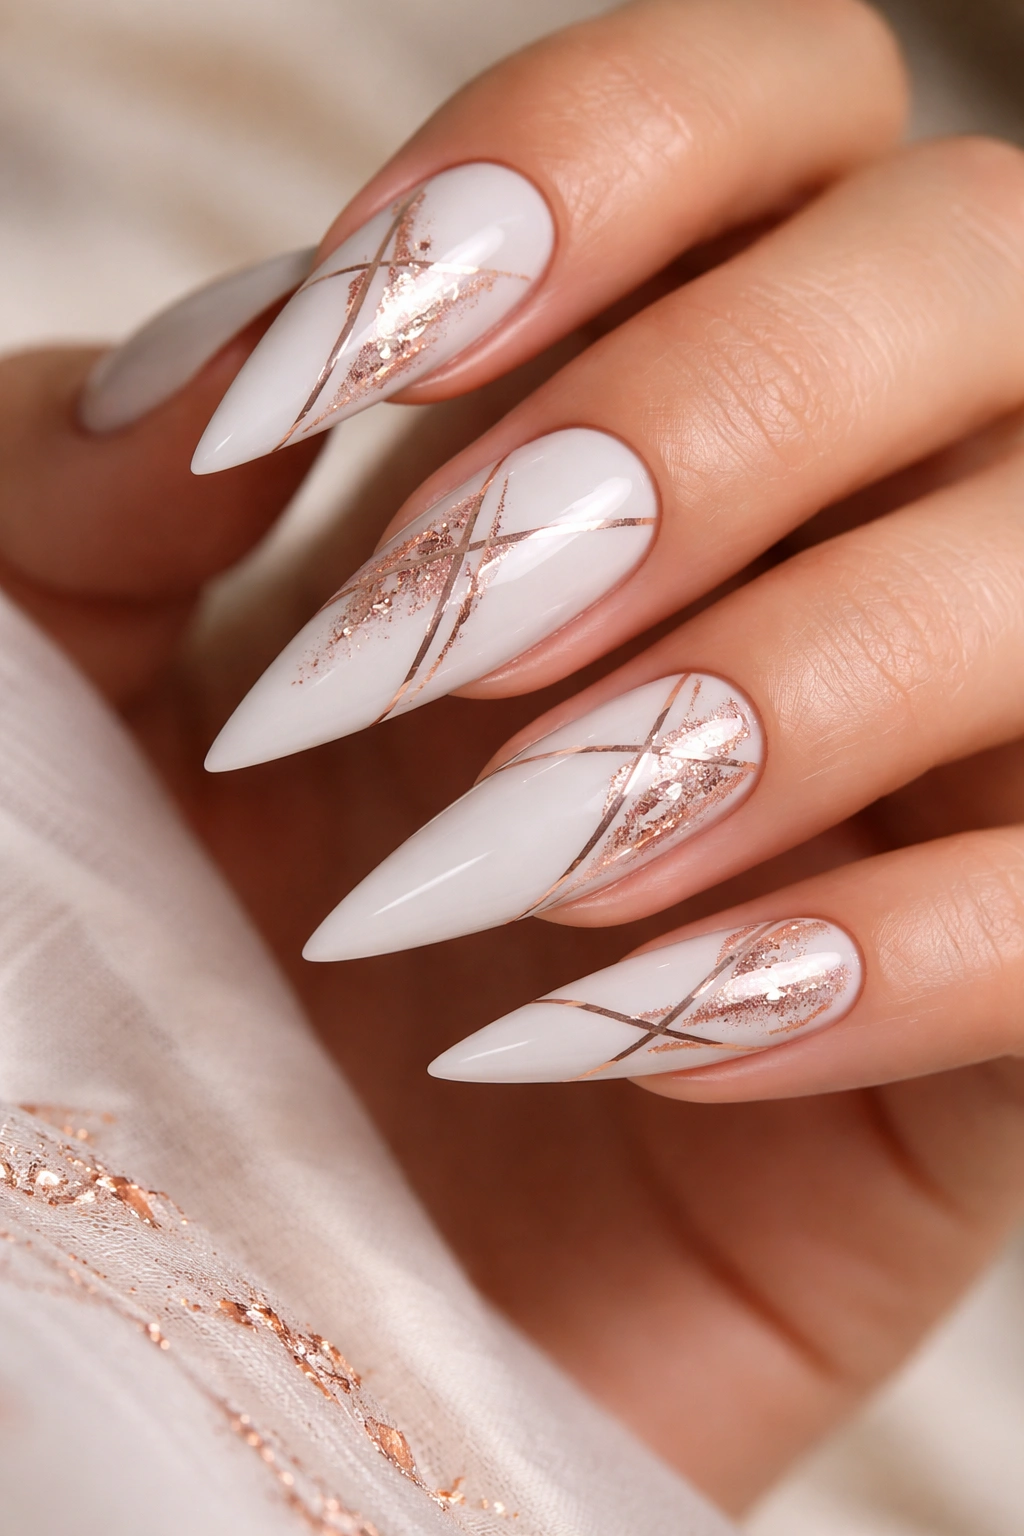
Rose gold has warmer, softer energy than traditional gold, making it a beautiful pairing with white for a more modern luxury aesthetic. Rose gold accents can be thin lines, foil, leaf, or geometric shapes—the metal adds depth without competing with the white base. This is the design for anyone who loves gold but wants something slightly softer.
Why Rose Gold Complements White
Rose gold is pink-toned, so it adds warmth and femininity to cool white in a way that feels intentional rather than accidental. The combination reads as very now while still being elegant and timeless. Rose gold also has less visual weight than traditional gold, so it feels more contemporary and less “statement jewelry” aesthetic.
Rose Gold Application
- Rose gold is easiest to apply as thin strokes with a metallic polish pen or paint pen
- Rose gold foil creates a more dramatic, textured effect
- Mixing rose gold with white in a ratio of about 70% white to 30% rose gold keeps the design balanced
- Rose gold looks best with a glossy finish that makes it shimmer
- A single rose gold accent on an accent nail (like the ring finger) feels more modern than doing all ten
Insider note: Rose gold photos beautifully because cameras pick up the warm, reflective tones even in natural light.
16. Milk White with Subtle Nail Art
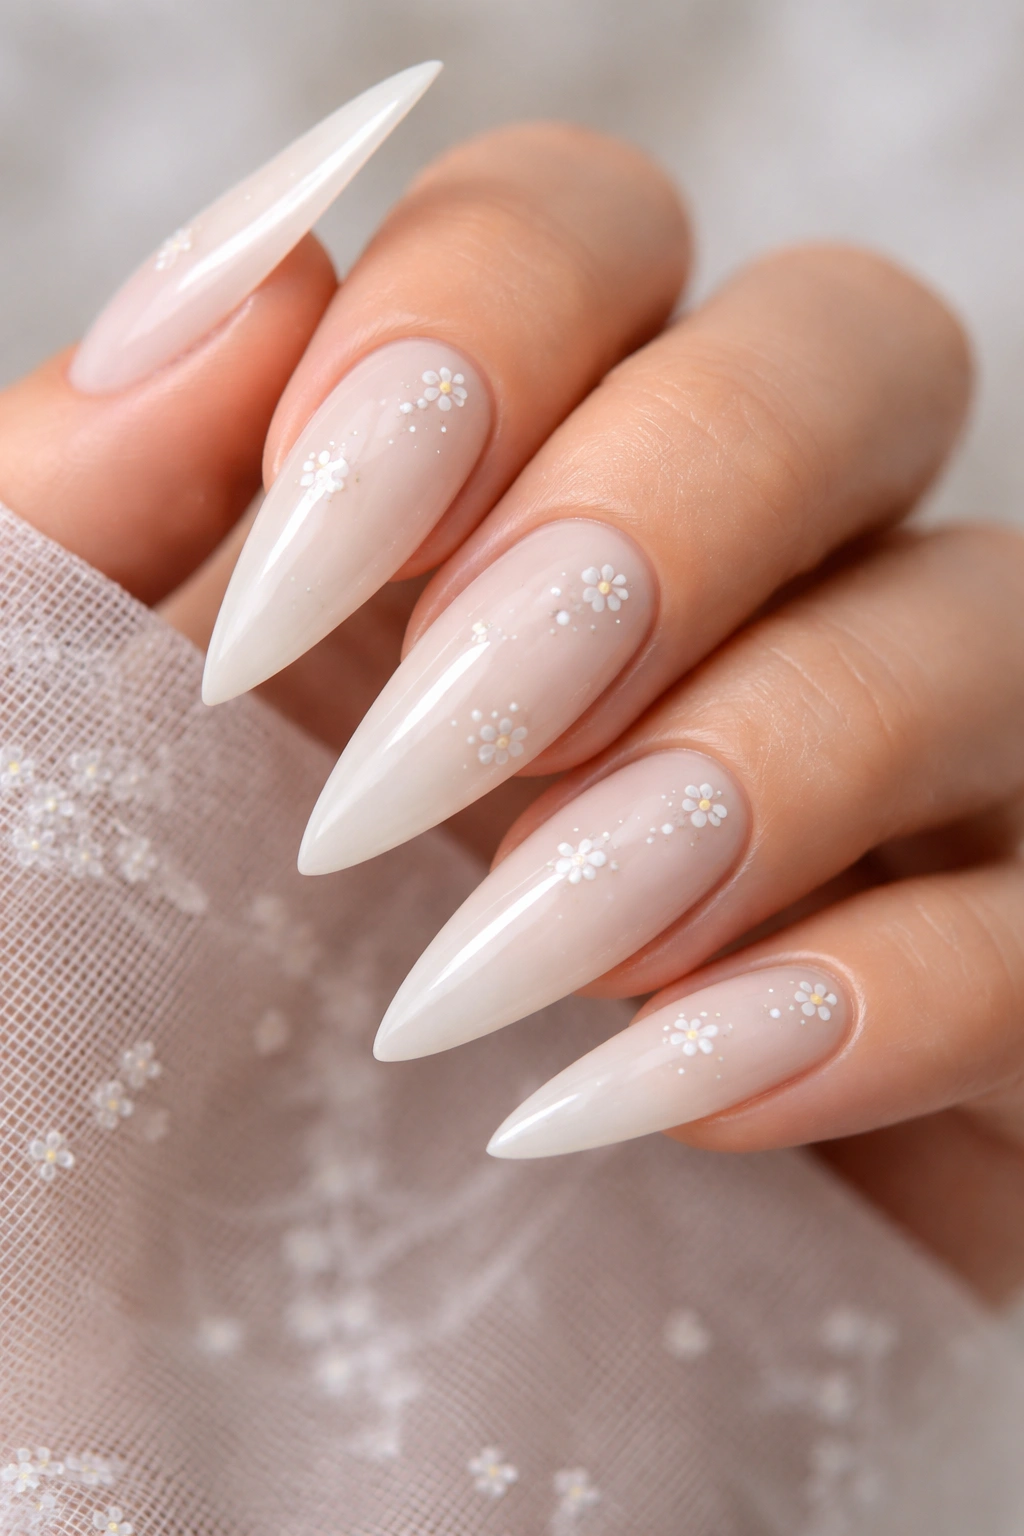
Milk white is translucent and creamy rather than pure white—it’s almost like white with a veil over it. This softer white base is the perfect canvas for subtle nail art because the colors blend and don’t create harsh contrasts. Tiny designs (small flowers, delicate lines, minimal iconography) work better on milk white than on stark white because everything reads as cohesive.
The Appeal of Milk White
Milk white feels softer and more romantic than pure white, yet it’s still clean and elegant. It’s easier to hide imperfections than pure white because it has less opacity. If you’ve always felt like pure white was too stark or clinical, milk white gives you that clean aesthetic with more warmth and sophistication.
What Works on Milk White
- Very fine, delicate designs work best because they integrate with the translucent base
- Tiny florals, dot patterns, or minimal line work create interest without overwhelm
- Nude, soft gold, or pale pink details look more refined on milk white than on pure white
- Glossy finish makes milk white appear more creamy and luxurious
- This design works beautifully for romantic occasions or everyday wear that feels special
Pro tip: Milk white requires professional application to look flawless because any streaks or imperfect opacity show more than with opaque white.
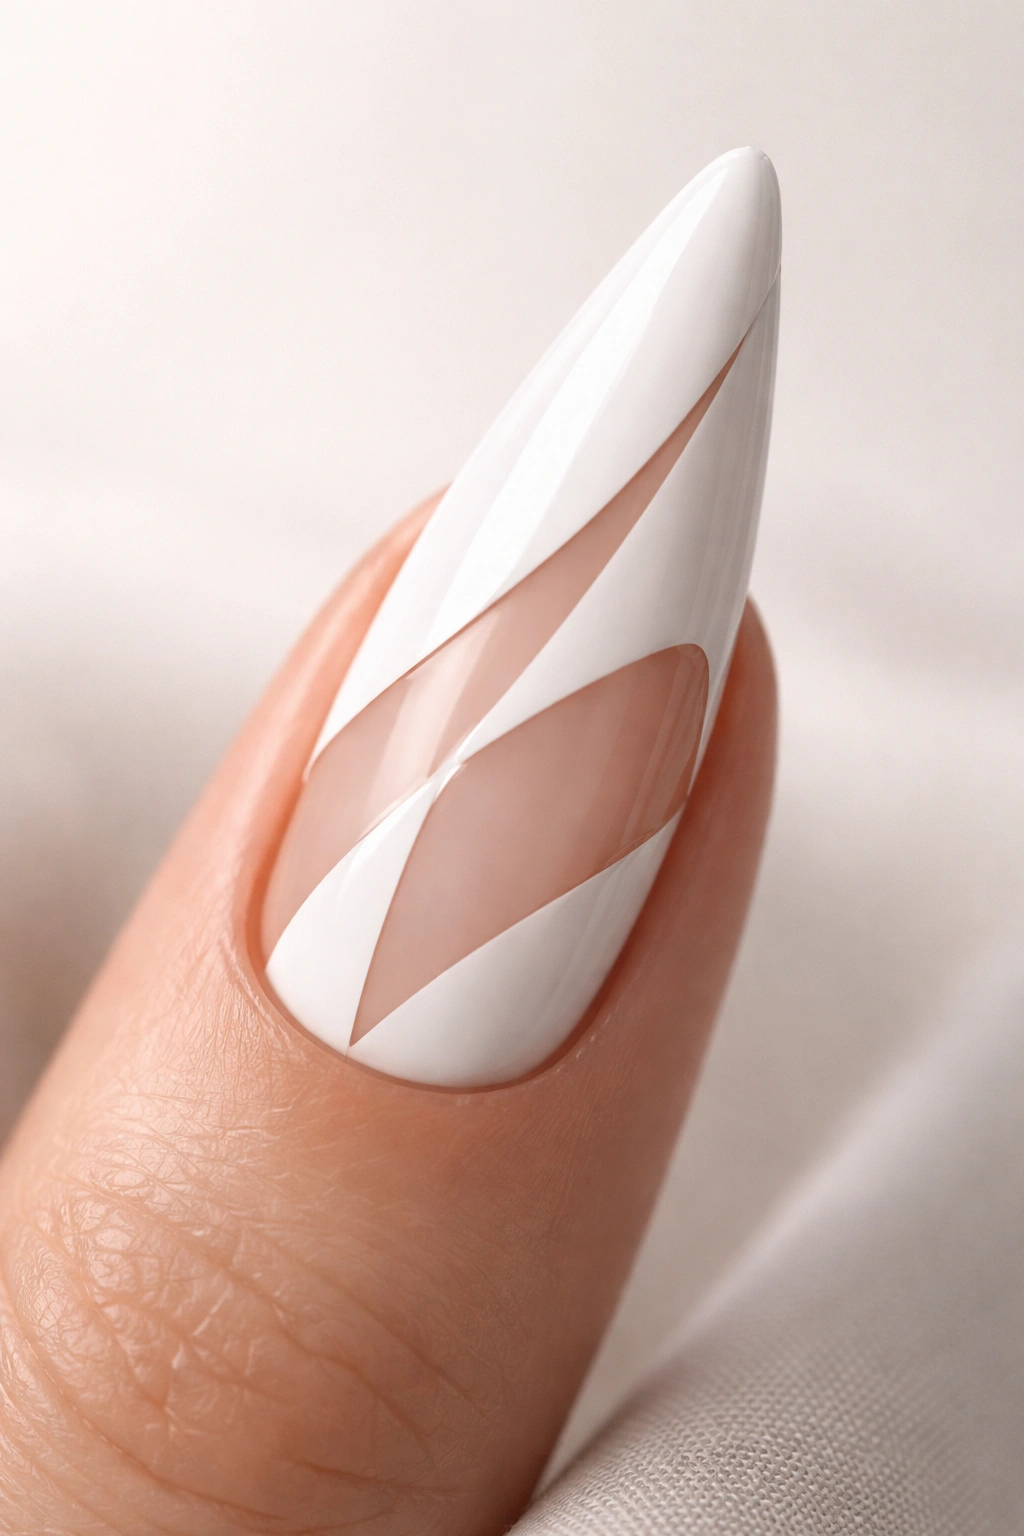
17. White Stilettos with Sheer and Translucent Elements
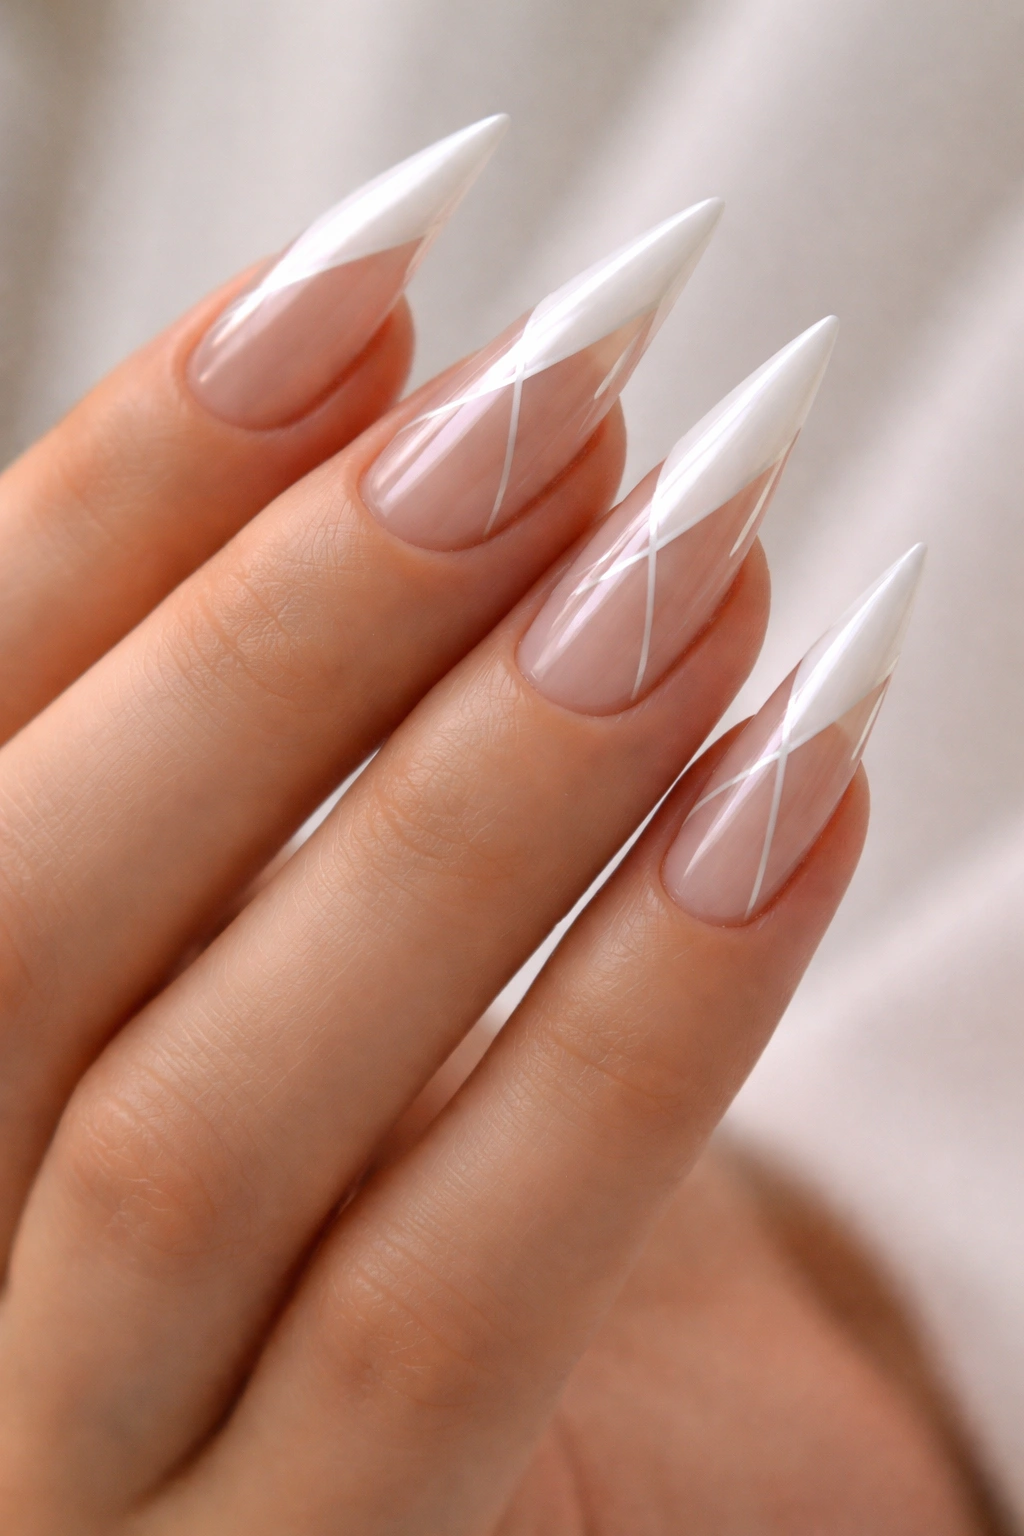
Combining solid white with sheer or translucent sections creates visual interest and texture. You might do white tips with sheer nude throughout, or alternate solid and sheer sections. This design plays with opacity and light in a way that feels architectural and modern.
The Sophistication of Transparency
Sheer and translucent elements add complexity and visual interest without the commitment of full color coverage. This approach feels very high-fashion and editorial because it shows restraint and intention. The interplay of opaque and transparent reads as curated and design-forward.
Creating Sheer Sections
- Apply sheer polish to the full nail, then layer solid white on top to specific areas
- Or apply white first and leave some areas bare (showing your natural nail) for a sheer effect
- Creating a gradient from sheer to opaque is more interesting than stark sections
- Glossy finish emphasizes the translucency effect
- Matte finish creates a more subtle, refined appearance
Worth knowing: This design requires a steady hand and planning because you need to be intentional about which areas are opaque and which are sheer.
18. White with Caviar Beads
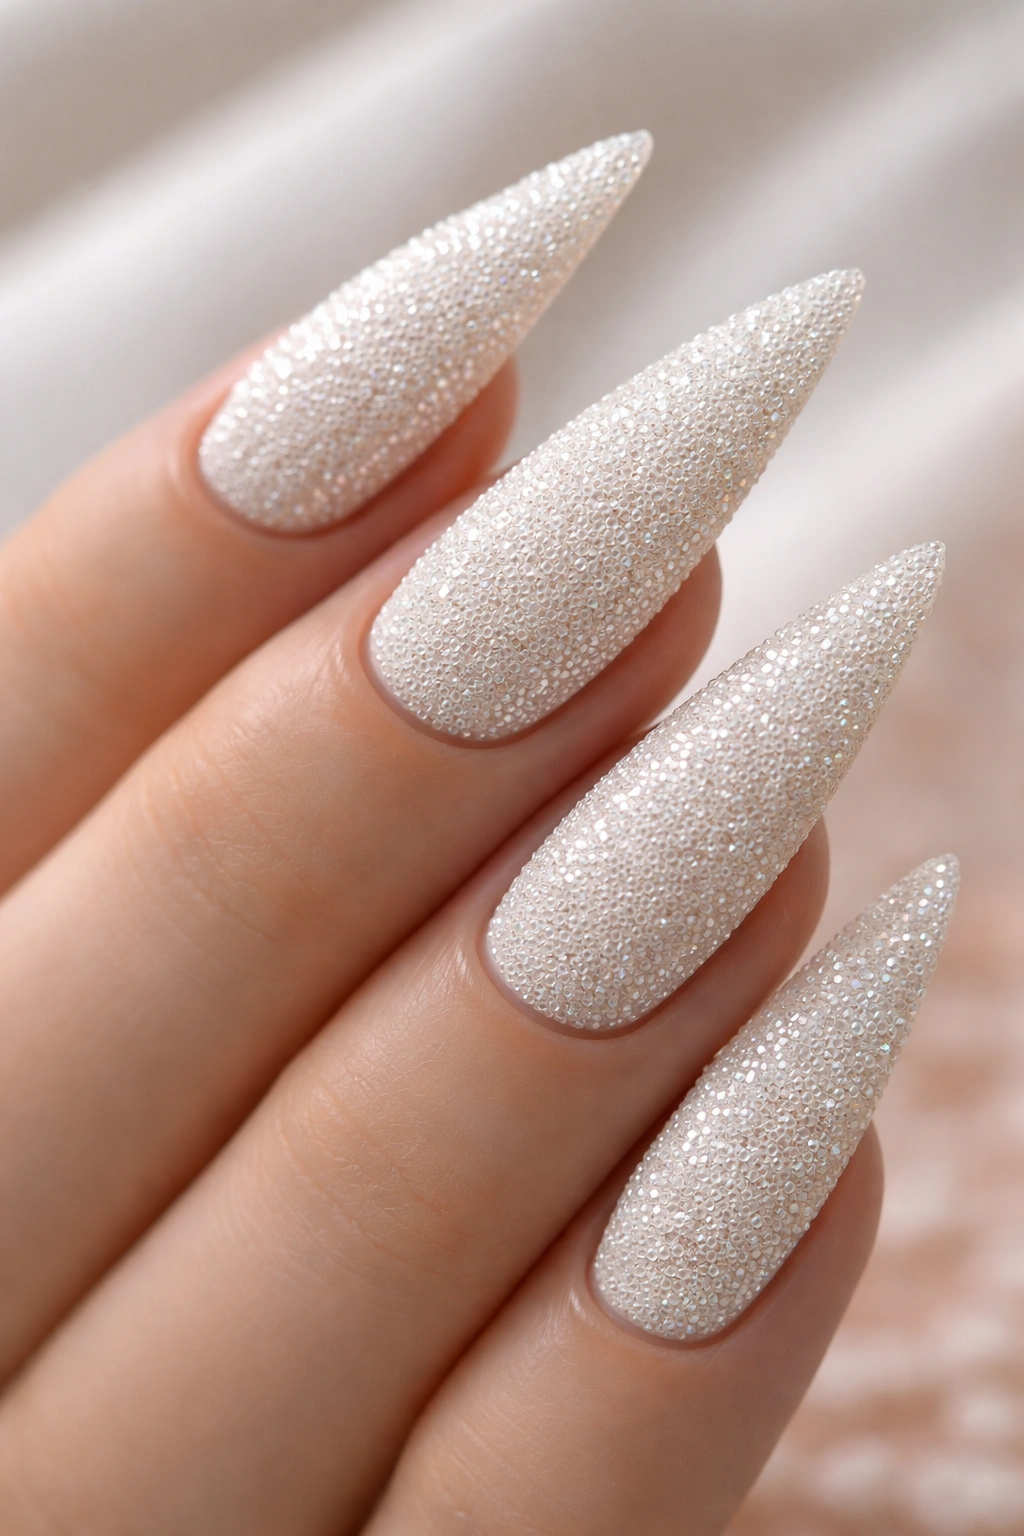
Caviar beads are tiny spherical beads that create a bumpy, luxurious texture that’s utterly unique. Unlike rhinestones or glitter, caviar beads create actual three-dimensional texture that you can feel. A white base studded with caviar beads is high-impact and instantly luxurious.
The Texture Appeal
Caviar beads create sensory interest—people always want to touch them because the texture is so unusual. They add visual dimension and make your nails instantly feel expensive and special. The downside is that they’re delicate and can pop off with rough use, and they catch on hair and fabric, so they’re better for low-impact days or special occasions.
Caviar Application
- Caviar beads adhere with special adhesive designed for nail art
- You can do full coverage caviar or scattered bead application
- Placement toward the tips prevents them from catching as much on your hands
- Caviar beads work best on gel or acrylic nails because regular polish won’t hold them securely
- Start with fewer beads than you think you need—you can always add more but can’t remove them easily
Pro tip: Caviar beads in white-on-white create interesting dimension because the beads catch light differently than the flat base.
19. White with Negative Space Designs
Negative space designs are trendy and modern, using the absence of polish to create patterns. You might paint the nail white but leave geometric shapes unpainted, or paint around a specific design so the nail shows through. This approach is graphic, editorial, and feels very current.
Why Negative Space Feels Sophisticated
Negative space designs require confidence and precision—you’re using emptiness as part of the design. This restraint and intentionality read as high-fashion. The designs are striking because contrast is high, but they still feel minimal because a significant portion of the nail is left bare.
Negative Space Techniques
- Use tape or guides to create precise geometric shapes of unpainted nail
- Paint around designs rather than trying to paint the space itself
- Cutout shapes (triangles, circles, lines) work best—complex shapes get too busy
- The unpainted portion should be about 20-40% of the nail for best visual balance
- Glossy white against matte or bare nail creates interesting texture contrast
Insider note: Negative space designs look more impressive than they are to execute—people always assume they’re incredibly difficult.
20. White with Holographic Finish

Holographic nail polish creates an iridescent, rainbow-shifting effect that looks different from every angle. White holographic is softer and more ethereal than colored holographic because the base is neutral. When light hits holographic white, it throws subtle rainbow tones that feel magical and otherworldly.
The Holographic Wow Factor
Holographic is undeniably trendy, but it’s so visually interesting that it transcends trend. The effect is different in natural light versus indoor light, which makes it endlessly fascinating. White holographic specifically is modern and elegant because it combines the sophistication of white with the innovation of holographic technology.
Holographic Application
- Holographic effect requires specific holographic powder or polish (regular white won’t create the effect)
- Application is slightly more technical than regular polish—follow brand instructions carefully
- Holographic shows best in natural light or bright indoor settings
- This finish doesn’t last as long as regular polish (typically 10-14 days instead of 3 weeks)
- Top coat should be high-shine to maximize the holographic effect
- Some holographic products are thicker and harder to apply, so start with user-friendly brands
Pro tip: Holographic nails photograph differently than they appear in person, and photos often don’t do the effect justice—the in-person impact is far superior.
Final Thoughts

White stiletto nails are far more versatile than they might initially appear. Whether you choose pure simplicity or intricate embellishment, glossy shine or velvety matte, stark contrast or soft blending, there’s a white stiletto design that matches your personal aesthetic and lifestyle. The beauty of white is that it serves as a perfect canvas—the options are truly limitless.
The key to choosing your design is thinking about how much maintenance you’re willing to commit to and what occasions you’re dressing your nails for most often. If you type constantly or use your hands roughly, minimal designs or those without embellishment are more practical. If you’re drawn to drama and you’re careful with your nails, the heavily decorated options are stunning choices. There’s no “right” white stiletto design—only the one that makes you feel confident and beautiful when you look at your hands.
Your white stiletto nails are an extension of your personal style, and they deserve to reflect who you are. Whether that’s the quiet elegance of pure white, the luxury of metallics, the glamour of gems, or the boldness of geometric contrast, own it completely. The fact that you’re thinking this intentionally about your nails means whichever design you choose will look incredible.
