

If there’s one nail trend that screams confidence and glamour, it’s extra long duck nails. These elongated, elegant nails have become a staple for anyone looking to elevate their style with dramatic length and eye-catching designs. The beauty of duck nails isn’t just about the length—it’s about the creative possibilities that come with that extended canvas. From bold ombré patterns to intricate nail art that stretches across every millimeter, the options are genuinely limitless.
The growing popularity of duck nails reflects something deeper in nail culture: people are embracing bolder expressions of themselves. Extra long nails aren’t for everyone, but for those who love them, they’re a powerful form of self-expression. Whether you’re planning a special event, looking to refresh your everyday style, or just ready to commit to a dramatic nail transformation, understanding the range of designs available helps you choose something that genuinely speaks to you.
What makes this nail style so compelling is how it transforms your entire hand aesthetic. Long nails catch light differently than shorter ones, they photograph beautifully, and they give you room to experiment with designs that simply wouldn’t work on a shorter nail bed. The challenge—and the thrill—is finding a design that matches both your personality and your lifestyle. That’s why exploring specific examples matters. Seeing real designs helps you visualize how something might actually look on your hands, not just in your imagination.
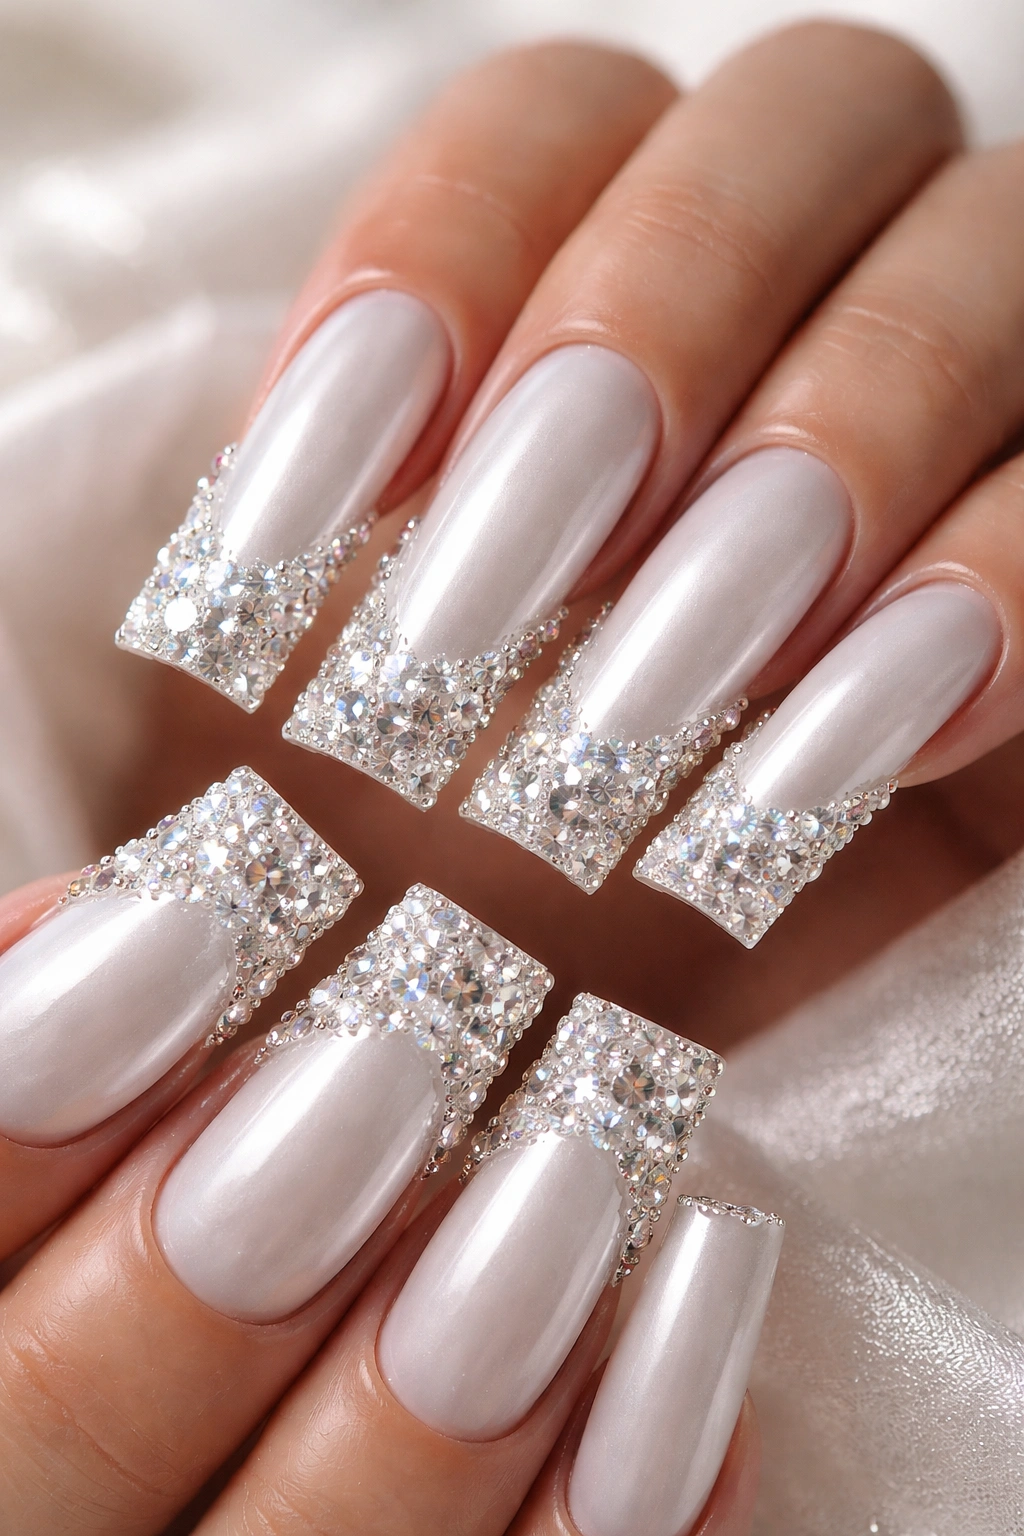
1. Glossy White Pearl With Embedded Crystals
Clean, minimalist elegance takes on a luxurious edge when you add strategically placed crystals to a glossy white base. This design starts with a high-shine white polish—the kind that reflects light like a mirror—and then incorporates small rhinestones or Swarovski crystals clustered along the nail tips or scattered down the center line of each nail. The crystals should catch the light constantly as you move your hands, creating subtle sparkle without screaming for attention.
Why This Design Stands Out
The white pearl base works beautifully on extra long nails because it elongates your fingers visually and creates a sophisticated, almost bridal aesthetic. The crystals add just enough personality and interest that the design feels special rather than stark. This works equally well for formal events, everyday wear, or professional settings where you want to feel polished without being over-the-top.
What You Should Know About This Look
- The crystals need to be applied with the right adhesive; cheap rhinestones fall off quickly and look tacky
- White polish works best on all skin tones when you choose the right undertone—pure white for cool tones, creamy white for warm tones
- Glossy finishes require more frequent touch-ups than matte finishes because they show every smudge and fingerprint
- A clear topcoat over the crystals protects them and prevents them from snagging on fabric
Pro tip: Position crystals on alternating nails rather than all of them for a more balanced, wearable look that doesn’t feel costume-like.
2. Soft Pink Ombré Fading to Gold
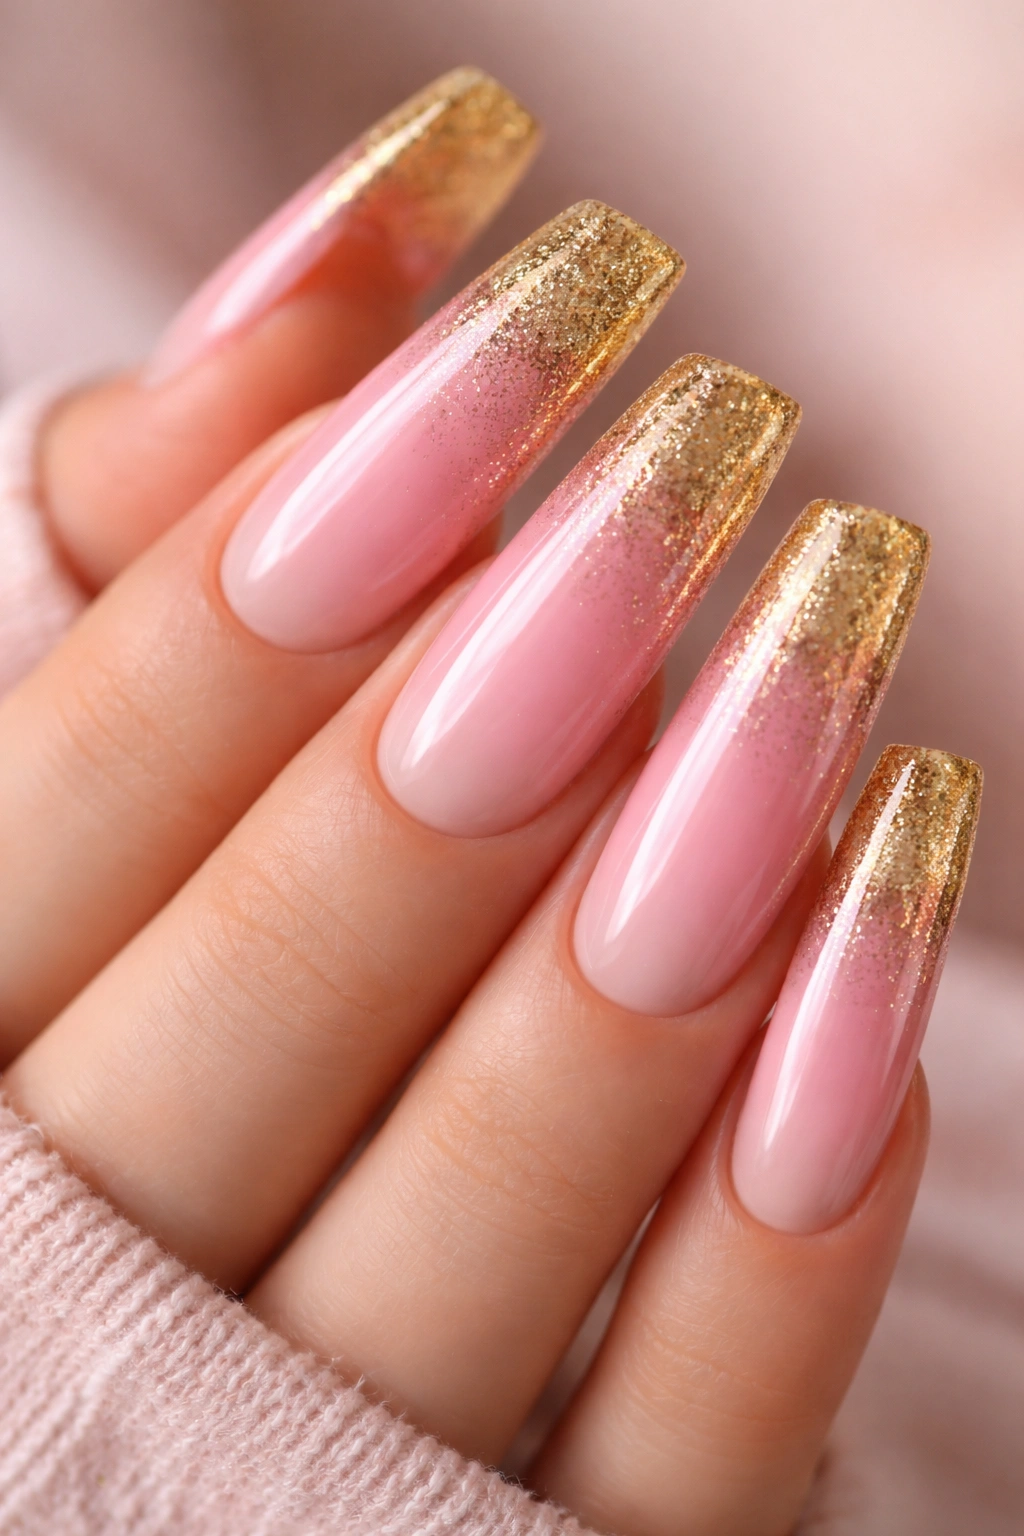
This gradient design is pure romance—soft, warm, and timelessly beautiful. Start with a pale pink shade at the cuticle and gradually transition to champagne or warm gold at the tips, creating a seamless color melt that looks airbrushed and expensive. The ombré technique on extra long nails gives you enough space to show the gradient shift clearly, and the colors you choose determine the vibe completely.
The Appeal of This Combination
Pink and gold together feel inherently celebratory and feminine without being childish or over-sweet. The soft pink keeps it wearable for daily life, while the gold transition adds enough glamour that this works beautifully for special occasions too. Long nails showcase this gradient effect particularly well because the color shift has room to breathe and develop naturally across the extended nail surface.
How to Make This Design Your Own
- Choose a pink undertone based on your skin—dusty rose for cool undertones, warm coral-pink for warm undertones
- The gold can be warm (champagne, bronze) or cool (shimmer gold with silver undertones)
- Add a thin gold accent line down the center of each nail for definition and extra visual interest
- Consider adding a matte topcoat to the pink section and keeping the gold section glossy for textural contrast
Worth knowing: Ombré gradients are harder to achieve with regular polish than gel; if you’re doing this at home, a makeup sponge dabbing method works better than trying to blend with a brush.
3. Deep Burgundy With Gold Leaf Accents
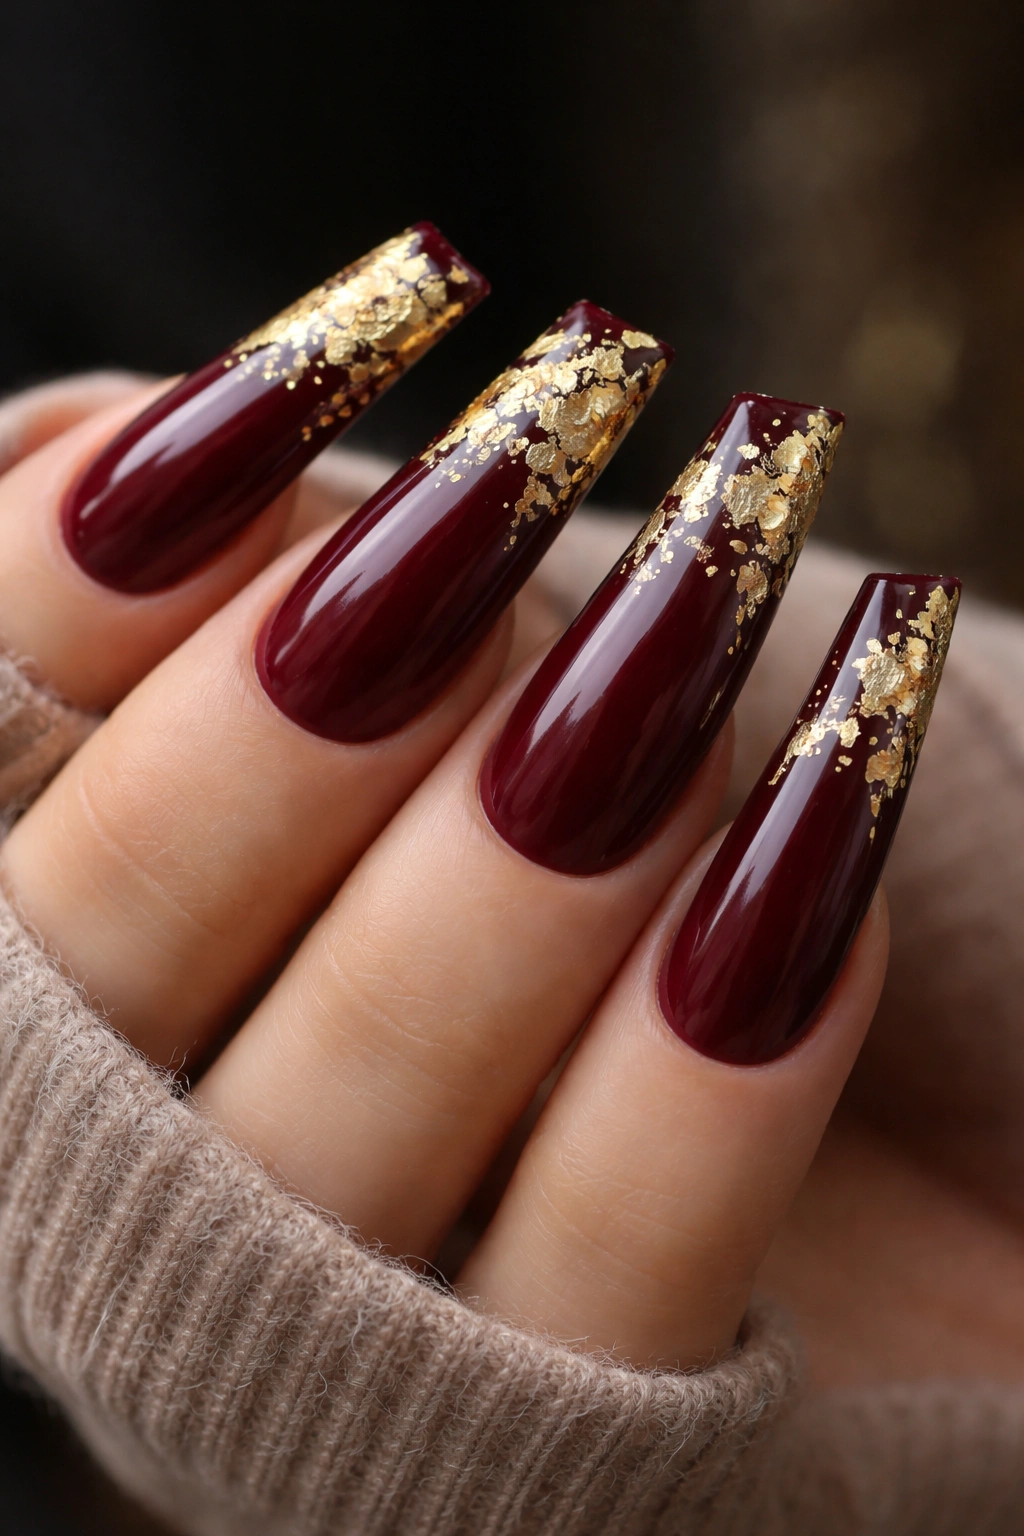
Burgundy nails carry an inherent sophistication, and when you add delicate gold leaf accents, you elevate the design from elegant to absolutely show-stopping. Apply a deep, creamy burgundy base—think wine color rather than bright red—and then apply thin pieces of gold leaf to select areas: perhaps scattered across the tips, forming geometric patterns, or creating a marble effect mixed into the burgundy itself.
Why Burgundy and Gold Work So Well Together
The color pairing feels luxurious, expensive, and timeless. Burgundy works on virtually every skin tone when you choose the right depth, and it photographs beautifully in both natural and artificial light. Gold leaf adds movement and interest without making the design feel busy. This is the kind of nail design that makes people stop and ask where you got them done.
Technical Details That Matter
- Gold leaf needs to be sealed with a strong topcoat immediately; exposed gold leaf tarnishes and looks dull
- The burgundy should be opaque in one to two coats—if you’re using a lighter shade, you’ll need three coats
- Real gold leaf is more durable than imitation, but imitation works perfectly fine if you seal it properly
- The contrast between the deep burgundy and bright gold is what makes this design pop, so avoid muting either color
Insider note: This design works beautifully as a full set or as a statement manicure where only two or three nails have the gold leaf accents while the others are solid burgundy.
4. Sheer Nude With Thin Black Line Art
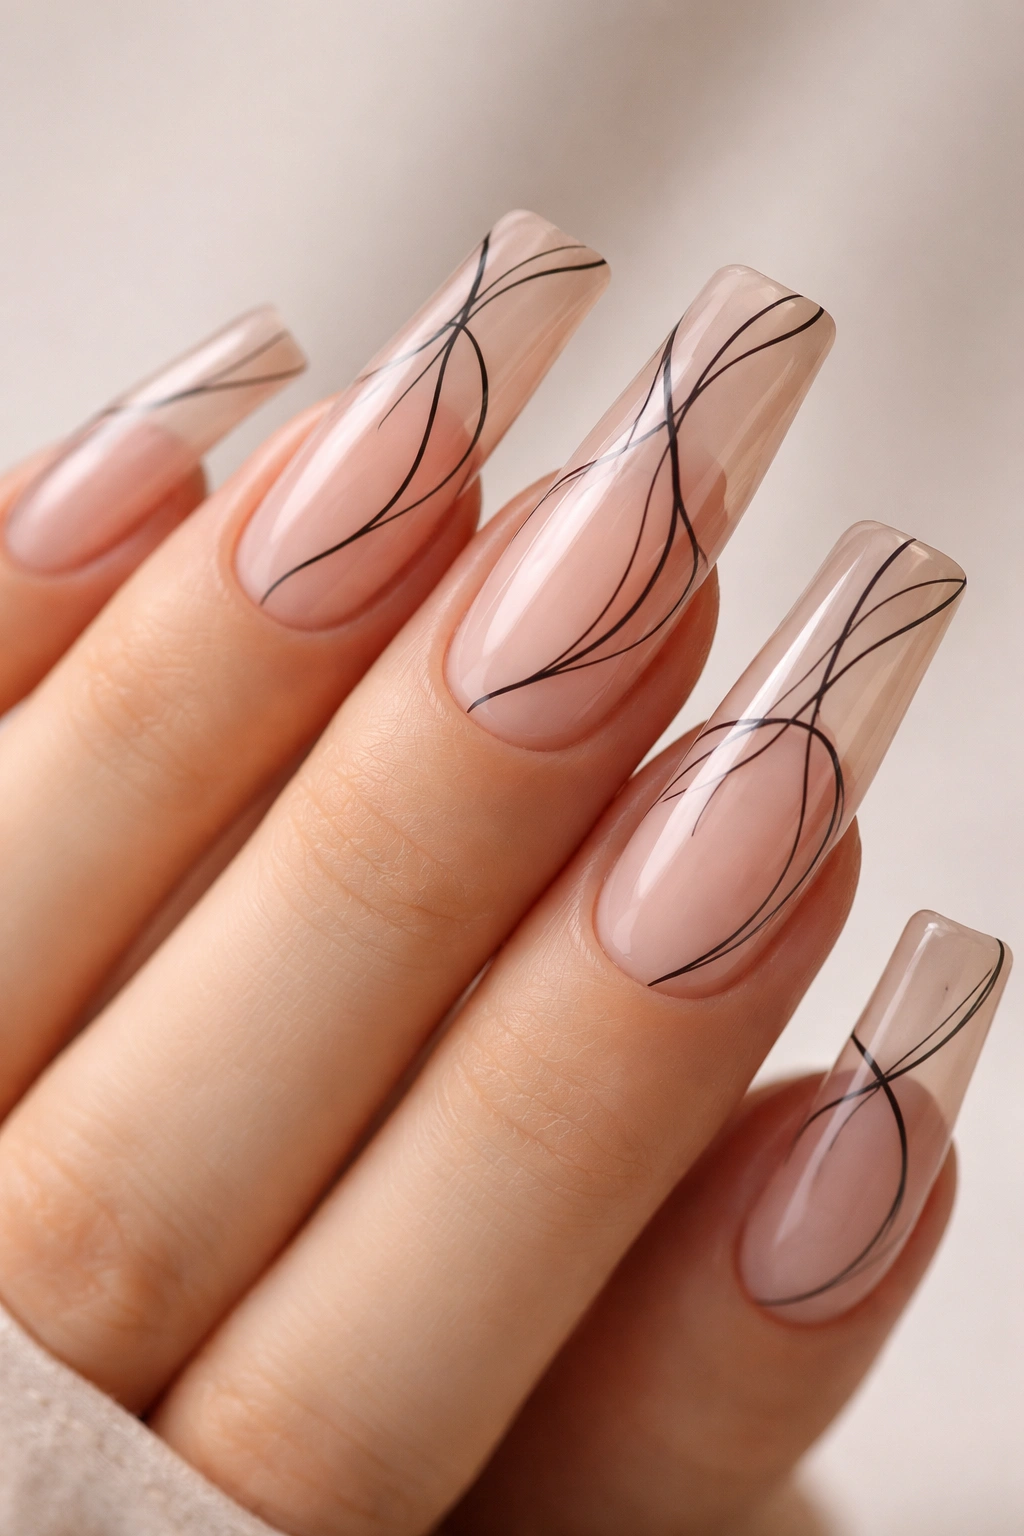
Minimalism meets sophistication in this understated yet striking design. A sheer, barely-there nude base serves as the canvas for delicate black line art—think geometric patterns, abstract squiggles, botanical outlines, or fine line illustrations that sit just above the nail surface. The transparency of the nude base creates a second-skin effect that makes your nails look impossibly natural and long.
What Makes This Design Special
Black lines on nude create maximum contrast and readability, meaning even intricate details remain sharp and clear. The minimalist aesthetic appeals to people who love nails but prefer a subtle approach, and the line art gives you complete creative freedom. You could do different designs on each nail, repeat the same pattern, or create a narrative that flows across all ten fingers.
Design Ideas to Consider
- Thin geometric shapes: triangles, squares, abstract intersecting lines
- Nature-inspired: branch patterns, leaf veins, delicate flower stems
- Abstract expressionist: free-form swoops and squiggles that look effortlessly artistic
- Mathematical: grid patterns, connected circles, symmetrical designs
- Personalized: your initials, a meaningful symbol, or a design that represents your interests
Pro tip: Use a super fine nail art brush or a toothpick dipped in black gel to draw these lines; regular polish is too thick and will look clunky.
5. Holographic Crystal Effect
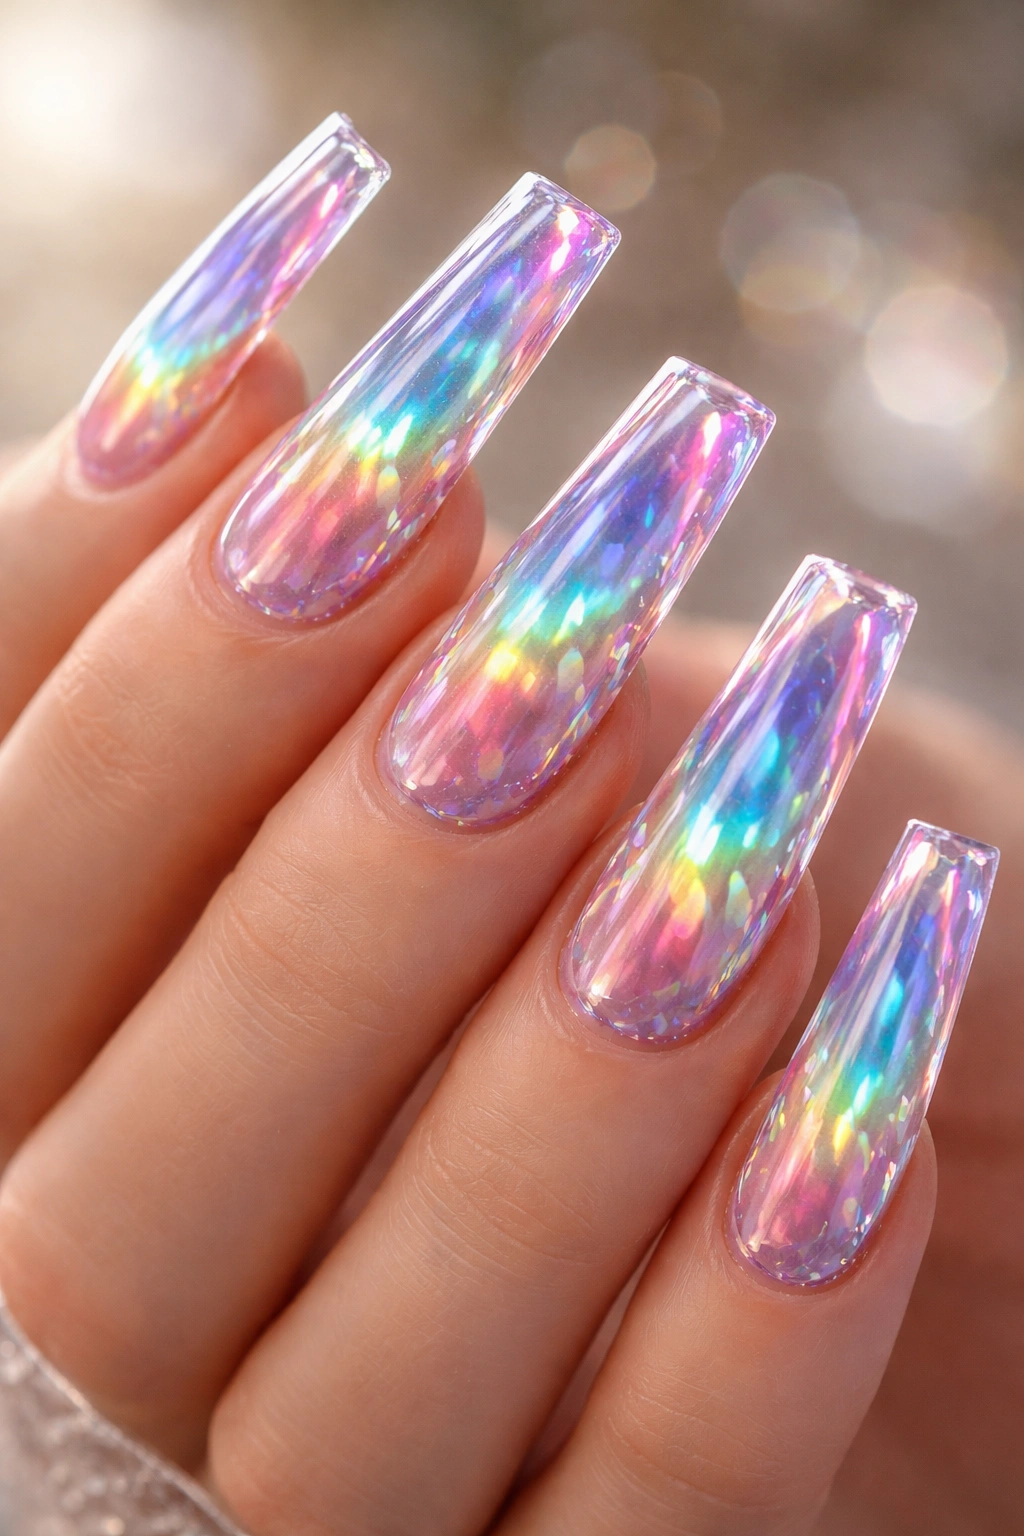
This design is pure fantasy and drama—imagine if your nails caught light like a prism, throwing rainbows across everything they touched. Holographic nail polish or chrome powder creates this effect, bending light in multiple directions to create an iridescent, crystal-like appearance. On extra long nails, this effect is absolutely mesmerizing because you have so much surface area for the light to play across.
Why This Works for Extra Long Nails
The longer your nails, the more dramatic the holographic effect becomes. Every movement catches different angles of light, creating a constantly shifting rainbow that’s genuinely hypnotic. This works best on nails shaped like coffins or duck nails specifically because the wider nail bed at the base shows more of the effect than thin, pointed nails would.
Achieving the Holographic Look
- Holographic polish applied over a white or nude base creates the strongest effect
- Chrome powder produces the most intense holographic appearance but requires careful application
- The effect works on both matte and glossy bases, but glossy shows the light reflection more dramatically
- A clear, ultra-glossy topcoat intensifies the holographic reflection
- The effect is most visible in natural daylight and flash photography
Worth knowing: Holographic effects look less impressive under artificial warm lighting; they truly shine outdoors or in bright environments.
6. Classic French Tips With A Modern Twist
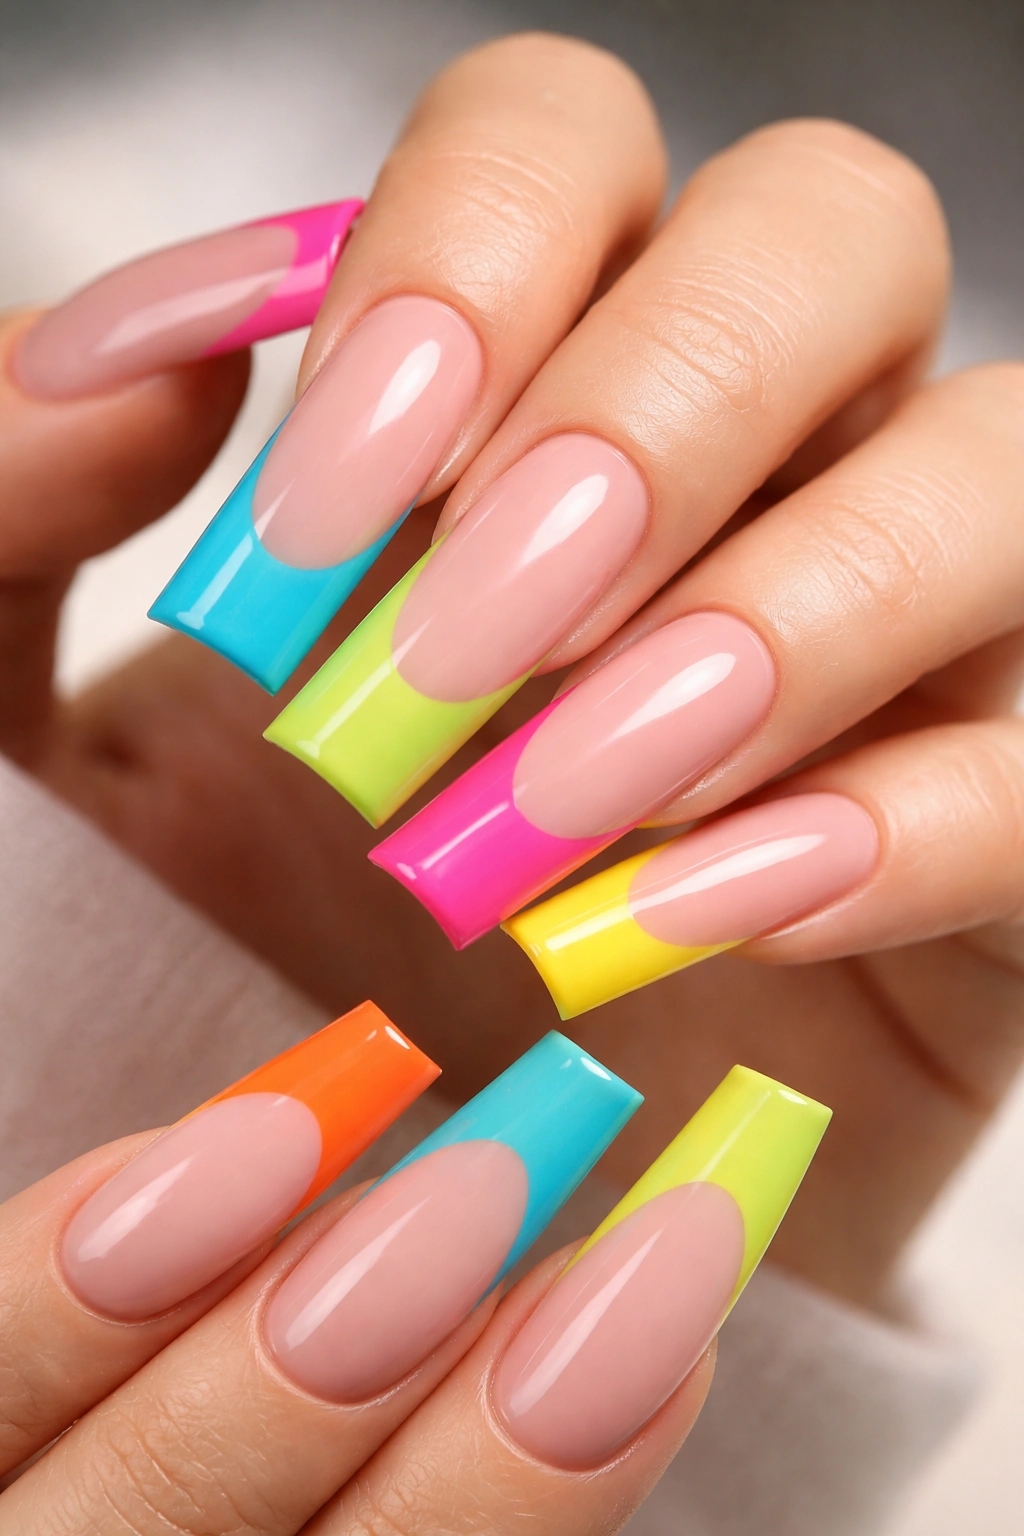
French tips never go out of style, but the modern interpretation adds personality and edge to the timeless classic. Instead of the traditional thin white line at the tip, try a thicker color block in an unexpected shade—metallic, ombre, glitter, or even a dark color like black or navy—while keeping the main nail body soft pink, nude, or sheer.
Updating the French Tip for Today
The traditional French manicure can feel dated, but playing with the tip color, thickness, and finish keeps it fresh and current. A thicker color block (maybe covering the top quarter of the nail) feels more intentional and modern than the delicate traditional version. Extra long nails give the French tip design more prominence and visual impact.
Modern Variations to Try
- Thick metallic gold or silver tips over nude base
- Ombre tips that transition from white to pink or blue
- Glitter-gradient tips that fade from opaque to sheer
- Asymmetrical tips—one color on some nails, different on others
- Geometric tips instead of curved (a straight line across creates architectural interest)
Pro tip: If you’re doing this at home, tape along the line where your color block will start to get a crisp, clean edge; freehand French tips are harder than they look.
7. Matte Black With Rose Gold Details
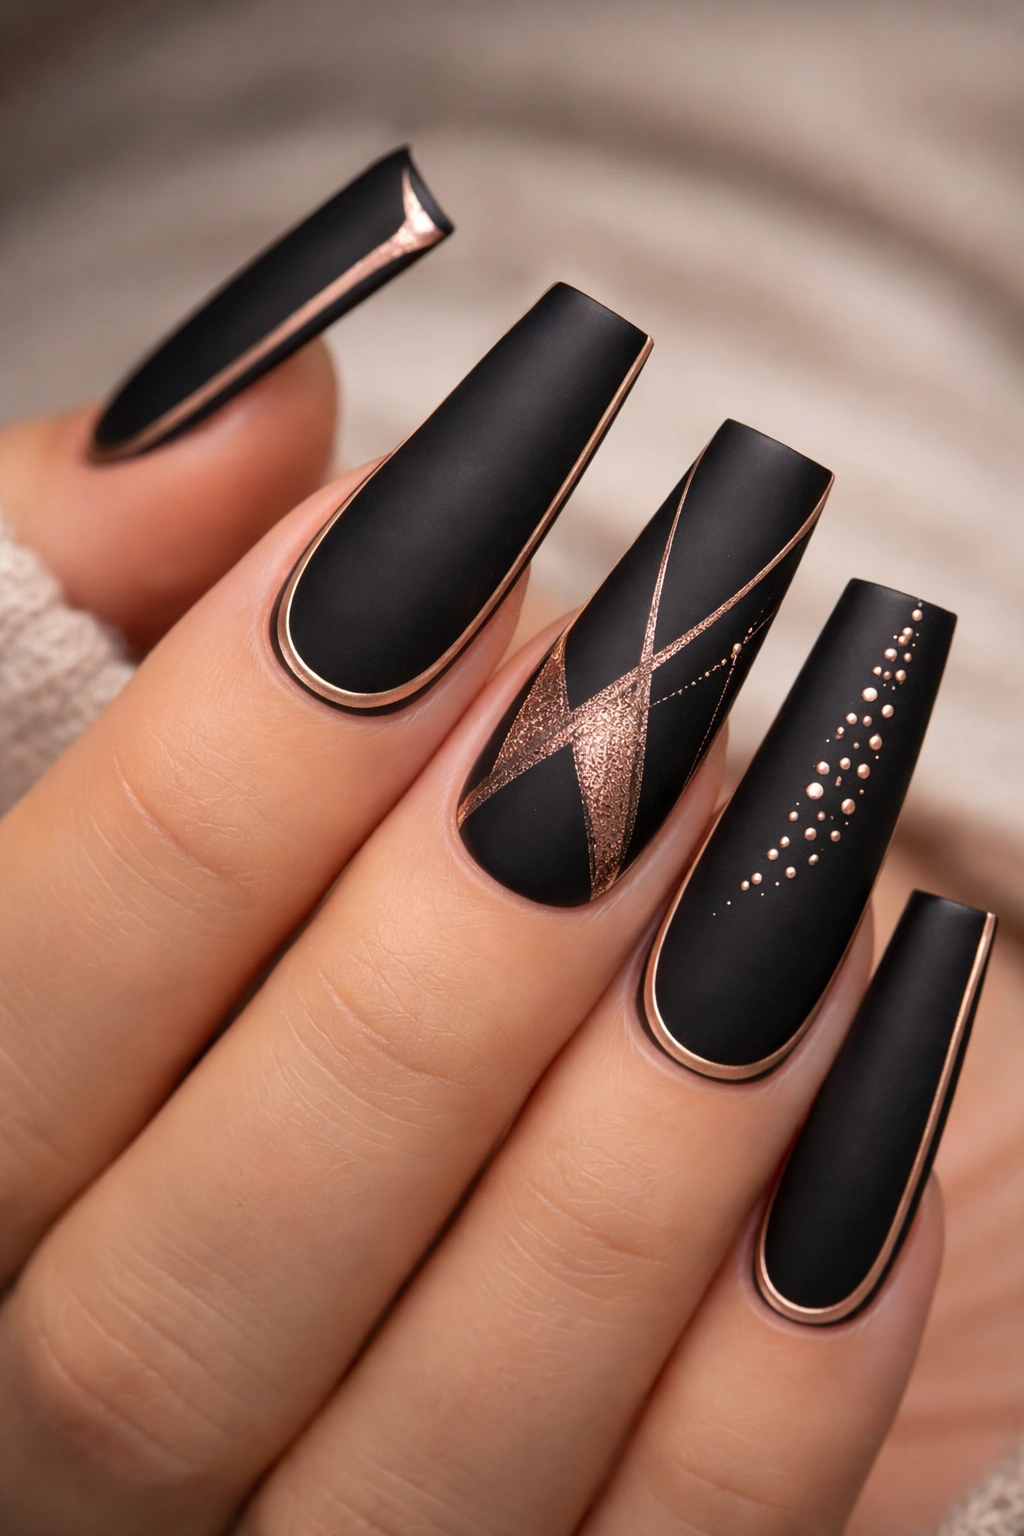
The contrast between matte black and rose gold creates a design that’s simultaneously moody and glamorous. Apply a velvety matte black base to all nails, then add rose gold accents: thin lines, geometric shapes, dot patterns, or a rose gold accent nail. The matte finish keeps the design from feeling too shiny or casual, while the rose gold adds warmth and luxury.
The Power of This Color Combination
Black and rose gold appeal to people who love both edgy and elegant styles. The matte texture softens what could feel harsh or gothic, while the rose gold adds femininity and warmth. This design photographs incredibly well and works for virtually any occasion—it’s professional enough for work but statement-making enough for nights out.
Rose Gold Accent Ideas
- Thin accent lines down the sides of each nail
- Dots scattered across the matte black base
- A geometric half-moon shape at the tip
- Rose gold foil pieces embedded in the matte black
- A rose gold glitter gradient fading from the cuticle
Worth knowing: Matte finishes can look dull if you use low-quality polish; invest in a good matte black because cheap versions look flat and gray rather than velvety and rich.
8. Transparent Base With Colorful Confetti
This design is pure joy and celebration, perfect for anyone who loves color but wants it balanced with a clean aesthetic. A clear or sheer nude base lets your natural nail (or nail extension) show through, while scattered confetti pieces—colorful glitter, small sequins, or translucent colored flakes—float throughout the design. The transparency keeps it from feeling overstimulating while the confetti adds personality and fun.
What Makes Confetti Nails So Appealing
The translucent quality of this design is surprisingly sophisticated. It’s playful without being juvenile, colorful without being chaotic, and decorative without being overdone. The confetti effect works beautifully on extra long nails because each piece is visible and distinct rather than crowded together.
Creating the Confetti Effect
- Use very fine glitter or micro sequins for a delicate look; chunky confetti can feel costume-like
- Mix various sizes of glitter pieces for visual interest and depth
- You can scatter them randomly or create a gradient where more confetti appears toward the tips
- A gel base works better than regular polish because the confetti pieces embed fully and don’t shift
- Clear topcoat seals everything and prevents pieces from snagging
Pro tip: Use tweezers or a dotting tool to place larger pieces intentionally; sprinkling random glitter often results in too much clustered in one area.
9. Deep Purple With Silver Starry Night Design
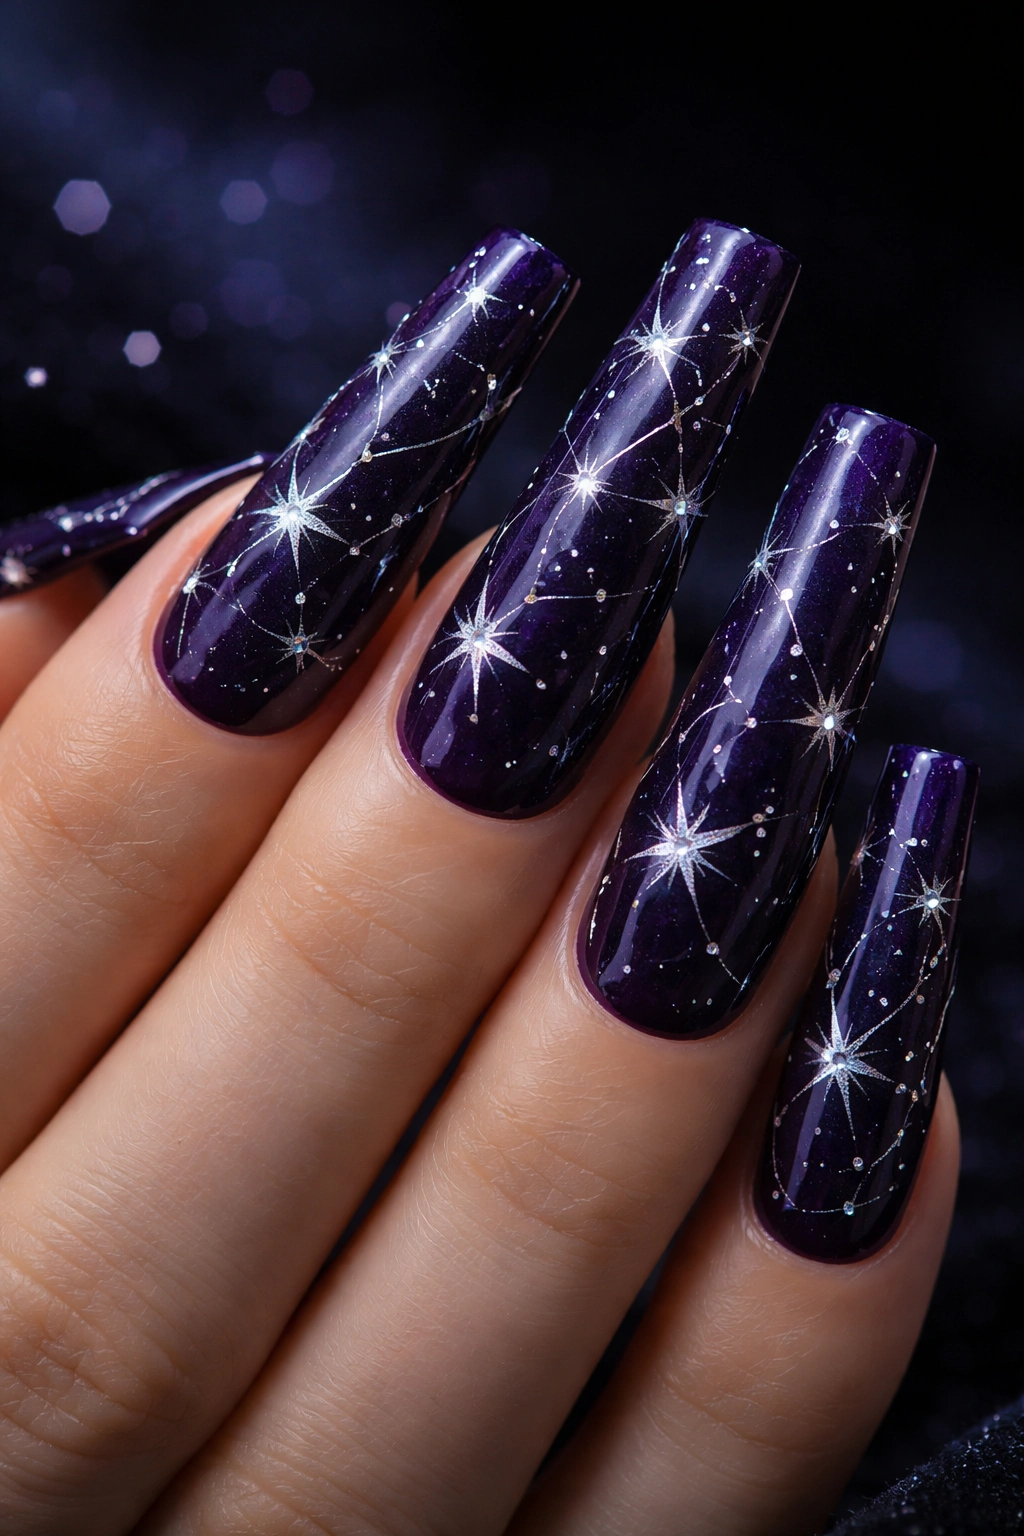
Inspired by cosmic beauty, this design combines a rich, deep purple base with delicate silver stars, dots, and constellation lines scattered across the nails. The deep purple acts as the night sky while the silver creates a magical, dreamy atmosphere. This design appeals to stargazers, dreamers, and anyone who loves combining fantasy with fashion.
Why This Design Resonates
The purple and silver combination feels mystical and calming while still being visually striking. The scattered star pattern keeps the design from feeling heavy or gothic, and it’s detailed enough to be interesting without being so complex that it requires professional application. This is one of those designs that looks completely custom and unique.
Creating the Starry Effect
- Use a deep, rich purple (eggplant, plum, or midnight purple)
- Apply silver dots of varying sizes with a dotting tool
- Connect some dots with thin silver lines to suggest constellations
- Add tiny silver flecks or microglitter for additional sparkle
- A matte topcoat on the purple base with a glossy topcoat over the silver creates dimensional contrast
Worth knowing: This design works beautifully if you do different constellation patterns on each nail, creating a personalized celestial map based on your astrological sign or a night sky that’s meaningful to you.
10. Butter Yellow With Hand-Painted Florals
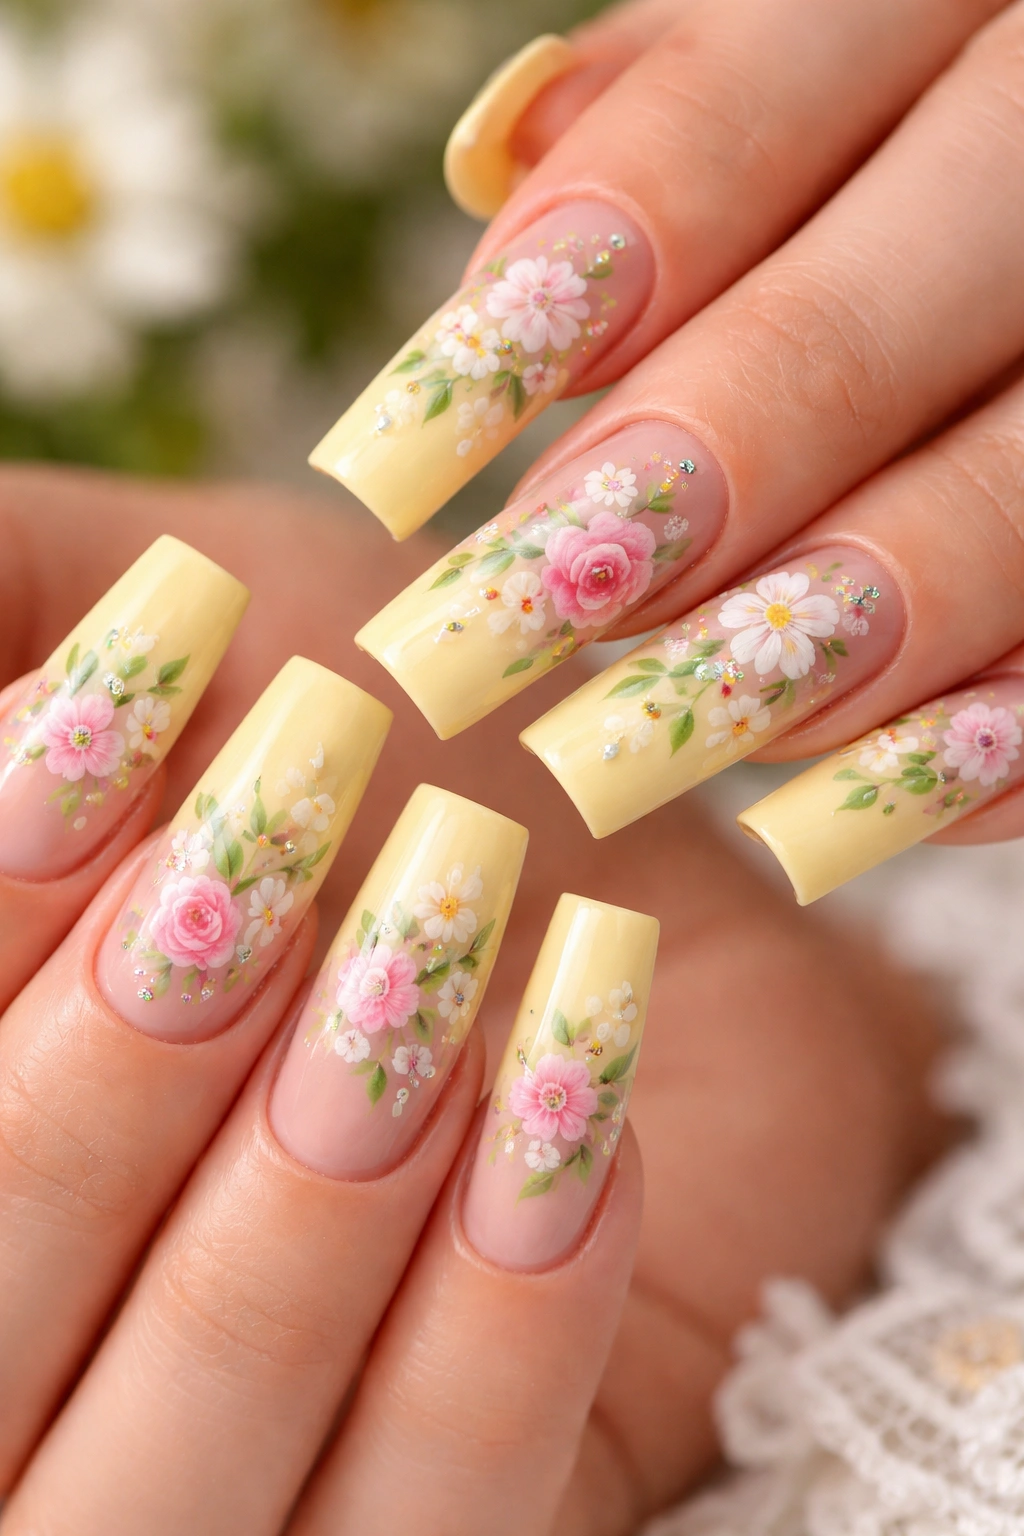
Cheerful and romantic, this design starts with a creamy butter yellow base and features delicate hand-painted flowers across the nails. Think small roses, daisies, wildflowers, or abstract botanical shapes in green, pink, white, or multi-colors. The sunny yellow provides the perfect backdrop for floral details, creating a design that feels both sophisticated and joyful.
The Appeal of Yellow Nails
Yellow can feel tricky to wear, but on extra long nails it feels intentional and fashionable rather than accidental or juvenile. The butter or cream tone is more wearable than bright neon yellow, and it complements virtually every skin tone. The hand-painted florals add artistic detail that elevates the design from simple to special.
Floral Design Options
- Tiny detailed roses clustered on select nails
- Scattered wildflower silhouettes across all nails
- A delicate floral vine that flows down the side of each nail
- Abstract watercolor-style flowers bleeding into each other
- Detailed botanical illustrations with leaves and stems
Pro tip: If hand-painting feels intimidating, you can use thin floral stickers designed for nails and seal them with topcoat; the effect is similar and much easier to execute.
11. Chrome Mirror Finish Silver
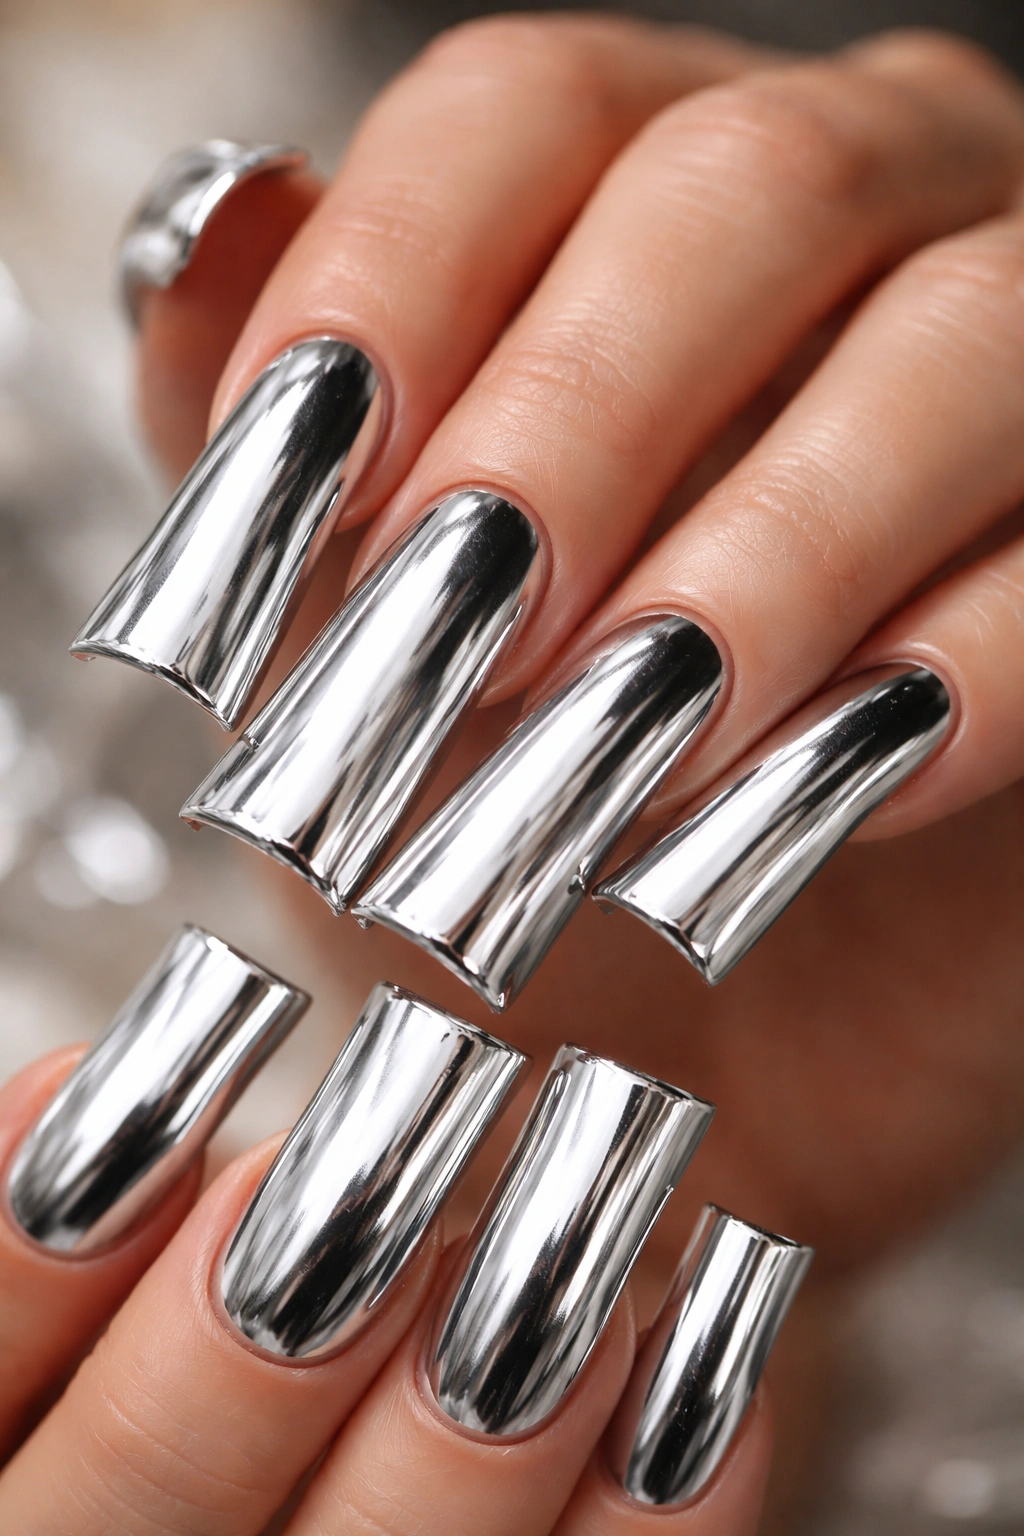
This is the design for people who love futuristic, cutting-edge aesthetics. Chrome mirror polish creates a reflective surface that looks like polished metal, turning your nails into miniature mirrors. The effect is absolutely stunning on extra long nails because you have more reflective surface area, and the length makes the mirror finish even more dramatic and eye-catching.
The Wow Factor of Chrome Nails
Chrome nails make an undeniable statement. They’re bold, modern, and impossible to miss. The reflective quality means your nails look different depending on the lighting and angle—in natural light they’re bright and silvery, under warm lights they take on a slightly golden tone. This design works for people who want their nails to be the main attraction.
Achieving a Perfect Chrome Finish
- Chrome powder is more effective than chrome polish for a true mirror effect
- Application requires a tacky gel base layer and careful buffing to avoid streaks
- The finish is delicate and can scratch, so handle your nails gently
- A matte topcoat over chrome creates an interesting textural contrast (chrome matte instead of glossy)
- Some chrome powders have color shifts—rose gold chrome or blue chrome adds variation
Worth knowing: True chrome finishes look best in photos and in person under bright conditions; they can appear dull under very dim lighting or warm yellowy indoor light.
12. Nude With Delicate Gold Filigree
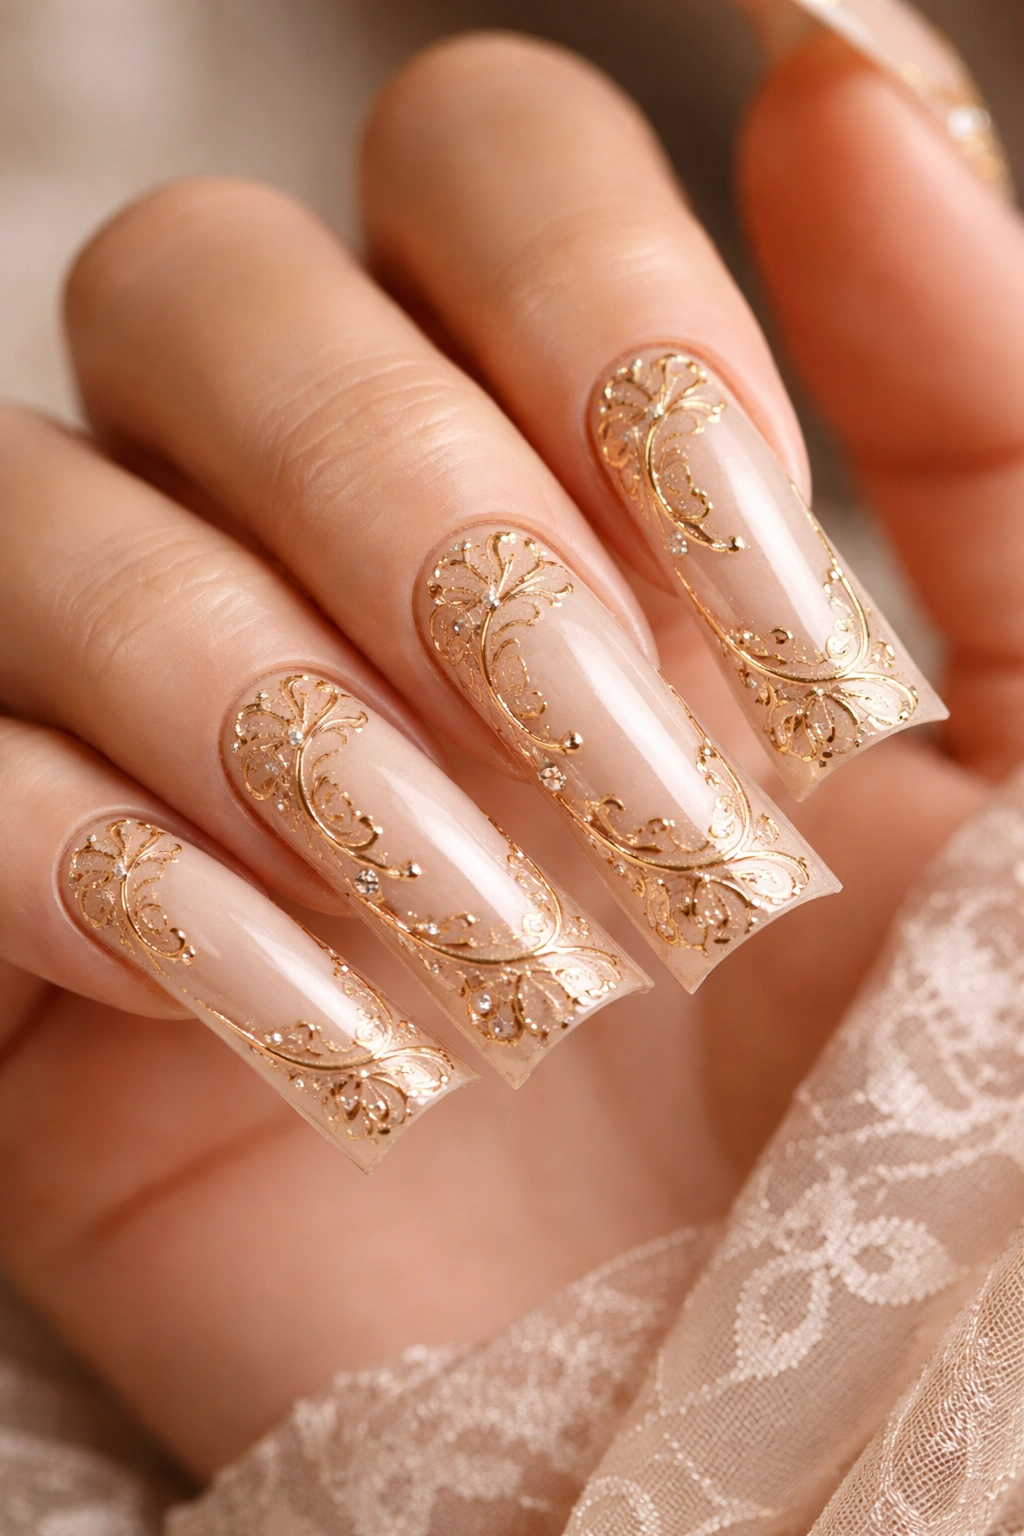
Elegance and sophistication shine through in this design, which pairs a clean nude base with intricate gold filigree patterns. Filigree is fine, ornamental metalwork, and when rendered in thin gold lines across nude nails, it creates a design that feels vintage-inspired yet completely current. The fine detail work makes this feel like you’ve invested serious time in your appearance.
Why Filigree Details Work
Fine gold lines on nude create an understated luxury that appeals to people with refined taste. The filigree patterns can be geometric, organic, or inspired by actual vintage designs. On extra long nails, the pattern has room to develop and become truly intricate without feeling cramped or busy.
Filigree Pattern Ideas
- Geometric art deco-inspired designs with sharp angles
- Organic, vine-like patterns that curl and spiral
- Symmetrical lace patterns that feel vintage
- Abstract swirls and flourishes
- Frame designs where filigree forms a border around the nail edges
Pro tip: Real gold foil or metallic paint creates a more authentic filigree effect than trying to paint lines freehand; you can apply filigree sheets designed specifically for nails.
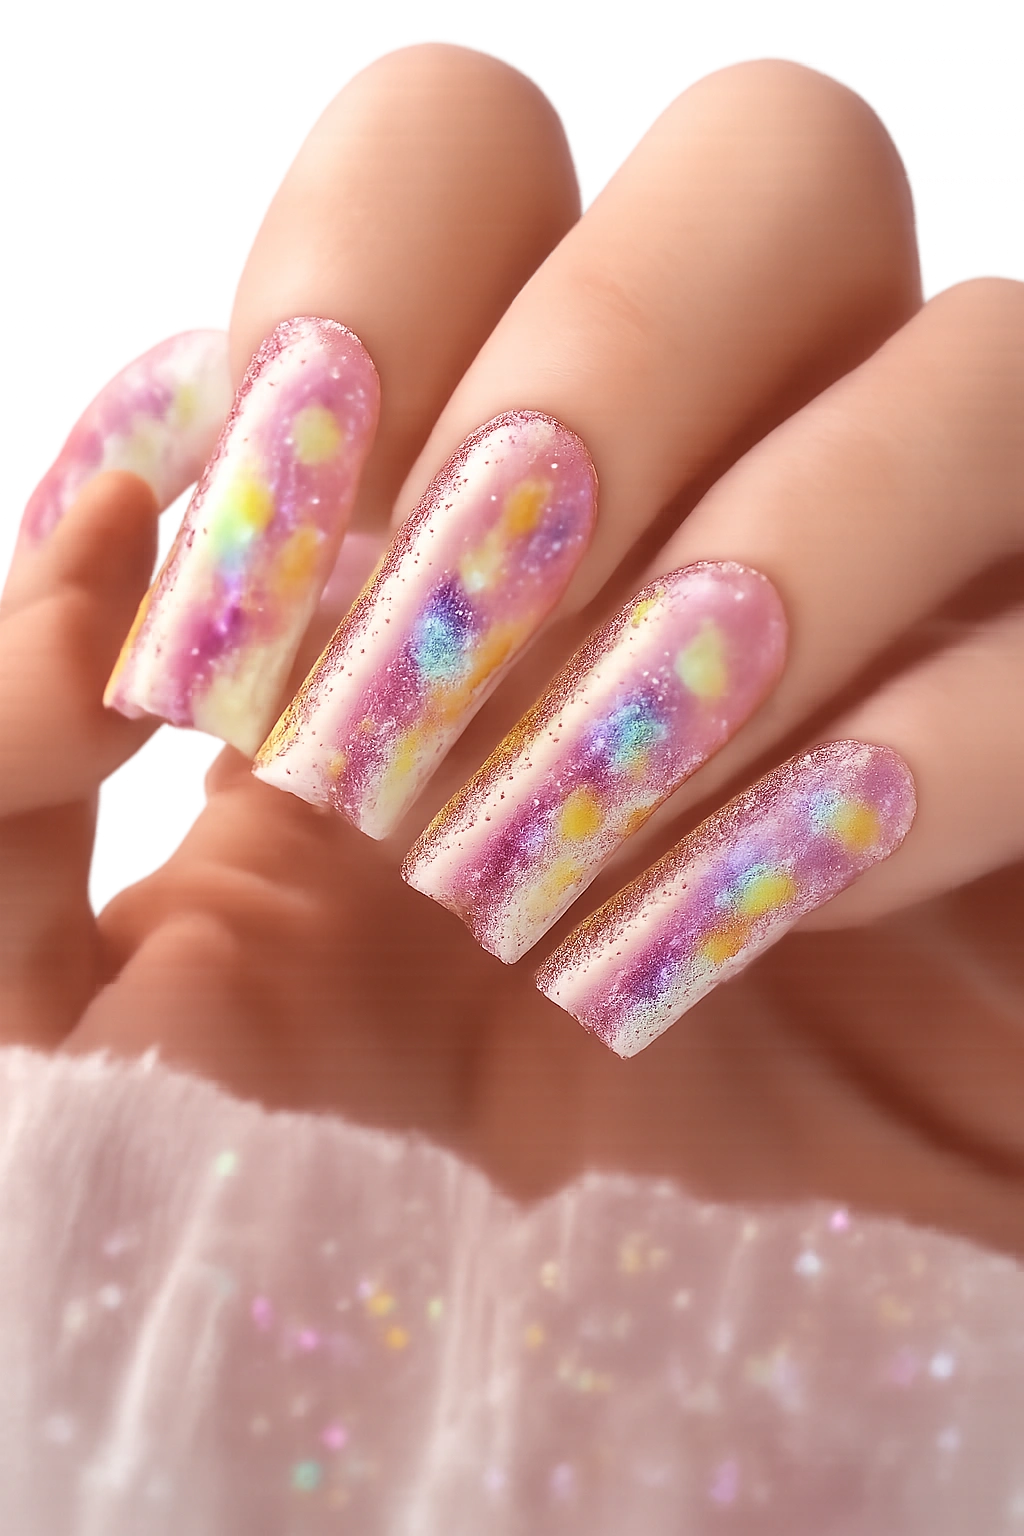
13. Gradient Pink to Purple With Glitter Tips
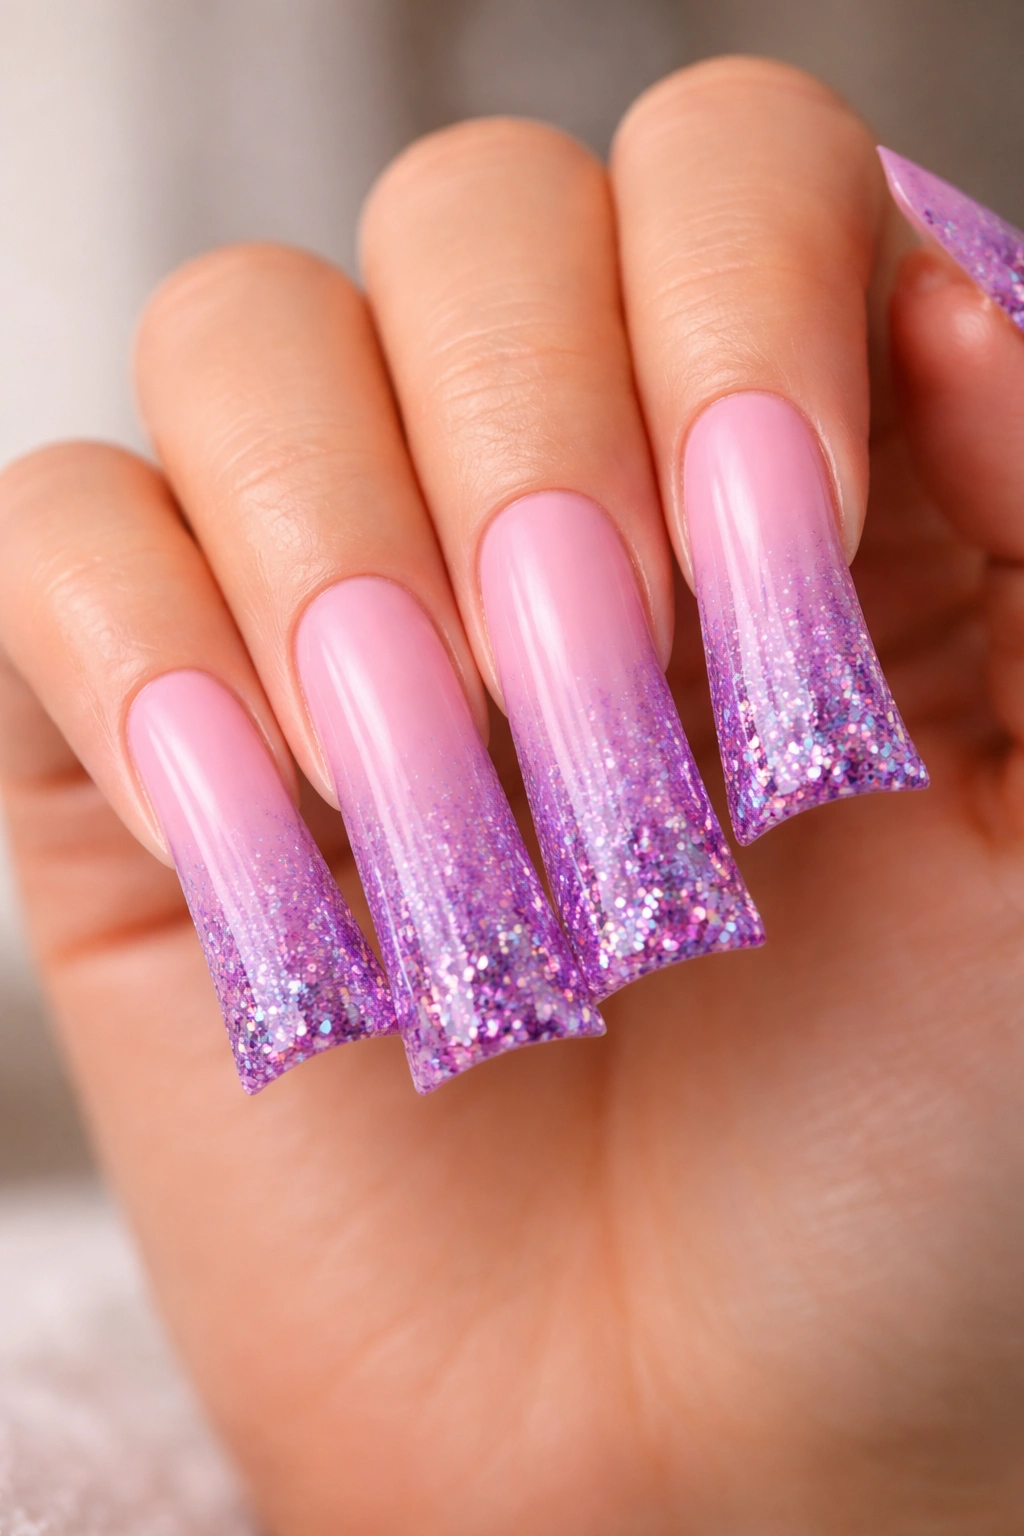
This multi-dimensional design captures attention through color shift and sparkle. Start with a soft pink at the cuticle, transition to a warmer purple in the middle, and fade to a glitter-packed tip area. The gradient creates movement and visual interest, while the glitter tips add glamour and catch light constantly. This design feels both romantic and celebratory simultaneously.
Why Gradients Feel So Dynamic
Gradient designs naturally draw the eye because of the color transition—they feel more sophisticated than a solid color but less abstract than pure art. Adding glitter to one section (typically the tips) concentrates the sparkle where it’s most visible and prevents the design from feeling overdone. This works beautifully on extra long nails because the color shift has space to develop gradually.
Executing a Seamless Gradient
- Use a makeup sponge to blend colors together if you’re doing this with regular polish
- Gel-to-gel gradients blend more seamlessly than regular polish
- The glitter works better if applied to a slightly tacky gel layer before it fully sets
- You can use chunky glitter, fine glitter, or a combination of both for varying effects
- A glossy topcoat intensifies the sparkle and color vibrancy
Worth knowing: Blending three colors smoothly takes practice; a pink-to-purple gradient with no intermediate shade can look sharp or muddy depending on the polish quality.
14. Matte Nude With Embellished Tips and Stones
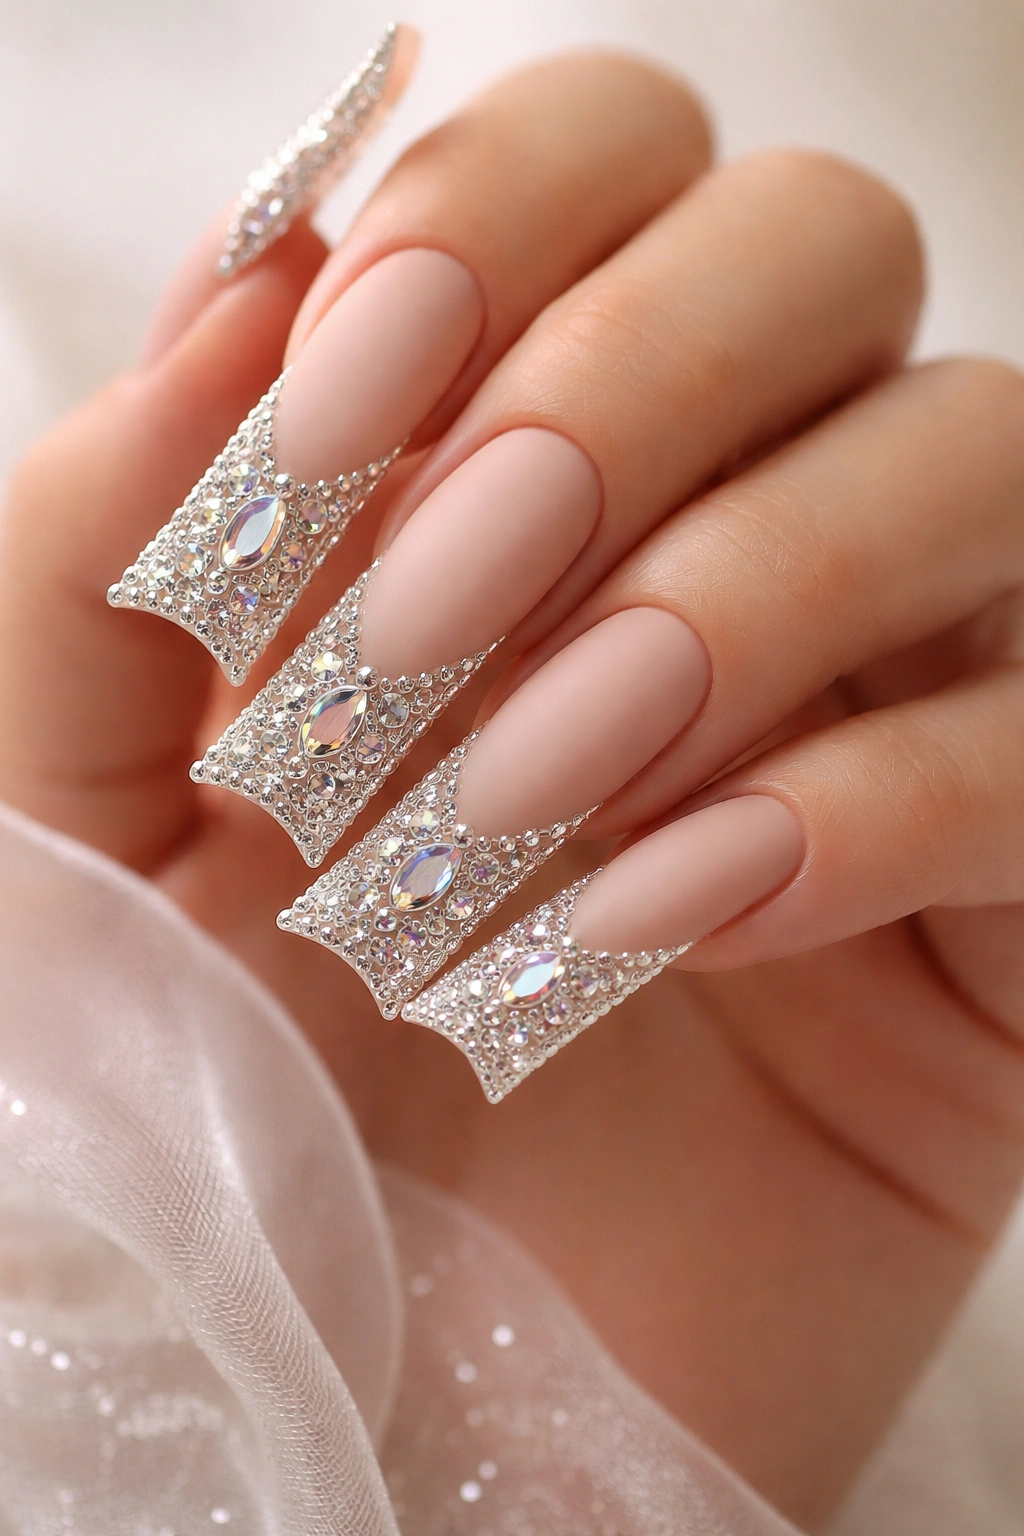
Luxury and sophistication collide in this design where a velvety matte nude base meets embellished tips covered in carefully arranged rhinestones and decorative elements. The stones create a bling effect that’s concentrated at the tips, making them the focal point while the rest of the nail remains clean and understated. This works beautifully for special events where you want your nails to genuinely sparkle.
The Balance of This Design
The matte base prevents the design from feeling costume-like or over-the-top; instead, it creates balance and elegance. The embellished tips feel intentional rather than accidental. Long nails allow the stone placement to be detailed and considered rather than cramped, and the tip area provides ample space for interesting arrangements.
Stone Placement Ideas
- An ombre of stones fading from full coverage at the tip to sparse coverage toward the middle
- Geometric patterns created by arranging stones in specific shapes
- A border of stones around the entire tip edge
- Asymmetrical placement where some nails have more stones than others
- Mix stone sizes and colors for more visual interest
Pro tip: Use tweezers with a slightly flat end (rather than sharp tweezers) for placing stones; you’ll have better control and won’t accidentally crack delicate stones.
15. Coral With Intricate White Lace Pattern
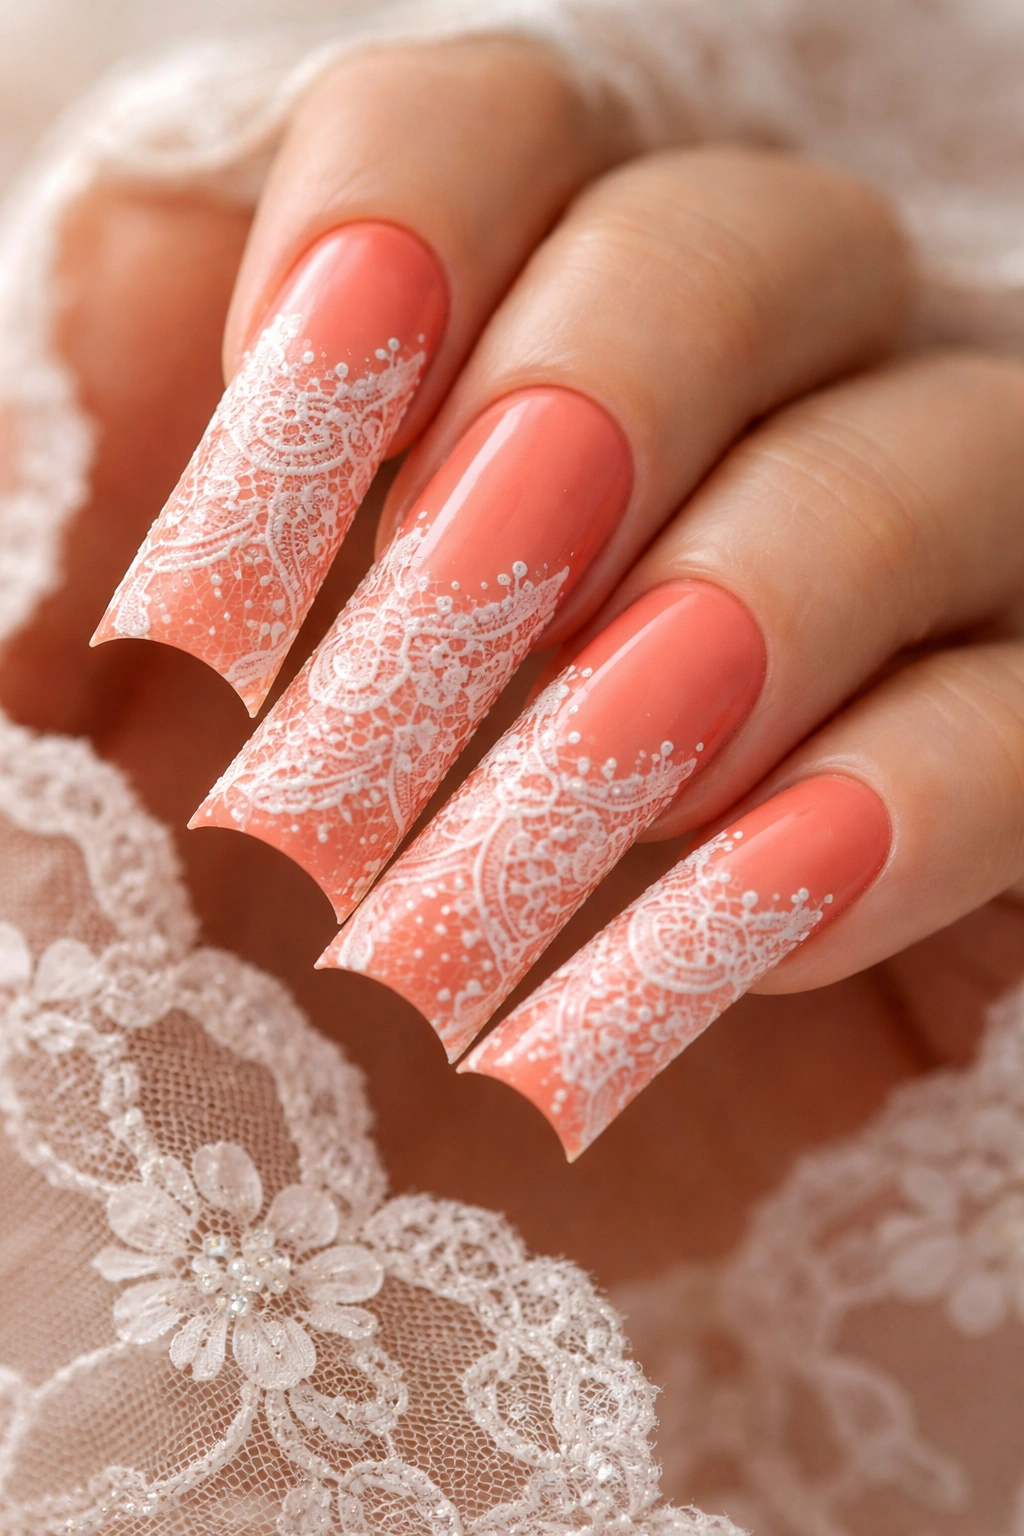
Romantic and feminine, this design features a warm coral base with delicate white lace patterns hand-painted or applied across the nails. The lace design can be as simple or as intricate as you want, creating the look of sheer lace placed over your nails. Coral is a universally flattering color that works on all skin tones, and the white lace adds vintage elegance and complexity.
Why Coral and Lace Complement Each Other
Coral is warm, approachable, and energetic, while lace feels romantic, delicate, and timeless. Together they create a design that’s both fun and elegant. The high contrast between the coral and white makes the lace pattern clear and readable, preventing the design from becoming muddled or unclear.
Lace Pattern Variations
- Vintage-inspired patterns with symmetrical details
- Asymmetrical lace that flows down one side of the nail
- Full nail coverage with intricate lace creating a second-skin effect
- Lace concentrated at the tips with clean coral at the base
- Lace stickers sealed with topcoat for an easier application method
Worth knowing: White hand-painted lace requires a steady hand and a very fine brush; if you’re not confident in your detail work, lace nail stickers designed for this purpose produce professional-looking results and save significant time.
Final Thoughts
Extra long duck nails offer an incredible canvas for creative expression, and the fifteen designs above barely scratch the surface of what’s possible. Whether you gravitate toward minimalist elegance, full glamour, artistic detail, or bold color combinations, there’s a design that matches your personality and lifestyle. The key is choosing something that genuinely excites you rather than simply following trends.
When you’re deciding on a design, consider your daily activities, how much time you’re willing to spend on maintenance, and what makes you feel confident and like yourself. A stunning manicure only works if you actually love wearing it. Many of these designs can be customized or combined—pairing a simple base with unique accents, mixing colors differently, or adjusting complexity to match your skill level or budget.
Remember that manicures are temporary, which means you can experiment freely. If a design doesn’t feel right on your nails, you can change it in a few weeks. This freedom to experiment is part of what makes nails such a fun form of self-expression. Whether you take one of these designs straight to your nail artist or use them as inspiration to create something entirely your own, you’re celebrating the part of yourself that loves beauty, creativity, and a little bit of drama. Long nails have a way of making you feel powerful, put-together, and ready to take on whatever comes next.
