

Duck nails have become one of the most recognizable and flattering nail shapes in recent years, and when you pair them with airbrush technology, the creative possibilities multiply exponentially. The distinctive wide, rounded tip of duck nails creates the perfect canvas for airbrush art — the expanded surface area gives you room to work with fine details, while the shape itself photographs beautifully and catches light from every angle. Airbrush application is particularly well-suited to duck nails because it allows you to blend colors seamlessly, create gradient effects that would be difficult with a brush, and achieve those hyper-realistic finishes that make people stop and ask about your nails.
Whether you’re a nail technician looking to expand your service offerings or someone who loves getting custom nail art, airbrush duck nail designs offer something for every aesthetic and occasion. The technique allows you to layer transparent pigments, create ombre effects, paint intricate imagery, and achieve a level of polish that feels salon-quality every single time. What makes airbrush particularly special for duck nails is how the curved surface interacts with the sprayed pigment — it creates dimension and depth that solid polish simply can’t match.
In this exploration, you’ll discover 18 distinct airbrush duck nail ideas ranging from minimal and elegant to bold and artistic. Each design includes the specific techniques that make it work, the color combinations that really pop, and practical tips for achieving the effect yourself or communicating your vision to your nail artist. Let’s dive into designs that showcase exactly why duck nails and airbrush art are such a powerful combination.
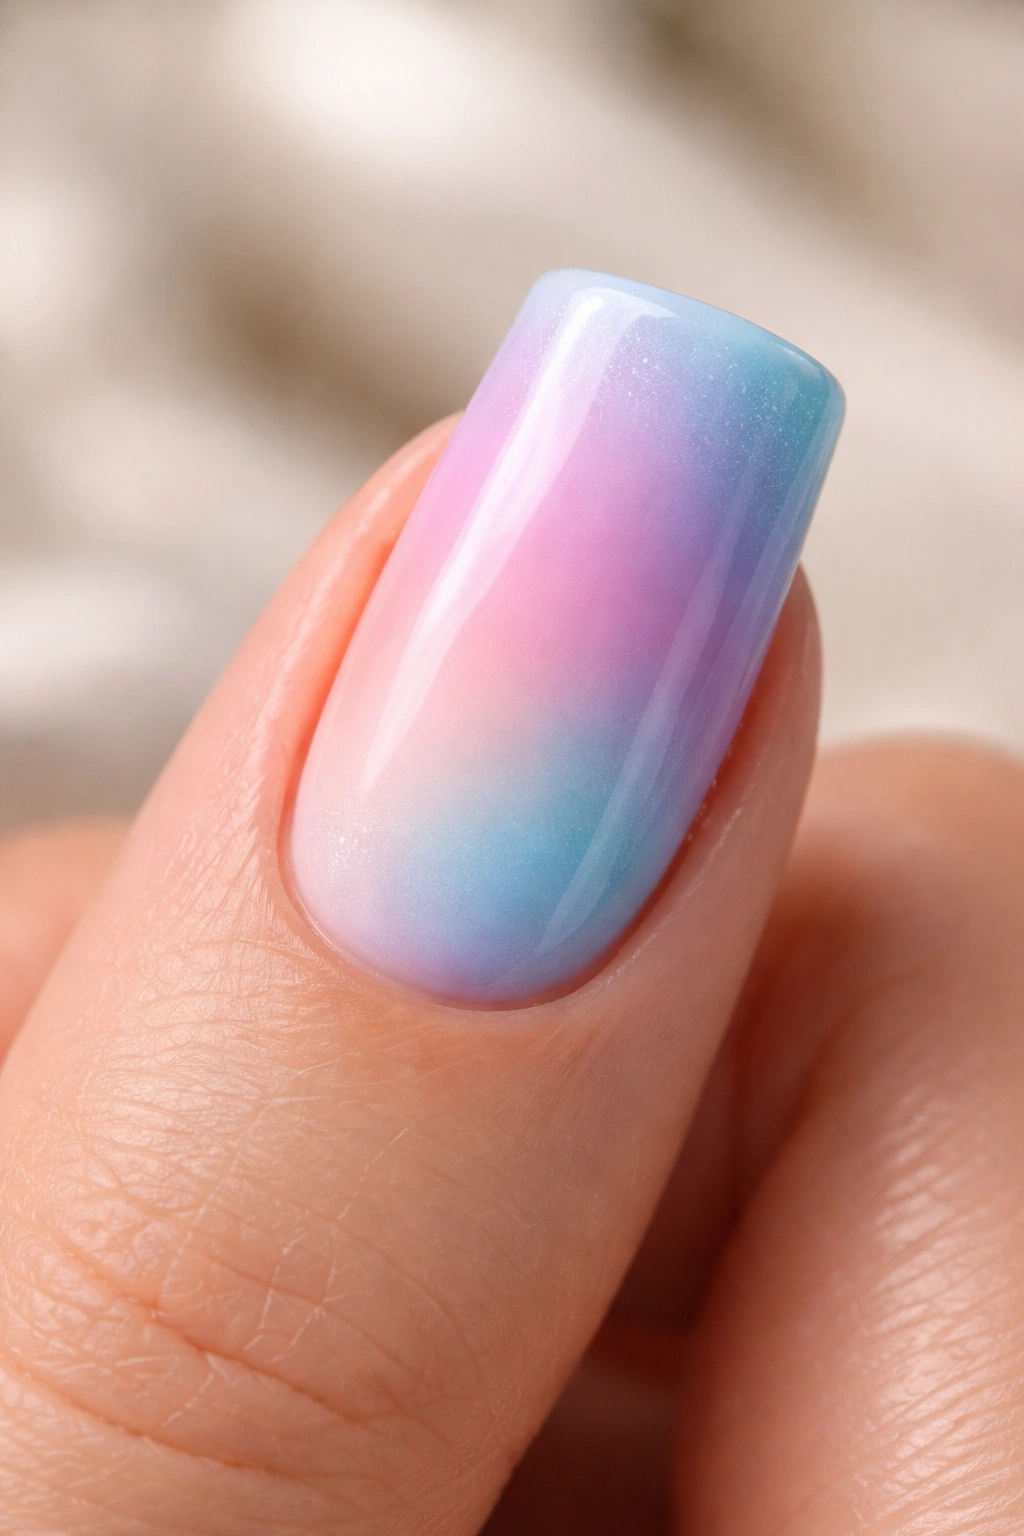
1. Soft Ombre Blush to White
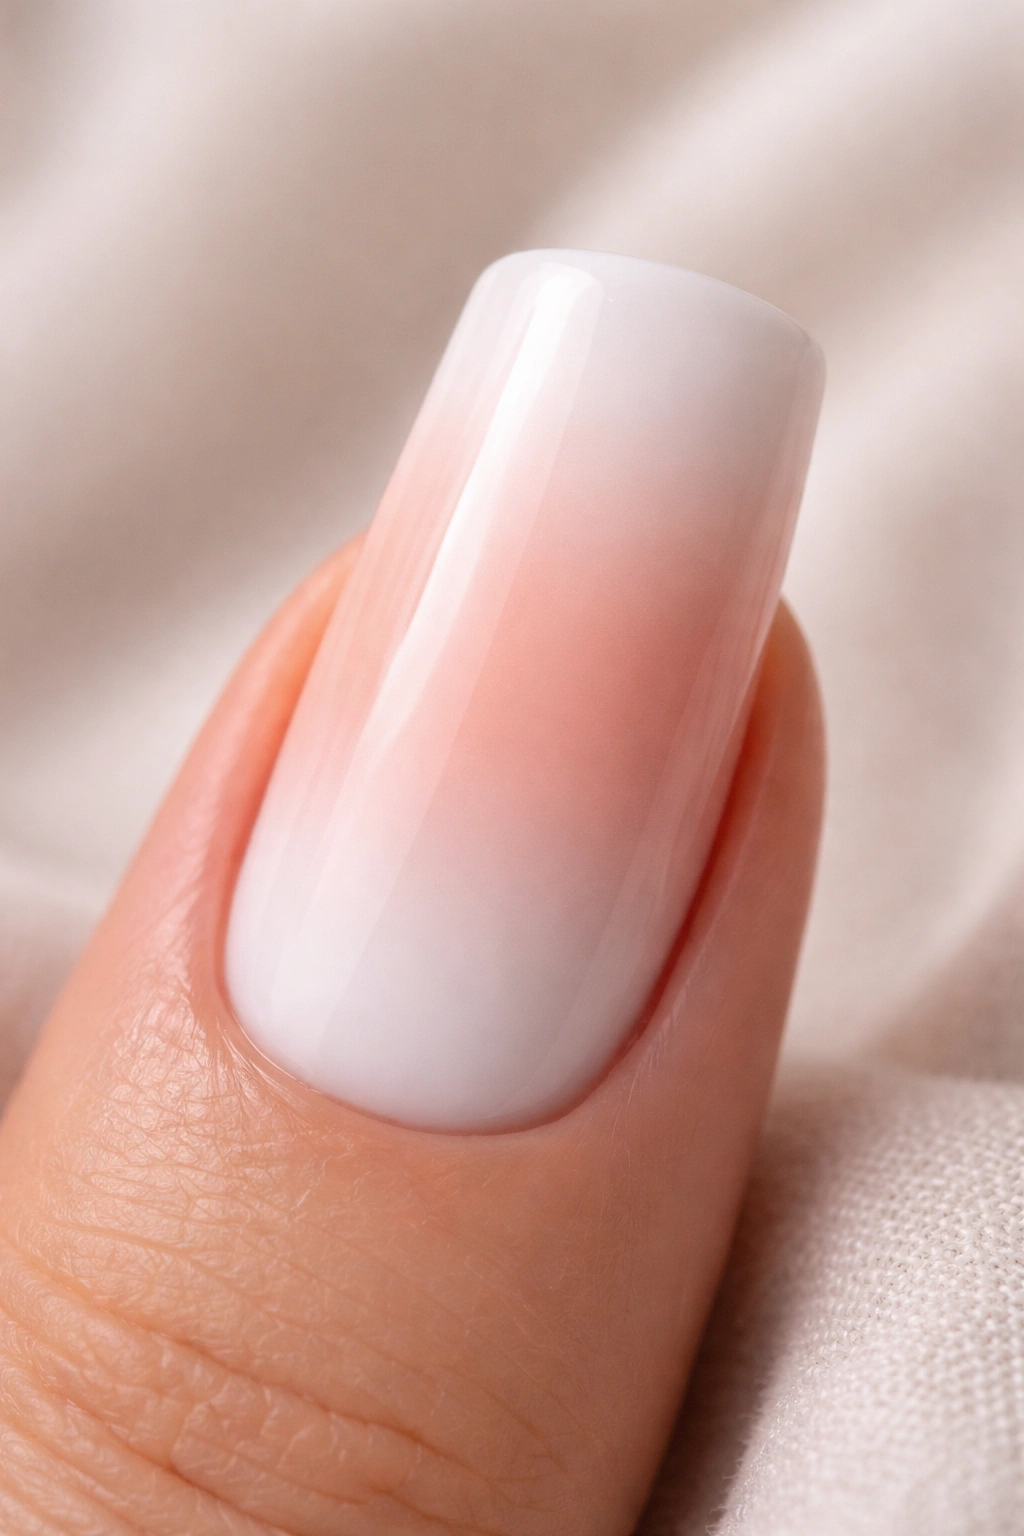
This design takes advantage of the airbrush’s ability to create seamless color transitions, starting with a soft peachy-blush tone at the cuticle that gradually fades to pristine white at the tip. The beauty of this design lies in its versatility — it works as an everyday manicure while still feeling intentional and polished. The gradient should be subtle enough that it appears almost monochromatic from a distance, but the depth becomes apparent when you move your hands.
Why This Design Works for Duck Nails
The airbrush technique is essential here because a traditional brush would leave visible streaks in the gradient transition. With an airbrush, you’re building up thin layers of pigment that blend imperceptibly into one another, creating that coveted “gradient without lines” effect. On duck nails specifically, this design emphasizes the width of the nail bed and makes the tip appear naturally elongated.
Key Application Tips
- Start with a white base coat and airbrush the blush color at the cuticle area
- Hold the airbrush at a 45-degree angle for the most even pigment distribution
- Use two to three very light passes rather than one heavy application
- Seal with a glossy top coat to enhance the luminosity of the gradient
- Consider adding a thin gold or rose gold line at the transition point for subtle sophistication
2. Watercolor Floral Garden
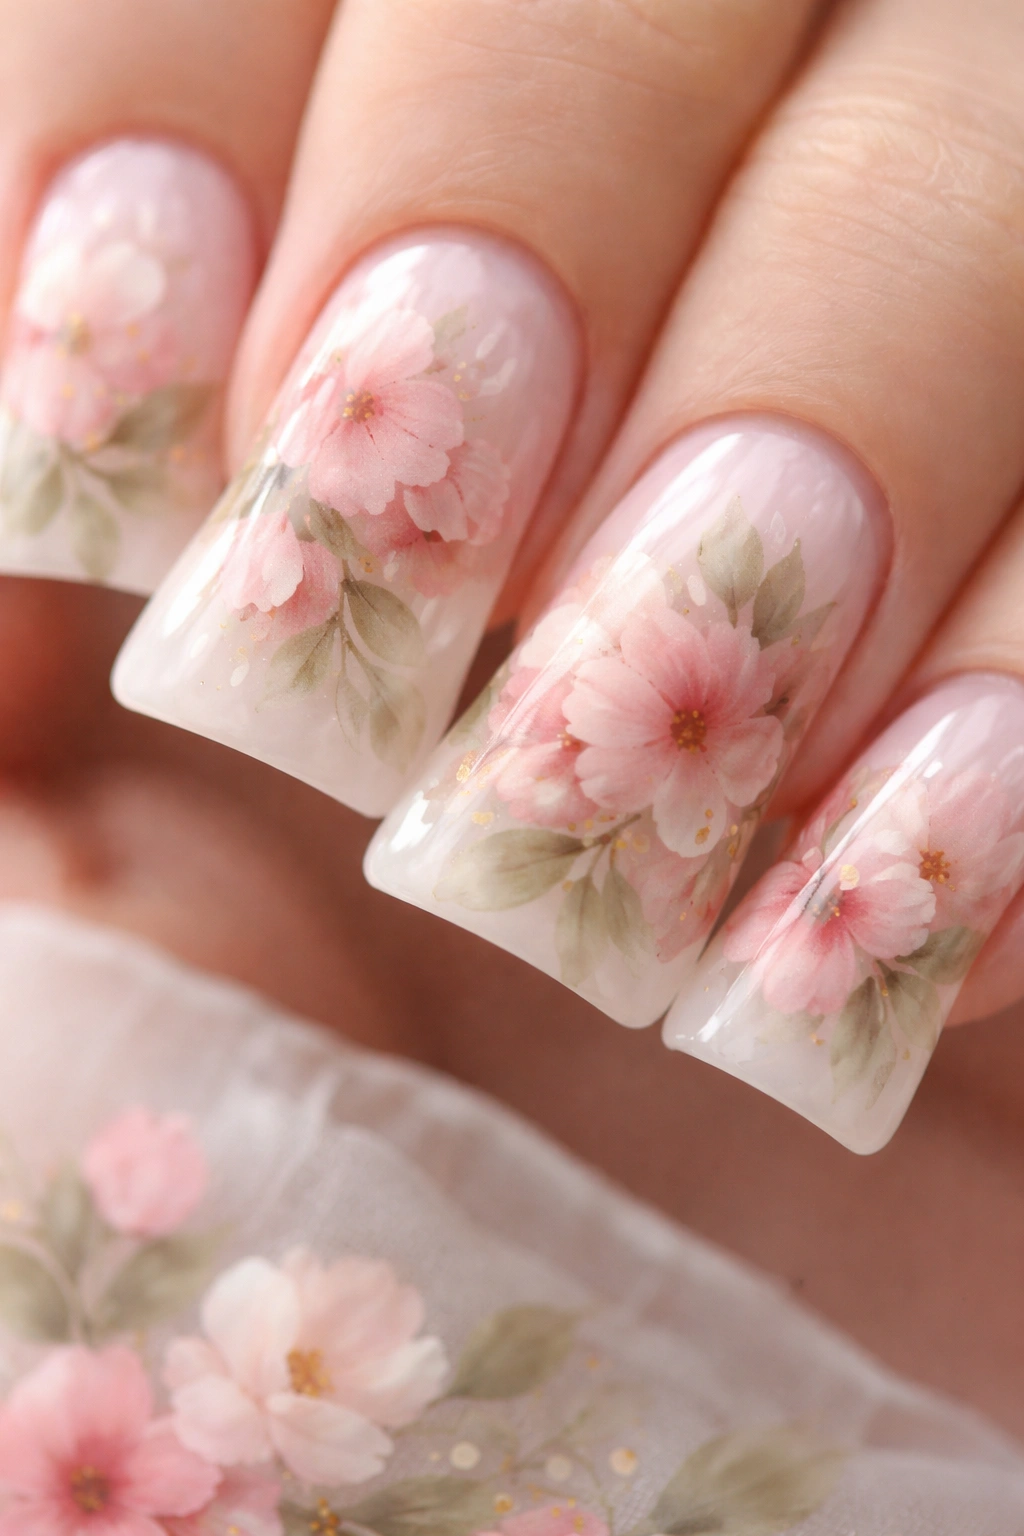
Imagine a botanical masterpiece spread across your nails — soft watercolor flowers in blush pinks, sage greens, and cream tones scattered across a white or pale nude base. This design celebrates the artistic potential of airbrush by layering transparent pigments to create that authentic watercolor effect where colors pool and blend naturally. Each nail can feature different flowers, or you can create a cohesive garden scene across all ten nails.
Why This Design Works for Duck Nails
The expanded surface area of duck nails becomes your artistic playground. You have room for detailed petals, stems, and foliage without cramping the composition. The airbrush’s ability to create soft edges and delicate color transitions is what makes watercolor florals possible — traditional brushwork would look stiff and graphic by comparison.
Key Application Tips
- Layer your pigments from lightest to darkest, allowing each layer to dry slightly
- Use stencils as guides, but airbrush freehand for the most organic appearance
- Keep pigment opacity low (around 30-40%) so transparency creates genuine watercolor effects
- Mist a setting spray between layers to ensure adhesion without streaking
- Finish with a matte top coat for authentic watercolor appearance, or glossy for a more finished look
3. Metallic Chrome Gradient
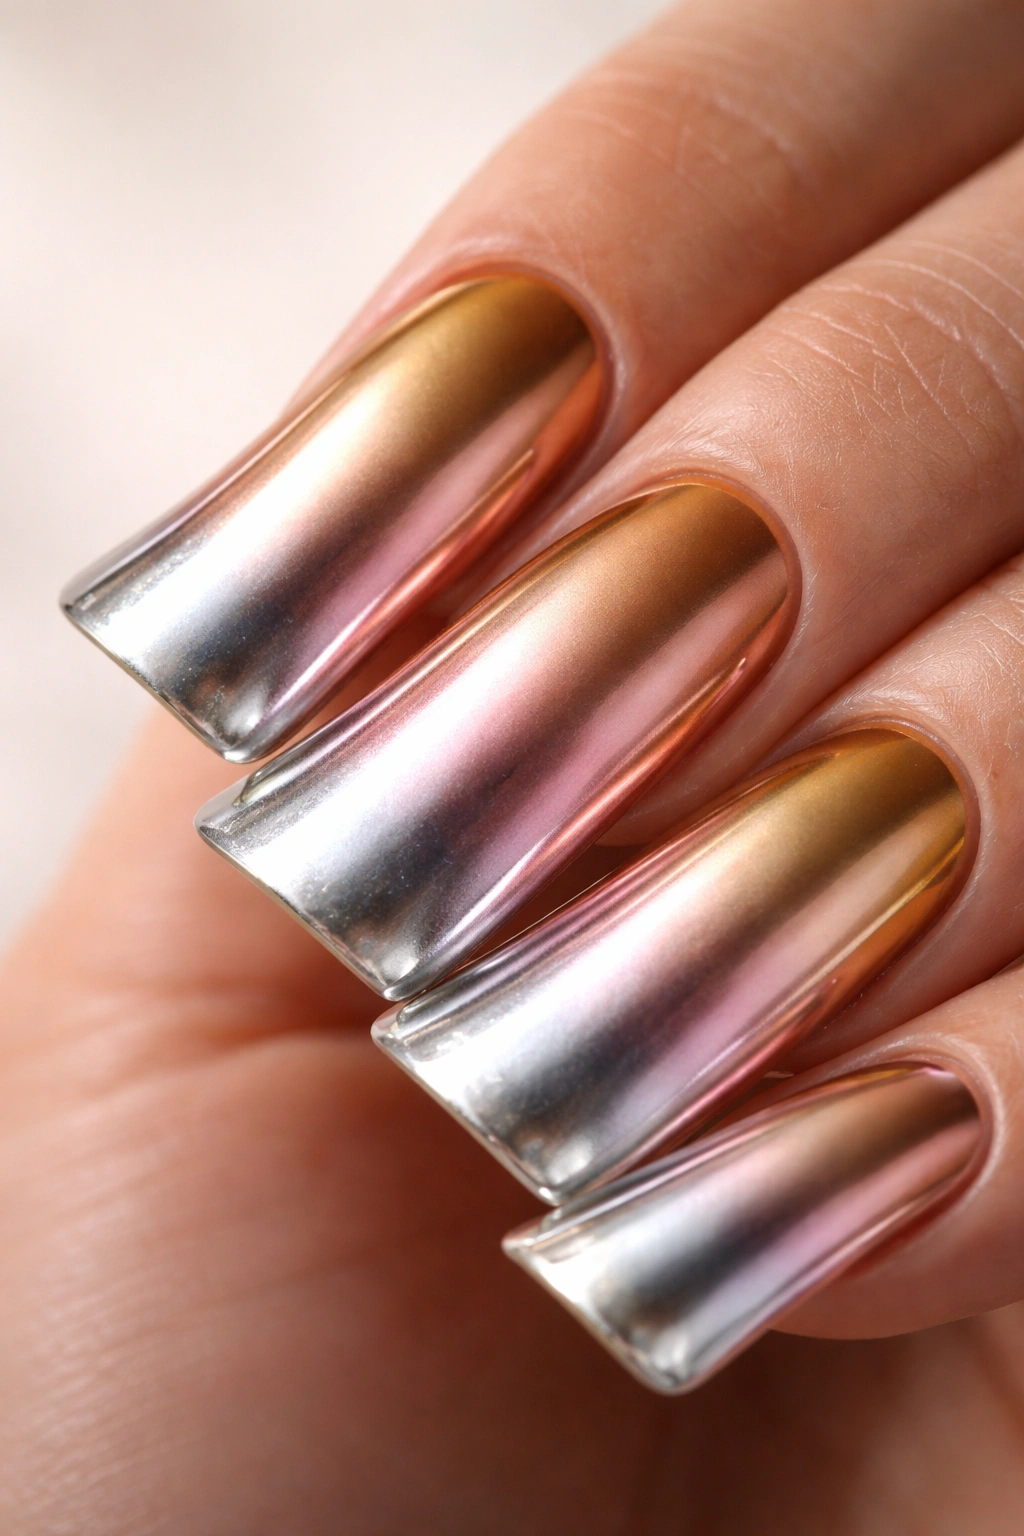
Chrome and metallic finishes are almost impossible to achieve with traditional nail polish, but airbrush makes them accessible. This design features a gradient from warm gold at the base through rose gold in the middle to cool silver at the tip, creating a light-catching effect that sparkles from every angle. The metallic pigments used in airbrush are finer and more reflective than most pressed foils, creating a smoother, more luxurious appearance.
Why This Design Works for Duck Nails
The wide surface of duck nails acts as a mirror for these metallic pigments. As you move your hands, the gradient shifts and shimmers, and the extra width of the nail ensures that light bounces across the surface dynamically. This design is particularly striking in natural sunlight or under artificial light — it genuinely transforms depending on the light source.
Key Application Tips
- Use specialized metallic airbrush pigments designed for nail art (regular metallics can appear chalky)
- Apply a glossy base coat to enhance the reflective properties
- Build up metallic pigments in very thin layers — the transparency is what creates the gradient
- Seal with a clear, ultra-glossy top coat to maximize shine
- Cure between layers if using UV-reactive metallics
4. Galaxy and Constellation Design
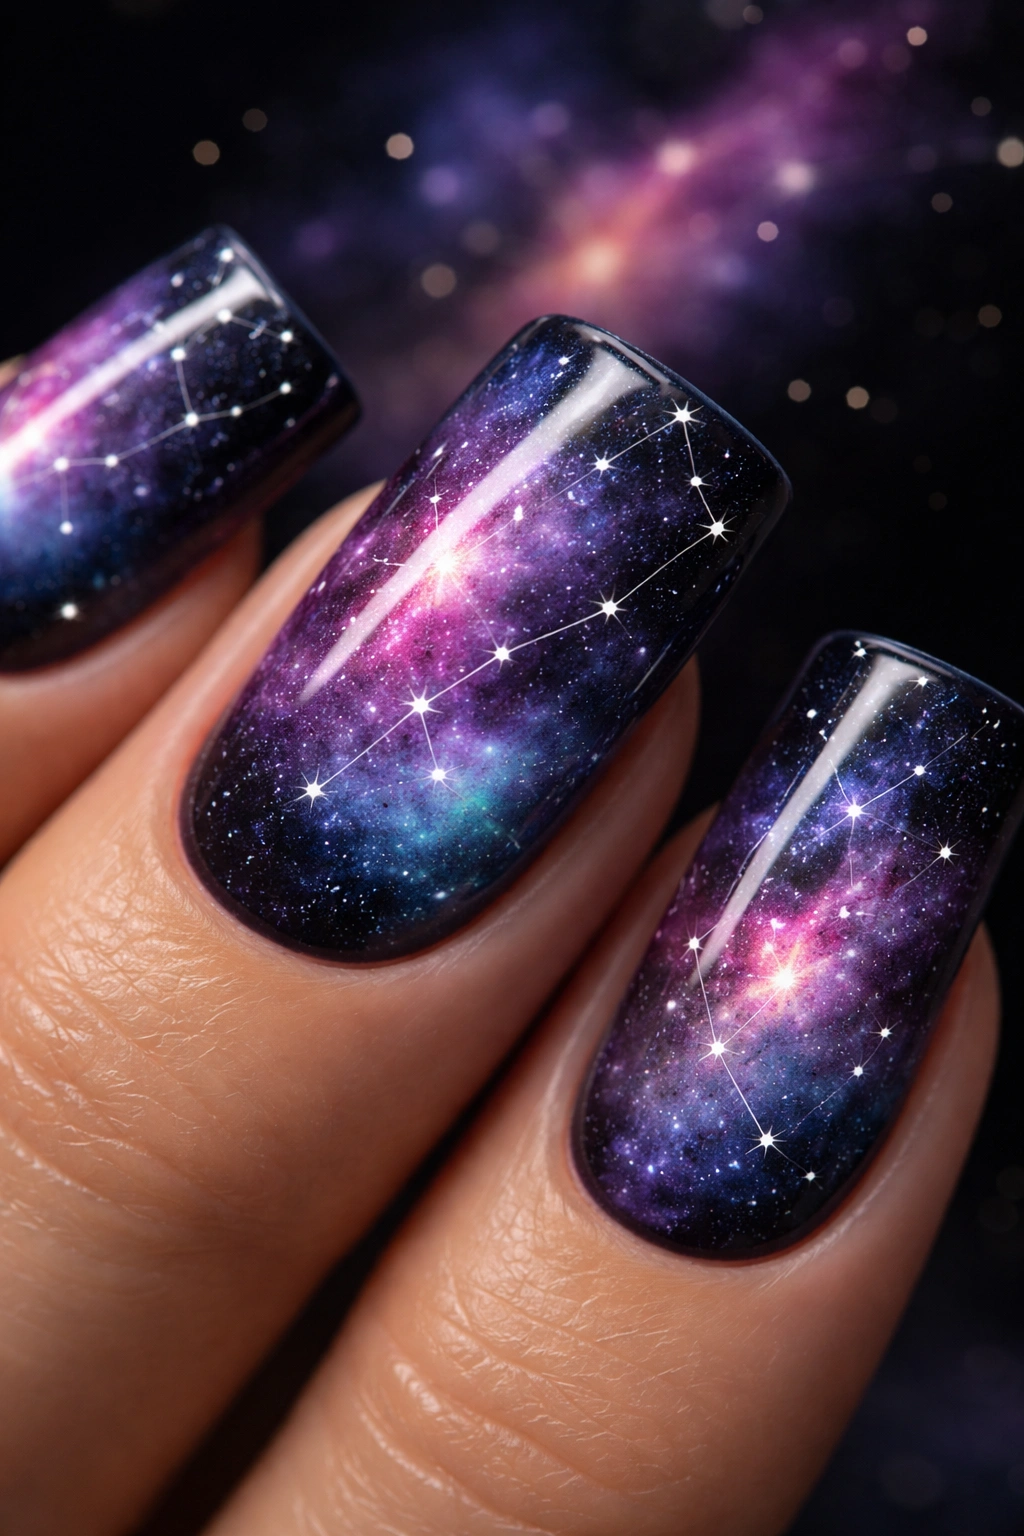
Transport your nails to outer space with a galaxy design that features deep purples, blues, and blacks studded with tiny stars and constellation patterns. The airbrush technique allows you to create that nebula effect with soft color blending and particle effects that look ethereal and dreamy. This design works beautifully on duck nails because the wider surface lets you include multiple constellations or a larger galactic scene without crowding the composition.
Why This Design Works for Duck Nails
Creating a convincing galaxy requires color layering and soft transitions that the airbrush excels at. You can spray darker pigments around the edges and lighter, more transparent pigments in the center to create depth and dimension. The duck nail shape provides enough real estate to make the design feel immersive rather than cramped.
Key Application Tips
- Start with a black or very dark purple base
- Layer deep blues and purples with semi-transparent pigments using circular motions
- Use white pigment very sparingly for stars — less is more
- Add constellation lines with a thin brush after airbrush work is complete
- Finish with a glossy top coat and consider adding tiny rhinestones for additional sparkle
5. Pearlescent Shimmer Fade
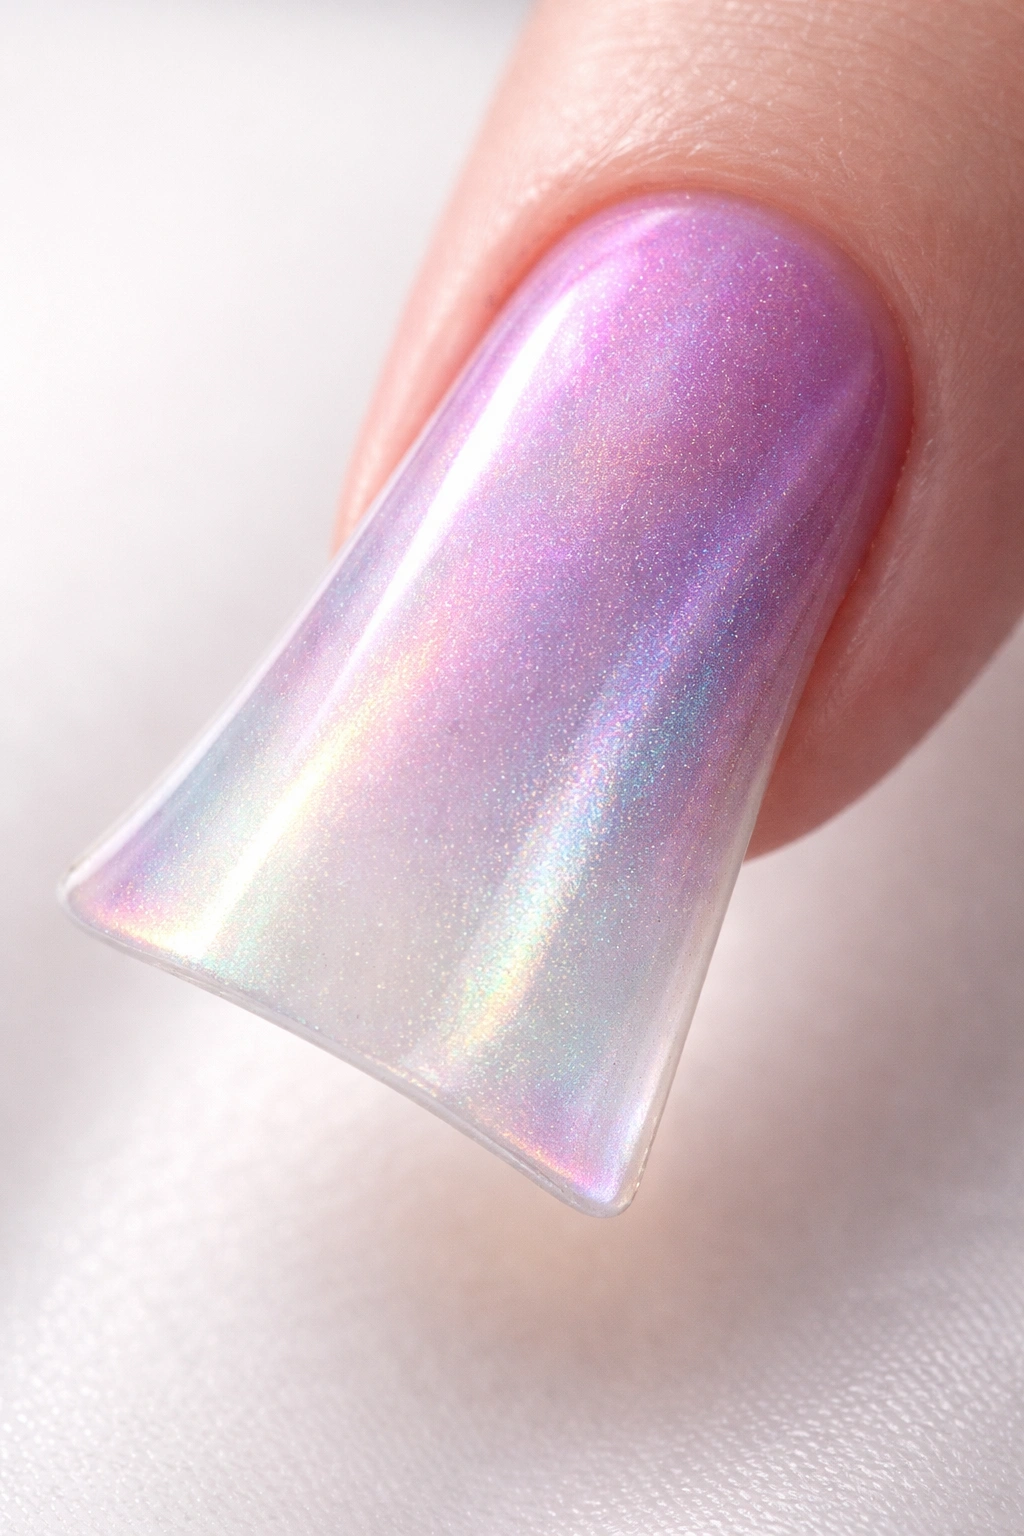
Pearlescent pigments in an airbrush create a unique effect that shifts between colors depending on the viewing angle — sometimes appearing pink, sometimes purple, sometimes silver depending on how light hits the nail. This design uses pearlescent pigments that fade from saturated color at the base to nearly translucent shimmer at the tip, creating an iridescent effect that traditional polish can’t replicate. The result is subtle elegance with hidden depth.
Why This Design Works for Duck Nails
The curved surface of duck nails is ideal for showcasing pearlescent pigments because the shape ensures light hits the nails from multiple angles throughout daily movement. The width of the nail means you see the color shift from side to side as well as base to tip, multiplying the visual interest. This design is particularly striking on duck nails because the shape naturally catches and reflects light.
Key Application Tips
- Use high-quality pearlescent pigments — cheaper versions appear dull and chalky
- Apply over a matching solid base color to anchor the shimmer
- Build the gradient very gradually with multiple thin passes
- Avoid matte top coats, which will dull the pearlescent effect
- Use a high-shine glossy or gel top coat to maximize light reflection
6. Sunset Landscape Scene
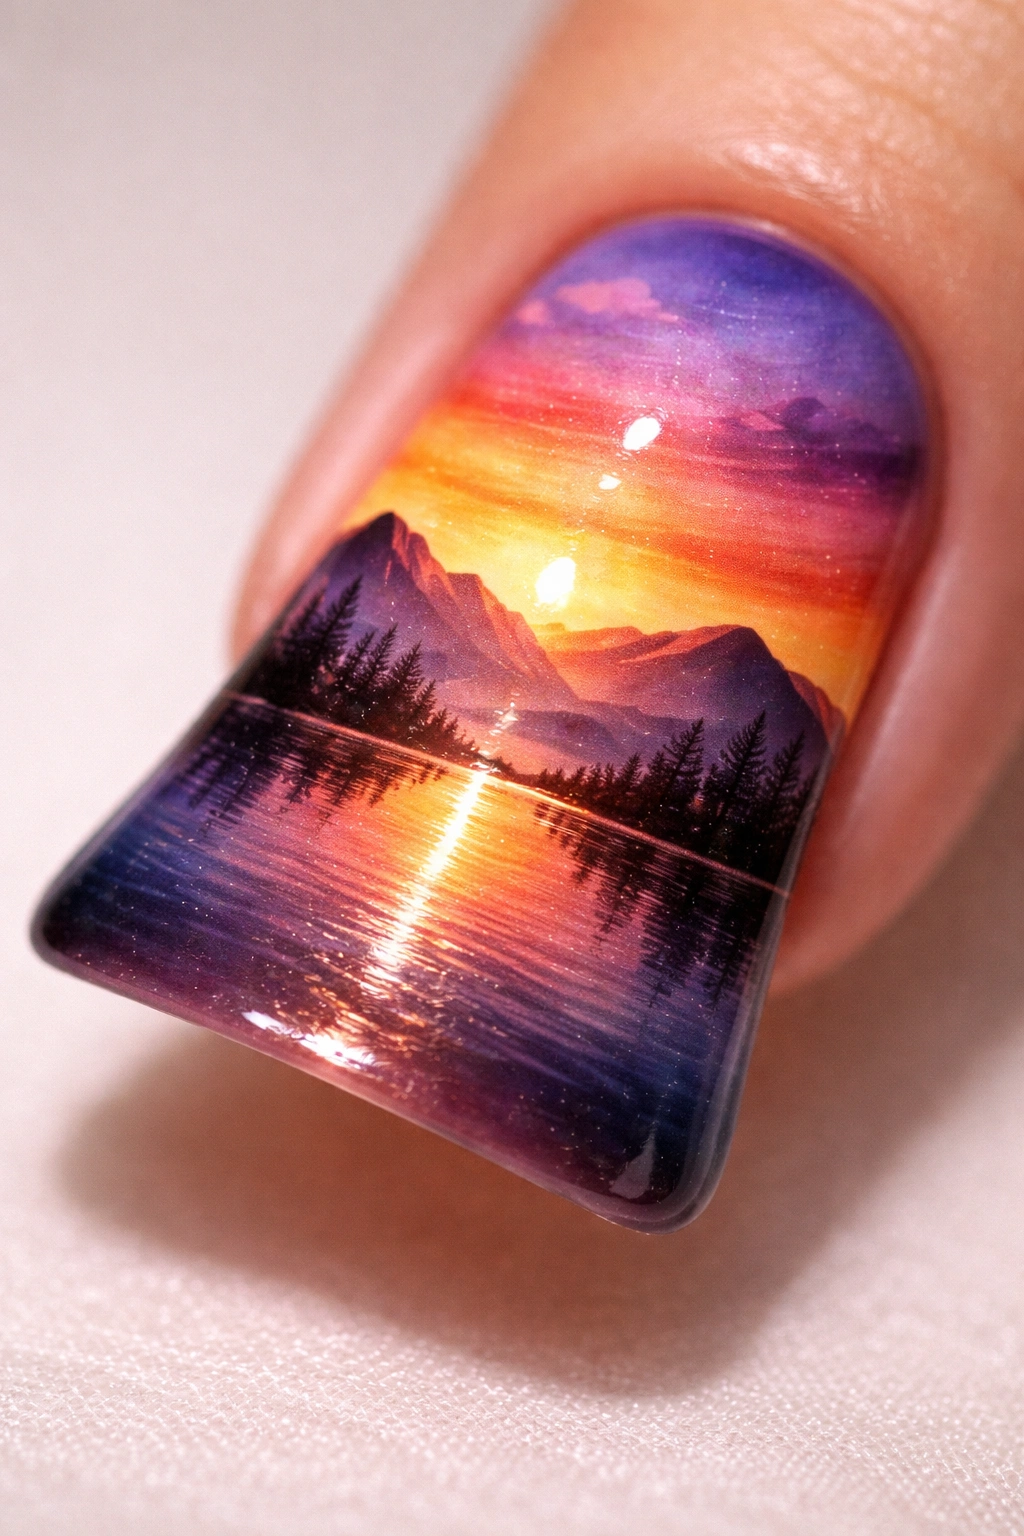
Create an entire landscape scene across your nails with airbrush — think silhouetted mountains, water reflections, and a glowing sunset sky transitioning from orange to pink to purple to deep blue. This design showcases airbrush’s ability to create photorealistic imagery and seamless color transitions across a larger composition. The duck nail shape gives you room to include foreground, middle ground, and background elements without sacrificing detail.
Why This Design Works for Duck Nails
A landscape scene with multiple elements requires space, and duck nails provide exactly that. You can include distinct geographical features and a full sky gradient without any component feeling rushed or crowded. The shape naturally frames the scene, with the tip providing the sky and the base providing the landscape.
Key Application Tips
- Sketch the basic composition lightly before airbrushing for guidance
- Work from background to foreground, starting with the sky gradient
- Use a stencil for the mountain silhouette to ensure clean lines
- Layer darker pigments for the mountains after the gradient is complete
- Add reflections in water with semi-transparent white pigments
- Seal with glossy top coat to enhance the photorealistic effect
7. Minimalist Geometric Lines
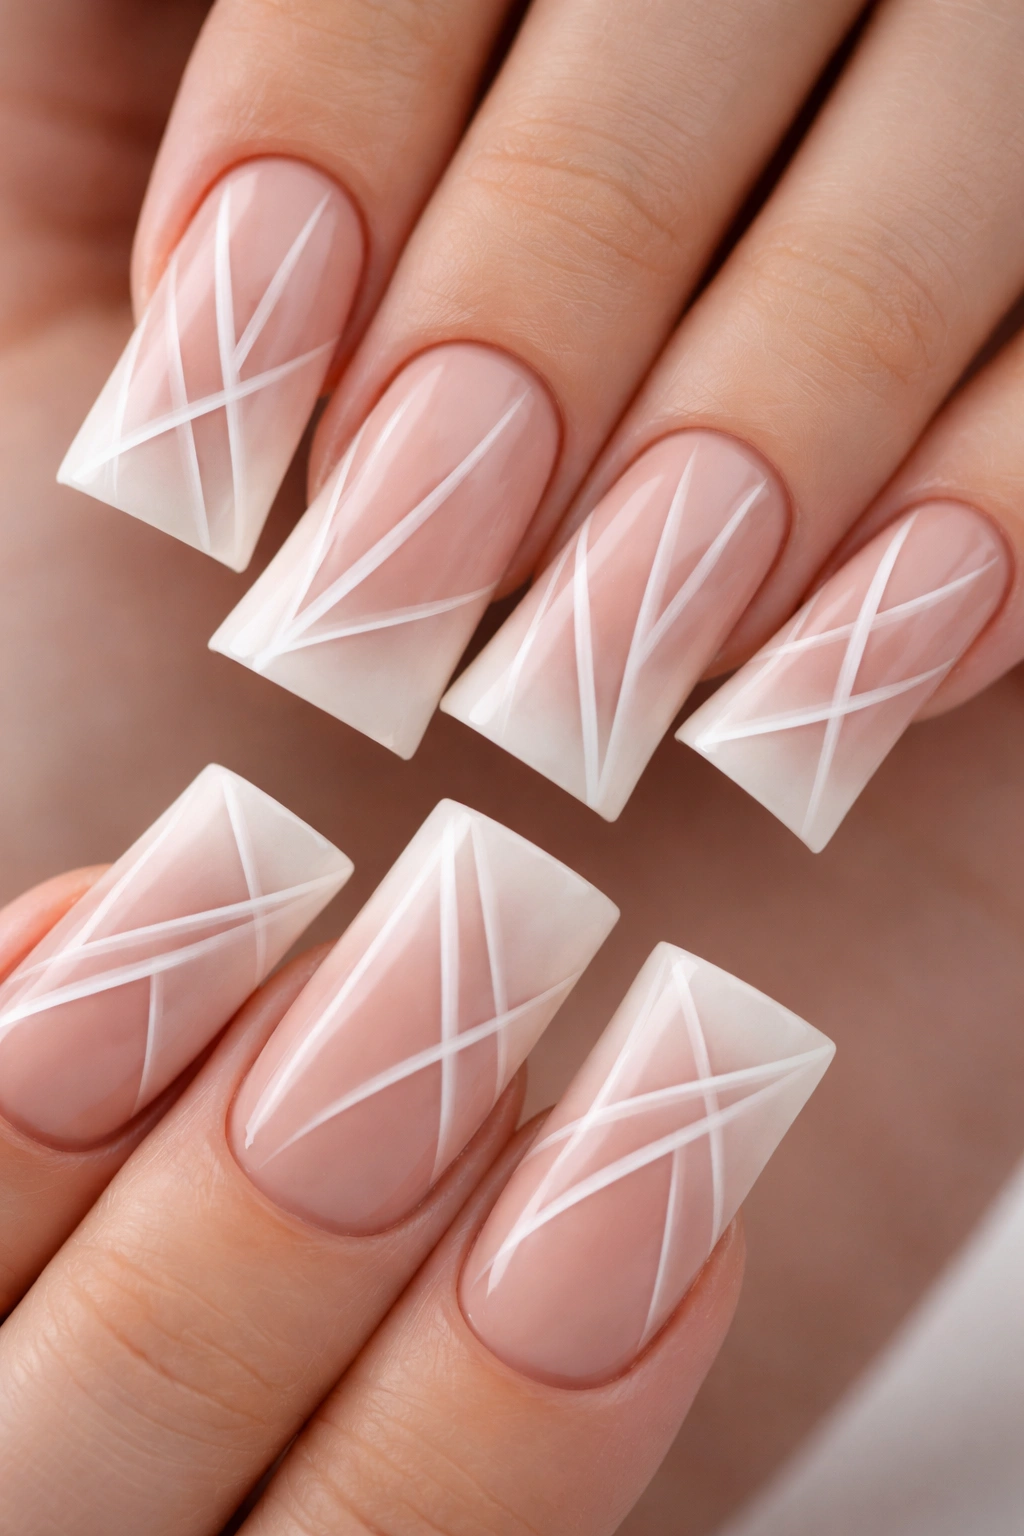
Sometimes the most striking designs are the simplest. This concept features clean, precise geometric lines in contrasting colors — perhaps white lines on a nude base, or rose gold lines on a soft pink background. The airbrush’s ability to create perfectly straight, crisp lines makes this design possible. What makes it special is how the geometric pattern interacts with the duck nail shape, creating visual interest through mathematics rather than imagery.
Why This Design Works for Duck Nails
The width and length of duck nails create an ideal rectangle for geometric patterns. Lines appear more prominent, angles feel more intentional, and the overall composition has room to breathe. The duck nail shape actually enhances geometric designs by providing a clear, flat surface where lines remain perfectly visible.
Key Application Tips
- Use painter’s tape to create perfectly straight lines and clean edges
- Apply tape to the already-basecoated nail and airbrush over it
- Remove tape immediately after spraying while pigment is still slightly wet
- Use contrasting colors — pastels on pastels won’t have enough visual separation
- Seal with glossy top coat for a polished, professional appearance
- Consider metallic pigments for added sophistication
8. Marble Veining Effect
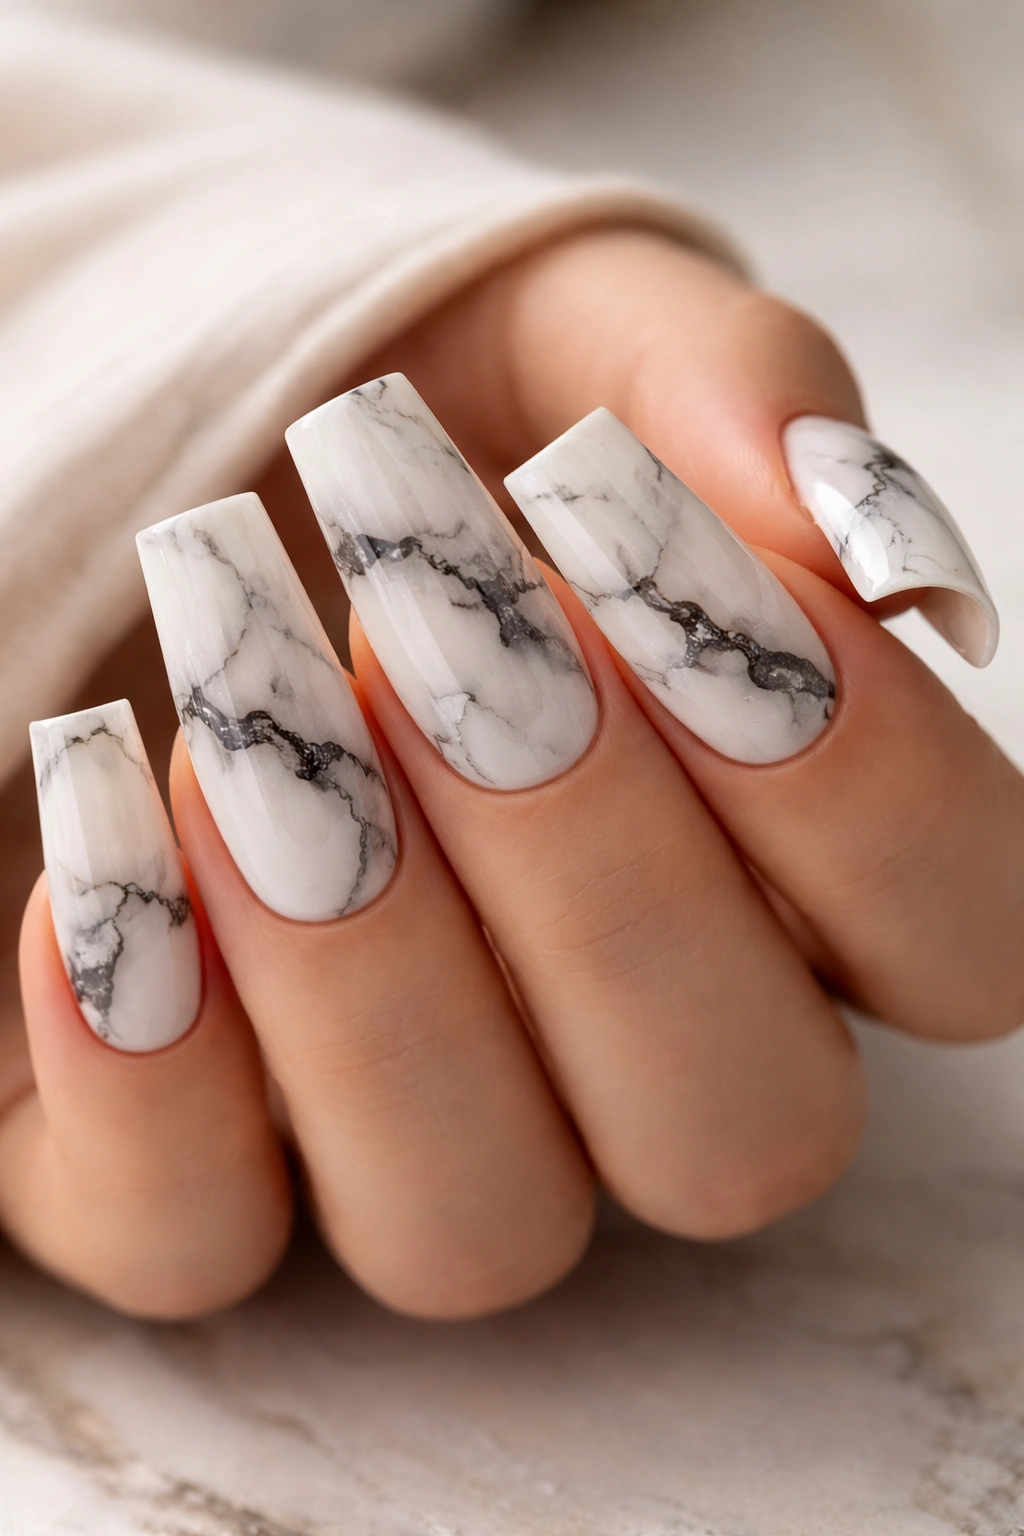
Marble nail designs have remained popular for good reason, and airbrush technique creates the most convincing marble effect available. Using white or cream base with grey and black veining, you can create authentic-looking marble that appears three-dimensional and elegant. The airbrush allows you to create those delicate, branching vein patterns with the fine control that brushwork can’t quite achieve.
Why This Design Works for Duck Nails
Duck nails provide a large, flat surface that shows off marble veining beautifully. The pattern spreads across the entire nail rather than being compressed into a smaller space, making the design feel more luxurious. The shape itself contributes to the sophisticated aesthetic that marble embodies.
Key Application Tips
- Apply white or cream base and allow it to fully cure
- Use a combination of grey and black pigments in very diluted concentrations
- Create veining with quick, controlled sprays that follow natural marble patterns
- Vary the line thickness and density for authenticity
- Use a toothpick or thin brush to refine any veining after airbrush application
- Seal with a glossy top coat, or matte for a more authentic stone appearance
9. Ombre Jewel Tones

This design features a rich gradient moving from deep emerald green at the base through sapphire blue in the middle to amethyst purple at the tip. Jewel-tone gradients are particularly striking because the colors are saturated and complex, creating visual depth that keeps the eye moving across the nail. The airbrush makes these multi-color gradients possible without any visible banding or harsh lines between shades.
Why This Design Works for Duck Nails
The length of duck nails accommodates a multi-color gradient beautifully — you have space for each color to exist and transition without colors getting lost or overwhelming each other. The width ensures each color zone is visible and distinct. On shorter nails, a three-color gradient can feel chaotic, but on duck nails it’s sophisticated.
Key Application Tips
- Choose jewel tones that sit at similar saturation levels for cohesive appearance
- Airbrush base color first, working from cuticle up approximately one-third
- Layer the middle color over the junction of the first two colors for blending
- Apply the third color from the tip up, overlapping slightly with the middle color
- Use semi-transparent pigments so colors show through and blend rather than sit on top
- Cure between colors if using products that require it, then seal with glossy top coat
10. Vintage Floral Damask Pattern
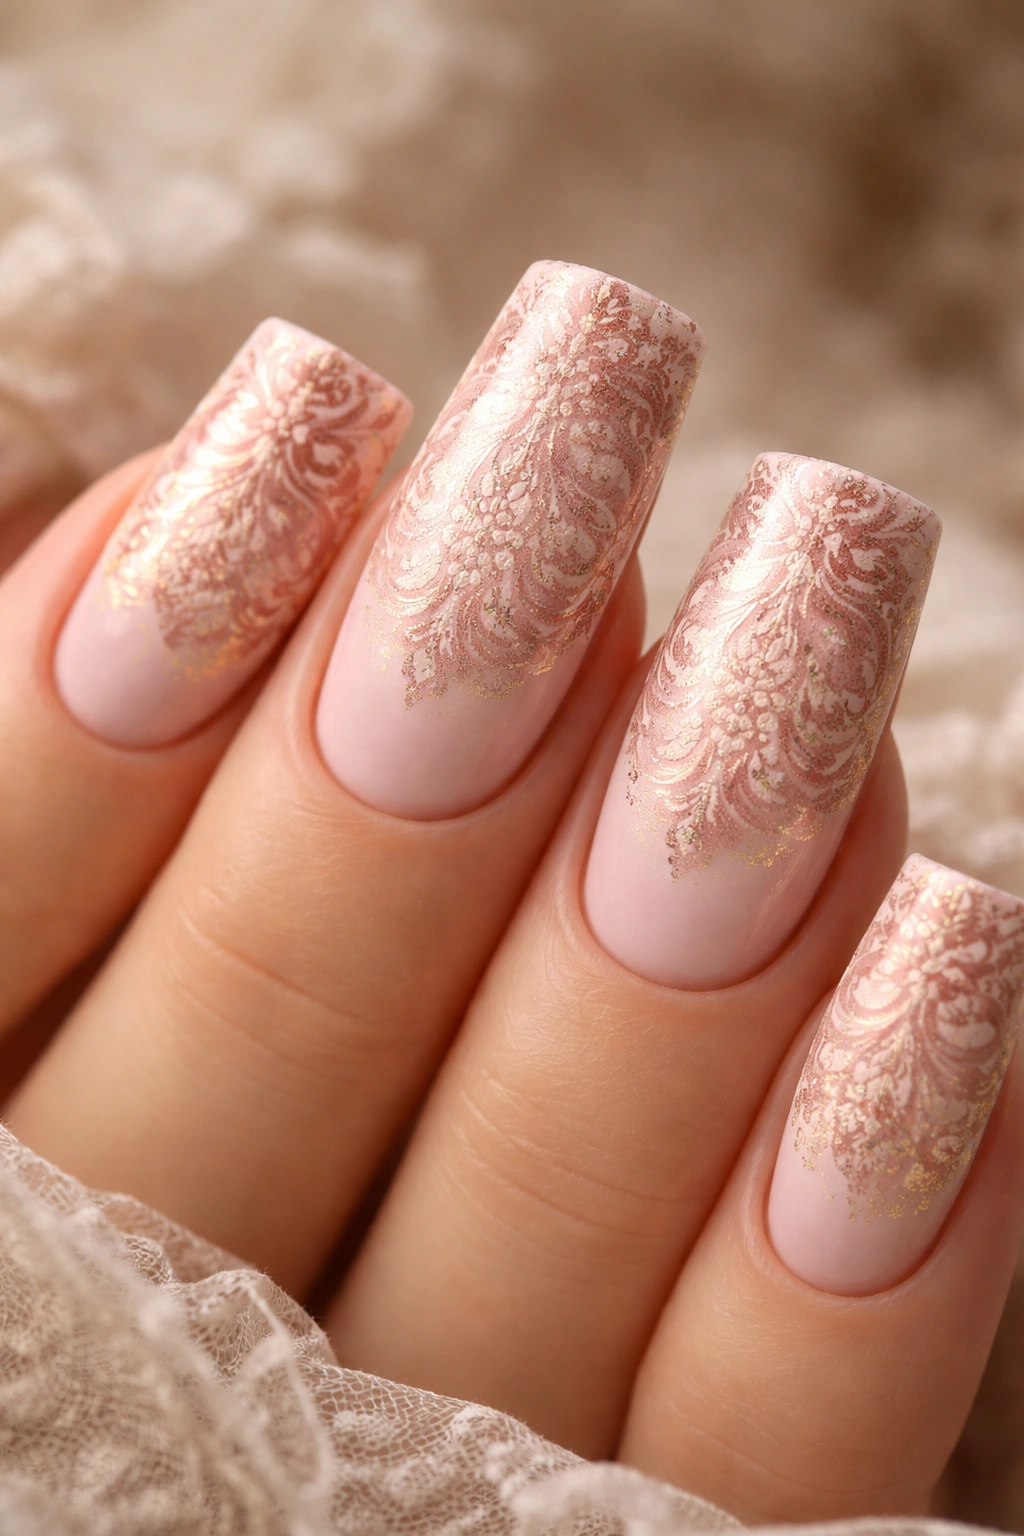
Create an ornate, romantic design with repeating damask patterns in soft colors — ivory, rose gold, and blush pink create a vintage aesthetic. The airbrush’s fine precision allows you to create delicate, repeating patterns that would be nearly impossible to hand-paint. This design is particularly elegant because the symmetry and repetition create a sense of refinement and attention to detail.
Why This Design Works for Duck Nails
Duck nails provide room for the damask pattern to breathe without becoming overwhelming or cramped. The traditional nature of damask design pairs beautifully with the modern, elegant shape of duck nails, creating a fusion of vintage aesthetics with contemporary style. The width of the nails means the pattern repeats multiple times, creating a cohesive design.
Key Application Tips
- Use a damask stencil to create consistent pattern repetition
- Airbrush semi-transparent versions of your chosen colors for delicate appearance
- Layer patterns from background to foreground for depth
- Consider alternating the saturation of colors between repeating pattern elements
- Use gold or rose gold accents for vintage enhancement
- Seal with glossy top coat to highlight the intricate pattern
11. Reverse Ombre with Glitter Transition
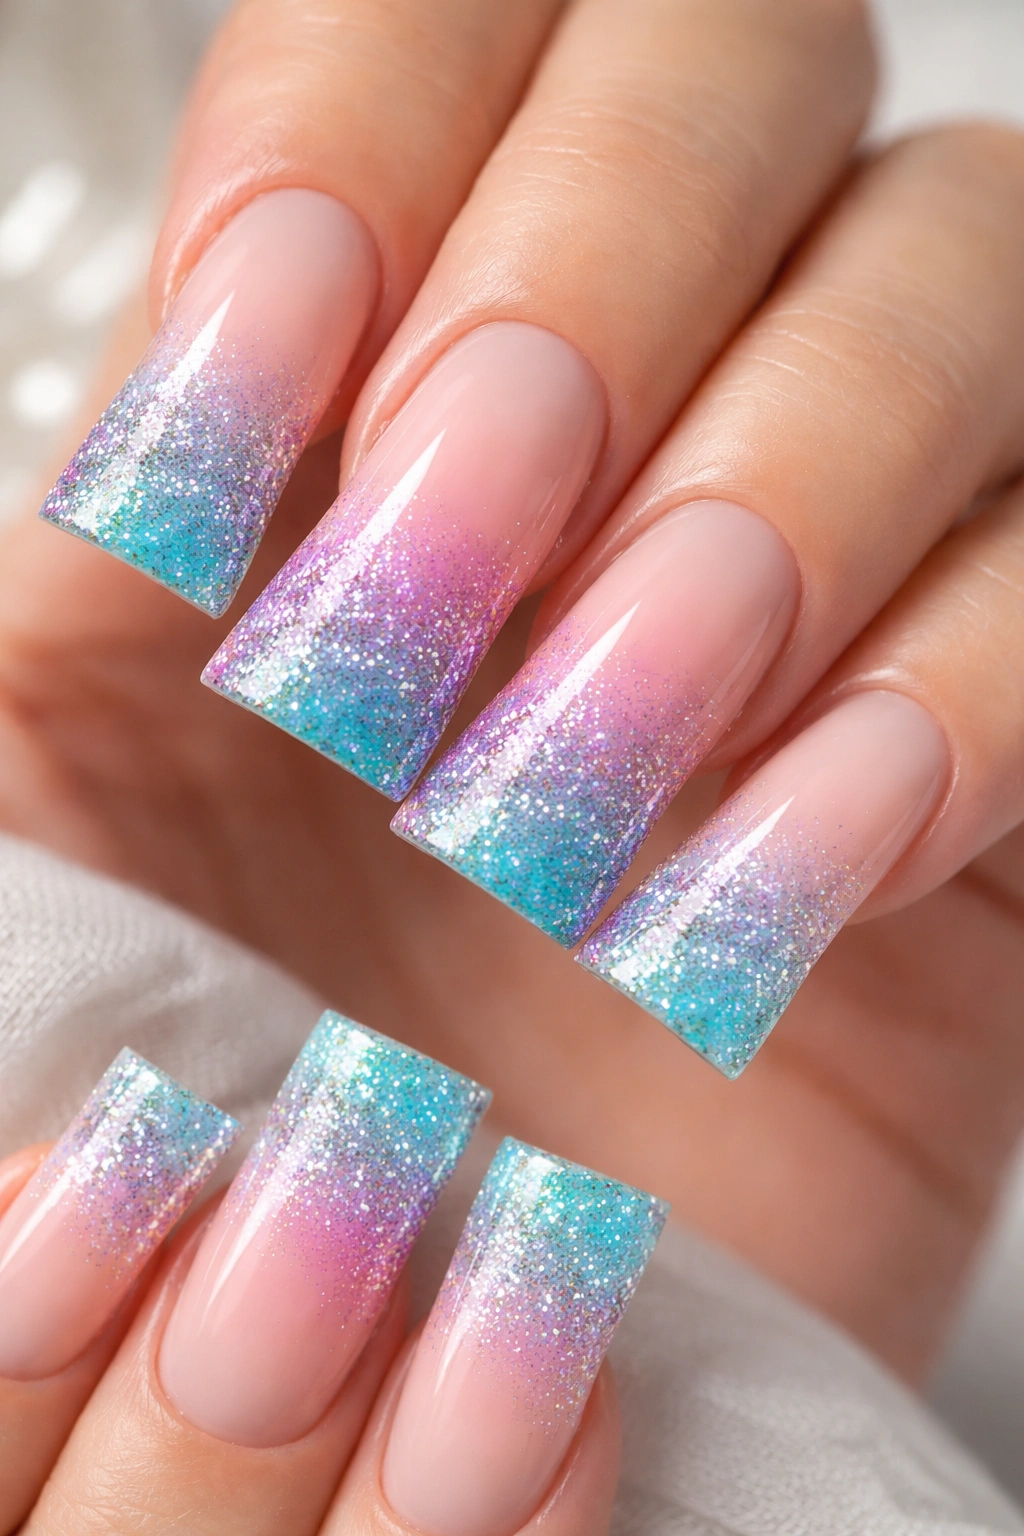
This design inverts the traditional ombre by keeping the cuticle area neutral and progressively intensifying color toward the tip, with a glitter gradient creating a sparkling transition zone. The effect is ethereal and modern, with pigment and sparkle working together to create dimension. The airbrush applies the pigment gradient while glitter suspension can be added during the final layers for a seamless integration.
Why This Design Works for Duck Nails
The wide surface of duck nails means the glitter transition zone is visible and impressive rather than becoming a thin line. You can see the progression from opaque pigment to transparent glitter suspension to full glitter coverage, creating layered visual interest. The duck nail shape frames this gradient beautifully.
Key Application Tips
- Apply neutral base coat and allow to cure completely
- Airbrush color gradient from mid-nail to tip with progressively heavier pigment application
- Switch to glitter suspension pigments as you approach the tip
- Layer glitter suspension so density increases toward the very tip
- Use clear glitter suspension initially, then add colored suspension for the final layers
- Seal with high-shine top coat to maximize sparkle and gloss
12. Abstract Ink Swirl Design

Create an artistic, modern design with abstract black ink swirls and patterns reminiscent of marbling or ink dropped into water. The airbrush creates soft, diffused edges on the swirls while maintaining control over the overall pattern. This design feels contemporary and artistic, perfect for someone who appreciates modern nail art. Each nail can feature a unique swirl pattern, or you can create a cohesive design across all ten nails.
Why This Design Works for Duck Nails
The expanded surface of duck nails accommodates complex abstract patterns that have room to develop and flow naturally. The swirls and curves have space to curve and spiral without feeling compressed. The duck nail shape actually frames abstract designs beautifully, giving them a gallery-worthy presentation.
Key Application Tips
- Apply white or pale base coat for contrast
- Use black or dark grey pigment in very low concentration for soft swirls
- Create swirls with loose, curved airbrush movements rather than trying to be precise
- Allow pigment to dry between layers to prevent colors from bleeding excessively
- Use a fine detail brush to sharpen any swirls after airbrush application if desired
- Seal with glossy top coat to enhance the ink-like appearance
13. Holographic Rainbow Gradient
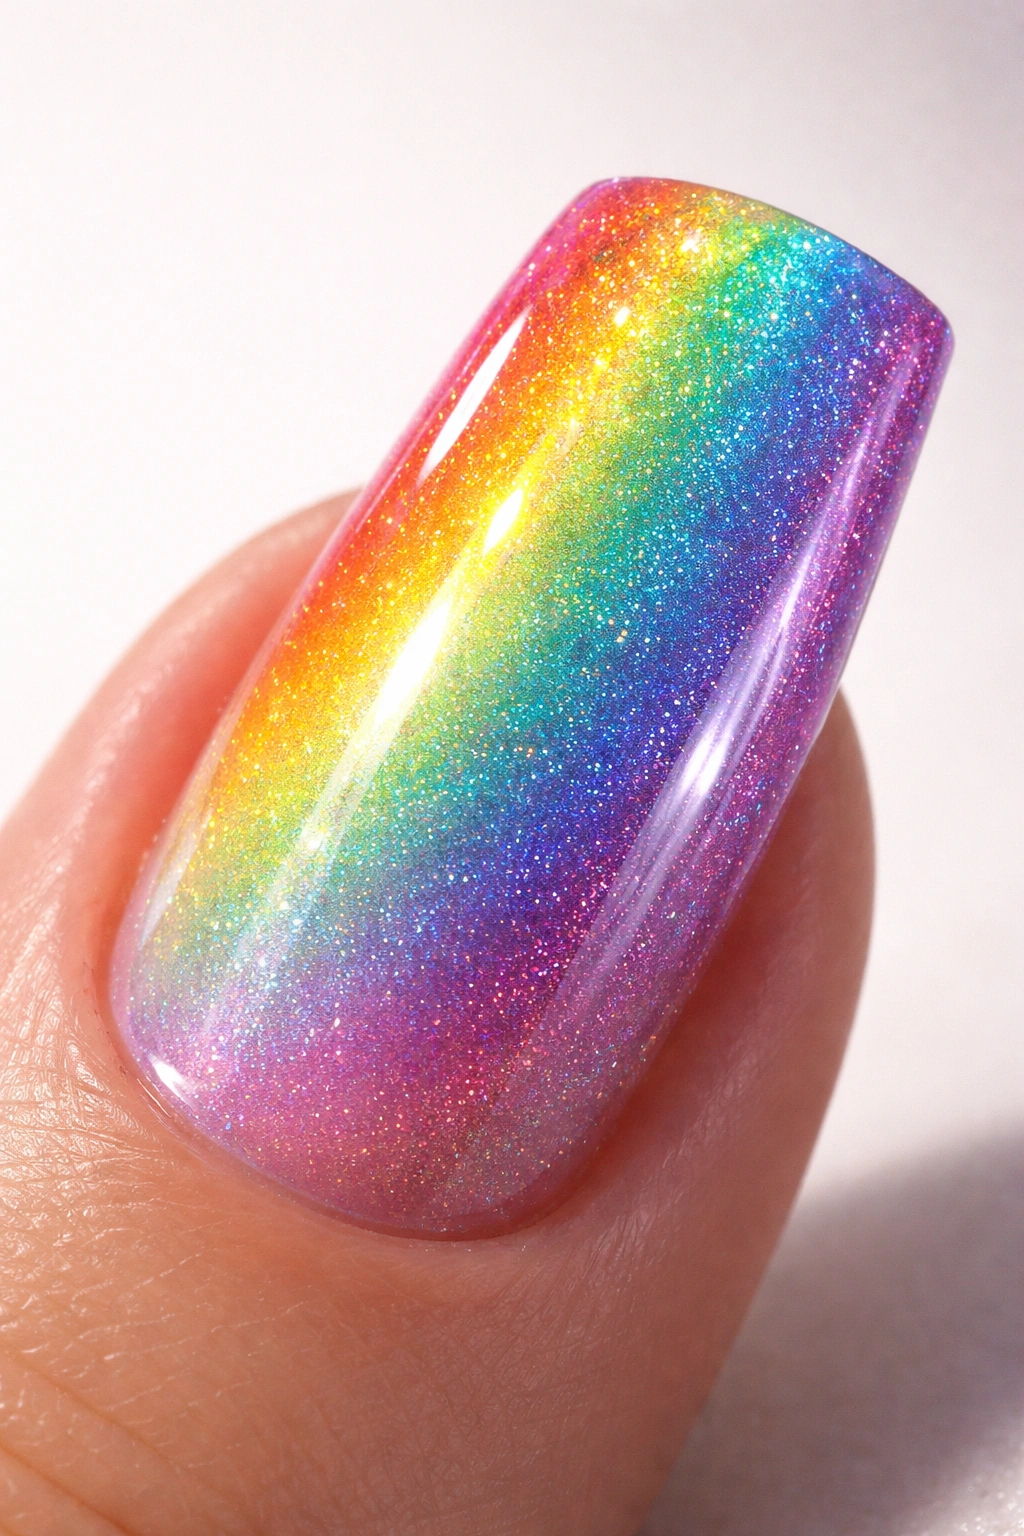
A true rainbow gradient that shimmers with holographic effect, cycling through red, orange, yellow, green, blue, and purple in a smooth transition across the nail. Holographic pigments in airbrush create a multi-dimensional rainbow effect that shifts and changes in different lighting. This is a bold, eye-catching design that celebrates color and plays with light reflection.
Why This Design Works for Duck Nails
Duck nails provide the space needed for a full rainbow gradient where each color is distinct and visible rather than compressed into thin stripes. The width of the nail means the rainbow appears balanced and intentional rather than chaotic. The shape frames the colorful gradient like a work of art.
Key Application Tips
- Use high-quality holographic pigments in airbrush-compatible formulas
- Layer colors in wavelength order for the most natural rainbow appearance
- Apply each color with semi-transparent pigments so they blend slightly at the boundaries
- Use multiple very light passes rather than heavy application to build the effect
- Allow each color layer to set slightly before applying the next for clean transitions
- Seal with ultra-glossy top coat to maximize holographic shimmer and light reflection
14. Brushed Metal with Accent Stripe
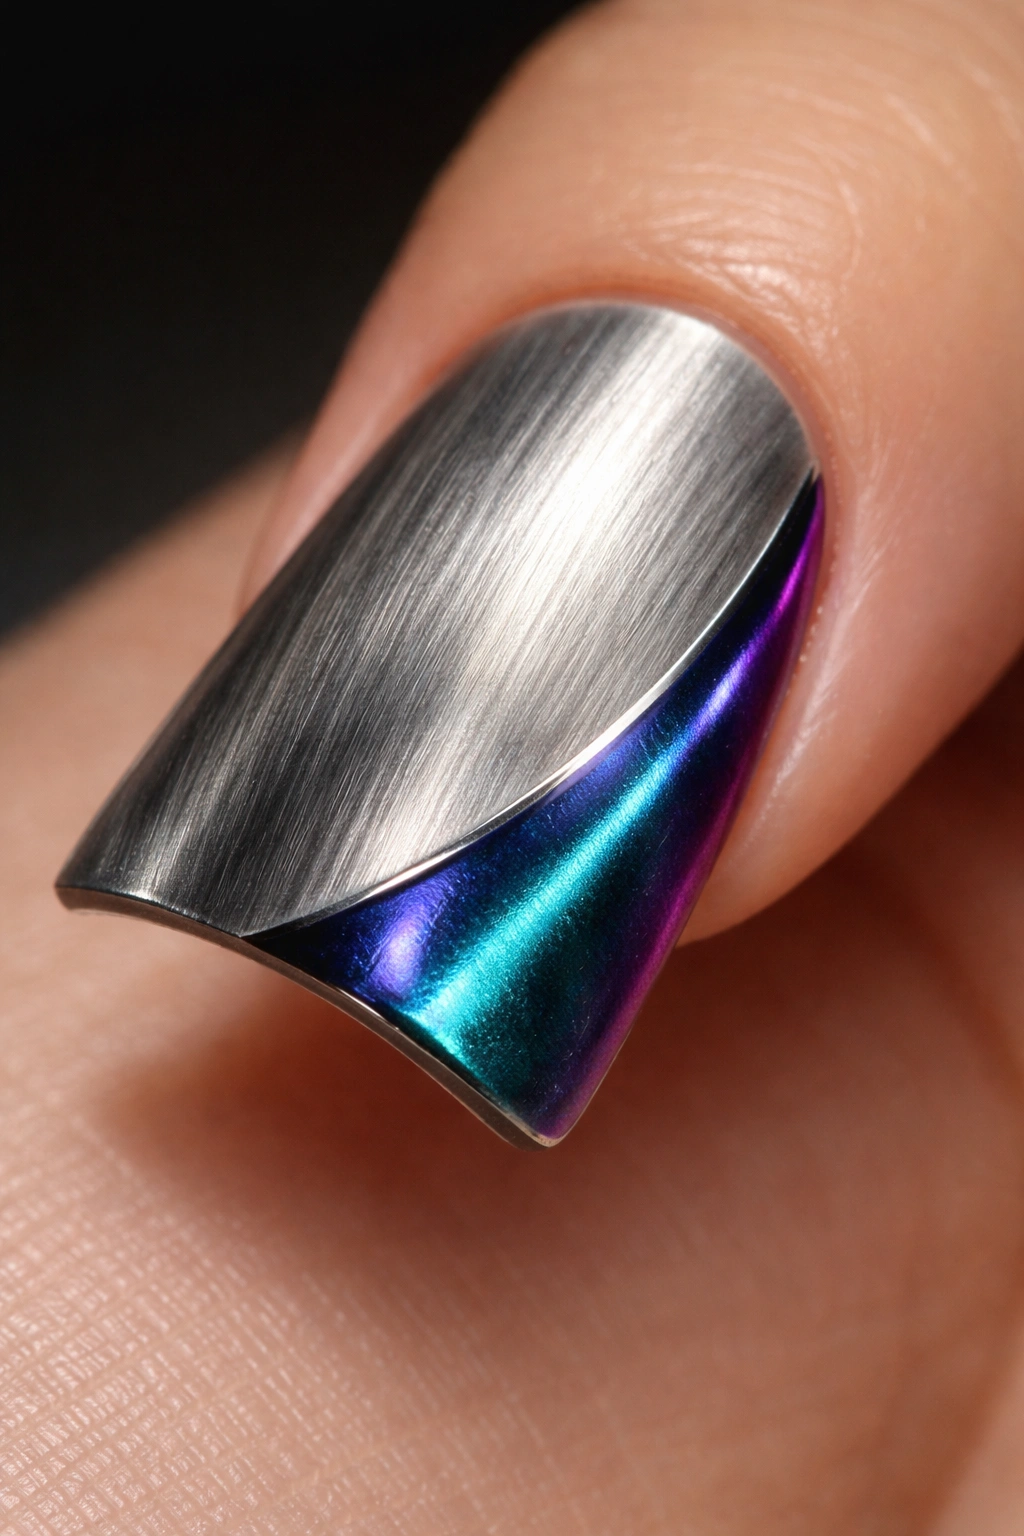
Create a sophisticated brushed metal finish using specialized metallic pigments applied in directional strokes to create texture, then add a contrasting accent stripe in a jewel tone or metallic shade. The airbrush can create a brushed effect by applying pigment in one direction, and the accent stripe provides focal interest and prevents the design from feeling too minimalist. This design is modern and professional while remaining visually interesting.
Why This Design Works for Duck Nails
The duck nail shape provides ample surface for both the brushed metal finish and the accent stripe without either element overwhelming the other. The width of the nail means the brushed texture is visible and appreciated rather than appearing as a subtle texture. The stripe creates a natural focal point that draws the eye.
Key Application Tips
- Apply metallic base coat and allow to cure
- Use directional airbrush strokes (all in one direction) to create brushed texture
- Layer metallic pigments to build depth and dimension
- Create accent stripe with painter’s tape for clean, crisp edges
- Use high-contrast color for the stripe to ensure visibility against the metal finish
- Seal with glossy top coat that emphasizes the metallic properties
15. Soft Cloud and Sky Design
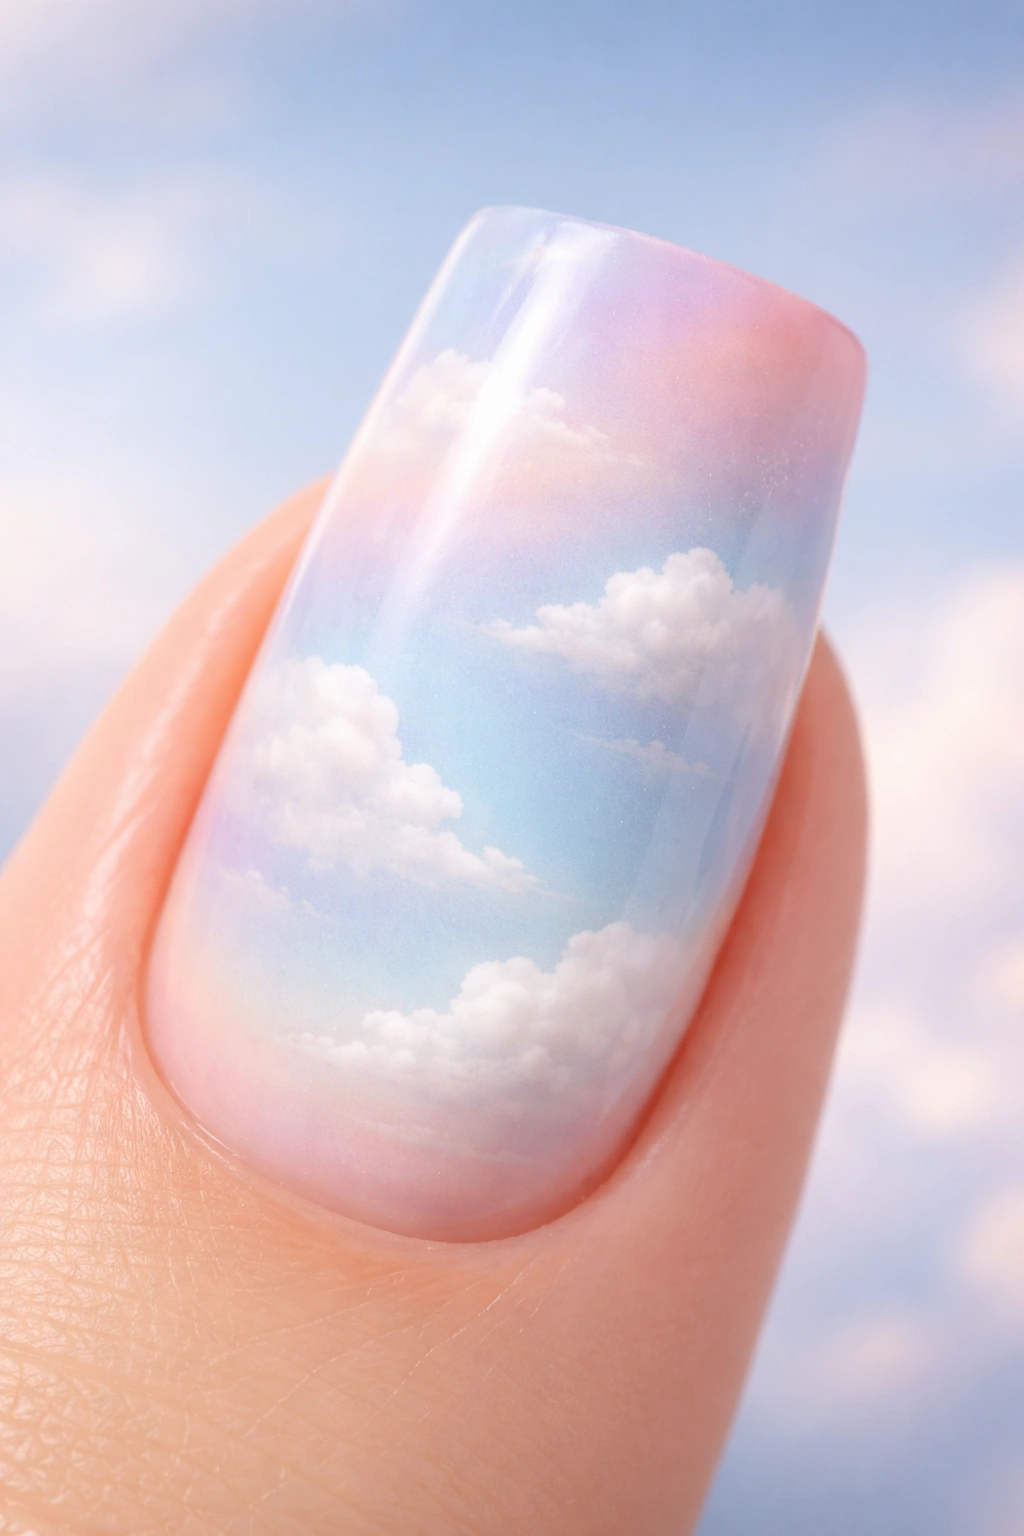
Create a dreamy, peaceful design with soft white clouds against a pale blue sky, perhaps with hints of pink or peach near the cuticle suggesting sunrise or sunset. The airbrush’s ability to create soft edges and diffused boundaries makes this design authentically peaceful. The colors are pastel and gentle, creating a calming aesthetic that feels fresh and serene.
Why This Design Works for Duck Nails
Duck nails provide room for multiple clouds of varying sizes and opacities, creating depth and movement in the sky. The shape accommodates a gradient sky background with clouds layered on top without any element feeling cramped. The design feels expansive and peaceful because of the nail’s width and length.
Key Application Tips
- Begin with pale blue base coat representing the sky
- Layer semi-transparent white pigments for soft cloud shapes
- Use very low pigment concentration and multiple light passes for authentic cloud softness
- Add hints of pink or peach pigment near the cuticle with transparent application
- Create cloud shadows with very dilute grey pigment for three-dimensional appearance
- Seal with matte top coat for authentic sky appearance, or glossy for more finished look
16. Splatter Paint Artistic Design
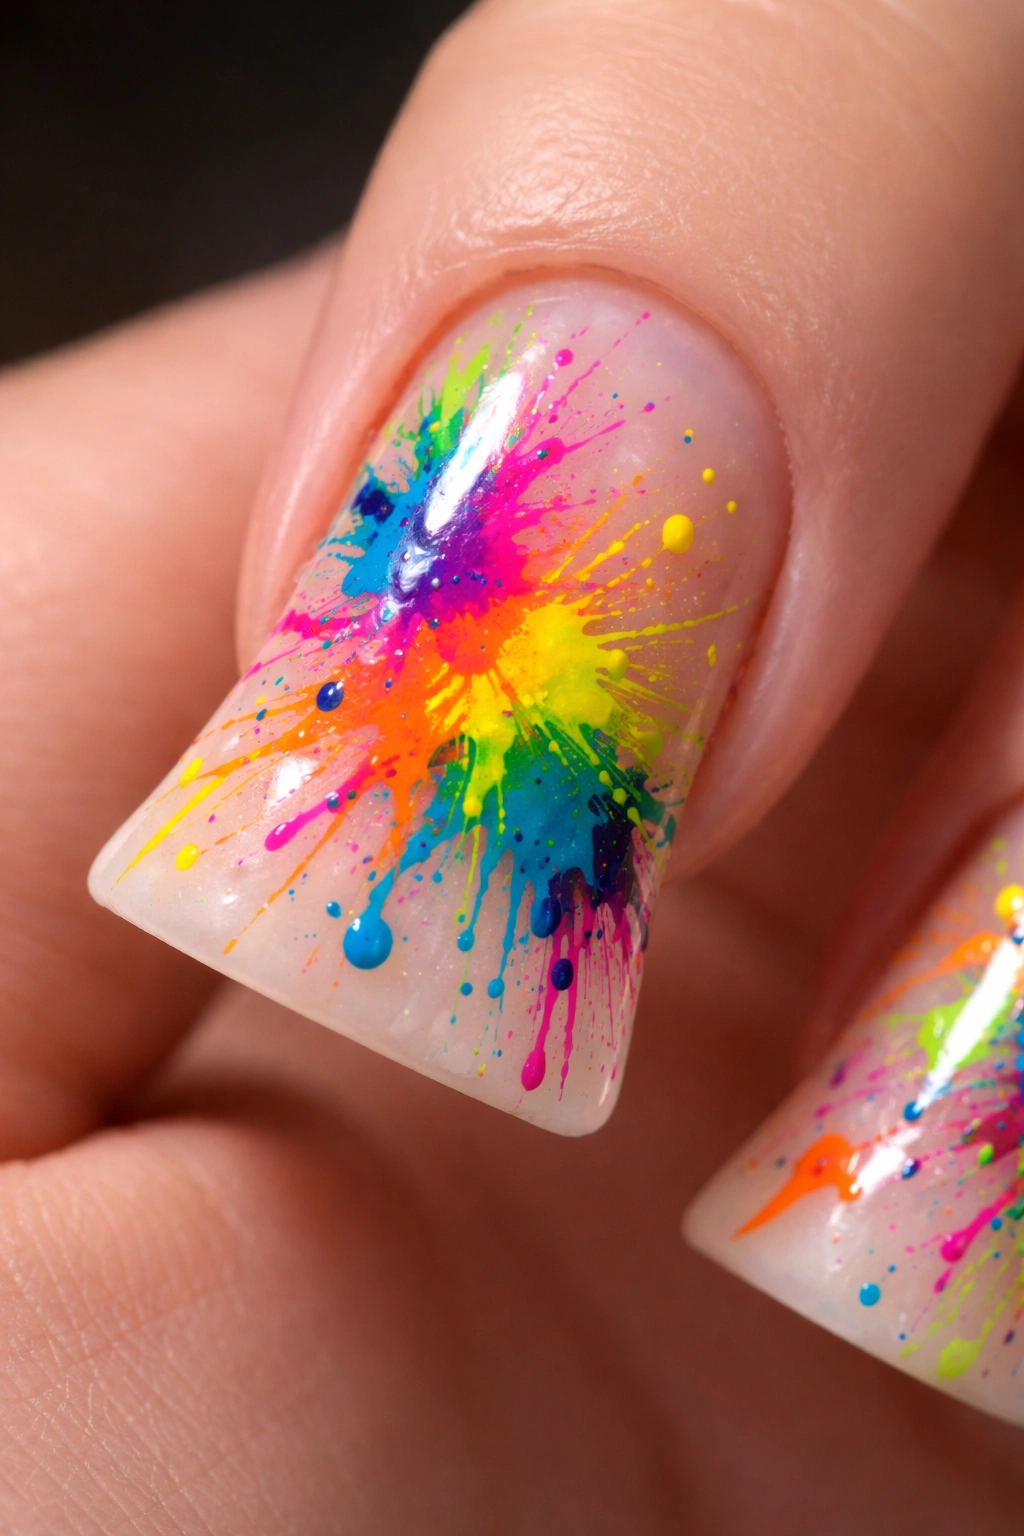
Create a bold, artistic design with colorful paint splatters across a neutral or contrasting base. The airbrush can create realistic splatter effects by using specific spray techniques and pigment concentrations. This design is perfect for someone who loves modern art and wants nail art that makes a statement. Each nail can feature a different color combination, or you can create a cohesive splatter pattern across all ten nails.
Why This Design Works for Duck Nails
The wide, flat surface of duck nails becomes your canvas for artistic expression. Splatters spread across the nail without feeling chaotic or cramped. The splatter design actually benefits from the duck nail shape because splashes are more visible and impactful than they would be on shorter, narrower nails.
Key Application Tips
- Apply neutral or contrasting base coat that provides good pigment visibility
- Adjust airbrush air pressure and pigment concentration to create splatter effect
- Create splatters using quick, jerky airbrush movements rather than smooth ones
- Layer multiple color splatters with slight overlap for artistic depth
- Allow each splatter to dry slightly before applying the next to prevent excessive blending
- Seal with glossy top coat to protect the artistic design
17. Encapsulated Foil with Gradient
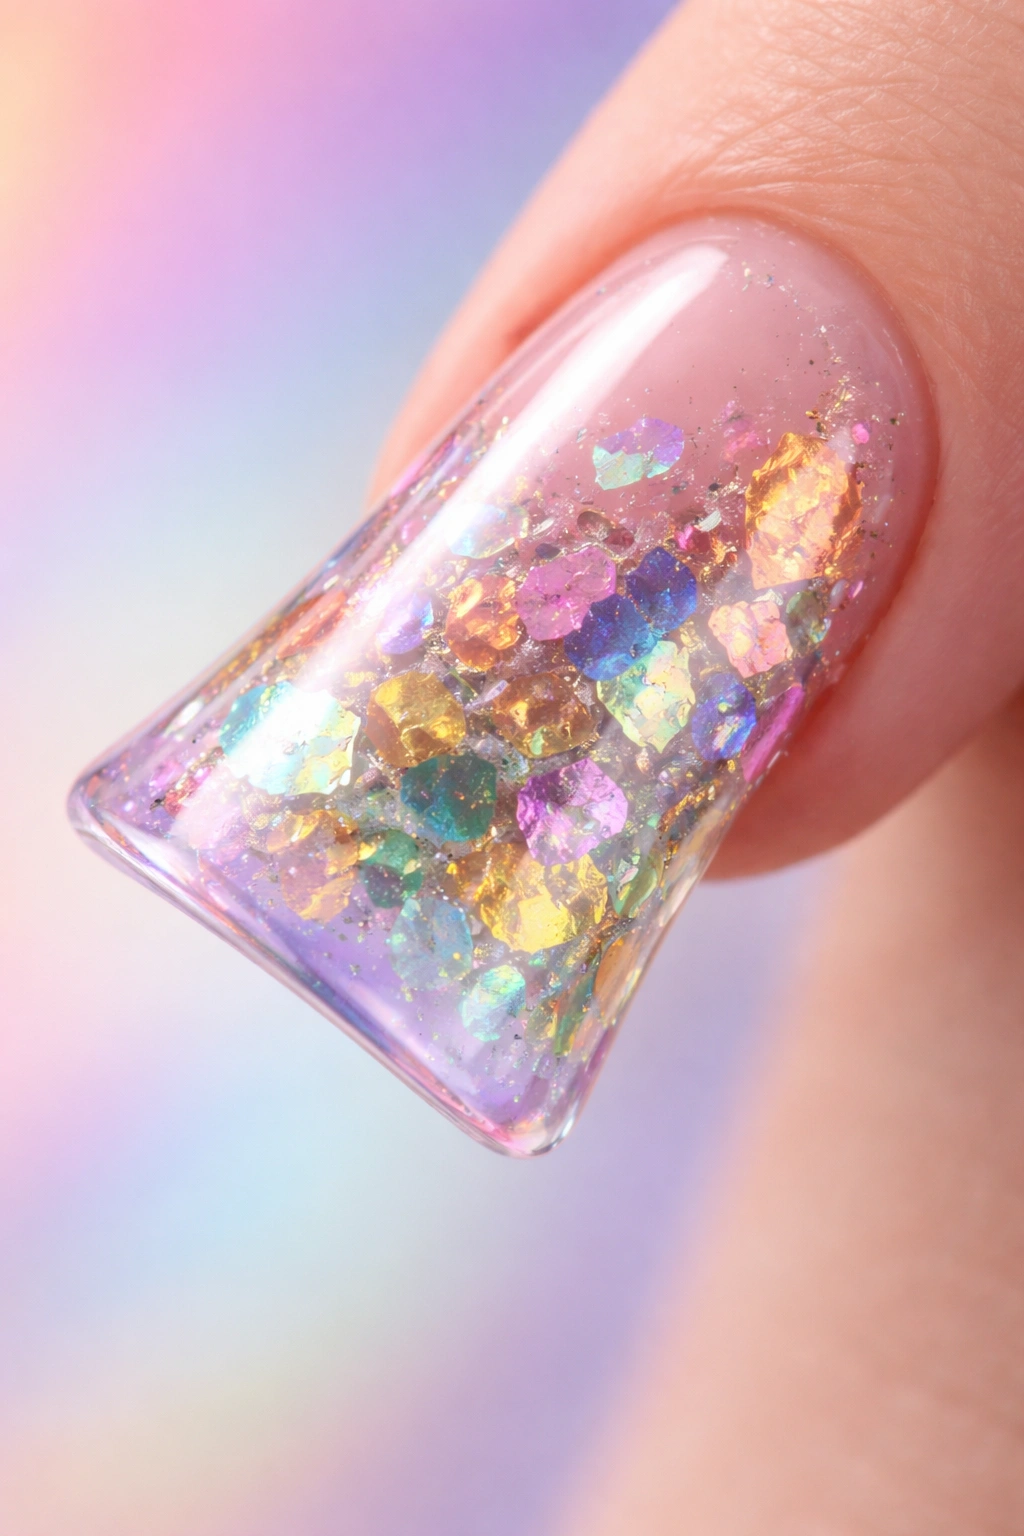
Combine encapsulated foil (foil sandwiched between layers of gel) with an airbrush gradient for a design that’s part sparkle, part color. The foil catches light and sparkles while the gradient provides color dimension. This design requires technical skill to layer properly but creates a luxurious, high-fashion appearance that’s truly special. The foil element adds texture and dimension that gradient alone can’t provide.
Why This Design Works for Duck Nails
Duck nails provide enough surface area that the foil sections are prominent and visible rather than becoming tiny sparkles. The gradient can wrap around the foil sections, creating visual interest and ensuring the foil doesn’t dominate the design. The combination of sparkle and color is particularly striking on the wider nail surface.
Key Application Tips
- Apply gel base coat and cure
- Tear foil into desired shapes and apply to the cured gel base
- Seal foil with a layer of clear gel and cure to prevent movement
- Apply gradient pigments over and around the foil sections
- Ensure gradient colors coordinate with the foil color (rose gold foil works well with warm gradients)
- Seal with glossy top coat, ensuring the coating covers foil edges completely
18. Sunrise Gradient with Silhouette
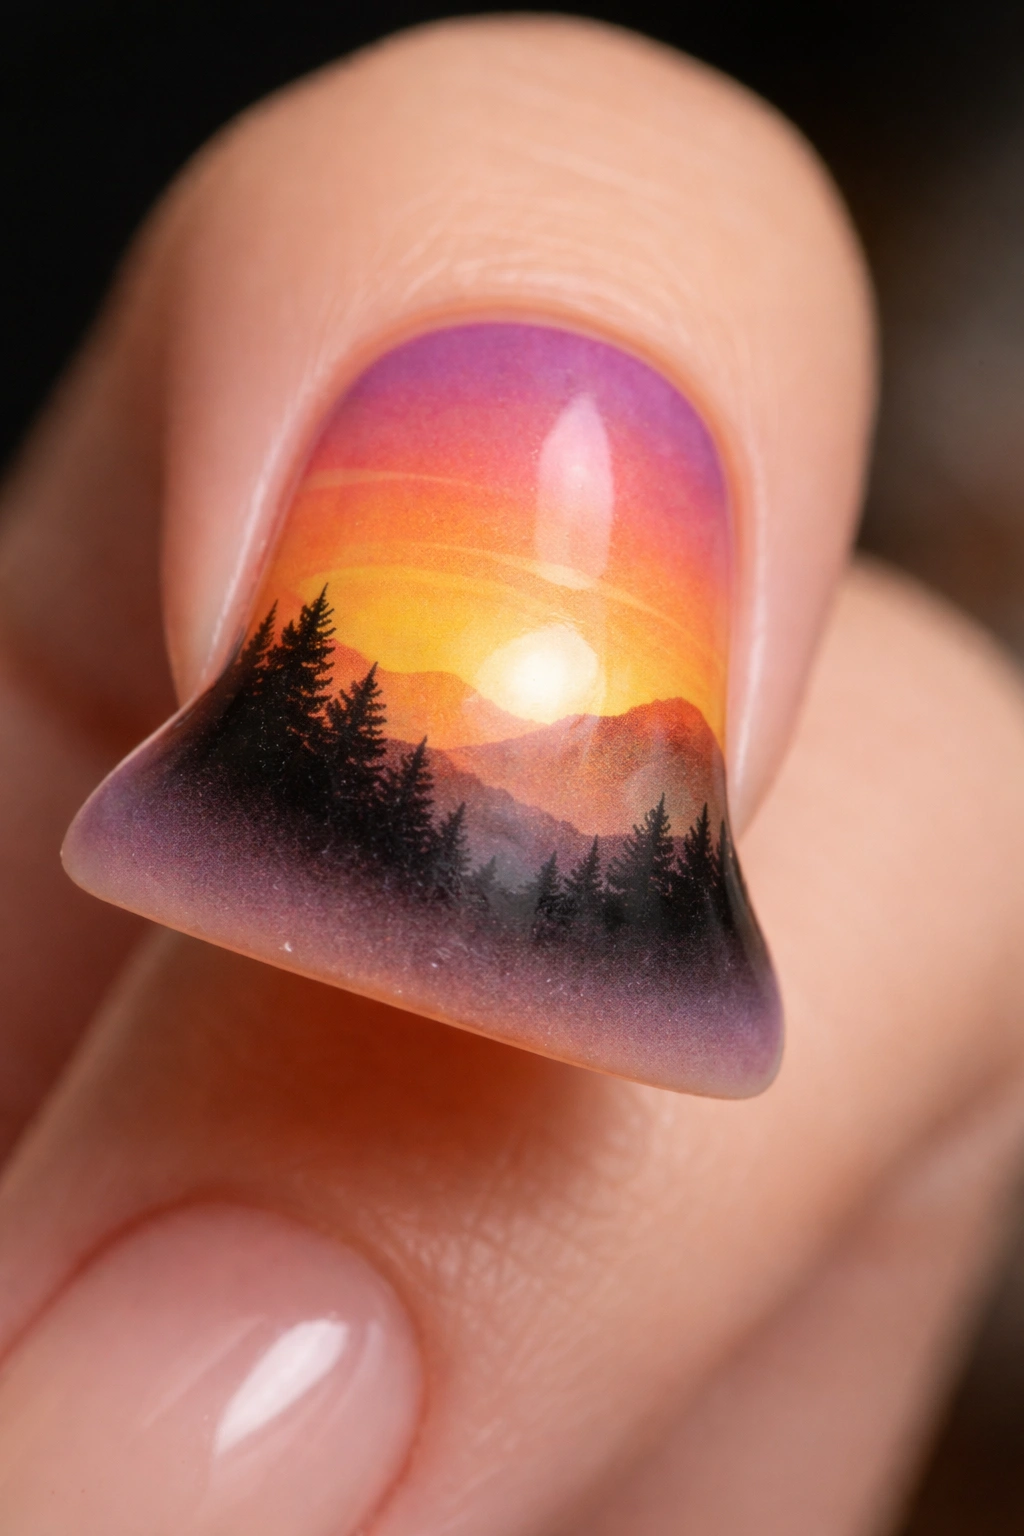
Create a landscape-inspired design featuring a rich gradient from deep orange at the base through golden yellow to pink and pale purple at the tip, with a silhouetted landscape (mountains, trees, or buildings) creating a dark contrasting element in the middle. This design combines the technical skill of gradient creation with artistic imagery. The result feels like a tiny landscape painting on each nail.
Why This Design Works for Duck Nails
The length of duck nails accommodates both the gradient and the silhouette without either feeling rushed. The width ensures the silhouette is visible and detailed rather than becoming a thin line. The duck nail shape frames the landscape beautifully, making it feel like a framed piece of art.
Key Application Tips
- Start with the lightest color (pale purple or pink) at the tip
- Gradually introduce warmer tones toward the base with semi-transparent pigments
- Create the richest color saturation at the base for visual weight and grounding
- Use a stencil or freehand create a distinct silhouette line in black or very dark color
- Add silhouette details with a thin brush after airbrush gradient is complete
- Seal with glossy top coat to enhance the landscape effect
Final Thoughts
Airbrush duck nail designs represent the intersection of technical skill and artistic expression — these aren’t designs you can achieve with traditional polish and a brush, they require the precision and blending capability that only airbrush technology provides. What makes these 18 designs so effective is that they take advantage of both the duck nail shape and the airbrush technique, using the width and length of the nails to showcase gradient effects, detailed imagery, and color transitions that feel intentional and luxurious.
The beauty of duck nails combined with airbrush art is that the possibilities genuinely are endless. Whether you’re drawn to the serenity of cloud designs or the boldness of splatter art, the minimalism of geometric lines or the romance of vintage florals, there’s an airbrush duck nail design that expresses your aesthetic. The duck nail shape itself has become sophisticated enough that it works with nearly any design concept, and the airbrush technique elevates every design into the realm of professional nail art.
If you’re considering trying any of these designs, remember that airbrush application is a skill that improves with practice. Starting with simpler gradient designs and working toward more complex scenes or patterns is a smart approach. Whether you’re having these designs created by a professional nail technician or learning to airbrush your own nails, understanding the techniques behind each design helps you communicate your vision clearly and appreciate the craftsmanship involved. The combination of duck nails and airbrush art creates manicures that don’t just look beautiful — they feel like wearable art.
