

Kawaii duck nails have become one of the cutest nail art trends that combines whimsy, charm, and playful personality in a way that instantly brightens your hands. Whether you’re drawn to pastel yellows, adorable facial expressions, or tiny feathered details, duck-themed nail designs offer endless creative possibilities that work for any occasion—from casual everyday looks to special celebrations. The beauty of duck nails lies in their versatility: you can keep them simple and minimalist or go full-on elaborate with tiny wings, webbed feet, and expressive eyes that seem to follow you around.
The appeal goes beyond just being cute, though that’s certainly a major factor. Duck nails tap into the broader kawaii aesthetic that celebrates softness, innocence, and genuine joy through design. These designs are surprisingly accessible whether you’re a nail art beginner or someone with years of experience. With the right techniques and a steady hand, you can achieve professional-looking duck designs at home or bring these ideas to a salon appointment for flawless execution.
What makes duck nails particularly special is how they let you express personality and creativity through a design that’s both recognizable and uniquely yours. A duck can be rendered in countless ways—realistic, abstract, cartoonish, sleeping, waving, or even wearing tiny accessories. The design possibilities feel limitless, and each variation tells a different story about your style and taste.
Why Kawaii Duck Nails Are Having a Moment
Kawaii aesthetics have exploded across fashion, beauty, and home décor, and nails are the perfect canvas for this playful style. Duck characters specifically bring an element of genuine warmth and humor that resonates with people of all ages. They’re not intimidating like some nail art designs can be—ducks are approachable, friendly, and inherently cute without trying too hard.
The design trend also benefits from social media visibility. Nail artists share creative duck variations regularly, inspiring others to try their own interpretations. This creates a wonderful cycle where each new design sparks ideas for the next person. Unlike trendy designs that fade quickly, duck nails have staying power because they’re rooted in the timeless appeal of kawaii culture rather than fleeting fashion moments.
Another reason for their popularity is the psychological effect of cute things. Research consistently shows that engaging with cute imagery actually affects our mood and behavior positively. Seeing adorable little ducks on your fingertips throughout the day creates small moments of joy and can genuinely improve your overall mood.
Essential Tools and Materials You’ll Need
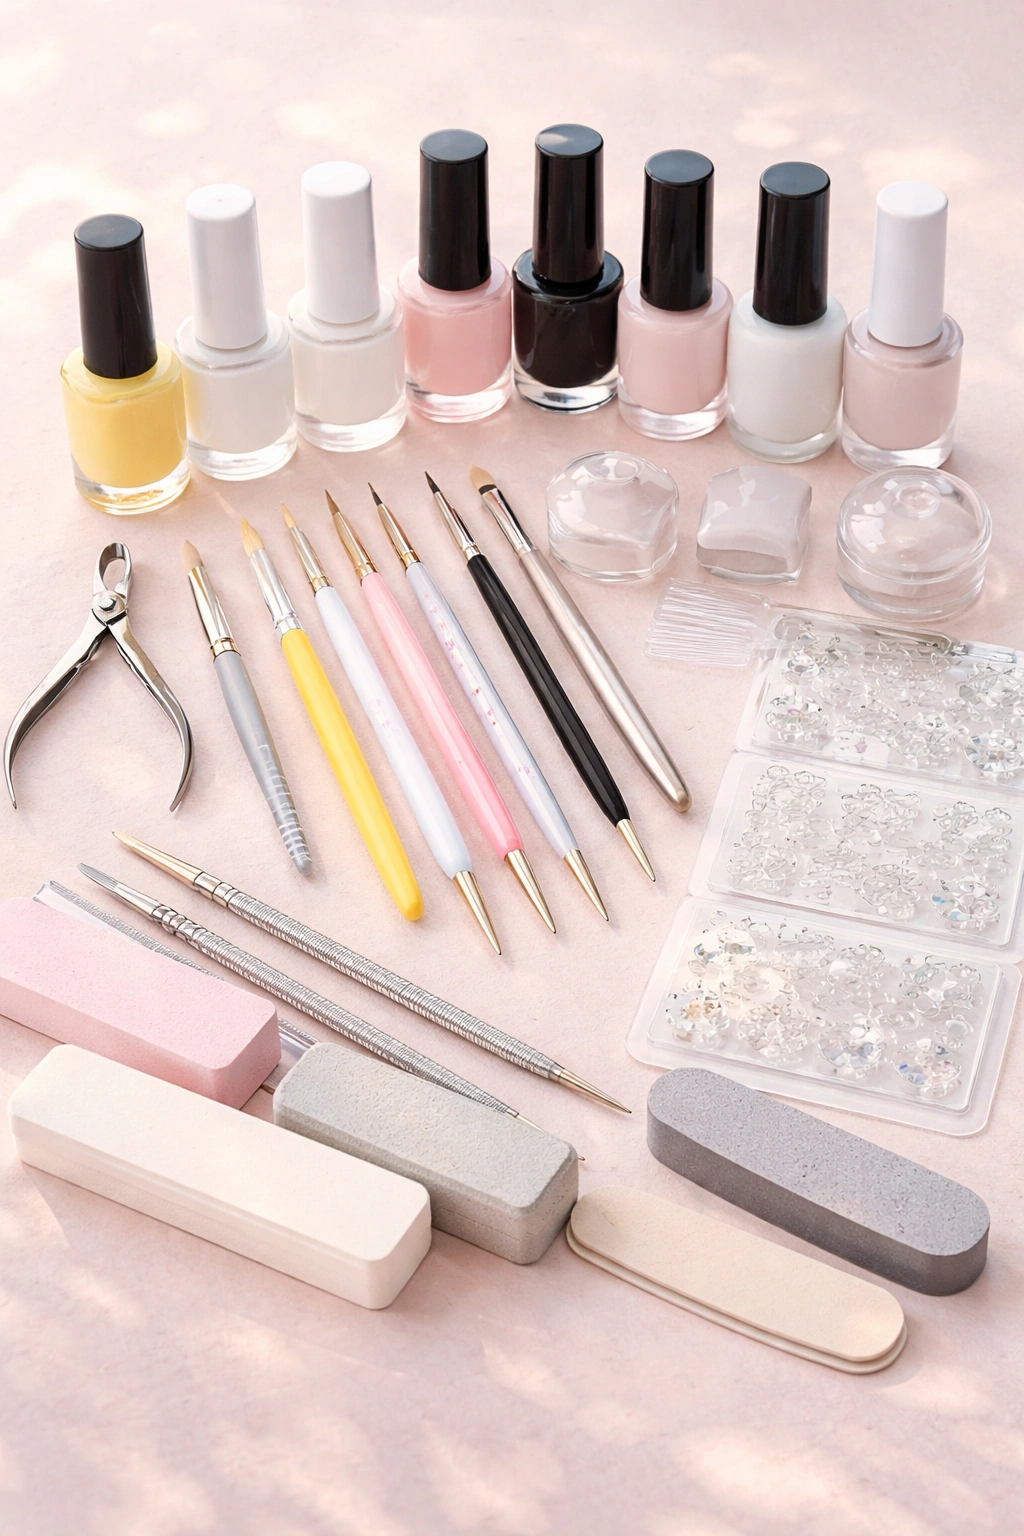
Before diving into specific duck nail designs, invest in the right supplies. Quality matters here because good tools make the difference between frustration and success. You’ll need a base coat, top coat, and a collection of nail polish colors—particularly in yellows, whites, blacks, and pinks for the classic kawaii duck aesthetic.
For detailed work, grab a set of fine-tipped nail brushes or dotting tools in various sizes. A 0 size brush handles tiny facial features, while slightly larger brushes work for body shapes and feather details. Many artists find that stripers (very thin, long brushes) are essential for creating clean lines on duck profiles.
Consider investing in a nail stamping kit if you want to create more intricate patterns quickly. Stamping can apply detailed designs that would take much longer to hand-paint. White gel polish is particularly useful for creating that glossy, polished kawaii look over colored bases. Matte top coat adds another dimension and works beautifully for certain styles.
Don’t overlook tools like nail files, cuticle pushers, and buffing blocks—nail health directly affects how long your cute designs last. Thin, weak nails won’t hold detailed art well, so proper nail care is foundational.
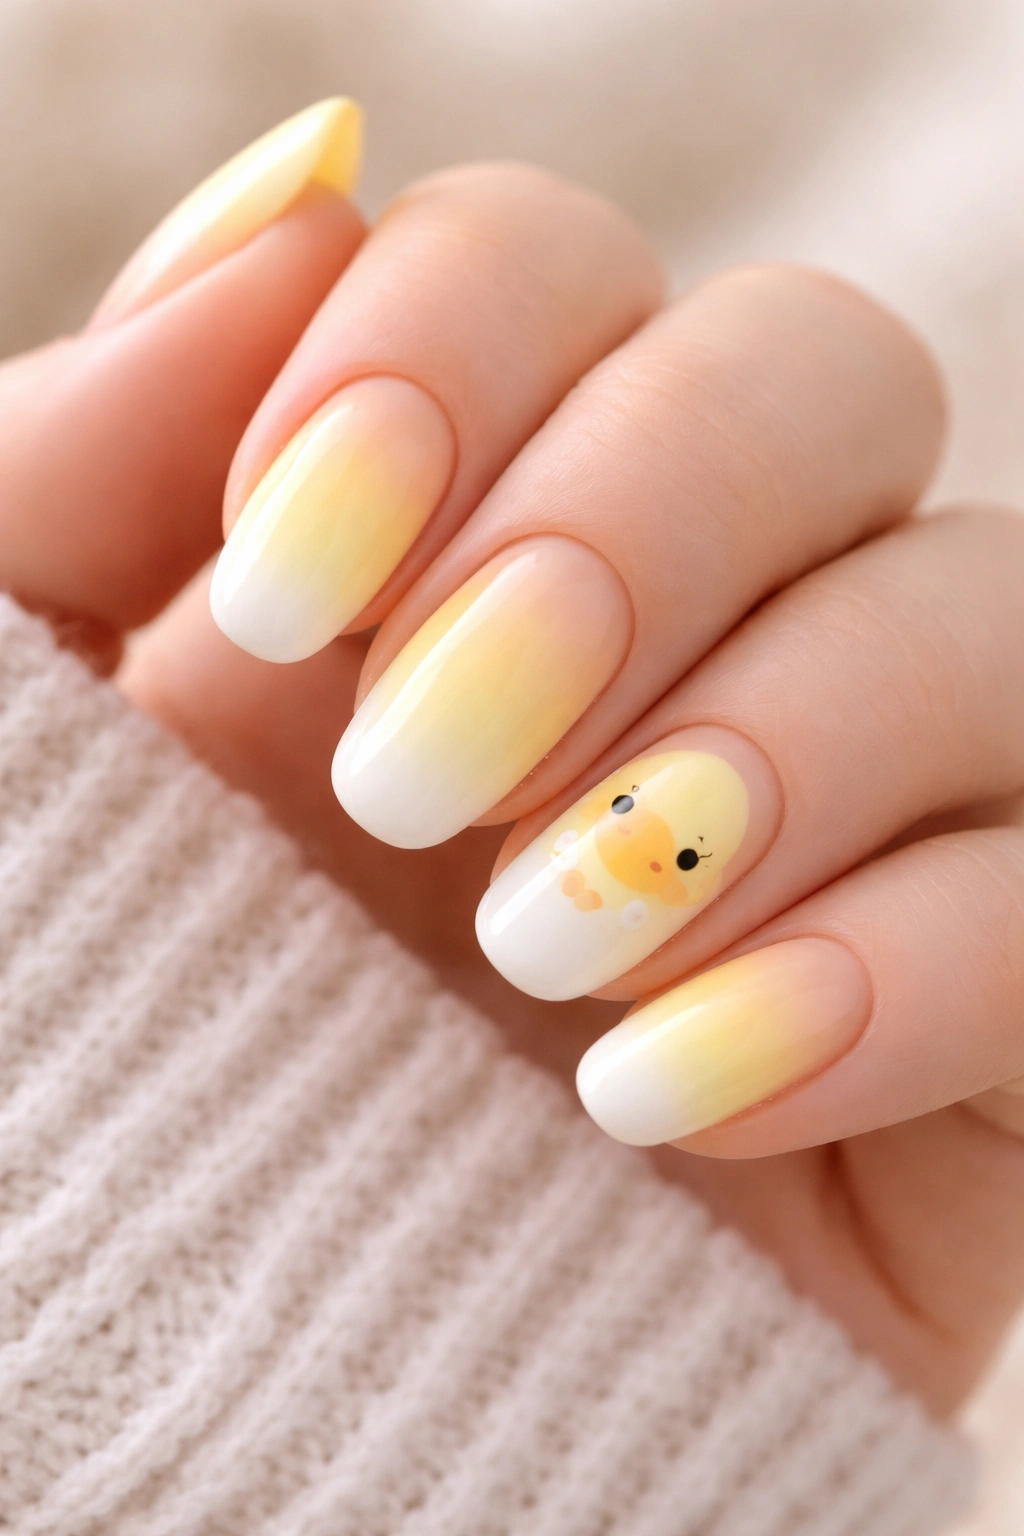
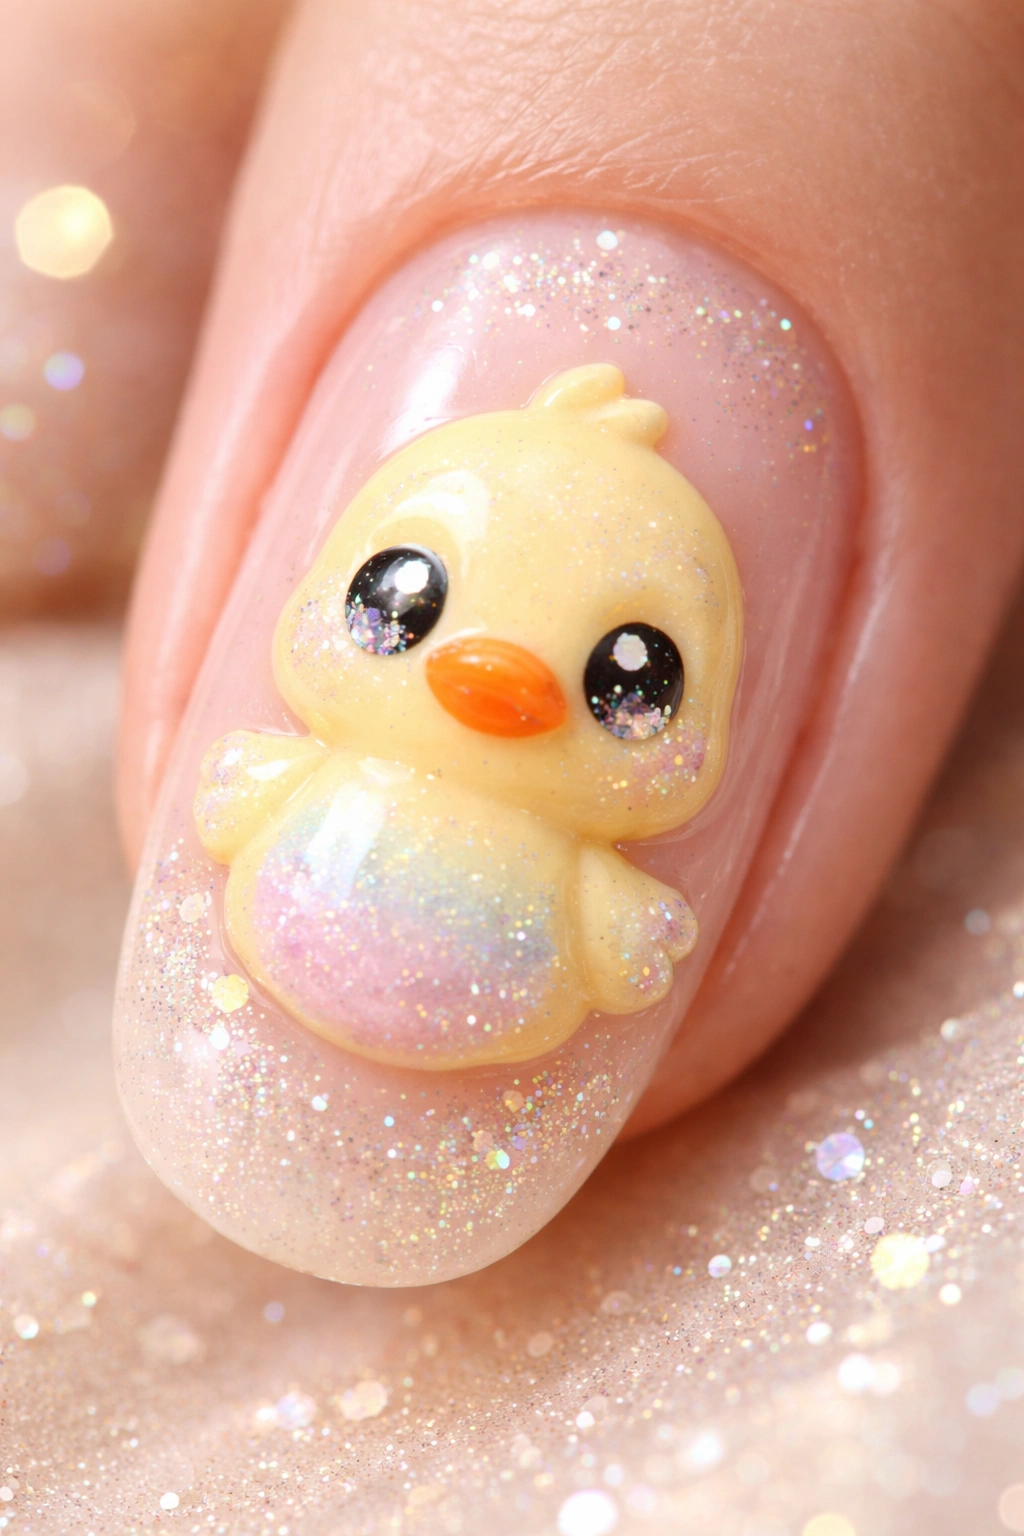
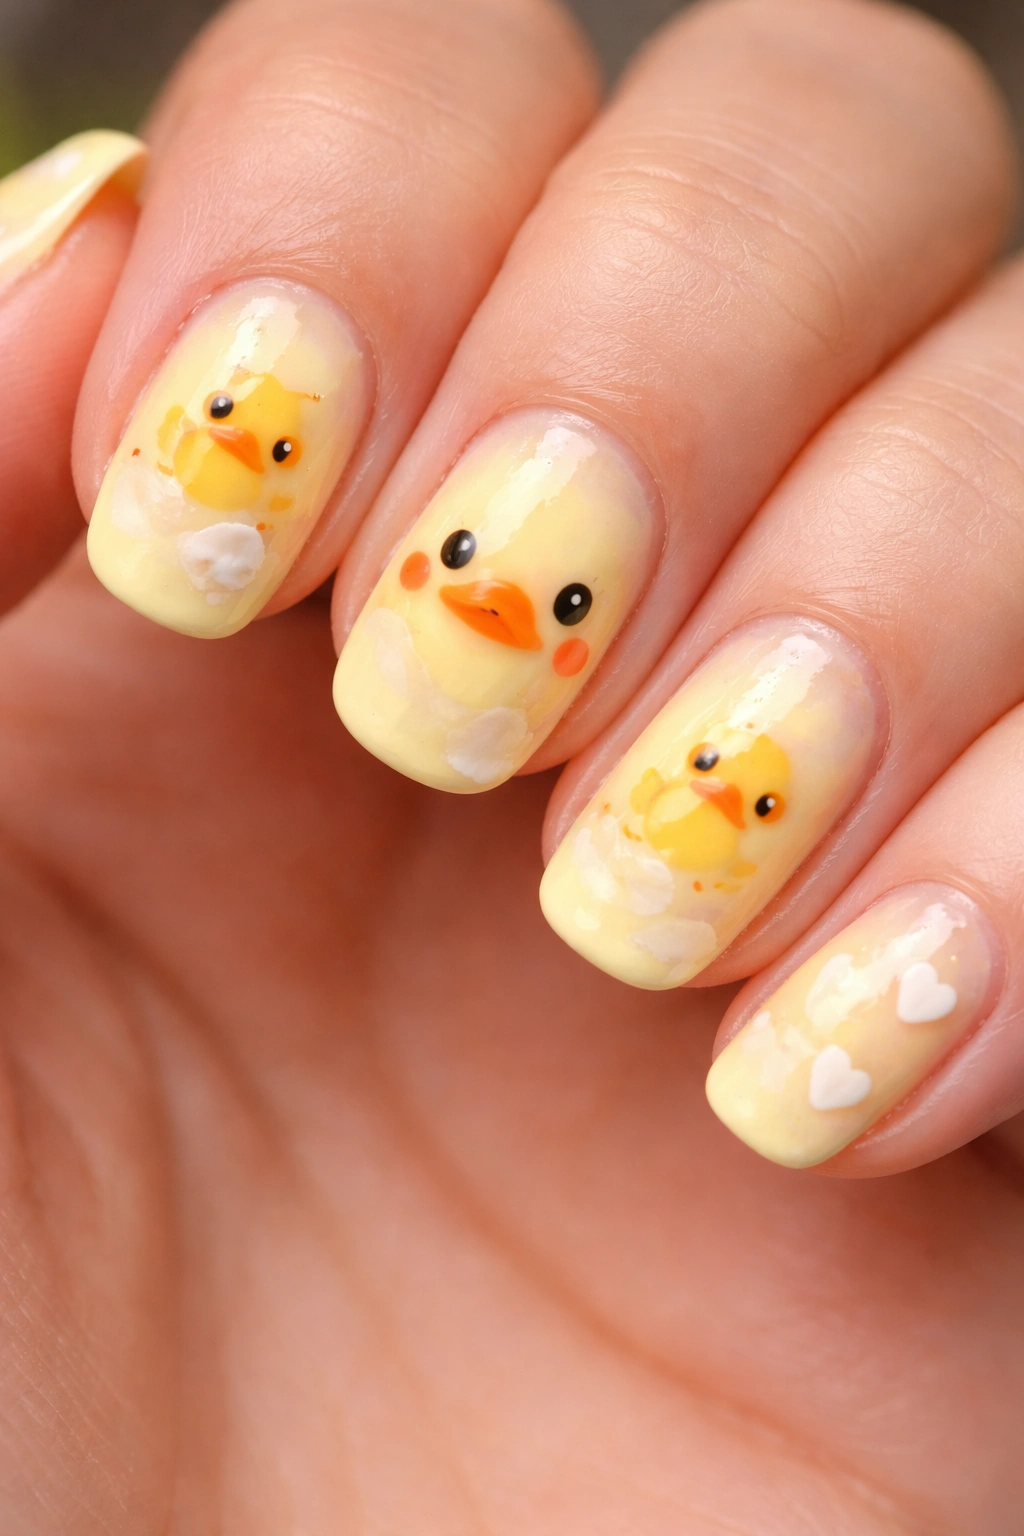
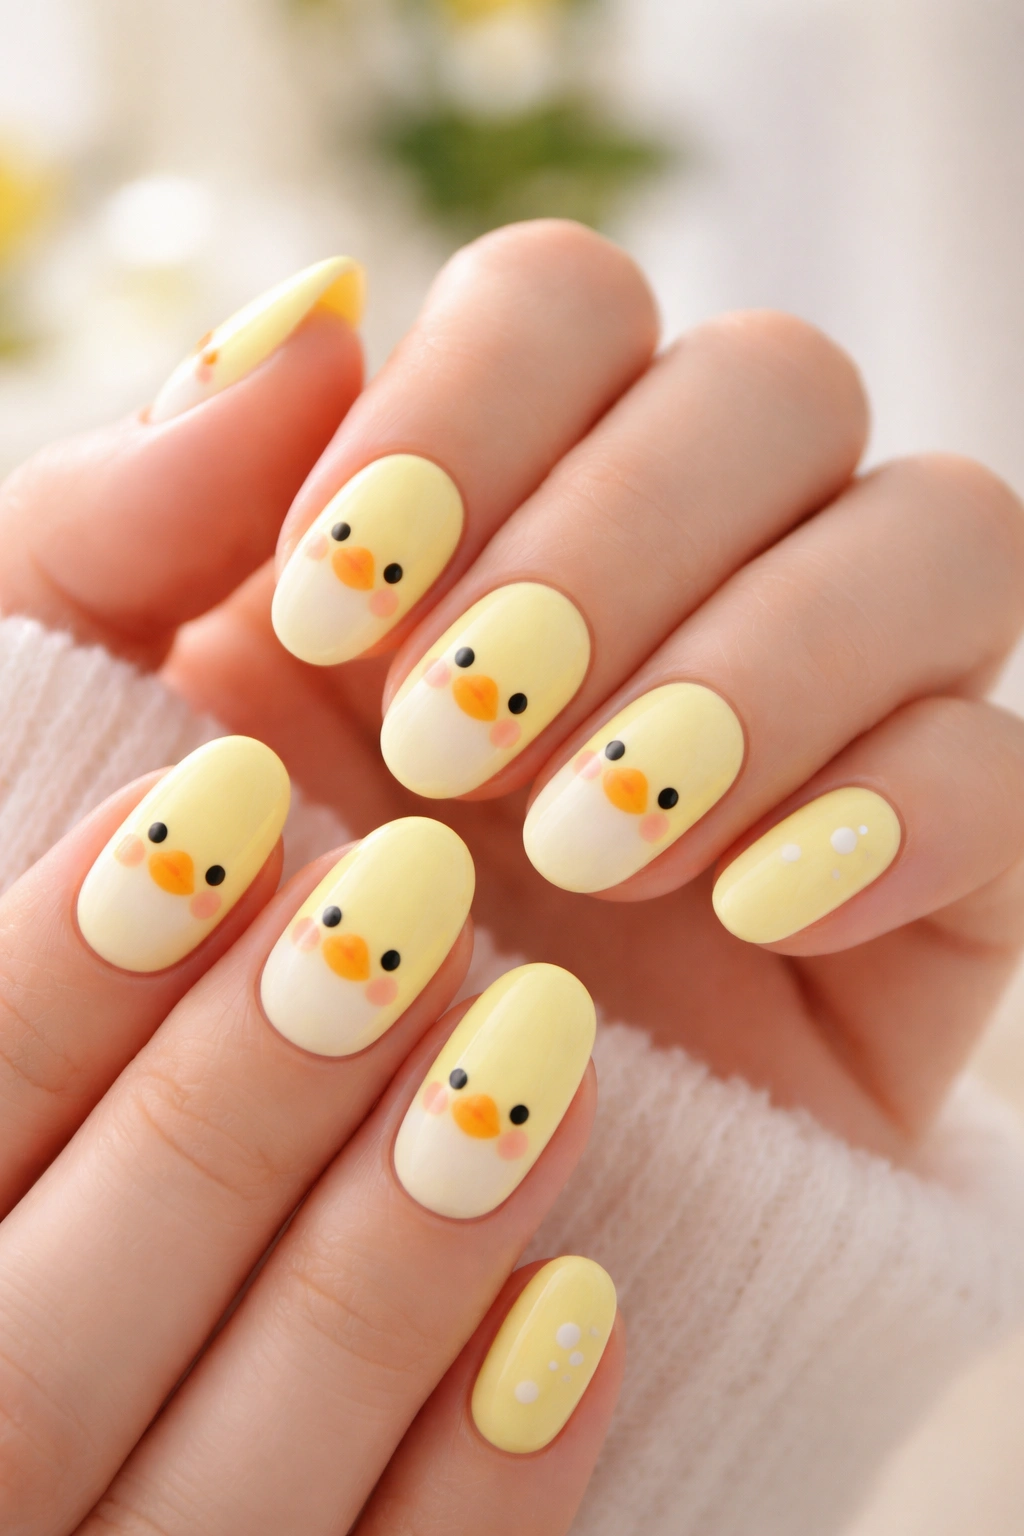
1. The Classic Yellow Duck with Personality
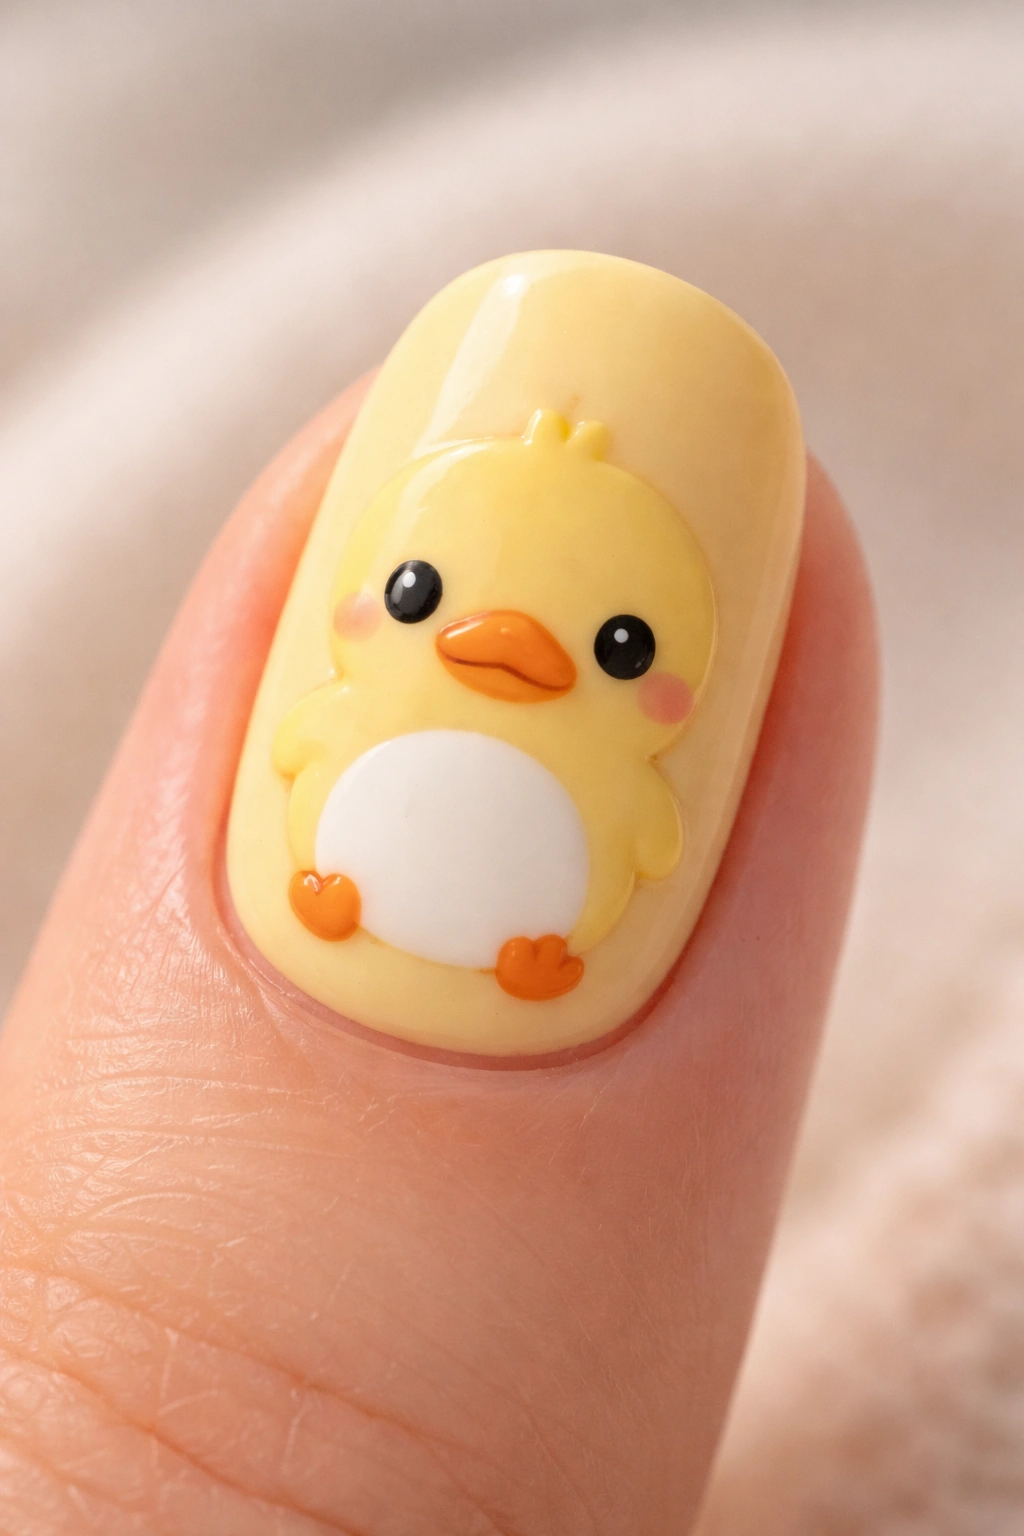
This is the quintessential kawaii duck nail design and serves as the perfect entry point for anyone new to duck-themed art. Start with a soft pastel yellow or creamy butter yellow base on each nail, then hand-paint a simple duck profile using a fine-tipped brush and white polish for the belly area. The magic happens when you add the facial features: two tiny black dots for eyes, a small orange curved line for the beak, and thin orange lines for the feet.
Why This Design Stands Out
The classic yellow duck works beautifully because it’s instantly recognizable and feels nostalgic for many people. The simplicity actually makes it more charming than overly complex designs. This version lets your nail polish quality and color choice be the star, which means you can focus on making each element clean and intentional rather than worrying about intricate details.
How to Execute It Perfectly
- Base layer: Apply 2 coats of soft yellow or butter yellow—this is your canvas
- Drying time: Wait a full 2 minutes between coats
- Duck body: Use white polish and a medium brush to paint an oval or teardrop shape
- Facial details: Dot on black eyes with a toothpick or dotting tool, one tiny black dot per eye
- Beak and feet: Switch to orange and paint a curved line for the beak, two thin lines beneath for webbed feet
- Top coat: Seal everything with a glossy finish
- Pro tip: Paint your duck on the ring or pinky finger for maximum visibility, or create a different duck variation on each nail for a cohesive set
Worth knowing: If your hand isn’t naturally steady, practice on paper first or use nail stencils designed for creating duck outlines. There’s no shame in using tools to get crisp results—many professional artists do.
2. Sleeping Duck Curled in a Ball
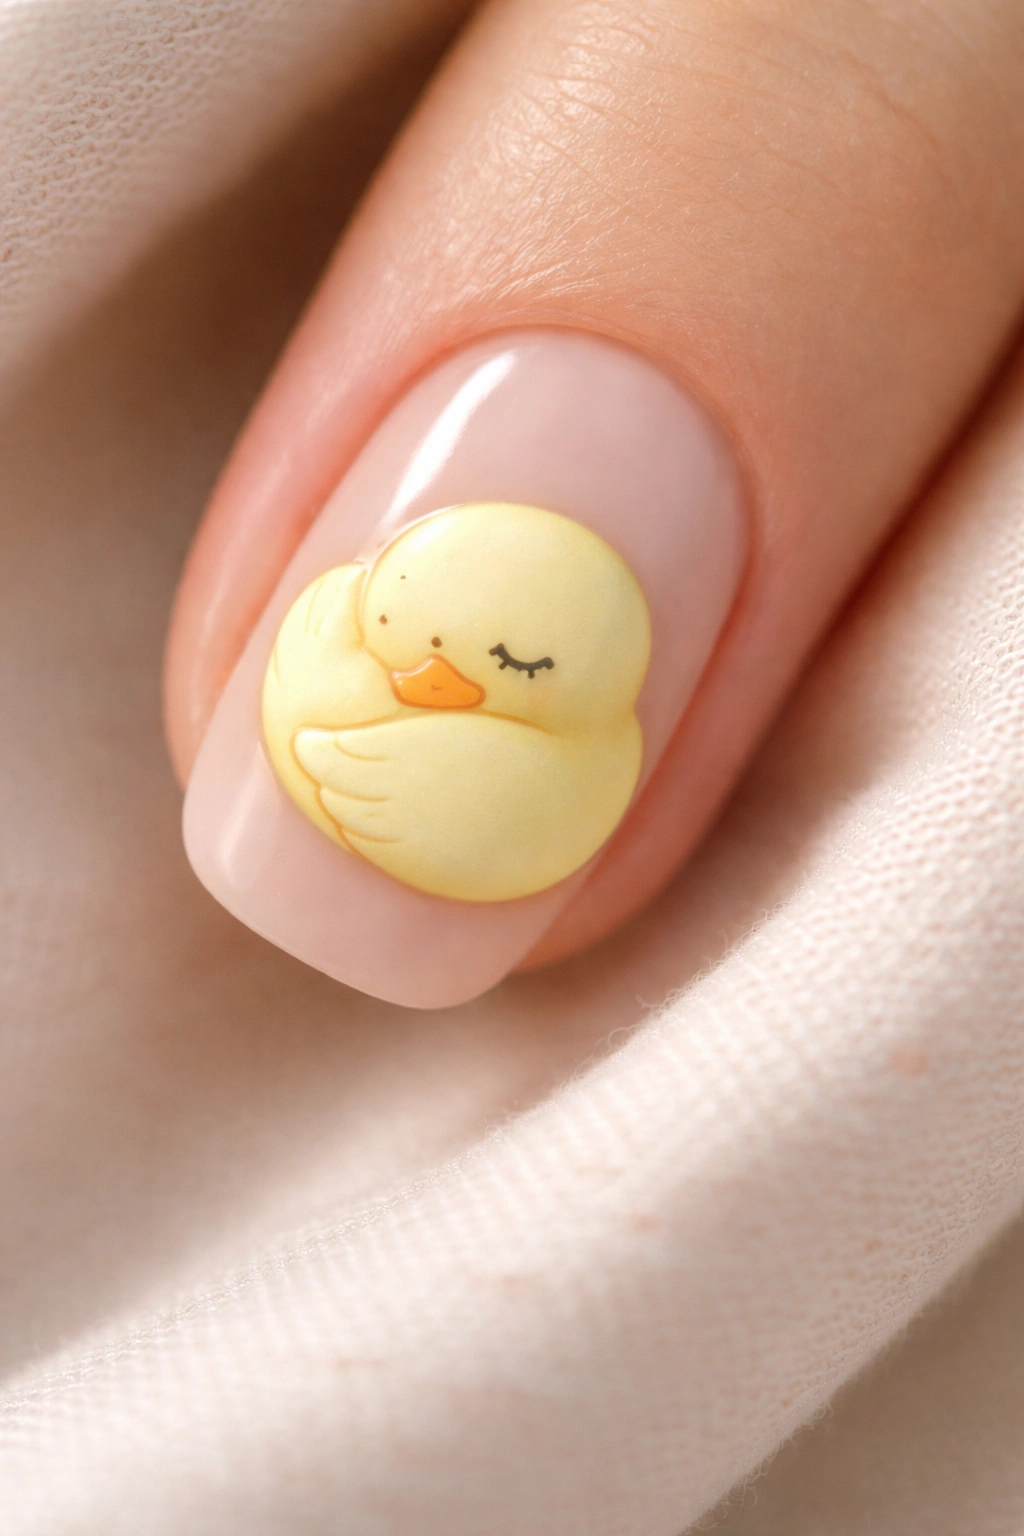
Sleeping ducks hit differently on the kawaii scale. Imagine a chubby little duck completely curled up, with just its round body visible and its head tucked down. This design captures pure coziness and works wonderfully on nude, soft pink, or pale blue base colors. The curled position means you’re essentially painting a large circle or oval for the body, then adding a tiny head tucked against it.
The Appeal of Sleepy Nail Art
This design resonates emotionally because it evokes comfort and relaxation. When you look at your nails, you see a little duck taking a peaceful nap, which can actually help you feel calmer. Many people find that cute, resting designs reduce anxiety throughout the day. The softness of the imagery translates into a soothing effect.
Design Execution Steps
- Apply a neutral base (nude, pale pink, or soft lavender)
- Paint the main body as a large, slightly flattened circle in pale yellow
- Add a smaller circle for the tucked head, overlapping slightly with the body
- Create the illusion of a curled position by painting a wing fold in white or pale yellow
- Add tiny closed eyes—just curved lines, like happy little crescents
- Paint a small beak where the head tucks
- Consider adding a subtle shadow under the curl to show dimension
- Optional: Tiny sparkles or shimmer finish suggest peaceful dreams
Quick insight: Sleeping designs work best when you keep the color palette soft and muted. Bright, saturated yellows can make the design look alert rather than restful, which contradicts the whole point.
3. Duck with Tiny Bow or Accessories
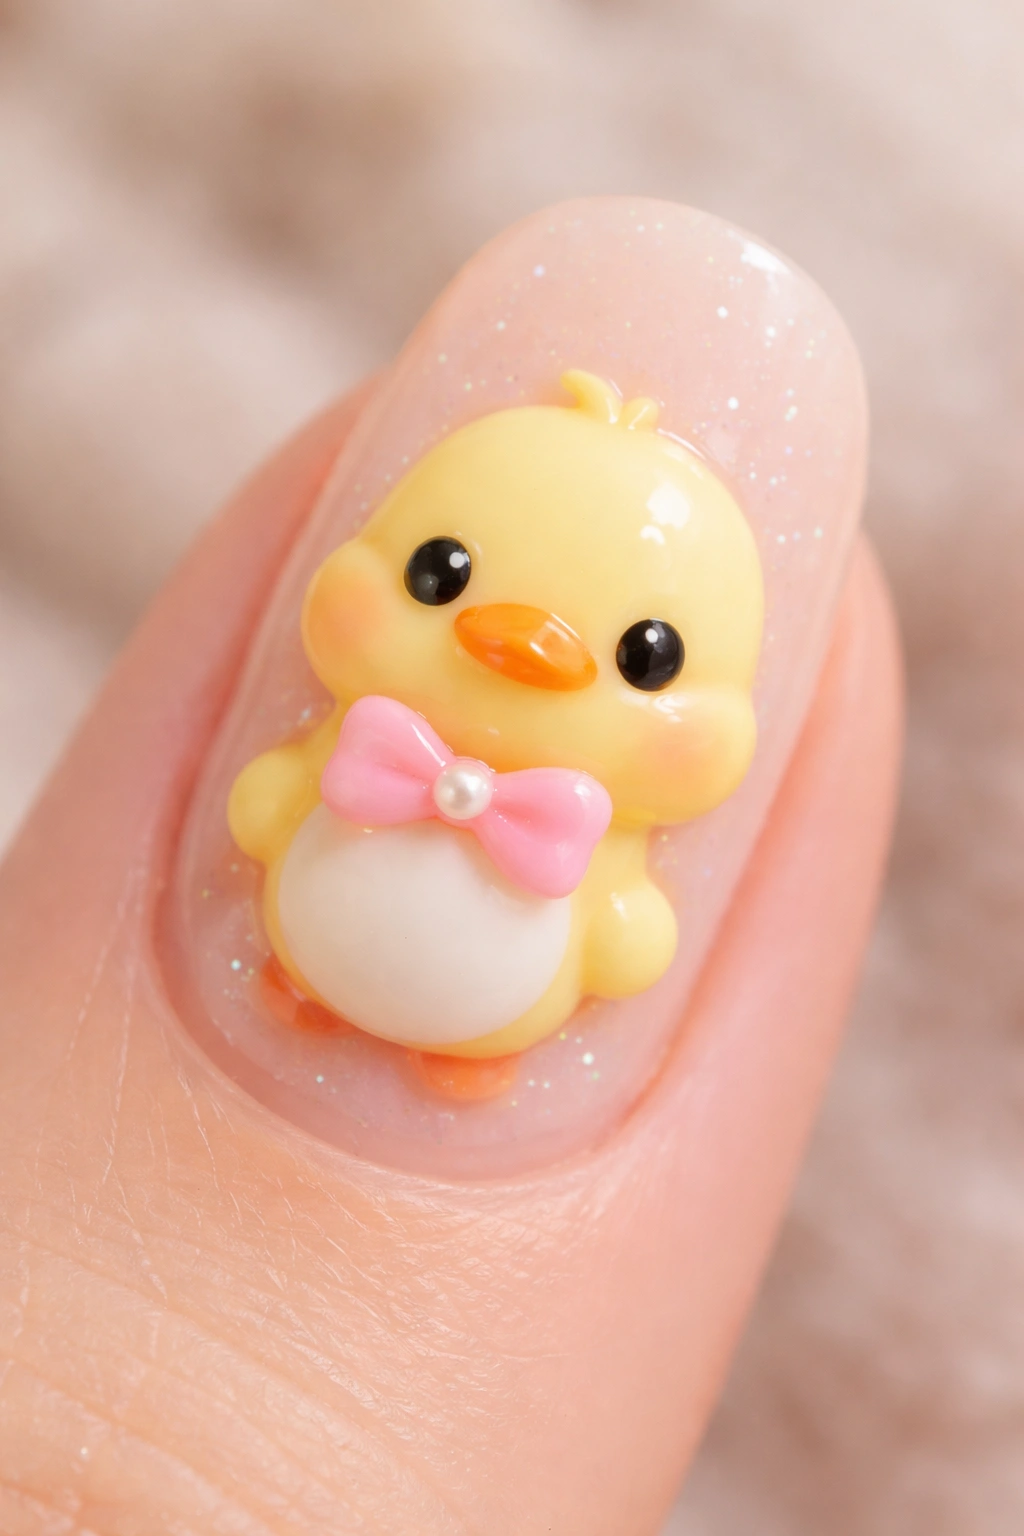
Elevating your duck design with cute accessories opens up a whole new dimension of creativity. Picture a standard duck wearing a miniature pink bow between its head and body, or tiny sunglasses perched on its beak. These accessories add personality and let you inject color beyond the standard yellow palette. A duck wearing a rainbow-striped scarf, a little flower crown, or even a tiny hat becomes a full character with its own style.
Making Accessories Look Intentional
The key to successful accessory placement is proportion. The bow, hat, or accessory should be noticeably smaller than the duck itself—otherwise it looks unbalanced. A bow should sit naturally where it would actually fit on a duck’s head or neck. Glasses need tiny arms extending to the sides of the duck’s beak. These details matter for making the design feel thought-through rather than random.
Accessory Ideas That Work
- Tiny flower crown sitting on top of the duck’s head with 4-5 petals
- Oversized bow (still proportional to the duck) at the neck or on the side of the head
- Sunglasses with small circular lenses and thin arms
- Little sailor outfit or striped bandana
- Tiny bucket the duck is holding or pulling
- Heart symbols floating around the duck (the duck is holding or wearing them)
- Minimal jewelry like a pearl necklace or ring
The beauty of accessorized ducks is that they let you create a narrative. Is this duck fancy? Adventurous? In love? Artistic? The accessories communicate personality instantly.
4. Ombre or Gradient Duck Nails
Taking your duck design into gradient territory creates visual depth and sophistication. Imagine a duck rendered where the colors transition smoothly—perhaps from pale yellow at the top to white at the bottom, or a blue-to-purple gradient that forms the duck’s body while maintaining all the adorable features. Gradient techniques can make simple designs feel more advanced and polished.
Creating Smooth Gradients
Gradients work best using a sponging technique. Apply two or more colors to a makeup sponge (slightly damp is crucial), then gently dab it onto your nail in overlapping motions. The key is blending rather than hard lines. Practice on a piece of paper first to understand how your colors interact. Some color combinations blend beautifully; others create muddy results.
Design Approaches for Gradient Ducks
- Vertical gradient: Light yellow at the top fading to white or pale blue at the bottom
- Diagonal gradient: Yellow on one side transitioning to orange, mirroring a sunset
- Pastel multi-color: Yellow to pink to blue in smooth transitions, creating a dreamy effect
- Ombre belly: Darker yellow for the duck’s back, light cream for the belly area, with a natural gradient between
- Holographic gradient: Using metallic or shimmer polishes that shift colors as light hits them
After creating your gradient base, add the duck details (eyes, beak, body outline) on top using contrasting colors. White detailing works over almost any gradient base. This layering approach—gradient background plus duck details on top—creates a more sophisticated final result.
5. Multiple Tiny Ducks Swimming Together
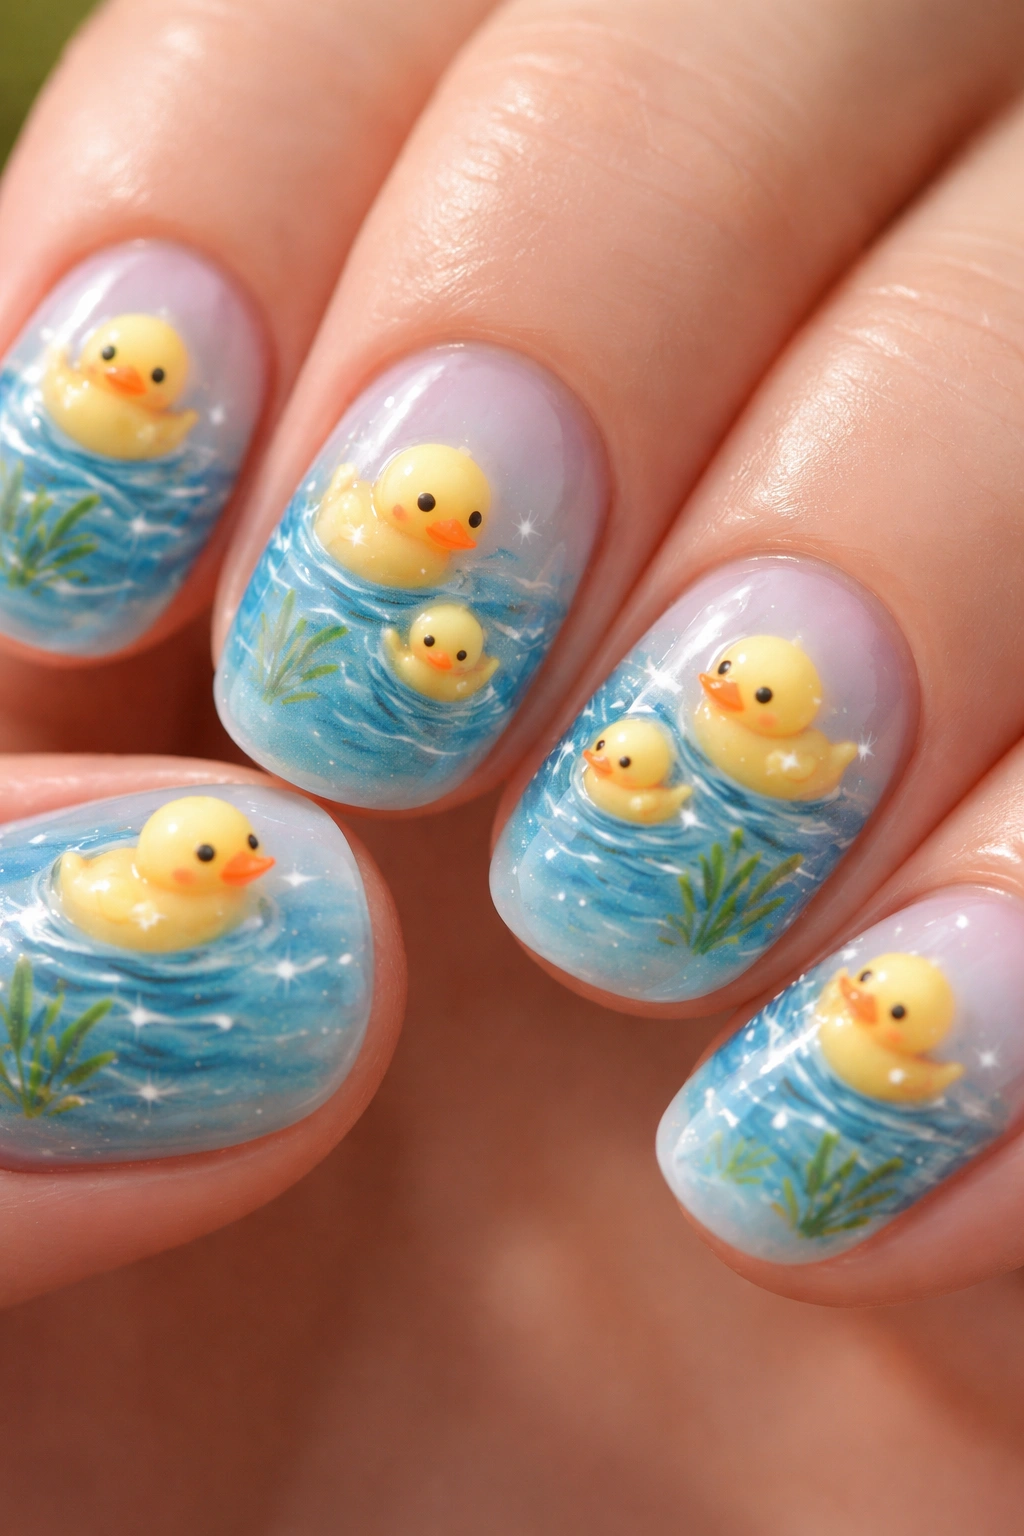
Sometimes more is better, and a design featuring several small ducks creates a scene rather than a single character. Picture four or five miniature ducks in different positions across a blue background—some facing forward, one in profile, another partially hidden. This design transforms your nail into a tiny aquatic landscape. The blue base represents water, and you can add subtle details like ripples or seaweed for context.
Creating Balance in Multi-Duck Designs
When painting several elements on a small nail canvas, composition matters enormously. Avoid placing all the ducks in a straight line—instead, stagger their positions at different heights. Vary their orientations: one facing left, another forward, another in partial profile. This creates visual interest and makes the scene feel dynamic rather than static.
One duck can be larger and more detailed while the others are simpler, which creates a focal point. Alternatively, make them all consistently detailed for a more organized, intentional look. The choice depends on your style preference.
Execution Tips
- Start with a light blue base that suggests water without being overwhelming
- Lightly sketch duck positions with a pencil before committing to polish
- Paint the main duck first—the one that’s biggest or most detailed
- Add secondary ducks with slightly less detail to show spatial variation
- Include water elements: wavy lines, ripples, or even tiny plants
- Consider adding reflections of the ducks beneath them for extra realism
- Finish with a glossy or matte top coat based on the mood you want
This design works particularly well on longer nails where you have more canvas to work with. On shorter nails, reduce the number of ducks to three and simplify their features.
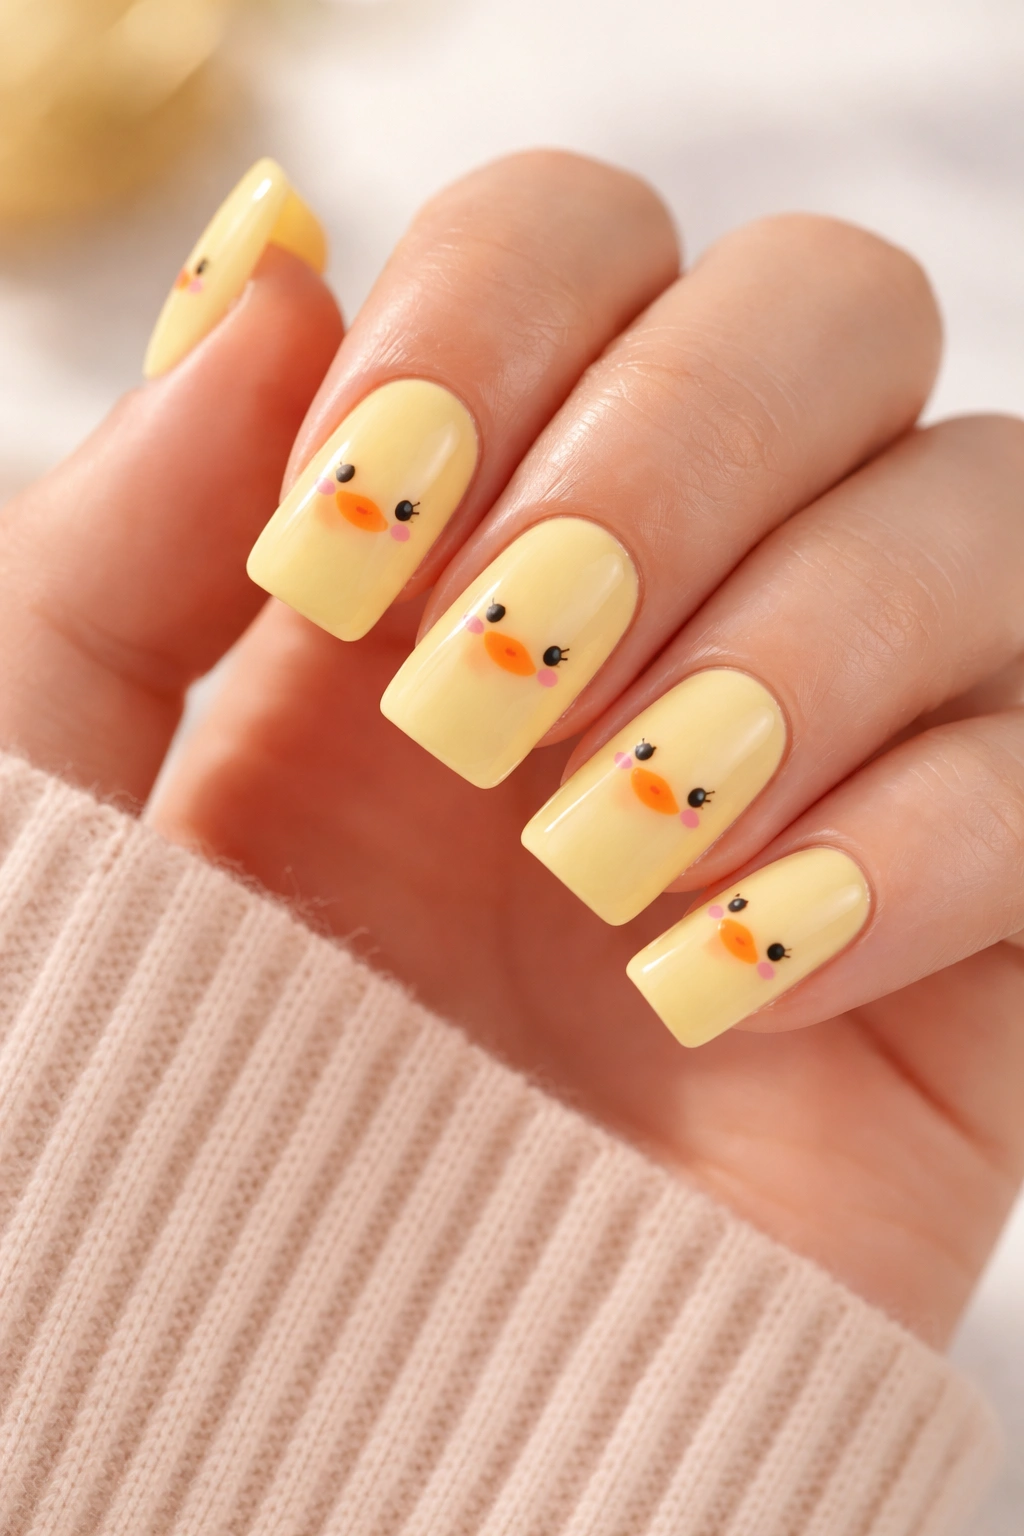
6. Kawaii Duck Face with Expressions
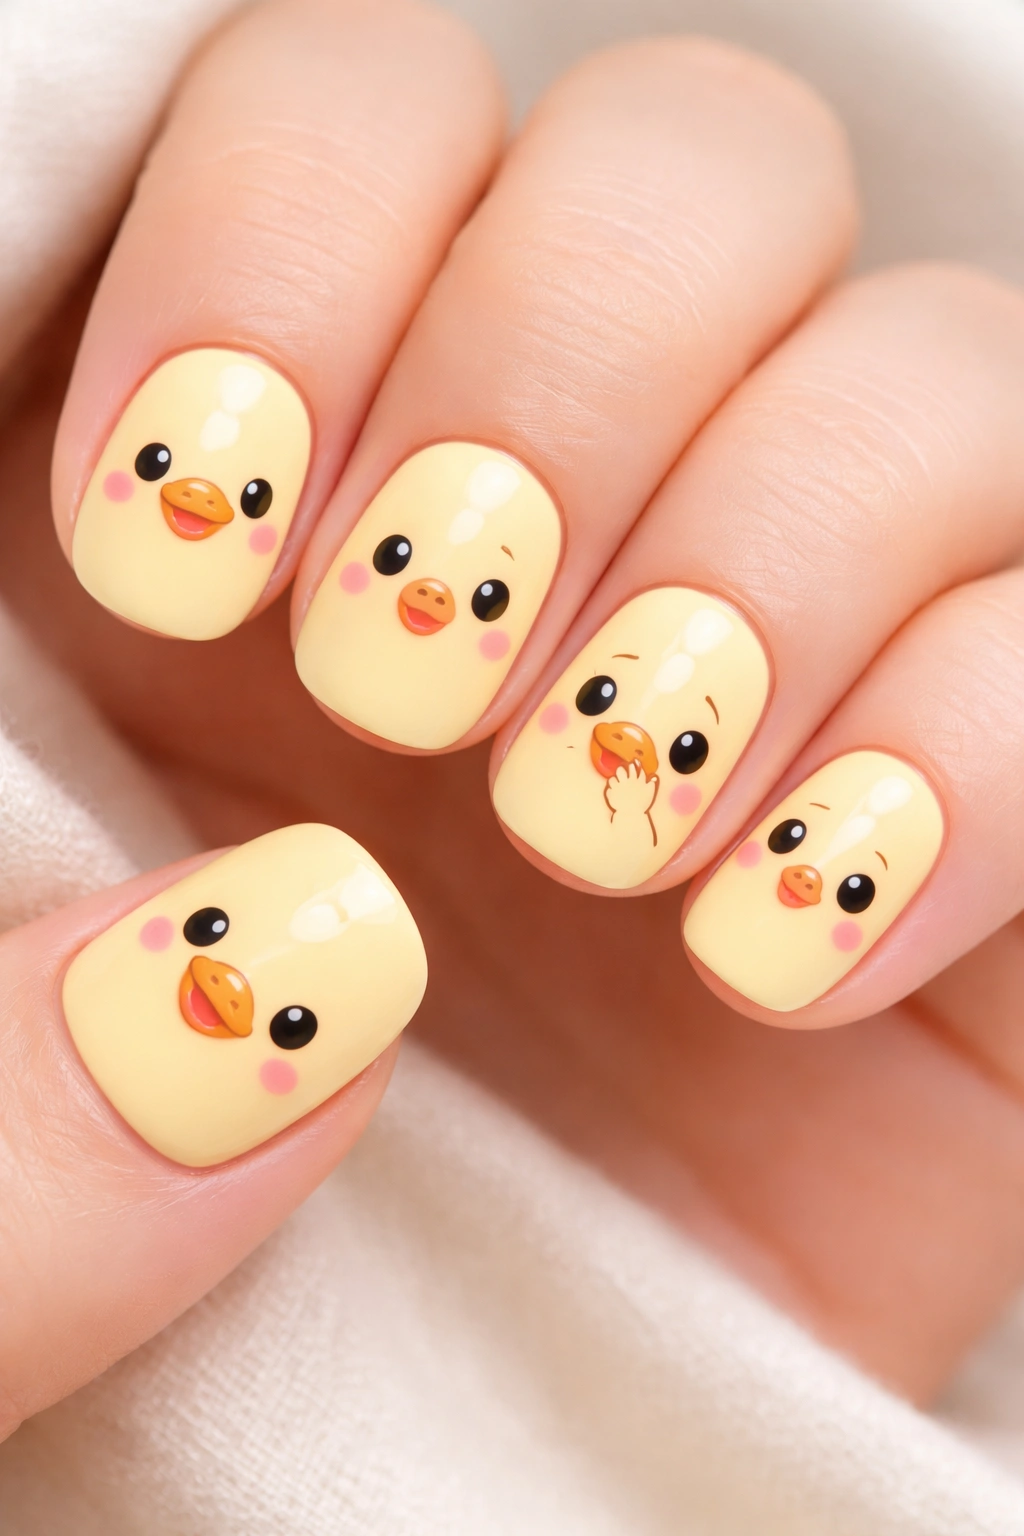
Duck faces showcasing different emotions create deeply engaging nail art. A surprised duck has a wide-open beak and big round eyes. A happy duck shows a closed beak with upturned eyes and tiny blush marks on the cheeks. A sad duck hangs its beak downward with smaller eyes and a slight frown. Each expression transforms the same basic duck shape into an entirely different mood.
Using Emotions to Tell a Story
When you create a set with different duck expressions across your five fingers, you’re telling a visual story. Your index finger might be a confident, smiling duck. Your middle finger could be a thoughtful, neutral duck. Your ring finger features a surprised duck. This creates a narrative arc that’s deeply satisfying. Every time you look at your hands, you see this little emotional journey.
Facial proportions shift slightly with each emotion, which is what makes them work. Surprised ducks need bigger eyes set higher on the face. Happy ducks benefit from subtle dimples or blush marks. Sad ducks look better with slightly droopy features.
Expression Ideas
- Happy/cheerful: Big smile, closed beak, upturned eyes with shine
- Surprised: Wide open beak, large round eyes, raised eyebrows
- Sleepy: Closed crescents for eyes, relaxed expression, slightly open beak
- Confused: Tilted head, one eye larger, head tilted
- Angry (adorably): Tiny furrowed brows, determined expression, beak slightly open
- Loving: Heart-shaped eyes or hearts surrounding the duck
- Silly: Cross-eyed or one eye winking, tongue-out expression
The most successful emotional duck designs use the entire face to communicate feeling. Don’t rely solely on the eyes—involve the beak, head tilt, and overall posture to convey the emotion fully.
7. Minimalist Line-Art Duck

If detailed painting feels intimidating, minimalist line-art ducks offer sophisticated results with minimal complexity. Imagine just a few clean, continuous lines that suggest a duck—perhaps a curved line for the head and neck, a longer curved line for the body, tiny dots for eyes. The elegance comes from restraint and precision rather than elaborate detail. These designs work beautifully on neutral base colors: nude, soft grey, or pale white.
Why Minimalism Works
Minimalist designs actually require more planning than ornate ones. Every line must be intentional because there’s nowhere to hide mistakes or unnecessary elements. There’s a confidence that comes through in truly minimal artwork—it says you know exactly what you’re doing without needing to prove it through complexity.
These designs also age better. Intricate details can start looking messy as nail polish chips or wears unevenly. Minimalist designs maintain their integrity even as they age slightly. A few clean lines still look intentional even with minor wear.
Creating Strong Minimalist Duck Designs
- Use the finest brush tip you own—precision is non-negotiable
- Plan your design on paper first with a pencil, then transfer to the nail
- Create the silhouette with one continuous line when possible—ducks are beautiful outline shapes
- Add just two or three defining details: eyes, beak, maybe one line suggesting the wing
- Consider negative space as part of your design—what you don’t paint is as important as what you do
- Pair line-art ducks with colors that create contrast (dark lines on light base, or light lines on dark base)
- Use black or very dark grey for the most professional, gallery-quality result
Minimalist ducks particularly shine when you paint them on the middle or index finger, where the nail’s natural curvature complements the flowing lines of the design.
8. Duck with Underwater or Nature Scene
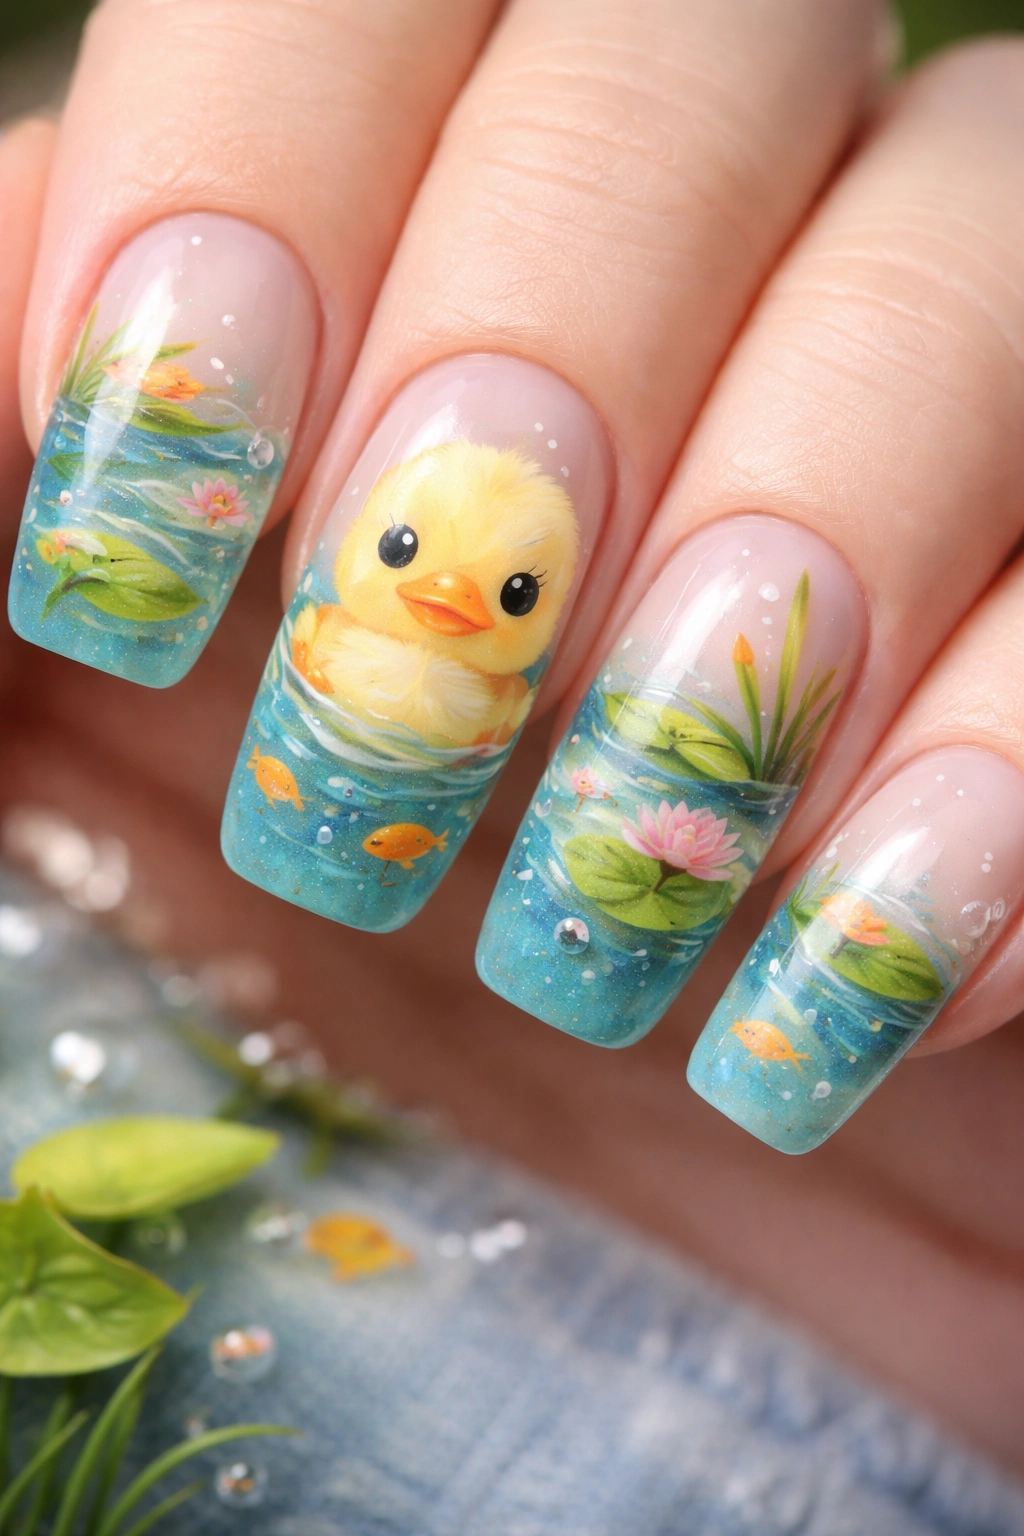
Expand beyond the duck itself and create a complete underwater world or natural habitat around it. Picture a duck in the water with lily pads, cattails, small fish, or aquatic plants floating nearby. In a forest version, the duck might be surrounded by tiny trees, mushrooms, and flowers. The duck becomes the focal point of an entire scene that tells a broader story about where this duck lives and what it does.
Building a Cohesive Scene
Scene-based designs require planning more than single-element designs. Sketch out your composition lightly first: Where does the duck sit? What’s in the foreground versus background? Small elements in the background should be slightly less detailed than the duck, which keeps the focus on your main subject. Overlapping elements (like a lily pad partly covering a fish) create depth and make the scene feel less flat.
Color choices become more complex when you’re painting scenes. You might use a blue gradient background transitioning to green at the bottom to suggest water meeting underwater plants. Lily pads need a natural green that’s distinct from the water color. Small details should use colors that either match the natural world or pop intentionally.
Scene Elements That Work Well
- Underwater: Lily pads, water lily flowers, tall grass, cattails, pebbles on the bottom, tiny fish
- Forest/meadow: Trees, mushrooms, flowers (daisies work great), grass tufts, a tiny cottage or birdhouse
- Garden: Sunflowers or roses, a watering can, butterflies, garden stones, a small fence
- Pond: Dragonflies, water ripples, stones, aquatic plants
The most successful scene designs have a limited color palette—typically 3-5 main colors plus white or a highlight color. Too many colors make the composition feel chaotic rather than intentional.
9. Holographic or Glitter Duck
Adding shimmer, sparkle, and light-reflecting elements takes duck designs into extra-special territory. Imagine painting your duck and then adding holographic powder, metallic polish, or iridescent glitter to specific areas. A duck’s body might be standard yellow while its eyes are tiny holographic circles that catch the light beautifully. Or the entire duck could be rendered in holographic polish that shifts colors as your hand moves.
Using Shimmer Strategically
The key to making sparkly elements work is restraint. Holographic or glitter details should highlight rather than overwhelm. Consider adding shimmer only to certain features: the eyes (making them gleam), a bow or accessory, the belly area, or wing details. This creates a focal point and makes the glitter feel intentional rather than messy.
Holographic powders work by mixing them into clear gel or applying them over wet top coat. The effect is otherworldly and dramatic. Glitter-based polishes offer a more subtle sparkle that catches light without being overwhelming. Metallic polishes provide a mirror-like, futuristic quality that works beautifully on minimalist duck designs.
Application Techniques
- Use holographic powder sparingly—a tiny amount goes a long way
- Apply powder while the top coat is still slightly tacky for best adhesion
- Layer different finishes: matte body with glossy accents, or glossy base with matte details
- Metallic paint pens create precise metallic details without the integration challenges of powder
- Seal everything thoroughly—sparkly designs need excellent top coat layers to prevent chipping
The most Instagram-worthy duck designs often combine clear or light bases with strategic holographic elements. The contrast between the simple design and the dramatic sparkle creates visual intrigue.
10. Rubber Duck or Bath-Time Theme
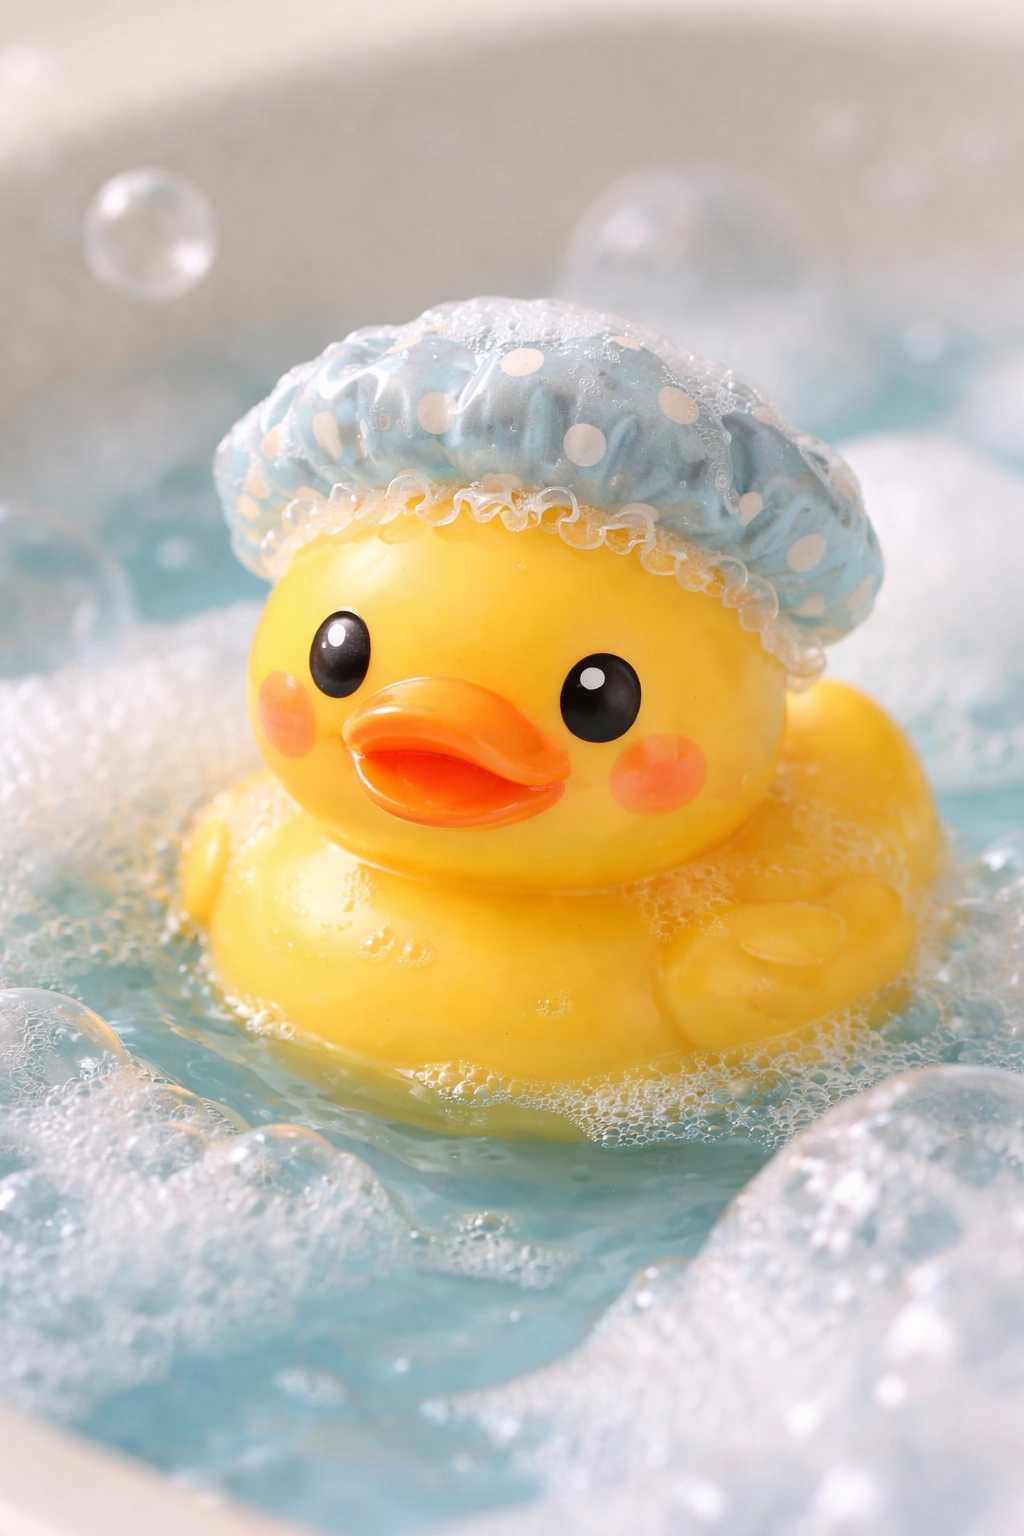
Wrapping up with a playful variation: the rubber duck aesthetic. These ducks are chubby, cheerful, completely yellow with minimal details, often wearing shower caps, sunglasses, or in bathtubs surrounded by bubbles. This design celebrates the campy, joyful side of duck culture and works wonderfully if you prefer designs that make people smile the instant they see them.
Capturing Rubber Duck Energy
Rubber ducks have a specific quality—they’re plump, rounded, and unapologetically silly. Capture this by making your duck shape rounder and squatter than a realistic duck. Think of a ball with a head rather than a more anatomically correct bird. The eyes should be happy and simple. Details like a little shower cap, bubbles, or a rubber ducky crown add to the playful vibe.
This design pairs beautifully with pastel or bright backgrounds. Consider a light blue base suggesting bathwater, white dots for bubbles, and the yellow duck as the cheerful focal point. You could even paint tiny bath toys: a rubber boat, a sponge, or a bottle of bubble bath nearby.
Design Elements That Enhance the Rubber Duck Vibe
- Bubbles: White circles of various sizes floating around the duck
- Shower cap: A tiny pointed or rounded cap on the duck’s head
- Bathwater: Wavy lines suggesting water, or a light blue base
- Bath toys: Tiny boats, sponges, or bottles
- Sunglasses or goggles: Adding personality and playfulness
- Rubber ducky written in tiny letters (if you’re confident in script)
- Heart shapes around the duck showing it’s beloved
This design works on any nail length and skill level. The simple shapes and cheerful subject matter make it very forgiving. Even if your lines aren’t perfectly straight, the playfulness of the design means slight imperfections actually add charm rather than detract from it.
Tips for Making Your Duck Nails Last Longer
Cute designs only stay beautiful if they actually last. Start with a solid base coat applied in thin, even layers. This prevents chipping and helps the design adhere properly to the nail plate. Your base coat is insurance against your beautiful artwork flaking away after a few days.
Use high-quality nail polish for your designs. Cheaper polishes tend to have poor pigmentation, requiring multiple thick coats that eventually peel and chip. Good polish maintains color vibrancy and applies smoothly even in thin layers. This matters more for designs because chipped areas show immediately.
Apply your design in thin layers rather than one thick coat. Three thin coats of yellow for your base looks better and lasts longer than two heavy coats. Thin application prevents cracking as your nails flex and move. Similarly, apply your design elements in thin coats, allowing proper drying time between layers.
Top coat is non-negotiable. Apply at least two layers of quality top coat, and consider a quick-dry top coat as your final layer for maximum durability. Top coat protects your design from exposure to water, soap, and everyday wear. Without it, even the most perfect duck design starts deteriorating within days.
Common Beginner Mistakes to Avoid
Rushing between coats is the number-one reason designs fail prematurely. Wet polish over partially-dry polish creates lifting and peeling. Wait until each layer is completely dry before applying the next. Set a timer if needed—most polishes need 2-3 minutes between coats, even quick-dry formulas.
Using polish that’s too thick is another common problem. If your polish feels like paint rather than flowing smoothly, thin it out by adding a few drops of polish thinner. Thick polish cracks, peels, and creates visible brush strokes even when you’re experienced. Thin, smooth polish applies beautifully regardless of your skill level.
Overworking details creates muddy, undefined results. If your duck’s eyes don’t look right, don’t keep going over them. Let them dry, then evaluate. Many beginners think more coats of polish will fix a problem when really they’re just layering mistakes. This is especially true with detailed work where you need clean definition.
Forgetting to clean your brushes between colors means colors mix on the brush, creating muddiness. Even a tiny amount of black polish left on a brush after painting eyes will contaminate your next color. Rinse or wipe brushes on a paper towel between each color change, or use separate brushes for clearly different colors (one for dark colors, one for light).
Applying design elements to the wet top coat is also problematic. Your cute details can slide around or pick up on your brush. Only add details to completely dry layers, then seal everything with fresh top coat afterward. This ensures crisp, defined designs that don’t smudge or smear.
Final Thoughts
Kawaii duck nails represent the perfect intersection of approachable nail art and genuine creative expression. Whether you lean toward minimalist elegance, elaborate scenes, or playful rubber duck energy, there’s a duck design that fits your style and skill level. The designs shown here are starting points—each one invites variations and personal interpretations that make them uniquely yours.
The wonderful thing about duck designs is their inherent charm removes pressure from perfection. A duck with slightly uneven eyes isn’t a failure; it’s a duck with character. Imperfect lines add personality. Asymmetrical details feel intentional rather than sloppy. This is what makes duck nails so accessible to beginners and so enjoyable for experienced artists.
Start with whichever design calls to you most, gather your supplies, and commit to enjoying the creative process. Take breaks when your hand gets tired—steadiness matters more than speed. Keep your brushes clean, give yourself proper drying time between coats, and seal everything with quality top coat. Your duck nails will make you smile every single time you look at your hands, which is really what nail art is all about.
