

White and gold is one of the most elegant color combinations you can wear on your nails, and it works for literally everything—from casual weekends to black-tie events. There’s something almost timeless about the pairing; gold brings warmth and luxury while white keeps everything fresh and sophisticated. Whether you’re drawn to minimalist geometry, glamorous glitter, or romantic florals, white and gold offers endless creative possibilities that can match any mood or occasion.
The beauty of working with these two colors is how versatile they are together. You can go bold with thick gold stripes and stamped patterns, or keep things understated with delicate accent nails and negative space designs. The combination works equally well on short practical nails and long dramatic ones, and it’s forgiving enough that even if you’re not a nail art expert, many of these designs are surprisingly achievable at home with basic tools and patience.
What makes white and gold especially appealing is how the contrast between the cool tone of white and the warm richness of gold creates natural visual interest without feeling overdone. These aren’t colors that need a ton of embellishment to look polished—sometimes the simplest designs are the most stunning. That said, if you love adding texture, dimension, and detail, white and gold gives you plenty of room to experiment with metallics, gems, and intricate line work.
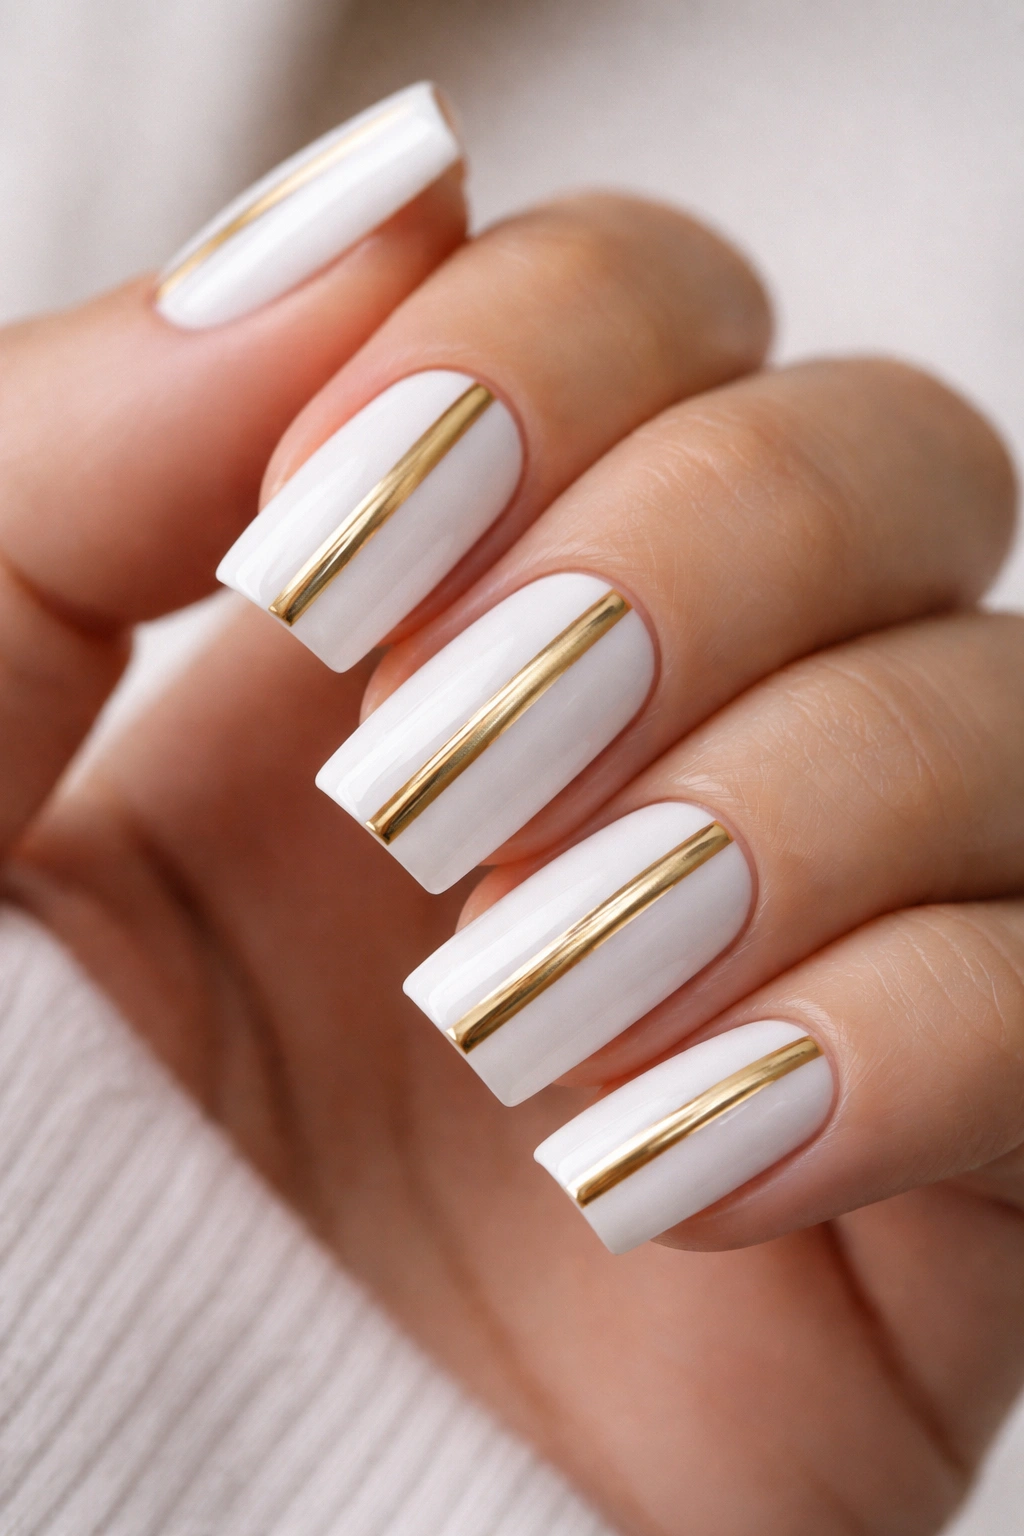
1. Geometric Gold Lines on White Base
This design strips away everything unnecessary and relies on the power of clean, straight lines. Paint your entire nail a crisp white, then use a thin gold striping brush or a toothpick to create geometric patterns—think diagonal lines, triangles, or abstract angles arranged across the nail surface. The key is keeping your lines straight and confident; wobbly lines can happen to anyone, so don’t stress if your first attempt isn’t perfect.
Why Minimalism Hits Different
Geometric designs work because they feel intentional and modern. A white base makes the gold lines pop dramatically, and there’s something deeply satisfying about a design that’s clean, balanced, and purposeful. This style doesn’t scream “look at me”—it whispers sophistication.
How to Execute It Perfectly
- Use a striping brush or thin-tipped gel liner for precision
- Consider using tape guides for completely straight lines if you’re unsure
- Two thin coats of white will give you a smooth canvas
- Let the gold dry completely before sealing with topcoat
Pro tip: Paint your lines at room temperature—warm nails can cause gold polish to flow unevenly, creating blurry edges.
2. Chunky Gold Horizontal Stripes
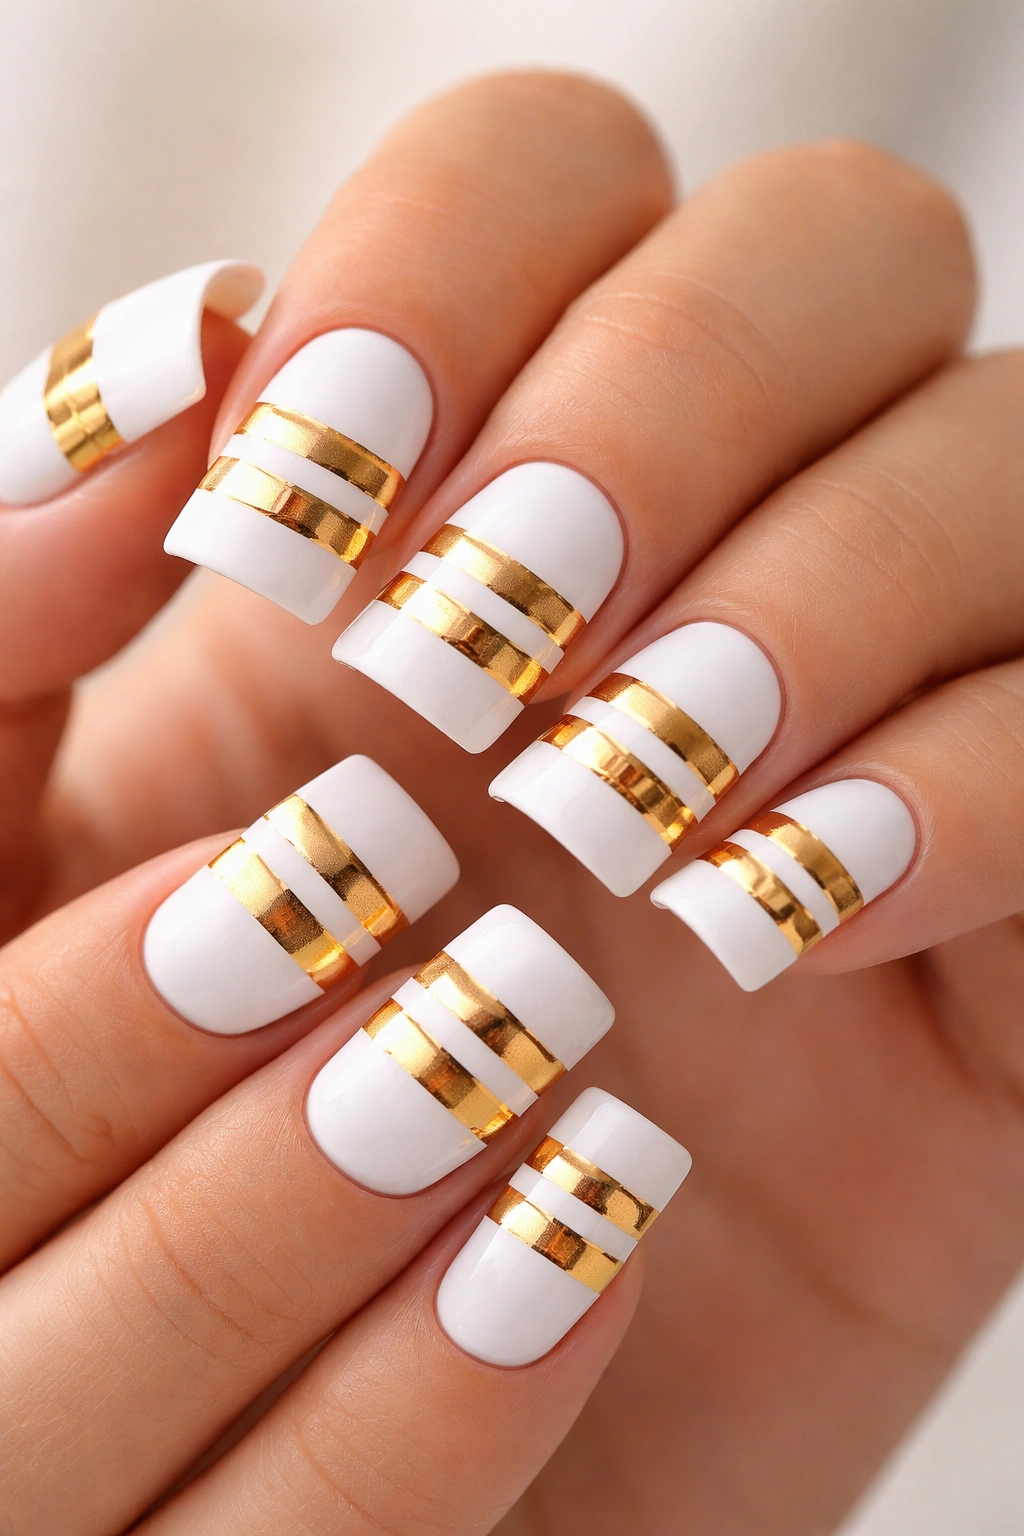
Instead of thin lines, think bold bands of gold sweeping horizontally across a white base. This design is bold, graphic, and impossible to miss. You can space them evenly or play with asymmetrical placement—maybe thick stripes on two nails, thin ones on another, and then switch it up on your pinky. The chunky approach makes this design work beautifully on both short and long nails.
The Power of Bold Statement Nails
Thick stripes command attention without needing any additional detail. The scale of the design means even slight imperfections in the stripe edges won’t be noticeable, which is why this is actually one of the easier gold-on-white designs to pull off. The visual impact is entirely out of proportion to the technique required.
Application Tips for Clean Stripes
- Use a regular nail polish brush, not a striping brush, for wider bands
- Apply gold in two coats for full opacity
- If your edges are uneven, don’t fret—slight irregularity adds to the handmade charm
- Negative space (where the white shows between the stripes) is part of the design’s appeal
Worth knowing: Spacing your stripes about 2-3mm apart creates visual rhythm that feels more intentional than random placement.
3. Gold Marble Effect Over White
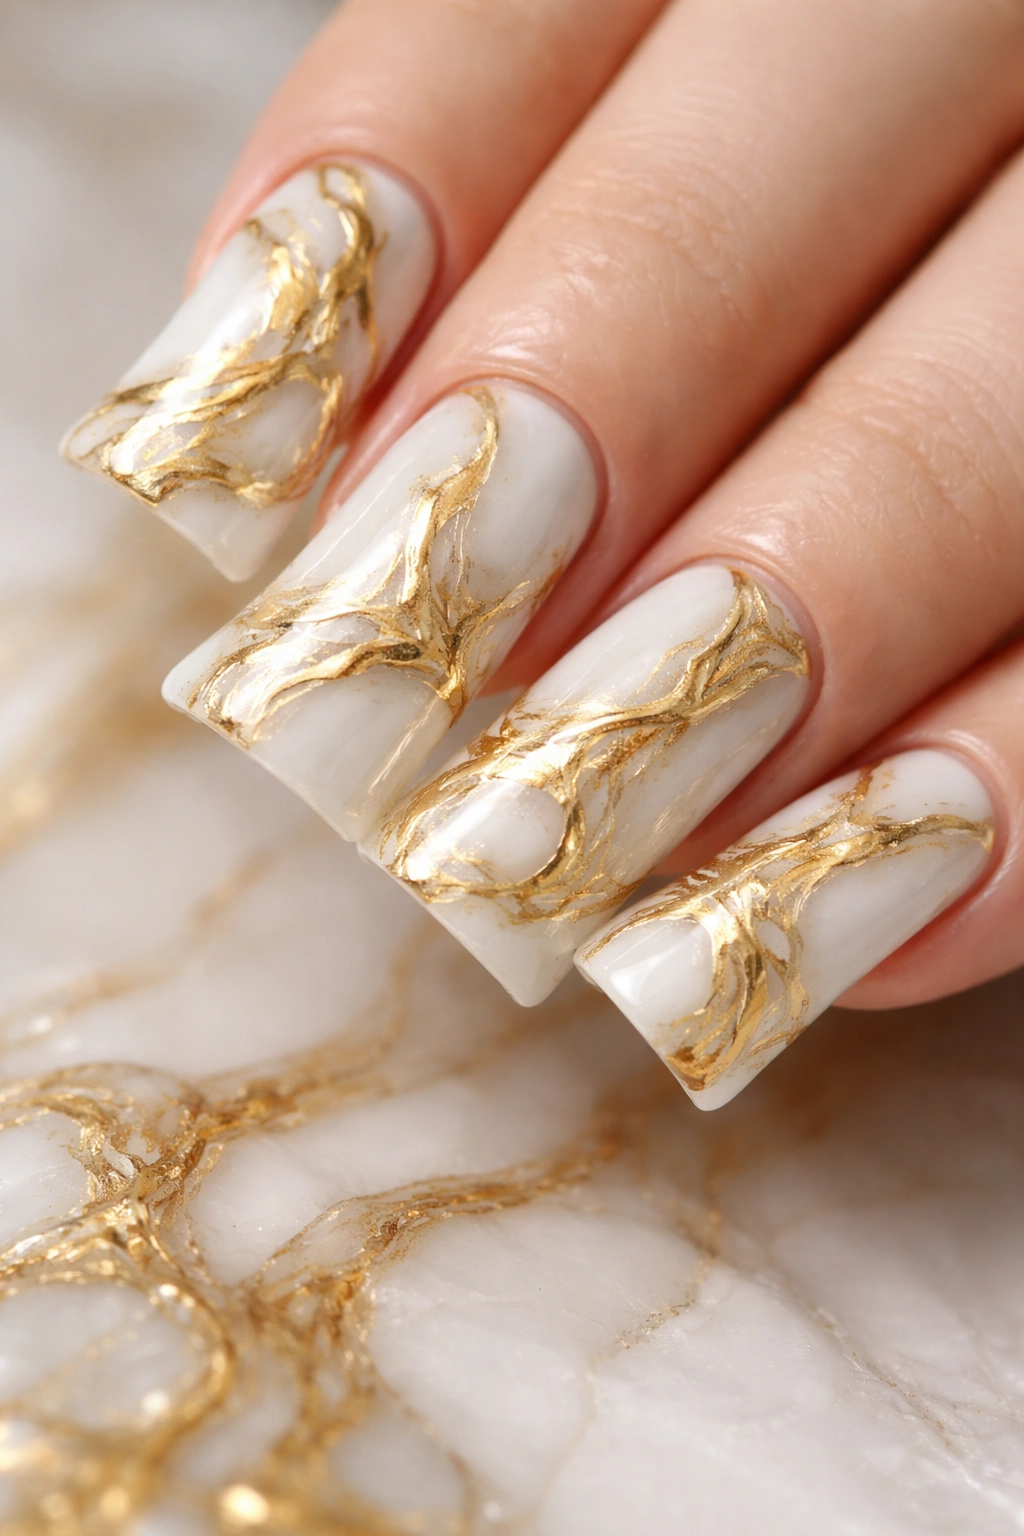
Swirl gold into white with a marbling technique that creates organic, flowing patterns across each nail. This isn’t a structured design—it’s artful and unique every single time. You’ll need a small bowl of room-temperature water, gold and white polish, and a thin tool to drag the colors together and create the marble pattern before dipping your nail in.
Why Marble Feels High-End
Marbling has an inherent luxury feel because it mimics real stone and requires a delicate hand to pull off well. Each nail ends up with a slightly different pattern, which means no two manicures are ever identical. This personalization is part of what makes marble designs so special—they feel bespoke.
Water Marbling Basics (and How to Get It Right)
- Keep water at room temperature, not hot or cold
- Drop polish onto the water surface in concentric circles
- Use a thin tool (bobby pin, toothpick, or specialized marbling tool) to drag and swirl
- Quickly dip your nail straight down, then pull straight out
- Pat dry and clean up edges with a brush dipped in acetone
Insider tip: Apply a thick base coat to your nail before dipping—it makes the transfer cleaner and the whole process more forgiving.
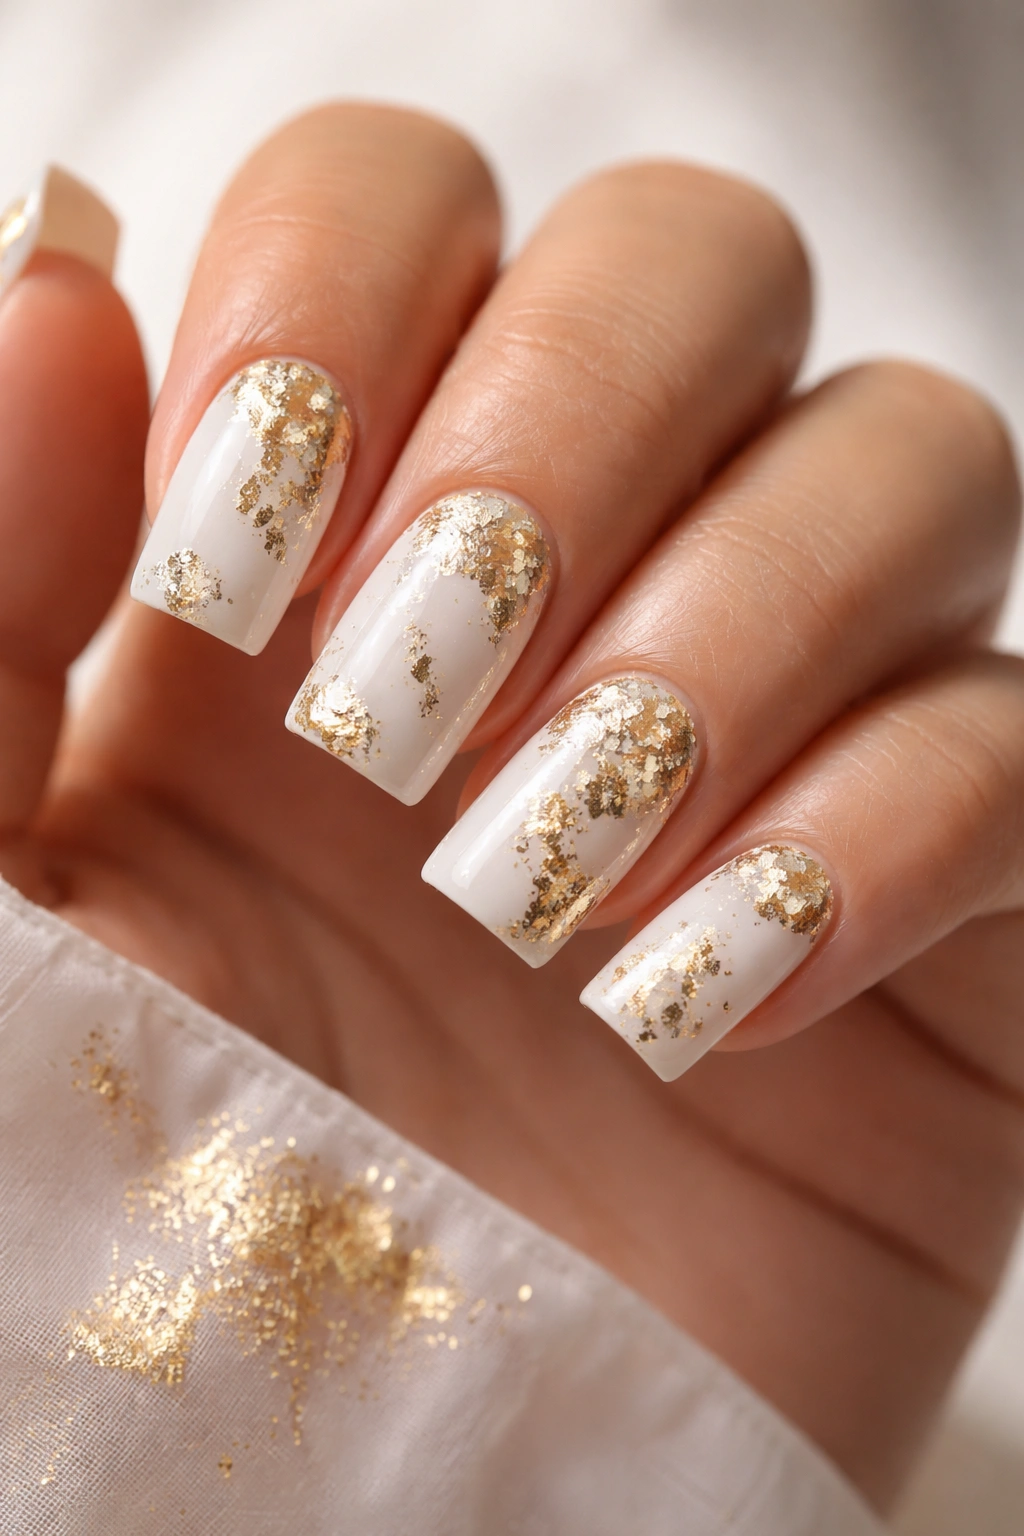
4. Gold Leaf Accent Nail
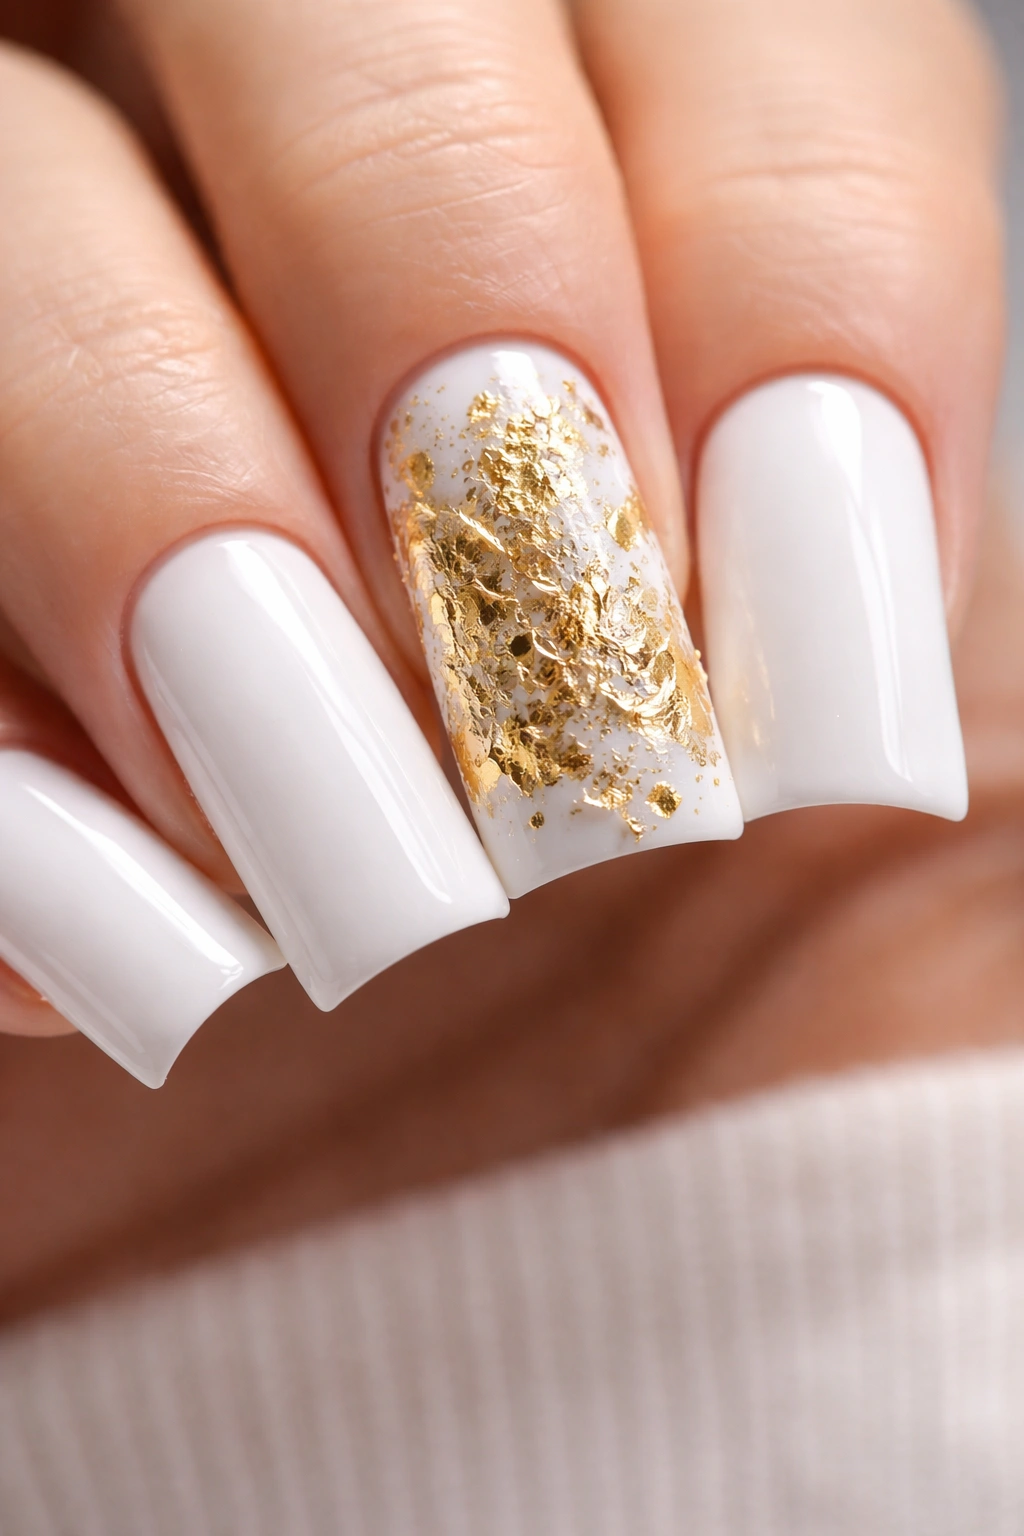
Create a statement accent nail by applying crumpled or torn pieces of gold leaf over a white base. You can press them down partially, let them wrinkle naturally, and seal everything with topcoat. The result is textured, dimensional, and catches the light beautifully. This works best as an accent on one or two nails while the others stay solid white.
The Texture Advantage
Gold leaf adds dimension that flat polish can’t achieve. Light bounces off the wrinkled surface differently depending on the angle, which means your nails look different (and gorgeous) from every perspective. This is sophisticated nail art that doesn’t require any free-hand painting ability.
How to Apply Gold Leaf Without Frustration
- Use a sticky base coat or tacky topcoat layer as your adhesive
- Cut or tear the leaf into manageable pieces before applying
- Press gently but firmly to set each piece
- Seal with a generous layer of clear topcoat to protect and smooth edges
- Wrinkles are a feature, not a flaw—embrace them
Pro tip: Keep a matte topcoat on hand if you prefer a more subtle look; it tones down the reflectiveness and creates a more understated elegance.
5. Delicate Gold Floral Branches on White
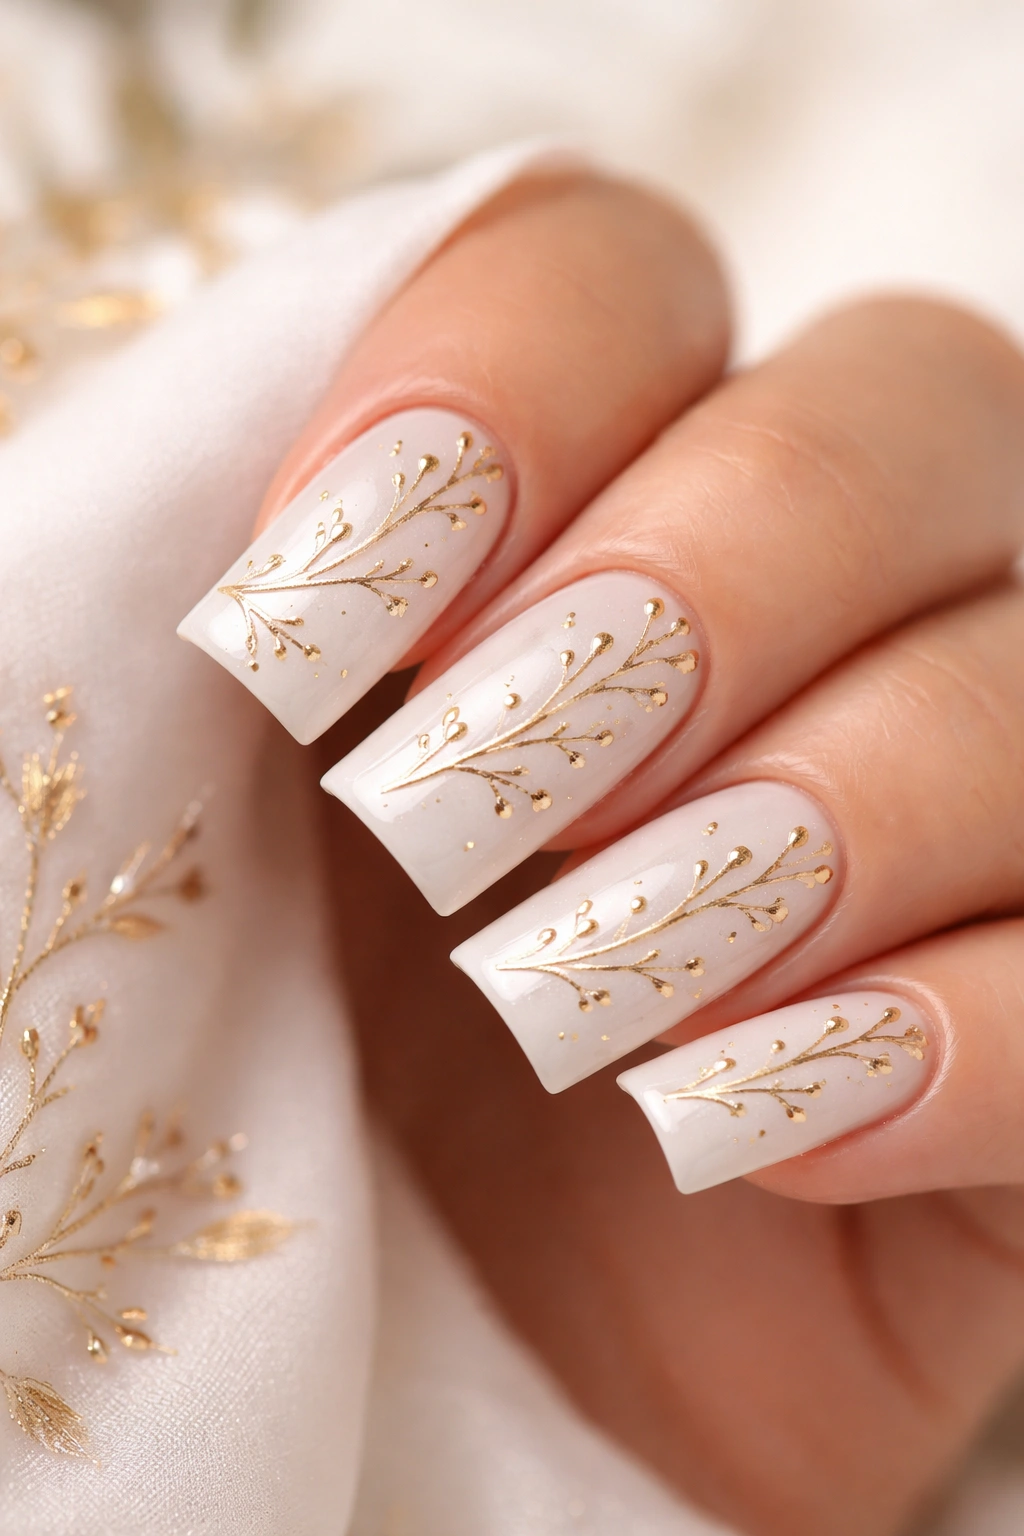
Paint thin, branching lines in gold that look like a minimalist drawing of flowering branches or vines. This design is intricate but surprisingly forgiving because organic lines don’t need to be perfect—slight irregularities actually make it look more natural and hand-drawn. Add tiny dot “flowers” where the branches meet for dimension.
Why Botanical Designs Never Feel Dated
Floral and botanical patterns have been in fashion for centuries because they work with human psychology—we’re naturally drawn to plants and growth imagery. Pairing botanical designs with white and gold feels timeless and elegant rather than trendy.
Creating Botanical Line Art on Nails
- Use a striping brush or thin gel brush for control
- Sketch your branch pattern lightly with a pencil first if needed
- Gold shows beautifully on white, so take your time with the line work
- Tiny dots at branch ends or junctions become “blooms”
- One coat of gold is usually enough for delicate lines
Worth knowing: Thinner lines require steadier hands, so take breaks between nails if your hand is getting tired.
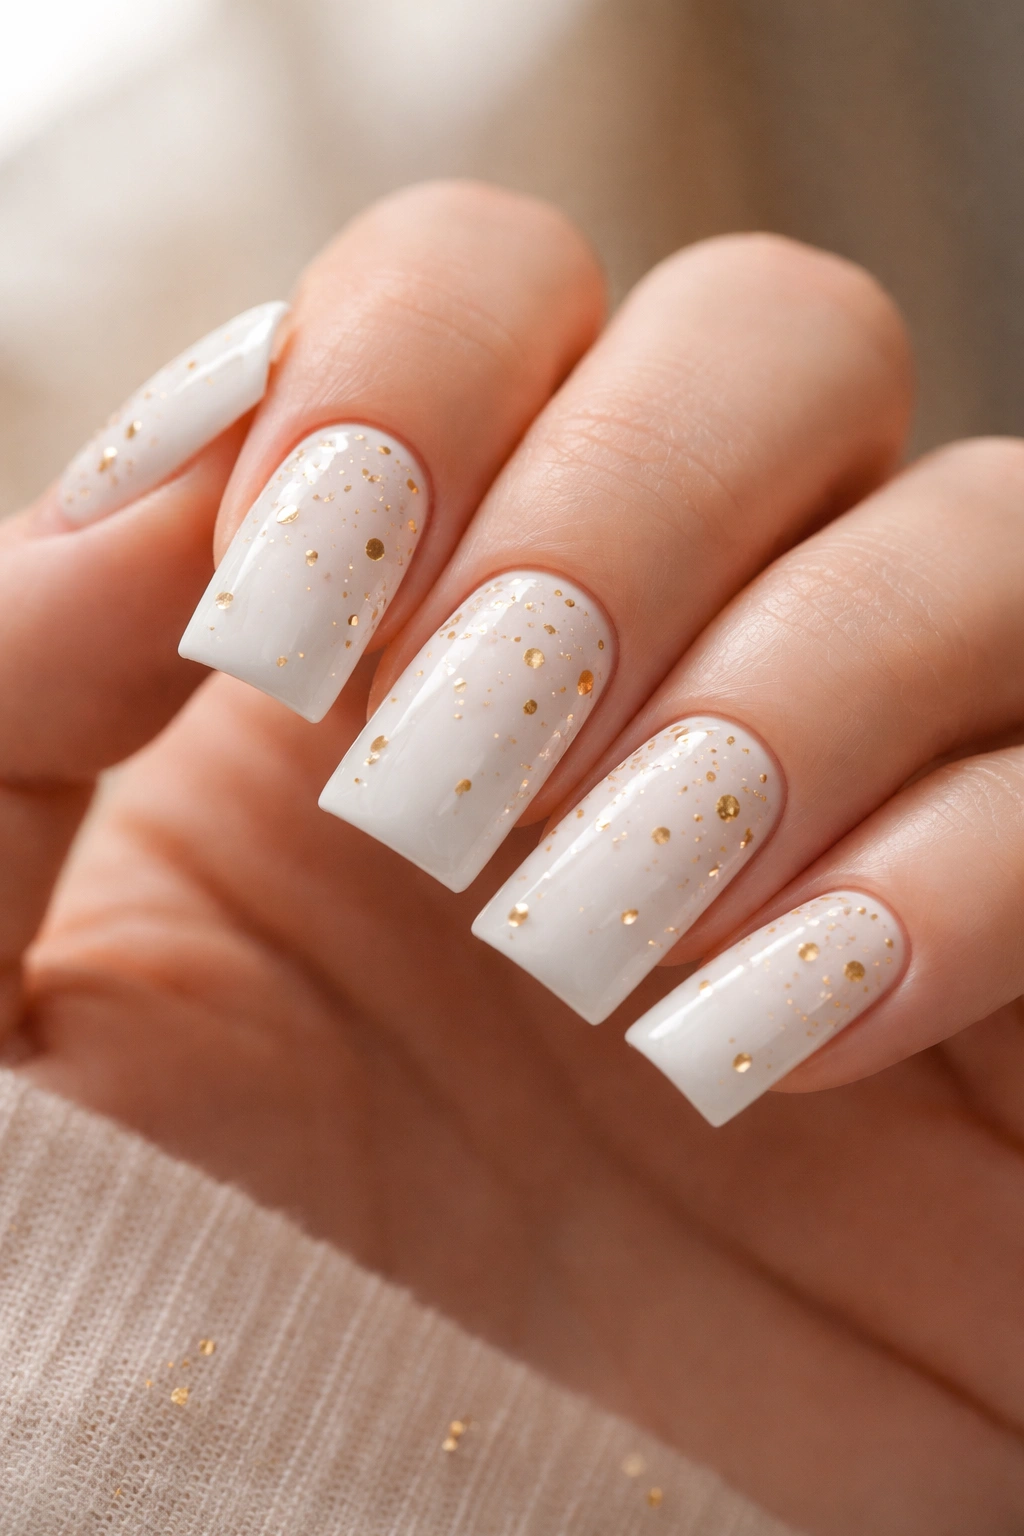
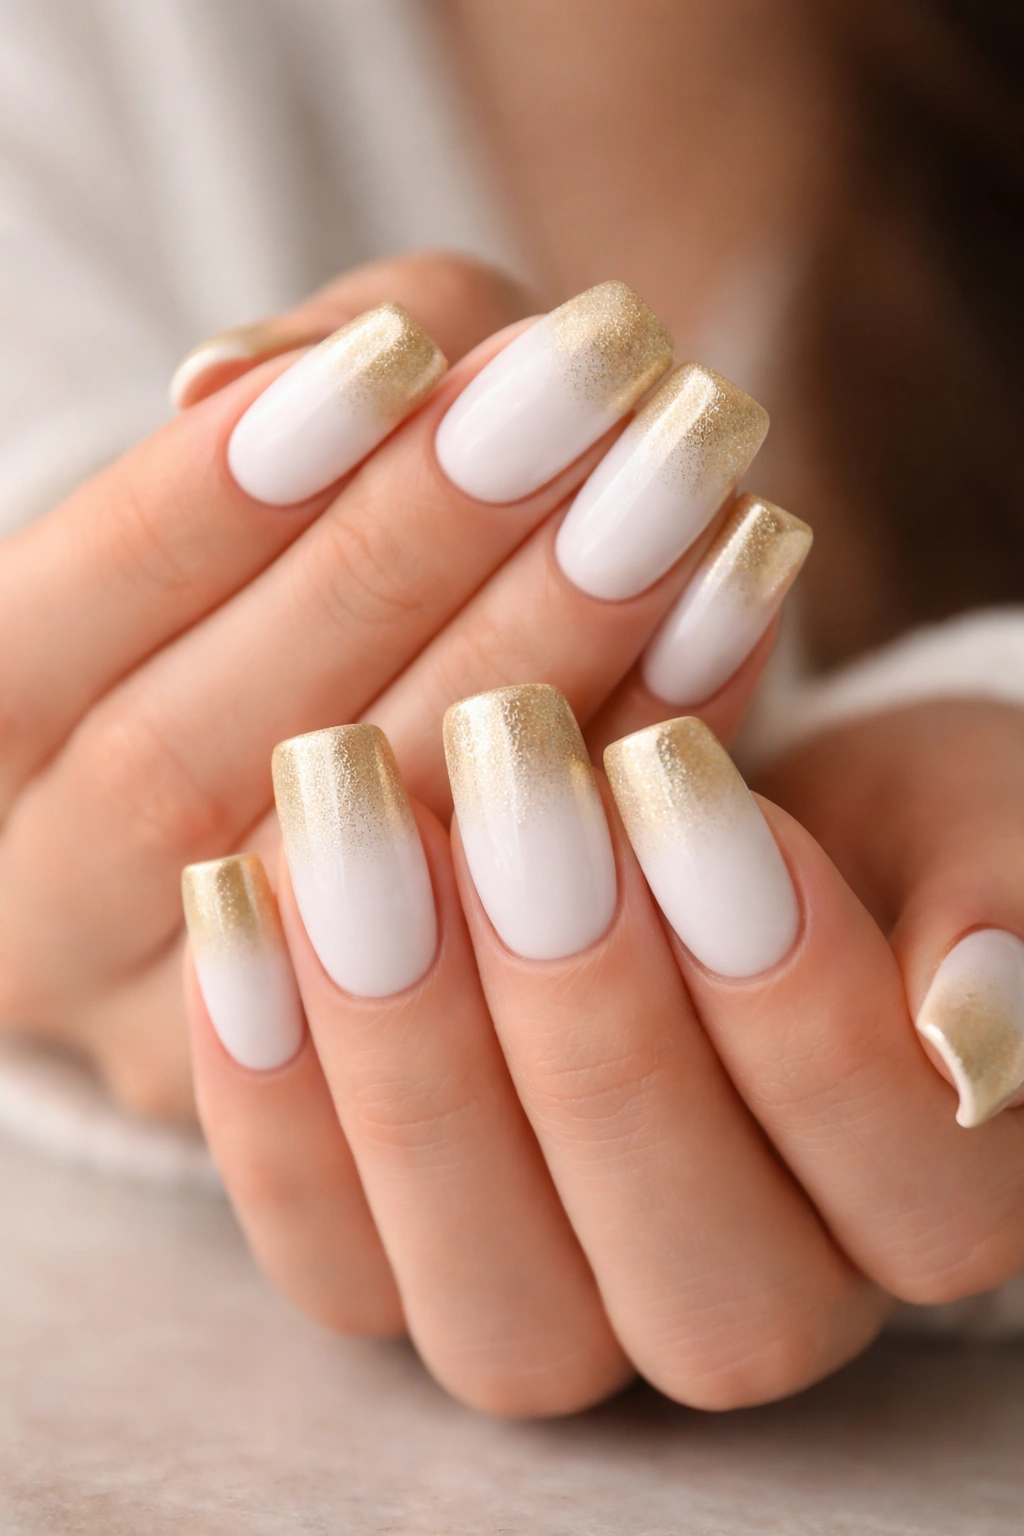
6. Gold Glitter Gradient Into White
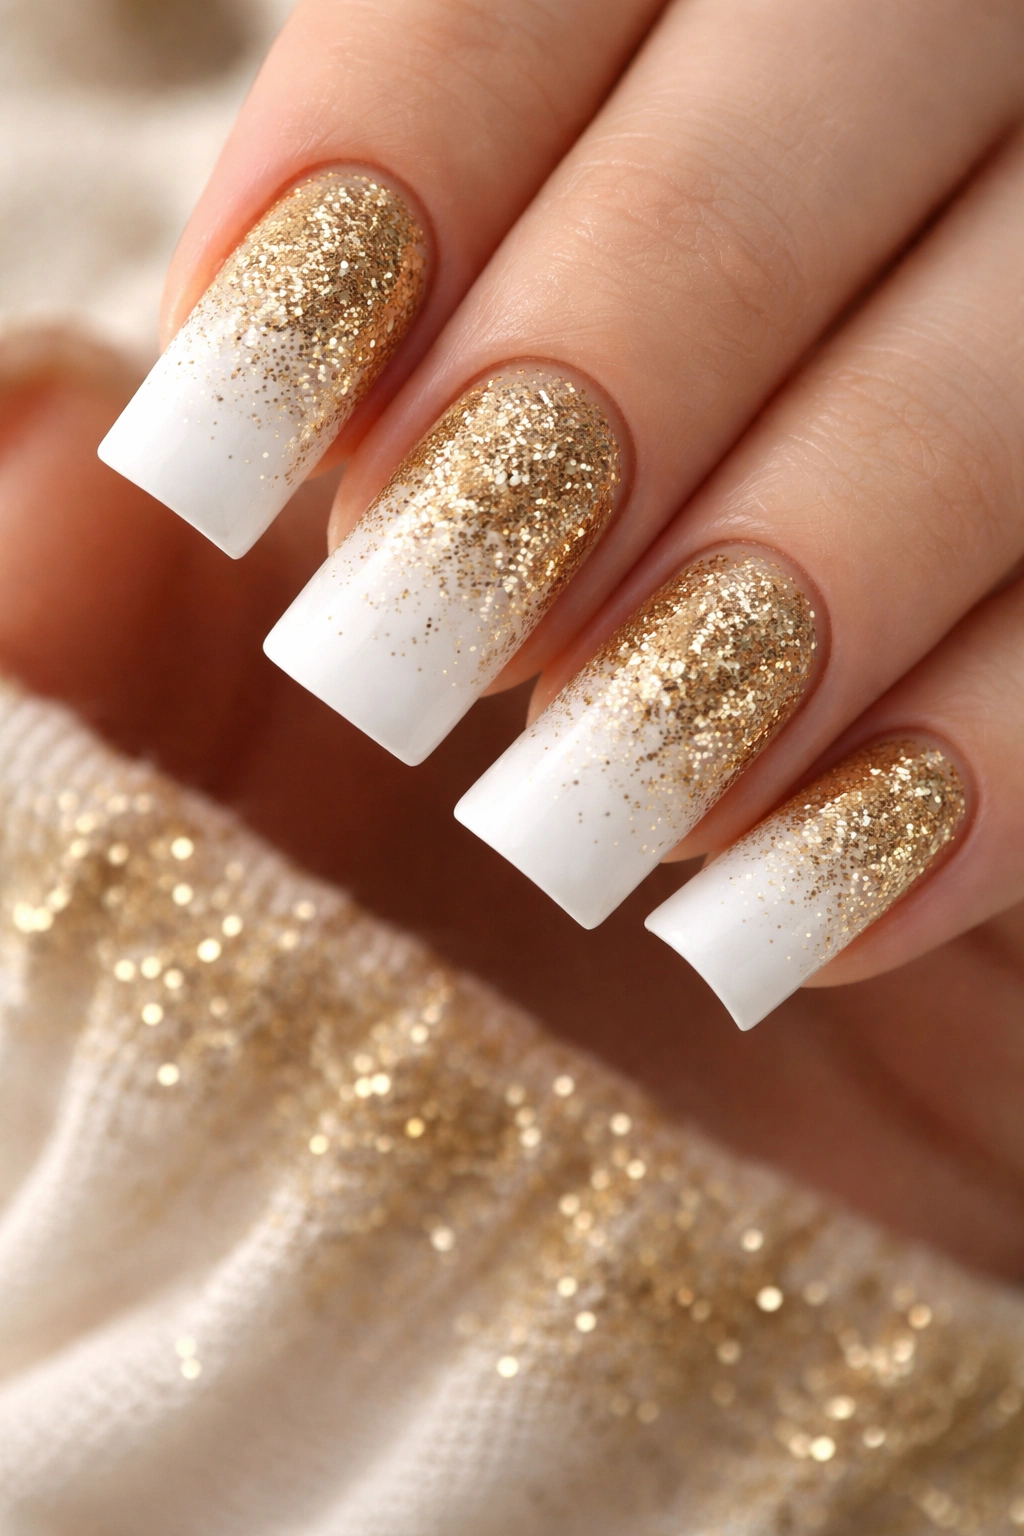
Create a gradient where gold glitter starts thick at the tip and fades into pure white at the base. This ombré effect is glamorous but easier to achieve than traditional gradients because glitter naturally creates texture that hides minor blending imperfections. Apply white polish as your base, then layer gold glitter polish more heavily on the tips and buff it down as you move toward the cuticle.
Why Glitter Gradients Feel Luxe
Gradients inherently feel sophisticated because they suggest effort and planning. Glitter adds sparkle without looking costume-y because it’s gradually integrated into white rather than being the entire nail. The effect is polished and glamorous.
Technique for Seamless Glitter Gradients
- Start with two coats of white polish as your base
- Apply gold glitter to the tip area with a full brush
- Use a nearly-dry sponge to tap and blend the glitter edge where it meets white
- Build up the glitter in the tip area more densely
- Topcoat seals everything and creates a smooth finish
Pro tip: A dedicated gradient sponge or even a regular makeup sponge works better than trying to blend with a brush.
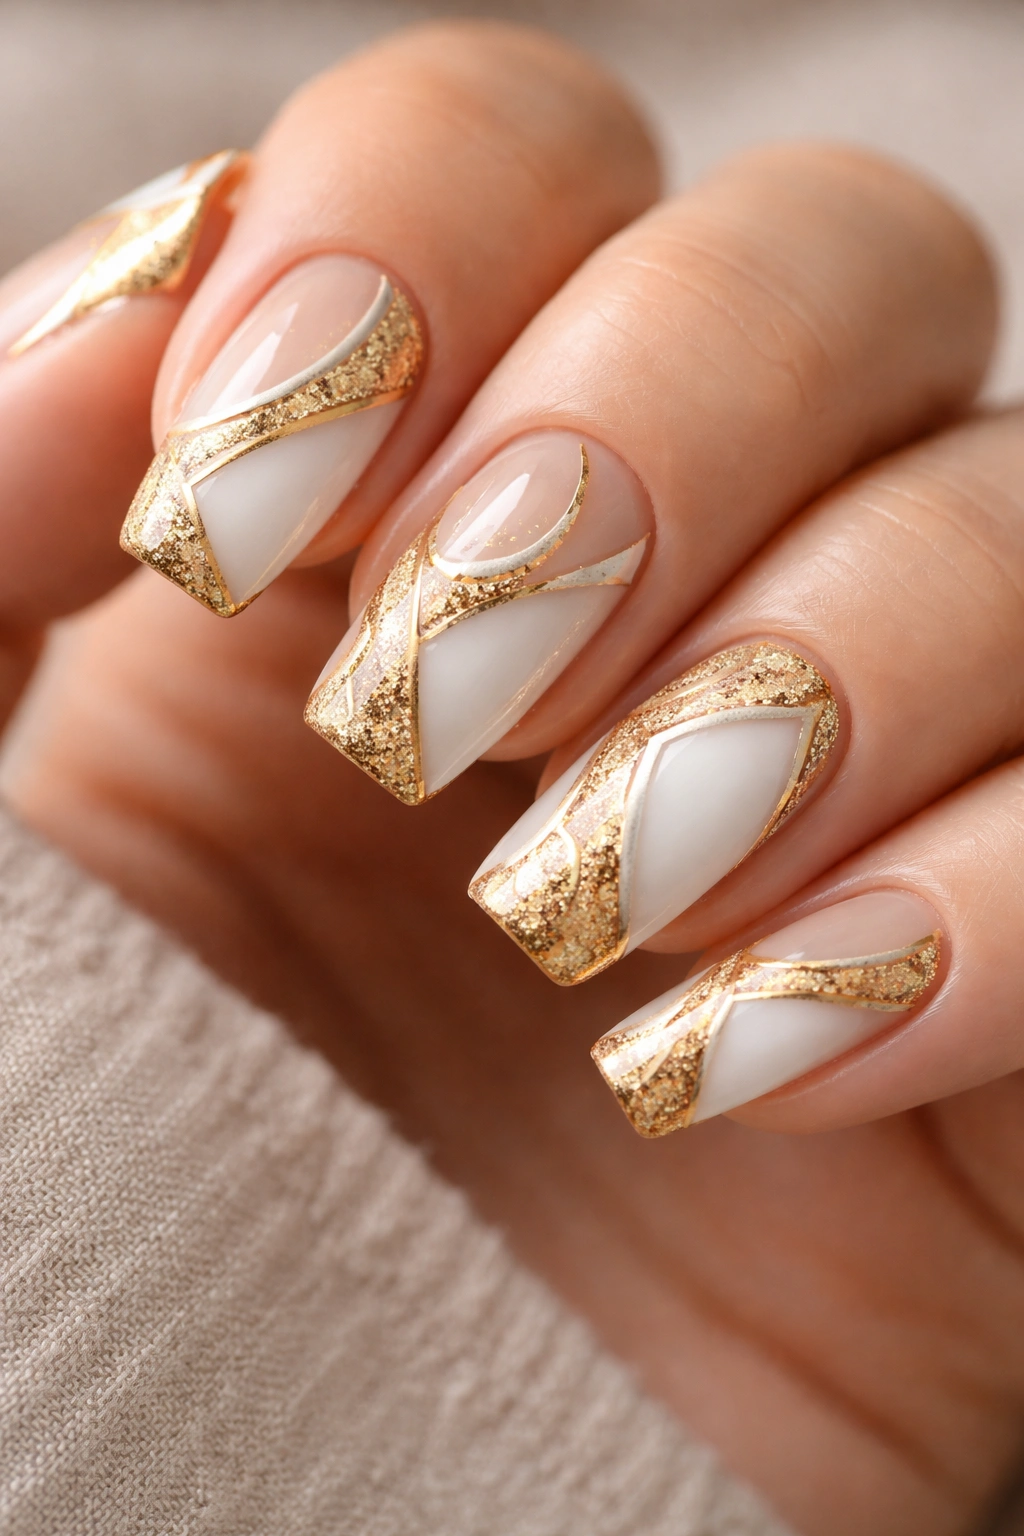
7. Vertical Gold Stripes with Negative Space
Paint white polish, then create vertical gold lines that don’t extend all the way across the nail. Maybe the stripes start from the cuticle and stop halfway down, or they float in the middle leaving white space above and below. This play with negative space feels architectural and intentional, like you’ve carefully planned exactly where each element belongs.
The Magic of White Space
Negative space in nail design creates visual interest precisely because it’s not filled in. It tricks the eye into seeing the design as more complex than it actually is. Leaving portions of white visible emphasizes the elegance of white as a color rather than just a background.
Strategic Placement for Impact
- Odd numbers of stripes (3, 5, or 7) feel more intentional than even numbers
- Consider varying stripe widths for a less rigid appearance
- Stripes that stop short of the tip create an elongating effect
- Symmetry feels intentional, but asymmetry can be equally striking
Worth knowing: The spaces between stripes matter as much as the stripes themselves—they should feel balanced even if they’re not mathematically identical.
8. Gold Metallic Half-Moon Mani
Paint your nails white, then create a bold metallic gold half-moon shape at the base of each nail, extending up about a quarter of the way. This reverse French mani—called a half-moon or reverse moon mani—pairs beautifully with white on top and gold below. The contrast between the shapes creates clean geometry that’s modern and surprisingly easy to execute.
Why Half-Moons Are Underrated
This design looks more complex than it is because it involves two distinct shapes. Half-moon designs are forgiving because slight irregularities in the curved edge actually add to the handmade charm rather than looking like mistakes. It’s one of the most flattering shapes for most nail beds.
Technique for Clean Half-Moon Edges
- Use a striping brush and steady hand, or use curved guides
- Apply gold polish in thin strokes, building up opacity
- The curve should be gentle and follow the natural contour of your cuticle
- Let the first coat dry before applying the second
- Clean edges with a tiny brush dipped in acetone if needed
Pro tip: The half-moon doesn’t need to be perfectly symmetrical across all nails—slight variations feel more authentic and intentional.
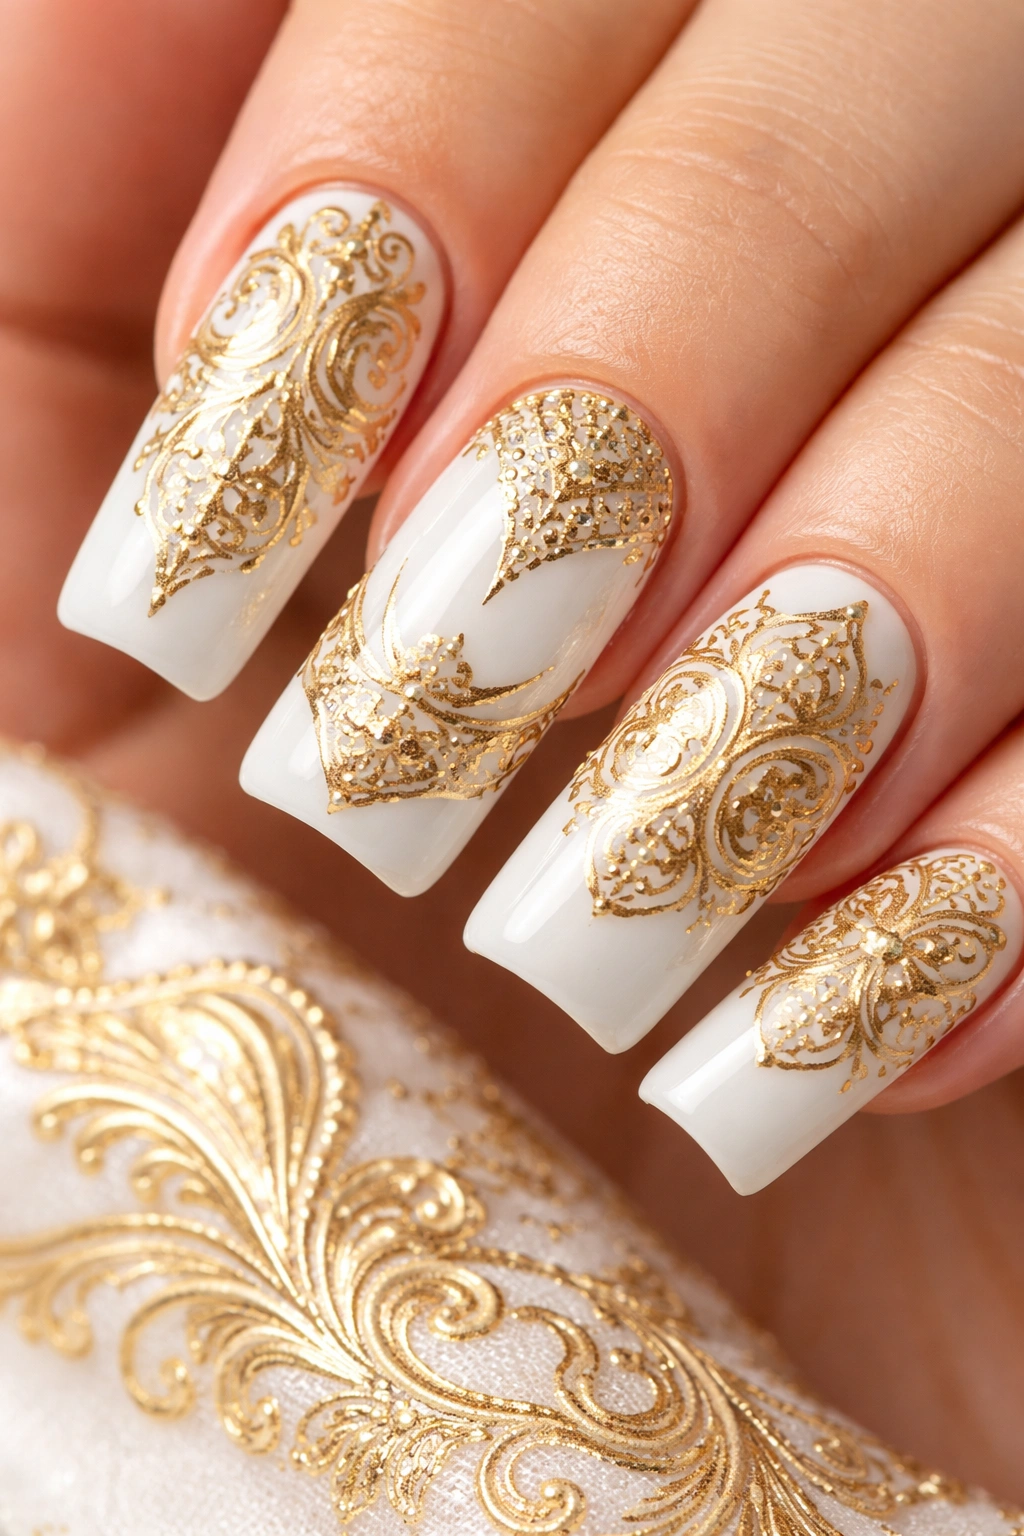
9. Fine Gold Lace Pattern Over White
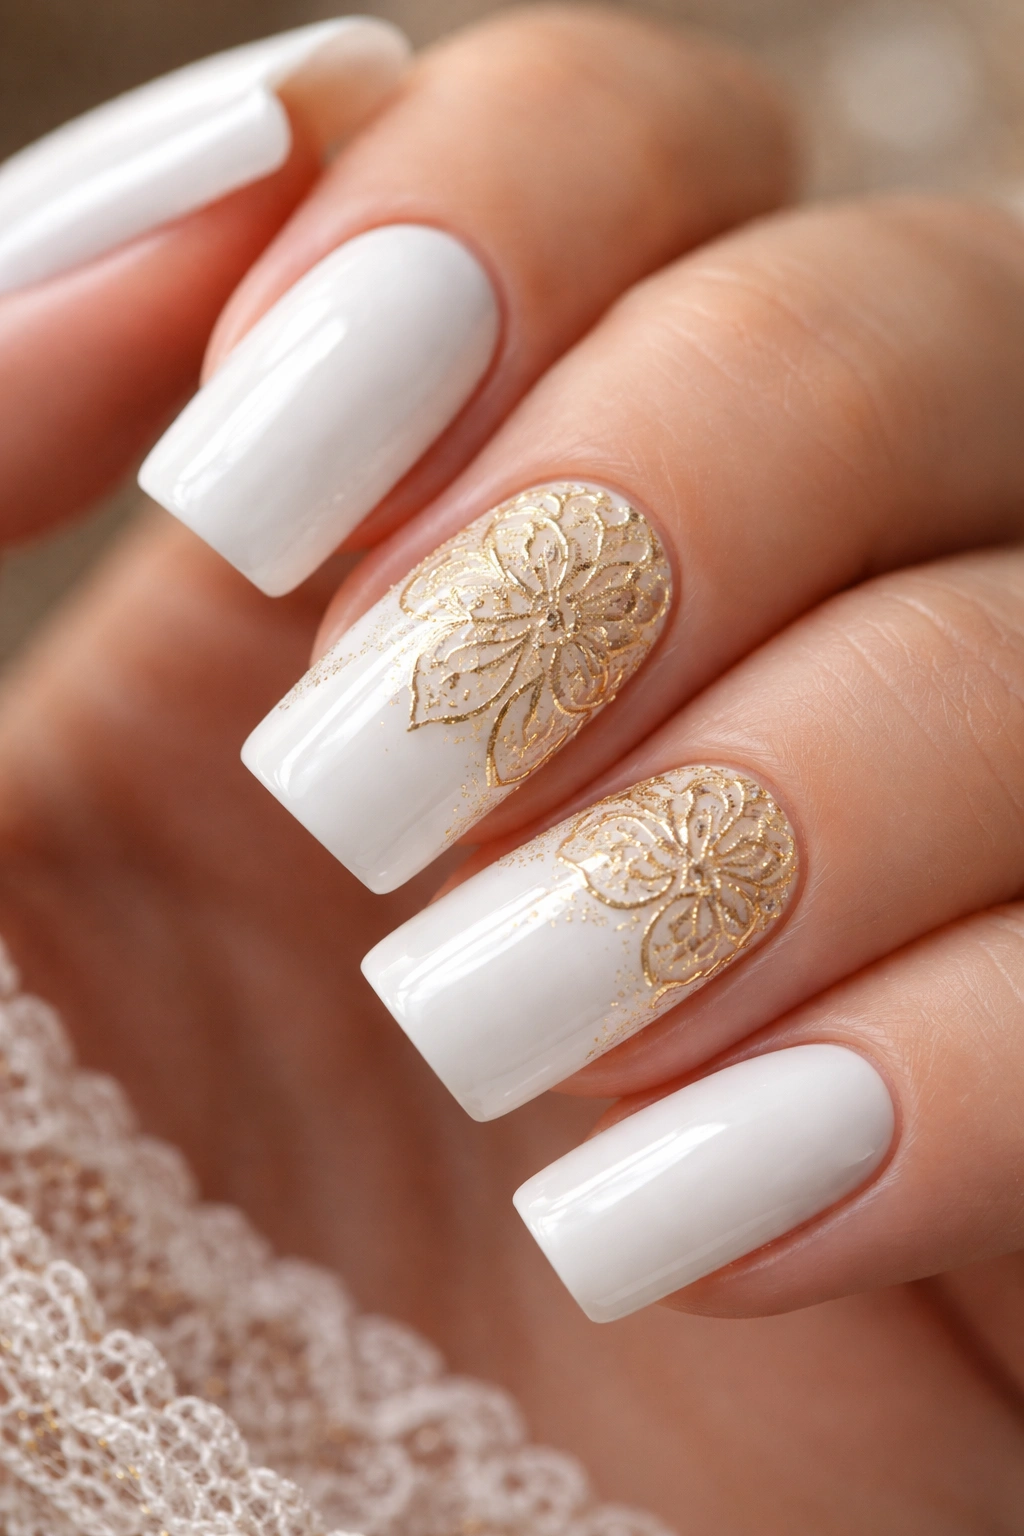
Recreate intricate lace patterns using a thin gold brush or a toothpick. Think delicate swirls, tiny loops, and crosshatch details that mimic actual lace texture. This is detailed work that pays off dramatically—white nails with fine gold lace look bridal, elegant, and intricate without being overdone. Focus the lace detail on one accent nail or create a lighter lace pattern across all nails.
Why Lace Reads as Instantly Sophisticated
Lace has inherent associations with elegance and romance. Even stylized or simplified versions of lace patterns trigger those associations. Fine detail work signals that effort and care went into the design, which elevates the entire manicure.
Creating Convincing Lace Details
- Use a very thin striping brush or a toothpick dipped in gold gel or polish
- Work on one small section at a time—don’t try to cover the whole nail at once
- Lace patterns have repetition and flow—let lines connect and weave
- Negative space is crucial; not every inch needs to be covered
- Practice simple swirl and loop patterns first before attempting complex lace
Worth knowing: Imperfect lace looks handmade and charming; don’t aim for perfection.
10. Gold Geometric Triangles Scattered Across White
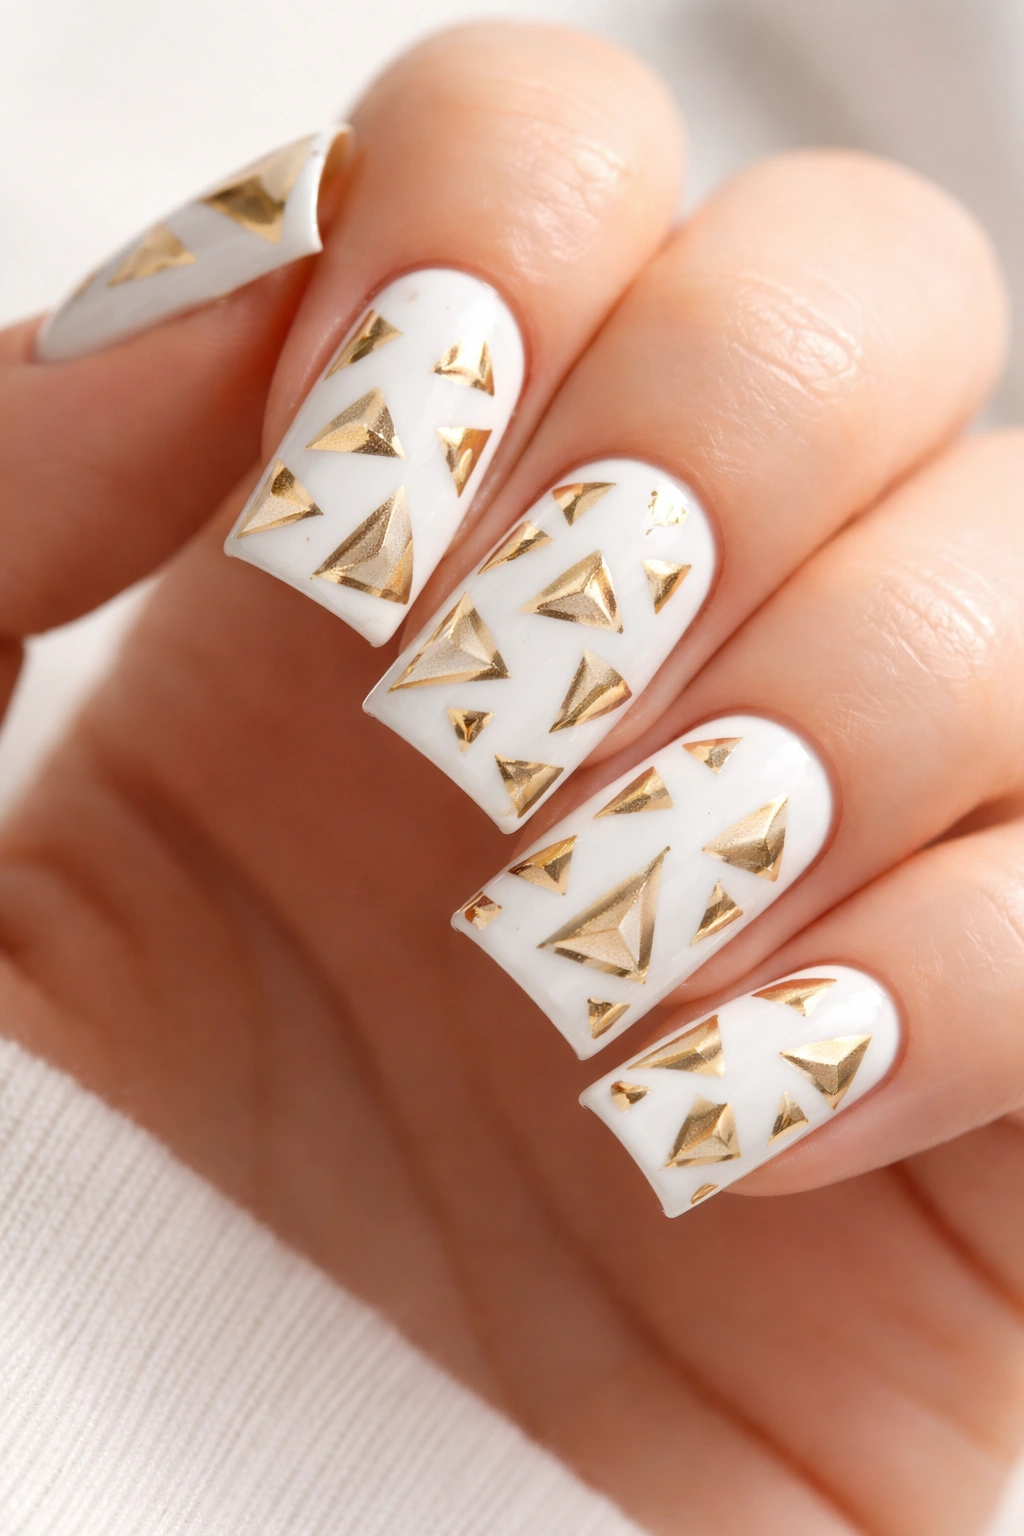
Create a design where gold triangles of varying sizes are scattered randomly across white nails. The triangles can point in different directions, overlap slightly, or sit in clean rows—the arrangement is entirely up to you. This design combines the precision of geometry with the freedom of asymmetrical composition.
The Appeal of Geometric Scatter Designs
Scattered geometric elements feel playful and modern without being too structured or rigid. The randomness makes the design feel contemporary, while the geometric shapes keep it refined. It’s the sweet spot between minimalism and pattern.
How to Create Convincing Triangles
- Use a striping brush or thin-tipped tool to paint the triangle outlines
- Fill triangles with gold using a slightly thicker brush
- Varying the triangle sizes makes the composition more interesting
- Some triangles can be fully opaque while others are semi-transparent for depth
- Consider rotating the direction each triangle points
Pro tip: Outline each triangle first in a slightly darker gold, then fill with a brighter gold for dimensional effect.
11. Floating Gold Dots and Accent Elements
Paint white nails, then add a composition of gold dots, small circles, and delicate elements floating across the surface. The “floating” aspect means nothing is anchored to the cuticle or tip—the dots and shapes exist independently in the white space. Use a dotting tool to create perfectly round dots of varying sizes, then add a few other tiny elements like lines or crescents for texture.
Why Abstract Compositions Work Beautifully
Abstract designs feel artistic and personal—they don’t need to represent anything specific, which means there’s no “right” way to execute them. Each nail becomes a tiny canvas for your own interpretation.
Creating Balanced Abstract Compositions
- Odd numbers of main elements (dots, shapes) feel more intentional
- Vary the size of dots to create visual interest
- Leave plenty of white space; don’t crowd the nail
- Consider the overall balance—heavier elements one side balanced with lighter elements elsewhere
- Asymmetry is your friend here
Worth knowing: Digital tools exist to help plan your composition before you paint if you want to practice first.
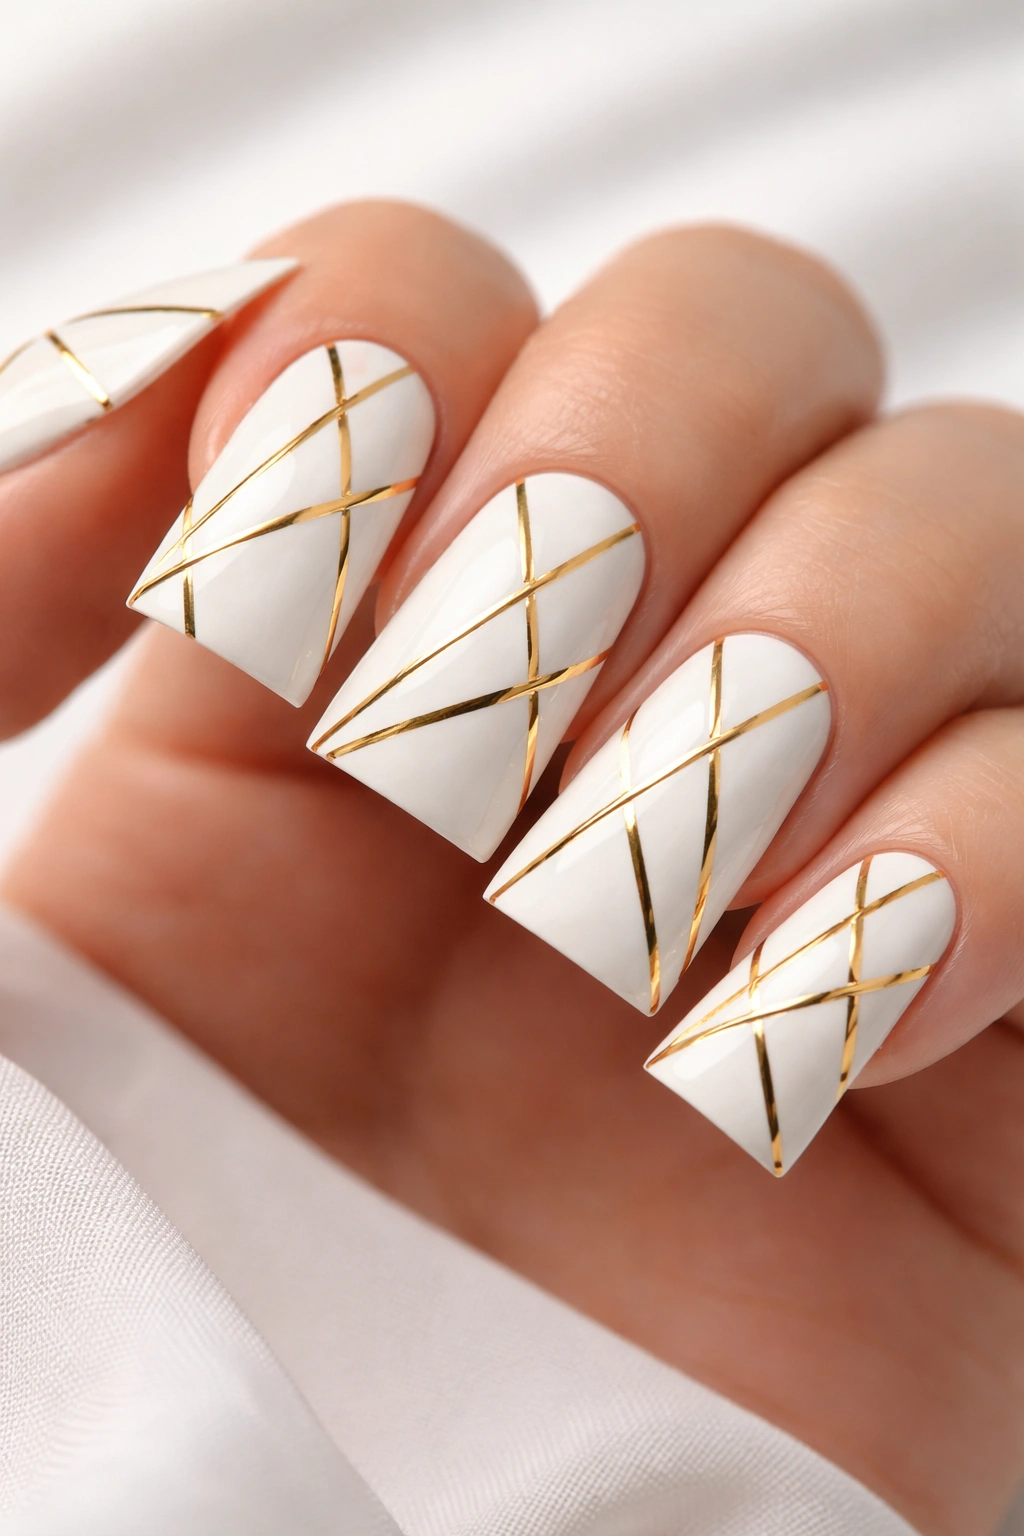
12. Gold Thin Diagonal Cross Pattern
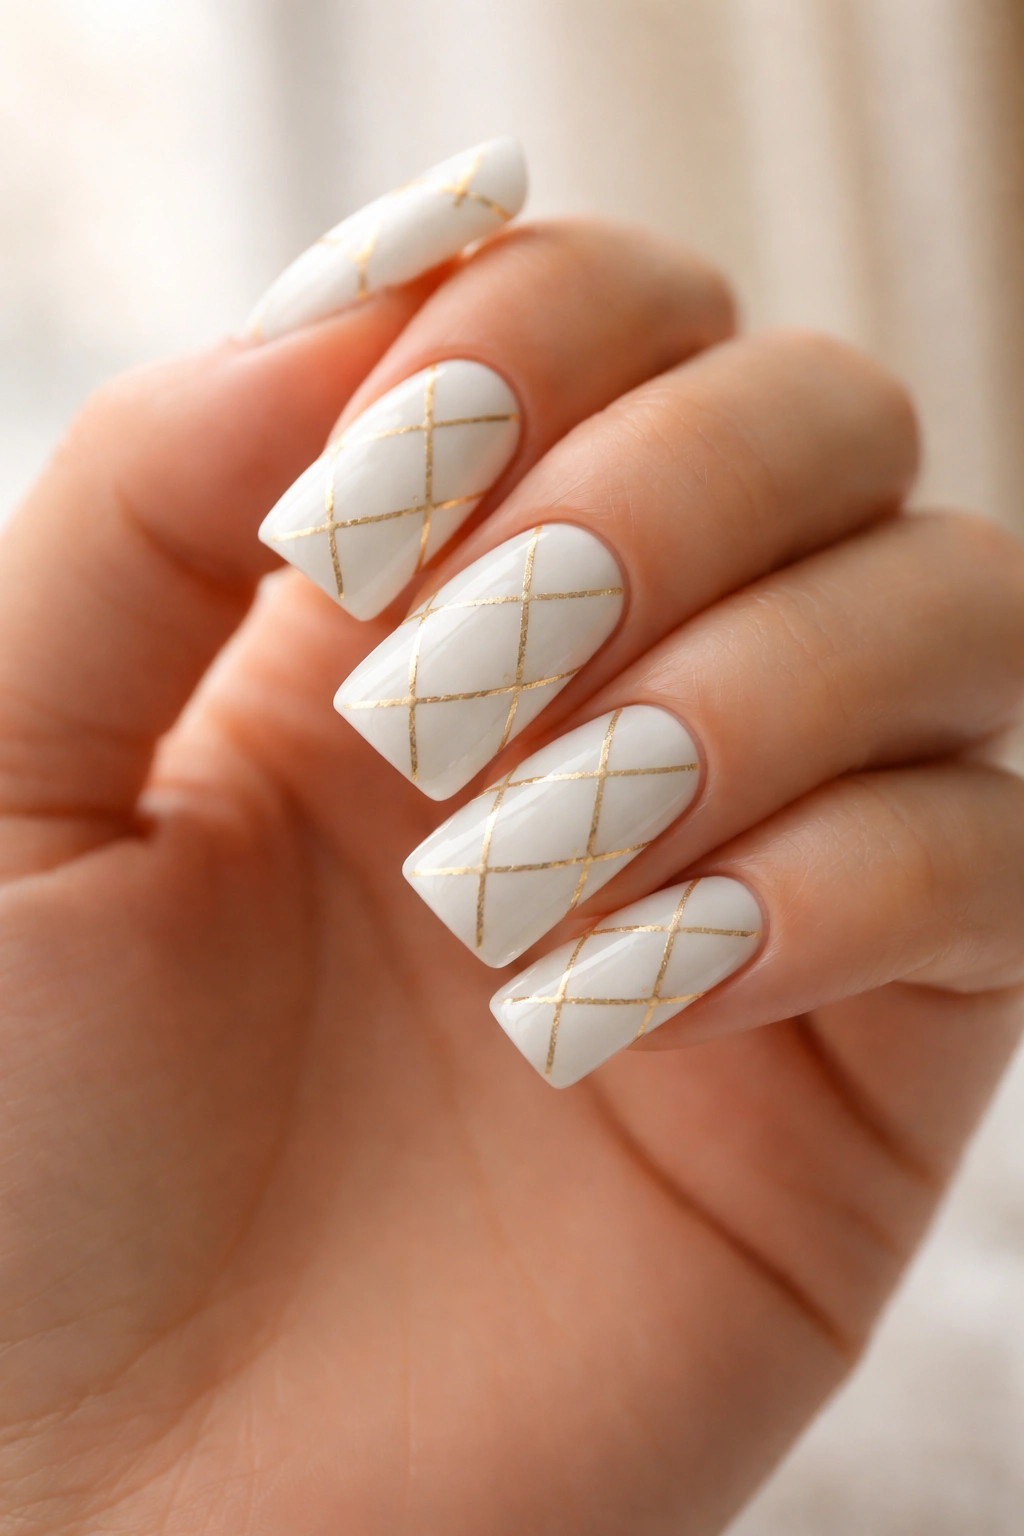
Create an elegant crosshatch or diagonal line pattern by painting thin gold lines that cross at intervals across your white base. The lines can be evenly spaced for a structured grid feel, or you can vary the spacing for a more organic look. The result is sophisticated and has a woven or lattice quality that’s very refined.
The Geometry of Cross Patterns
Diagonal lines are more dynamic than horizontal or vertical ones—they create movement and energy even though the design is purely geometric. When lines cross, they create visual interest at the intersection points.
Executing Perfect Crosshatch Designs
- Plan your spacing ahead of time if precision matters to you
- Use a striping brush and paint one direction of lines first
- Allow those lines to dry completely before painting the perpendicular direction
- The intersection points are where the visual magic happens
- Vary the thickness of lines in different directions for subtle dimension
Pro tip: Paint lines from cuticle to tip rather than side to side—it’s easier to maintain consistent spacing.
13. White Nails with Gold Foil Accents
Apply white polish, then use adhesive (like a sticky base coat or a dab of gel) to attach pieces of thin gold foil strategically across the nail. This is less about painting and more about assemblage—you’re creating a design by placing metallic elements. The foil catches light and creates shine that regular polish can’t achieve.
Why Foil Creates Unique Light Effects
Foil has reflective properties that polish doesn’t. It bounces light differently depending on the angle, which means your nails look dynamic and alive. The effect is subtle but unmistakable.
Application Without Frustration
- Use a sticky topcoat, gel base, or even a tiny dab of clear nail glue as adhesive
- Cut foil into shapes (squares, triangles, irregular pieces) before applying
- Press firmly to ensure good contact
- Seal everything with multiple layers of topcoat to protect the foil
- Metallic foil is delicate, so handle nails gently until fully sealed
Worth knowing: Foil adds thickness, so keep top sealing coats generous and smooth.
14. Gold Ombre Tips with White Base
Create a classic ombre effect where the tips of your white nails gradually transition to solid gold. The middle section fades through shades of pale gold or champagne, creating a smooth transition from white to rich gold. This is a slightly more advanced gradient technique but absolutely worth the effort.
Why Ombre Transcends Trends
Ombre has staying power because it works with natural nail anatomy—the tips of nails are naturally slightly different in appearance than the nail bed. Emphasizing this with color creates a flattering, elongating effect.
Blending Multiple Shades for Smooth Ombre
- Use white, pale gold, medium gold, and rich gold polishes
- Apply white to the full nail first
- Use a sponge to stipple each successive shade, blending edges
- Build the depth gradually rather than trying to blend in one go
- Patience with drying between layers pays off in smoothness
Pro tip: A makeup sponge cut into a small rectangle works better than traditional nail sponges for precision blending.
15. Stamped Gold Patterns on White Background
Use nail stamping plates with metallic gold polish to create intricate patterns over white nails. Stamping plates exist for nearly every design imaginable—florals, geometric patterns, mandalas, lace—so you can create complex designs without free-hand painting. The stamped image transfers onto your nail with precision that’s hard to match by hand.
Why Stamping Democratizes Nail Art
Stamping removes the need for advanced painting skills. If you can press a plate firmly and cleanly, you can create salon-quality designs. It’s the shortcut that doesn’t compromise quality.
Stamping Technique Essentials
- Choose a stamper and scraper that fit your stamping plate
- Apply metallic gold polish to the plate and scrape off excess at a 45-degree angle
- Immediately press the stamper down firmly and roll it toward you
- Transfer the image to your nail with a gentle pressing motion
- Metallic polishes can be finicky, so practice your timing
- Seal with topcoat, which also helps blend any edges
Worth knowing: Metallic polishes sometimes don’t transfer as cleanly as regular polish—have a cleanup brush ready in case you need to touch up edges.
16. Gold Accent Nail with Crystal or Gem Embellishments
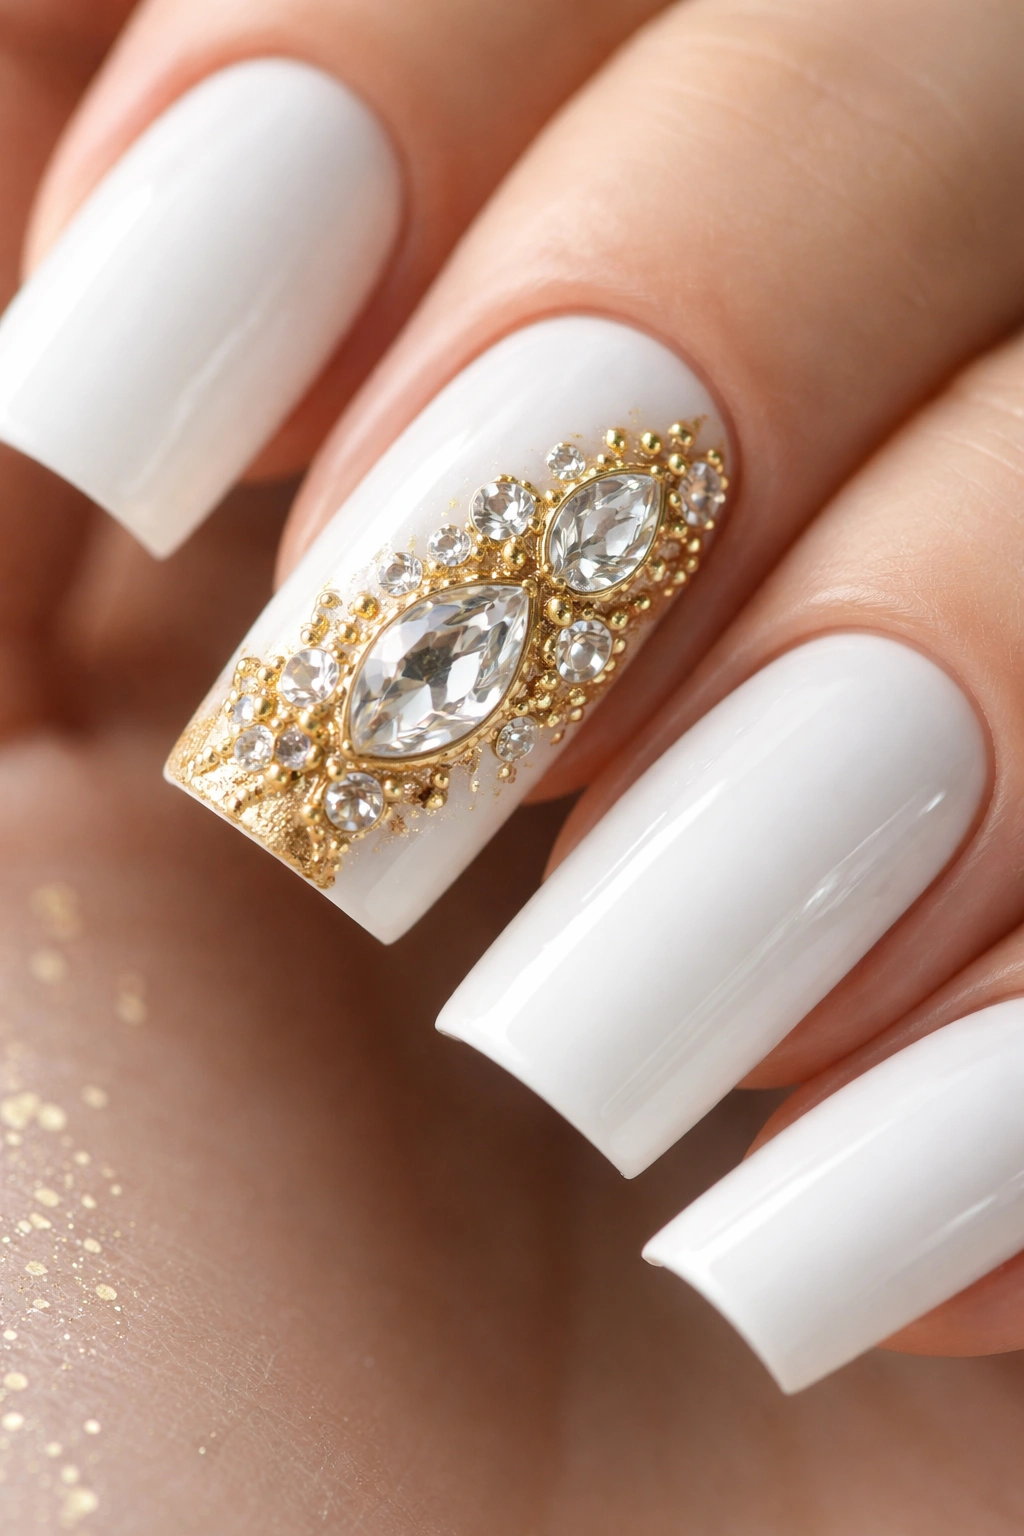
Paint most nails white and solid, but create an accent nail that combines white and gold with embedded crystals or rhinestones. Use a sticky base coat to adhere small gems, then add fine gold details around them. The gems catch light and add dimension that creates a focal point without overwhelming the manicure.
The Drama of Strategic Embellishment
Adding gems to just one accent nail creates drama with restraint. It says you’re willing to be fancy but not trying too hard. The gems do most of the visual work, so minimal gold detail can have maximum impact.
Setting Gems for Maximum Longevity
- Use a tacky base coat or clear nail glue to set gems
- Press gems firmly into place and let adhesive cure completely
- Apply topcoat around gems carefully to avoid dislodging them
- Build up topcoat in layers to seal gems securely without creating a dome
- Gems on nail tips are more prone to catching and breaking, so focus accent gems toward the nail bed
Pro tip: Set a gem, let it cure, then apply another layer of topcoat before adding the next gem—this prevents gems from shifting as you work.
17. Gold-Filled Nail Art with Negative Space Windows
Create a design where you paint strategic areas of gold, leaving white “windows” that break up the pattern. Think of it as creating gold designs with intentional gaps rather than continuous coverage. Maybe you paint gold along the edges with white space in the center, or create small sections of gold pattern scattered across the white nail.
The Visual Interest of Negative Space
Negative space makes designs feel more sophisticated by forcing the viewer’s eye to complete the picture mentally. Patterns aren’t explicitly filled in; instead, your brain connects the dots. This creates more elegant-feeling designs than solid coverage.
Composing Windows and Patterns
- Sketch your design plan lightly first
- Create geometric or organic shapes in gold
- Ensure enough white space remains to balance the composition
- Consider how patterns align across multiple nails
- The negative space should feel intentional, not accidental
Worth knowing: Asymmetrical negative space patterns often feel more intentional and artistic than perfectly symmetrical ones.
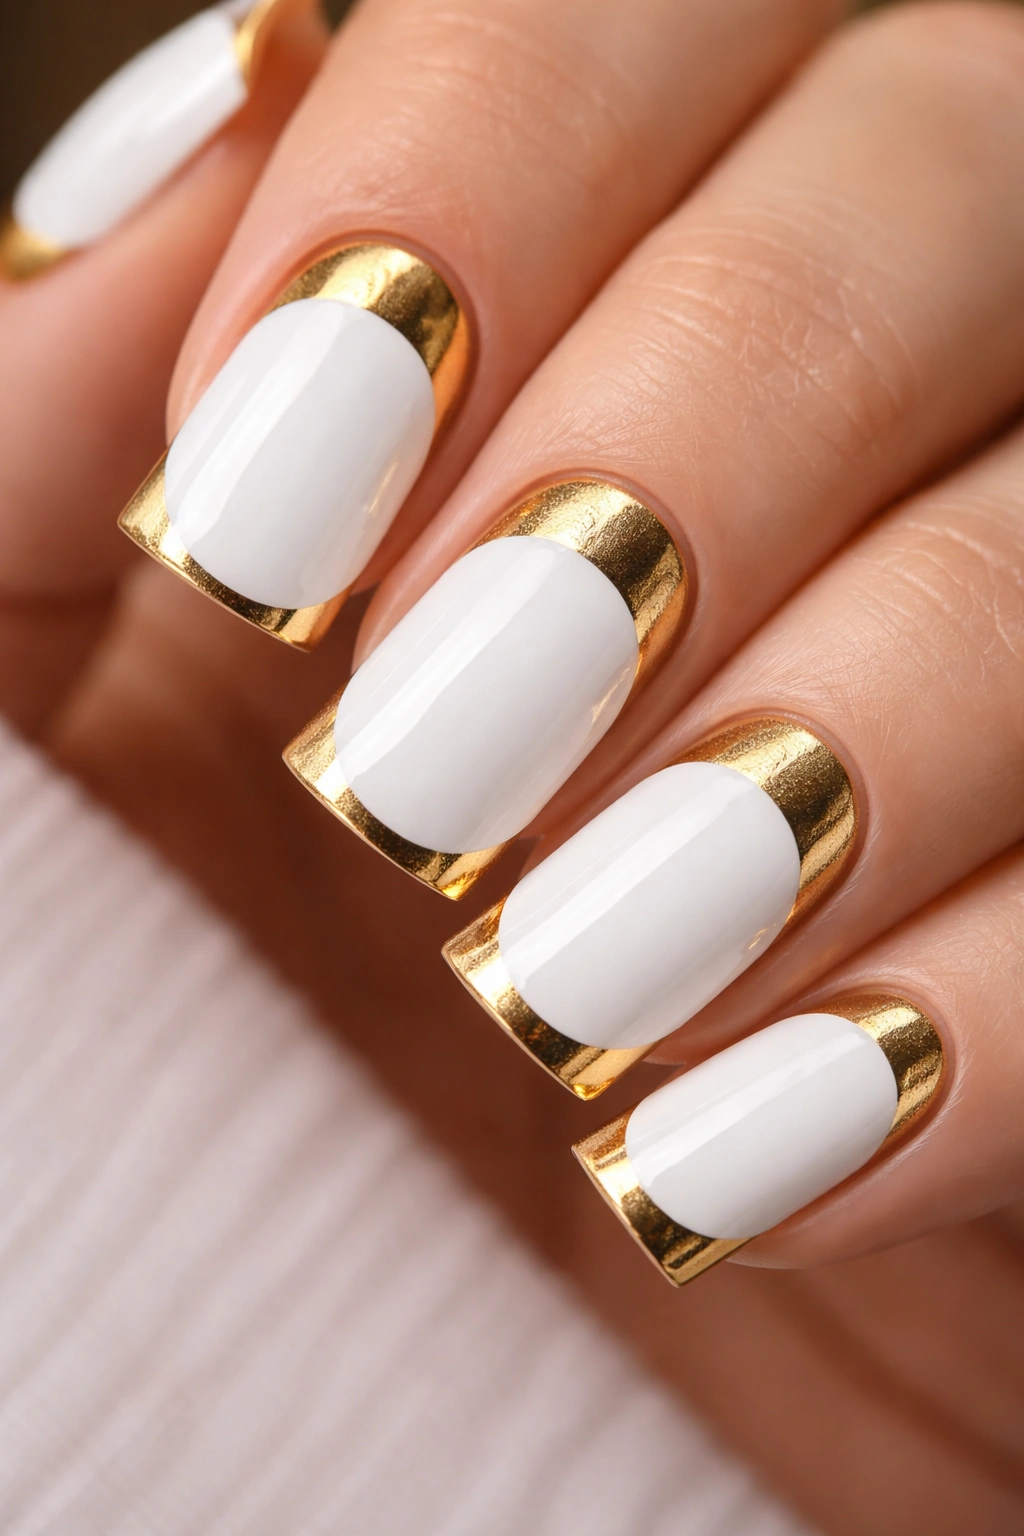
18. Classic Gold French Tips on White Base
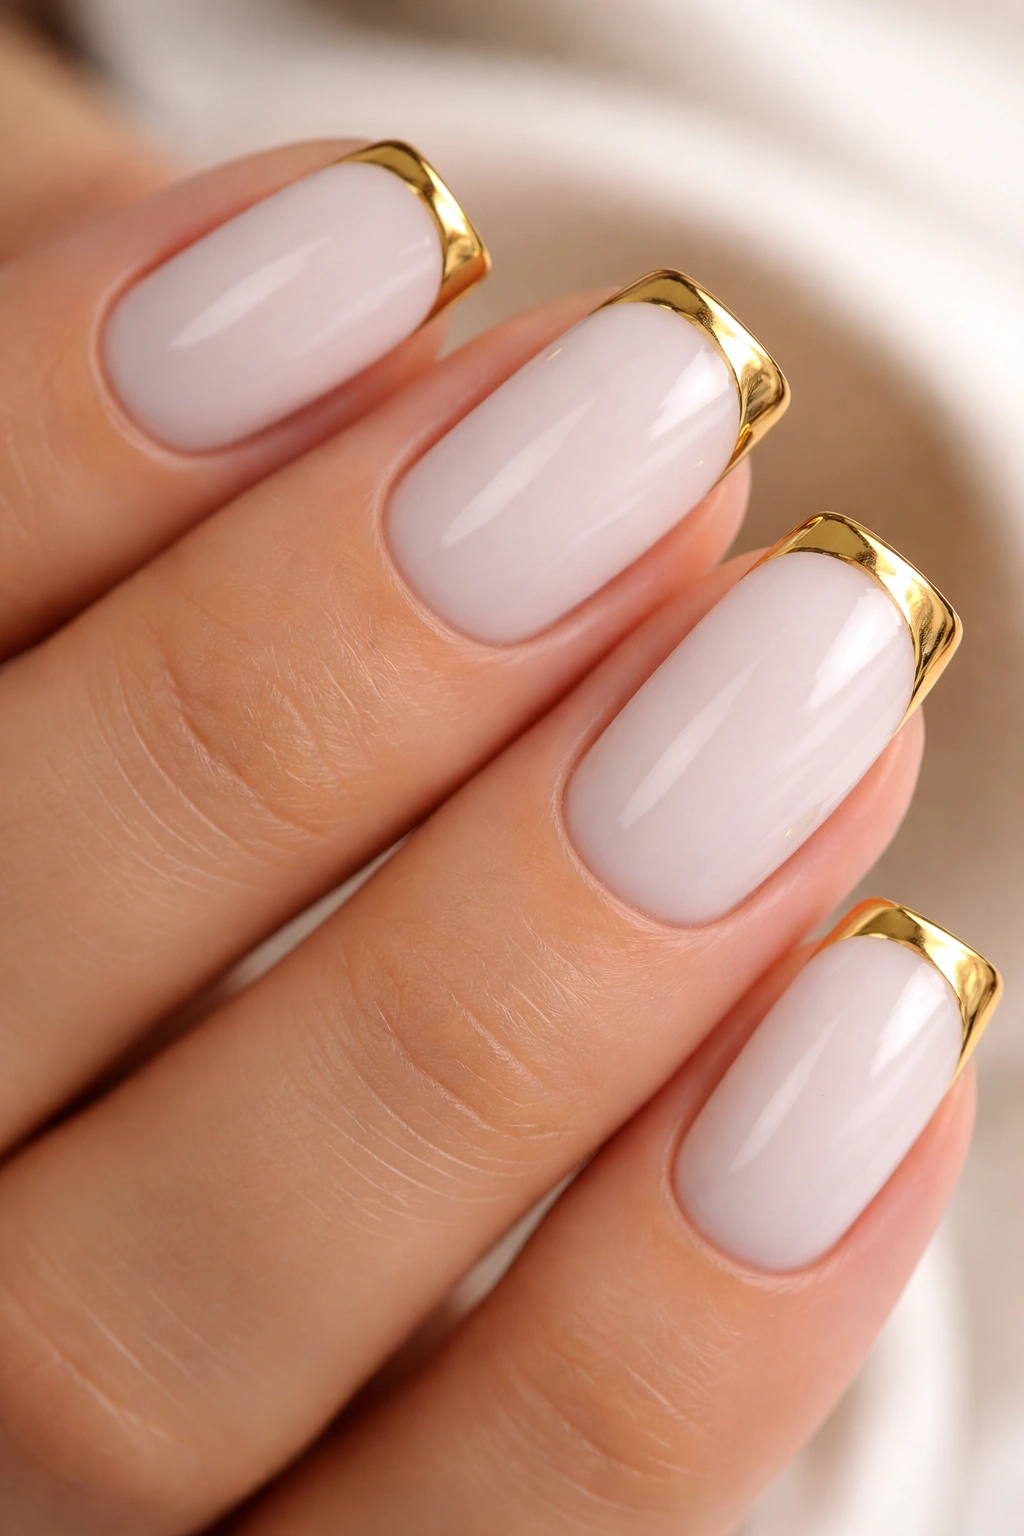
Paint your entire nail white, then create a clean gold line at the tip edge, extending about a quarter-inch down the nail. This is the French manicure classic, reimagined with white base and gold tip instead of the traditional white tip. It’s timeless, elegant, and works for any occasion.
Why French Manicure Never Gets Old
The French manicure is a design classic because it works with every skin tone, matches any outfit, and suits both casual and formal settings. Substituting gold for the traditional white tip modernizes the classic without abandoning what makes it work.
Perfecting the Gold French Tip Line
- Create a straight line where the tip begins using a curved guide or steady hand
- Apply gold polish along the tip edge in smooth strokes
- The line should follow the natural curve of your nail tip
- Two coats usually provide full opacity
- Seal with a glossy topcoat for maximum shine and protection
- Slight imperfections in the line actually add charm
Pro tip: The “smile line” (where the gold tip starts) should follow your natural nail tip shape—this is what makes it flattering.
Wrapping Up
White and gold nail designs are proof that you don’t need tons of colors or complicated techniques to create something genuinely beautiful. The combination works because the colors enhance each other perfectly—gold glows against white, and white keeps gold from feeling overwhelming or costume-y. Whether you’re drawn to minimal geometry, delicate detail work, or bold statement stripes, this color pairing adapts to your style.
The best part about exploring these designs is that none of them require professional-level skills. Many are actually easier to execute at home than they look, which means you can try several of these ideas without worrying that imperfection will ruin the result. In fact, slight irregularities often add to the handmade charm that makes nail art feel personal and intentional.
Pick a design that speaks to you, gather your supplies, take your time, and trust the process. White and gold is your foundation—everything else is just creative exploration from there.
