

Duck nails are having a major moment, and when you add bling to the mix? They’re absolutely unstoppable. This wider, squared-off nail shape has become the go-to canvas for anyone who wants their manicure to make a serious statement. The beauty of duck nails is how they showcase glitter, rhinestones, crystals, and metallic finishes—the extra surface area means more sparkle, more dimension, and more visual impact than traditional nail shapes could ever deliver.
The thing about bling-covered duck nails is that they work for pretty much any occasion. Whether you’re heading to a night out, a special event, or you just want your everyday hands to feel a little bit glamorous, there’s a design that’s going to hit the mark. From subtle shimmer to full-on crystal coverage, the range of options available right now is genuinely impressive. The key is finding the design that matches your personality and your willingness to commit to a showstopping manicure.
What makes these 16 designs special isn’t just the bling factor—it’s how the bling is applied, layered, and combined with base colors to create something that actually looks intentional rather than chaotic. Some designs use precision placement with individual crystals, while others go for all-over glitter coverage. Some stick to a single color story, while others mix metallics and iridescent finishes for maximum dimension. These are the duck nail designs that actually pop, that photograph beautifully, and that hold up as genuinely chic manicure choices.
1. Pink Diamond Gradient with Micro Crystals
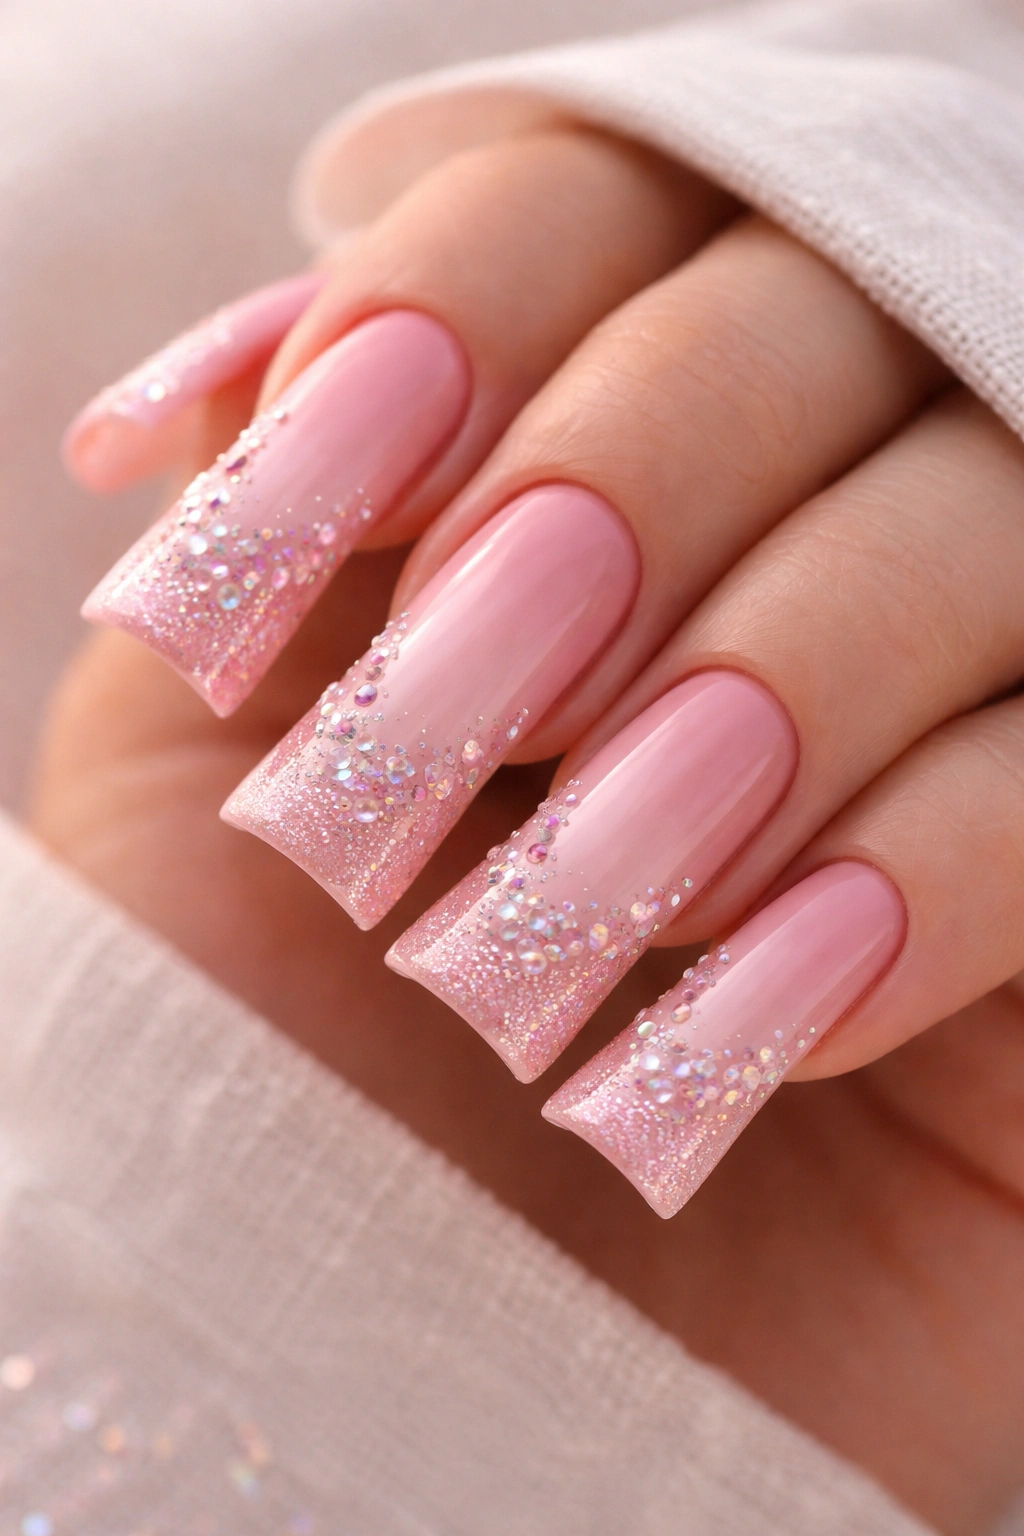
Soft pink ombre that transitions from a barely-there blush at the base to a more saturated rose toward the tips sets the foundation here, and then micro crystals get strategically placed along the ombré gradient to catch every bit of light. The crystals aren’t scattered randomly—they’re positioned to follow the color flow, creating a sense of intentional movement across the nail. This design works because the ombre provides sophistication while the crystals add just enough sparkle without feeling overdone.
Why This Design Stands Out
The gradient creates visual depth that makes the crystals pop even more, and the pink tone is universally flattering on different skin tones. The micro crystals (typically sized around 2-3mm) are manageable in terms of durability while still delivering serious shimmer. You get a manicure that feels elegant during the day but glamorous enough for evening events.
Key Features to Ask For
- Soft ombré gradient using pink gel polish shades
- AB-finish micro crystals positioned along the gradient line
- Clear gel base coat and glossy top coat for extra shine
- Placement concentrated in the upper half of the nail for a lifted effect
Pro Tip
This design stays relatively wearable because the crystals don’t cover the entire nail—they’re accents rather than the main event. If you want extra security with the gems, ask your nail tech to use a slightly thicker layer of builder gel under the crystal areas.
2. Holographic Chrome Duck Nails with Scattered Rhinestones
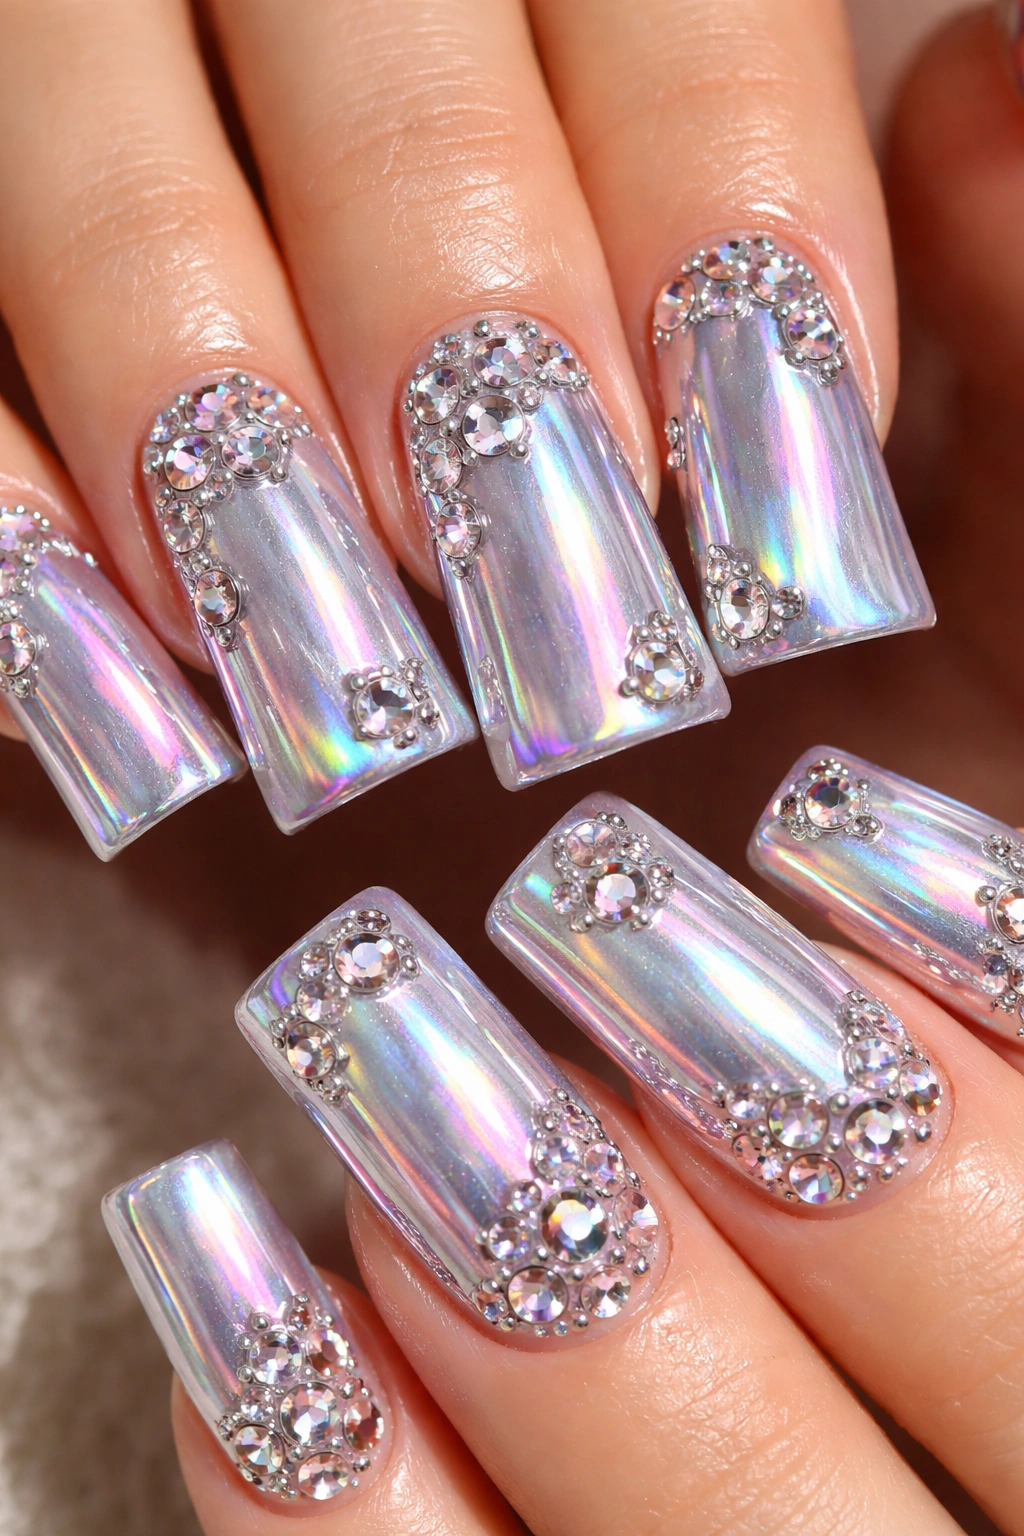
Holographic chrome creates that liquid, rainbow-shifting effect that looks different depending on the angle and lighting, and when you add scattered medium-sized rhinestones across the surface, you get an almost alien-like glamour. The chrome base does most of the work here—it’s already incredibly sparkly—but the strategic rhinestone placement adds dimensional pops that catch light differently than the chrome does. This is the design for someone who wants maximum impact and doesn’t mind maintaining a slightly bolder look.
Why This Design Stands Out
Chrome finishes have evolved dramatically, and the holographic versions now available are genuinely stunning. They shift through blues, greens, pinks, and purples as your hand moves, creating an almost constantly-changing manicure. The scattered rhinestones break up the chrome just enough to add texture without making it feel cluttered.
Key Features to Ask For
- Holographic chrome powder applied over a sticky base coat
- Clear gel to seal the chrome before rhinestone placement
- Mix of crystal and AB-finish rhinestones in varying sizes (3-4mm range)
- Scattered placement that feels intentional rather than random
Worth Knowing
Chrome can sometimes feel slippery, so make sure your nail tech uses a good grip top coat. The holographic finish is also best appreciated in natural or bright light—under dim lighting it won’t have the same impact that makes this design special.
3. Crystal-Encrusted Nude with Gold Accents
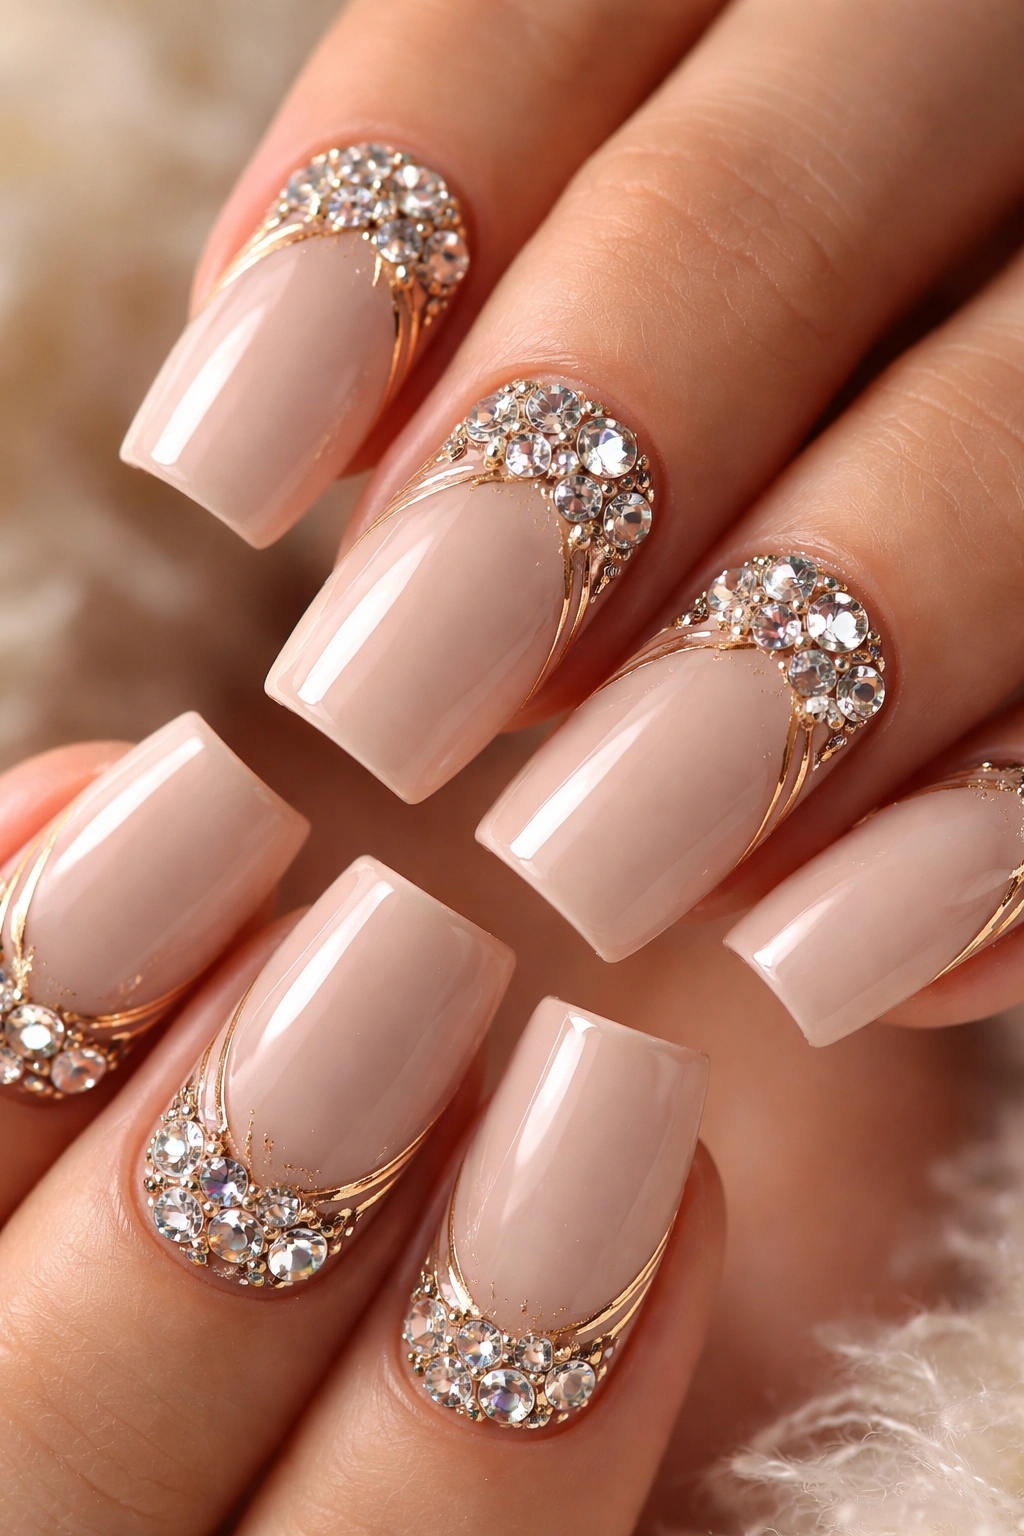
A creamy nude base becomes the perfect backdrop for a cluster of crystals concentrated near the cuticle area, creating a statement that’s sophisticated rather than loud. Gold metallic lines or delicate gold leaf accent the crystal cluster, bridging the gap between the bling and the neutral base color. This is the design that reads as expensive and intentional, perfect for someone who wants sparkle but on the subtle side.
Why This Design Stands Out
Nude nails are the ultimate blank canvas, and the crystals truly become the focus. The gold accents add warmth and prevent the design from feeling too sterile. This works beautifully for professional settings where you still want your nails to feel special but need them to read as polished rather than party-ready.
Key Features to Ask For
- Warm nude gel polish (not too pink, not too brown—a true neutral)
- Crystal cluster concentrated in the cuticle or lower third of the nail
- Thin gold lines or gold foil detail accenting the crystal area
- Glossy top coat that makes the crystals shimmer without adding extra thickness
Quick Facts
- This design works for both manicures and pedicures
- Crystal clusters tend to be more durable than scattered gems
- The color theory here means the crystals pop more dramatically
- Gold metallics age better than silver in most lighting conditions
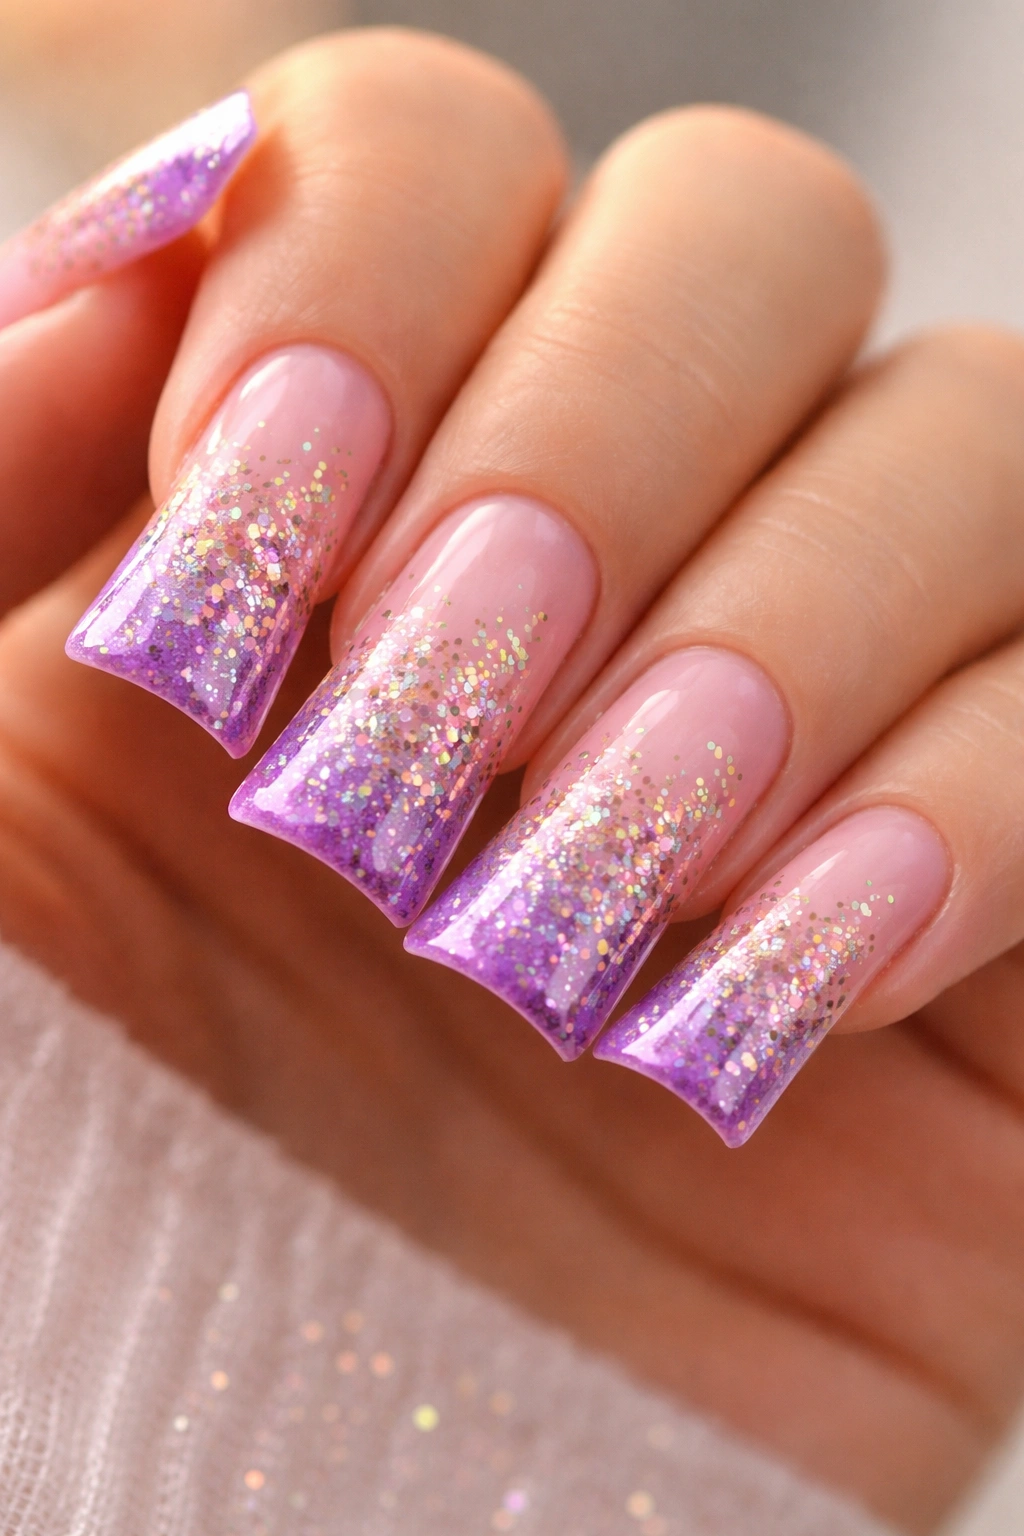
4. Rainbow Rhinestone Ombré That Fades to Glitter
Start with a clear or very pale base and build a gradient using multiple colors of rhinestones—transitioning through reds, oranges, yellows, greens, blues, and purples—then fade into fine glitter toward the tips. The result is a manicure that contains an actual rainbow but feels cohesive rather than chaotic. This design is pure joy, the kind of manicure that makes you smile every time you look at your hands.
Why This Design Stands Out
The color gradient gives the design structure and makes it feel intentional. The transition from distinct rhinestones to finer glitter creates dimension and prevents the design from feeling too heavy. This is one of those designs that photographs beautifully and translates well on social media.
Key Features to Ask For
- Clear gel base or very pale shimmer base
- Rainbow rhinestones graduating in size as they move toward the tip
- Fine glitter in matching rainbow colors blended into the upper nail
- Extra glossy top coat to make everything shimmer cohesively
Pro Tip
Ask your nail tech to arrange the rhinestones in a specific color order rather than random placement—the structure makes the design read as intentional art rather than a sparkle accident. This takes more time but makes a massive difference in the final look.
5. Gold Leaf and Chunky Glitter Mix Over Warm Nude
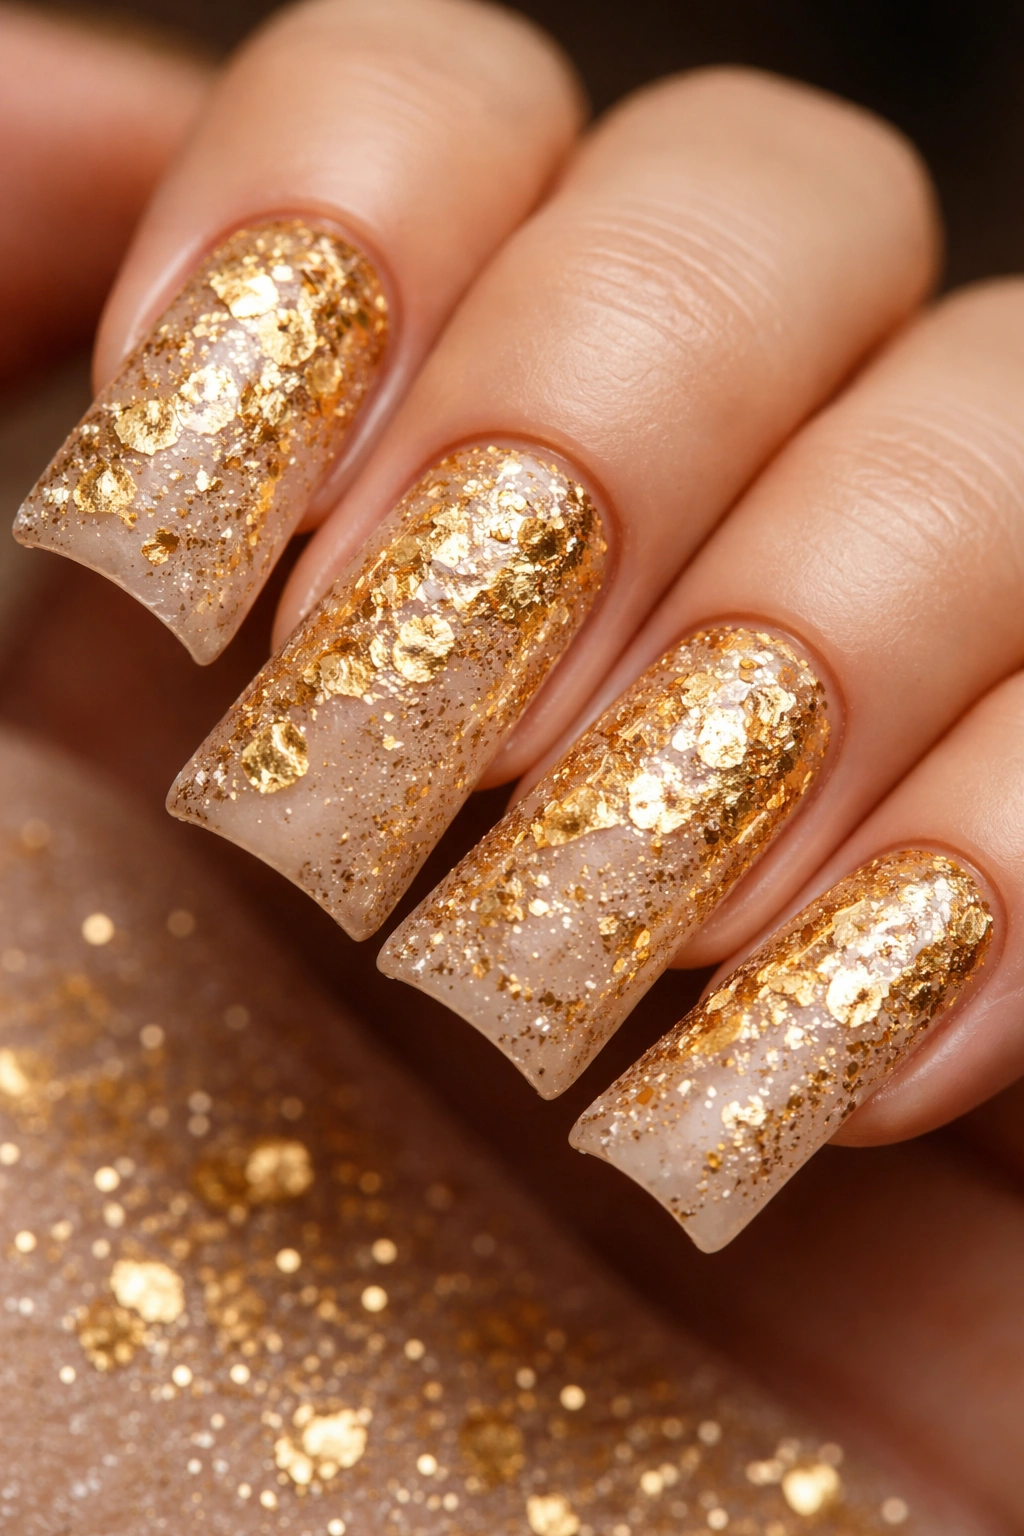
Gold leaf gets scattered across a warm nude or light gold base, and then chunky glitter in complementary gold tones gets layered over and around the leaf pieces. This creates a texture that’s really beautiful to look at, and the combination of delicate leaf and chunky sparkle gives you both elegance and edge. It’s the kind of design that feels artistic and considered.
Why This Design Stands Out
Gold leaf adds a handcrafted, almost organic feel that pure sparkle alone can’t achieve. The chunky glitter gives visual interest and catches light differently than fine glitter would. Together, they create a design with genuine dimension—it’s not flat sparkle, it’s layered and textured.
Key Features to Ask For
- Warm nude or soft gold base coat
- Gold leaf pieces applied in a scattered but intentional pattern
- Medium-to-chunky gold glitter layered over the top
- Matte or satin top coat option to let the texture show (or glossy if you prefer extra shine)
Worth Knowing
The texture of chunky glitter plus leaf means this design shows fingerprints more than a smooth sparkle design might. That’s actually part of its charm—it creates shadow and depth—but it’s worth knowing if you prefer nails that always look perfectly pristine.
6. Mirror Chrome with Strategic Gem Placement
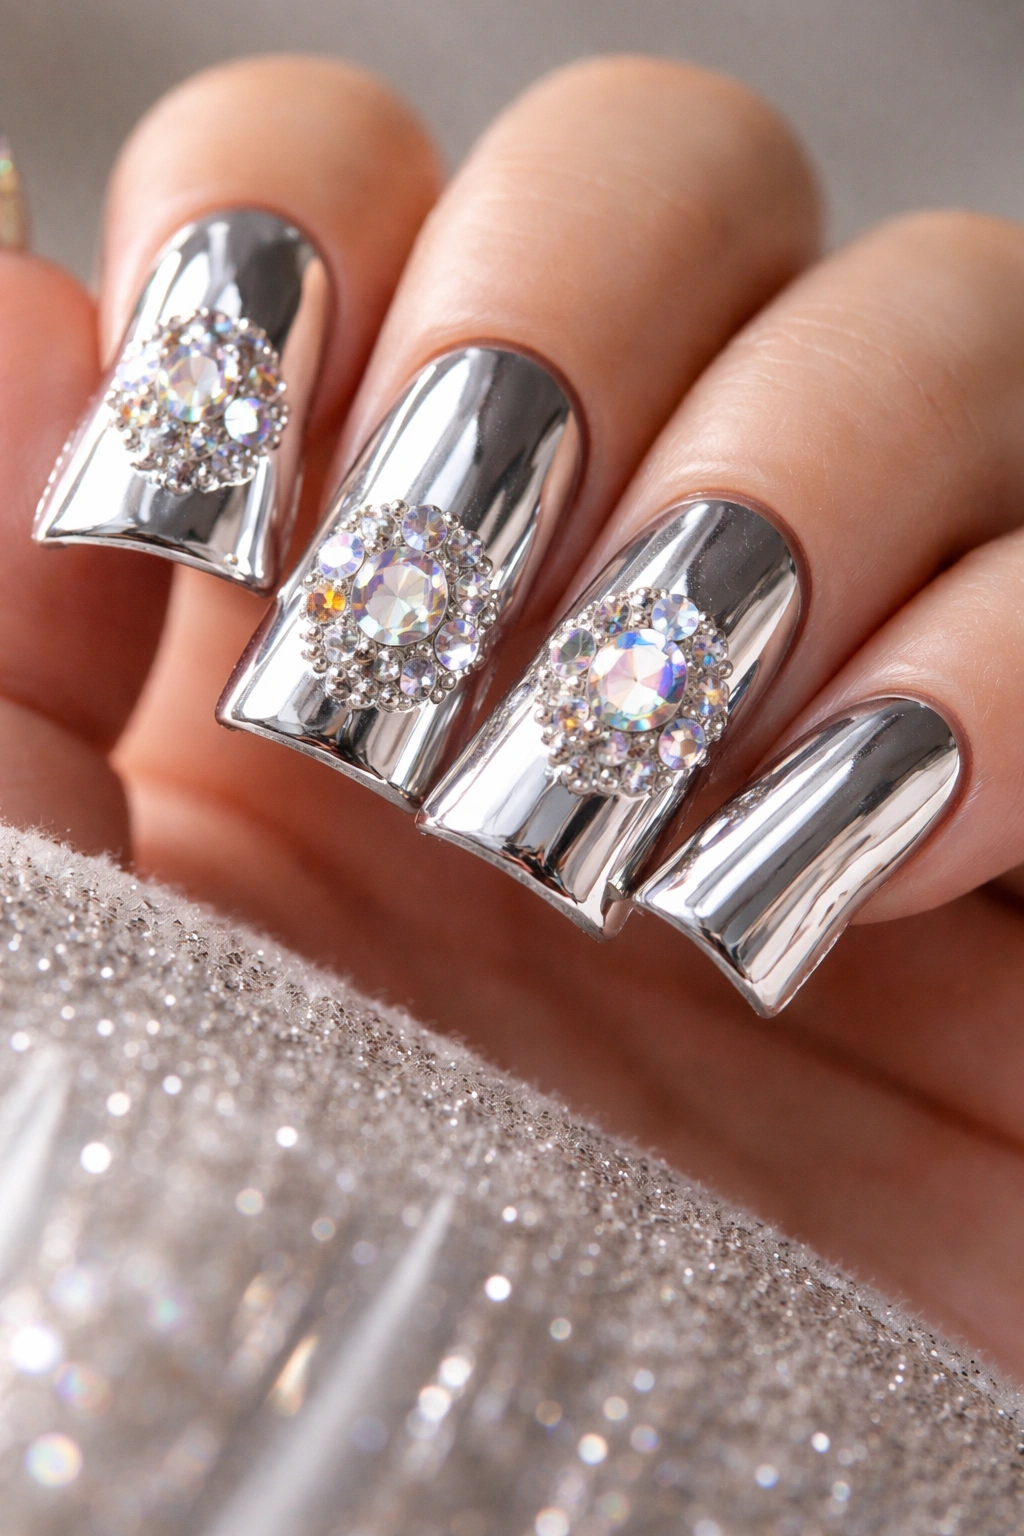
Mirror chrome creates that ultra-reflective, almost metallic look that makes your nails appear like polished metal, and then you strategically place larger individual gems or crystal clusters to add dimensional pops. The gems interrupt the mirror effect just enough to add visual interest and texture. This is maximally modern and genuinely striking.
Why This Design Stands Out
Mirror chrome is bolder than holographic chrome—it’s more monochromatic but more reflective. The gem placement becomes more important because you’re working with a simpler base. When gems are placed well, they look like intentional jewelry rather than random sparkle additions.
Key Features to Ask For
- Mirror chrome powder (typically applied over a sticky base)
- Clear gel seal before gem placement
- Larger gems or crystal clusters (4-5mm or slightly bigger)
- Placement in the center or at strategic points rather than scattered across
Quick Facts
- This design requires good lighting to show its full potential
- Mirror chrome can be slightly more delicate than regular gel—handle with extra care
- The contrast between the reflective chrome and gems creates optical depth
- This works beautifully as a monochromatic design when using silver or gold chrome
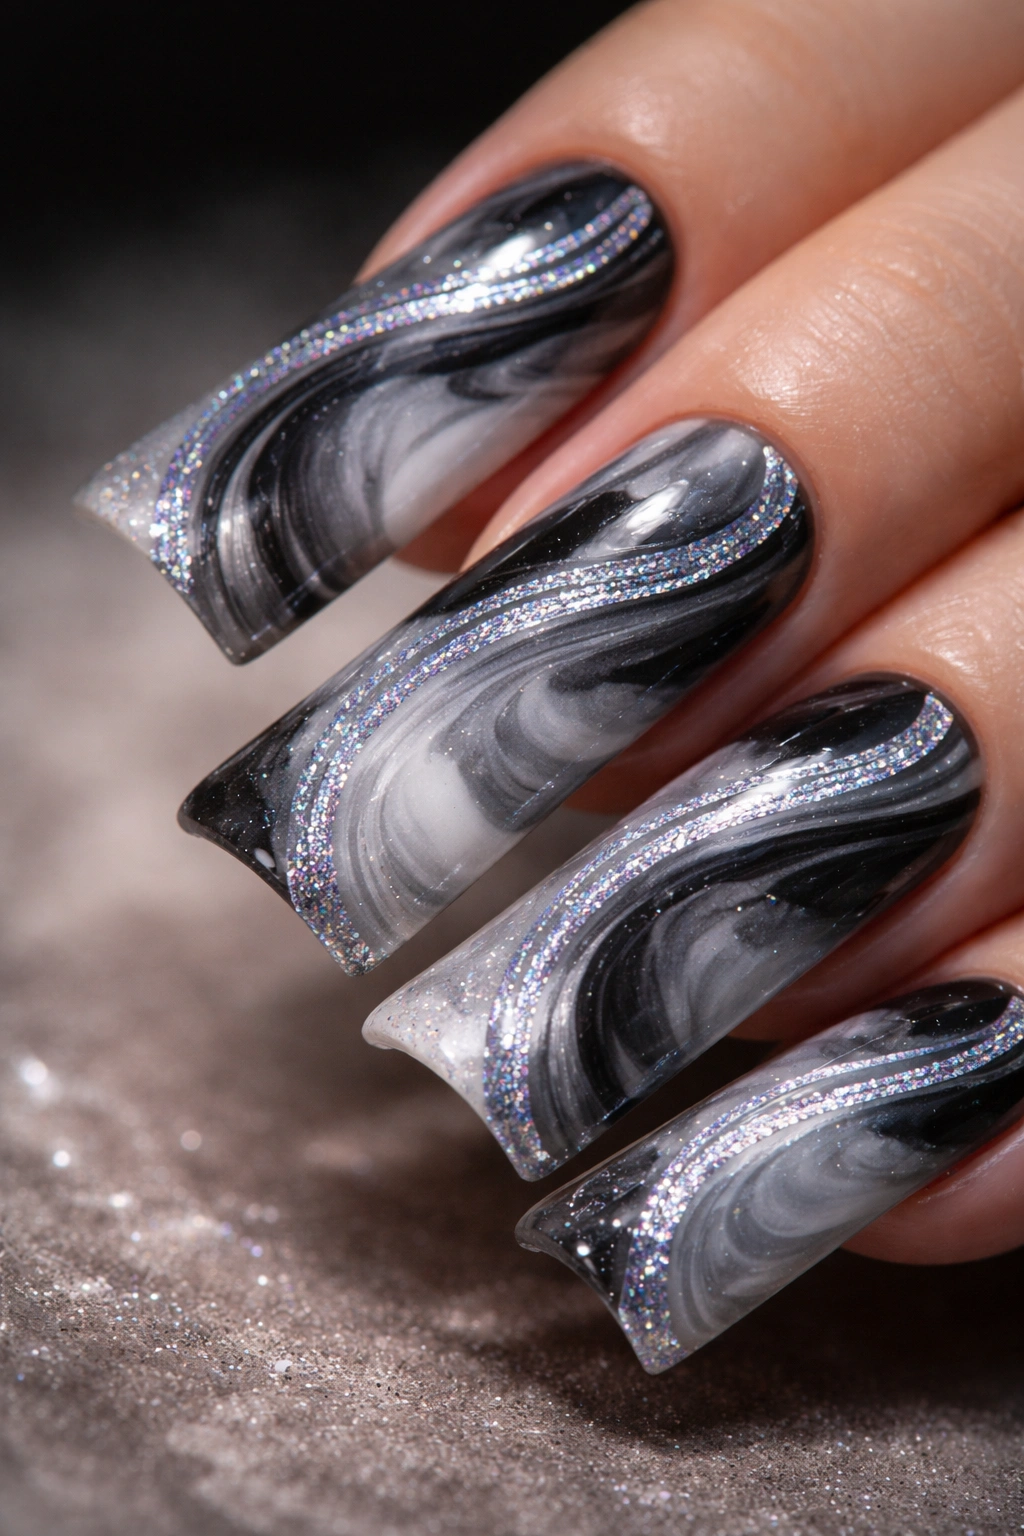
7. Marble Swirl with Iridescent Sparkle Accents
Black and white (or grey-toned) marble effect created using gel to swirl and blend colors creates the foundation, then iridescent sparkle gets applied selectively to highlight certain areas of the marble pattern. The sparkle follows the natural curves of the marble design rather than existing separately from it. This is modern and sophisticated, with enough complexity to feel genuinely interesting.
Why This Design Stands Out
Marble gives this design movement and visual complexity on its own, so the sparkle is really accenting rather than being the primary design element. The combination of organic swirling marble with geometric precision of gems creates a really beautiful contrast. This design reads as artistic and intentional.
Key Features to Ask For
- Marble effect created with black, white, and grey gel polish shades
- Iridescent glitter or dust applied to specific marble swirls
- Fine-lined details added with gel pen if desired
- Clear glossy top coat that makes the whole design shimmer
Pro Tip
Ask your nail tech to position the iridescent accents on the higher parts of the marble swirls so light hits them differently as your hand moves. This creates an interactive element to the design.
8. Champagne Shimmer with Gold Studs and Micro Gems

A champagne or pale gold shimmer base creates luxury from the foundation up, then small gold studs (square, round, or geometric) get placed in a strategic line or pattern across the nail, with micro gems filling in gaps or creating texture. The combination of smooth shimmer and raised metal studs creates real dimension and interest. This feels expensive and polished.
Why This Design Stands Out
Studs are different from glitter or rhinestones—they’re dimensional in a totally distinct way. The metallic studs against the champagne shimmer creates a cohesive color story that’s just inherently chic. This is the kind of design that works whether you’re dressing up or dressing casual because it reads as sophisticated rather than costume-y.
Key Features to Ask For
- Champagne or pale gold shimmer gel base (not too sparkly on its own)
- Gold metal studs in your choice of shapes (typically 2-3mm)
- Micro gems or crystals filling around the studs
- Matte or satin top coat to let the studs show texture
Worth Knowing
Metal studs can sometimes catch on fabric or hair more than pure sparkle designs. This isn’t typically a problem, but it’s worth being slightly more mindful with hand placement than you might be with other manicures.
9. Black Onyx Base with Diamond-Studded Tips
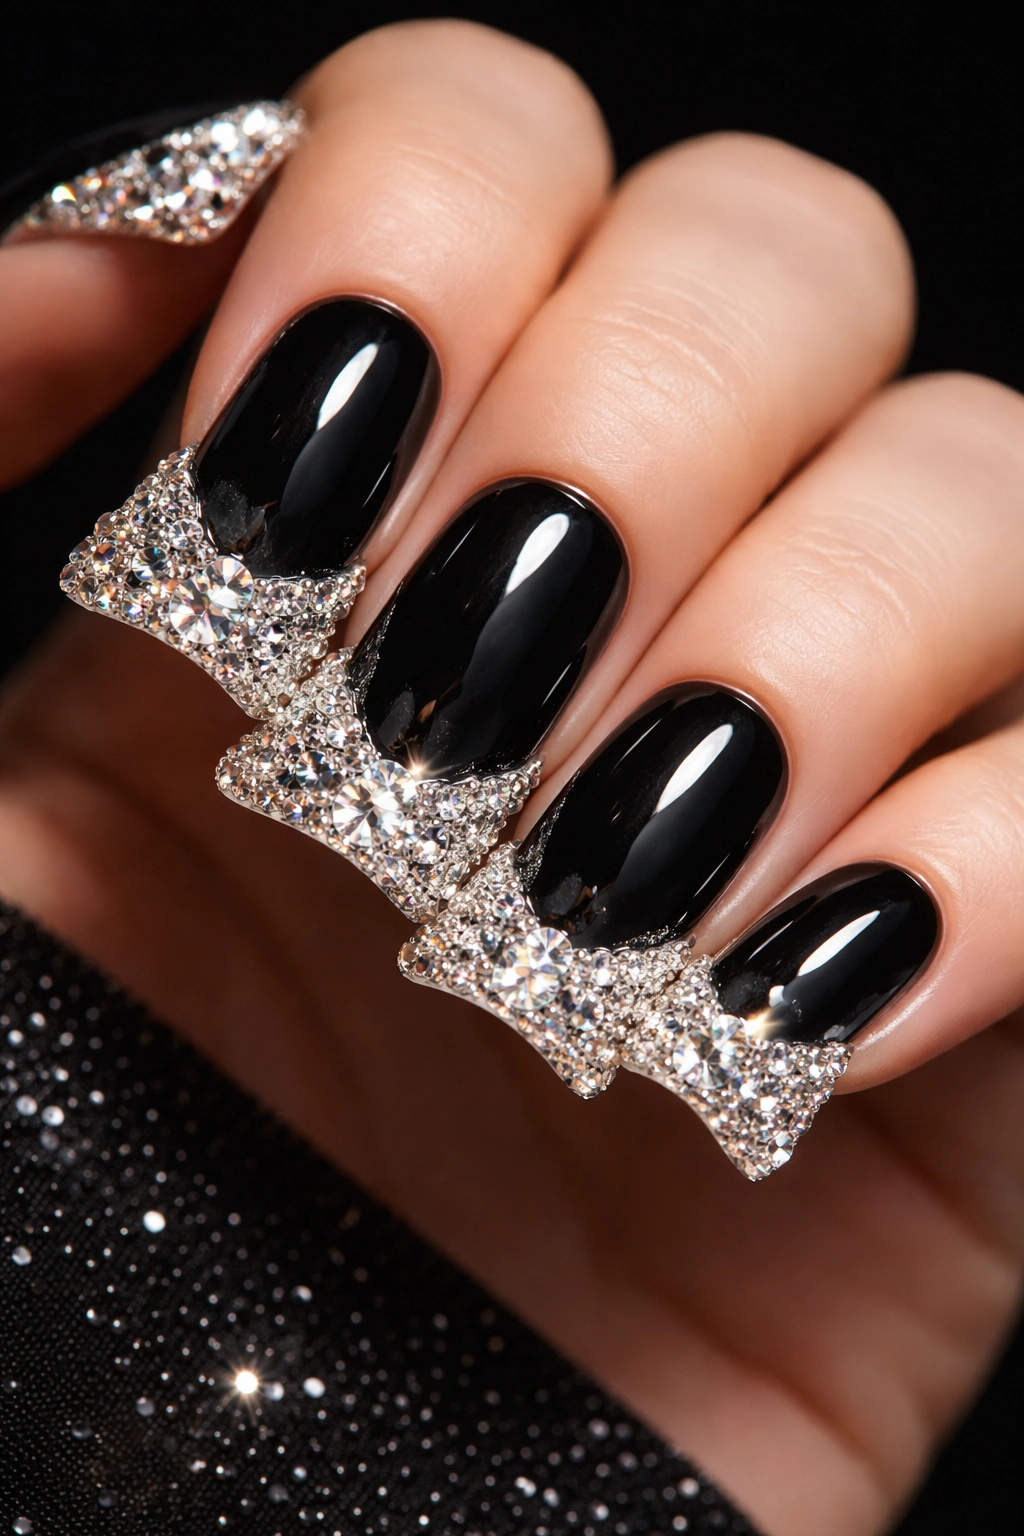
Deep, rich black gel polish covers the entire nail as a dramatic base, and then the tips get heavily studded with clear or AB-finish crystals creating an almost crown-like effect at the edge. The contrast between the dark base and bright gems is where this design gets its power. It’s edgy and glamorous at the same time.
Why This Design Stands Out
Black is the perfect background for clear crystals—the gems absolutely glow against it. The concentration of gems specifically at the tips creates visual lift and elongation. This is a design that photographs beautifully and has serious luxury vibes without feeling overly feminine or delicate.
Key Features to Ask For
- Deep black gel polish covering the entire nail surface
- Heavy crystal coverage at the tips only (typically starting about 1/3 down from the tip)
- Mix of sizes for depth (some larger gems, some micro crystals)
- Glossy top coat to make everything shimmer
Quick Facts
- This design benefits from excellent lighting to show the gem detail
- The black base means you can go heavier on crystal coverage without it feeling chaotic
- This works beautifully on both short and longer duck nail lengths
- The tip design creates automatic visual length and sophistication
10. Iridescent Pearl with Holographic Dust Overlay
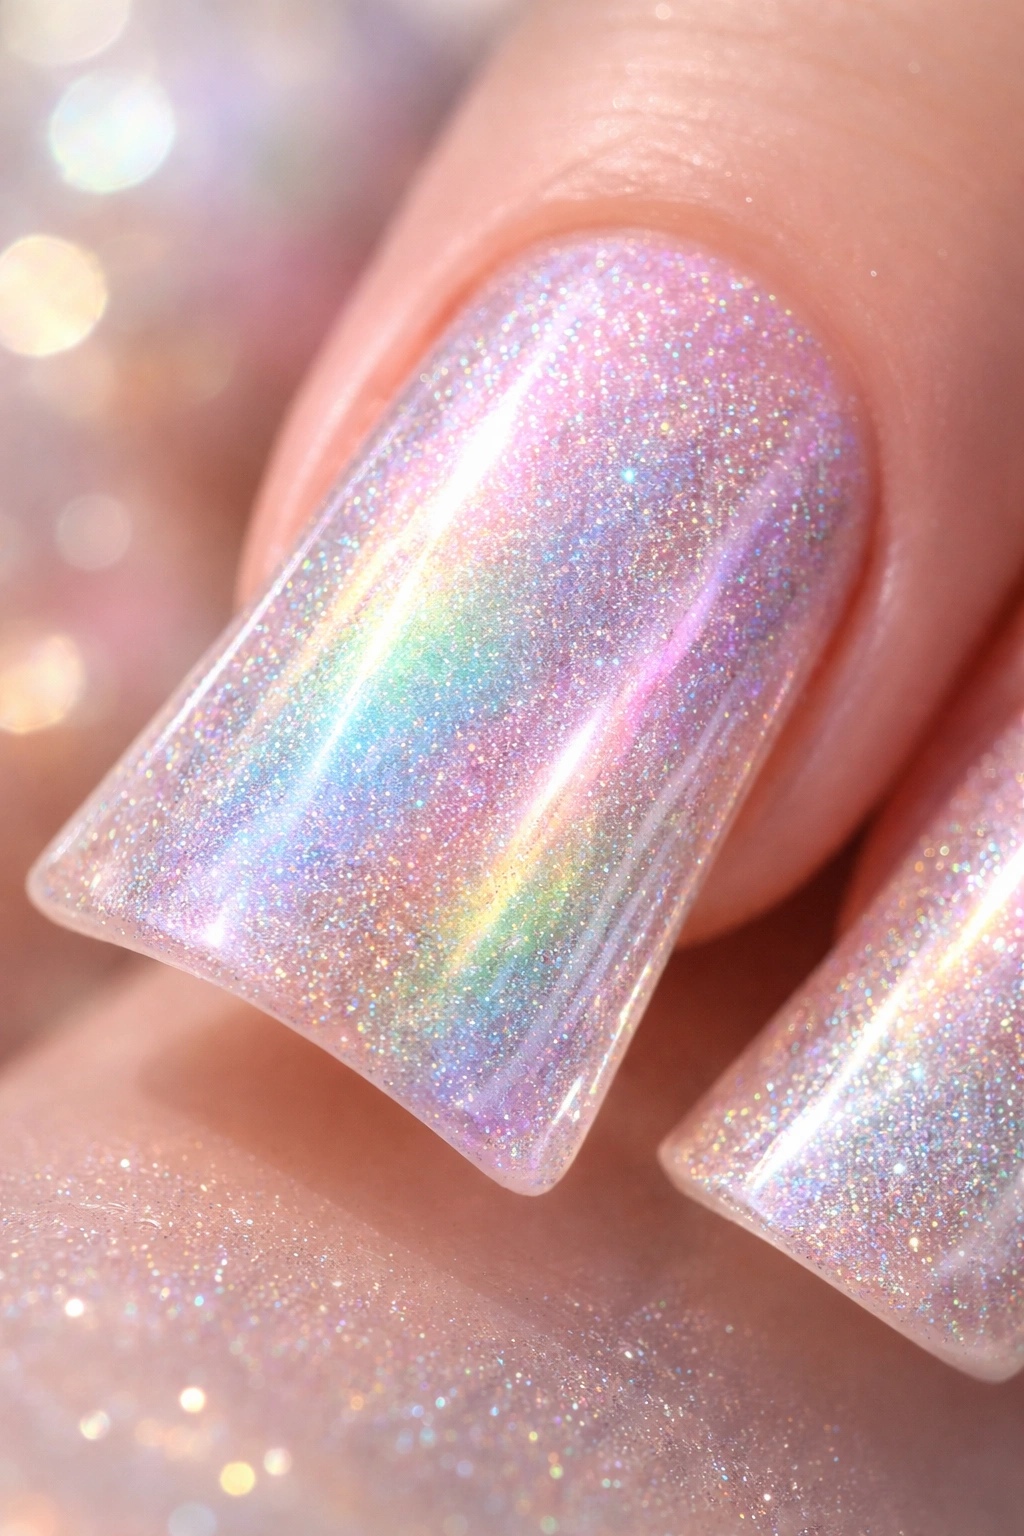
An iridescent pearl or opalescent base creates soft color-shifting even before you add anything else, then holographic dust gets applied strategically to intensify the rainbow-shifting effect. The result is a design that’s pure shimmer and dimension, almost ethereal in how it catches and plays with light. This feels dreamy and otherworldly.
Why This Design Stands Out
Pearl bases already have dimension built in—they shift between pink, blue, and purple depending on light and angle. The holographic dust amplifies this effect and adds an extra layer of sparkle. This is one of those designs that’s genuinely different looking depending on your environment—indoor light, outdoor light, and evening lighting will all show different color stories.
Key Features to Ask For
- Iridescent pearl or opalescent gel base
- Holographic dust or powder layered over the pearl
- Clear glossy top coat that enhances the shimmer
- Optional: add a few scattered micro gems for extra dimension
Pro Tip
This design is especially beautiful in warmer months when you’re spending more time outside in varying light. The color-shifting effect is most dramatic when you move between different lighting conditions.
11. Metallic Confetti Mix with Varied Finish Glitters
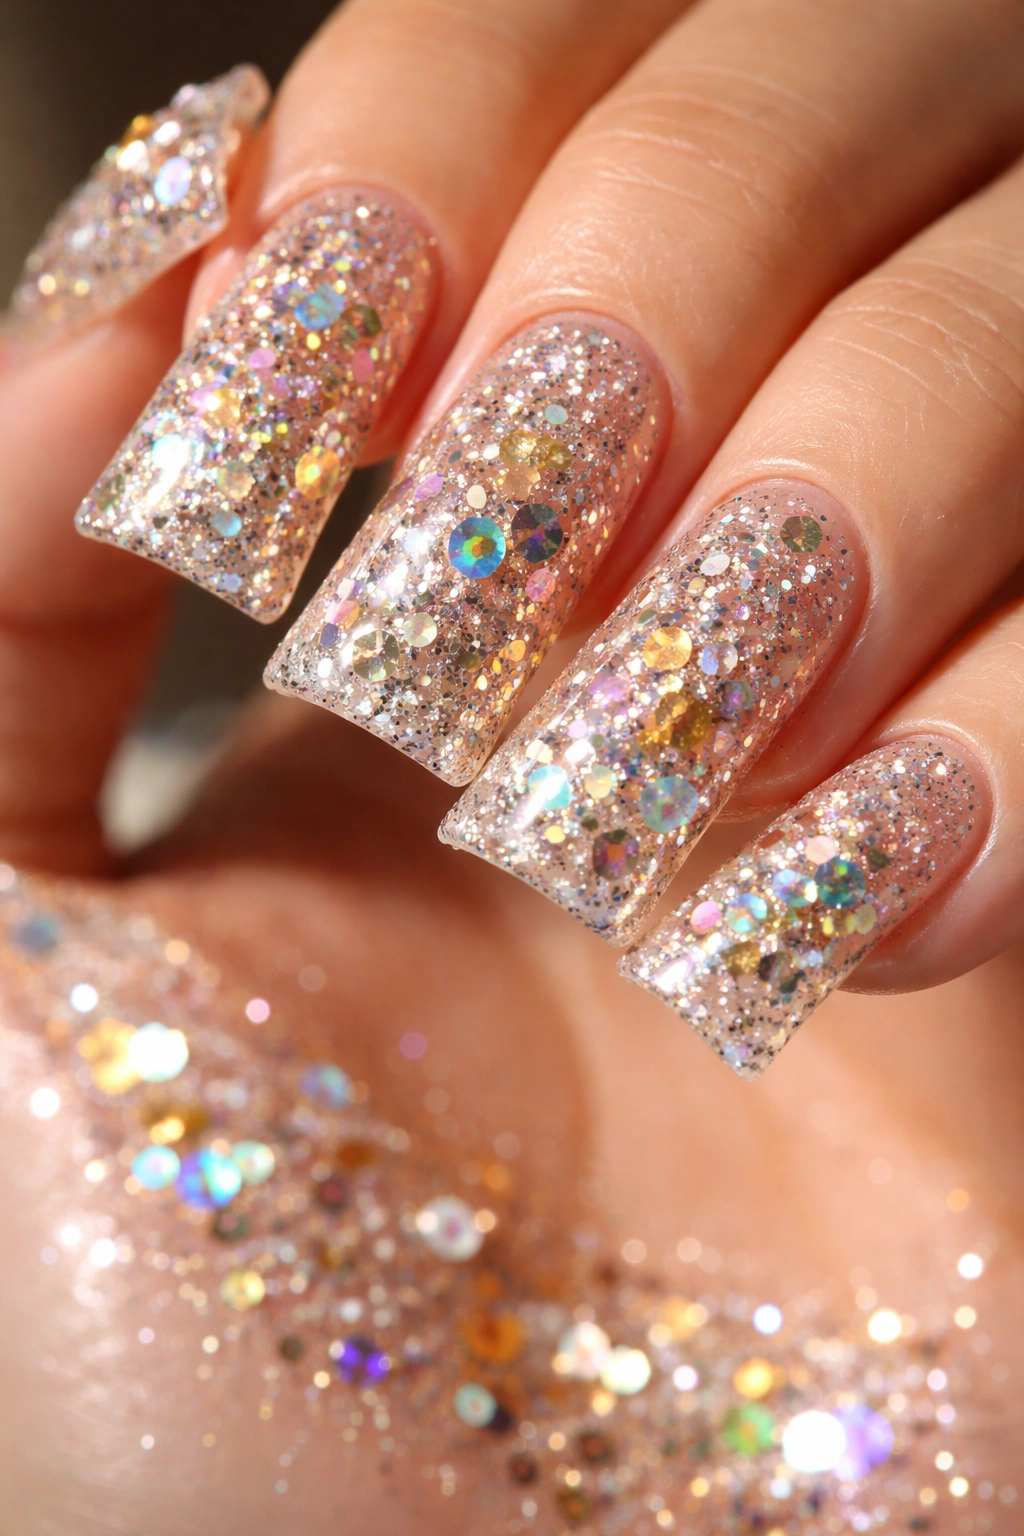
Multiple different glitter sizes and finishes layered together—fine glitter, chunky glitter, holographic glitter, and metallic foil pieces—all in complementary colors create a design that’s basically organized chaos. It’s sparkly, it’s fun, it’s complex, and it genuinely stands out. This is for someone who loves maximum shimmer and doesn’t do subtle.
Why This Design Stands Out
The varied glitter sizes create depth and texture that single-glitter designs can’t match. The different finishes (holographic vs metallic vs matte) catch light in completely different ways. This design has genuine dimension—it’s not just sparkle, it’s layered sparkle with personality.
Key Features to Ask For
- Nude, white, or very pale base to let glitter show clearly
- Multiple glitter shades and sizes applied in layers
- Mix of finishes (holographic, metallic, sparkle)
- Matte top coat option to let texture show (or glossy for extra shine)
Worth Knowing
Glitter nail designs require more careful removal and can take longer to file off, but the look is so worth it. Ask your nail tech to seal the glitter properly so it stays put throughout your wear time.
12. Crystal Flower Design with Central Focal Point
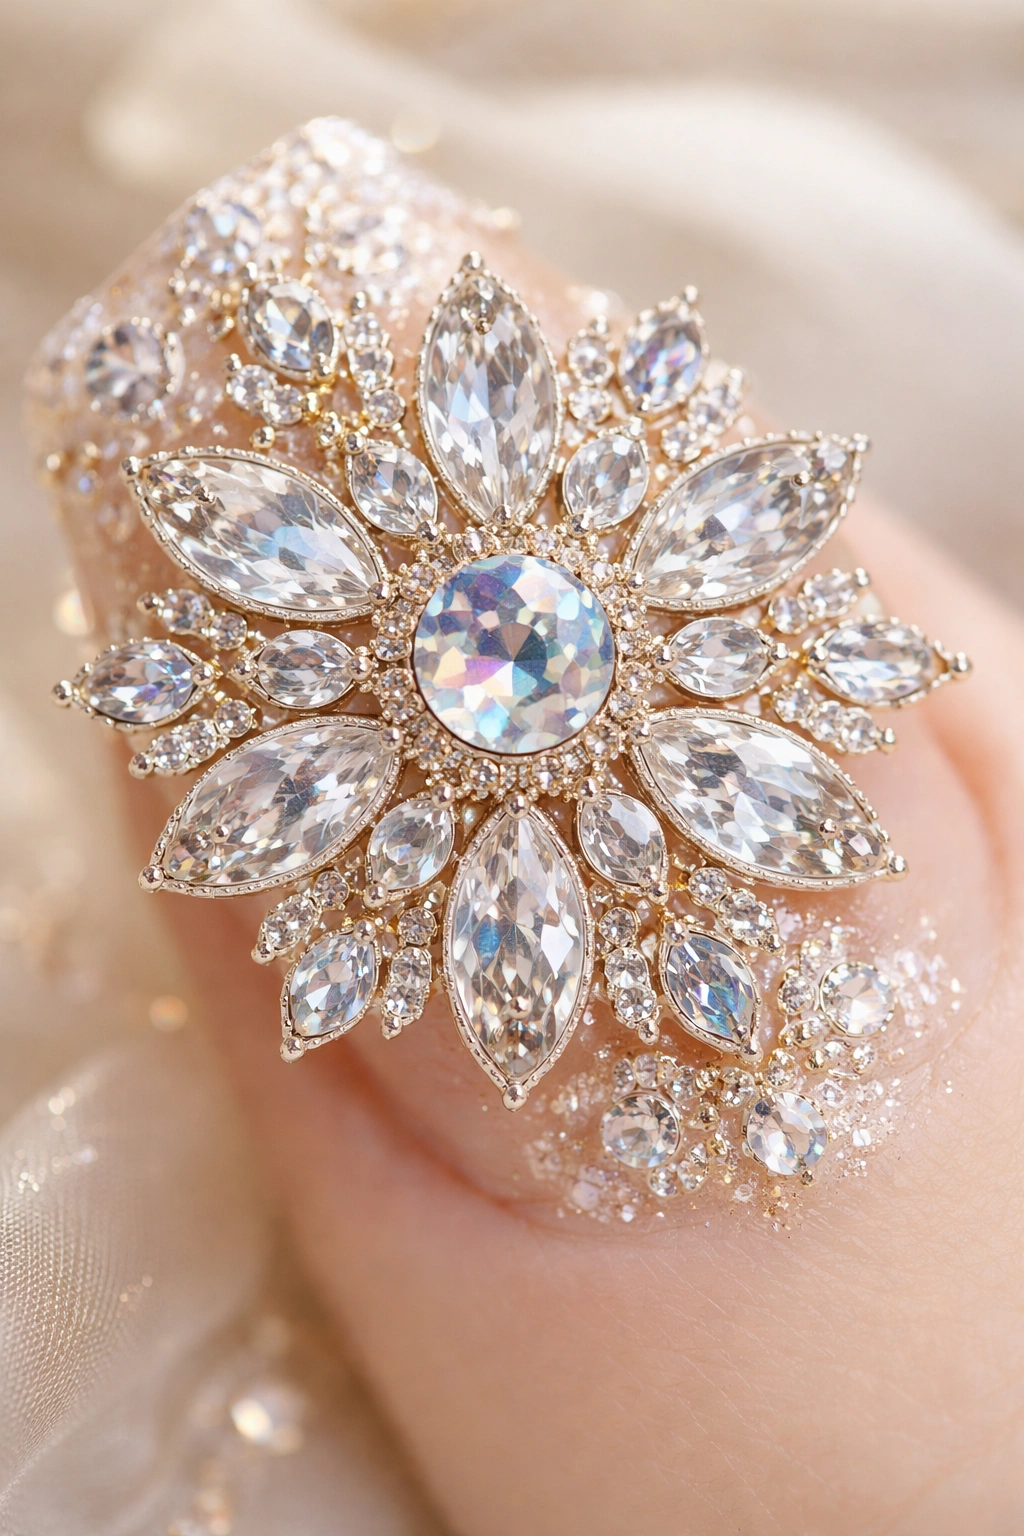
Individual crystals get arranged into flower or mandala shapes, with larger gems forming the center of the flower and smaller crystals radiating outward. This is applied over a neutral base, creating a truly artistic design that’s almost jewelry-like. The geometric precision of the flower shape makes this feel intentional and high-concept.
Why This Design Stands Out
Flower designs create natural focal points and guide the eye across the nail in a purposeful way. The geometry of a perfectly-arranged flower is inherently beautiful. This design requires skill to execute well, which means when you find the right nail artist, the result is genuinely impressive and unique.
Key Features to Ask For
- Neutral or slightly shimmery base color
- Large crystals (4-5mm) for the flower center
- Graduated sizing of crystals as they move outward
- Precise placement in a symmetrical pattern
- Optional: thin gold or silver lines connecting the gems
Quick Facts
- This design is customizable based on flower shape and gem color
- The complexity of the design means it photographs beautifully
- Flower designs work as one-nail focal points or across all nails
- This works especially well on longer nail lengths that give more canvas space
13. Rose Gold with Glitter Fade to Clear Tips
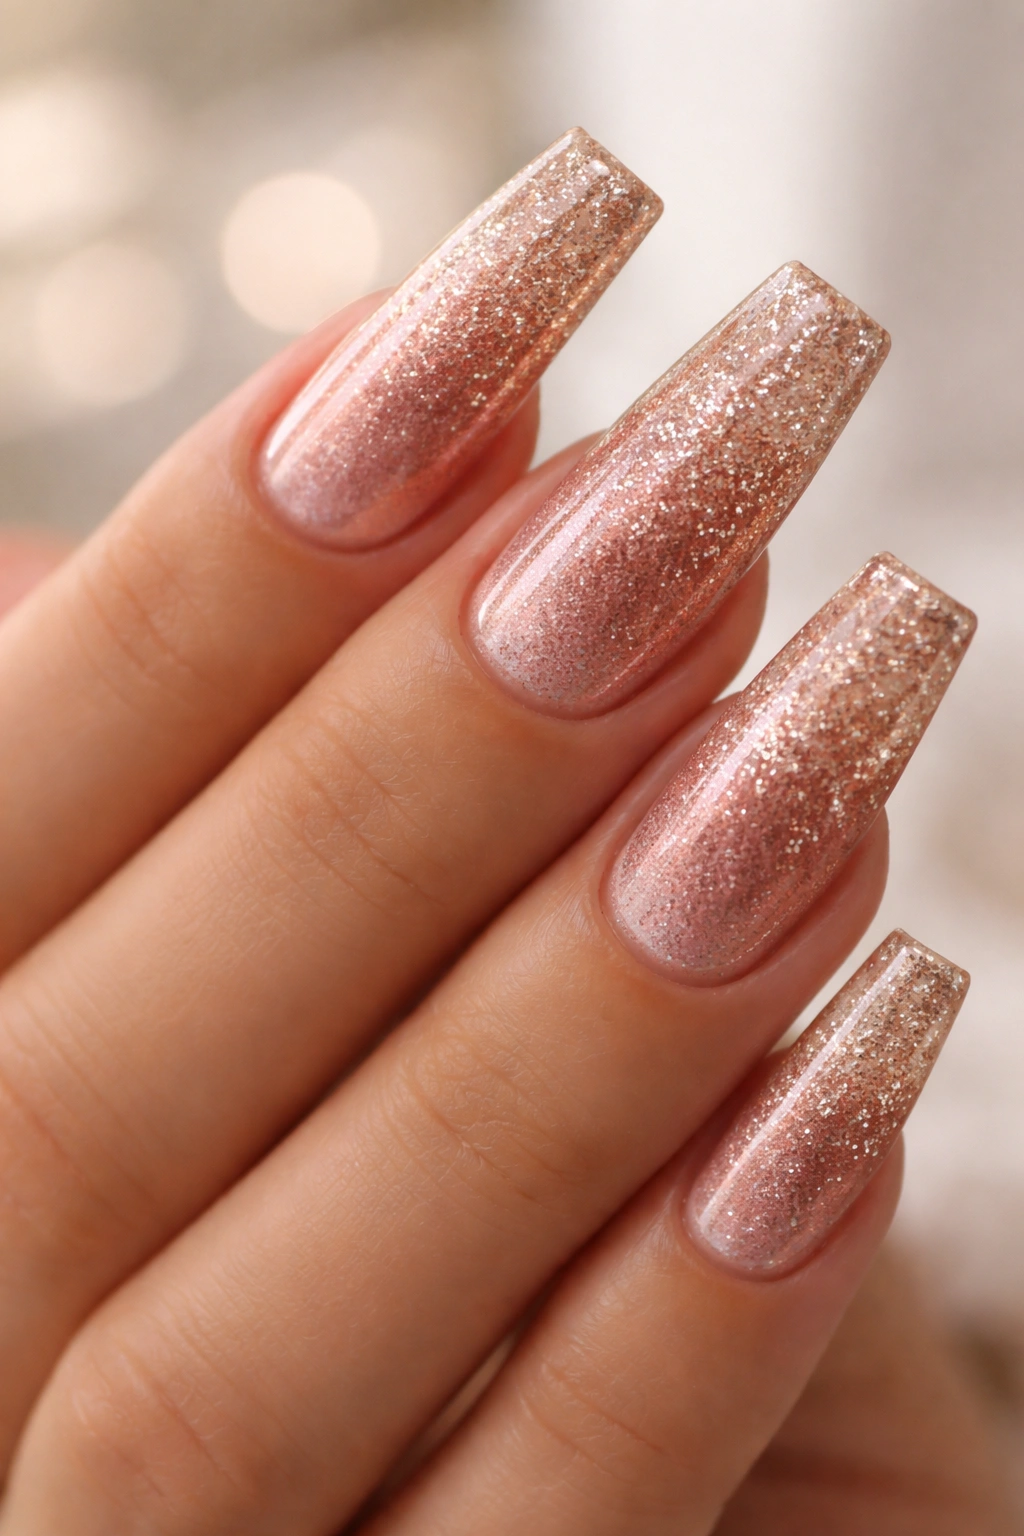
Rose gold shimmer or pale rose base transitions into fine rose gold and champagne glitter, then fades to clear gel at the tips creating an ombre effect. The result is a design that’s elegant and sparkly simultaneously, with the fading effect creating visual length. It’s sophisticated enough for formal events but fun enough for everyday wear.
Why This Design Stands Out
Rose gold is universally flattering and warm-toned, which means this design works beautifully on virtually every skin tone. The fade from shimmer to glitter to clear is a really smart gradient technique that’s easier to maintain than a solid glitter nail. The warm tones make this feel romantic and elegant.
Key Features to Ask For
- Rose gold shimmer gel base
- Gradual transition to rose gold and champagne glitter
- Clear gel tips that fade smoothly (no harsh line)
- Glossy top coat for maximum shine
Pro Tip
Ask your nail tech to make the fade gradual across the middle section of the nail—the most natural fade happens over a larger area rather than sharp color change at one spot.
14. Ombre Bling with Metallic Flakes Throughout
Color ombre (transitioning from one hue to another across the nail, like pink to purple) gets enhanced with metallic flakes scattered throughout the gradient, creating an effect that’s both smooth and sparkly. The flakes follow the color gradient rather than existing as separate elements. This is dimensional and beautiful from every angle.
Why This Design Stands Out
Flakes are different from traditional glitter—they’re thinner and more delicate, creating a more refined sparkle. Pairing them with ombre creates a design that’s dynamic without being chaotic. The color gradient gives structure while the flakes add luxury.
Key Features to Ask For
- Color ombre in your choice of complementary shades
- Metallic flakes in complementary or contrasting colors
- Flake placement distributed across the entire ombre gradient
- Glossy top coat that enhances the flake shimmer
Worth Knowing
Flakes can sometimes be delicate and may not last as long as traditional gems, but they create a truly unique shimmer effect that’s worth it. Ask your nail tech to seal them properly to maximize wear time.
15. Diamond Dust Effect with Strategic Gem Placement
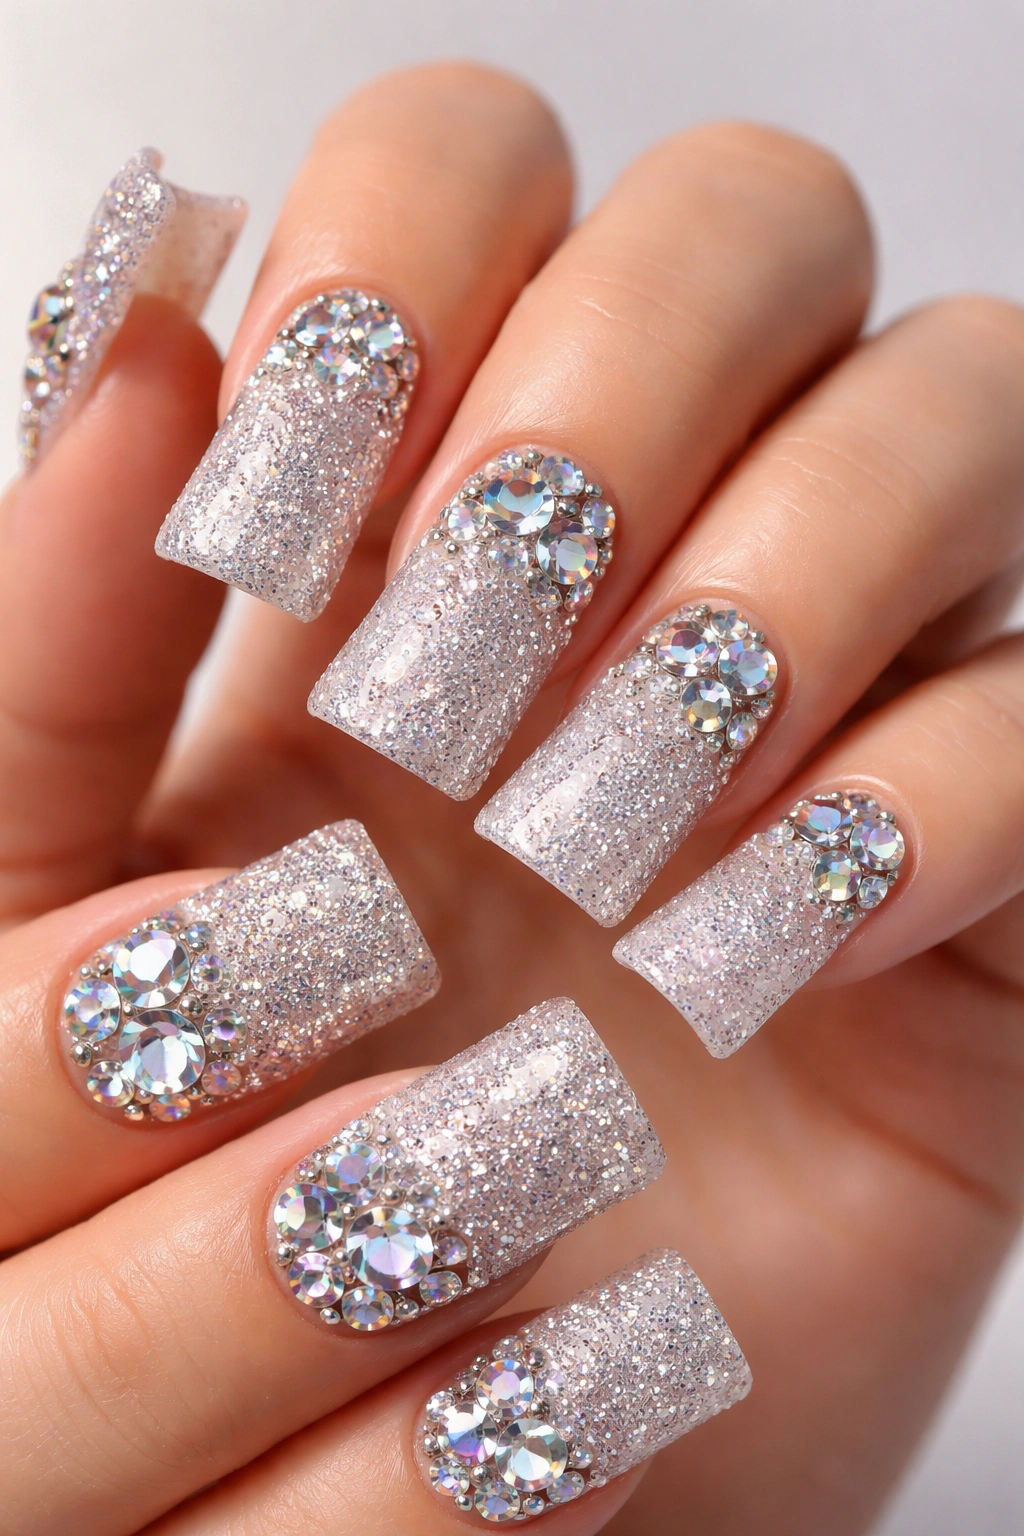
Fine diamond dust applied across the entire nail creates a uniform sparkle base, then larger individual diamonds or crystals get placed in strategic clusters creating focal points. The diamond dust provides all-over shimmer while the larger gems add dimension. This is maximally sparkly but still feels intentional rather than random.
Why This Design Stands Out
Diamond dust is fine enough that it doesn’t feel heavy, but it creates serious shimmer across the entire nail surface. The strategic gem placement prevents the overall effect from feeling flat or one-dimensional. This design catches light constantly and is genuinely sparkly from every angle.
Key Features to Ask For
- Diamond dust applied evenly across the entire nail
- Clear gel seal before larger gem placement
- Larger gems positioned in clusters rather than scattered
- Extra glossy top coat for maximum reflection
Quick Facts
- This design works beautifully on any base color
- The all-over sparkle means this works for any occasion
- Diamond dust is more durable than many glitter options
- This design pairs well with French tips or ombré bases
16. Diamond Dust French with Bling Border
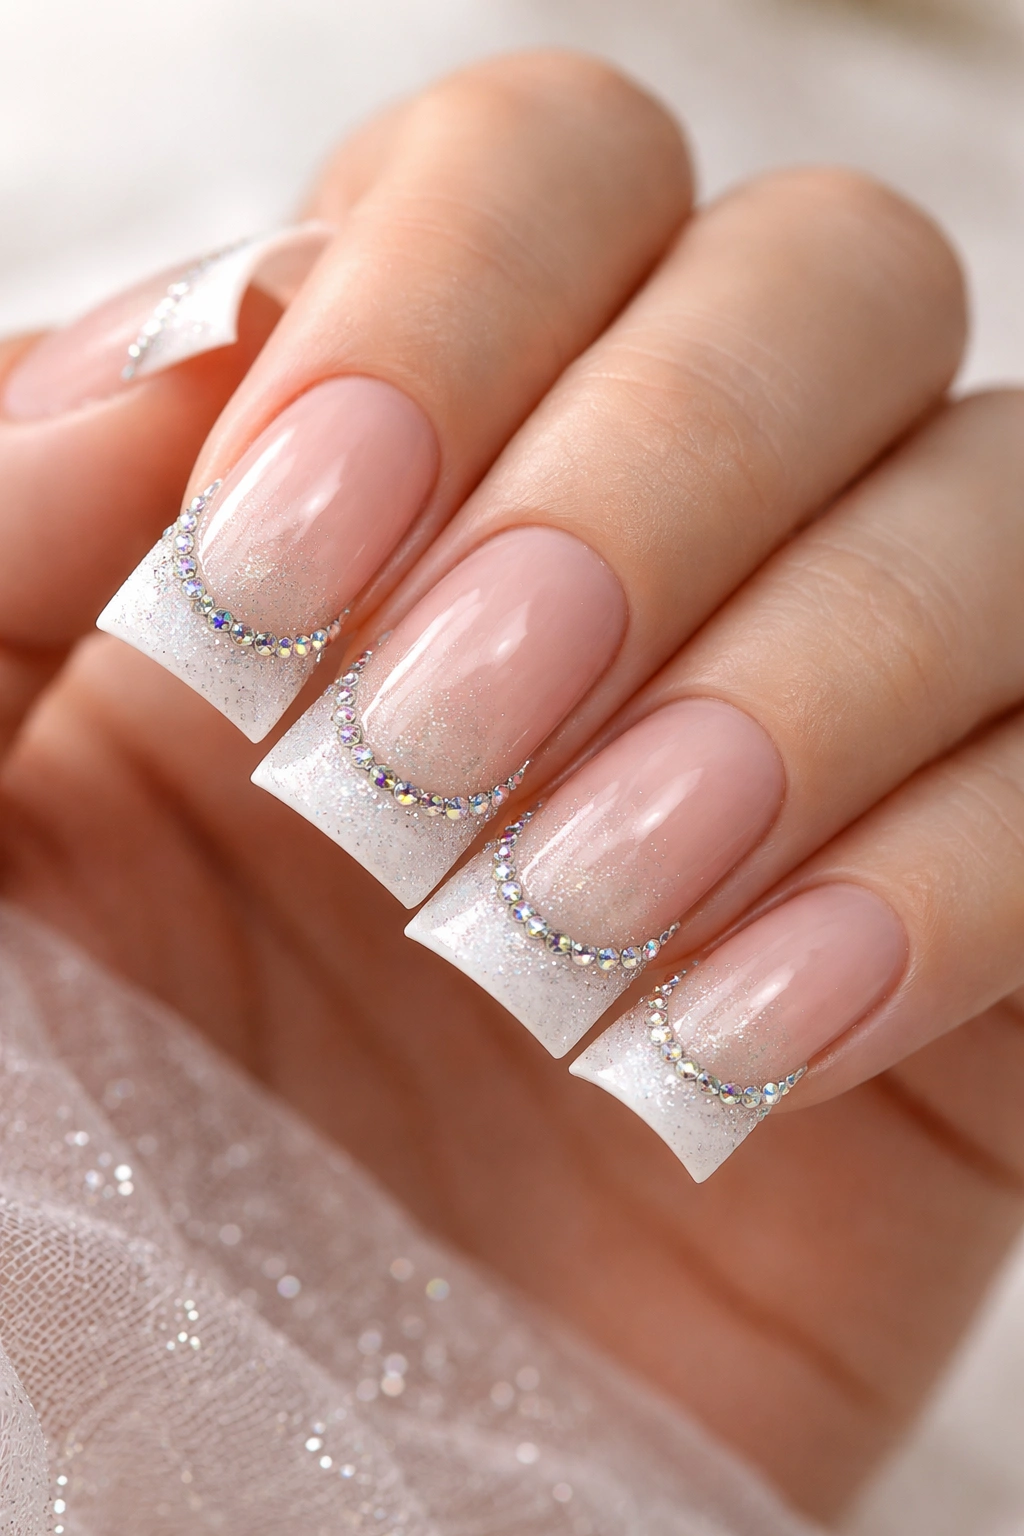
Classic French tip nail design gets a modern upgrade with diamond dust covering the tips and a delicate rhinestone or gem border running along the line where the white tip meets the nude base. The gems create a precise line that elevates the traditional French manicure into something genuinely special. This is the design that works everywhere and never goes out of style.
Why This Design Stands Out
French tips are timeless, and adding bling respects that tradition while making it feel current. The gem border creates definition and visual interest without disrupting the clean simplicity of a French design. This is elegant, wearable, and genuinely chic—it’s the manicure that works for formal events, professional settings, or just when you want your nails to feel special.
Key Features to Ask For
- Nude or very pale base on the nail bed
- Classic white diamond dust covering the tips
- Thin rhinestone or gem border along the French line
- Super glossy top coat for maximum shine
- Optional: add micro gems in the white tips for extra sparkle
Pro Tip
Ask your nail tech to apply the gem border with precision—a perfectly straight gem line transforms a standard French manicure into something that reads as high-end and intentional. The detail work here is what elevates the entire design.
Final Takeaway
Duck nails and bling are genuinely a perfect pairing. The wider, squared-off shape gives you real canvas space to work with, which means your sparkle gets to truly shine rather than getting cramped onto a tiny surface. Whether you’re going for subtle crystal accents or full-coverage glitter chaos, there’s absolutely a design in this list that’s going to make your nails feel special.
The key to making any of these designs work is finding a nail technician who understands precision placement and has genuine skill with gems and glitter application. The difference between a design that looks expensive and intentional versus one that looks chaotic comes down to application technique and artist expertise. Show your technician photos of exactly what you want, ask detailed questions about gem placement and durability, and don’t be afraid to go back if something isn’t quite right.
These designs range from subtle enough for everyday wear to show-stopping enough for special events, which means you can absolutely find something that fits your style and your lifestyle. The beauty of bling on duck nails is that it’s inherently eye-catching—your hands become an accessory, a statement piece, and a genuine conversation starter.
