

Royal blue is having a serious moment in nail art, and duck nails—those bold, sculptural press-ons or acrylics shaped like a duck’s bill—have become the canvas for some seriously stunning designs. If you’re ready to make a statement with your manicure, royal blue duck nails offer the perfect blend of elegance and edge. They’re dramatic enough to catch attention, versatile enough to work with nearly any aesthetic, and absolutely transformative when paired with the right embellishments and finishes.
The beauty of royal blue on duck nails is that the color deepens the drama of the shape itself. Royal blue sits at that perfect intersection between classic sophistication and contemporary cool—it’s darker than a standard blue, richer and more intense, which means your nail art gains instant depth and dimension. Whether you’re going for a minimalist look or loading up on glitter and gems, royal blue provides the ideal base that elevates whatever you add to it.
What makes this combination so compelling is the versatility. Royal blue works for everything from date night to office settings to weekend adventures. You can keep it understated with just the solid color and a glossy finish, or you can go wild with nail art details that transform your duck nails into genuine wearable art. The shape itself is statement-making enough that you don’t need to overcomplicate things, but when you do add design elements, they have real room to shine against that rich blue backdrop.
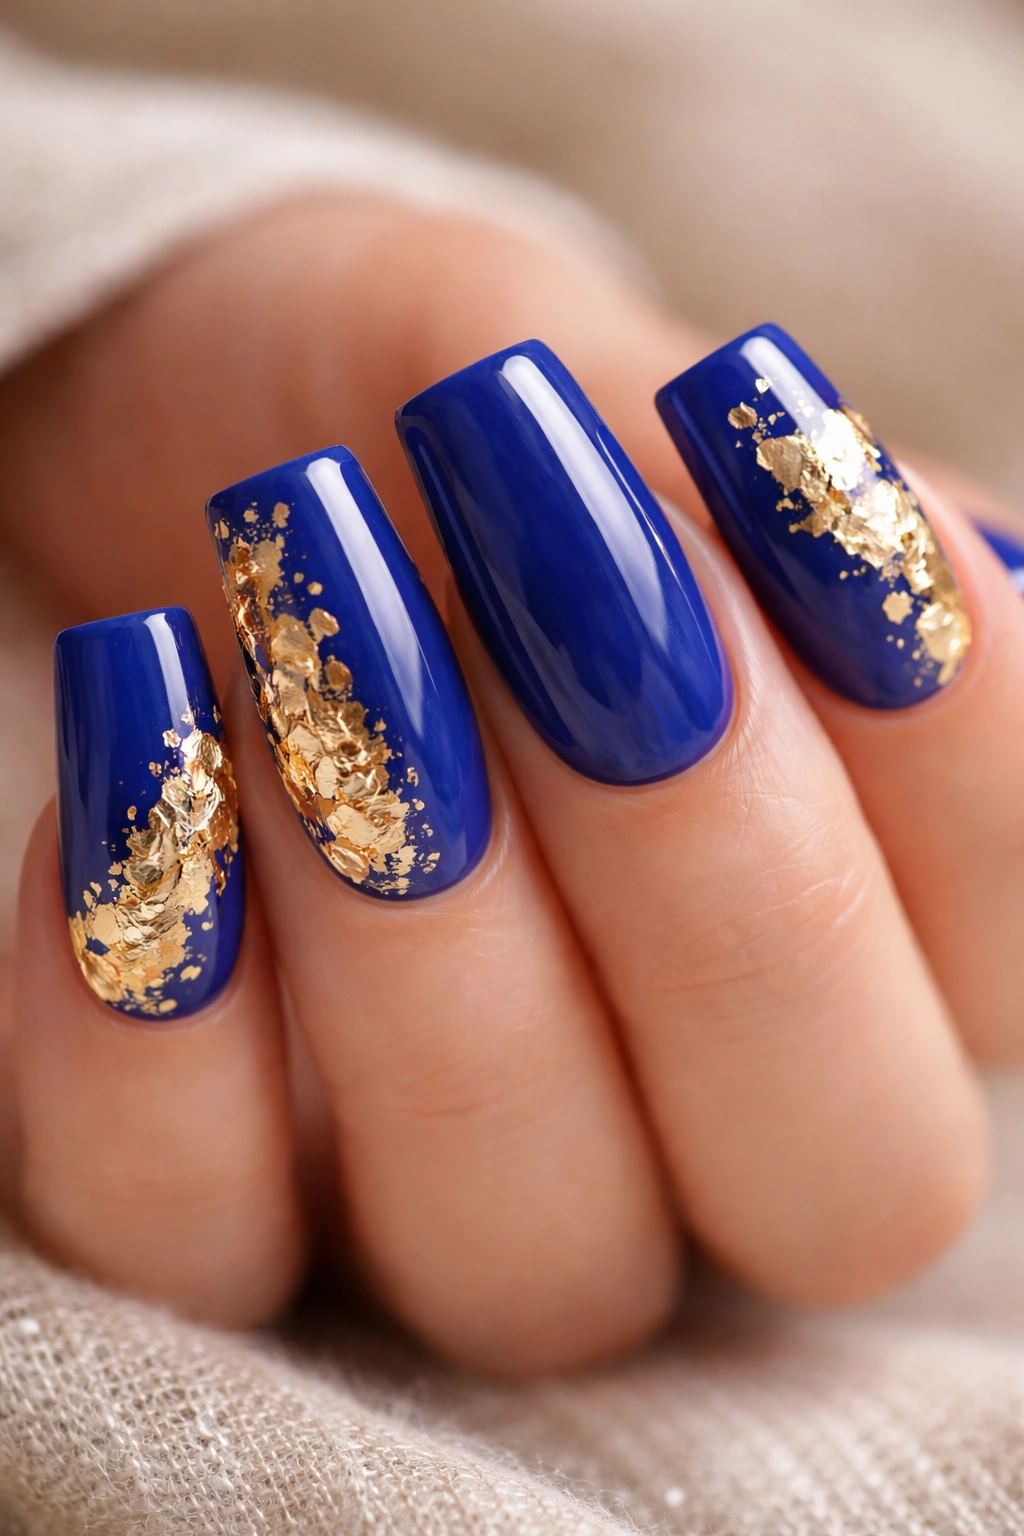
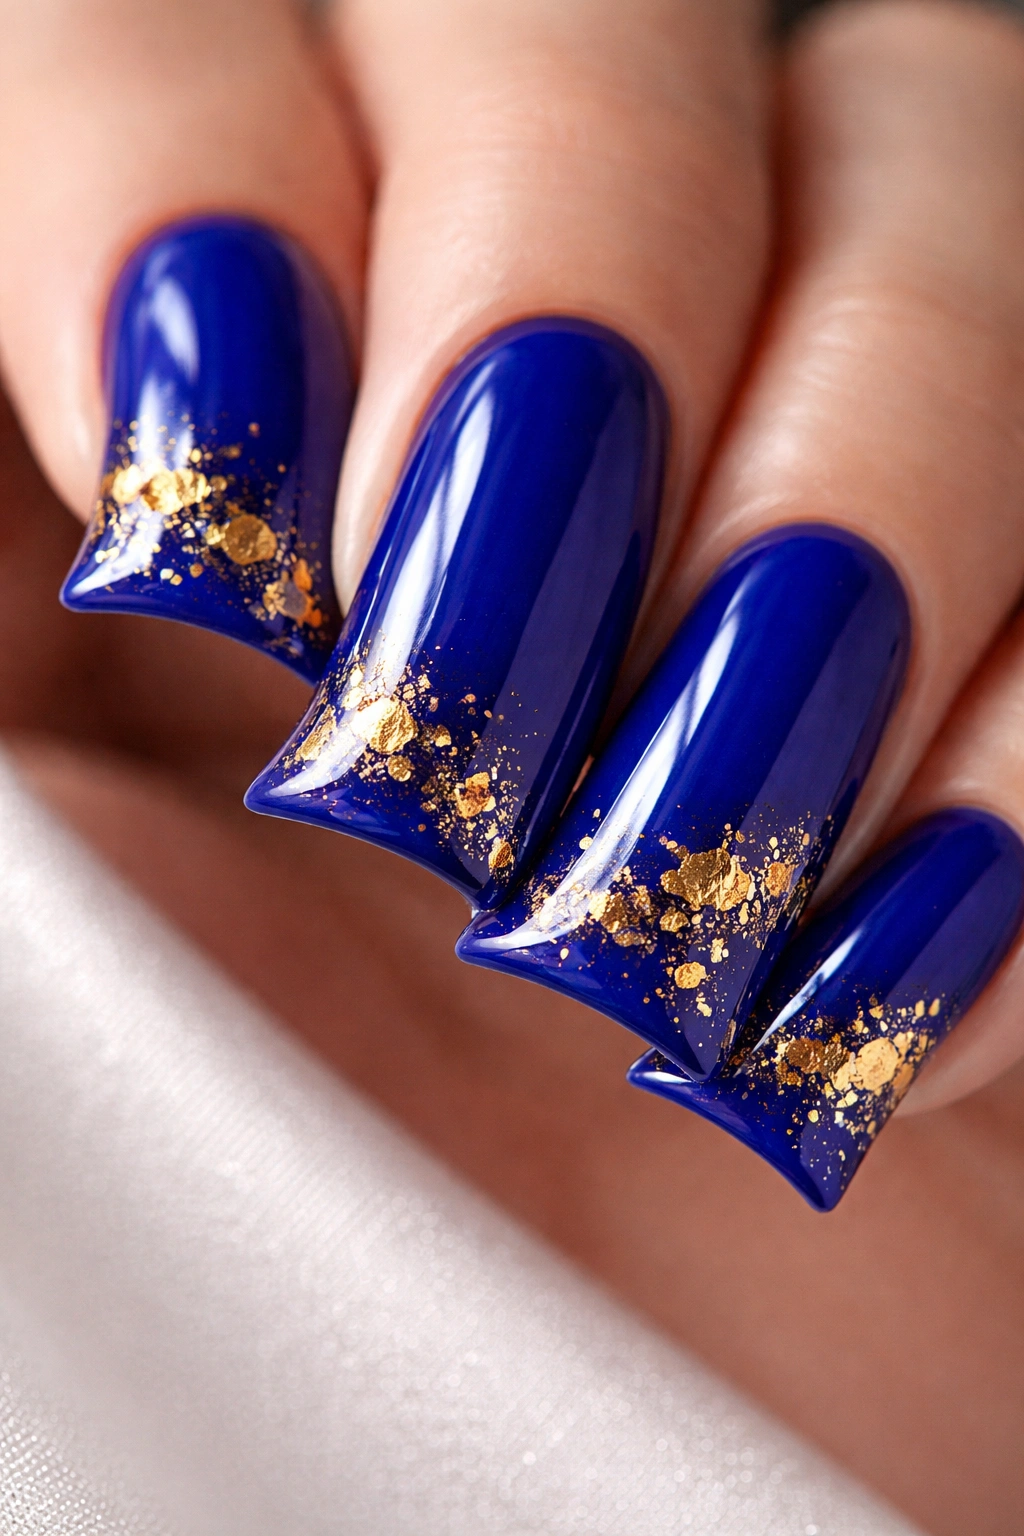
1. Classic Glossy Royal Blue With Gold Foil Accents
A glossy royal blue base creates that luxurious, wet-look finish that instantly elevates any manicure. When you add delicate gold foil pieces scattered across the nail—particularly along the tip or in small geometric patterns—you get a design that feels high-end and sophisticated without being overly complicated. The contrast between the deep blue and warm gold creates visual interest that draws the eye.
How to Create This Look
Gold foil works best when applied strategically rather than covering the entire nail. Start with two coats of glossy royal blue polish, letting each layer dry completely. Apply a thin layer of clear gel or sticky base coat over the dried polish, then press small pieces of gold foil randomly across the nail surface. Seal everything with a high-shine top coat that amplifies the glossy finish and locks the foil in place permanently.
Why This Design Works
- Rich blue and warm gold are a naturally complementary color pairing that feels intentional and polished
- The glossy finish on duck nails reflects light beautifully, emphasizing the shape’s sculptural qualities
- Gold foil catches light from different angles, adding dimension even when you’re keeping the overall design relatively simple
- This look suits professional settings just as well as night-out scenarios
Pro tip: Press the foil gently and hold for at least 3 seconds to ensure it adheres properly to the sticky base coat—rushing this step leads to foil pieces that peel off within days.
2. Royal Blue Ombré From Nude to Deep Blue
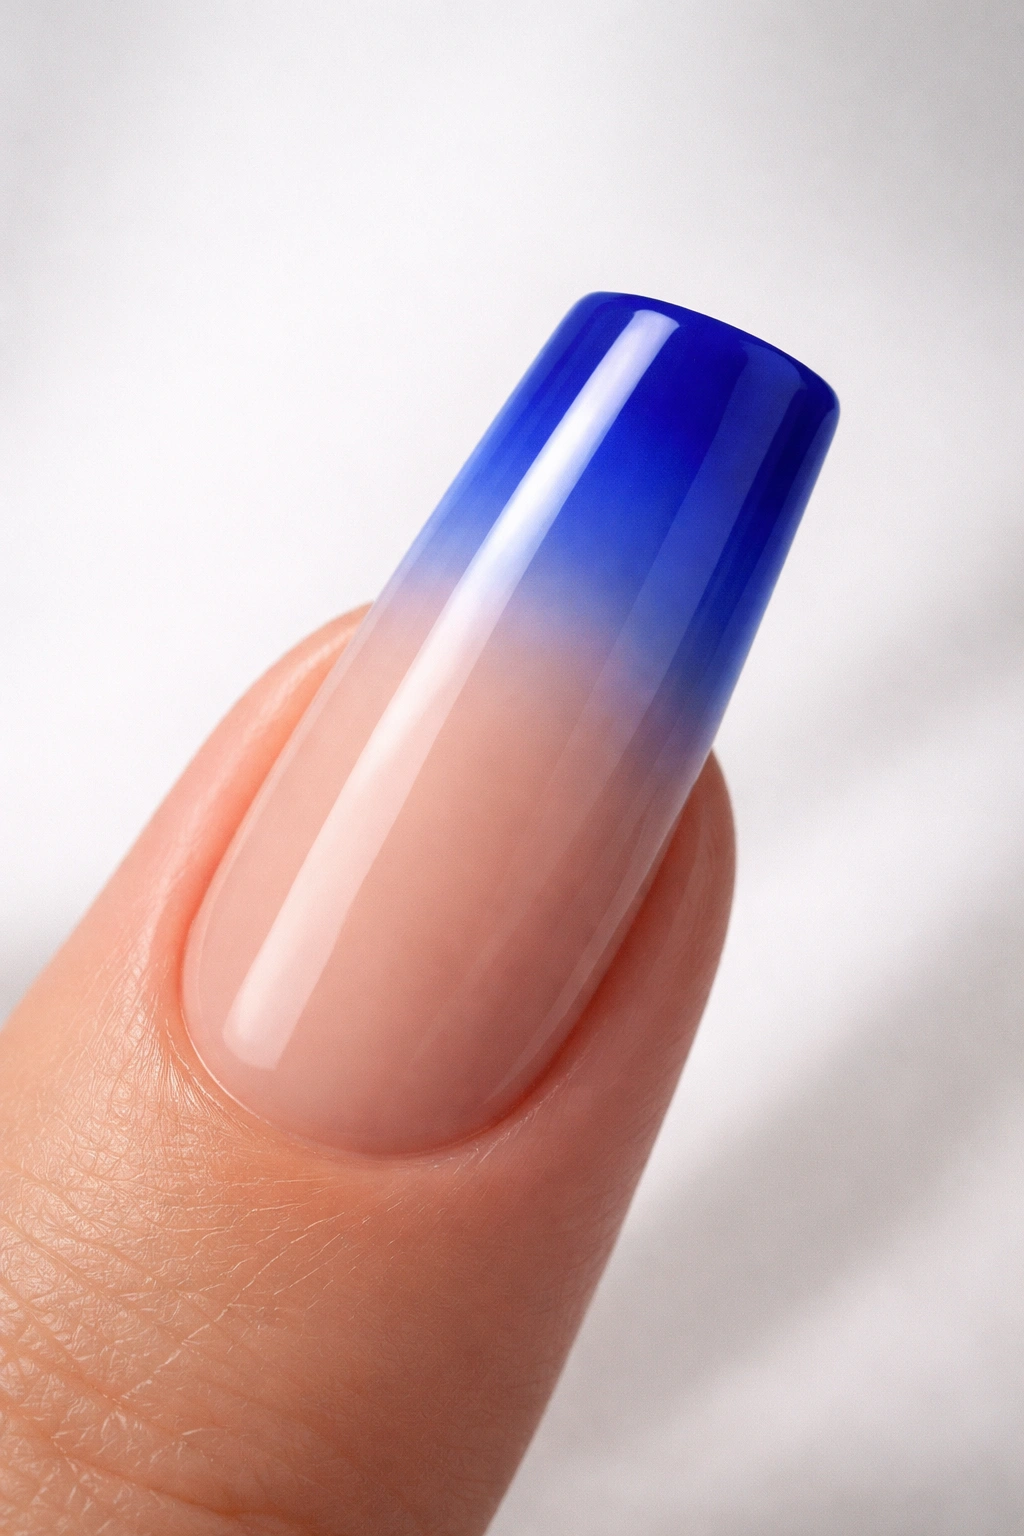
An ombré gradient from a soft nude or cream tone on the nail bed to deep royal blue at the tip creates a striking elongated effect that plays beautifully with the duck nail shape. The gradient makes the already-dramatic shape even more elegant by creating visual flow from lighter to darker tones. This design works particularly well because it maintains softness while still delivering that royal blue impact.
Technique for Flawless Blending
Use a makeup sponge to blend the transition between your two polish colors. Apply the nude shade to the inner two-thirds of the nail, then apply royal blue to the outer third. Press a damp sponge gently over the overlapping edge, moving in small dabbing motions to create that seamless gradient. You may need to repeat this 2-3 times to get a truly smooth transition. Seal with a glossy top coat that unifies the entire design.
What Makes Ombré Special on Duck Nails
- The gradient direction follows the natural shape of the duck nail, creating an almost artistic quality
- Lighter tones at the base keep the look wearable for daytime while the blue at the tip delivers drama
- This design photographs beautifully and translates well to any lighting condition
- The subtle blending makes the manicure feel more intentional and professional than a solid color alone
Worth knowing: If you don’t have a makeup sponge, you can use a cut-up piece of a cosmetic wedge or even a damp paper towel—the texture matters less than the gentle blending motion.
3. Royal Blue With White Geometric Line Work
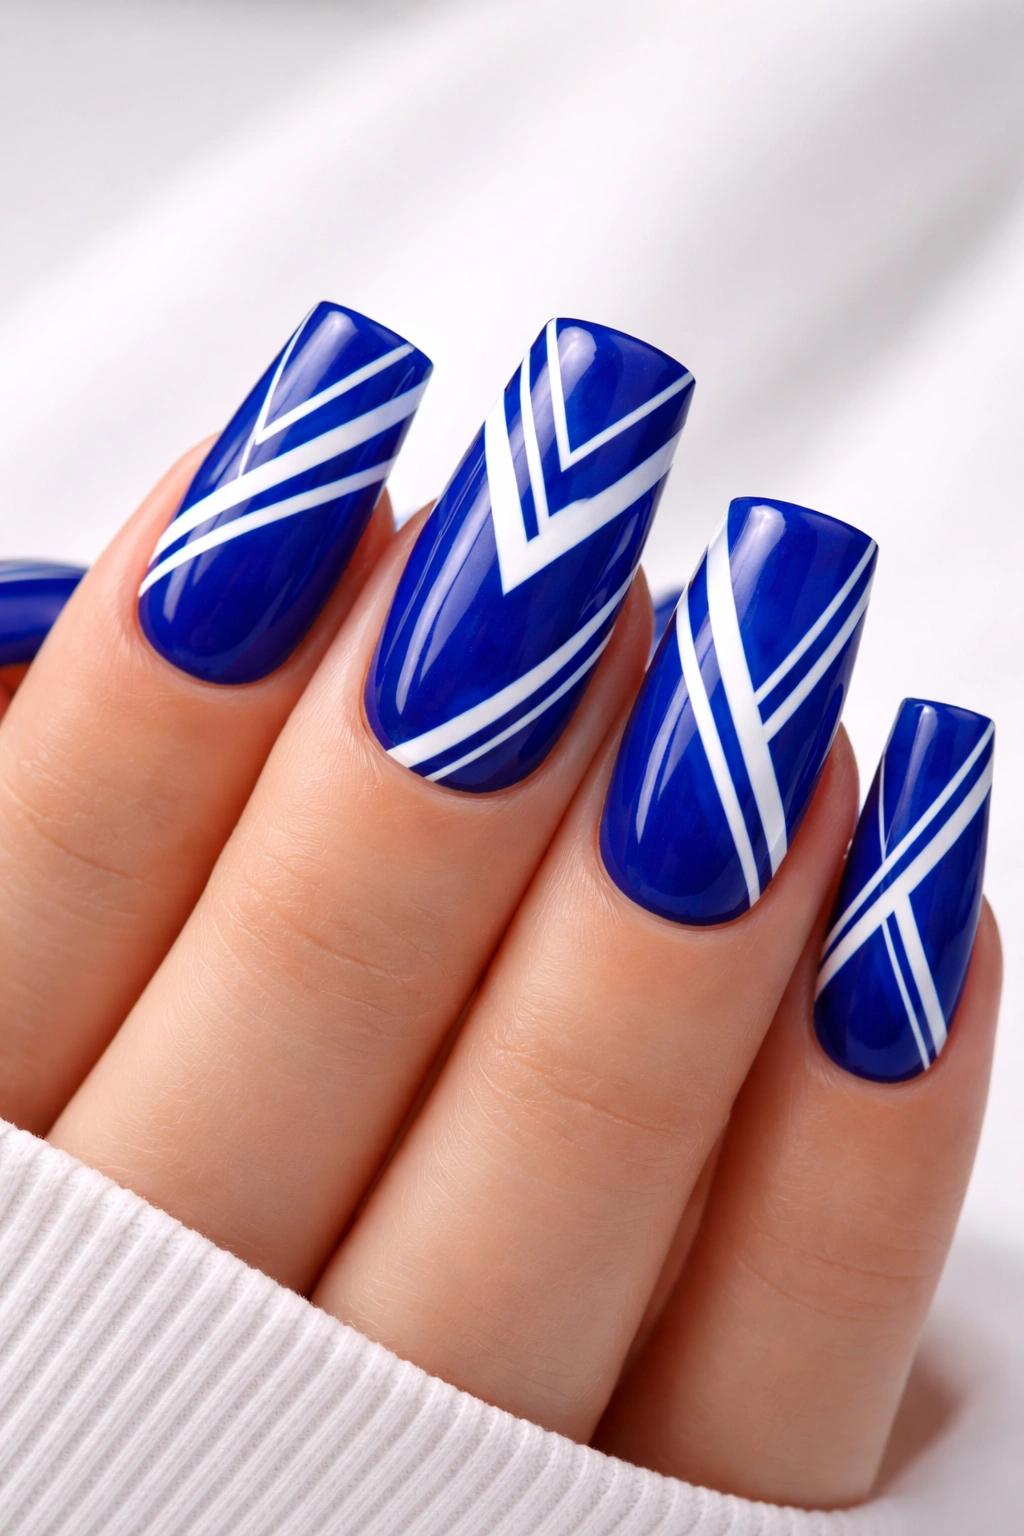
Clean white lines crossing the royal blue base in geometric patterns—chevrons, diagonal stripes, or asymmetrical angles—create a contemporary look that feels modern and artistic. This design approach lets you control exactly how much white you want to use, so you can keep it minimal with just a few lines or go bolder with interlocking geometric shapes. The crisp contrast between white and royal blue makes every line pop with clarity.
Creating Precise Line Work
A thin nail art brush is essential for this design. Apply your royal blue base in two coats, then use white polish and a precise brush to draw your geometric pattern. For perfectly straight lines, use a fine-tip striping brush or even a thin nail art liner. If you’re doing symmetrical patterns like chevrons or stripes, you can use painter’s tape to mask areas and ensure perfectly sharp edges. Seal with a matte or glossy top coat depending on your preference—matte finishes often make geometric work feel more artistic and design-forward.
Why Geometry Complements Duck Nails
- Geometric patterns feel contemporary and fashion-forward rather than dated or overdone
- White offers maximum contrast against deep royal blue, making the design visible from a distance
- This style works across all settings—professional, casual, artistic, trendy
- You can customize the intensity by adjusting how many lines you add and how much white covers the nail
Pro tip: If precision isn’t your strong suit, try tape-assisted designs using thin striping tape designed for nail art—these tape-offs remove cleanly and guarantee sharp lines every single time.
4. Royal Blue Marbled Effect With White Swirls
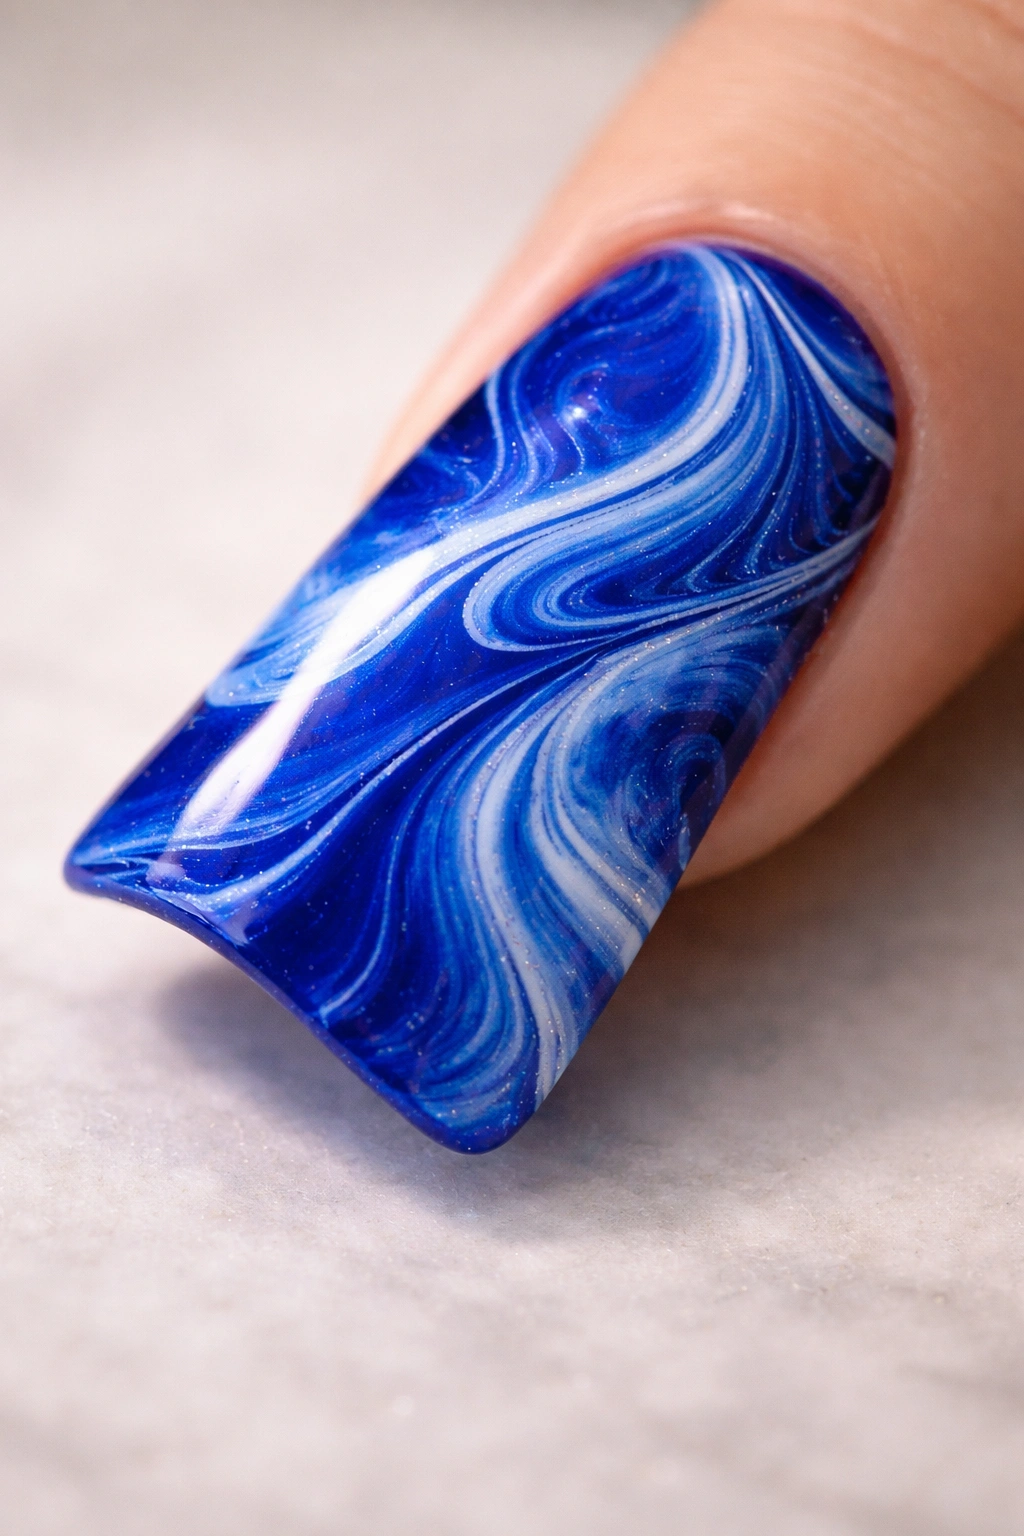
A marbled finish with white swirls throughout the royal blue creates an organic, flowing design that feels artistic and high-end. Marbling mimics natural stone patterns, which gives duck nails a sophisticated, almost abstract quality. Unlike geometric designs, marbling is forgiving—slight imperfections actually enhance the organic, natural appearance.
Marbling Technique Step by Step
Create a marble effect by dropping small amounts of white polish onto your royal blue wet base, then using a thin brush or toothpick to drag and swirl the white into the blue in flowing patterns. The key is working quickly before the polish sets—the longer you wait, the harder it becomes to blend. Don’t aim for perfection; the beauty of marble is in its unpredictable, natural-looking flow. Seal with a glossy top coat to enhance the stone-like appearance.
The Appeal of Marble on Duck Nails
- Marble feels luxurious and expensive even though it’s relatively simple to create
- White swirls against royal blue create a sophisticated, spa-like aesthetic
- The organic pattern draws attention without feeling busy or overwhelming
- Every manicure is unique, which adds to the artistic appeal
Worth knowing: If your first marbling attempt doesn’t look perfect, that’s actually ideal—true marble in nature is never uniform, so variations make the design feel authentic rather than poorly executed.
5. Royal Blue Duck Nails With Accent Nail in Silver
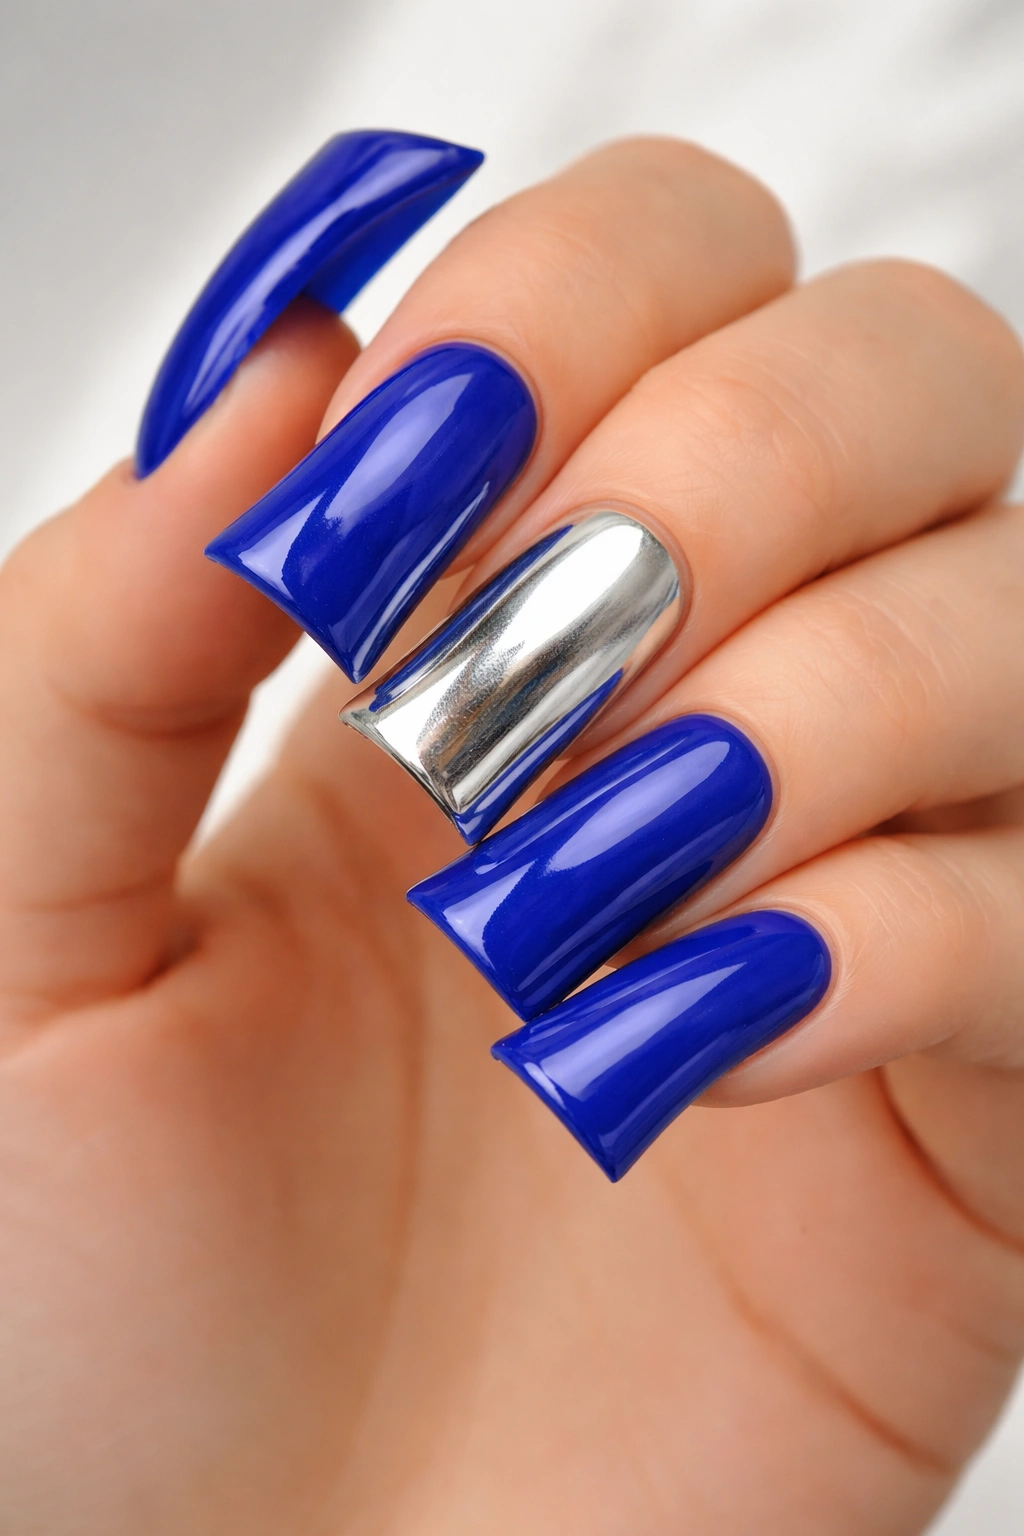
A solid royal blue design on most of your fingers, with one accent nail in gleaming silver, creates visual interest and prevents the look from feeling monotonous. The silver accent (usually the ring or middle finger) acts as a focal point that draws the eye and adds dimension. This approach is less commitment than doing multiple design details but delivers more impact than a solid color alone.
Building the Two-Tone Aesthetic
Paint your royal blue base on four nails, applying two coats and finishing with a glossy or matte top coat depending on your desired look. On your accent nail, apply a metallic silver polish—these typically have a mirror or chrome finish that’s incredibly reflective. The high-shine silver creates maximum contrast against the matte or glossy blue. This simple approach lets each color be the star without competing elements.
Why This Two-Tone Strategy Works
- One accent nail feels intentional and planned rather than like you couldn’t decide on a design
- Silver complements royal blue beautifully, creating a cool-toned, cohesive color story
- This design is quick to create and maintain, making it perfect for regular salon visits or at-home manicures
- The minimalist approach keeps the focus on the duck nail shape itself, which is already a bold statement
Pro tip: Match your silver accent nail to any silver jewelry you’re wearing regularly—rings, bracelets, or watches—to create a polished, coordinated look that feels intentionally styled.
6. Royal Blue Base With Crystallized Glitter Gradient
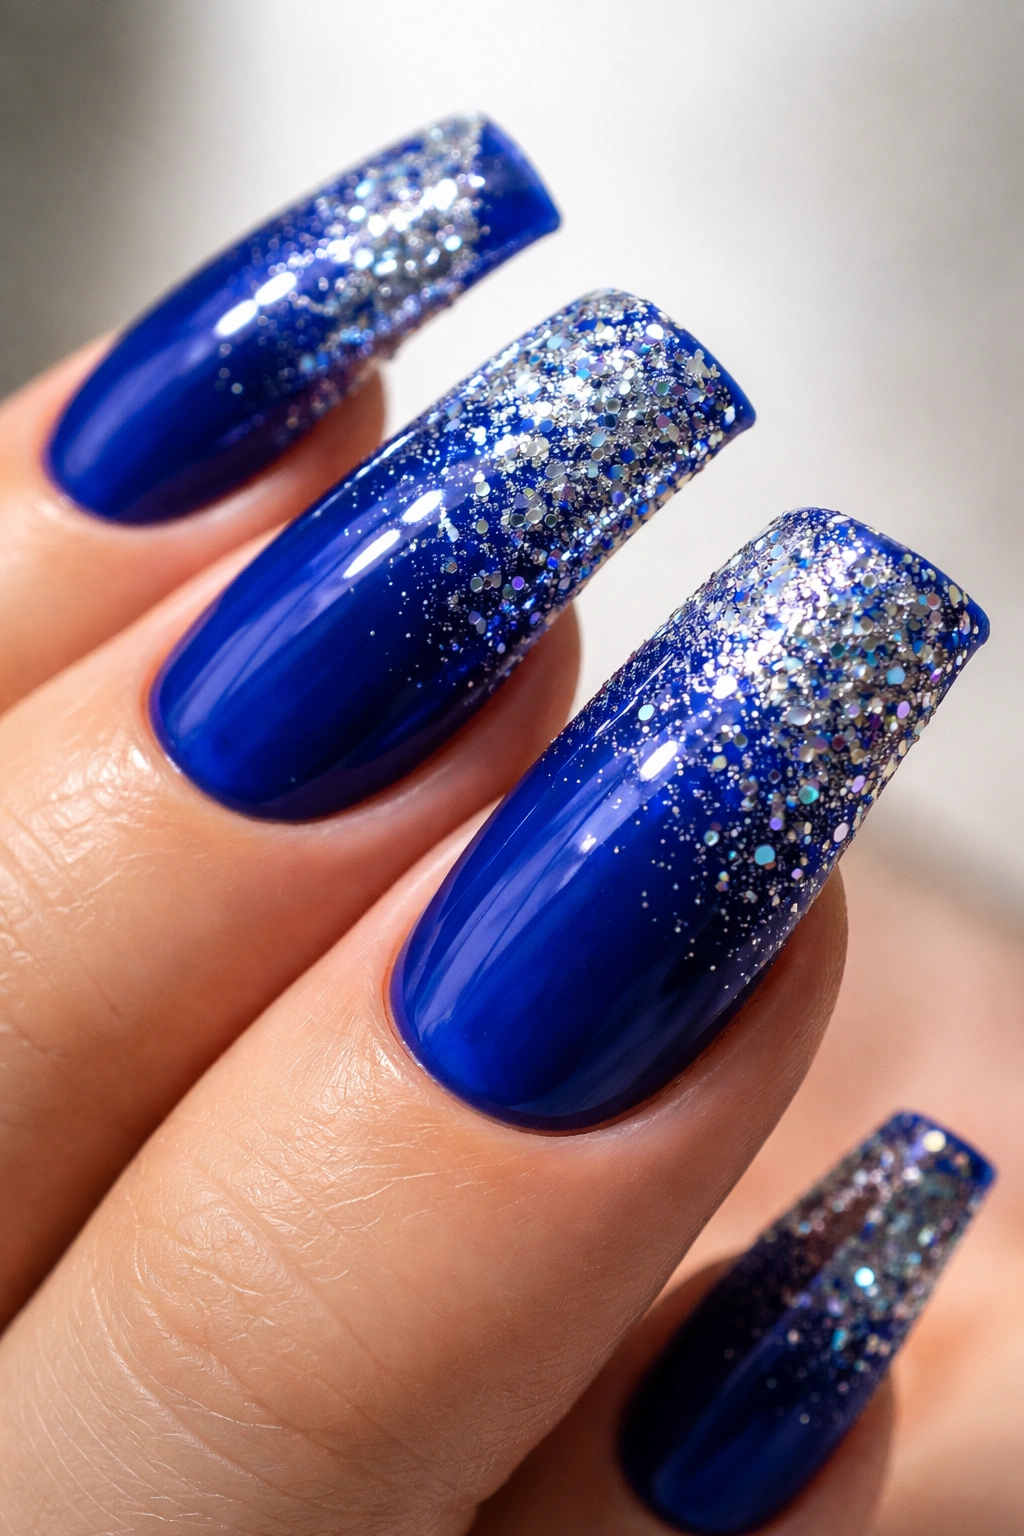
A gradient of glitter starting sparse at the base and building to heavy concentration toward the tip creates a “glitter fade” effect that adds sparkle without overwhelming the design. This approach works because the solid blue base grounds the look while the glitter adds movement and light-catching appeal. The gradient direction emphasizes the duck nail shape, making it look even more striking.
Layering Glitter for a Gradient Effect
Apply your royal blue base and let it dry completely. Using clear gel or a sticky base coat, create a thin gradient of adhesive on the nail—less at the base, more as you move toward the tip. Press fine glitter onto the wet adhesive, building up layers as you move downward. You can use a single glitter color or blend multiple complementary shades. Seal everything with a top coat that fully encapsulates the glitter, preventing it from catching and snagging.
The Magic of a Glitter Gradient
- The gradient direction creates visual movement that flatters the duck nail shape
- Starting with less glitter at the base keeps the design looking sophisticated rather than costume-y
- Heavy glitter concentration at the tip (where the shape is most dramatic) amplifies the nail art impact
- Glitter catches light in a way that solid polish never can, making your nails visible from across a room
Worth knowing: Invest in quality clear gel or top coat for this design—cheap formulas don’t encapsulate glitter securely, resulting in loose sparkles that shed onto your clothes and skin within days.
7. Royal Blue With Minimalist Gold Geometric Shapes
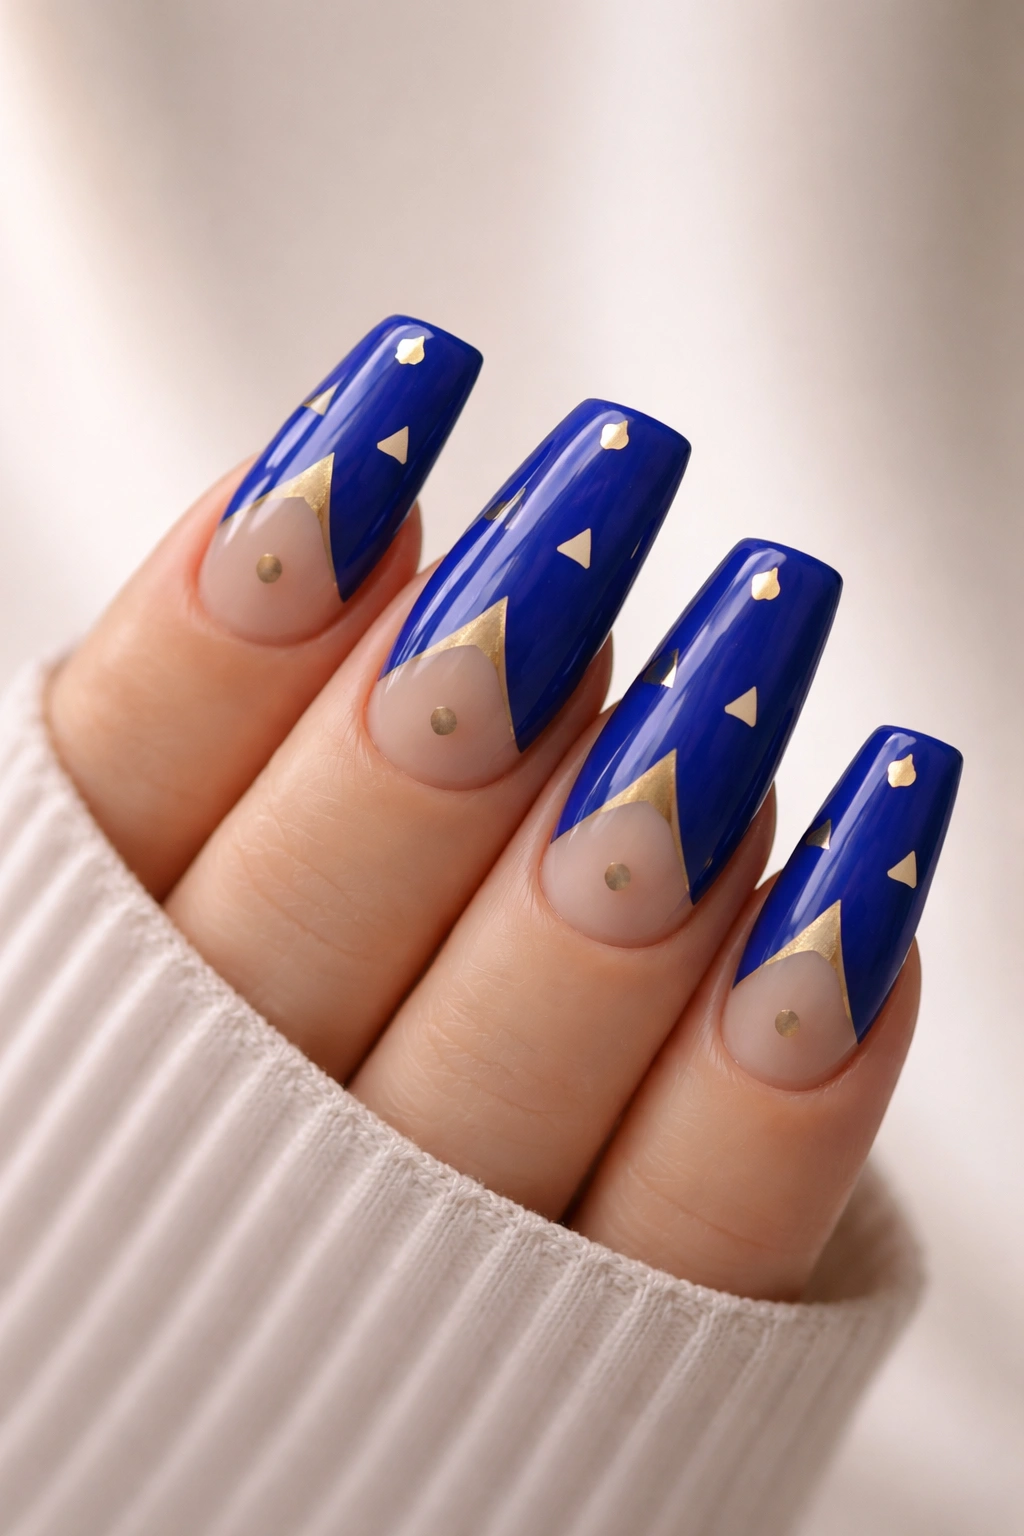
Instead of lines, use small geometric shapes—triangles, diamonds, or circles—in gold across your royal blue base. Space them purposefully rather than covering the entire nail, which keeps the look elegant and contemporary. This design approach gives you the option to increase or decrease complexity depending on your mood and aesthetic preferences.
Precision Placement Technique
Draw your small gold geometric shapes using a thin nail art brush or dotting tool, spacing them strategically across the royal blue base. You might place a gold triangle at the tip, a diamond on the upper portion, and a smaller circle lower on the nail—the specific placement is less important than ensuring they’re spaced with intention rather than randomly scattered. This deliberate spacing elevates the design and makes it feel like true nail art rather than decoration.
Why Negative Space Matters
- Leaving areas of solid royal blue prevents the nail from looking cluttered or over-designed
- Negative space draws attention to both the shapes you’ve created and the beautiful color of your base
- This minimalist approach works across all settings—professional, casual, creative, elegant
- The design feels modern and fashion-forward without attempting too much
Pro tip: Use a light box or place a piece of white paper under your nail to ensure your geometric shapes are properly spaced and aligned before committing them to polish.
8. Royal Blue With Iridescent Foil Details
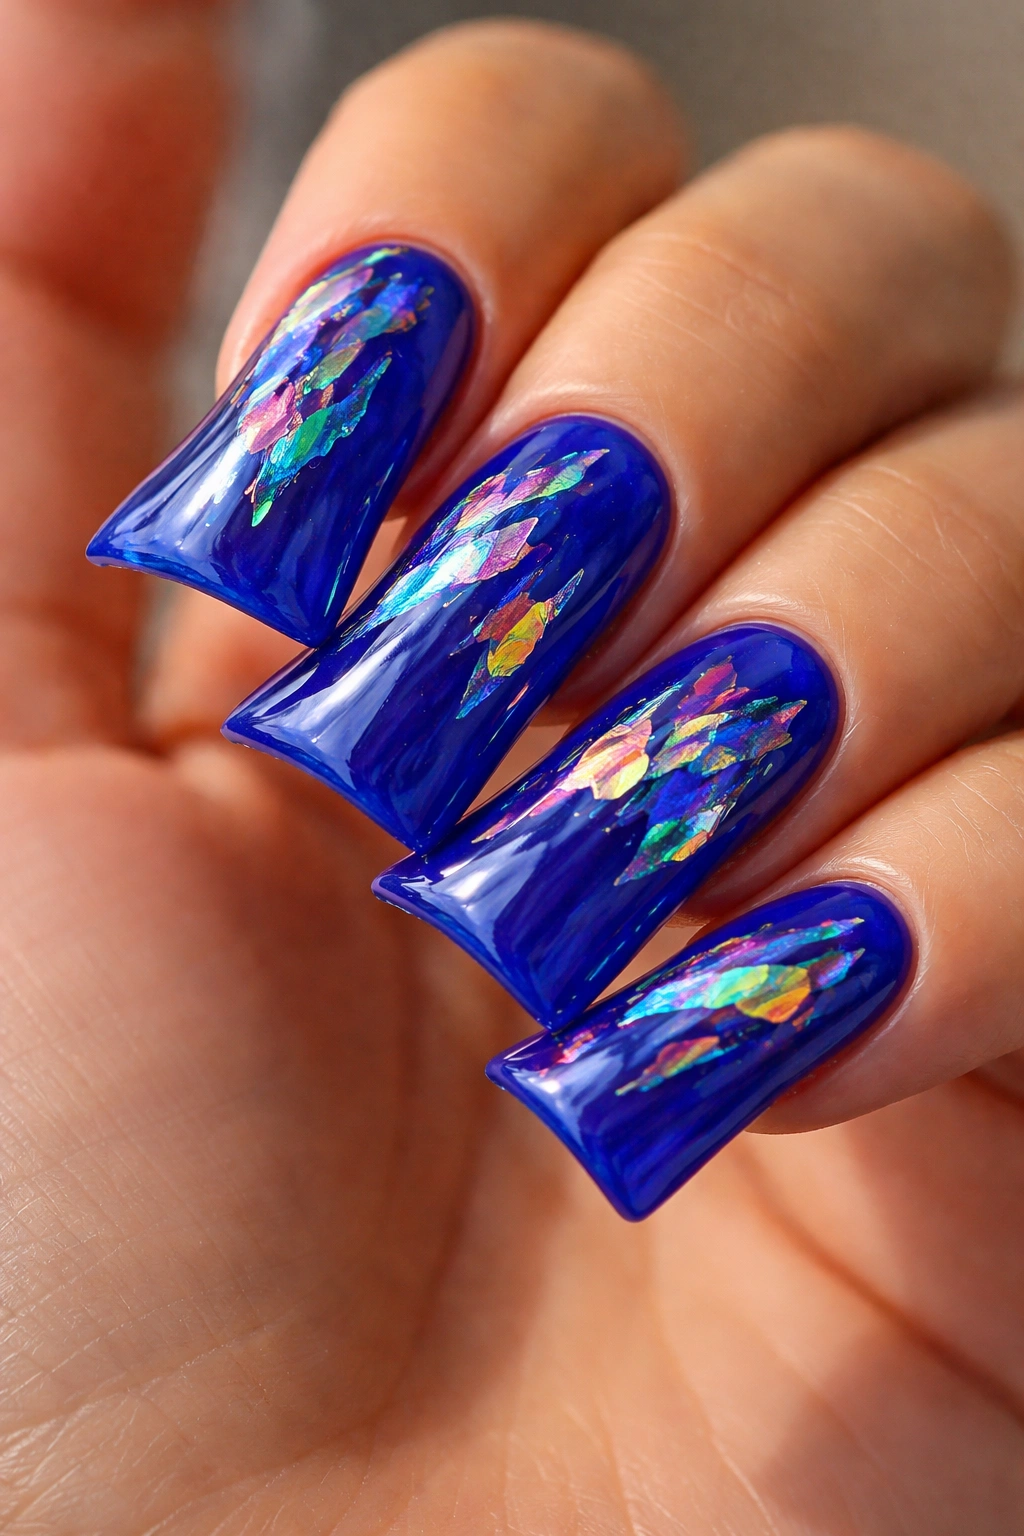
Iridescent foil shifts between multiple colors—blues, purples, greens, silvers—depending on how light hits it, creating a magical, multidimensional effect against the solid royal blue base. This design combines the sophistication of foil application with the visual interest of color-shifting finishes. The shifting iridescence makes every glance at your nails reveal something slightly different.
Applying Iridescent Foil Successfully
Use a sticky base coat over your dried royal blue polish, then tear or cut iridescent foil into shapes or patterns—geometric designs, abstract scattered pieces, or even an accent nail covered entirely in foil. Press the foil firmly onto the sticky base, holding for several seconds to ensure strong adhesion. Seal with a high-quality top coat that protects the foil’s shimmery surface without dulling the color-shifting effect.
The Appeal of Iridescent Details
- Iridescent foil catches light in ways that make your nails look expensive and intentionally designed
- The color-shifting quality means your nail art looks different in various lighting conditions, adding intrigue
- Royal blue paired with iridescent foil creates a sophisticated, almost mystical aesthetic
- The foil makes your manicure feel special and unique, not something every person with basic nail art skills could replicate
Worth knowing: Iridescent foil application requires a truly sticky base coat—if your base isn’t properly adhesive, the foil will slip and slide rather than staying put. Don’t skip this essential step.
9. Royal Blue Ombre Into Black at the Tips
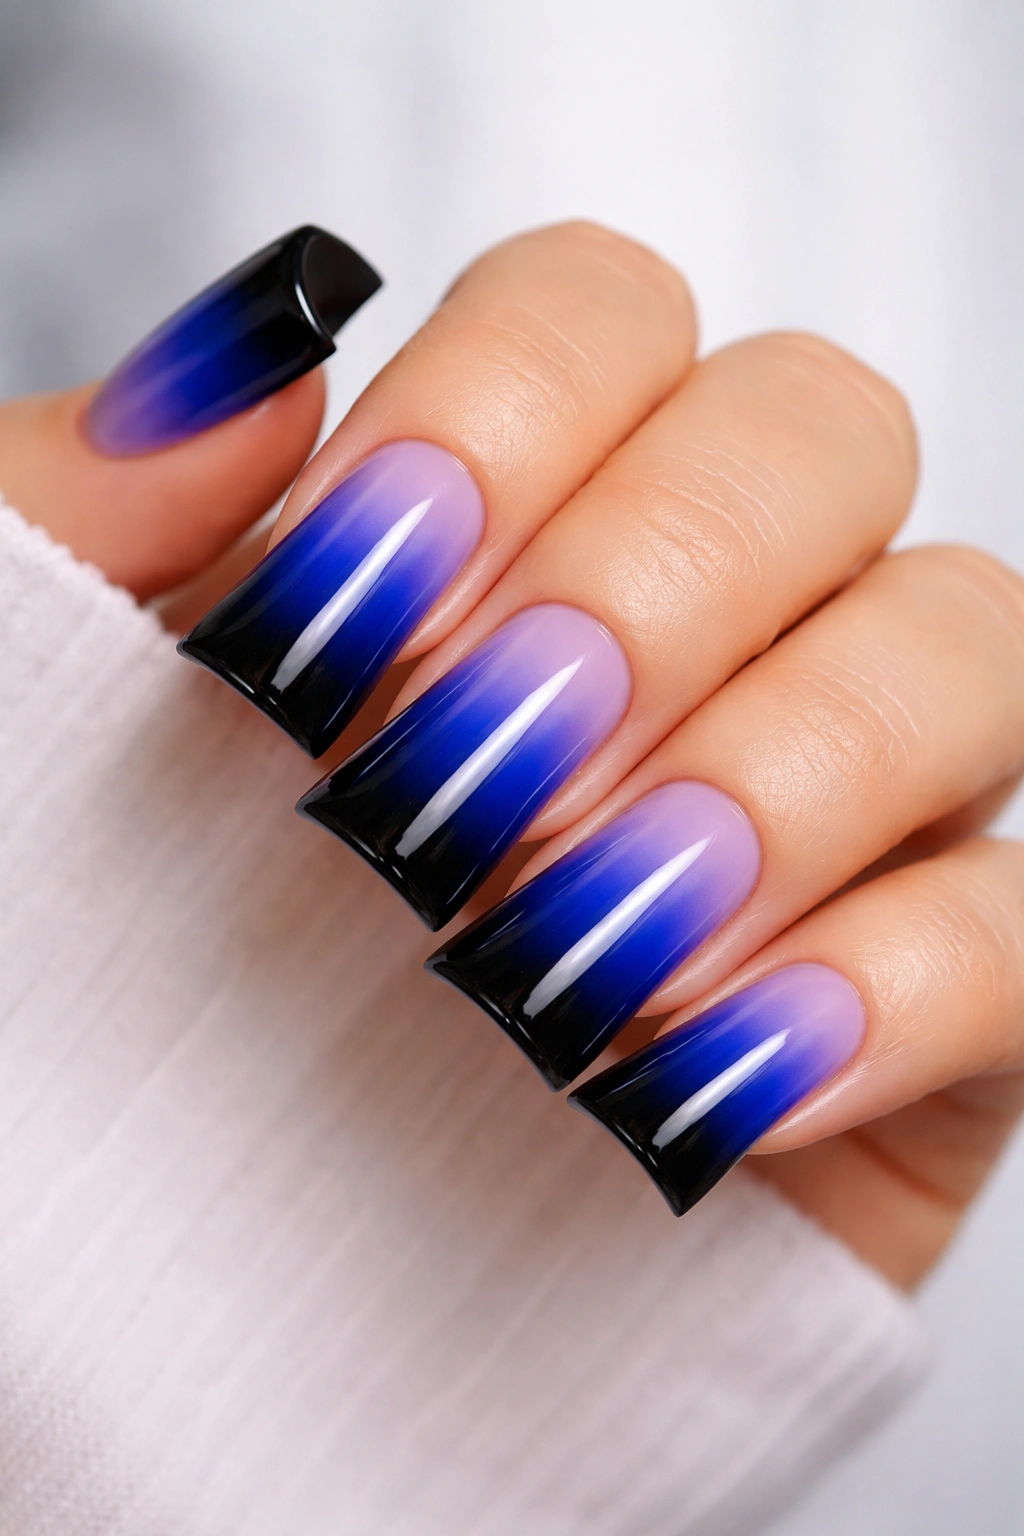
A subtle ombre that transitions from royal blue on the nail bed into black at the extreme tip creates drama and definition. Black is a bold choice, but the gradual transition from blue prevents it from feeling harsh or overly dramatic. This design makes the duck nail shape look even more pronounced and elongated, emphasizing the manicure’s sculptural qualities.
Creating a Blue-to-Black Ombre
Apply royal blue to the majority of the nail, then introduce black polish in the outermost third, blending the two colors where they meet using a sponge or blending brush. You want a smooth gradient rather than a harsh line, so take time with the blending process. The blue-to-black transition should take up approximately the last quarter-inch to half-inch of the nail, with the darkest black reserved strictly for the very tip.
Why Black Tips Amplify Duck Nails
- The transition into black emphasizes the pointed tip shape, making it look more dramatic and sculptural
- Black adds sophistication and edge while royal blue keeps the look wearable and elegant
- The ombre approach prevents the black from feeling too harsh or costume-like
- This design photographs beautifully and looks striking in both natural and artificial lighting
Pro tip: If your first ombre attempt isn’t perfectly smooth, add a hint of shimmer or glitter along the gradient line—this draws attention to the artistic transition and makes slight imperfections feel intentional.
10. Royal Blue With Delicate White Dot Pattern
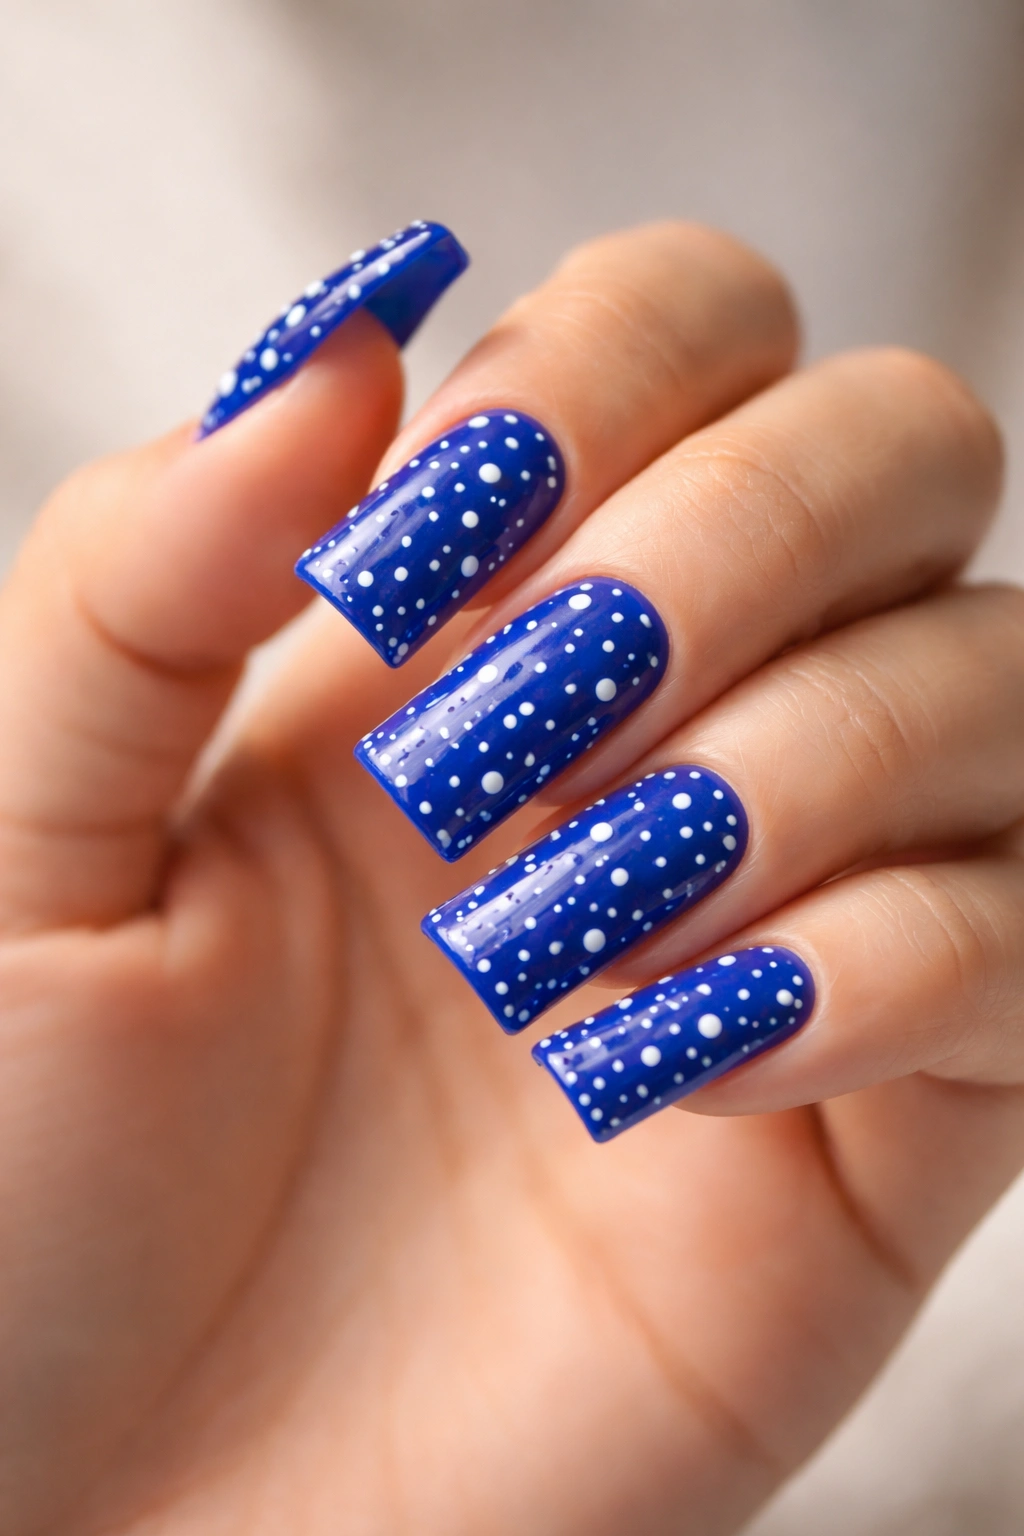
Small white dots scattered across the royal blue base in a seemingly random pattern create a playful, artistic look that feels contemporary and approachable. Use a dotting tool to apply tiny white dots in various sizes across your nail, spacing them with intention but without a specific geometric pattern. This “polka dot” approach is more forgiving than designs requiring precision lines or shapes.
Dotting Tool Technique
Dip a dotting tool (or the rounded end of a bobby pin, which works equally well) into white polish, then gently press onto your royal blue base, holding briefly to create a dot. Vary the size of your dots by using different amounts of polish on your dotting tool. Some dots should be barely visible, others more prominent—this variation adds visual interest and prevents the design from looking mechanical or repetitive.
The Appeal of Dot Designs
- Dots are forgiving to create—they don’t require precision or perfect spacing
- The scattered pattern feels whimsical and artistic without being overly complex
- White dots offer crisp contrast against royal blue while maintaining an approachable aesthetic
- This design works across all nail shapes and sizes, making it universally flattering
Worth knowing: Allow each dot to dry slightly before applying the next one—if you apply dots too close together while the polish is still wet, they’ll blur into each other rather than remaining distinct.
11. Royal Blue With Glitter Tips and Matte Finish
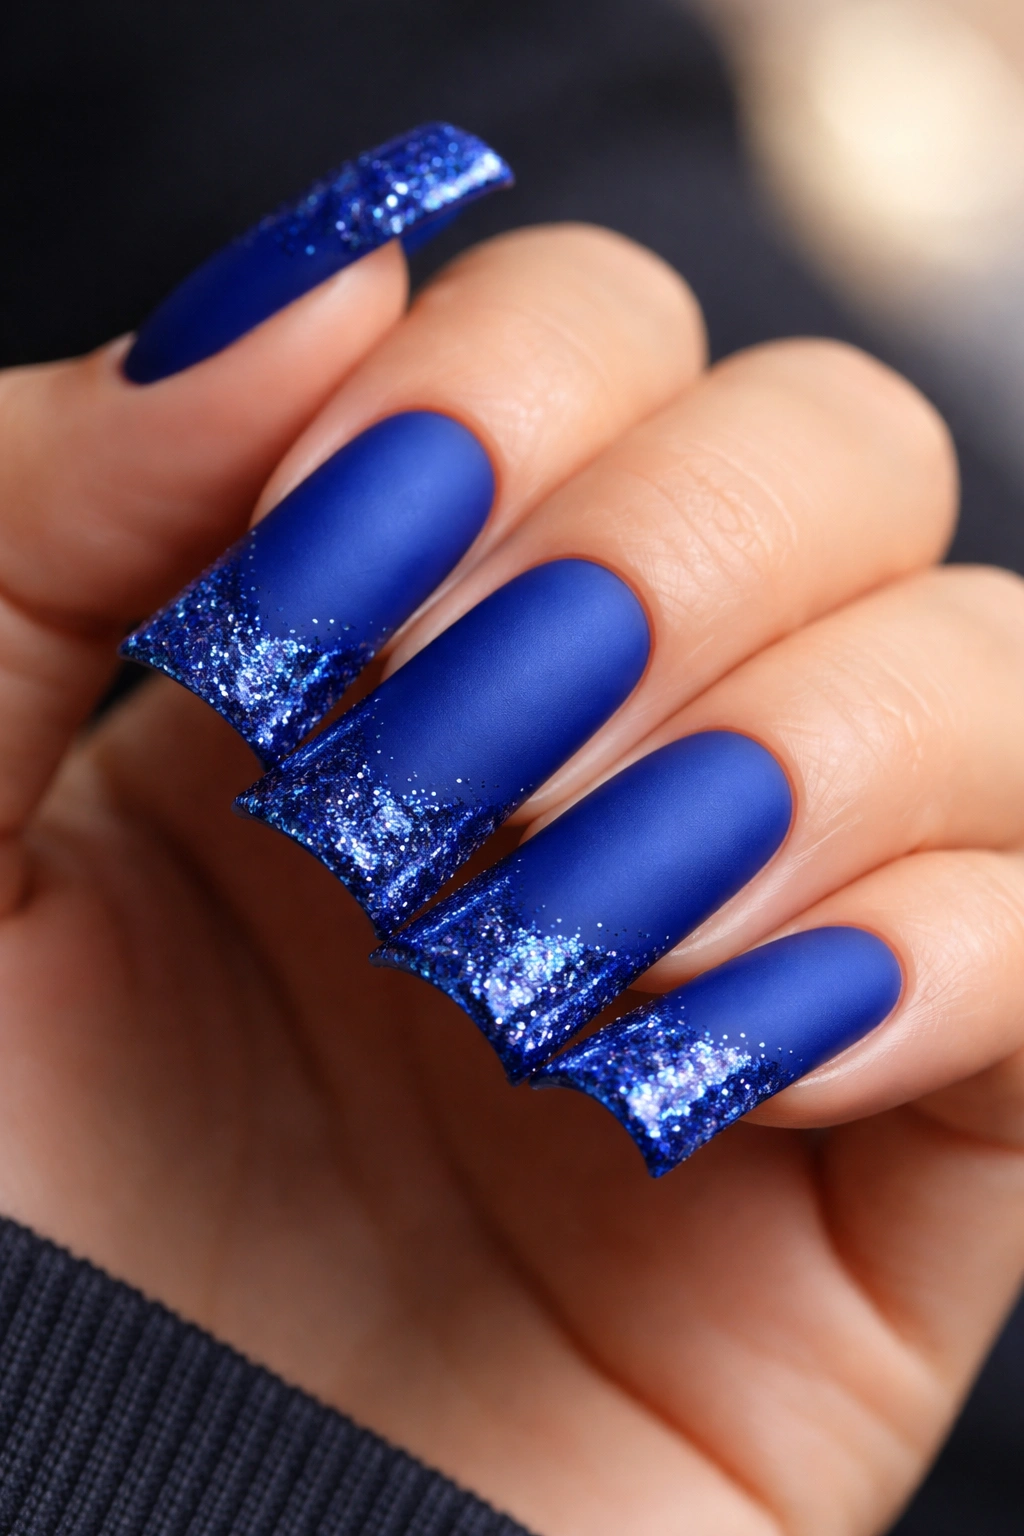
A matte royal blue base combined with glossy glitter at the tips creates visual contrast in both texture and shine. The matte finish grounds the design and prevents the glitter from feeling overwhelming, while the glossy glitter tips draw immediate attention to the most dramatic part of your duck nail. This combination of finishes adds sophistication that a single-finish manicure can’t achieve.
Combining Matte and Glossy
Apply your royal blue base and finish with a matte top coat for a velvety, sophisticated finish. Once completely dry, apply a sticky clear gel to just the tip of each nail, then press fine glitter (or your preferred glitter application method) onto the wet gel. Seal with a glossy top coat only in the glittery tip area, leaving the matte finish intact on the body of the nail. The contrast between matte and glossy creates visual depth and dimension.
Why Texture Contrast Elevates Design
- Matte and glossy finishes play against each other, creating visual interest without requiring multiple colors
- Matte finishes feel contemporary and artistic, while glossy glitter tips add glamour and shine
- This texture combination makes your manicure look intentionally designed and thoughtfully executed
- The contrast directs attention exactly where you want it—the glittery tips of your statement duck nails
Pro tip: Use a very precise application of your glossy top coat on the glittery section only, using a thin brush to avoid getting glossy product on the matte body of the nail—this keeps the contrast clean and intentional.
12. Royal Blue With Chrome or Mirror Powder Details

Chrome powder (applied with a special rubbing technique) creates a mirror-like, almost metallic finish that reflects light intensely. Combining chrome details with a royal blue base creates an ultra-modern, high-tech aesthetic that feels genuinely sophisticated. The reflective quality makes your nails look expensive and professionally executed.
Applying Chrome Powder
Create chrome details by applying a sticky base coat to your royal blue base, then using a special chrome powder applicator to rub the powder onto the wet base in the areas where you want the mirror finish (tip, accent nail, or specific design sections). The more pressure you apply while rubbing, the more intense the chrome effect becomes. Seal with a non-wipe top coat that protects the chrome finish without dulling its reflective quality.
The Modern Appeal of Chrome
- Chrome finishes are extremely trendy in contemporary nail art and look undeniably high-end
- The mirror-like quality makes ordinary duck nails look futuristic and fashion-forward
- Chrome catches and reflects light in ways that create genuine visual impact
- This finish works particularly well with royal blue, creating a cool, sophisticated aesthetic
Worth knowing: Chrome powder application requires practice—it’s trickier than applying regular polish. Don’t get discouraged if your first attempt isn’t perfect; the technique becomes intuitive once you understand the pressure and rubbing motion required.
13. Royal Blue Nails With Hand-Painted Floral Accent
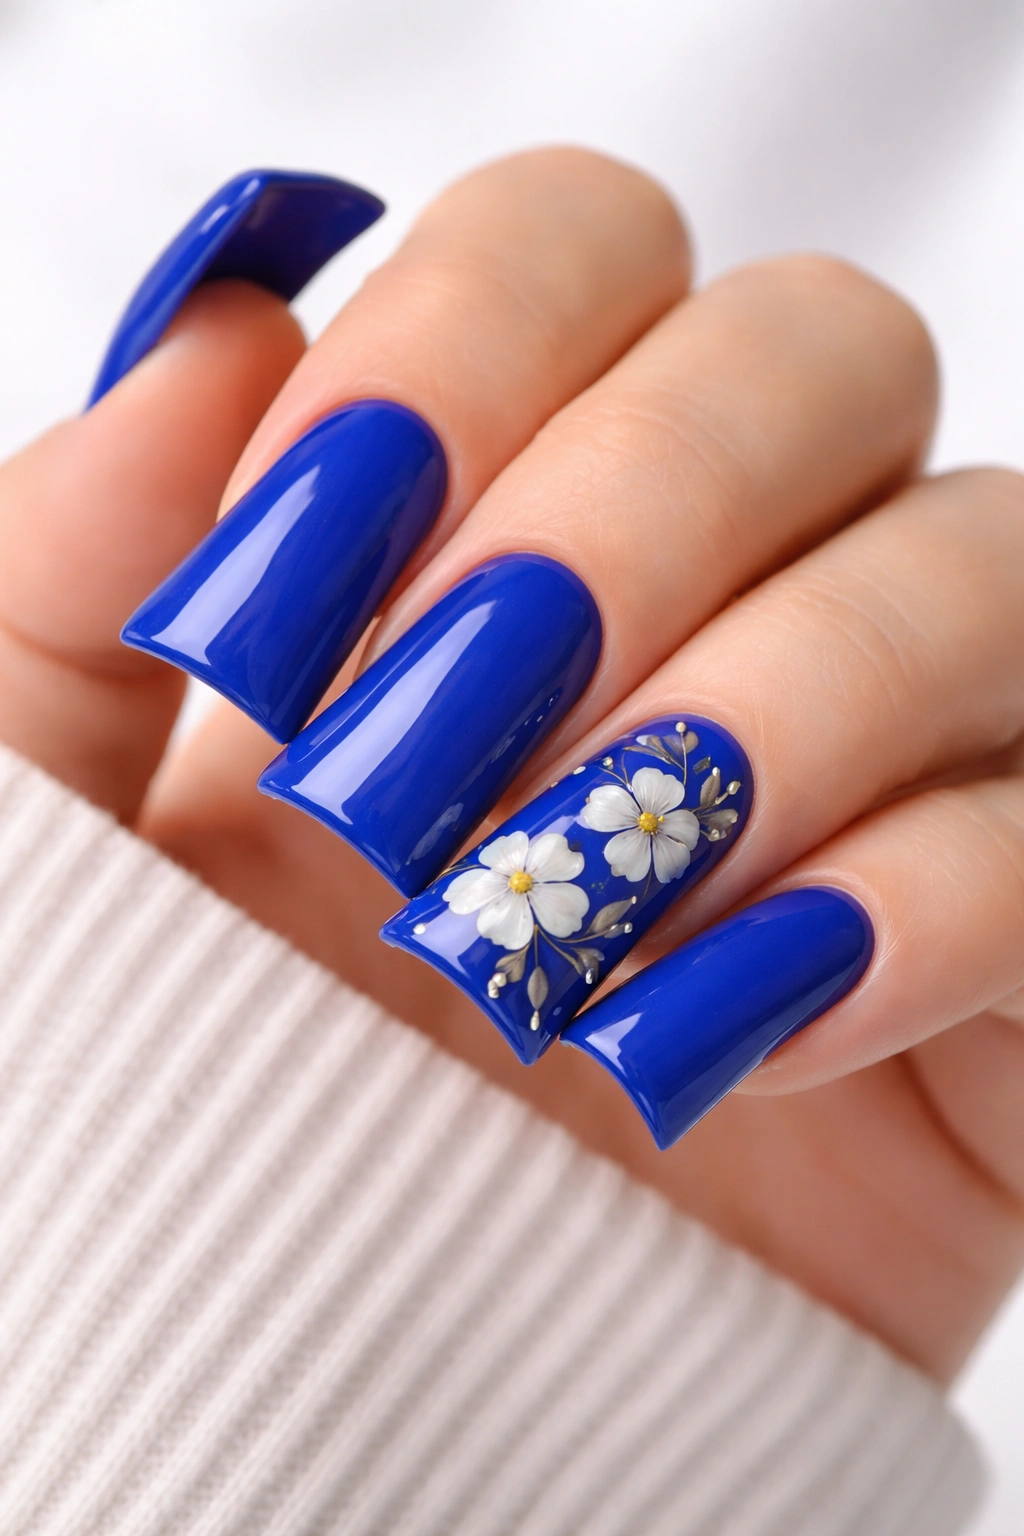
One accent nail features hand-painted flowers in white, gold, or contrasting colors against the royal blue base, while the remaining nails stay solid. This design showcases artistic skill while keeping the overall look balanced. Flowers add femininity and artistic credibility, making the manicure feel like genuine wearable art.
Hand-Painting Flowers on Duck Nails
Use a very thin brush to sketch your flower outline gently on the blue base, then fill in with your chosen accent color. Even simple flowers—a few petals, a stem, and a center—look striking against royal blue. You don’t need to be a skilled artist; slightly imperfect hand-painted flowers often read as more authentic and charming than perfectly executed designs. The duck nail shape provides plenty of space for flower details without the design feeling cramped.
Why Florals Complement Royal Blue
- Flowers add an artistic, gallery-like quality to your manicure
- Royal blue provides an elegant, sophisticated backdrop for delicate floral work
- One floral accent nail feels intentional and curated rather than overdone
- This design works across all settings and age groups, making it universally appealing
Pro tip: Paint your flowers on a practice wheel or paper first—even professional nail artists sketch their designs before committing them to client nails, and this approach eliminates the risk of mistakes on your actual manicure.
14. Royal Blue Duochrome With Temperature-Sensitive Polish
Temperature-sensitive (thermochromic) polish changes color based on temperature—some formulas shift from royal blue to lighter blue in warmth, others transition to completely different colors. This interactive element makes your manicure a conversation starter and adds an element of fun to your nail art. The design works because you get two distinct looks depending on the temperature.
Using Thermochromic Polish
Apply thermochromic polish over a base coat or directly on your nails (depending on the formula—some require a white base to show color more vividly). Most thermochromic formulas dry with color completely, then shift as your hands warm or cool. You can apply thermochromic polish alone for a solid-color design that transforms, or layer it with other elements like glitter or foil for more complex designs. Seal with a standard top coat to protect the thermochromic polish and preserve color-changing properties.
The Appeal of Interactive Nail Art
- Temperature-sensitive designs create genuine novelty—people love watching your nails change color
- This approach adds entertainment value to your manicure, making it memorable
- Royal blue thermochromic polishes typically shift to lighter, brighter blues or even purples, creating beautiful transitions
- The design appeals to anyone who loves unique, unconventional nail art
Worth knowing: Thermochromic polish formulas vary significantly in quality—invest in a reputable brand known for vibrant color changes and durable formulas, as cheap versions often shift subtly rather than dramatically.
15. Royal Blue With Gold Leaf Details
Unlike foil, gold leaf is thinner and creates a more organic, artistic effect. Apply gold leaf pieces to your royal blue base in an asymmetrical pattern—clustering more on one side of the nail or trailing along the edges. The delicate, irregular edges of gold leaf create visual interest that structured foil can’t achieve.
Applying Gold Leaf for Organic Beauty
Use a sticky base coat or gel as your adhesive. Tear gold leaf into organic shapes (don’t cut or measure—the irregularity is the point), then gently press each piece onto the wet base. Gold leaf is delicate and requires a lighter touch than foil—excessive pressure tears it. Let some pieces overlap, layer gold over white, or leave small gaps that expose the blue underneath. Seal everything with a glossy top coat that locks the leaf in place.
Why Gold Leaf Feels More Artistic
- Gold leaf’s organic edges feel handcrafted and artistic rather than manufactured
- The delicate, irregular pieces create visual texture that catches light beautifully
- This approach reads as more sophisticated and gallery-like than structured foil patterns
- Gold leaf on royal blue creates a genuinely luxurious aesthetic
Pro tip: Buy quality gold leaf from an art supply store rather than cheap nail art versions—premium gold leaf is easier to work with and creates a more genuine, beautiful finish.
16. Royal Blue With Negative Space Line Designs
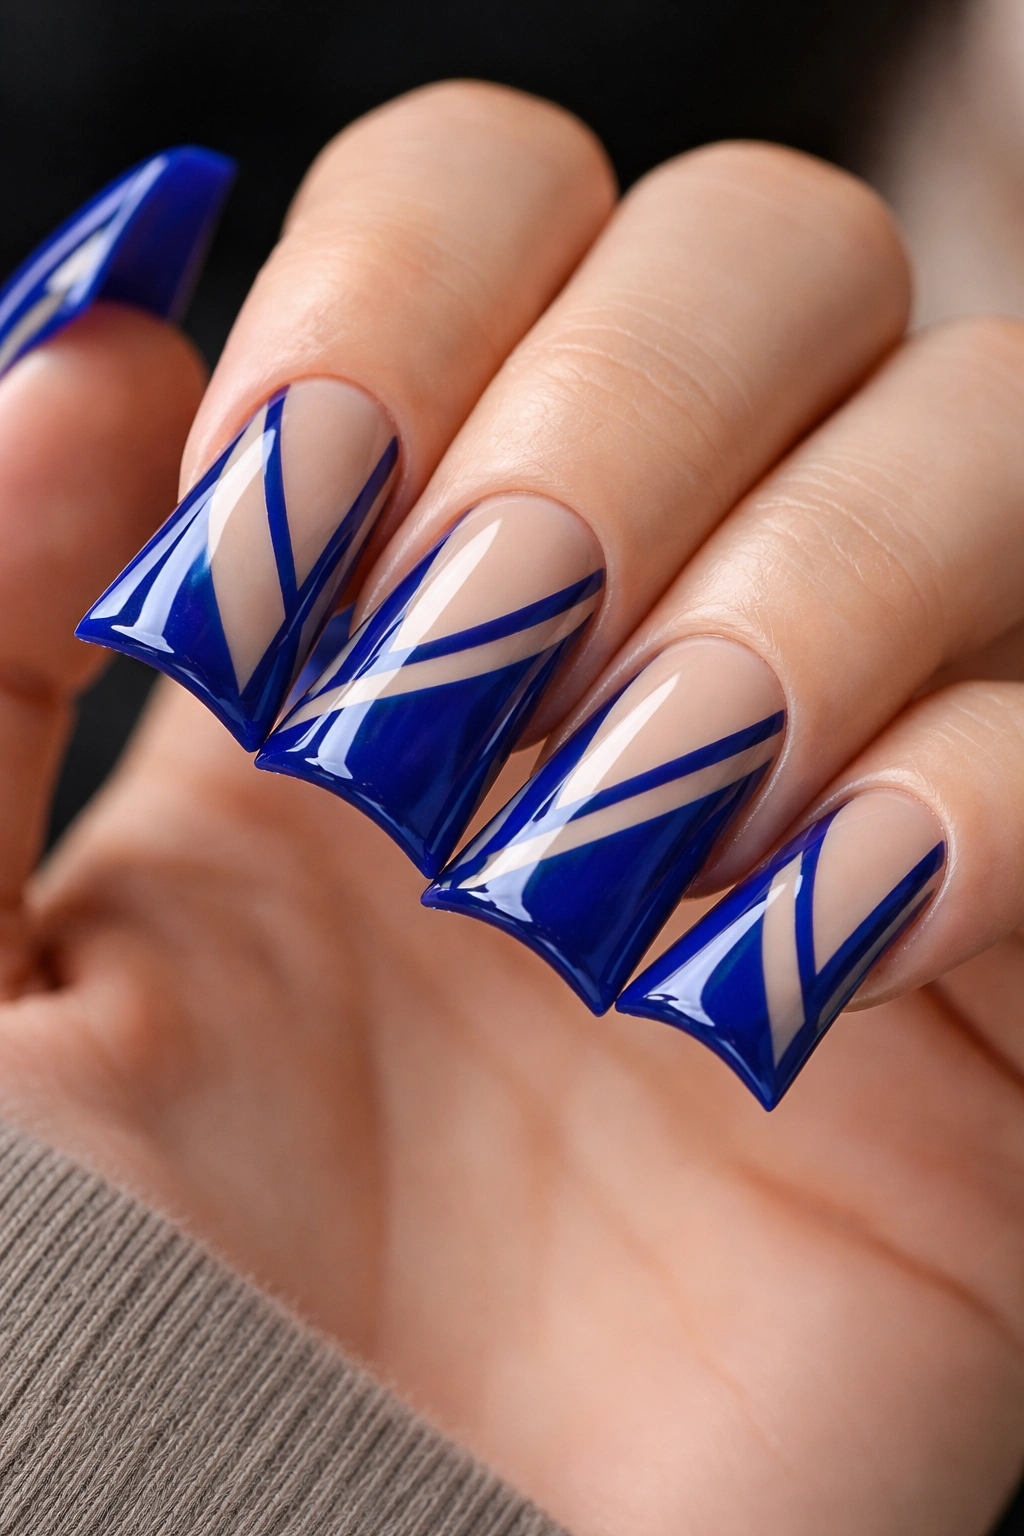
Negative space designs involve removing portions of your polish to reveal the nail underneath, creating striking designs through what’s absent rather than what’s present. On royal blue, negative space lines or patterns in the nail color underneath create high contrast and a modern, edgy aesthetic. This technique is advanced but creates genuinely unique, impressive results.
Creating Negative Space Carefully
This technique requires precision and typically works best with acrylics or hard gel, which you can file away to reveal the nail below. Map out your line pattern (diagonal stripes, geometric shapes, or abstract patterns) before beginning. Use a fine nail file to carefully remove polish in your intended areas, revealing the natural nail or a base coat color underneath. The contrast between royal blue and whatever lies beneath (usually nude, white, or natural nail) creates striking visual impact.
Why Negative Space Feels High-End
- Negative space designs demonstrate technical skill and artistic vision
- The high contrast between royal blue and revealed areas creates dramatic visual impact
- This approach feels contemporary, editorial, and genuinely unique
- Negative space designs don’t appear in basic nail art, making your manicure feel professionally done
Worth knowing: This technique is challenging to execute at home—if you’re attempting it yourself, go slowly with a fine file and constant reference to your planned design. Professional nail technicians often recommend leaving negative space designs to experts, as mistakes are difficult to correct.
Final Thoughts
Royal blue duck nails offer endless possibilities for creative expression, whether you’re drawn to minimalist elegance or bold, glittery maximalism. The key to any successful design is choosing elements that genuinely speak to your personal style rather than forcing designs that don’t resonate with you. A simple glossy royal blue with subtle gold accents can be just as stunning and impactful as an elaborate multi-element design—what matters is that your manicure feels intentional and makes you feel confident.
The versatility of royal blue means you can shift your design choices based on the season, occasion, or simply whatever creative direction inspires you. Start with a design that feels achievable at your skill level, then gradually experiment with more complex techniques as your confidence grows. Every design covered here is achievable through practice, whether at a salon or at home with patience and the right tools. Your duck nails are the perfect canvas—now it’s time to create something that makes you genuinely excited to show them off.
