

Duck nails have taken the beauty world by storm, and combining them with the warmth and luxury of gold creates an absolutely irresistible aesthetic. These adorable webbed-toe designs offer endless possibilities for creative expression, whether you’re drawn to bold maximalism or subtle sophistication. Gold pairs beautifully with duck nails because it catches light, adds dimension, and elevates even the simplest design into something gallery-worthy. Whether you’re prepping for a special event, looking to refresh your everyday look, or simply want to experiment with a trend that’s genuinely fun, gold duck nail ideas give you the freedom to express your personality while staying on-trend.
The versatility of gold duck nails is what makes them so compelling. You can go glam with full chrome finishes, romantic with delicate line work, or playful with chunky glitter textures. Each approach tells a different story and suits different moods and occasions. Let’s explore twenty stunning gold duck nail designs that’ll inspire your next manicure.
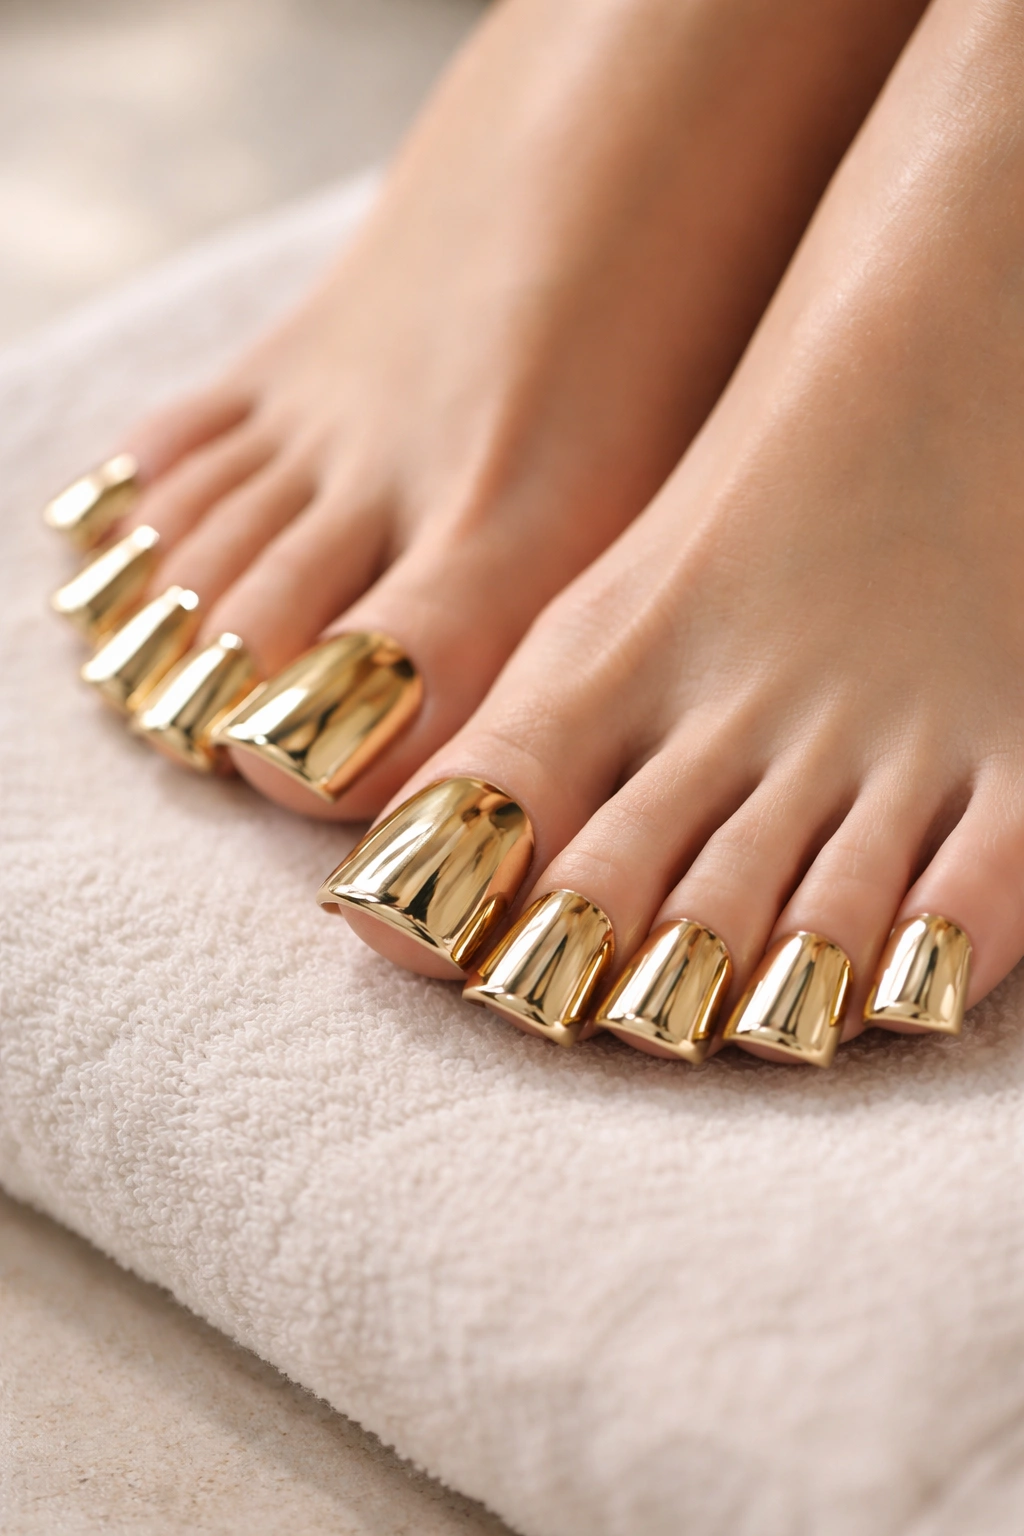
1. Classic Gold Chrome Duck Nails
Chrome finishes create that coveted mirror-like effect that photographs beautifully and turns heads in person. Gold chrome duck nails deliver luxury without feeling over-the-top, giving you that high-shine metallic look that feels expensive and modern. This style works for professional settings when executed with restraint, or you can amplify it with glitter accents for evening occasions.
Why This Design Stands Out
Gold chrome reflects light in every direction, creating a three-dimensional depth that flat polish simply can’t achieve. The mirrored finish emphasizes the sculpted shape of duck nails, making the webbed toes appear more pronounced and defined. This style transitions seamlessly from day to night, looking equally stunning in office lighting or under disco balls.
What You Need to Know
- Chrome powder application requires a sticky base coat and a special magnetic applicator to create the reflective pattern
- The metallic finish shows fingerprints easily, so frequent touching up keeps them camera-ready
- Gold chrome pairs beautifully with minimalist nail art or can stand alone as a statement
- This finish typically lasts 2-3 weeks with proper top coat maintenance
- Professional application usually ensures better chrome distribution and durability than DIY attempts
Pro tip: Seal your chrome with a matte top coat for a softer, more wearable version that’s less reflective but equally chic.
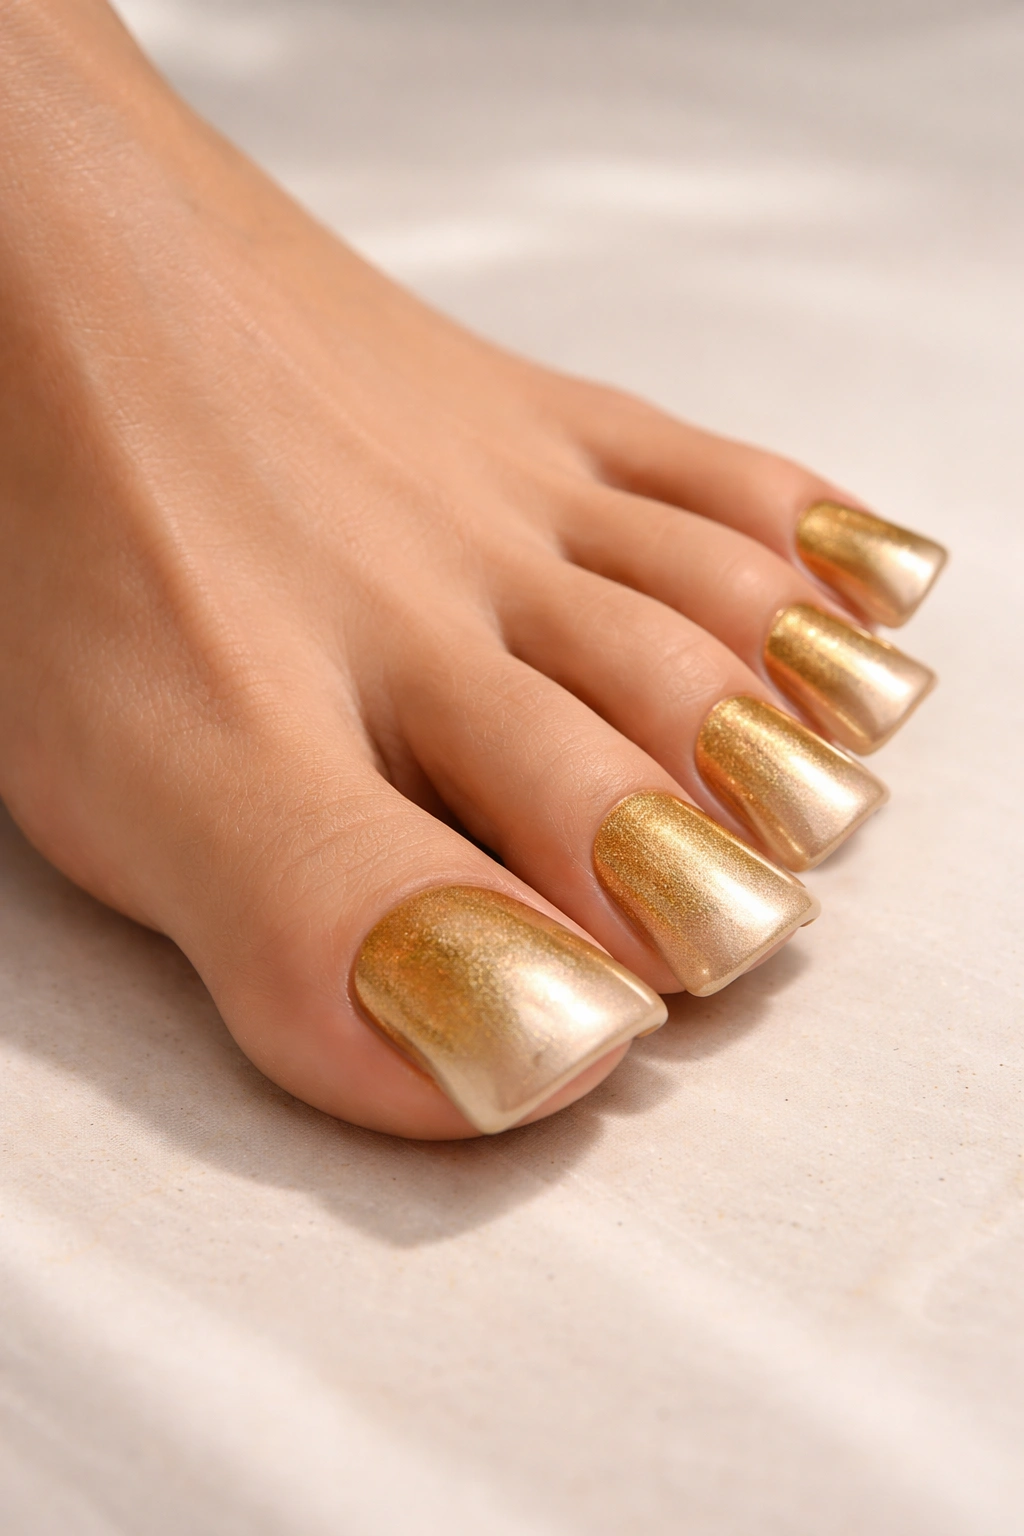
2. Gold Ombre Duck Nails With Gradient Effect
Gradient designs create a seamless flow of color that feels artistic and intentional. Gold ombre duck nails start deep at the base and fade to nude or white at the tips, creating visual length and a sophisticated ombré effect that flatters all skin tones. This style works particularly well on almond or coffin-shaped duck nails where you have enough surface area to show the gradient transition.
The Magic of Gradient Design
Ombré nails use a sponging technique to blend colors smoothly across the nail surface, creating a gradient that appears hand-painted but feels cohesive. Gold gradients specifically leverage the metal’s warmth to create an elegant transition that feels organic rather than artificial. The effect elongates fingers and creates a seamless connection between the nail and your skin tone.
Application Insights
- Use a makeup sponge or specialized gradient sponge for smooth color blending
- Build gradient nails in thin layers, sponging carefully to avoid harsh lines
- Gold, champagne, and nude combinations create the most flattering ombré effect
- The gradient technique works on both natural nails and extensions
- Ombré manicures typically last 2-3 weeks before the gradient line becomes visible near the cuticle
Worth knowing: Practice your gradient technique on practice wheels before attempting it on your actual nails — the sponging motion takes finesse to perfect.
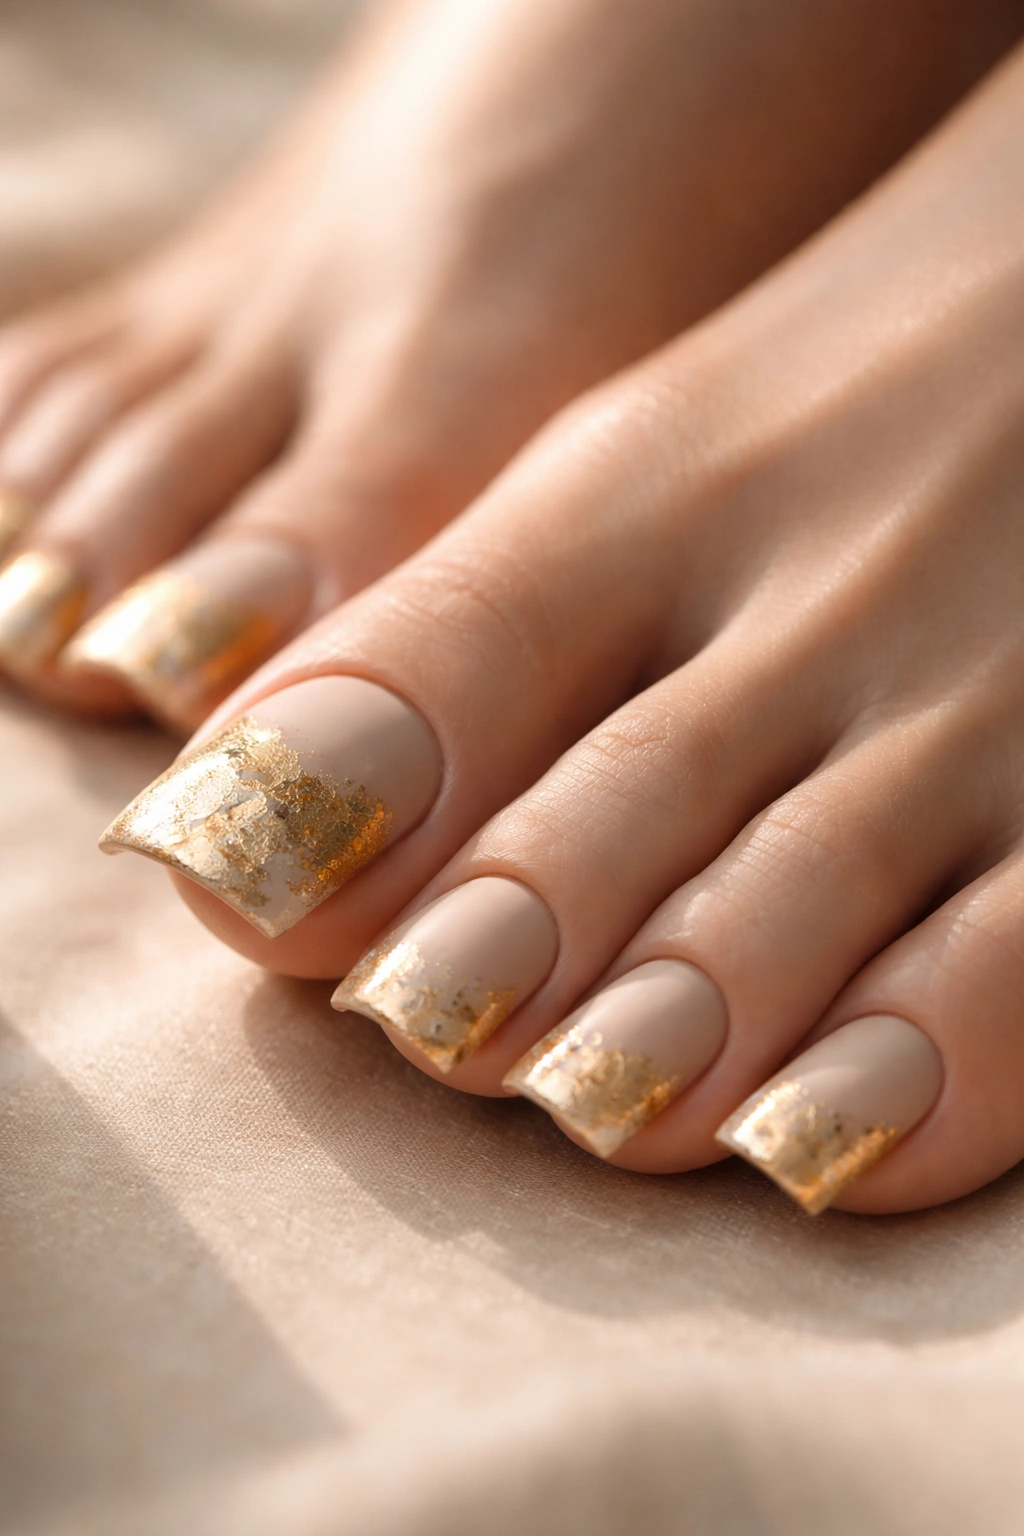
3. Gold Foil Flake Duck Nails

Foil flakes create an organic, artistic texture that catches light in unexpected ways. Gold foil flake duck nails scatter metallic fragments across a nude, white, or clear base, giving you a speckled, constellation-like appearance that feels intentional and luxe. This style offers movement and interest without being too pattern-heavy, making it perfect for those who want visual impact with subtlety.
Why Foil Flakes Add Dimension
Foil pieces are larger and more reflective than regular glitter, creating pockets of shine that sparkle differently depending on how light hits your nails. Gold foils specifically add warmth and prestige to any base color, making even a neutral canvas feel elevated. The random placement means no two nails look exactly identical, adding an artistic, handmade quality.
How to Work With Foil
- Apply foil to either a sticky base coat (before top coat) or a wet top coat layer
- Use tweezers or a thin nail tool to place individual foil pieces precisely
- Gold foils work beautifully over nude, blush, white, or even translucent bases
- The foil effect lasts the entire manicure duration without flaking if sealed properly
- Foil flakes create dimension that photographs incredibly well from any angle
Insider note: Layer gold foil with holographic accents for a multidimensional effect that shifts colors as you move your hands.
4. Geometric Gold Lines on Duck Nails
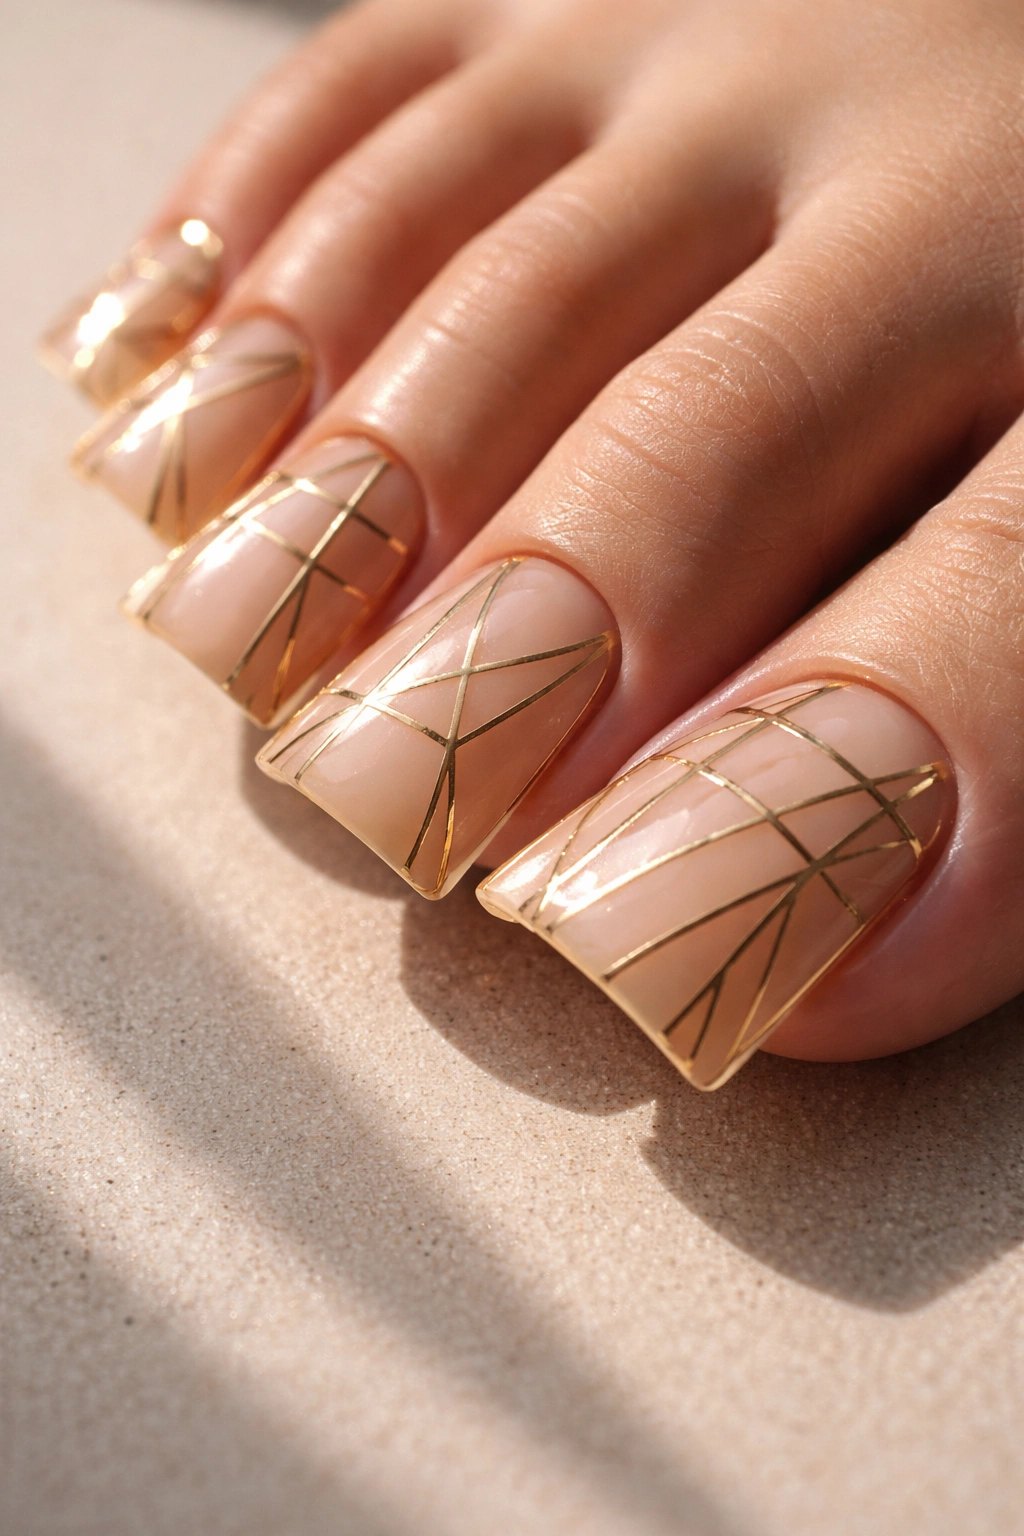
Clean lines and geometric patterns bring a modern, architectural quality to duck nails. Gold geometric designs use thin brushstrokes to create triangles, grids, stripes, or asymmetrical patterns that play with negative space and proportion. This style appeals to minimalists who want visual interest without cluttering the nail surface.
The Appeal of Geometric Design
Geometric patterns feel intentional and curated, suggesting precision and thoughtful design rather than decorative excess. Gold lines pop against nude, white, or even darker backgrounds, creating contrast that makes the pattern readable and striking. The clean aesthetic works for both casual and professional settings while maintaining that duck nail novelty factor.
Design Execution Tips
- Use a thin liner brush or nail art pen for precise, clean lines
- Gold metallic polish or liner works better than regular polish for geometric work
- Negative space (leaving areas bare) makes geometric designs feel less busy
- Symmetrical patterns on some nails with asymmetrical patterns on others creates visual balance
- Geometric designs photograph beautifully and look sharp both in person and on camera
Pro tip: Create gold geometric patterns on only a few accent nails while keeping others solid for a sophisticated look that isn’t overwhelming.
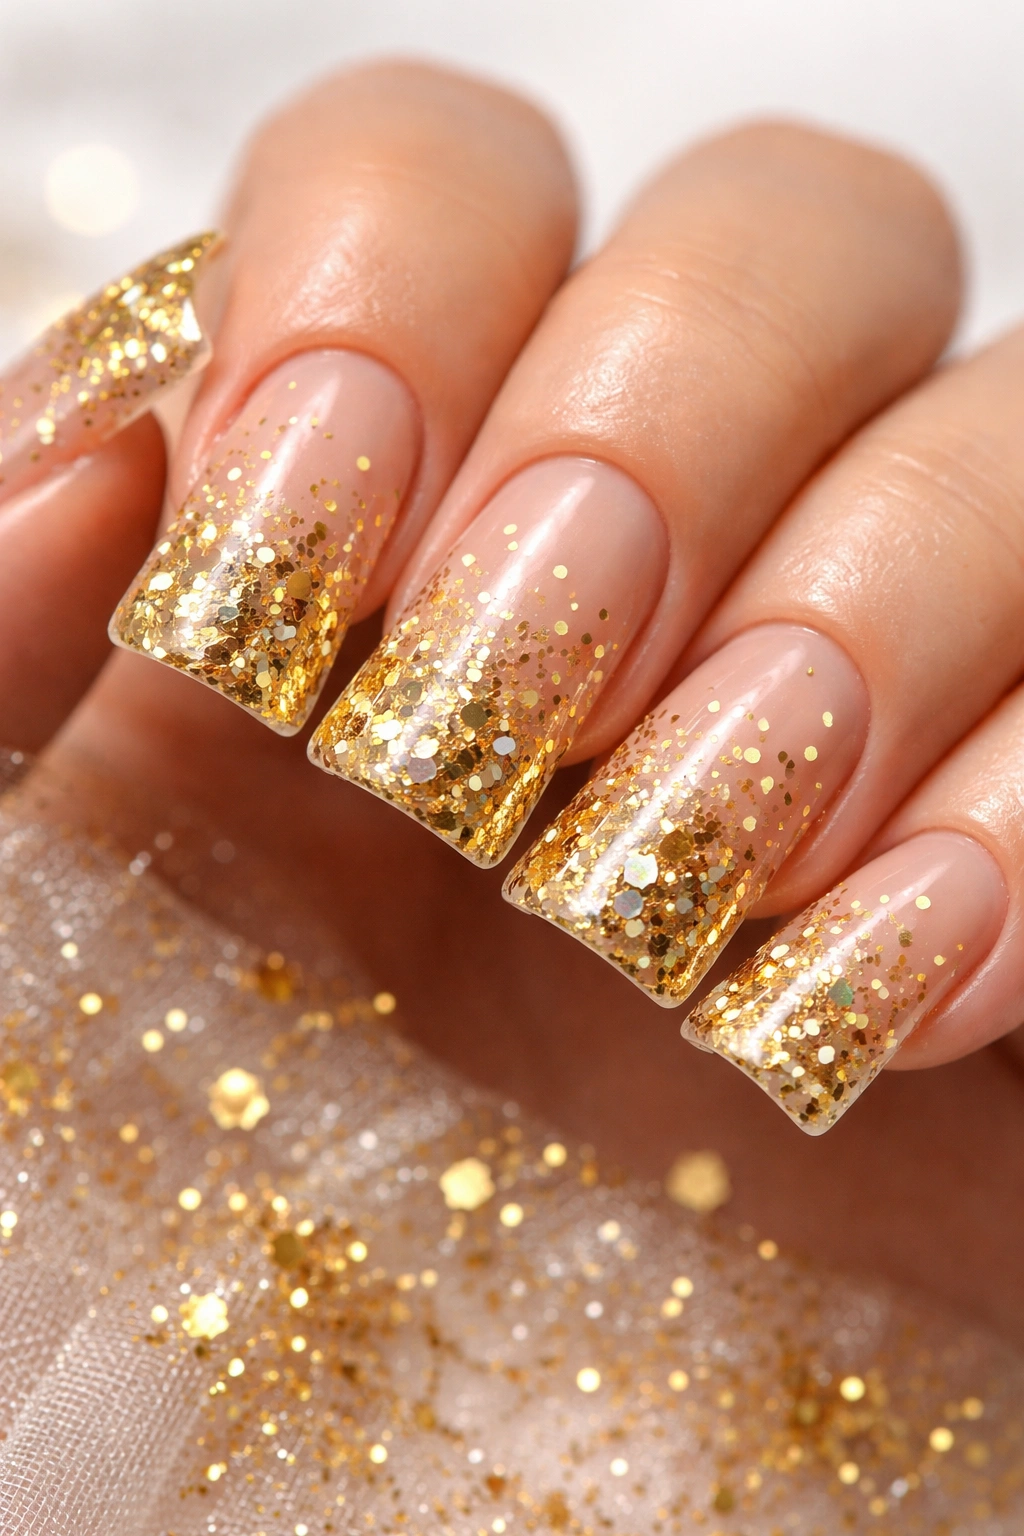
5. Gold Glitter Gradient Duck Nails
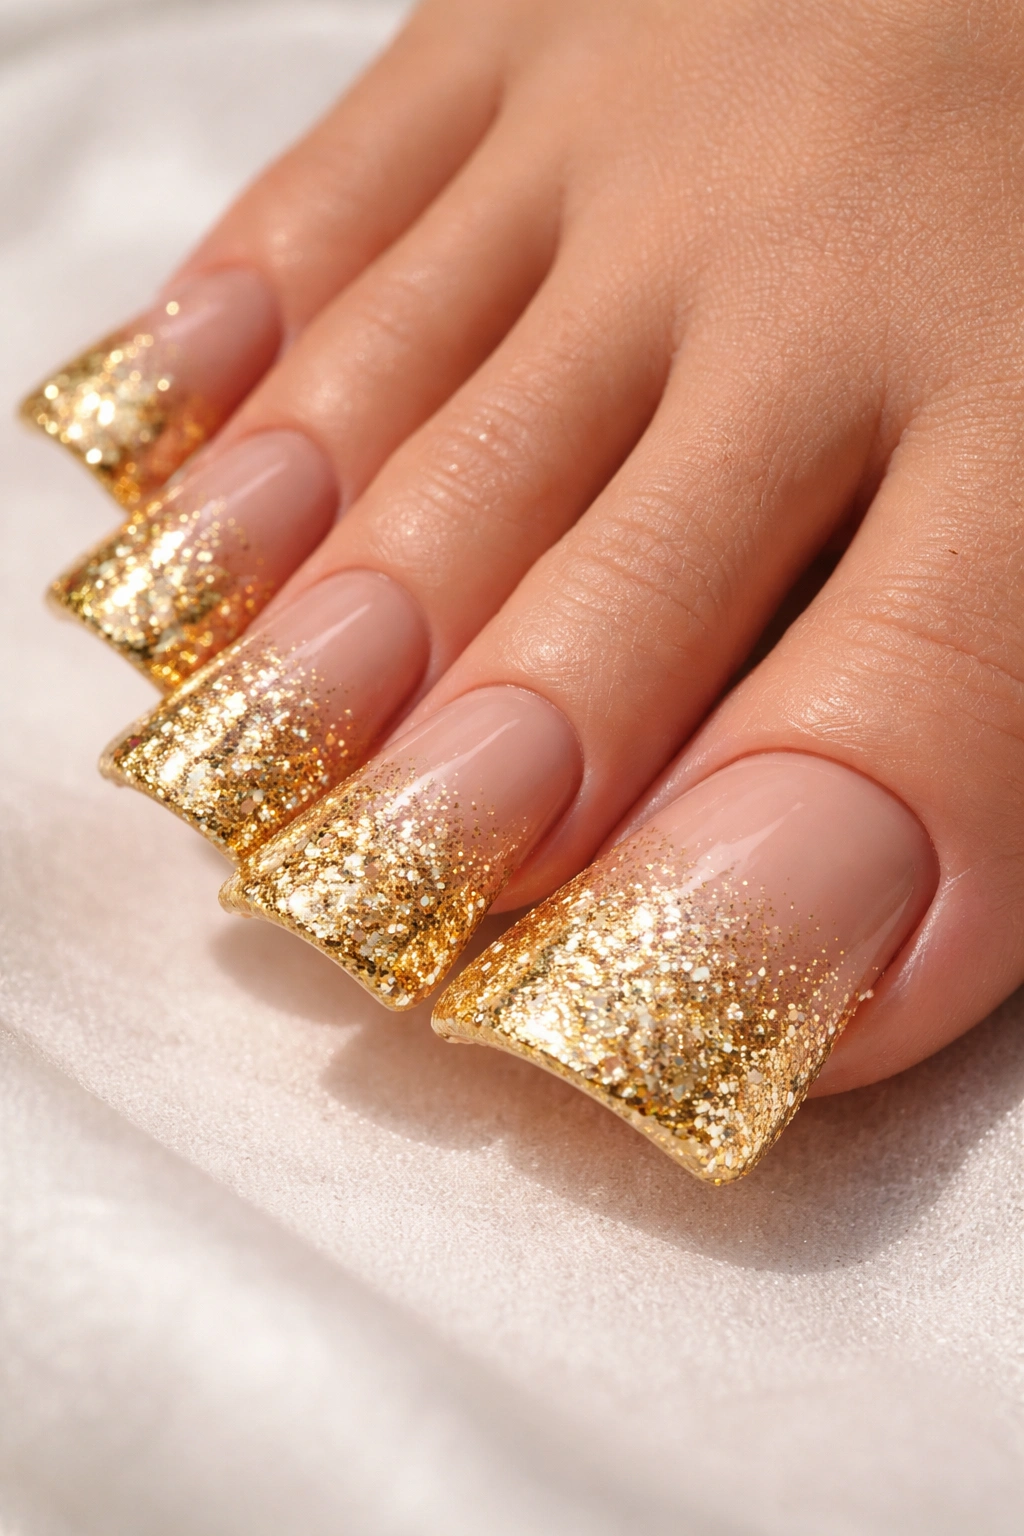
Glitter creates playful sparkle while gradients maintain sophistication. Gold glitter gradient duck nails blend fine to chunky glitter across the nail, concentrating sparkle at the tips while keeping the base more subtle. This creates depth and draws attention to the nail tips, emphasizing the duck nail shape.
Building the Glitter Gradient
Glitter gradients require layering different glitter sizes from base to tip, creating a transition that feels intentional. Gold glitter in various sizes — from micro shimmer to chunky hexagon flakes — allows you to create nuanced transitions. The technique works especially well on duck nails because the webbed toes become a focal point for concentrated sparkle.
Practical Application Notes
- Start with finer glitter closer to the cuticle and transition to larger pieces toward the tips
- Use a clear or nude base to let glitter shine without competing colors
- Glitter gradients take longer to apply but create a genuinely eye-catching result
- Multiple layers of top coat keep glitter secured and prevent chipping
- This design works beautifully for celebrations, date nights, or any occasion where sparkle feels appropriate
Worth knowing: Pre-glitter your nails using a sponge to press glitter into wet polish for better adhesion than placing individual pieces.
6. Champagne and Gold Bling Duck Nails
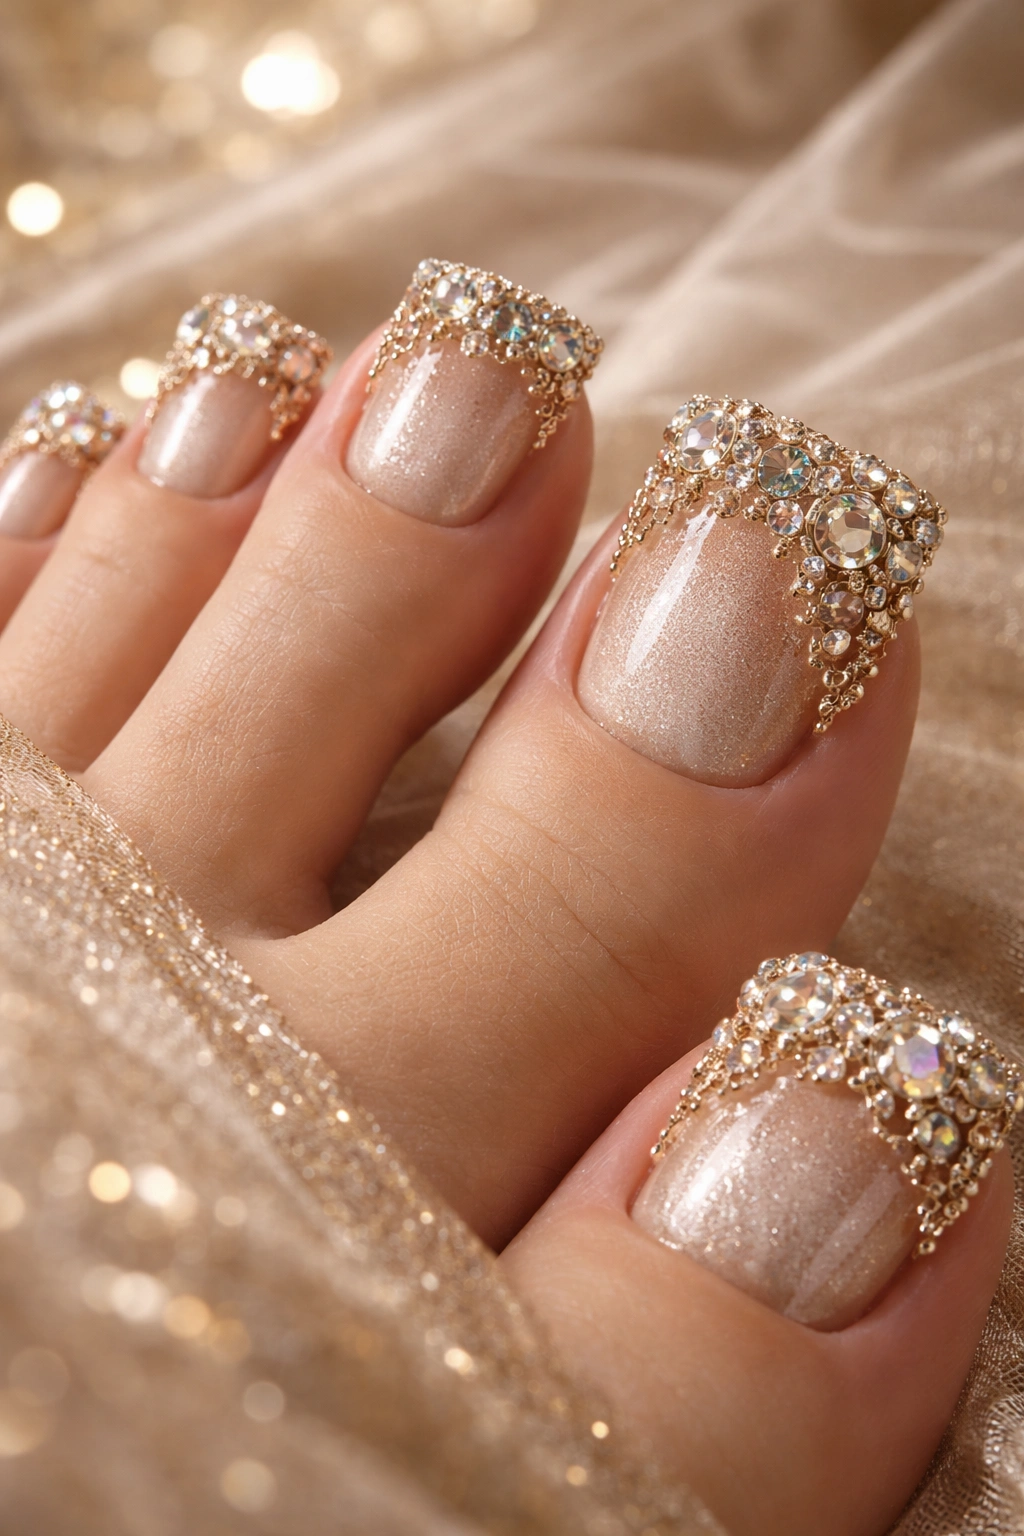
Combining two warm metallics creates luxe contrast without clashing. Champagne and gold bling duck nails layer champagne or rose gold elements with pure gold accents, often incorporating rhinestones, crystals, or studs for extra dimension. This style reads as high-end and celebratory, perfect for special occasions or when you want to feel extra glamorous.
Mixing Metallics Successfully
Champagne and gold are complementary warm tones that enhance rather than compete with each other. By using one as the base and the other for accents or embellishments, you create intentional contrast that feels luxurious rather than clashing. Rhinestones or crystals catch and scatter light, amplifying the metallic effect.
Design Details Worth Noting
- Champagne works as the dominant color with gold accents on the tips or webbed areas
- Rhinestones placed along the nail edge or in clusters add texture and sparkle
- Crystal AB (aurora borealis) stones amplify the metallic effect with rainbow sparkles
- This look works beautifully for weddings, proms, galas, or any dressy occasion
- Professional application ensures stones stay secure throughout the manicure duration
Pro tip: Place larger stones on the webbed toes of duck nails to emphasize that unique shape and create a focal point for bling placement.
7. Matte Gold Leaf Duck Nails
Matte finishes bring a sophisticated, modern edge to metallic designs. Gold leaf duck nails combine brushed gold leaf elements with a matte base coat, creating contrast between shiny and flat textures. This style feels artistic and carefully curated, appealing to those who appreciate understated luxury.
The Matte-Metallic Contrast
Matte topcoats neutralize the shine of metallic polish, but strategically placed gold leaf breaks through the matte finish with unexpected sparkle. This contrast creates visual interest and depth while maintaining a modern, gallery-like aesthetic. The technique works beautifully on duck nails where the webbed toes can showcase strategic leaf placement.
Application Specifics
- Apply matte topcoat first, then carefully place gold leaf on top
- Seal gold leaf with a glossy top coat to protect it and create contrast against the matte base
- Gold leaf can be applied in abstract patterns, geometric shapes, or freehand designs
- Matte gold nails photograph beautifully in natural light, showing subtle texture and depth
- This design maintains elegance for weeks without showing wear as obviously as pure matte finishes
Insider note: Use sheets of gold leaf rather than flakes for more controlled, artistic application on duck nail canvases.
8. Gold and Black Marble Duck Nails
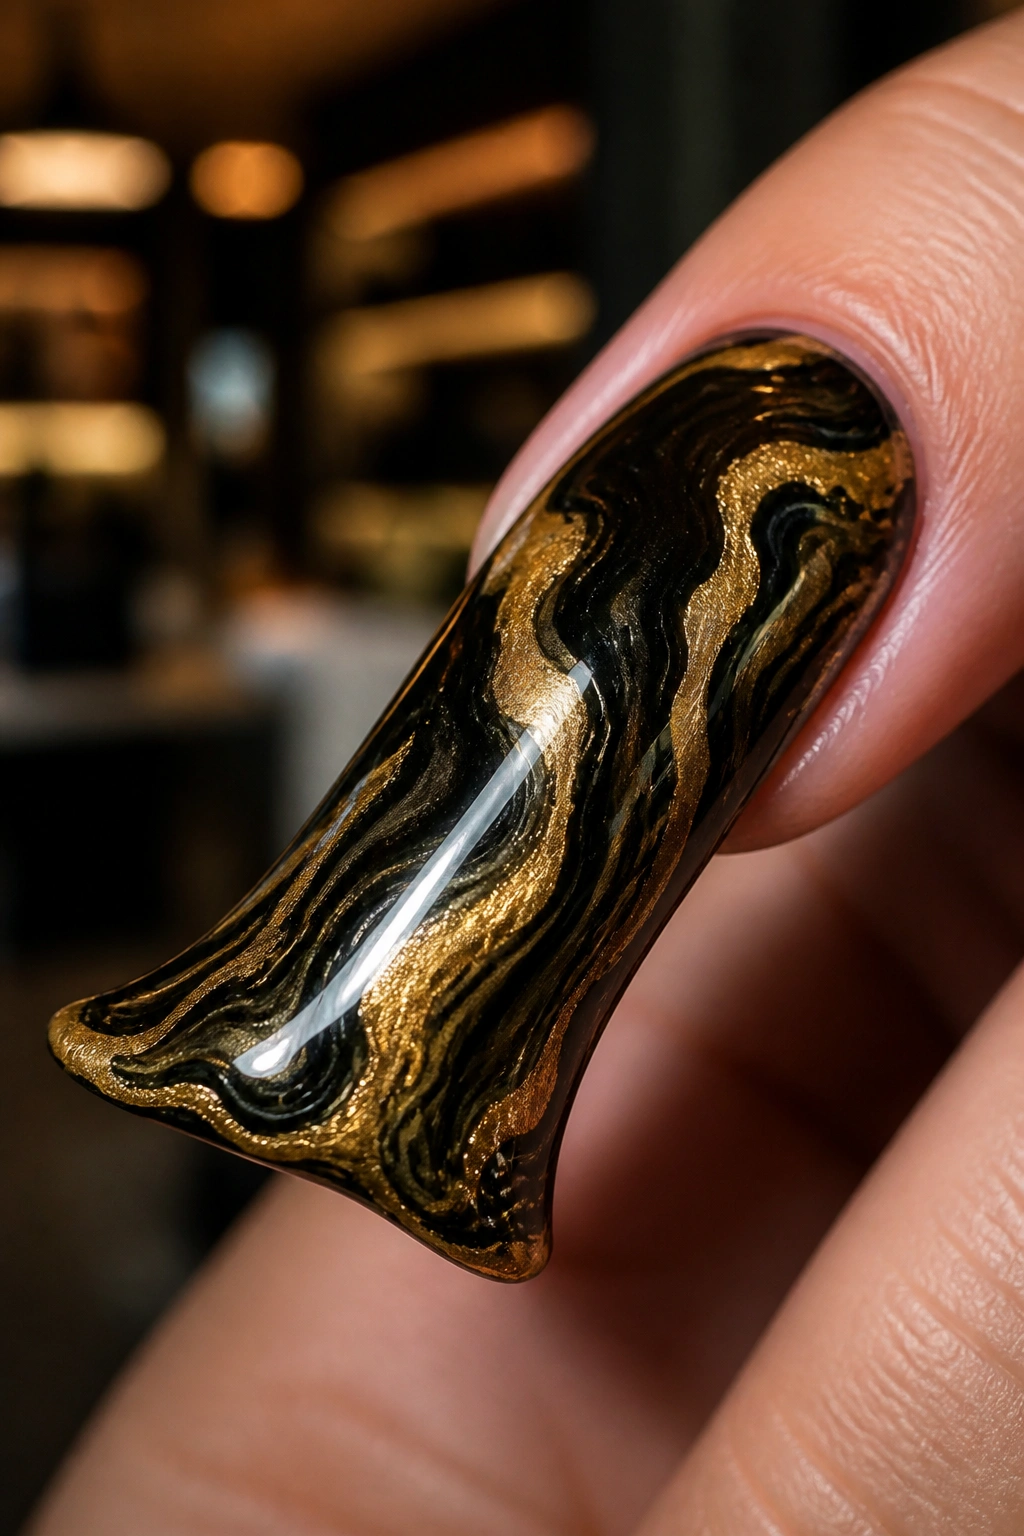
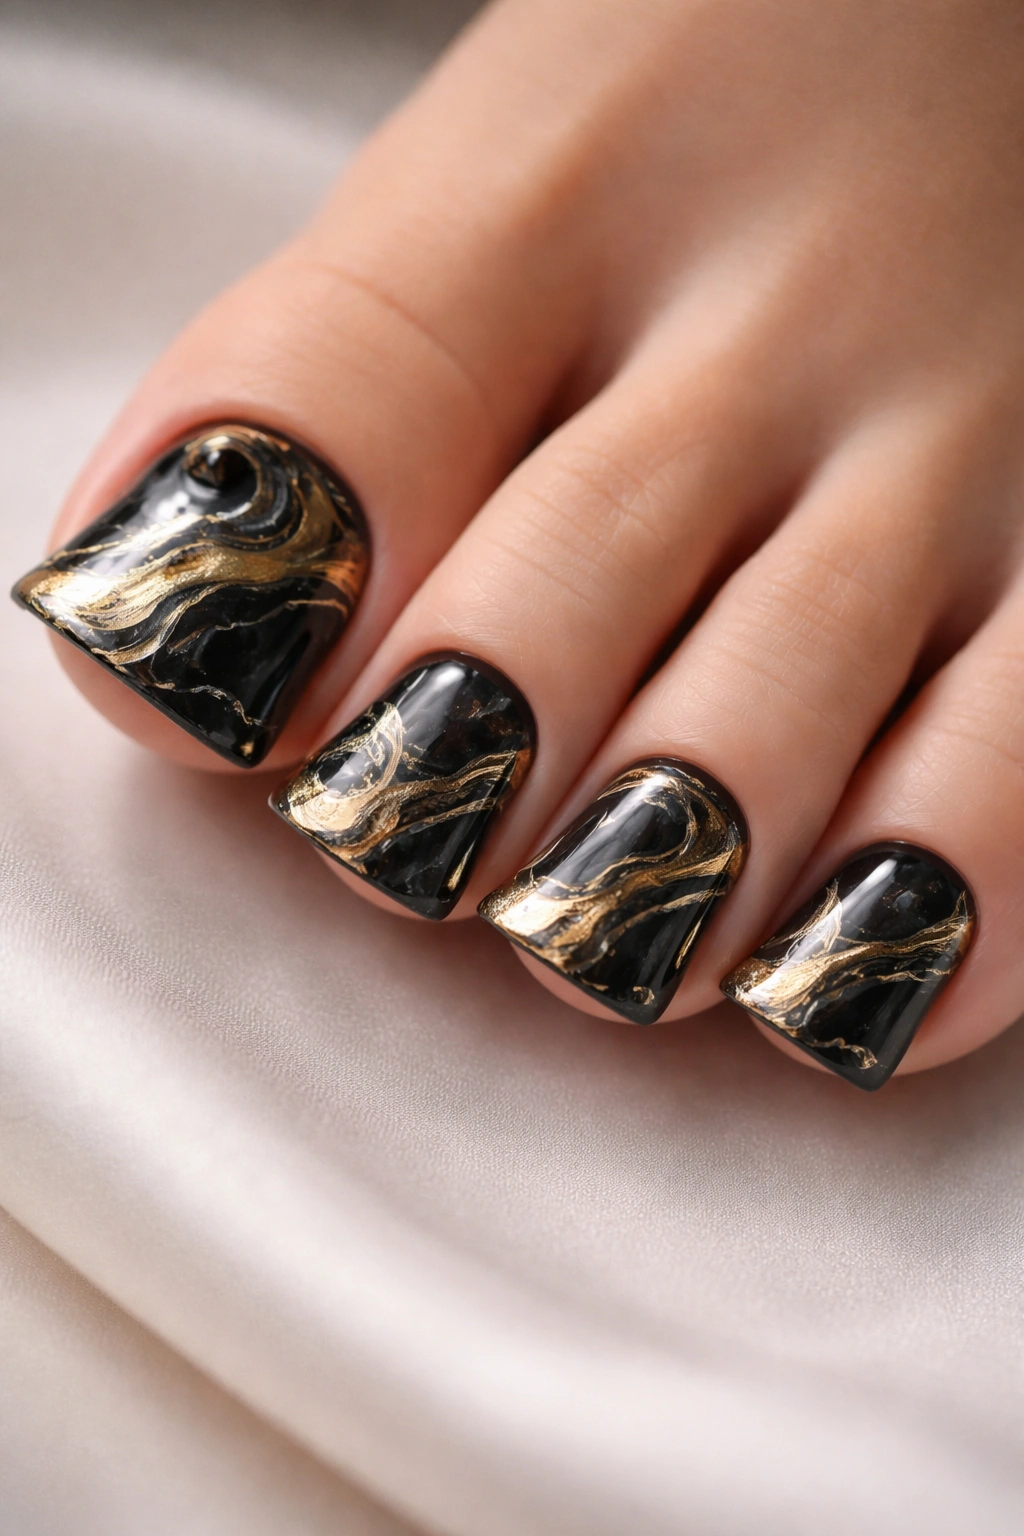
Marble designs create organic, sophisticated patterns that feel artistic without being overly decorated. Gold and black marble duck nails swirl metallic gold through dark black or charcoal backgrounds, creating that coveted marbled effect. This style offers drama and elegance, working beautifully for evening occasions or whenever you want serious visual impact.
Creating Marble Effects
Marble nail designs use water marbling or freehand brush techniques to create those characteristic swirling patterns. Gold and black combination creates maximum contrast, making the marble pattern readable and striking. The organic nature of marble designs means no two nails look identical, adding artistic authenticity.
Marble Design Techniques
- Water marbling uses a bowl of water to float and swirl polishes together, then dipping nails into the pattern
- Freehand marbling uses thin brushes to create swirls and patterns directly on the nail
- Gold polish shows beautifully against black or charcoal backgrounds
- Marble designs work on any nail length or shape, including duck nails
- Sealing marble designs with a glossy topcoat enhances the artistic effect and protects the design
Worth knowing: Freehand marble requires less setup than water marbling and gives you more control over where patterns appear on your nails.
9. Gold Floral Accents on Duck Nails
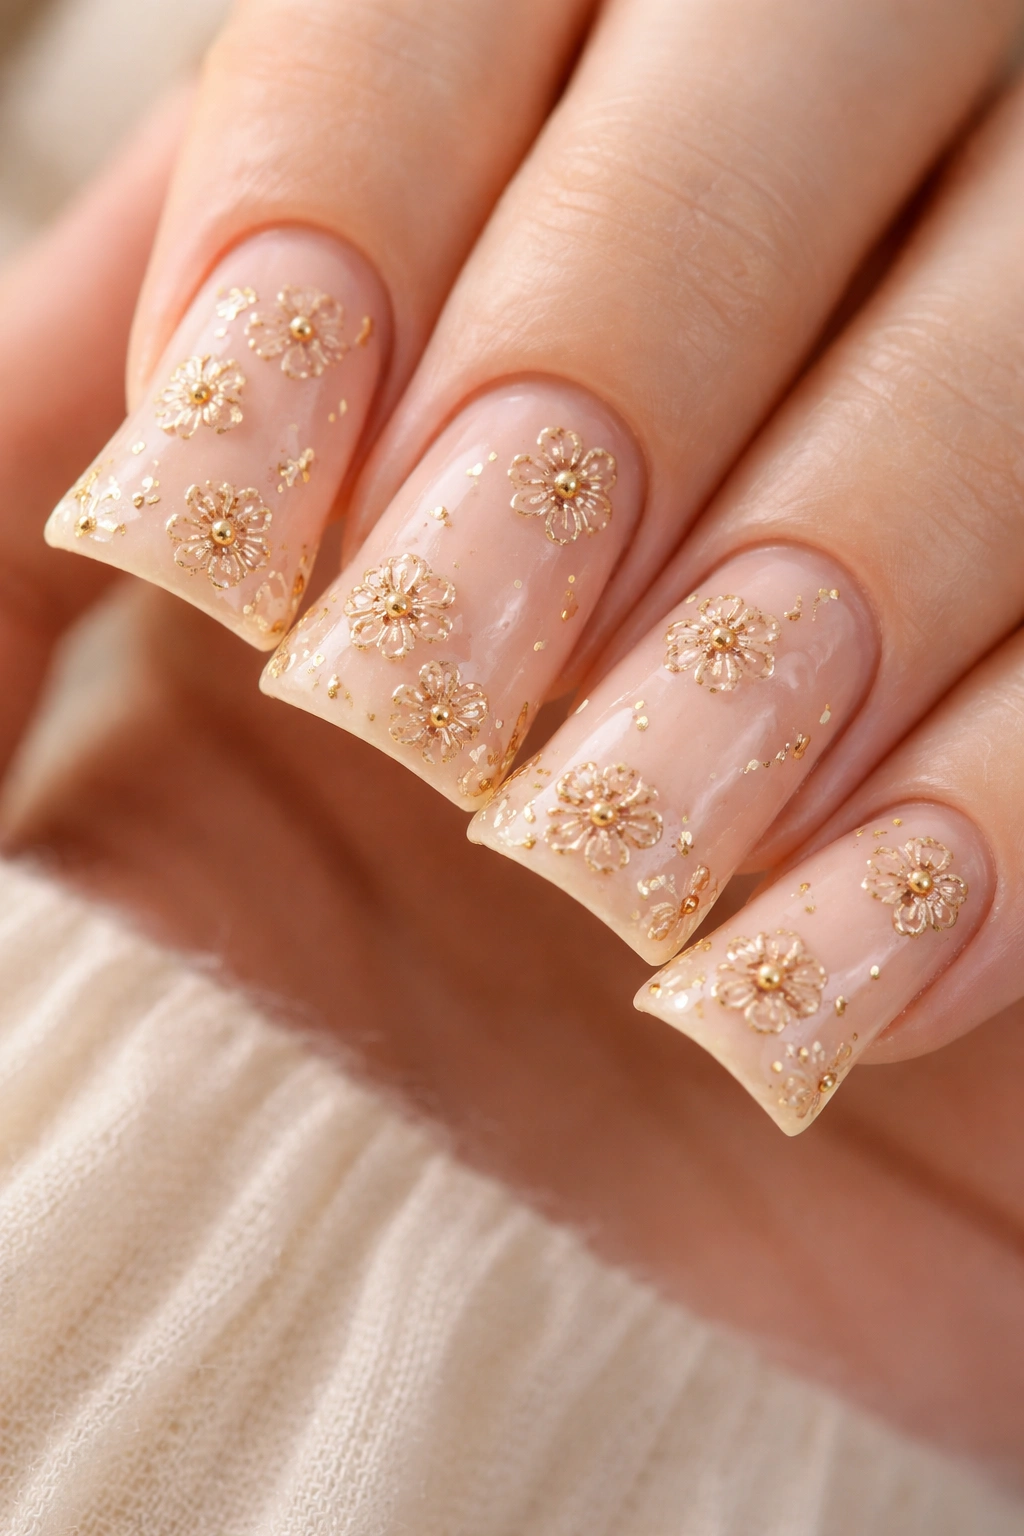
Floral designs bring delicate beauty to duck nails while gold accents add prestige and visual interest. Gold floral duck nails feature small flower designs painted or applied to some nails, while gold elements (leaf details, outlines, or centers) emphasize botanical themes. This style works year-round and appeals to those who love nature-inspired aesthetics with a touch of glamour.
Designing Florals With Gold
Floral designs range from tiny, minimalist line flowers to fully painted botanical illustrations. Gold works as outline detail, center stamens, leaves, or background element, depending on your preferred style. Duck nails provide an interesting canvas for floral work because the webbed toe detail already suggests organic, natural beauty.
Floral Application Options
- Hand-painted florals require steady hands or professional skills; stamp designs offer precision without the learning curve
- Gold outlines over delicate florals create definition and add luxury
- Nude, white, or blush bases let floral designs pop without competing colors
- Accent nails with detailed florals while keeping others solid for visual balance
- Floral designs photograph beautifully and feel sophisticated for professional or personal settings
Pro tip: Use gold leaf as stems or background element behind floral designs for added dimension without overwhelming delicate flowers.
10. Gold Holographic Duck Nails
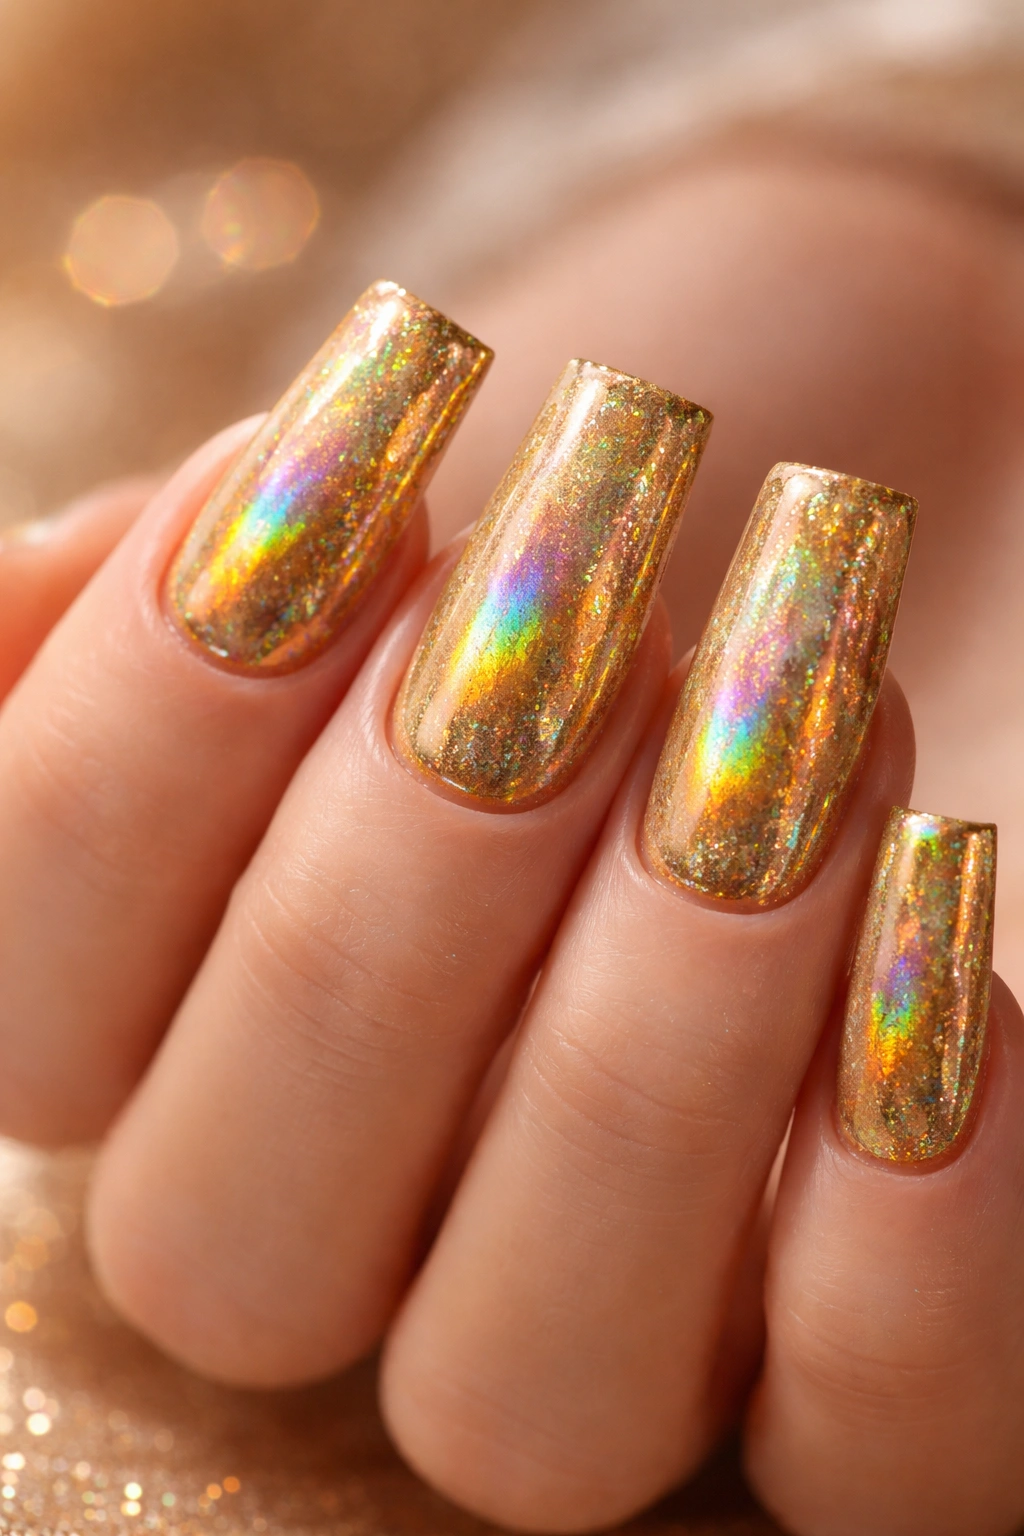
Holographic finishes create rainbow reflections that shift depending on the angle and lighting. Gold holographic duck nails combine warm gold tones with holographic particles, creating multidimensional sparkle that reads as pure magic. This style appeals to those who love color-shifting effects and want nails that look different depending on how light hits them.
The Science of Holographic Polish
Holographic formulations contain ultra-fine particles that refract light into rainbow colors while maintaining a gold undertone. The effect appears different in natural light versus artificial light, and changes as you move your hands and view your nails from different angles. This makes holographic nails endlessly fascinating to look at.
Holographic Application Details
- Holographic polishes work best in thin, even layers for optimal color-shifting effect
- Natural light shows off holographic effects most dramatically
- Layering holographic polish with regular gold creates unique blended effects
- Holographic nails typically maintain their sparkle throughout the 2-3 week manicure cycle
- This style photographs differently depending on camera flash and available light
Insider note: Apply holographic polish under bright light to ensure even coverage and maximum color-shifting effect.
11. Gold Striped Candy Cane Duck Nails
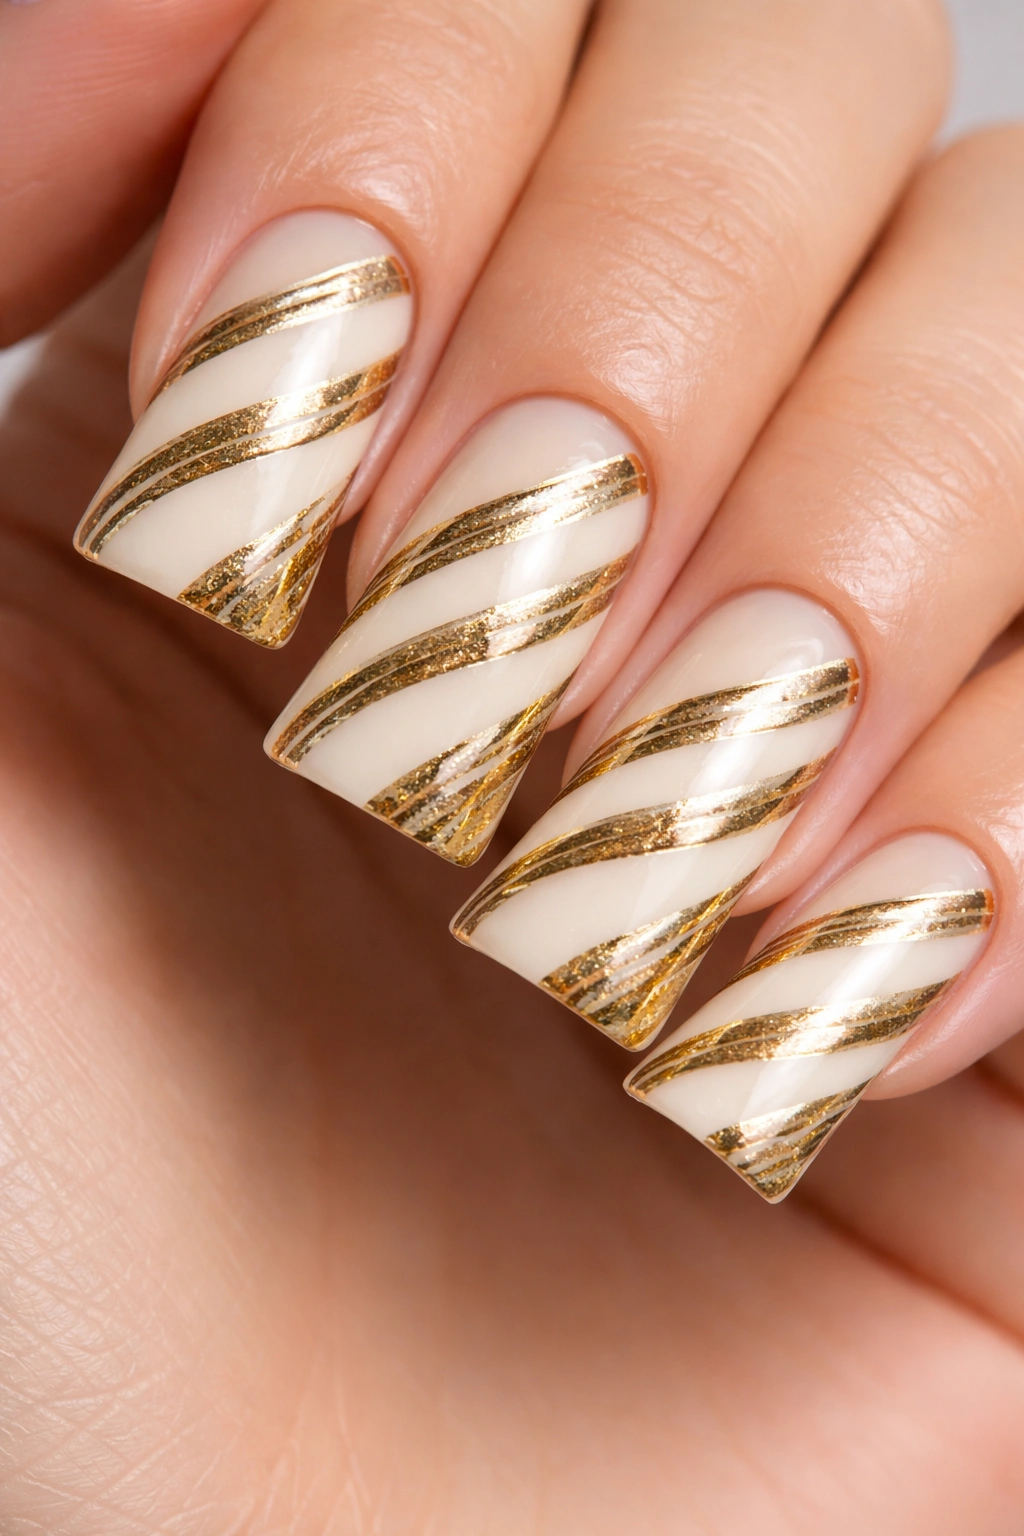
Striped designs add visual movement and playfulness to duck nails. Gold striped candy cane duck nails feature diagonal or vertical stripes in gold and white, cream, or nude, creating a fun, modern twist on classic stripe designs. This style works beautifully for holiday occasions or whenever you want cheerful visual interest.
Stripe Design Versatility
Stripes can run vertically (elongating effect), horizontally (modern graphic feel), or diagonally (playful dynamism). Gold stripes pop against white or neutral backgrounds, creating clear visual contrast and readable pattern. Duck nails provide excellent canvas space for showcasing stripe designs without pattern feeling cramped.
Creating Clean Stripes
- Tape nail guides make perfectly straight stripes without requiring advanced brush skills
- Thin metallic gold polish covers better than regular polish for stripe work
- Alternating stripe widths creates visual interest — thick and thin combinations feel more dynamic
- Stripes work on both short and long nails; duck nail shape naturally showcases this design
- Clean stripe edges photograph beautifully and read as intentional, modern design
Pro tip: Use painter’s tape as a stripe guide, pressing firmly to prevent polish from seeping under the tape edge.
12. Gold Sunburst Duck Nails
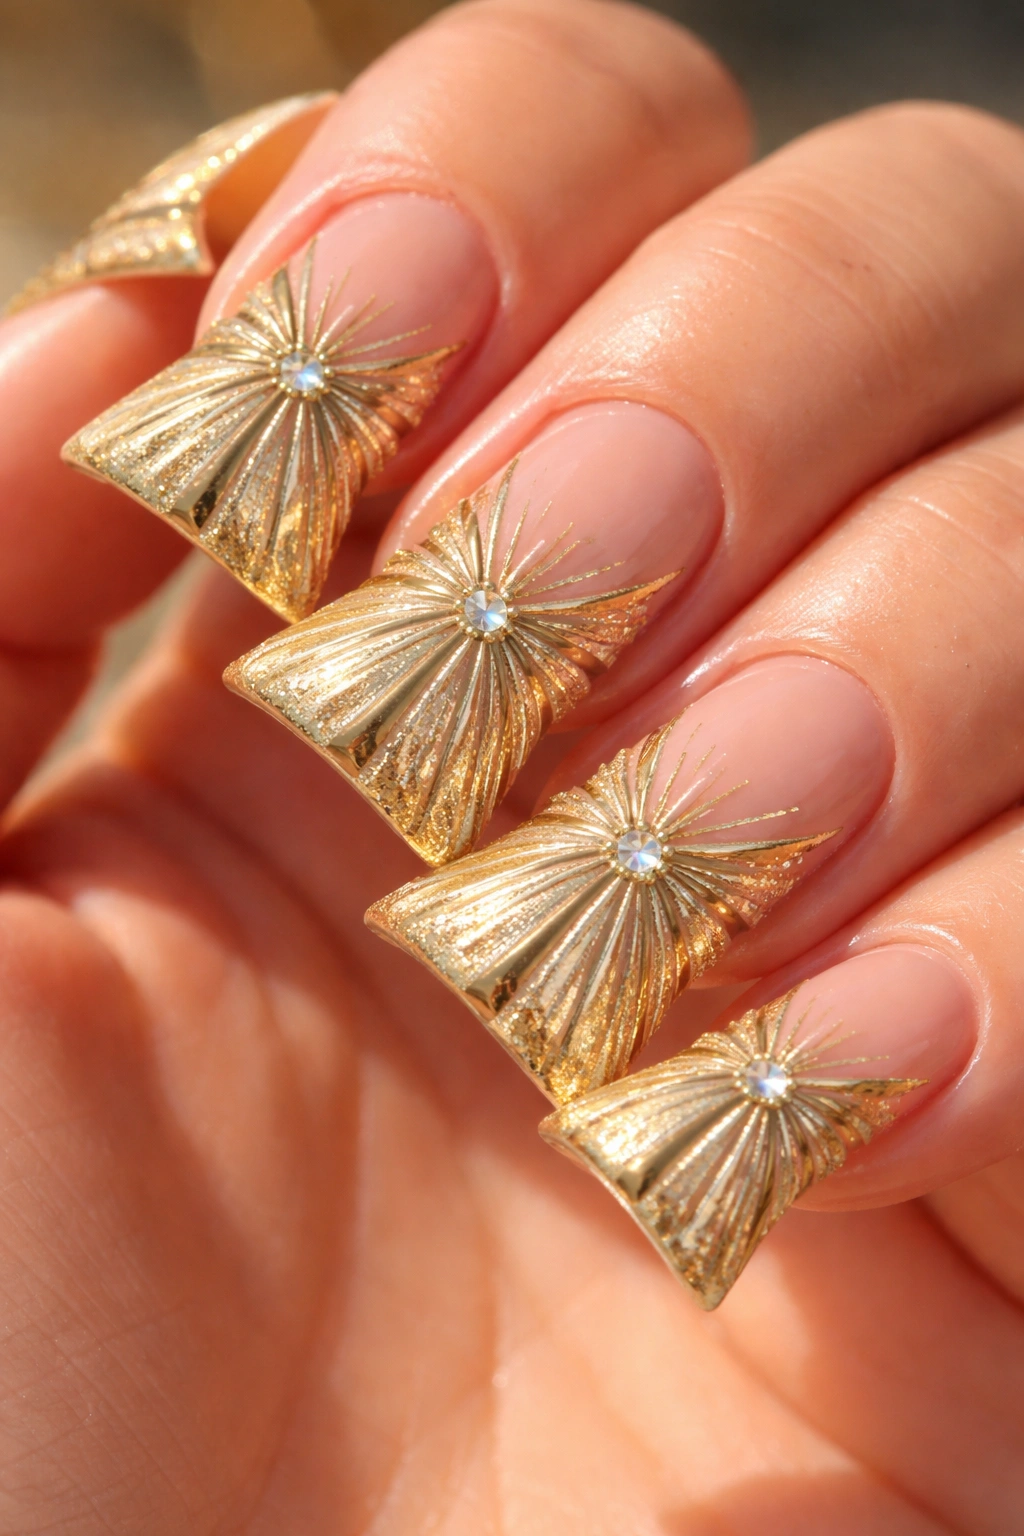
Sunburst designs create radiant patterns that draw the eye outward from the nail center. Gold sunburst duck nails feature rays or lines emanating from a central point, often with the webbed toe detail at the center creating a natural focal point. This style feels geometric and modern while maintaining an organic, natural quality.
Creating Radiant Sunburst Patterns
Sunburst designs use thin lines or rays to create that radiating effect, with gold polish creating luminous lines against nude, white, or pastel backgrounds. The technique works beautifully on duck nails because the webbed toe can serve as the natural center point for rays. The result feels both artistic and architecturally intentional.
Sunburst Application Steps
- Sketch the center point and basic ray placement with a thin pencil before applying polish
- Use a thin liner brush or nail art pen to create even rays extending from the center
- Gold metallic polish shows beautifully against neutral backgrounds
- Sunburst patterns work on accent nails or across all ten nails for maximum impact
- This design requires steadiness but creates a professionally artistic result
Worth knowing: Varying ray thickness and length creates visual interest — make every other ray slightly longer for an organic, dynamic effect.
13. Gold Drip Duck Nails

Drip designs create artfully chaotic patterns that look spontaneous yet intentional. Gold drip duck nails feature gold polish dripping down from the tips or across the nail surface, creating that Instagram-famous “wet” effect. This style appeals to those who love modern art-inspired designs and want something that captures attention instantly.
The Appeal of Drip Design
Drip effects feel playful and contemporary, suggesting movement and artistic freedom rather than rigid precision. Gold drips against nude, white, or pastel bases create visual drama while maintaining sophistication. Duck nails provide plenty of canvas for showcasing drip patterns without feeling cramped.
Drip Technique Execution
- Use a slightly thinner gold polish or gel to create drips that flow naturally
- Apply base color first, then use a thin brush or dropper to create dripping lines
- Gold drips look best when they appear somewhat organic and uncontrolled
- Layer clear topcoat carefully to maintain the drip effect’s visual impact
- This design photographs beautifully and creates genuine visual interest from every angle
Pro tip: Create drips from multiple points (tips, sides, center) rather than just one location for a more artistic, gallery-worthy appearance.
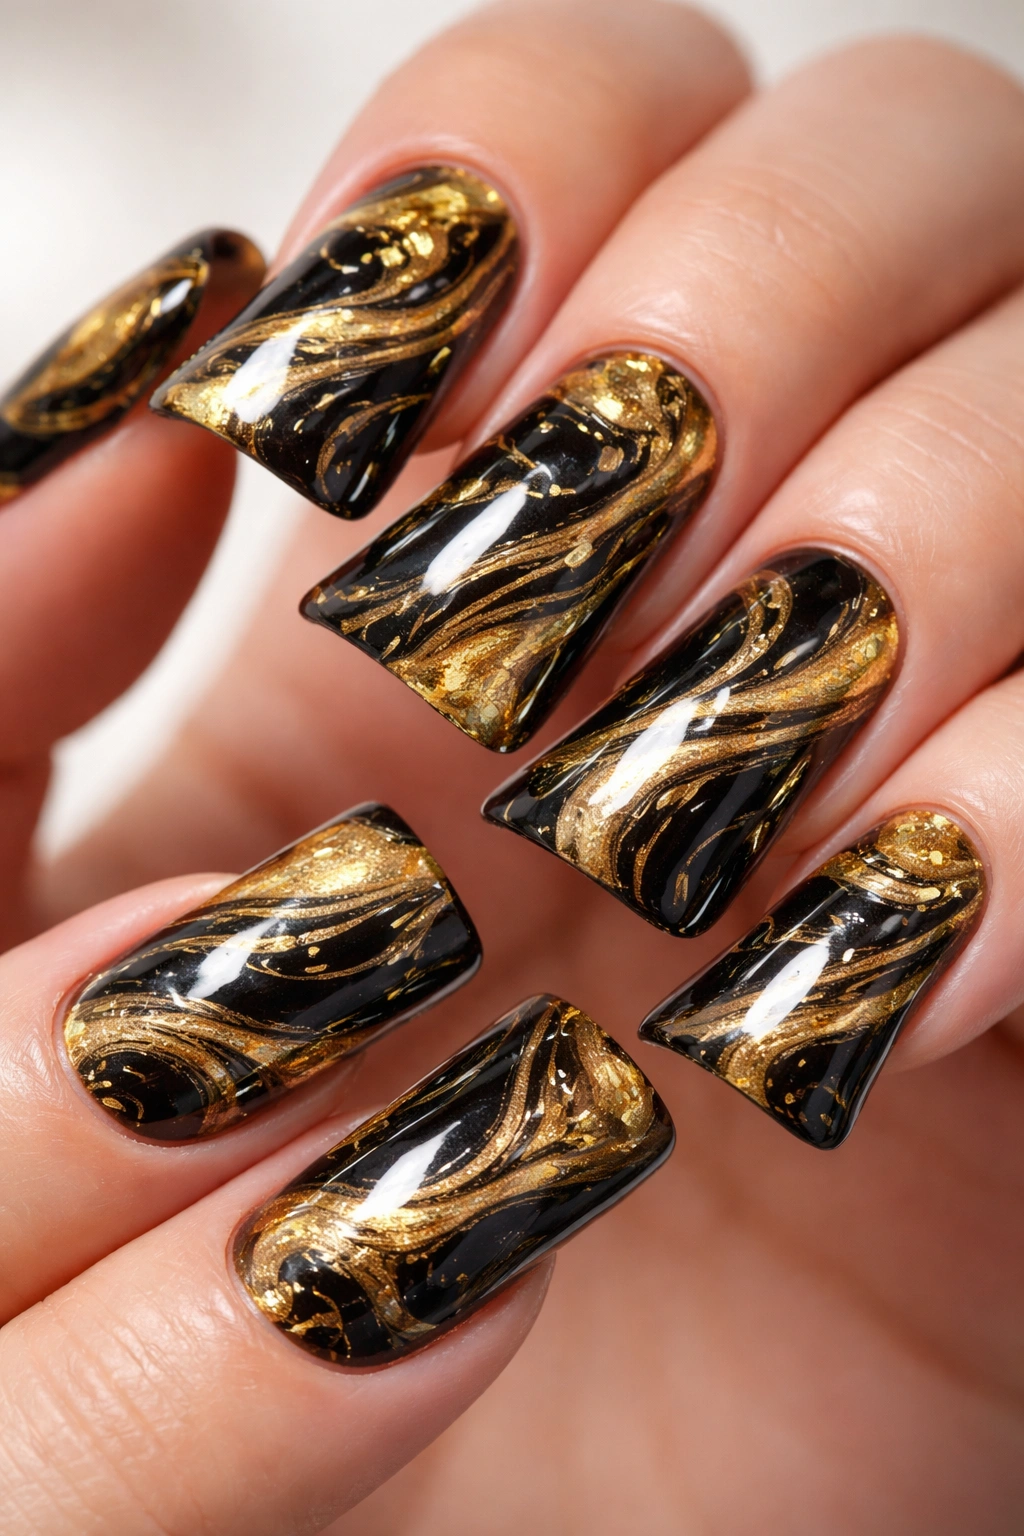
14. Gold Confetti Duck Nails
Confetti designs create festive, celebratory energy perfect for special occasions. Gold confetti duck nails scatter small pieces of metallic gold, holographic fragments, or metallic confetti shapes across a neutral base. This style feels celebratory without being costume-y, working beautifully for parties, celebrations, or whenever you want pure joy in nail form.
Confetti Design Execution
Confetti designs use multiple elements of varying sizes and shapes to create that festive scatter effect. Gold metallic confetti catches light and creates sparkle, while mixed element sizes add visual depth. The randomness of confetti placement means no two nails look identical, which increases visual interest.
Application and Materials
- Use a combination of glitter sizes, foil flakes, and metallic fragments for texture variety
- Clear or nude bases let confetti shine as the focal point
- Apply confetti to either a sticky base coat (before sealing) or wet topcoat (before curing)
- Confetti designs photograph beautifully with flash, creating extra sparkle
- This style works for any occasion where celebration feels appropriate
Insider note: Mix gold confetti with rose gold, champagne, and copper pieces for a refined, multimetallic confetti effect that feels upscale rather than childish.
15. Gold Negative Space Duck Nails
Negative space designs create artistic effects by leaving portions of the nail bare or showing through the base. Gold negative space duck nails feature strategic cutouts, gaps, or transparent sections that allow skin or base color to show through, creating geometric or organic patterns. This style appeals to minimalists and those who appreciate clever visual tricks.
The Artistry of Negative Space
Negative space designs suggest sophistication through restraint — what you don’t paint matters as much as what you do. Gold elements surrounding empty space create visual contrast and draw attention to the empty areas as much as the painted portions. Duck nails work beautifully for this because the webbed toe itself creates natural negative space.
Negative Space Techniques
- Use stencils to create precise geometric cutouts filled with gold
- Freehand negative space requires careful planning but creates more artistic results
- Nude or light bases work best for showing negative space effectively
- Half-moons, geometric shapes, or organic lines all work as negative space patterns
- This design requires precision but creates genuinely striking visual results
Worth knowing: Paint the negative space sections with clear or skin-tone polish rather than leaving them completely bare — this creates definition while maintaining the negative space effect.
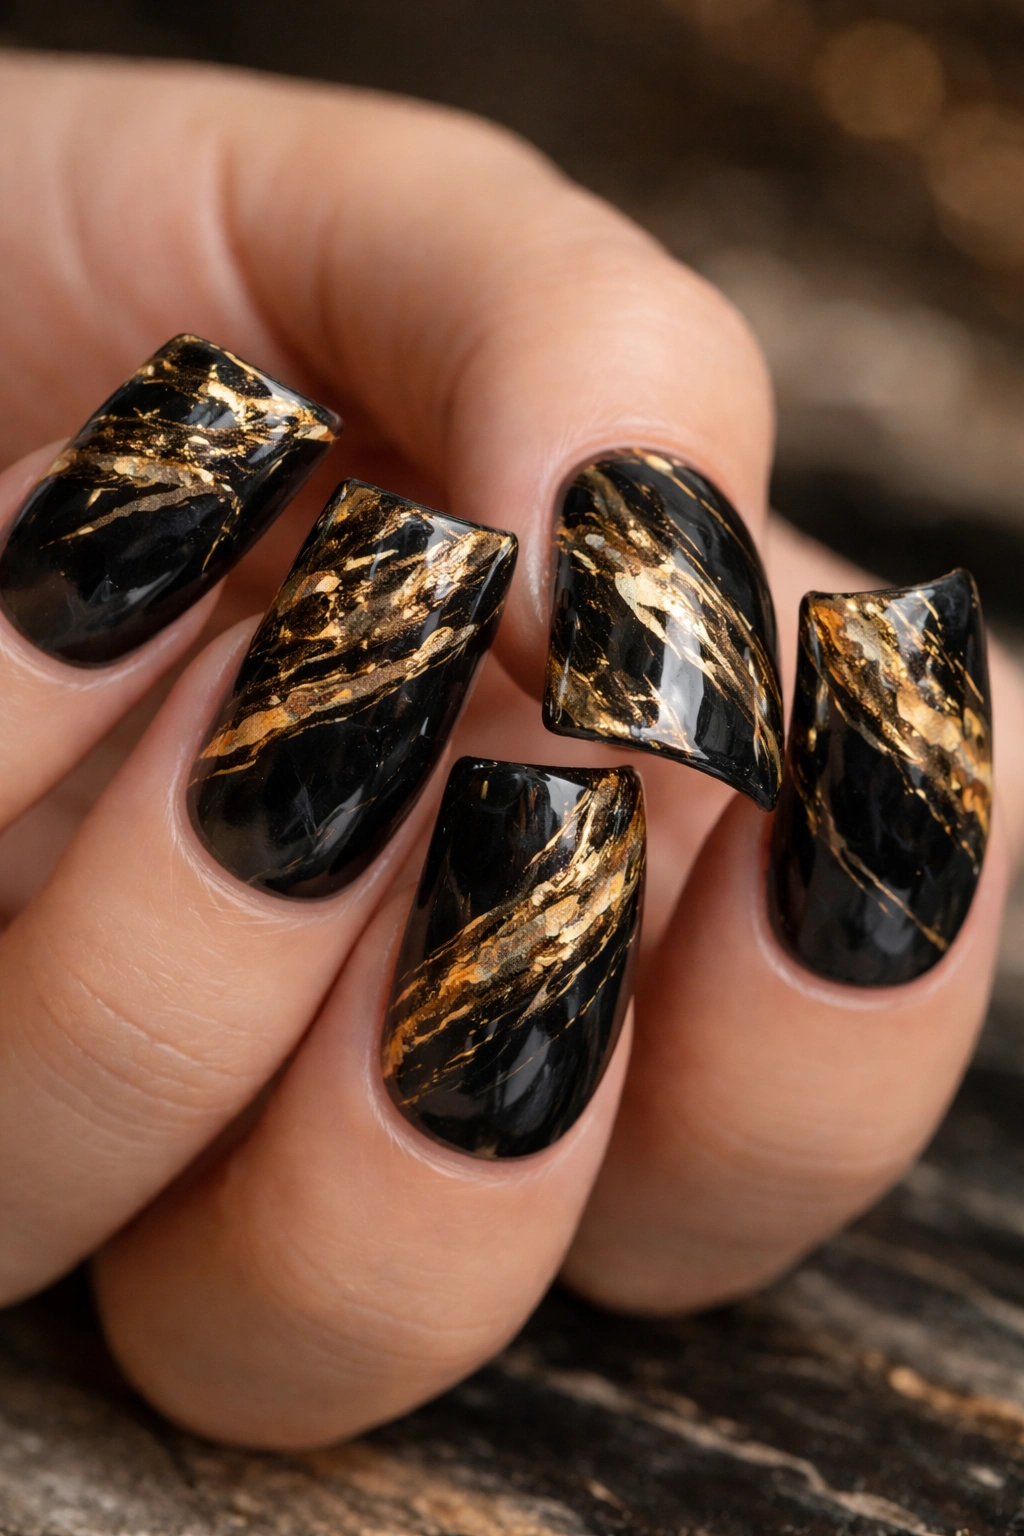
16. Gold Tortoiseshell Duck Nails
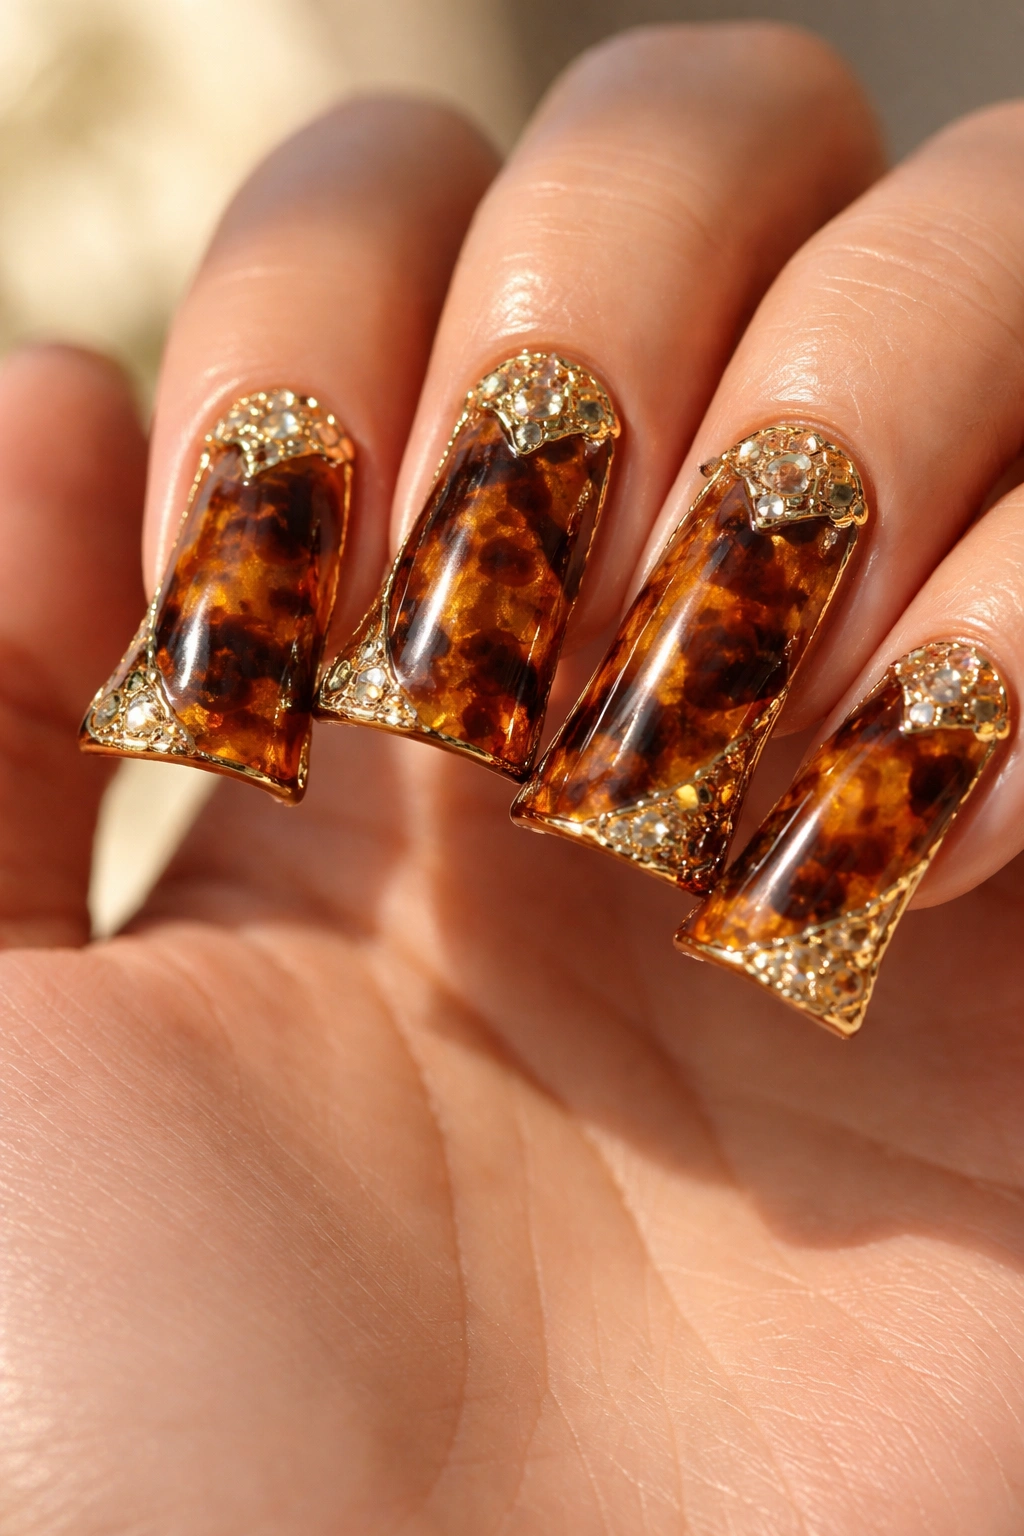
Tortoiseshell designs create warm, organic patterns inspired by natural tortoise shell coloring. Gold tortoiseshell duck nails blend gold with amber, brown, and caramel tones, creating those characteristic mottled patterns. This style feels earthy and organic while maintaining that luxe metallic quality, working beautifully for any season.
Creating Tortoiseshell Effects
Tortoiseshell patterns use multiple warm tones layered and blended to create those natural mottled effects. Gold acts as a prominent color in the palette rather than a small accent, creating a genuinely warm, cohesive look. The organic nature of tortoiseshell means no precise technique is required — hand-painted freehand approaches often look most authentic.
Tortoiseshell Application
- Use a sponge or brush to blend gold, amber, brown, and caramel polish together
- Apply colors separately then blend where they meet for natural-looking transitions
- Tortoiseshell patterns work on all nails or as accent designs
- This design photographs beautifully in natural light, showing warmth and depth
- Tortoiseshell appeals to those who love nature-inspired designs with metallic luxury
Pro tip: Add small flecks of black or dark brown over the tortoiseshell base for authenticity and visual depth.
17. Gold Geometric Triangles Duck Nails
Triangle designs create bold, architectural patterns perfect for those who love geometric shapes. Gold geometric triangle duck nails feature repeating or mixed-sized triangles in shades of gold against neutral backgrounds. This style feels modern, precise, and intentional while remaining adaptable to various aesthetic preferences.
Triangle Design Variations
Triangles can be stacked vertically, arranged horizontally, placed randomly, or used as pattern fill creating countless design possibilities. Gold triangles pop against nude, white, black, or even pastel backgrounds. Duck nails provide excellent surface area for showcasing triangle patterns without feeling cramped.
Creating Triangle Patterns
- Use a thin liner brush or nail art pen for precise triangle edges
- Tape guides create perfectly straight triangle lines without requiring advanced brush skills
- Filled triangles versus outlined triangles create different visual effects
- Gold metallic polish shows beautifully against solid backgrounds
- This design works on all nails or as accent designs depending on your style
Worth knowing: Mix filled and outlined triangles on the same nail for texture and visual interest without making the design overly complicated.
18. Gold Constellation Duck Nails
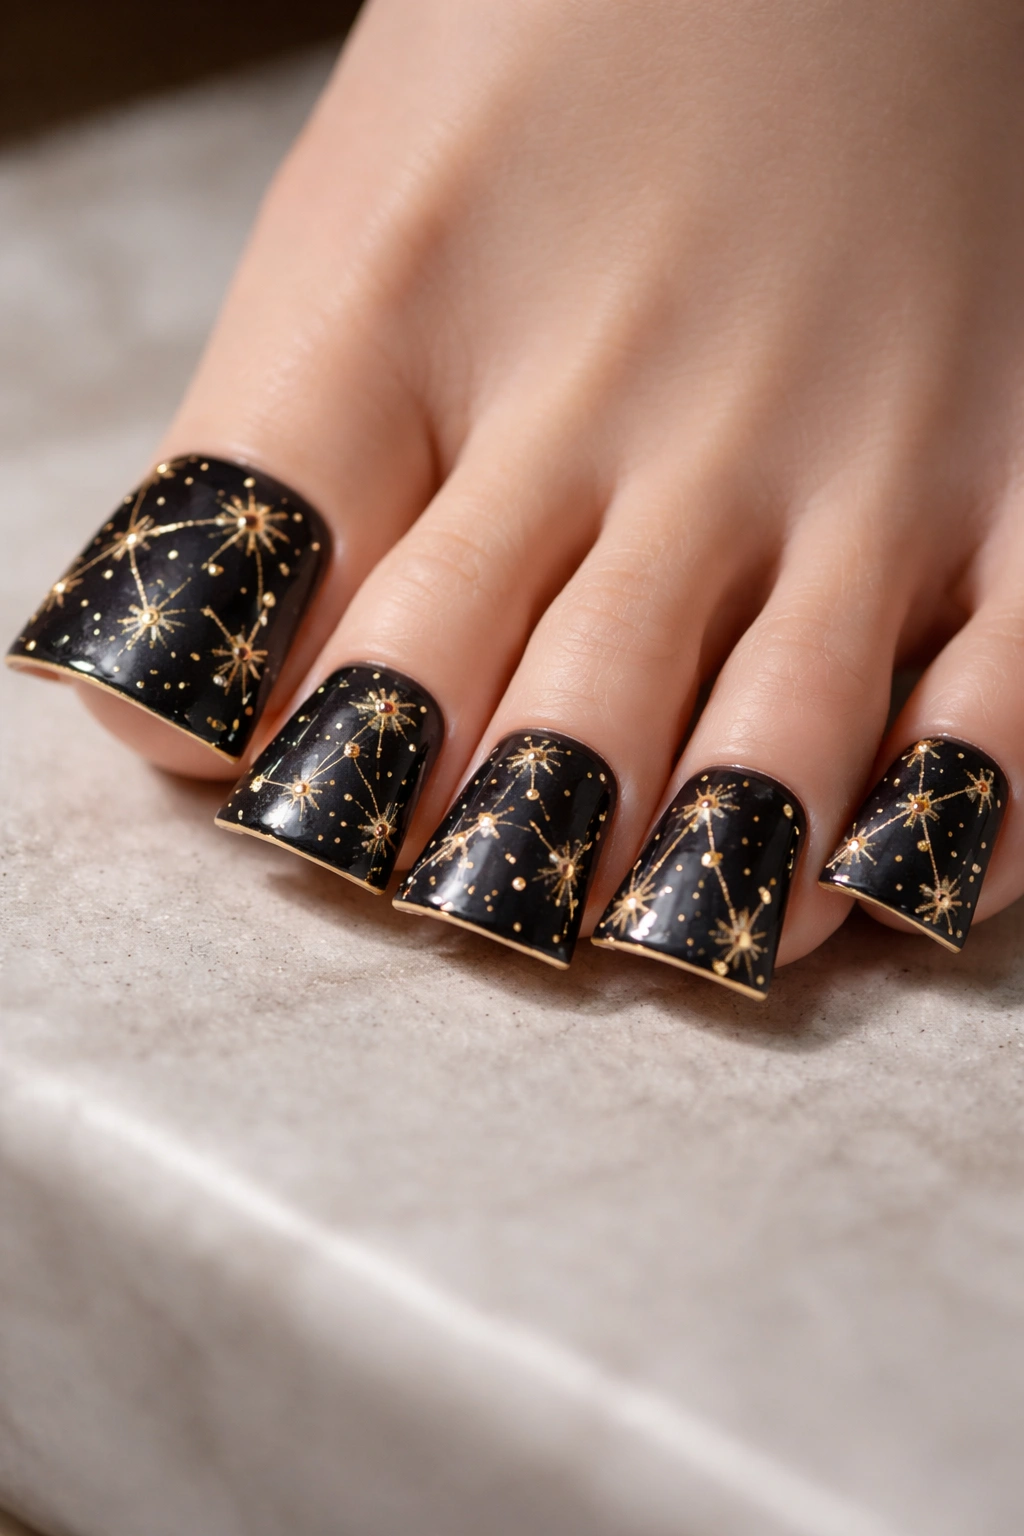
Constellation designs create celestial beauty with scattered dots and connecting lines. Gold constellation duck nails feature gold dots connected by thin lines against dark or nude backgrounds, creating those magical starry effects. This style appeals to stargazers and those who love celestial themes with sophisticated execution.
Celestial Design Elements
Constellation designs use tiny dots (stars) connected by delicate lines to create actual or abstract constellation patterns. Gold polish creates that luminous, starry quality while dark backgrounds create celestial drama. Duck nails provide interesting canvas for constellation placement — you can create multiple different constellations across your ten nails.
Constellation Application
- Use a thin liner brush or nail dotting tool to create tiny, precise dots
- Connect dots with thin lines using a thin brush, creating constellation patterns
- Dark navy, black, or deep purple backgrounds create maximum contrast with gold stars
- Gold holographic polish adds extra sparkle and dimension to constellation effects
- This design works beautifully for night events or whenever cosmic themes feel right
Insider note: Research actual constellation patterns and recreate them on your nails for authentic, meaningful designs that real star-watchers will appreciate.
19. Gold and Blush Marble Duck Nails
Soft color combinations create romantic, elegant aesthetics perfect for weddings and formal events. Gold and blush marble duck nails swirl warm gold through soft pink or blush tones, creating those marbled patterns with a feminine, romantic quality. This style feels luxe and carefully curated while maintaining softness rather than boldness.
Romantic Marble Combinations
Blush and gold create warm, flattering combinations that suit virtually all skin tones. The marble technique adds artistic sophistication while the color combination maintains elegance and femininity. Duck nails provide excellent canvas for showcasing these romantic patterns without the design feeling cramped or overwhelming.
Blush and Gold Marble Execution
- Use water marbling or freehand techniques to create marble patterns
- Gold polish swirled through blush creates seamless color transitions
- Add subtle glitter or shimmer to marble for extra dimension without heaviness
- This combination works beautifully for bridal nails, special events, or romantic occasions
- Photographs beautifully in any lighting condition, showing depth and luxury
Pro tip: Add a tiny champagne or rose gold accent to the webbed toe area for a personalized, detailed touch.
20. Gold and Nude Ombre Gradient Duck Nails

Classic combinations create timeless, versatile designs that work for any occasion. Gold and nude ombre duck nails create that coveted gradient effect using gold at the base transitioning to nude at the tips. This style maximizes flattery and elongation while maintaining sophistication that works for professional or personal settings.
Why Gold and Nude Works
Gold and nude are complementary tones that create natural-looking gradients without clashing. The gradient technique elongates nails while the warm metallic tones add luxury. Duck nail shape becomes more pronounced and defined with this color and technique combination, emphasizing the webbed toe detail.
Ombre Application for Maximum Flattery
- Start with gold at the cuticle line, gradually transitioning to nude at the tips
- Use a sponge to blend the colors smoothly without harsh lines
- This combination flatters all skin tones and works for any occasion
- Gold and nude ombre works beautifully on almond, coffin, or square duck nail shapes
- This design maintains its elegant appearance throughout the 2-3 week manicure cycle
Worth knowing: This classic combination photographs beautifully in any lighting and works as a blank canvas for subtle accent nail designs if you want to add personality.
Final Thoughts
Gold duck nails offer the perfect intersection of playful novelty and genuine sophistication. Whether you’re drawn to minimalist geometry, romantic florals, celestial sparkle, or bold metallics, gold complements every approach with warmth and luxury. The duck nail shape itself creates inherent visual interest, and gold elements amplify that uniqueness, making your manicure genuinely stand out.
The beauty of gold duck nail designs is their flexibility — you can adapt any of these ideas to match your personal style, upcoming events, or current mood. Start with designs that resonate most with you, then branch out into unfamiliar territory as your confidence grows. Each manicure is an opportunity to express yourself and experiment with colors and techniques you haven’t tried before.
Your hands deserve to feel beautiful and make you smile every time you catch a glimpse of them. Whether you’re treating yourself to a professional manicure appointment or creating these designs at home, know that you’re participating in a creative tradition that’s as old as self-expression itself. Enjoy your golden duck nails, and don’t be surprised when people ask where you got them done — these designs absolutely deserve the compliments.
