

Duck nails have become the go-to choice for anyone wanting a bold, statement-making manicure that turns heads. The distinctive fan-like shape—wide at the tip and gradually widening from the nail bed—creates a dramatic silhouette that photographs beautifully and feels luxurious on your hands. When you pair this trending shape with rich, sophisticated green shades, you’re combining two major nail design movements into something that feels fresh, elegant, and endlessly customizable.
Green might be the most versatile color in your nail art arsenal. It ranges from soft pastels that feel gentle and spring-like to deep jewel tones that scream luxury and confidence. The beauty of green is that it works across seasons, flatters almost every skin tone, and pairs perfectly with countless embellishments and design techniques. Whether you’re drawn to minimalist elegance or statement-making nail art, green duck nails offer a refined canvas for creativity.
The thing about duck nails specifically is that their exaggerated width gives you significantly more real estate to work with than traditional nail shapes. That wider surface means intricate designs actually show up properly, metallic finishes catch the light beautifully, and subtle details become focal points rather than getting lost. If you’ve been hesitant about trying duck nails because you worried they’d feel too extreme, know that pairing them with a refined color like green actually softens the look and makes it feel intentional and artistic rather than over-the-top.
Let’s explore fifteen green duck nail ideas that range from barely-there elegance to full-on statement designs. Each one works beautifully on this particular shape and can be customized to match your personal style, skill level, and the occasion.
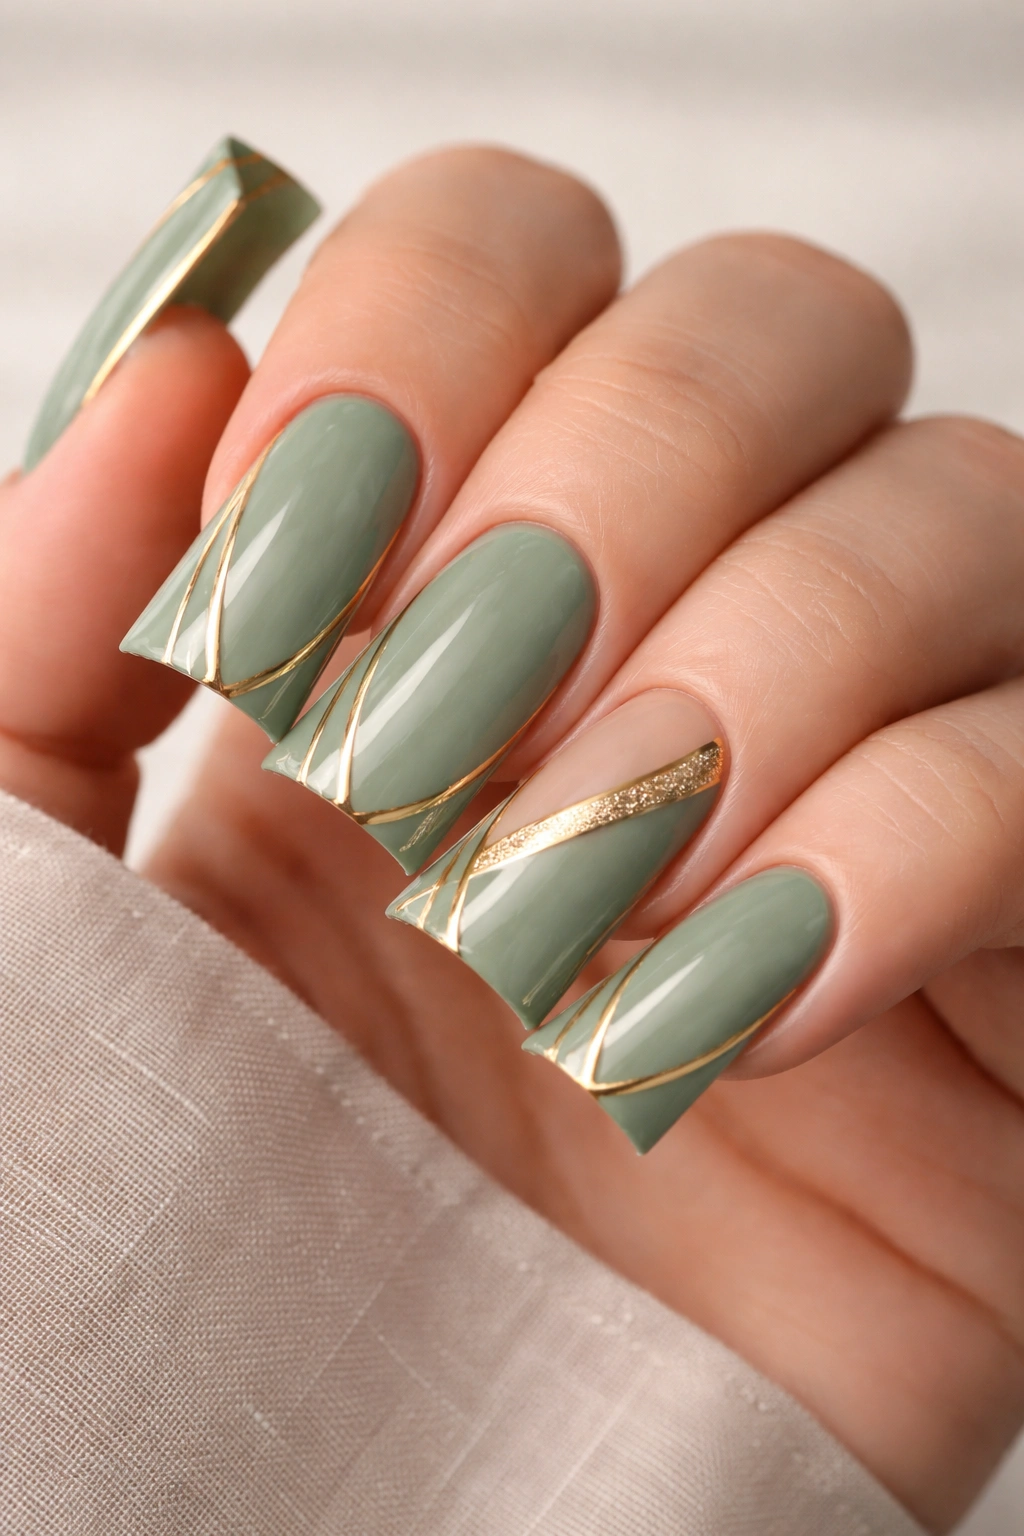
1. Sage Green With Gold Accents
Sage green is the sophisticated older sister of standard greens—it’s muted, calming, and genuinely elegant without trying too hard. This shade pairs beautifully with warm gold tones, creating a luxury aesthetic that feels both modern and timeless. The soft, grayish-green base allows gold details to shine without overwhelming the design.
Why This Design Works So Well
Sage green flatters virtually every skin tone because it’s warm enough to feel approachable but neutral enough to feel refined. When you apply it as a creamy base on duck nails, the wider surface area makes the color feel intentional and sophisticated rather than safe. The addition of gold—whether as thin accent lines, delicate geometric shapes, or a metallic stripe down the center of one nail—immediately elevates the entire manicure from simple to polished.
How to Execute It
- Paint all ten duck nails with two coats of your sage green base polish, allowing each coat to dry completely
- Using a thin brush or a gold striping pen, add geometric lines, geometric triangles, or a thin stripe down the center of your accent nail
- Consider adding small gold dots or a minimalist gold leaf design on one or two nails for visual interest
- Seal everything with a high-quality glossy or matte top coat depending on the mood you’re going for
Pro tip: If you don’t feel confident with freehand gold details, use thin gold striping tape instead—it creates perfectly clean lines and removes easily if you change your mind.
2. Dark Green Marble
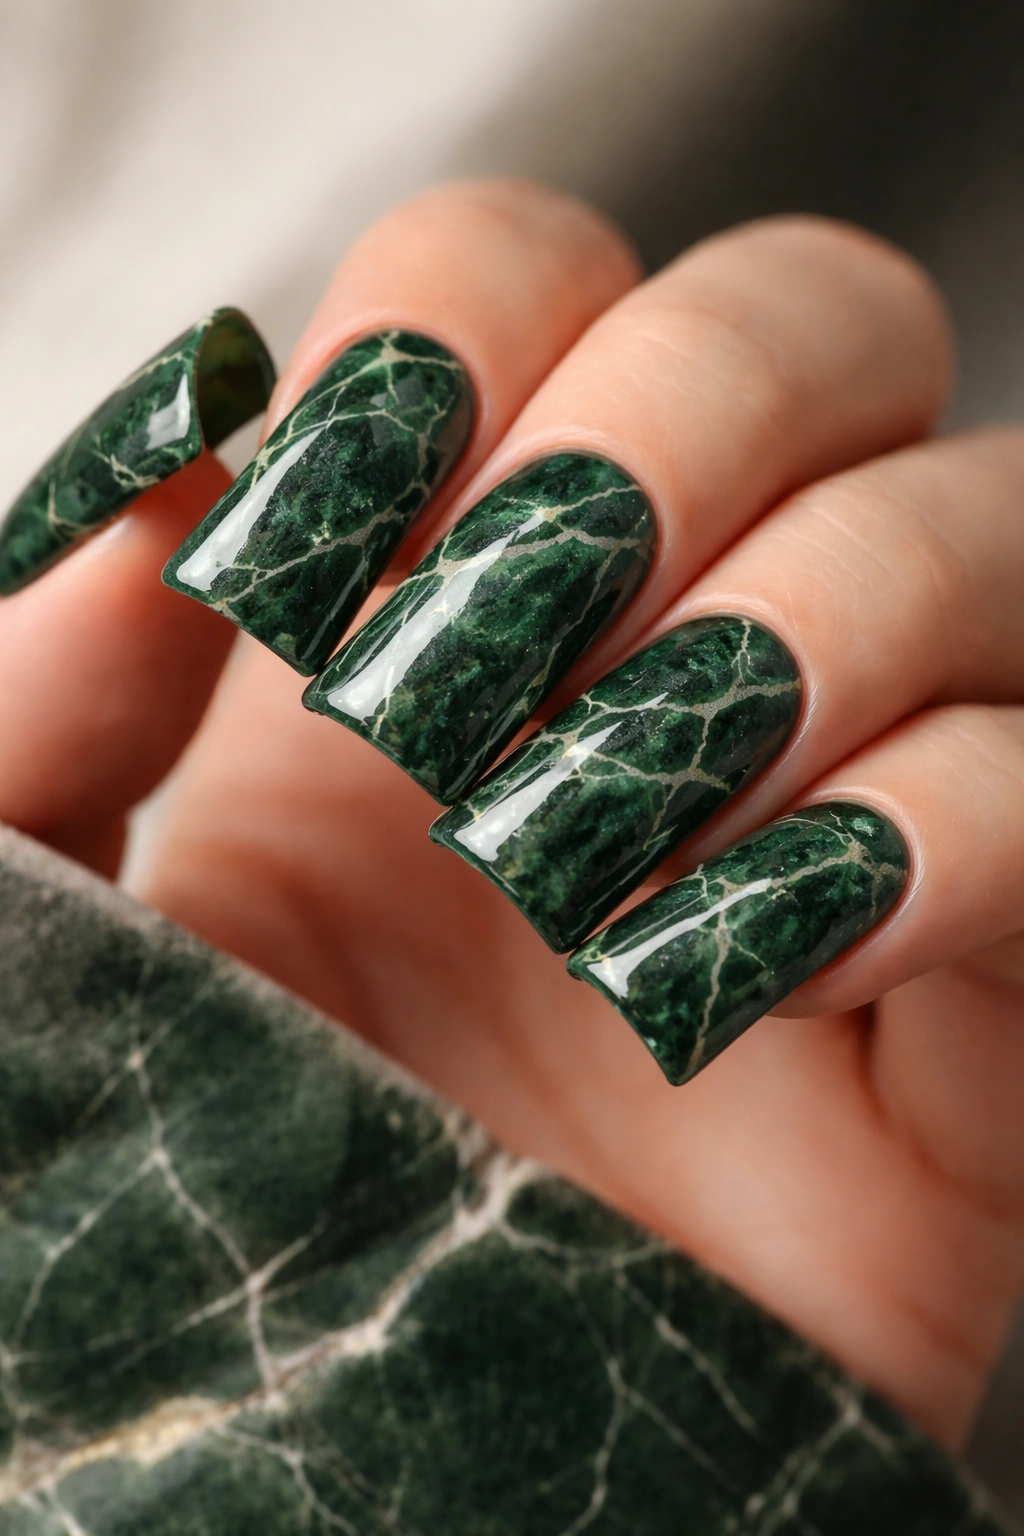
Marble nail designs have staying power because they feel artistic and intentional while still being relatively forgiving to execute. Pair dark green marble with cream or white veining, and you’ve got a design that reads as sophisticated rather than chaotic. The combination feels earthy and elegant simultaneously.
Why This Design Works So Well
Dark green marble taps into nature-inspired trends while maintaining a polished, upscale appearance. The marble pattern automatically adds visual texture and complexity that makes the design feel more luxurious than a solid color. On duck nails, the wider surface gives marble patterns more room to breathe and creates a more dramatic, gallery-worthy result.
How to Execute It
- Start with a dark forest or hunter green base color—two coats for full opacity
- While the second coat is still tacky, use a thin brush or toothpick to create irregular veining with white or cream polish
- Create flowing, organic lines rather than trying for strict marble accuracy—imperfection is actually the point
- For smoother blending, drag a clean, dry brush gently through the white lines before they fully set
- Seal with a glossy top coat to enhance the glossy, polished appearance
Worth knowing: You can also use a water marble technique—drop white or cream polish into a cup of room-temperature water, swirl it with a toothpick, then dip your nails into the pattern for a more organic, fluid marble effect.
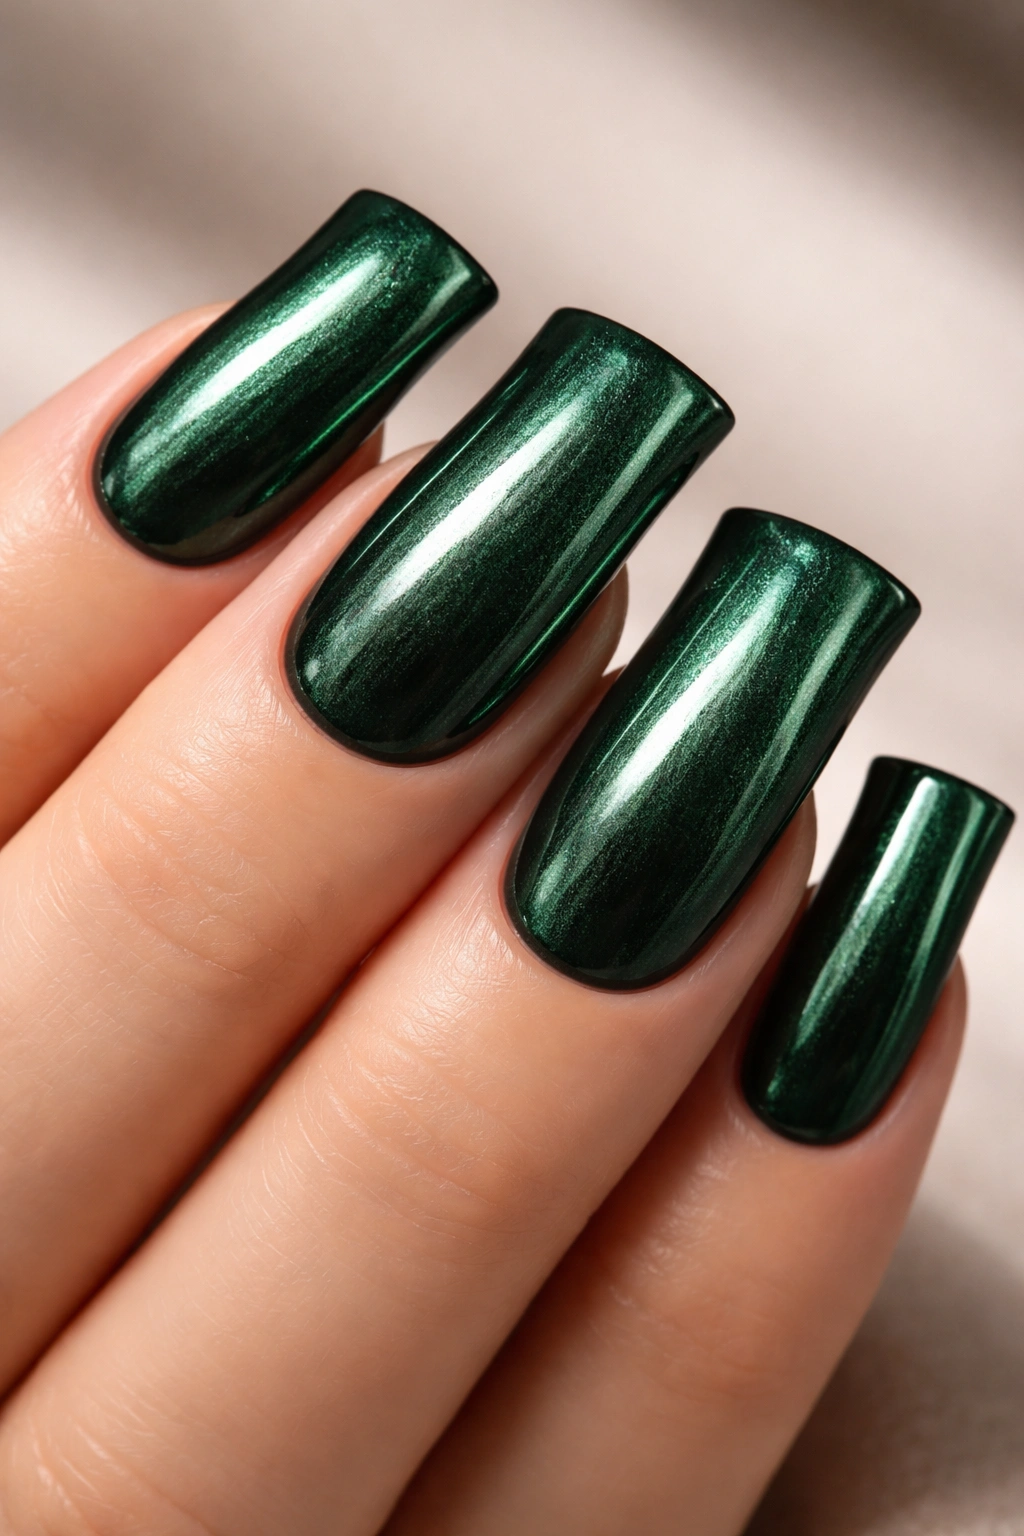
3. Emerald Green Ombre
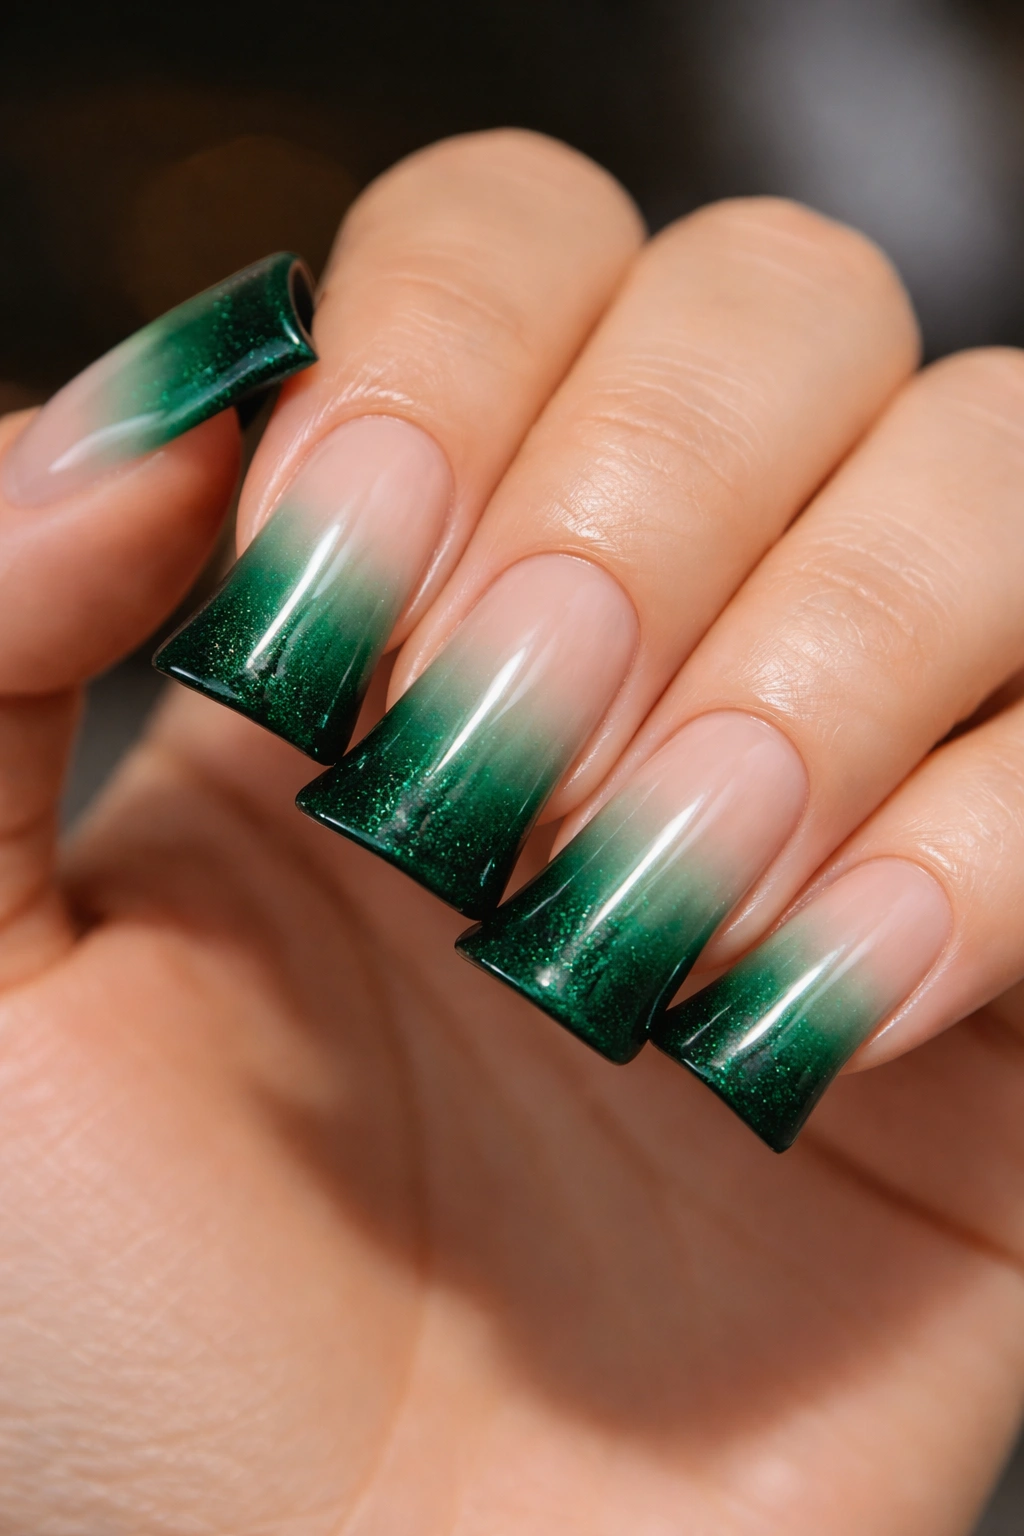
Emerald green represents the peak of nail color luxury. It’s a jewel tone that demands attention, and when you blend it into a lighter shade—soft mint or even white—you create an ombre that feels both modern and incredibly elegant. This design is actually simpler to execute than it looks.
Why This Design Works So Well
Ombre on duck nails creates a gradient that follows the natural direction of the nail’s fan shape, which makes the design feel intentional and specifically suited to this shape. Emerald ombre catches light beautifully and creates dimension that solid colors simply can’t match. The gradient also means the design is softer and less intense at the base, making it feel wearable for everyday situations while still being undeniably statement-making.
How to Execute It
- Apply a white or very pale cream polish as your base color—this will be your lightest point
- Using a makeup sponge, apply emerald green to one edge of the sponge and white to the other edge
- Gently sponge the colors onto each nail, allowing them to blend in the middle, and repeat until you’ve built the gradient to your desired intensity
- Clean up any residue around the nail edges with a damp cotton swab
- Finish with a top coat to smooth any texture from the sponging technique
Quick facts:
- Ombre typically requires 3-4 passes with the sponge to look smooth and intentional
- The wider duck nail canvas makes this technique actually easier than on narrow nails
- You can create ombre in any direction—side-to-side, diagonal, or following the fan shape of the duck nail
4. Mint Green With White Tips
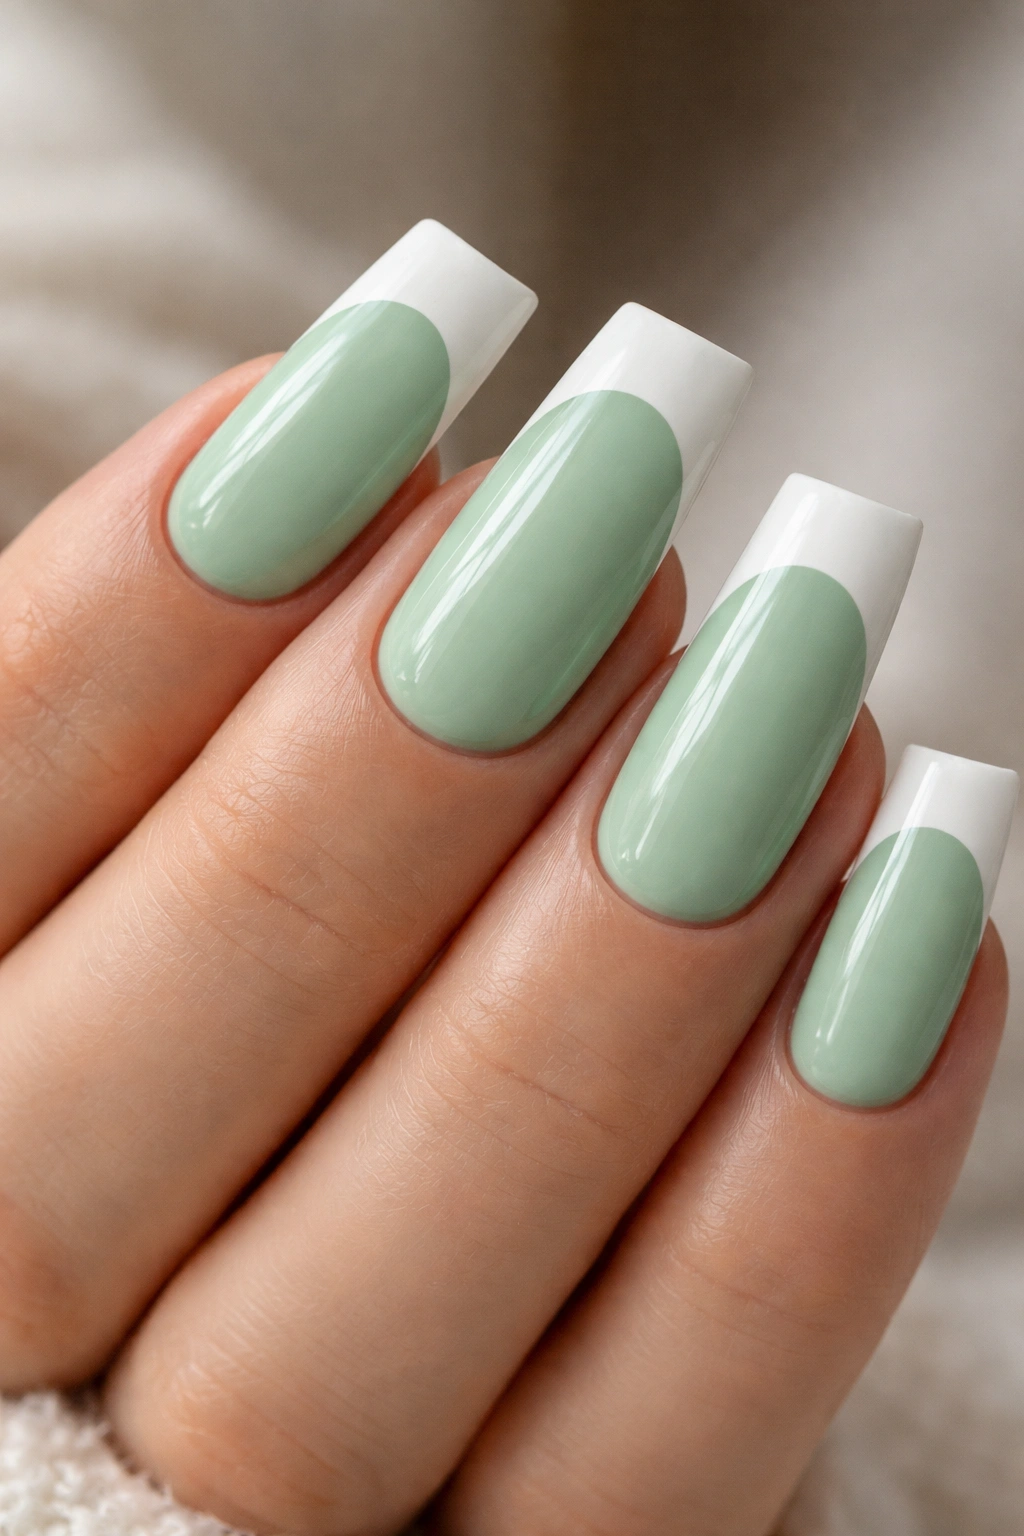
If you love classic French tips but want something fresher and more contemporary, mint green with white tips delivers exactly that. This design is clean, modern, and surprisingly versatile—it works for professional settings and weekend brunch equally well.
Why This Design Works So Well
Mint green sits at the intersection of playful and refined. It’s cheerful without being juvenile, and pairing it with white tips creates a design that feels intentional and designed rather than like you’re wearing a French manicure from 2005. On duck nails, the white tip emphasizes the width and shape of the nail, making the design feel geometric and very modern.
How to Execute It
- Paint all duck nails with two coats of mint green—a pale, icy green works best for this design
- Using either a thin brush or striping tape, create a clean white line across the widest part of the nail tip
- For a softer look, apply the white slightly thicker so it’s more of a block than a delicate line
- Alternatively, create a gradient transition by sponging white into the mint green rather than keeping a hard line
- Seal with a glossy top coat for a clean, polished finish
Pro tip: Mint green and white also works beautifully with a nude or skin-tone base instead of mint throughout—this creates an elongating effect that actually makes duck nails look slightly less dramatic.
5. Forest Green Glitter
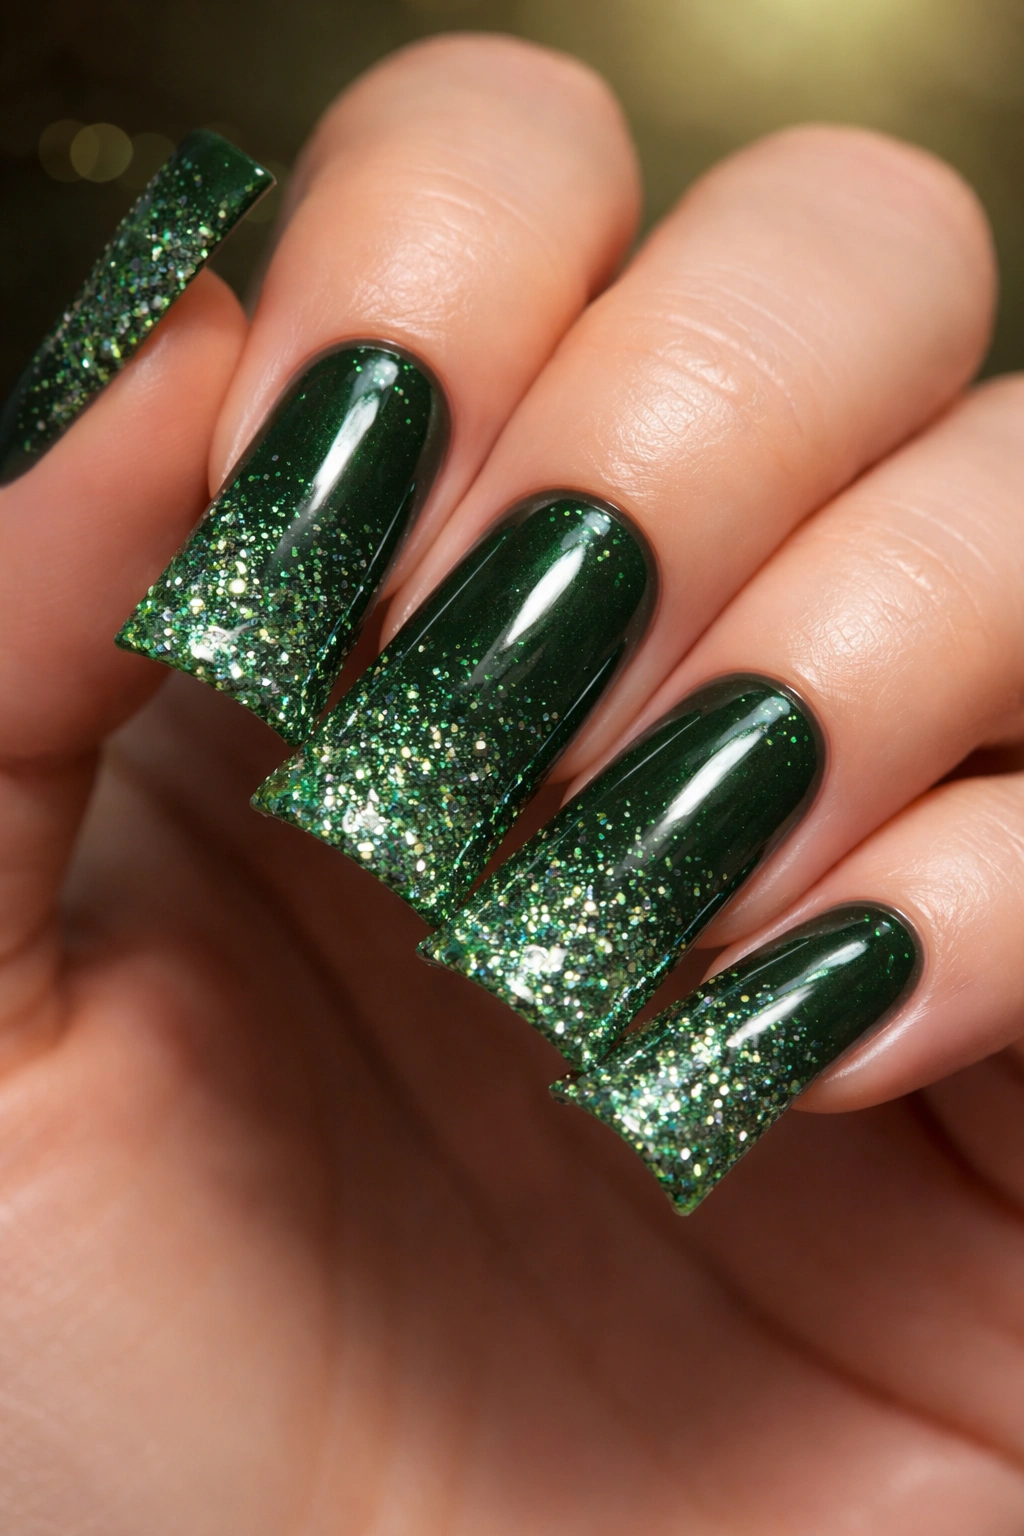
There’s something undeniably luxurious about glitter on a rich, dark base color. Forest green glitter nails feel celebratory and special, but they’re also surprisingly wearable if you choose the right glitter size and concentration. This design reads as elevated rather than costume-y.
Why This Design Works So Well
Forest green creates the perfect backdrop for glitter because the dark tone makes sparkle look high-end and intentional. On duck nails, glitter disperses across the wider surface area, creating more visual impact and sparkle without feeling overdone. The combination of deep green and glitter feels festive but also versatile enough for professional settings if you keep the glitter in a specific area rather than covering the entire nail.
How to Execute It
- Apply two coats of rich forest green as your base color
- For full glitter coverage: mix your favorite chunky or fine glitter with a clear polish and apply as a third coat
- For a more subtle effect: apply glitter only to the tips or create a glitter gradient that fades toward the nail base
- For accent-only glitter: paint just one or two nails with the glitter mixture, keeping the others as solid forest green
- Seal carefully with a thick top coat to keep glitter particles sealed in place
Quick facts:
- Chunky glitter looks more sophisticated and modern on duck nails than microglitter
- Mixing glitter with clear polish gives you better control over coverage and opacity
- Rose gold or champagne glitter tends to look richer against forest green than silver glitter
6. Seafoam Green Chrome
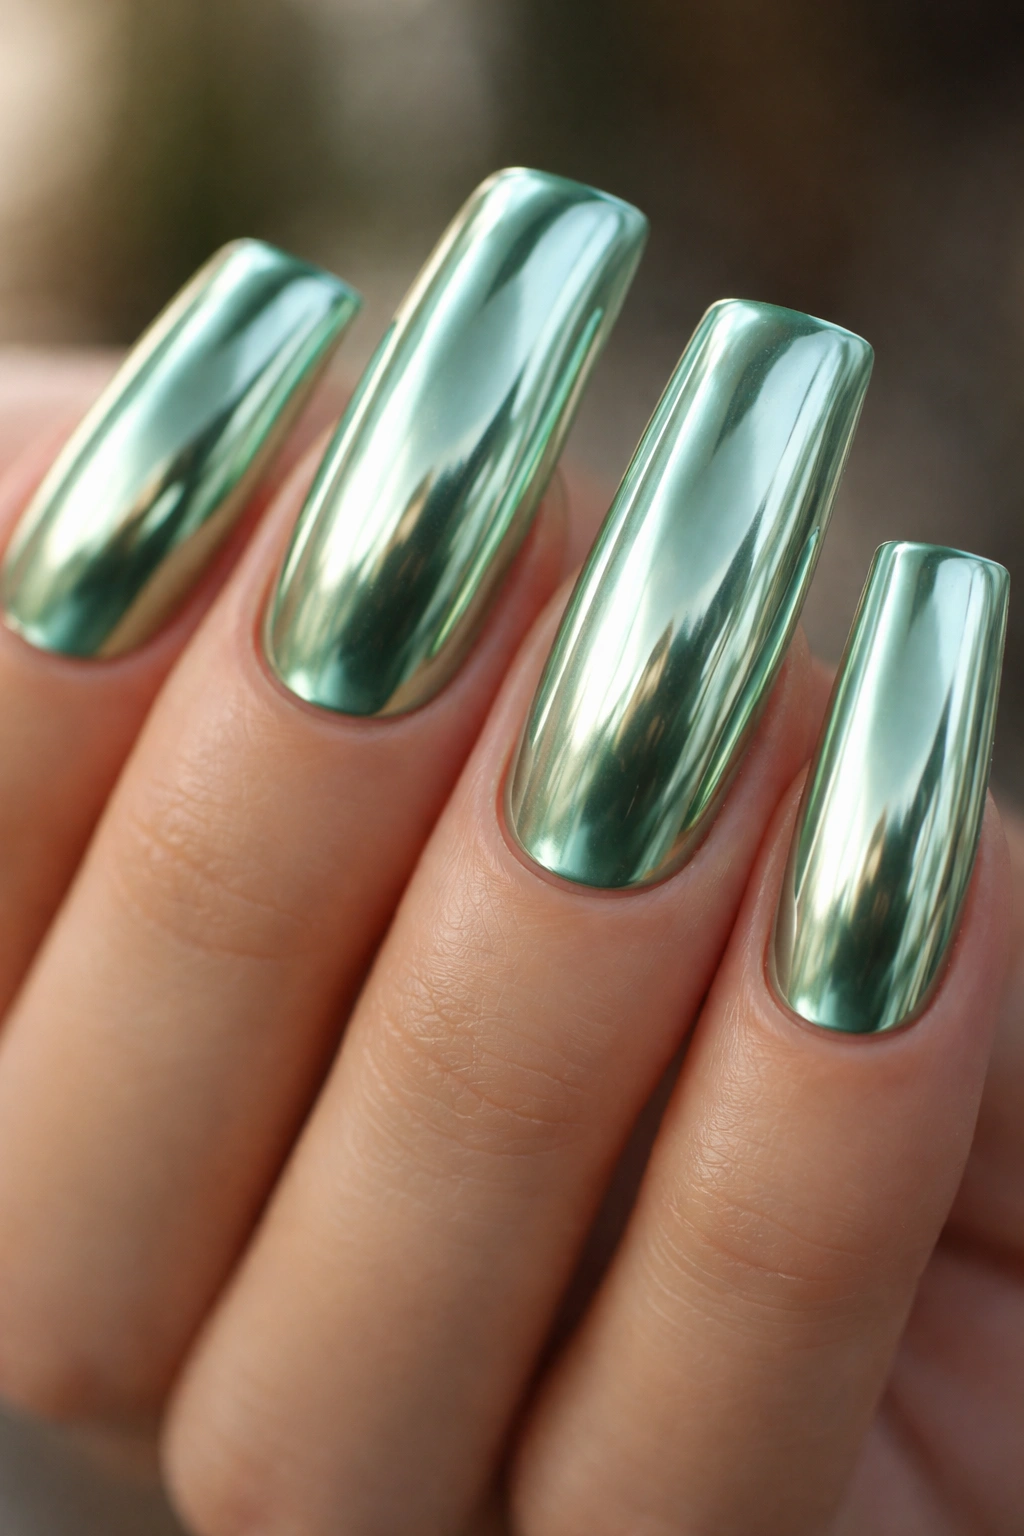
Chrome finishes have revolutionized what’s possible in nail art, and seafoam green chrome is genuinely one of the most stunning combinations available. Chrome nails have an almost holographic, liquid-metal appearance that photographs beautifully and catches light from every angle.
Why This Design Works So Well
Seafoam green chrome creates a cool-toned, ethereal look that feels both futuristic and organic simultaneously. The chrome finish reflects light in ways that solid polish simply cannot, creating depth and dimension that make your nails look almost three-dimensional. On duck nails, the wider surface maximizes the reflective chrome effect, making the impact even more dramatic.
How to Execute It
- Apply a seafoam green base color in two coats—this acts as the foundation for the chrome powder
- While the second coat is still slightly tacky, use a velvet chrome powder applicator to rub the powder onto your nails using circular motions
- Build the chrome gradually—you can always add more powder but you can’t remove it once it’s set
- Continue buffing and layering the powder until you achieve the liquid-metal finish you want
- Seal with a clear, thick top coat to protect the chrome effect and prevent premature fading
Worth knowing: Chrome powders work best on slightly sticky nail surfaces, so don’t use a UV-dried base—air-dry your green polish for the best chrome adhesion.
7. Olive Green Matte
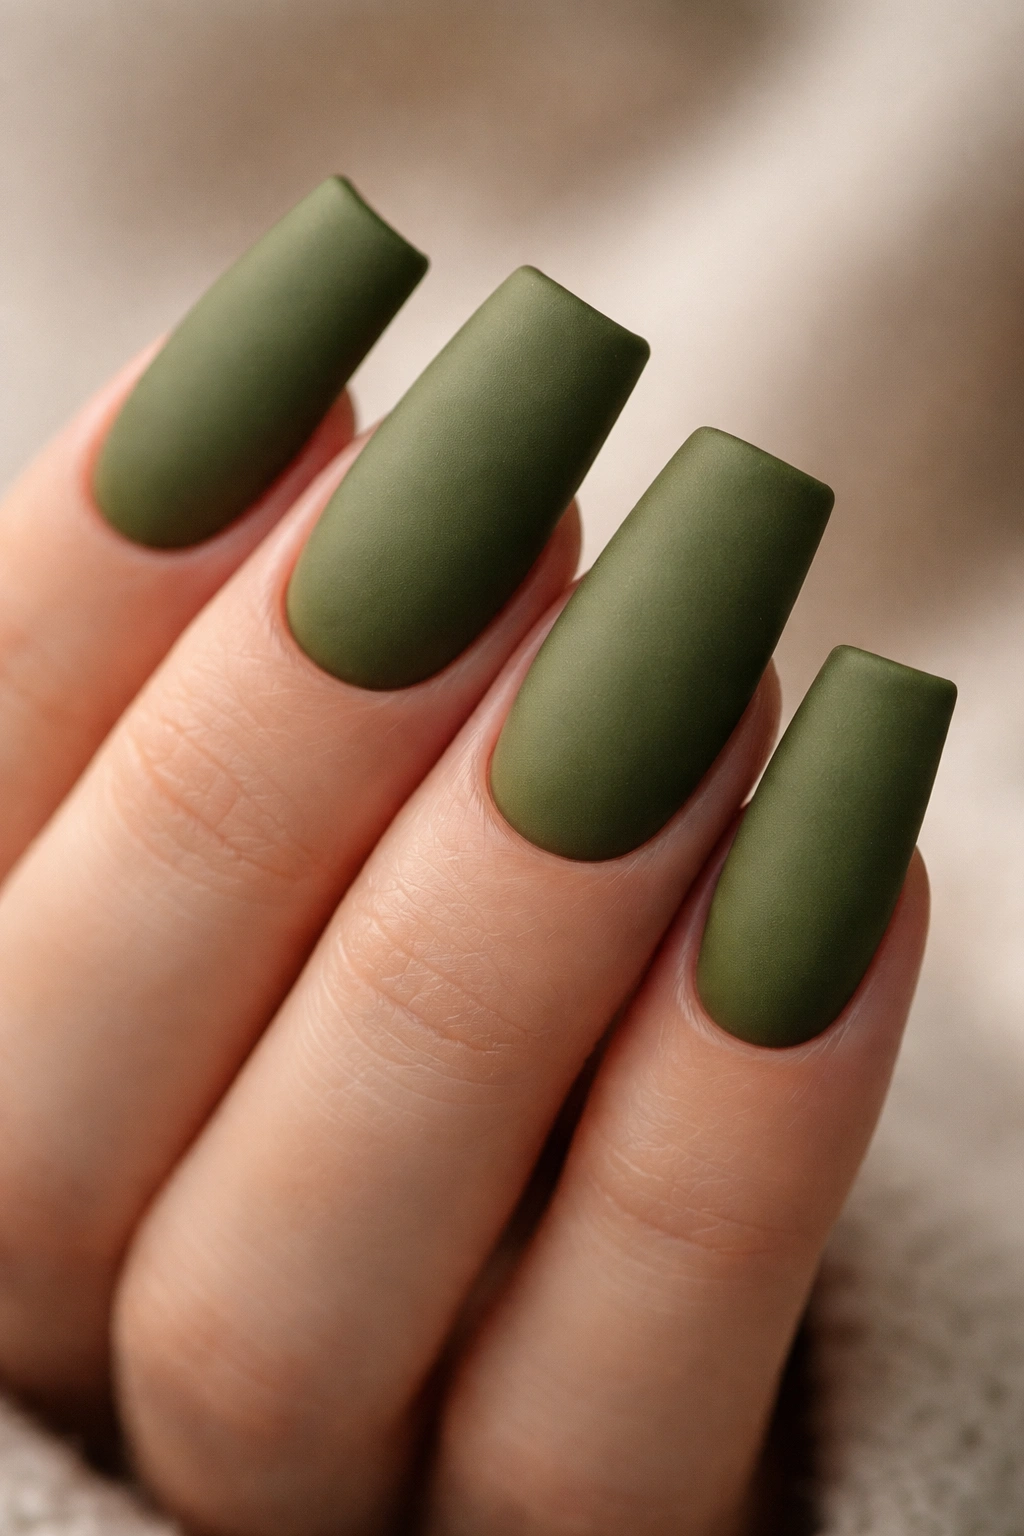
Matte finishes bring a sophisticated, modern edge to any manicure, and olive green matte feels especially refined and artistic. This design is proof that you don’t need glitter or embellishments to create something truly special—sometimes simplicity and texture are enough.
Why This Design Works So Well
Olive green is a complex, sophisticated shade that sits between true green and brown, making it feel warm, earthy, and luxurious. The matte finish strips away shine and creates a velvety texture that feels tactile and modern. On duck nails, matte olive green creates a bold statement without being loud—it’s understated confidence.
How to Execute It
- Apply two coats of your chosen olive green polish, allowing adequate drying time between coats
- Instead of a glossy top coat, seal with a matte top coat—there are excellent matte formulas available that don’t crack or look cheap
- If you want to add subtle dimension without breaking the matte aesthetic, consider adding one accent nail with a matte finish in a slightly different shade of green, or keeping one nail glossy for contrast
- Maintain the matte finish by avoiding excessive hand washing in the first 24 hours after application
Pro tip: Matte finishes show fingerprints and smudges more readily than glossy finishes, so if you’re someone who frequently has oily hands, consider switching back to glossy after a few days.
8. Lime Green Neon
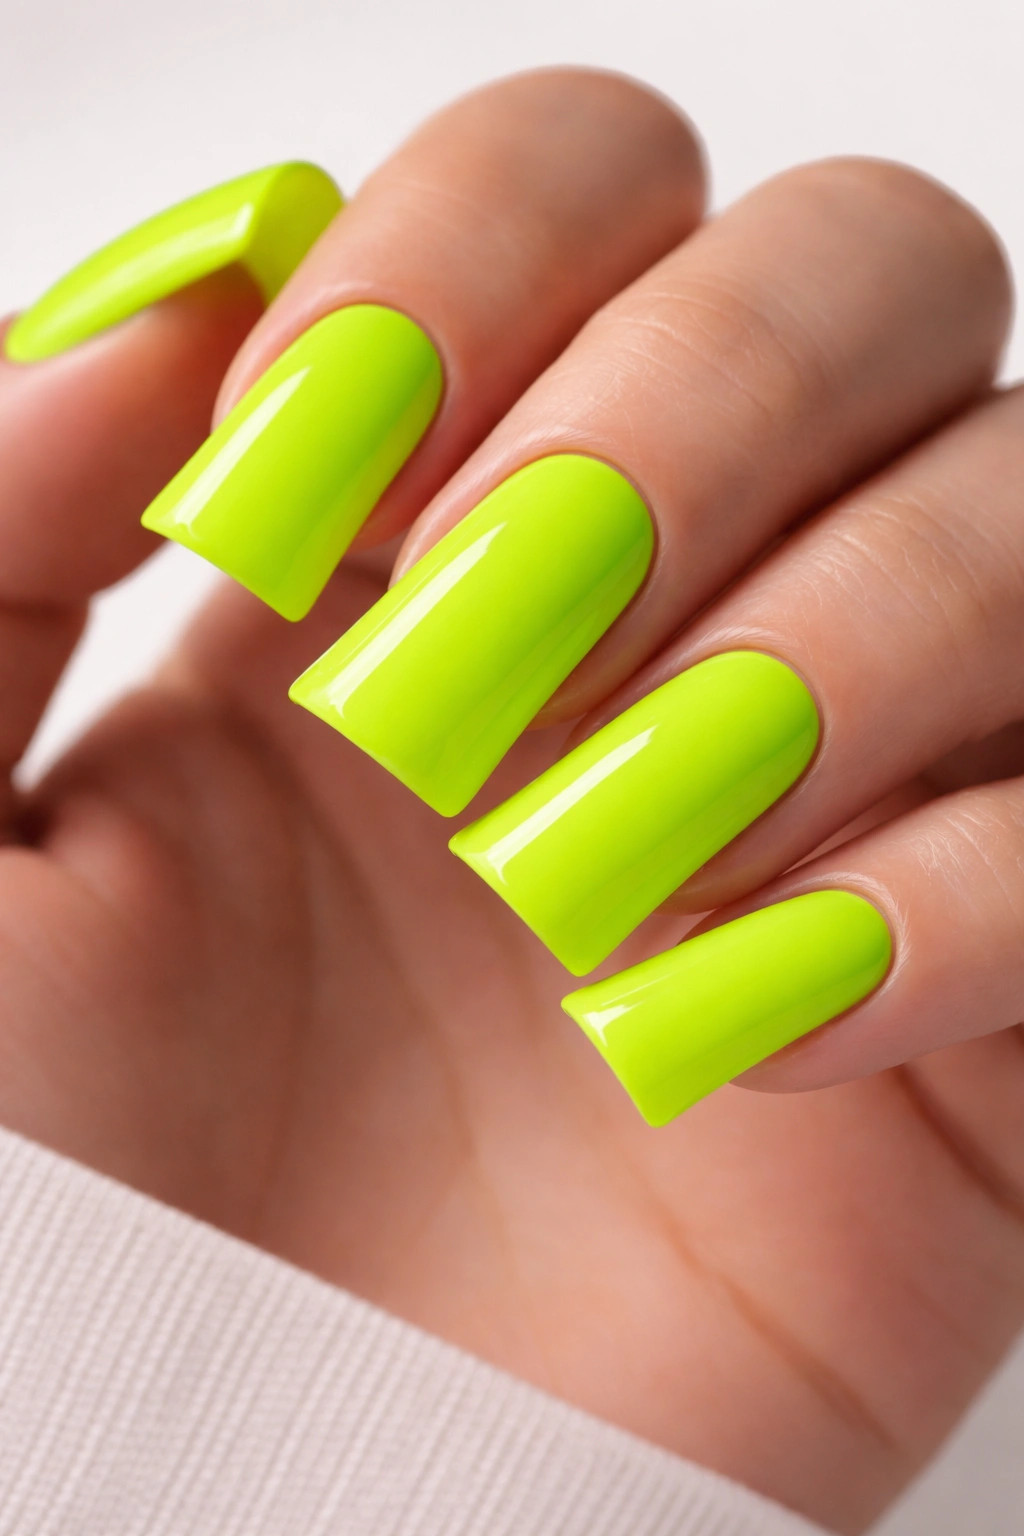
If you want your nails to announce your arrival before you walk into a room, neon lime green duck nails are your answer. This design is bold, confident, and genuinely fun without being unpolished. Neon green works for creative industries, weekend statements, or anyone who simply loves high-impact color.
Why This Design Works So Well
Neon lime green is impossible to miss, and on duck nails, the wider surface makes the color even more visually impactful. This shade works best when you commit fully to the boldness—there’s no point in attempting understated elegance with neon. The color is so striking that you don’t need additional design elements; the shape and color are sufficient on their own.
How to Execute It
- Choose a quality neon lime green polish—cheaper versions often look dull or streaky rather than brilliantly neon
- Apply three thin coats rather than two thick coats for better opacity and a more vibrant finish
- Neon polishes often benefit from a quick seal with a clear top coat to enhance the luminosity
- Keep the design clean and simple—additional art competes with the impact of the neon color itself
- Consider pairing neon lime with just one gold or silver metallic accent nail for visual balance
Quick facts:
- Neon greens photograph better in natural light than fluorescent light
- This shade is particularly striking on deeper skin tones
- Neon green makes a particularly strong impact if you’re also wearing other bold colors in your outfit
9. Pistachio Green With Rhinestones
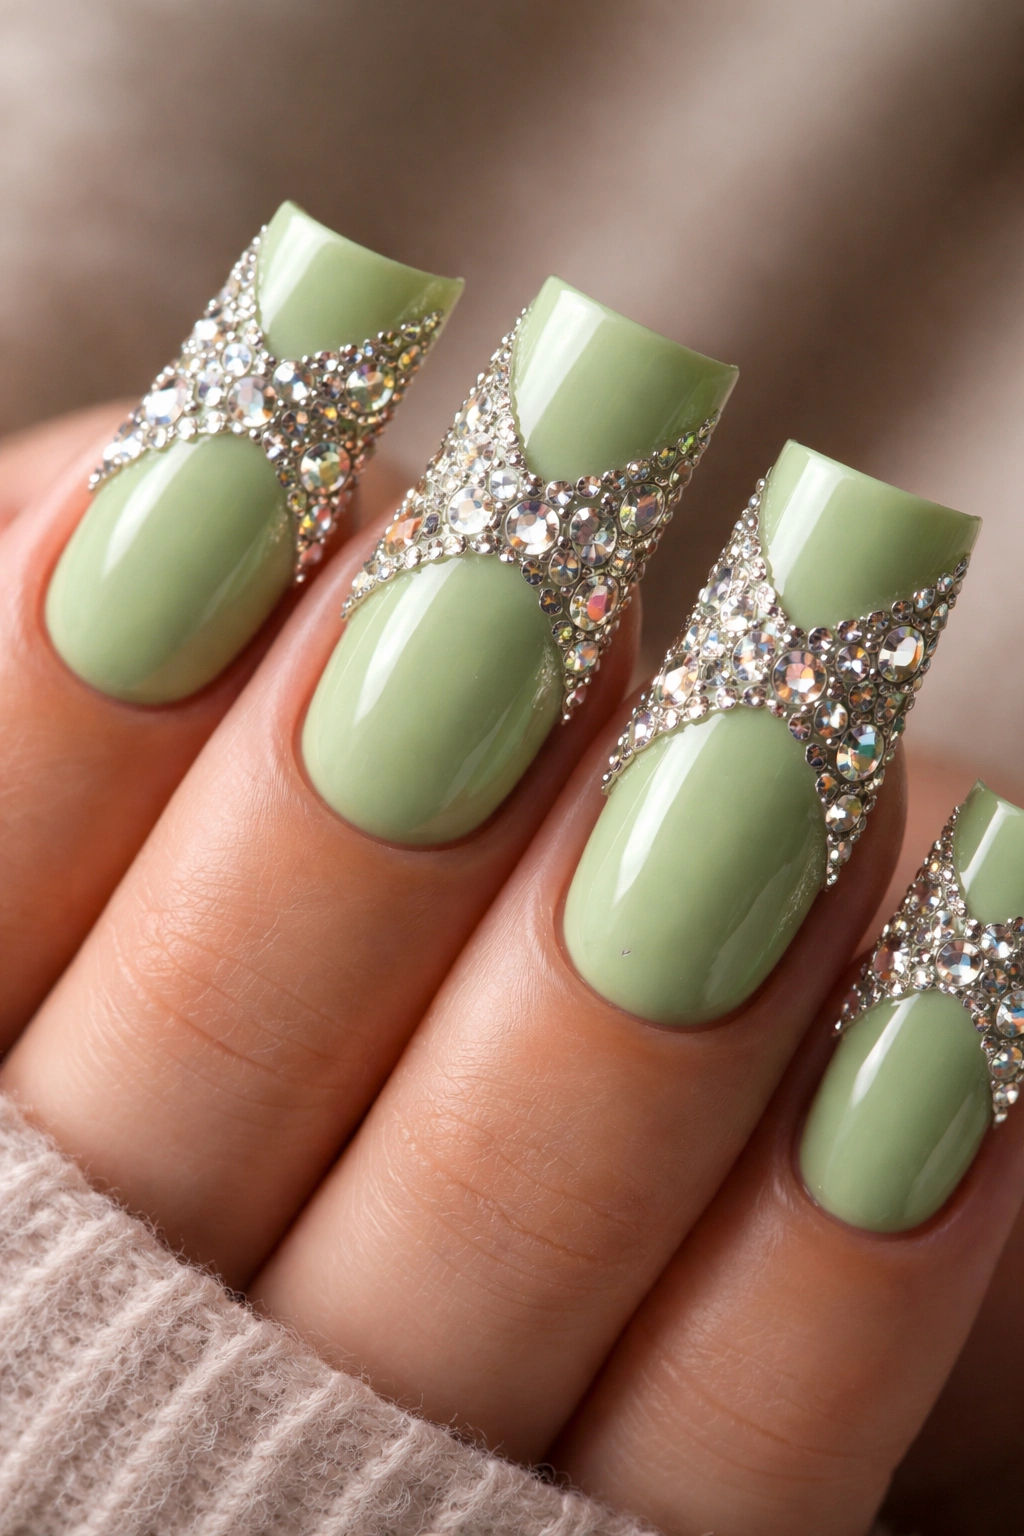
Pistachio green is the pale, slightly dusty shade of green that feels both playful and refined simultaneously. When you add sparkle in the form of carefully placed rhinestones, you create a design that’s elegant for formal occasions but also fun and youthful enough for everyday wear.
Why This Design Works So Well
Pistachio green is flattering on almost every skin tone and doesn’t feel overwhelming in the way that brighter greens sometimes do. The pale, muted quality makes rhinestones the natural focal point rather than competing with a bold base color. On duck nails, rhinestones placed strategically along the tip or in a geometric pattern create visual interest that feels intentional and designed.
How to Execute It
- Paint all nails with two coats of pistachio green polish, allowing complete drying between coats
- Using nail glue or a sticky top coat, place rhinestones in your chosen pattern—straight line along the tip, scattered design, or geometric arrangement
- Clear rhinestones look classic and allow the nail color to shine, while colored rhinestones can match or complement your design
- Seal everything with a generous top coat that goes over all rhinestones to lock them firmly in place
- Avoid washing your hands in very hot water for the first 24 hours to ensure proper glue setting
Worth knowing: You can also create a rhinestone design by using a sticky base coat, applying rhinestones, and then sealing with a clear top coat—this method is actually more durable than using nail glue alone.
10. Hunter Green Metallic
Hunter green metallic captures luxury without trying too hard. This is the shade of expensive jewelry and designer handbags, and when you apply it with a metallic finish, you’ve created something that feels genuinely premium and sophisticated.
Why This Design Works So Well
Hunter green is deep enough to feel serious and luxurious while remaining flattering on virtually every complexion. The metallic finish catches light beautifully and creates subtle dimension without looking cartoonish or cheap. On duck nails, metallic hunter green feels intentional and gallery-quality—like you designed this specifically for your hands.
How to Execute It
- Choose a high-quality metallic or shimmer formula in hunter green rather than trying to recreate the effect with regular polish
- Apply two coats for full coverage and maximum metallic shimmer
- Metallic finishes sometimes work best with a thin, glossy top coat that enhances rather than dulls the shine
- Keep the design minimal—the metallic finish and rich color are sufficient without additional embellishment
- Consider adding one accent nail in a complementary shade like gold, champagne, or a slightly lighter shade of green
Pro tip: Hunter green metallic looks particularly striking when paired with nude or skin-toned cuticles and surrounding skin, as the contrast makes the nail color pop even more dramatically.
11. Teal Green With Gradient
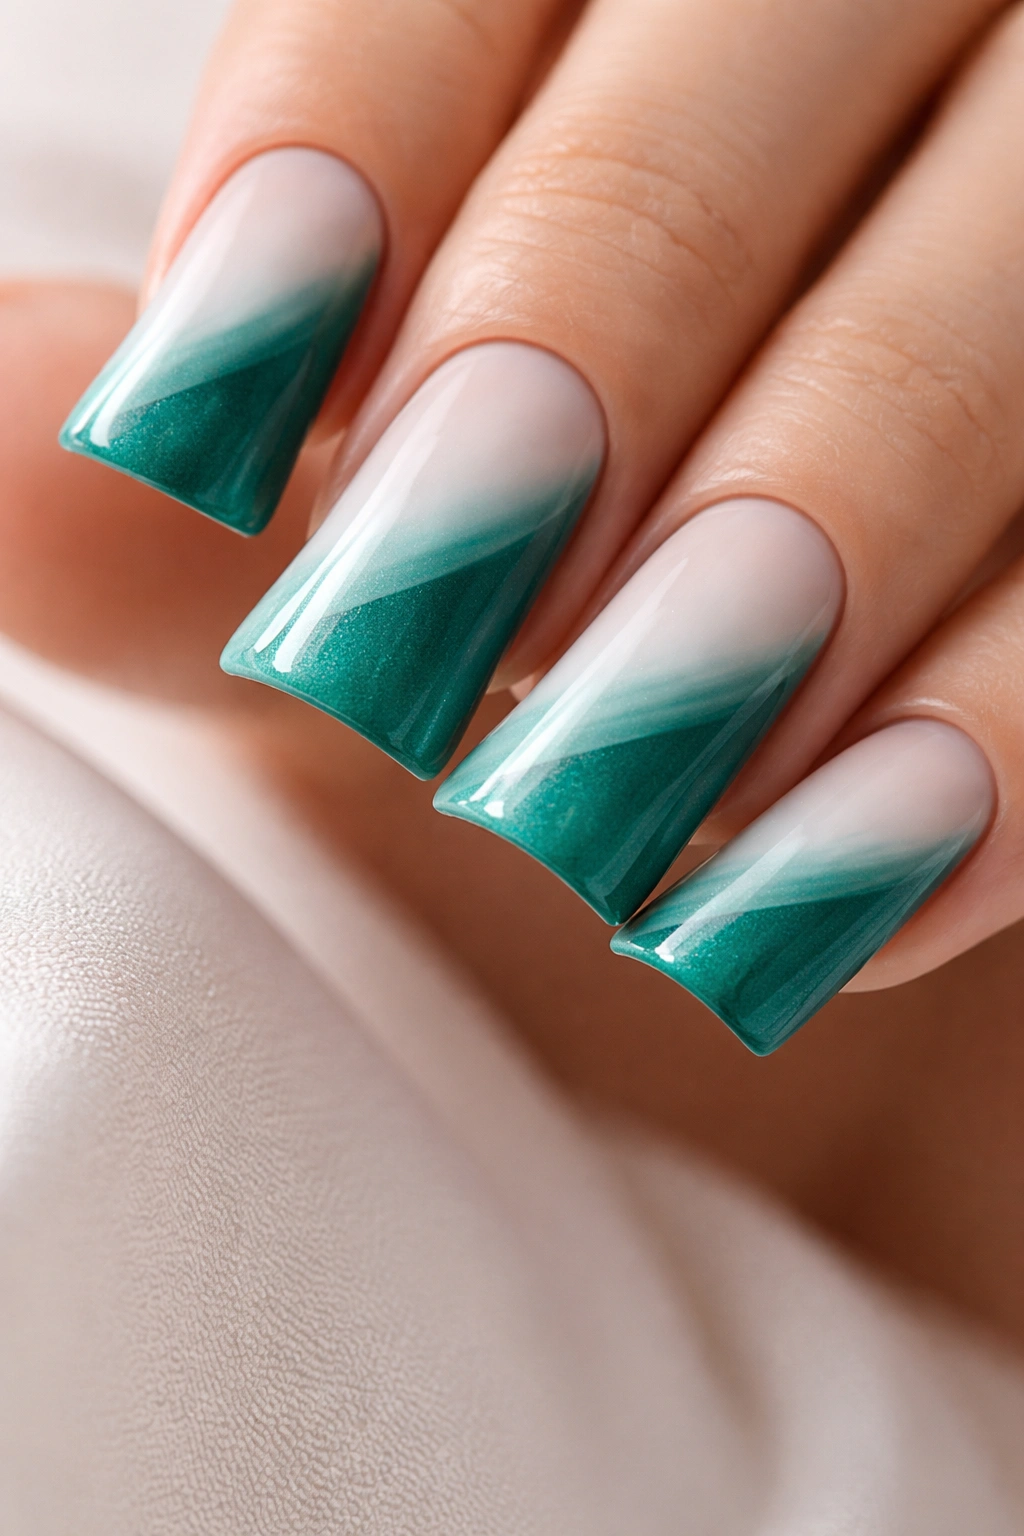
Teal sits at the beautiful intersection of blue and green, making it feel fresher and more contemporary than traditional green alone. When you create a gradient that transitions from teal to white or to a lighter blue, you’re creating a design that feels modern, sophisticated, and dimensionally complex.
Why This Design Works So Well
Teal is inherently modern and works across seasons and styles. A gradient design immediately communicates intentionality and artistic thought, which elevates the entire manicure. On duck nails, gradients take on additional impact because the wider surface area gives the color transition more room to develop and become visually interesting.
How to Execute It
- Start with a white or very pale blue base as your lightest point
- Using a makeup sponge, apply teal to one edge and white or pale blue to the other
- Sponge the colors onto your nail, overlapping them slightly in the middle to create a gradient transition
- Repeat the sponging process 3-4 times until the gradient looks smooth and intentional
- Seal with a top coat to smooth any texture from the sponging technique
Quick facts:
- Diagonal gradients are easier to create on duck nails than they are on traditional nail shapes
- You can create this gradient on all nails for a cohesive look, or just on accent nails while keeping others solid teal
- Teal gradient is particularly stunning on photos and looks deeper and richer in person than you might expect from the photos
12. Green Holographic
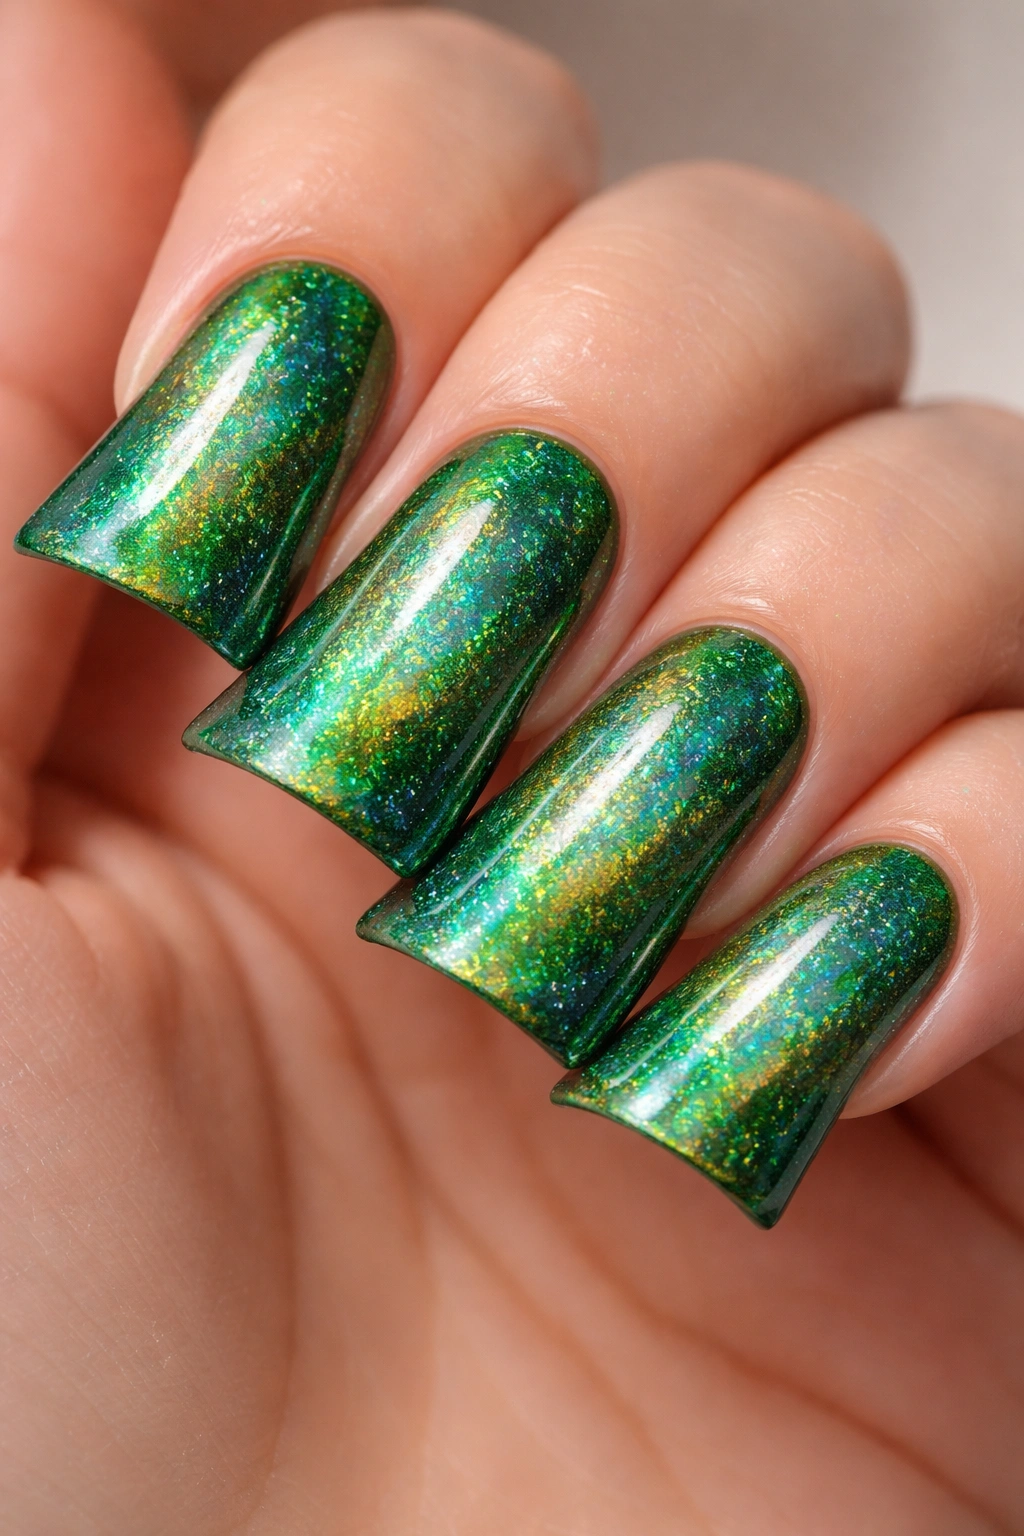
Holographic finishes create an optical illusion effect where the nail appears to shift colors and sparkle from different angles. Green holographic nails are mesmerizing, almost hypnotic, and feel genuinely futuristic.
Why This Design Works So Well
Holographic finishes are intrinsically eye-catching—they literally change appearance depending on the angle and lighting. On duck nails, this creates a design that’s interesting from every direction, which is particularly satisfying for someone who wants their nails to make a statement. The holographic effect is pure visual interest without needing additional design elements.
How to Execute It
- Apply a holographic polish in green (these are specifically formulated to create the color-shifting effect)
- Two thin coats usually provide enough opacity for the holographic effect to show clearly
- Holographic polishes often include small holographic flakes or particles that create the effect, so careful application helps them show up better
- Seal with a clear top coat, though many holographic formulas include their own built-in shine
- Natural and indirect light shows off holographic effects better than direct sunlight or fluorescent light
Pro tip: For maximum holographic impact, keep your nails very clean and free of dust, as particles can interfere with the light-refraction that creates the effect.
13. Avocado Green With Floral Accents
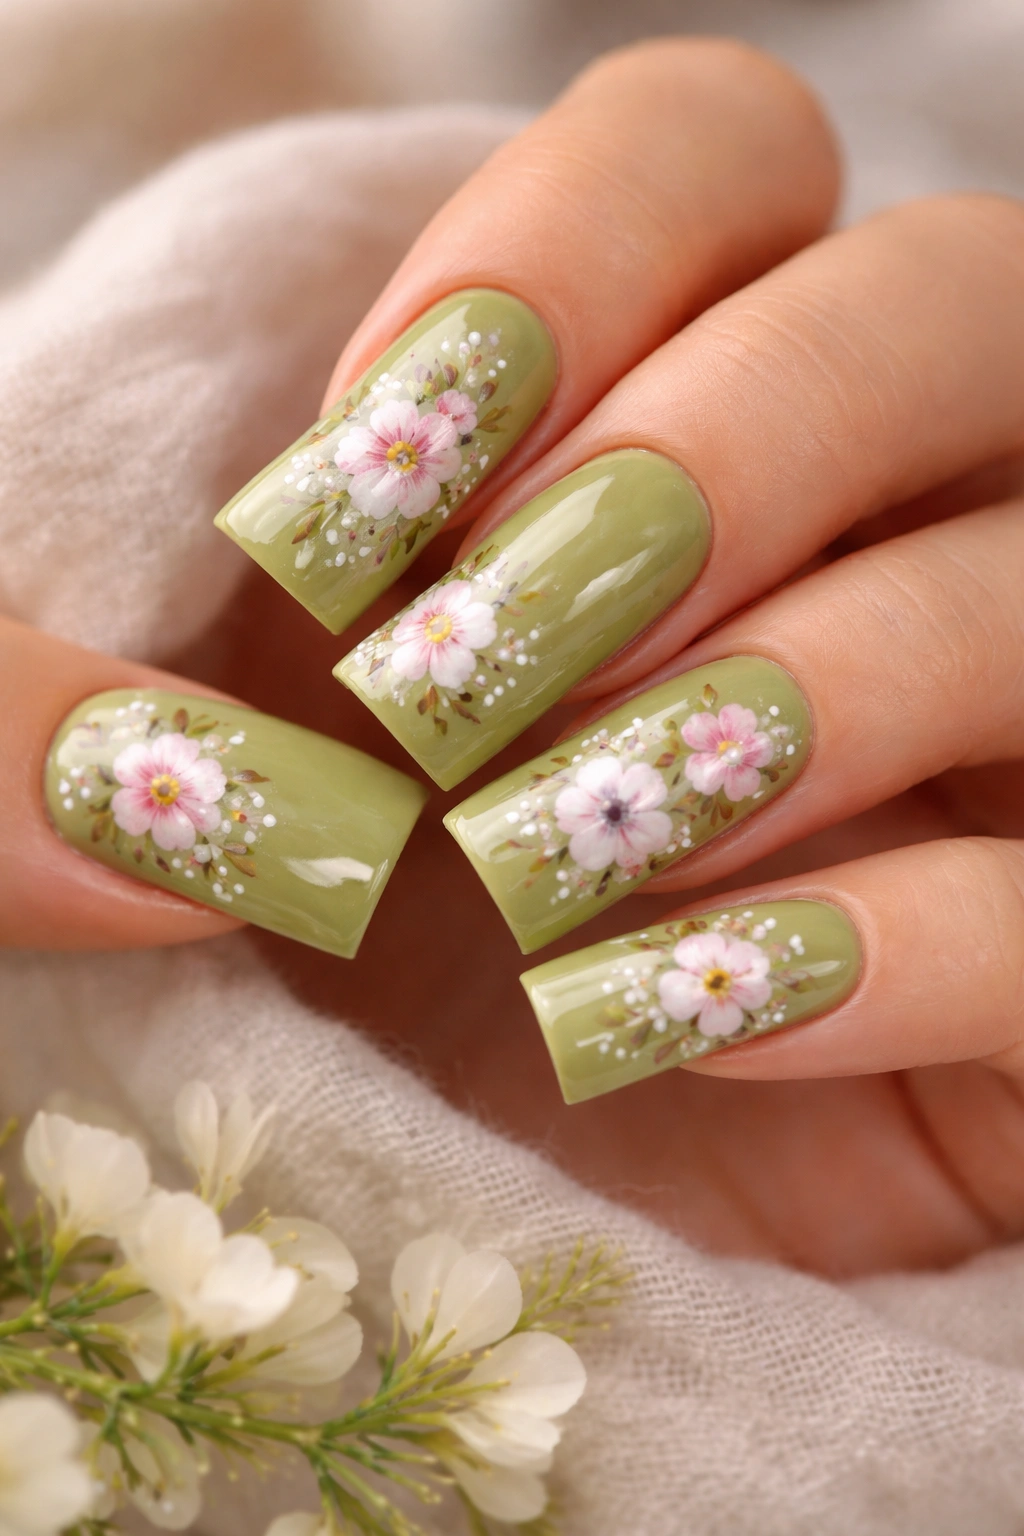
Avocado green is warm, earthy, and surprisingly versatile. When you add delicate floral nail art—whether it’s hand-painted flowers, decals, or stamped designs—you create something that feels both artistic and wearable for everyday life.
Why This Design Works So Well
Avocado green has a vintage, retro charm that feels nostalgic and comforting. Pairing it with florals creates a garden-inspired aesthetic that’s particularly lovely for spring and summer (or anytime you want to bring that feeling indoors). On duck nails, the wider surface gives you space to create detailed floral art that actually shows up and looks intentional.
How to Execute It
- Paint all nails with two coats of avocado green base polish
- Choose floral elements—you can hand-paint tiny flowers with a thin brush, use nail decals, or stamp designs using stamping plates
- White, cream, pink, or purple flowers all complement avocado green beautifully
- Consider adding delicate green leaves or vines to frame the flowers and create a cohesive botanical theme
- Seal everything with a top coat that protects your artwork and provides glossy finish
Quick facts:
- Stamping is actually easier than hand-painting for someone new to nail art
- Nail decals provide the most consistent results if you’re not confident with painting
- You can create the floral design on all nails or just on accent nails, depending on your preference
14. Forest Green With Leaf Nail Art

Leaf designs on forest green nails create a nature-inspired aesthetic that feels organic and artistically intentional. This design works year-round but feels particularly satisfying during autumn months when leaves are a natural part of the visual landscape.
Why This Design Works So Well
Leaf art on forest green feels less like “nail art” and more like wearable nature. The design is inherently sophisticated because leaves are structurally interesting with visible veins and varied shapes. On duck nails, leaf designs have plenty of room to develop and become truly detailed and beautiful.
How to Execute It
- Paint all nails with two or three coats of forest green, allowing full drying between coats
- Using a thin brush and either white, gold, or a lighter shade of green, paint leaf shapes with visible vein details
- Vary the leaf direction and size for a natural, organic appearance rather than creating perfect uniformity
- Consider adding tiny branches connecting multiple leaves for a more botanical composition
- Seal with a glossy top coat that brings out the detail of your leaf work
Pro tip: If hand-painting feels intimidating, you can create this design using green and gold nail striping tape to create leaf shapes, which is surprisingly easy and creates a modern, geometric version of the botanical aesthetic.
15. Green and White Geometric
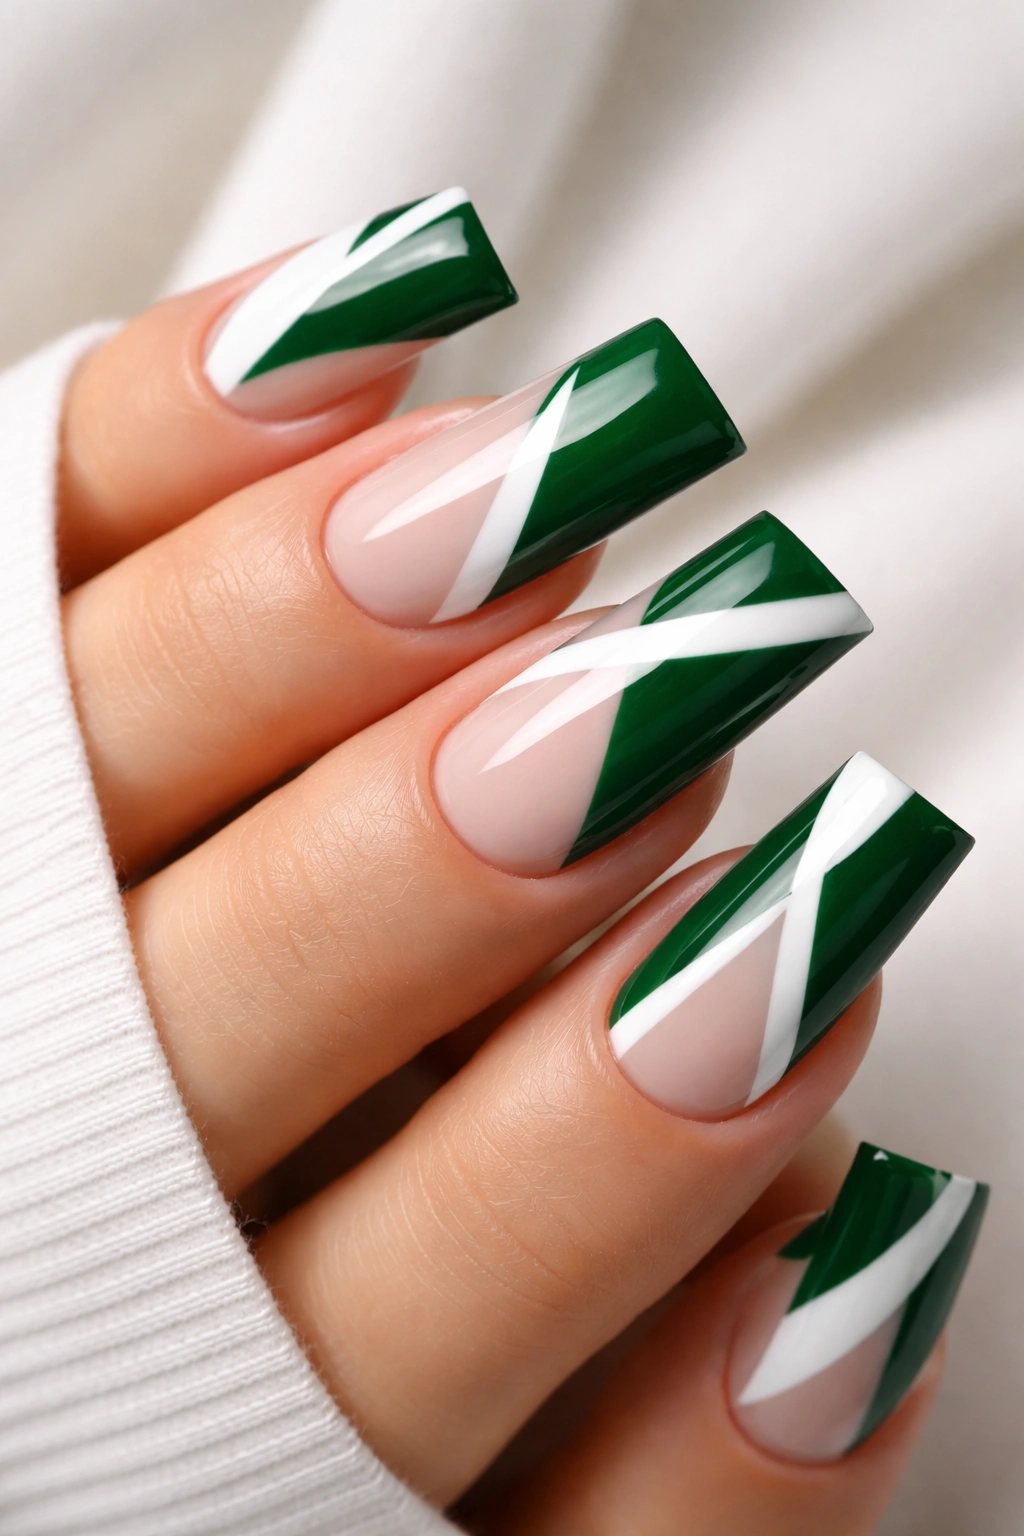
Geometric designs are inherently modern and sophisticated. When you combine green and white in clean geometric patterns, you create something that feels intentionally designed and absolutely contemporary. This is the design for people who love structured, minimalist aesthetics.
Why This Design Works So Well
Geometry on nails feels architectural and intentional in a way that’s deeply satisfying. Green and white provides maximum contrast and makes geometric shapes pop visually. On duck nails, the wider surface actually makes geometric precision easier—you have more space to work with, and shapes look intentional rather than cramped.
How to Execute It
- Paint all nails with a clean white base—two coats for full opacity
- Using striping tape or a thin brush with forest or hunter green polish, create your chosen geometric pattern
- Triangles, hexagons, diagonal lines, or a combination of shapes all work beautifully
- You can create geometric patterns on all nails or reserve them for accent nails while keeping others solid green or white
- Keep lines clean and precise—geometry demands accuracy, so take your time and use a steady hand
Worth knowing: Striping tape creates the most precise geometric lines if you’re not confident freehand, and it’s completely removable if you change your mind mid-design.
Final Thoughts
Green duck nails represent the perfect convergence of trend-forward shape and timeless color. Whether you’re drawn to soft, subtle palettes like sage and pistachio or prefer bold statements with neon and chrome, there’s genuinely a green duck nail design that matches your personality and comfort level.
The real magic of this shape and color combination is how customizable it is. You can wear the same basic green shade in twenty different ways depending on finish, embellishments, and design elements. Start with whatever appeals to you most, and don’t be afraid to experiment as you get comfortable with the shape.
Remember that duck nails are a design choice just as much as the polish color and pattern are. This shape makes a statement, and pairing it with rich, sophisticated green shades actually tones down the boldness while maintaining all the visual impact. You’re not choosing between refined or trendy—with green duck nails, you’re getting both.
