

Duck nails have transformed from a bold, specific trend into a legitimate style category with endless interpretations. The signature wide, rounded tip that gives this nail shape its name creates the perfect canvas for creativity—whether you’re drawn to minimalist elegance, playful patterns, or statement-making embellishments. The beauty of duck nails lies in how adaptable they are; they work equally well for someone seeking understated sophistication as they do for those craving maximum visual impact.
What makes duck nails genuinely modern isn’t just the shape itself—it’s how you style it. The nail art world has moved far beyond basic color fills, and contemporary duck nail designs incorporate advanced techniques, unexpected color combinations, mixed textures, and clever layering that would have been unthinkable just a few years back. Whether you’re planning your next salon visit or exploring designs to recreate at home, these 20 ideas represent the most compelling directions the trend is heading right now.
The shape’s inherent boldness means even simple designs feel intentional and polished. You can go super minimal with solid colors that let the shape speak for itself, or you can layer on complexity with detailed nail art, chrome accents, or dimensional elements that make each nail a tiny work of art. The versatility is genuinely remarkable—these designs work for everyday wear, professional settings, special occasions, or whenever you want to feel confident and distinctive.
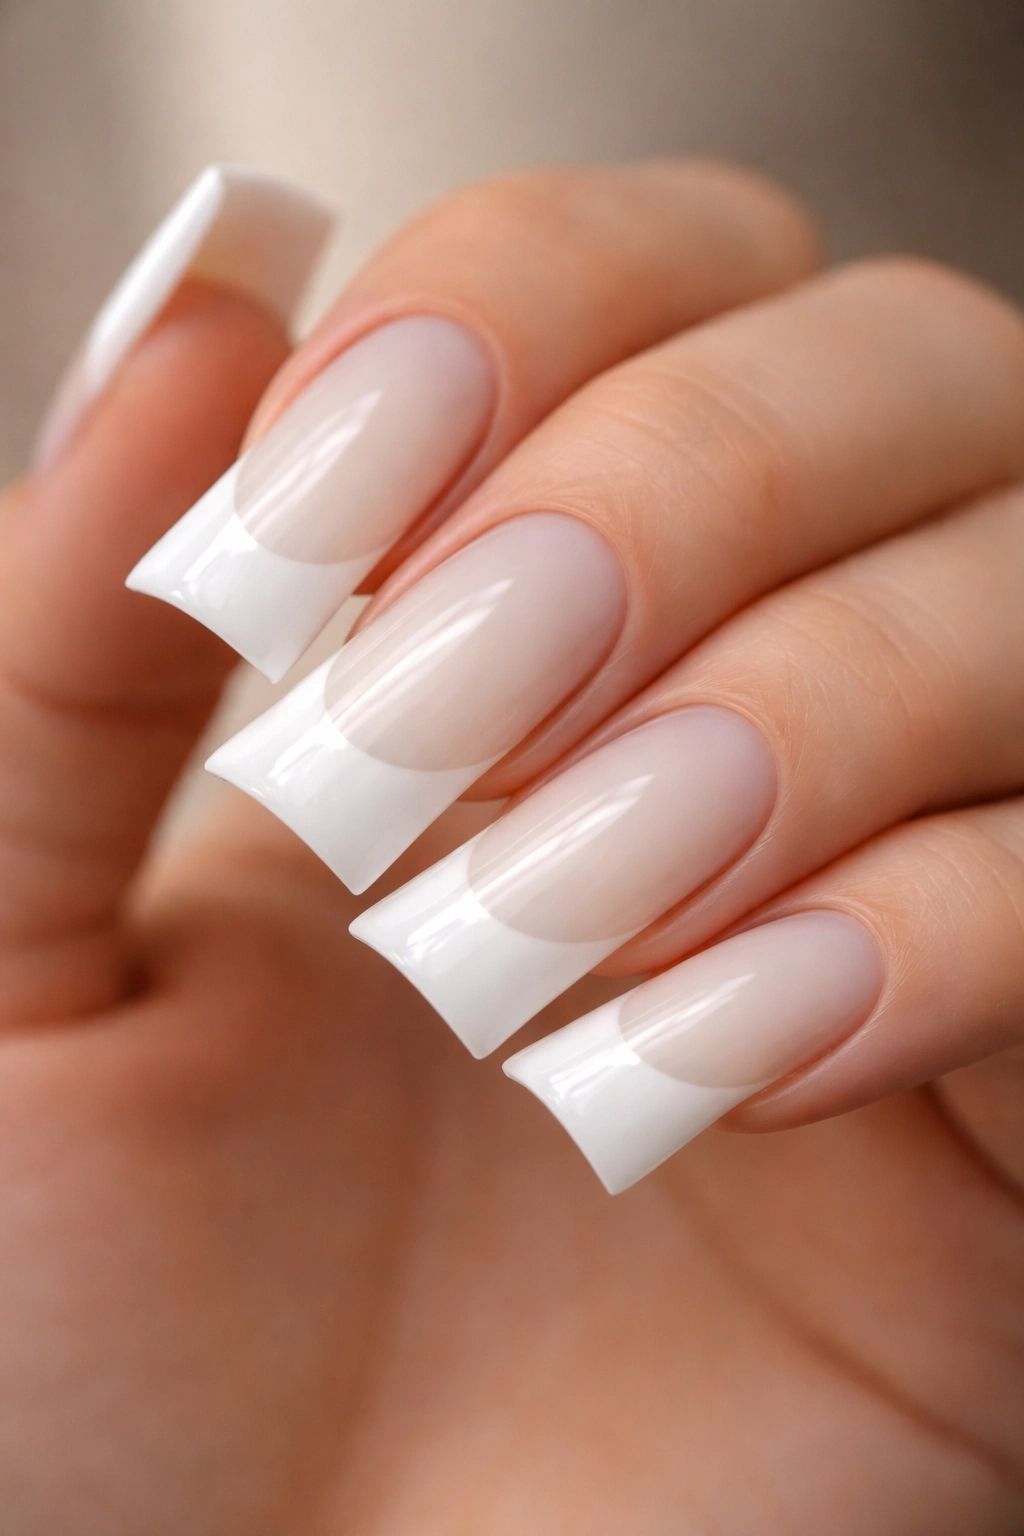
1. Glossy White with Milky Center Gradient
Classic white duck nails take on a modern edge when you incorporate a soft milky gradient through the center of each nail. The look combines crisp bright white at the edges with a warmer, creamy white-to-beige fade toward the middle, creating depth without introducing a completely different color.
Why This Design Works So Well
The gradient effect gives you dimension that reads as intentional and elevated rather than accidental or unfinished. White is universally flattering and professional, yet the gradient detail transforms a basic choice into something current and considered. It’s the kind of design that looks effortlessly expensive even when you’re doing it yourself.
How to Execute It Perfectly
- Use a white base coat as your foundation, applying two thin coats for opacity
- Choose a milky nude or soft cream color that’s just slightly warmer than your white base
- Apply the gradient color to the center third of the nail using a makeup sponge, using a dabbing motion rather than smooth strokes
- Blend the edges with a clean, slightly damp sponge to ensure the transition looks soft rather than striped
- Seal everything with a glossy top coat that amplifies the light-reflecting quality
Pro tip: This design photographs beautifully because the gradient catches light and creates subtle shadows, making your nails look more three-dimensional in photos than in person.
2. Chrome Metallic with Nude Base
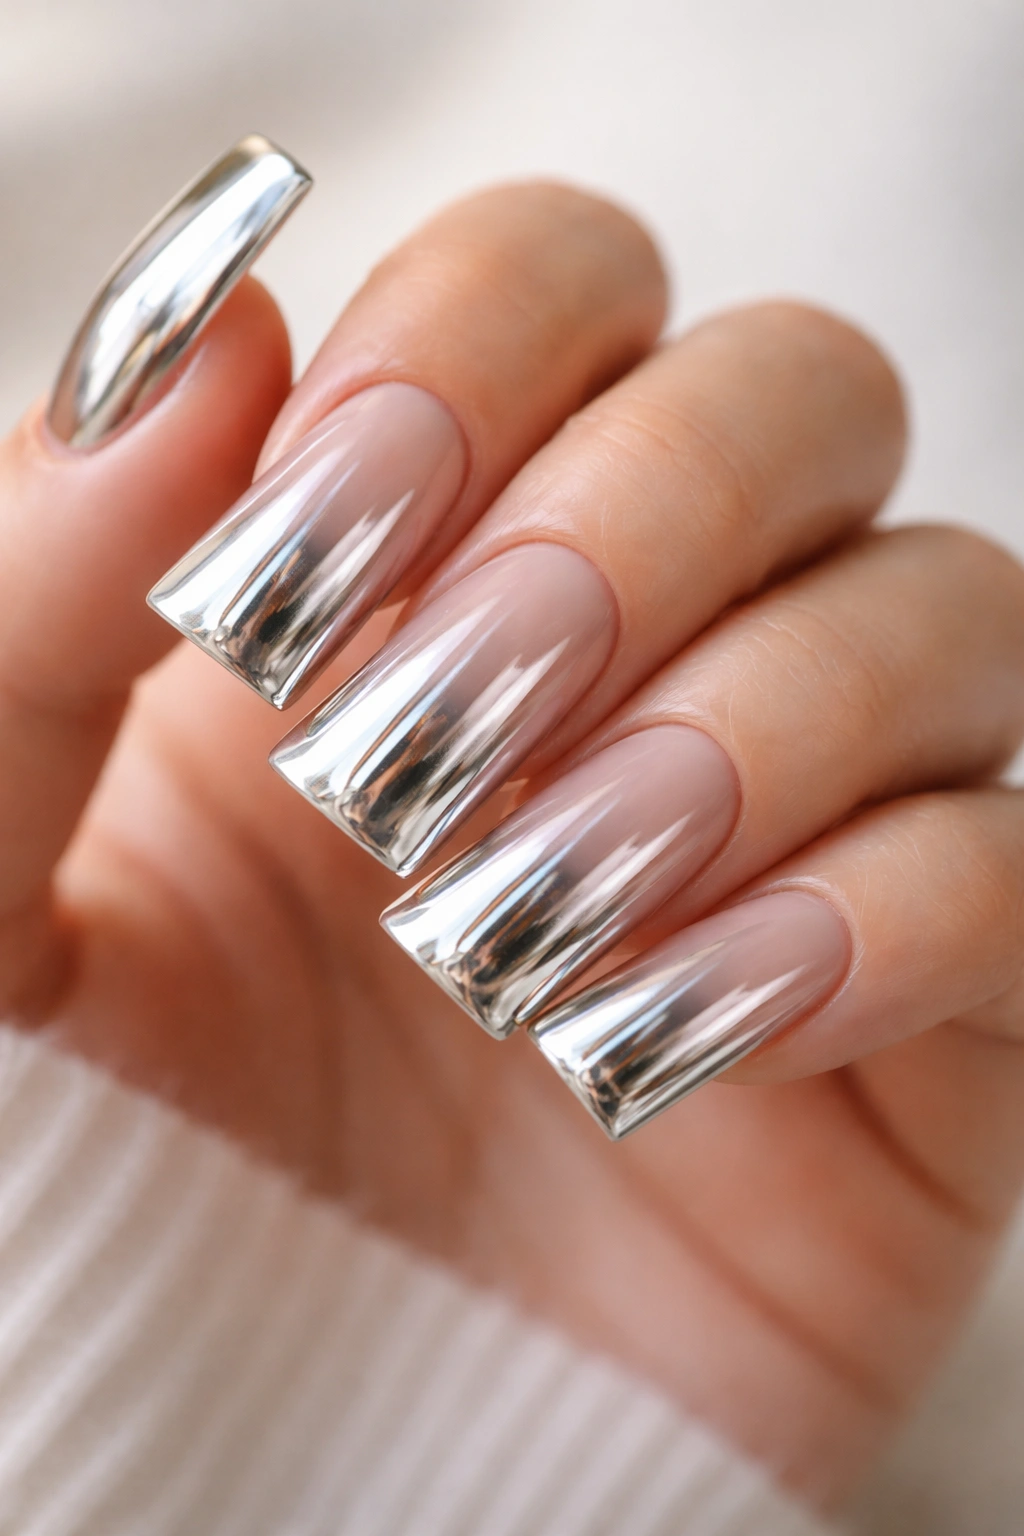
A nude or soft pink base coat paired with a full chrome metallic top layer creates a futuristic, almost liquid-metal effect that catches the light from every angle. The chrome sits directly over the warm base color, giving it subtle warmth rather than harsh silver-steel vibes.
The Metallic Transformation Effect
Chrome powder reflects light so intensely that it transforms the entire appearance of your nail shape, making duck nails look almost sculptural. The mirror-like finish amplifies the nail’s dimension and creates an effect that’s genuinely hard to capture in photos—it has to be seen in person to truly impress.
Application Requirements
- Start with a smooth, even nude or pale pink base (two coats for full opacity)
- Apply a sticky base coat or chrome prep coat to help the powder adhere evenly
- Use a velvet applicator to work chrome powder gently across the entire nail surface
- Build coverage gradually—apply, inspect under light, apply again until you achieve mirror-like reflectivity
- Seal with a matte or glossy top coat depending on whether you want a soft or high-shine finish
Worth knowing: Chrome powder requires a specialized applicator and proper ventilation, and it works significantly better over a slightly textured surface than over perfectly smooth nails.
3. Sheer Pink with Delicate Line Art
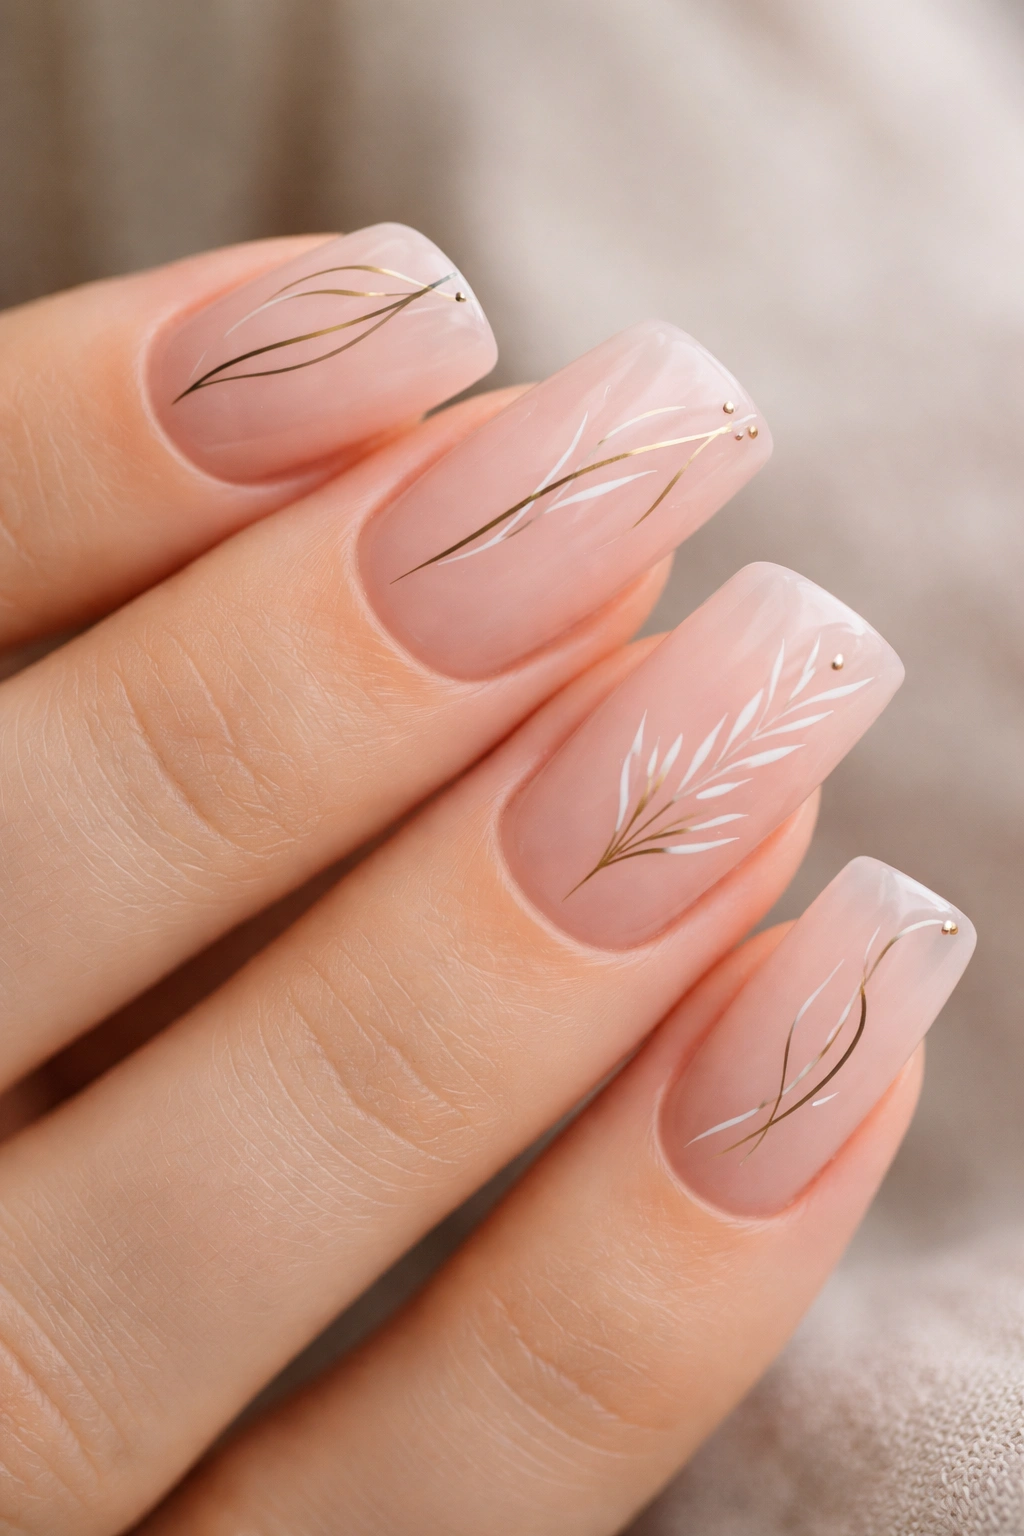
Ultra-sheer pink or nude nails with thin black, gold, or white line art creates a minimalist, sophisticated look that reads expensive and intentional. Think delicate geometric lines, abstract squiggles, or simple botanical outlines scattered across the nail surface.
Why Minimalism Hits Different on Duck Nails
The wide surface area of a duck nail gives you room for line art without the design feeling cramped. A thin line that would disappear on a shorter nail becomes a focal point on this shape. Sheer bases allow the lines to stand out clearly while keeping the overall aesthetic clean and modern.
Creating Perfect Line Art
- Build your sheer pink base with 2-3 thin coats to ensure you can still see your nail bed through the color
- Use a thin nail art brush (size 0 or smaller) with concentrated pigment color—diluted polish creates wobbling, inconsistent lines
- Sketch your lines slowly and deliberately; rushing creates shaky, imperfect results
- Seal with matte top coat for a soft, refined finish that emphasizes the line work rather than making the nails look glossy
Insider note: The most forgiving line art approach uses short, intentional strokes rather than trying to draw one continuous perfect line—small segments that connect visually read just as intentional as one flowing line.
4. Tortoiseshell with Gold Foil Accents
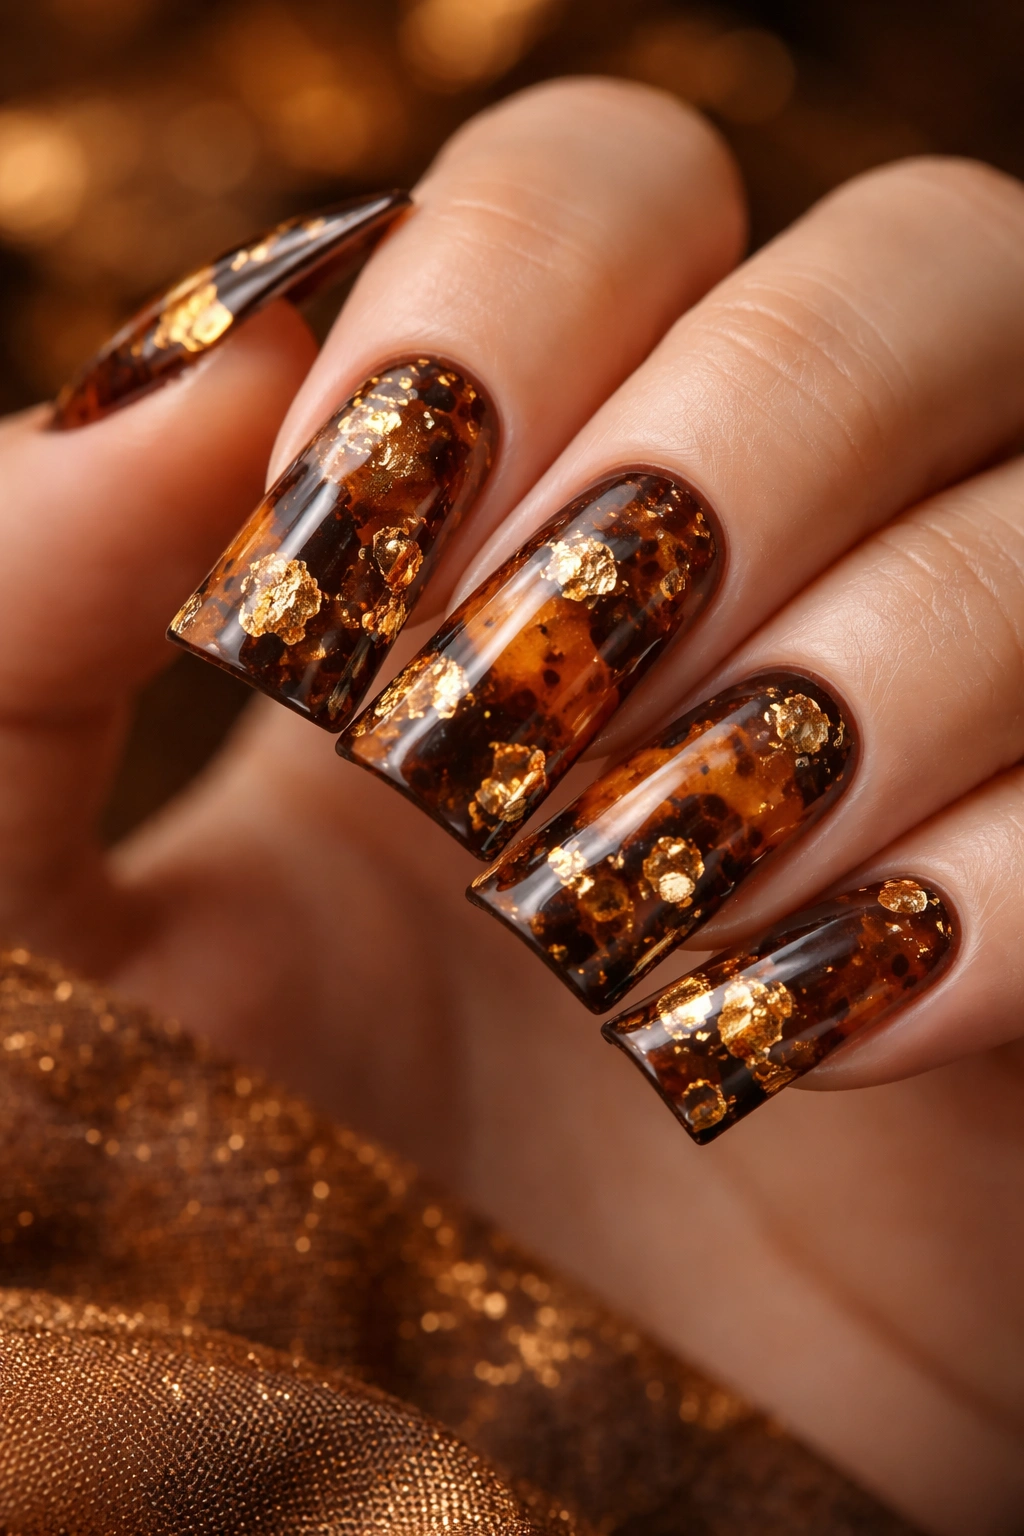
Warm tortoiseshell coloring (browns, golds, and amber tones blended together) paired with small gold foil flecks creates a luxe, earthy-yet-glamorous aesthetic. This design bridges bohemian and upscale, making it work for both casual and dressier occasions.
Building Authentic Tortoiseshell
Tortoiseshell isn’t one solid color—it’s an intentional blend of warm, overlapping tones that suggest natural pattern. The beauty comes from how the colors merge and interact, not from having crisp, clean sections.
Technique for Rich Results
- Apply a warm cream or pale gold base coat as your foundation
- Using a larger nail art brush, drop patches of warm browns and deeper golds across the nail, leaving some base color visible
- Blend the edges where colors meet using a dry brush or sponge, creating soft transitions rather than hard lines
- Add small foil flecks using a foil adhesive and loose gold foil pieces, concentrating them near the tips
- Seal with gloss to amplify the richness and make foil sparkle
Pro tip: The most convincing tortoiseshell uses at least three different warm tones, and leaving some base color visible actually makes it look more authentic than complete coverage.
5. Ombré Sunset Gradient

A dramatic color gradient that transitions from warm orange at the base, through coral, to peachy-pink at the tip creates a sunset effect that literally looks like a sunset captured on your nails. This design is bold, eye-catching, and surprisingly versatile.
Why This Gradient Technique Works
Duck nails provide enough length and width that you can create smooth, noticeable gradient transitions. Shorter nail shapes make gradients difficult to execute because there’s not enough surface area for the colors to actually blend noticeably.
Executing the Gradient Smoothly
- Apply a sticky base coat to help gradient colors blend smoothly
- Prepare three related colors: deep orange, mid coral, and peachy-pink
- Using a makeup sponge or nail art sponge, apply one color to a section, then the next color overlapping slightly, then the third color
- Dab repeatedly with a clean, damp sponge to blend where the colors meet, creating soft transitions
- Work quickly before polish dries so your blending actually creates smooth gradients rather than distinct bands
- Seal with glossy top coat that amplifies the gradient and adds dimension
Worth knowing: Ombré works best when your color choices are related (all warm, all cool, all pastels) rather than randomly selected—the gradient should read as intentional, not accidental.
6. Sage Green Matte with Pearl Details
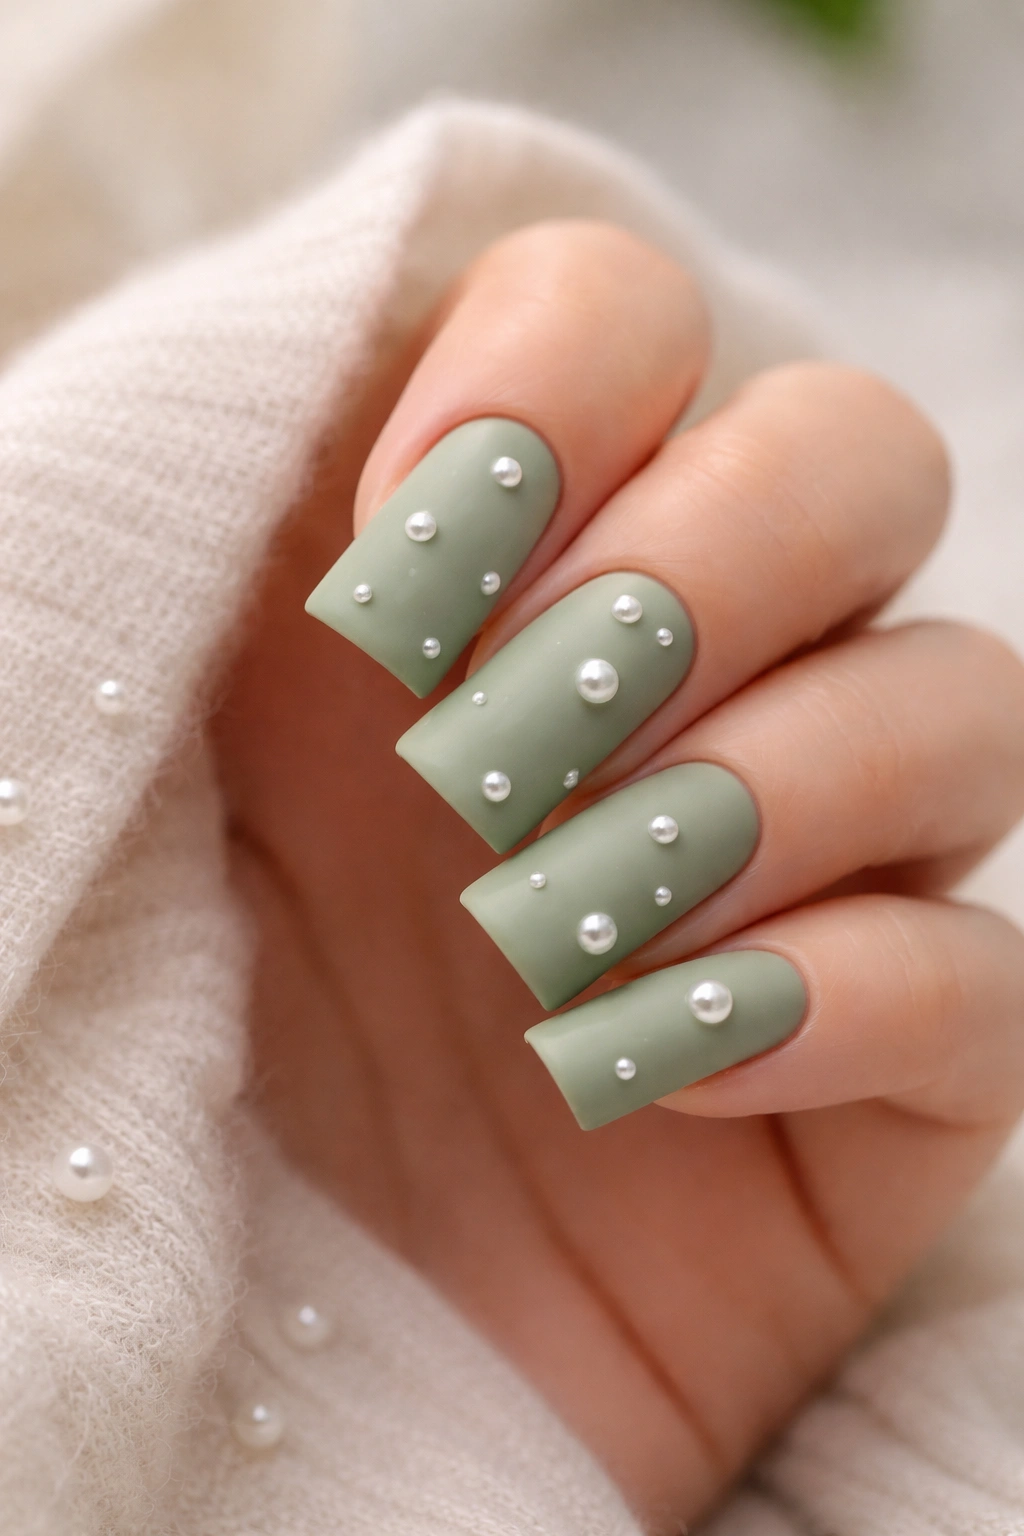
Soft, slightly muted sage green in a matte finish, accented with pearl elements scattered strategically across the nail, creates an earthy, modern, deeply restful aesthetic. This design works especially well for people who love nature-inspired colors but want something more contemporary than basic green nails.
The Power of Matte in Modern Design
Matte finishes read as more intentional and sophisticated than glossy because they’re less common and require deliberate choice. Matte sage green feels contemplative and earthy, while glossy sage feels more playful. The contrast between matte base and sparkly pearl creates visual interest through texture rather than just color.
Building This Design
- Apply two coats of sage green polish in matte finish, ensuring full opacity
- Choose pearl elements: pearl dust mixed into a clear top coat, pearl foil flecks, or pre-made pearl stickers depending on your skill level
- Apply pearls in a scattered, organic pattern rather than perfect symmetry—concentrate them on the tips or edges rather than completely covering the surface
- Seal with a glossy or semi-gloss top coat that protects the pearls while creating subtle shine that contrasts the matte base
Insider note: Matte finishes require a matte top coat formulated specifically for matte finishes—regular top coat will add unwanted shine.
7. Negative Space with Nude and Black
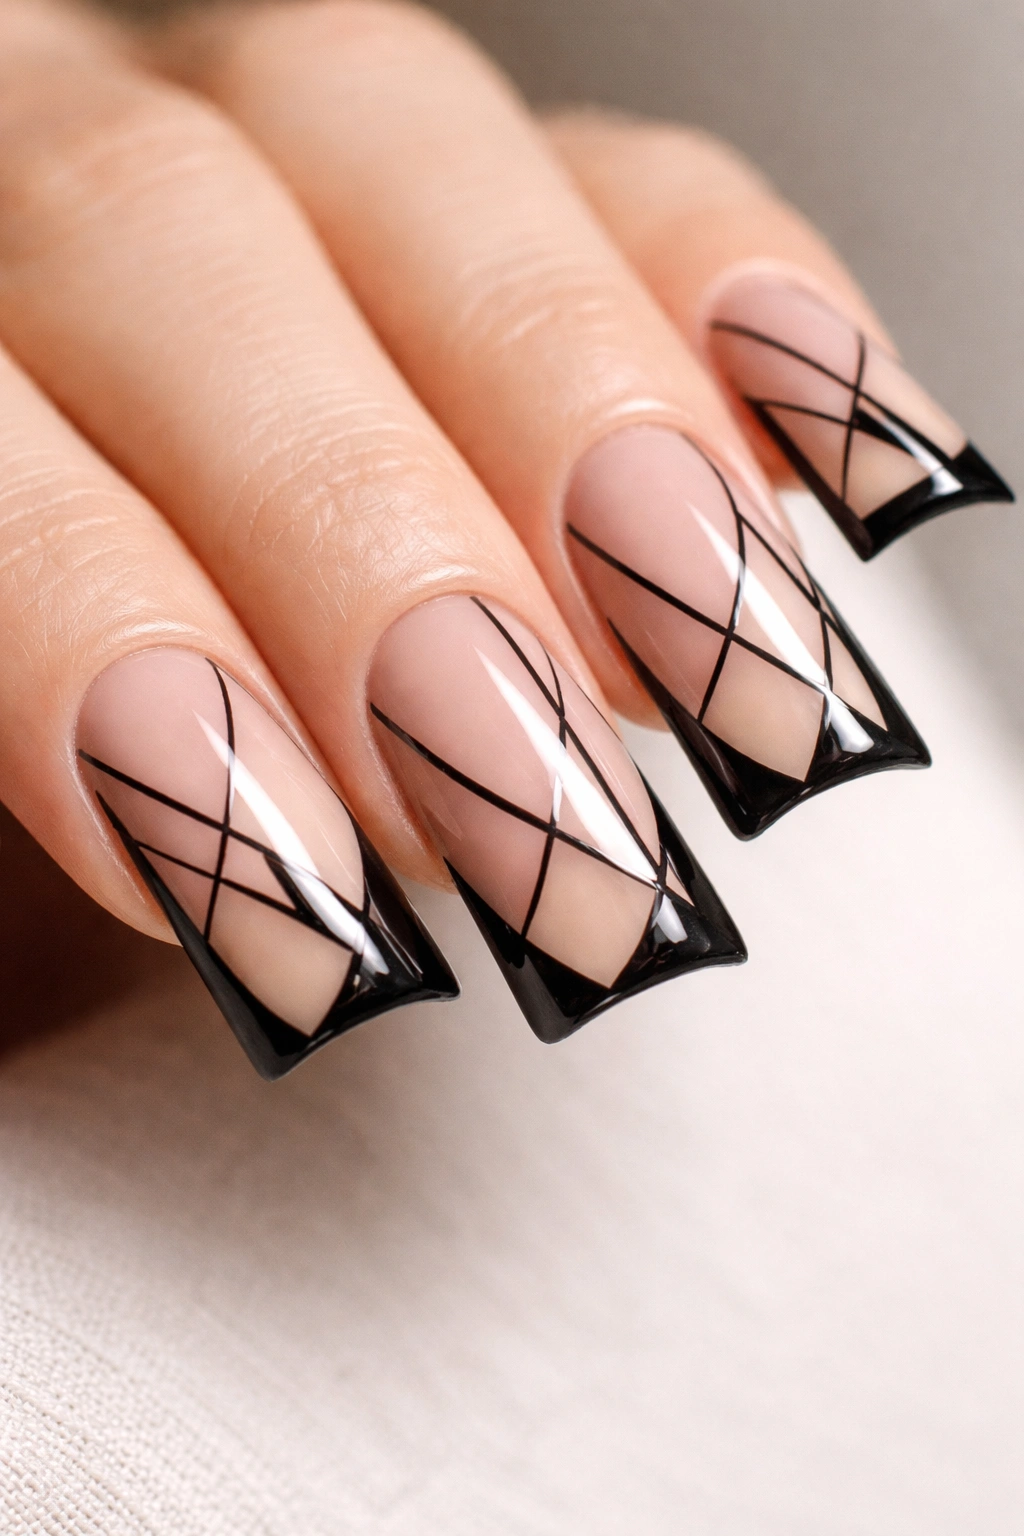
Intentional bare nail showing through a design using negative space—where you deliberately leave parts of the nail unpainted to create pattern—works beautifully on duck nails. Nude polish with strategic black lines and negative-space sections creates graphic, sophisticated contrast.
Why Negative Space Feels Modern
Negative space design reads as intentional and thoughtful rather than accidental or unfinished. It plays with your eye’s tendency to complete patterns, making simple designs feel complex and considered. On duck nails, the size and shape amplify this effect.
Creating Graphic Negative Space
- Start with a nude base coat or bare nail (depending on your vision)
- Use a thin black brush or nail art pen to create geometric shapes: triangles, stripes, or angular designs
- Leave sections completely bare (no polish at all) rather than filling every space
- Seal with glossy top coat, which will emphasize the contrast between bare nail, nude, and black
- Consider using both glossy polish and matte top coat over different sections to create additional texture contrast
Pro tip: Sketching your negative space pattern on paper first prevents you from winging it on your actual nails and ending up with unbalanced designs.
8. Sparkly Red with Gold Foil Tip
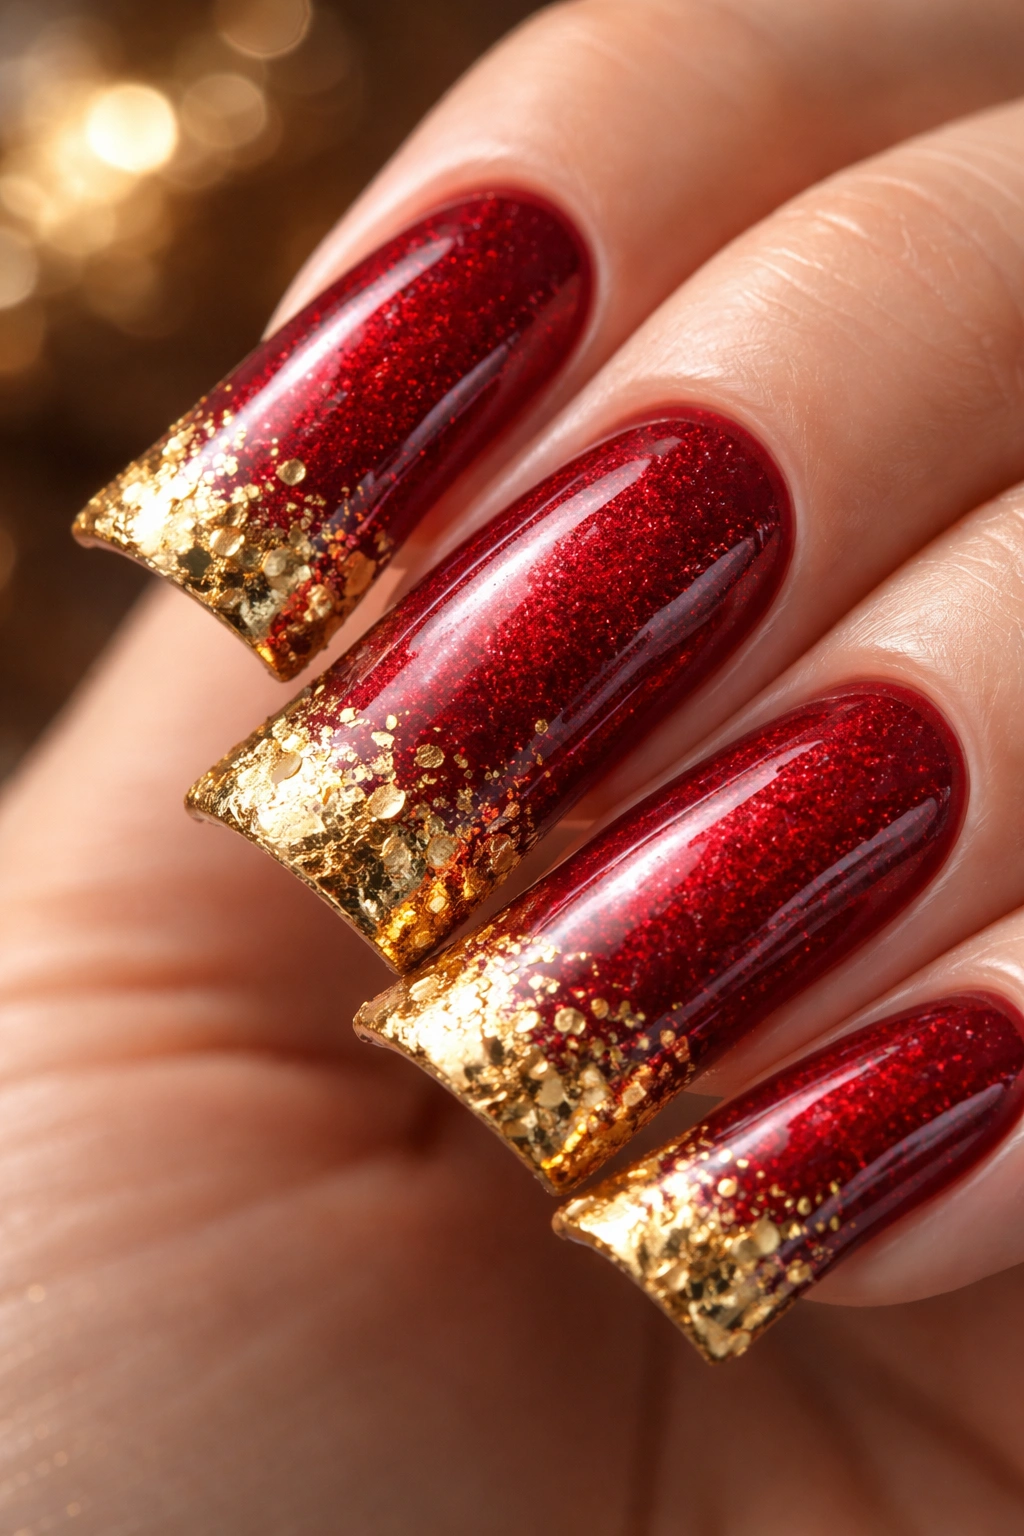
Deep, rich red with fine gold foil flecks throughout, concentrated more heavily at the wide tip, creates a statement look that’s festive without feeling costume-y. The foil catches light and creates movement, making the red feel more dynamic than solid color alone.
Building Glittery Depth
Red nail art requires a specific approach to avoid looking flat or cheap. Quality red polish, layering technique, and strategic sparkle placement all matter significantly more with red than with softer colors.
Execution Strategy
- Apply two coats of high-quality, rich red polish—cheap red often looks more orange or cheap plastic than luxe
- While the second coat is slightly tacky (not fully dry but set enough to hold foil), apply gold foil using foil adhesive
- Concentrate foil more heavily toward the tips where the nail is widest—this draws the eye to the duck nail shape
- Apply a glossy top coat that amplifies both the red richness and the gold sparkle
- The foil should catch light and create visible sparkle without looking like you dumped glitter on your nails
Worth knowing: Real foil creates a more refined effect than glitter—foil sits flat against the nail while glitter has dimension, which reads very differently.
9. Pastel Lavender with Tiny Rhinestone Accents
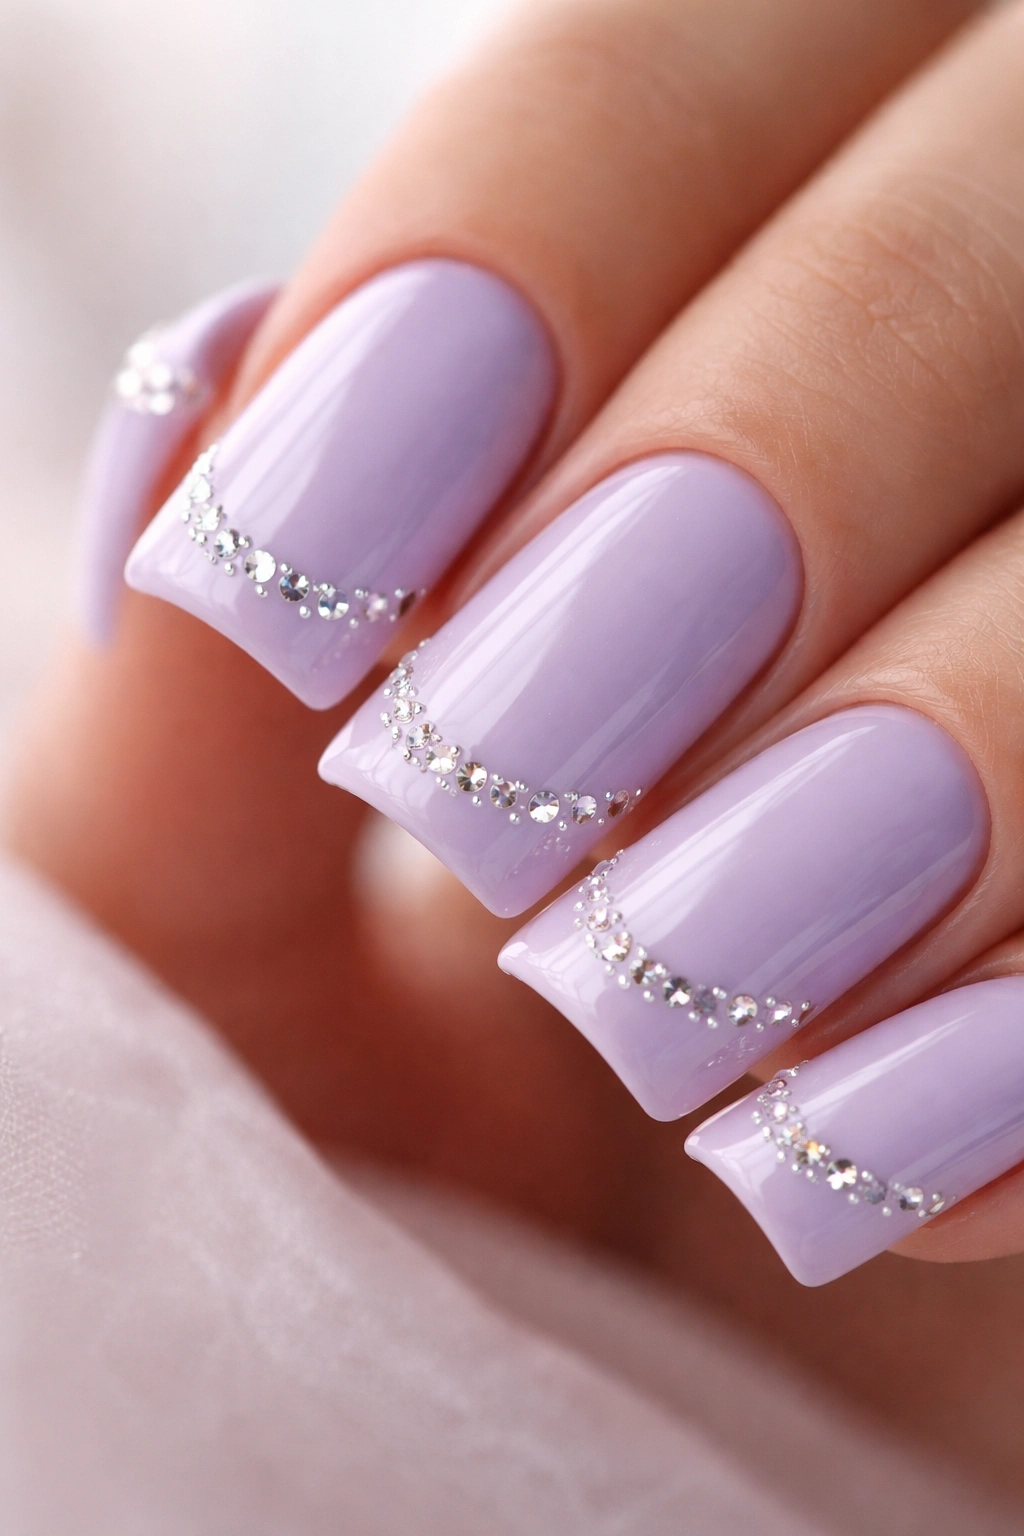
Soft, powder-soft lavender as your base, decorated with tiny rhinestones placed strategically to create subtle sparkle rather than overwhelming bling. This design is feminine and elegant without reading as overly decorated or costume-like.
Rhinestone Placement Strategy
The difference between “elegant sparkle” and “too much bling” comes down to restraint and placement. Scattered rhinestones read differently than lines or patterns of rhinestones.
How to Place Rhinestones Effectively
- Apply two coats of pastel lavender polish for smooth, opaque coverage
- While the final coat is still slightly sticky, apply individual rhinestones using a rhinestone pick and adhesive or using a sticky base coat designed for stone application
- Use smaller rhinestones (2-3mm) rather than large ones for a more refined effect
- Concentrate them on the tips or create a subtle gradient where they’re denser at the tip and sparse toward the base
- Seal with a glossy top coat that holds stones in place while adding shine
- Choose rhinestones in clear or light colors rather than dark or smoky—they should sparkle subtly, not dominate
Pro tip: Real crystal rhinestones (like Swarovski) sparkle and refract light far more beautifully than plastic alternatives, and the difference is immediately visible.
10. Marble Effect with Jewel Tones
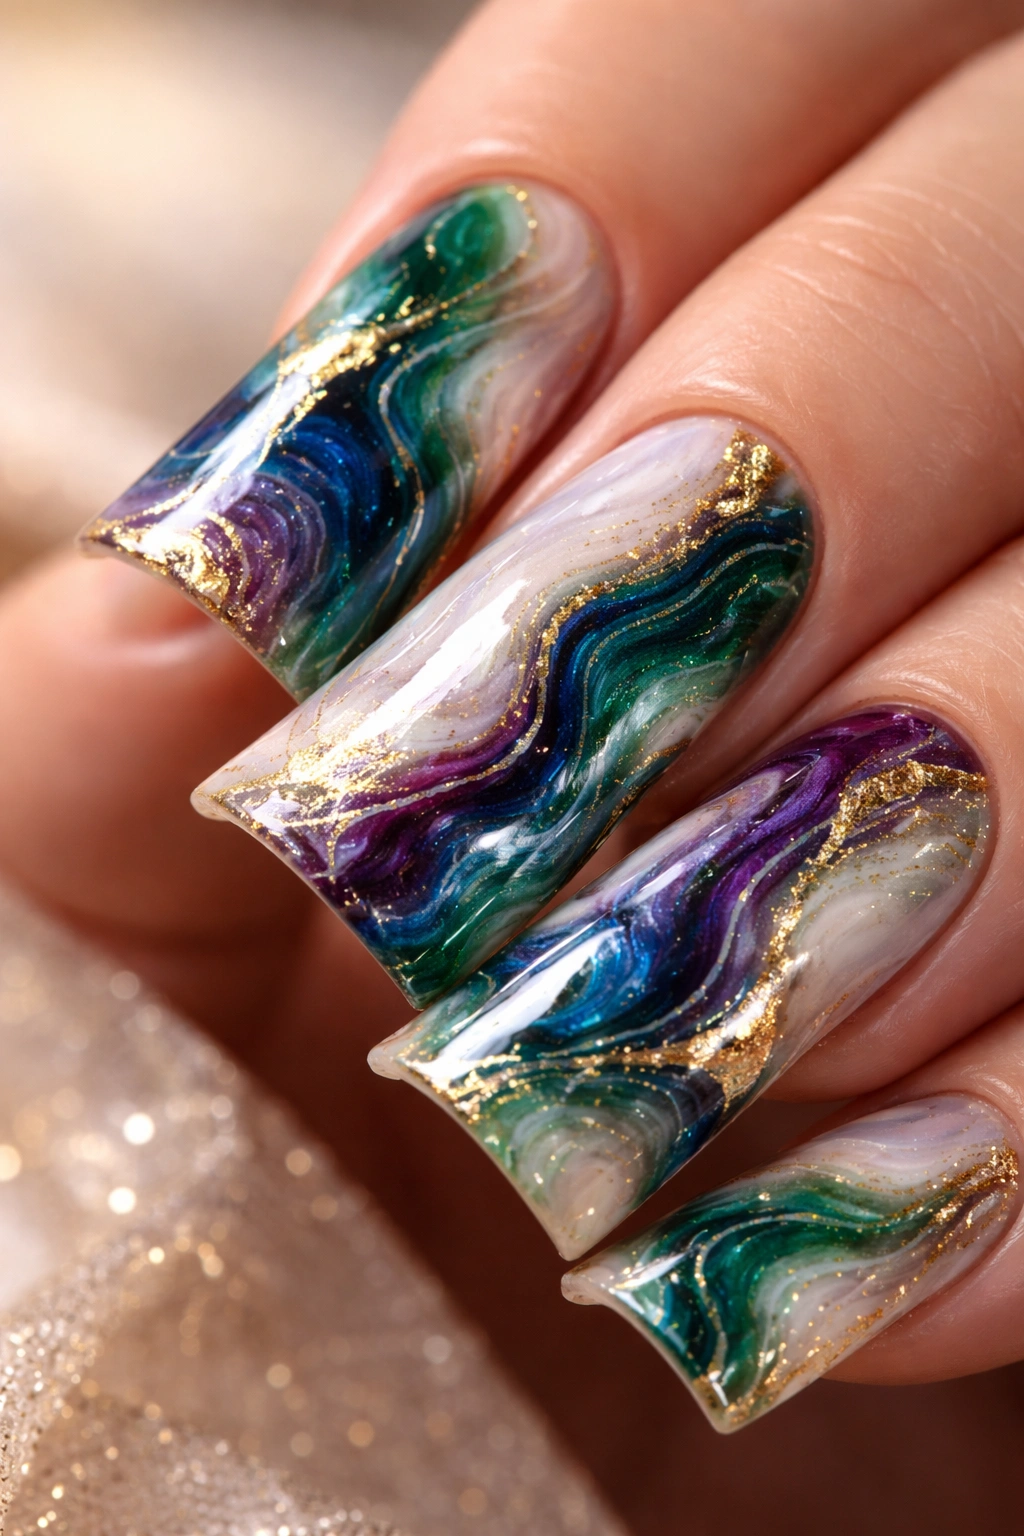
Swirled marble pattern combining deep jewel tones—emerald, sapphire, amethyst, and gold—creates an abstract, luxe aesthetic that feels both artistic and wearable. The marble pattern looks complex but is actually quite forgiving to execute.
Creating Natural-Looking Marble
Marble nail art requires understanding how water or marble medium moves polish to create organic, interconnected patterns rather than predictable designs.
Marble Technique Steps
- Apply a white or pale cream base coat—this lets jewel tones stand out while providing contrast
- Drop concentrated jewel-tone polishes onto the nail surface in a scattered pattern
- Using a thin brush or toothpick, drag through the colors to create marbled, connected patterns
- You’re aiming for organic veining that looks like actual stone, not geometric or perfectly symmetrical patterns
- Seal with glossy top coat that enhances the marble effect
- The beauty comes from the unpredictability—no two nails will be identical, which feels more authentic and less machine-made
Worth knowing: Marble patterns look better when your colors have good contrast with each other and with your base color—jewel tones against white create dramatic, readable patterns.
11. Nude with Rose Gold Gradient Tip
Creamy nude base that gradually shifts to rose gold at the wide tip, creating a subtle gradient that emphasizes the duck nail shape. This design is sophisticated and works for professional settings while still feeling special and intentional.
Why Rose Gold on Nude Works
Rose gold has warm undertones that complement nude beautifully, and the gradient naturally draws attention to the tip where the duck nail shape is most pronounced. This design is all about subtle luxury rather than obvious statement-making.
Creating a Subtle Rose Gold Transition
- Apply two coats of creamy, warm nude polish
- Create a rose gold mixture by combining rose gold pigment or chrome powder with a glossy base coat
- Using a makeup sponge, apply the rose gold to just the tip area, blending backward toward the nude
- The transition should be gradual enough that you can’t identify one specific line where nude becomes rose gold
- Seal with glossy top coat that amplifies both the nude warmth and rose gold shimmer
Insider note: Rose gold chrome is significantly harder to apply evenly than regular rose gold polish, so if you’re not experienced with chrome application, mixing rose gold pigment into clear polish creates a beautiful alternative.
12. Aquamarine Blue with White Swirls
Cool, bright aquamarine blue—the color of tropical ocean water—with white swirled throughout creates a summery, playful, yet still refined aesthetic. The white swirls prevent the blue from feeling heavy or dark while adding contrast and visual interest.
Creating Balanced Color Play
When combining two colors, the ratio of each matters significantly. Too much white reads as primarily white with blue accents; the balance should feel like equal partners.
Swirl Technique
- Apply two coats of aquamarine blue for vivid, opaque color
- While the final coat is still slightly sticky, apply concentrated white polish in swirled patterns across the nail
- Use a thin brush to create organic, interconnected swirls rather than perfect spirals
- Let some blue show between the swirls—don’t cover the entire nail with white
- Blend slightly where colors meet using a damp brush, creating softer transitions
- Seal with glossy top coat that makes both colors pop while maintaining the playful, fresh aesthetic
Pro tip: Aquamarine works better on duck nails than on short nails because the wider surface area showcases the color more dramatically without the shade feeling overwhelming.
13. Black with Holographic Flakes
Deep, solid black as your base, topped with holographic flakes that catch light and flash different colors from different angles. This design is modern, edgy, and genuinely striking in natural light where holographic flakes truly shine.
The Magic of Holographic Effects
Holographic flakes are small, reflective pieces that scatter light, making them appear to flash different colors as they move or as light angle changes. In indoor lighting they might be subtle; in sunlight they’re genuinely dazzling.
Building Holographic Black
- Apply two coats of high-quality, rich black polish
- While the final coat is sticky, apply holographic flakes using a dedicated adhesive or sticky base coat
- Work in sections so the base doesn’t dry before you’ve placed all flakes
- Distribute flakes across the entire nail for even sparkle
- Don’t use too many flakes—the goal is strategic sparkle over a black base, not a completely covered, glittery nail
- Seal with glossy top coat that protects flakes while amplifying their reflective quality
Worth knowing: Holographic flakes are most visible and impressive outdoors or in bright natural light—indoors with artificial light, they’re more subtle.
14. Soft Pink with Delicate Floral Line Art
Pale, barely-there pink as your base, with delicate floral outlines rendered in thin white or pale gold lines scattered across the nail. This design manages to be both romantic and modern, feminine without being overly precious.
Drawing Botanicals That Look Professional
Botanical line art seems simple but requires careful attention to proportion and line weight to look polished rather than amateur.
Floral Art Approach
- Apply 2-3 coats of soft pink polish to build opaque coverage while maintaining sheerness
- Choose one or two simple flower types: tiny roses, simple daisies, botanical stems, or minimalist wildflowers
- Use a very thin brush (size 0 or smaller) with concentrated white or pale gold polish
- Draw slowly and deliberately, focusing on clean, even lines rather than rushed strokes
- Space flowers across the nail with intention—not perfectly symmetrical, but clearly intentional placement
- Seal with matte top coat that emphasizes the delicate line work rather than creating shine that competes with the design
Insider note: The most professional-looking botanical art uses consistent line thickness throughout, which requires a steady hand and polish with the right consistency—not too thick, not too thin.
15. Deep Emerald with Liquid Gold Swirls
Rich, deep emerald green base with swirls and drips of liquid gold moving across the nail surface, creating movement and opulence. This design is sophisticated and luxe without being overdone or cartoon-like.
Creating Intentional Gold Movement
Liquid gold needs to be applied in a way that looks deliberate and artistic rather than accidental or messy. The placement and quantity both matter.
Liquid Gold Technique
- Apply two coats of deep emerald green for rich, saturated color
- While the final coat is slightly tacky, apply liquid gold using a thin brush to create swirls, drips, or accent lines
- Gold should move across and over the green rather than sitting on top in isolated blobs
- The swirls should follow the natural shape of the nail, possibly dripping downward toward the tip to emphasize the duck nail silhouette
- Seal with glossy top coat that makes both the emerald depth and gold shimmer absolutely luminous
Pro tip: Liquid gold works best when applied in thin, deliberate strokes rather than heavy-handed coverage—you can always add more, but removing gold without damaging the base is nearly impossible.
16. Milky White with Subtle Shimmer
Creamy, almost translucent white that shows a hint of shimmer from within, creating depth and dimension without being overtly sparkly. This design is clean, modern, and surprisingly versatile.
Why Subtle Shimmer Works
Obvious glitter or foil can read as costume-like, but subtle shimmer—where you can see sparkle but it’s not the design’s focus—reads as sophisticated. The shimmer should feel like a quality element, not a decorative afterthought.
Building Subtle Shimmer
- Choose a milky white or neutral polish with integrated shimmer (not one with visible glitter)
- Apply 2-3 thin coats to build opacity while maintaining a luminous, slightly translucent appearance
- The shimmer should be visible when light hits it but not obvious in all lighting conditions
- Seal with glossy top coat that amplifies the shimmer’s reflective quality
- The result should feel like clean, quality nails with something special about them, not nails that are trying too hard to shine
Worth knowing: Subtle shimmer polish often requires 3 coats to look intentional rather than just barely-there, so resist the urge to stop at 2 coats.
17. Burnt Orange with Geometric Black Lines
Warm, sophisticated burnt orange as your base, divided and detailed with geometric black lines creating abstract patterns. This design bridges earthy and modern, making it feel current without feeling trendy or temporary.
Using Geometry to Create Visual Interest
Geometric line work requires planning and precision but creates results that feel intentional and artful rather than accidental.
Geometric Line Execution
- Apply two coats of burnt orange for solid, warm coverage
- Sketch your geometric pattern lightly with pencil on paper first to plan placement
- Using a thin brush and concentrated black polish, draw your geometric pattern: triangles, parallel lines, abstract divisions, or angular shapes
- Lines should be clean and even rather than wobbly—steadiness matters more than perfect symmetry
- Space the geometric elements thoughtfully so they feel distributed across the nail rather than clustered or sparse
- Seal with matte top coat that lets the geometry stand out clearly
Insider note: Geometric designs look more sophisticated when the lines have consistent thickness throughout and when the pattern has obvious intentionality—random-looking geometry reads as unfinished.
18. Crystal Clear with Embedded Pearl Beads

Completely transparent or barely-there sheer nail with pearl beads (actual tiny pearls) embedded directly into a clear gel or regular polish, creating a dimensional, sculptural effect. This design is genuinely unique and feels custom and special.
Creating Dimensional Bead Effects
Embedded beads require specific technique and materials to stay secure and look intentional rather than carelessly placed.
Pearl Embedding Technique
- Apply a clear or sheer base coat (if using regular polish, use one with good adhesive properties)
- While sticky but set enough to hold beads, carefully place tiny pearl beads where you want them
- Press each bead gently into the surface to ensure it adheres
- Let the base coat fully set with beads in place
- Apply a second clear coat over the top that surrounds and secures the beads while maintaining transparency
- The beads should be visible and dimensional, creating actual texture you can feel, not just see
- Seal with glossy top coat that holds everything in place and makes pearls luminous
Pro tip: This design works better with gel-based systems (like gel polish) than with regular polish because gel creates stronger adhesive bonds that actually hold pearls permanently.
19. Champagne with Gradient to Nude
A warm champagne color at the base that gradually transitions to soft nude at the tip, creating an elegant, understated ombré that emphasizes the duck nail’s shape. This design reads as expensive and refined with minimal effort.
The Power of Warm-to-Warm Gradients
When gradient colors are in the same warm family, the transition reads as sophisticated rather than obvious. Champagne-to-nude feels intentional and flattering in a way that contrasting colors don’t necessarily achieve.
Smooth Gradient Application
- Apply one coat of champagne as your base
- Create a sticky base coat or use one coat of champagne plus a tacky top coat
- Using a makeup sponge, apply nude polish to the tip area
- Sponge multiple times, gradually working backward toward the base, building the transition zone
- The gradient should be imperceptible—you shouldn’t see a clear line where champagne becomes nude
- Seal with glossy top coat that amplifies both colors and makes the gradient shimmer
Worth knowing: This gradient looks better with a sponge (dabbing motion) than with a brush (which creates visible lines rather than smooth transitions).
20. Nude Base with Silver Foil Geometric Pattern
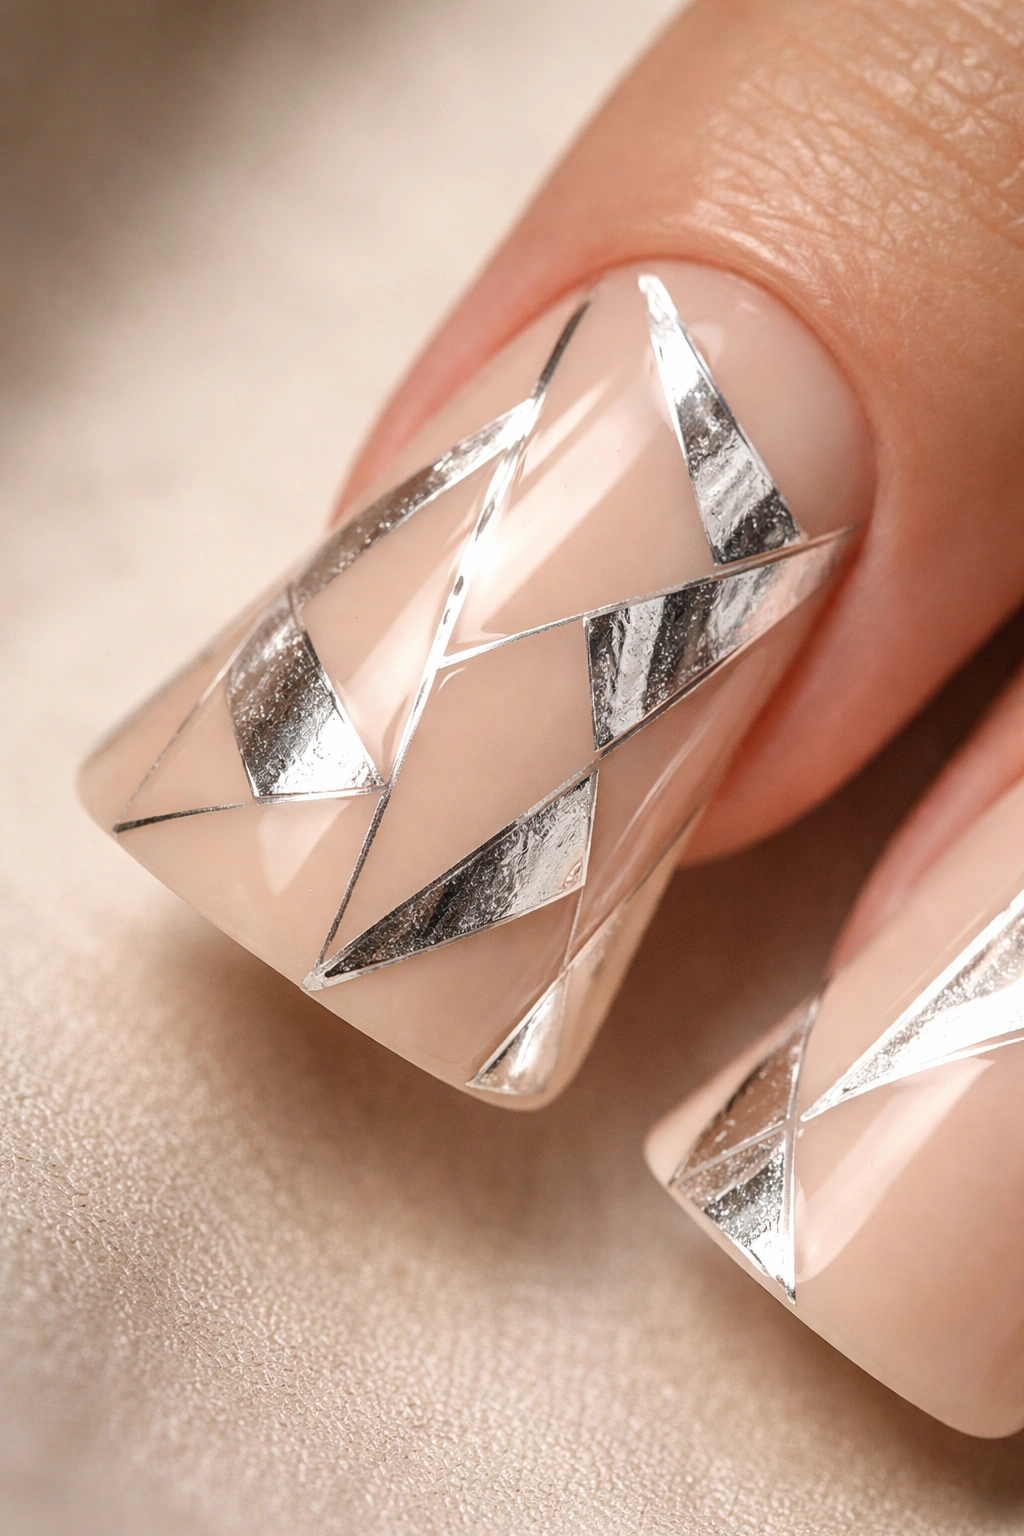
Warm, creamy nude as your base, patterned with silver foil in specific geometric shapes (not scattered randomly, but arranged with intention). This design is modern, graphic, and sophisticated without being overly decorated.
Strategic Foil Placement
Random foil scattered across nails reads differently than foil arranged in intentional patterns. Pattern creates visual interest through organization, not through busyness.
Geometric Foil Placement
- Apply two coats of nude polish for smooth, even base
- Plan your geometric pattern: diagonal stripes, corner triangles, parallel lines, or abstract angular shapes
- Apply foil adhesive in your chosen geometric pattern
- Apply silver foil over adhesive, creating distinct shapes rather than overall coverage
- The contrast between matte nude and reflective foil should be obvious and striking
- Seal with glossy top coat that holds foil in place while amplifying its reflective quality
- The result should feel like a carefully planned design, not scattered sparkle
Insider note: Foil geometric patterns are most striking when they follow the nail’s natural lines—patterns that move toward the tip feel more intentional than patterns that fight the nail’s direction.
Final Thoughts
Duck nails offer an incredible opportunity to express yourself through nail design because their width and shape naturally showcase whatever style direction you choose. Whether you’re drawn to minimalist elegance, bold color statements, sparkly embellishments, or artistic detail work, these 20 designs represent different angles and approaches you can adapt to your personal aesthetic and skill level.
The beauty of duck nails is that they’re inherently distinctive—the shape itself makes a statement, so your design can be subtle and still feel special. You don’t need elaborate nail art or expensive materials to create a design that looks polished and intentional. Sometimes a beautiful color with thoughtful application is exactly what duck nails need to feel completely current and flattering.
Start with designs that match your current skill level and preferred aesthetic, then gradually explore variations. As you become more comfortable with application techniques, you can layer in more complexity. The versatility here is genuinely remarkable—you could wear a different duck nail design every week for months and never repeat yourself. That’s what makes this shape so compelling as a nail art canvas.
