

Duck nails have taken over the nail world, and honestly, it’s easy to see why. That distinctive tapered, curved shape creates a perfect canvas for endless creativity—whether you’re going minimalist and chic or bold and statement-making. The unique silhouette itself catches light differently than traditional almond or coffin nails, giving even simple designs a modern, polished edge. What makes duck nails so appealing is that they work for nearly every aesthetic, lifestyle, and skill level. You can rock them at the office, on a night out, or just living your everyday life, and they always feel intentional and put-together.
The beauty of duck nails is that you don’t need complicated, time-intensive designs to make them look stunning. Some of the most striking nail looks start with simple color choices, minimal patterns, or clever negative space. The shape itself is doing half the visual work for you. Whether you’re a nail art beginner or someone who prefers low-maintenance manicures, there’s a duck nail idea here that fits your style perfectly. Let’s explore some of the simplest yet most effective duck nail designs that prove you don’t need to be an artist to get professional, Instagram-worthy results.
1. Soft Peachy Ombre Gradient
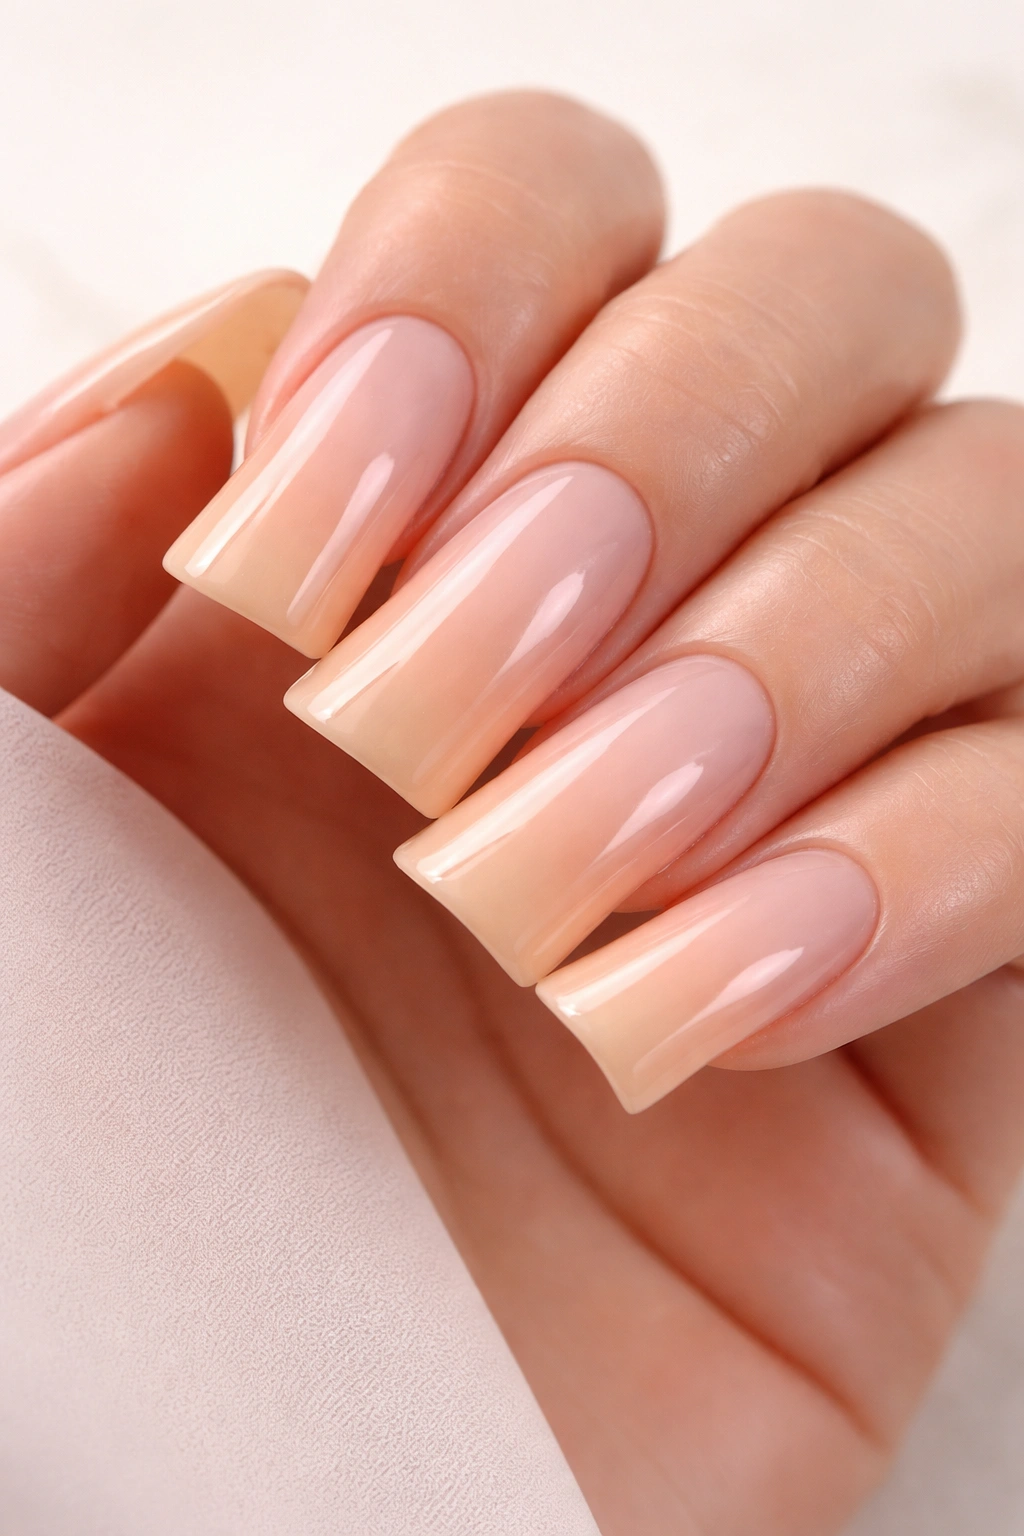
A soft peachy ombre flowing across duck nails creates an effortlessly elegant look that suits every season and skin tone. Start with a pale peachy-nude base and gradually deepen the color toward the tips, blending the shades where they meet. The ombre effect is surprisingly forgiving because any slight color variations just enhance the gradient effect rather than looking like mistakes.
Why This Design Works So Well
Peachy tones are inherently flattering and calming without looking boring. The gradient draws the eye along the length of your nail, emphasizing the duck shape’s elongated silhouette. This design transitions seamlessly from casual daytime to evening without looking out of place in any setting. You’ll get compliments on the sophisticated simplicity of it.
How to Create It
- Use a makeup sponge or a soft makeup wedge to blend two or three shades of peachy polish
- Dab the sponge gently on your nail in a stippling motion rather than dragging it—this creates a smoother gradient than stroking
- Seal everything with a glossy top coat to blur the color transitions even further
- Practice on one nail first to get the blending rhythm down before moving to all ten
2. Classic White French Tips
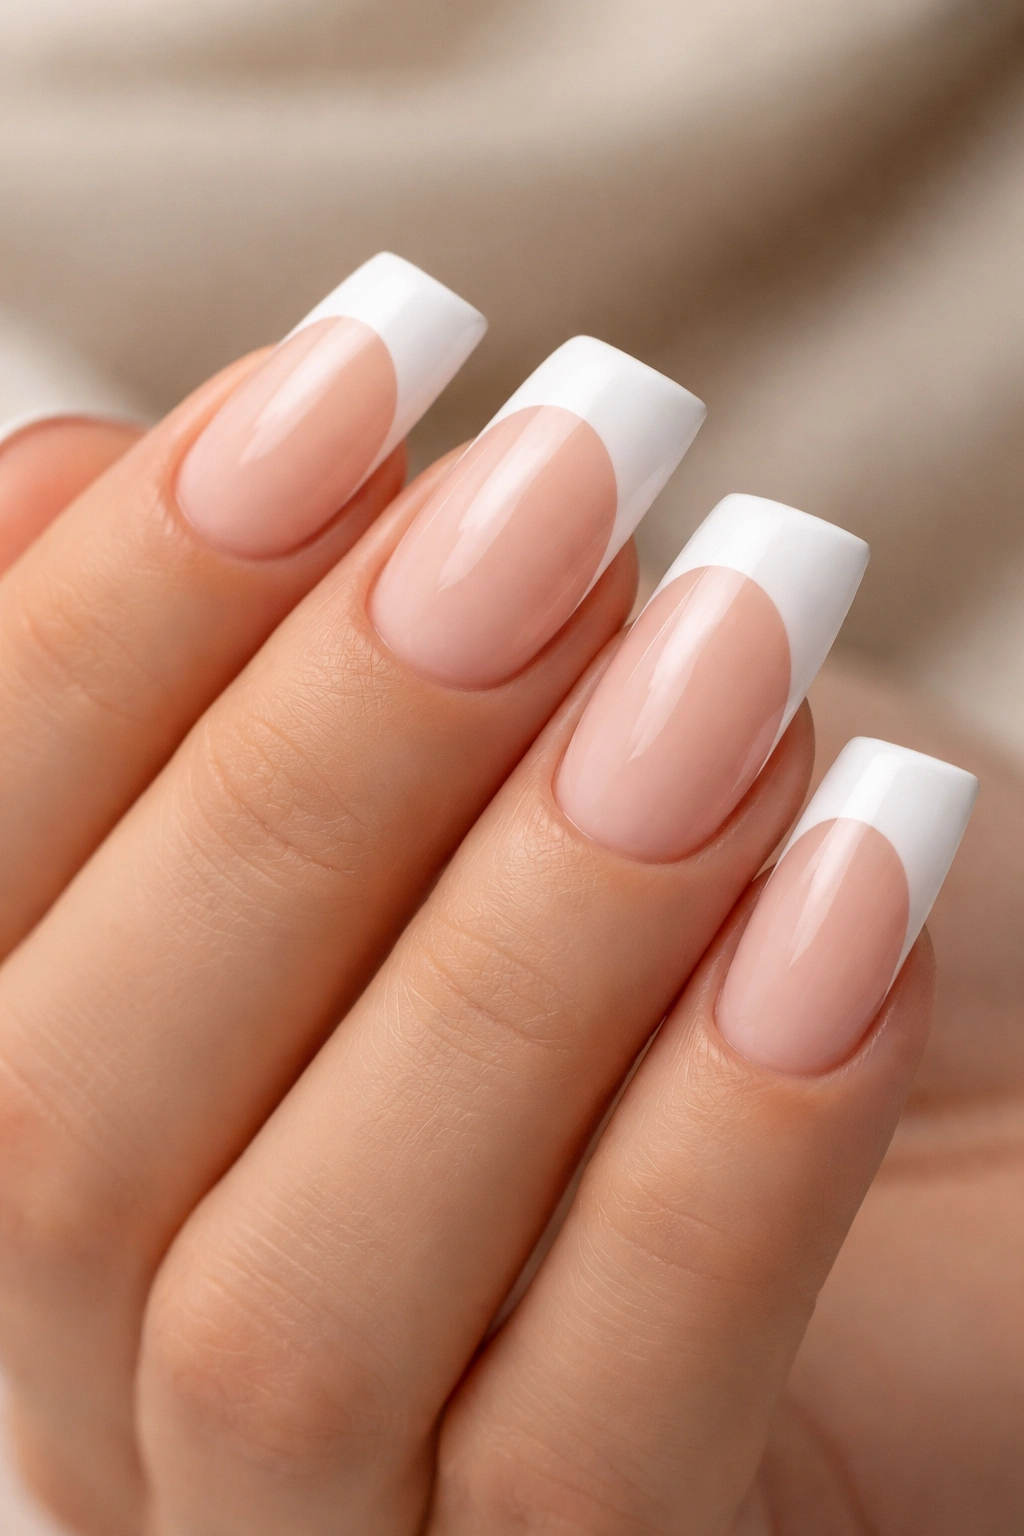
French tips will never go out of style, and on duck nails, they feel both timeless and contemporary. Paint your entire nail in a soft beige, nude, or pink base, then use white polish or a white gel polish to paint the curved tip. The arc of a duck nail’s tip creates a naturally flattering frame for the white—it’s less blunt than a traditional square French tip and more forgiving about perfect lines.
What Makes Duck Nail French Tips Different
The rounded tip of a duck nail means your white line can follow the natural curve rather than requiring a sharp, geometric angle. This actually makes French tips easier to paint freehand because you’re working with a gentle arc instead of a precise corner. The result feels more ethereal and less rigid than classic French tips. It’s the perfect introduction to French tip manicures if you’ve been nervous about the precision involved.
Application Tips for Flawless Results
- Use a thin nail art brush or angled liner brush for better control than the thick polish brush
- Paint thin layers rather than one thick layer—thin paint is easier to apply cleanly and looks more elegant
- A white gel polish holds the line crisper than regular polish and won’t yellow as quickly
- If you make a mistake, use a small brush dipped in rubbing alcohol to clean up the edges while polish is still wet
3. Deep Burgundy with Gold Flecks
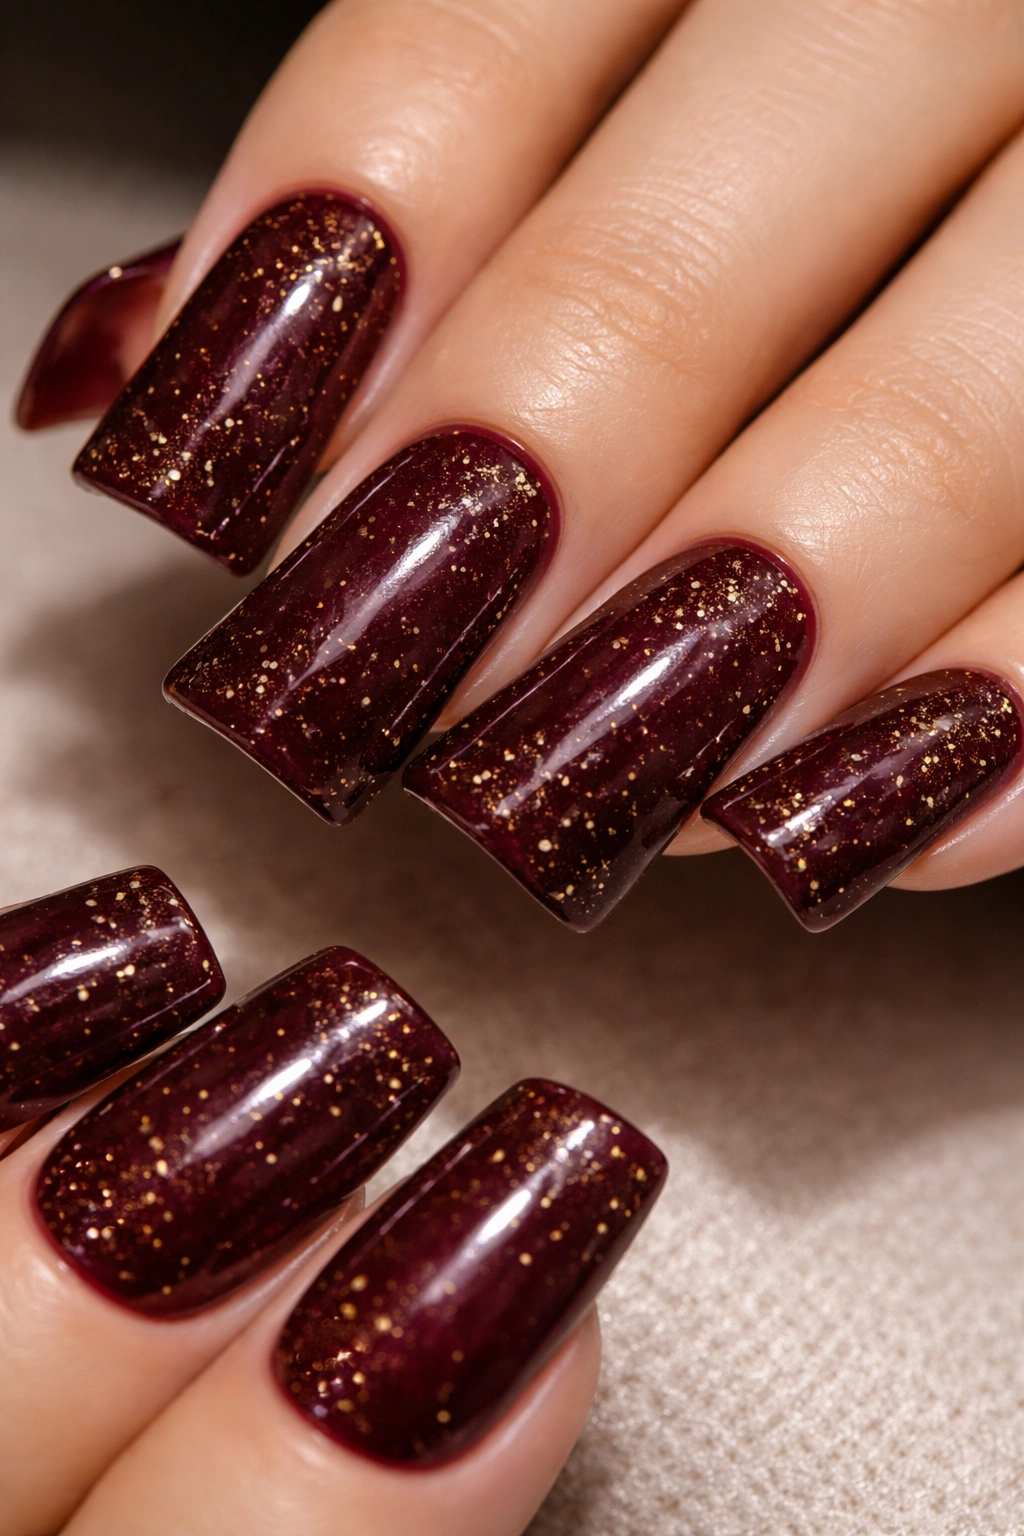
Deep burgundy is sophisticated, moody, and flattering on nearly every person, and adding gold flecks transforms it from formal to playful. Start with a rich burgundy base and let it dry completely, then use a thin dotting tool or the tip of a toothpick to scatter tiny gold flecks across the surface. The flecks catch the light and give the nail dimension without being over-the-top.
Why Burgundy and Gold Is Such a Winning Combination
Burgundy has an inherent richness that photographs beautifully and works for both warm and cool undertones. Gold adds just enough sparkle to feel celebratory without screaming “party nails.” The contrast between the deep color and the warm metallic creates visual interest on a very simple base design. This combo works equally well for a cozy evening, a holiday gathering, or everyday wear if you like your accessories bold.
Creating the Flecks Strategically
- Dip a dotting tool in gold polish and tap it onto your nail in a loose, uneven pattern—random placement looks more intentional than evenly spaced dots
- You can also use gold leaf or gold flake press-ons if you want a more luxe effect without the precision work
- A second coat of clear top coat over the flecks makes them look like they’re floating within the polish rather than sitting on top
- The more scattered your placement, the more the design feels curated rather than accidental
4. Minimalist Black Line Accent
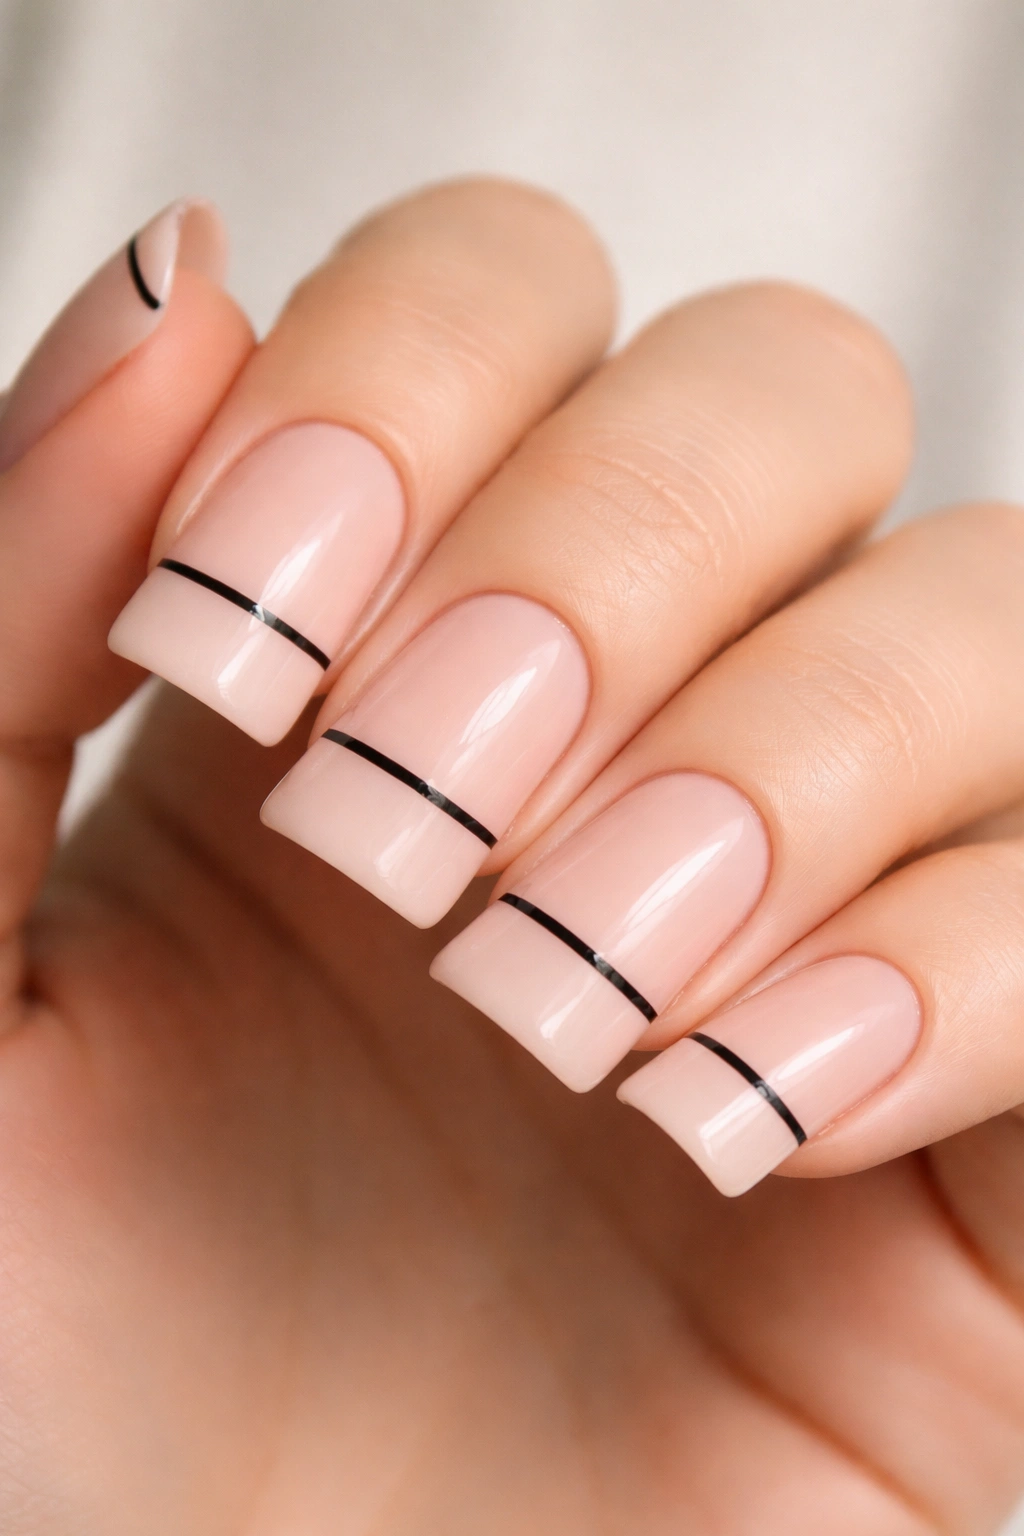
Sometimes the simplest designs create the biggest impact. Paint your nails in a clean, pale pink or nude, then add a single thin black line horizontally across the middle or diagonally from corner to corner. The stark contrast between the light base and the black line feels modern and architectural without requiring any special skills.
The Power of Negative Space and Contrast
This design relies entirely on the tension between colors and the precision of a single line—no complexity needed. The clean graphic nature of it reads as intentional and artistic even though execution is straightforward. Black lines are incredibly forgiving because they’re meant to be bold and defined, so there’s no worry about blending or blurring. It’s the kind of design that makes people assume you went to a professional salon.
Execution Techniques
- Use a thin nail art brush or even a calligraphy pen with nail polish to draw your line
- Tape off the area with a thin strip of painter’s tape if you want a perfectly crisp edge
- Draw your line while the base polish is completely dry to prevent smudging
- A matte top coat over the line and glossy over the base creates additional visual interest through the contrast in finishes
5. Soft Lavender with Tiny Flowers
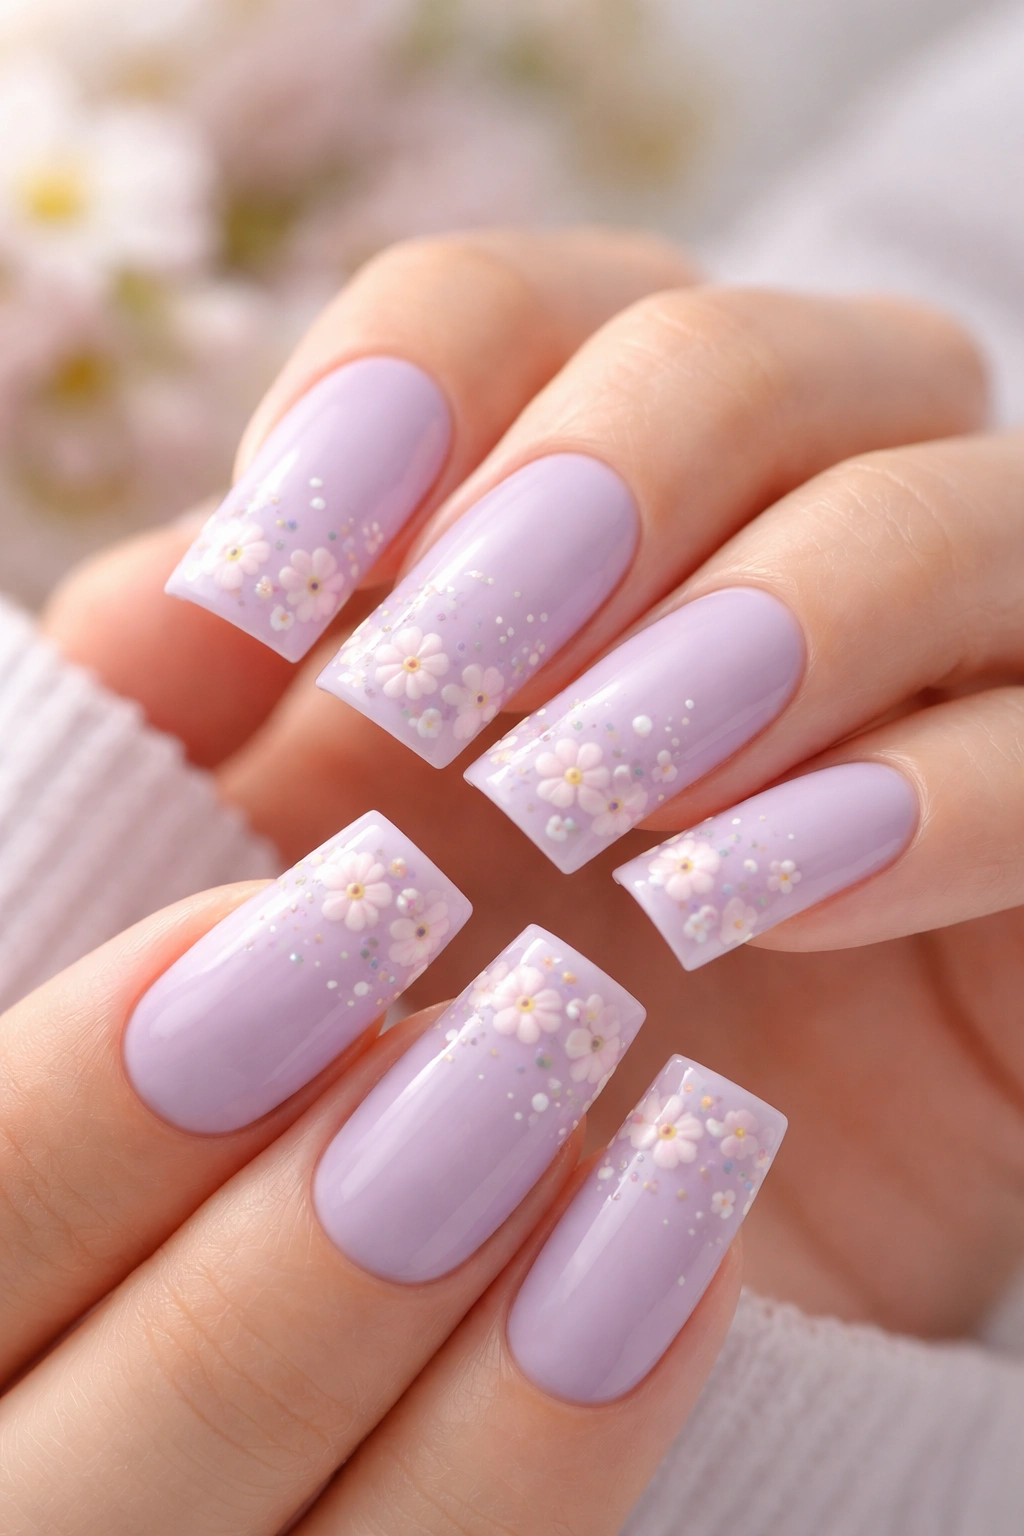
Lavender is inherently calming and pairs beautifully with delicate florals, making this design feel both romantic and contemporary. Use a soft, muted lavender as your base and add tiny white or pale pink flowers using a dotting tool. Keep the flowers small and scattered—you’re aiming for a garden whisper, not a full floral arrangement.
Creating Flowers Without Advanced Skills
Flowers are simply dots arranged in a circle with a tiny dot in the center. Use two coordinating colors for the petals and a contrasting color for the center—for example, white petals with a pale yellow center. Work on one flower at a time and let each one dry slightly before moving to the next to prevent smudging. Even imperfect flowers have charm; they look hand-painted in the best way.
Design Placement That Looks Intentional
- Cluster flowers toward the tips of your nails to emphasize the duck shape
- Leave some nails plain lavender to balance the ones with flowers—an alternating pattern is visually striking
- Space flowers unevenly rather than in strict rows; natural placement always looks more polished
- Add tiny green leaf marks with a thin brush to ground your flowers and suggest a garden
6. Nude Base with Subtle Shimmer
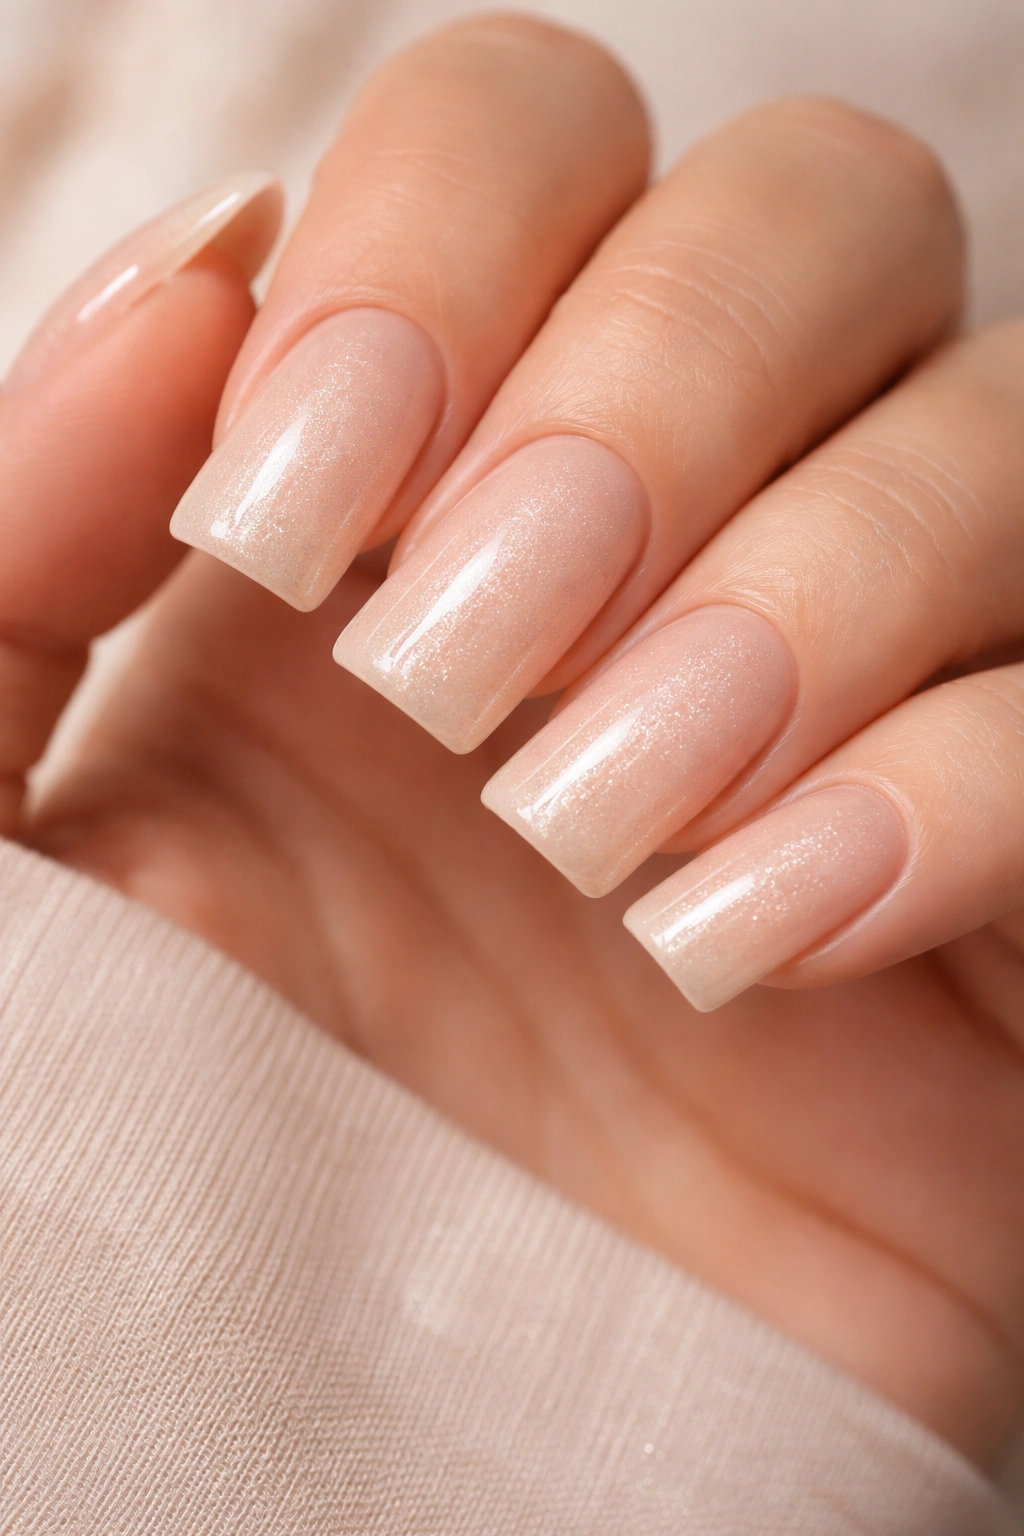
Sometimes you want something that feels polished but isn’t attention-grabbing—that’s where a nude base with subtle shimmer excels. Choose a nude polish that matches your skin tone precisely, then use a shimmer top coat or a nude polish with fine shimmer mixed in. The result catches the light just enough to look elevated without being sparkly.
Why Nude Shimmer Is the Sophistication Hack
A truly coordinated nude-to-skin tone creates an optical illusion that lengthens your fingers and makes your nails look naturally healthy and luminous. Adding shimmer gives that nude base dimension and prevents it from looking flat or one-dimensional. The subtlety of the shimmer means it works in professional settings while still feeling special. It’s the ultimate “my nails but better” design.
Achieving the Perfect Match
- Swatch your nude polish directly on your skin in natural light before committing—what looks right in the store might be too warm, cool, pink, or yellow once you apply it
- If shimmer top coats are too intense, mix a tiny amount of shimmer polish into your nude base to create custom shimmer polish
- Apply shimmer only to the upper half of the nail for a gradient effect from matte to shimmery
- Matte top coat over the shimmer actually makes it read as more subtle and sophisticated
7. Pastel Pink with White Geometric Shapes
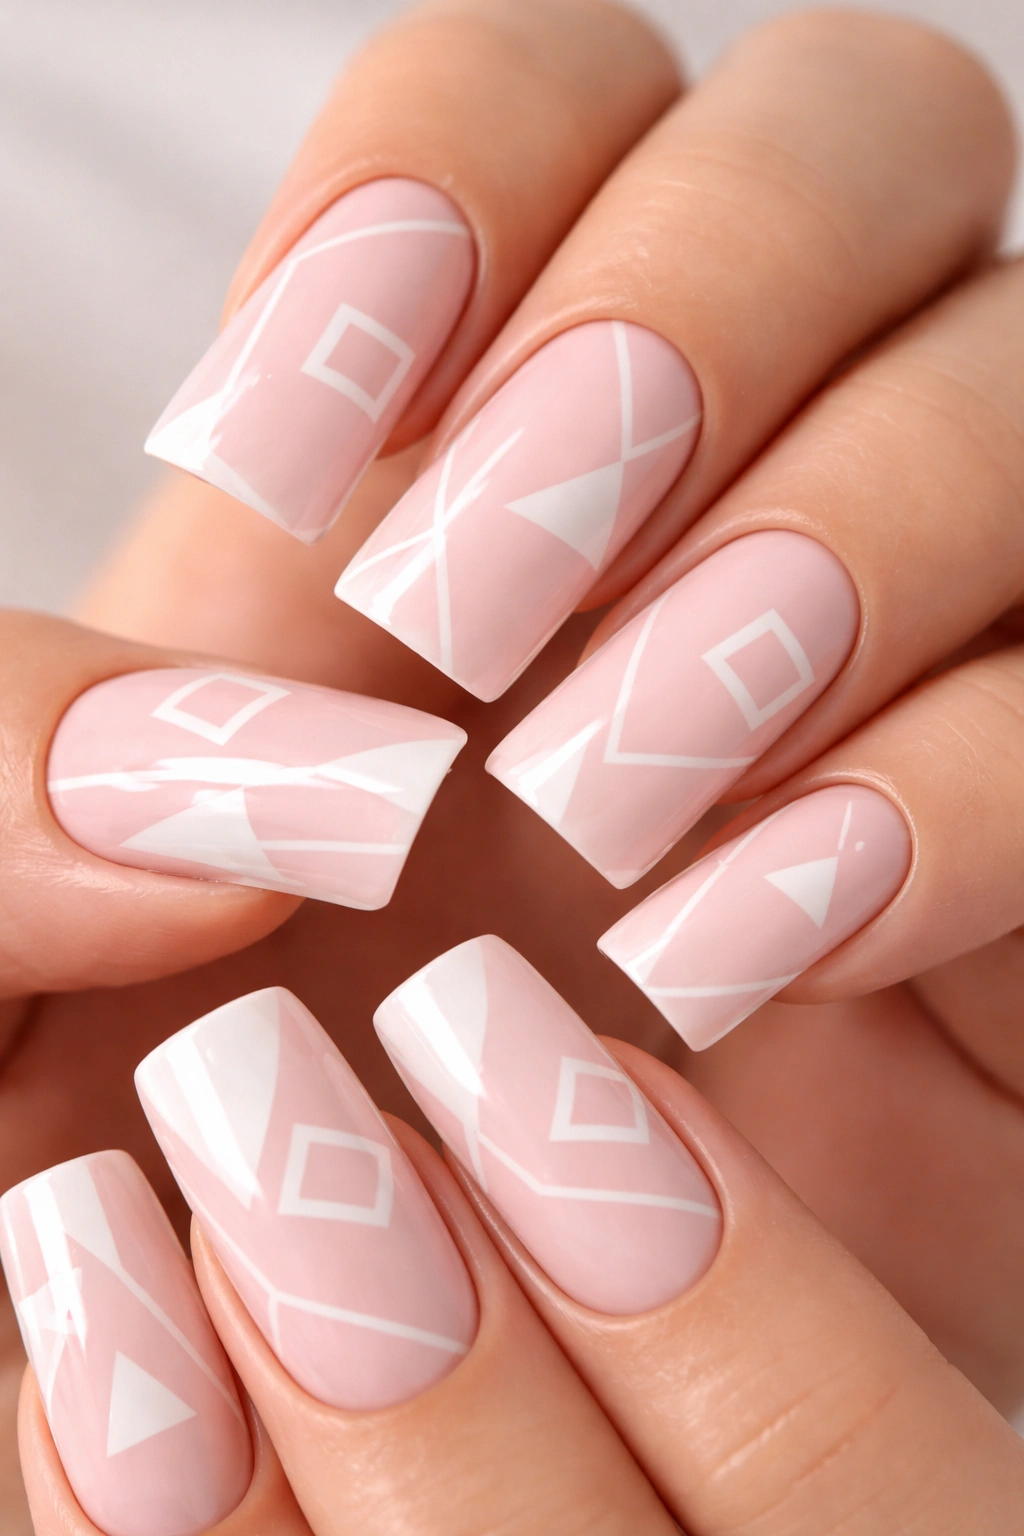
Pastels are having a major moment, and pairing soft pink with clean white geometric shapes feels current without being trendy or dated. Use a light, creamy pink as your base and add white squares, triangles, or simple shapes using a thin brush or painter’s tape. Geometry is forgiving because precision is actually part of the aesthetic—slight imperfections read as intentional variation.
Why Pastels Work So Well on Duck Nails
Soft, desaturated colors feel calming and approachable, making even graphic designs feel gentle and artistic. The duck shape’s curves provide a natural contrast to the geometric angles, creating visual balance. Pastels photograph beautifully and feel appropriate for virtually any occasion from spring brunches to winter holiday parties. The combination feels simultaneously playful and put-together.
Creating Crisp Geometric Shapes
- Painter’s tape is your best friend—place strips on your nail in your desired shape, paint white over them, and carefully peel away the tape once the paint is completely dry
- For freehand shapes, use a thin angled brush and don’t overthink it; slight wobbly lines actually enhance the hand-painted aesthetic
- Mix and match shapes rather than repeating the same one on every nail—this creates visual interest and a curated feel
- White on pastel has better coverage than most color combinations, so you typically need only one coat
8. Chrome or Mirror Finish Nails
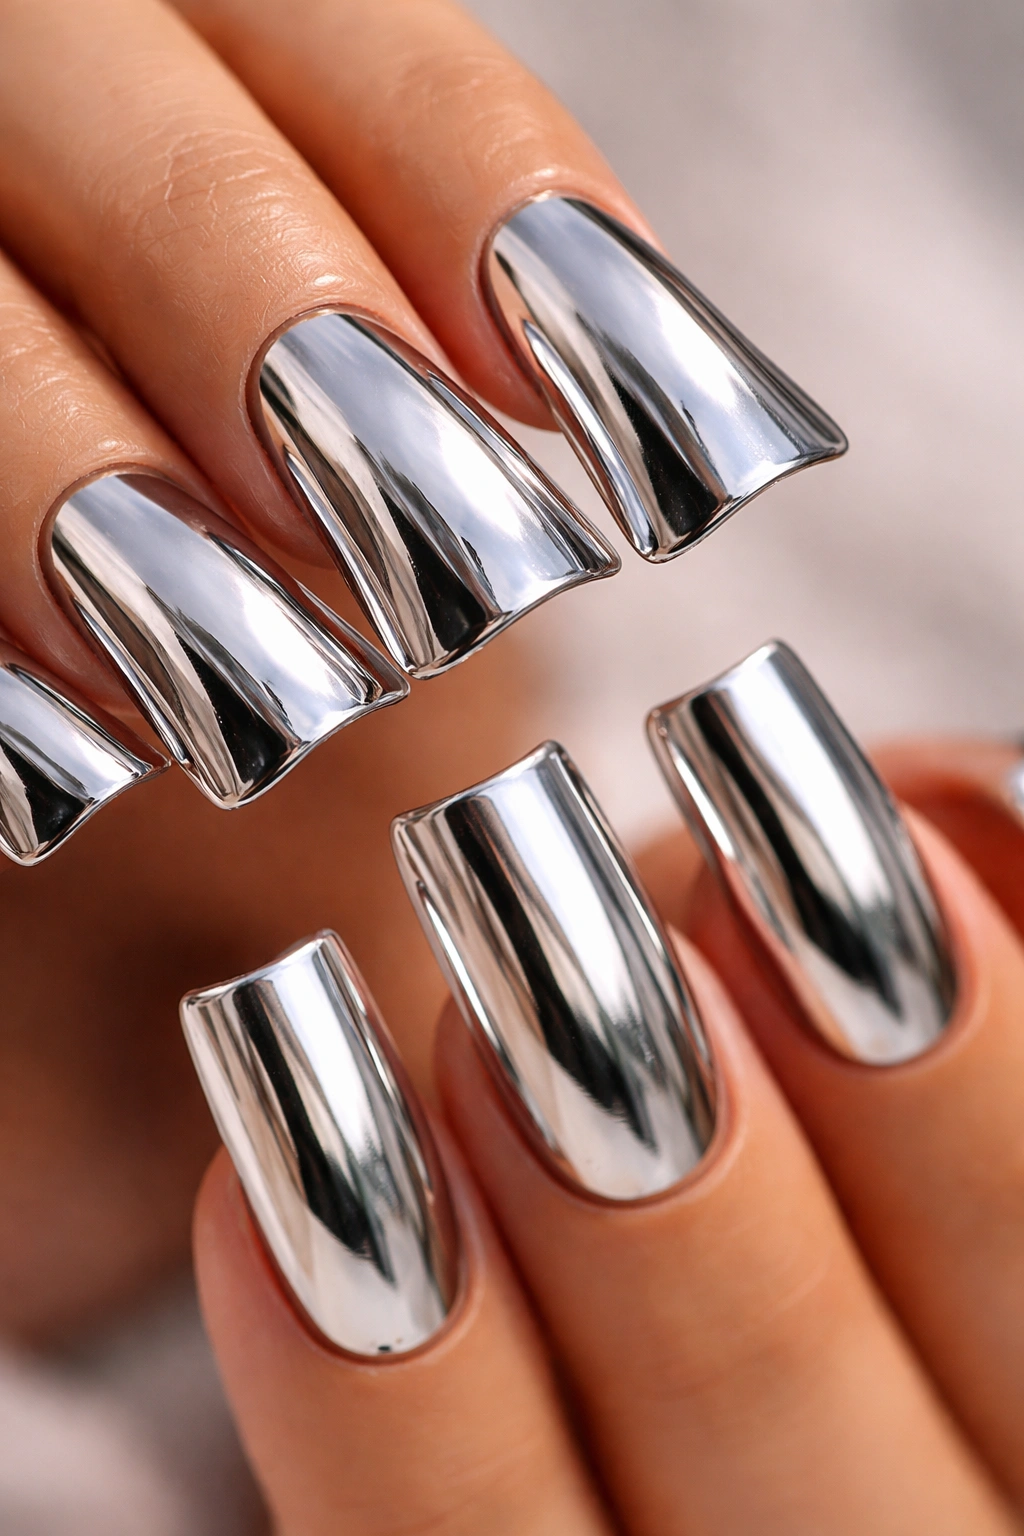
Chrome and mirror finishes have moved beyond specialty salons and are now available in easier-to-apply products, making metallic duck nails accessible for everyone. These high-shine finishes catch light dramatically and make your nails look impossibly shiny and modern. A simple solid chrome or mirror finish is statement-making on its own without needing additional design work.
The Appeal of Metallic Finishes
Chrome finishes create an almost three-dimensional effect that regular polish can’t achieve, making even a simple solid color look complex and expensive. The reflective quality draws attention to the shape of your nails, showing off the duck nail silhouette’s lines beautifully. A metallic finish works for bold personalities and anyone who enjoys being the center of attention. It reads as runway-ready even when you’re doing absolutely nothing else.
Application Tricks for Mirror-Smooth Results
- Most chrome powders require a sticky base coat and work best over wet gel polish rather than dry regular polish
- Use a soft brush or cotton pad to rub the powder onto the nail in circular motions for the most intense finish
- Buffer any rough edges once the powder is set to create a seamless, smooth surface
- A thick clear top coat seals everything and prevents the powder from rubbing off on your hands
9. Soft Blue with Delicate White Stars
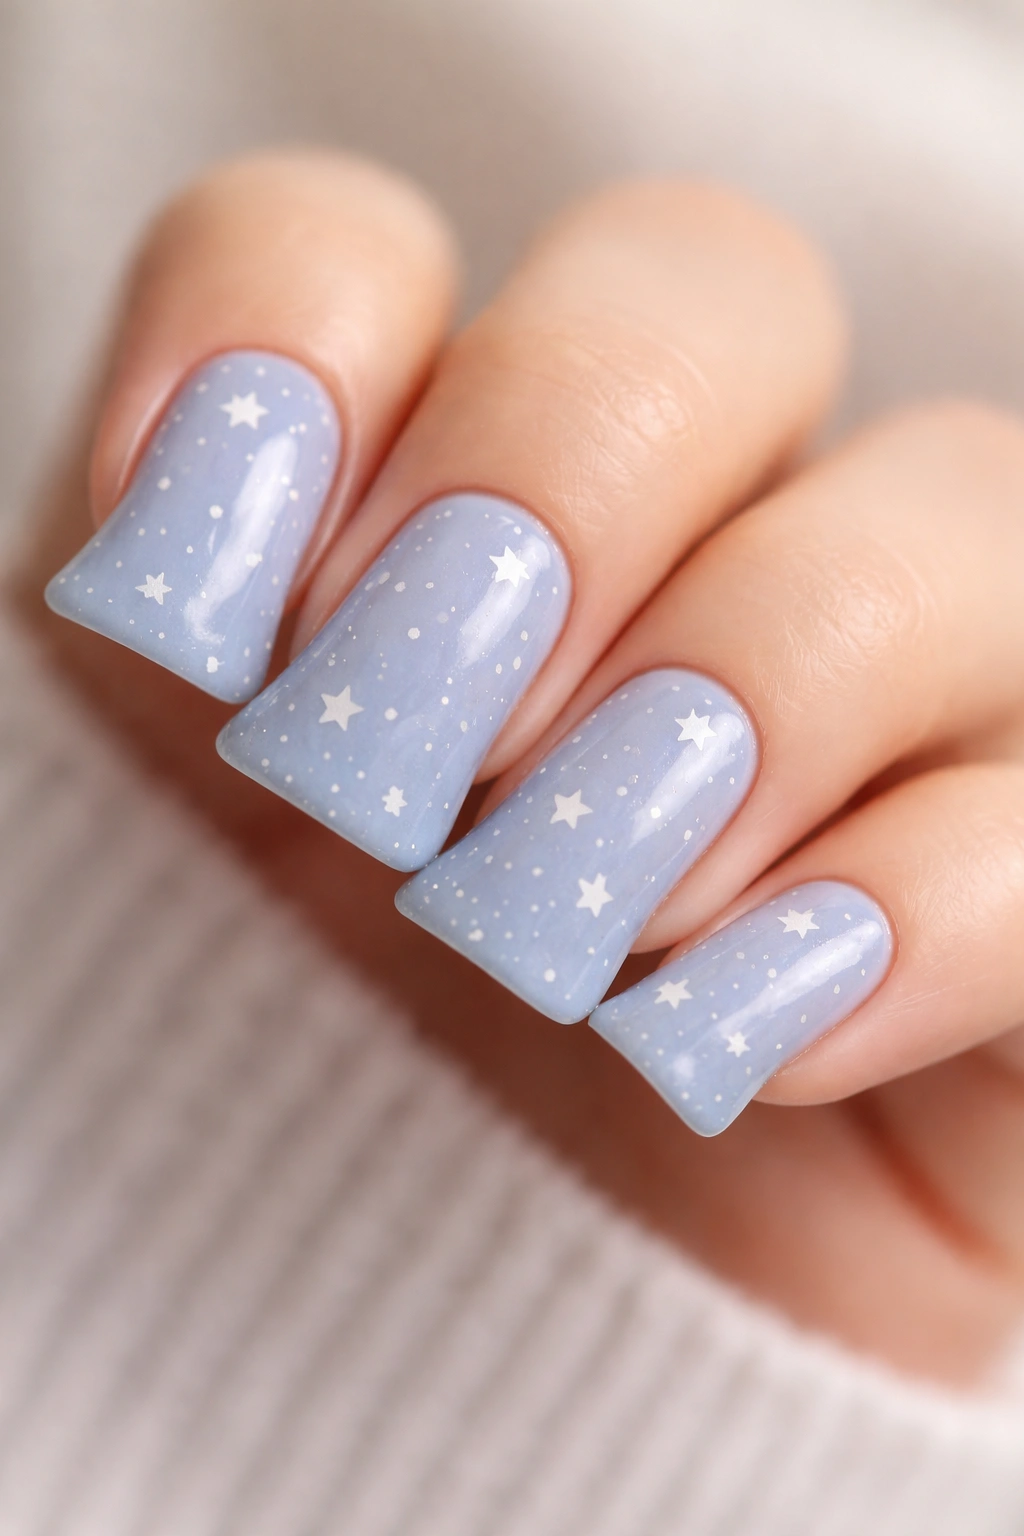
Blue is calming, universally flattering, and pairs perfectly with tiny white stars for a whimsical-but-wearable design. Use a soft, dusty blue or periwinkle as your base and add stars of varying sizes scattered across the nail surface. Stars are genuinely one of the easiest shapes to paint—five points arranged in a circle, and you’re done.
Making Stars Look Intentional
Stars work because they’re universally recognizable and require zero blending skills; they’re either there or they’re not. Even wobbly stars have charm because handmade always beats perfect. The soft blue base ensures this design reads as whimsical rather than childish, appropriate for adults who love a touch of playfulness. This is an excellent design for practicing your freehand nail art skills.
Star Painting Technique
- Use a very thin brush or the edge of a toothpick dipped in white polish
- Start by placing five small dots in a star pattern, then connect them with thin lines
- Alternatively, paint tiny filled-in triangles arranged in a star pattern for a more solid, less delicate look
- Scatter stars across the nail in a loose pattern rather than placing them in rows—randomness feels more organic
10. Cream Base with Brown Eyeliner Details
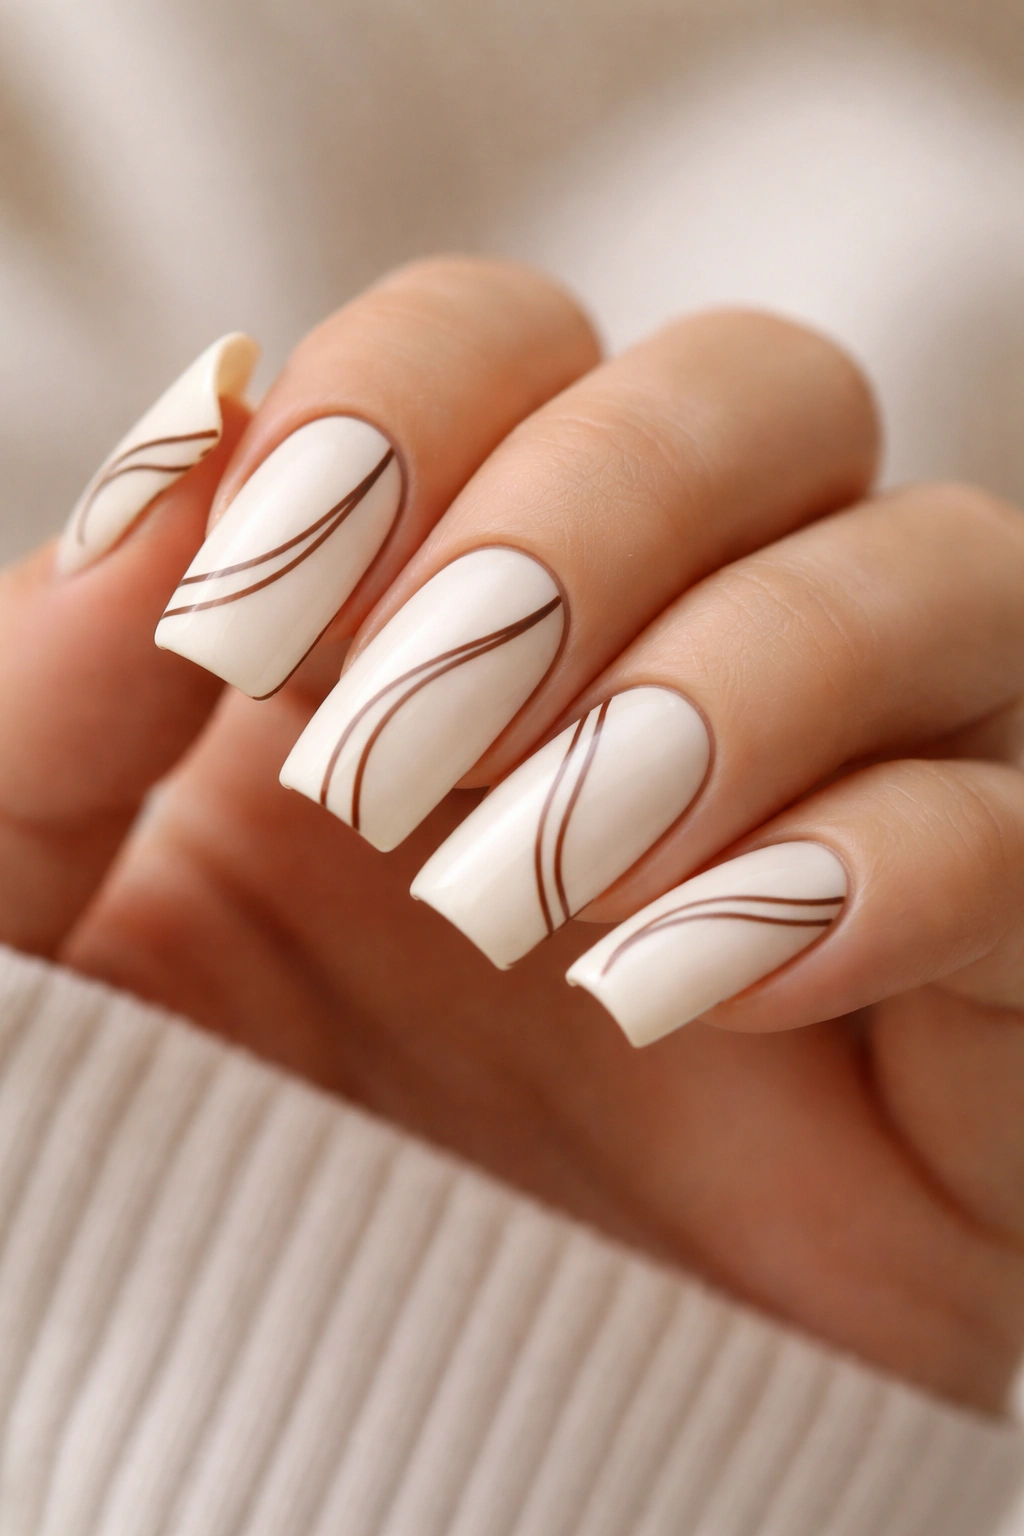
This design is clever and easy: a creamy off-white base with thin brown lines creating a minimalist face or abstract expression. Brown eyeliner pencil (yes, the makeup kind) can actually work on nails, or use a thin brown nail polish with a precise brush. This quirky design is perfect for people who love humor and individuality in their manicures.
Why This Design Stands Out
The unexpected use of eyeliner creates an art-school vibe that feels creative and confident. Brown lines on cream create just enough contrast to be readable without being loud. This design is wildly shareable and always gets conversations started—people love asking if that’s actually eyeliner. It’s the kind of design that reflects a sense of humor and willingness to take creative risks.
Creating the Details
- Use an angled eyeliner brush and brown eyeliner pencil, or a thin nail art brush with brown polish
- Sketch simple lines, dots, or abstract marks rather than trying to create realistic features
- Seal everything with a clear top coat if using eyeliner to prevent it from smudging throughout the day
- Keep the design minimalist—a few intentional marks are more striking than a crowded nail
11. Dusty Rose with Pressed Flowers
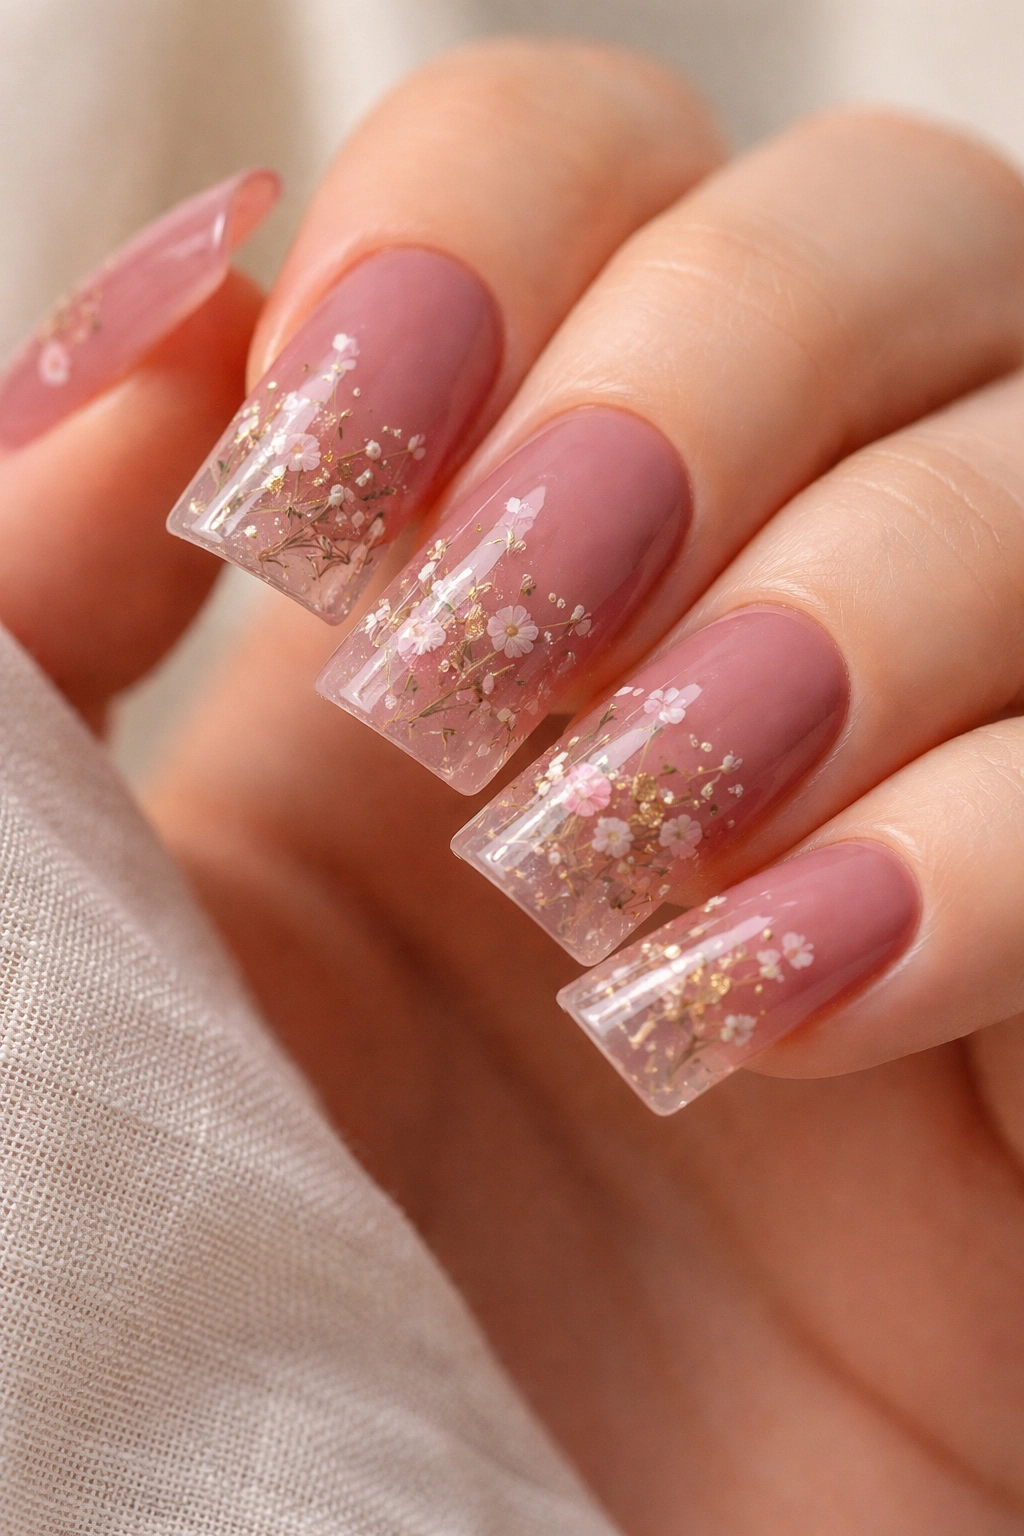
Preserved flowers or dried flowers mixed into clear polish create an ethereal, botanical aesthetic that feels both delicate and unique. Use a dusty rose base and apply a clear topcoat mixed with tiny dried flowers or floral confetti. The flowers appear suspended in the polish, creating depth and visual interest with minimal effort.
The Appeal of Botanical Elements
Pressed flowers feel sophisticated and natural in a way that painted flowers sometimes don’t—they’re the real thing. This design bridges the gap between simple and elaborate; while technically minimal, the visual impact feels complex and considered. It’s perfect for people who love nature-inspired aesthetics and want their nails to reflect that without getting too cutesy. Every nail looks slightly unique because the flower placement is organic.
Using Real Botanical Elements
- Pre-made floral nail art sets with pressed flowers are available and often come with application instructions
- You can also press your own tiny flowers using the microwave parchment paper method for a truly personalized design
- Layer the flower onto a clear base coat, then seal with your topcoat to encapsulate it
- Smaller flowers (like baby’s breath or tiny daisies) work better than large, bulky flowers that won’t lay flat
12. Warm Caramel with Burnt Orange Accent Nail
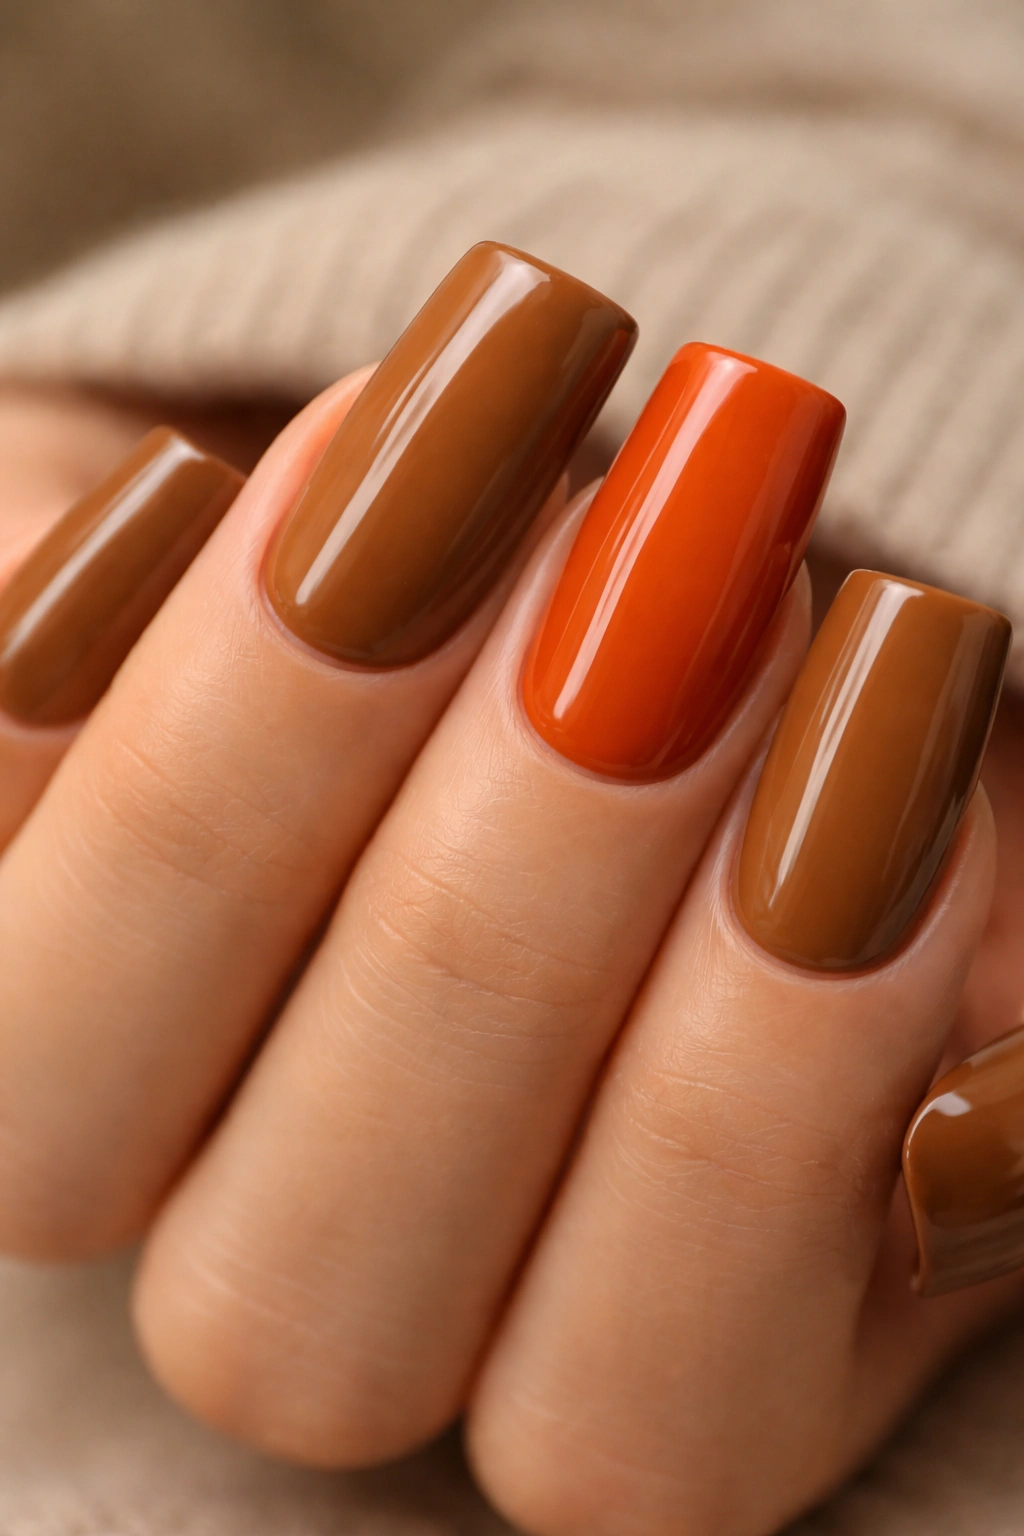
Warm, earthy tones feel incredibly current and work for all skin tones, making this a universally flattering design. Paint your nails in a warm caramel brown and designate your ring finger or middle finger as an accent nail in burnt orange. The two colors harmonize beautifully—they’re from the same warm family but different enough to create impact. One accent nail feels balanced and intentional rather than overwhelming.
Why Accent Nails Work
An accent nail breaks up the visual uniformity and gives you a focal point without requiring complex design work. The warm brown-to-orange color story feels upscale and thoughtful, like you’ve put real consideration into your color choice. This design is perfect for people who appreciate color but prefer understated nail art. It works in professional settings and adds personality without screaming for attention.
Choosing Your Accent Nail Strategically
- Ring finger accent nails draw attention when you’re gesturing, making them the most visible option
- Middle finger accents create visual balance across the hand
- If you have a dominant hand, consider putting the accent on the opposite hand for balance
- Even all nails in the caramel with only the thumb in burnt orange creates a completely different vibe—more striking and unusual
13. Translucent Nude with Negative Space Design

Translucent polishes are underrated—they let your actual nail show through while adding a wash of color that feels natural and elevated. Use a translucent nude or soft pink and add a small area of pure negative space (unpainted nail) in a geometric shape like a circle or triangle. The contrast between the soft translucent polish and your actual nail creates visual interest through restraint.
The Sophistication of Negative Space
Negative space feels intentional and artistic because it’s the opposite of what most people expect from nail art. When used deliberately, blank space reads as confidence and design sense rather than an incomplete manicure. This approach works especially well if you have naturally beautiful, healthy nails you want to showcase. It’s minimalist in the best possible way.
Creating Clean Negative Space
- Use painter’s tape to mask off your desired shape before applying translucent polish
- Apply the polish over the entire nail, then carefully remove the tape to reveal the unpainted area
- Make sure your nails are clean and have no ridges; the transparency will show everything
- A clear gloss over the translucent areas makes the color look even more luminous
14. Soft Yellow with Delicate Black Outlines
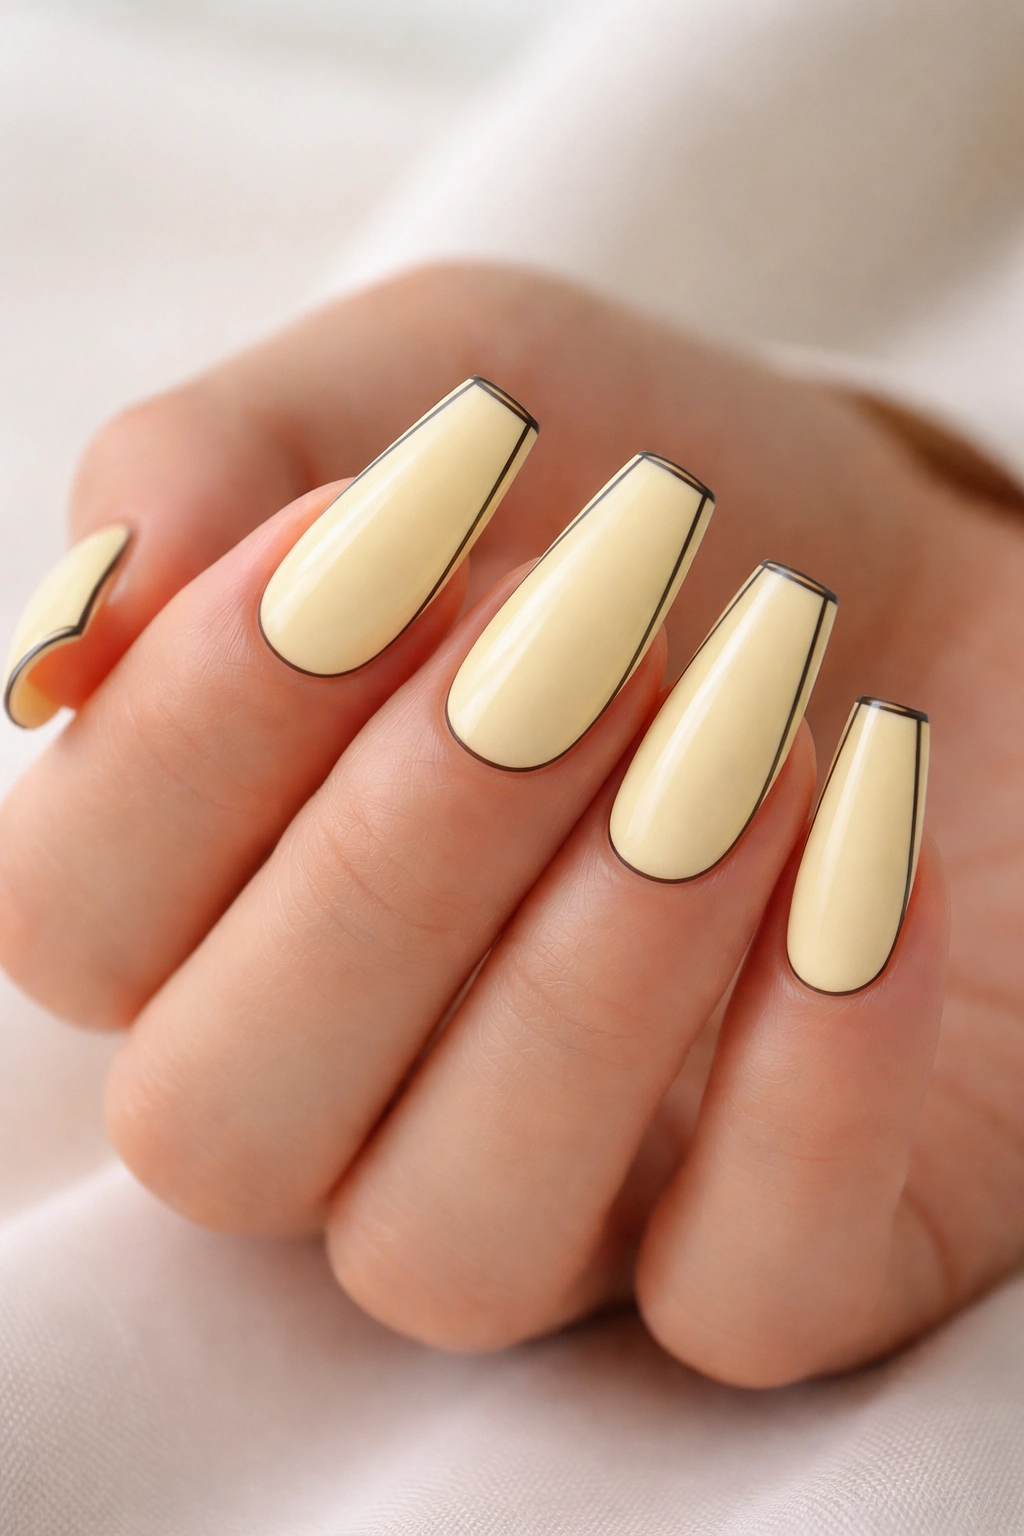
Soft, pale yellow is cheerful without being neon or childish, and fine black outlines add an illustrative quality that feels artistic and contemporary. Paint your nails in pale butter yellow and use a thin black brush to outline each nail or create simple shapes. The black outline effect is reminiscent of colored pencil illustrations and gives your manicure an art-forward vibe.
Why Black Outlines Elevate Simple Colors
A dark outline makes any color read as more intentional and designed—it’s a technique borrowed from illustration and comic art. The contrast between the warm yellow and the cool black creates visual pop without needing multiple colors. This design is perfect for people who love art, design, or anything with an indie aesthetic. It feels creative and individual without requiring advanced technical skills.
Applying Precise Black Outlines
- Use a very thin nail art brush and black gel or regular polish—thin strokes look more intentional than thick ones
- Outline just the edge of your nail (around the perimeter) for a clean, minimalist look
- Alternatively, outline simple shapes you’ve drawn with yellow to create a stained-glass effect
- The black lines look most striking against the pale yellow with matte finish topcoat rather than glossy
Final Thoughts
The beautiful truth about duck nails is that the shape itself is doing most of the visual heavy lifting, which means you can keep your designs wonderfully simple and still achieve stunning results. Every design here requires basic supplies, minimal technique, and maximum impact. Whether you gravitate toward soft pastels, moody jewel tones, or minimalist graphics, there’s a duck nail idea here that speaks to your style.
The key is choosing designs you’ll actually love wearing, not designs that look impressive on a screen. A cream base with a single black line is just as valid as an intricate floral pattern—what matters is that it makes you smile when you look down at your nails. Start with one design that speaks to you, master it, and then branch out from there. Duck nails are endlessly forgiving, incredibly versatile, and honestly one of the easiest ways to elevate your entire look.
