

Duck nails have become one of the most striking nail trends, and the slim version offers a more wearable take on this bold aesthetic. Unlike the dramatic, extra-wide webbing of traditional duck nails, slim duck nails maintain that signature curved, rounded silhouette while keeping the design more refined and less likely to catch on everything you touch. They’re the middle ground between subtle elegance and eye-catching drama — perfect for anyone who wants to make a statement without sacrificing practicality.
What makes slim duck nails so appealing is their versatility. You can dress them up with intricate nail art, keep them minimalist with a single-color polish, or layer on glitter, chrome, or marble effects. The shape itself is forgiving too — it flatters most hand shapes and nail beds, and you can adjust the curve to suit your personal style and comfort level. Whether you’re heading to a special event or just want to refresh your everyday look, there’s a slim duck nail design that’ll work for you.
The best part? These nails don’t require a trip to an expensive salon every week. Many designs are achievable at home with the right tools and a little patience, or you can take inspiration to a nail technician for a custom creation. Let’s explore eleven gorgeous slim duck nail ideas that prove this trend is here to stay.
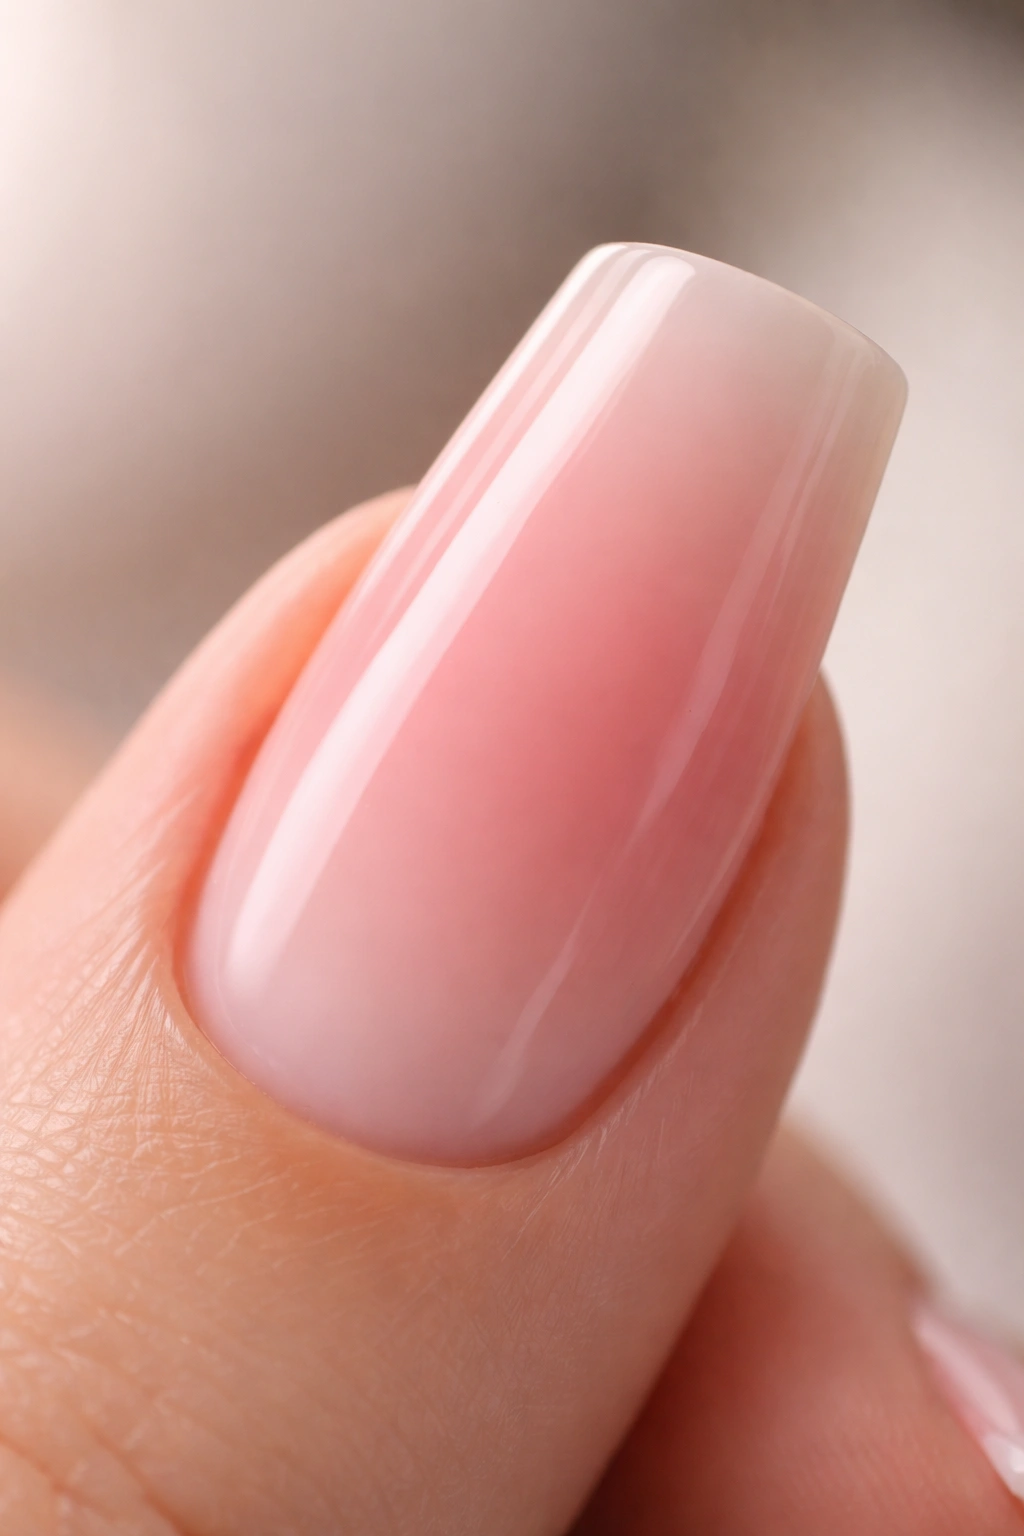
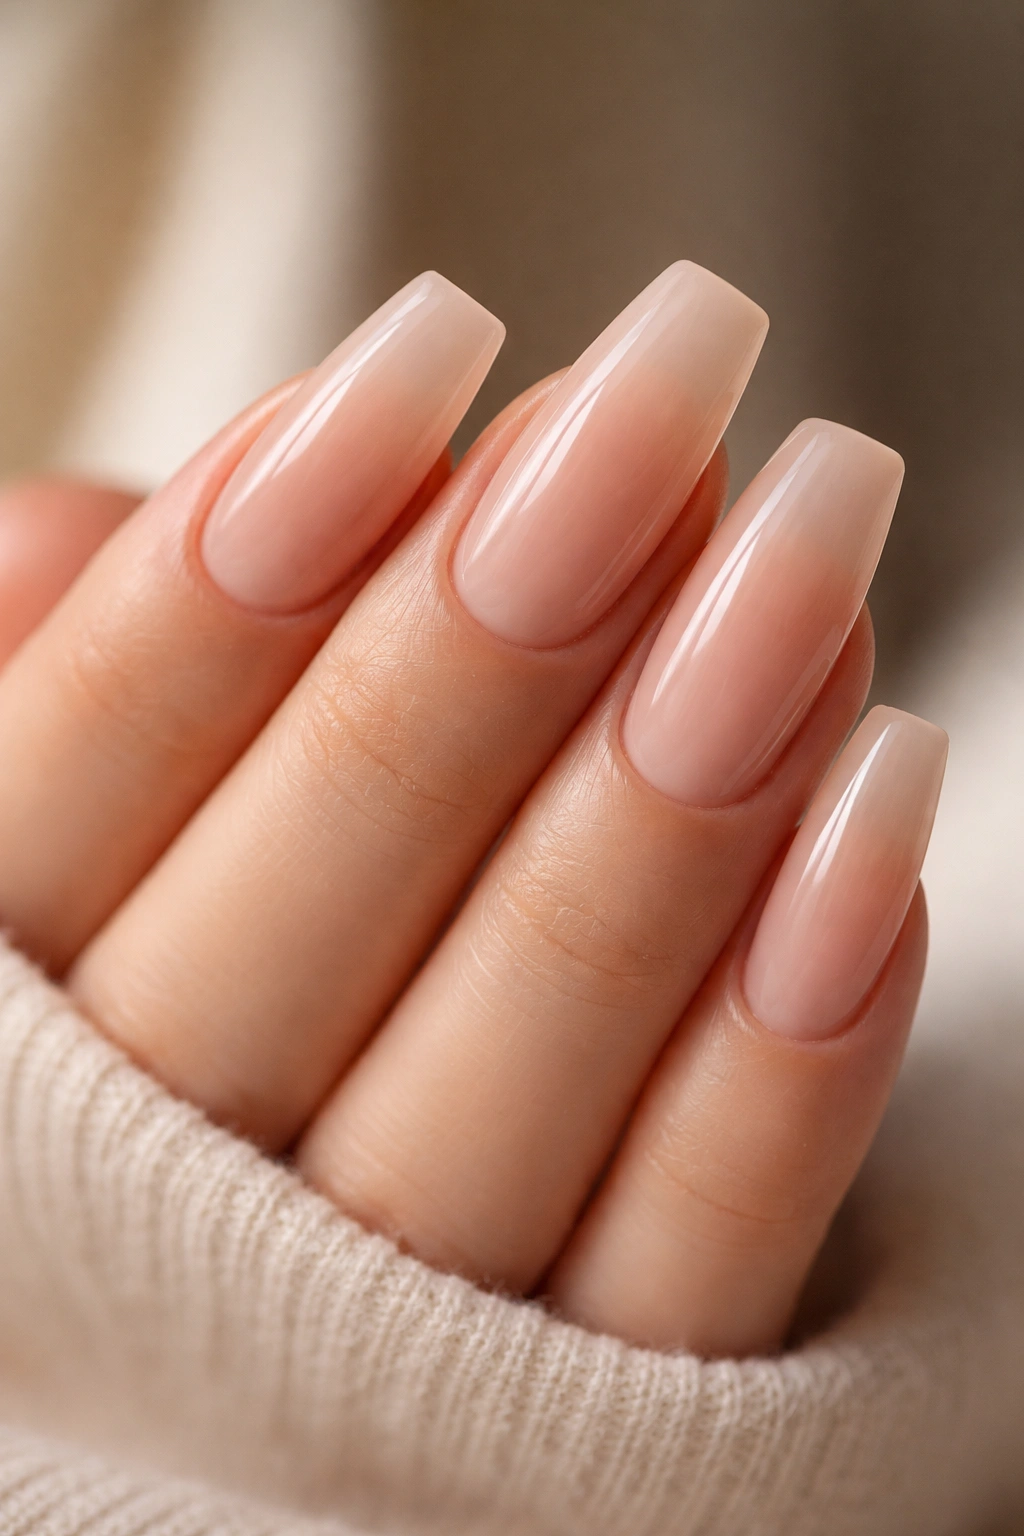
1. Classic Nude with Soft Curve
A nude base is the ultimate canvas for slim duck nails because it highlights the shape itself without competing for attention. This design works beautifully in warm beige, cool pink-nude, or even a milky white shade — whatever complements your skin tone. The simplicity is actually what makes it sophisticated; the focus stays entirely on the elegant curve and the polish quality.
Why This Design Never Fails
Nude duck nails are timeless because they suit every occasion and skin tone. The soft, rounded shape feels less aggressive than a stark white or dark color, making it perfect if you’re new to the trend or want something office-appropriate. The design reads as polished and intentional rather than experimental, so you can wear it confidently anywhere.
How to Perfect the Look
- Use a sheer, buildable nude polish for a natural finish that looks like your nails but better
- Apply a glossy top coat to emphasize the smooth curve and add dimension
- Keep the nail edges sealed and smooth for a high-end manicure appearance
- Consider a nude with a subtle shimmer for extra sophistication without being glittery
Pro tip: Layer a nude base with a barely-there pink or peach for extra warmth and dimension that photographs beautifully.
2. Ombré Gradient from Nude to Deep Burgundy

Ombré on slim duck nails creates a stunning visual effect because the curved shape elongates the gradient transition. Starting from a pale nude at the base and deepening to burgundy or wine at the tip creates depth and movement. This design feels luxurious and high-fashion without being over-the-top.
The Art of Seamless Blending
The magic of an ombré duck nail is the gradient transition. You can achieve this by sponging layers of color onto the nail tip, blending where the shades meet. Burgundy pairs perfectly with nude because it’s warm, rich, and doesn’t clash with any skin tone. The deeper color at the tip adds visual weight that balances the curved shape.
Application Tips for Success
- Use a makeup sponge dampened slightly to blend polish on the nail
- Apply thin layers and build color gradually to avoid a muddy appearance
- Seal with a glossy top coat to smooth out any texture from the sponging process
- Consider a top coat with a subtle shimmer to catch light across the gradient
Worth knowing: This design works best when you give yourself at least 30 minutes for the polish to set between layers — rushing the gradient shows in the final result.
3. Chrome or Mirror Finish with Metallic Shine
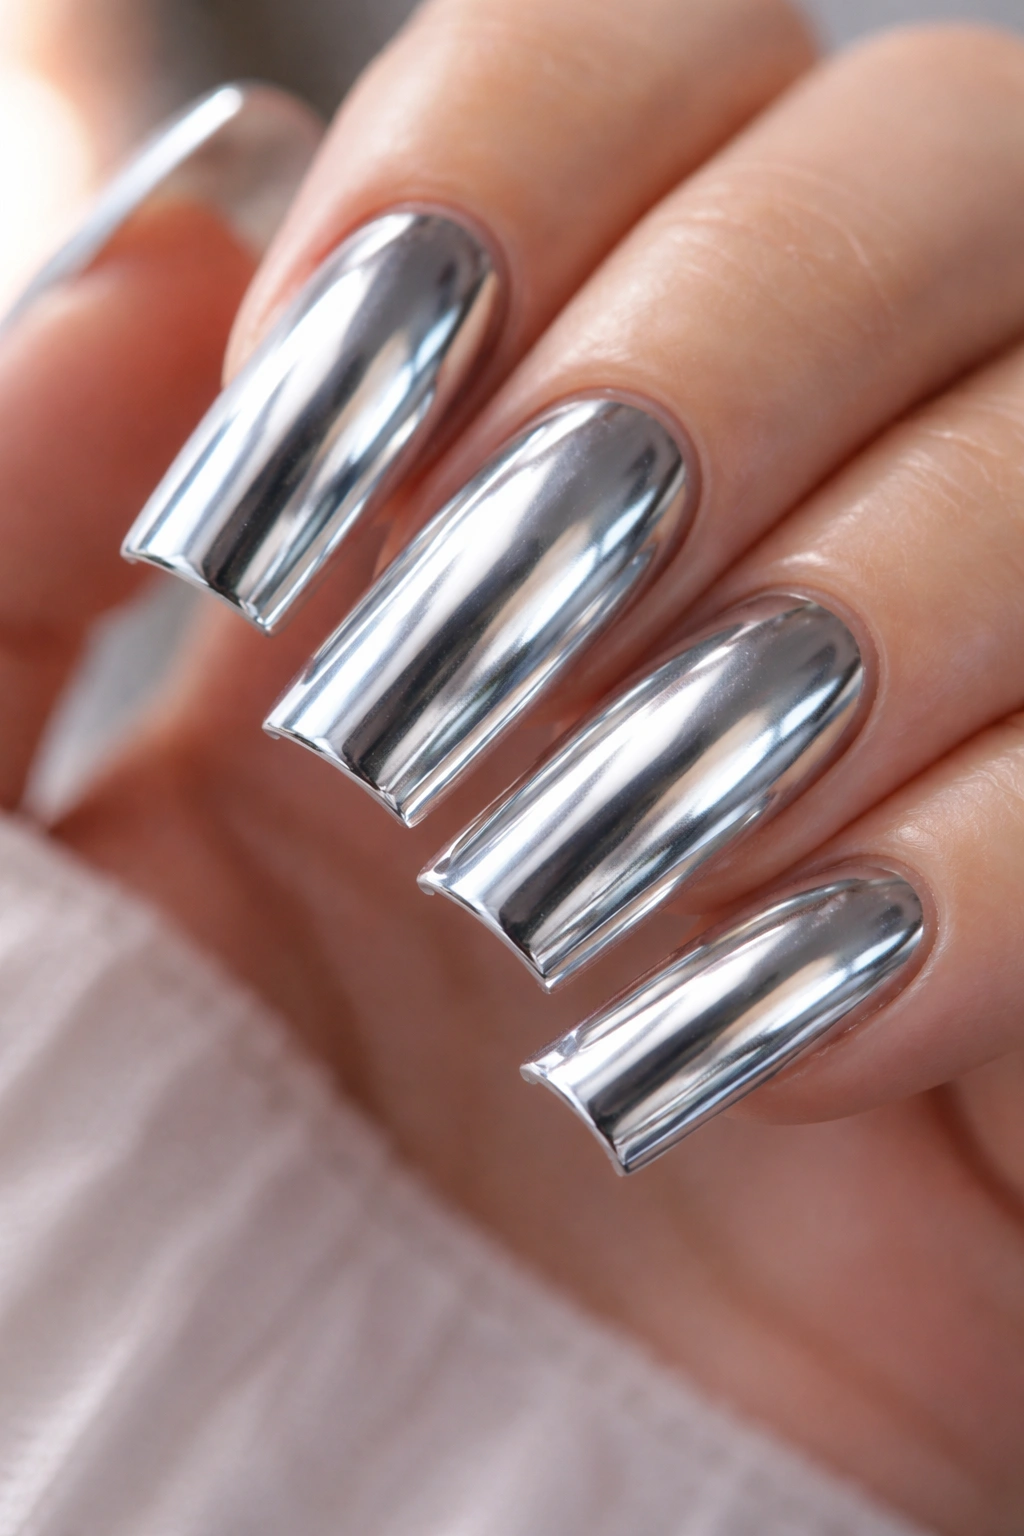
Chrome or mirror powder on slim duck nails creates an almost futuristic, eye-catching look that’s surprisingly modern. The reflective finish works especially well on the curved surface because it catches light from different angles, creating movement and depth. You can go for silver, rose gold, copper, or even holographic finishes depending on your vibe.
Why Chrome Transforms the Shape
Mirror powder adheres differently to curved surfaces than to flat ones, and that’s the beauty of duck nails. As light hits the curve, the reflection shifts and shimmers, making the shape appear even more three-dimensional. This effect is subtle but powerful — it’s why chrome duck nails photograph so beautifully and get so much attention in real life.
Getting a Flawless Chrome Finish
- Apply a sticky base coat first — most chrome powders require this
- Use a special chrome brush or applicator pad to rub the powder onto the nail in firm, circular motions
- The more pressure and buffing, the more intense the mirror effect becomes
- Seal with a glossy top coat to lock in the powder and add extra shine
Real talk: Chrome powder can feel intimidating if you’ve never used it, but it’s easier than it looks. The key is not being afraid to apply pressure when buffing — a light touch actually produces a dull, patchy finish.
4. Minimalist Line Art in Black or Gold
Line art is striking on slim duck nails because the curved shape becomes a gallery for fine details. A single black line down the center, delicate gold stripes, or geometric line patterns create an artistic, editorial look. This design says “I have taste” without screaming for attention.
Designing with Intention
The best line art designs work with the nail’s shape rather than against it. Vertical lines that follow the curve from base to tip feel natural and elongating. Horizontal stripes create a different energy — they feel playful and modern. You could also do abstract line work that doesn’t follow a strict pattern, which adds personality and makes each nail feel like individual artwork.
Execution and Tools
- Use a fine-tipped nail art brush or a thin striping brush for clean lines
- Gel polish works better than regular polish for this design because it doesn’t smudge as easily
- You can also use nail art pens, which offer excellent control and precision
- Practice on a practice wheel or even paper before committing to your nails
Insider note: If you’re not confident freehand, you can use nail tape or stencils to create perfectly straight lines, then go over them with polish once you remove the tape.
5. Soft Nude Base with Delicate Flower Details
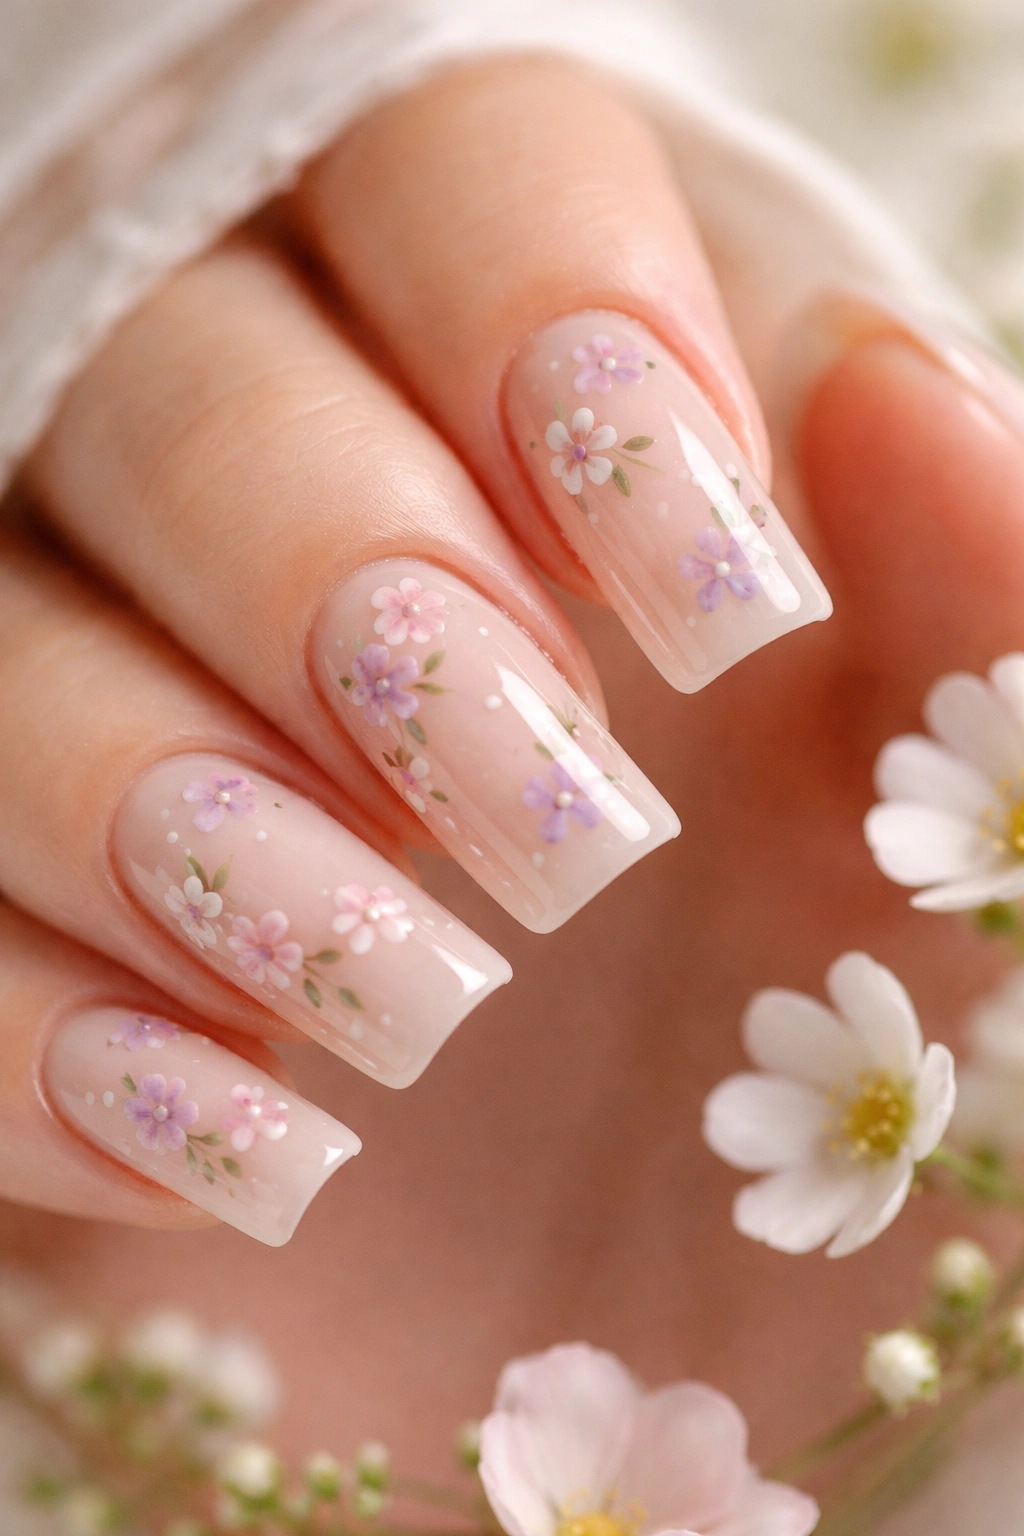
Flowers are eternally elegant on slim duck nails, especially when kept delicate and small. A scattered placement of tiny florals in soft colors — think blush pink, lavender, or sage green — on a nude base creates a romantic, refined look. This design is detailed enough to be interesting but balanced enough for everyday wear.
Bringing Florals to Life
Small flowers work because they respect the nail’s shape and don’t overwhelm the space. You might paint a cluster of four or five tiny flowers on the nail bed, or scatter them loosely across the surface. Using a soft color palette keeps the design feeling elegant rather than costume-like. Paired with a glossy top coat, the flowers catch light and appear almost three-dimensional.
Flower Painting Techniques
- Start with a base coat and your nude polish
- Use a small dotting tool to create the flower centers in contrasting colors
- Paint delicate petals around the dots with a thin brush
- Add tiny leaves if desired for a natural garden feel
- Seal with a clear top coat for protection and shine
Pro tip: Reference actual flower shapes while painting — even slightly imperfect florals look more authentic and charming than perfectly symmetrical ones.
6. Glitter Gradient with Clear Polish
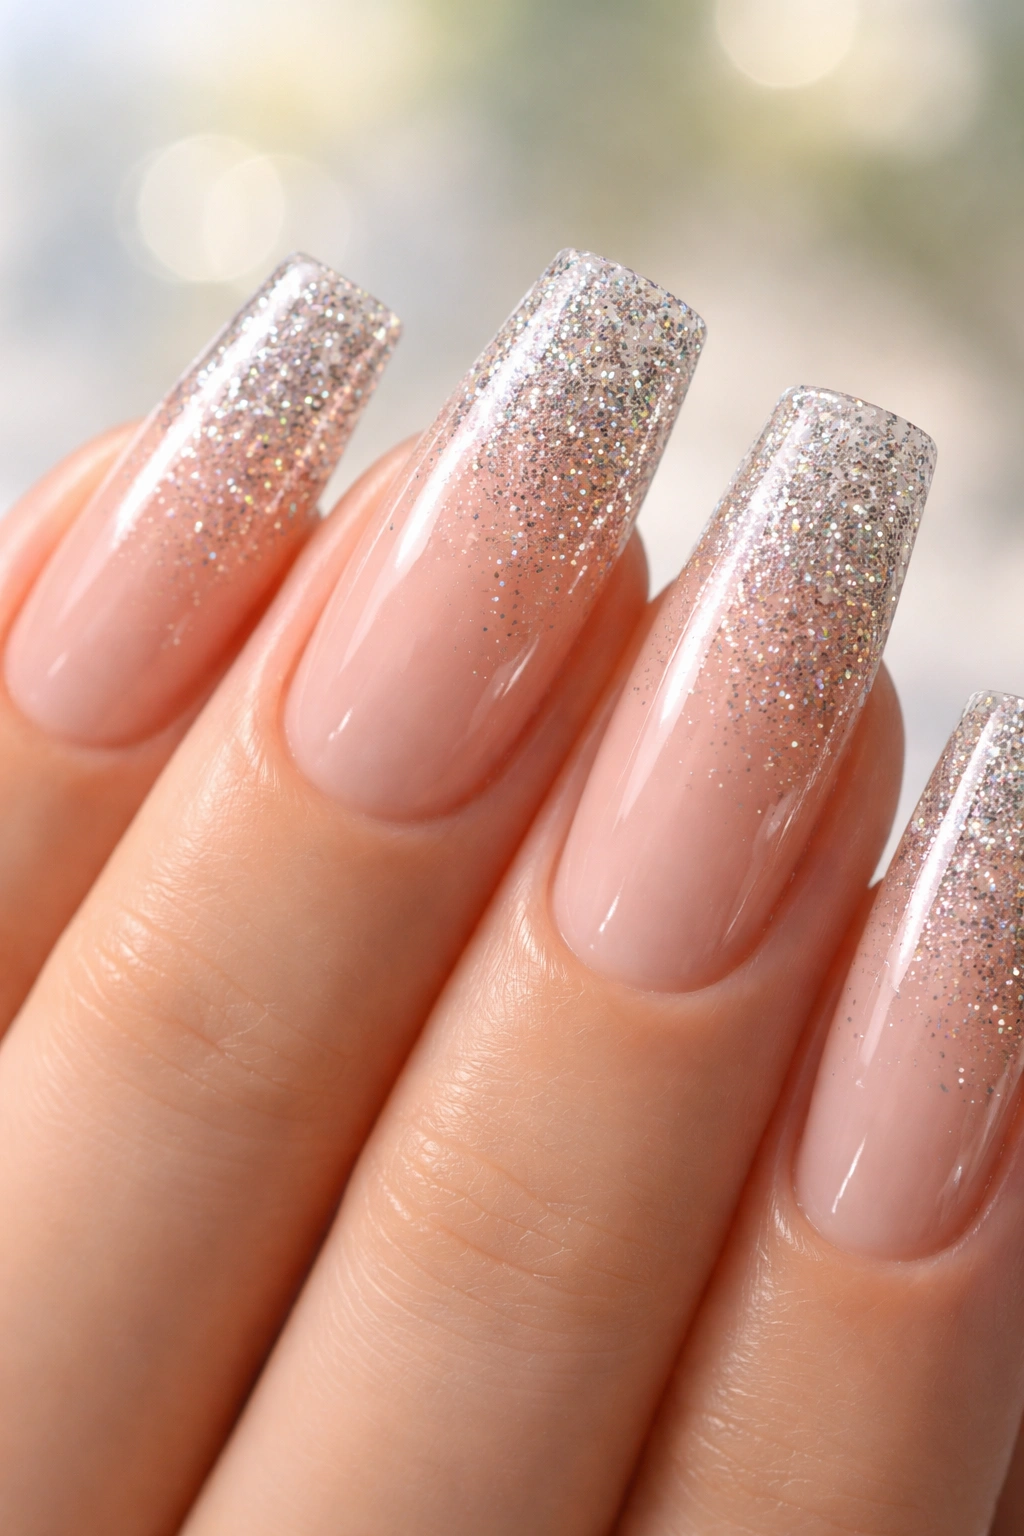
Clear polish packed with glitter creates a stunning effect on slim duck nails because the shape allows the glitter to catch light from multiple angles. You can do a full glitter coverage or a gradient where glitter is concentrated at the tip and fades toward the base. The transparency keeps it sophisticated rather than costume-y.
Why Glitter and Slim Duck Nails Are a Match
The curved surface of duck nails is perfect for glitter placement — it won’t sit flat and dull like it might on a traditional nail shape. Instead, the glitter sits in the contours and catches light dramatically. Clear or translucent bases with fine glitter particles create an elegant, sparkly look that’s not over-the-top, while chunky glitter reads as more fun and bold.
Creating a Glitter Design That Lasts
- Apply a sticky base coat — this prevents glitter from shifting around
- Use a glitter gel or a clear polish heavily packed with glitter particles
- For a gradient, apply glitter densely at the tip and use fewer particles toward the base
- Seal with a thick top coat to encapsulate the glitter and prevent it from catching on clothing
Worth knowing: Chunky glitter tends to shift as your top coat dries, so work quickly once you’ve applied it and let the top coat cure fully before using your nails.
7. Soft Ombré Pink to White Ombre
A pink-to-white ombré is universally flattering and reads as both elegant and playful. Starting from a warm pink or coral at the base and fading to white at the tip creates a light, airy feeling. This design flatters the curved duck nail shape because the color gradient naturally follows the curve.
Achieving Dimensional Color Transition
The best pink-to-white ombré uses warm undertones in the pink and doesn’t go too stark white at the tip — a soft, creamy white works better. The transition should feel gradual and blended, not like two distinct blocks of color. This design photographs beautifully and looks stunning in person, especially in natural light.
Blending Technique for Smooth Gradients
- Choose a warm pink — rose, coral, or dusty pink all work beautifully
- Use white or an off-white shade rather than pure white for a softer appearance
- Sponge the colors onto the nail in thin layers, overlapping in the middle
- Apply extra sealant and let it cure fully so the gradient stays in place
- A glossy finish makes the gradient appear more cohesive and professional
Real talk: The sponging method can be messy your first time, but it’s worth the learning curve because the results are absolutely worth it.
8. Two-Tone Design with Negative Space

Two-tone designs with negative space (where part of the nail is left bare or shows the nail bed) create a modern, graphic look on slim duck nails. You might paint the base one color, the tip another, and leave a thin line of natural nail between them. Or do a half-and-half split. This design is bold but balanced.
Playing with Color Contrast
The most striking two-tone designs use colors with good contrast — nude and black, blush and burgundy, white and navy. The negative space acts as a visual break that keeps the design feeling clean and intentional rather than confused. The curved shape of duck nails actually helps frame the color blocking beautifully.
Creating Clean Separation
- Use thin striping tape or a steady hand with a thin brush to create the division line
- Apply your first color, let it dry completely, then apply your second color
- Seal both colors under a clear top coat
- For extra definition, you can outline the color separation line with a thin gold or black line
Pro tip: If your line isn’t perfectly straight, it actually adds to the modern, slightly rebellious vibe of the design.
9. Marble Effect with Neutral Tones
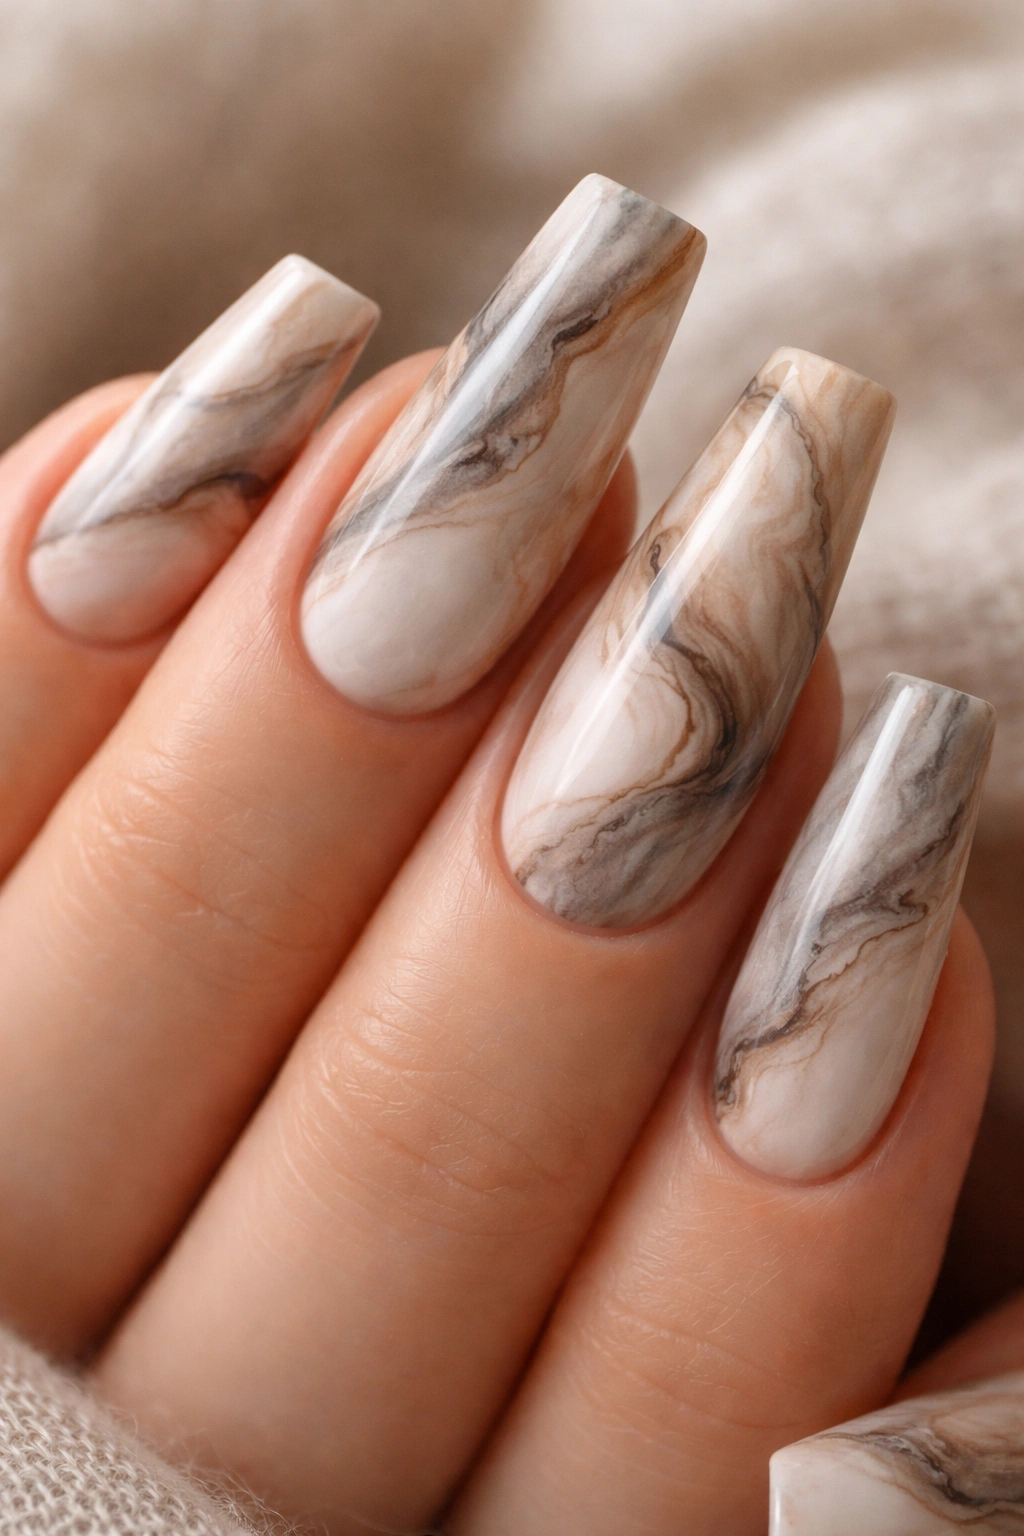
Marble nails with slim duck shapes create an organic, sophisticated look that feels both artistic and wearable. Using warm grays, soft blacks, cream, and taupe swirled together mimics real marble stone. The varied pattern means imperfections actually add to the authentic appearance.
Creating Convincing Marble Illusions
True marble patterns are irregular and organic — there’s no strict rule to follow, which makes them easier to execute than you might think. The key is using colors that actually appear in real marble: soft neutrals with gray undertones, cream, black, and sometimes subtle hints of burgundy or gold. The swirled pattern should look natural and random, not too geometric.
Marble Technique That Works
- Apply a white or cream base coat
- Using a thin brush and darker polish, create irregular lines and squiggles across the nail
- Blend the lines slightly with a clean brush or q-tip to create a watercolor effect
- Add a hint of gray or black in some areas for depth
- Seal with a glossy top coat to enhance the stone-like appearance
Insider note: The less controlled your technique, the more realistic your marble appears. Perfection actually looks fake in marble design.
10. Holographic or Iridescent Top Coat with Nude Base
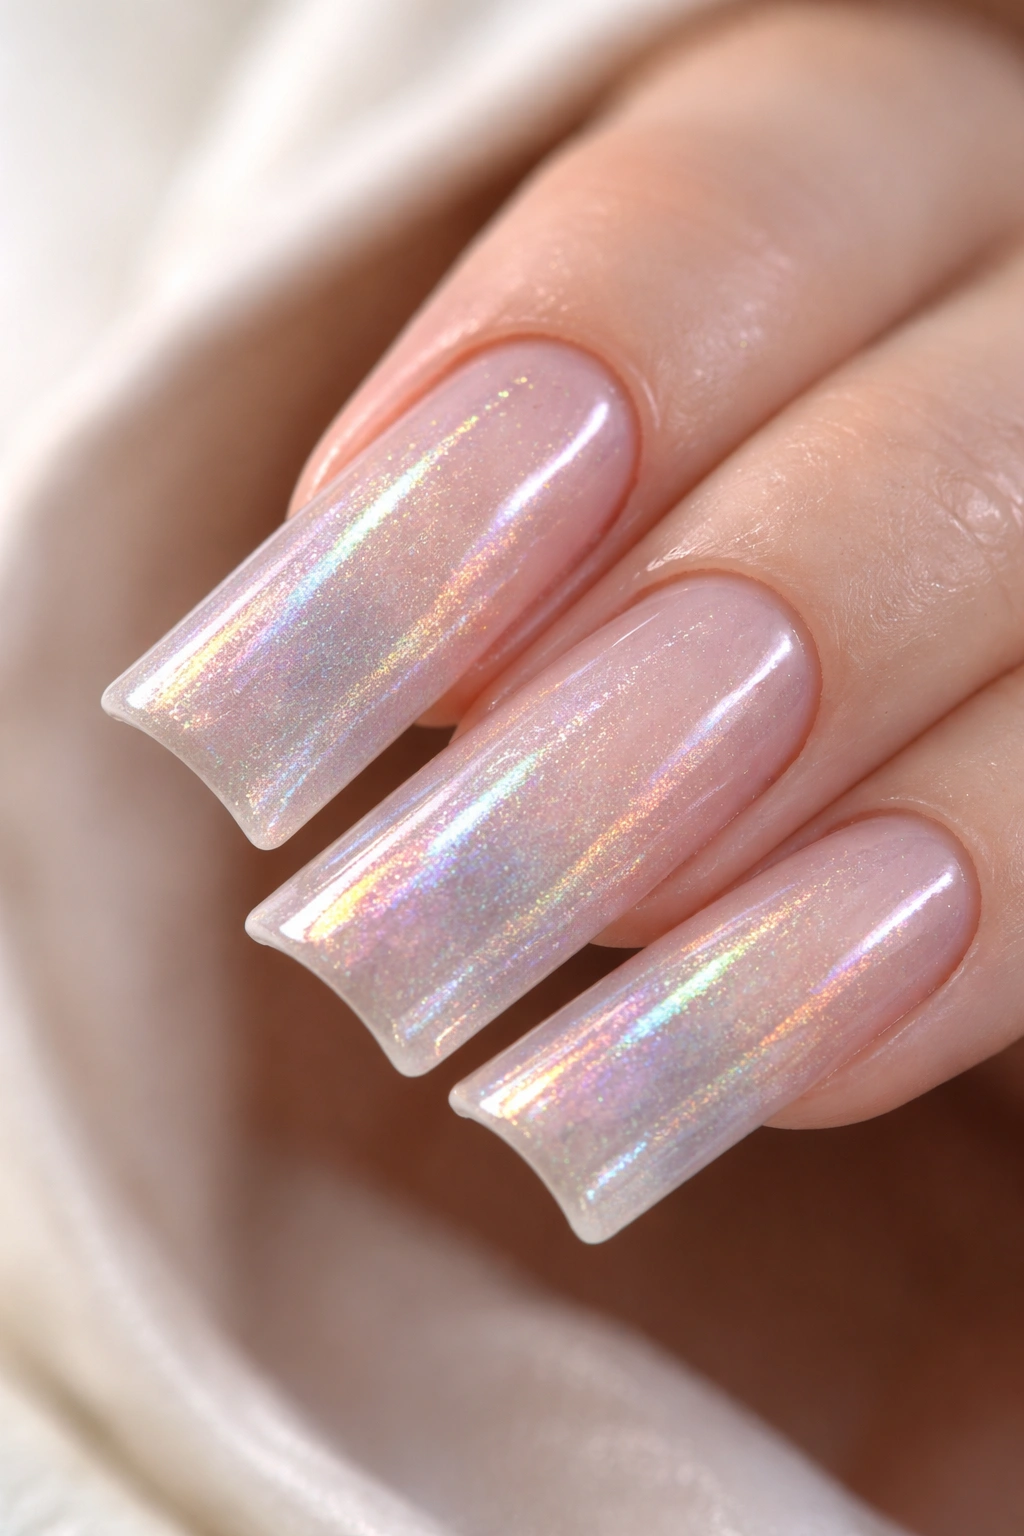
A holographic top coat applied over a nude base creates a subtle, shimmery effect that’s perfect for anyone who wants sparkle without full-on glitter. The iridescent finish catches rainbow hues in certain light, adding dimension without the commitment of a full color change. It’s sophisticated and eye-catching simultaneously.
The Subtle Power of Holographic Polish
Holographic polishes are incredibly versatile because they layer beautifully over any base color. On a nude base, the holographic effect reads as high-fashion and modern. The rainbow shimmer appears and disappears as you move your hand, which keeps the design interesting and dynamic throughout the day.
Building the Perfect Holographic Look
- Start with a smooth, even nude base coat
- Apply the holographic top coat in 1-2 thin layers for a subtle effect, or 2-3 layers for more pronounced holographic shift
- Use a glossy finish to maximize the reflective quality
- Consider applying a second glossy top coat for extra durability and shine
- The holographic effect is most visible in bright or natural light
Worth knowing: Holographic polishes photograph beautifully but look even better in person, where you can actually see the color-shifting effect in motion.
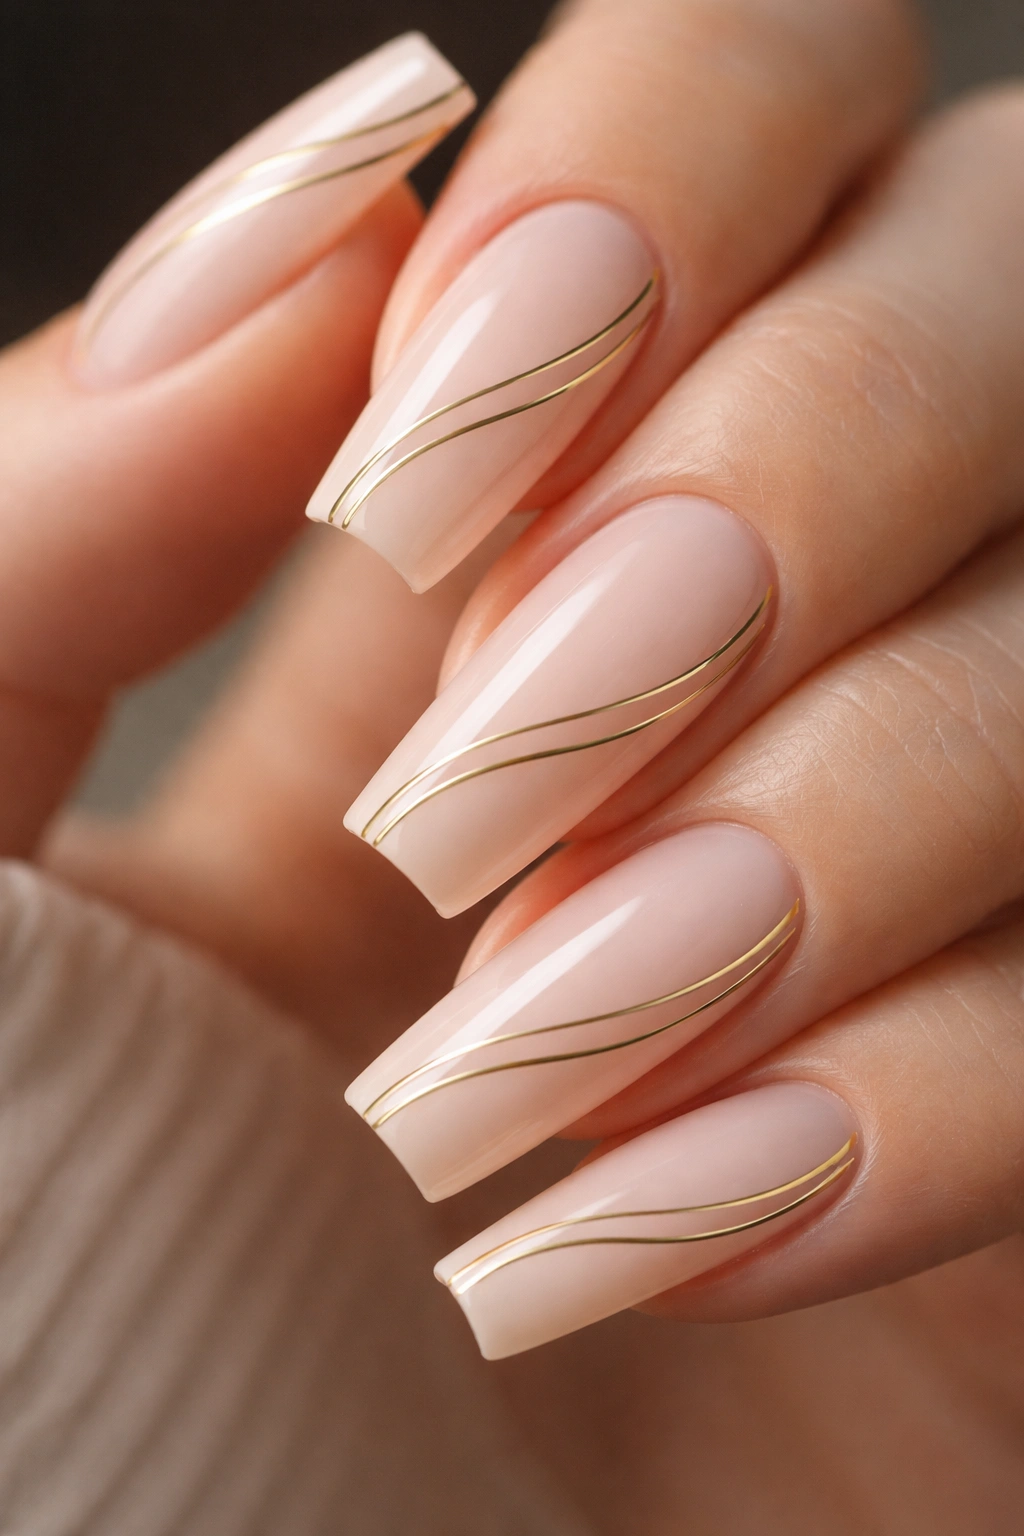
11. Minimalist Gold Accent Line with Nude Base
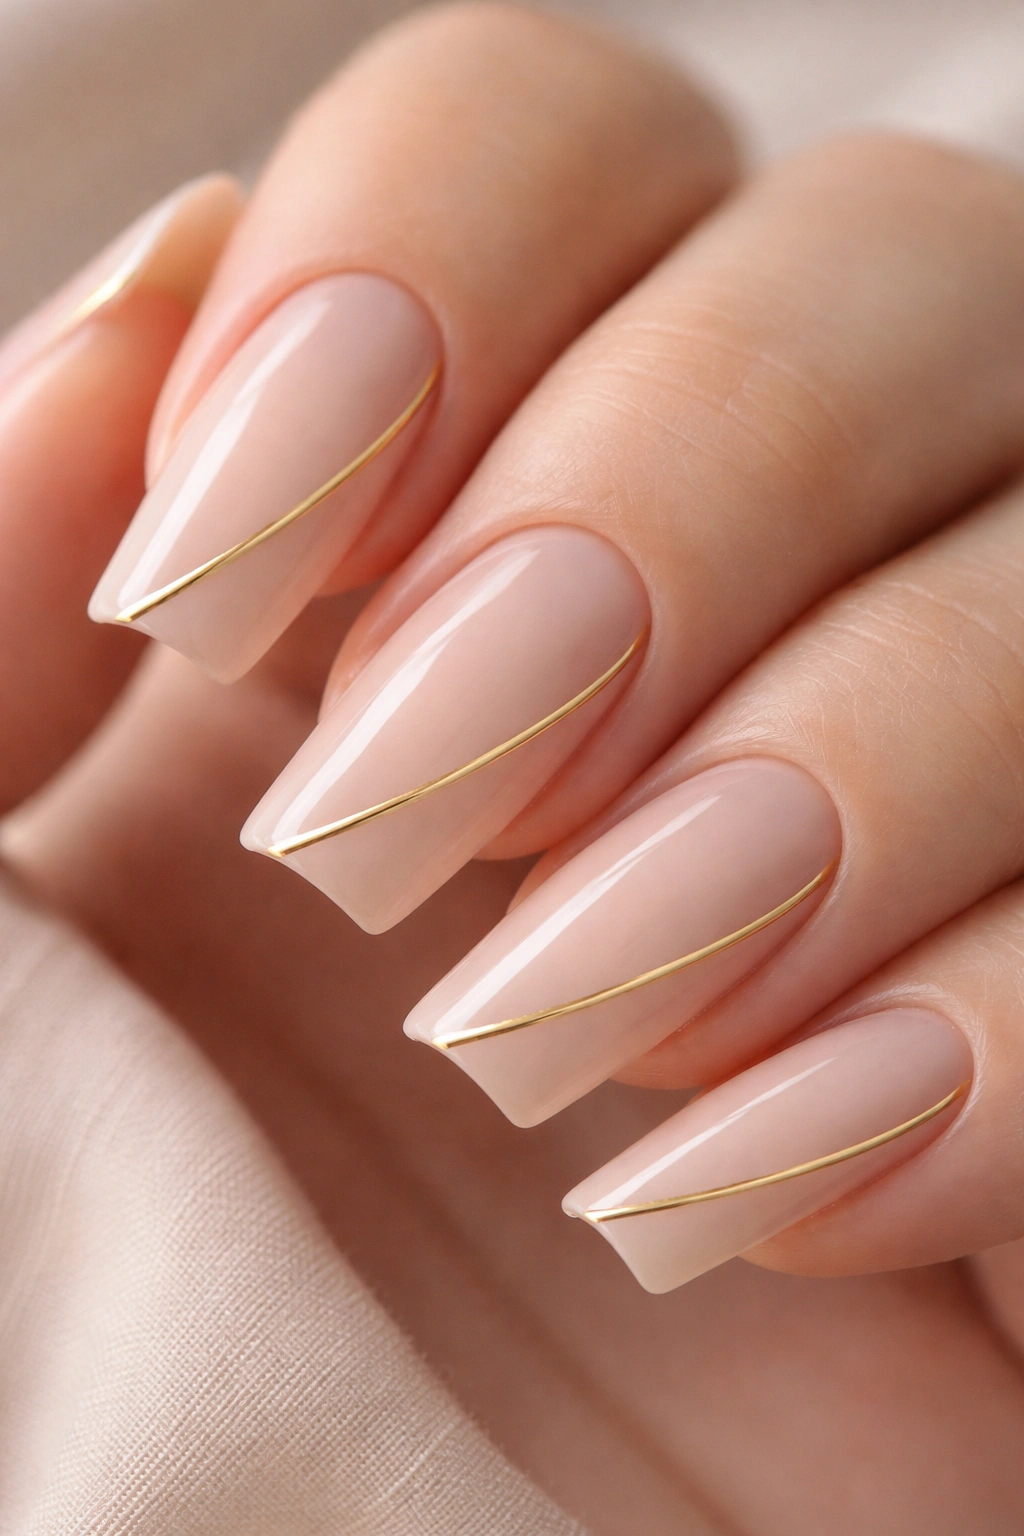
A single gold accent line on a nude base is understated sophistication at its finest. The thin gold stripe down the center of the nail (or off to one side) adds just enough visual interest while keeping the overall look clean and elegant. This design is incredibly wearable for work, special events, or everyday wear.
Why Simplicity Works So Well
Sometimes the best nail designs are the ones that know when to stop. A gold line on nude doesn’t compete with your outfit, makeup, or personal style — it simply elevates the overall look with a touch of luxury. The curved shape of the duck nail means the gold line follows a graceful path, which adds movement and elegance even in its simplicity.
Perfect Execution of Minimalist Design
- Use a nude polish that flatters your skin tone as the base
- Once the base is dry, use a thin brush or gold striping pen to paint a line from the base toward the tip
- You can center the line, offset it, or even create two thin parallel lines for variation
- Keep the line straight and clean — this is where precision matters
- Seal with a glossy top coat to protect the gold and add shine
Pro tip: If you’re worried about a shaky hand, use thin gold striping tape applied with precision — remove it immediately after painting the line over it, and you’ll have a perfectly clean stripe every time.
Final Thoughts
Slim duck nails prove that you don’t need extreme dimensions to make a statement. Each of these eleven designs shows how the shape itself is the hero, whether you’re keeping things minimal or layering on intricate details. The beauty of slim duck nails is their wearability — they’re bold enough to feel special but refined enough to work in any setting.
Finding your favorite design often comes down to your personal style and how much maintenance you’re willing to do. A simple nude requires only a regular polish refresh, while something like marble or flower details might need a professional touch. The great news is that every design here can be customized to match your vibe, your color palette, and your confidence level.
Whether you’re trying this trend for the first time or you’re already a duck nail enthusiast, these ideas should give you plenty of direction for your next manicure. Don’t be afraid to mix and match elements from different designs — maybe you love the marble effect but want a gold accent line, or you prefer the glitter gradient but with different colors. The only real rule with duck nails is that they should make you feel confident and beautiful.
