

Duck nails have absolutely taken over the nail art world, and when you add 3D elements into the mix? That’s when things get truly spectacular. The dimensional texture transforms what could be a flat, cute design into something that demands attention and showcases serious nail art skill. Whether you’re thinking about booking an appointment at the salon or attempting a 3D design at home, knowing what’s actually possible—and what looks stunning in person—makes all the difference.
The beauty of 3D duck nails goes beyond the obvious charm of the shape itself. The wide, rounded tip that extends past the natural nail line creates a built-in canvas for dimensional effects. Unlike traditional nail shapes, duck nails give you extra surface area to play with, which means 3D embellishments, textures, and raised designs don’t just sit flat—they really pop. You get depth, movement, and that satisfying tactile quality that makes people lean in for a closer look.
What makes 3D designs on duck nails particularly effective is the interplay between the nail’s natural geometry and the dimensional elements you layer on top. A simple gel accent becomes dramatic when it has actual height. A hand-painted detail gets more impact when it’s enhanced with pearl powder, gel layers, or acrylic sculpting. The 3D doesn’t overshadow the duck shape—it highlights it, creating a more luxe, intentional look.
Ready to see what’s actually achievable? Here are 16 stunning approaches to duck nails with 3D designs that prove this trend isn’t just about the shape—it’s about taking it to the next level.
1. Crystal-Encrusted Nude Duck Nails
This design combines a soft, neutral base with strategically placed Swarovski crystals that rise up and catch the light from every angle. The crystals create a dimensional effect that’s elegant rather than over-the-top, perfect for someone who wants sophistication with subtle sparkle. The nude or pale pink base keeps the focus on the crystal work, which forms delicate clusters that look less like random rhinestones and more like intentional jewelry placement.
Why This Look Works So Well
The neutral background acts as a blank canvas, letting the 3D crystal elements become the star without competing with busy colors or patterns. Crystals reflect light differently depending on the angle and lighting conditions, creating movement that flat nail art simply can’t match. When these crystals are properly applied with quality gel or acrylic, they don’t snag on fabric or feel sharp to the touch—they sit flush enough that daily life doesn’t become a challenge.
Application Essentials
- Use quality crystal-grade stones rather than cheaper rhinestones that lose their shine quickly
- Apply crystals after your base color has fully cured to ensure they stay put
- Mix crystal sizes to create depth—use larger stones as focal points and smaller ones for fill
- Seal everything with a glossy topcoat to protect the stones and create a seamless finish
Pro tip: If you’re concerned about crystals popping off, apply a gel adhesive specifically designed for gemstones rather than relying on regular builder gel.
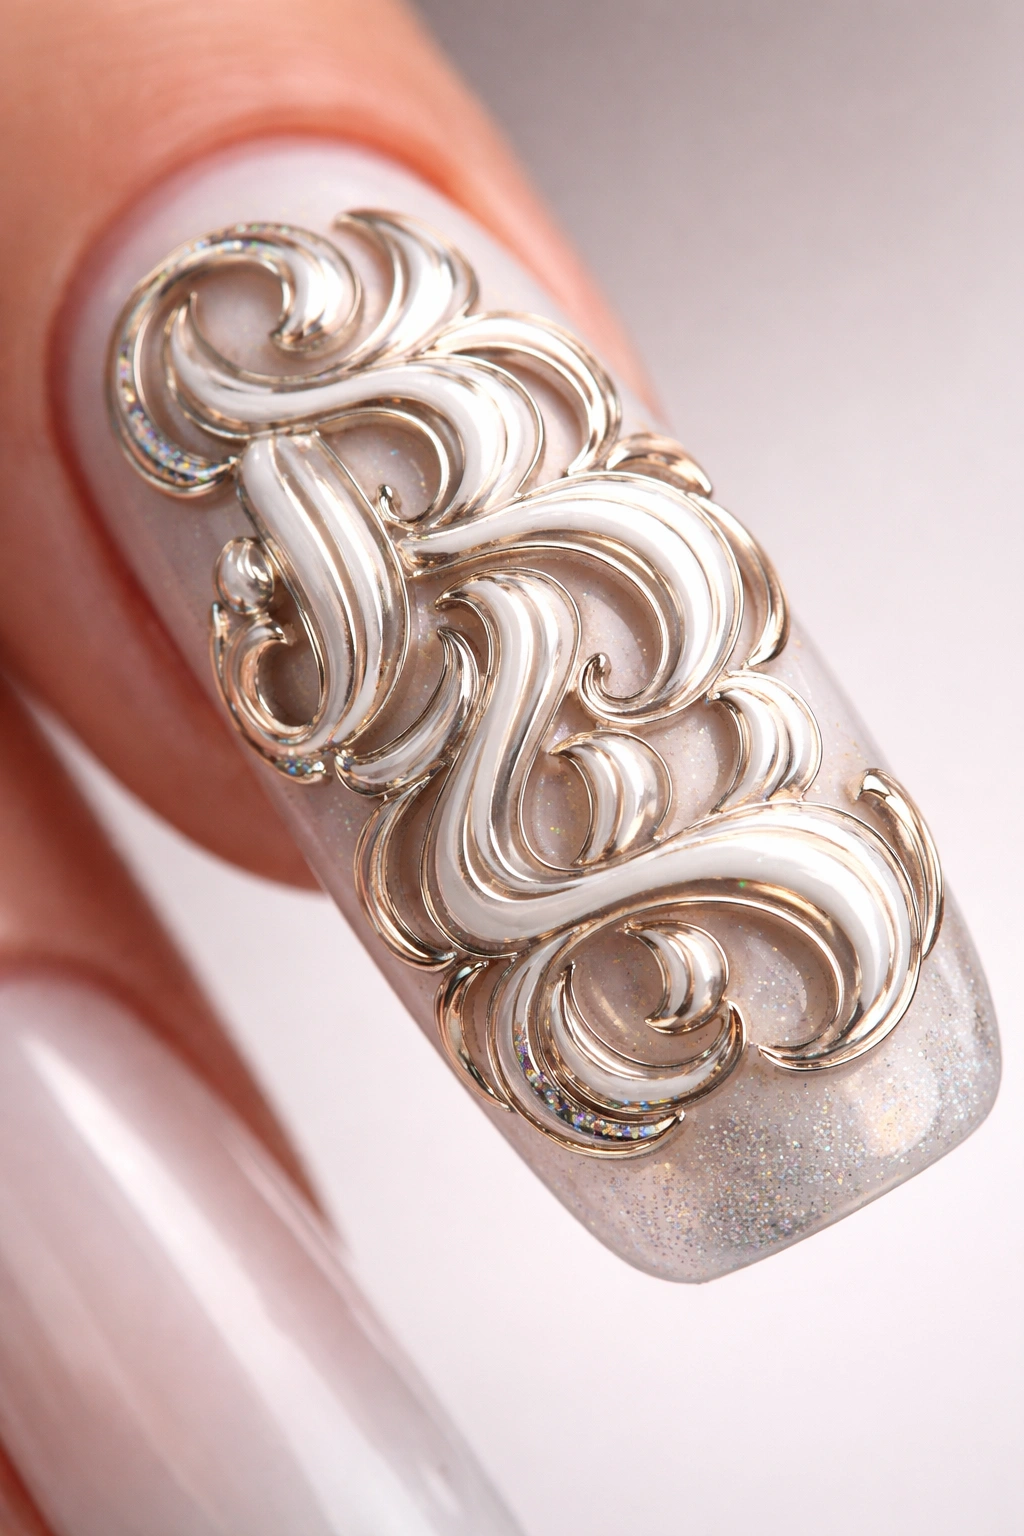
2. Feathered 3D Texture With Metallic Accents

This design mimics the look of actual feathers using special 3D gel techniques and layering, with metallic gold or silver brushwork that adds luxury to the texture. The feathering creates genuine dimension through careful sculpting, not just color variation. Small metallic lines trace through the feathered texture, catching light and emphasizing the raised, feather-like pattern across the entire nail surface.
The Feathering Technique Explained
Creating feathered texture requires either textured gel products that dry with built-in dimension, or careful hand-sculpting with standard gels using a fine brush to create raised lines. The metallic accents aren’t painted overtop—they’re built into the texture, which means light hits them from multiple angles. This technique requires a steady hand and some practice, making it something you’d want a skilled technician to execute unless you’re experienced with gel work.
What Makes It Three-Dimensional
- Textured gels naturally create surface height variation that reflects light differently than smooth gels
- Metallic pigments enhance the dimensional effect by creating contrast between shiny and matte areas
- Layering builds actual height, not just visual illusion
- The feather pattern follows the contours of the duck nail’s natural curve
Worth noting: This design does require regular maintenance since textured nails can accumulate dirt more easily than smooth ones.
3. Blooming 3D Florals on Blush Base
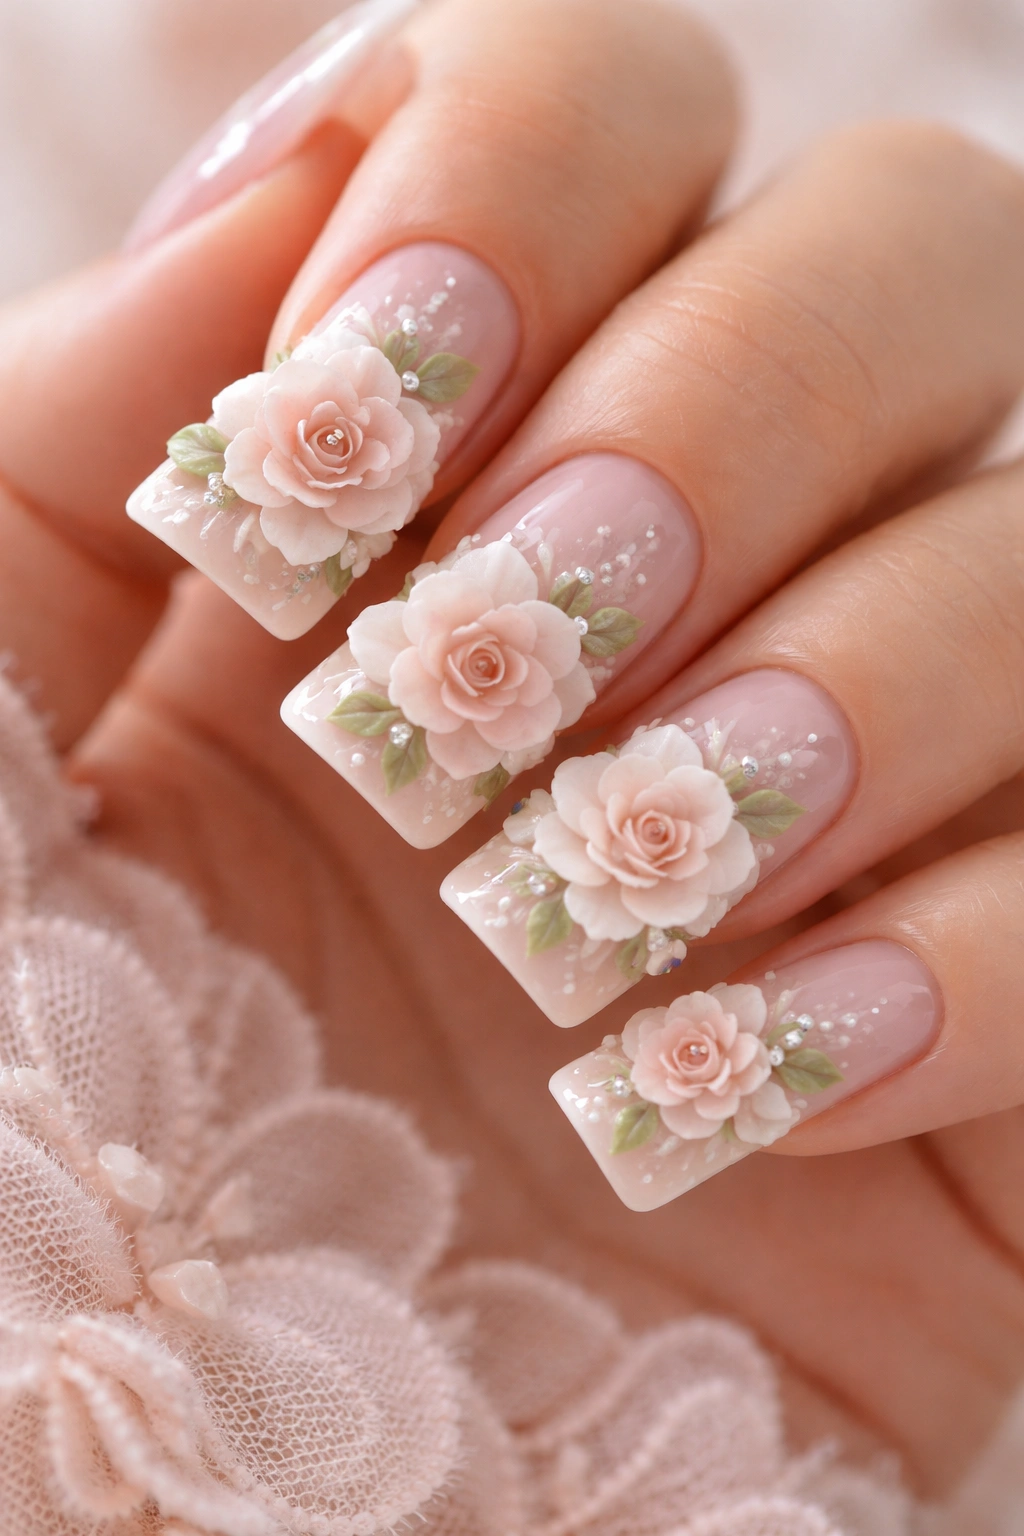
Hand-sculpted 3D flowers—like tiny roses, peonies, or cherry blossoms—bloom across a soft blush or peachy base, creating an incredibly romantic and feminine aesthetic. Each flower is individually sculpted using acrylic or thick builder gel, giving them actual depth and dimension. The flowers literally rise off the nail surface, casting tiny shadows that add to the overall dimensional effect.
Building Three-Dimensional Flowers
Creating 3D florals requires either pre-made acrylic flower molds (quick but less customizable) or hand-sculpting each petal individually using acrylic powder and monomer, or thick gel. Hand-sculpted flowers take more time but offer complete control over size, color blending, and petal shape. Each petal is built separately, allowing light to hit from underneath and create shadows that make the flowers look incredibly lifelike.
Design Composition Matters
- Scatter flowers across the nail rather than clustering them all in one area
- Vary flower sizes to create visual interest and depth
- Use white or cream petals with colored centers for dimension
- Add tiny green leaves tucked between flowers for botanical accuracy
Real talk: 3D floral nails require careful handling since the flowers are delicate. You’ll want to avoid resting your hands on hard surfaces directly.
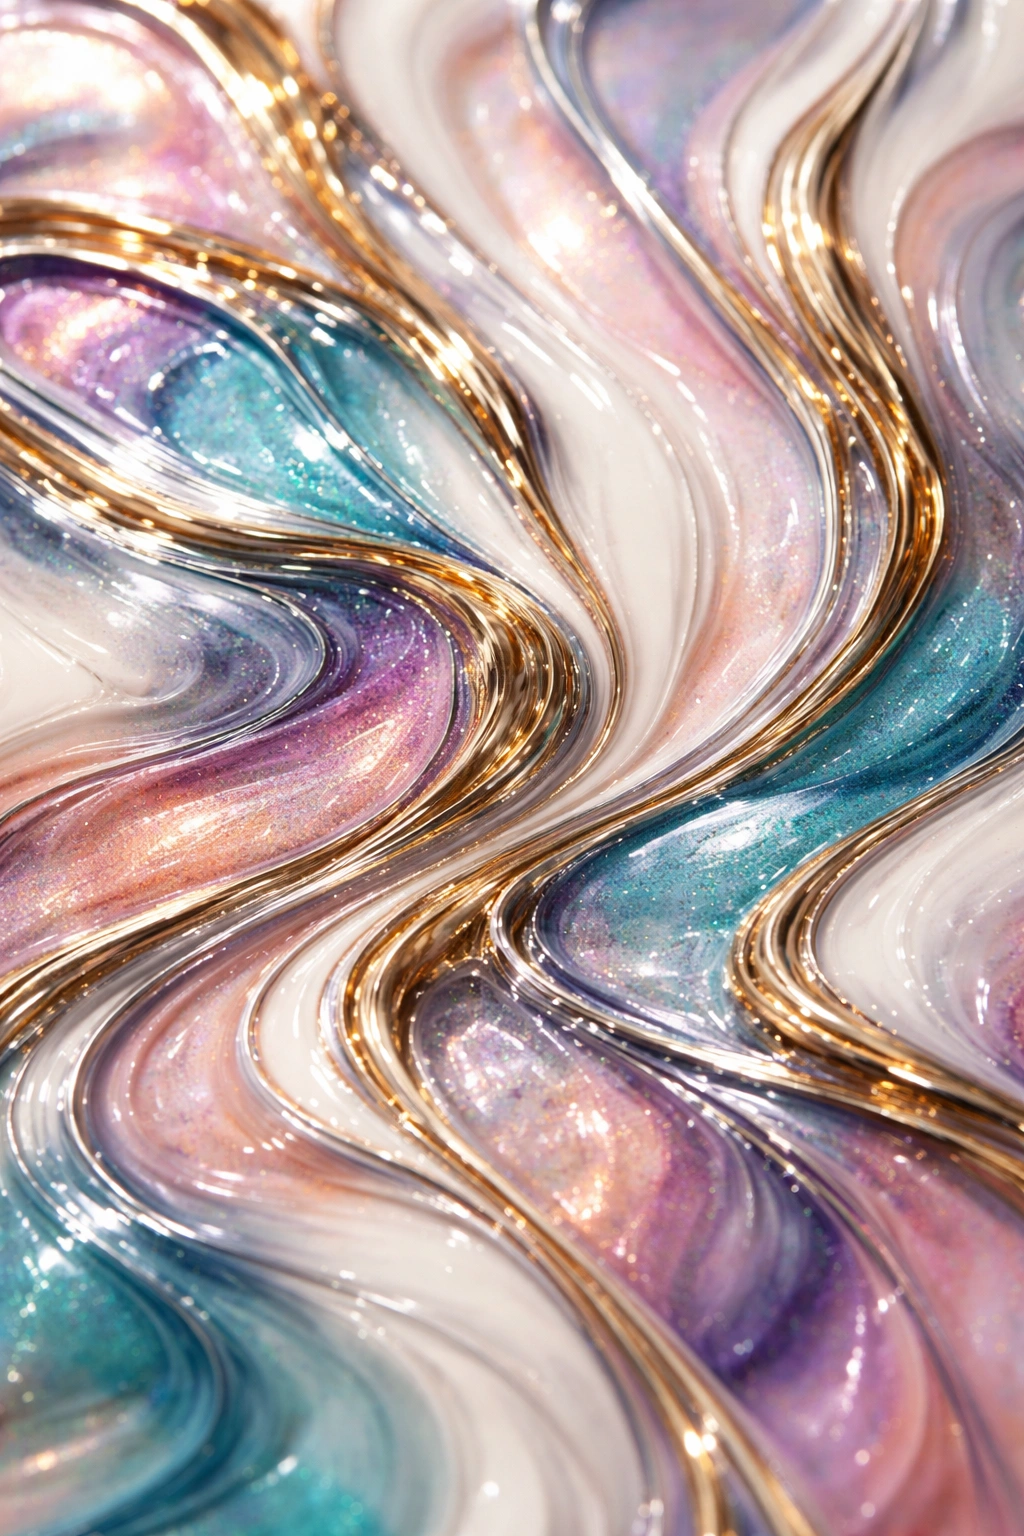
4. Ombré Gradient With Dimensional Glitter Encapsulation
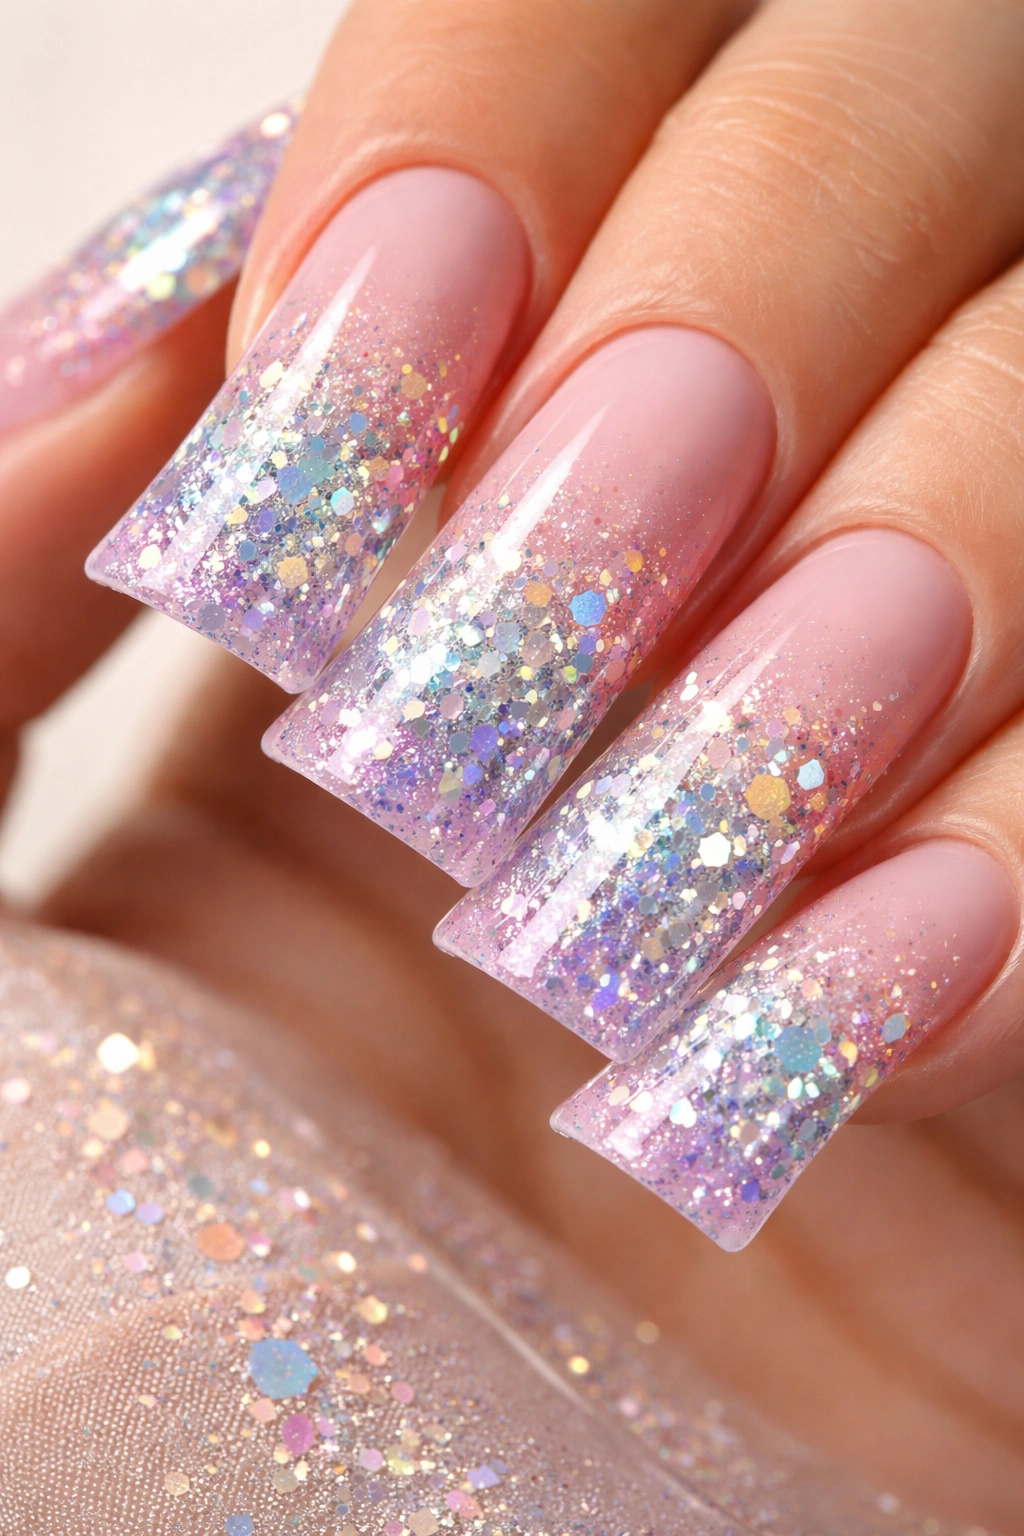
Gradient color flowing from one shade to another becomes three-dimensional when glitter is encapsulated within the layers—suspended between gel coats so it floats visually rather than sitting on the surface. The glitter catches light from different angles, and the gradient beneath creates color shifting that makes the dimensional effect even more pronounced. This design balances complexity with wearability, making it sophisticated enough for professional settings while still being fun and eye-catching.
How Encapsulation Creates Dimension
When glitter sits on top of a nail, it’s flat. When it’s encapsulated between layers of gel or acrylic, it creates depth perception because your eye registers the gap between the glitter and the surface. This layering technique means the glitter truly floats, catching light at various angles depending on how you move your hand. The effect is similar to looking at an object suspended in clear resin—you see dimension that isn’t actually part of the physical surface.
Execution Steps
- Apply a thin base layer of your first gradient color
- Add glitter or glass flakes to the semi-cured layer
- Seal with a second color layer (the second gradient shade)
- Finish with clear gel or topcoat to lock everything in place
Worth knowing: This requires a steady hand and good timing—your first layer needs to be tacky, not fully cured, for the glitter to stay embedded.
5. Pearl and Matte Texture Combo
Glossy pearls (either iridescent or specific colors) contrast against a matte finish background, creating instant dimension just through the sheen contrast alone. The pearls reflect light while the matte sections absorb it, making the pearls appear to rise off the nail surface even though they’re relatively flat. The combination of textures creates a sophisticated, almost architectural look that works beautifully on duck nails.
The Power of Finish Contrast
This design is deceptively simple but incredibly effective. Dimension doesn’t always require height—sometimes it’s created through what your eye perceives. A shiny element against a matte background creates visual separation that feels three-dimensional. Matte topcoats have become increasingly refined, so you can create clean, professional results without needing textured gels.
Styling the Design
- Paint an abstract pattern with matte topcoat
- Place pearls along specific lines or focal points
- Use matte sections to frame the pearls visually
- Consider metallic matte finishes paired with pearlescent glossy elements for extra contrast
Pro tip: Use matte topcoat as a final seal to lock everything in place while maintaining that dual-finish effect.
6. Holographic Chrome With Dimensional Stamping
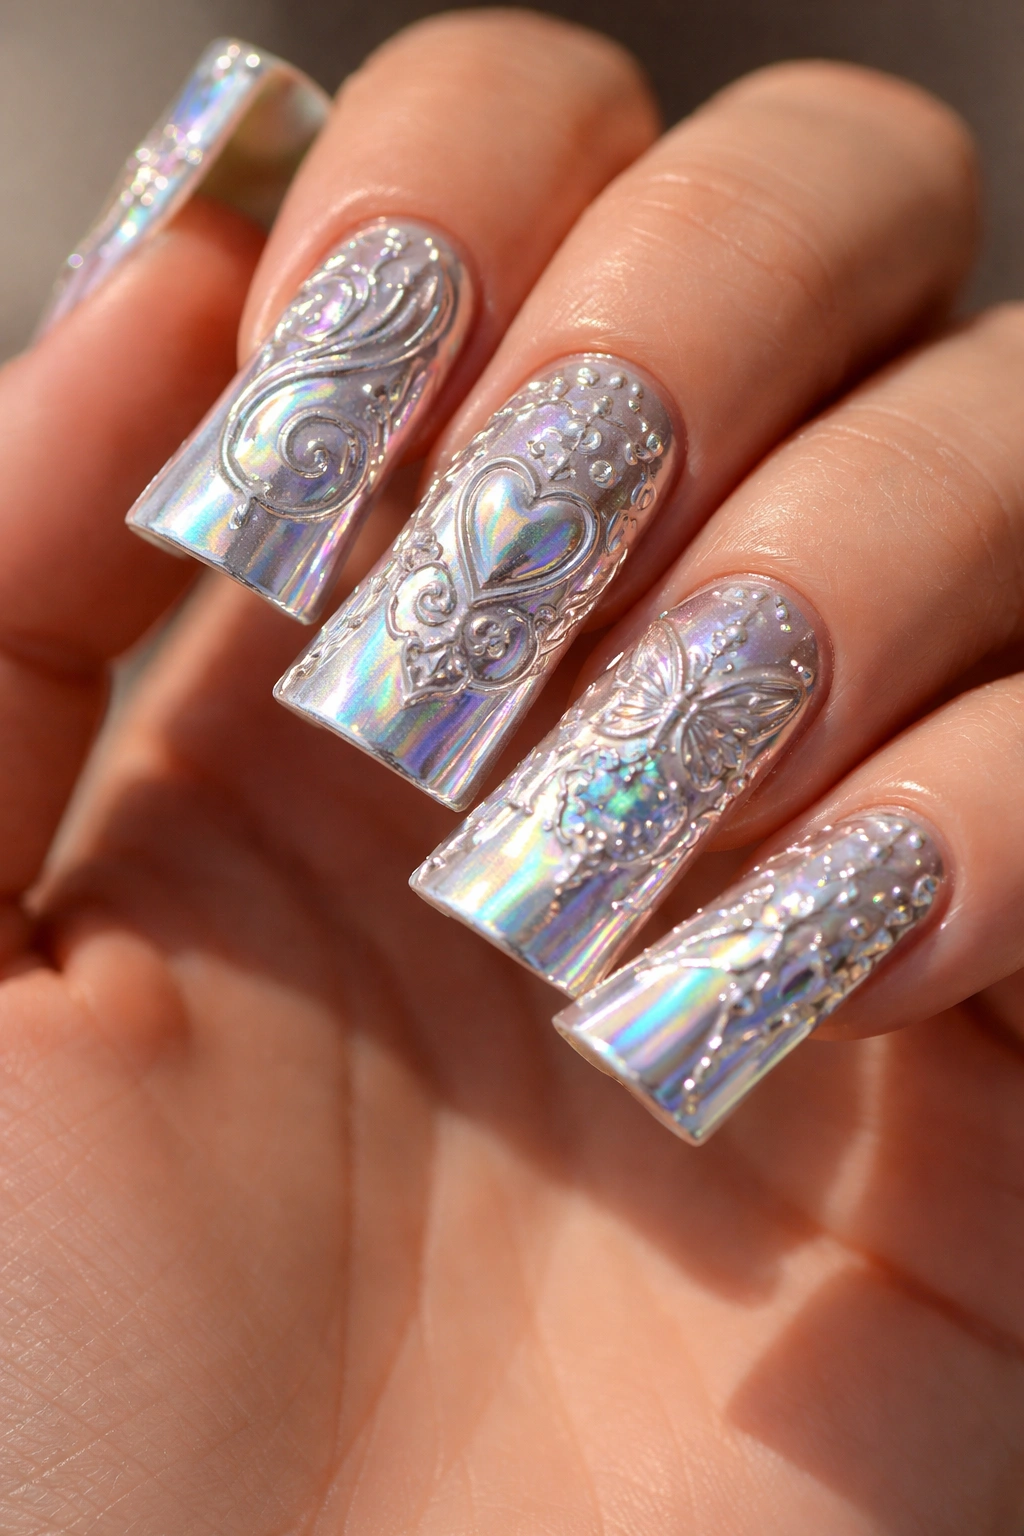
A holographic chrome base (which shifts color and reflects light like oil on water) gets enhanced with 3D stamped patterns that add actual texture rather than just color variation. The chrome itself already creates a dimensional, reflective quality, and adding dimensional stamping makes the whole design feel incredibly futuristic and textured. This combination is striking and modern, appealing to people who love both sparkle and structure.
Understanding Chrome and Stamping Together
Chrome powder creates an incredibly reflective, mirror-like effect. When you layer dimensional stamped patterns on top, the chrome continues reflecting light beneath the raised stamps, creating layers of light reflection. The stamps might be geometric, floral, or abstract—but because they’re raised, they cast tiny shadows that enhance the 3D effect even more.
Application Strategy
- Apply your chrome base and seal it completely before stamping
- Use thick stamping gel (not thin regular gel) for dimensional stamps
- Allow each stamped element to cure before adding the next layer
- Finish with matte topcoat to dull the chrome slightly and make the stamps stand out more
Insider note: Some chrome powders work better with certain base colors—black and deep colors show chrome most dramatically.
7. Sculpted Acrylic Dragon Scales
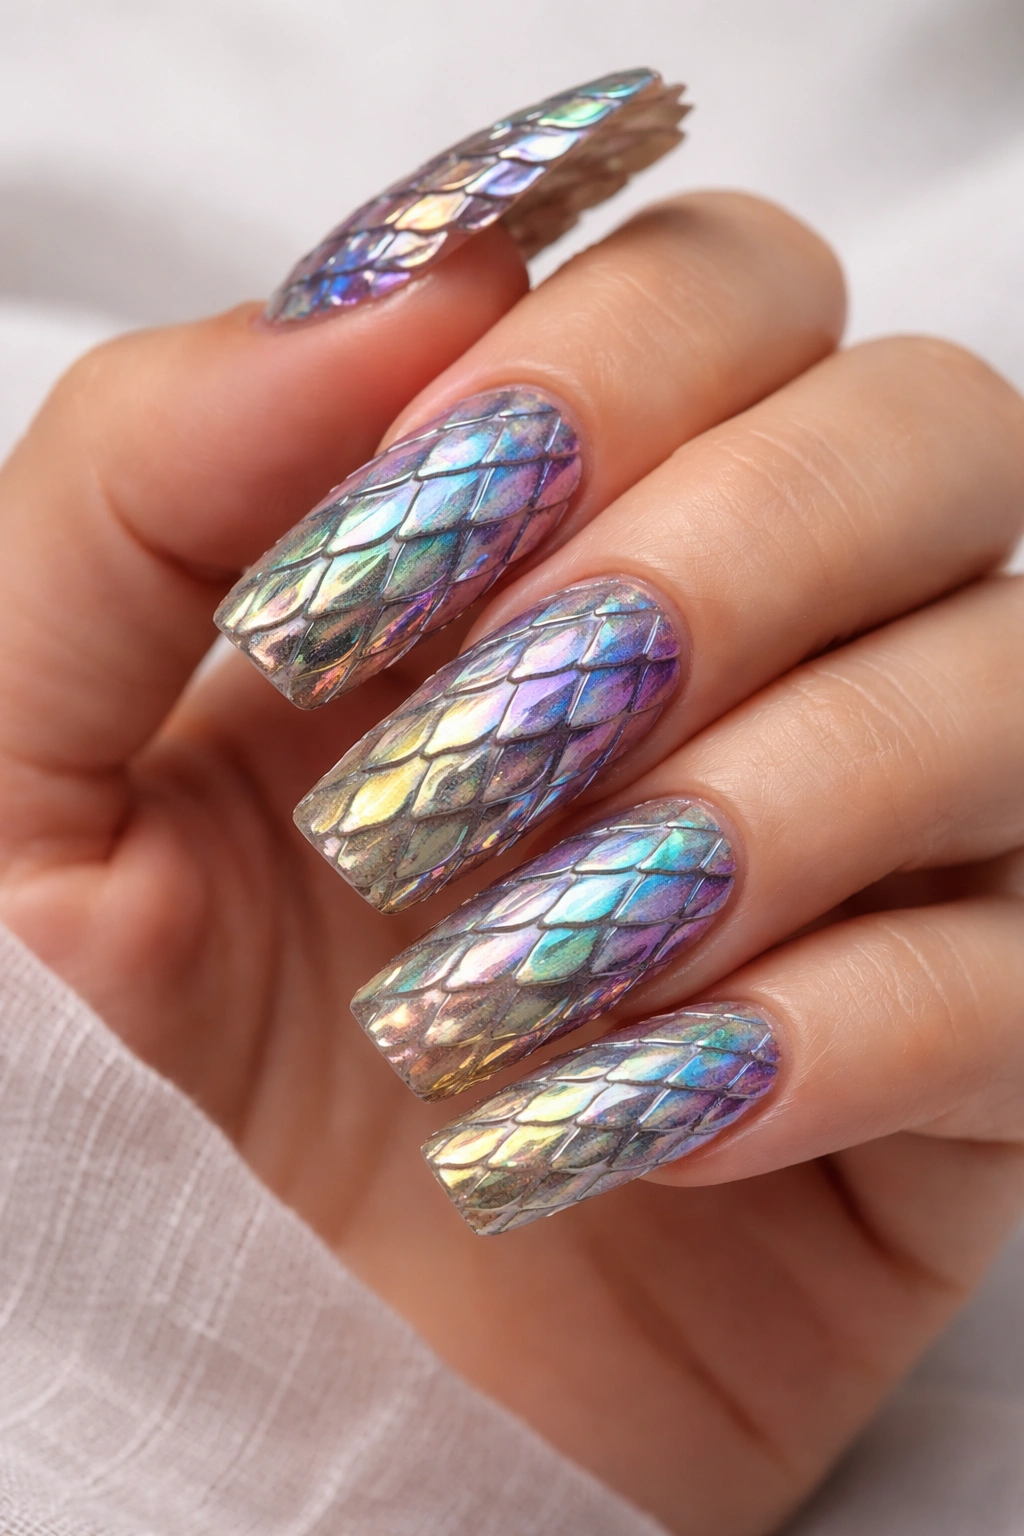
Individual acrylic scales are sculpted to overlap each other like dragon or mermaid scales, creating dramatic three-dimensional texture that covers the entire nail. Each scale is hand-carved from acrylic after application, then painted with iridescent or metallic finishes that shift and shimmer. The overlapping creates actual shadows, making the nail surface incredibly tactile and visually complex.
Sculpting Realistic Scale Detail
This design requires genuine technical skill. Each scale needs to be carved individually, shaped to point slightly upward and outward, then blended at the edges so they appear to seamlessly overlap. The dimensional effect comes from the actual height of each scale and the shadows created by the overlaps. When light hits these scales, it bounces off multiple surfaces, creating movement and depth that’s impossible to achieve with paint alone.
Paint and Finish Techniques
- Use iridescent powders mixed into translucent gels for shimmer
- Add metallic accents with a fine brush along each scale’s edge
- Consider a glossy finish that makes scales look wet and reflective
- Layer different color transparents for color-shifting depth
Worth considering: Sculpted scale nails are absolutely stunning but require professional application and careful daily handling.
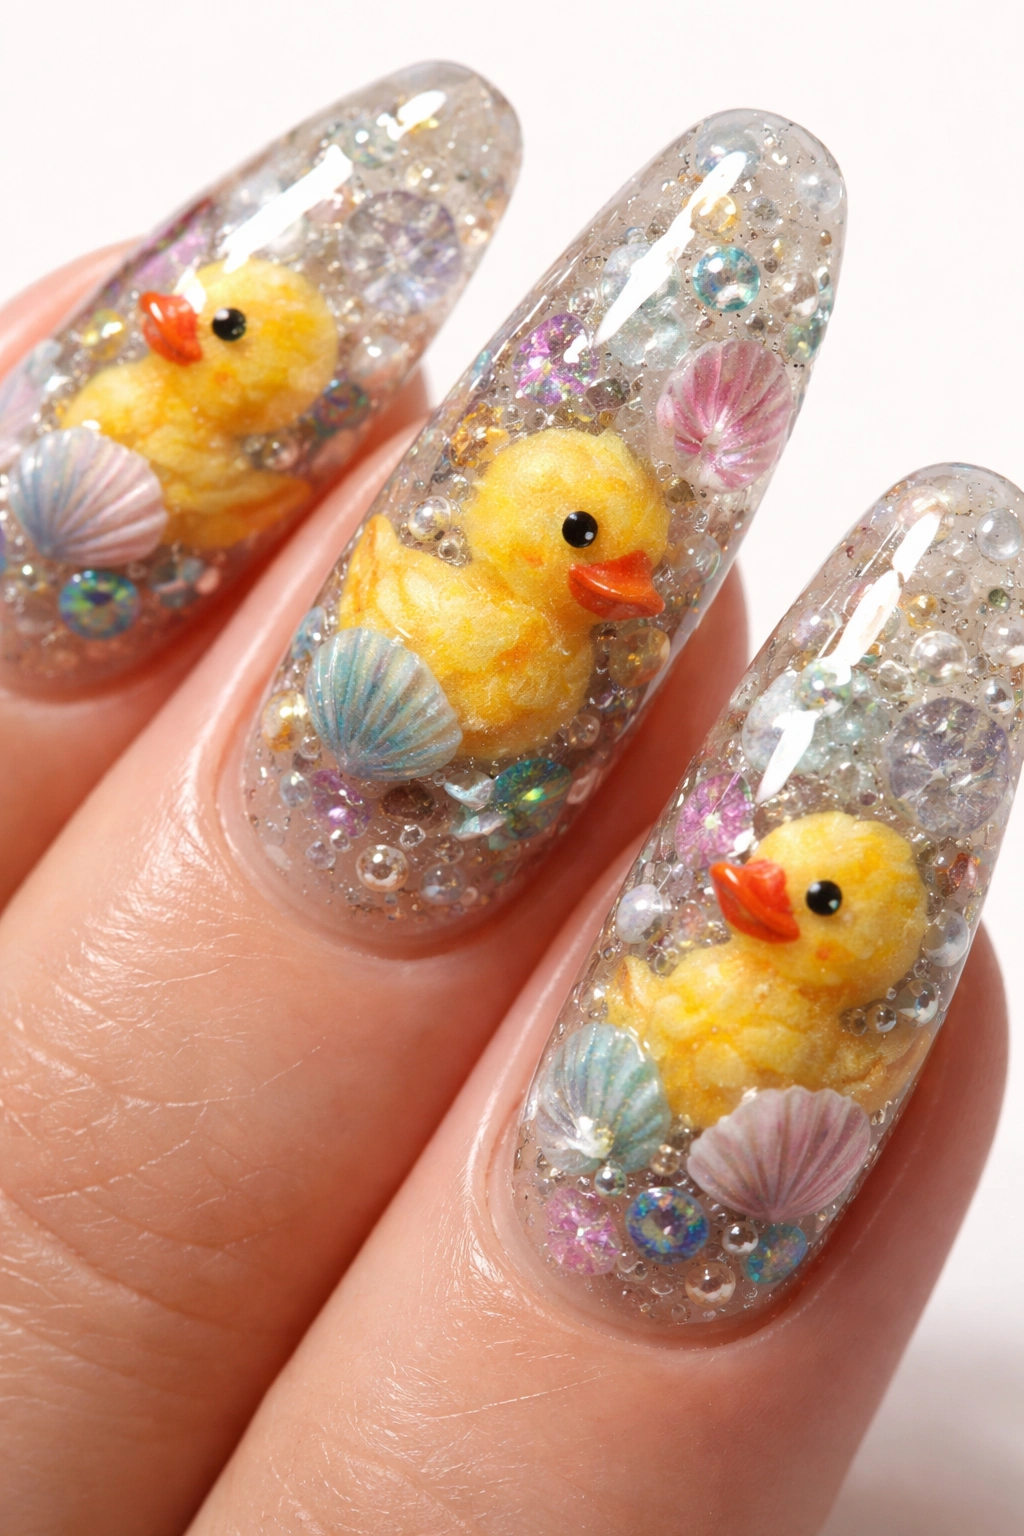
8. Jelly Nails With Embedded Confetti and 3D Charms
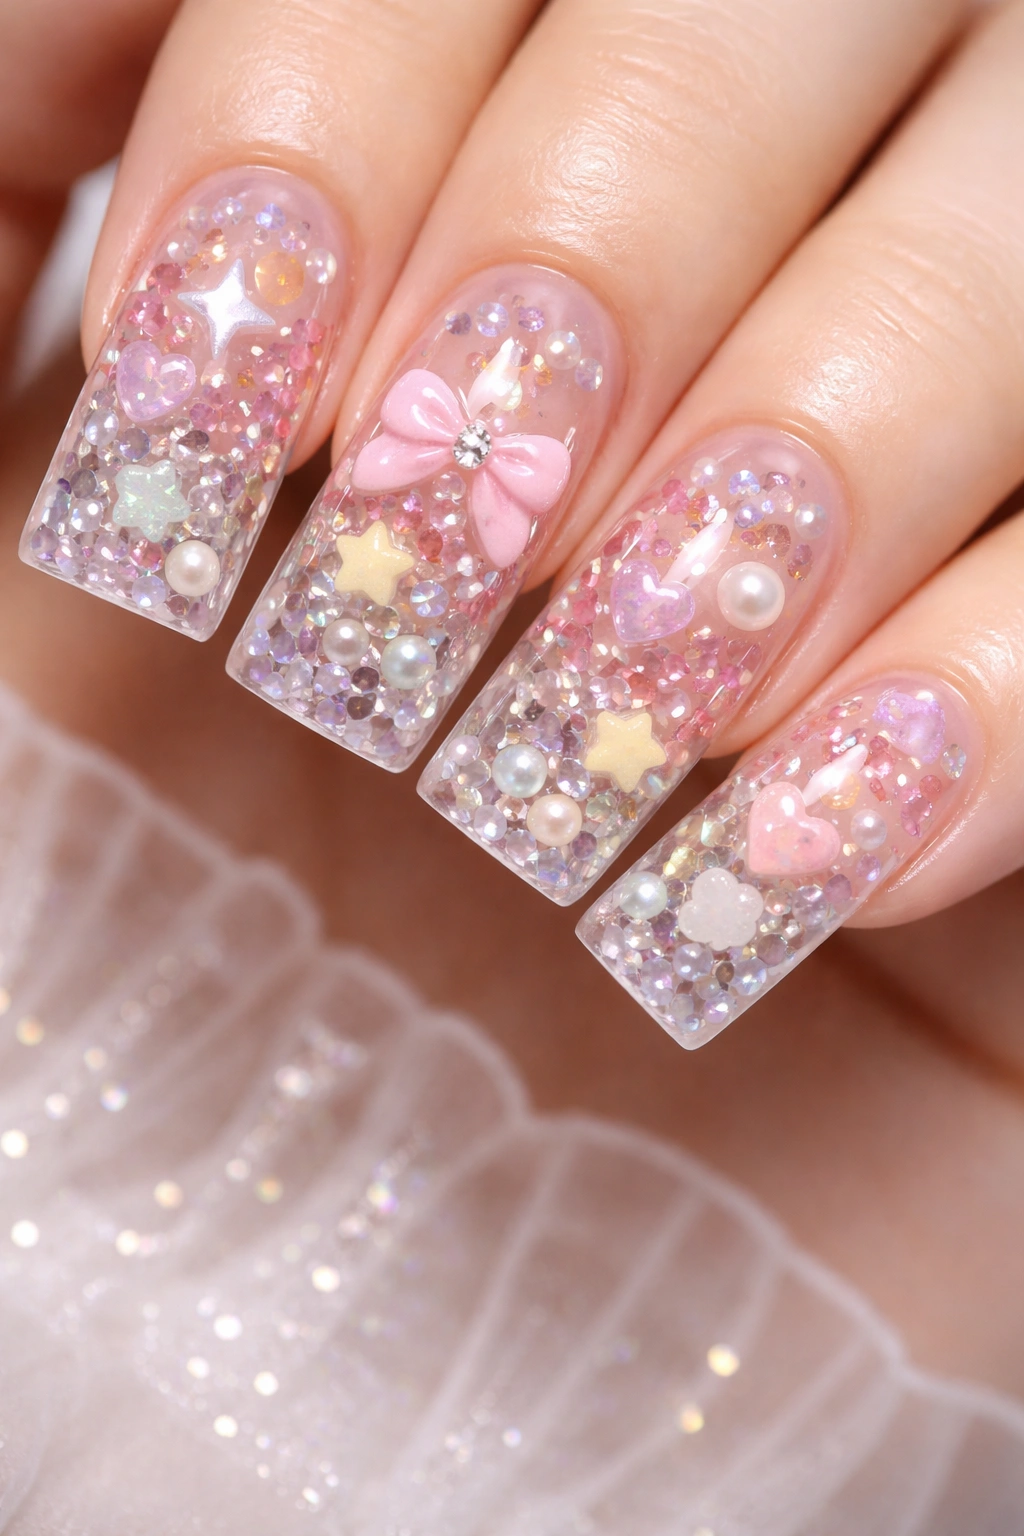
A translucent or semi-opaque jelly base with suspended confetti pieces and tiny 3D charms (stars, hearts, pearls) creates depth because you can see through the layers. The embedded elements float at different depths within the gel, creating visual dimension that changes depending on the angle you view them from. This design is playful, whimsical, and surprisingly sophisticated when executed with quality materials.
Building Layered Dimension in Jelly Nails
Jelly nails work best when you’re intentional about how you embed elements at different depths. Your first layer might contain some elements, your second layer different ones, and your top layer might have surface-level charms. This stacking creates genuine depth perception because your eye registers multiple planes rather than a flat surface. The transparency of jelly nails makes this layering visible in a way solid colors don’t.
Material Selection Matters
- Use quality jelly gels that remain translucent when cured (some turn cloudy)
- Choose confetti and charms that don’t absorb gel or become discolored
- Layer elements strategically—don’t overcrowd or the design becomes muddy
- Add a glossy topcoat that won’t fog up the clarity
Pro tip: Foil confetti works beautifully in jelly nails and reflects light at different angles depending on how it’s positioned.
9. Geometric 3D Lines and Shapes
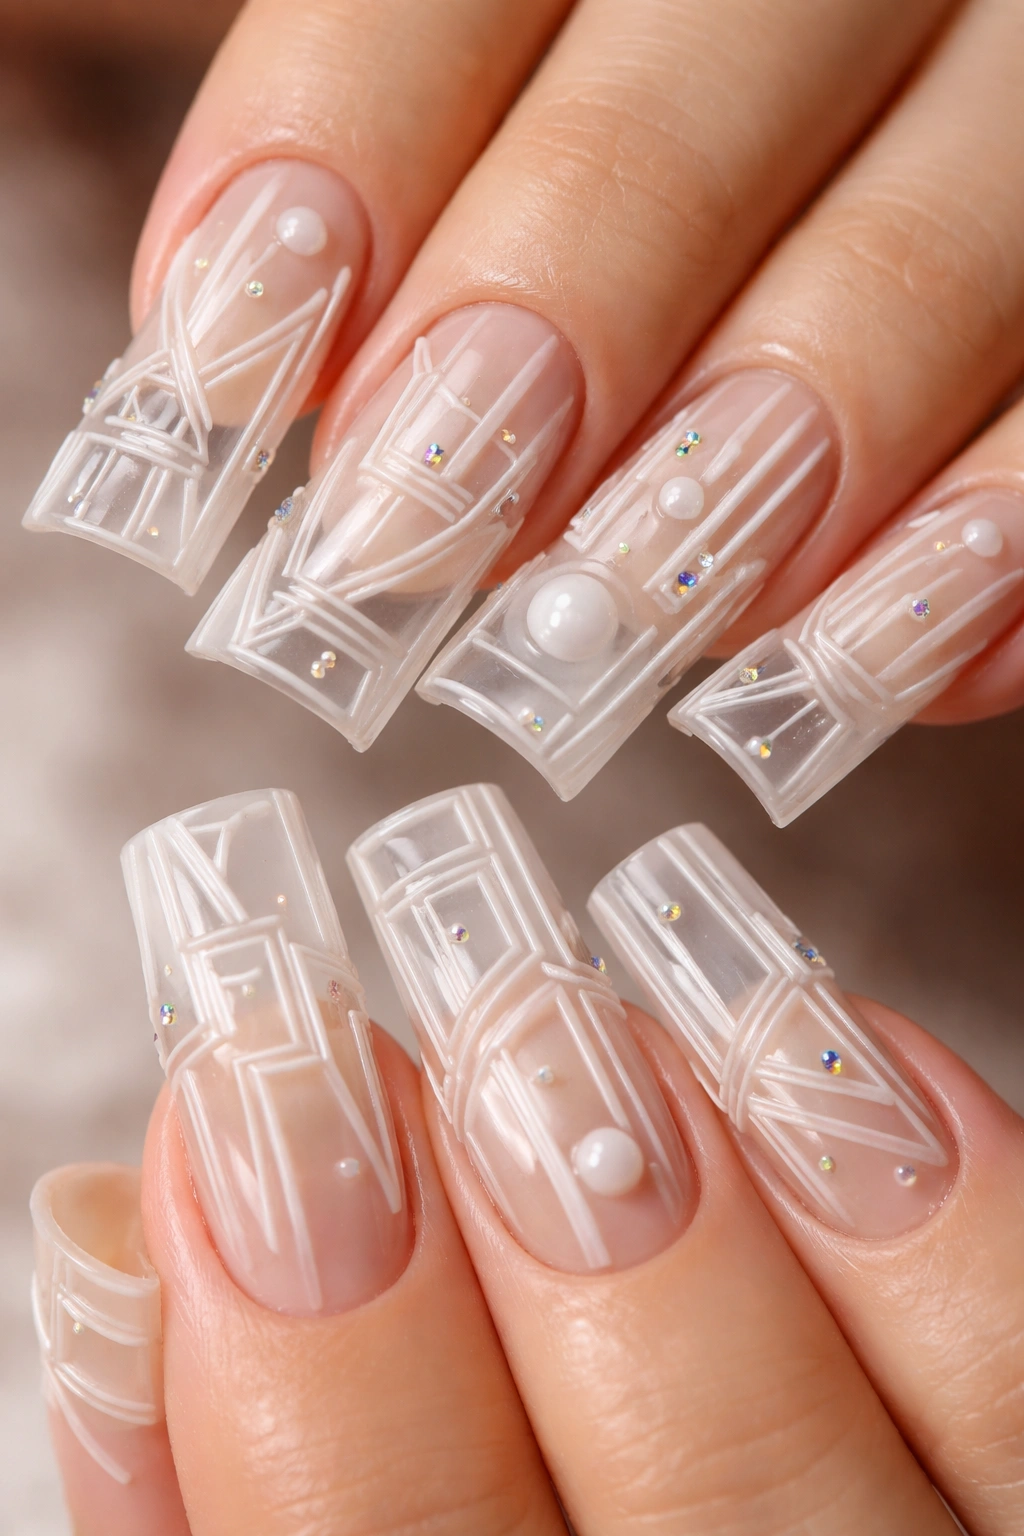
Clean, precise geometric lines are raised and layered to create an architectural, three-dimensional effect—like they’re floating above the nail surface. Each line or shape is built using builder gel or acrylic in thin, controlled layers, creating actual height. The geometric nature of the design means the dimension follows intentional patterns rather than organic curves, giving an avant-garde, artistic impression.
Creating Raised Geometric Elements
This requires steady hands and excellent brush control, or alternatively, using thin gel stripes and building them up layer by layer. Each layer adds height, and maintaining clean edges means the geometry remains precise even as it becomes three-dimensional. The finished effect looks almost like nail art that exists in a blueprint or design specification.
Design Composition
- Create focal points where multiple lines intersect
- Use negative space (bare nail showing through) to frame raised elements
- Consider mixing metallic lines with solid colors for contrast
- Play with angled lines that create optical illusions of depth
Worth knowing: Geometric designs on duck nails work particularly well because the nail shape is already bold and defined—the geometry complements that existing structure.
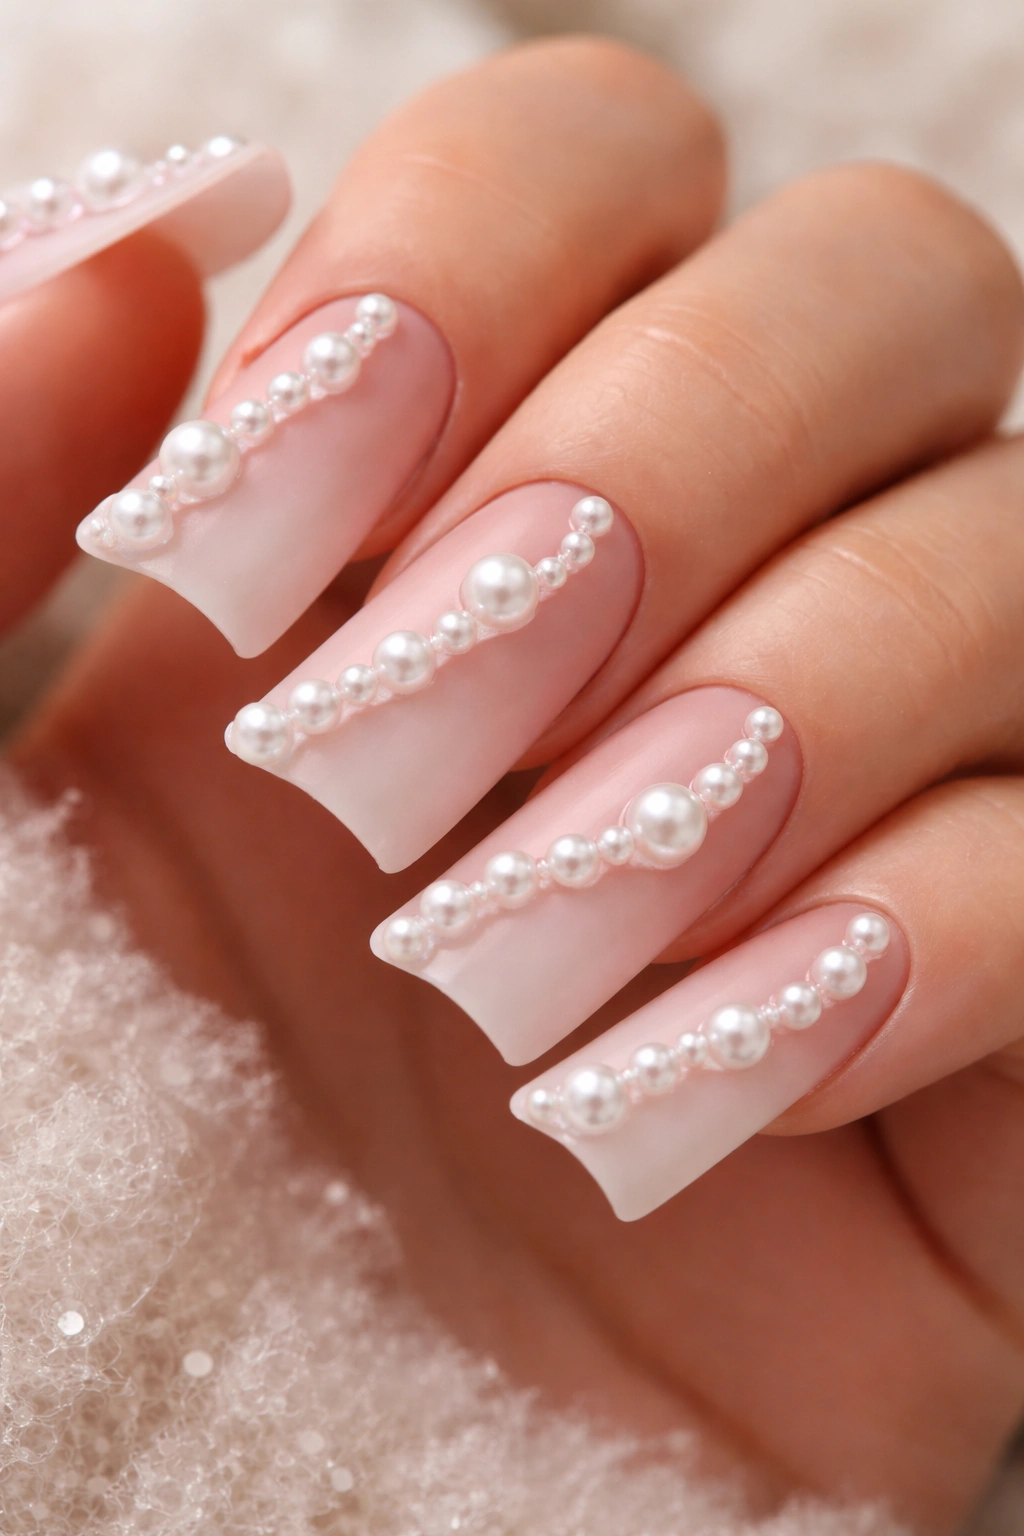
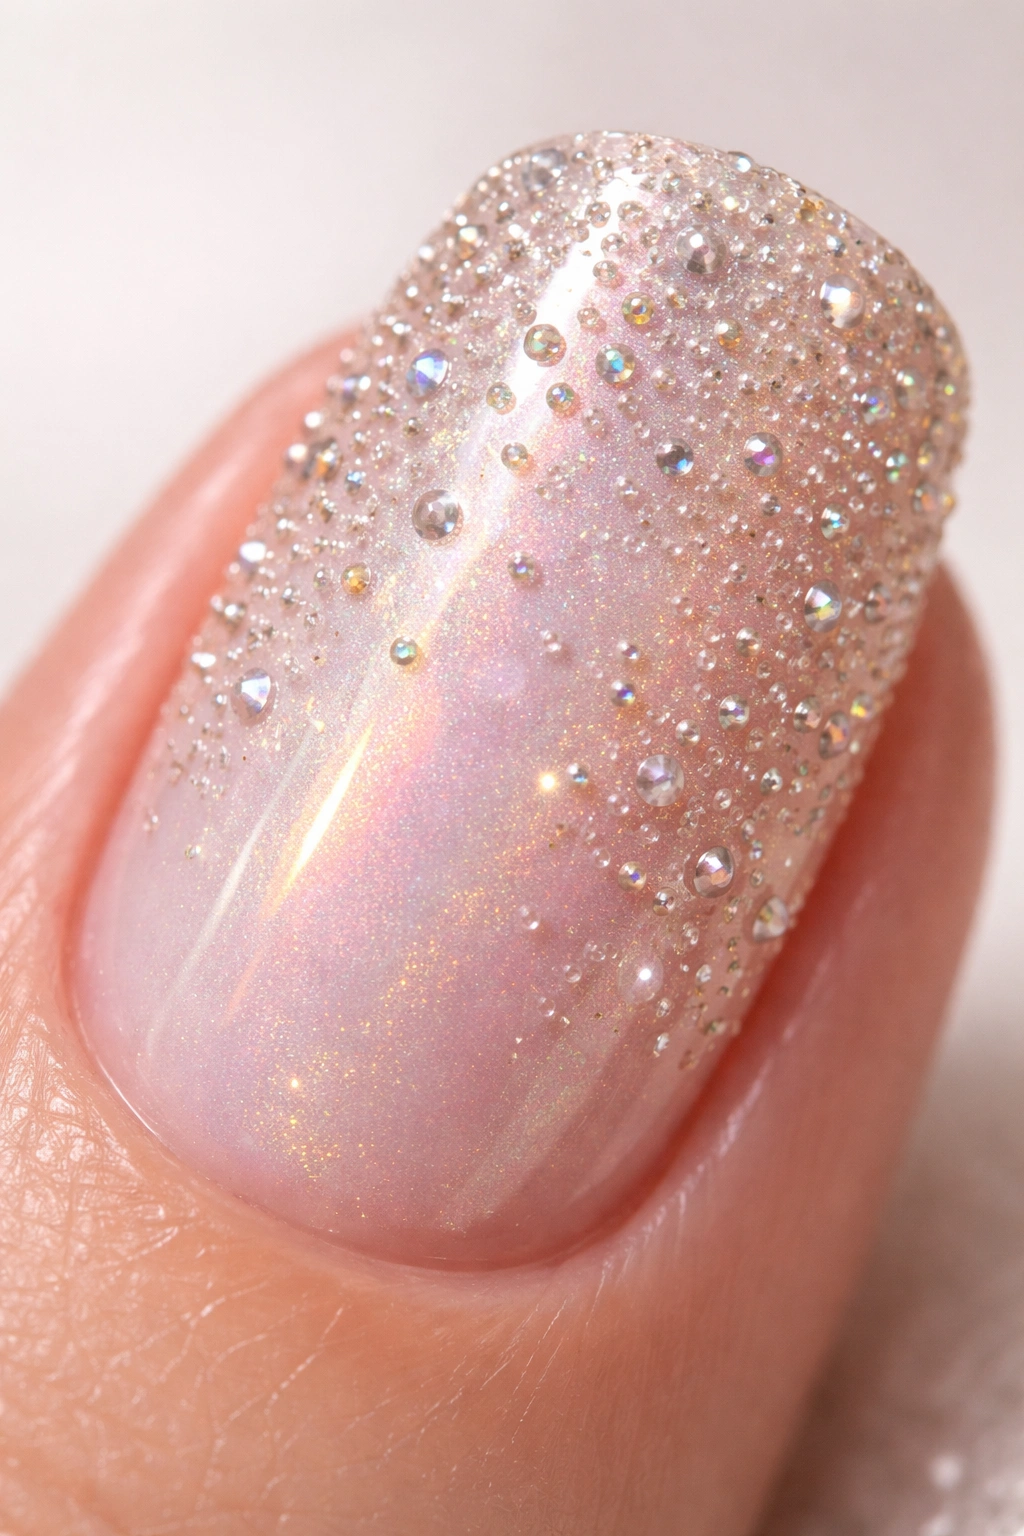
10. Sugar Effect With Dimensional Beading
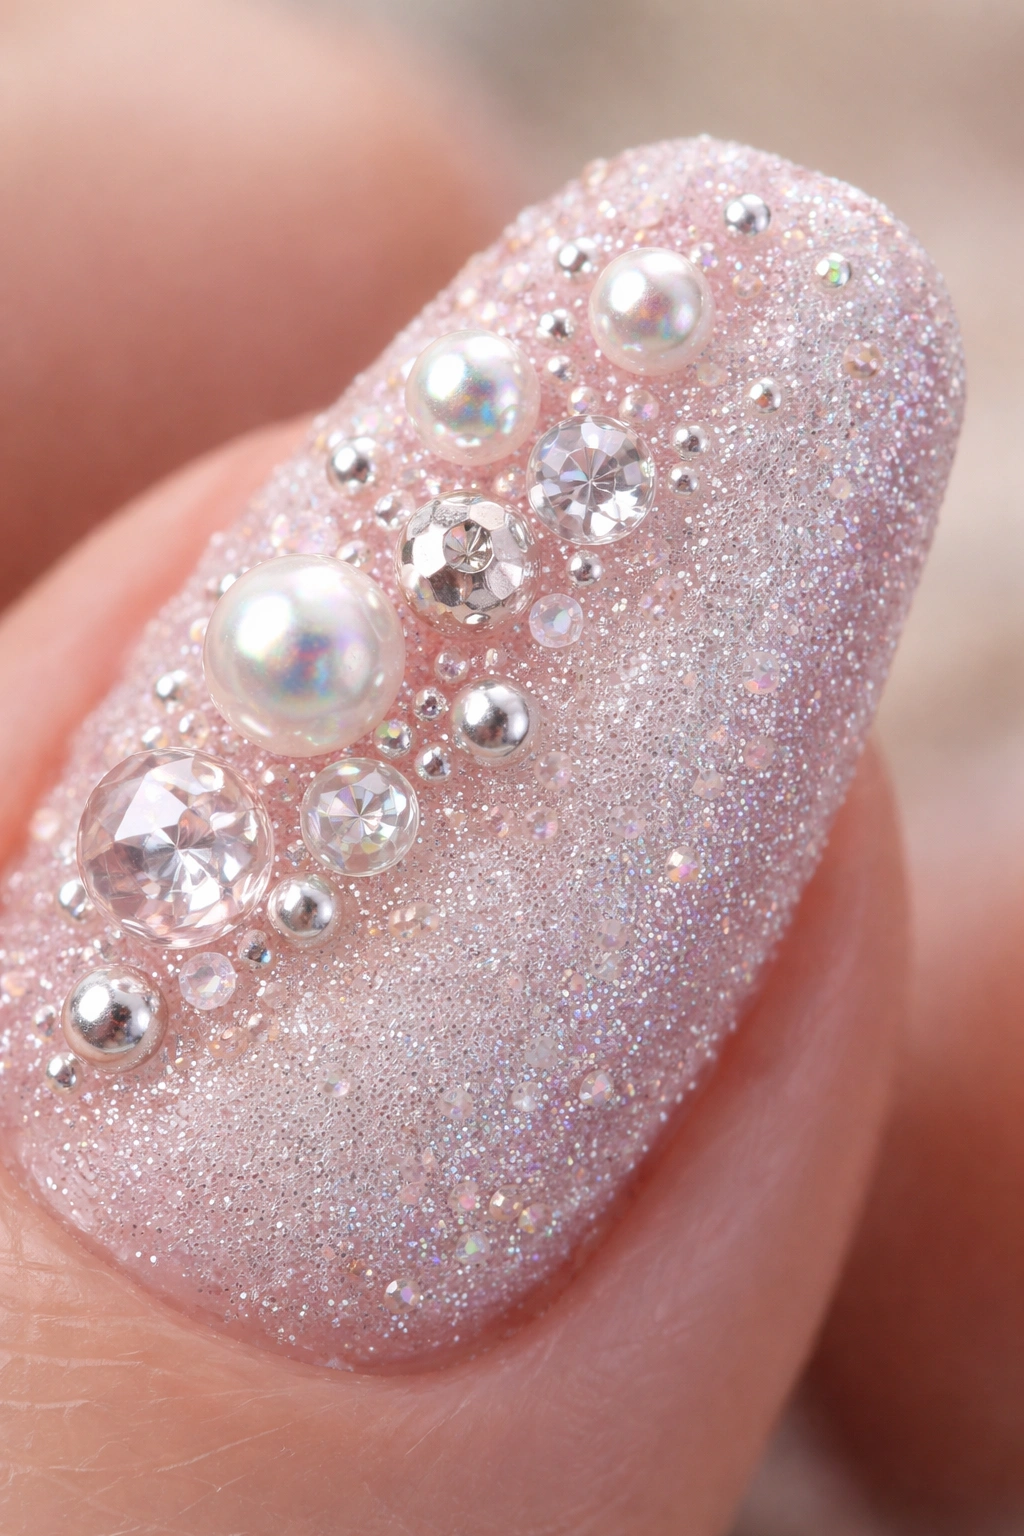
A textured, granulated finish (created with special sugar gels or textured powders) gets enhanced with tiny beads that sit on top, creating dimension both from the textured base and the raised beads. The sugar texture catches light across its entire surface, and the beads add focal points of shine that appear to rise higher than the sugar texture beneath. The result is incredibly tactile-looking and indulgent, almost like your nails are covered in edible pearl sugar.
Achieving the Sugar Texture
Sugar gels are specifically formulated to cure with a grainy, uneven surface that looks like it’s covered in tiny crystals. You can enhance this effect by sprinkling actual microbeads or caviar beads into the semi-cured gel, creating additional dimension. When these beads are secured in place and topped with clear gel, they sit proud of the surface, creating genuine height.
Bead Placement Strategy
- Scatter beads randomly across the sugar texture for organic appeal
- Create patterns with beads if you prefer structure
- Mix bead sizes and finishes (metallic, pearl, translucent)
- Ensure beads are fully encapsulated so they don’t catch on fabric
Real talk: Sugar and bead combinations require careful hand care since the texture can snag on delicate fabrics.
11. Abstract 3D Marbling With Metallic Swirls
Organic, flowing swirls are created using marbling techniques, then enhanced with dimensional metallic gel that sits slightly raised above the marbled base. The metallic elements follow or cross the marbled pattern, creating visual layering. The abstract nature of marbling means every set is unique, and the 3D metallic accents make each design feel personalized and artistic.
Marbling Technique Combined With 3D Elements
Traditional marbling creates beautiful, organic patterns that are already visually complex. When you add dimensional metallic work on top, you’re building onto an already interesting base. The metallic doesn’t need to perfectly follow the marble—sometimes contrast between the geometric metallic lines and the organic marble pattern creates more visual impact.
Building the Dimensional Metallic Work
- Create your marble pattern first and allow it to fully cure
- Use metallic gel in a thin consistency for fine lines
- Apply metallic work with a thin brush or even a toothpick for precision
- Build up height gradually—a thick single coat looks heavy, thin layers feel refined
Worth considering: Abstract designs mean you don’t need to be perfectly precise, making this more forgiving than geometric designs.
12. Translucent Gel With Suspended Holographic Pigment
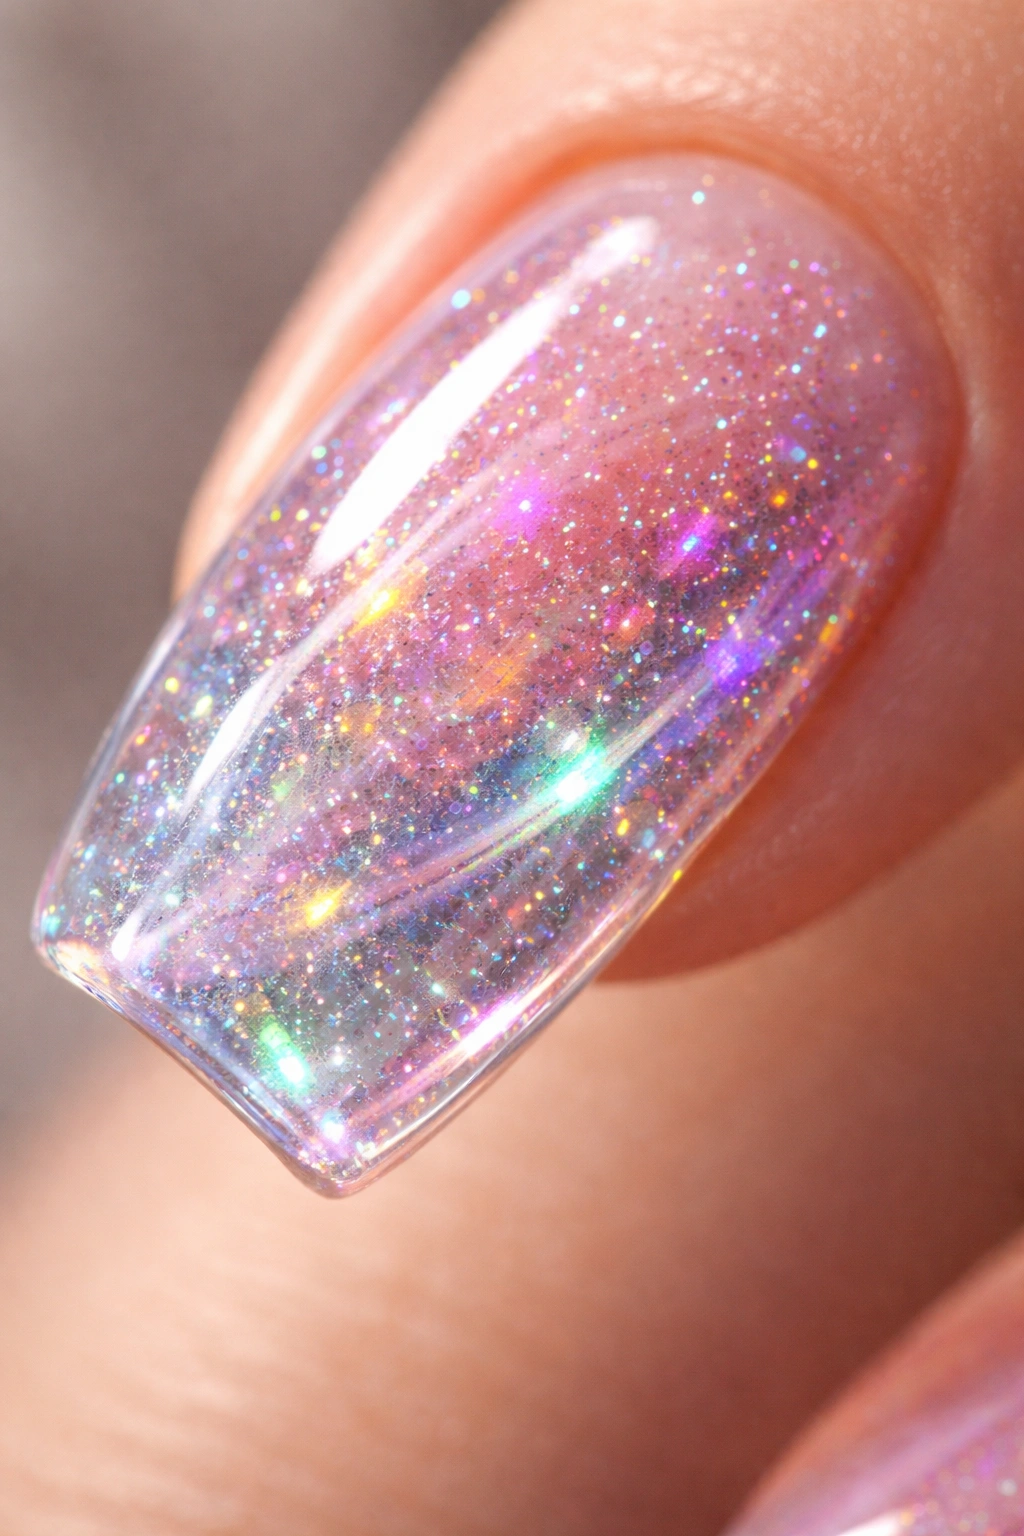
A clear or barely-tinted gel base with holographic pigment suspended throughout creates dimension through light refraction. The holographic particles shift colors and reflect light at different angles, making the nail surface appear to change and move as you move your hand. The transparency allows light to penetrate deeply into the gel, amplifying the holographic effect.
How Holographic Pigment Creates Dimension
Holographic pigment doesn’t sit on the surface like regular shimmer—it’s suspended throughout the gel thickness, meaning light passes through the pigment particles and bounces back out at multiple angles. This creates a three-dimensional effect that’s impossible to achieve with surface-level color. As you rotate your hand, the colors shift and change, creating dynamic movement.
Application and Finish
- Mix holographic pigment thoroughly into your gel base
- Use quality cosmetic-grade holographic powder (nail-specific products work best)
- Seal with a glossy topcoat that won’t yellow or cloud the holographic effect
- Avoid matte topcoats with this design—they diminish the dimensional light effect
Insider tip: Some holographic pigments look better in natural light, others in artificial light—test application on practice nails before committing to a full manicure.
13. 3D Butterfly or Moth Wings
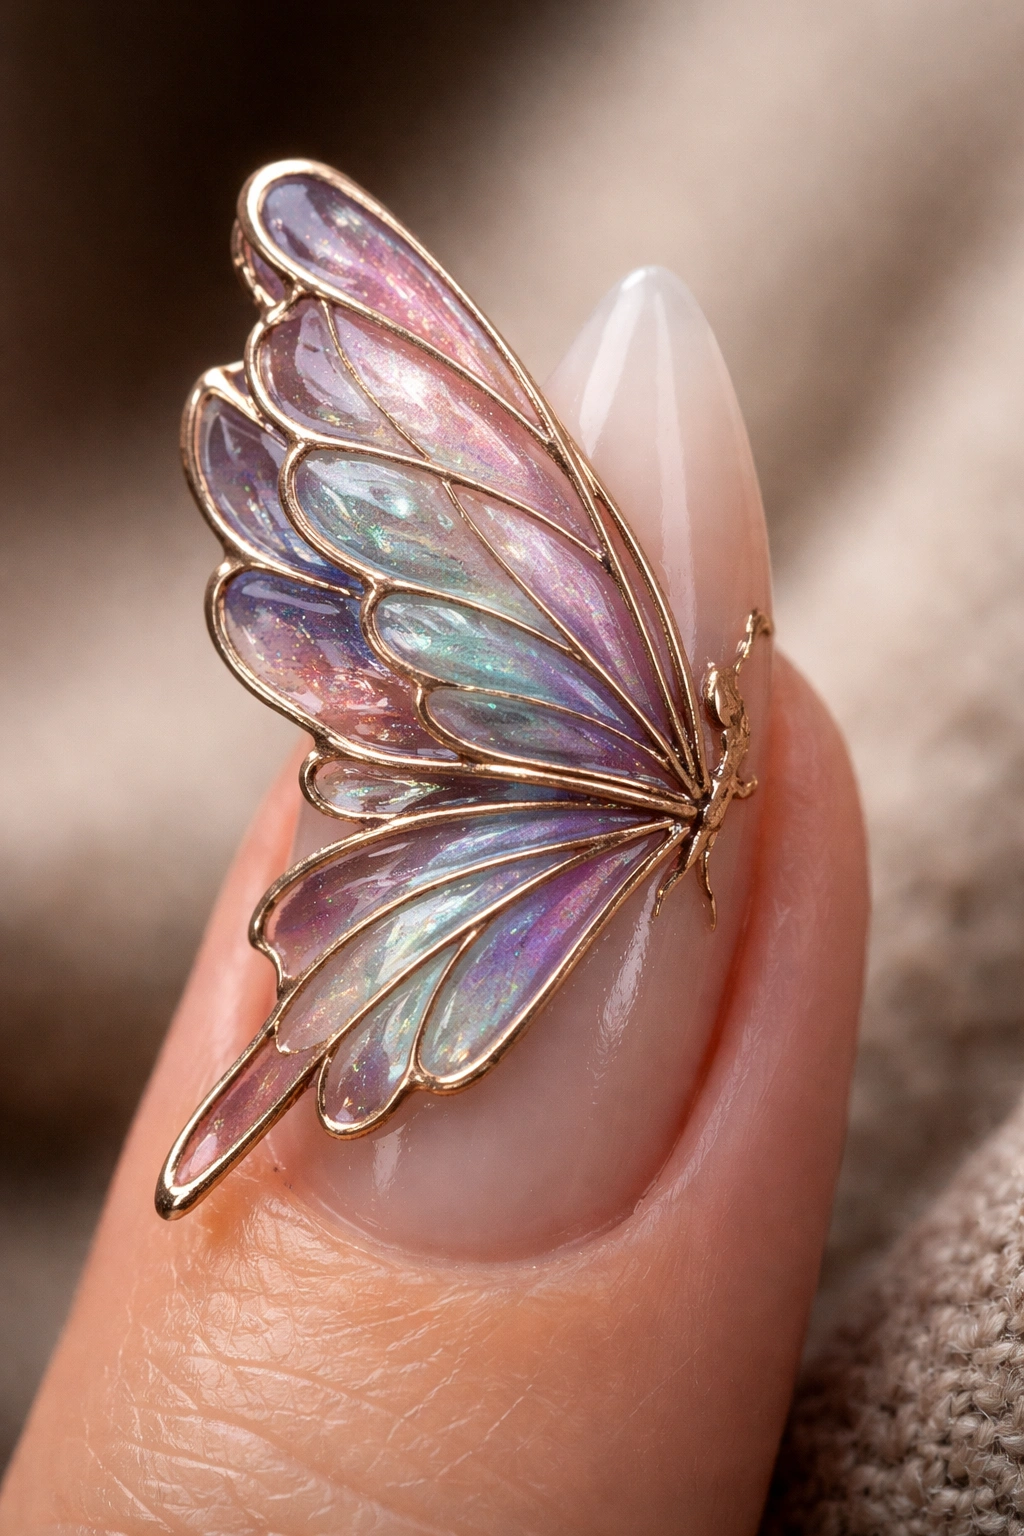
Sculpted butterfly or moth wings rise dramatically off the nail surface, with each wing layered and shaded to look lifelike. The wings are built using acrylic or gel with careful attention to individual wing sections, then hand-painted with details and metallic accents that emphasize the dimensional structure. The body of the butterfly is typically smaller, anchoring the wings which become the main focal point.
Sculpting Realistic Wing Structure
Creating believable butterfly wings requires understanding basic wing anatomy—the main wing sections, the vein-like patterns, and how wings naturally curve. Each section is sculpted separately, then joined together to form complete wings. The shading and painting create shadows that make the wings appear to have actual depth and form, almost like they could flutter away.
Painting and Detail Work
- Use matte and glossy finishes to differentiate wing sections
- Add metallic accents along wing edges and veins
- Create shadow areas with darker translucent gels beneath lighter sections
- Consider ombré wing coloring that shifts from one shade to another
Pro tip: This design is absolutely a “statement nail” situation—it’s bold and beautiful, but it’s not practical for someone who needs low-key, professional nails.
14. Caviar Beads With Glazed Gel Background
Tiny caviar beads (microspheres of acrylic or polymer) create texture and dimension across a smooth glazed gel base. The beads catch light individually, creating multiple points of shine that reflect light differently depending on the angle. The glazed background remains smooth and glossy, creating contrast between the textured bead areas and the smooth gel surface.
Applying Caviar Beads Effectively
Caviar beads are applied to semi-cured gel, then sealed with additional gel layers that secure them in place. The key is ensuring beads are evenly distributed and fully encapsulated so they don’t pop off. The final result should feel smooth to the touch despite the textured appearance—if beads are catching on your skin or clothes, they’re not fully sealed.
Bead Placement Strategies
- Create an ombré effect by concentrating beads heavily in one area and fading them out
- Use different bead colors to create patterns or gradients
- Mix bead sizes for more visual interest
- Reserve heavy beading for areas less likely to encounter friction
Worth knowing: While caviar beads look incredibly luxe, they add minimal actual dimension compared to sculpted elements—the visual effect is more about texture than height.
15. Embossed 3D Lettering or Monogram
Raised, dimensional letters or monograms are sculpted onto the nail surface using acrylic or thick gel, creating a personalized design with genuine texture. Each letter rises above the base, and the spaces between letters are carved out, creating shadows that emphasize the three-dimensional nature. The letters are hand-painted with metallic or contrasting colors that highlight the dimensional structure.
Sculpting Clear, Readable Letters
Creating legible lettering at nail size requires precision and careful planning. Each letter needs to be proportioned correctly, spaced evenly, and sculpted to similar heights. Thinner letters look more elegant but are harder to sculpt cleanly. Bolder letters are easier to execute and tend to show dimension more dramatically. Hand-sculpting is more realistic than attempting to use stamps at this scale.
Design Refinement
- Choose serif or sans-serif fonts and stick with one style
- Use metallic or pearl finishes to highlight letter edges
- Consider subtle background texture that contrasts with smooth letters
- Keep lettering to 1-3 characters maximum for clarity at nail size
Real talk: Embossed lettering is sophisticated but works best as an accent nail, not across all ten nails—too much texture gets visually overwhelming.
16. Reverse Stamped Images With Dimensional Topcoat
Detailed images stamped onto the underside of a clear or translucent nail plate (reverse stamping) are then sealed with a dimensional topcoat that creates texture over the design, making it appear to rise off the nail. The image sits beneath the sealed topcoat, and the dimensional texture on top creates a layered, almost 3D effect. This technique allows for incredibly detailed artwork while maintaining nail durability.
Understanding Reverse Stamping and Dimensional Layers
Reverse stamping places images on the underside of the nail plate, which protects them from daily wear while creating an interesting visual effect—the image is visible through the nail, but it’s protected by the layers above it. Adding a dimensional topcoat to the outside creates texture that makes the image appear to sit within multiple layers of dimension rather than flat against the nail.
Creating the Dimensional Effect
- Use quality stamping polish with detailed imagery
- Allow stamped image to completely dry before sealing
- Apply dimensional topcoat in controlled, even layers
- Consider mixing matte and glossy topcoats for additional texture contrast
Worth noting: This technique requires a light nail plate or significant nail overlay—stamped images won’t show through dark nails effectively.
Final Thoughts

3D duck nails represent the intersection of technical skill and creative vision. The dimensional elements aren’t just decoration—they’re intentional design choices that transform a simple nail shape into genuine wearable art. Whether you’re drawn to sculptured florals, geometric precision, or textured effects, three-dimensional design elevates duck nails from trendy to timeless.
The most successful 3D designs balance visual impact with practicality. The stunning nails that actually survive daily life are the ones where dimensional elements are thoughtfully placed and properly secured, not the ones that look incredible in photos but snag on everything you touch. If you’re getting this done professionally, investing in a technician who understands both the aesthetic possibilities and the structural requirements of 3D work makes all the difference.
Start by choosing a 3D approach that genuinely speaks to your style. Whether it’s the elegance of encrusted crystals, the artistry of hand-sculpted flowers, or the precision of dimensional geometry, the best design is the one that makes you excited to show off your nails. Because that’s what duck nails with 3D elements really are—they’re an invitation to embrace nail art as a legitimate form of personal expression.
