

Reverse duck nails have completely transformed how we think about statement nail designs. Instead of the traditional duck nail shape—where the nail extends straight and then flares dramatically at the tip—the reverse version flips that concept on its head, creating a nail that’s wide at the base and gradually tapers toward the tip. This inverted silhouette is elegant, less intimidating than classic duck nails, and surprisingly versatile. The result feels modern, sophisticated, and way more wearable for everyday life while still delivering that bold, architectural nail moment everyone’s craving.
What makes reverse duck nails so compelling is that they work with virtually every aesthetic and skill level. Whether you’re into minimalist vibes, maximalist glamour, or anything in between, there’s a reverse duck nail design waiting for you. The tapered shape actually flatters most hand shapes and nail beds better than traditional ducks do, since it creates an elongating effect without the jarring width at the tip. You get the drama and the elegance without the extreme commitment that classic duck nails demand.
The beauty of exploring reverse duck nail ideas is discovering how much personality you can pack into this one shape. From color blocking to negative space, from intricate art to subtle texture, the possibilities genuinely feel endless. Whether you’re heading to work, a wedding, or just want to feel confident and put-together on a random Tuesday, there’s a reverse duck design that’ll make you feel like the best version of yourself.
1. Ombré Gradient with Soft Blending
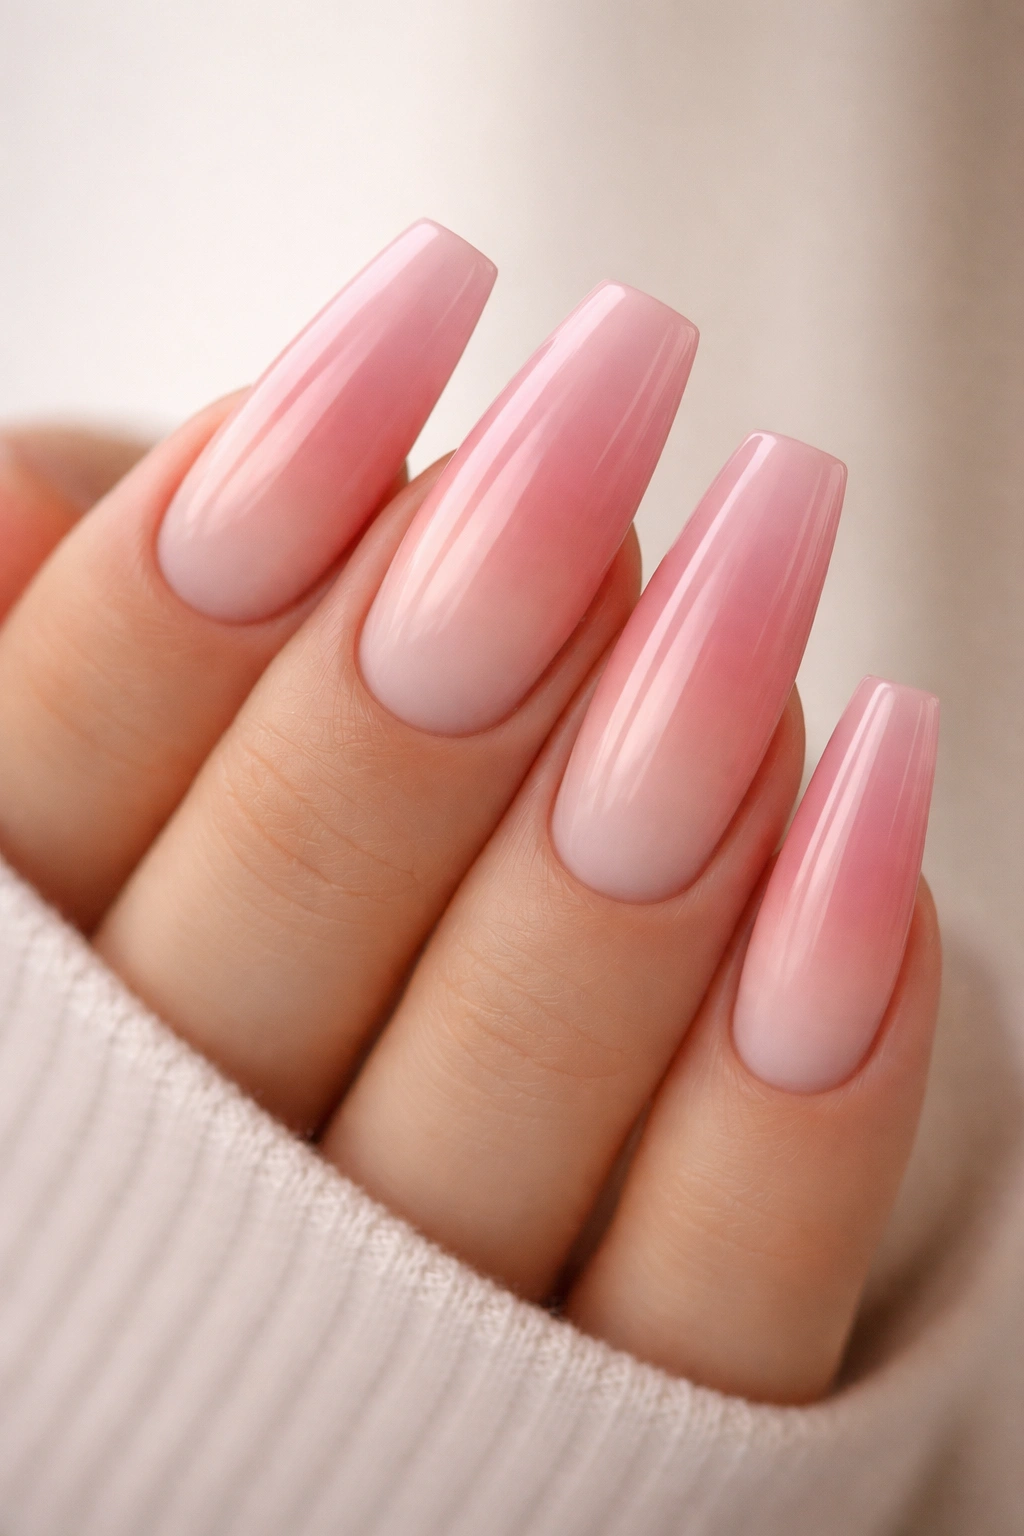
Ombré reverse duck nails create an absolutely mesmerizing effect because the shape naturally complements the gradient flow. Start with a light shade at the wide base—think soft pink, pale peach, or creamy white—and gradually deepen the color as you move toward the tapered tip. The transition should be smooth and blended, taking advantage of the nail’s natural width to showcase the color shift in all its glory.
Why This Works
The tapered shape of reverse duck nails enhances the ombré effect in ways that traditional square nails simply can’t match. The width at the base gives you plenty of real estate to start your first color, and as the nail narrows toward the tip, the gradient becomes increasingly concentrated, creating a visual drama that’s almost hypnotic. The shape guides your eye naturally from base to tip, following the color journey exactly the way it was designed to.
How to Execute This Look
Use a makeup sponge or ombré brush to apply thin, overlapping layers of color. Start by painting your base shade on the wider portion of the nail, then blend in the middle shade where they meet, and finish with your darkest shade at the tapered tip. Set everything with a glossy top coat to enhance the blended, seamless effect.
Pro tip: Using colors within the same family (light to dark rose, nude to deep bronze, cream to chocolate) creates a more sophisticated look than jumping between contrasting hues.
2. Minimalist Line Art and Geometric Shapes
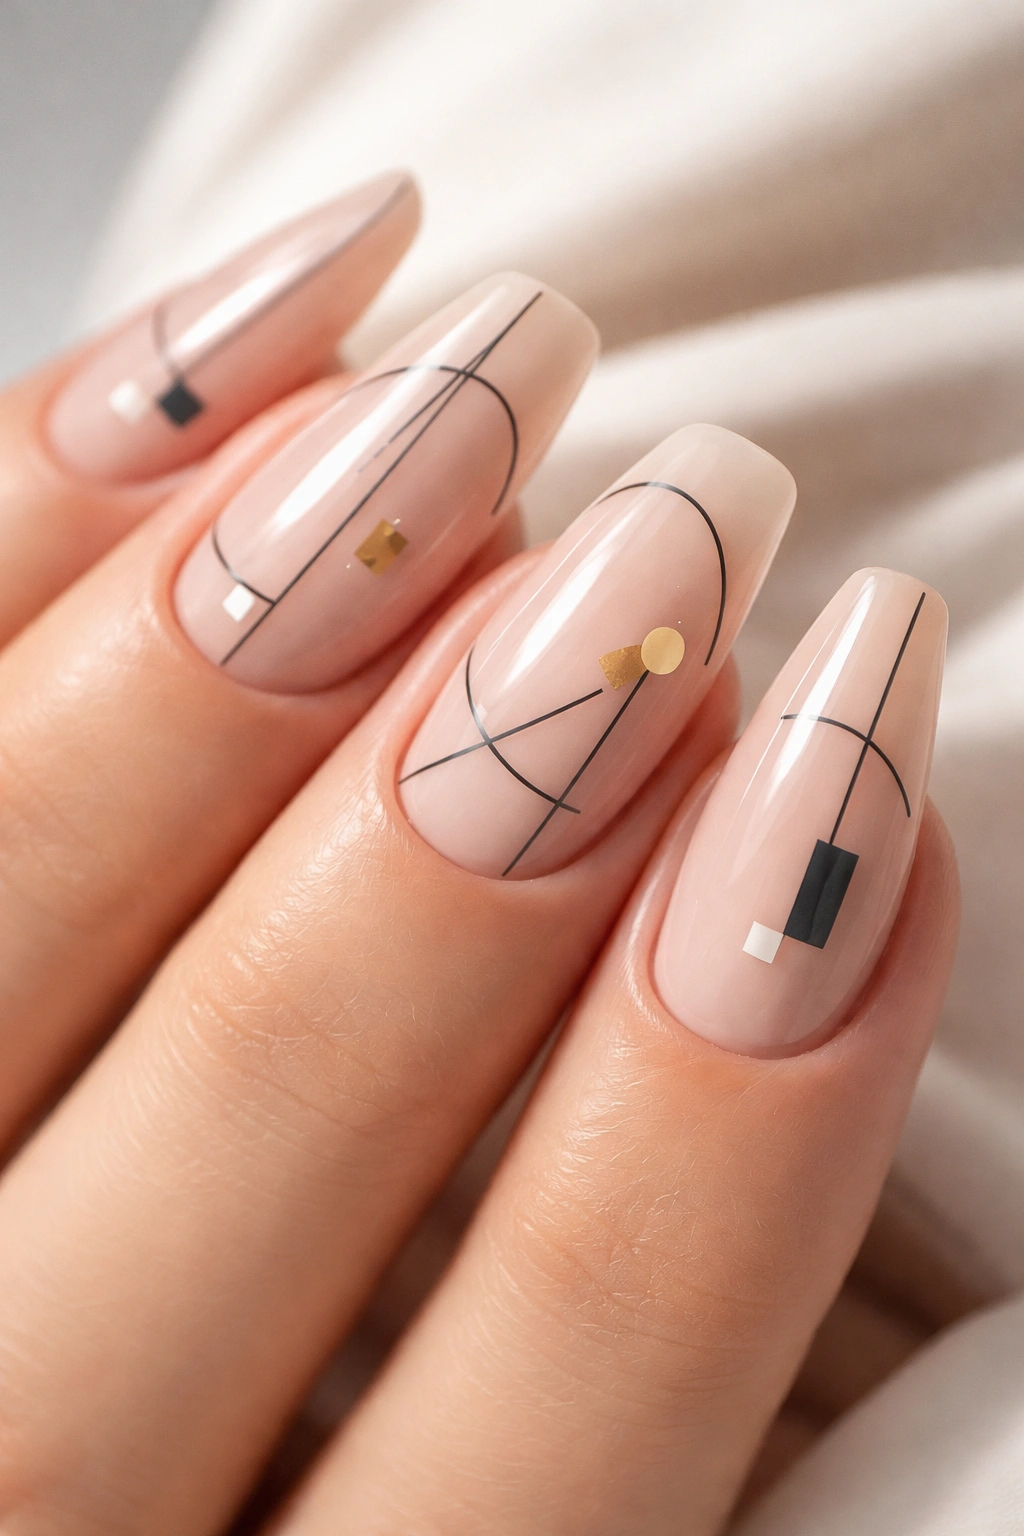
Reverse duck nails provide the perfect canvas for clean, architectural line work. A single elegant line running from base to tip, geometric blocks of color, or negative space designs all feel incredibly sophisticated on this shape. The tapered form actually emphasizes the precision of geometric patterns, making even simple designs look intentional and artistic.
What Makes Geometric Designs Stand Out
Geometric shapes and clean lines photograph beautifully against the reverse duck silhouette because they emphasize the nail’s natural architecture. A diagonal line that follows the taper, a triangular negative space element, or alternating color blocks feel like they were specifically designed for this shape. There’s an unexpected harmony between the clean, structured geometry and the flowing taper of the nail itself.
Design Ideas to Try
- A single metallic line running from the base to the tip down the center
- Alternating triangular blocks in two complementary colors
- Negative space cutouts in the middle or at the tip
- A thin outline frame with the rest left bare or filled with a subtle color
Insider note: Use ultra-thin brushes or nail art liners for the cleanest lines—precision is everything with geometric designs.
3. Marble and Stone Texture Effects
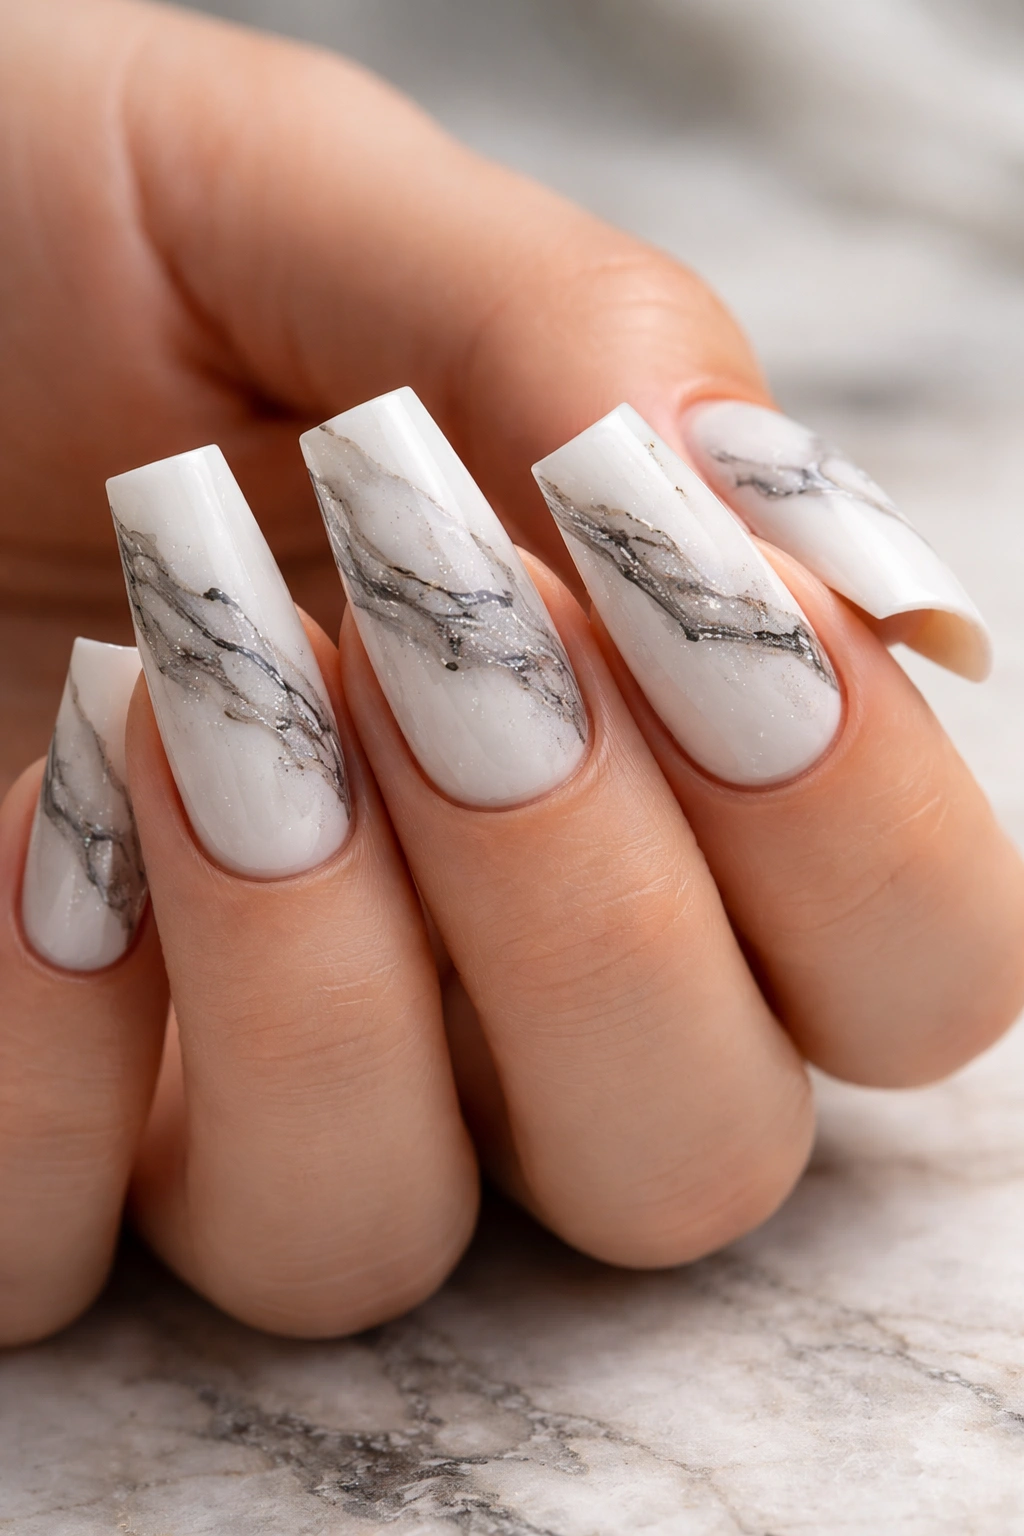
Marble reverse duck nails feel incredibly luxurious and high-end, yet the technique is actually quite forgiving. The natural, organic veining of marble creates movement and interest across the taper, making the design feel intentional and artistic. Whether you’re going for classic black-and-white marble, warm caramel stone, or cool gray granite, this texture adds instant sophistication.
Why Marble Works on Reverse Ducks
The tapered width variation creates natural shadows and depth that enhance the three-dimensional quality of marble effects. When light hits the wider base differently than the tapered tip, the marble veining actually looks more realistic and dimensional. The shape amplifies the luxury feel that marble is all about.
How to Create Marble Nails
Use a base color, then add thin lines of a contrasting color in a web-like pattern using a thin brush or a detail tool. Blend and blur the lines slightly with a dry brush to create that characteristic soft, organic marble look. Seal with a glossy topcoat to enhance the stone-like sheen.
Worth knowing: Marble works especially well on nude, white, gray, or black base colors—these neutral palettes let the veining become the actual star.
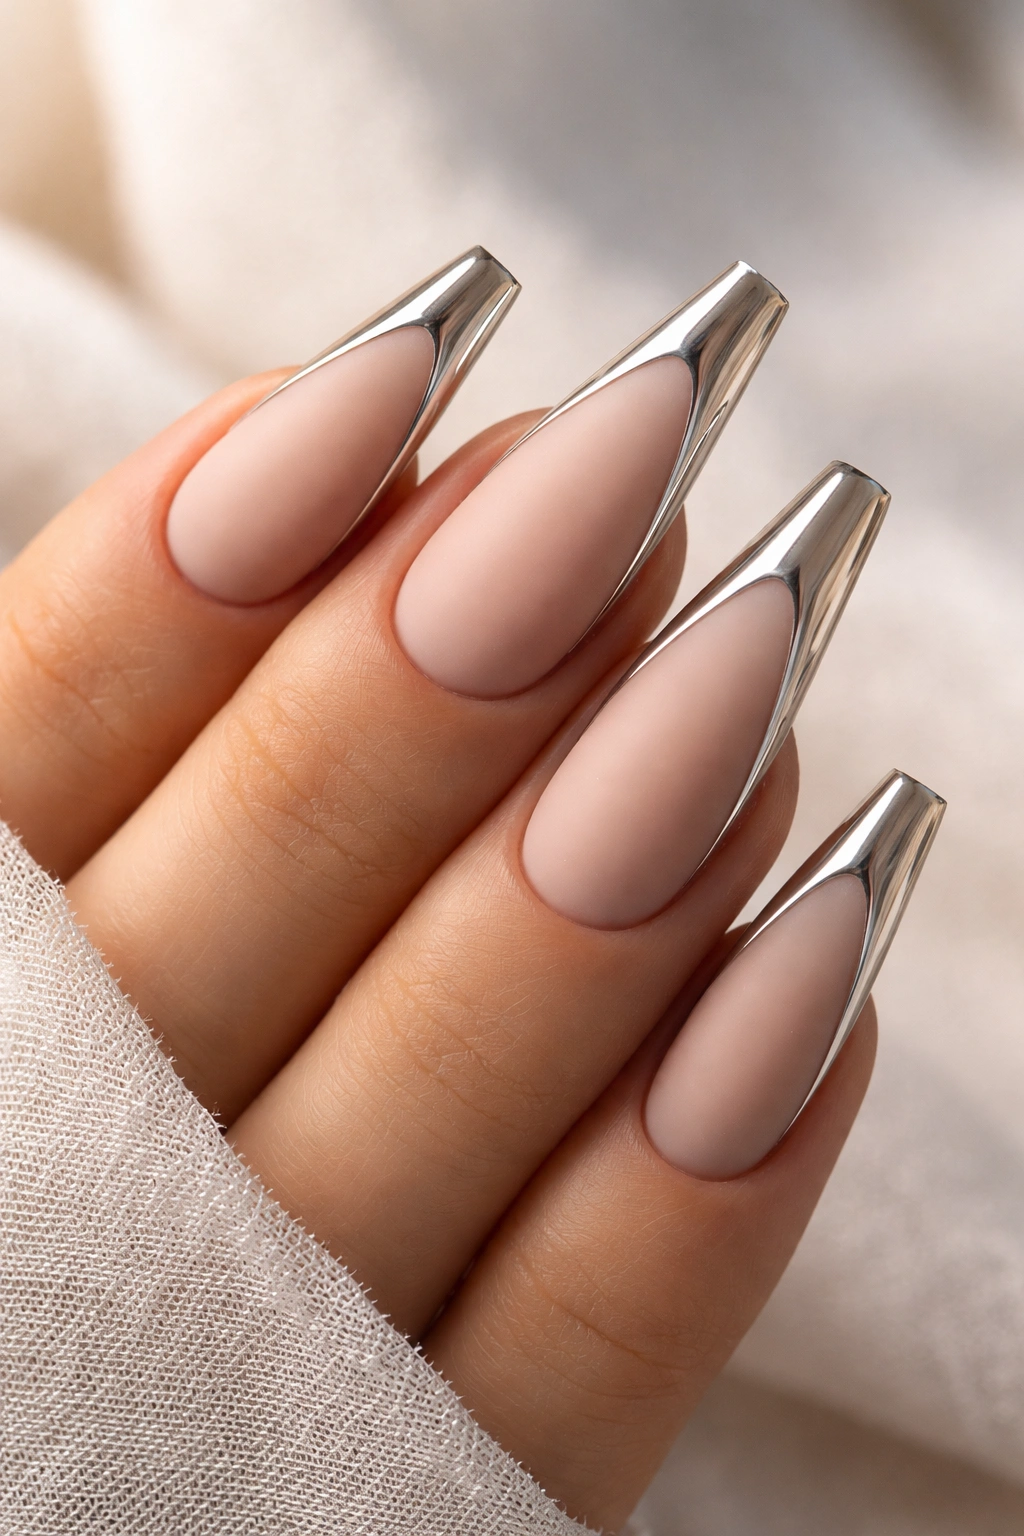
4. Negative Space with Chrome Accents
Negative space reverse duck nails let your actual nail bed peek through in strategic areas, creating an ultra-modern, architectural look. Pair those bare sections with chrome or metallic accents, and you’ve got a design that feels fashion-forward and editorial. The tapered shape makes negative space designs feel even more intentional—the gaps actually follow the nail’s natural geometry.
The Power of Negative Space
Negative space designs immediately feel contemporary and design-focused. They’re a way of saying “I’m confident enough in my nail shape that I don’t need to fill every millimeter.” On reverse duck nails, strategic bare sections emphasize the silhouette itself, making the shape the real design element. Add metallic accents, and you’ve got a design that catches light and draws attention.
Execution Strategies
- Leave the center of the nail bare with full color on the outer edges
- Create a tapered negative space line that follows the shape’s taper
- Bare sections at the base with metallic or glitter concentration at the tip
- Geometric cutouts combined with chrome dust for a futuristic effect
Quick tip: Use chrome powder applied with a rubber brush for the most reflective, eye-catching metallic sections.
5. Glitter Gradient and Sparkle Effects
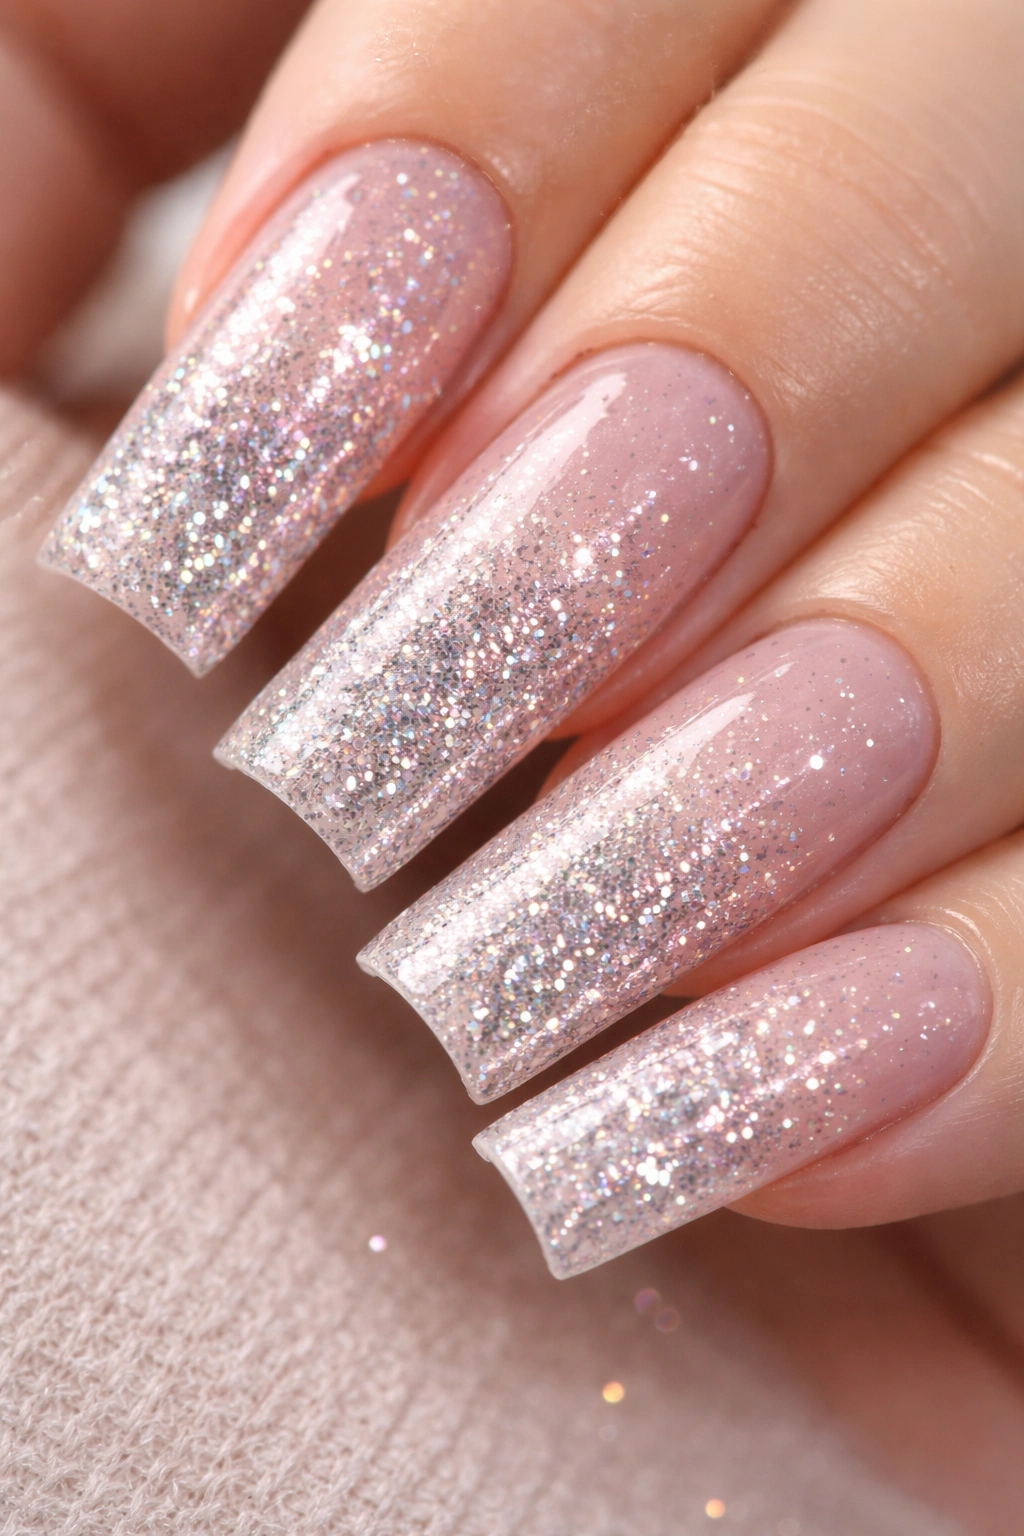
Glitter gradients on reverse duck nails create an ethereal, glamorous effect that’s perfect for any occasion from everyday confidence to special events. Start with scattered glitter at the tapered tip and gradually increase density toward the base, or reverse it for a more unexpected effect. The varying widths of the nail actually help showcase glitter at different densities in a naturally beautiful way.
Why Glitter Gradients Feel So Good
The width variation of reverse duck nails means glitter at the base has more space to spread out and sparkle, while glitter at the tip concentrates into a dazzling focal point. This natural variation creates dimension and visual interest that solid glitter or no glitter at all simply can’t achieve. The taper also catches and reflects light differently along its length, making glitter twinkle more dramatically.
Types of Glitter to Use
- Fine holographic or iridescent glitter for a subtle shimmer
- Chunky multi-colored glitter for maximum sparkle
- Chrome glitter for a futuristic metallic effect
- Ombré glitter sets in gradient colors that follow your base polish
Pro tip: Use a thick gel or builder base so glitter sits on top rather than sinking into polish, creating maximum light reflection.
6. Two-Tone Color Blocking with Sharp Lines
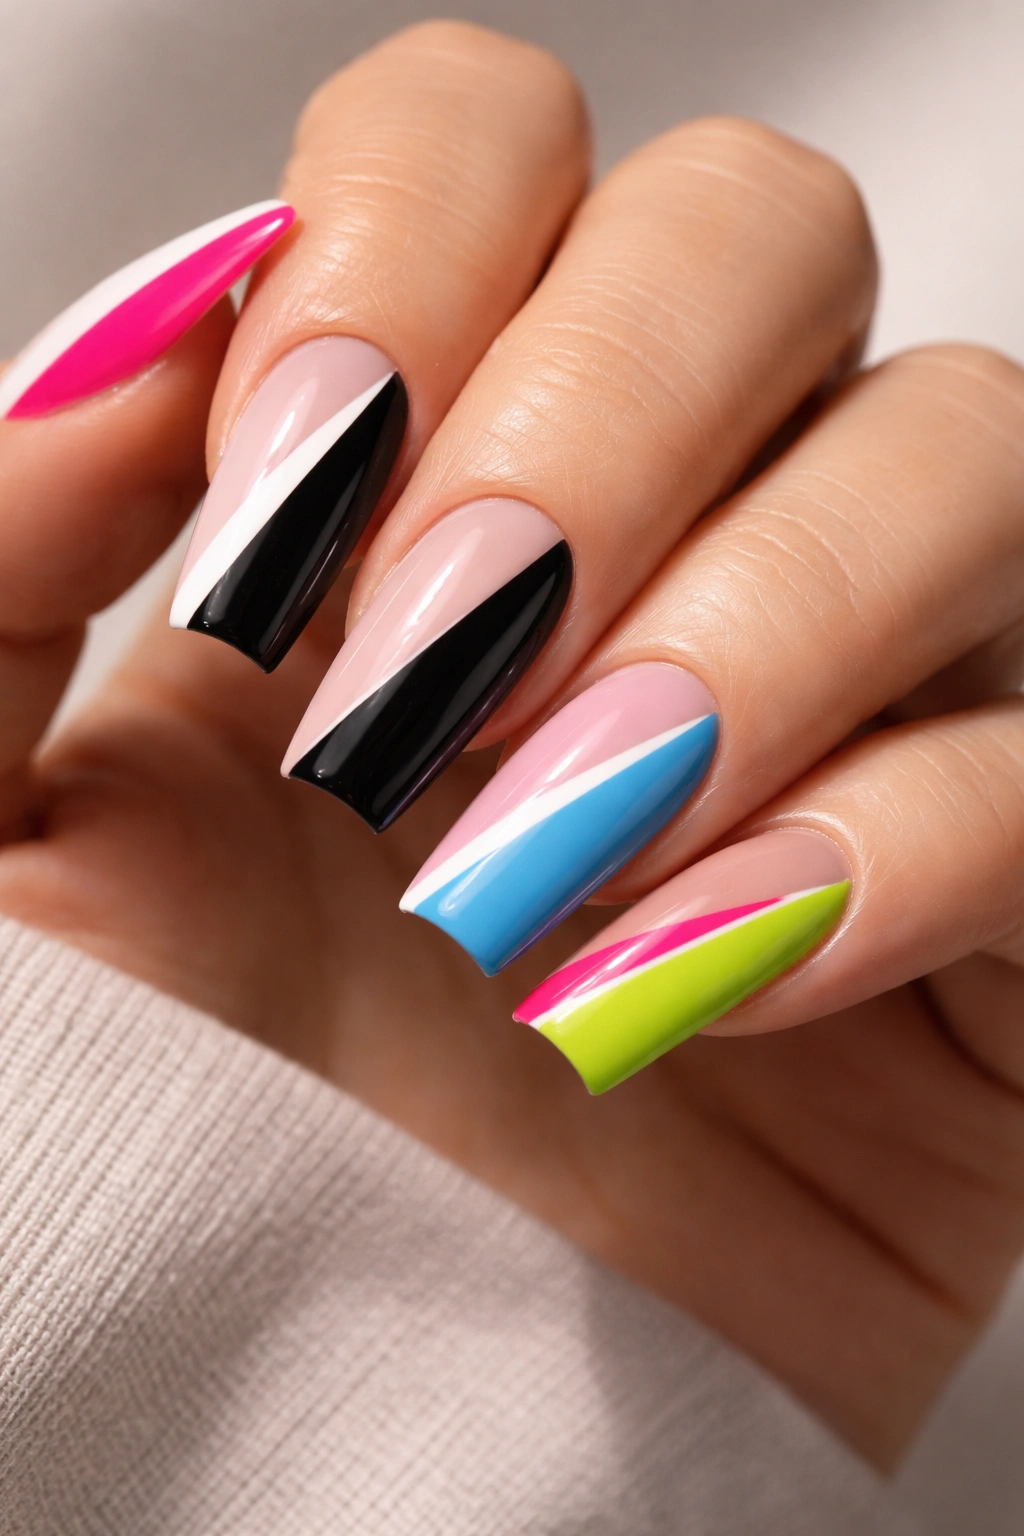
Color blocking on reverse duck nails creates a bold, graphic statement. Split the nail vertically, horizontally, or diagonally with two contrasting colors, using the taper as part of your composition. The shape naturally creates interesting proportions—the wider base gives more space to one color, while the tapered tip concentrates the second shade into a powerful focal point.
How Color Blocking Complements the Shape
When you divide a reverse duck nail with a color block, you’re essentially using the shape’s natural taper as part of your design. A diagonal line that follows the taper feels intentional and designed. A vertical split looks striking because the base is wide enough to give each color room to breathe. Horizontal divisions showcase the taper as the design actively narrows toward the tip.
Color Combination Ideas
- Classic navy and gold for a sophisticated vibe
- Hot pink and deep purple for a bold, editorial look
- Cream and emerald for an elegant contrast
- Coral and teal for a playful, vibrant feel
Worth knowing: The most impactful color blocks use colors with real contrast—don’t pair similar shades or the design will disappear instead of pop.
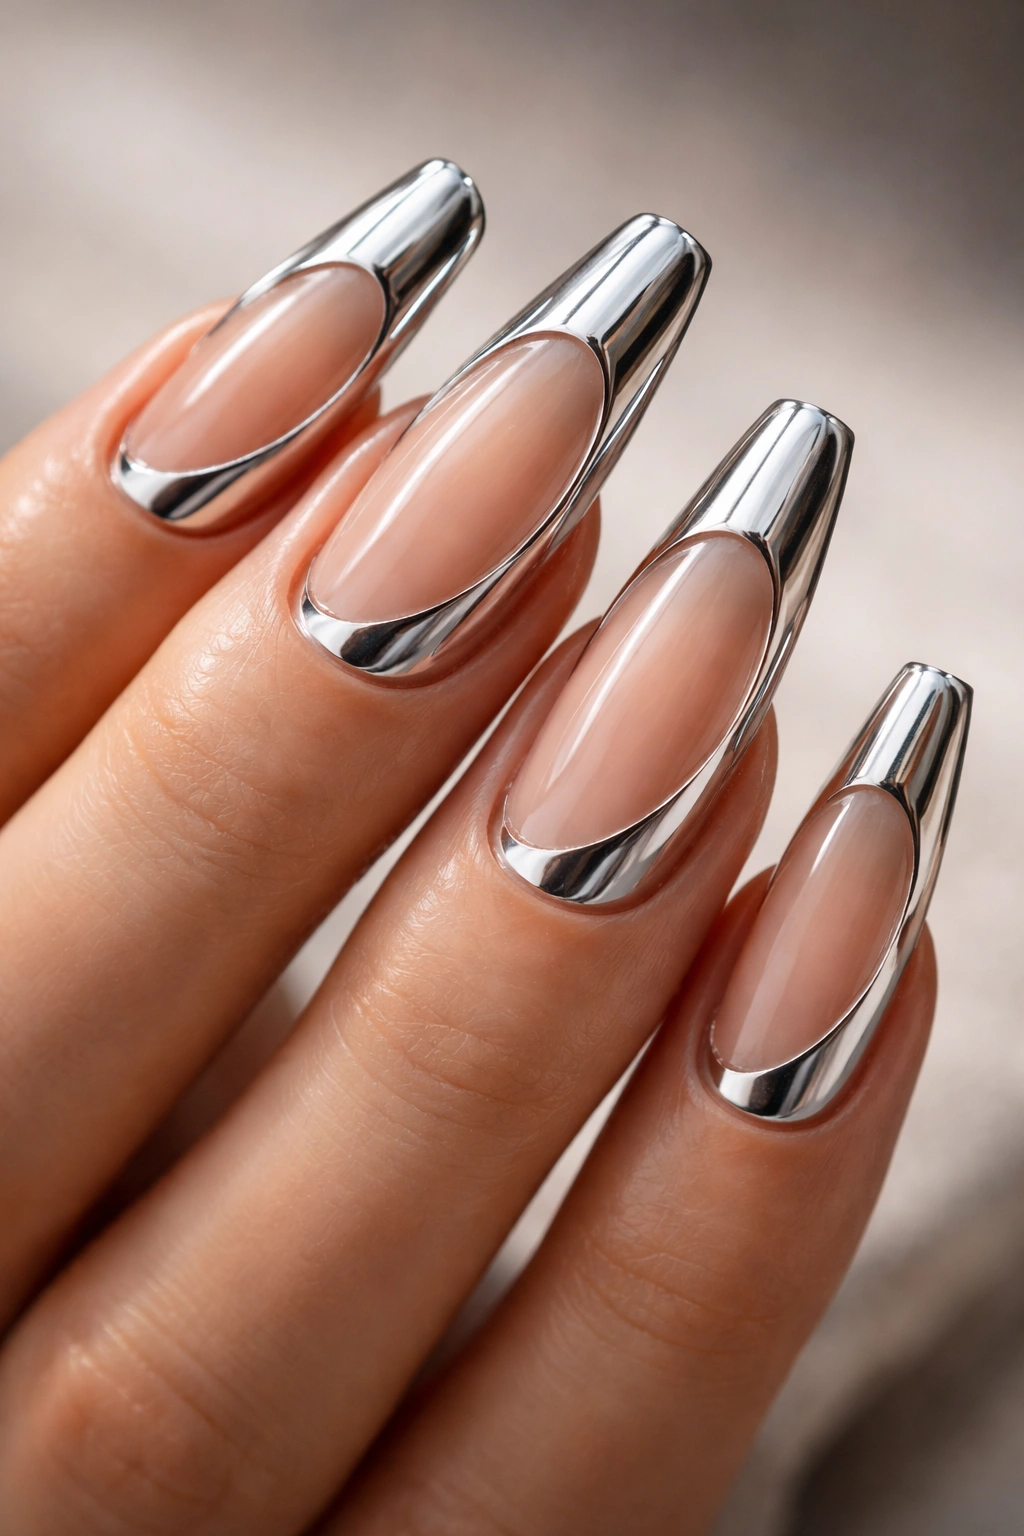
7. French Tips Reimagined with Reverse Shape

The reverse French tip is a modern twist on the classic design. Instead of color starting at the tapered tip and extending backward, reverse French designs feature color at the wide base fading toward a bare or nude tip. Alternatively, you can do a traditional French look using the taper to your advantage—a thin, precise line of contrasting color right where the nail narrows toward the tip.
Why Modern French Tips Feel Fresh
A traditional French tip on reverse ducks creates a completely different effect than on square nails because the tip is naturally narrower. This means your French line is more delicate and precise, requiring less product and looking incredibly chic. The proportions feel perfectly balanced—the color has room to exist at the wide base, then gracefully tapers away.
Variations to Explore
- Nude base with gold or chrome tips
- Sheer pink with white tips (classic French reimagined)
- Dark tip with gradient fade toward the base
- Colored tips matching your base with a thin metallic line
Quick execution tip: Use a thin brush or tweezers to position striping tape at the exact width you want for your French line, then paint cleanly up to that point.
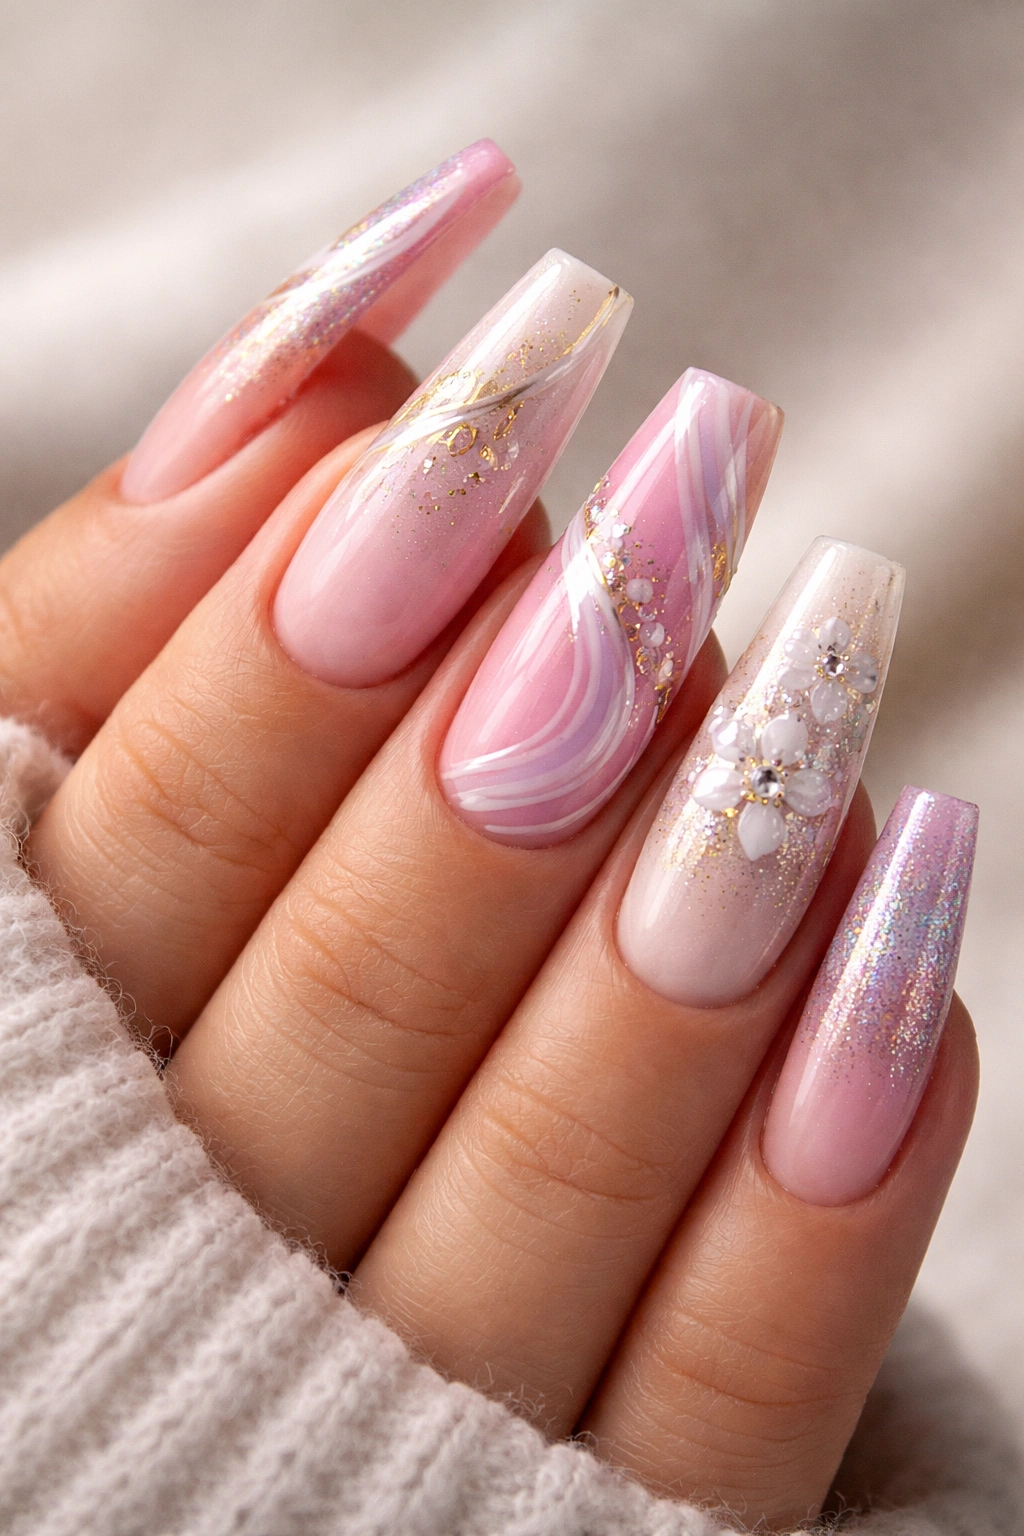
8. Nail Art with Hand-Painted Details and Illustrations
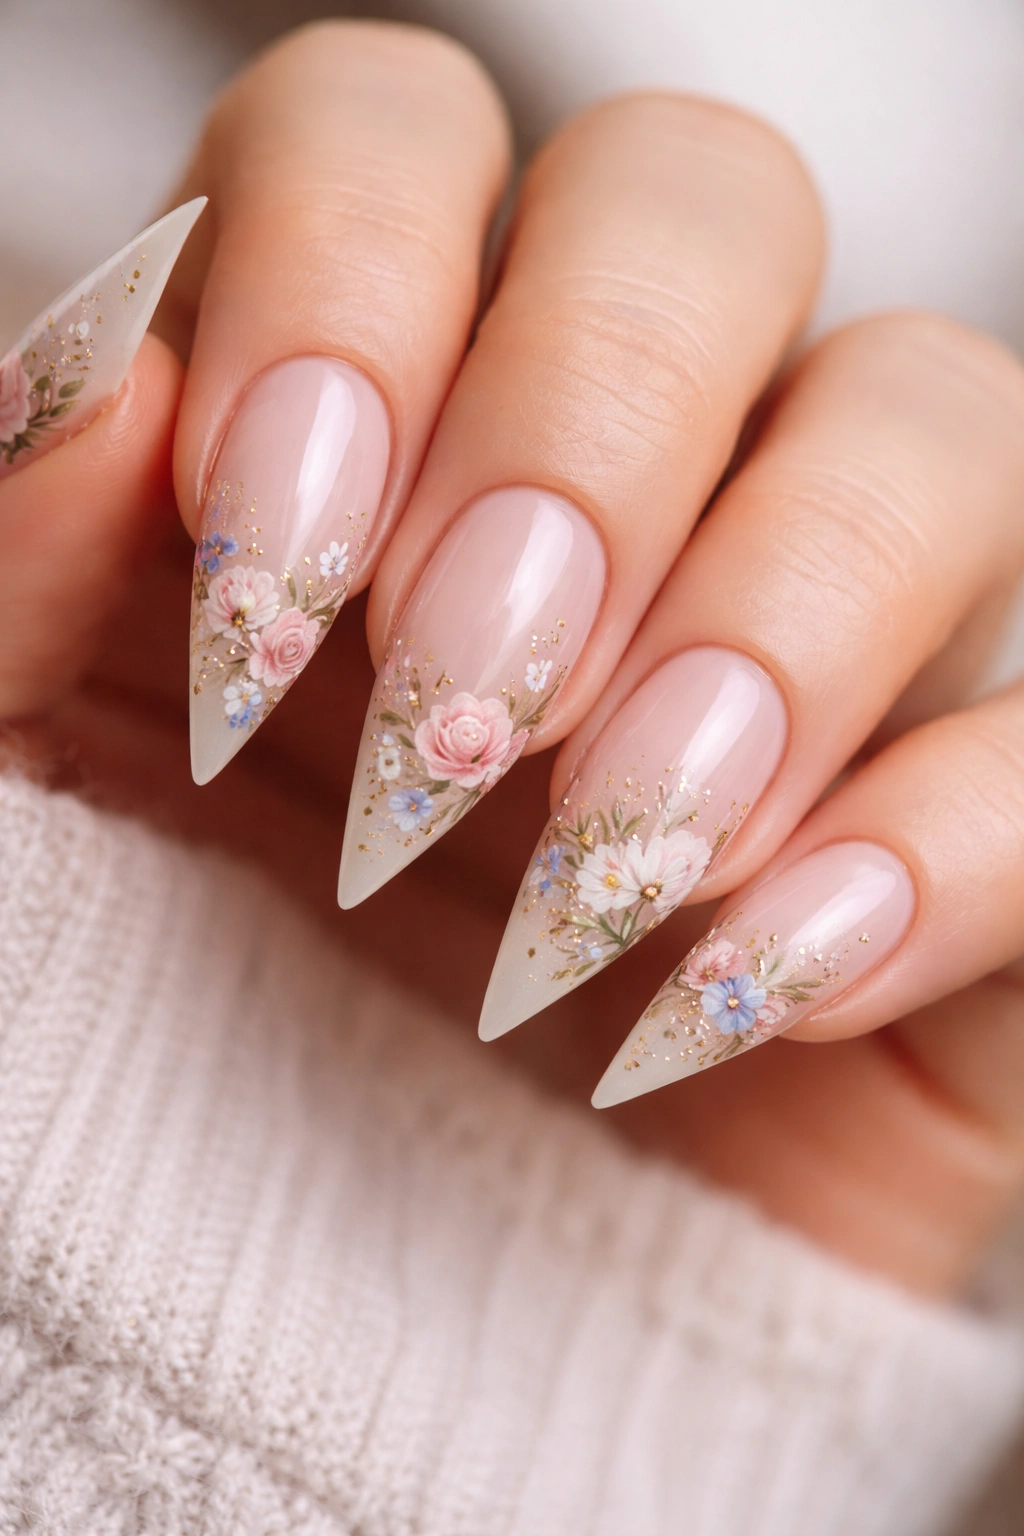
Hand-painted nail art on reverse duck nails gives you a gorgeous canvas for detailed illustration work. Small florals, abstract brushstrokes, miniature landscapes, or delicate figures all fit beautifully on these nails. The tapered shape actually makes detailed work feel more intentional—the art naturally becomes more concentrated toward the tip, creating a visual focal point.
Making Details Work on Tapered Nails
Fine art details work especially well on reverse duck nails because the decreasing width actually helps you focus your most intricate work toward the tip. The wider base gives you room for background elements or secondary details, while the tapered area becomes your centerpiece. This natural composition guide means your art has inherent balance and flow.
Ideas for Hand-Painted Designs
- Delicate wildflower bouquets with a detailed focal flower at the tip
- Abstract watercolor washes with precise line work
- Tiny landscape scenes concentrated at the narrower tip area
- Botanical line drawings with leaves and stems flowing across the nail
- Minimalist animal portraits or faces
Insider note: Use a very fine detail brush or even a size 0 liner brush, and apply thinner coats of nail art polish than regular polish for the best control and detail.
9. Encapsulated Foil and Flake Designs
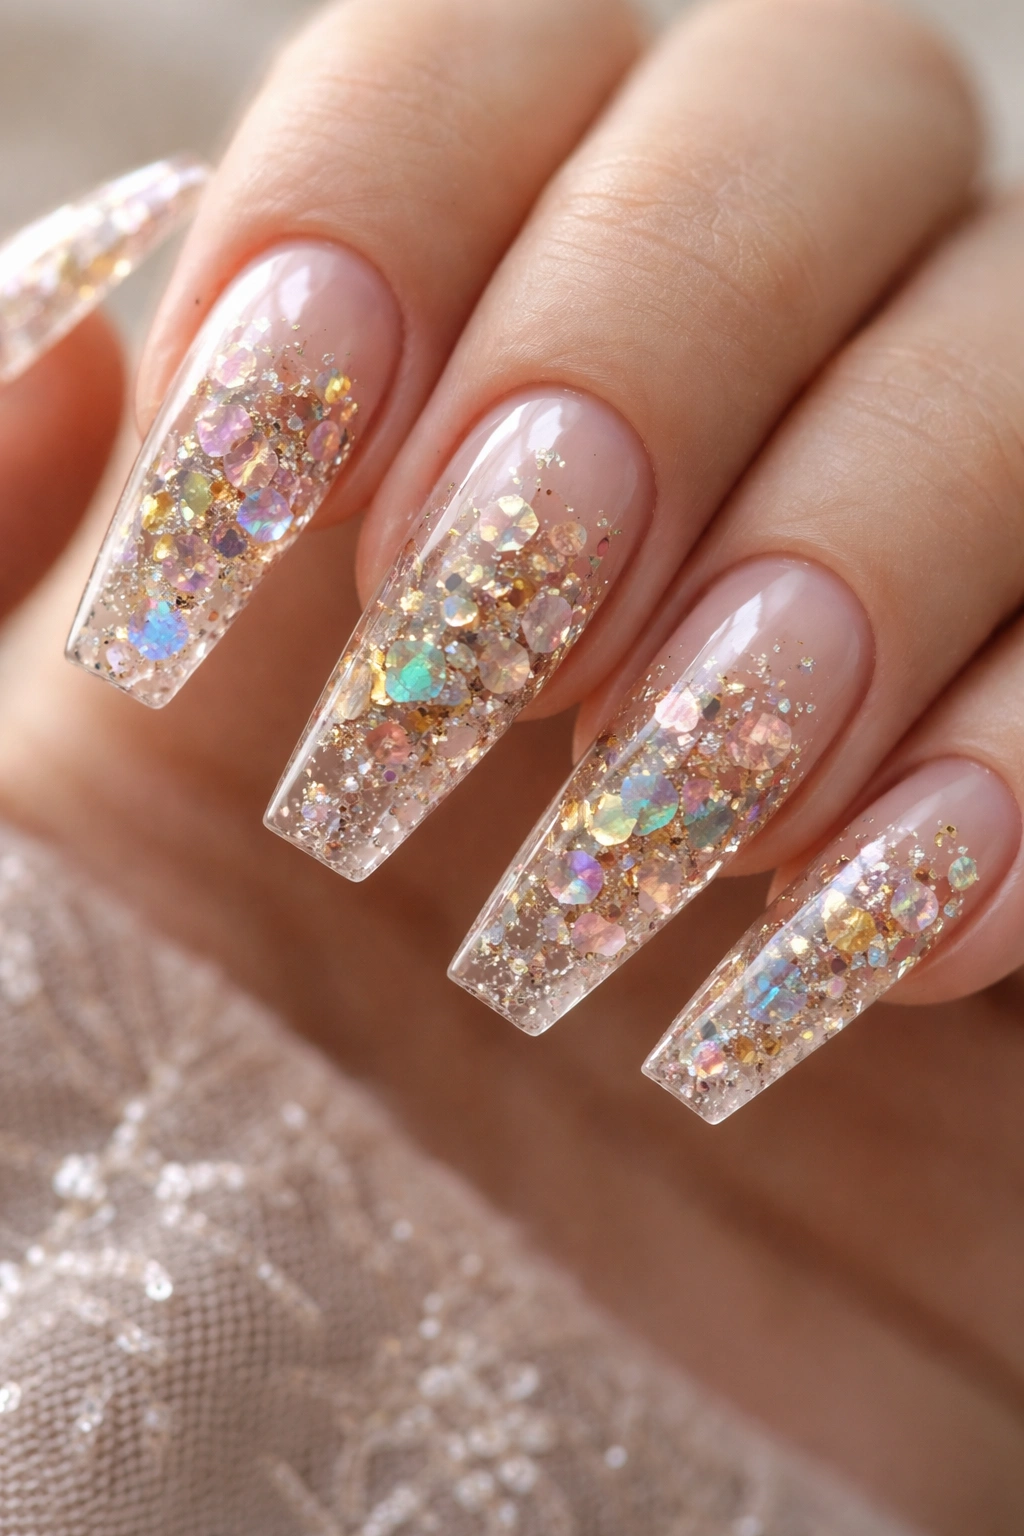
Encapsulated designs—where glitter, foils, metallic flakes, or confetti are sealed inside the polish layers—feel incredibly dimensional and eye-catching on reverse duck nails. The varying width means light hits the encapsulated elements differently across the nail’s surface, creating movement and depth. Gold, silver, holographic, or color-shifting foils all look stunning encapsulated.
The Visual Impact of Encapsulated Elements
When you encapsulate glitter or foils inside a reverse duck nail, the elements sit at different depths depending on where they are on the nail. At the wider base, they have more space to create depth and reflection. At the tapered tip, they concentrate into a brilliant focal point. This natural variation creates a design that’s more complex and interesting than the same encapsulation on a square nail.
Encapsulation Techniques to Try
- Gold or silver foil pieces scattered throughout a neutral base
- Holographic flakes that shift colors as you move your hand
- Colorful confetti encapsulated in a clear or opaque builder gel
- Mica or chrome flakes for a shimmering, iridescent effect
Pro tip: Tap encapsulated pieces gently into your base layer before curing so they stay distributed rather than sinking to the bottom.
10. Matte Finishes with Glossy Accents
A matte reverse duck nail with strategic glossy accents creates a sophisticated, modern contrast that feels incredibly high-end. The matte base provides a soft, velvety canvas, while glossy elements—whether stripes, dots, or geometric shapes—catch light and create dimension. The tapered shape means your glossy accents automatically follow the nail’s architecture, creating a naturally balanced design.
Why Matte and Glossy Combinations Feel So Luxe
Combining finishes on the same nail creates contrast that immediately reads as intentional and designed. Matte finishes feel soft and modern, while glossy elements add shine and dimension. On reverse duck nails specifically, this combination takes advantage of the shape’s natural taper—glossy accents at the tip become a focal point, while matte wraps around like a frame.
Design Ideas with Matte and Gloss
- Matte base with a glossy stripe down the center that follows the taper
- Glossy metallic tips fading into a matte mid-section and base
- Matte background with glossy geometric shapes layered on top
- Glossy tips and base with a matte band across the middle
- Full matte with tiny glossy accents or dots for subtle interest
Worth knowing: Use a true matte topcoat rather than relying on matte nail polish alone—topcoat creates a more uniform, elegant matte finish that won’t look dusty or unpolished.
Final Thoughts
Reverse duck nails represent a real shift in how people approach statement nail designs. They offer all the drama and personality of traditional ducks without the extreme commitment, and honestly, they’re often more flattering on different hand shapes. The key to nailing any of these designs is understanding that the tapered shape itself is part of your design—let it guide your color placement, your art direction, and your overall aesthetic.
The best reverse duck nail design is the one that makes you feel confident and like yourself. Whether you’re drawn to minimalist geometry, glamorous glitter, or delicate hand-painted art, there’s a reverse duck variation that speaks to your style. Start with a design that feels achievable in your skill level, then use that success as a springboard to try something more complex next time.
Remember that these nails are meant to be enjoyed and refreshed regularly—they’re not a permanent commitment, which is part of what makes them so fun. Experiment, take your time with application, and don’t stress about perfect execution on your first try. Your reverse duck nails will look better with each attempt, and the confidence you gain from creating something bold and beautiful on your own hands? That’s the real reward.
