

Stiletto nails scream confidence, and when you’re celebrating a birthday, why not make your manicure match the occasion? The sharp, elongated shape of stilettos commands attention and provides a gorgeous canvas for bold colors, intricate designs, and eye-catching embellishments. Whether you’re throwing an intimate dinner party, heading out for a night on the town, or just wanting to feel absolutely fabulous on your special day, the right nail design can elevate your entire look and boost your confidence instantly.
The beauty of stiletto nails for a birthday is that they work for literally any style—classic elegance, playful fun, glamorous bling, edgy drama, you name it. The length and shape naturally draw the eye to your hands, making them perfect for designs that deserve to be noticed and celebrated. Plus, there’s something about getting fresh stiletto nails right before your birthday that just feels like the ultimate form of self-care and confidence-building.
In this guide, we’ve gathered 16 stunning stiletto nail ideas that range from timeless sophistication to bold statement-making designs. Each one is tailored to help you express your personality and feel absolutely incredible on your birthday. Let’s dive into the options.
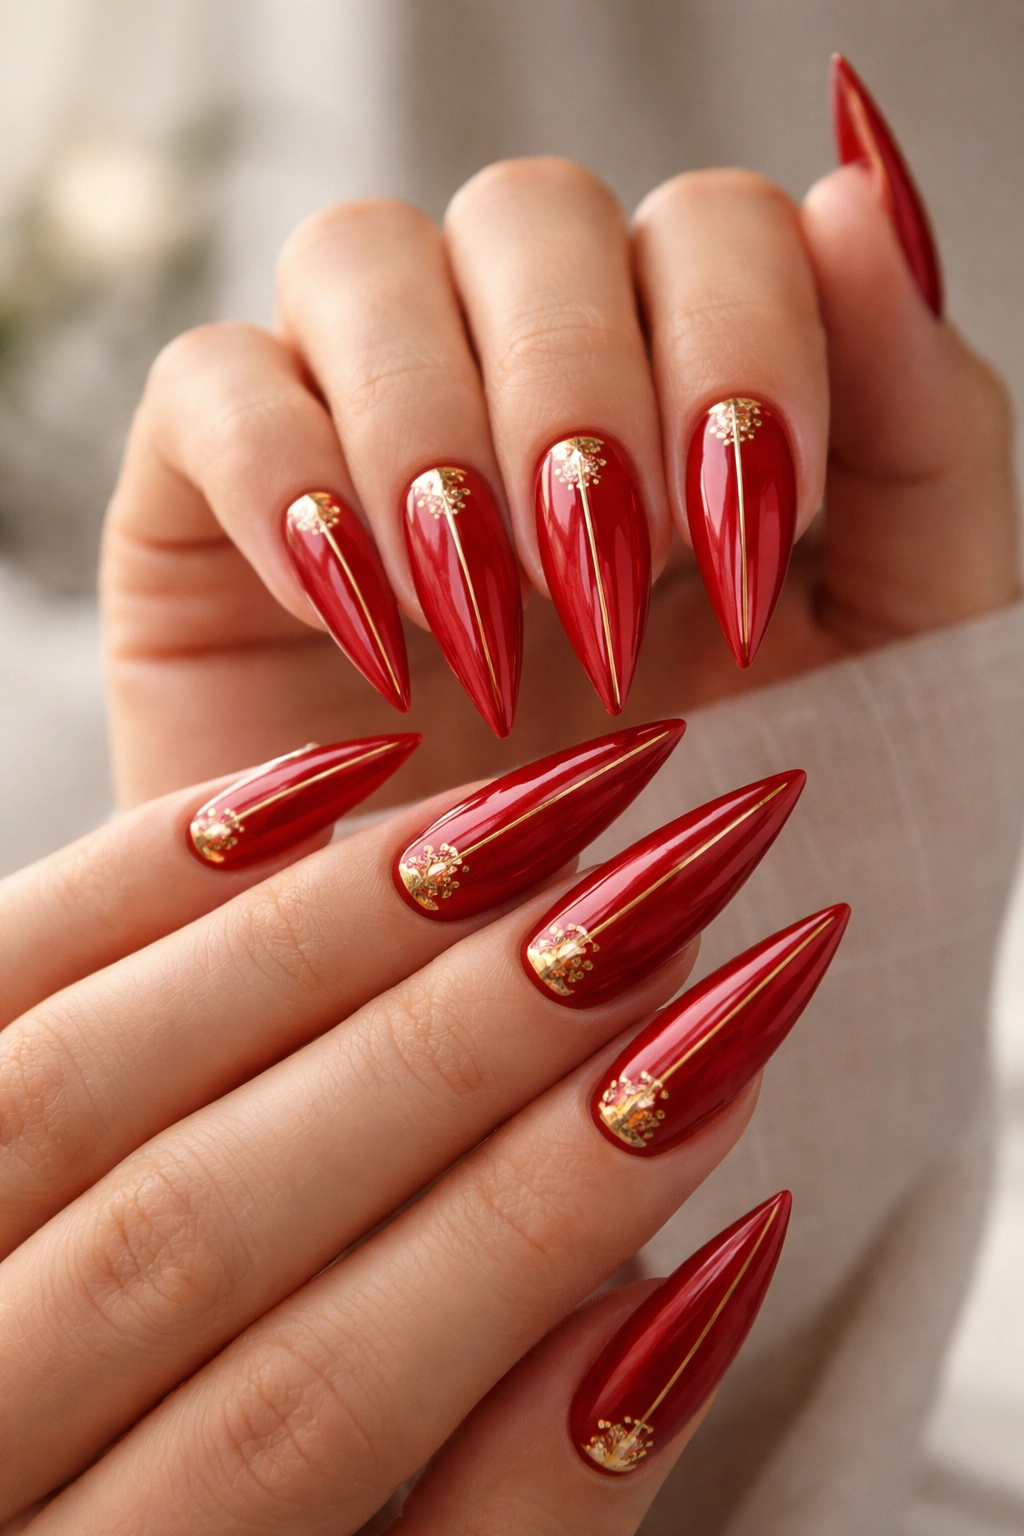
1. Classic Red Stilettos with Gold Accents
Red stiletto nails are the definition of birthday glamour—they’re sophisticated, universally flattering, and instantly make you feel special. A rich, bright red (think true red, not too orange or burgundy) creates a polished, put-together vibe that works for literally any birthday celebration, from casual brunch to elegant dinner.
Why This Design Works for Birthdays
Red nails have a celebratory feel that instantly reads as “something special is happening.” The color is bold enough to make a statement but classic enough that it never feels out of place. When you pair red with gold accents—whether that’s a thin gold line down the center, gold foil flakes, or tiny gold details at the cuticle—you’re adding luxury and refinement without overwhelming the design. This combination signals both confidence and sophistication.
How to Personalize It
- Add a single diamond or rhinestone at the base of one accent nail for a touch of sparkle
- Create a gradient from red to gold for an ombre effect
- Layer thin gold stripes vertically for a modern art deco vibe
- Use matte red with glossy gold accents for textural contrast
- Keep most nails solid red and create a full gold-foil feature nail
Pro Tip
If you’re worried about the boldness of red, start with a slightly deeper shade like burgundy or wine red—they’re easier to coordinate with various outfits and still feel festive without being quite as dramatic.
2. Rose Gold Ombre with Glitter Fade
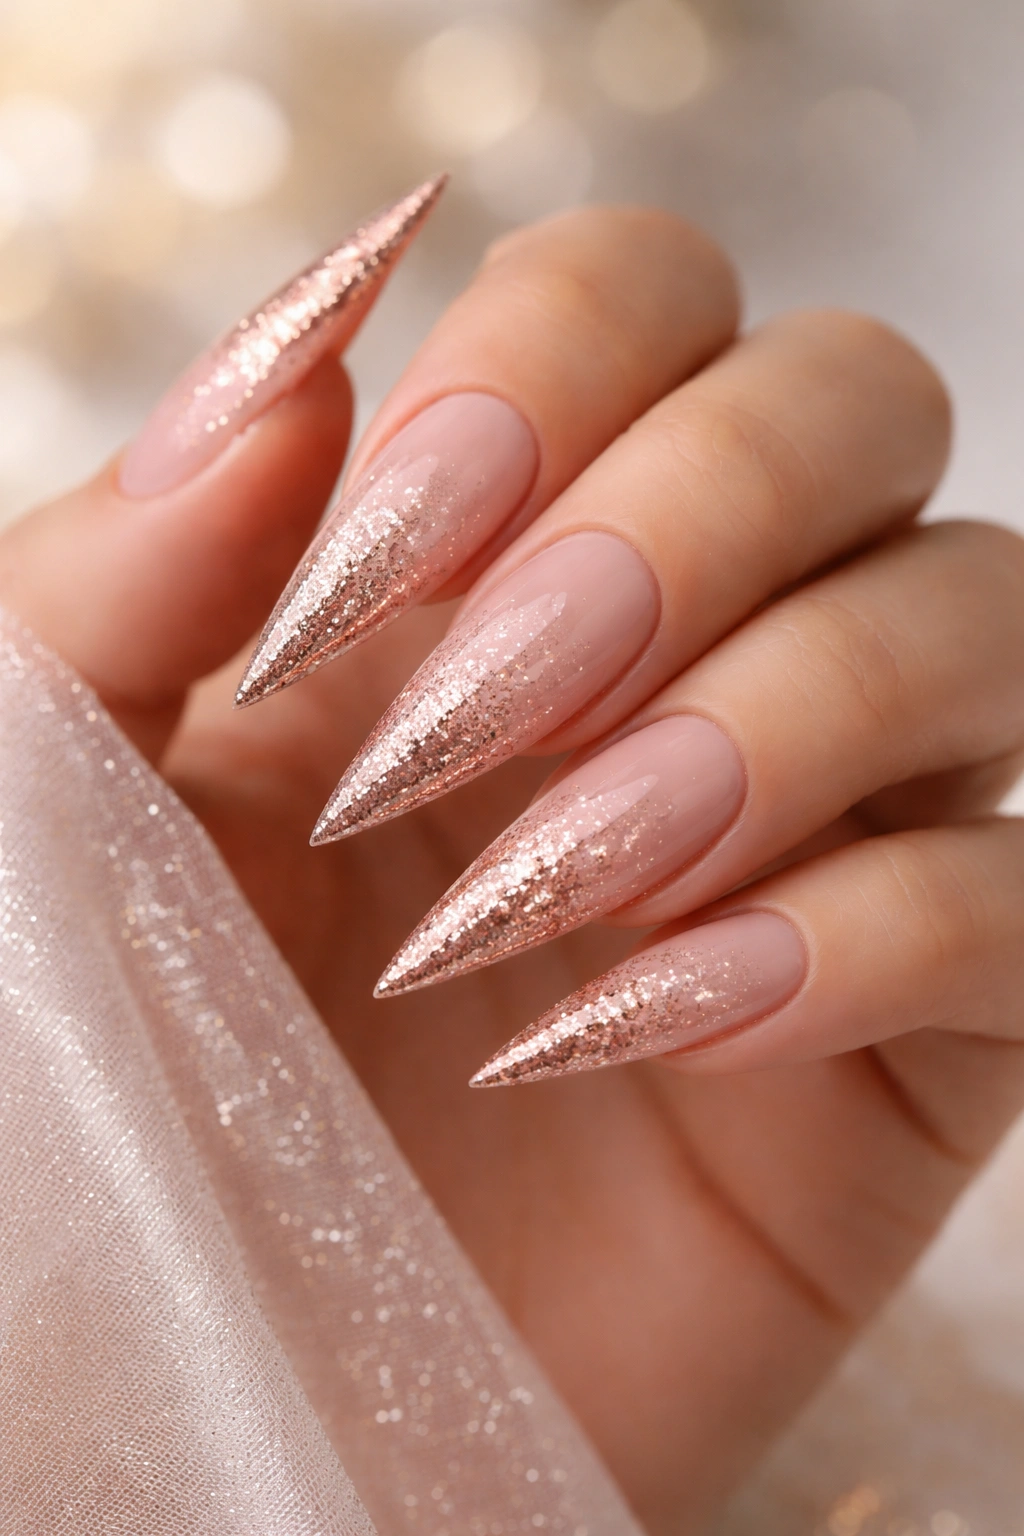
Rose gold is endlessly flattering and feels inherently celebratory, making it perfect for a birthday look. An ombre that transitions from pale pink at the base to shimmering rose gold and glitter at the tips creates depth, dimension, and movement that catches light beautifully.
What Makes This Special
The gradient effect creates a dreamy, luxe aesthetic that’s been popular in nail design for good reason—it genuinely looks expensive and complicated even though a skilled technician can execute it cleanly. The transition from solid color to glitter doesn’t feel jarring; instead, it looks like the nail is literally glowing or melting into sparkle. It’s romantic, modern, and celebratory all at once.
Application Considerations
- Choose a pale rosy pink for the base, then layer progressively warmer rose gold shades toward the tip
- The glitter can be full coverage at the tip or faded throughout for a more subtle effect
- Use cosmetic-grade rose gold glitter particles for maximum shine without a gritty texture
- Seal everything with a glossy top coat to create that liquid, luminous effect
- This design works especially well on longer stilettos where the gradient has room to shine
Styling Angle
This shade family works beautifully with gold jewelry, warm-toned skin, and champagne-colored makeup. If your birthday outfit has any metallic or shimmery elements, this nail design will coordinate perfectly without matching exactly.
3. Nude Stilettos with Tiny Diamond Studs

Sometimes the most elegant birthday manicure is one that lets your hands shine without overwhelming the eye. Nude stilettos provide a long, lean silhouette that flatters the hand, and when you add tiny diamond studs or rhinestone embellishments, you get refined luxury rather than loudness.
Why Understated Elegance Works
Not every birthday celebration calls for bold color—some of the most impactful manicures are those that feel effortlessly expensive and sophisticated. Nude nails elongate the fingers and create a neutral backdrop that makes any jewelry, dress, or overall aesthetic shine. The subtle sparkle from diamond studs adds just enough celebratory energy without being over the top.
Customization Options
- Place tiny diamonds in a constellation pattern up one side of the nail
- Create a single line of micro-diamonds down the center
- Cluster diamonds at the cuticle or tip only
- Mix diamond sizes for visual interest
- Use champagne-toned rhinestones if full diamonds feel too formal
Real-Talk Tip
Nude nails require impeccable hand care to look expensive. Invest in a quality hand cream, moisturize regularly, and keep cuticles neat and pushed back. When the base color isn’t doing the visual heavy lifting, everything else has to be perfect.
4. Birthday Cake Nails with Frosting Details
If you want playful, Instagram-worthy nails that scream “it’s my birthday,” cake-inspired designs deliver. Think soft pink or white base “frosting,” sprinkles, tiny fondant-like details, and a design that literally looks like you could take a bite out of your nails (you shouldn’t, but they’d look like it).
The Design Concept
These nails feature a creamy base color with painted or embedded details that mimic cake decorations—colorful sprinkles, pearl-like beads for “frosting pearls,” delicate hand-painted swags, or even tiny edible-looking fondant pieces. They’re whimsical, joyful, and distinctly birthday without being tacky. The key is executing them with clean lines and quality materials so they read as artistic rather than childish.
Technical Details
- Use a soft pink, mint, or buttercream yellow as your base
- Paint thin, delicate details with a fine art brush
- Layer in both matte and glossy finishes for depth
- Embed actual tiny beads or rhinestones as “pearls”
- Use a combination of freehand painting and perhaps one or two stamped elements
- Seal with a glossy top coat to preserve all the detail
Best For
This design absolutely shines if you’re celebrating with a smaller, more casual group or heading to a birthday brunch. They’re conversational pieces—people will comment on them, ask about them, and they instantly communicate that you’re in celebration mode.
5. Deep Purple with Silver Geometric Accents
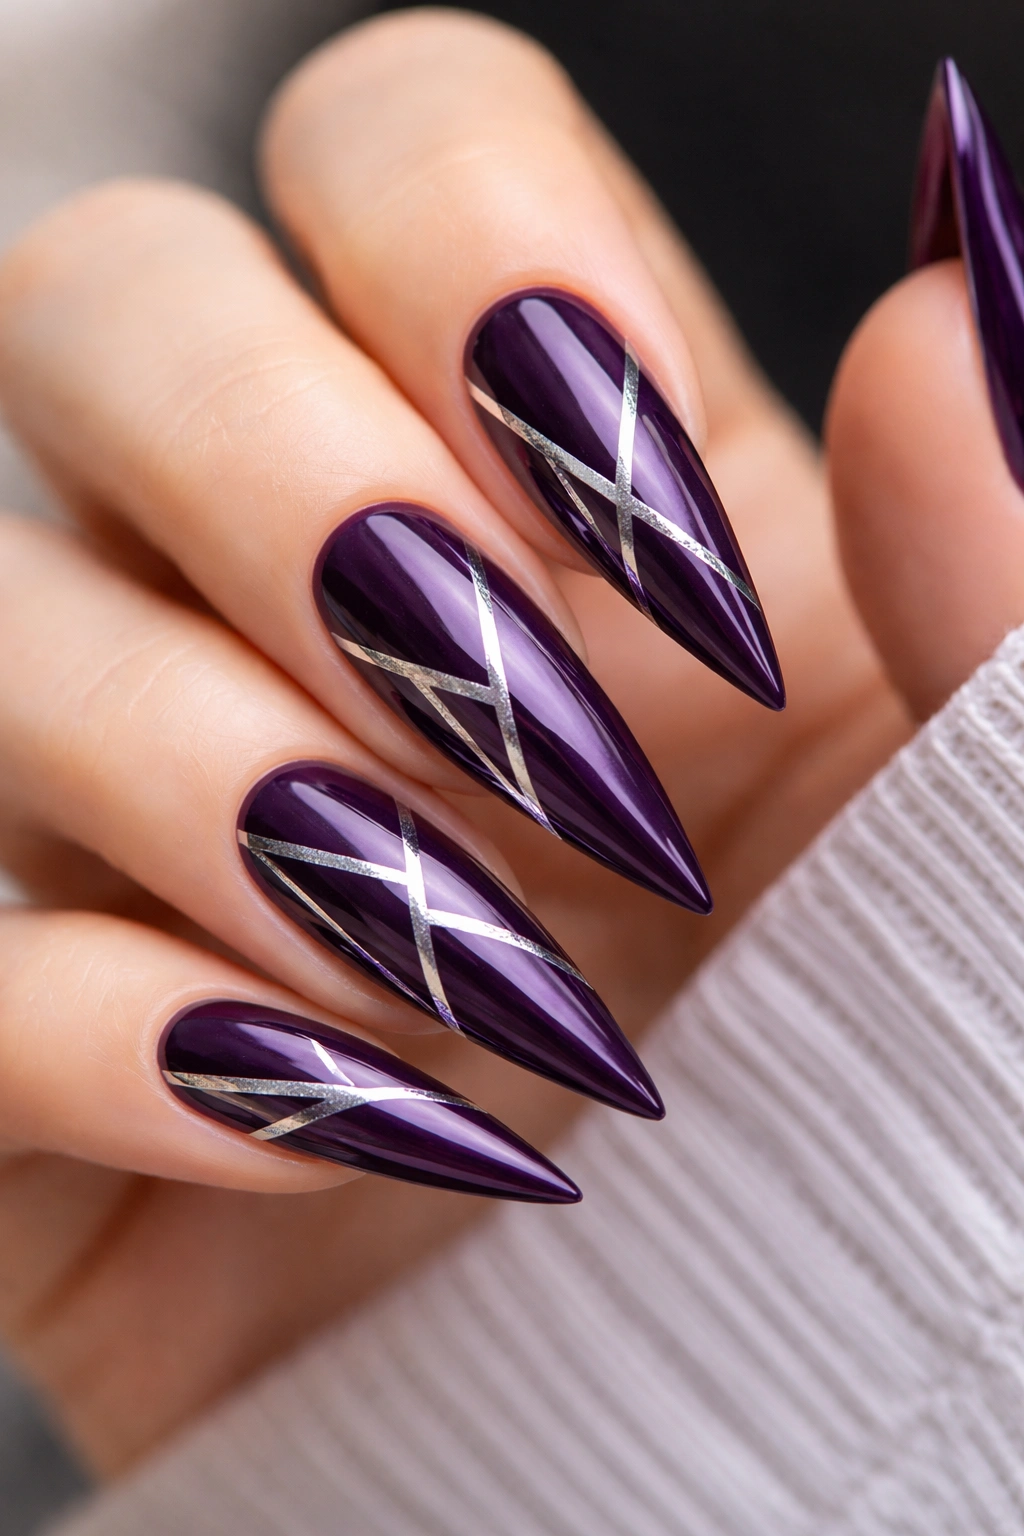
Purple conveys creativity, luxury, and individuality, making it an excellent choice for someone who wants their birthday nails to feel special but not stereotypically “girly.” Deep shades like plum, eggplant, or royal purple paired with silver geometric elements create a modern, sophisticated look.
Design Execution
The geometric elements—clean lines, triangles, squares, or angular shapes in silver or chrome—create visual interest and structure against the rich purple base. This combination feels contemporary and intentional rather than just randomly decorated. The metallic silver pops beautifully against darker purples and creates a polished, editorial quality.
Layout Ideas
- Paint half the nail with geometric patterns in silver
- Create a thin silver vertical line with small geometric shapes clustered around it
- Use a stamped geometric pattern over the purple base
- Try a gradient from solid purple to a geometric silver ombré effect
- Paint clean silver triangles pointing inward from the side of the nail
Jewelry and Styling
This nail design pairs beautifully with silver jewelry, modern black or neutral clothing, and creates an especially striking look against warm or cool skin tones depending on the exact purple shade you choose.
6. Champagne and Glitter Gradient
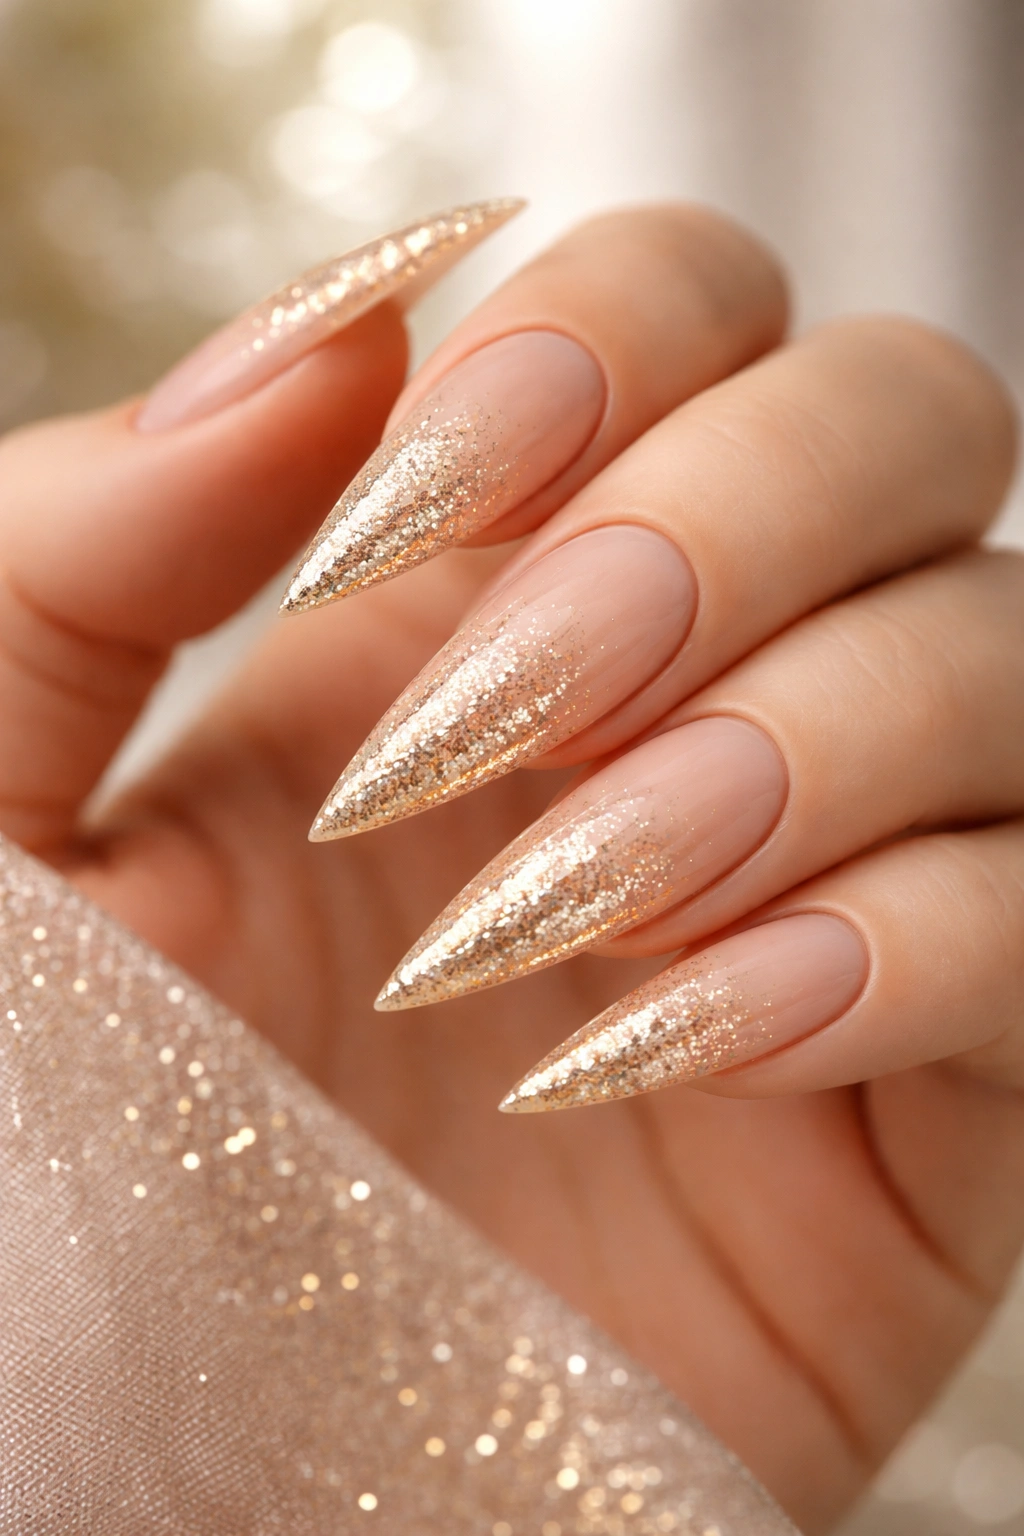
Champagne nails are inherently celebratory without being cartoonishly “party-like.” When you layer in a subtle glitter gradient that intensifies toward the tip, you create nails that catch light and sparkle when you move, perfect for a birthday when you want to feel radiant and noticed.
The Color Story
Start with a pale, warm champagne or pale gold nude base, then gradually layer in increasingly fine or increasingly densely packed glitter as you move toward the nail tip. The overall effect should look luminous and dimensional rather than like you got halfway through a glitter bomb craft project. The transition should be soft and intentional.
Application Pro Tips
- Use a light champagne base that reads as a soft neutral
- Layer cosmetic-grade glitter in gold, champagne, and clear tones
- Use progressively finer glitter as the density increases for a smoother appearance
- A glossy top coat is non-negotiable—it seals everything and creates that liquid, luxe look
- This design works beautifully on long stilettos where the gradient has real estate to work with
Why It’s Perfect for Birthdays
Champagne and glitter read as celebratory and festive without being costume-like. It’s sophisticated enough for a nice dinner but fun and sparkly enough to feel genuinely celebratory. It works with almost any outfit, jewelry, and makeup tone.
7. Black Stilettos with White Ombre Tip

High-contrast black and white creates a bold, fashion-forward aesthetic that’s especially striking on stiletto nails. A black base that transitions to white at the tip creates a sharp, modern look—it’s edgy, graphic, and absolutely runway-worthy.
Design Technique
The ombre effect should be smooth and intentional, with the color transition occurring roughly in the middle to upper third of the nail. The key is making sure the gradient isn’t muddy or unclear—the contrast between black and white is what makes this design effective. Use quality products and take time with the blending to achieve clean lines.
Customization Approaches
- Keep the design pure black-to-white for maximum impact
- Add a thin gold or silver line where the colors transition
- Include a geometric shape at the transition point
- Layer in matte and glossy finishes to add dimension
- Create a negative space design within the gradient
Who Should Wear It
This design is perfect if you want to feel powerful, edgy, and confident on your birthday. It works especially well for evening celebrations, night-out vibes, or if your personal style runs toward modern and architectural.
8. Pearlescent Pink with 3D Florals
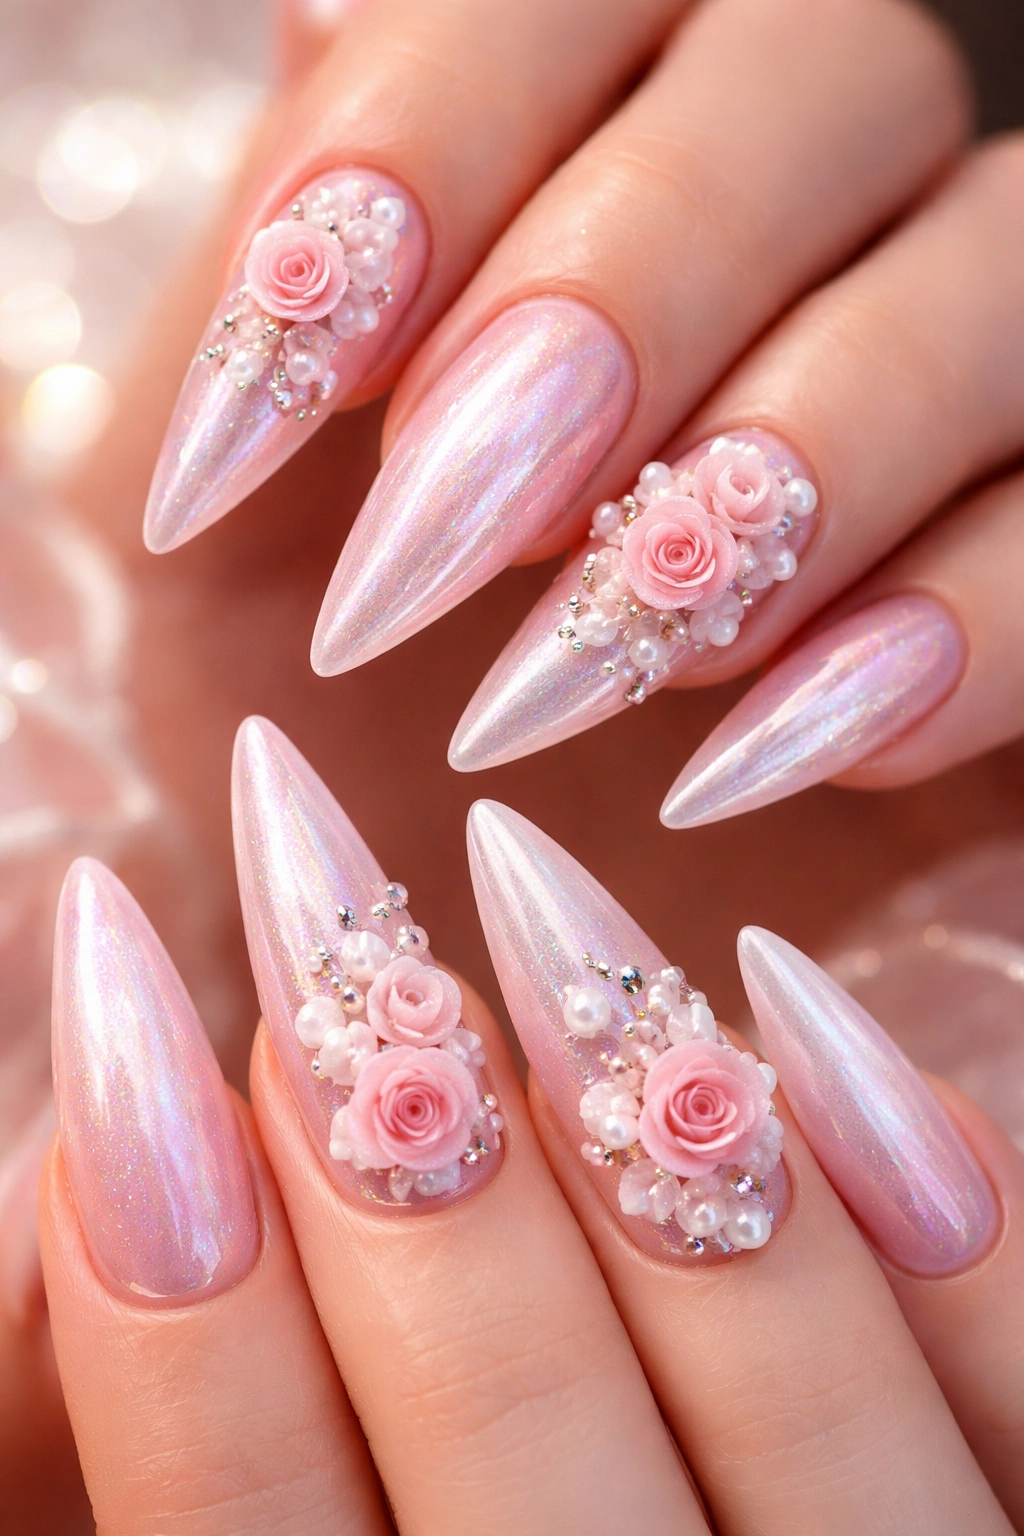
Pearlescent nails have a naturally luxurious quality—they shimmer and shift as you move your hands. When you pair a shimmering pink pearlescent base with three-dimensional floral elements, you create a design that’s romantic, artistic, and genuinely eye-catching.
What Makes 3D Elements Special
Three-dimensional nail art involves embedding actual small objects or sculpted elements into or on top of the nail base. This could mean tiny rose buds, delicate flowers, or ornamental elements that extend slightly off the nail surface. These require skill to apply but create an absolutely stunning result that photographs beautifully and feels luxurious.
Realistic Execution
- Work with a skilled nail technician for 3D elements—this isn’t a beginner DIY project
- Choose a pearlescent or shimmer base color that complements the floral elements
- Use high-quality 3D pieces that are durable and won’t pop off
- Consider the placement—usually one to three accent nails with 3D elements, not all ten
- Seal carefully with a durable top coat that won’t trap the elements underneath
Occasions and Styling
This design is absolutely stunning for formal birthday celebrations, special dinners, bridal or wedding-adjacent events, or any time you want your manicure to feel genuinely luxurious and artistic.
9. Fire Ombre (Red, Orange, Yellow)

If you want your nails to literally look like flames, a fire ombre in warm tones creates the ultimate birthday statement. This design transitions from deep red at the base through orange to golden yellow at the tip, creating a dynamic, energetic aesthetic.
Color Selection
The success of this design hinges on choosing the right shades of red, orange, and yellow that transition smoothly without looking muddy or dull in the middle. You want clear, bold colors with good pigmentation. Rich reds, true oranges (not coral), and golden yellows work better than washed-out or pastel versions.
Blending Technique
The gradient should be smooth and intentional, with colors melting into each other rather than appearing as distinct stripes. This requires patience during application and quality gradient tools or blending techniques. Some technicians use a dry sponge method to gently blend colors, while others use careful brush work.
Why It’s Birthday-Perfect
Fire ombre nails convey energy, passion, excitement, and celebration. They’re bold without being inappropriate for most settings, and they genuinely stand out. If you want to feel electrified and special on your birthday, this design delivers.
10. Soft Blush with Delicate Hand-Painted Details
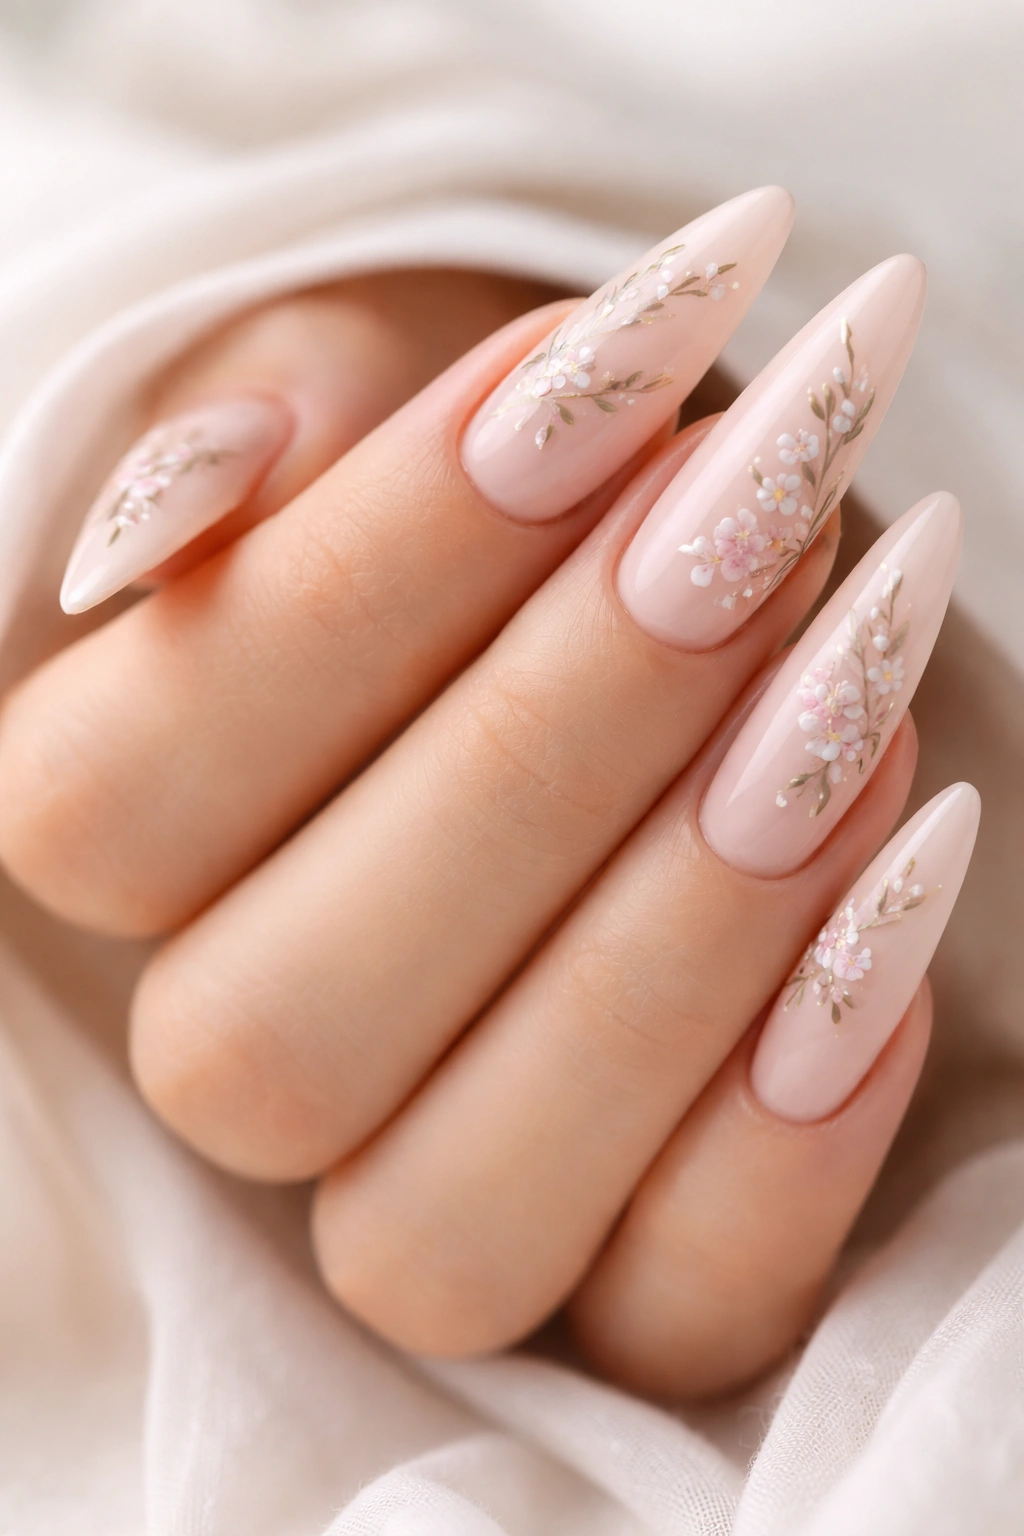
Sometimes a birthday manicure doesn’t need to be loud—it needs to be beautiful. A soft blush pink base with delicate hand-painted details like tiny florals, vines, or abstract line work creates an elegant, artistic aesthetic that feels special and personal.
The Subtlety Factor
This design works precisely because it’s not screaming for attention. Instead, it invites closer inspection. The details reward attention—someone has to look closely to see the careful line work, the delicate flowers, or the artistic elements. It feels handcrafted and precious rather than manufactured or trendy.
Detail Ideas
- Thin watercolor-style florals clustered at the cuticle
- Delicate vine designs running down one side of the nail
- Tiny abstract line drawings that create a cohesive pattern
- Small botanical illustrations spaced evenly
- Minimal negative space designs with intricate details
Best Executed By
This design requires a skilled, artistic nail technician. Hand-painted details are difficult to execute cleanly, and rushed work shows immediately. If you’re considering this option, invest in a technician known for artistic, detailed work.
11. Gold Leaf Stilettos with Nude Base
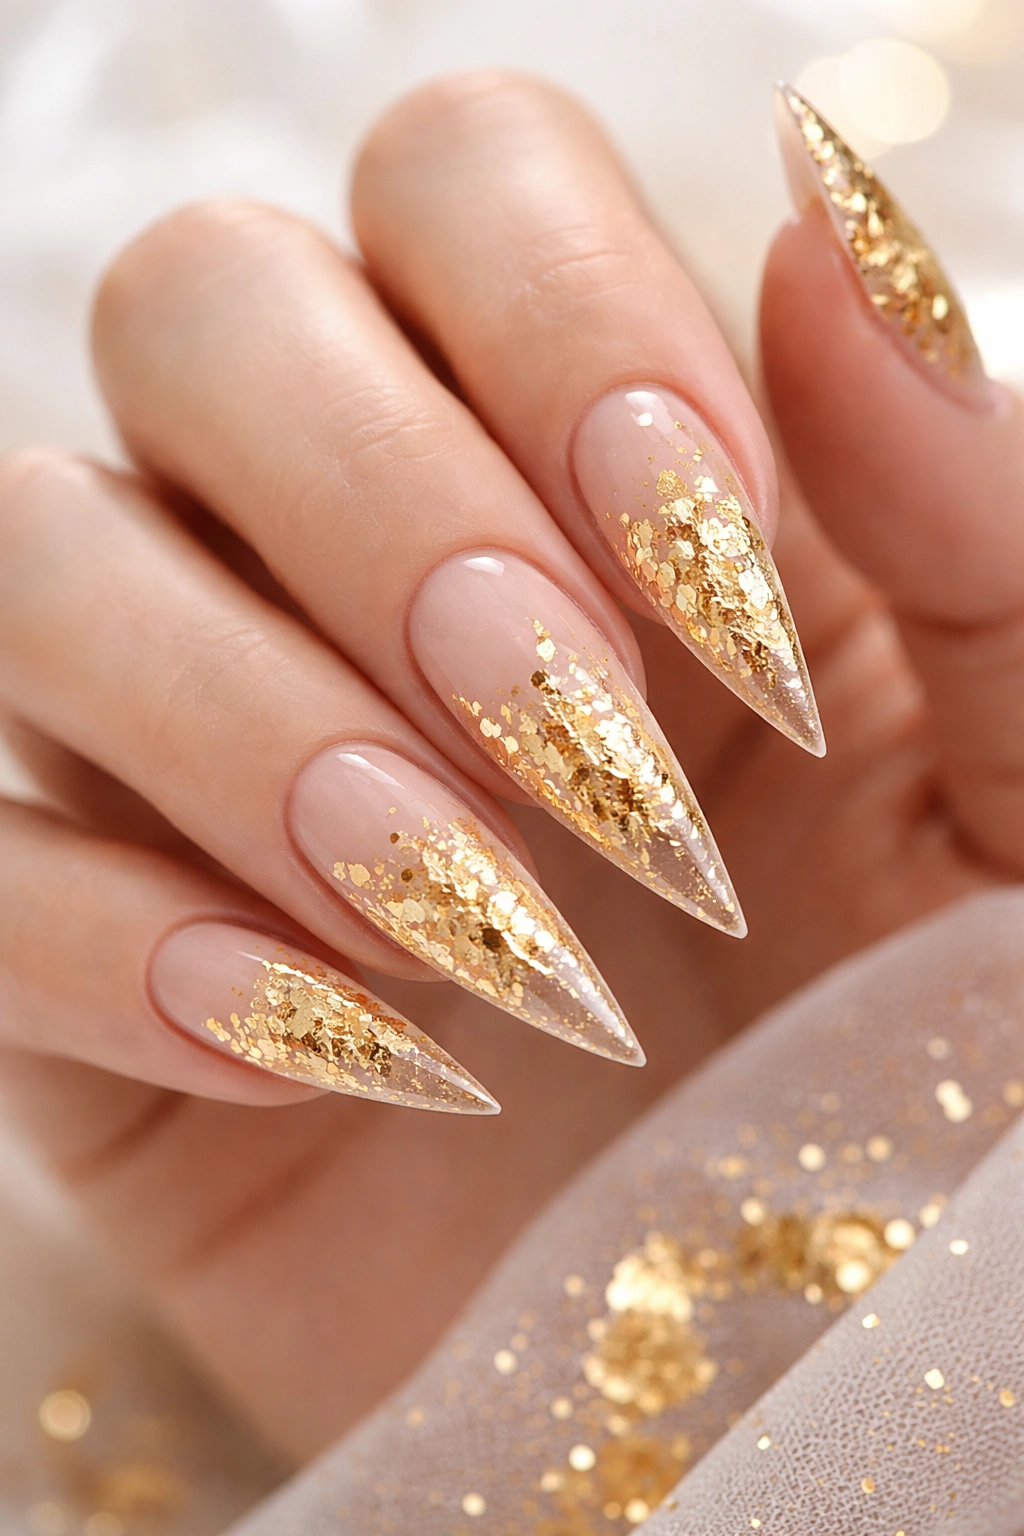
Gold leaf creates instant luxury and sophistication. A nude base with sheets or flakes of real gold leaf scattered or embedded creates a design that looks like wearable art—it’s expensive-looking, unique, and absolutely stunning.
Gold Leaf Technique
Real gold leaf is delicate and requires careful application, but the results are worth it. The technician applies the base color, then carefully applies gold leaf pieces while the base is still slightly tacky, sealing everything with a clear top coat. The leaf can be applied randomly for an organic look or more deliberately for geometric patterns.
Shade Pairing Considerations
- A warm nude works beautifully with gold leaf
- A pale champagne creates a softer, more romantic look
- Even a slightly deeper nude allows the gold to really pop
- The nude base should let the gold be the star without competing for attention
Durability and Care
Gold leaf nails require a bit more careful handling than some designs—you need to be gentle when washing hands and avoid anything too abrasive. But if you’re committed to the care, the design lasts well and stays stunning throughout your wearing period.
12. Holographic Stilettos with Matte Finish
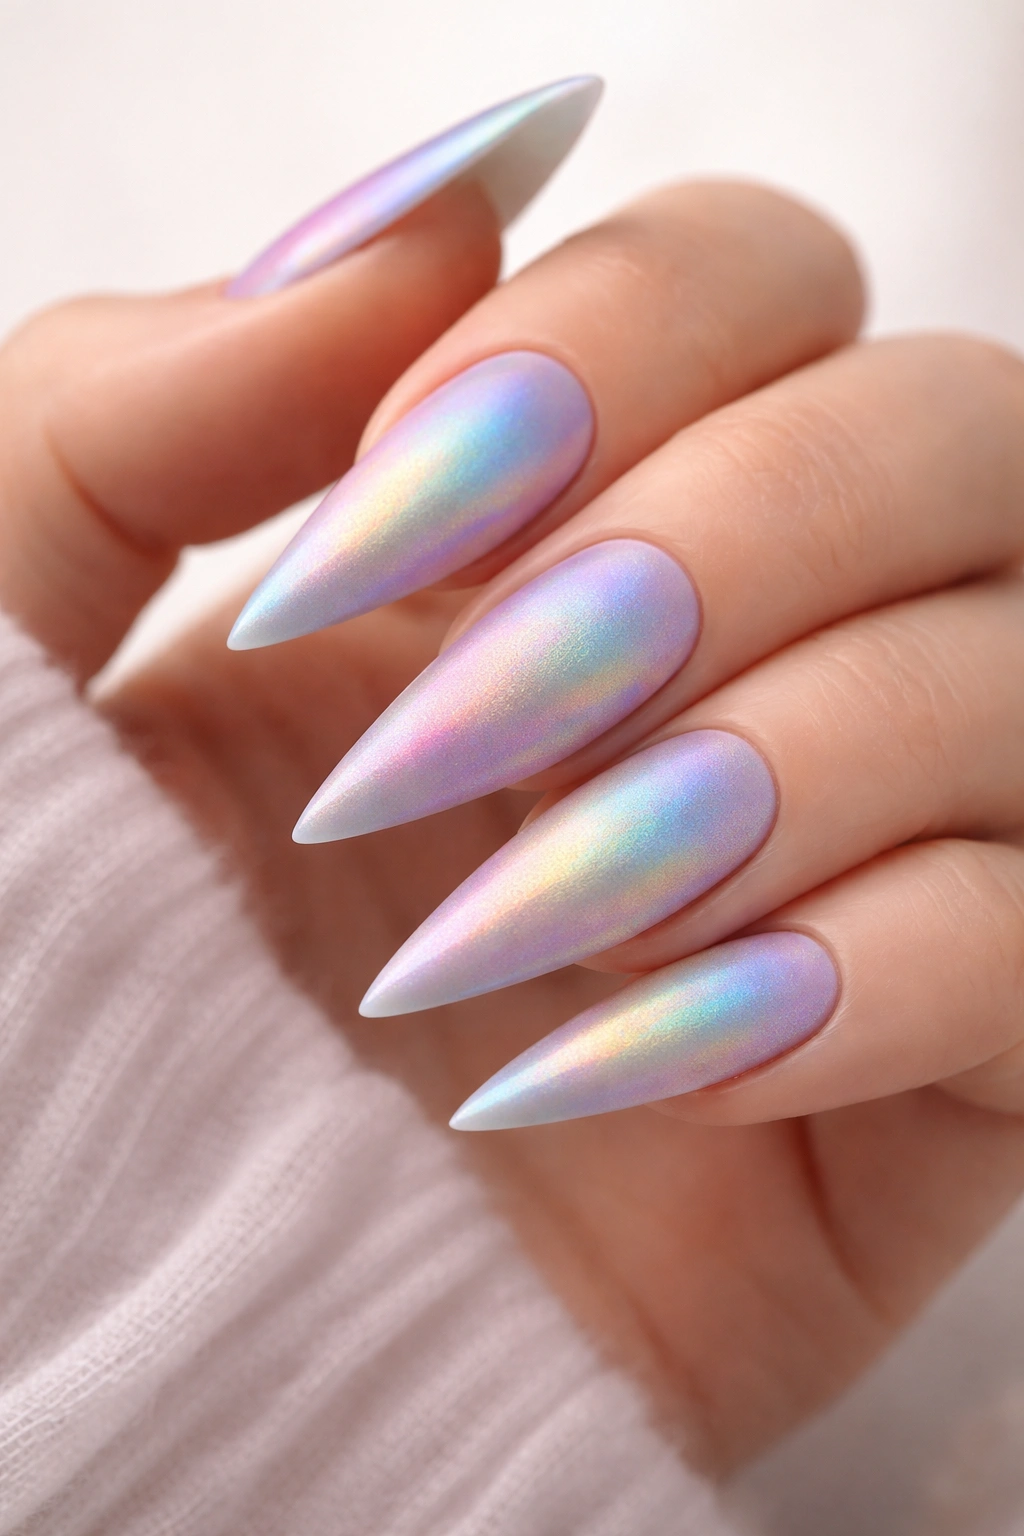
Holographic nail polish creates a rainbow effect that shifts and shimmers as you move your hands. When executed with a matte finish, the holographic effect becomes even more pronounced and unique—it’s futuristic, playful, and absolutely eye-catching.
The Matte Holographic Effect
Matte top coats applied over holographic base colors create an interesting texture contrast. Instead of a glossy shine, you get a velvety surface that somehow makes the holographic shift even more visible. The effect reads as modern, intentional, and highly curated—it’s not an accident, it’s clearly a deliberate artistic choice.
Variations and Customizations
- Use a matte top coat over all-holographic nails for maximum effect
- Create an accent nail in solid holographic while others are matte
- Use holographic polish as an ombre fading into a matte solid color
- Layer holographic over a colored base for a more subtle effect
- Mix glossy and matte holographic for textural interest
Who Wears This Look
This design is perfect if your personal style is creative, artistic, or slightly unconventional. It works for someone who loves standing out, who’s interested in modern nail trends, or who wants their nails to be a genuine conversation piece.
13. Icy Blue with Crystal Encrusted Tip
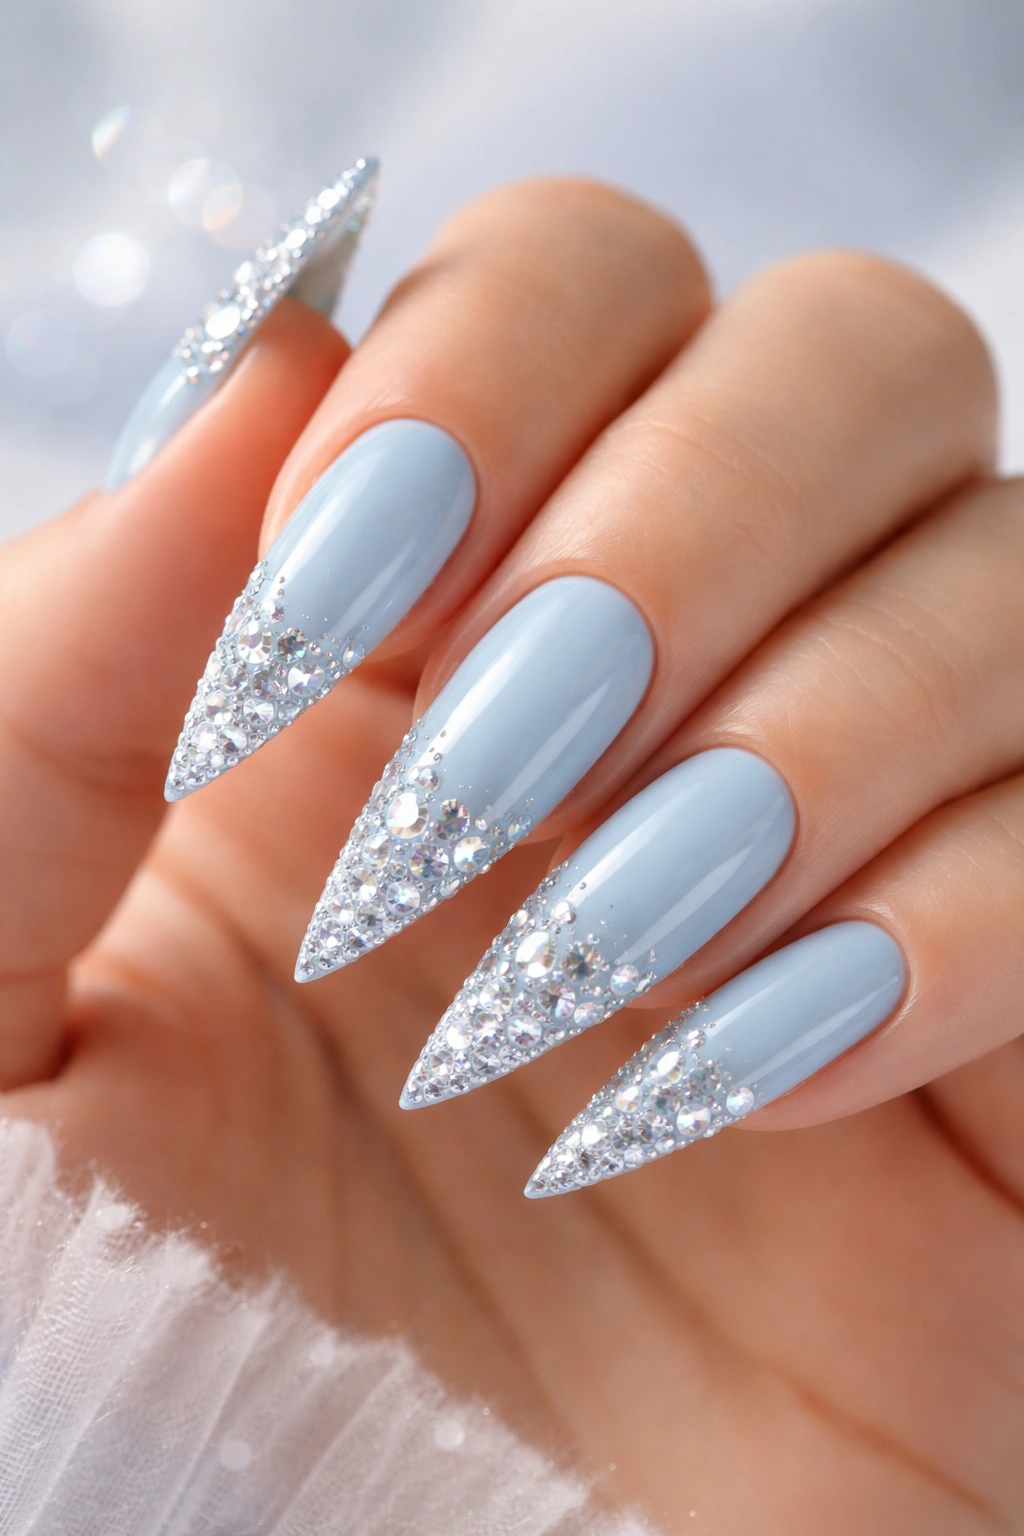
Cool-toned blues are sophisticated and less common than warm tones, making an icy blue stiletto manicure feel distinctly special. When you add crystal or rhinestone encrusting on the tip, you create a design inspired by ice and jewels—glamorous, cool-toned, and absolutely stunning.
Color Selection
Look for icy, cool-toned blues rather than warm or royal blues. Pale blue, robin’s egg blue, or icy turquoise work beautifully. The cooler the tone, the more the crystalline embellishments will pop and sparkle.
Crystal Application
This design works best when crystals are placed deliberately rather than randomly scattered. Try:
- Full coverage of the tip in graduated crystal sizes
- A diagonal line of crystals across the nail
- Clustered crystals at one corner
- A ombre of crystals fading from tip toward the base
- Crystals in multiple complementary tones (clear, champagne, pale blue)
Styling Context
Icy blue with crystals works beautifully for winter birthdays, elegant evening celebrations, or anytime you want to feel cool, composed, and glamorous. It pairs beautifully with silver jewelry, cool-toned makeup, and modern clothing.
14. Burgundy Stilettos with Nude Ombre Transition
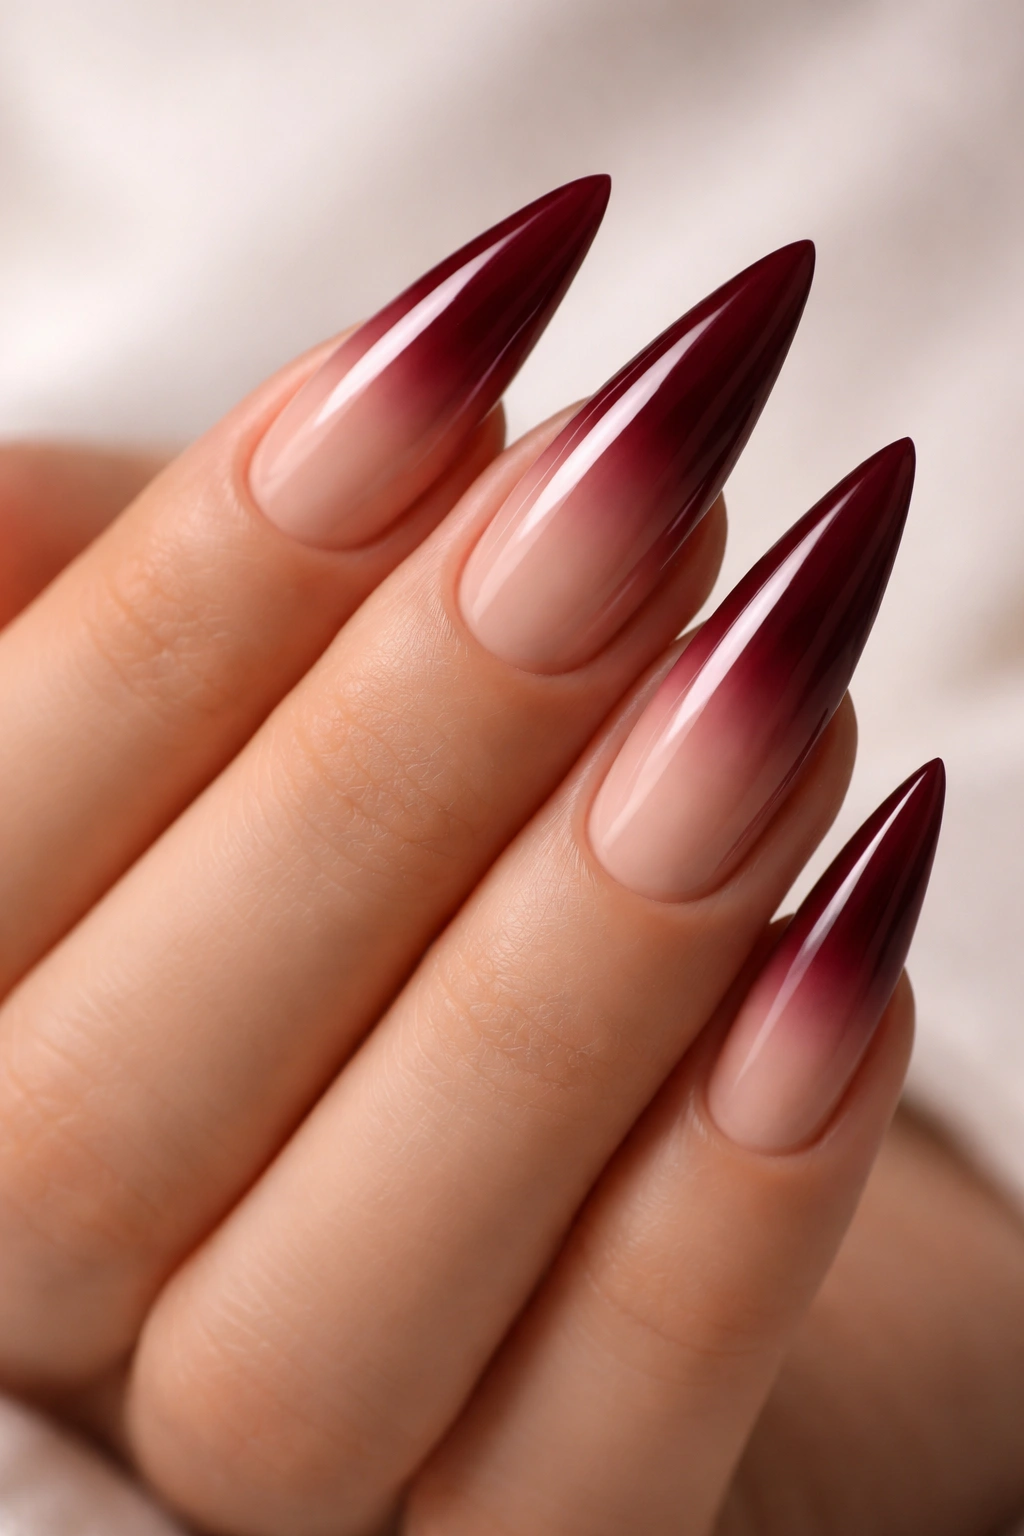
Burgundy is a sophisticated, jewel-toned shade that feels more elevated than basic red. When you create an ombre that transitions from deep burgundy at the base to nude or beige at the tip, you get a design that’s elegant, modern, and flattering on virtually all skin tones.
Why This Gradient Works
The transition from warm, deep burgundy to neutral nude creates visual interest and elongates the nail while avoiding the harshness of a solid dark color. It’s sophisticated without being heavy, bold without being overwhelming, and modern without feeling trendy or temporary.
Execution Details
- Start with a deep, rich burgundy at the cuticle
- Create a smooth gradient toward a soft nude or beige tip
- The transition should occur gradually across the middle third to half of the nail
- Use quality products to ensure the gradient is smooth and even
- A glossy finish keeps the nails looking polished and luxe
Occasions and Versatility
This design works for essentially any birthday celebration—brunch, dinner, casual hangout, formal event. It’s equally at home with casual jeans or an elegant gown. It’s the kind of manicure that reads as “I have my life together.”
15. Gradient Rainbow with Matte Finish
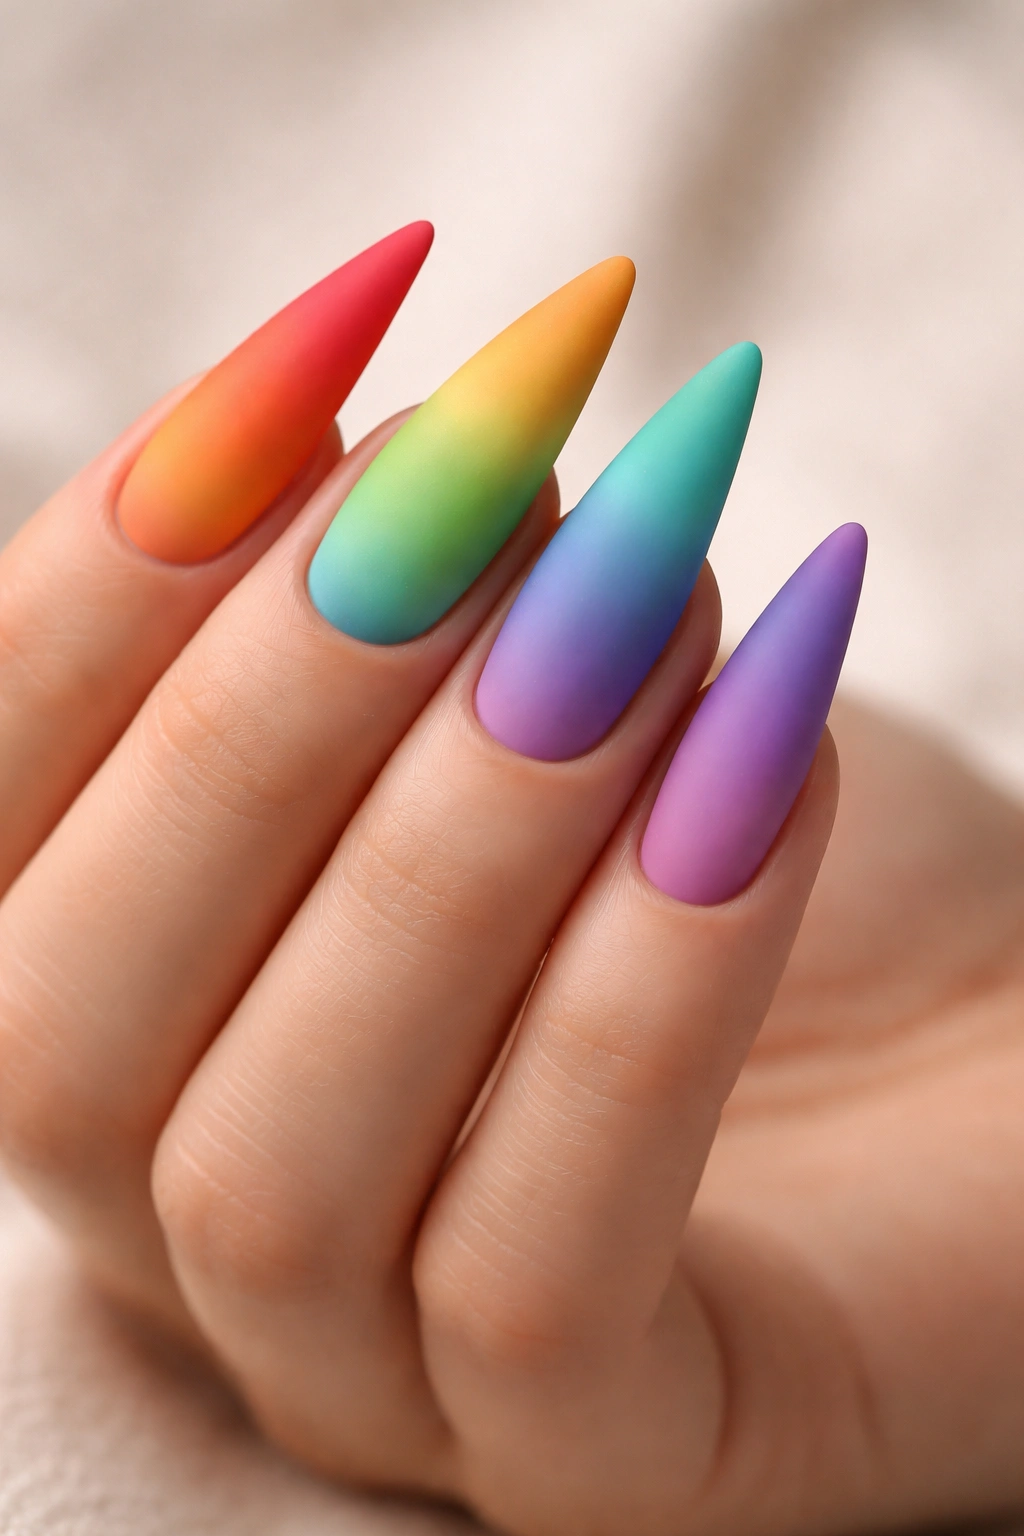
Rainbows immediately signal celebration, joy, and fun—but when executed as a subtle gradient on stiletto nails with a matte finish, a rainbow manicure becomes sophisticated rather than cartoonish. Each nail features a gentle transition through the color spectrum, creating a dreamy, artistic effect.
Color Flow
The ideal execution has each nail displaying a portion of the color spectrum—one nail flows from red to orange, the next from orange to yellow, and so forth. The overall effect across all ten nails creates a complete rainbow spectrum, or each nail can be a mini rainbow gradient.
Matte Magic
The matte finish is key to making this work as a sophisticated design rather than a fun but childish one. Matte surfaces reflect light differently than glossy ones, making the colors appear richer and more velvety. The effect becomes artistic and intentional rather than just “bright colors.”
Personalization Options
- Create an ombre within the standard rainbow color order
- Use pastels for a softer, dreamier effect
- Include thin white lines between colors for definition
- Focus the gradient on accent nails while others remain neutral
- Add sparkle in the form of subtle glitter within the gradient
16. Metallic Chrome with Geometric Black Lines

Chrome nails have a futuristic, high-fashion quality that photographs beautifully and genuinely looks like liquid metal. When you overlay geometric black lines creating angular shapes, you get a design that’s cutting-edge, modern, and absolutely show-stopping.
Chrome Polish Application
True chrome polish requires careful application and a special application method—usually involving a rubber peel base, the chrome powder, and precise technique. It’s worth the investment for the stunning results, but it’s more challenging than regular polish. Work with someone experienced in chrome finishes.
Geometric Line Design
The black lines should be clean, precise, and create intentional shapes—think triangles, chevrons, or abstract geometric patterns. The contrast between the reflective silver chrome and matte black lines is striking and creates visual interest.
Impact and Styling
This design is perfect for someone with modern, architectural personal style. It works beautifully in professional creative settings, evening celebrations, or any context where you want to project confidence, edge, and contemporary sophistication.
Final Thoughts
Your birthday nails should make you feel incredible—whether that means classic and refined, playfully celebratory, glamorously embellished, or artistically unique. Stiletto nails provide the perfect canvas for expressing your personality and celebrating yourself, and the design options are genuinely endless.
The most important thing is choosing a design that aligns with how you want to feel on your birthday. If you tend toward elegance, go with classic reds, nudes with subtle sparkle, or sophisticated solid colors. If you love fun and attention, choose bold ombres, cake designs, or statement embellishments. If you’re creative and artistic, lean into hand-painted details or modern geometric designs.
When you book your appointment, bring reference photos of designs you love and be specific about what appeals to you—the exact shade, the placement of details, the level of sparkle. A skilled technician can help you refine your vision and ensure the final result makes you feel absolutely beautiful on your special day. Your hands deserve to look as fabulous as you feel when you’re celebrating another year of being you.
