

White and gold might be the most versatile color combination in nail design. The pairing has an inherent elegance that works for everything from boardroom meetings to weekend brunches, and it feels modern without trying too hard. Stiletto nails already make a bold statement with their length and sharp angle, so adding white and gold to the mix creates designs that are simultaneously sophisticated and eye-catching.
The beauty of this color combination is how adaptable it is. White provides a clean, neutral canvas that pairs beautifully with virtually any skin tone, while gold accents add warmth, luxury, and dimension. Whether you’re drawn to minimalist geometric patterns, ornate metallic details, or something in between, white and gold stilettos offer endless creative possibilities. The contrast between the two colors is just striking enough to feel intentional, but subtle enough to suit professional settings.
If you’ve been thinking about trying white and gold stilettos but weren’t sure where to start, these 16 designs cover everything from timeless classics to trend-forward styles. Each one is achievable at a salon or at home with patience, and most can be customized to match your personal style. Let’s explore designs that prove why white and gold has earned its place as one of the most reliable, flattering nail combinations out there.
1. Classic White with Gold Stripe Accent
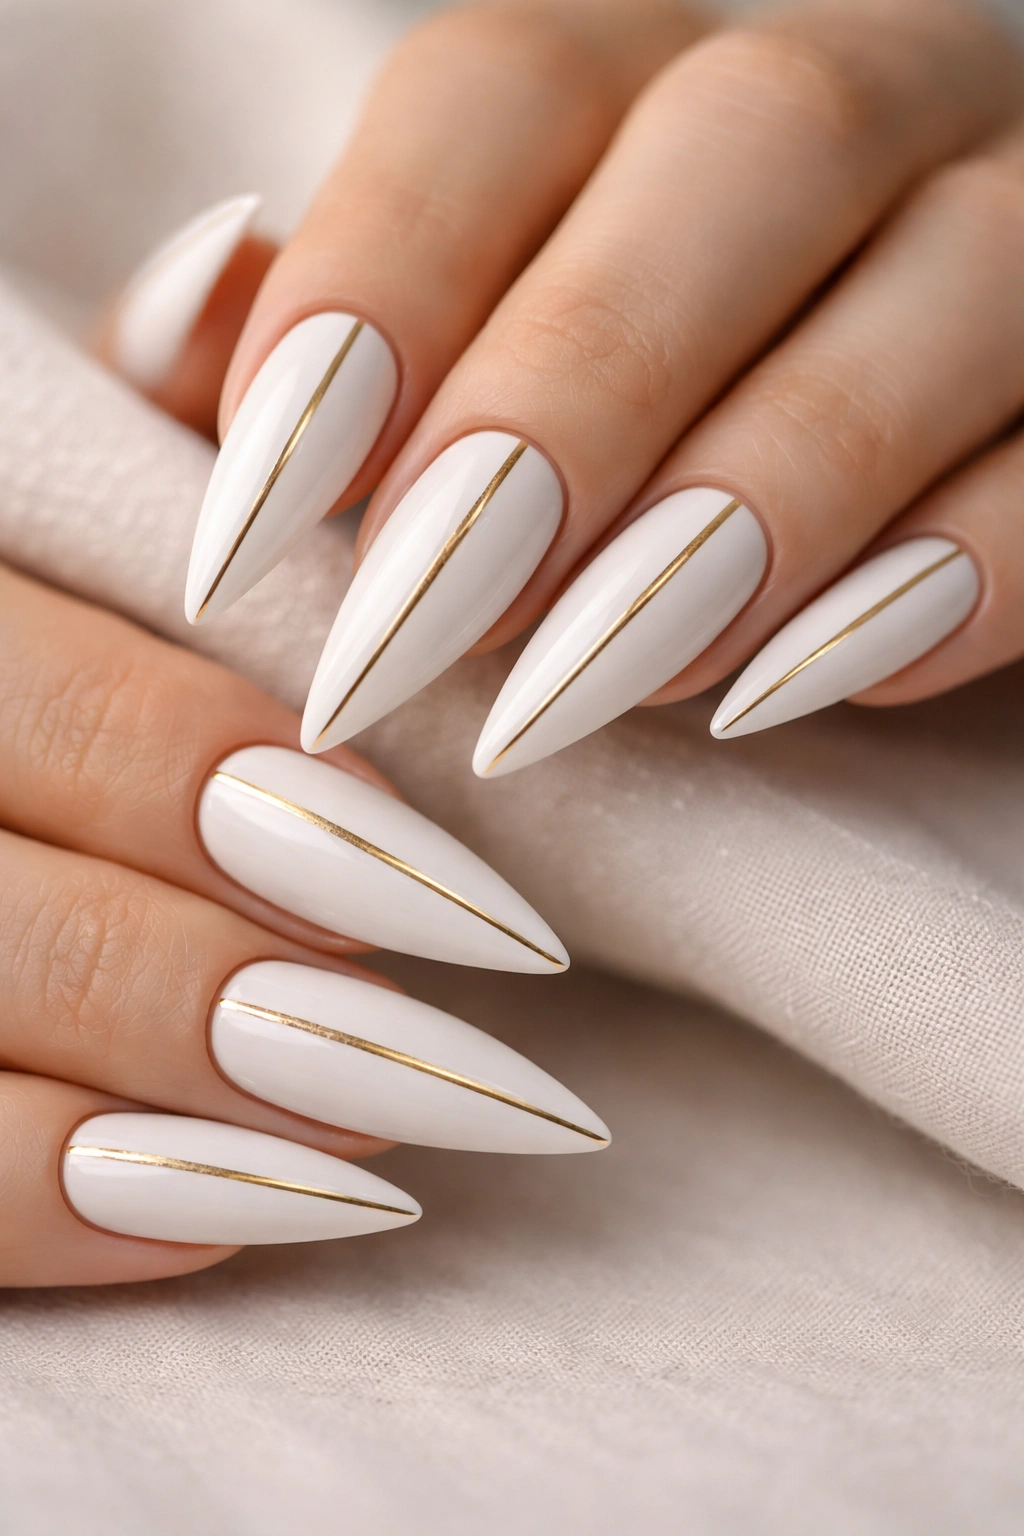
This is the foundation design that works in literally any season and any situation. Imagine a clean white base coating all ten nails, then a single thin or medium-width gold stripe running vertically down the center of each nail. The geometry is simple enough that it reads as polished and intentional rather than experimental.
Why This Design Works
The single vertical line creates the illusion of a longer, more slender nail, which actually complements the stiletto shape perfectly. Gold trim has an intrinsic luxury feel that elevates what might otherwise be a basic white manicure into something noticeably more refined. The brightness of white makes the gold pop without either color overwhelming the other, and the contrast is just distinct enough to catch light and draw attention.
Application and Styling Notes
- Use a fine liner brush or thin striping brush to achieve the gold line — thicker than a hairline but not so thick that it loses elegance
- Gold stripe can run from cuticle to tip, or you can leave a small white space at the tip for added visual interest
- This design pairs effortlessly with any outfit and looks just as appropriate with casual jeans as it does with evening wear
- The stripe can be centered, slightly offset to one side, or positioned at the edge for a slightly edgier interpretation
- Consider using a chrome or shimmer gold for extra dimension, or stick with a matte metallic for a more understated finish
Pro tip: If you’re painting at home, use thin, steady strokes and let the first coat dry completely before adding a second coat for opacity. Rushing this step is where most DIY manicures lose their precision.
2. Gold Flecks Scattered Across White Base
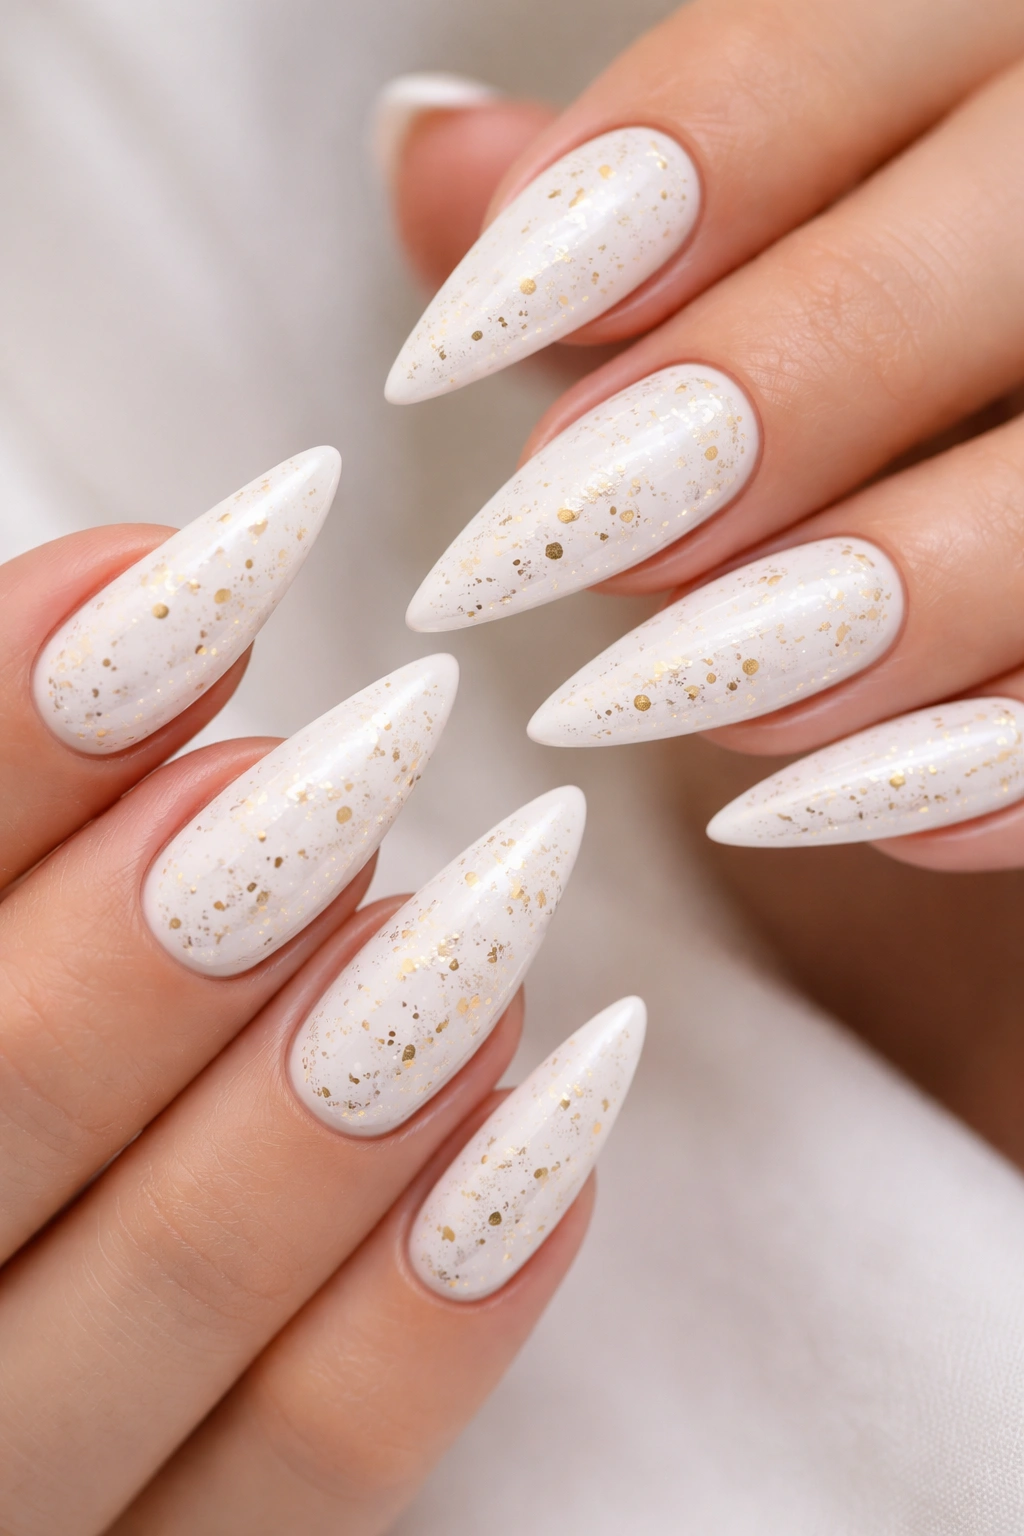
Imagine a pristine white base that’s been delicately dusted with tiny fragments of gold leaf or flecks throughout. This design feels organic and less controlled than geometric patterns, which gives it a modern, artistic quality while maintaining its sophisticated appearance.
Why This Design Creates Visual Interest
Gold flecks catch light constantly as you move your hands, creating an almost shimmering effect even without actual glitter. The scattered placement makes the design feel spontaneous and unique, so even if you get two manicures with the same concept, they’ll never look exactly identical. The randomness actually adds to the charm — it feels curated rather than mass-produced.
Getting the Look Right
- Gold leaf pieces (available at any beauty supply store) work beautifully for this; apply them while the white base is still slightly tacky
- Alternatively, use a sponging technique with a very diluted gold polish to create tiny flecks across the surface
- Seal everything under a glossy or matte top coat depending on the mood you’re going for
- The density of flecks is totally customizable — go sparse for understated elegance or dense for more dramatic impact
- This design is especially flattering on longer nails where you have more surface area to work with
Worth knowing: This design actually photographs beautifully because the flecks catch camera flash in really flattering ways, making your nails look more luminous and expensive than a flat white base alone.
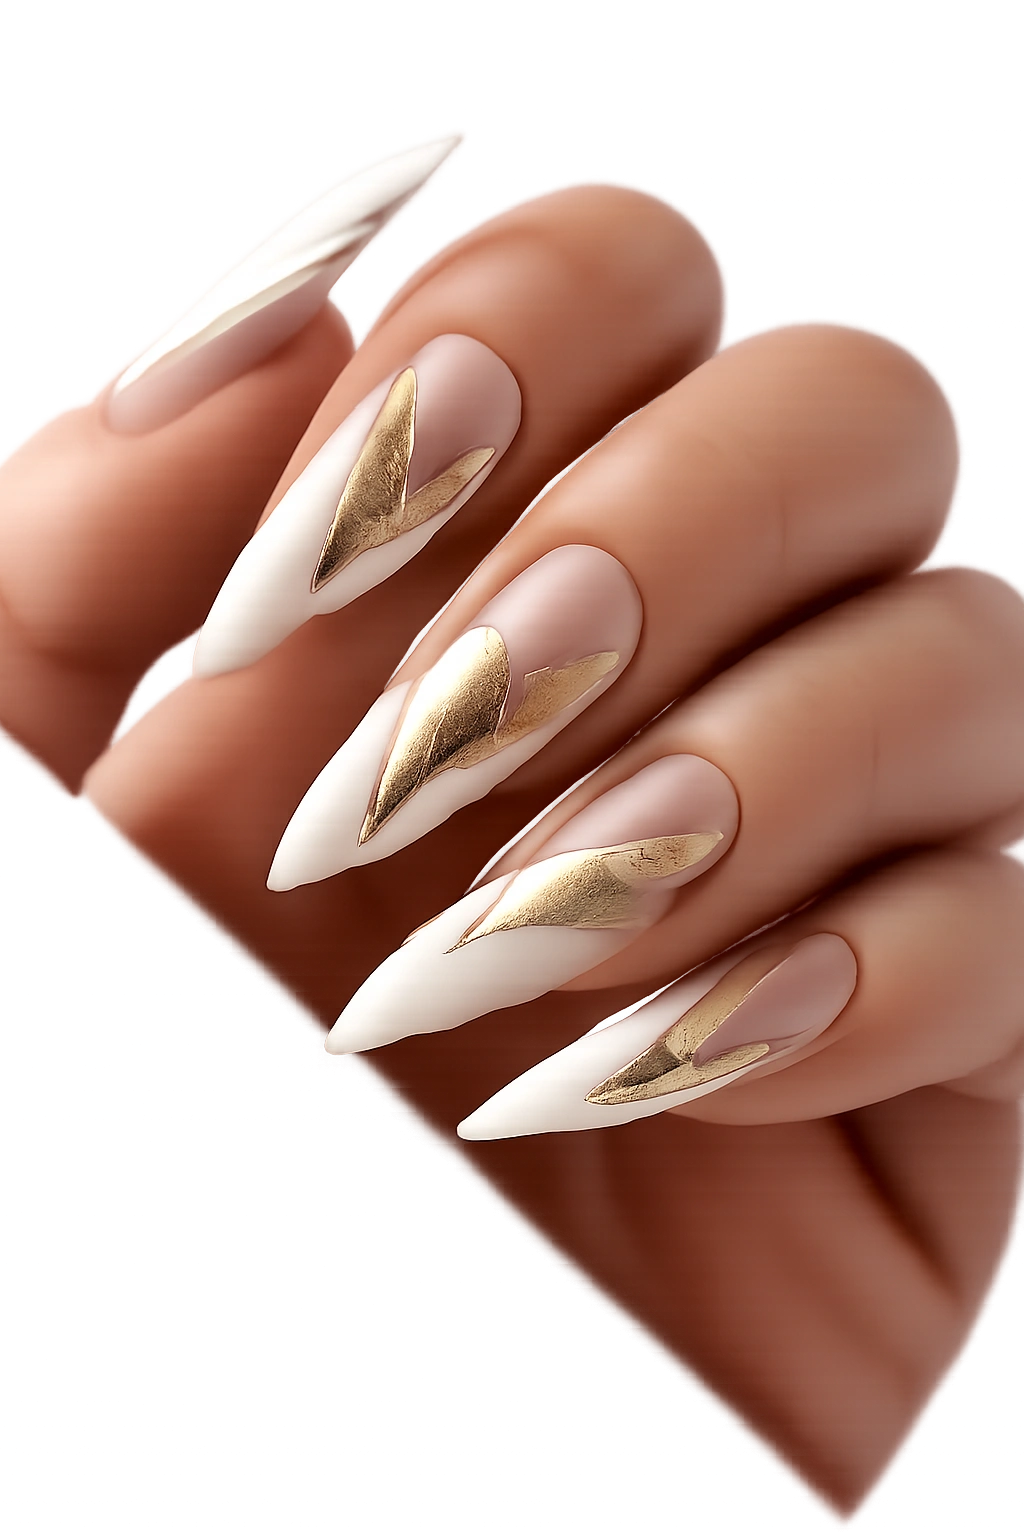
3. Half-Moon Gold Accent with White Nails

The half-moon or half-diamond design positions a curved gold shape at the base of each white nail. This vintage-inspired look has made a huge comeback in recent years because it’s both retro and contemporary at the same time.
Why This Shape Feels So Luxe
The half-moon creates a frame that draws eyes toward your fingertips, actually making stiletto nails look even longer and more dramatic. Because the gold is concentrated at the base near the cuticle area, it creates a visual starting point that makes the nail shape feel intentional and designed. The curved shape softens what might otherwise feel too angular about stiletto nails, creating elegant balance.
Executing the Half-Moon Design
- Use a half-moon nail guide sticker or create your own curved outline with a thin pencil
- Paint the curved gold section first, then seal it before adding the white polish on top
- Alternatively, paint the entire white base first, then carefully paint the gold half-moon with a curved brush or sponge
- The thickness of the gold line matters — too thin and it disappears, too thick and it overwhelms the delicate stiletto shape
- Keep the white section ultra-clean and bright to maximize the contrast
Pro tip: If you’re doing this at home, paint the base color first and let it fully dry. Then use painter’s tape to create a curved edge for the half-moon section, which gives you much more control than trying to paint freehand.
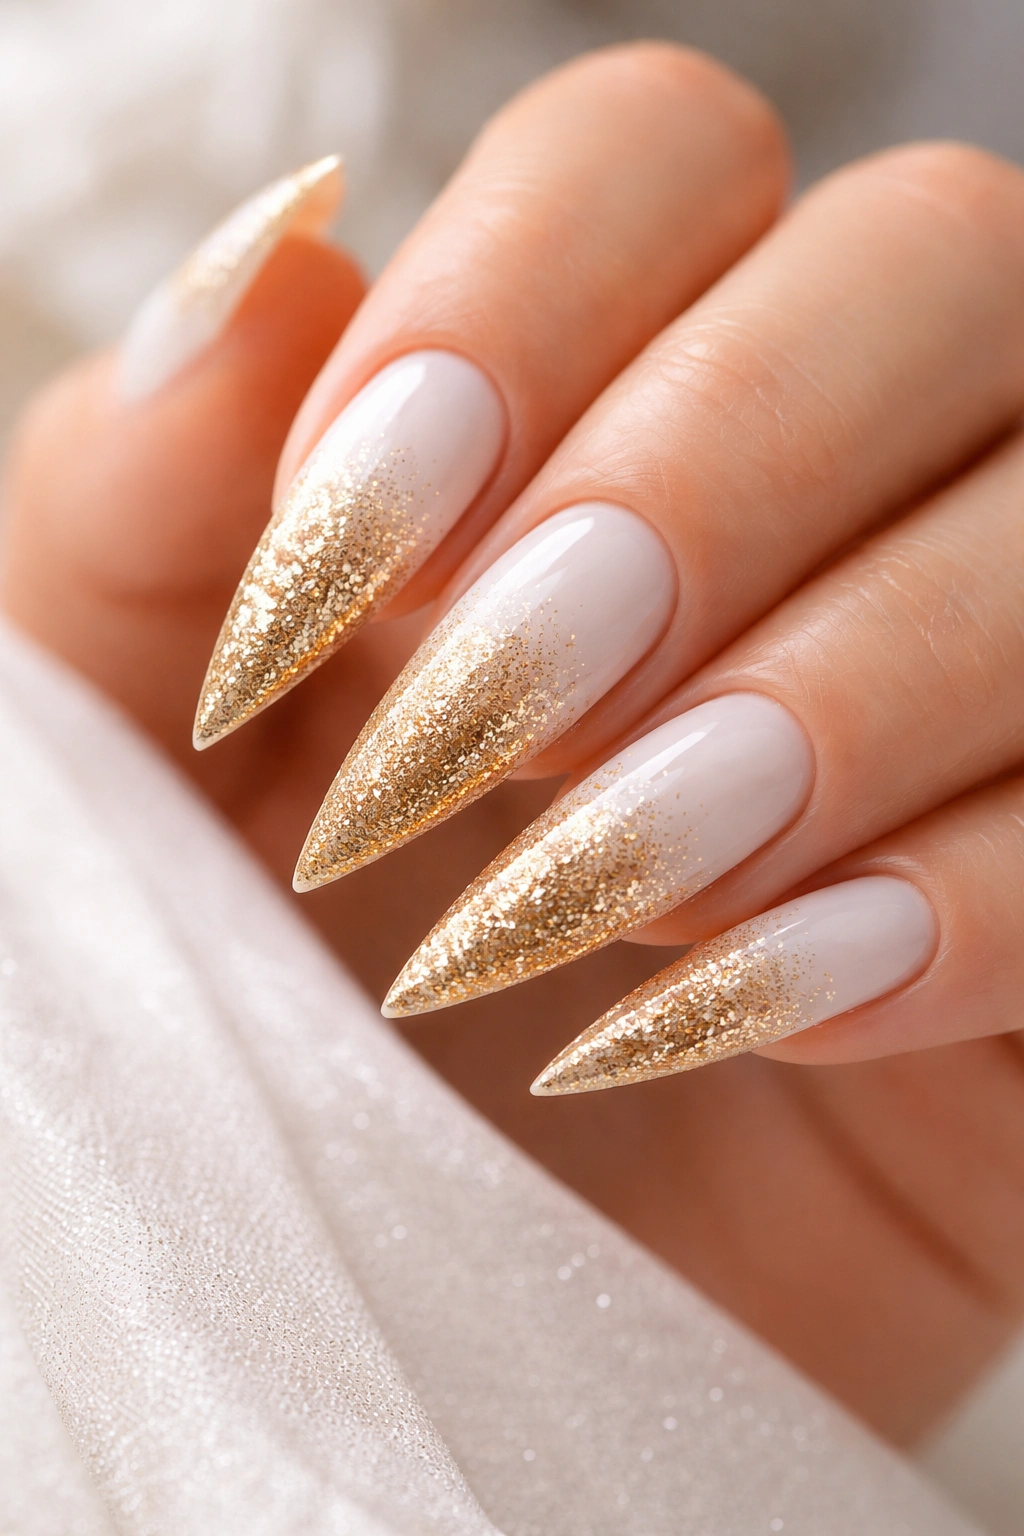
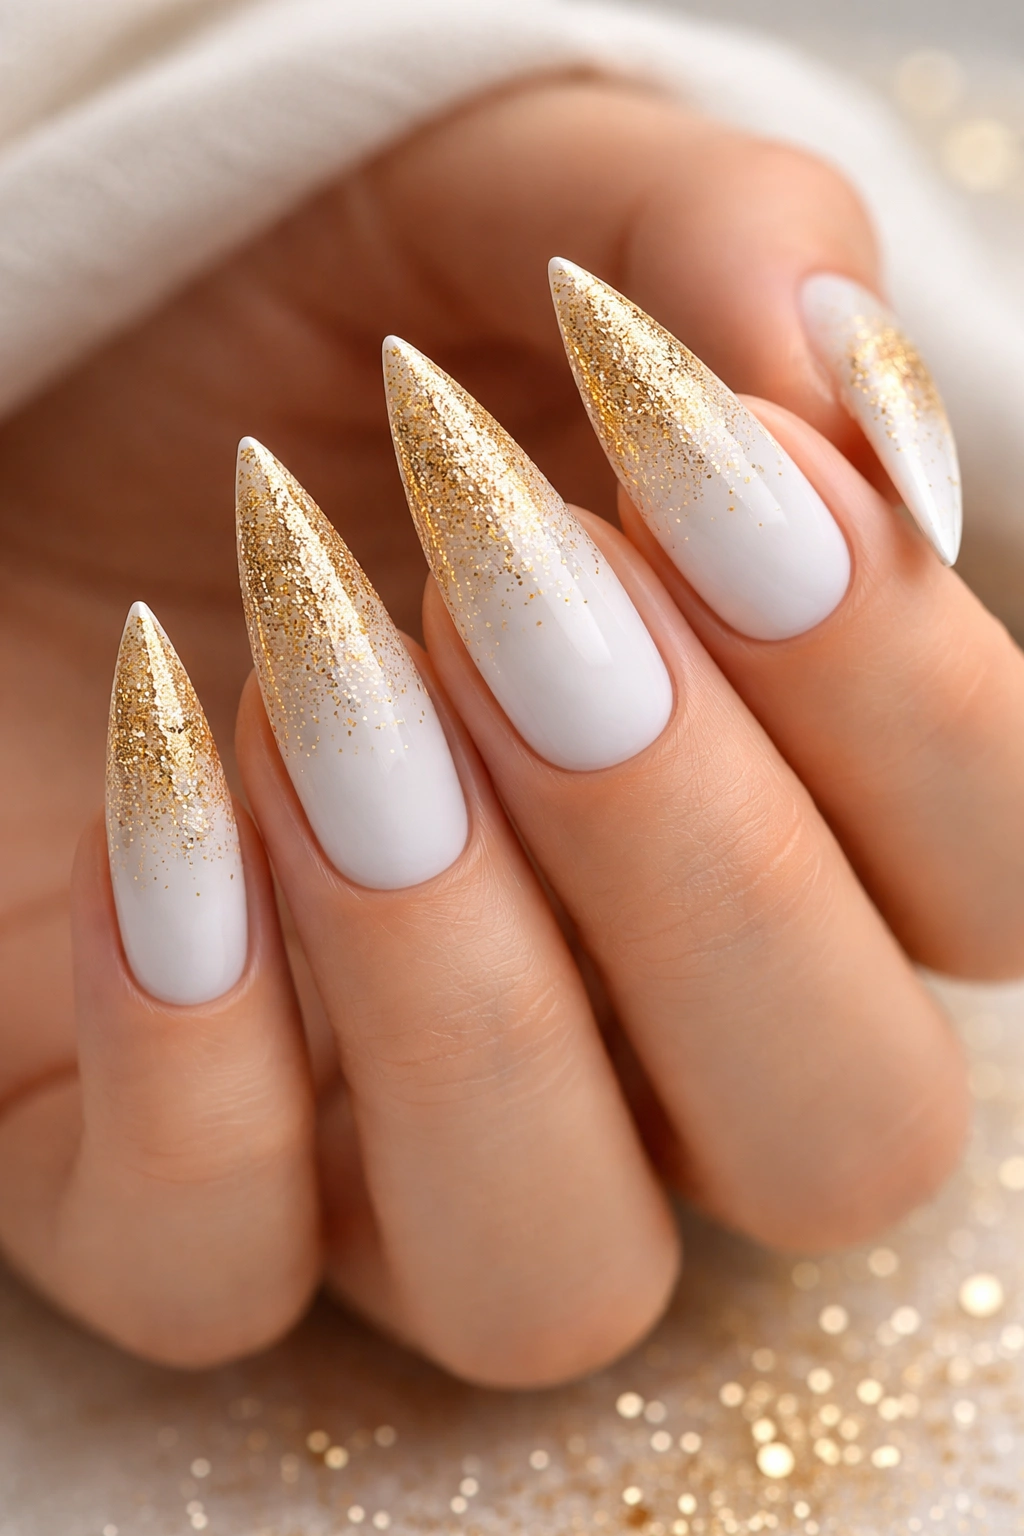
4. Gold Ombre Fade from Base to White Tip
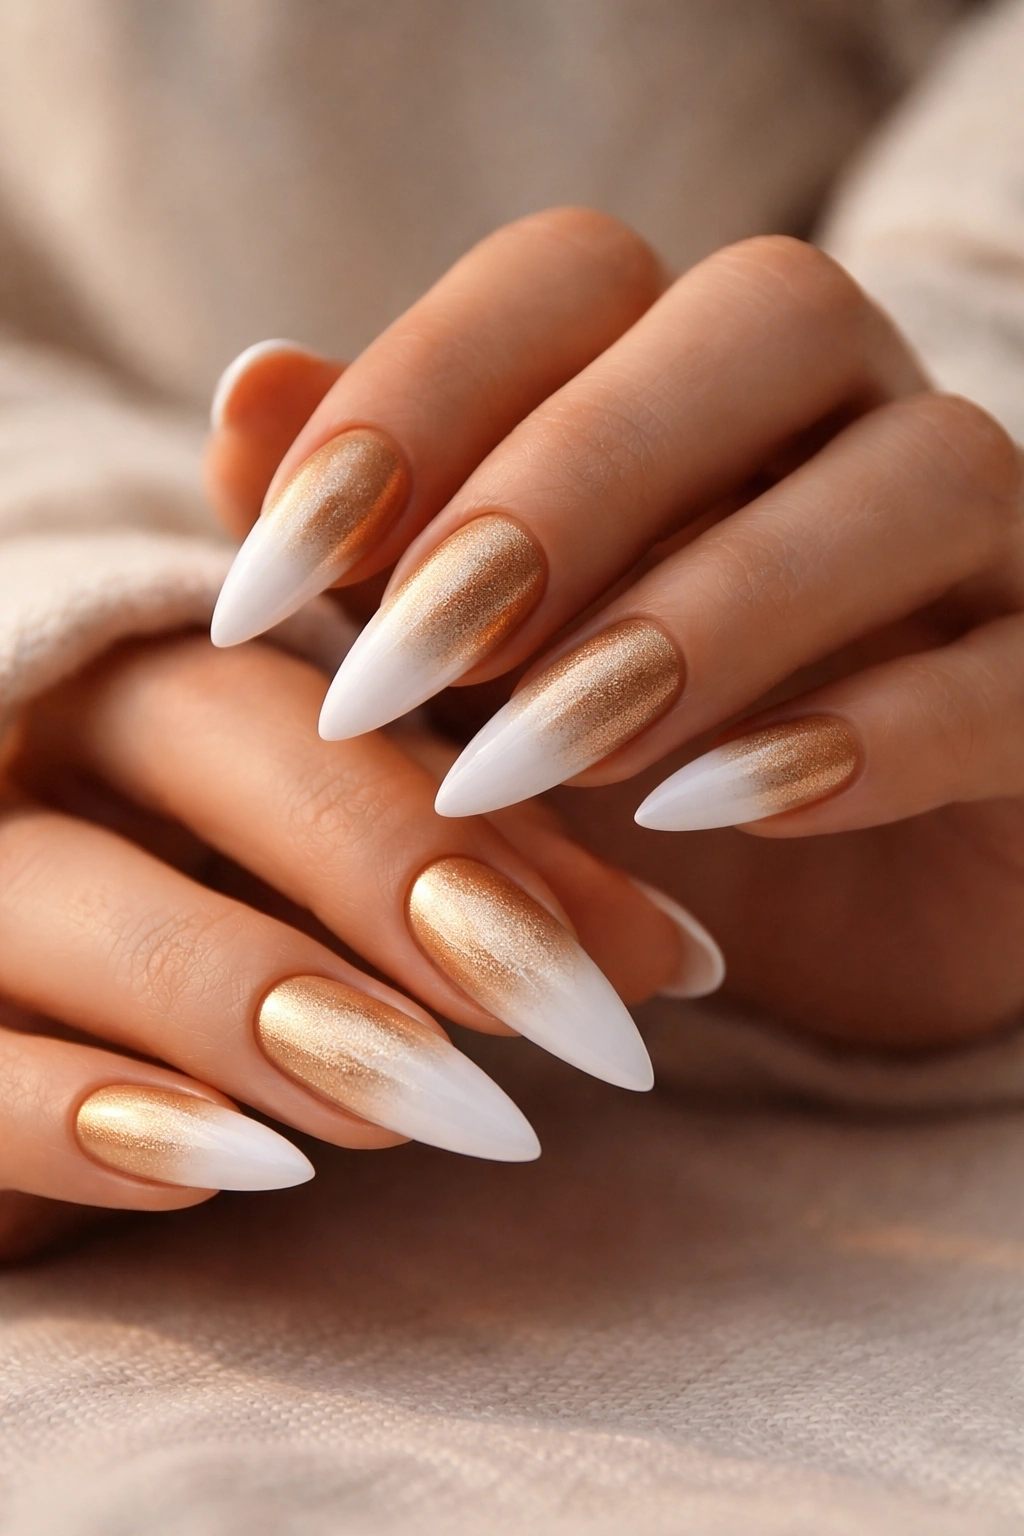
This design transitions smoothly from a concentrated gold color at the cuticle to pure white at the tip. The ombre creates depth and visual movement, making the stiletto shape feel even more elongated and dramatic.
Why Ombre Adds Dimension
Gradual color transitions are inherently more visually interesting than flat color blocks, and they create a sense of movement along the nail. The gold-to-white ombre feels organic because it mimics how light would naturally play across a polished surface. This design also cleverly uses the fact that white is lighter than gold — the eye naturally travels toward the lighter end of the nail, reinforcing the lengthening effect.
Creating a Smooth Ombre Transition
- The sponging method works best here — use a makeup sponge or small nail sponge to dab and blend colors in the transition zone
- Start with thin layers of both colors and build gradually rather than trying to get full opacity in one pass
- A matte white at the tip actually creates a more elegant transition than glossy, since it won’t reflect light as harshly
- Make sure there’s no obvious line between the two colors — the whole point is that it fades smoothly
- This design works particularly well on longer nails where you have more real estate to blend across
Worth knowing: This is actually a very wearable design for professional settings because the gold is secondary to the prominent white, and the ombre reads as sophisticated rather than flashy.
5. White with Thin Gold Geometric Lines
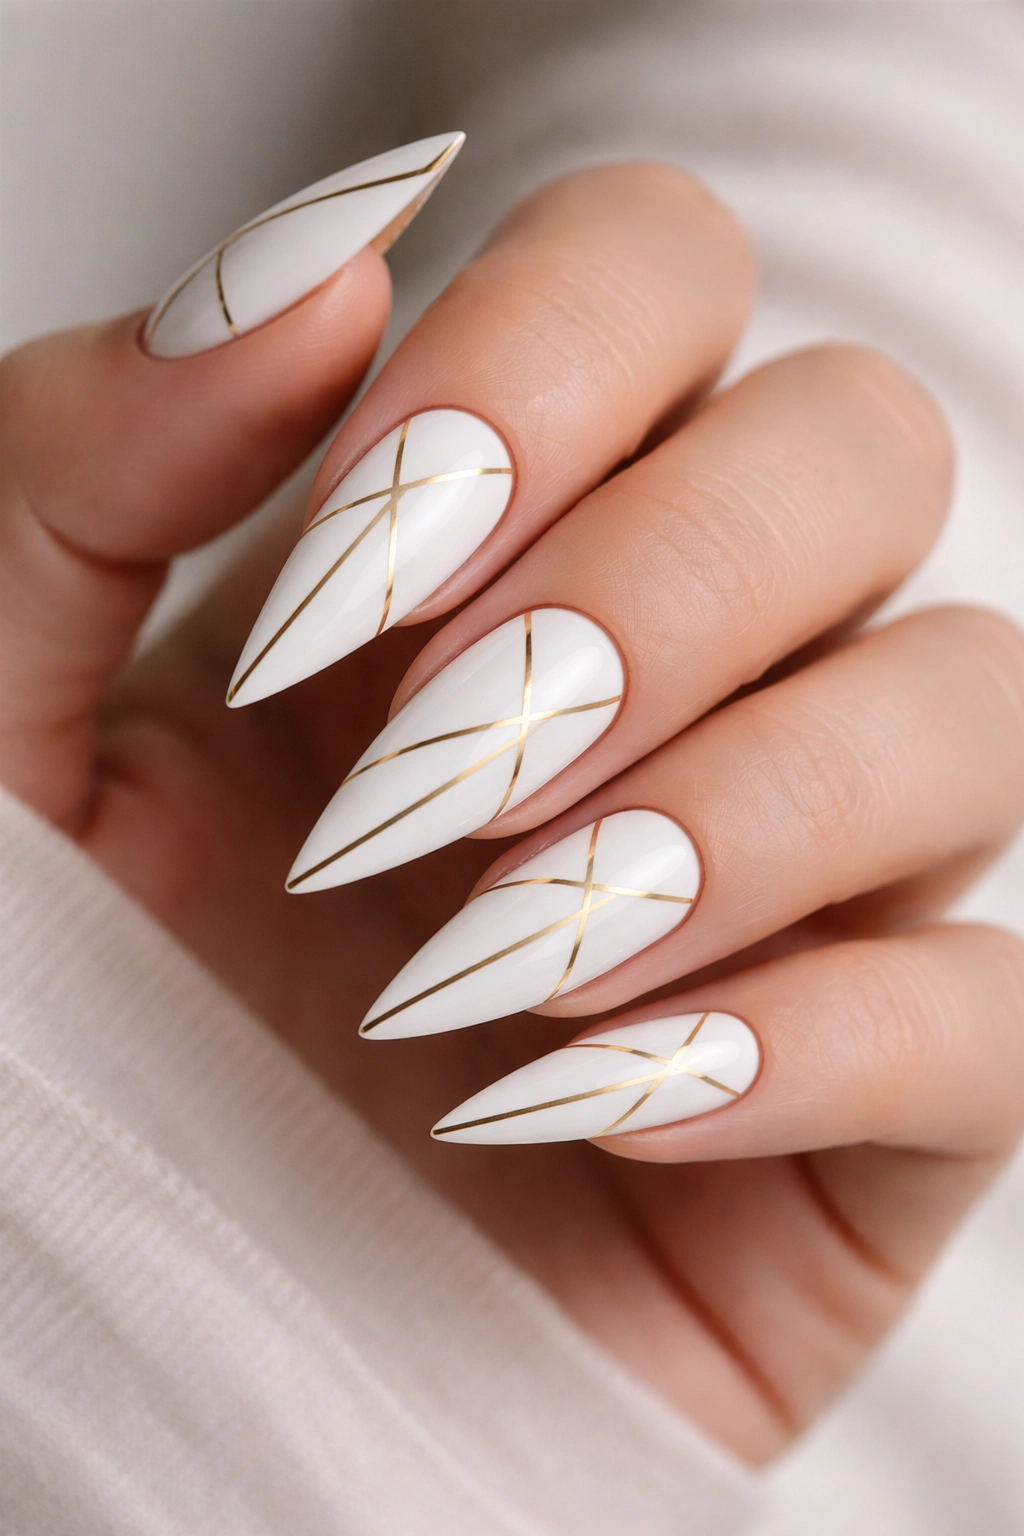
Create a pattern of thin, intersecting gold lines across the white base — think architectural blueprints or a fine mesh pattern. The lines can be straight, angled, or slightly curved depending on the mood you’re going for.
Why Geometric Patterns Feel Modern
Geometric designs immediately read as intentional and creative without requiring actual illustration skills. Thin lines create visual interest without overwhelming the nail, and the precision of geometry appeals to people who appreciate clean, structured aesthetics. Gold lines against white create sharp contrast that makes every angle pop.
Bringing Geometric Patterns to Life
- Use a fine striping brush or toothpick for precise line work; a thin detail brush designed specifically for nail art is even better
- The pattern can be symmetrical (same design on all ten nails) or asymmetrical (different pattern on each nail) — both approaches work beautifully
- Consider patterns like grids, triangles, diagonal cross-hatches, or scattered lines
- The spacing between lines matters — too close together and it blurs into a muddy color, too far apart and it loses impact
- This design actually hides minor imperfections better than solid colors because small flaws read as intentional variations in the pattern
Pro tip: Use a ruler or straight edge guide to keep lines straight if you’re doing this at home. There are flexible nail guides available that conform to the curved surface of the nail and help maintain precision.
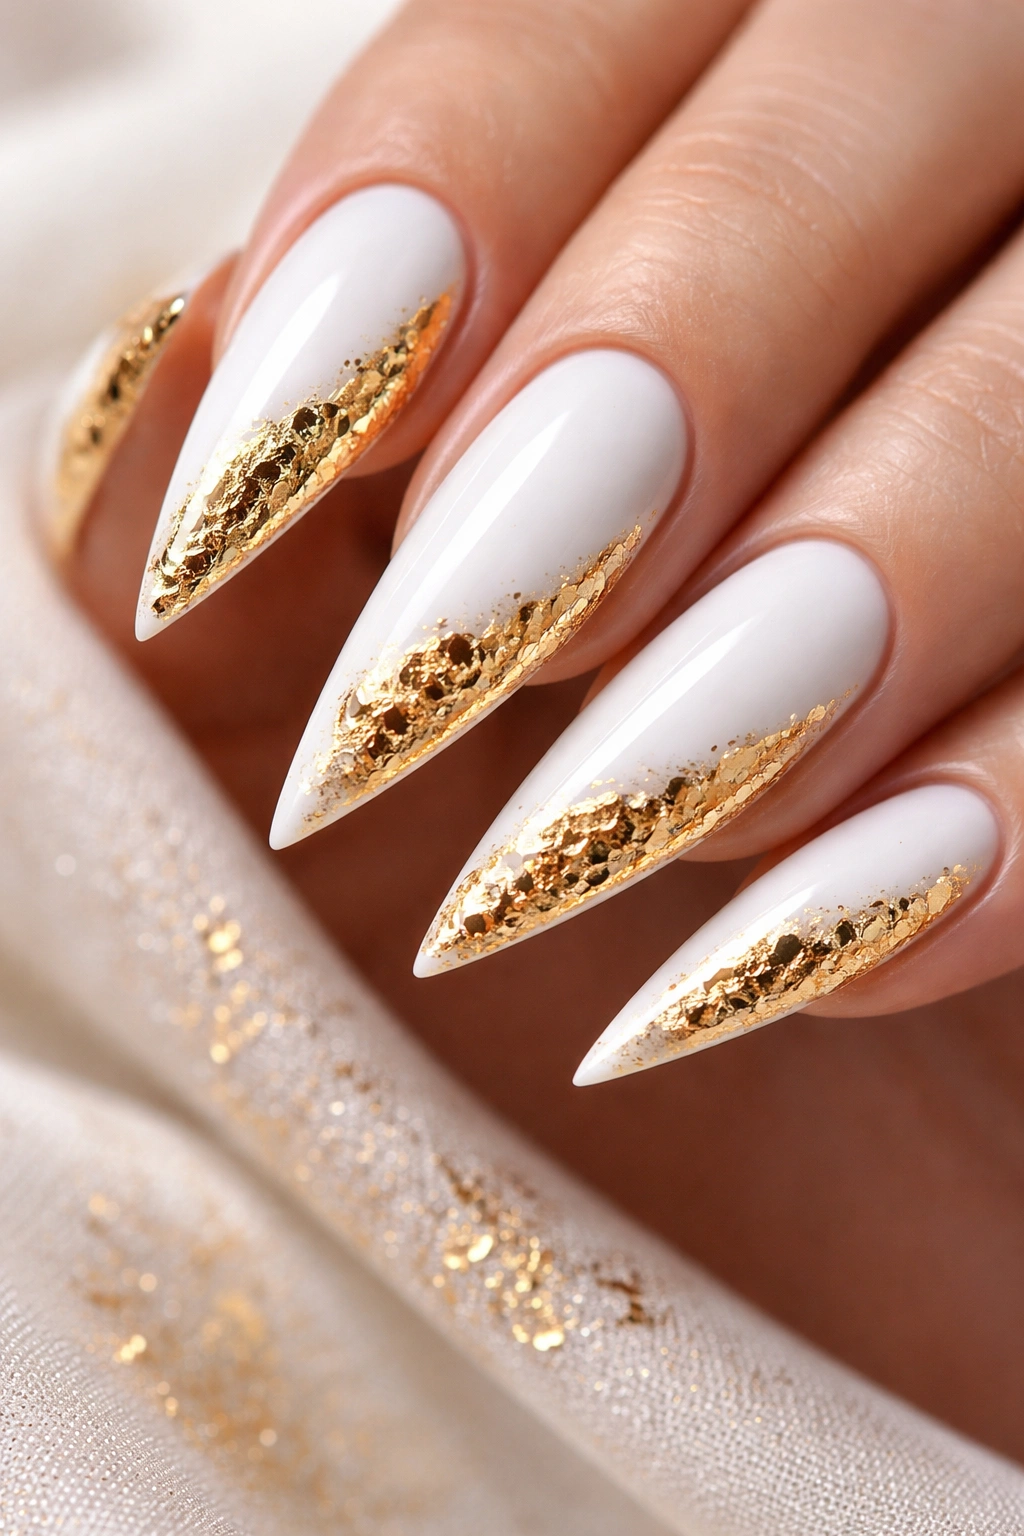
6. Gold-Dipped Tip with White Base
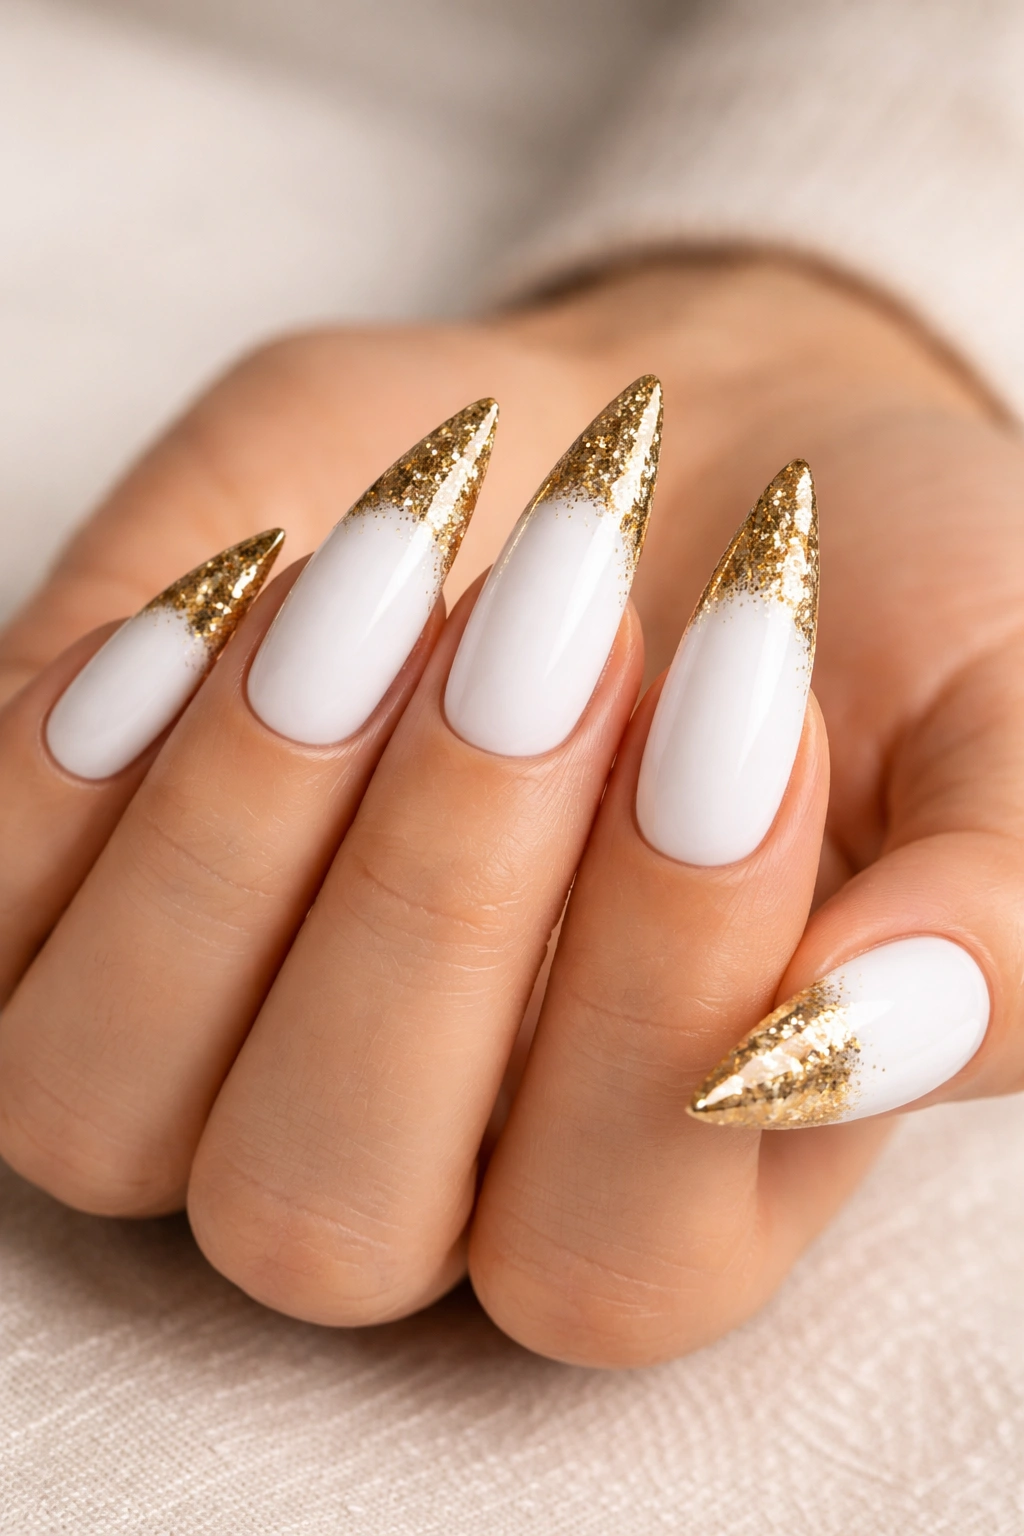
Instead of the traditional French manicure, imagine the bottom three-quarters of each nail in pure white, then the tip “dipped” into a chunky gold glitter or metallic finish. This creates a bold contrast that feels modern and playful while still maintaining sophistication.
Why This Variation Feels Fresh
The gold-dipped tip puts the glamorous element exactly where it catches light most dramatically when your hands are in motion. This placement also plays beautifully with the stiletto shape — the pointed tip becomes an exclamation point in gold. The thicker, chunkier finish of glitter gold is different enough from other white-and-gold designs to feel distinct and intentional.
Getting the Gold Dip Right
- Define where the white ends and gold begins with a clean line — this can be straight across or slightly curved depending on your preference
- Use a chunky glitter gold that has larger, more visible pieces for maximum impact
- Seal the glitter firmly under thick, strong top coats to prevent pieces from catching and peeling
- The dipped effect works best on longer nails where you have enough space to show the transition clearly
- Consider mixing a few gold glitter pieces into clear polish to create a custom gradient from white to full glitter
Worth knowing: This design actually hides nail length imperfections really well because the glitter draws attention and the eye reads it as intentional styling rather than noticing any irregularities in the white base.
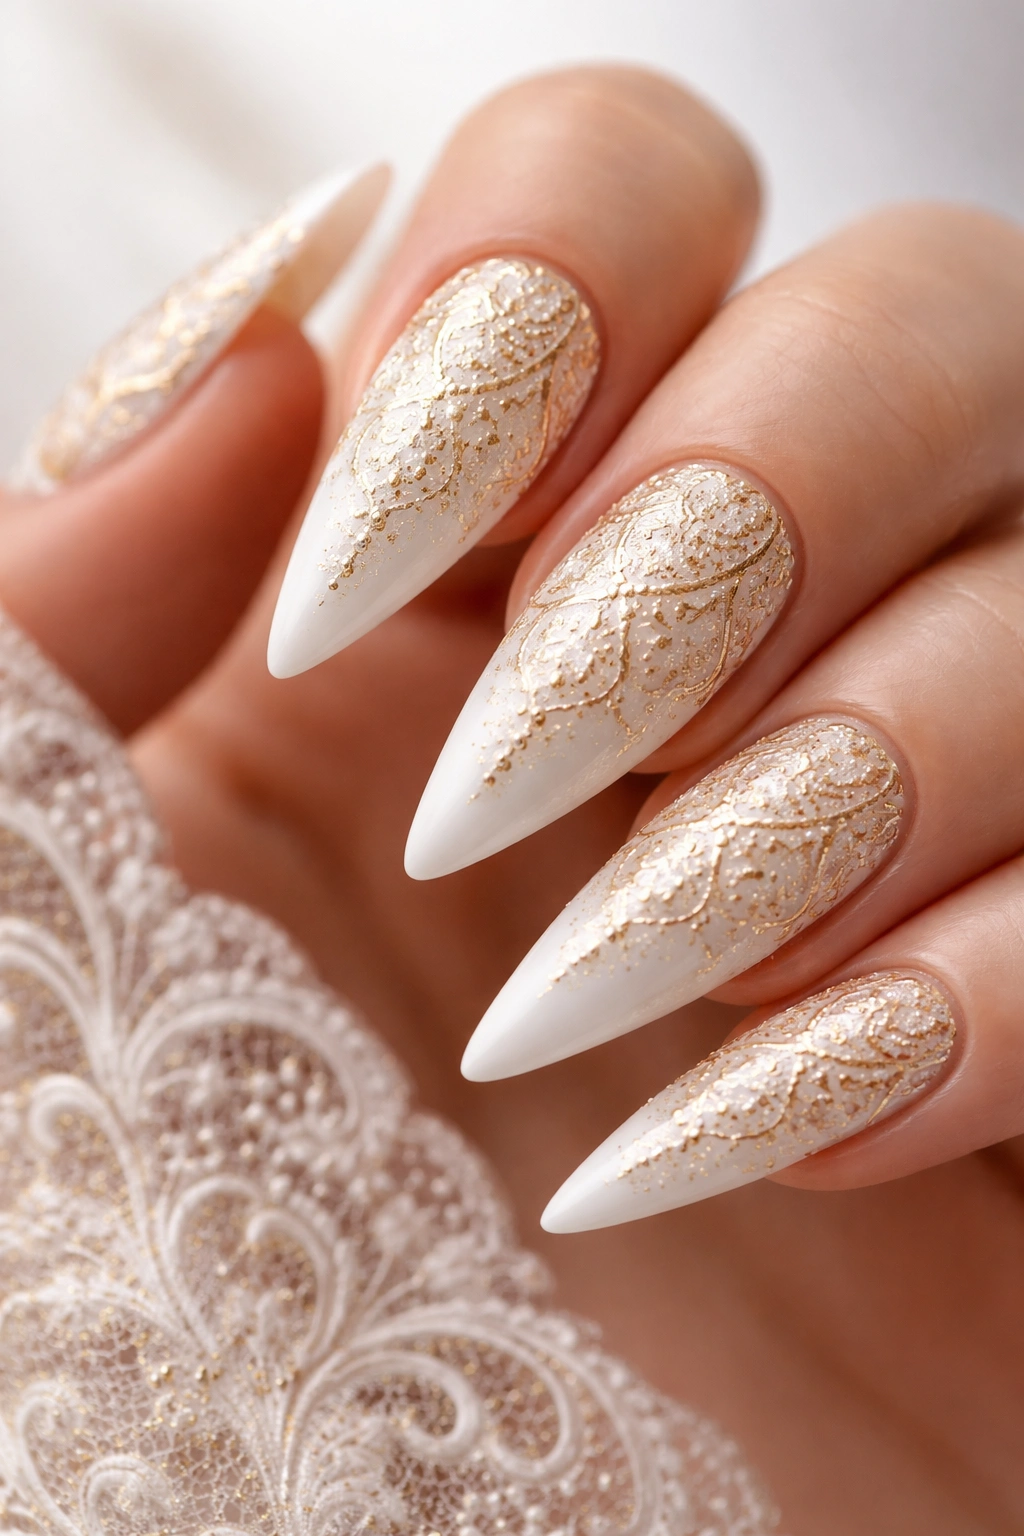
7. Delicate Gold Lace Pattern Over White
Overlay an intricate gold lace pattern across the white base, using thin brushwork to create tiny repeating details that mimic the look of actual lace. This design feels romantic and feminine without being saccharine.
Why Lace Details Feel Timeless
Lace patterns appeal to people who want elegance with personality — it’s detailed enough to show artistry but delicate enough to remain sophisticated. The intricate detailing makes the design feel handcrafted and special, even though the pattern might repeat. Gold lace over white has a jewelry-like quality that makes nails feel like intentional accessories rather than afterthoughts.
Creating Delicate Lace Details
- Lace patterns don’t require a steady hand as much as confidence — slight imperfections actually add to the handmade charm
- Use a very fine detail brush and thin gold polish for the best results
- Start with a basic lace motif (scalloped edges, tiny floral patterns, or geometric lace) and repeat it across the nail
- You don’t need to cover the entire nail with lace — even placing a delicate gold lace band around the edges or in one corner creates the effect
- This design pairs beautifully with slightly longer stilettos because the lace details have room to breathe
Pro tip: If lace painting feels intimidating, use a thin gold striping tape or nail stickers with lace patterns — they create the same effect with zero hand-painting required.
8. White Marble with Gold Veining
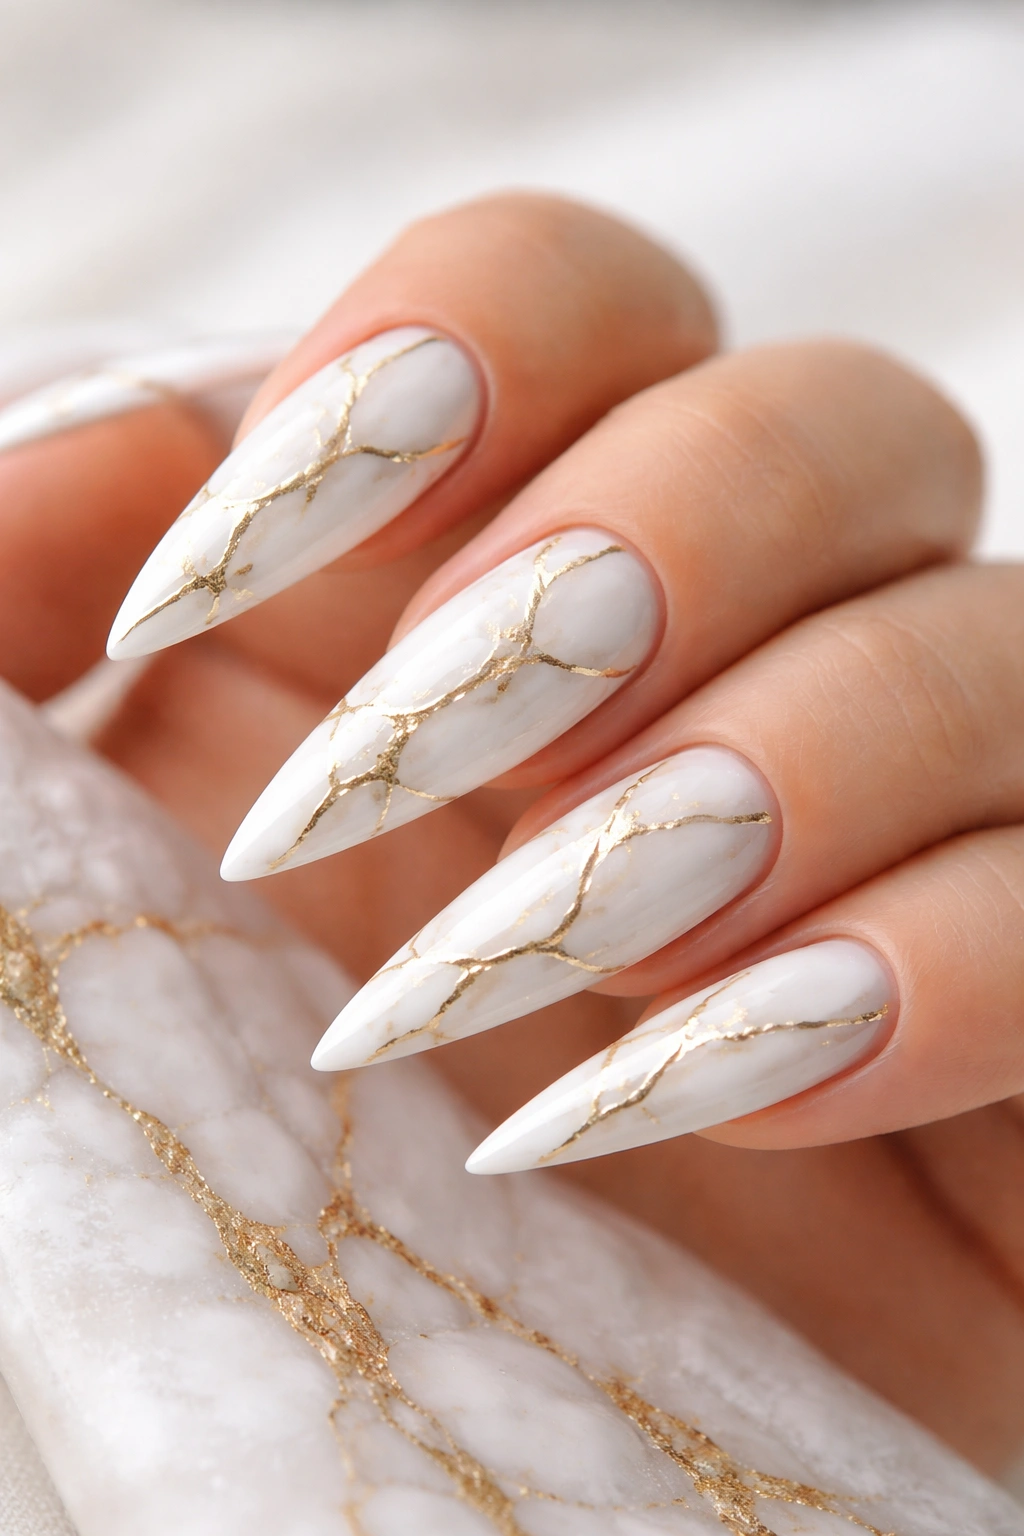
Create a classic marble effect in white with thin gold lines running through like natural stone veining. The illusion of natural marble makes this design feel upscale and timeless.
Why Marble Never Goes Out of Style
Marble mimics luxurious natural stone, which automatically reads as expensive and intentional. The organic randomness of marble veining makes every nail unique, so the design never feels repetitive. Gold veining adds warmth and luxury to what would otherwise be a cool white marble effect.
Creating Marble Effect
- Start with a white base and let it dry completely
- Use a thin brush or fine striping tool to paint irregular, branching gold lines that look like natural stone cracks and veins
- The lines should be somewhat random but not completely chaotic — study actual marble patterns for inspiration
- Consider adding very thin, secondary lines in a slightly lighter gold or pale champagne color for depth
- Seal with a glossy top coat to enhance the polished stone appearance
Worth knowing: This design actually works beautifully on both short and long nails because the veining automatically draws the eye and creates visual interest regardless of nail length.
9. Gold Glitter Gradient from White
Transition from a clean white base to an increasingly concentrated gold glitter as you move toward the tip. Unlike a smooth ombre, this has more visible sparkle and texture.
Why Glitter Gradients Feel Celebratory
Glitter adds instant glamour and catches light in ways that solid colors can’t. The gradient means you get the sophisticated look of white with the fun of glitter, without being glitter-heavy. This design hits that sweet spot between professional and playful.
Building a Glitter Gradient
- Start with a white base and seal it with a glossy top coat
- Mix glitter into clear gel or polish to create different concentrations — very sparse glitter near the base, denser glitter at the tip
- Apply thin layers and build gradually rather than trying to get full coverage in one pass
- Consider using gold glitter in multiple sizes for more visual interest — larger sparkles mixed with tiny ones
- This design requires strong sealing because loose glitter particles can catch and chip
Pro tip: Use a clear gel base under your glitter layers if you’re working with gel nails — it holds glitter more securely and creates a smoother, more professional finish than regular polish.
10. White Nail with Gold Striped Border Frame
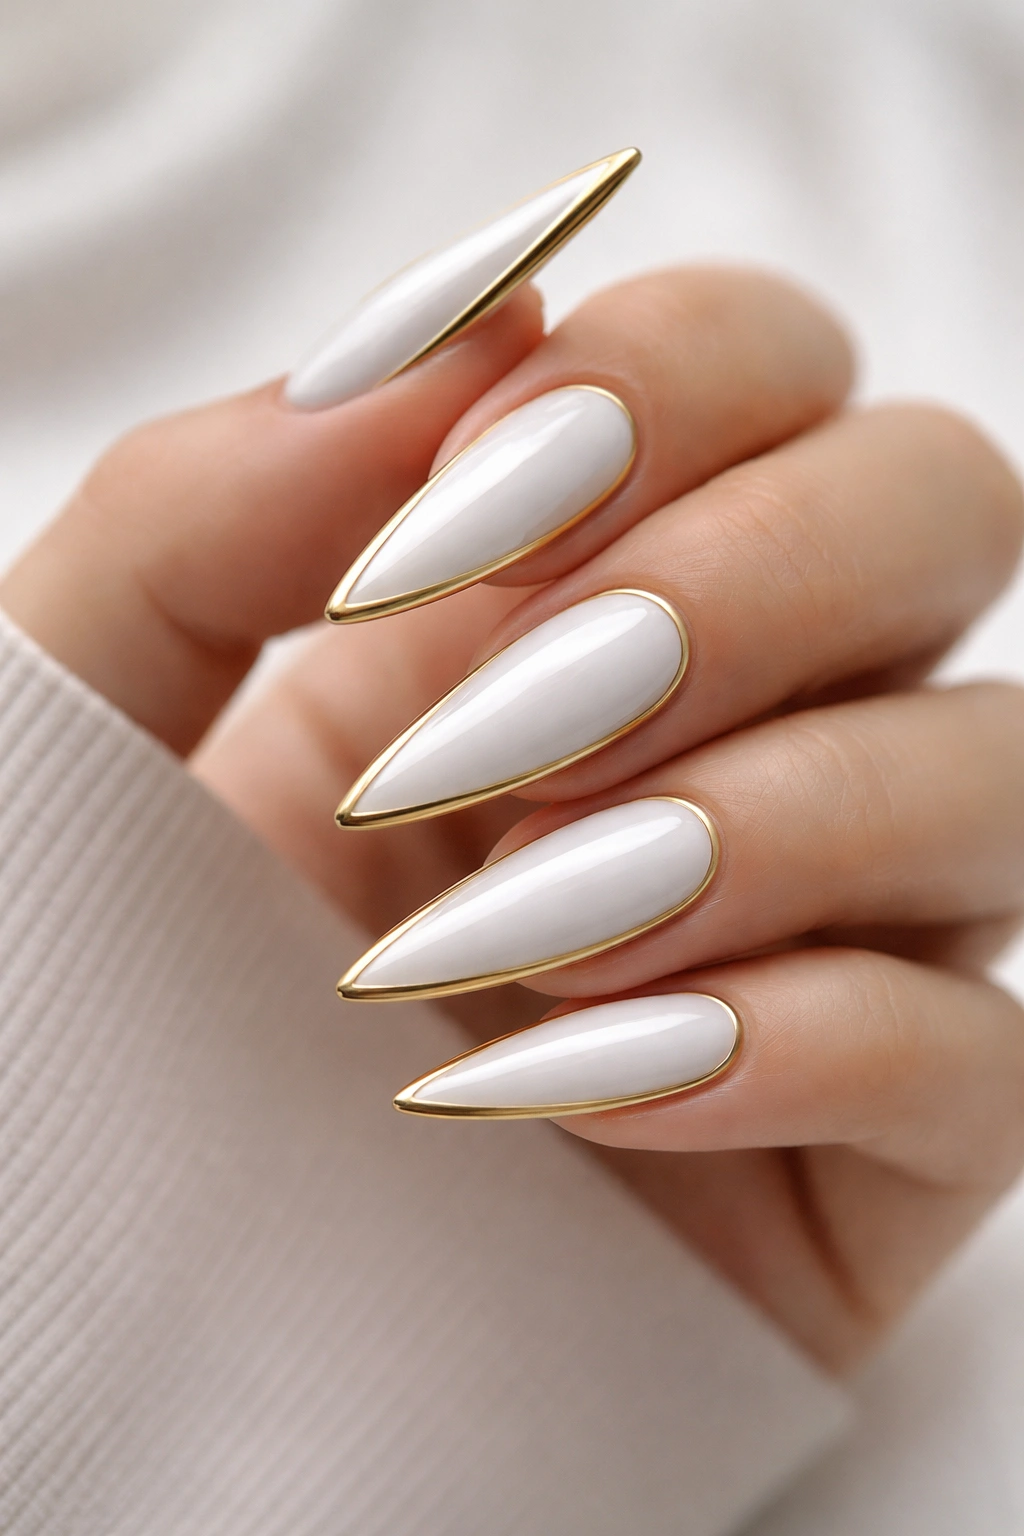
Paint each nail entirely white, then use thin gold lines to create a frame or border around the edges — imagine a thin rectangle of gold outlining the perimeter of the white nail. This feels architectural and sophisticated.
Why Border Framing Feels Polished
The frame creates a sense of intention and design that elevates a simple white base into something intentional and curated. Borders draw attention to the silhouette of the nail itself, which is perfect for showcasing the clean lines of a stiletto shape. This is a design that feels professional in any context.
Creating a Perfect Border Frame
- Use painter’s tape or nail guides to create clean, straight lines; even experienced artists benefit from these tools for precision
- The border can be thin (single thin line) or thicker (double lines creating a frame with space between them)
- Keep the border completely white-free for maximum contrast and visual impact
- The border works on all nail lengths but feels especially polished on very long stilettos
- Consider keeping the interior pure white and ultra-matte while the border is glossy for subtle texture variation
Worth knowing: This design is actually one of the easiest to maintain because any minor imperfections in the white base are hidden inside the frame, so you only need to keep the border lines clean.
11. Gold Foil Accents with White Base
Use actual gold foil or metallic leaf applied strategically to the white base — perhaps in the corners, along the edges, or in specific geometric shapes. The foil creates three-dimensional texture and catches light in ways that painted gold can’t.
Why Foil Creates Premium-Looking Nails
Real foil or metallic leaf has depth and dimensional quality that makes nails look genuinely expensive. Unlike glitter, foil sits smoothly against the nail surface without creating texture that catches and snags. The reflective quality of foil is subtler and more sophisticated than glitter sparkle.
Working with Metallic Foil
- Gold foil sheets are available at any beauty supply store and work beautifully with gel and traditional polish
- Apply a slightly tacky base (use foil glue or slightly undried gel) in the areas where you want foil to adhere
- Press the foil firmly into place and seal with top coat once it’s dry
- The foil can be applied in geometric shapes, free-form shapes, or scattered placement
- This technique works especially well on longer nails where foil accents have room to shine
Pro tip: If foil feels intimidating, start with just one accent nail (your ring finger or thumb) featuring foil, while the other nine nails stick to painted design. It makes the foil feel intentional rather than like an experiment.
12. Negative Space Design with Gold Accents
Create patterns where sections of the nail are left bare (showing your natural nail or a clear base), with white and gold filling in the remaining spaces. Negative space designs feel modern and artistic.
Why Negative Space Feels Contemporary
Leaving parts of the nail bare automatically makes a design feel current and thoughtful — it’s not trying to cover every inch. Negative space actually draws more attention to the areas you DO color because of the contrast. This design works beautifully on longer nails where you have enough surface area for the concept to really read.
Building Negative Space Designs
- Simple negative space: paint white in geometric shapes (stripes, triangles, sections) with gold accents in between
- More complex version: create negative space in shapes like moons, diamonds, or abstract forms
- The key is ensuring the negative space is intentional and symmetrical — it should clearly read as design, not like you ran out of polish
- Consider alternating which nails feature which color in the dominant position — white-heavy on some nails, gold-heavy on others
- This design actually works beautifully with matte top coat because the variation between bare nail, matte polish, and glossy areas creates visual interest
Worth knowing: Negative space designs actually help your manicure last longer because you’re using less polish overall, which means less chance of chipping.
13. White with Gold Glitter Tips and Striped Accent

Combine multiple elements: a white base, gold glitter concentrated at the very tip, and a thin gold stripe running vertically down the center. This is more complex than single-element designs but creates maximum visual impact.
Why Layering Elements Works
Combining multiple design elements (solid white base, glitter accent, striping) creates depth and sophistication that single-element designs can’t achieve. Each element serves a purpose — the white keeps it clean, the glitter adds glamour, the stripe adds geometry and intentionality. The stiletto shape has enough surface area that multiple design elements don’t feel crowded.
Executing a Multi-Element Design
- Start with the white base and seal it completely before adding additional elements
- Paint the center stripe next while you have steady focus on precision
- Add the glitter tips last, being careful to contain them to the very tip area
- Each element should feel intentional, not accidental or overlapping in confusing ways
- Make sure the glitter is fully sealed because it’s the most prone to snagging
Pro tip: This is a design where using nail guides and tools (ruler for the stripe, tape for the glitter section) actually saves time and creates better results than freehand work.
14. Gold-Leafed White Base with Clear Tips
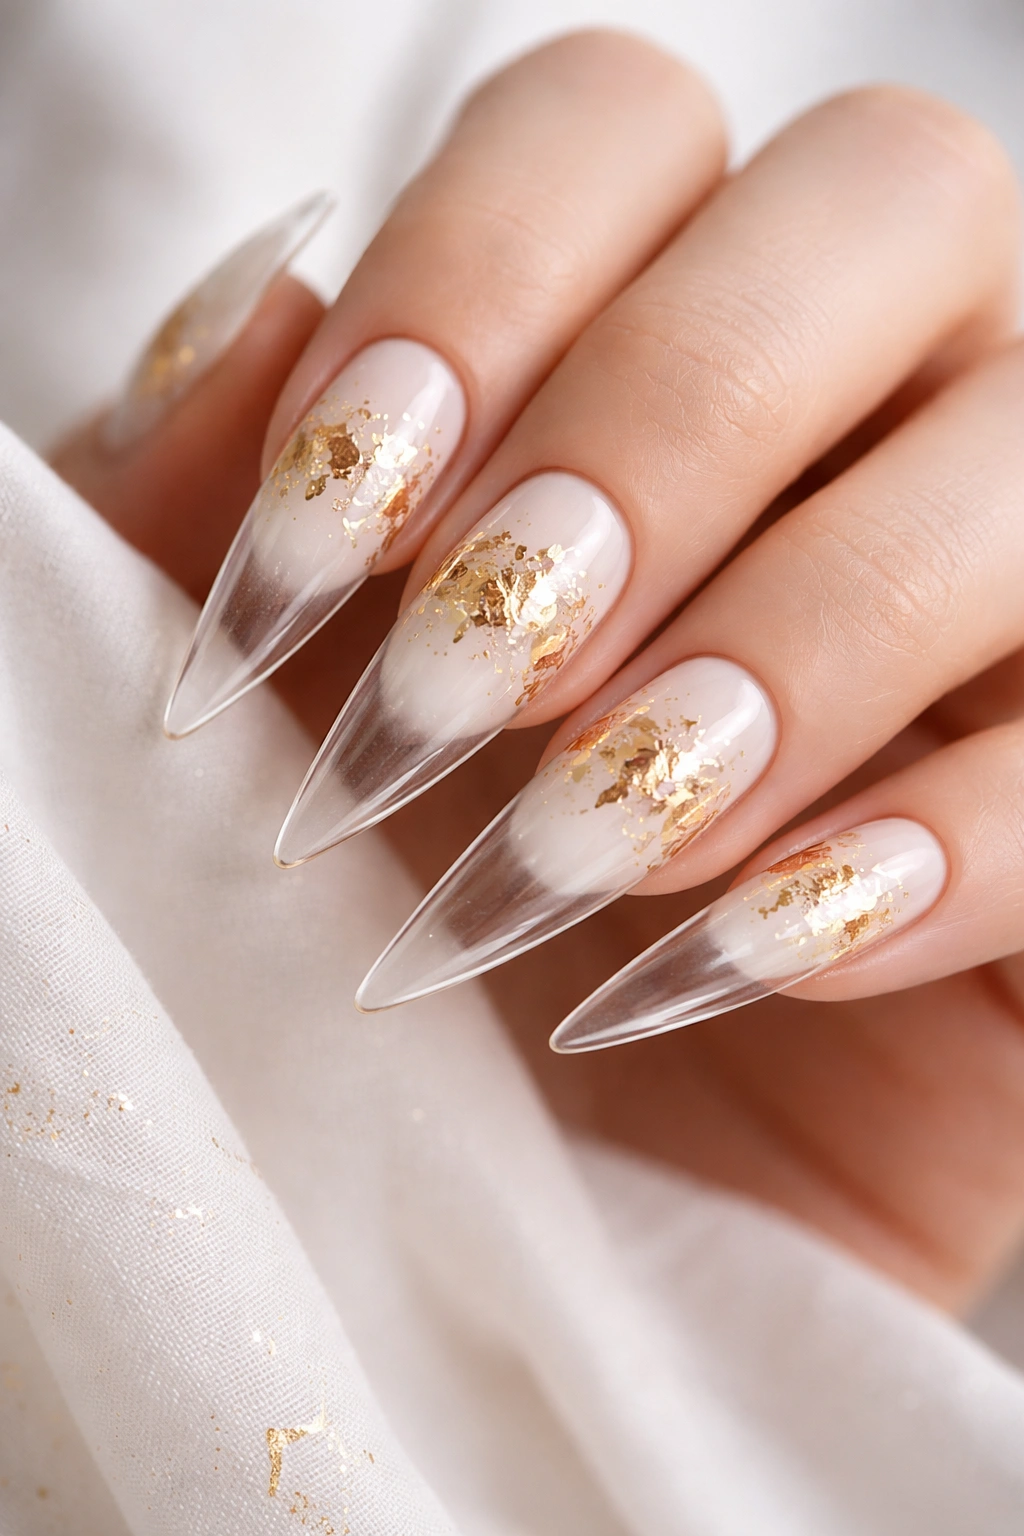
Paint most of the nail white with scattered gold leaf pieces throughout, then create an ombré effect where the very tip transitions to clear or slightly frosted. This creates a modern, multi-dimensional look.
Why This Combines Best Elements
You get the sophistication of gold-leafed white combined with the modern edge of clear tips. The clear tip elongates the visual line of the stiletto even more dramatically than a solid color. The transitions between solid white, gold-leafed white, and clear create visual movement and interest.
Building This Layered Design
- Start with white base and seal it
- Apply gold leaf pieces while your next coat is still slightly tacky, focusing them on the middle and base sections
- Create a transition zone where white gradually fades to clear — you can do this with sponging or with a thin layer of very diluted white
- Keep the very tip crystal clear or very pale for maximum visual effect
- Seal everything with a strong, thick top coat that won’t yellow or discolor over time
Worth knowing: This design actually feels more modern and fashion-forward than traditional designs, so it works beautifully for people who like keeping their style current and trend-aware.
15. Thick Gold Geometric Shapes on White Background
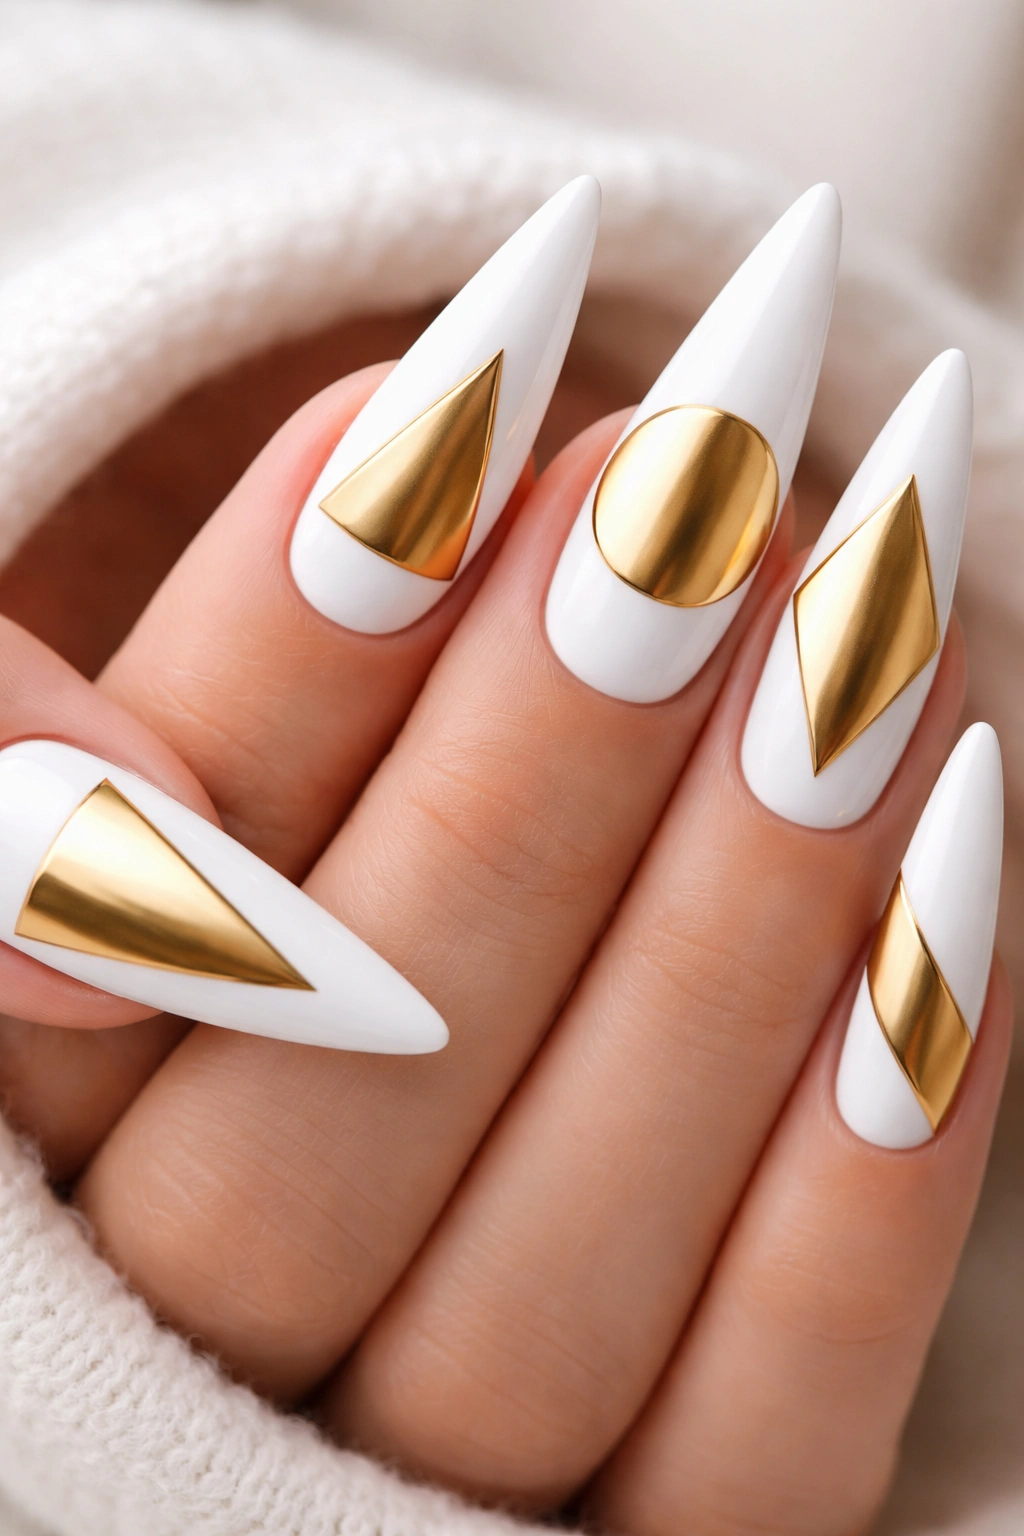
Paint white base on all nails, then add larger geometric gold shapes — perhaps a triangle on one nail, a circle on another, a diamond on the next. This creates bold geometry that feels intentional and artistic.
Why Larger Shapes Create Statement Nails
Bigger shapes are more forgiving to paint and create more dramatic visual impact than thin lines. Varying the shape on different nails creates interest without requiring any additional colors. Geometric shapes immediately read as modern and design-focused.
Painting Bold Geometric Elements
- Start with a white base and seal it completely
- Use a fine brush or nail pen to paint the gold shapes — the shapes can be filled in solid or just outlined
- Consider using a nail stamp or stencil for perfectly symmetrical shapes if your hand-painting skills aren’t confident yet
- Outline shapes first in a thinner line, then fill in if desired
- The shapes don’t need to be perfectly sized — slight variations actually make them feel more handcrafted and intentional
Pro tip: If painting shapes freehand stresses you out, use water-based nail decals or stamping plates designed for geometric patterns. They create the same effect with zero freehand skills required.
16. White with Gold Gradient Tips and Scattered Glitter
Combine a smooth white base with a gold gradient that concentrates at the very tip, then scatter fine gold glitter throughout for extra sparkle and dimension. This is a fully glamorous design that works beautifully for special occasions.
Why This Design Feels Celebratory and Special
Multiple techniques layered together create maximum visual interest and luxury. The gradient gives you the sophisticated color transition while glitter adds festive sparkle. White keeps it elegant enough for upscale events, while the gold elements ensure it definitely makes a statement.
Creating Full-Glam Multi-Technique Design
- Start with pristine white base and seal
- Create gradient from white to gold using sponging technique, starting with very concentrated gold at the tip and fading toward white at the base
- While the gradient is still slightly tacky, apply fine gold glitter particles throughout — not just at the tip, but scattered across the gradient area
- The glitter shouldn’t be so dense that it overwhelms the gradient, but dense enough to create visible sparkle
- Seal with multiple strong top coats to protect all the intricate layering
Pro tip: This is definitely a design that benefits from professional application because the multiple layers require precision and steady hands. If you’re attempting it at home, prepare for a longer manicure appointment and use quality tools specifically designed for gradient work.
Final Thoughts
White and gold stilettos have earned their popularity because they’re genuinely versatile, flattering, and endlessly customizable. Whether you gravitate toward minimalist designs like the single gold stripe or prefer full-glam combinations with multiple elements, these 16 designs prove that the combination works in virtually any style and for any occasion. The key is choosing a design that reflects your personal aesthetic — whether that’s architectural geometry, romantic lace, organic marble effects, or bold, statement-making glitter.
The beauty of stiletto nails is that they already command attention with their shape and length, so the white and gold combination actually provides the perfect balance. White keeps the overall look refined and wearable, while gold adds the luxury touch that justifies the effort of maintaining longer nails. These designs also photograph beautifully, which matters if you’re someone who documents your manicures or uses them for professional images.
Consider your lifestyle when choosing your design — if you’re frequently typing or working with your hands, simpler designs like the gold stripe or border frame will stand up to more wear and tear. If you have a special event coming up, that’s the perfect time to invest in something more complex like the multi-element designs or the full-glam glitter versions. Either way, white and gold stilettos are a decision you won’t regret because the combination never stops looking intentional and polished.
