

Pink and gold is one of those color combinations that feels simultaneously romantic, luxe, and effortlessly wearable. When you pair these two shades on a stiletto nail shape, you’re creating a look that works for everything from everyday confidence to special occasions where you want your nails to do the talking. The beauty of this pairing is that it’s versatile enough to range from soft and subtle to bold and eye-catching, depending on which shade of pink you choose and how much gold accent you incorporate.
Stiletto nails with pink and gold design elements have a way of making your hands feel instantly polished and put-together. The elongated, pointed shape amplifies the elegance of the color combination, creating an almost dramatic effect that draws attention without screaming for it. What makes this combination so appealing is that pink softens the metallic intensity of gold, while gold elevates a simple pink base into something more sophisticated and considered. You’re not just choosing two colors—you’re creating a complete aesthetic that feels intentional.
The real advantage of exploring different pink and gold nail designs is discovering which approach resonates with your personal style. Some designs lean into the romance of the pairing with soft, blended gradients. Others embrace the glamorous side with bold geometry and metallic details. Whether you prefer understated elegance or full-on statement nails, there’s a pink and gold stiletto design that feels authentically you. Let’s walk through 14 different interpretations of this timeless combination, each with distinct techniques, difficulty levels, and styling occasions.
1. Classic Rose Gold Gradient
Rose gold exists in that magical space between pink and gold, which makes it the perfect foundation for a gradient stiletto design. This approach layers a soft pink base that gradually transitions into warmer rose gold tones toward the tips. The beauty of this technique is that it feels sophisticated without requiring intricate patterns or multiple colors competing for attention.
Why This Design Reads So Luxe
The gradient effect creates dimension and depth that a single solid color simply can’t achieve. Your eye naturally travels from the nail bed toward the tip, and the warmth intensifying in that direction creates a sense of movement. This subtle gradient mimics light hitting a polished surface, which is exactly why rose gold has become synonymous with luxury nail art. The technique works especially well on stiletto nails because the elongated shape gives the gradient plenty of room to develop and become more noticeable the further down the nail you look.
Technique and Application Tips
- Use a sponge or makeup blending tool to create a seamless transition between soft pink and deeper rose gold
- Apply a nude or pink base coat first, then sponge on the rose gold tone at the tip
- Seal everything with a glossy topcoat to maximize shine and depth
- If you’re uncomfortable with sponging, ask your nail technician for an airbrush application—this creates an even more seamless blend
- The key is patience: multiple thin layers blend better than one thick layer
Pro tip: This design photographs beautifully in natural light because the gradient catches and reflects light differently depending on the angle, creating an almost holographic quality.
2. Soft Pink with Gold Foil Flecks
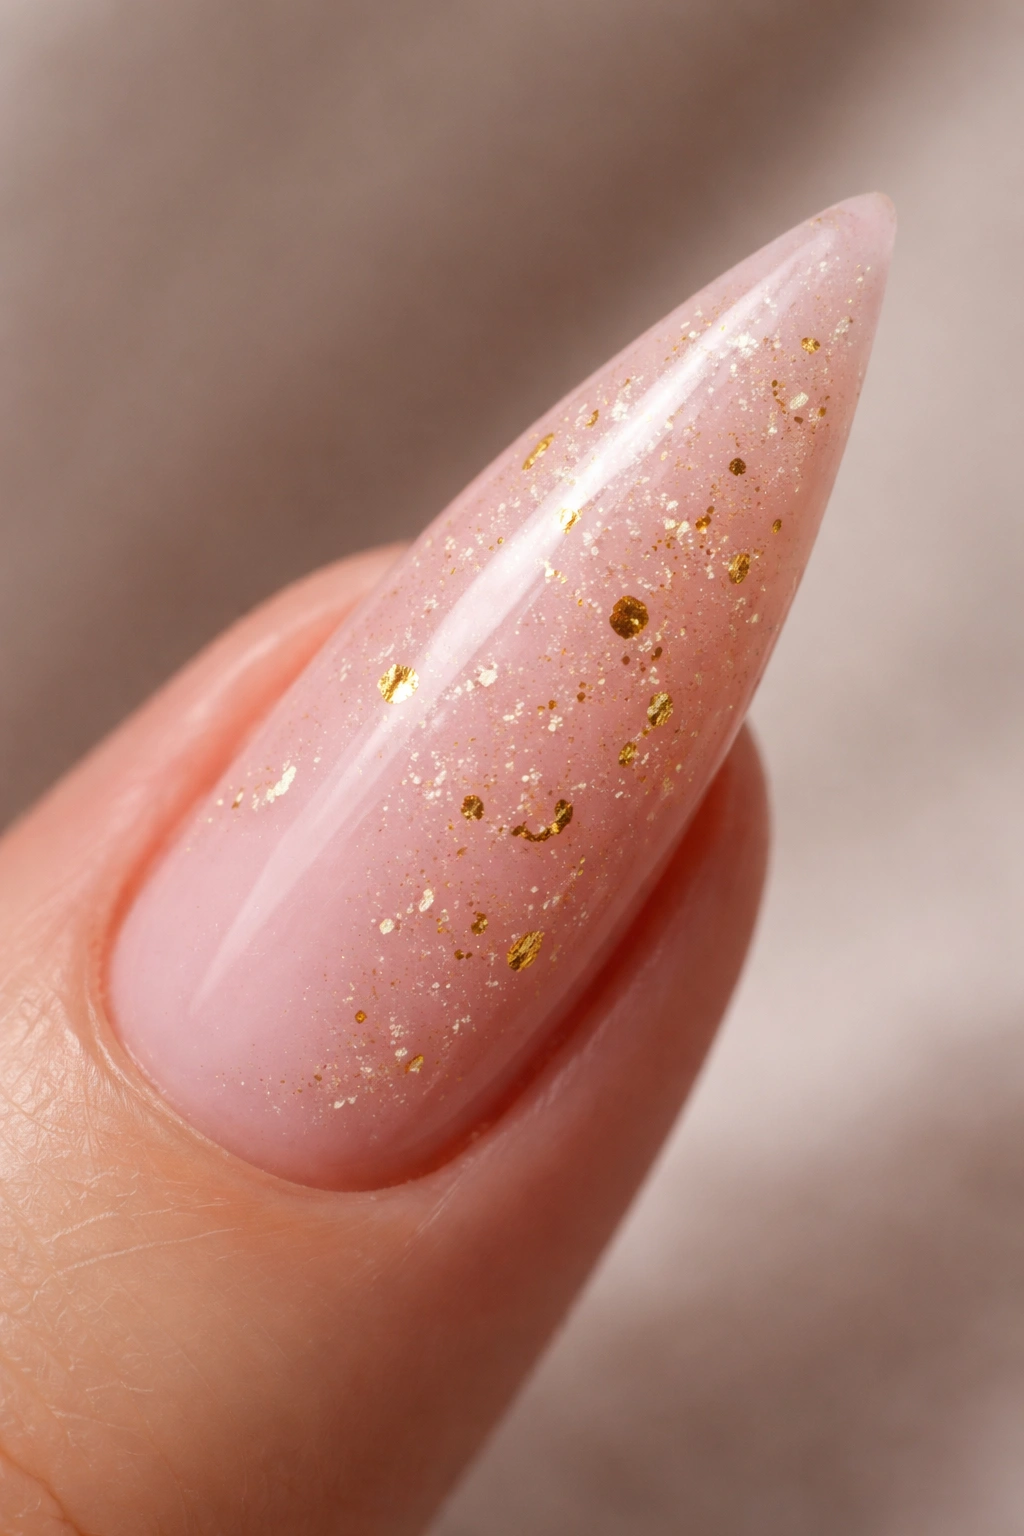
If you love the idea of incorporating gold but want to keep the overall aesthetic soft and wearable, scattered gold foil pieces on a pale pink base offer the perfect balance. This design works beautifully on stiletto nails because the pointed tip naturally draws the eye, and you can strategically place foil flecks to emphasize that shape. The randomness of the flecks keeps the design from feeling too formal, making it ideal for everyday wear.
What Makes This Approach Feel Modern
Gold foil fragments read as elevated and artisanal rather than costume-y because they’re used sparingly. The soft pink background keeps everything feeling gentle and approachable, while the flecks of metallics add just enough visual interest to show you’ve put thought into your nails. This design language is very current—it mirrors the aesthetic of minimalist luxury, where a single meaningful detail matters more than an entire busy pattern.
How to Create This Look
- Paint two coats of a pale pink base (think ballet slipper or barely-there pink)
- Tear small, irregular pieces of gold foil (don’t cut perfect shapes—the imperfection is the point)
- Press foil pieces into a thin layer of clear topcoat, concentrating them more heavily near the tip and scattered more sparsely on the nail bed
- Seal with a glossy topcoat to secure everything in place
- If using nail foil sheets, press them directly onto wet topcoat with a manicure tool, then seal
Worth knowing: Real gold or silver leaf from an art supply store often looks more refined than traditional nail foil, though it’s more delicate to work with.
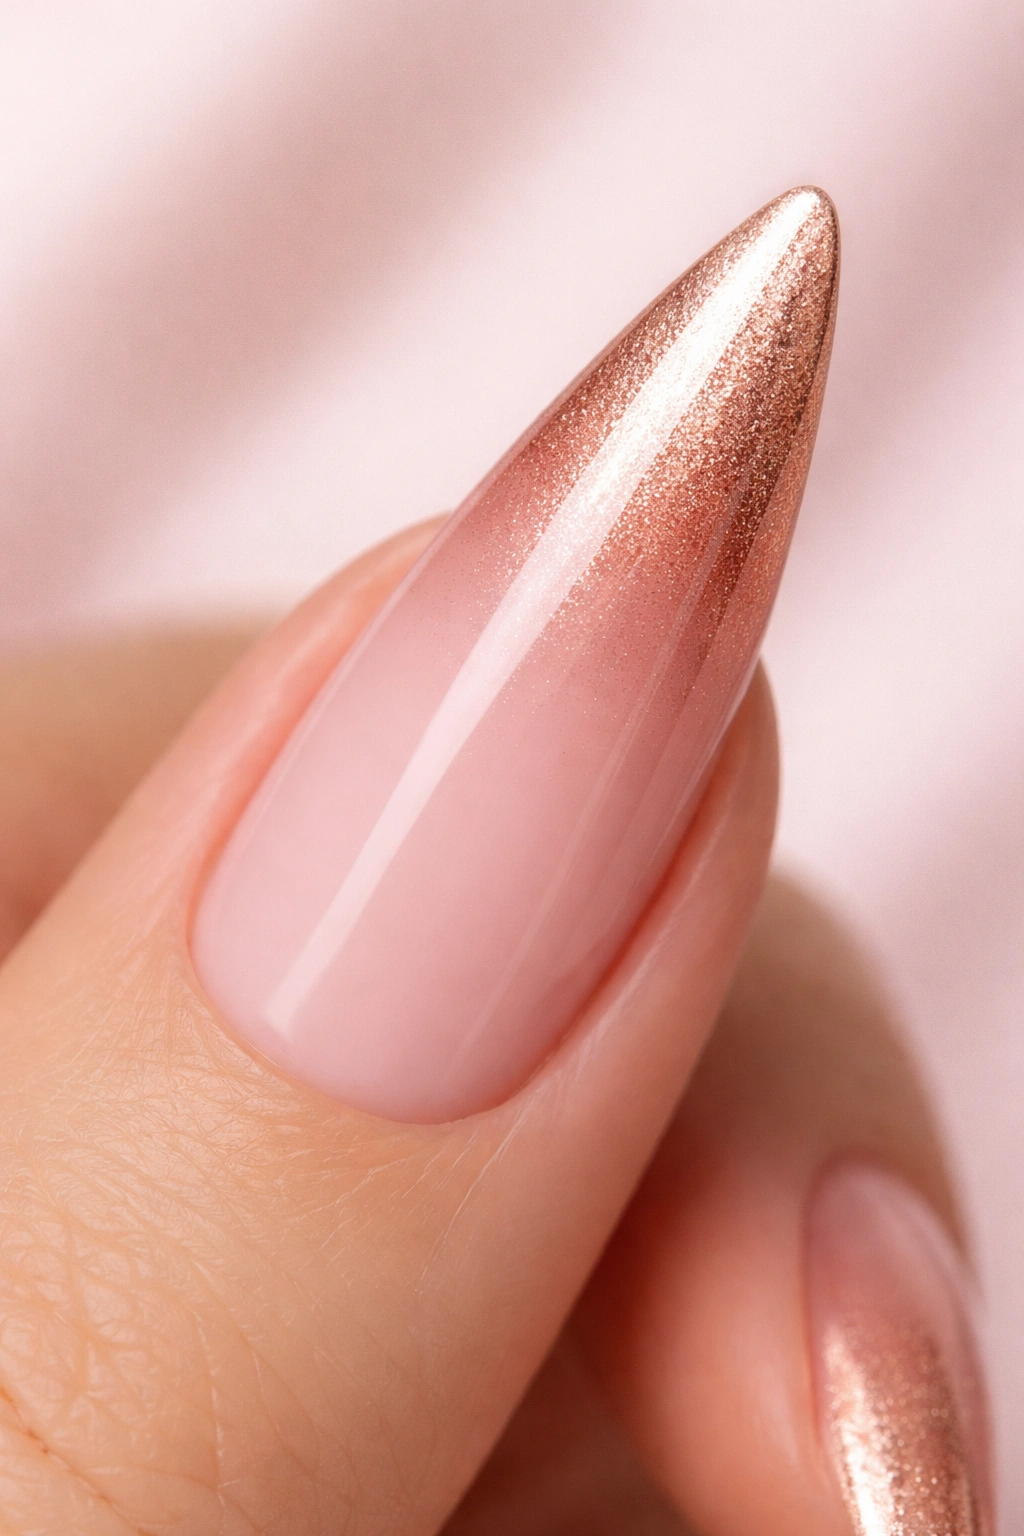
3. Ombre Pink to Gold Transition

An ombre design takes the gradient concept but pushes it further, creating a more dramatic color shift from a deeper, more saturated pink on the nail bed to vibrant gold at the tip. This approach works beautifully on stiletto nails because the sharp point becomes a natural focal point for the most intense gold tone. The effect is simultaneously romantic and bold—you’re getting visual impact without sacrificing sophistication.
The Science Behind Why This Works
An ombre gradient works on stiletto nails because of how the eye processes color and shape together. The pointed tip naturally draws attention, and when that’s where your most saturated color lives, it creates visual harmony. The deeper pink at the base provides grounding and sophistication, while the gold tip feels celebratory and confident. Together, they create a progression that feels intentional and elevated.
Application Process for Ombre Success
- Start with a nude or very light pink base coat
- Sponge on your chosen pink shade in the middle-to-base area of the nail
- Blend your gold tone into the pink, creating an overlapping transition zone
- Add pure gold to just the tip for maximum color saturation at the point
- Use light pressure when sponging to avoid harsh lines—the blend should be gradual
- Finish with a shiny topcoat to unify the design
Pro tip: Ombre works best when you use shades that are genuinely different enough to create contrast—pale pink and rose gold ombres are too similar and won’t show the gradient clearly.
4. Gold-Striped Pink Nails

Sometimes the simplest designs create the strongest impact. Thin or medium-width gold stripes running vertically down a pink background add structure and movement without overwhelming the softness of the pink base. This design reads as modern and intentional, perfect for someone who wants gold accents without full metallic nails.
Why Stripes Elevate a Basic Pink
Stripes create visual rhythm and direct the eye in a specific way. On stiletto nails, vertical stripes emphasize the nail’s length and pointed shape, making them appear even more elongated and elegant. The stripes also add a sense of movement and dynamism that a solid pink nail lacks. Gold stripes against pink also create a subtle contrast that feels high-fashion without being over the top.
Creating Clean, Precise Stripes
- Apply two coats of pink base and let dry completely
- Use a thin nail art brush or striping tool with gold polish or gel polish
- Draw stripes from the cuticle toward the tip in smooth, confident motions
- For perfectly straight lines, use striping tape as a guide—apply tape, paint over it, then remove before topcoat
- You can do all nails the same or create variation by using different stripe widths or stripe counts on each nail
- Seal with glossy topcoat for a polished finish
Insider note: If hand-painting stripes feels intimidating, nail polish strips with gold stripes exist and can look just as intentional as hand-painted ones.
5. Marble Pink and Gold Design
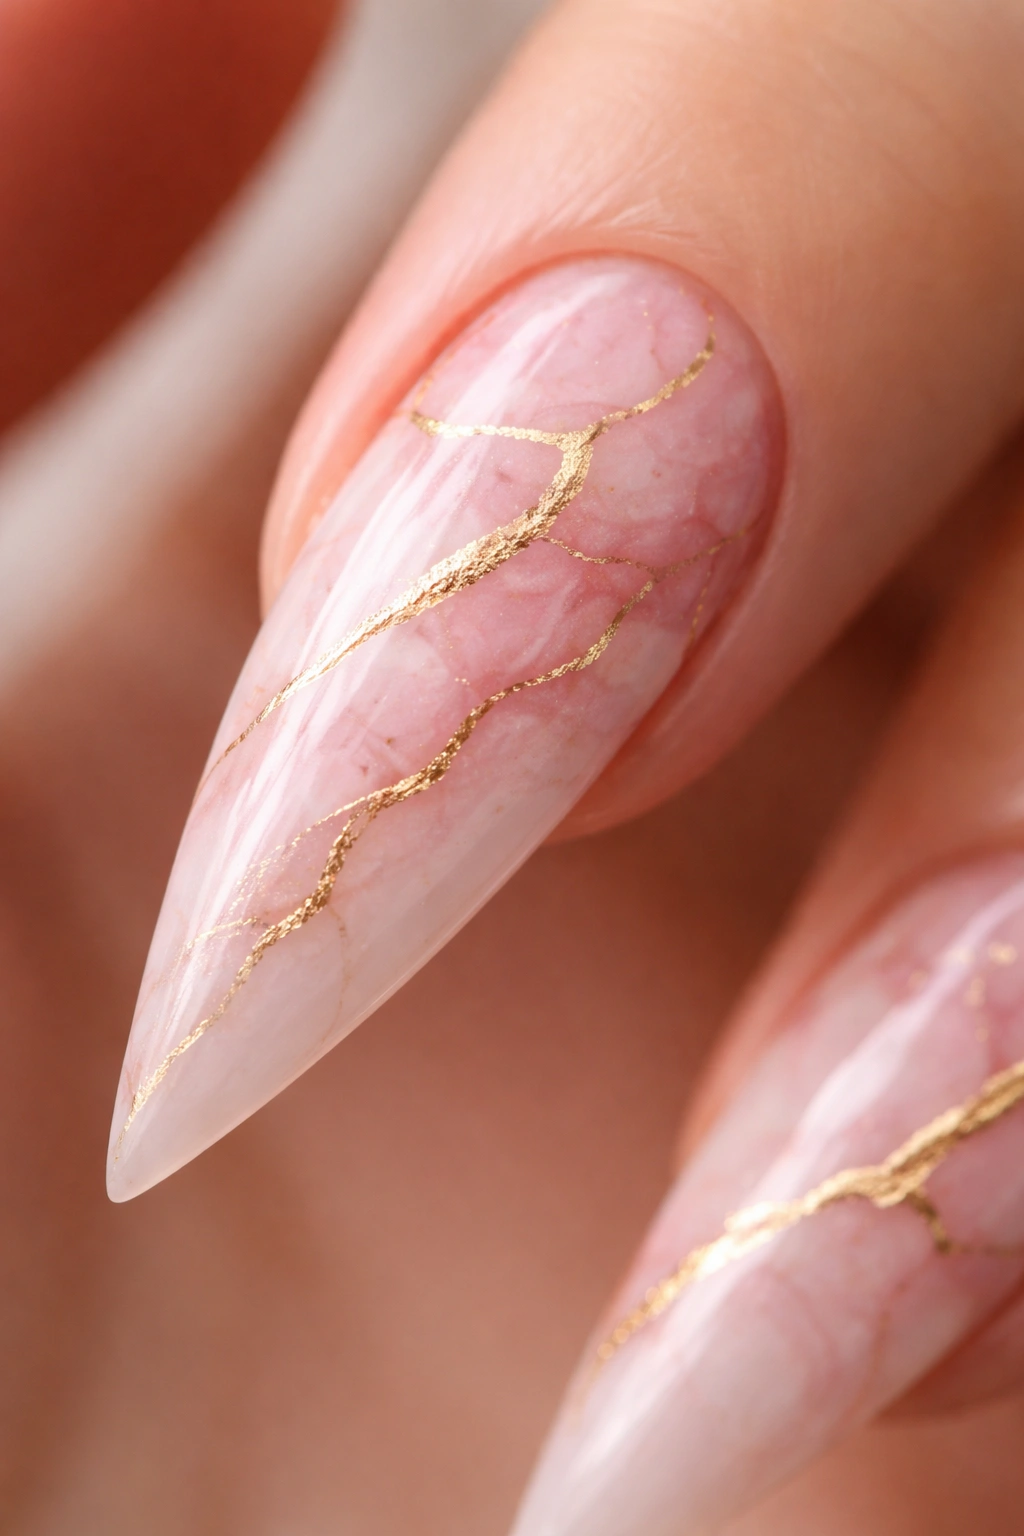
Marble patterns feel inherently luxurious, and when you execute one in soft pink with gold veining, you get a design that’s both artistic and wearable. The organic, flowing nature of marble works beautifully on stiletto nails, where the pattern has plenty of surface area to develop. This design reads as more advanced than it actually is, making it an excellent choice if you want to look like you’ve invested significant effort.
The Appeal of Marble on Stilettos
Marble patterns mimic natural stone, and there’s something about wearing nail art inspired by gemstones and minerals that feels inherently elegant. On stiletto nails, the elongated shape means the marble pattern has more real estate to display its veining and color variations. The pointed tip becomes a natural focal point where veins can converge, creating a sense of completeness to the design.
Technique for DIY Marble Nails
- Paint a base coat of soft pink and allow it to dry
- Use a thin brush to paint irregular, flowing lines and veins in gold across the nail surface
- Vary the pressure and width of your lines—some should be thin and delicate, others bolder
- Don’t aim for perfect accuracy to real marble; the beauty is in the organic, slightly imperfect quality
- Some veins should reach from one edge to another, while others should be shorter and scattered
- Seal with a glossy topcoat to enhance the appearance of depth
Worth knowing: If hand-painting marble feels too challenging, water marble techniques (dropping polish into water and transferring the pattern) can work, though they require practice and are less predictable.
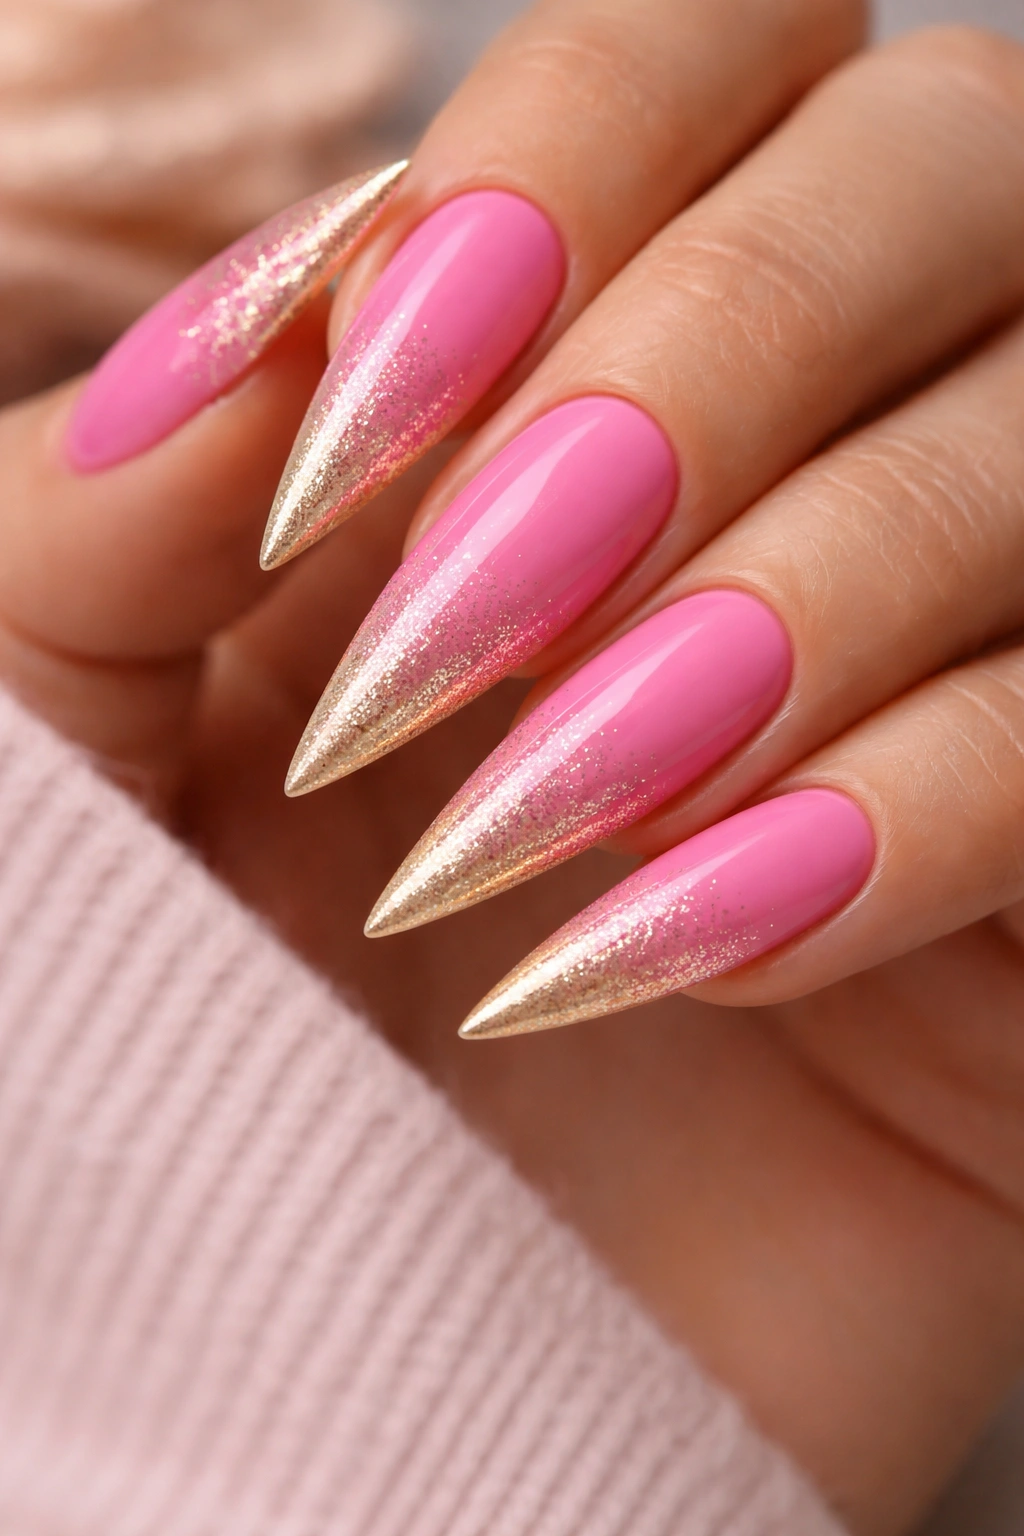
6. Glitter Gradient Pink to Gold
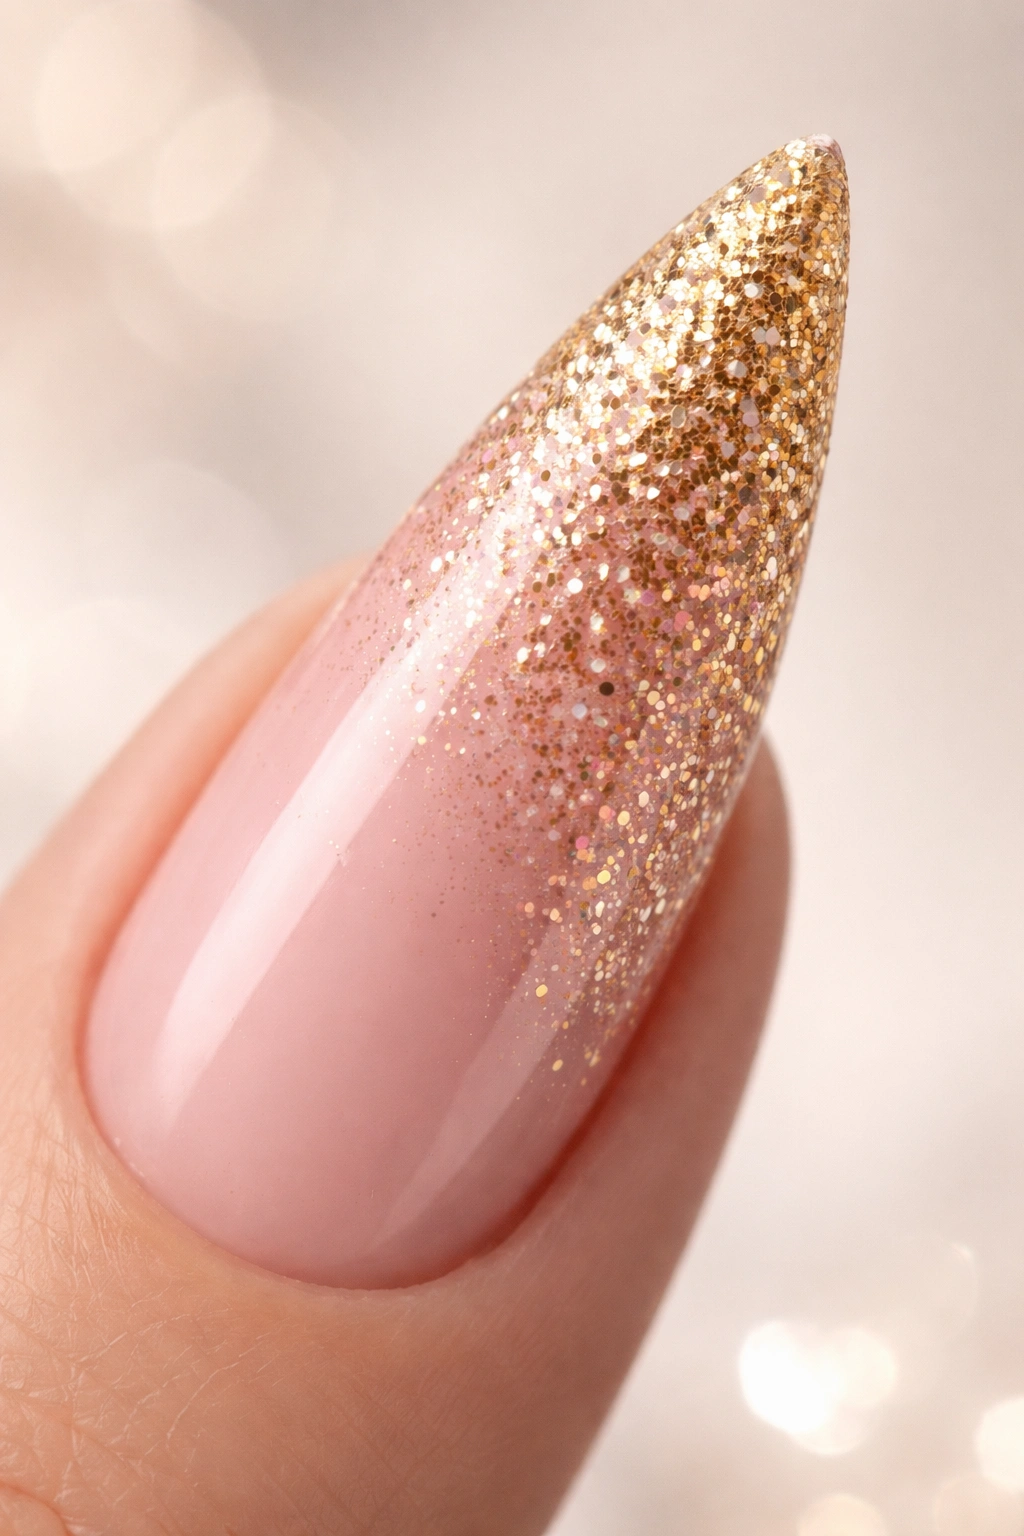
When you want something more celebratory than a simple polish gradient, glitter gradient design layers increasing amounts of sparkle as it moves toward the tip. Starting with a pink base, you gradually introduce more and more gold glitter until the tip is completely covered in a gold glitter finish. This design works especially well on stiletto nails because it builds visual interest in the direction of the point.
Why Glitter Gradients Feel Special
Glitter catches light and creates movement, which automatically makes nails feel more festive and elevated. A gradient of glitter—from sparse to dense—creates the illusion of built-up texture without actually having to apply thick glitter coatings to the entire nail. This approach is sophisticated enough for evening wear but playful enough for celebrations and special occasions.
Building a Glitter Gradient
- Paint a pink base (two coats for full coverage)
- Apply a thin layer of clear topcoat or glitter base coat in the upper portion of the nail
- Press glitter pieces into this sticky layer, concentrating more near the tip and less at the base
- Build density gradually—the transition from minimal glitter to full coverage should be gradual, not abrupt
- Once the base glitter is set, seal with another topcoat, then apply a final glitter topcoat for maximum sparkle
- Alternatively, use glitter-infused gel polish, starting with a light pink gel base and then coating with progressively glitter-dense layers toward the tip
Pro tip: Mixing different sizes of glitter particles creates more visual interest than using a single size throughout.
7. Pink Nails with Gold Geometric Patterns
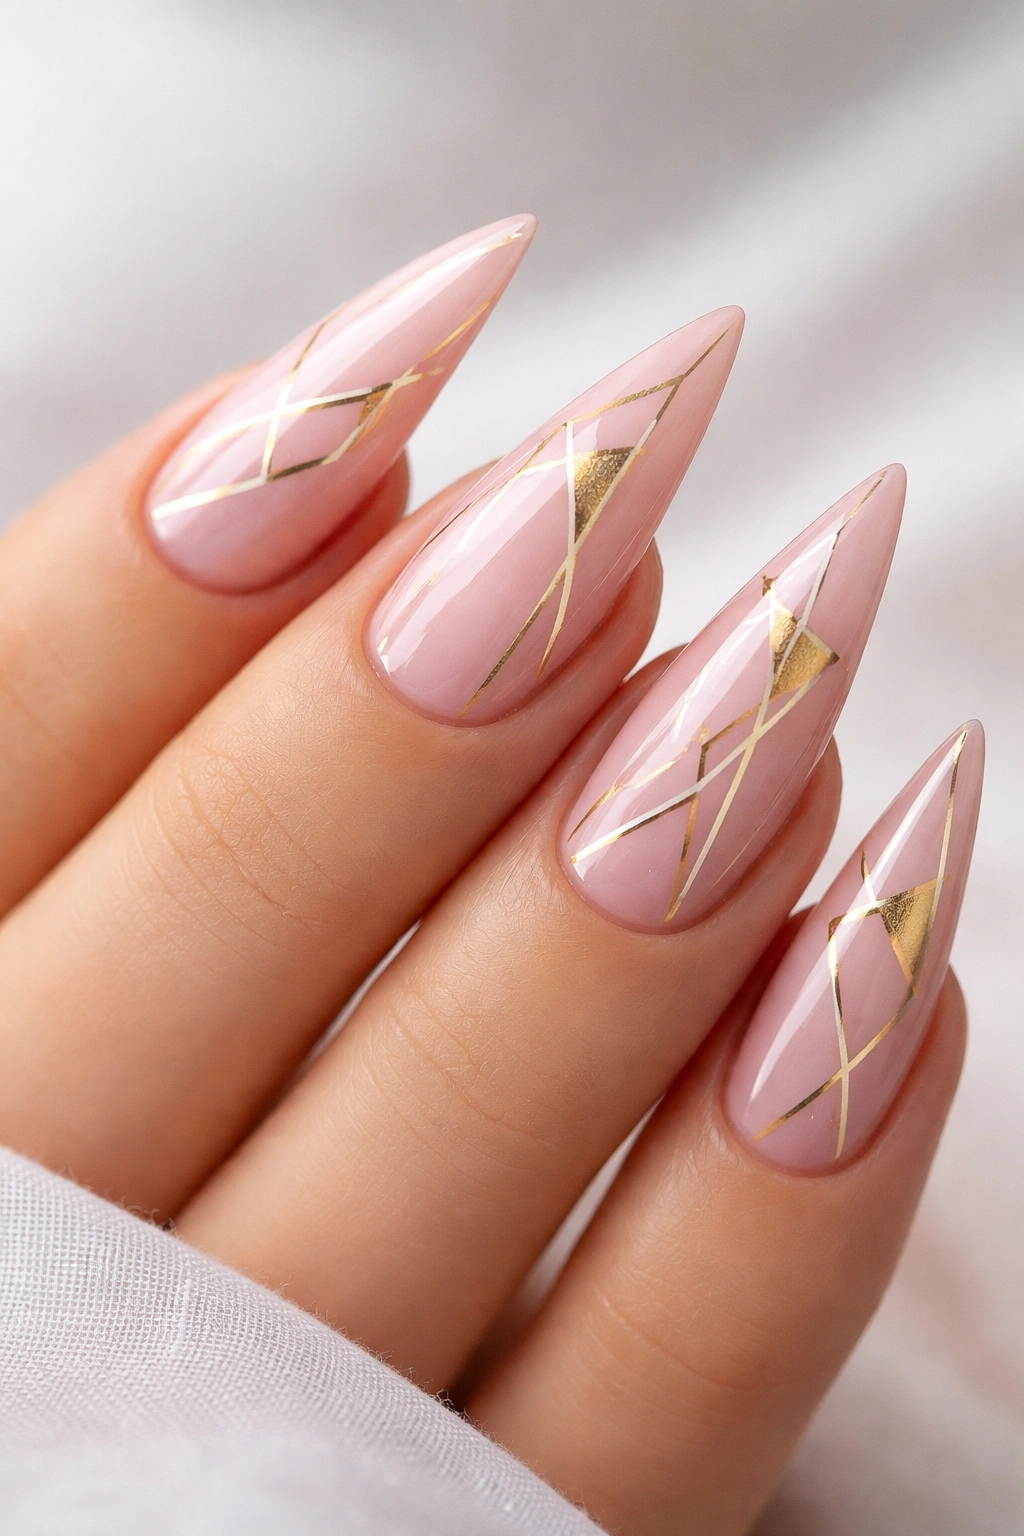
Geometry brings structure and a modern sensibility to nail art. Gold geometric shapes—triangles, lines, or angular patterns—layered over a pink base create a design that’s contemporary and sophisticated. This approach appeals to people who prefer clean lines and intentional design over soft, flowing patterns.
What Makes Geometry Work on Nails
Geometric patterns create visual order and feel intentional. They work particularly well on stiletto nails because the pointed tip can serve as the apex or focal point of geometric shapes. Whether you’re creating angular patterns that point toward the tip or geometric segments that build interest across the nail, structure creates a sense of purpose and design thinking.
Executing Geometric Designs
- Paint a pink base and let dry completely
- Map out your geometric pattern lightly with a pencil or light-colored polish
- Use a thin brush or striping tool to paint gold geometric shapes—triangles work beautifully, as do parallel diagonal lines or angular chevron patterns
- Keep shapes crisp and clean by painting deliberately rather than tentatively
- You can do the same pattern on all nails for unity or create subtle variations
- Seal with topcoat to protect the precise lines
Worth knowing: Geometric nail stickers exist if hand-painting feels too precise. High-quality nail decals can look nearly identical to hand-painted designs.
8. Soft Blush with Gold Leaf Accents

Gold leaf—actual delicate metallic sheets—creates a high-end luxury effect that’s genuinely difficult to replicate with regular polish. Against a soft blush pink base, gold leaf accents look like you’ve applied actual precious metal to your nails. This design feels more sophisticated than “nail art”—it feels like wearable luxury.
Why Gold Leaf Feels Elevated
Gold leaf has a dimensional quality that standard gold polish can’t match. It catches light differently and has a natural irregularity that reads as artisanal and considered. When applied over a soft blush pink, it creates a beautiful contrast between feminine delicacy (the pink) and opulent luxury (the gold leaf). The effect is both romantic and glamorous.
Applying Gold Leaf for Maximum Impact
- Paint a base of soft blush pink (two coats for full coverage)
- Apply a thin layer of clear topcoat or specialized adhesive base to the areas where you want gold leaf
- Tear small, irregular pieces of gold leaf (avoid cutting perfect shapes)
- Using a small tweezers or manicure tool, carefully press gold leaf pieces into the wet topcoat
- Gold leaf should adhere immediately; any pieces that don’t stick should be pressed more firmly
- Once the adhesive dries, seal everything with a topcoat to secure the leaf permanently
- You can apply more gold leaf on top of the first topcoat layer if you want double-thickness effects
Insider note: Real gold and silver leaf from art supply stores is often less expensive than specialty nail leaf and looks equally beautiful.
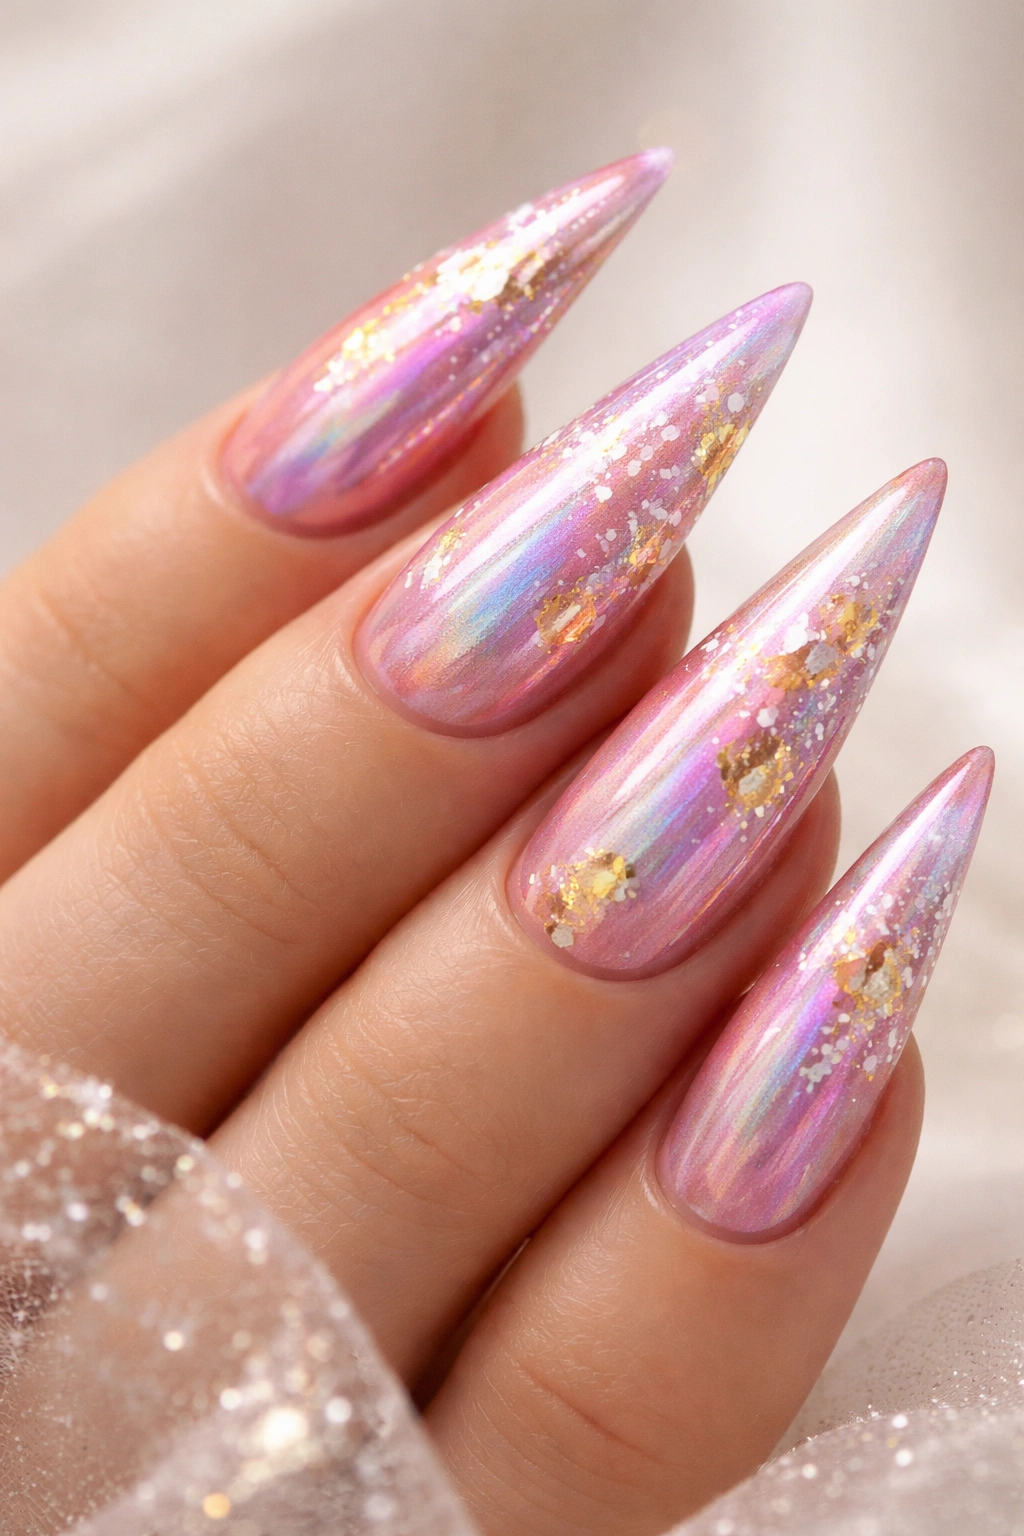
9. Pink and Gold Mirror Finish
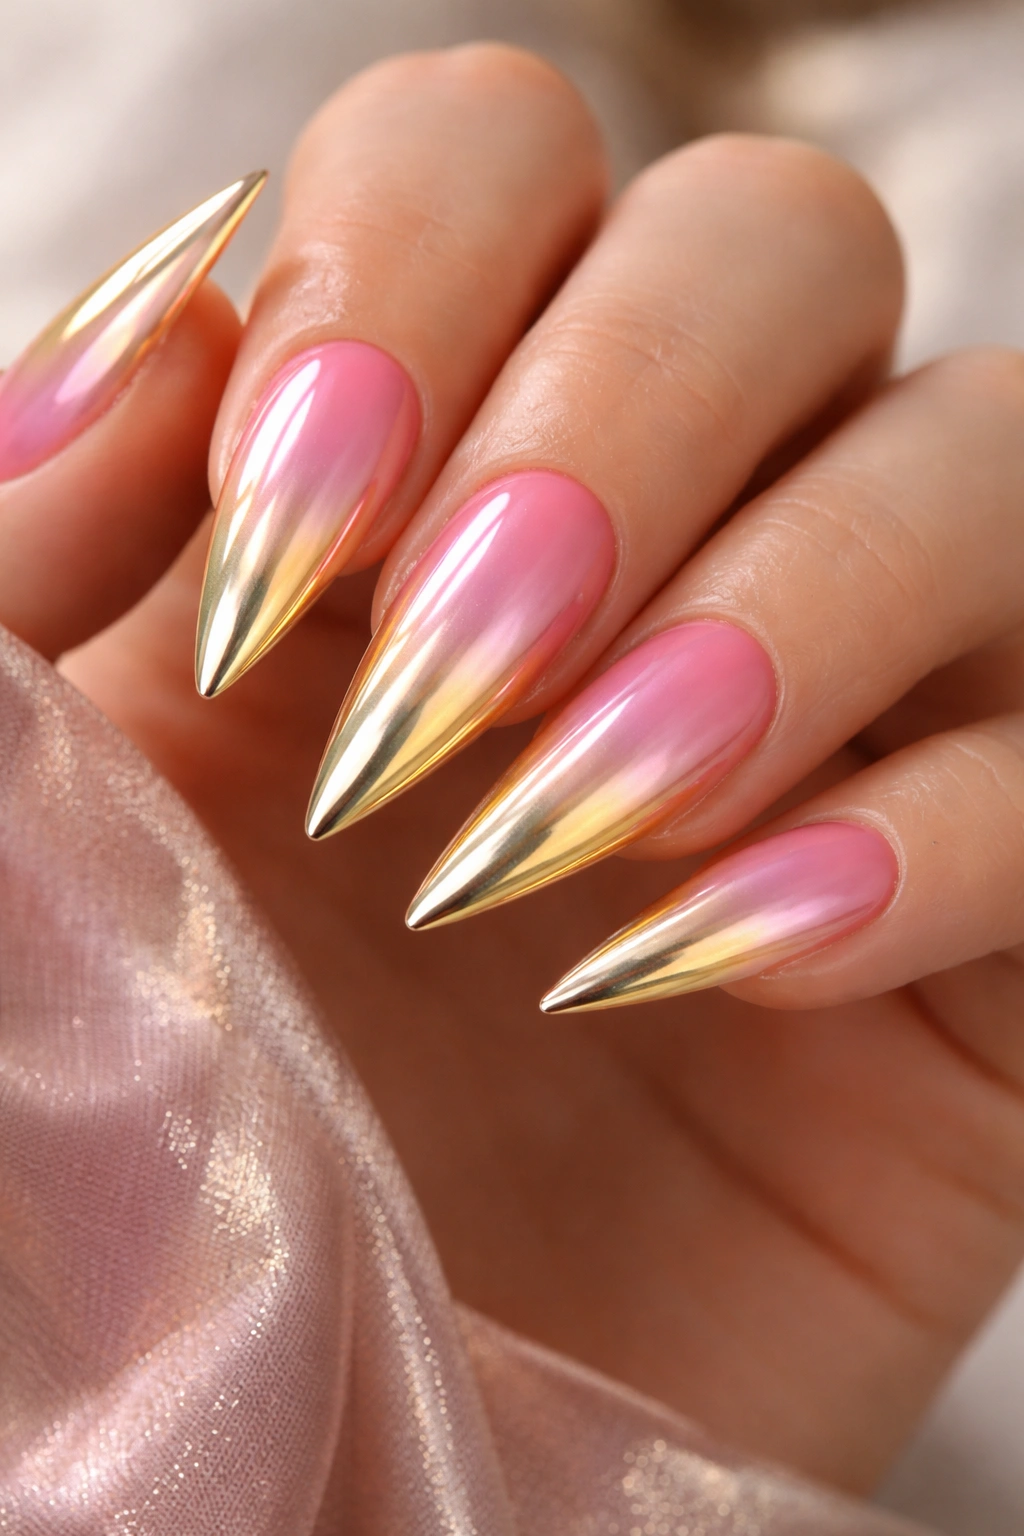
A mirror finish—also called chrome finish—is achieved using specialty chrome powder, and it creates an almost holographic, reflective surface that’s truly eye-catching. When you apply this technique over an ombre of pink-to-gold, you get nails that literally look metallic from certain angles. This is an advanced look best achieved at a professional salon, but the impact is undeniably striking.
The Technology Behind Mirror Finish
Mirror powder works by bonding microscopically to the surface of gel polish, creating a reflective coating that bounces light. On an ombre base of pink-to-gold, the mirror finish amplifies the gradient effect and creates iridescent qualities—the color seems to shift slightly depending on the angle you view it from. On stiletto nails, this means your nails literally shimmer and reflect as you move your hands.
What to Expect at a Salon
- A professional will apply your pink-to-gold ombre base in gel
- Once cured, they’ll apply a specialized topcoat or adhesive layer
- Chrome powder is then buffed onto the tacky surface with a soft brush
- The powder bonds and creates the mirror effect
- A final topcoat seals everything in place
- This is not a DIY-friendly technique unless you’ve invested in professional-grade products and practice
Worth knowing: Mirror finish nails require professional maintenance and careful handling because the finish can be damaged by rough surfaces.
10. Candy Pink with Gold Champagne Blend
If rose gold feels too muted for your taste, a true candy pink paired with champagne-toned gold creates a more playful, energetic combination. This design uses a bright, saturated pink as the base and layers warm champagne tones over it, creating a blend that’s more vibrant than subtle. This approach works beautifully for people who love color and aren’t afraid to make a statement.
Why Candy Pink Reads As Confident
Bright, saturated pinks are inherently bold and playful. They read as youthful and confident, and pairing them with champagne gold (which is warmer and more muted than pure gold) creates a combination that’s high-energy without being overly formal. This design works well for everyday wear if you love color, and it absolutely shines for parties, events, and occasions where you want your nails to be a conversation starter.
Creating the Candy Pink and Champagne Look
- Start with a bright, true pink base (two coats for vibrancy)
- Apply champagne-toned polish or gel to create a gradient or color-block effect toward the tips
- You can blend these colors together for a gradient effect or keep them more distinct for a color-block design
- If blending, use a sponge to feather where the colors meet
- If color-blocking, use tape to create a clean line between the two shades
- Seal with a topcoat that enhances both the pink brightness and champagne warmth
Pro tip: Candy pink shows color best with a glossy finish—matte topcoats will dull the vibrancy you’re going for.
11. Matte Pink with Gold Metallic Tips
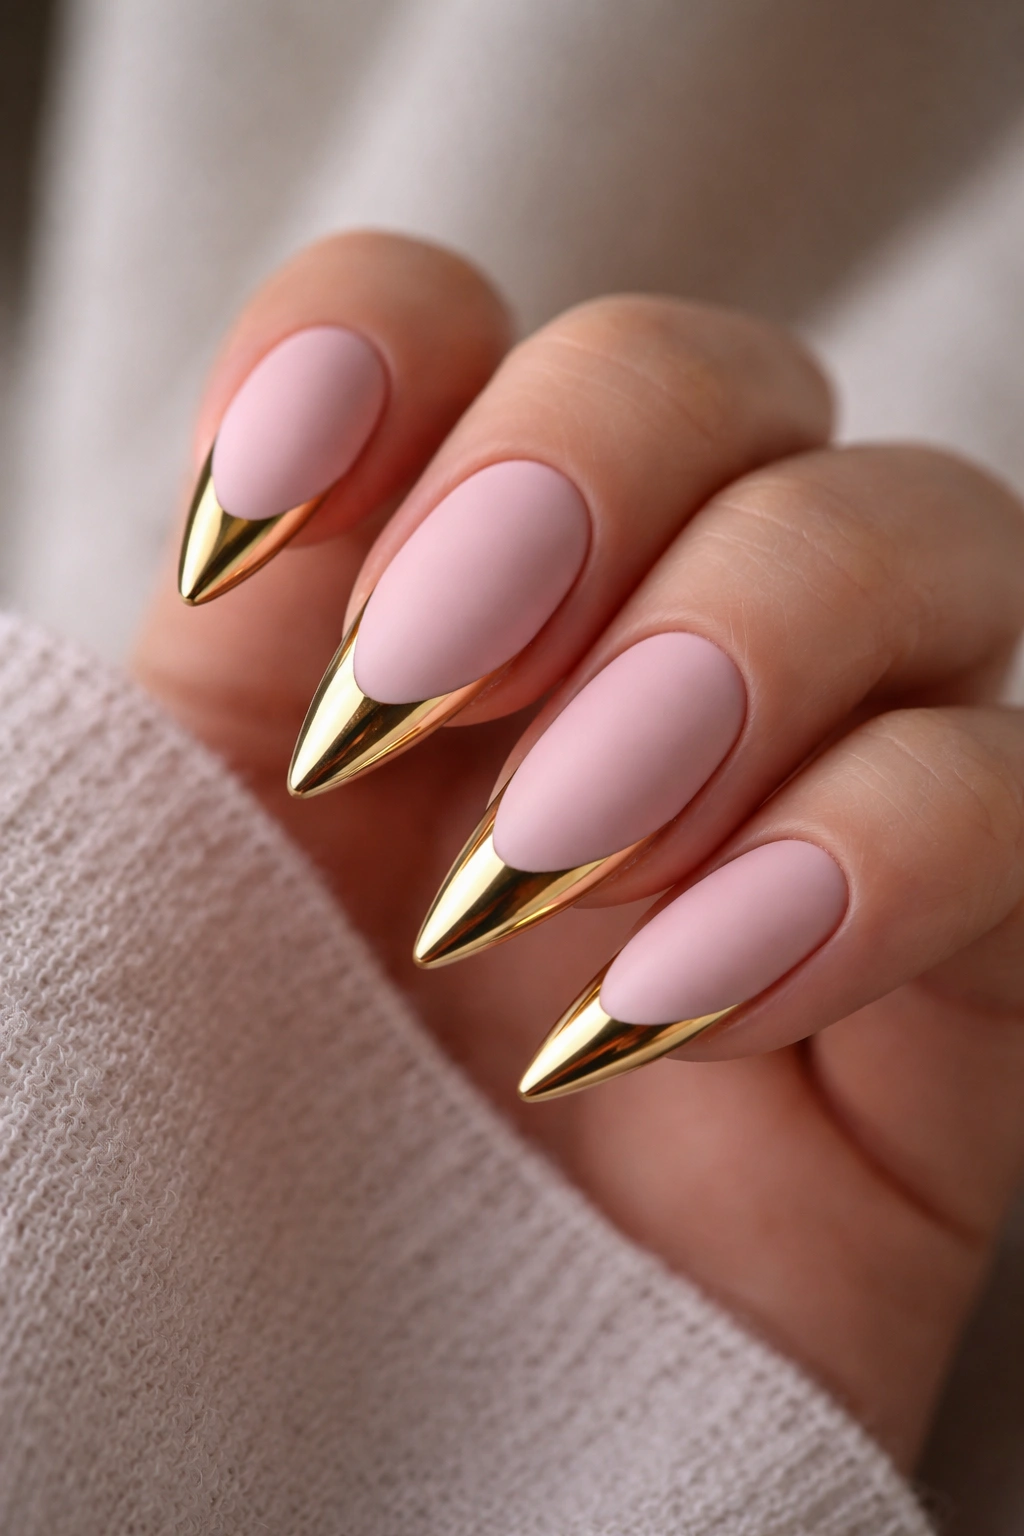
The contrast between a matte finish and metallic shine creates visual interest and modern sophistication. A matte soft pink base with metallic gold tips creates a design that’s more textural than purely color-based. The play between the soft, light-absorbing matte surface and the reflective gold tips is what makes this design compelling.
Why Texture Contrast Creates Impact
When two different finishes meet on the same nail, it creates visual tension that draws the eye. The matte pink appears softer and more subdued, while the metallic gold tips absolutely pop with shine and dimension. On stiletto nails, this contrast is particularly effective because the tip—which is naturally the focal point of the shape—is also where the most reflective, eye-catching finish is located.
Achieving Perfect Matte and Metallic Contrast
- Paint a pink base (gel or regular polish, two coats)
- If using gel, cure after the base coats, then apply a matte topcoat and cure (this gives you the matte finish)
- If using regular polish, allow the pink to dry completely, then apply a matte topcoat
- Once the matte finish is fully set, apply metallic gold polish to just the tips
- You can use striping tape to create a clean line between the matte section and the metallic tips, or you can freehand the transition for a more organic look
- Seal the entire nail with a glossy topcoat to protect everything and enhance the metallic shine on the tips
Worth knowing: Matte finishes are more delicate than glossy finishes and require more careful handling to avoid smudging.
12. Pink Floral Design with Gold Details
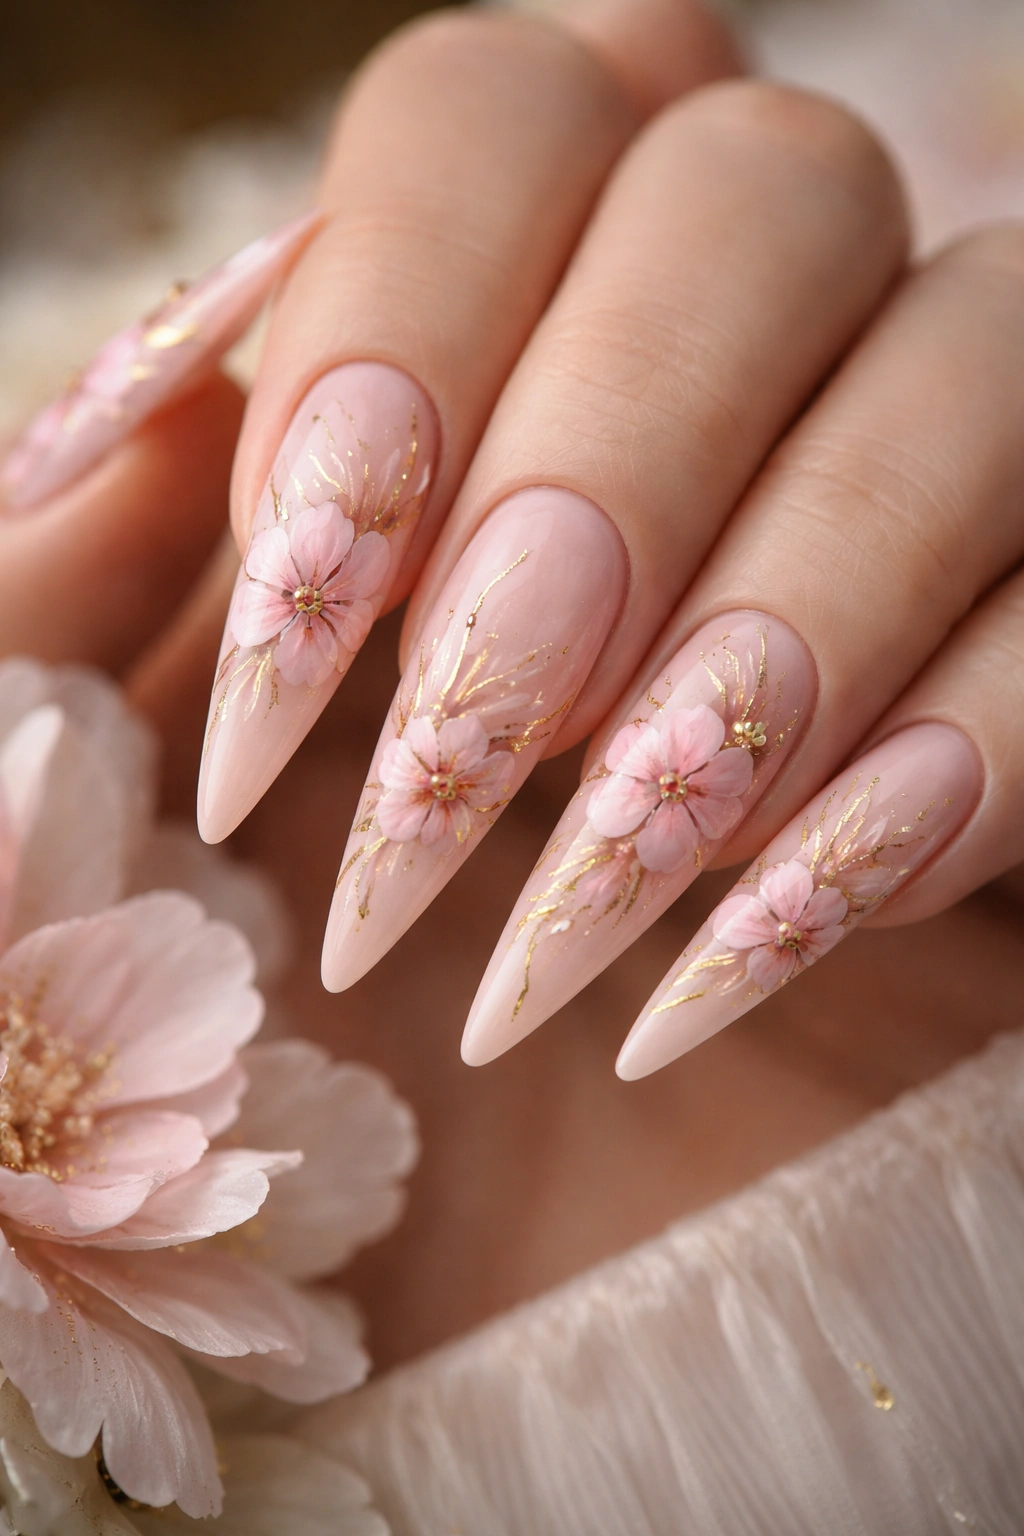
Florals add a romantic, feminine dimension to nail art. A delicate floral design painted in pink tones with gold details creates nails that feel artistic and considered. This design works particularly well on stiletto nails because the elongated shape gives you plenty of room to develop a floral pattern that looks balanced and intentional.
Why Florals Feel Timeless
Floral designs tap into a deeply aesthetic, timeless appeal. Flowers are inherently beautiful, and translating them onto nails creates a sense of wearable art. When you add gold accents—perhaps gold stems, gold centers to flowers, or gold leaf-like details—you elevate the design from pretty to sophisticated.
Painting Florals with Gold Accents
- Start with a soft pink base and let dry completely
- Using a small brush and pink or deeper rose tones, paint simple floral shapes—think small roses, delicate petals, or abstract flower suggestions
- Don’t aim for photorealistic detail; stylized, slightly simplified flowers read more elegantly on nails
- Once the flowers are dry, add gold details: thin gold stems, gold stamen in flower centers, or gold outlines around petals
- You can scatter flowers across the nail or concentrate them in certain areas (like near the tip)
- Seal with a glossy topcoat to protect the design
Pro tip: If hand-painting florals feels too challenging, nail art decals of floral designs exist and can look beautiful when sealed properly.
13. Holographic Pink with Gold Accents
Holographic finishes create an almost otherworldly, rainbow-reflective quality that’s genuinely captivating. When you apply holographic techniques with a pink base and add gold accents, you get nails that feel futuristic while maintaining the softness of pink. This is an advanced look that showcases specialty products and technique.
What Makes Holographic Finishes So Striking
Holographic finishes work by utilizing light-reflecting particles that create rainbow effects as light hits the nail from different angles. On a pink base with gold accents, the holographic effect amplifies the sense of dimension and makes your nails look almost alive—the colors seem to shift and change as you move. This is one of the most eye-catching finishes available in nail art.
Creating a Holographic Pink and Gold Look
- Apply a pink gel base (two coats)
- Once cured, apply a holographic topcoat or use holographic powder on a tacky layer
- The holographic finish will create rainbow-reflective effects across the entire nail
- Add gold accents: you can paint thin gold lines, add gold foil pieces, or apply gold glitter strategically
- The gold acts as an anchor point for the eye against the busy holographic backdrop
- Seal everything with a glossy topcoat to protect and enhance shine
- This requires gel polish and professional products for best results
Worth knowing: Holographic finishes look completely different depending on lighting—they’re subtle indoors but absolutely stunning in natural light or sunlight.
14. Minimalist Pink with Gold Line Art
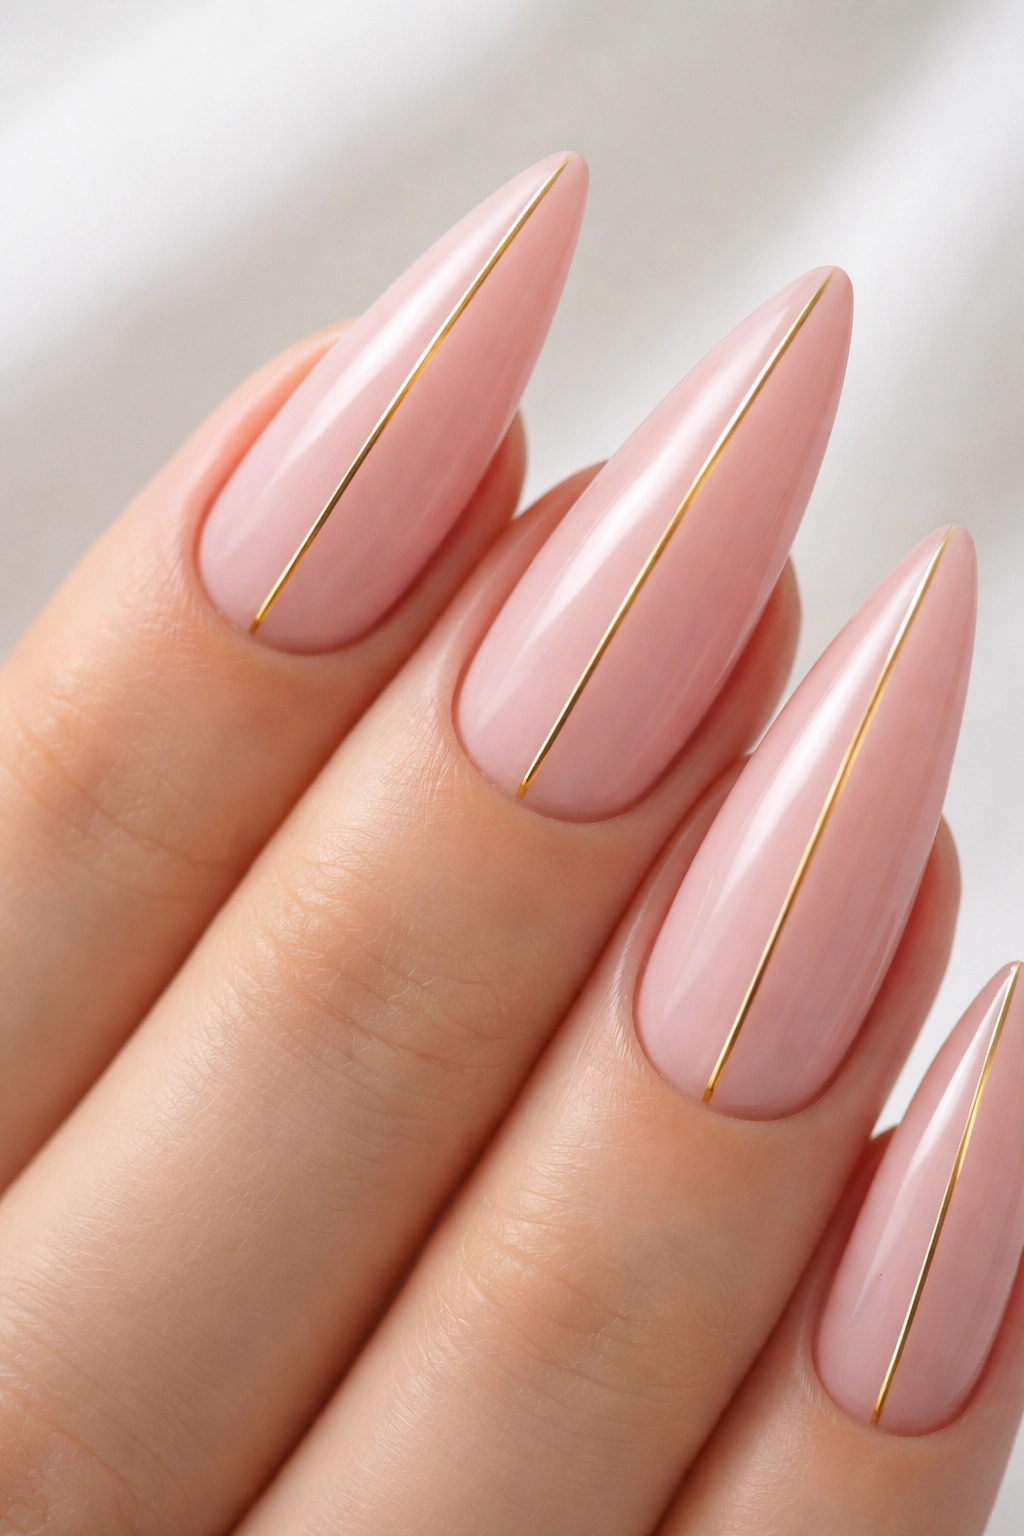
Sometimes the most sophisticated designs are the simplest ones. A solid soft pink base with minimal gold line art—perhaps a thin gold stripe down the center, or delicate line-work that mimics jewelry or geometry—creates an understated elegant look. This design appeals to minimalists who want their nails to be refined rather than attention-grabbing.
Why Less Is More in Nail Design
Minimalism is a deliberate aesthetic choice, not a default due to lack of skill. A single meaningful gold line or pattern on a soft pink background reads as more considered and intentional than a busy, multi-element design. On stiletto nails, this restraint actually emphasizes the shape itself—the elongated point becomes the design, and the minimal gold accents enhance rather than compete.
Executing Minimalist Line Art
- Paint a soft pink base and let dry completely
- Using a thin brush or striping tool, paint one or more thin gold lines
- These could be: a single vertical stripe down the center, a thin gold outline just inside the edge of the nail, or delicate line-work that resembles minimalist jewelry design
- Keep the gold element(s) clean and precise—perfection matters more in minimalist designs
- Some designs work beautifully with gold only on the tip, while others feature gold running the full length of the nail
- Seal with a glossy topcoat to protect the lines and enhance shine
Insider note: Striping tape is your friend here—create guides with tape to ensure perfectly straight, symmetrical lines.
Final Thoughts

Pink and gold on stiletto nails is endlessly versatile precisely because there are so many ways to combine these two colors. Whether you gravitate toward soft, romantic aesthetics or bold, statement-making designs, there’s an approach that resonates with your personal style. The key is choosing a design that feels authentically you—that you’ll enjoy wearing and that makes you feel confident when you catch your nails in your peripheral vision throughout the day.
The technical skills required range from simple solid colors with minimal accents to more advanced techniques like mirror finishes and holographic effects. If you’re new to nail art, starting with simpler designs like the soft pink with gold foil flecks or the minimalist pink with gold lines allows you to build confidence before progressing to more complex techniques. The beautiful thing about stiletto nails as a canvas is that even simple designs feel elevated simply due to the elegant shape.
Remember that your nail technician is a valuable resource if you find any of these designs intimidating. Bringing reference photos or describing what appeals to you about a particular design helps them execute your vision. And if you’re doing these at home, take your time—rushing leads to mistakes, while patience leads to nails you’ll genuinely love wearing. Pink and gold is a timeless combination for good reason: it works, it feels good, and it makes your hands look intentionally beautiful.
