

Stiletto nails have become the ultimate power move for anyone who wants bold, elegant, statement-making hands. The sharp, elongated shape demands attention and commands confidence—whether you’re heading to a formal event or just want to feel like you’ve got your life together on an ordinary Tuesday. What makes stilettos so irresistible isn’t just the shape itself, but the endless creative possibilities for color, texture, and embellishment that come with it.
The beauty of stiletto nails lies in their versatility. They work with minimalist designs that let the shape speak for itself, but they also serve as a perfect canvas for intricate art, bold colors, and glamorous details. A simple stiletto with a single color can look sophisticated and timeless, while an ornate design with gems and metallic accents transforms them into wearable jewelry. The key is choosing a design that aligns with your personal style, lifestyle, and the occasions you dress for most often.
Right now, there’s an exciting mix of trends circulating among nail artists and enthusiasts—everything from classic luxury aesthetics to experimental art techniques. Some designs play with contrast and dimension, while others lean into maximum drama with bold hues and sparkle. Whether you’re drawn to understated elegance or full-on glamour, there’s a stiletto nail idea here that’ll make you want to book an appointment immediately.
1. Classic Red Stilettos with Gold Accents
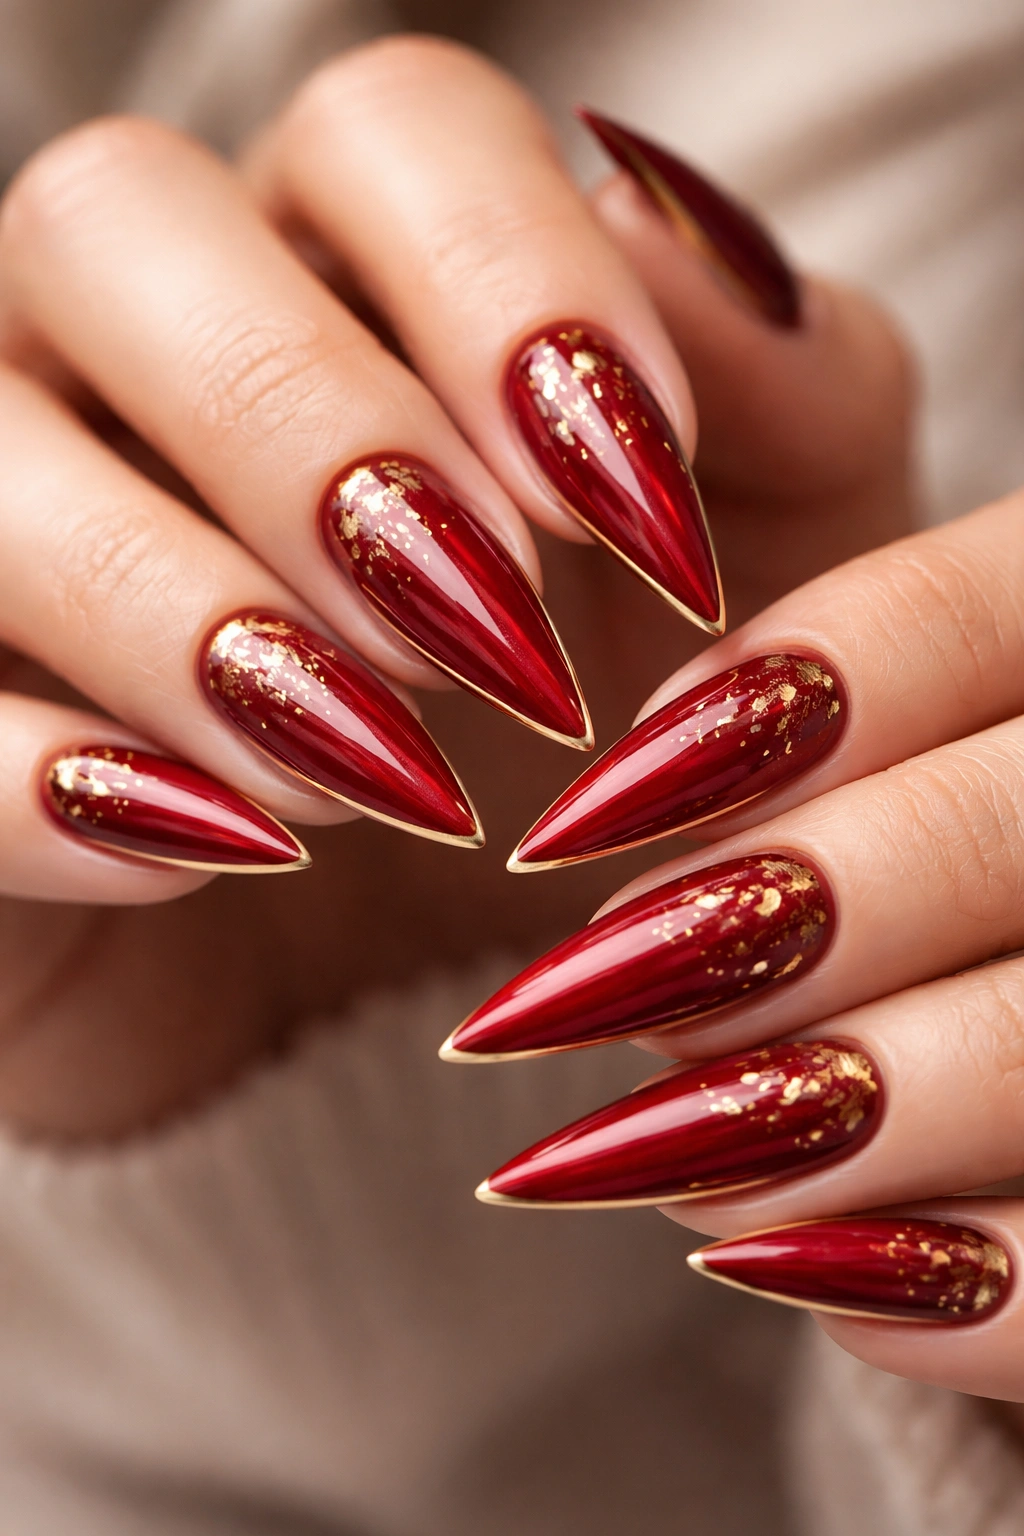
Red is the undisputed queen of stiletto nails, and for good reason. A true crimson red on a stiletto shape instantly elevates any look and feels inherently luxurious and intentional. What takes this timeless design to the next level is the addition of strategic gold accents—whether that’s a delicate gold stripe along the side, a thin gold outline around the nail, or small gold foil flecks scattered across the surface.
Why This Combination Never Goes Out of Style
Red and gold together tap into a sense of classic luxury that transcends trends. The warmth of gold complements the boldness of red beautifully, creating a sophisticated interplay rather than a chaotic clash. Red stilettos with gold details feel equally at home at a wedding, a night out, or even a power meeting where you want to signal confidence and refinement. The contrast between the dramatic nail color and the delicate gold accent creates visual interest without veering into busy or overwhelming territory.
How to Make This Design Your Own
- Use a deep, true red rather than orange-red or burgundy for maximum classic impact
- Apply gold accents as a thin line down the center or along one edge for elegant simplicity
- Layer thin gold foil or flakes into the topcoat for a more textured, dimensional effect
- Add a single small gold stud or rhinestone near the tip for extra glamour
- Combine matte red with glossy gold accents for an unexpected modern twist
Pro tip: Keep the gold accents minimal and intentional—too much metallic detail can make the design feel costume-y rather than chic. Let the red remain the main event.
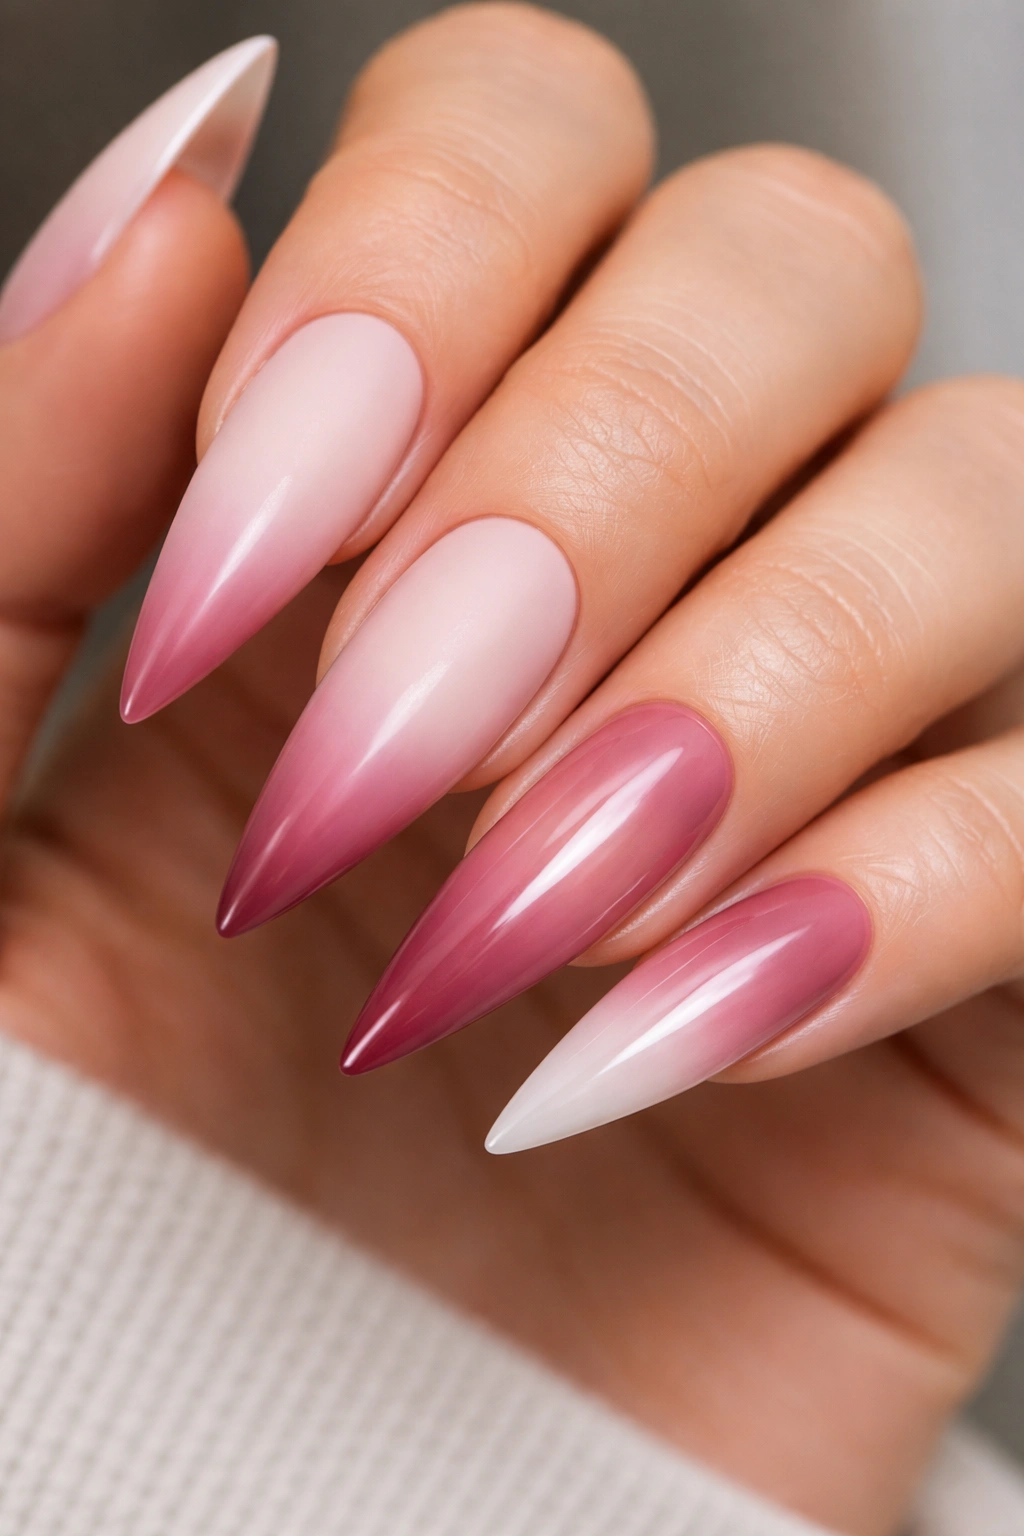
2. Ombre Gradient Stilettos
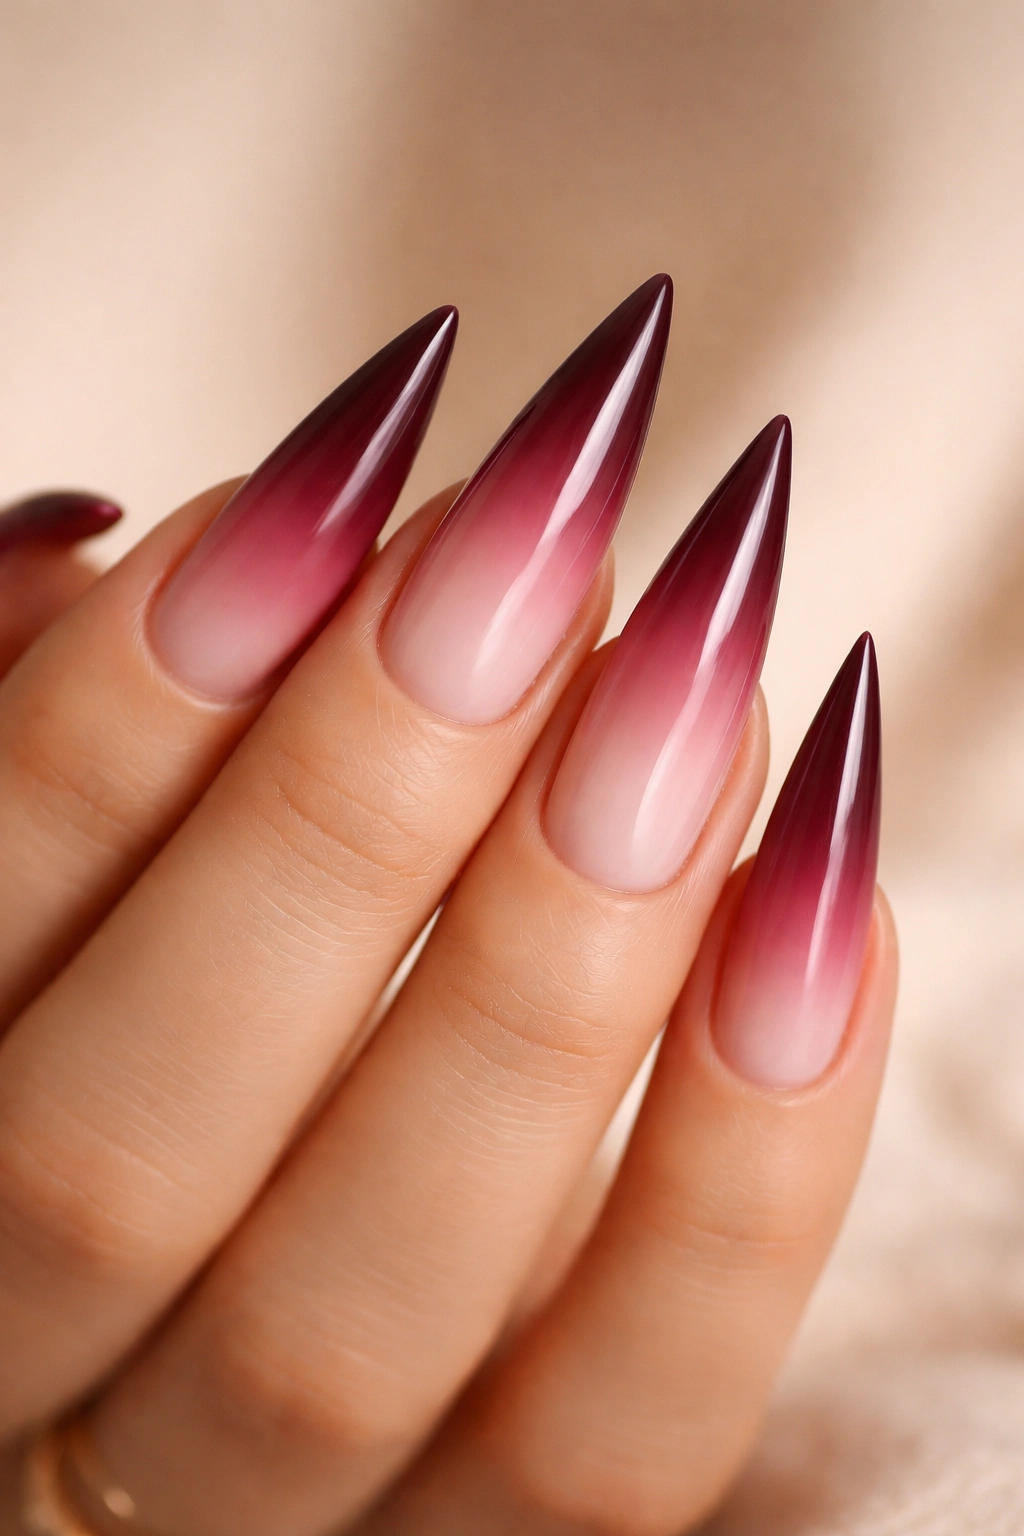
Ombre on stilettos creates a stunning visual illusion of depth and movement. Rather than sitting flat on the nail, color seems to flow and shift, which is especially striking on the elongated surface of a stiletto shape. The gradient might fade from a dark shade at the base to a lighter version at the tip, or transition from one color family entirely to another—like soft pink to deep burgundy, or pale gold to rich bronze.
The Psychology of Gradient Designs
Gradient nails work so well on stilettos because they create the illusion of length and elegance. The eye naturally follows the color transition from base to tip, which actually makes the nail appear longer than it is. This is part of why ombré designs feel so inherently flattering and why they photograph beautifully. The subtle color shift also means the design reads as sophisticated and intentional rather than random or accidental.
Achieving a Flawless Gradient Effect
- Use a sponge application method to blend two or three complementary colors together smoothly
- Choose colors within the same undertone family (warm to warm, cool to cool) for a cohesive blend
- Practice blending on the sponge before applying to your actual nails—this makes the difference between a gorgeous gradient and a muddy mess
- Seal the gradient with a glossy top coat to add shine and lock the colors in place
- Consider adding a thin gold or silver line at the midpoint where colors meet for extra definition
3. Geometric Metallic Designs
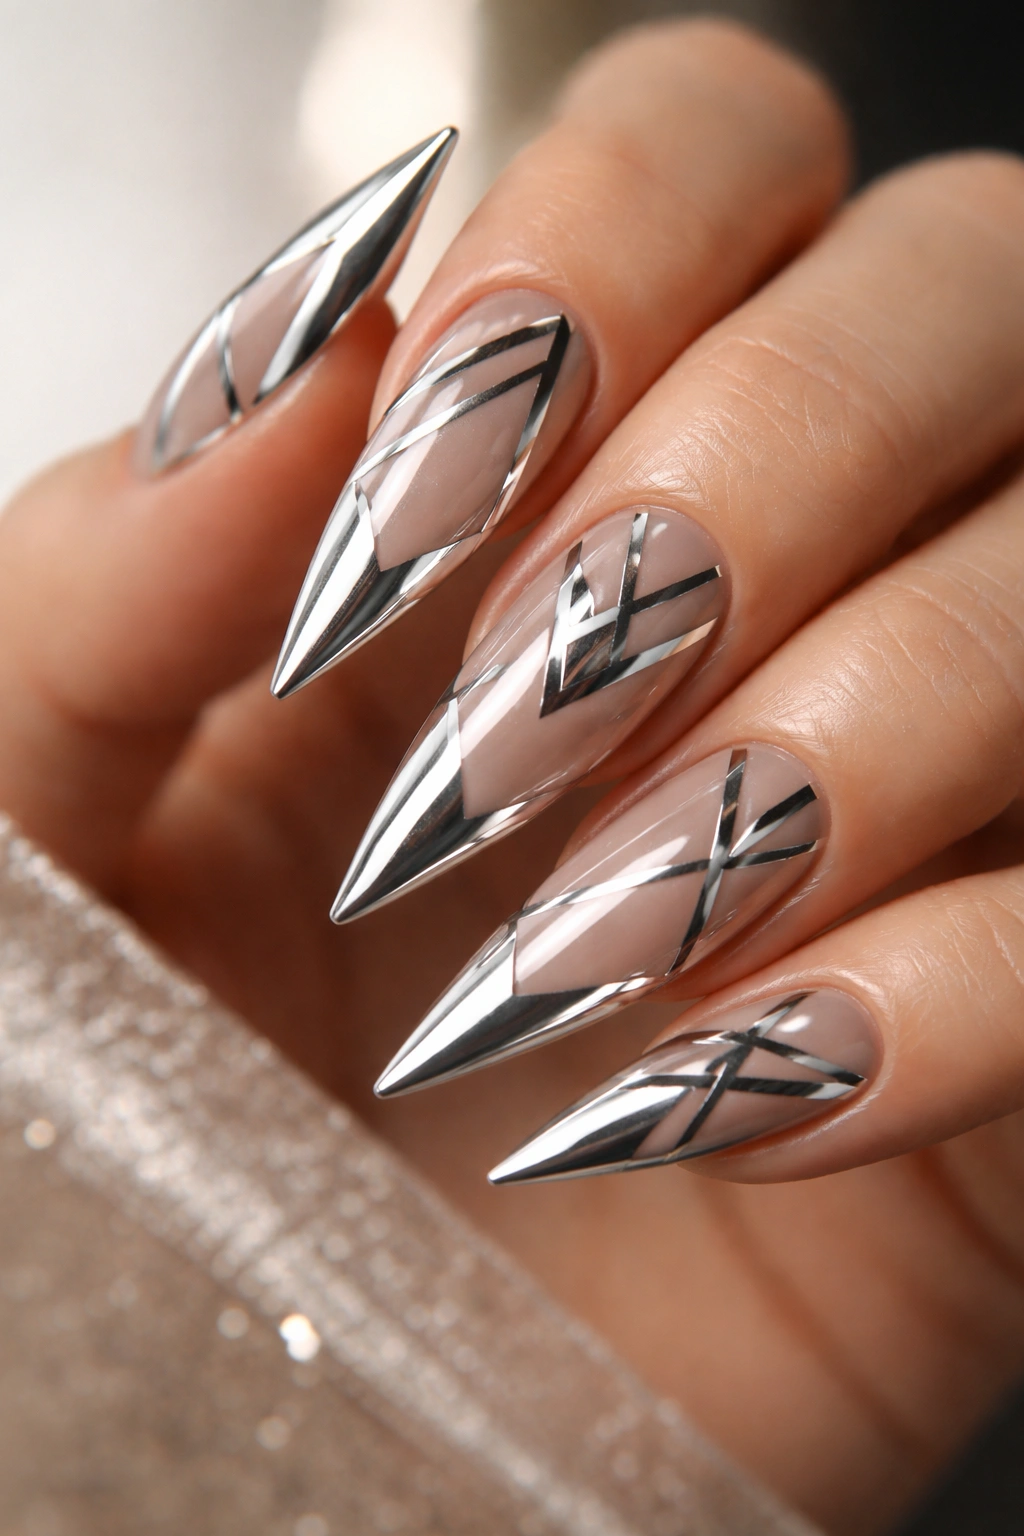
Geometric patterns on stilettos—think sharp triangles, clean lines, bold stripes, or asymmetrical shapes—feel contemporary and bold. When executed in metallic finishes, they become downright architectural. Chrome, holographic, and mirror finishes take geometric designs from simple line art into the realm of wearable sculpture. These designs appeal to anyone who loves modern art, minimalism, or statement-making style.
Why Geometric Patterns Suit Stilettos Perfectly
Stilettos are inherently dramatic and architectural shapes themselves, so geometric patterns feel like a natural extension of that aesthetic. Rather than fighting against the sharp point, geometric designs emphasize and celebrate it. The contrast between negative space (bare or nude base) and metallic geometric shapes creates a visual impact that’s impossible to ignore. These designs also tend to be timelessly modern—they won’t feel dated the way some trend-driven designs might.
Techniques for Crisp, Precise Lines
- Use thin striping brushes or nail art pens for clean, deliberate lines
- Apply a base layer of nude or matte black, then add metallic accents on top for contrast
- Create negative space by leaving sections of the nail bare or a contrasting color
- Experiment with asymmetrical designs where patterns appear only on some nails, not all ten
- Combine matte base colors with ultra-glossy metallic accents for maximum dimension
Worth knowing: Geometric designs require a steady hand or the right tools. If freehand application isn’t your strength, consider going to a nail artist who specializes in nail art—the precision will make all the difference in how polished the final result looks.
4. Nude Stilettos with Rhinestone Details
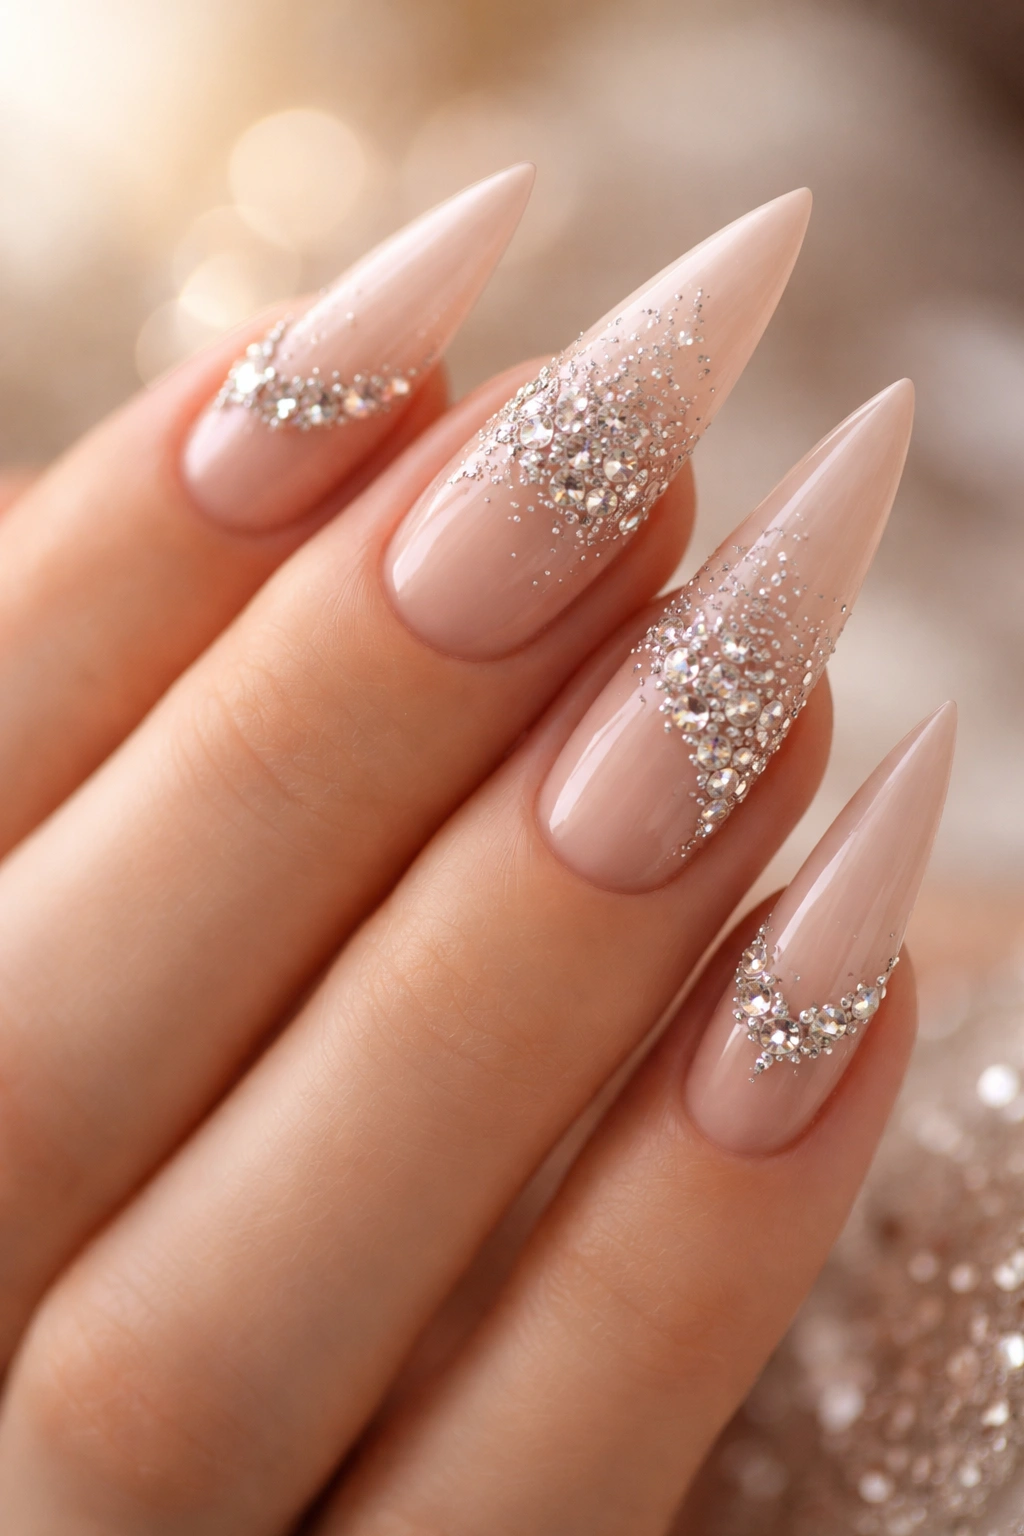
Nude stilettos are the ultimate chameleon—they elongate the finger, feel effortlessly chic, and work with virtually any outfit or occasion. What elevates them from basic to show-stopping is strategic rhinestone placement. A sparse scattering of stones near the tip, a glittering gradient that fades from densely packed gems at the nail tip to bare nail at the base, or a constellation of small stones across the surface transforms the design into something genuinely luxurious and eye-catching.
The Power of Understatement
There’s something deeply sophisticated about nude nails with gems. Rather than competing with bold color, the gems become the focal point, and their sparkle is actually more noticeable against the neutral backdrop. This design works for someone who wants their nails to feel fancy and intentional without being loud or overly dramatic. The nude-and-rhinestones combination also reads as appropriate for more conservative professional settings while still feeling special and polished.
Applying Gems Without Disaster
- Use a slightly sticky topcoat or nail glue specifically formulated for gems to ensure stones stay put
- Place larger rhinestones strategically rather than densely covering the nail
- Create a gradient by placing more stones at the tip and fewer toward the base
- Use tweezers or a rhinestone picker tool for precise, controlled placement
- Seal everything with a thick, glossy top coat to protect stones and create a smooth surface
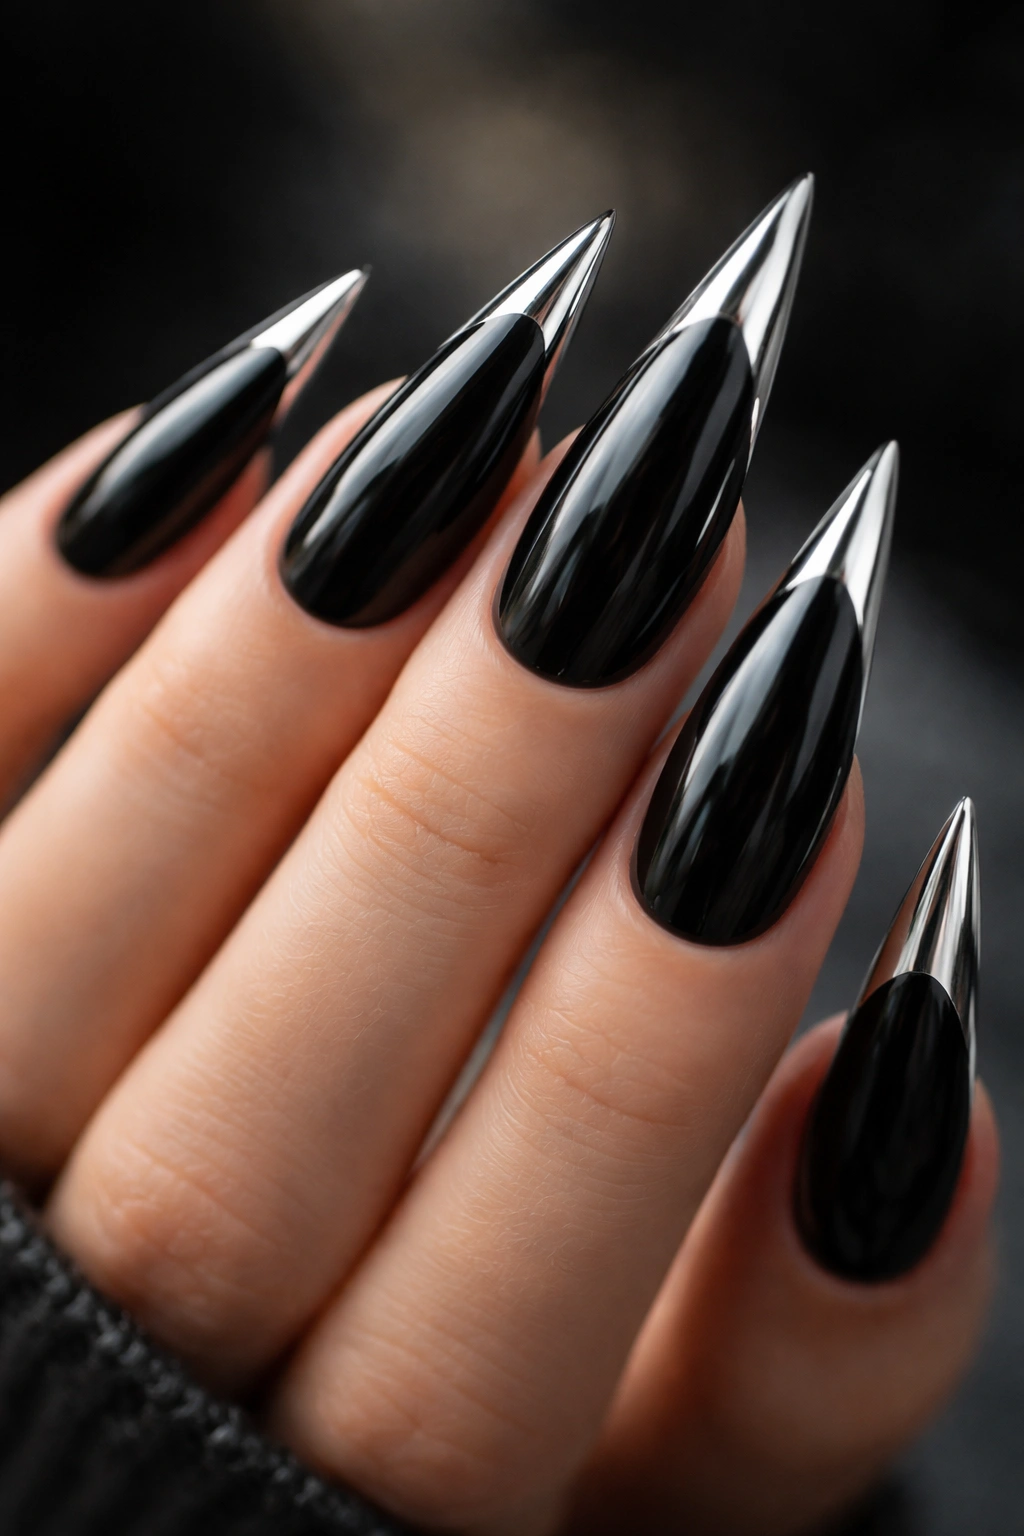
5. Dark Glossy Black with Chrome Tips
Jet-black stilettos already command attention, but adding a chrome or mirror-finish tip creates an edgy, futuristic look that’s simultaneously elegant and rebellious. The stark contrast between the matte or glossy black and the reflective chrome creates a visual pop that feels very current. This design appeals to anyone with an edge—goths, minimalists, and anyone who loves the intersection of luxury and avant-garde style.
The Edgy-Meets-Elegant Appeal
Black chrome tips feel sophisticated rather than costume-y because of the precision and intentionality behind them. The chrome material catches light and draws the eye directly to the pointed tip, emphasizing the stiletto shape even more dramatically. This design works beautifully in both professional and creative settings, though it definitely makes a statement. There’s something almost futuristic about it—like you’re wearing a tiny piece of high-tech art on your fingertips.
Getting the Chrome Effect Right
- Start with a perfectly opaque glossy black base, applied in thin, even coats
- Use a dedicated chrome powder and a special application tool or sponge to transfer the powder to the nail
- The chrome powder adheres best to a sticky topcoat layer, so don’t skip that step
- You can create a sharp line between black and chrome, or blend them slightly for a gradient effect
- Seal with a thick top coat designed to work with chrome powder (regular top coat can dull the effect)
Insider note: Chrome powder and products can be finicky—they work best on nails that are perfectly smooth and properly prepped. Any ridges or bumps will show, so invest in a good base coat and make sure your nail surface is completely smooth before applying chrome.
6. Vibrant Neon Stilettos
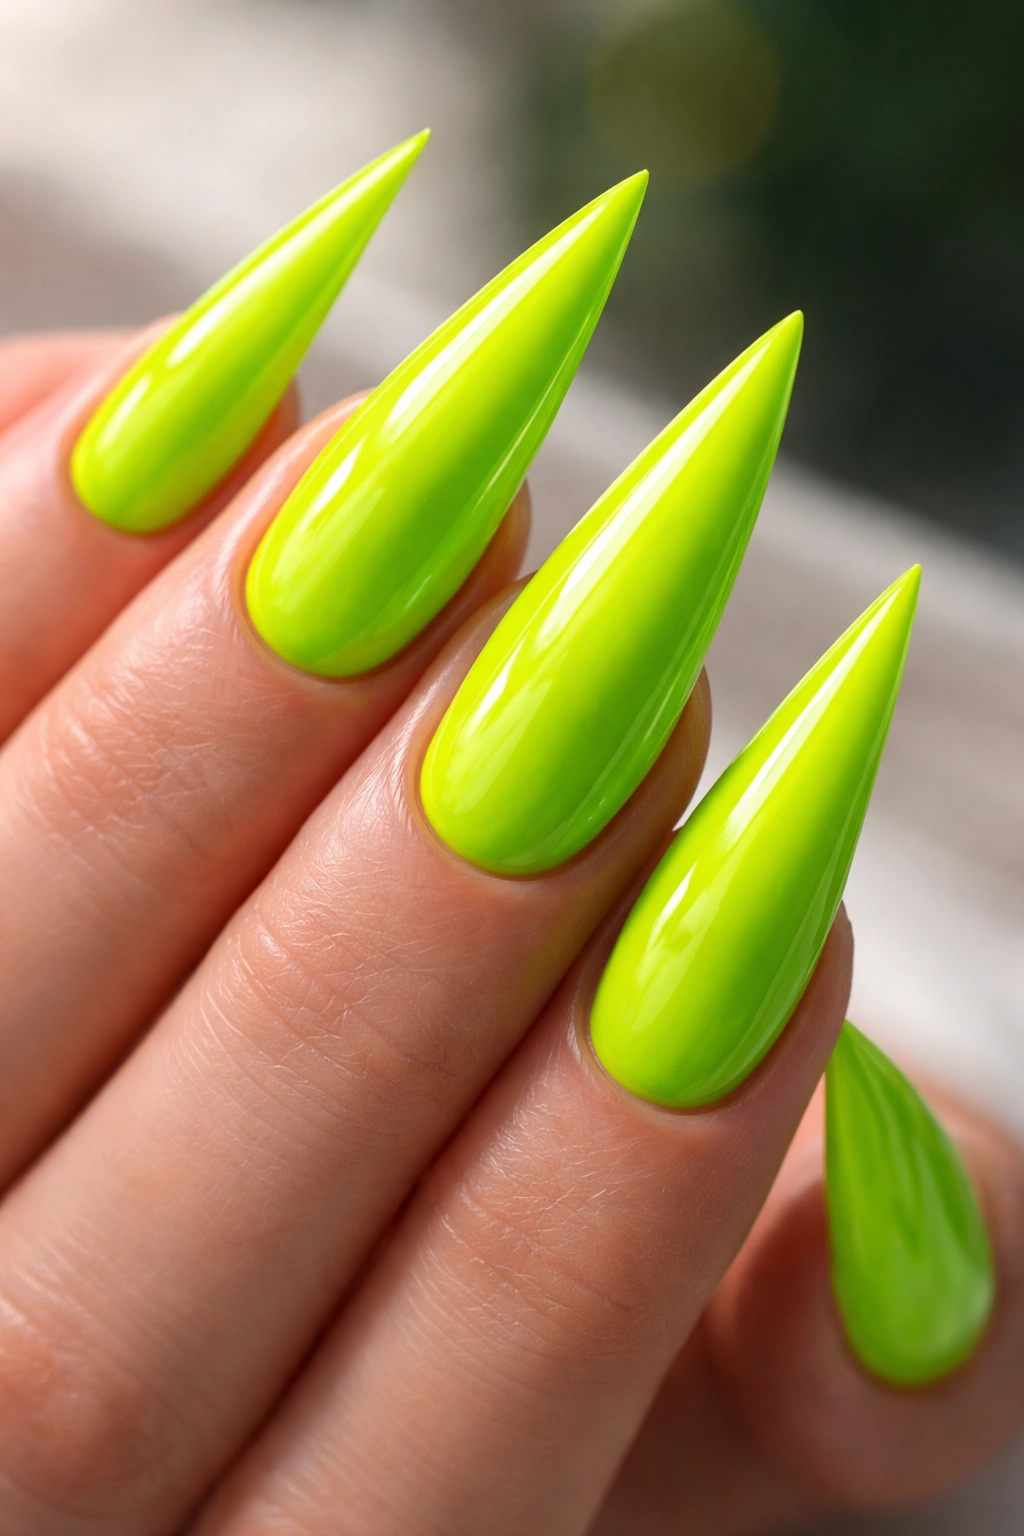
If you’re here to make a statement, neon stilettos are your answer. Electric lime green, hot pink, blazing orange, or radioactive yellow—neon shades are inherently bold, youthful, and impossible to ignore. On a stiletto shape, which already commands visual attention, neon becomes practically a wearable announcement of confidence. These are perfect for someone with a vibrant personality who wants their nails to match their energy.
When and Where Neon Stilettos Work Best
Neon nails are ideal for creative industries, casual settings, or situations where personal expression is celebrated. They work beautifully at festivals, concerts, creative workplaces, or just as a daily mood boost for anyone who loves bold color. Neon also photographs incredibly well—these nails will look stunning in photos and on social media. If you have a more conservative work environment, save neon stilettos for weekends and after-hours occasions when you can fully express this side of your style.
Making Neon Colors Pop
- Use a smooth, opaque base coat first (neons can be sheer, so layering ensures coverage)
- Apply neon color in two or three thin coats for maximum vibrancy without streaking
- Pair a single neon shade with nude or white accents to balance the boldness
- Add metallic or glitter accents to neon for extra dimension and playfulness
- Combine two complementary neon colors (like neon pink and neon yellow) on different nails for maximum impact
7. Marble Effect Stilettos
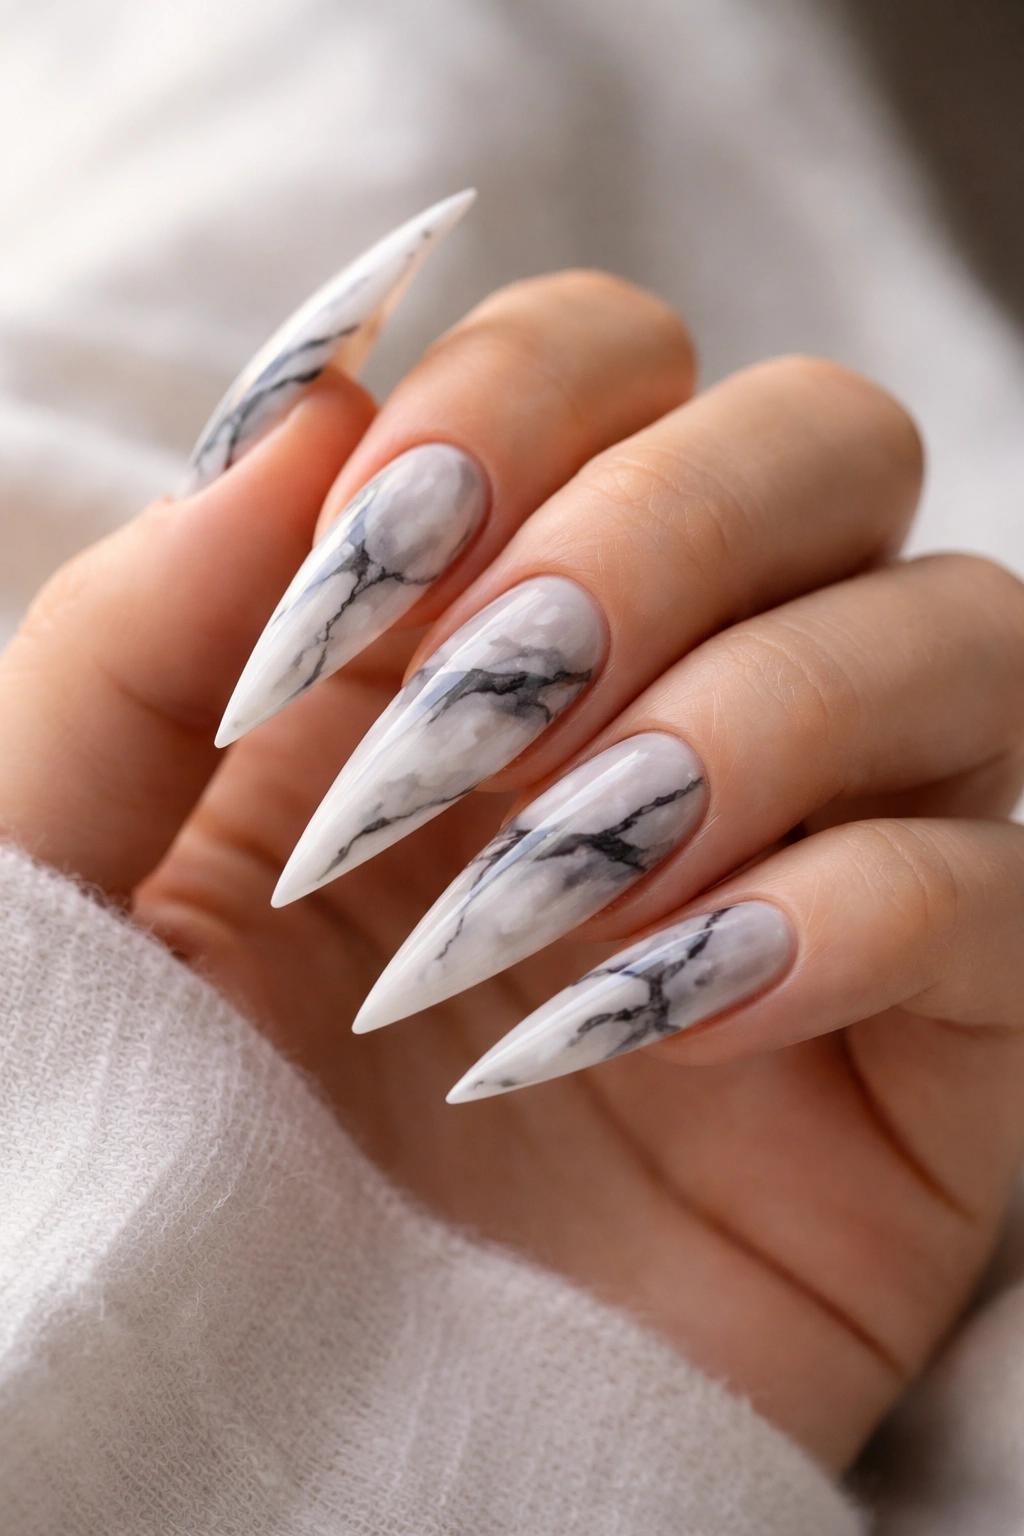
Marble nail designs mimic the natural veining and color variation found in real marble stone, creating an organic, artistic, high-end aesthetic. On stilettos, marble designs feel particularly sophisticated—like tiny sculptures of stone. The veining can be done in black and white for a classic look, or in jewel tones (deep blues, purples, greens) with metallic veins for something more luxe and artistic.
The Appeal of Natural-Inspired Nail Art
Marble designs work because they’re inspired by something genuinely beautiful and high-end—actual marble is associated with luxury, elegance, and refined taste. When translated onto stiletto nails, marble creates a sense of artisanal craftsmanship and intentionality. The organic pattern variation means no two nails look exactly identical, which actually adds to the appeal rather than detracting from it. This design feels polished enough for formal occasions but artistic enough to work in creative settings.
Creating Realistic Marble Effects
- Start with a white or nude base and let it dry completely
- Use thin brushes or even a toothpick to create delicate veining lines in black, gray, or metallics
- Keep veining lines relatively thin and irregular—perfectly uniform lines look artificial
- Add subtle color variation to the base (soft gray, pale blue, or blush undertones) for depth
- Seal with a glossy top coat to enhance the stone-like appearance and add shine
Pro tip: Look at actual marble reference images while creating your design. Real marble has a specific pattern quality—veining isn’t random, but it also isn’t symmetrical. Study the natural variation to create something that feels authentic rather than generic.
8. Minimalist White Stiletto Tips
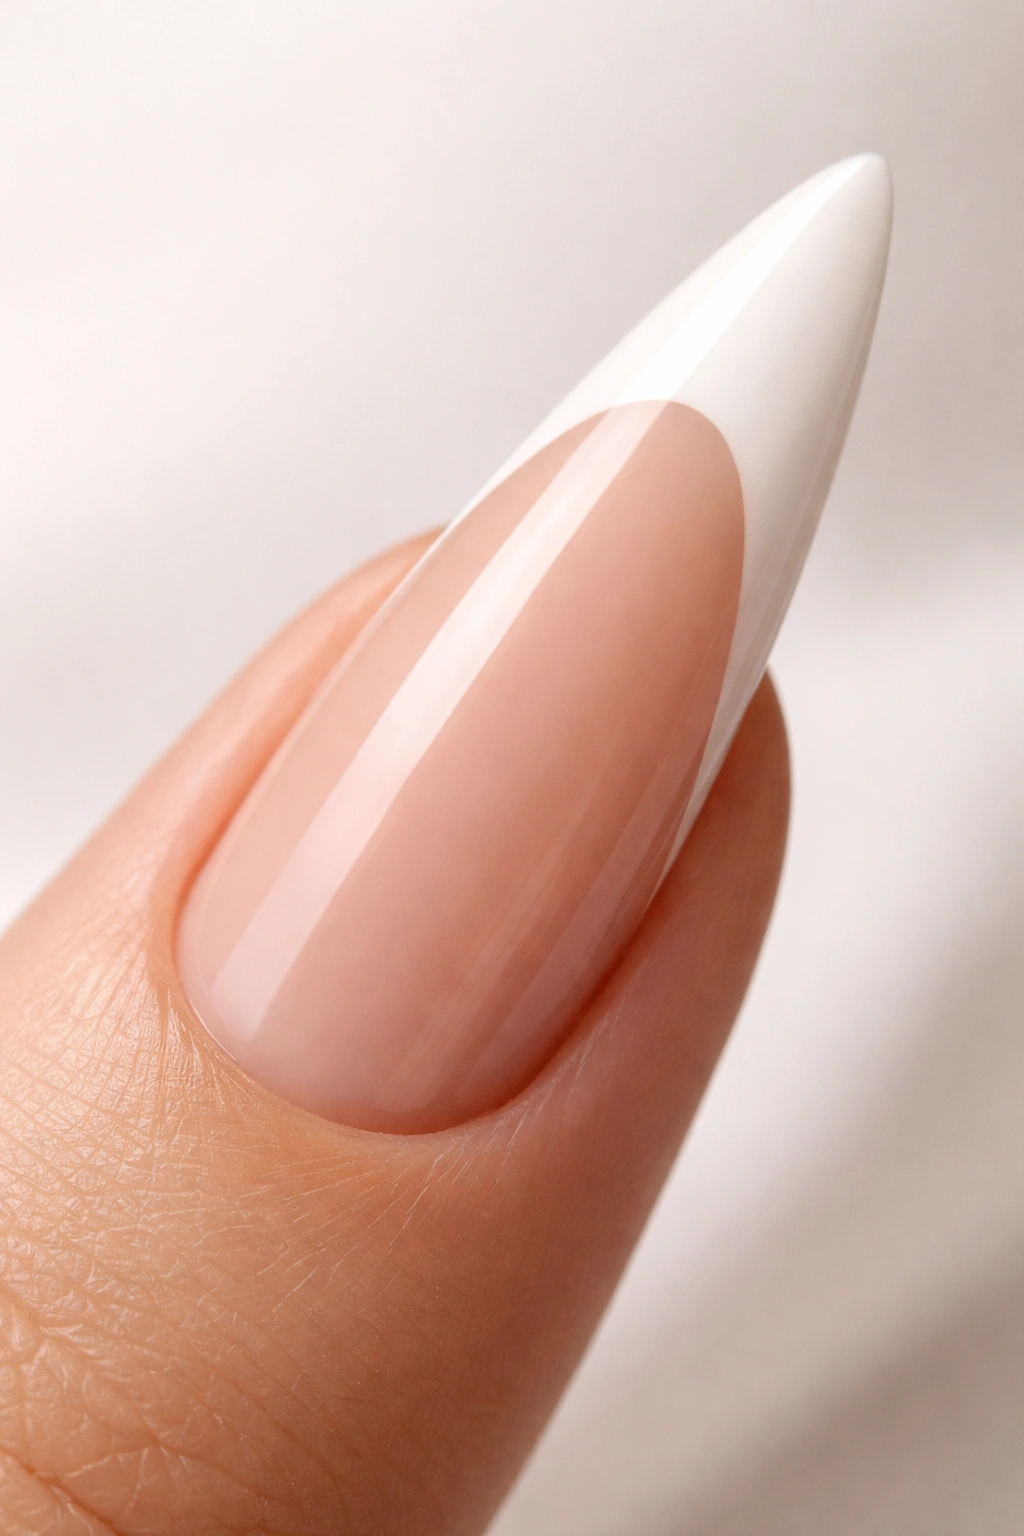
Sometimes less really is more, and minimalist white stilettos prove it. A pure white stiletto tip on a nude, blush, or natural nail base creates a clean, modern French manicure update. The simplicity is elegant, the effect is elongating, and this design works in virtually any setting imaginable. It’s the ideal choice for someone who wants nails that feel intentional and polished without being over-the-top or complicated.
Why Simplicity Reads as Sophisticated
There’s a paradox in nail design: sometimes the simplest designs are the hardest to execute and the most impactful when done well. A perfectly executed white stiletto tip requires immaculate application, smooth nail edges, and precision in the placement of the white tip line. When it’s done right, it reads as effortlessly chic—not boring, but refined and intentional. This design also has the advantage of being nearly universally flattering and appropriate for any context, from corporate meetings to casual daily wear.
Perfecting the Minimalist White Tip
- Use a pure white polish with excellent coverage and opacity
- Create a sharp line between the white tip and the base color using a thin striping brush or guide
- Keep the white tip relatively wide (covering roughly the top third of the nail) for modern impact
- Ensure the nail edges are perfectly smooth and even—any roughness will be visible with minimal design
- Finish with a glossy, thick top coat for a polished, professional appearance
9. Jewel-Tone Stilettos with Pearl Accents
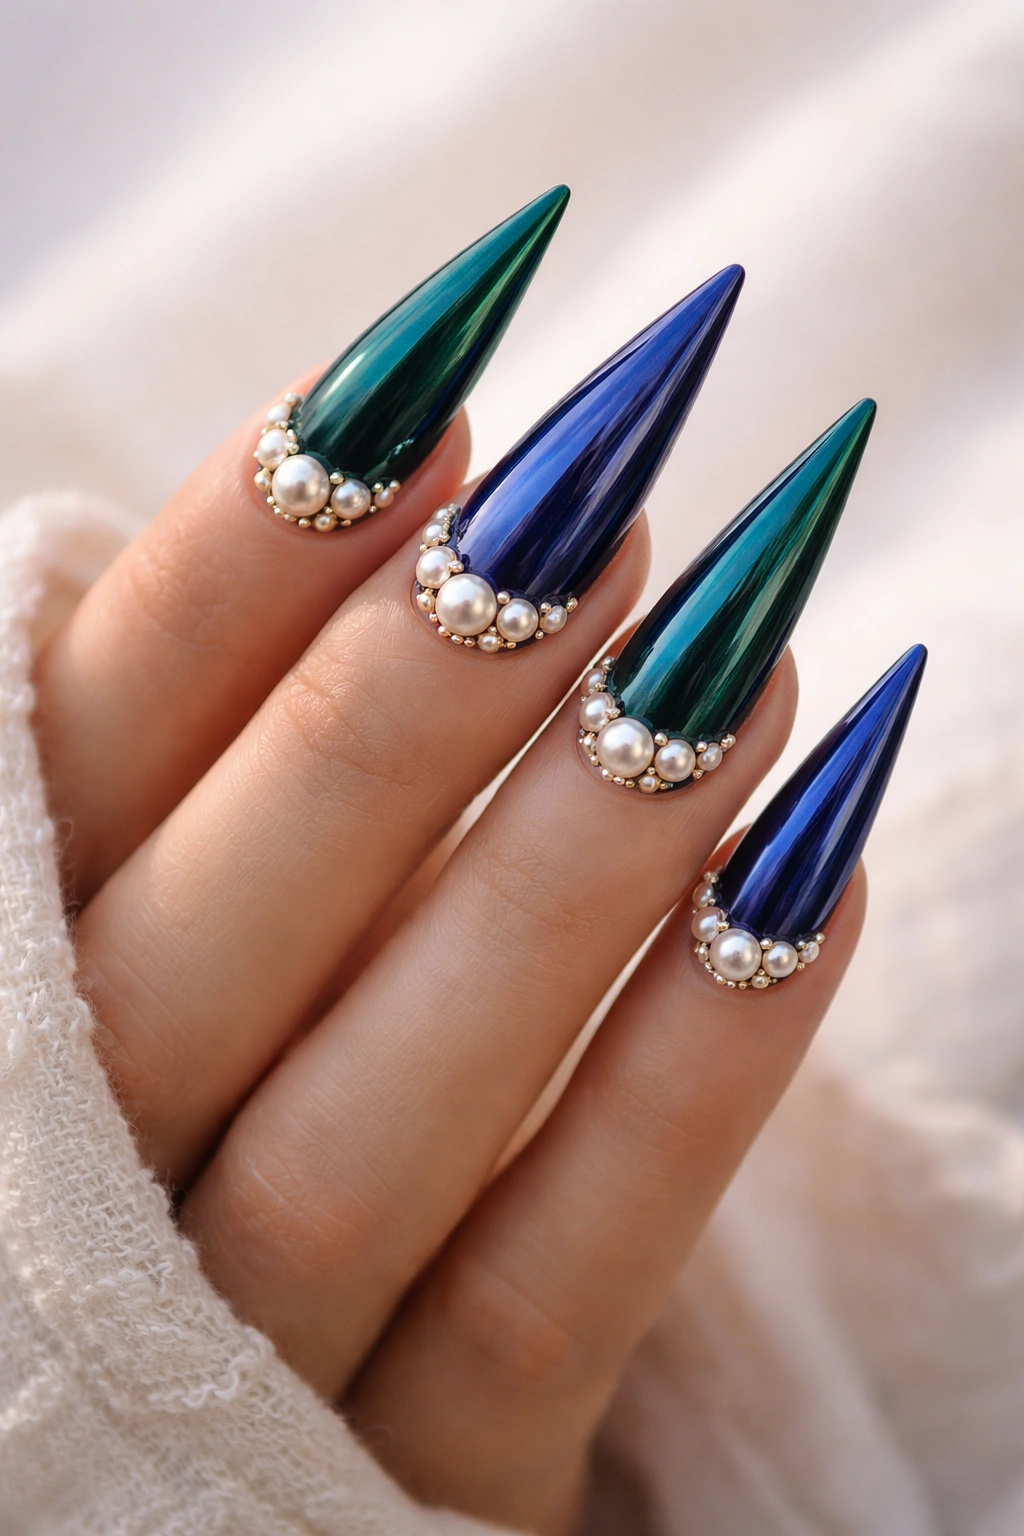
Jewel tones—emerald, sapphire blue, amethyst purple, and deep ruby red—feel inherently luxurious and sophisticated. When paired with pearl accents, the effect is genuinely precious. Pearls add an organic, luminous quality that complements jewel tones beautifully. This design appeals to anyone who loves jewelry, luxury, and classic elegance with a contemporary twist. It’s rich without feeling costume-y, and it photographs beautifully in almost any lighting.
The Winning Combination of Color and Texture
Jewel tones are already luxe on their own, but pearls take them to another level by adding texture, dimension, and a soft luminescent quality. The combination feels like you’re wearing actual jewelry on your nails—something precious and intentional. Jewel tones are also universally flattering across different skin tones and seasonal color palettes, which means this design works year-round. The pairing of matte or slightly satin jewel tone with lustrous pearls creates visual interest and sophistication.
Creating Jewel-Tone Designs with Pearl Details
- Start with a rich, fully opaque jewel-tone base (typically requires 2-3 coats)
- Place pearls in a strategic pattern: around the base, scattered across the nail, or concentrated near the tip
- Use a slightly tacky topcoat or specialized nail glue to adhere pearls securely
- Consider mixing different pearl sizes and finishes (matte, iridescent, metallic) for dimensional interest
- Seal with a thick, glossy topcoat to protect pearls and create a smooth, polished surface
Worth knowing: Pearl placement matters—too many pearls feels chaotic, while too few doesn’t justify the design choice. Aim for a balanced distribution that draws the eye without overwhelming the nail surface.
10. Matte vs. Glossy Ombre Stilettos
This design plays with finish contrast rather than color alone—an ombre gradient that transitions from matte to glossy, or vice versa, creates visual intrigue and dimension that’s subtle but definitely noticeable. You might start with a matte pale pink base and transition to a glossy deep rose tip, or go from gloss to matte with metallic accents in between. This technique-forward design appeals to anyone who loves innovation and unconventional approaches to nail art.
Why Finish Contrast Creates Impact
Most people think about ombre only in terms of color, but finish changes are equally powerful. Matte finishes feel modern, velvety, and sophisticated, while glossy finishes feel traditional, luxe, and reflective. Combining the two creates complexity and dimension that catches light differently depending on the angle and lighting. This design feels current and artistic without being costume-y or overly complicated. It’s the kind of nail design that makes people do a double-take—they know something is interesting about your nails, but they can’t quite pinpoint what it is at first glance.
Executing Matte-to-Glossy Transitions
- Choose a color gradient first (light to dark within the same color family works best)
- Apply the darker shade at the tip with a glossy topcoat
- Apply the lighter shade toward the base with a matte topcoat
- Use a sponge to blend the two shades together smoothly in the middle section
- The transition area will naturally have a semi-matte finish where matte and glossy meet
- Consider adding metallic accents in the transition zone for extra dimension and visual interest
Final Thoughts

Stiletto nails are about confidence, intention, and refusing to play it safe with your style. Whether you choose timeless elegance like red and gold, artistic complexity like marble designs, or futuristic edge like chrome tips, the most important thing is that your design feels authentically you. A stiletto nail look that you actually love wearing will make you feel powerful and put-together every single day.
The beauty of all these ideas is that they’re not one-time-only designs—you can adapt them seasonally, rotate through them based on your mood, or combine elements from different designs to create something entirely original. Your nails are a tiny but visible canvas for creativity, and stilettos give you the perfect elongated surface to play with color, texture, and technique. Pick a design that speaks to you, find a talented nail artist who can execute it flawlessly, and prepare for the compliments.
