

Tropical vibes aren’t just for summer vacations — they’re making a serious statement on nails. Stiletto nails, with their sharp, elongated shape and dramatic point, are the perfect canvas for bold, vacation-inspired designs that feel luxurious and eye-catching. Whether you’re drawn to vibrant florals, ocean-inspired palettes, or sunset gradients, there’s something magnetic about carrying a piece of paradise on your fingertips year-round.
The beauty of tropical stiletto nail designs goes beyond the obvious appeal of bright colors and palm trees. Stilettos have a naturally sophisticated edge that elevates even the most playful tropical themes into something that works in professional settings, casual outings, or special events. The elongated shape also gives nail artists more canvas space to play with intricate details, layering, and dimension — allowing tropical designs to feel genuinely artistic rather than kitsch.
What makes tropical stiletto nails particularly satisfying is the contrast they create. The sleek, almost dangerous aesthetic of a stiletto nail paired with the soft, organic energy of tropical imagery creates an intriguing visual tension. You get the confidence boost of a bold nail shape combined with the carefree, warm-weather feeling of tropical themes. It’s sophisticated and fun simultaneously. Whether you’re planning to wear these designs for a week or drawing inspiration for your next nail appointment, these ideas showcase just how versatile and stunning tropical stilettos can be.
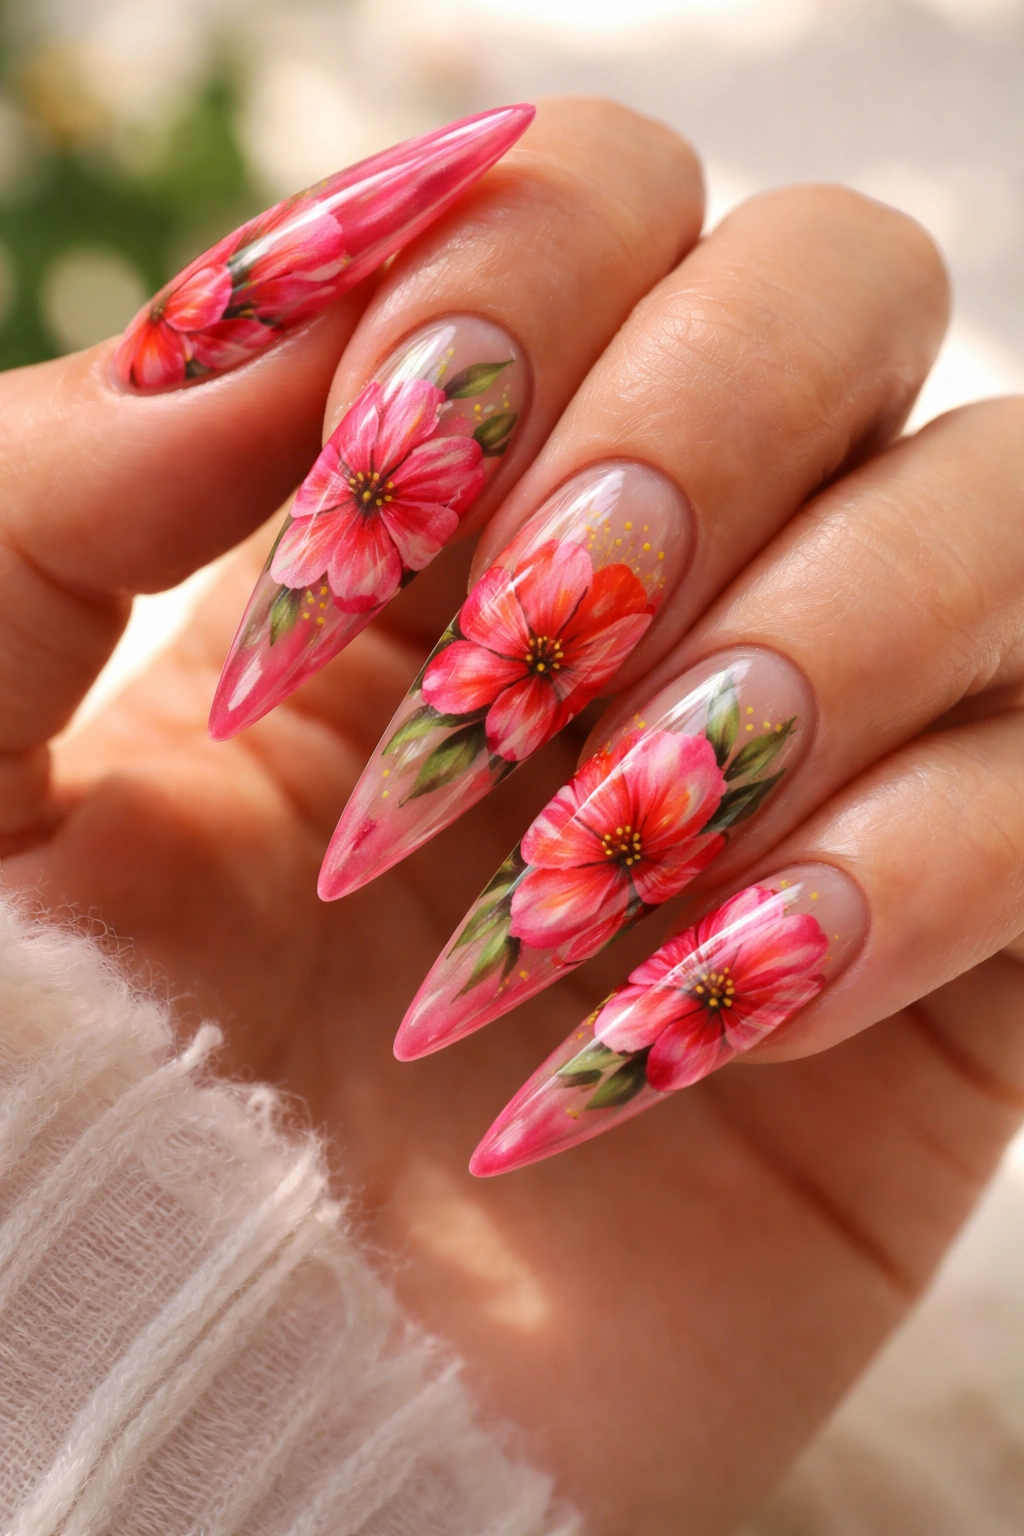
1. Bright Pink Hibiscus Blooms
Hibiscus flowers are the quintessential tropical symbol, and when rendered on bright pink stiletto nails, they become a showstopping statement. Start with a hot pink or coral-pink base that pops with warmth and energy, then hand-paint detailed hibiscus flowers in contrasting colors — deep reds, coral, and orange work beautifully against the pink background. The flowers should feature distinctive ruffled petals and prominent centers, giving them realistic dimension.
Design Details That Matter
The key to making hand-painted hibiscus feel polished rather than cluttered is spacing. Leave negative space between blooms so each flower has room to shine as an individual element. Paint some flowers in full profile and others slightly turned at different angles to create movement and visual interest across all ten nails. Add delicate green leaves and fine stems in between using a thin brush or dotting tool. Consider adding a glossy top coat that catches light and gives the flowers an almost three-dimensional appearance.
Making It Work for Your Lifestyle
- Paint hibiscus on an accent nail while keeping others solid pink for a more subtle approach
- Use matte finish on the base with glossy hibiscus flowers for textural contrast
- Add tiny gold flecks or leaf accents around the blooms for added elegance
- Layer with semi-transparent colors to create depth in the petals
Pro tip: If you’re getting these done at a salon, bring a high-quality reference photo showing your preferred hibiscus variety — there are hundreds of species with different petal arrangements and colors, and the reference helps your nail artist nail the exact look you want.
2. Sunset Ombré With Palm Silhouettes
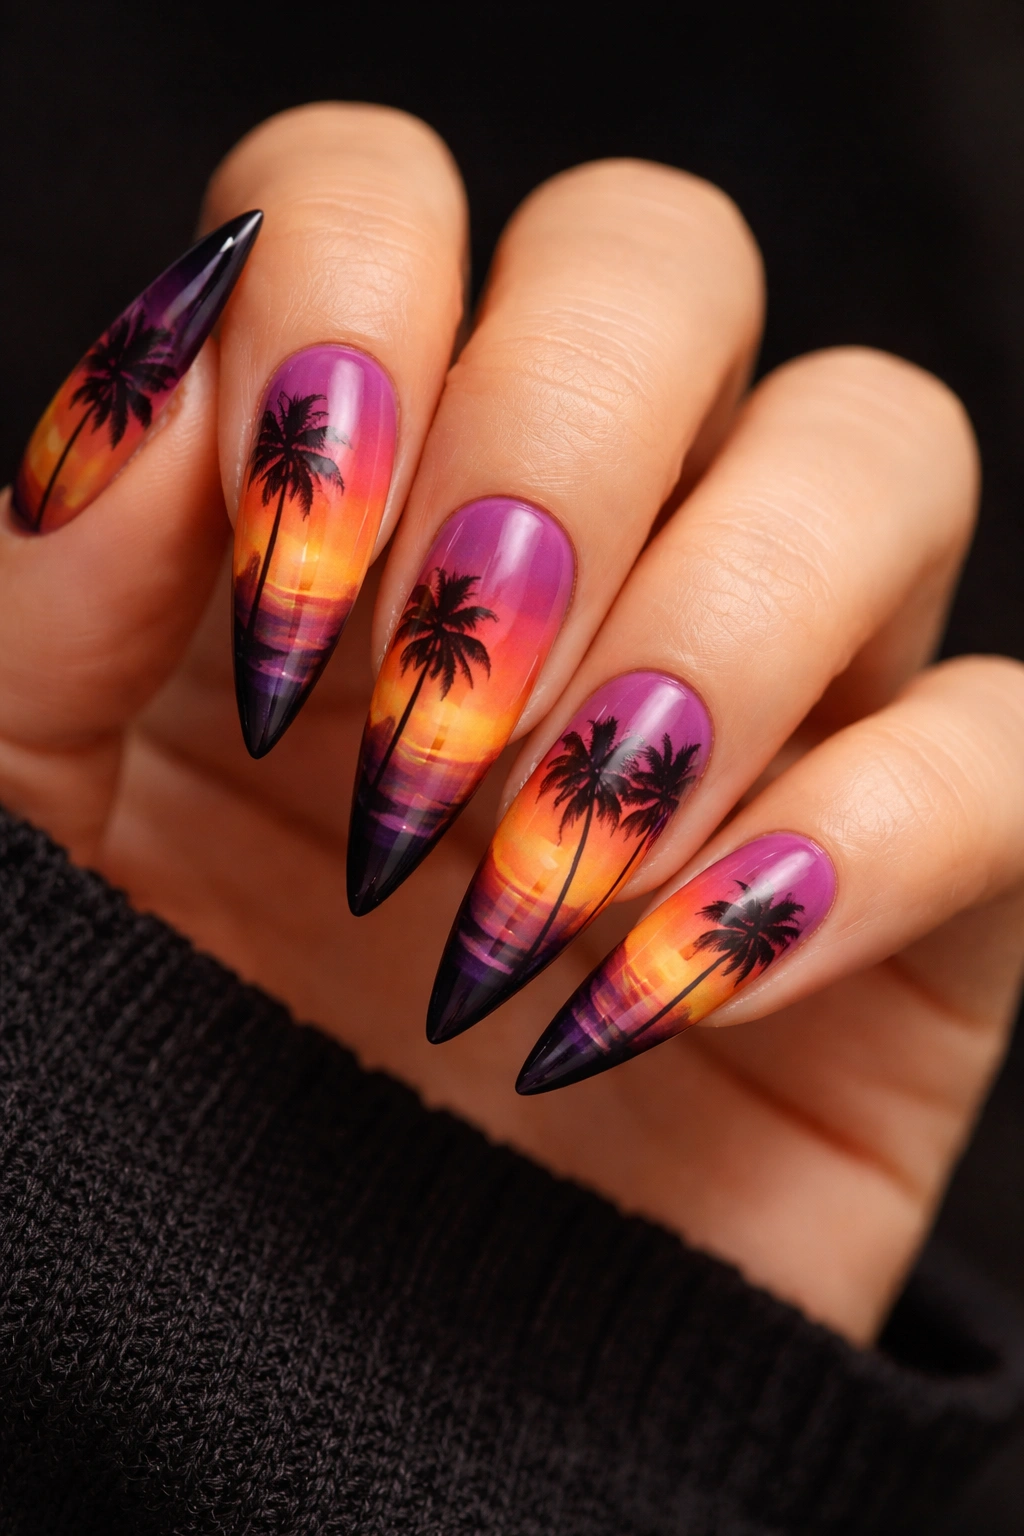
Capture the exact moment when the sun dips below the horizon with an ombré that transitions from deep orange to hot pink to purple across the stiletto nail. This design works beautifully as a full-nail gradient, with the colors shifting smoothly from warm to cool tones, creating the illusion of an actual tropical sunset sky.
Layering the Colors Perfectly
The ombré works best when you apply it with a makeup sponge, gently blending multiple polish colors while the layers are still wet. Start with the darkest shade at the tip, then blend in the mid-tones, and finish with lighter shades toward the cuticle. The result should be a seamless gradient with no harsh lines. Once the ombré is set, add delicate black or dark silhouettes of palm trees, grass, and beach scenery at the tip to ground the sunset scene.
The Silhouette Element
- Use a thin liner brush or a toothpick to paint precise palm frond silhouettes
- Include a horizon line separating the sky from the land/water
- Add tiny birds in flight to emphasize the tropical setting
- Keep silhouettes solid black or dark navy for maximum contrast against the sunset colors
Worth knowing: This design looks particularly stunning on longer stiletto nails because the ombré gradient has more vertical space to display the color transition, making the sunset effect feel more dramatic and atmospheric.
3. Emerald With Gold Leaf Accents
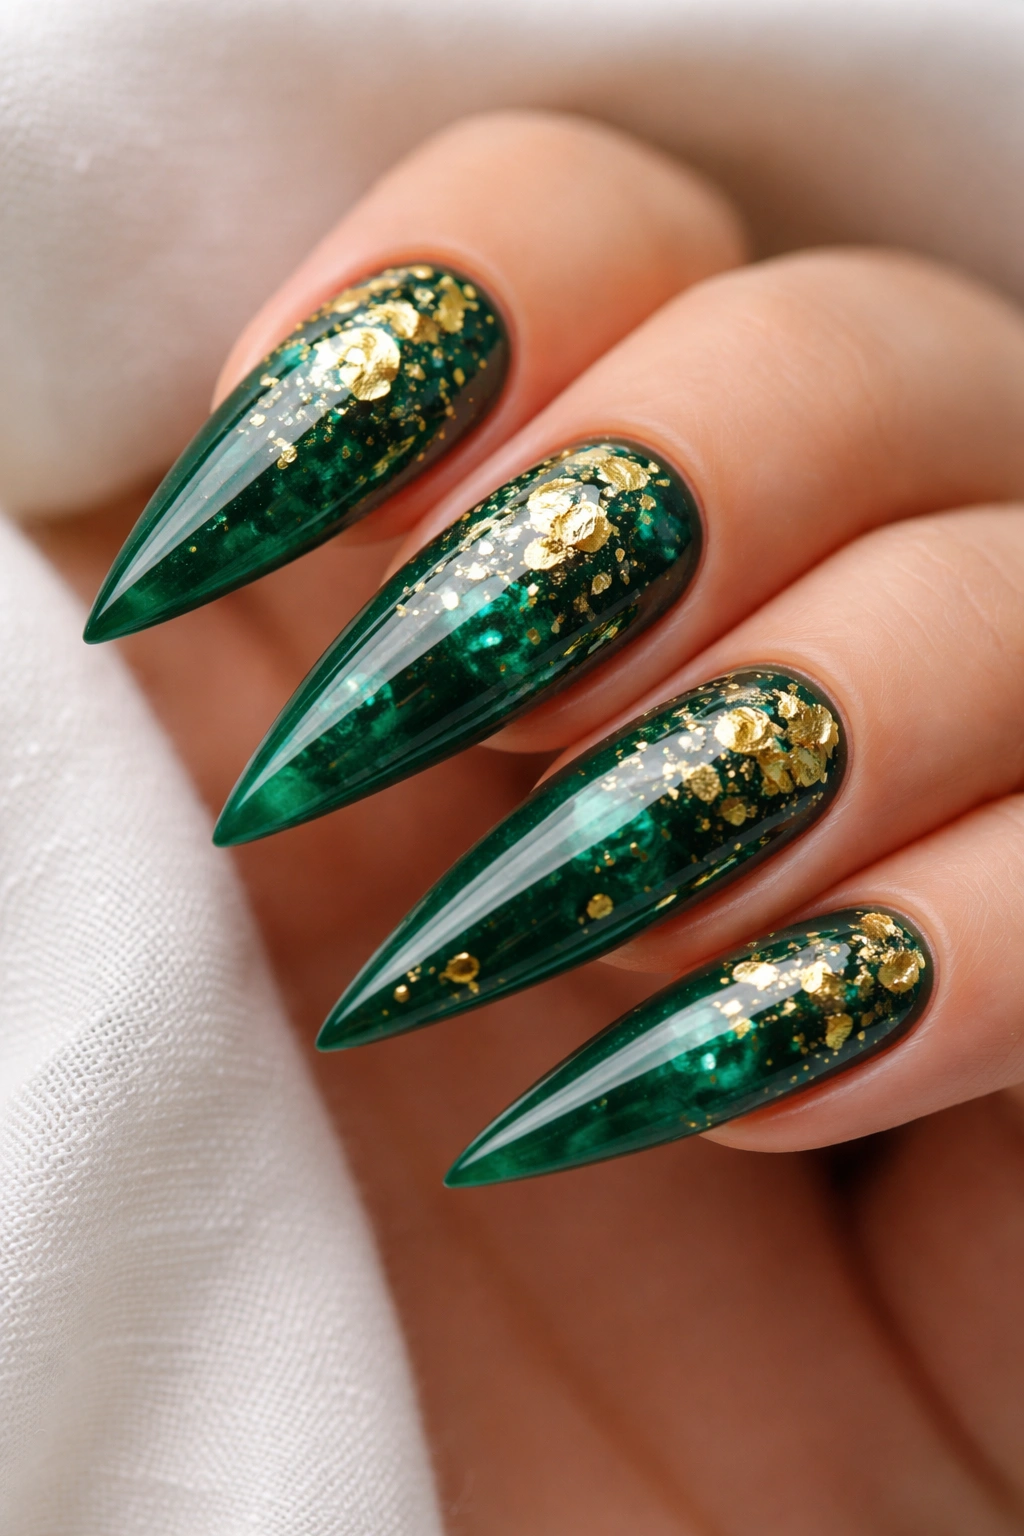
Deep emerald green is an underrated tropical color that evokes lush jungles and tropical foliage. Pair a rich emerald base with delicate gold leaf accents scattered across the nail surface, creating a sophisticated take on tropical glamour that feels more editorial and upscale than typical bright tropical designs.
Applying Gold Leaf Successfully
Real gold leaf or metallic foil creates a luxury effect that looks expensive and premium. Apply a thin layer of sticky base coat or adhesive designed for nail foils, then carefully position small pieces of gold leaf or metallic foil across the emerald base. You can create a geometric pattern, an organic scattered effect, or even carefully place foil along the tips and sides of the stiletto shape to frame the nail beautifully.
Complementary Details
- Add tiny white or cream-colored dots to mimic dewdrops on jungle leaves
- Paint delicate fern fronds in lighter green over the emerald base
- Include a glossy topcoat to seal the foil and create shine
- Consider matte emerald with glossy gold accents for textural interest
Worth knowing: Gold leaf can crack or peel if not sealed properly, so use a durable topcoat specifically formulated for foil nails and be gentle with your hands during the first 24 hours after application.
4. Peacock Feather Design
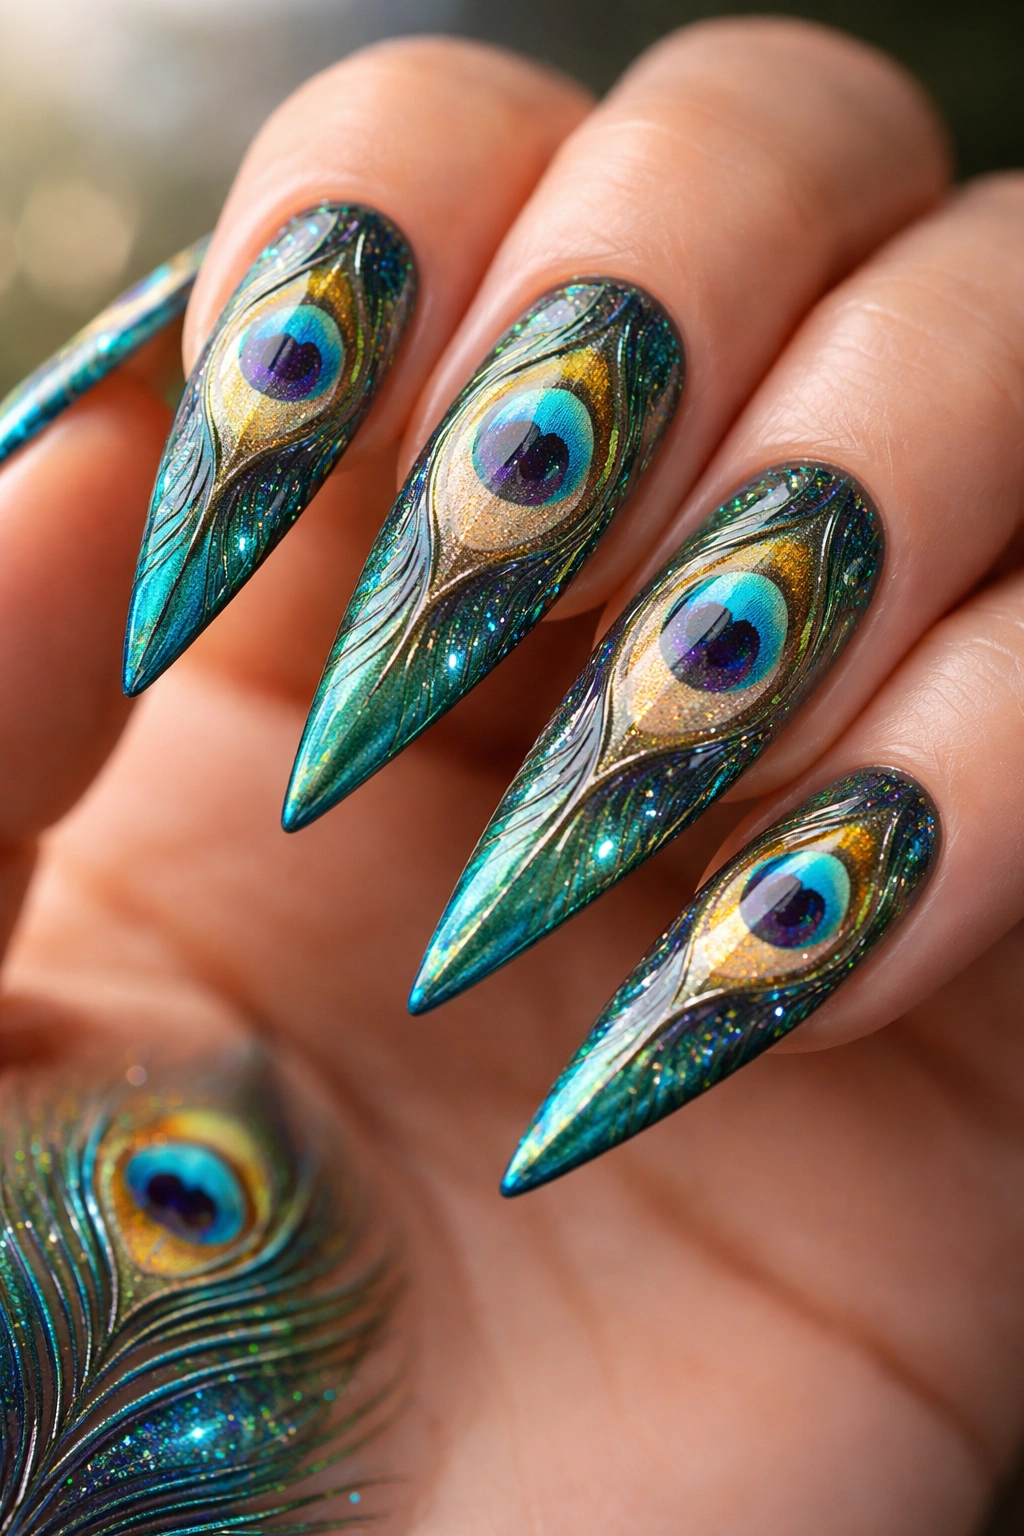
Peacock feathers represent the height of tropical elegance with their iridescent quality and intricate patterns. Recreate the iconic eye-shaped pattern with deep teals, blues, and greens as the base, then layer in cream, gold, and iridescent accents to capture the otherworldly shimmer peacocks naturally possess.
Building Dimension Into Peacock Eyes
Paint the primary eye shape with a rich teal or jewel-tone blue, then add concentric circles or ovals in contrasting colors — cream, gold, and metallic green create stunning depth. The teardrop or eye-shape of each peacock feather becomes its own focal point. Paint several feathers across the nail surface in varying sizes and angles to create a cohesive, balanced design. Fine black or dark lines separate the color sections and add definition.
Finishing Touches That Shine
- Use an iridescent topcoat to mimic the natural shimmer of peacock feathers
- Add tiny rhinestones or glitter at the center of each eye for extra glamour
- Paint feather barbs with thin lines to add realistic texture
- Incorporate blues, teals, greens, and purples in the color palette for authentic peacock tones
Pro tip: Peacock feather nails photograph incredibly well, especially in natural light, so if you’re planning to show them off on social media, do your photos outdoors or by a window for maximum shimmer visibility.
5. Pineapple Motif With Yellow Base
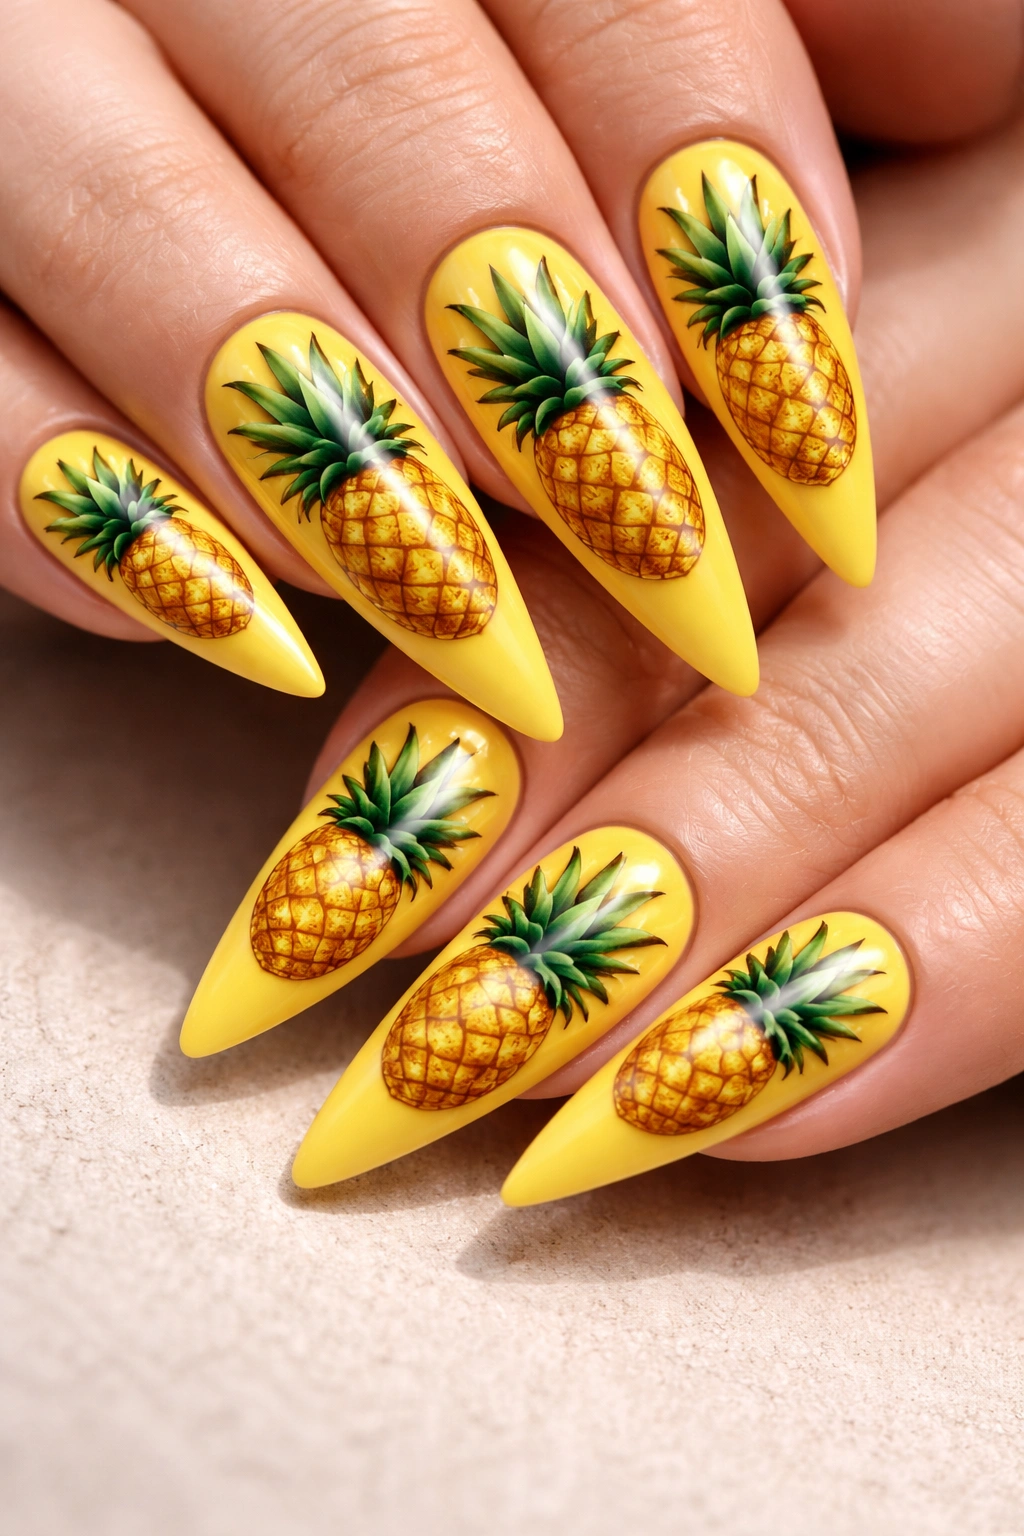
The pineapple is tropical royalty — fun, bold, and instantly recognizable. A bright yellow stiletto nail serves as the perfect base for detailed pineapple designs, either as full illustrations or simplified geometric interpretations depending on your artistic preference and nail artist’s skill level.
Realistic Pineapple Rendering
Paint large, detailed pineapples with careful attention to the cross-hatched diamond pattern that defines pineapple skin. Use shades of yellow, orange, and brown to create depth and dimension in the pattern. The crown of green leaves at the top should be carefully painted with individual leaf shapes radiating outward. For a more artistic approach, paint some pineapples in profile, others head-on, and include some cut in half to show the yellow interior.
Simplified Geometric Pineapples
- Create geometric diamond patterns to represent pineapple skin
- Paint solid green triangles for the crown leaves
- Use solid yellow fill with minimal detail for a cleaner aesthetic
- Outline pineapples in black or deep orange for definition
Worth knowing: Yellow polish can be notoriously difficult to achieve even coverage on, so professional nail technicians often use a special yellow-toned base coat or apply extra thin coats to avoid streaking. If you’re doing this at home, patience with thin layers is your best friend.
6. Monstera Leaf Pattern
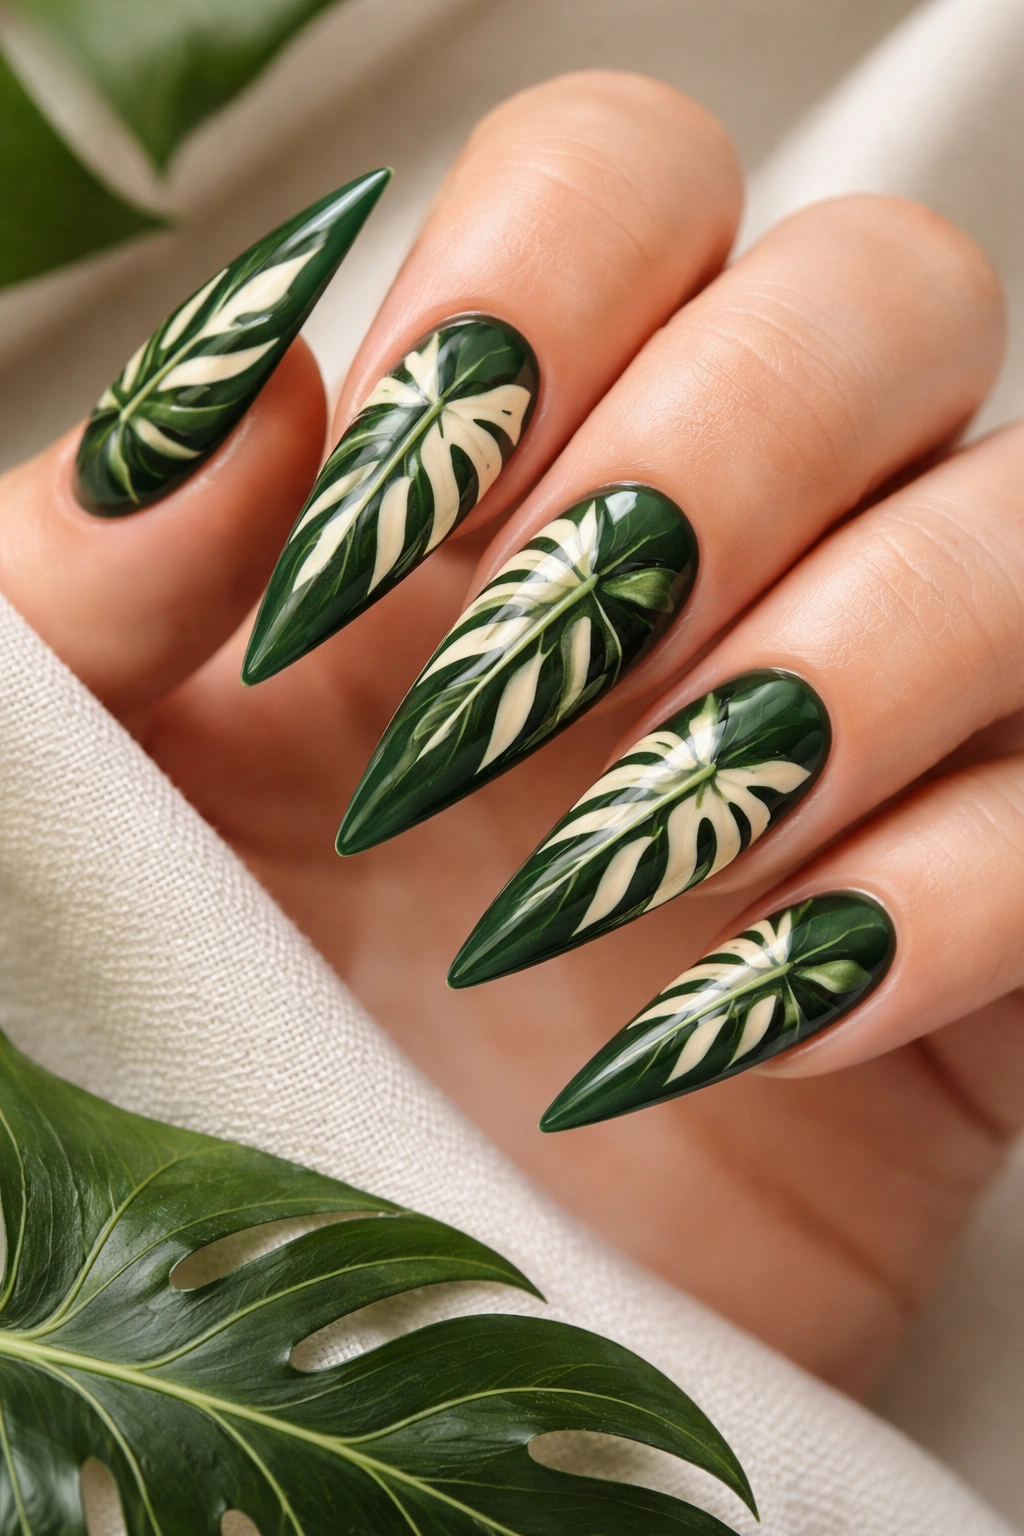
Monstera plants, with their distinctive heart-shaped leaves featuring split patterns, represent modern tropical aesthetics. These architectural leaves translate beautifully onto stiletto nails in deep green, white, and cream color combinations that feel both trendy and naturally beautiful.
Capturing Monstera’s Signature Splits
Paint large monstera leaves with careful attention to the irregular fenestration (the natural holes in the leaves). Start with the heart shape, then use white or cream to paint the split areas, creating the illusion of holes through the leaf. Add darker green veins and leaf lines for botanical accuracy. The leaves should feel organic and slightly asymmetrical — real monstera leaves aren’t perfectly uniform, and that imperfection is what makes them beautiful.
Design Layout Options
- Paint one large leaf per nail for a minimalist approach
- Create an overlapping pattern with multiple leaves at different angles
- Mix leaf sizes for visual interest and movement
- Add tiny vines or tendrils between leaves for connection
Pro tip: Monstera designs work particularly well on stilettos because the elongated nail shape mirrors the vertical orientation of monstera leaves naturally, creating harmonious visual balance.
7. Ocean Blue With Starfish Details
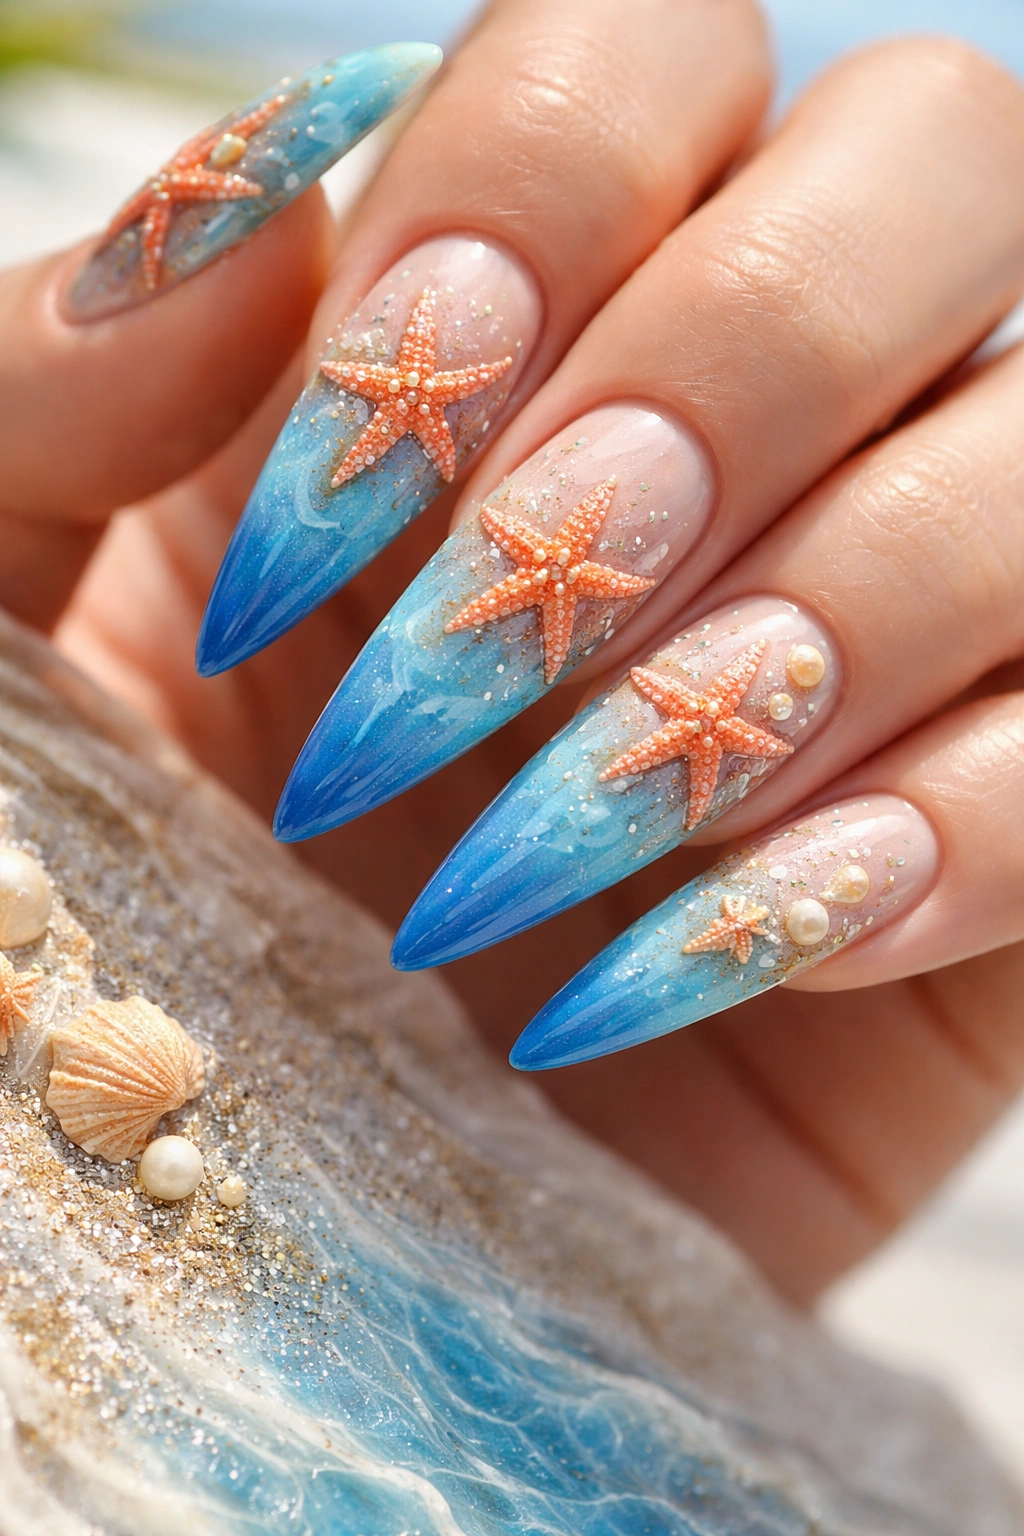
Transport yourself to a tropical beach with ocean blue stilettos adorned with starfish, shells, and sandy details. A gradient from light sky blue at the base to deeper ocean blue at the tip creates depth, then add realistic starfish rendered in coral, orange, or peach tones across the surface.
Creating Realistic Starfish
Starfish come in many species with varying colors — choose coral, orange, purple, or pink depending on your preference. Paint five-pointed stars with careful attention to the bumpy, textured surface real starfish possess. Add tiny dots across the starfish body to mimic these bumps, and use shading to create dimension. Paint some starfish from above and others at slight angles to avoid a flat, repetitive appearance.
Beach Scene Elements
- Add tiny seashells in cream, pink, and white scattered across the nail
- Include small sand dollar designs for authenticity
- Paint wavy water lines at the tip to ground the ocean theme
- Add tiny bubbles or particle effects for movement
Worth knowing: This design captures the feeling of tropical waters without relying on neon colors, making it work beautifully in professional environments while still feeling distinctly vacation-inspired.
8. Tropical Flowers With Glitter Gradient
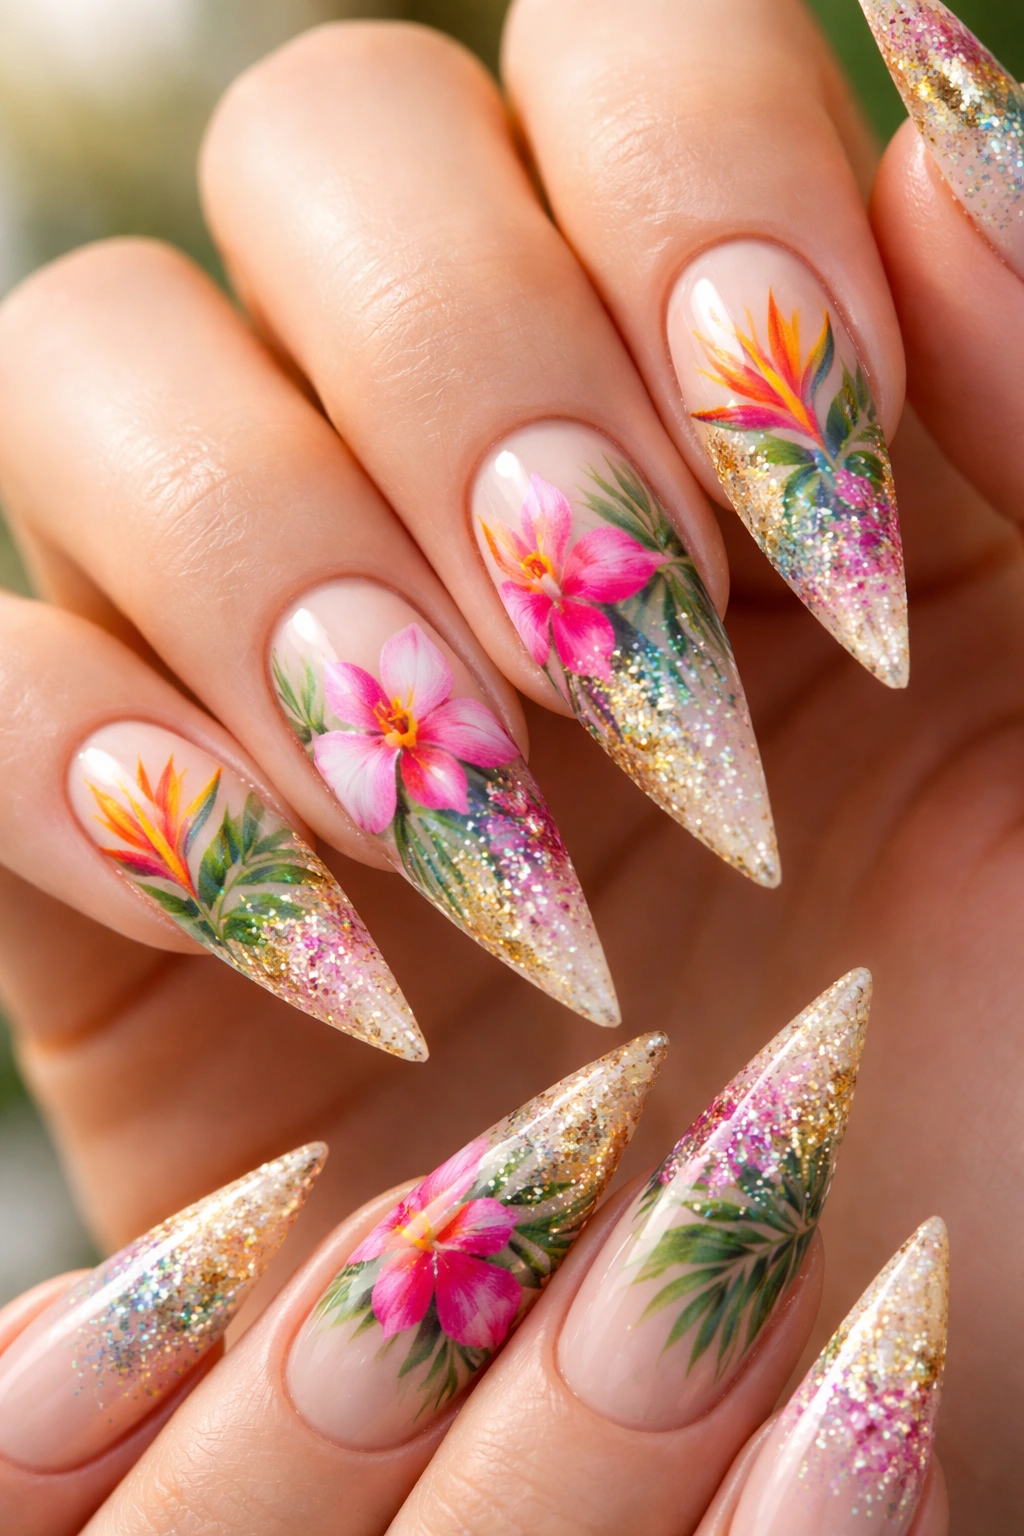
Combine hand-painted tropical flowers with a subtle glitter gradient for a design that’s both artistic and glamorous. Paint colorful flowers — orchids, bougainvillea, or bird of paradise — on a lighter base, then layer a glitter gradient that transitions from heavy glitter at the tip to sparse glitter at the cuticle.
Layering Flowers and Glitter
Paint detailed flowers first, allowing them to dry completely before applying the glitter layer. This prevents the glitter from settling over wet polish and obscuring your floral work. Use a nude, cream, or pale pink base that makes both the flowers and glitter pop without competing for attention. The glitter should feel like an accent element, not the main focus.
Glitter Application Techniques
- Use a makeup sponge to dab glitter onto tacky base coat for controlled placement
- Apply glitter more densely at the tips and gradually lighten toward the base
- Use multiple glitter colors — golds, pinks, and corals complement tropical flowers beautifully
- Seal everything with a thick, protective topcoat
Pro tip: If loose glitter feels too bold for your preferences, consider using glitter gels or polishes that incorporate sparkle evenly throughout, giving a more subtle shimmer effect.
9. Turquoise With Coral Swirls
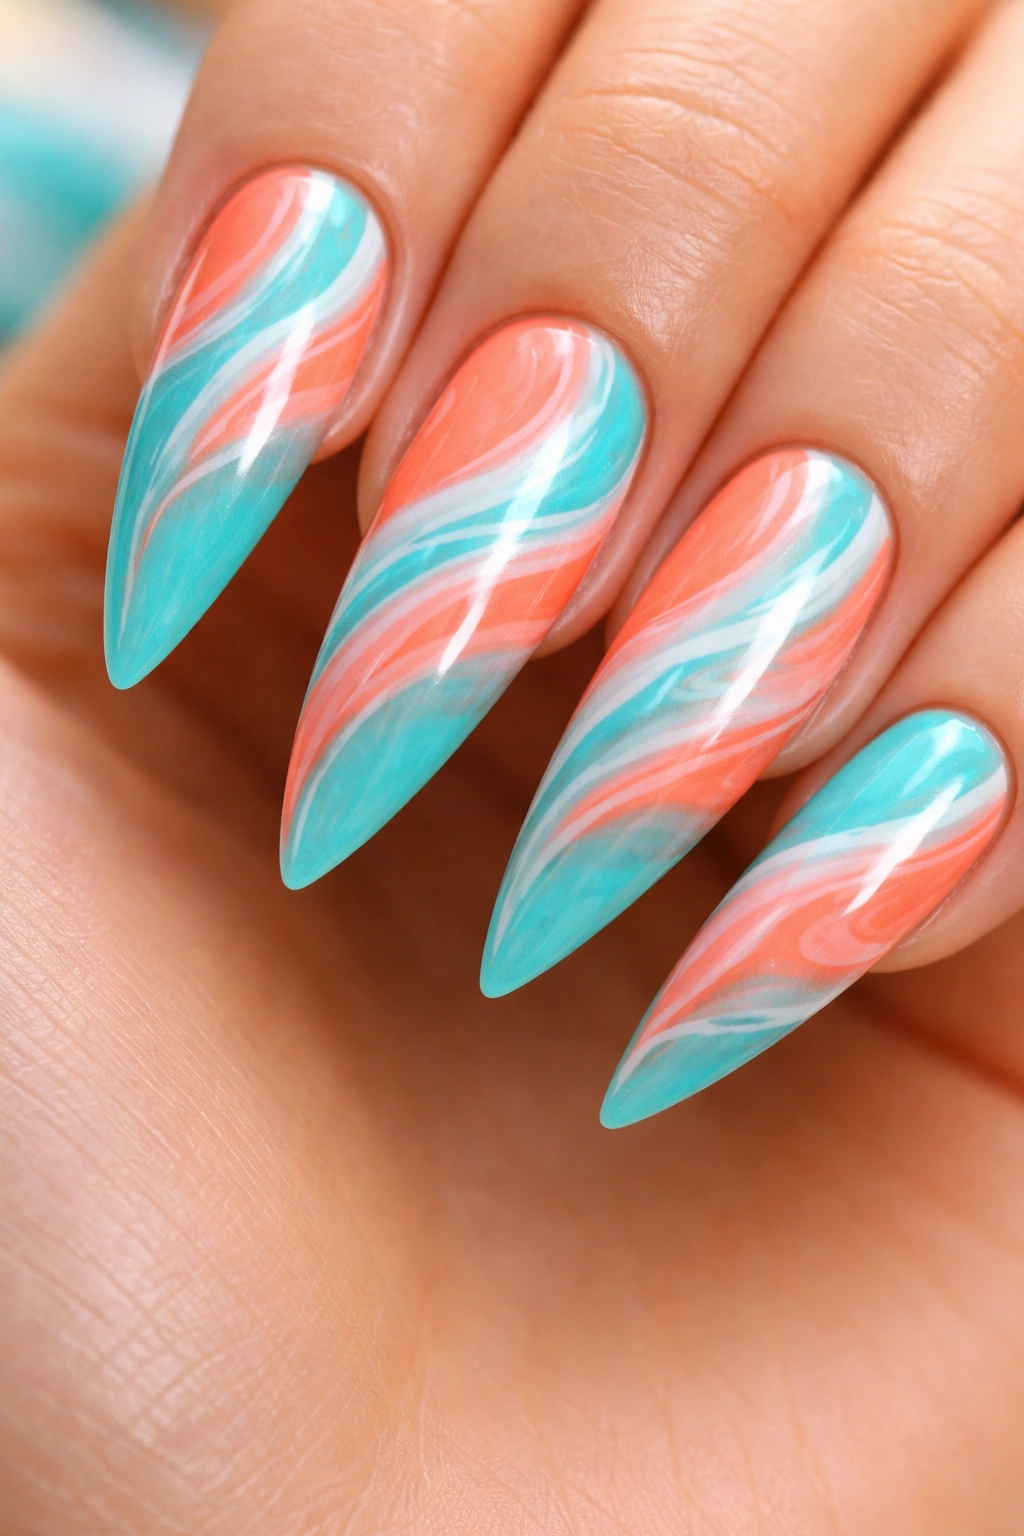
Turquoise represents tropical waters, and when paired with coral swirls, it captures the contrast between sky, sea, and reef life. This design relies on color theory and movement rather than realistic imagery, creating a modern, abstract tropical aesthetic.
Creating Swirl Patterns
Apply a smooth turquoise base coat first, allowing it to cure completely. Using a thin liner brush or detail brush, paint flowing coral swirls across the nail surface. Swirls should curve and flow organically across the nail, creating movement and visual interest. Some swirls should be thick and bold, others delicate and wispy, varying the width and intensity to prevent monotony. Add white or cream accent swirls alongside the coral for additional dimension and contrast.
Design Balance and Spacing
- Start swirls at the cuticle and sweep them toward the tip
- Create some swirls that connect multiple nails for visual flow across the full mani
- Vary the number of swirls on each nail to avoid rigid uniformity
- Leave some empty turquoise space so the base color shows through
Worth knowing: Swirl designs require a steady hand and practice to look polished rather than accidental. Professional nail artists often sketch swirls lightly with pencil first, then paint over the pencil lines before wiping them clean.
10. Neon Yellow With Black Tropical Line Art
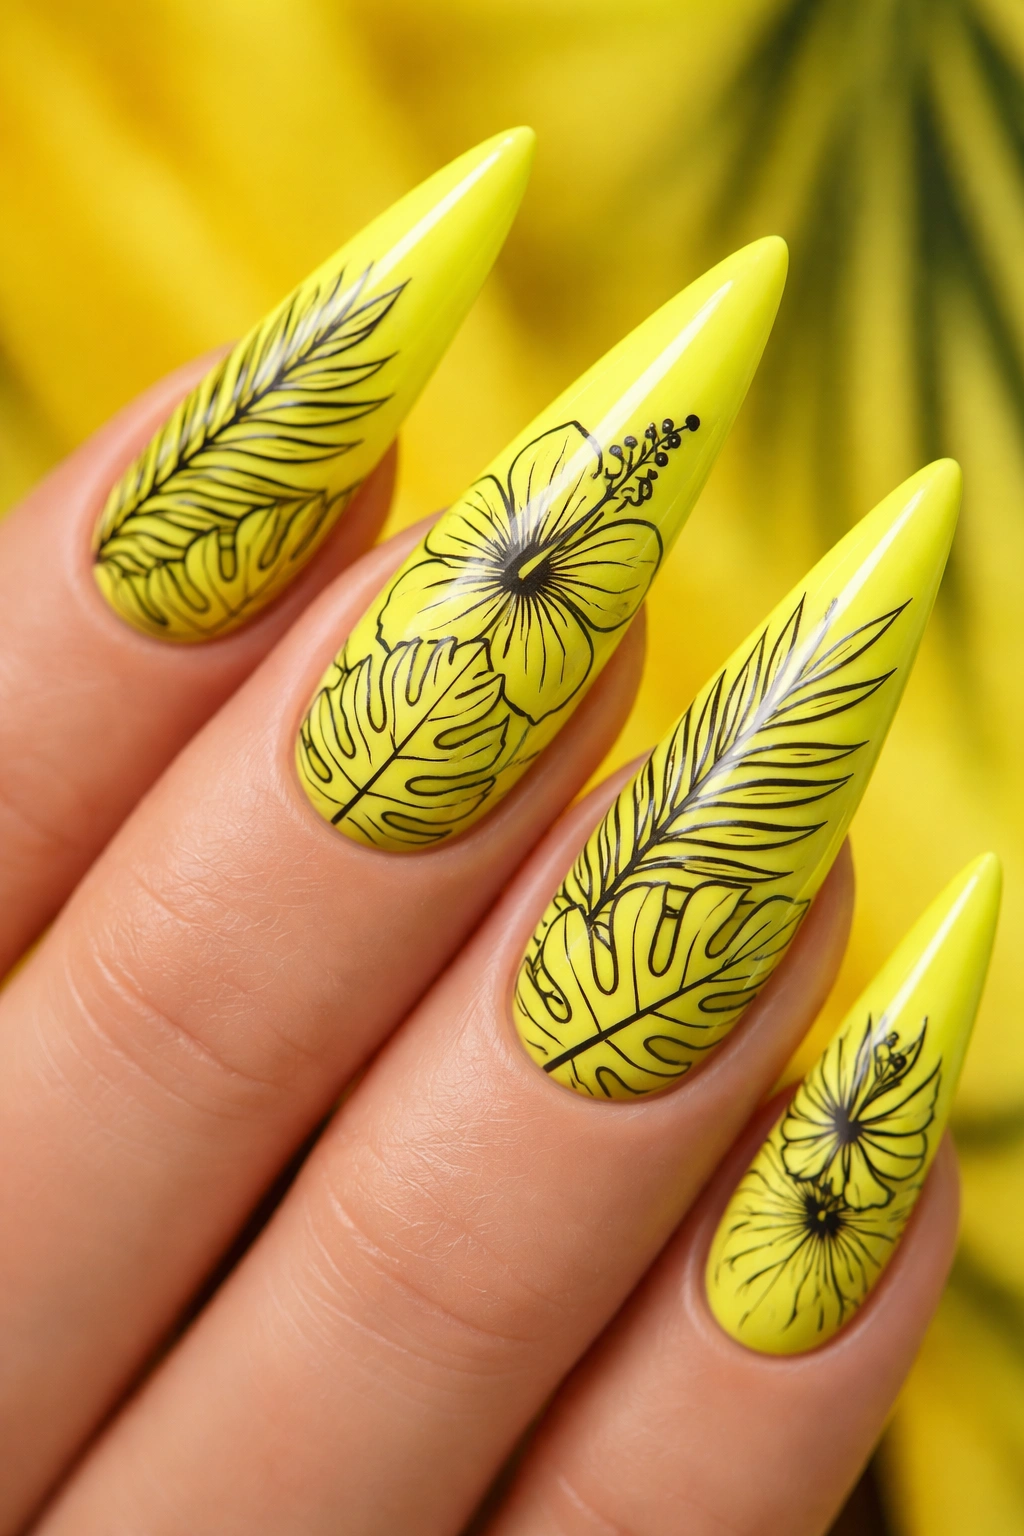
Neon colors feel contemporary rather than traditionally tropical, but they work beautifully for a modern take on tropical themes. A vibrant neon yellow stiletto nail becomes the perfect background for minimalist black line art featuring tropical elements like hibiscus flowers, monstera leaves, and palm branches.
Line Art Execution
Fine black lines create the images — think botanical illustration style rather than filled-in designs. Paint single-line flowers with petals, delicate leaf veins, and branches using a thin liner brush. The contrast between neon and black is striking and graphic. Keep the designs minimalist and spaced carefully to avoid overwhelming the bright base color. Line art feels sophisticated and intentional rather than playful, making this design work in modern, trendy aesthetics.
Color Combinations That Work
- Neon yellow with black line art and white accents
- Hot neon pink with black botanical illustrations
- Neon green with white and black tropical elements
- Combine line art with negative space and solid color for balance
Pro tip: Neon polishes can be tricky to apply evenly — they often need three thin coats rather than two thick ones to achieve even color without streaking or transparency.
11. Watercolor Tropical Blooms
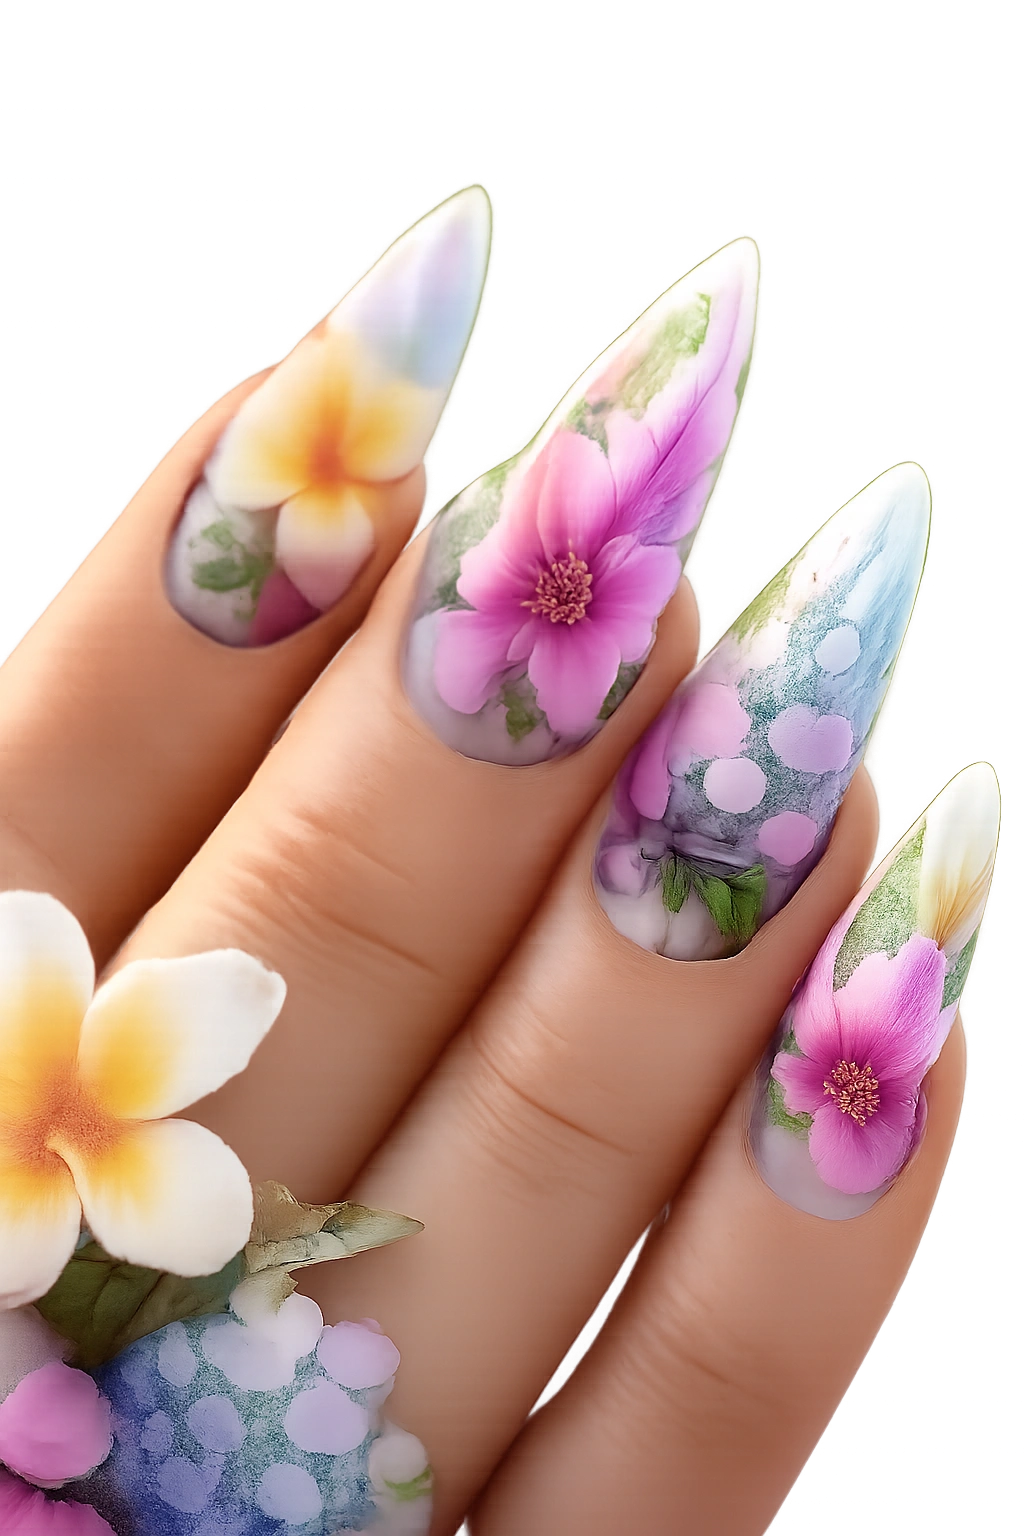
Watercolor techniques create soft, organic, beautifully imperfect tropical flowers that feel artistic and painterly. Use water-based techniques or specially formulated watercolor polishes to create flowers that look like they’re painted with actual watercolors — with bleeding, transparency, and organic color mixing.
Watercolor Polish Application
Some brands make polish specifically designed to mimic watercolor effects, creating thin, translucent layers that blend and bleed into each other naturally. If using regular polish, apply thin layers to a wet base and encourage the colors to blend by adding tiny drops of water or diluted polish. The beauty of this technique is its unpredictability — each nail becomes unique and organic-looking rather than perfectly uniform.
Flower Subjects for Watercolor
- Plumerias with soft pink, white, and yellow blending
- Hydrangeas with layers of blue and purple diffusion
- Lotus flowers with pale pink centers bleeding into white
- Orchids with delicate, translucent petal effects
Worth knowing: Watercolor designs look particularly stunning in natural light because the translucent layers create depth and dimension that catches light differently than opaque polish.
12. Coral Pink Gradient With White Beach Scene
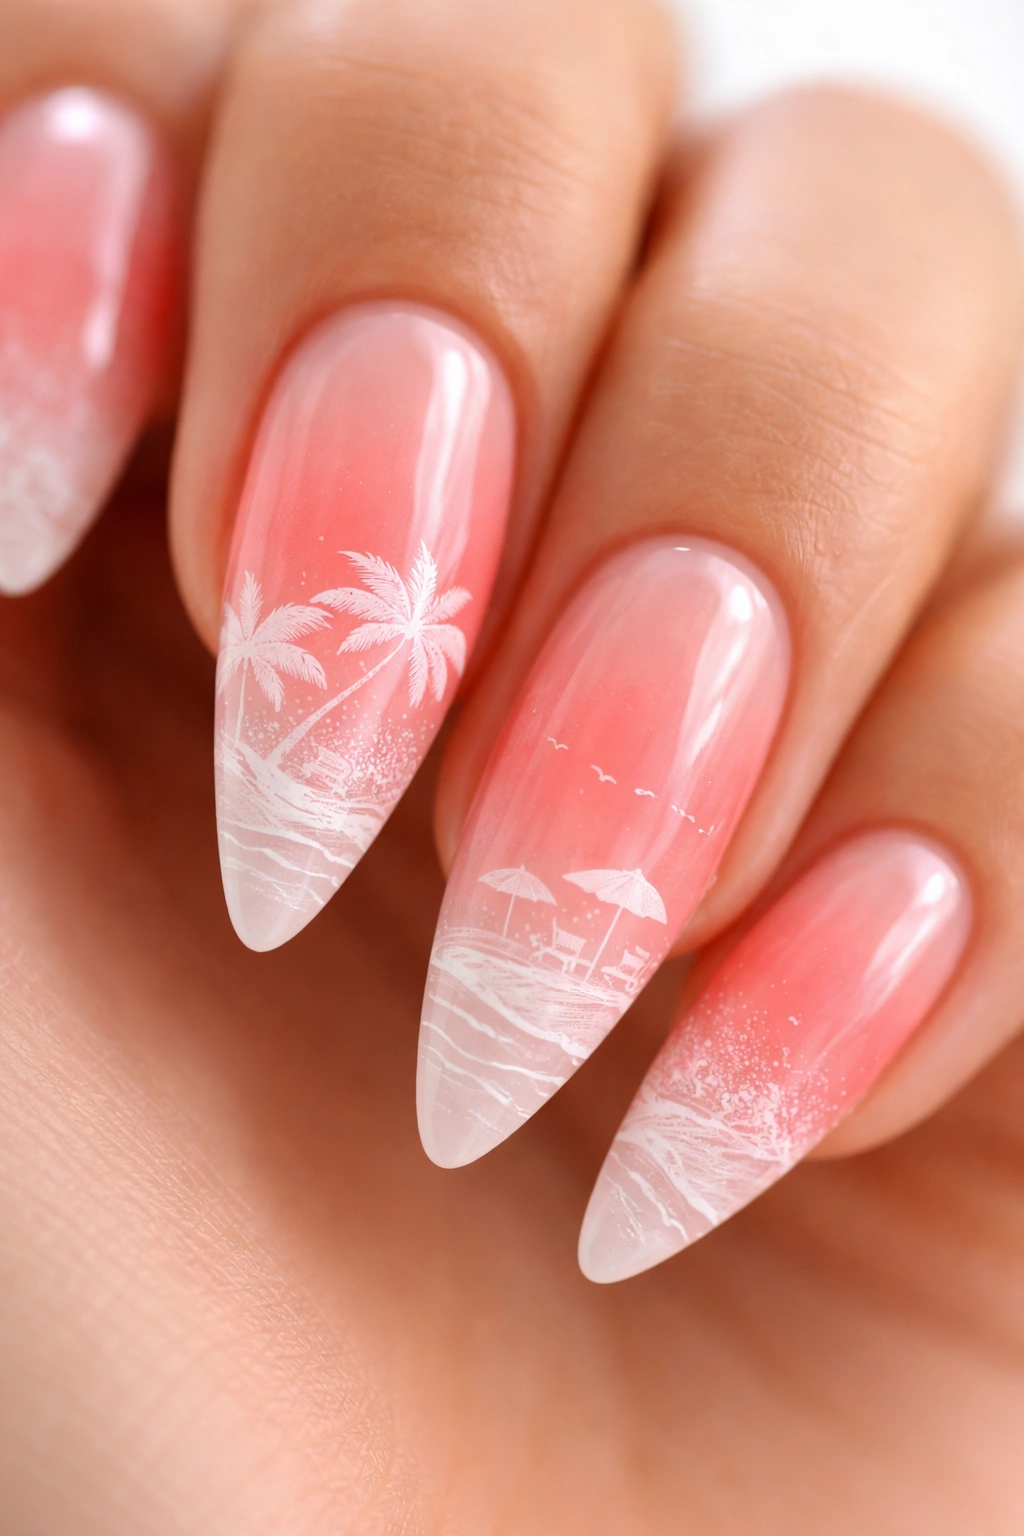
A gradient that transitions from deeper coral at the tip to pale coral pink at the cuticle creates a soft tropical foundation. Over this gradient, paint a delicate white beach scene featuring palm trees, beach umbrellas, and ocean waves.
Creating the Gradient Base
Use a makeup sponge to blend two to three coral shades into a smooth gradient. The sponge technique creates soft blending rather than harsh lines. Once this base is set, the white beach scene becomes the focal point. The contrast between the soft gradient and crisp white imagery creates visual interest and dimension.
White Beach Scene Details
- Paint thin palm trees with minimal detail for elegance
- Include a beach umbrella in white outline form
- Add wavy horizon lines suggesting ocean and beach
- Include tiny stars or a crescent moon for evening-beach ambiance
- Keep the white imagery concentrated toward the tip of the nail
Pro tip: This design captures the essence of tropical themes without relying on overly bright or saturated colors, making it versatile enough for everyday wear and professional environments.
13. Marbled Effect With Tropical Colors
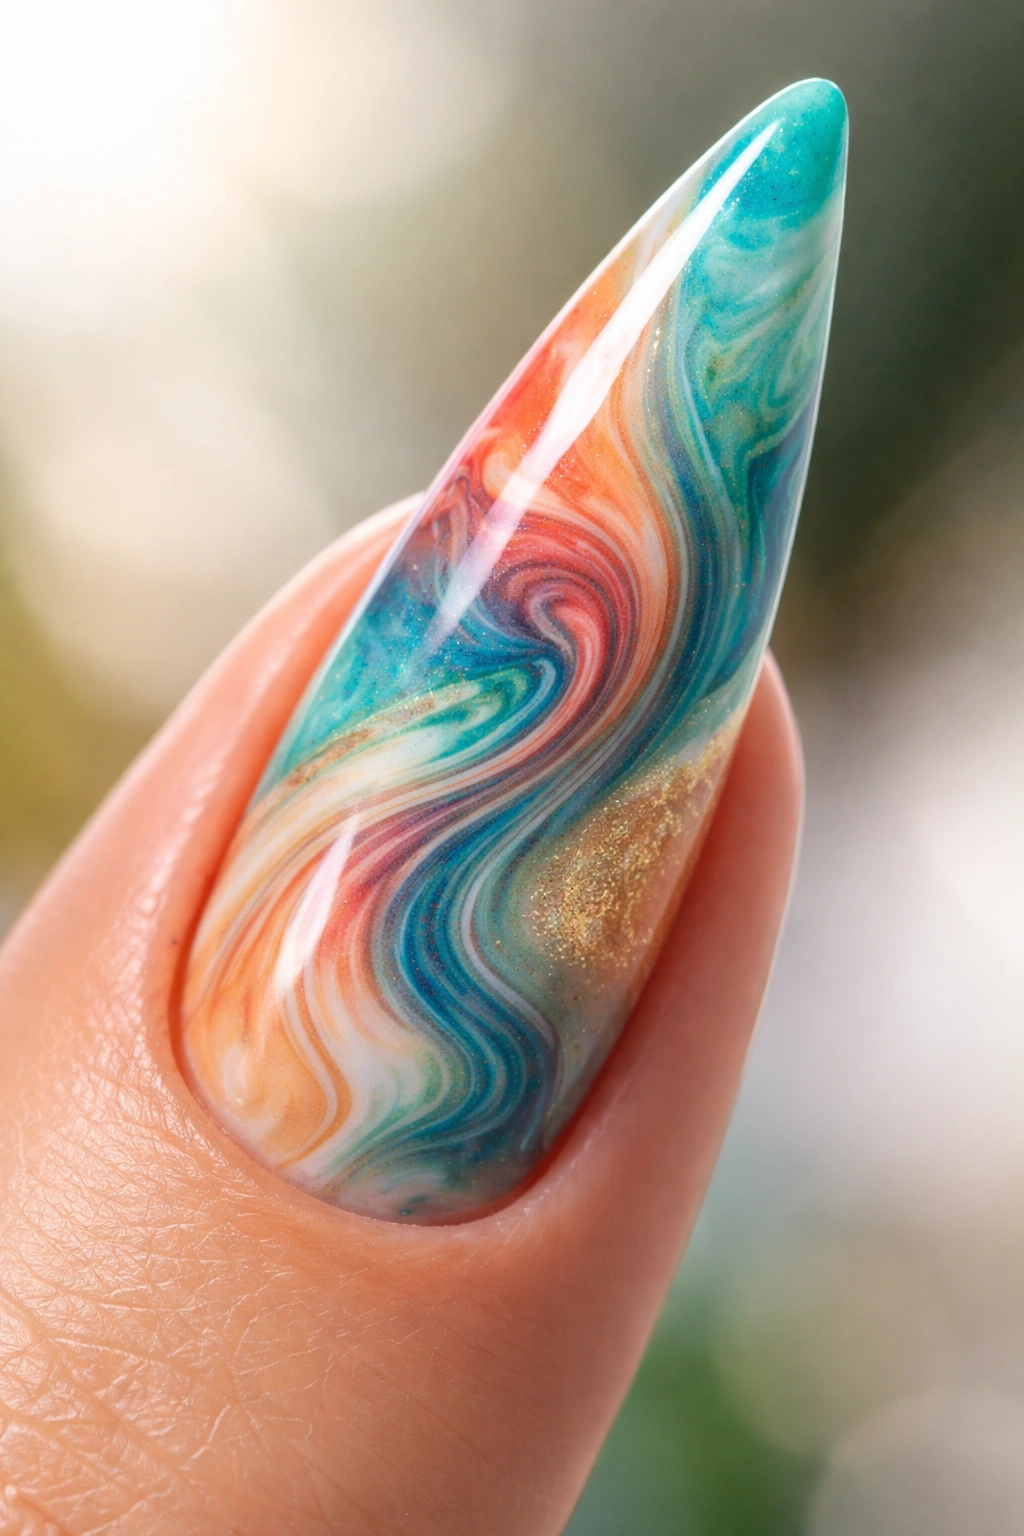
Marble techniques create organic, swirled patterns that feel luxurious and unpredictable. Using tropical colors — teals, corals, ocean blues, and sandy tones — create a marbled effect that captures tropical essence through color combination rather than identifiable imagery.
Water Marbling or Swirl Techniques
Traditional water marbling involves floating polish on water and swirling it, then dipping the nail into the pattern. Alternatively, create the effect directly on the nail using a thin brush or toothpick to drag and swirl wet polish into patterns. Each nail becomes a unique abstract artwork. The unpredictability is part of the charm — no two marbled nails are identical, making your mani genuinely one-of-a-kind.
Color Palettes for Tropical Marble
- Turquoise, coral, white, and gold for a sophisticated look
- Ocean blue, sandy tan, and white for beach-inspired designs
- Teal, pink, orange, and cream for vibrant tropical energy
- Purple, green, and gold for jewel-tone tropical elegance
Worth knowing: Marbled designs work beautifully on stiletto nails because the shape gives you more surface area for the pattern to be visible and striking.
14. Tropical Fruit Medley
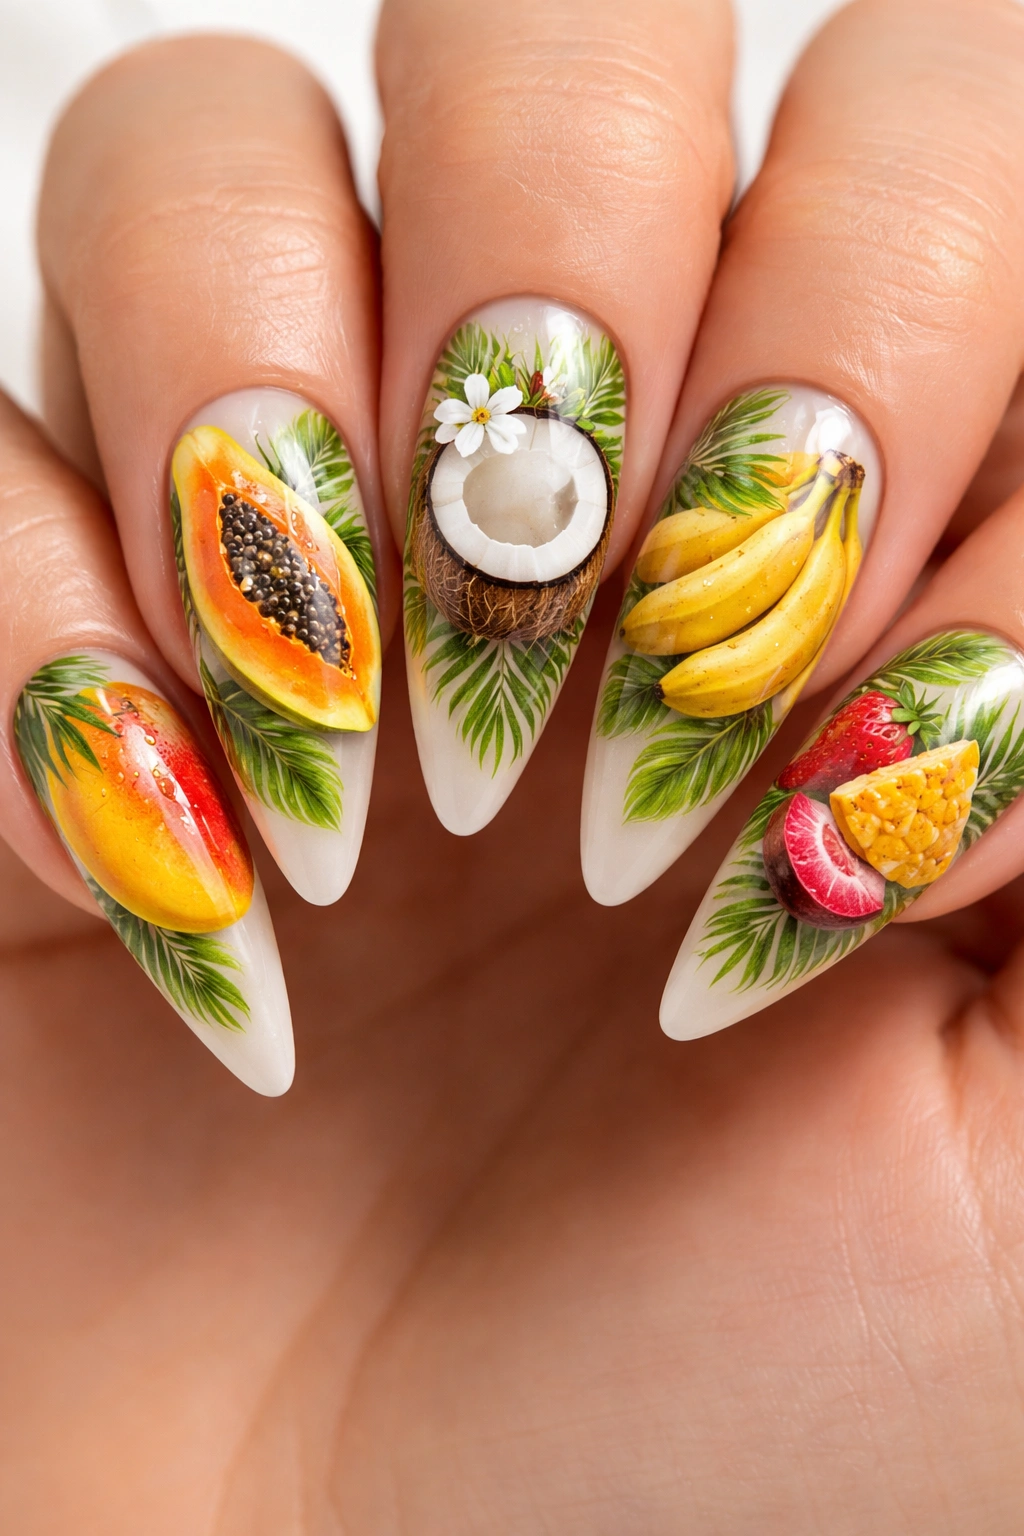
Showcase multiple tropical fruits on different nails — mangoes, papayas, coconuts, and bananas — creating a colorful, playful design that celebrates tropical abundance. Each nail becomes a small fruit illustration, varying the style and detail level for visual interest.
Realistic Fruit Rendering
Paint mangoes with their characteristic orange-red coloring and smooth shape, papayas with pink or orange flesh and black seeds, coconuts with brown husk and white interior, and bananas in various stages of ripeness. Include fine details like leaf accents, shadows, and highlights that make the fruits feel three-dimensional. Some fruits should be whole, others sliced, others arranged in groups.
Fruit Distribution Across Nails
- Paint a different fruit on each of five nails for a complete set
- Repeat favorite fruits across multiple nails for cohesion
- Include mint leaves or tropical flowers as accent elements between fruits
- Vary the orientation and scale of fruits for dynamic composition
Pro tip: Fruit designs feel especially vibrant and appealing when you include bright, contrasting colors and careful attention to highlights and shadows that make fruits look glossy and fresh.
15. Sunset Gradient With Palm Fronds
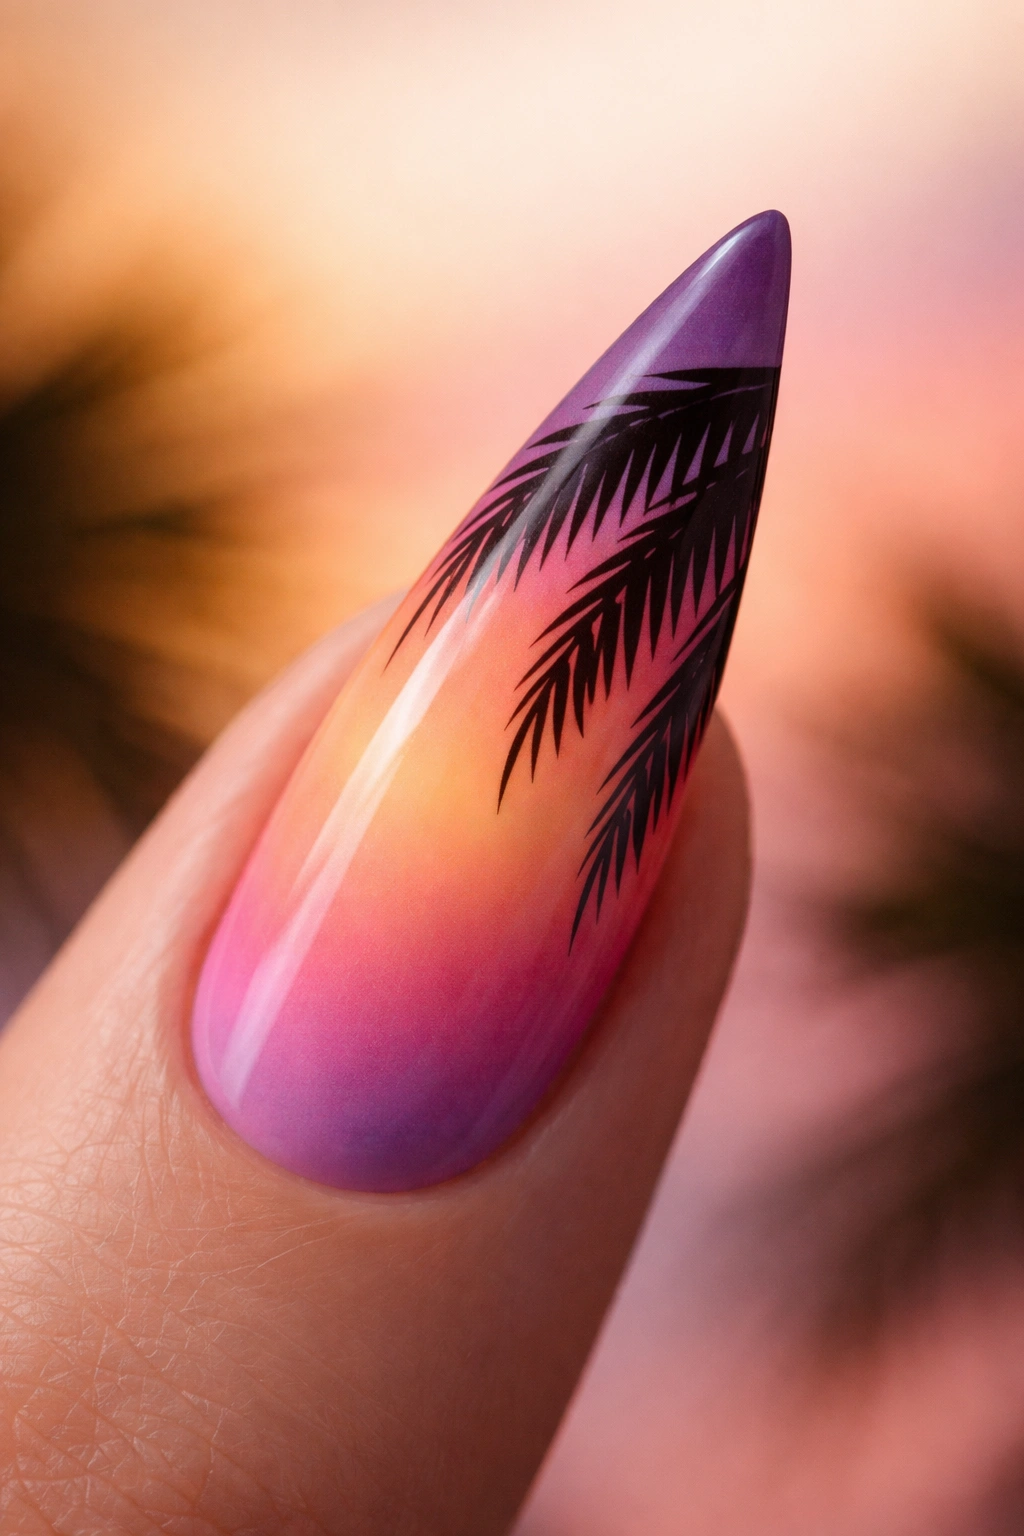
Layer a stunning sunset gradient with carefully painted palm fronds silhouetted against the sky. This design combines the atmospheric beauty of an ombré gradient with specific tropical imagery, creating a design that’s both romantic and distinctly beach-themed.
Building the Sunset Foundation
Create a gradient from warm peachy tones near the cuticle, transitioning to coral, then hot pink, then purple toward the tip. The gradient should be smooth and blended using a makeup sponge technique. Once the gradient is completely set, add silhouettes of tall palm fronds at the tip area, their outlines in black or very dark green, creating contrast against the colorful background.
Palm Frond Details
- Paint fronds with individual leaflets radiating from a central stem
- Vary frond heights and angles for organic movement
- Include multiple overlapping fronds to create jungle density
- Keep fronds silhouetted in dark color for maximum contrast
Worth knowing: This design works particularly well on stilettos because the length of the nail gives the sunset gradient space to fully transition through multiple colors while still leaving room for the palm details at the tip.
16. Holographic Tropical Elements
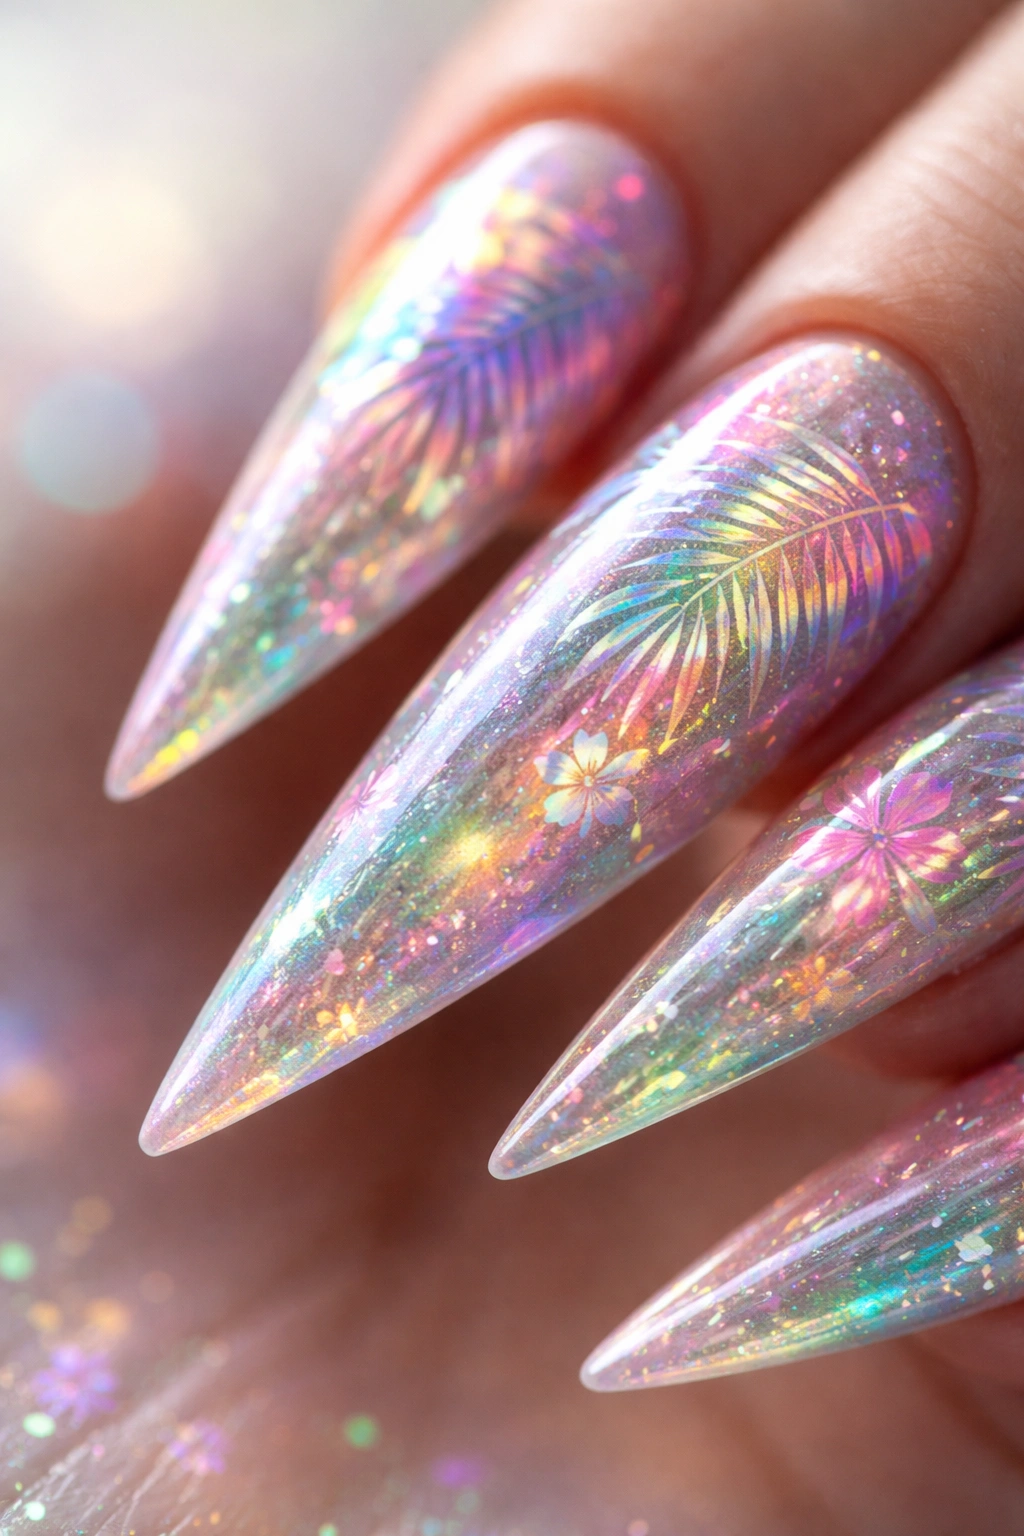
Holographic polishes and foils bring a futuristic twist to tropical themes, creating multidimensional effects that shift and change with light and movement. Use holographic polish as a base or as detailed tropical elements like flowers, leaves, and geometric patterns.
Holographic Application Methods
Apply holographic polish evenly across the nail for full coverage, or use it selectively for accent elements. The magic of holographic finishes is their color-shifting quality — they appear different colors from different angles. Pair holographic tropical designs with solid bases in complementary colors to make the holographic elements pop. Seal everything with a quality topcoat to protect the holographic effect.
Design Ideas With Holographic Elements
- Holographic flowers on a cream or pale pink base
- Holographic geometric tropical patterns on nude backgrounds
- Holographic leaves with hand-painted flower accents
- Scattered holographic glitter creating a rainbow tropical effect
Pro tip: Holographic elements photograph beautifully under natural light and look especially stunning in motion as your hands move and the colors shift.
17. Tropical Leaves on Chrome Base
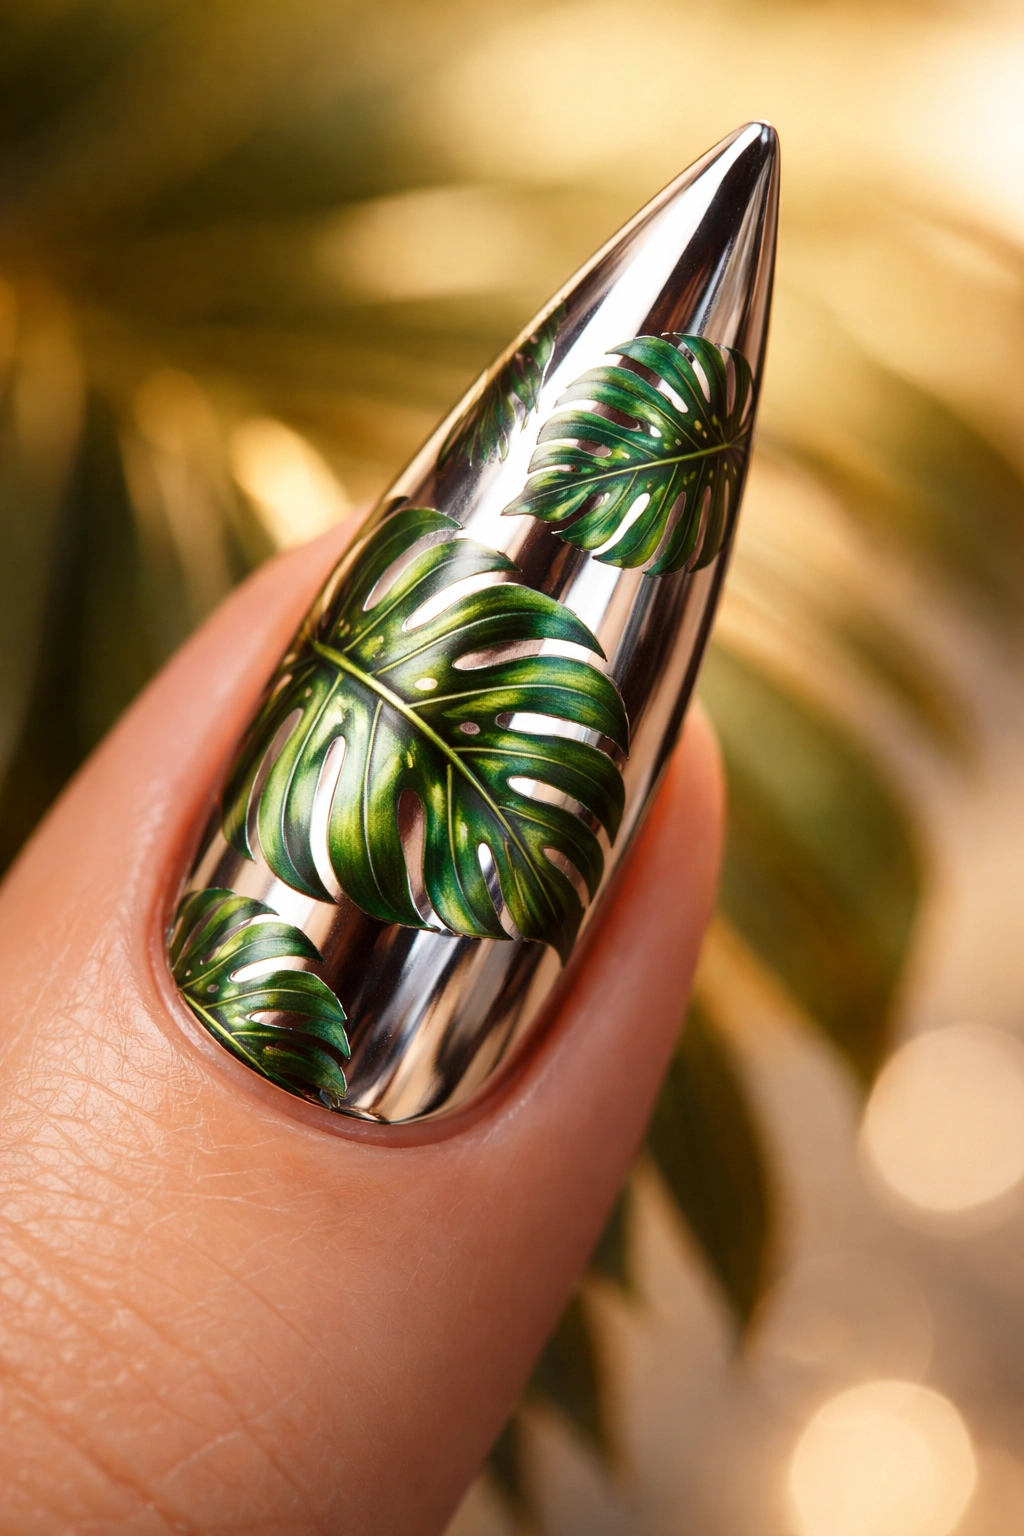
Chrome finishes create mirror-like, metallic surfaces that feel futuristic and luxurious. Layer tropical leaf designs over a subtle chrome base, or create a reverse effect with leaf outlines revealing chrome beneath a darker topcoat.
Chrome Base Application
Professional chrome finishes require specific powder and application technique best done by experienced nail technicians, but the results are stunning. A warm rose gold chrome or cool silver chrome provides a sophisticated foundation for tropical imagery. The reflective quality of chrome makes any design layered over it appear to have additional depth and dimension.
Leaf Designs on Chrome
- Paint green monstera leaves with detailed veining over the chrome
- Create palm frond silhouettes that contrast with the reflective base
- Use negative space, removing portions of overlay to reveal chrome
- Add gold or copper accents to complement the metallic base
Worth knowing: Chrome finishes require protective topcoating and careful handling to maintain the mirror finish, but they create an undeniably luxurious aesthetic that elevates any design.
18. Ombré Blue to Green With Shells and Pearls
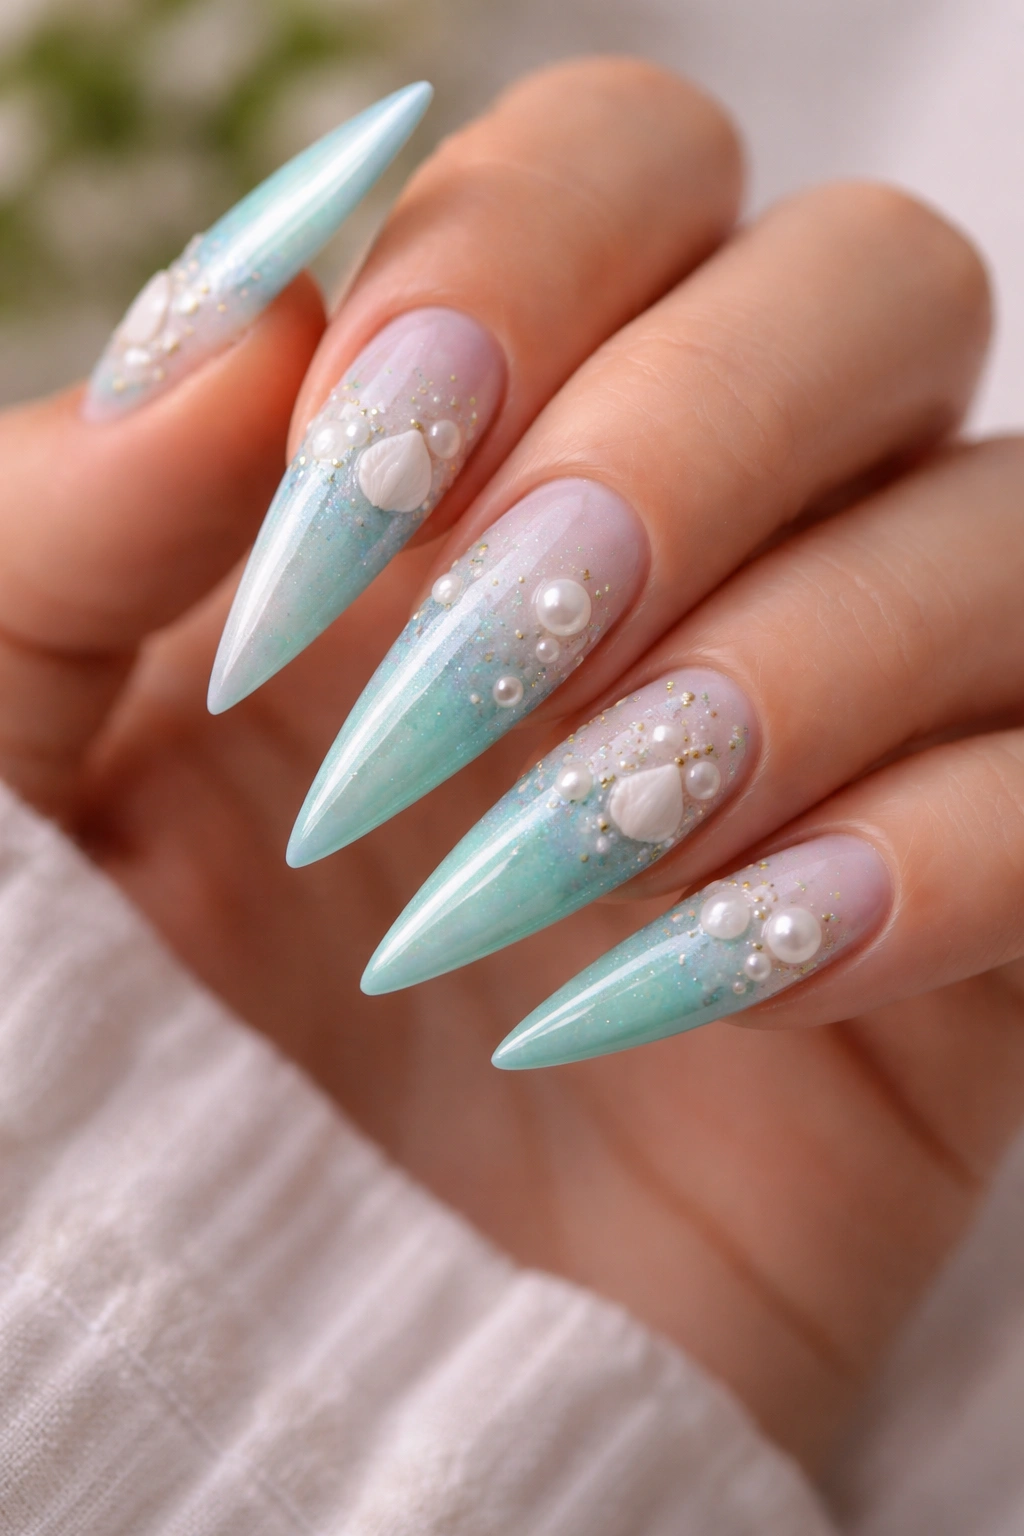
An ombré that transitions from sky blue at the cuticle to sea green at the tip creates an oceanic foundation. Add delicate shells and pearl accents scattered across the gradient, using white, cream, and iridescent elements.
Gradient Execution
Blend sky blue into turquoise, then into seafoam green using a makeup sponge technique. The transition should feel natural and aquatic. Once the gradient is set, add shell designs in white and cream using careful detail work. Paint scallop shells with radiating ridges, conch shells with spiral patterns, and clam shells with ridged textures.
Pearl and Shell Accents
- Paint small white pearls with highlight spots creating shine and dimension
- Include various shell types for visual interest and variety
- Add tiny starfish or sand dollars as complementary elements
- Use iridescent topcoat to make the overall design shimmer
Worth knowing: This design captures tropical ocean vibes without featuring bright, saturated colors, making it work beautifully in conservative professional settings while still feeling distinctly tropical.
19. Tropical Ombre With Floral Accents
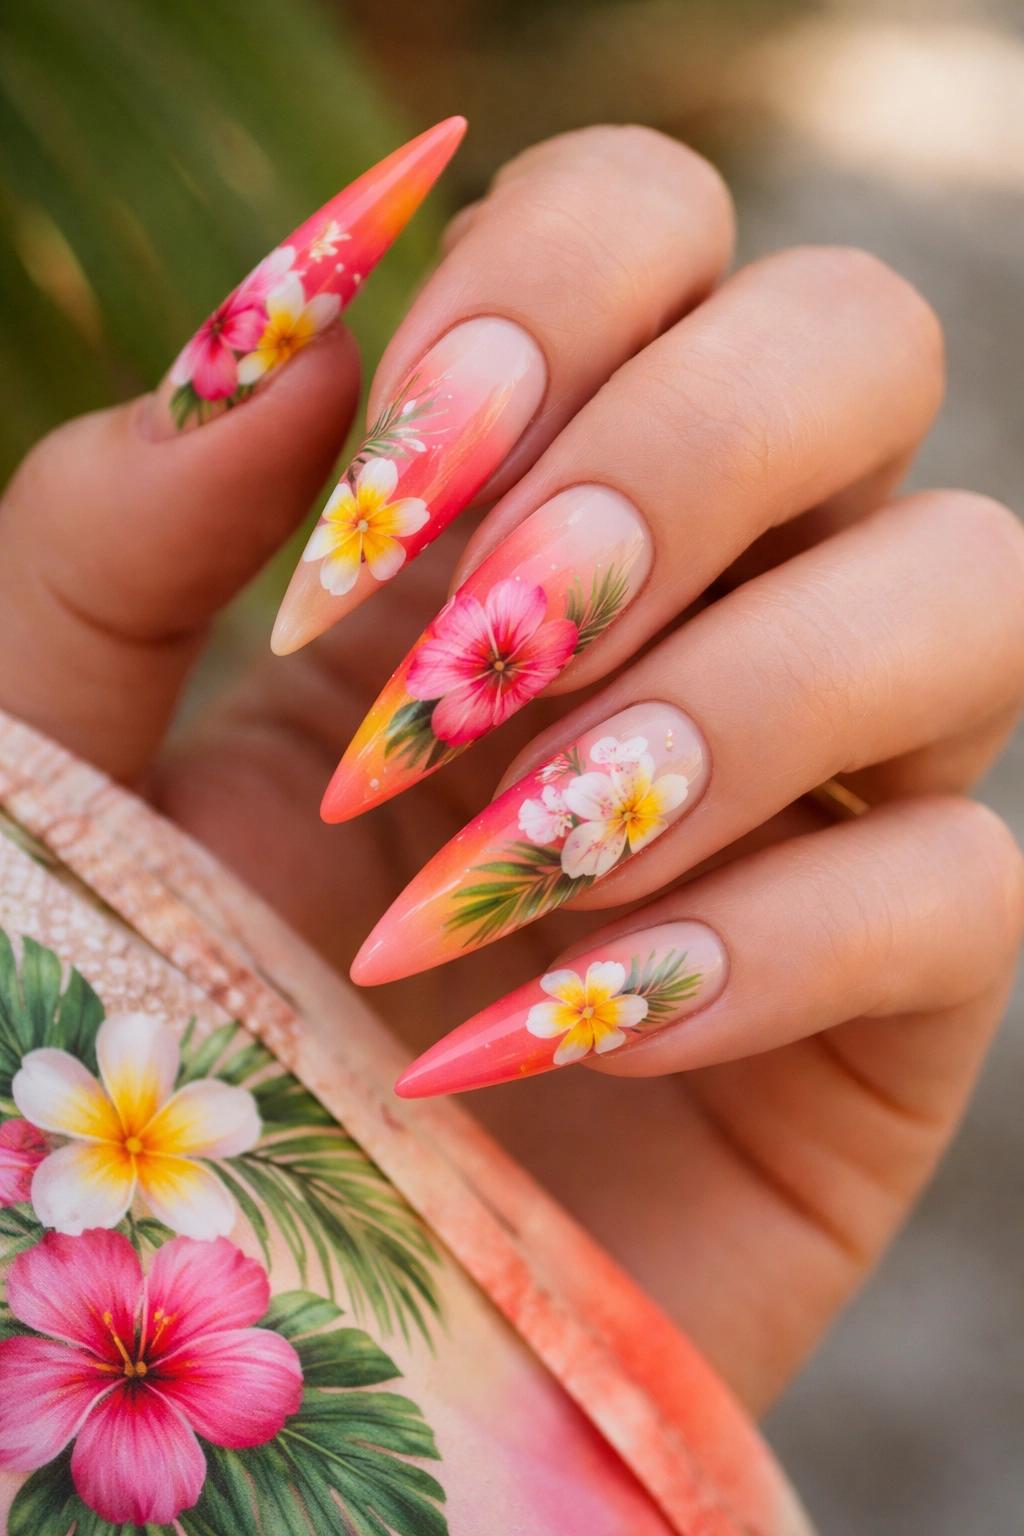
Create an ombré using tropical colors — coral to orange to peachy cream — then add hand-painted floral accents that float across the gradient. The flowers should feature realistic details and varied colors that complement the ombré base.
Ombré Color Flow
Blend coral, orange, and peachy cream into a cohesive gradient that flows from darker at the tip to lighter at the cuticle. Use the makeup sponge technique for smooth, seamless blending. The ombré provides energy and visual interest on its own, so floral accents should be strategic rather than overwhelming.
Floral Placement and Design
- Paint 2-4 flowers per nail positioned asymmetrically
- Include various flower types — hibiscus, plumeria, and orchids
- Use contrasting colors that stand out against the ombré background
- Add green leaves and stems for botanical balance
Pro tip: This design balances realism with gradient effects, appealing to people who want both artistic hand-painted elements and the clean simplicity of gradient work.
20. Neon Tropical With Geometric Elements
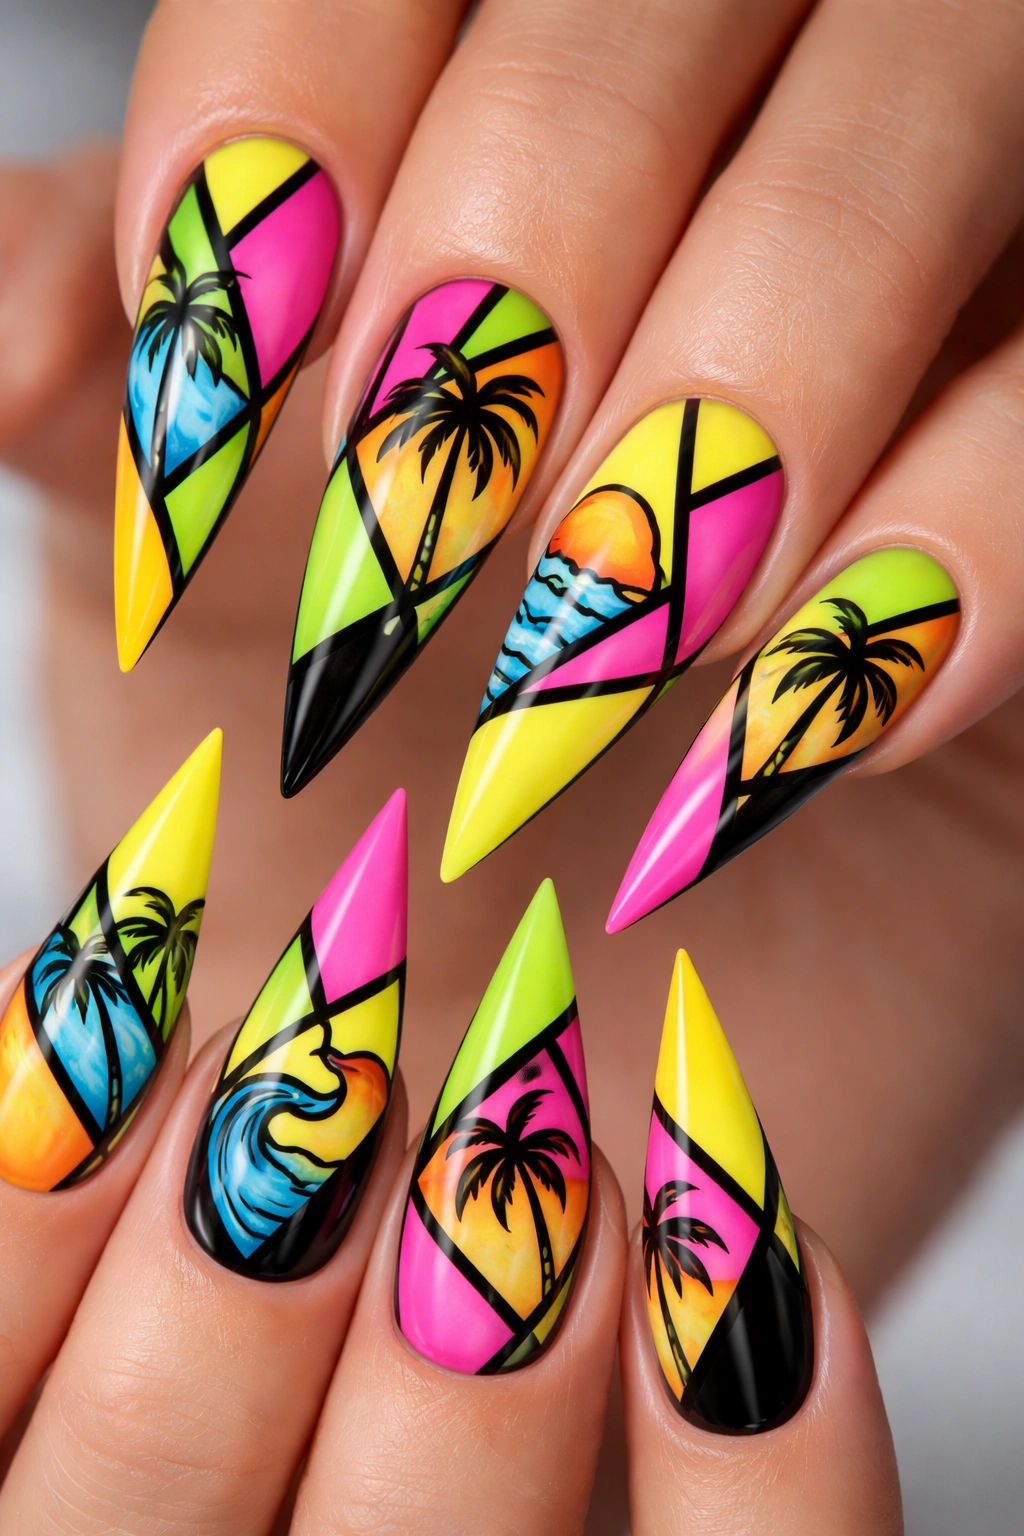
Combine neon tropical colors with geometric patterns and clean lines for a design that feels contemporary and graphic. Mix neon pink, neon green, and neon yellow with black geometric borders and angular shapes.
Geometric Pattern Design
Create geometric sections on each nail using black lines — triangles, circles, chevrons, and angular shapes. Fill these sections with solid neon colors, creating a stained-glass effect. Within geometric sections, paint simplified tropical elements like palm trees, flowers, or waves in contrasting neon colors. The geometric structure brings order to the bright colors, making the overall design feel intentional and sophisticated.
Color and Pattern Balance
- Use black lines as structural elements to organize the neon colors
- Mix geometric shapes with organic tropical imagery
- Vary the size and density of patterns across nails
- Include white or metallic accents to break up solid neon areas
Worth knowing: This design works especially well for people who love both bold color and modern graphic design, creating a truly unique aesthetic that’s neither traditionally tropical nor purely geometric, but an exciting combination of both.
Final Thoughts
Tropical stiletto nails represent the perfect meeting point between edge and escape. Whether you’re drawn to realistic florals, abstract color play, or modern geometric interpretations of tropical themes, there’s a design here that matches your aesthetic and mood. The stiletto shape elevates every design option, transforming tropical themes from casual beach wear into genuinely sophisticated nail art that works across any setting.
The beauty of tropical nail inspiration is that it spans the spectrum from minimalist line art to elaborate, detailed illustrations, from neon modern to soft romantic. You can lean into vacation vibes for a trip or maintain tropical energy year-round. Your nail technician can help you customize any of these designs based on your lifestyle, skin tone, and personal preferences — colors can be adjusted, details simplified or added, and elements combined in endless ways.
Whatever tropical stiletto design speaks to you, the commitment is temporary while the confidence boost is immediate. Treat these ideas as starting points for conversations with your nail artist, reference photos to copy exactly, or launching pads for completely unique creations that blend tropical beauty with your personal style.
