

Hot pink and rhinestones aren’t just a beauty combination—they’re a statement. There’s something undeniably glamorous about stiletto nails adorned with glittering stones that catch the light with every gesture, transforming your hands into miniature works of art. Whether you’re heading to a night out, a special celebration, or simply want to feel more confident in your everyday life, hot pink stilettos with rhinestones deliver that perfect balance of edge and elegance that makes heads turn. The beauty of this nail design trend is its flexibility—you can go subtle and refined or bold and unapologetically dazzling, depending on your mood and the occasion.
The combination of hot pink and rhinestones has become increasingly popular across social media platforms, beauty salons, and nail art communities. What makes these designs so appealing is that they work across different seasons, skin tones, and personal styles. A hot pink stiletto with strategic rhinestone placement can feel fresh and modern rather than dated or overdone, especially when you choose the right design variation for your personality. The key is understanding the different styles available so you can pick the one that resonates with you most.
If you’re considering taking the plunge into hot pink stiletto nails with rhinestones, you’ve got far more options than you might think. From minimalist designs to full-on glamour, these designs range in complexity, sparkle level, and aesthetic direction. Let’s explore ten distinct hot pink stiletto nail designs with rhinestones that showcase the incredible variety possible within this category.
Understanding Hot Pink Stiletto Nails With Rhinestones
Hot pink stiletto nails with rhinestones represent a specific intersection of nail design trends. The stiletto shape itself—long, tapered, and dramatically pointed—creates a perfect canvas for showcasing rhinestone embellishments because the extended surface area allows light to bounce across multiple stones, creating maximum sparkle. Hot pink as the base color bridges the gap between bold and wearable; it’s confident without being as aggressive as black or nude, yet it’s still eye-catching and fun.
The rhinestones add dimension and luxury to what might otherwise be a simple solid-color manicure. They catch light differently depending on the angle, time of day, and surrounding lighting, which means your nails look different in natural daylight than they do under indoor lighting or in photographs. This dynamic quality is part of what makes rhinestone nails so visually interesting—they’re never quite the same twice.
Quality matters significantly when it comes to rhinestones on nails. High-quality crystals have better clarity, more precise facets, and sparkle with more intensity than lower-quality stones. Premium rhinestones also tend to stay adhered to nails longer when applied correctly with proper nail prep and quality adhesive. The base hot pink color should be opaque and evenly applied so the rhinestones stand out as the focal point rather than blending into an uneven background.
Tips for Choosing the Right Rhinestone Style
Not every hot pink stiletto design calls for the same rhinestone approach, and understanding your options helps you choose a design that’ll genuinely make you happy when you wear it. The first decision involves placement: are you going for all-over coverage, accent nails only, or scattered strategic placement? Full coverage creates maximum glamour and sparkle but requires more rhinestones and a bolder aesthetic. Accent designs—where only one or two nails feature rhinestones—offer a more sophisticated, balanced look that works in professional settings while still delivering visual interest.
The size of your rhinestones matters too. Larger stones (3-5mm) create bold statements and are visible from a distance, but they can feel heavy if overused. Smaller stones (1-2mm) offer more delicate, refined sparkle and work beautifully for intricate patterns or scattered designs. A mix of stone sizes—combining larger focal stones with smaller accent stones—creates depth and visual complexity that photographs well and looks interesting up close.
Consider the type of stones you’re drawn to as well. Standard glass rhinestones offer classic sparkle and excellent light refraction. AB (Aurora Borealis) rhinestones have an iridescent coating that creates rainbow effects as they catch the light, adding extra dimension. Swarovski crystals represent the premium option with superior clarity and brilliant sparkle, though they’re pricier. Your choice depends on your budget and how much sparkle you want your nails to deliver.
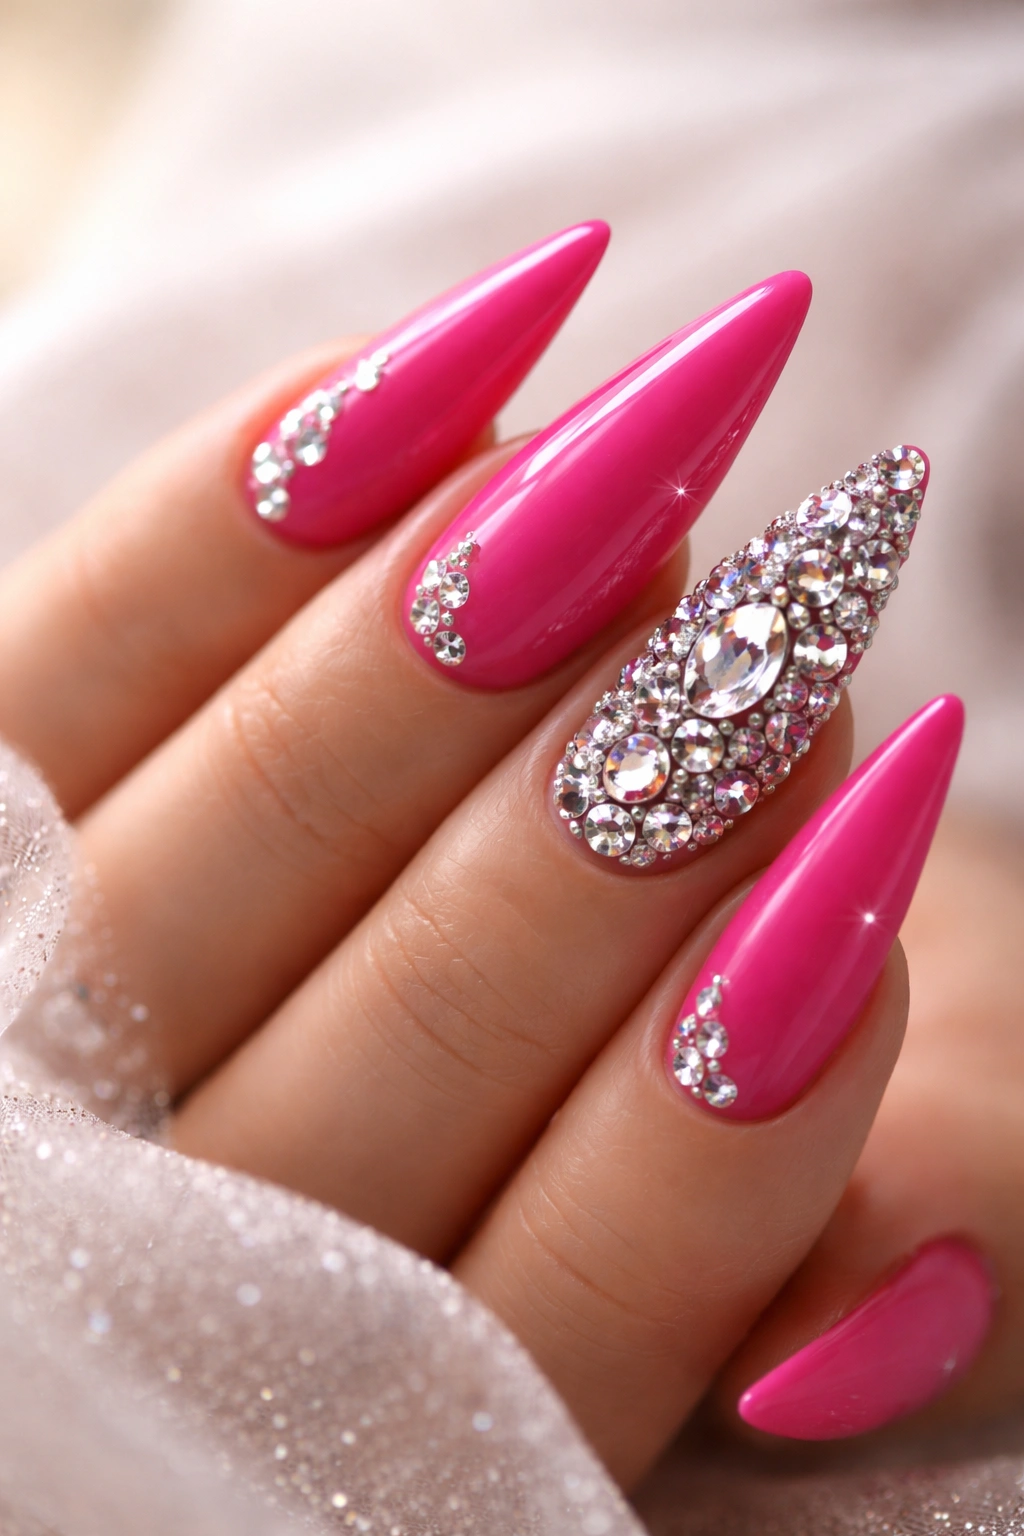
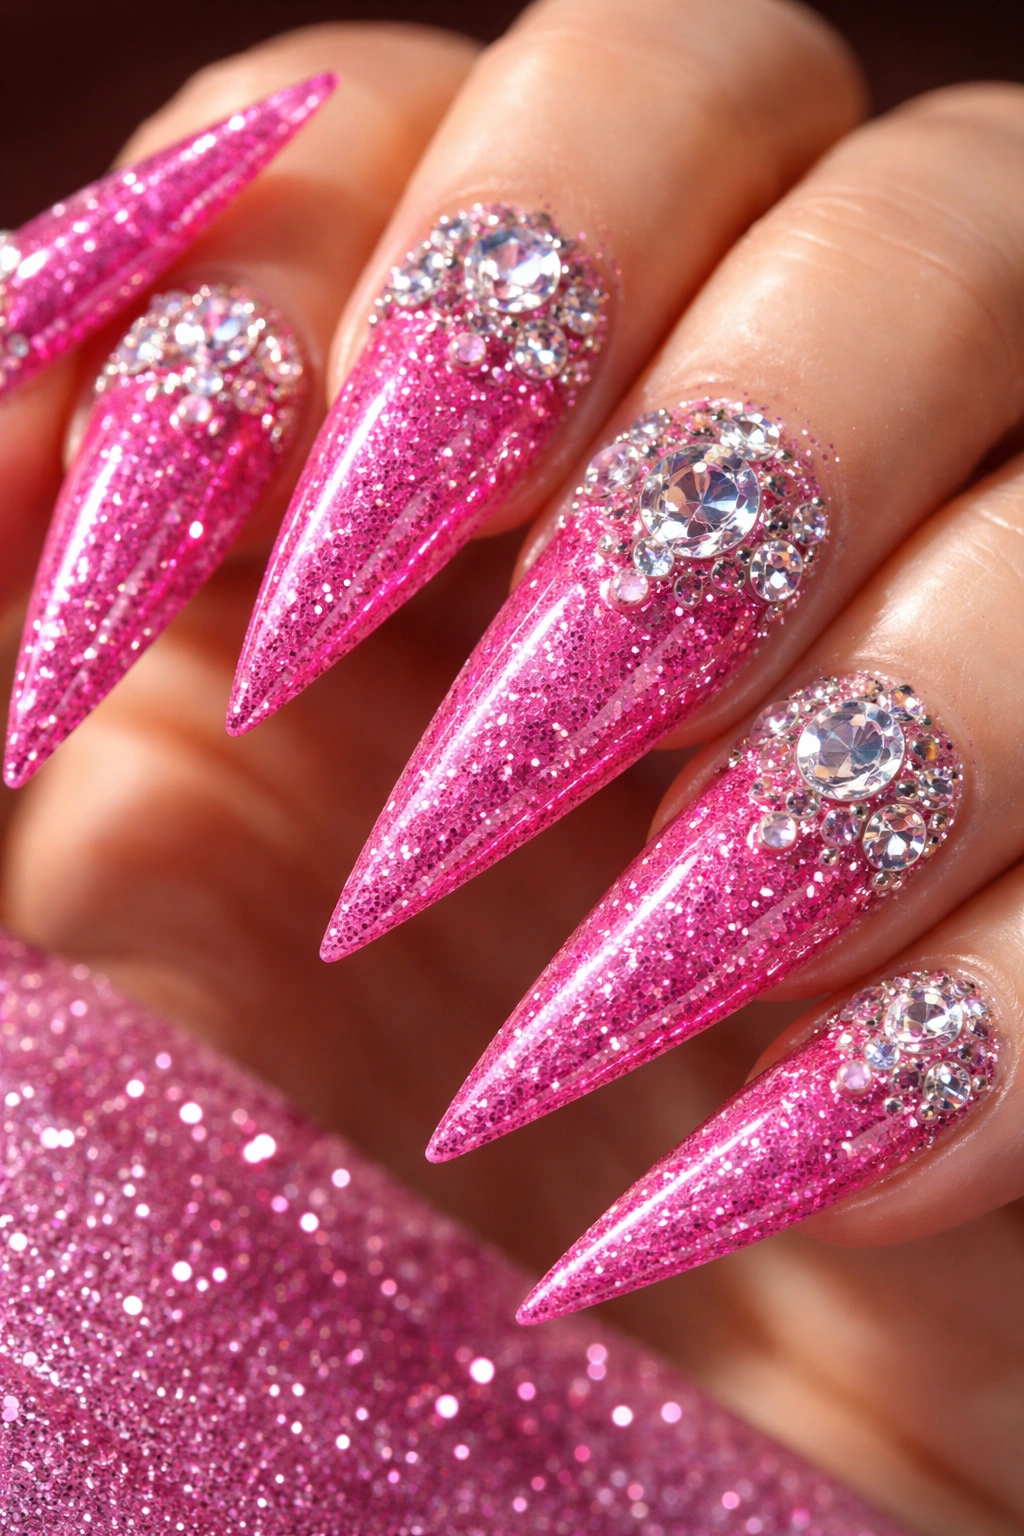
1. Full-Coverage Crystal Hot Pink Glamour
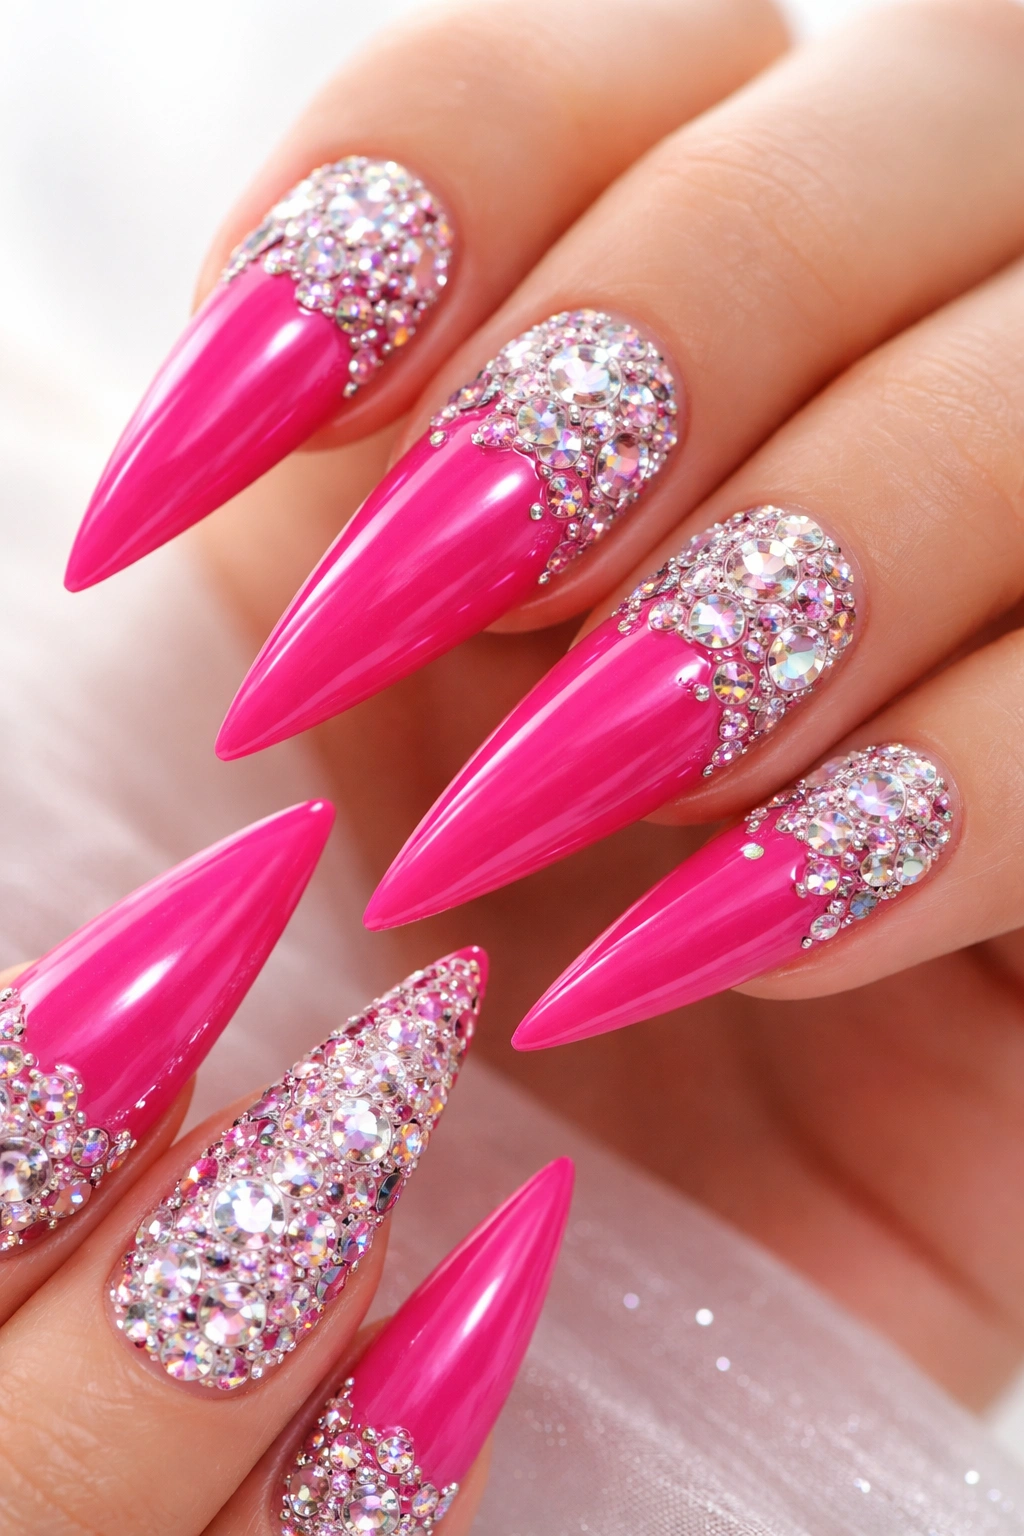
This is the maximalist approach to hot pink stiletto nails with rhinestones—a densely embellished design where rhinestones cover nearly the entire nail surface, creating an absolutely stunning glittery effect. The hot pink serves as barely-visible background color between the stones, which collectively create an all-over shimmer and sparkle that’s impossible to miss. When you move your hands, light bounces across dozens of rhinestones simultaneously, creating a dazzling effect that photographs beautifully and turns heads in person.
Why This Design Steals the Show
This style works best when you want maximum impact and aren’t concerned about subtlety. It’s perfect for special events like weddings (as a guest or bridal party member), celebrations, nightlife, or any occasion where you want your nails to be a standout feature of your overall look. The full-coverage approach works particularly well with larger rhinestones (4-5mm) spaced in a deliberate pattern, or with a mix of sizes that creates a more organic, shattered-glass effect.
What to Know About Full Coverage
- Application takes longer than sparser designs, typically 1-2 hours depending on stone size and quantity
- Your nail technician should use quality adhesive designed for rhinestones to ensure longevity
- Full coverage means rhinestones may catch on fabric occasionally, so be mindful when reaching into pockets or handling delicate materials
- These nails truly shine in low-light settings and photographs, making them ideal for evening events and social media
- Maintenance involves gentle cleaning around stones to prevent product buildup that dulls sparkle
Pro tip: Ask your technician to use a mix of matte hot pink between stones rather than glossy finish—matte creates contrast that makes rhinestones pop even more dramatically.
2. Ombre Gradient With Rhinestone Accent
This design blends the visual interest of an ombre effect with strategic rhinestone placement, creating a sophisticated look that feels more artistic than purely sparkly. The ombre typically flows from hot pink at the nail base gradually transitioning to a lighter shade (nude, white, or even silver) toward the tip, with rhinestones concentrated along the gradient line or clustered at the nail tip. This creates a seamless visual flow where the rhinestones feel like a natural extension of the color transition rather than an added embellishment.
The Art of Gradient Design
What makes ombre work so beautifully with rhinestones is the way the two elements complement each other visually. The gradient draws the eye, and the rhinestones punctuate the design at the most visually interesting points. Most nail artists create ombre using a sponging technique with different shades of polish, which creates a soft, blended transition. The rhinestones are then applied once the ombre has completely dried, typically in a line that mirrors the gradient’s visual journey.
Making Your Ombre Truly Special
- Choose a rhinestone color that complements both shades in your ombre (clear, AB, or pink-toned stones usually work best)
- The gradient works beautifully with smaller rhinestones (2-3mm) rather than chunky ones, as they feel more integrated
- Consider placing rhinestones in a curved pattern rather than perfectly straight—it feels more organic and artistic
- Ombre designs photograph incredibly well and look dimensional both in person and in pictures
- This style works for any occasion since the ombre adds sophistication while rhinestones add glam
Worth knowing: The sponging process for ombre takes practice, so if you’re doing this at home, test on a practice nail first or visit an experienced nail technician for best results.
3. Minimalist Hot Pink With Single-Stone Accent
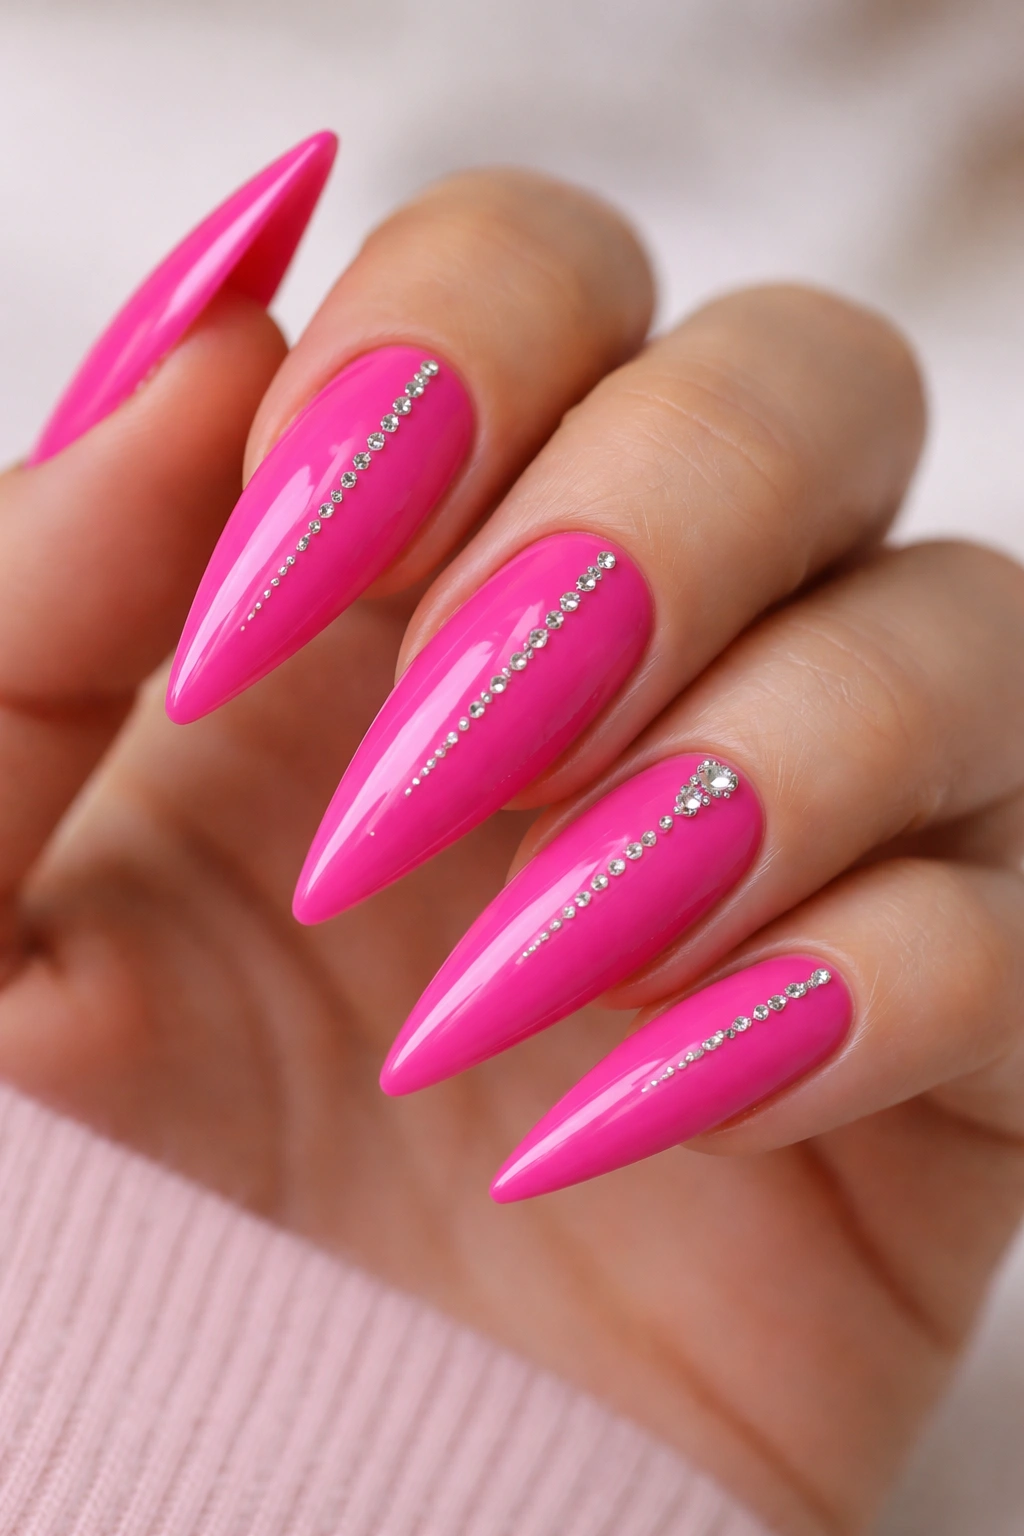
Sometimes less is more, and this design proves that point perfectly. A single row of tiny rhinestones down the center of each nail, or even just one or two strategic stones on accent nails, creates an understated elegance that works in professional, casual, or formal settings. The hot pink stiletto remains the main visual element, but the rhinestones add a subtle touch of sparkle and glamour that elevates the entire look without overwhelming it.
The Power of Restraint
This approach appeals to people who love the idea of rhinestone nails but worry about them being too bold or impractical for their lifestyle. A minimalist design respects the beauty of the hot pink color itself while adding just enough sparkle to feel special and intentional. The negative space—the portions of nail without rhinestones—becomes part of the design’s elegance, creating visual rhythm and preventing the overall effect from feeling busy or chaotic.
How to Style Minimalist Rhinestones
- Use the smallest rhinestones available (1-2mm) for a truly delicate effect
- Placement options include a thin vertical line down the center, a small cluster at the cuticle, or scattered stones on just two or three nails
- Pair with a glossy hot pink finish for maximum shine and polish
- These designs work beautifully for work environments, professional settings, or daily wear
- The understated sparkle feels sophisticated and intentional rather than costume-like
Insider note: Minimalist rhinestone designs last longer on nails because there’s less surface area where stones can potentially loosen or fall off over time.
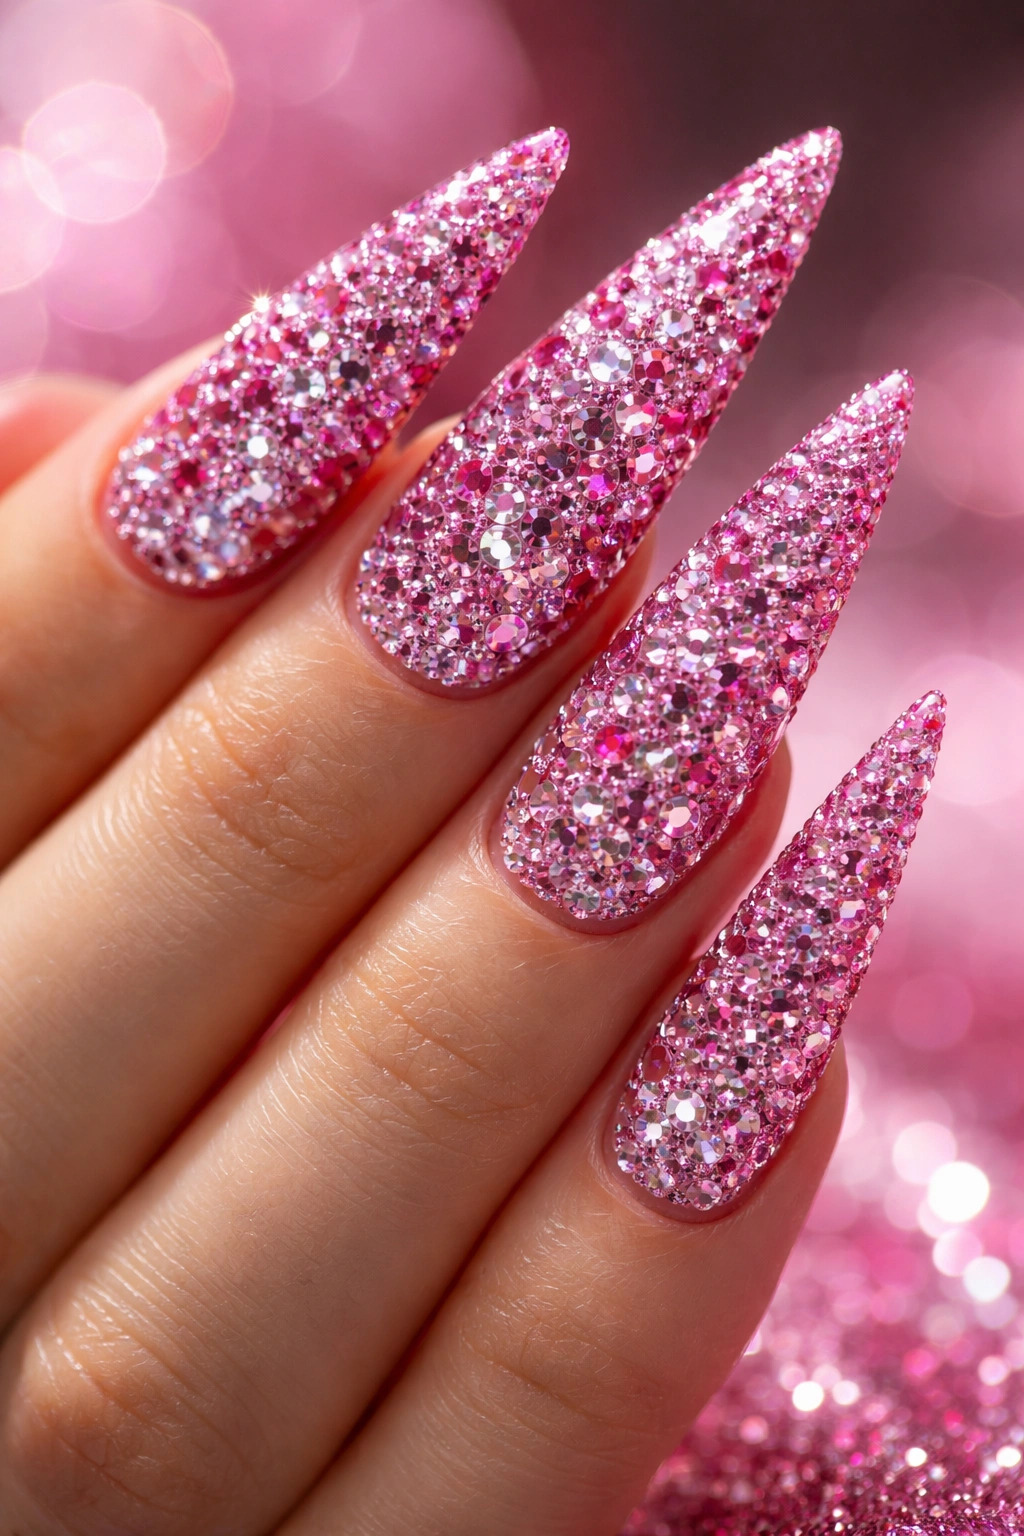
4. Glitter and Rhinestone Combination
Combining hot pink glitter with rhinestones creates a multi-dimensional sparkle effect where you get both fine shimmer and larger stones working together. Typically, the entire nail gets a base of glitter polish in hot pink (or a lighter glitter shade with hot pink base), and then rhinestones are placed strategically on top—perhaps clustered at the tip or arranged in a pattern. The glitter provides overall sparkle while the rhinestones create focal points and extra dimension that catches light differently than glitter alone.
Why Glitter and Stones Work Together
Glitter and rhinestones sparkle in different ways. Glitter particles are tiny and create a fine, all-over shimmer that looks softer and less formal. Rhinestones are larger, individual, and create distinct points of light reflection. Together, they deliver maximum sparkle with multiple layers of visual interest. When light hits the nail, you see both the fine glitter shimmer and the bright flashes of light bouncing off rhinestone facets, creating a more complex and captivating effect than either element alone.
Balancing Both Elements
- Use a quality hot pink glitter polish as your base—this ensures even color and shine
- Allow glitter base to dry completely before applying rhinestones or they may shift
- Choose rhinestone colors that either match or contrast deliberately with your glitter shade
- Scattered rhinestone placement (rather than organized patterns) works best with glitter since glitter is already visually busy
- This combination feels fun and celebratory, perfect for parties and special occasions
Pro tip: If you want to wear this design for an extended period, consider a glitter top coat over the rhinestones once they’re fully adhered—it seals them in and extends their lifespan.
5. Geometric Pattern With Rhinestones
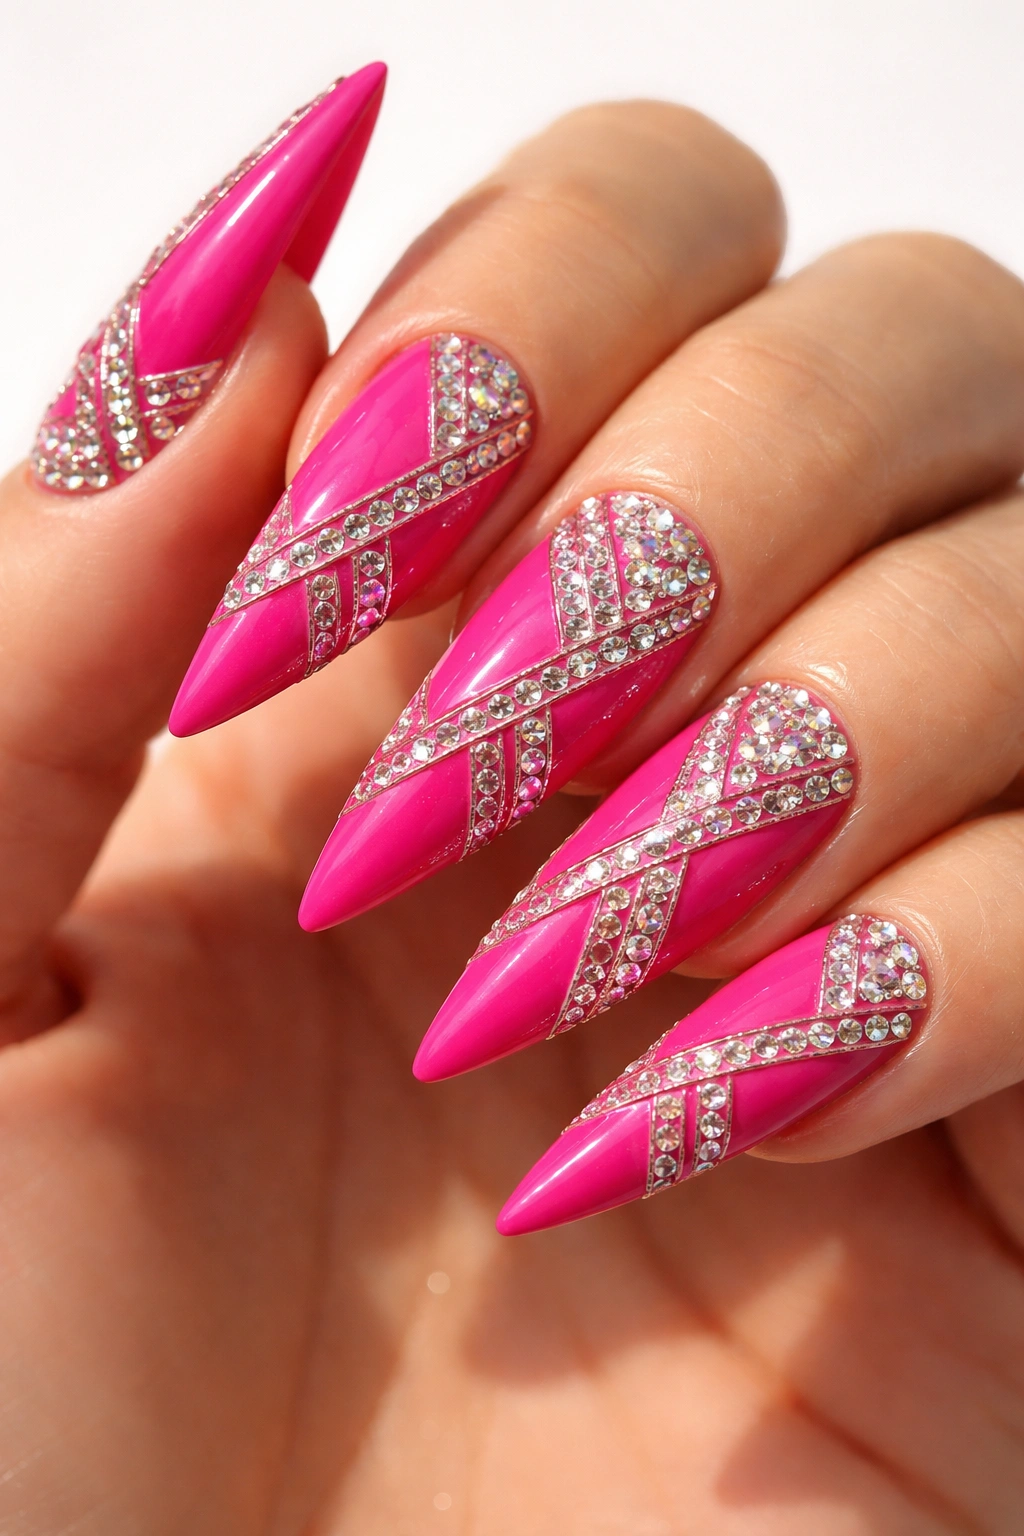
This design approaches rhinestone placement as a structured pattern rather than random sparkle. Geometric designs might include a diagonal stripe of rhinestones across the nail, a geometric border frame, triangles filled with stones, a starburst pattern radiating from the cuticle, or a modern color-block effect with rhinestones along the dividing lines. The hot pink remains the dominant color, but the geometry and rhinestones create visual structure and intentional design that feels artistic and deliberate.
The Art of Pattern Placement
Geometric designs require more planning than random placement but deliver more impressive results. Your nail technician typically sketches the pattern first or uses nail guides to ensure symmetry and precision. The rhinestones then become part of the geometric composition, creating clean lines and organized visual interest. This approach works beautifully for people who appreciate modern, design-forward aesthetics and want their nails to feel artistically considered rather than purely decorative.
What Makes Geometry Work
- Geometric patterns photograph exceptionally well due to their organized, visually balanced composition
- Smaller rhinestones (2-3mm) work better for geometric patterns than chunky stones, which can disrupt clean lines
- Consider creating negative space within your pattern—areas without stones that let the hot pink show through
- Clear or AB rhinestones work best for geometry since they don’t compete with the pattern’s visual interest
- This style works for any occasion and appeals to people with more sophisticated design sensibilities
What to know: Geometric designs take longer to create than organic, scattered designs since placement must be more precise, so expect to spend extra time and potentially pay more for this level of detail.
6. Metallic Accents With Rhinestones
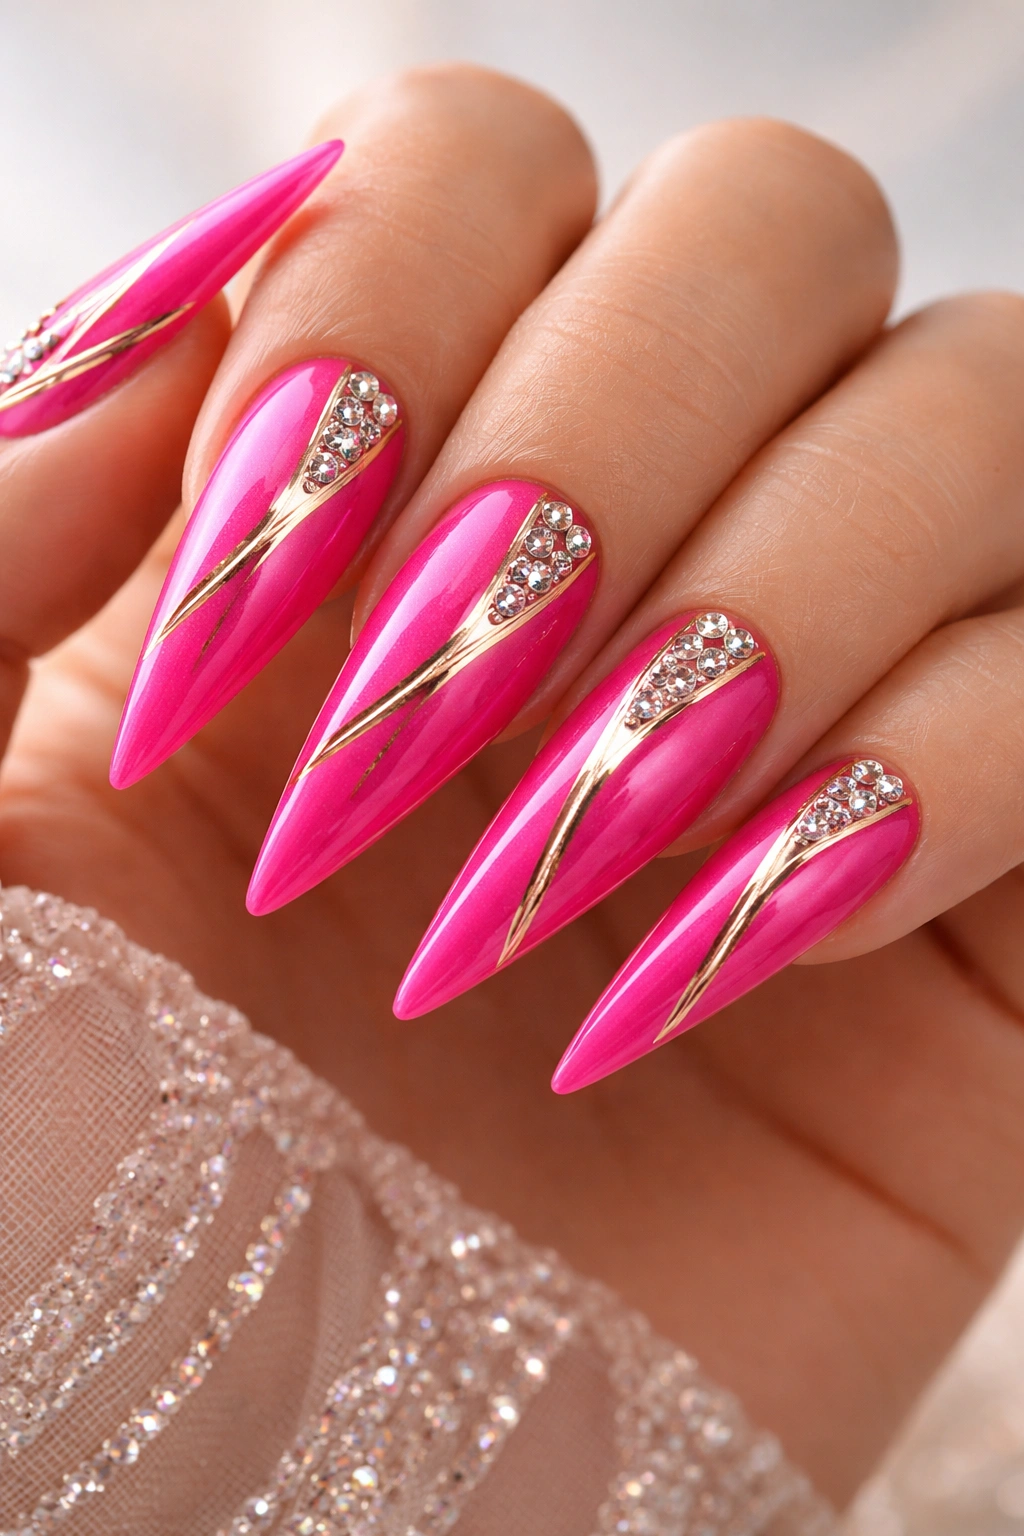
Combining hot pink with metallic elements and rhinestones creates a sophisticated fusion of warm color and cool shine. This might involve a thin gold or silver metallic stripe running through the nail with rhinestones placed along the metallic line, a metallic gradient from hot pink into shimmery silver or gold, or metallic detailing at the cuticle area with rhinestones sprinkled across the nail tip. The metallic elements add a luxe quality that makes rhinestones feel even more precious and intentional.
The Luxury Factor of Metallics
Metallic accents immediately elevate any nail design, suggesting higher-end fashion and luxury. Gold pairs beautifully with hot pink, creating a warm, glamorous combination that feels both modern and classic. Silver or holographic metallics create a cooler, more futuristic aesthetic with hot pink. The combination of metallic shine and rhinestone sparkle delivers layered visual interest—the metallics add smooth, reflective shine while rhinestones add faceted, prismatic light effects.
Pairing Metals and Rhinestones
- Gold metallics pair best with warm-toned rhinestones or clear stones
- Silver or cool metallics work beautifully with AB rhinestones or cool-toned stones
- Metallic gel or foil techniques allow for precise metallic stripe placement
- Consider a thin metallic line as a “frame” for rhinestone placement rather than full coverage with metallics
- This combination works for both casual and formal occasions depending on other design elements
Worth considering: Metallic polish can sometimes make photographing your nails trickier since it reflects light very intensely—experiment with different angles and lighting to find how your nails look best.
7. Scattered Confetti-Style Rhinestones
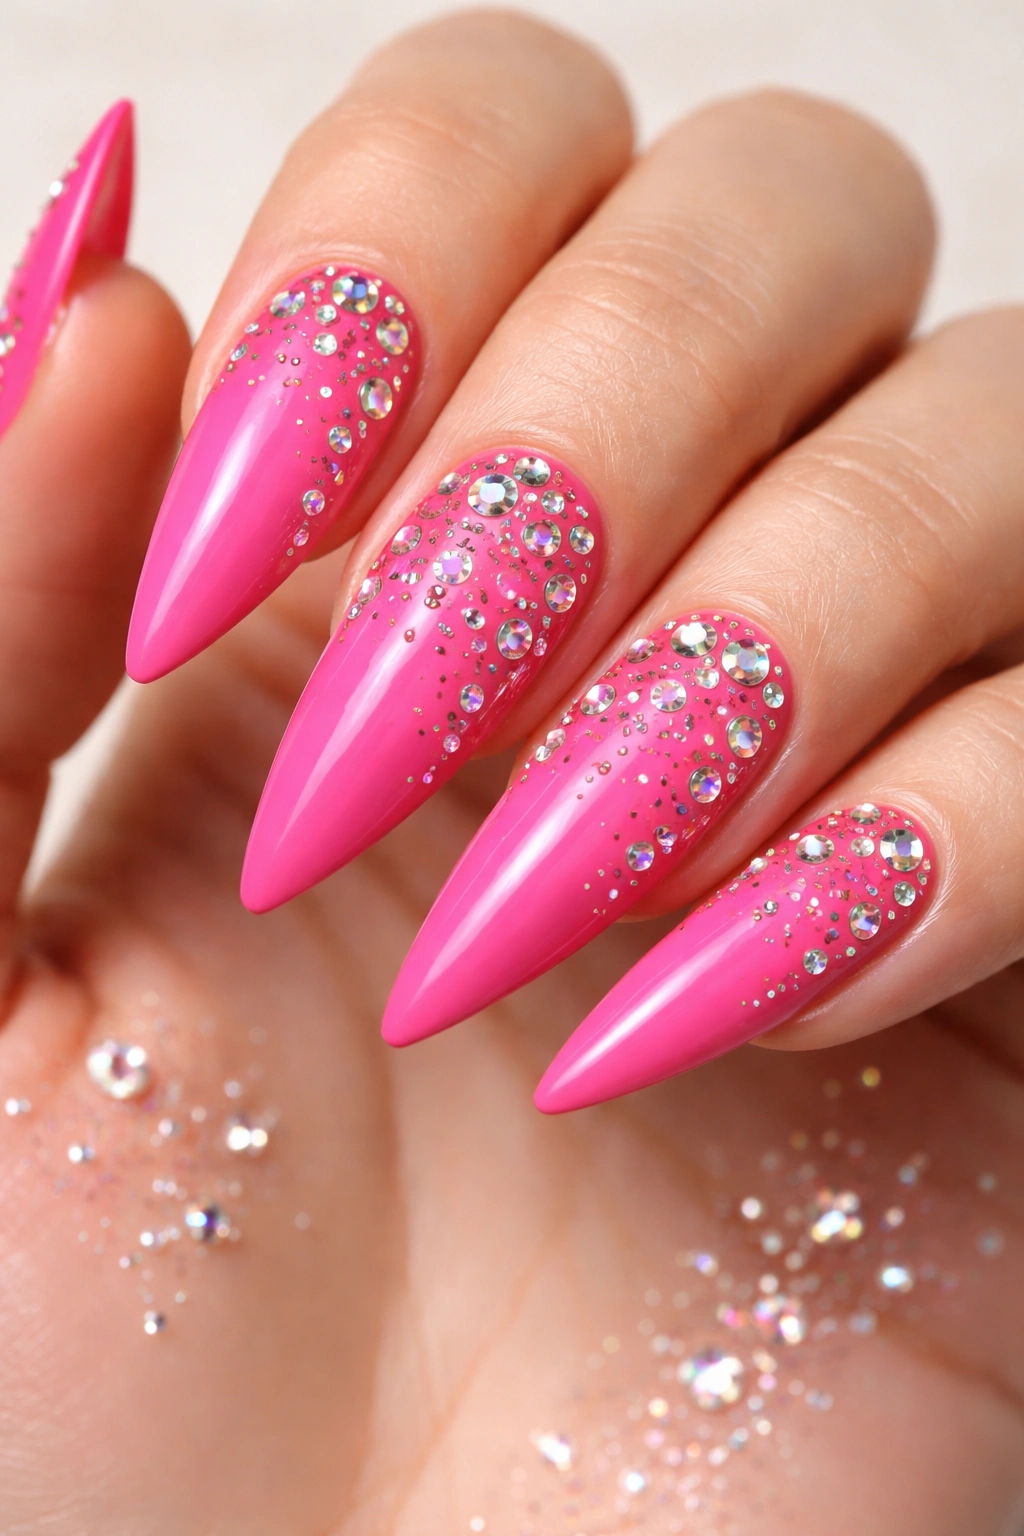
This is the fun, playful approach to rhinestone nails—stones scattered across the nail in random, organic placement that feels spontaneous and celebratory rather than structured. The hot pink base remains visible between the stones, which creates a lighter, airier feel than full coverage. The scattered approach works beautifully with a mix of rhinestone sizes, creating visual variety and a more organic, less manufactured appearance. It’s the design equivalent of throwing glitter in the air and letting it fall where it may.
The Joyful Energy of Scattered Designs
Scattered rhinestones feel less formal and more playful than organized patterns or full coverage. This approach appeals to people who want sparkle but worry about rhinestones feeling too “pageant” or costume-like. The randomness and variety make the design feel fun, youthful, and less predictable. Each nail can have slightly different stone placement, creating uniqueness while maintaining visual cohesion through the consistent hot pink base and rhinestone choice.
Creating Convincing Scatter Placement
- Mix rhinestone sizes (1-5mm) to create more organic, varied visual interest
- Place stones with intentional randomness—completely uniform scattered placement paradoxically looks less natural
- Leave at least 30-40% of nail surface as hot pink background so stones feel incorporated rather than chaotic
- Consider heavier concentration near the tip with fewer stones toward the cuticle, or vice versa
- This design works beautifully for casual wear, everyday events, and people who love playful aesthetics
Pro tip: If you’re having your nails done, tell your technician you like the scattered look—they’ll understand you want organic placement rather than a specific pattern.
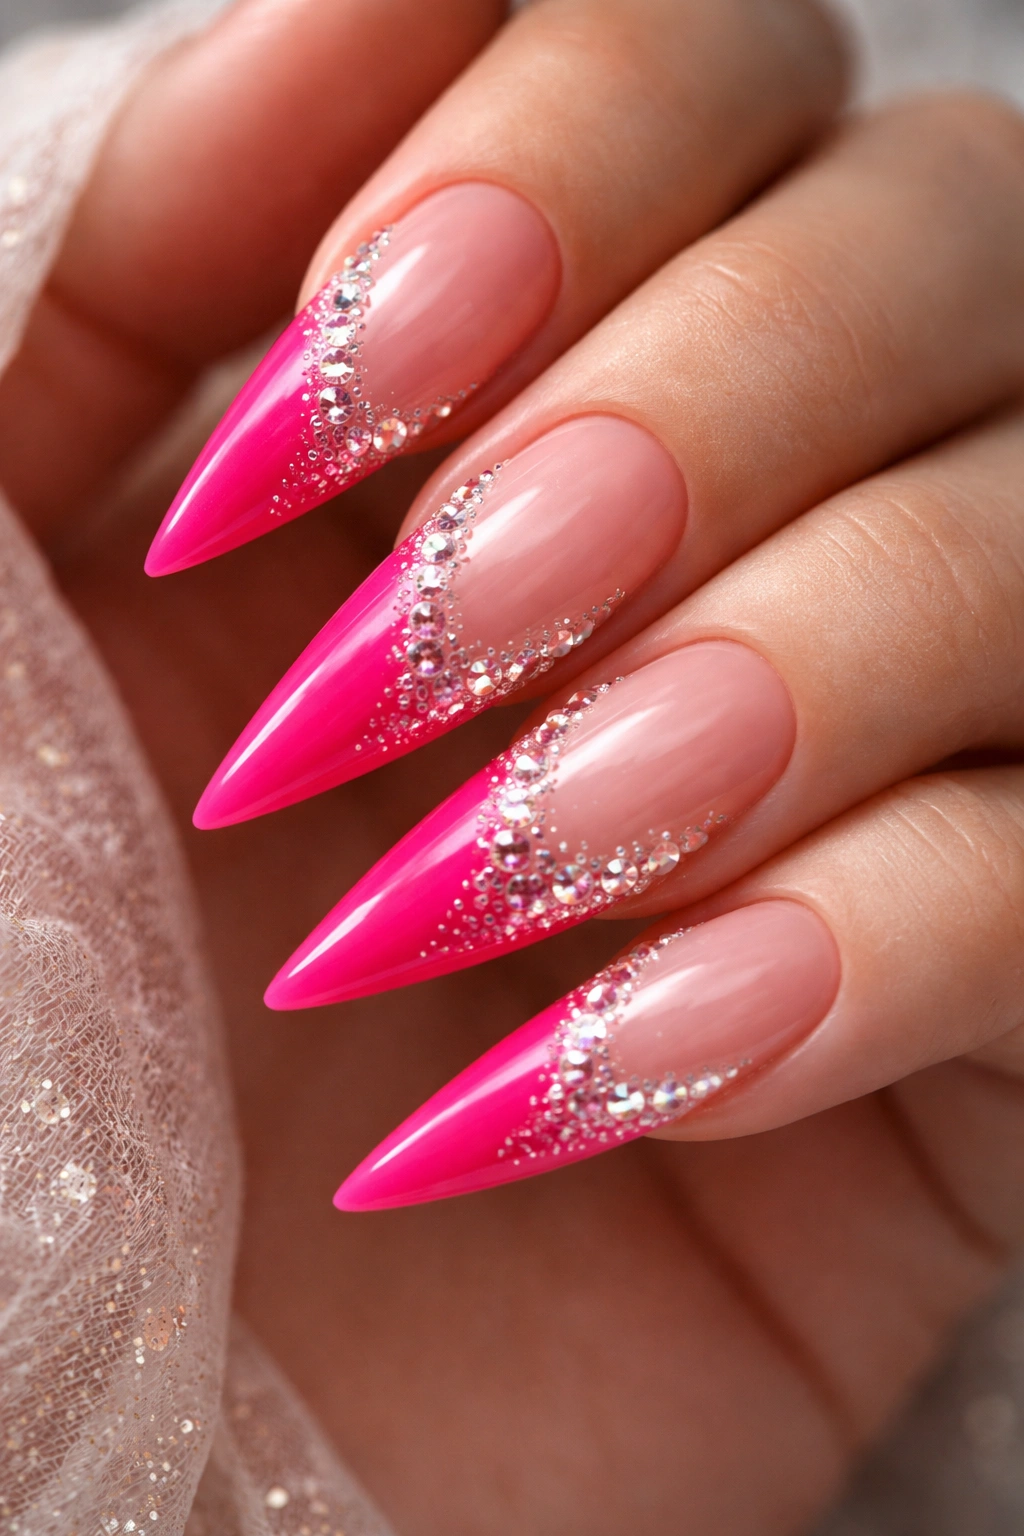
8. Reverse Ombre With Rhinestone Border
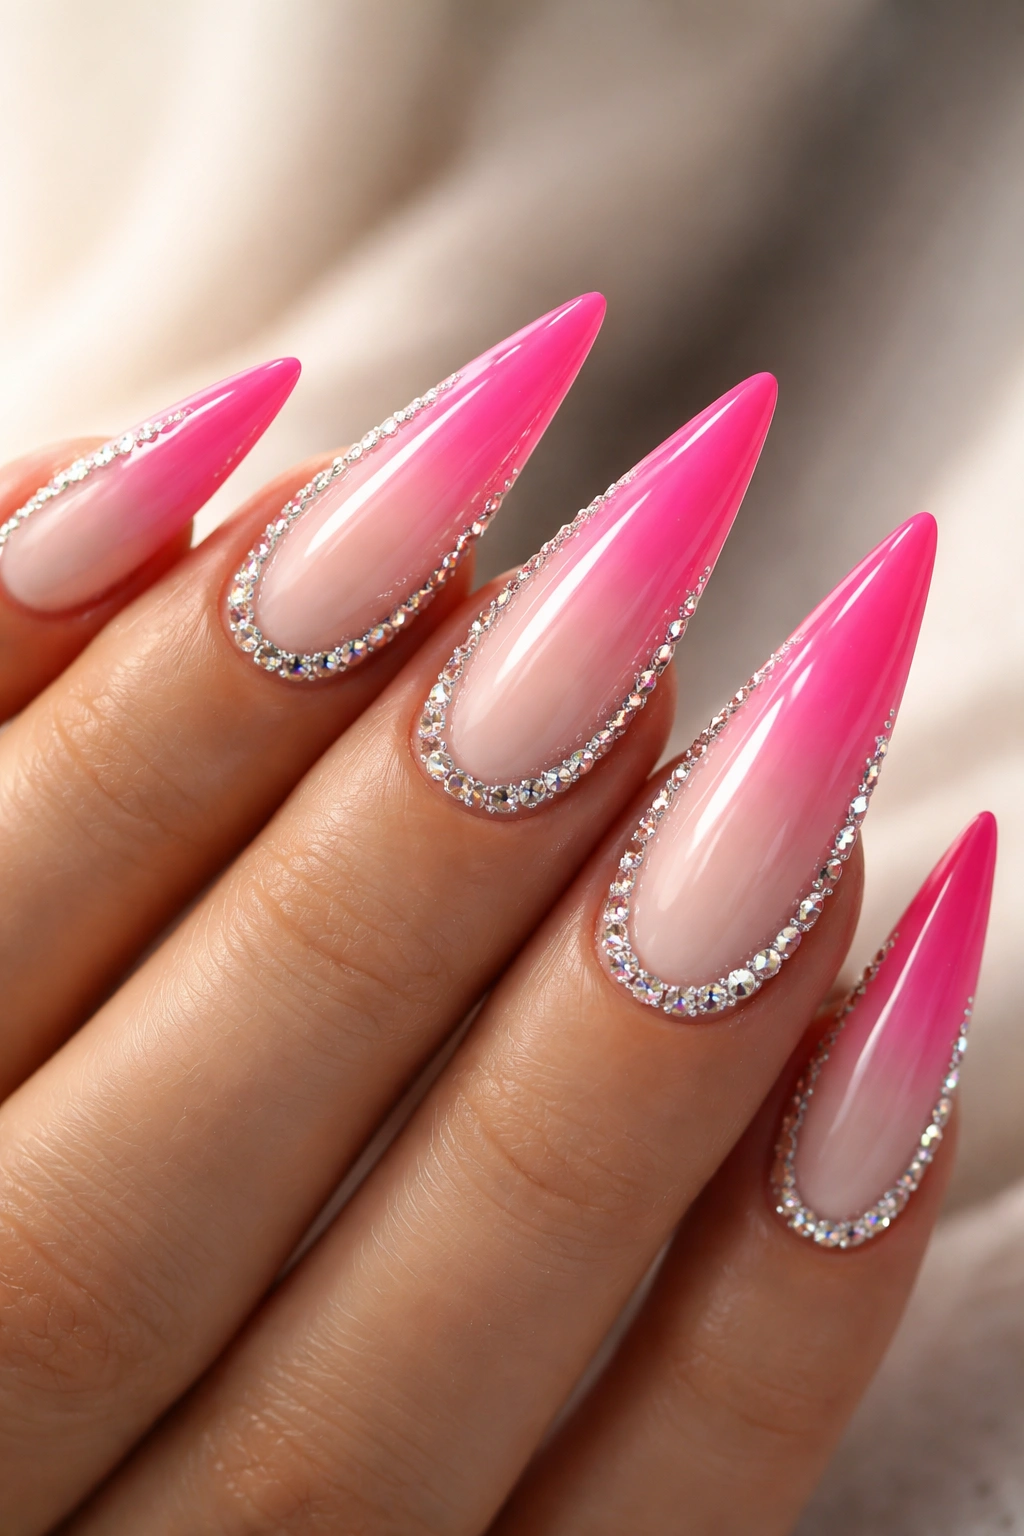
A reverse ombre starts light or white at the base and transitions to deeper hot pink at the tip, creating a visual effect that’s opposite from traditional ombre. Adding rhinestones as a border—often following the gradient line where colors transition—creates a sparkling dividing line between the two color zones. The rhinestones highlight the gradient transition and draw attention to the color play, creating a sophisticated, dimensional design that’s visually striking without being overdone.
The Elegance of Reverse Gradients
Reverse ombre feels more modern and unexpected than traditional ombre since most people are familiar with the traditional direction. The rhinestone border transforms the gradient from a soft color transition into a defined, almost architectural design element. The stones punctuate the point where colors meet, creating visual interest and elegance. This approach works particularly well when the lighter base is nude or white, creating high contrast that makes rhinestones really shine.
Executing Reverse Ombre With Stones
- The base shade should be significantly lighter than hot pink—white, nude, or pale pink works beautifully
- Create the reverse ombre using sponging technique or gradient application
- Allow the ombre to fully dry before applying rhinestones
- Place rhinestones in a relatively straight or curved line following the gradient transition
- Use medium-sized stones (3-4mm) for a more defined border effect
- This design works for any occasion and photographs beautifully
What to know: Reverse ombre requires careful base color choice—too similar a shade to hot pink and the reverse effect won’t be obvious. Choose contrast for maximum visual impact.
9. Accent Nail With Concentrated Rhinestone Design
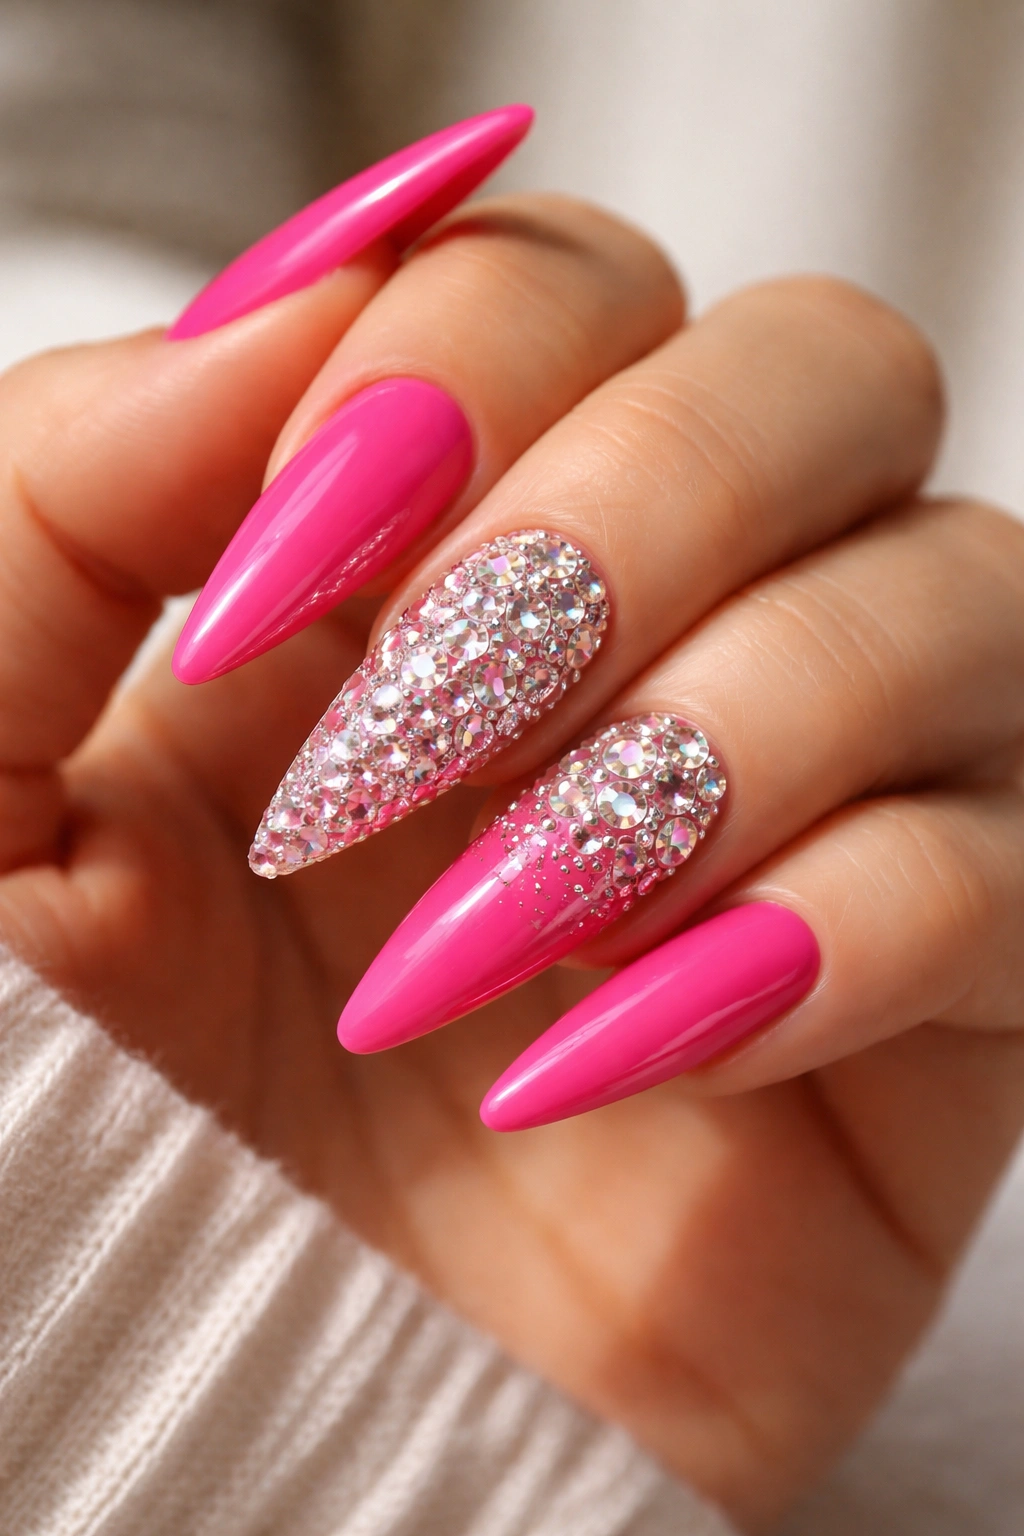
In this approach, one or two accent nails feature concentrated, elaborate rhinestone designs while the remaining nails stay as solid hot pink with no embellishment. The accent nails might feature full coverage, a geometric pattern, a burst design, or any other concentrated rhinestone aesthetic. This creates focal points—literally directing attention to specific nails—while keeping the overall look from feeling overwhelming. It’s a clever way to include maximum sparkle while maintaining balance and wearability.
The Strategic Power of Accent Nails
Accent nails work psychologically because they create visual interest without the commitment of full sparkle on all ten nails. People’s eyes naturally travel to the accent nails, making them feel like intentional design choices rather than afterthoughts. This approach works beautifully in professional settings where full rhinestone coverage might feel inappropriate, but a single statement nail feels creative and intentional. It’s also practical—if rhinestones fall off an accent nail, you’ve got backups, whereas full coverage means multiple stones to replace.
Making Your Accent Nails Count
- Use accent nails on your ring fingers or middle fingers for maximum visibility
- Create contrast between accent and regular nails—solid hot pink next to elaborate rhinestone designs creates more visual impact
- Consider using a different shade of rhinestones on accent nails (AB stones, metallic, or a different size) to further differentiate
- Accent designs work beautifully with any of the other rhinestone approaches mentioned in this article
- This strategy works for any setting—workplace, casual, or special events
Insider note: Accent nail designs are often the most photographed nail designs because they create the best composition for close-up photos without overwhelming the image.
10. 3D Dimensional Rhinestone Clusters
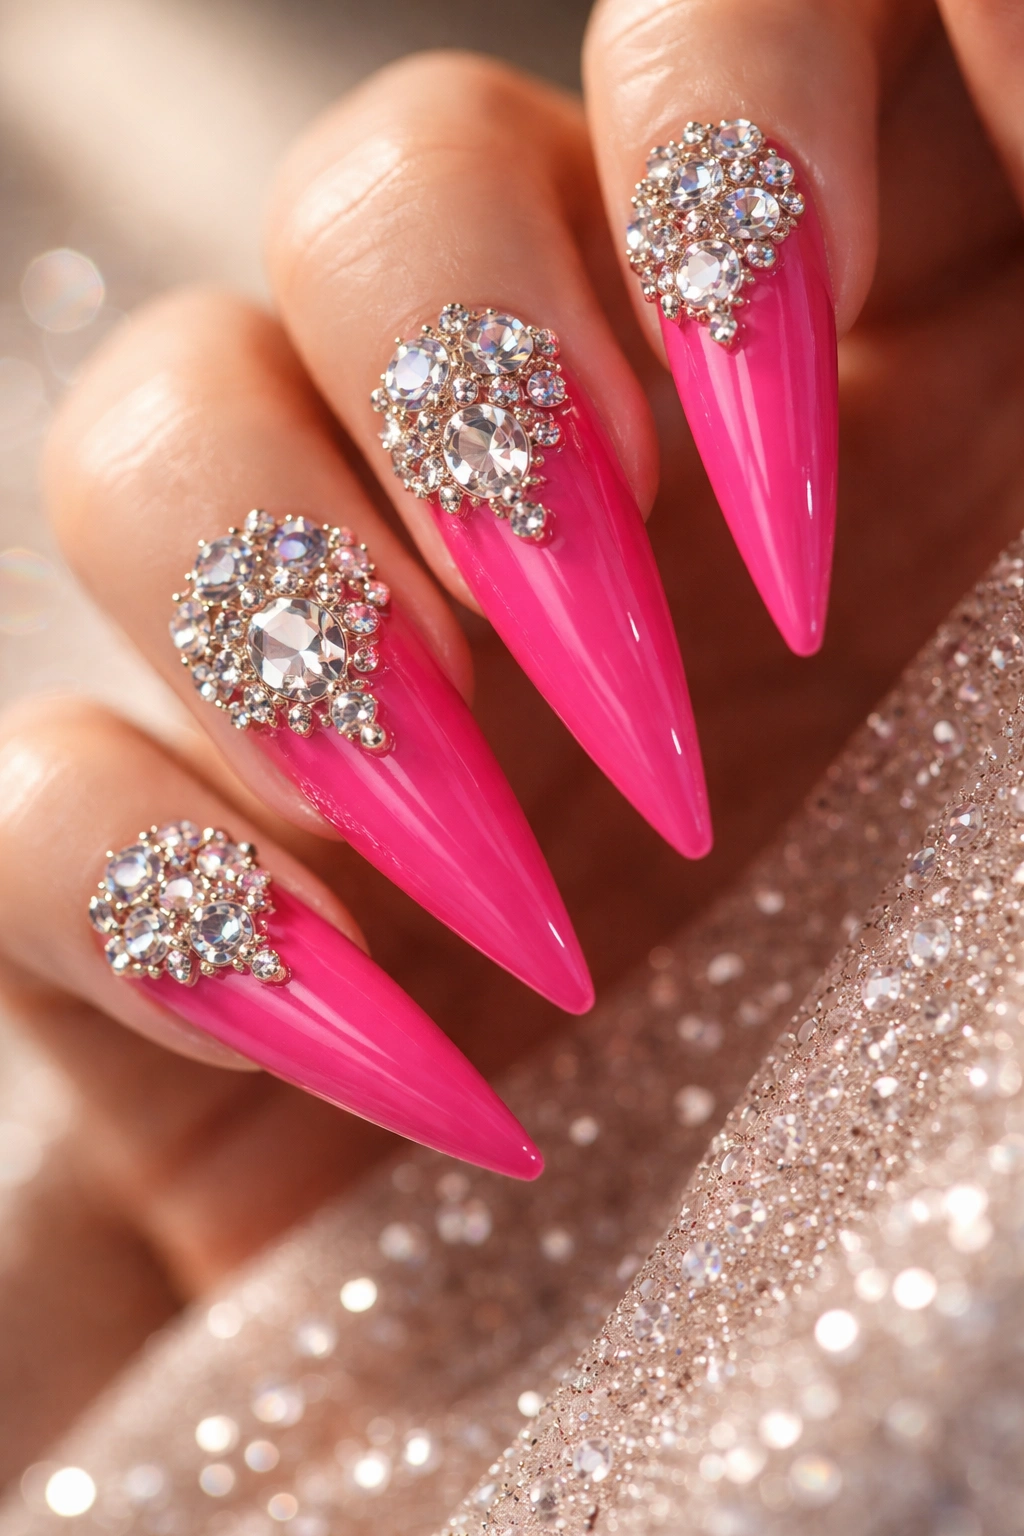
This is the most dramatic approach to hot pink stiletto nails with rhinestones—creating literal three-dimensional clusters where rhinestones are layered and stacked, creating height and dimensional structures that extend beyond the nail surface itself. Larger stones might be surrounded by progressively smaller stones, creating mountain-like formations, or stones might be layered in tiers. The result is nail art that’s genuinely sculptural, catching light at multiple angles and creating shadows that add to the dimensional effect.
The Impact of True Three-Dimensionality
While most rhinestone designs sit flat on the nail surface, 3D clusters actually rise up from it, creating genuine height and shadow play. This approach is maximalist in the extreme—it’s bold, unapologetic, and undeniably eye-catching. The three-dimensionality means the design looks dramatically different in person than in photographs (which tend to flatten three-dimensional designs). Light hits the clusters from multiple angles, creating complex shadow and light patterns that shift as you move your hands.
Creating Convincing 3D Clusters
- Use multiple layers of adhesive to build height—allow each layer to dry partially before adding stones
- Combine large focal stones (5-7mm) with progressively smaller stones descending down the cluster
- Placement typically concentrates on the nail tip rather than spreading across the entire nail
- Consider using a mix of clear and AB stones to enhance the dimensional light play
- 3D rhinestone designs require extra care since the height makes them more vulnerable to catching on things
Worth knowing: 3D rhinestone designs require a skilled nail technician and specialized materials—they’re more expensive than other rhinestone designs and require more maintenance to keep clusters intact. They’re perfect for special occasions but may not be practical for daily wear or professional settings.
Care and Maintenance for Rhinestone Nails
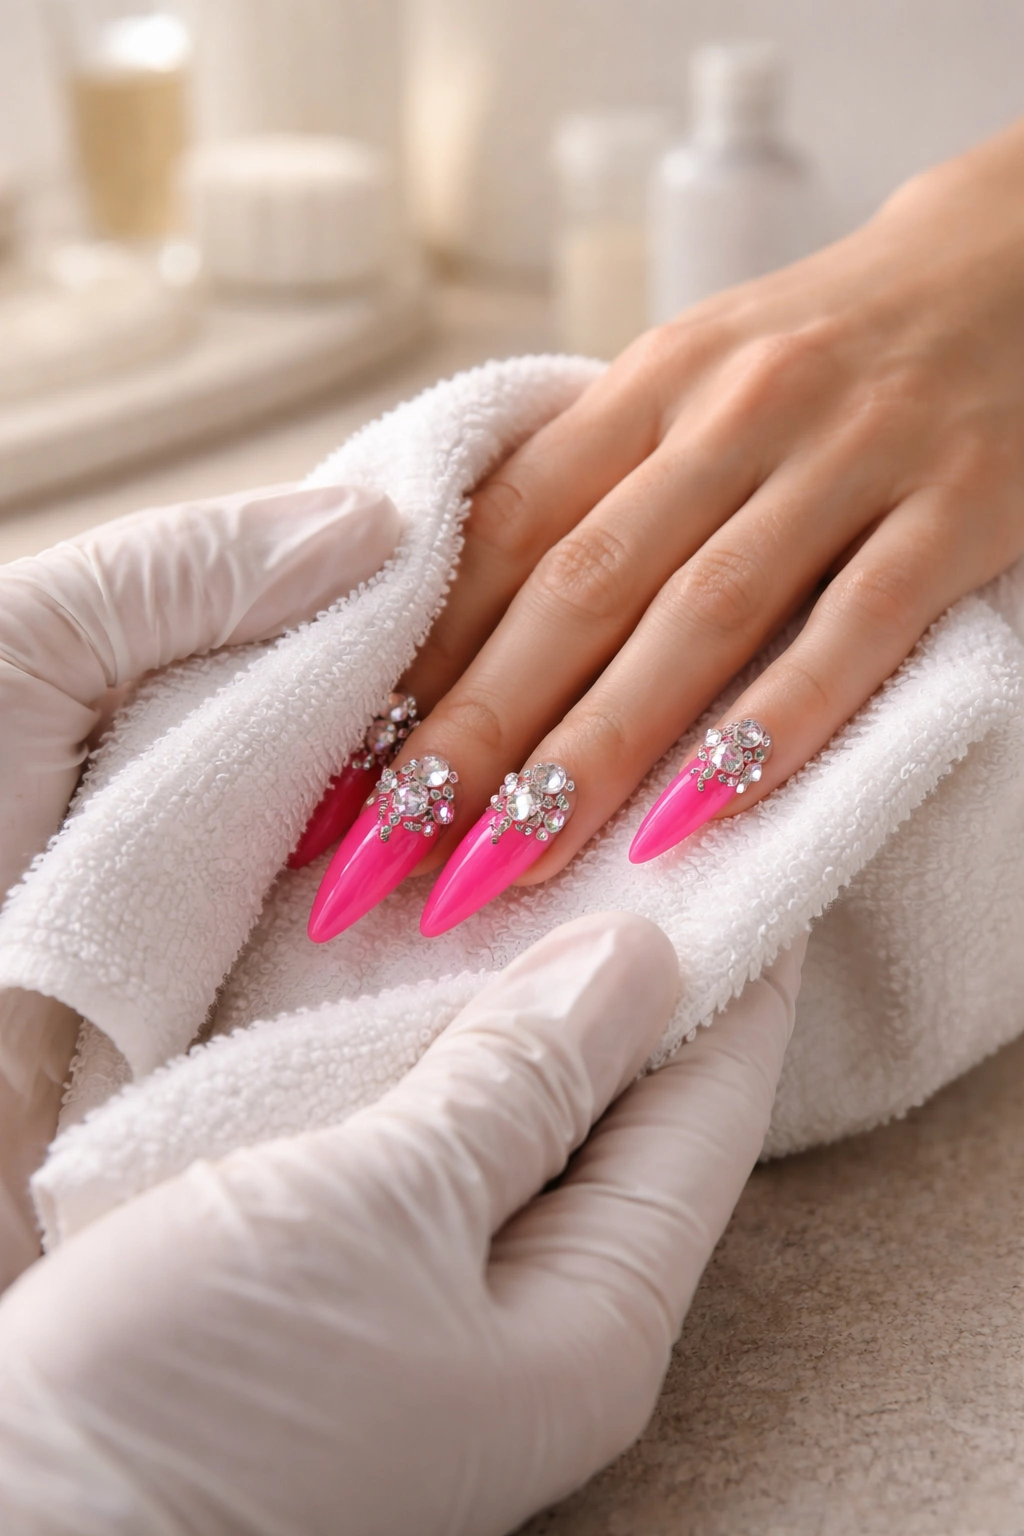
Hot pink stiletto nails with rhinestones require more maintenance than solid-color nails because the additional embellishments need protection and care. The rhinestones themselves won’t degrade, but the adhesive holding them to your nails will gradually weaken through daily activities, moisture exposure, and contact with surfaces. Your goal is maximizing the lifespan of your design through mindful handling and proper maintenance routines.
Avoid prolonged water exposure, which is the primary enemy of rhinestone nails. Water seeps under rhinestones and weakens the adhesive bond, causing stones to loosen or fall off. Wear gloves when washing dishes, showering, or doing wet tasks. When you do get your hands wet, dry them thoroughly rather than letting water air-dry, since moisture lingering under stones causes faster degradation.
Be mindful of your activities—rhinestones can catch on fabric when reaching into pockets, brushing against clothing, or handling delicate materials. They can also break if you hit your nails against hard surfaces, so avoid using your nails as tools for opening things or scratching. Treat your rhinestone nails more delicately than you might treat natural nails, recognizing that the embellishments require extra care.
Keep your nails clean to maintain their shine and sparkle. Use a soft brush and gentle cleaning motions to remove dust, product buildup, or debris around the rhinestones. A dry toothbrush works beautifully for this purpose. Avoid harsh chemicals and acetone-based products around your rhinestones since some adhesives are weakened by acetone exposure. If stones do fall off, your nail technician can usually replace them by reapplying fresh adhesive and a new stone.
Where to Get Hot Pink Stiletto Nails With Rhinestones

Finding the right nail technician to create hot pink stiletto nails with rhinestones is crucial for achieving a design you’ll love. You want someone experienced with both stiletto nail extensions and rhinestone application, not just one or the other. Start by checking local nail salons’ social media pages and portfolios to see examples of their rhinestone work. Look for clear photos showing detail, even application, and secure-looking stone placement.
Ask questions when booking your appointment. Inquire about the quality of rhinestones they use (are they standard crystals, AB crystals, or Swarovski?), the application method, and how long stones typically last on their applications. Discuss your specific design ideas and ask if they’ve created similar designs before. A good technician will ask you detailed questions about what you want rather than just saying yes to everything.
If you prefer at-home applications, you can purchase rhinestone nail kits online, though this requires practice and patience. You’ll need quality adhesive, a good selection of rhinestone sizes, and steady hands. Many people find that investing in a professional application is worth the cost for the superior results and longevity.
Pricing for hot pink stiletto nails with rhinestones typically ranges from $40-$80 for the initial set depending on your location and salon, with additional costs for more elaborate designs featuring more stones or additional embellishments. Fills (maintenance appointments) usually cost $25-$50. The investment is worthwhile if you love the look and can wear them for a few weeks before needing maintenance.
Final Thoughts
Hot pink stiletto nails with rhinestones represent the intersection of bold personal style and genuine glamour. Whether you choose minimalist sparkle or maximum coverage, scattered stones or organized patterns, the combination of hot pink’s confidence and rhinestones’ shine creates nails that genuinely turn heads and make you feel fabulous. The variety of design options means there’s an approach that suits every personality, occasion, and comfort level with sparkle.
The key to loving your rhinestone nails is choosing a design that genuinely reflects your aesthetic and lifestyle. If you spend most of your time in professional environments, a minimalist or accent nail approach keeps the sparkle elegant rather than excessive. If you love being the center of attention and have a lifestyle that allows for high-maintenance beauty, full-coverage or 3D cluster designs deliver maximum impact. Most people find themselves somewhere in the middle, enjoying rhinestone nails as occasional special-occasion designs rather than everyday wear.
Remember that rhinestone application is both art and craft. The difference between stunning rhinestone nails and mediocre ones often comes down to the skill and experience of the person applying them. Invest in finding a talented technician whose work resonates with you, ask detailed questions about their process, and communicate clearly about your vision. With the right technician and proper care, your hot pink stiletto nails with rhinestones will absolutely deliver the glamour, confidence, and visual impact you’re seeking—and you’ll love showing them off.
