

Stiletto nails have become a signature statement for celebration, and there’s something undeniably festive about sporting a bold, glamorous nail design on your birthday. The sharp, elongated silhouette of a stiletto shape commands attention, making it the perfect canvas for showcasing personality and style—especially when you’re ready to celebrate yourself. If you’ve got medium-length nails and you’re wondering how to rock the stiletto aesthetic without committing to extreme length, you’re in exactly the right place.
The beauty of medium stiletto nails is the balance they strike: you get the dramatic, tapered elegance that makes this shape so iconic, but with a length that’s genuinely wearable for everyday activities. That practicality doesn’t mean sacrificing any glamour or impact. In fact, some of the most stunning nail designs work better on medium canvases because they don’t feel overwrought or difficult to pull off. Whether you’re drawn to sparkly celebrations, sophisticated minimalism, bold color blocking, or intricate nail art, medium stilettos give you the freedom to express exactly who you are on your special day.
What makes a birthday nail design truly special isn’t just the technical execution—it’s the story it tells. Your nails should make you feel confident, celebrated, and absolutely like yourself. That’s why I’ve gathered twenty of the most stunning, tested birthday stiletto designs specifically suited to medium nail lengths. Each one plays to different moods and aesthetics, so you’ll find something that resonates with your personal style, whether you’re planning an intimate celebration or a major party.
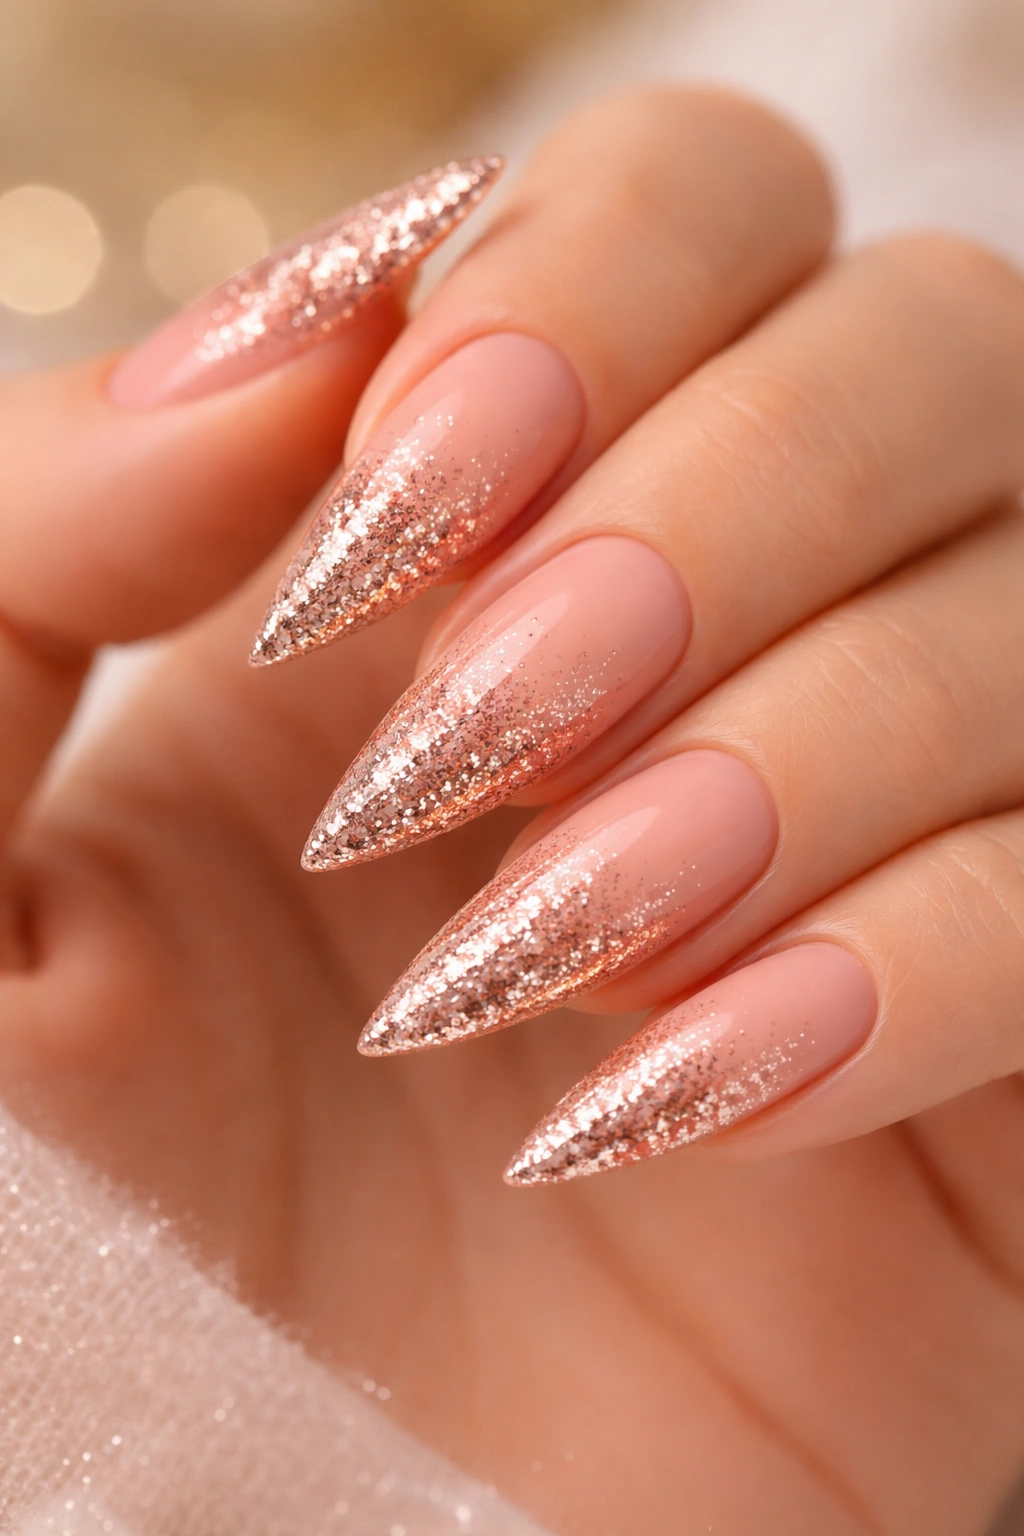
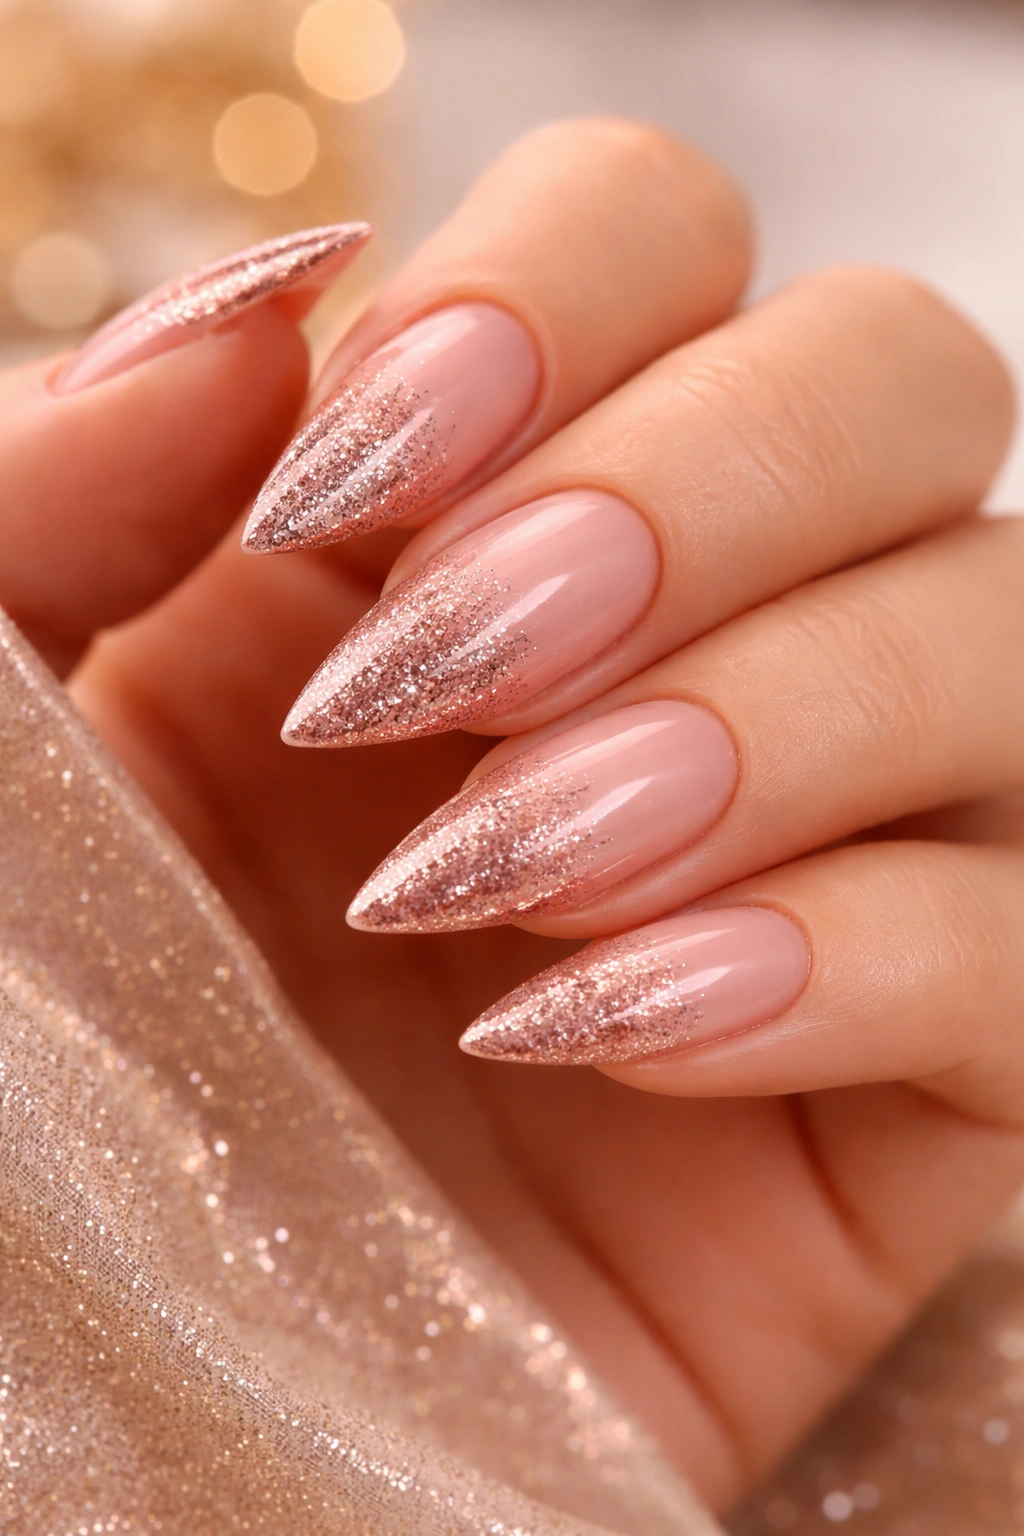
1. Rose Gold Ombre Celebration
Rose gold has an almost magical quality—it’s glamorous without being overly serious, and it catches light in the most flattering way possible. This ombre effect starts with a soft peachy-pink at the nail base and gradually deepens into a rich rose gold at the tip, creating dimension and movement across the nail. The color transition isn’t harsh or sudden; instead, it’s a smooth, dreamy blend that looks almost airbrushed. Medium stilettos provide the perfect length to showcase this gradient without it looking stretched or unbalanced.
Why This Design Feels Celebratory
Rose gold ombre works for birthdays because it’s inherently joyful and reflective. The warm metallic tones feel luxurious and special without demanding that you wear anything “too much” for your celebration. The gradient creates visual interest, which means your nails will look expensive and intentional even if the design is technically simple. It’s one of those designs that photographs beautifully and works equally well whether you’re dressing up for a dinner party or keeping things casual with friends.
Application Tips and Finishing Touches
- Use a sponge or blending brush to create the gradient—it gives you more control than trying to blend with a regular brush
- Start with a neutral nude base, then layer the pink and gold, blending as you go
- Seal everything with a glossy top coat to enhance the metallic finish and add shine
- Add a few micro gold glitter accents at the tips if you want extra sparkle without overwhelming the design
2. Classic Black and Gold Geometric
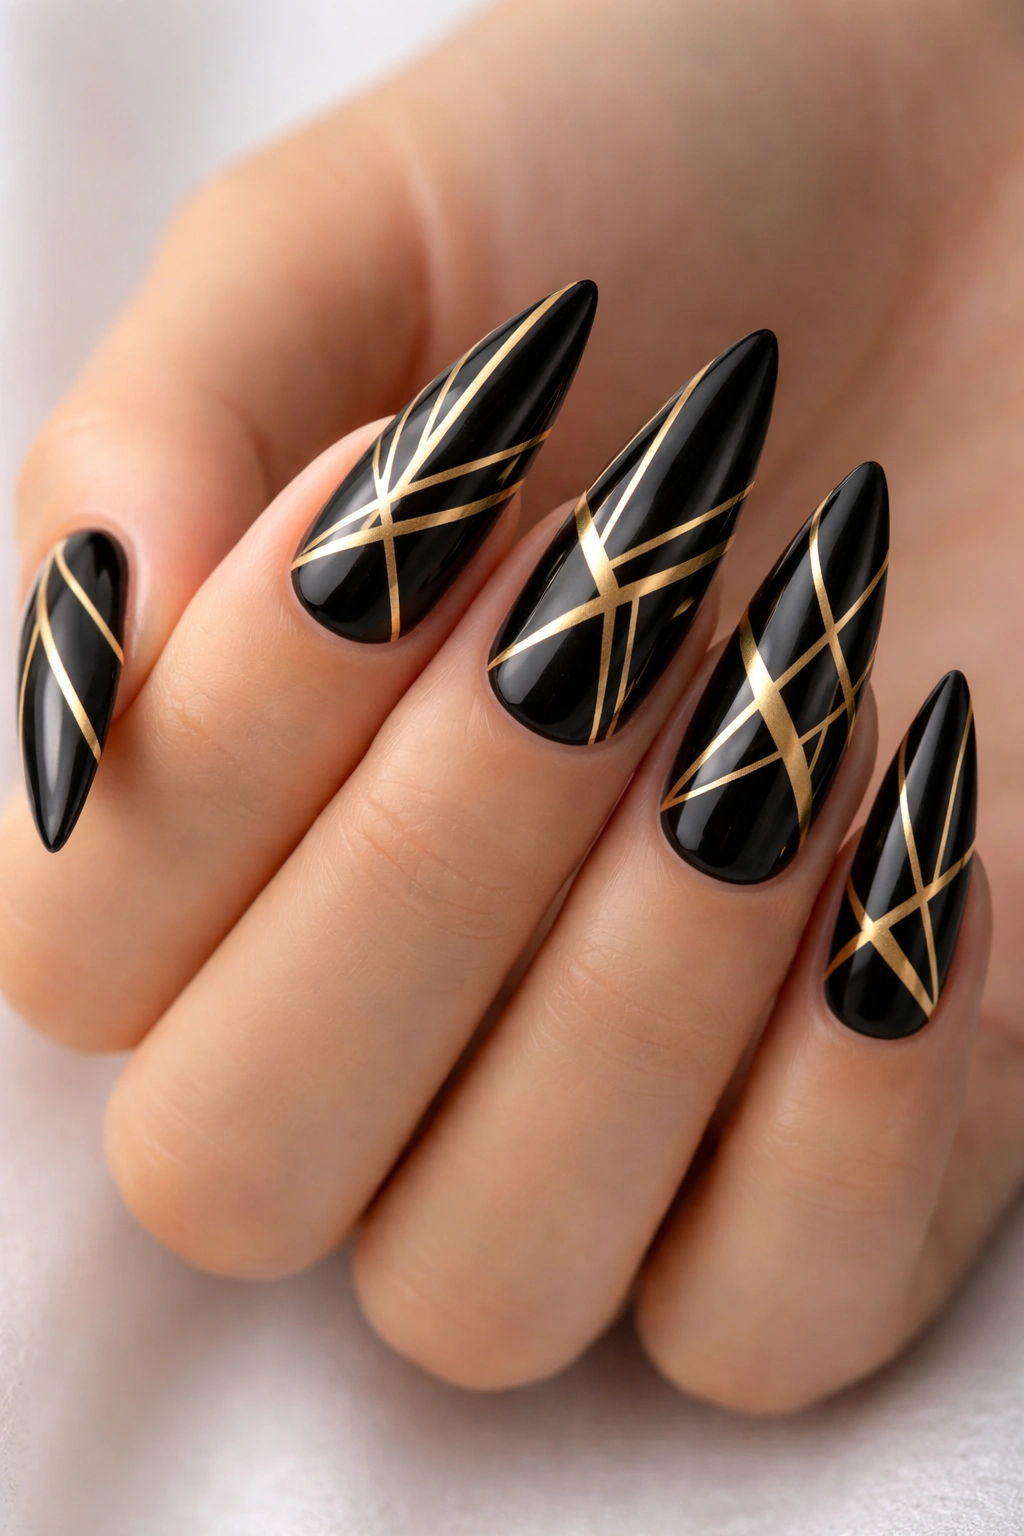
There’s a reason black and gold never goes out of style—the contrast is stunning, the look is sophisticated, and it works for literally every skin tone. This design features a sleek black stiletto base with sharp gold geometric lines cutting across the nails in a modern, angular pattern. Triangles, stripes, and angular shapes create movement and visual interest while maintaining an air of refined elegance. The geometry isn’t random; it’s intentional and architectural, which is what makes it feel special rather than just “decorated.”
Why This Design Works for Birthdays
Geometric patterns feel intentional and modern—they signal that you’ve put thought into your appearance. Black and gold is the ultimate “I’m celebrating but I’m also classy” color combination. It pairs beautifully with virtually any outfit, from a little black dress to jeans and a blazer. This design says you’re sophisticated, confident, and ready to be the center of attention on your terms.
How to Execute the Gold Geometric Detail
- Paint the base with two coats of black gel or polish for opacity and coverage
- Use a thin geometric brush or striping tool to draw clean gold lines—a makeup brush with a thin tip can work in a pinch
- Plan your design on at least one finger—sketch it lightly with pencil on a practice nail first if geometric shapes aren’t your strength
- Seal with a matte top coat to make the gold lines pop against the black, or go glossy if you prefer shine
- Gold chrome dust can replace actual gold lines if precision painting feels intimidating
3. Birthday Confetti Explosion
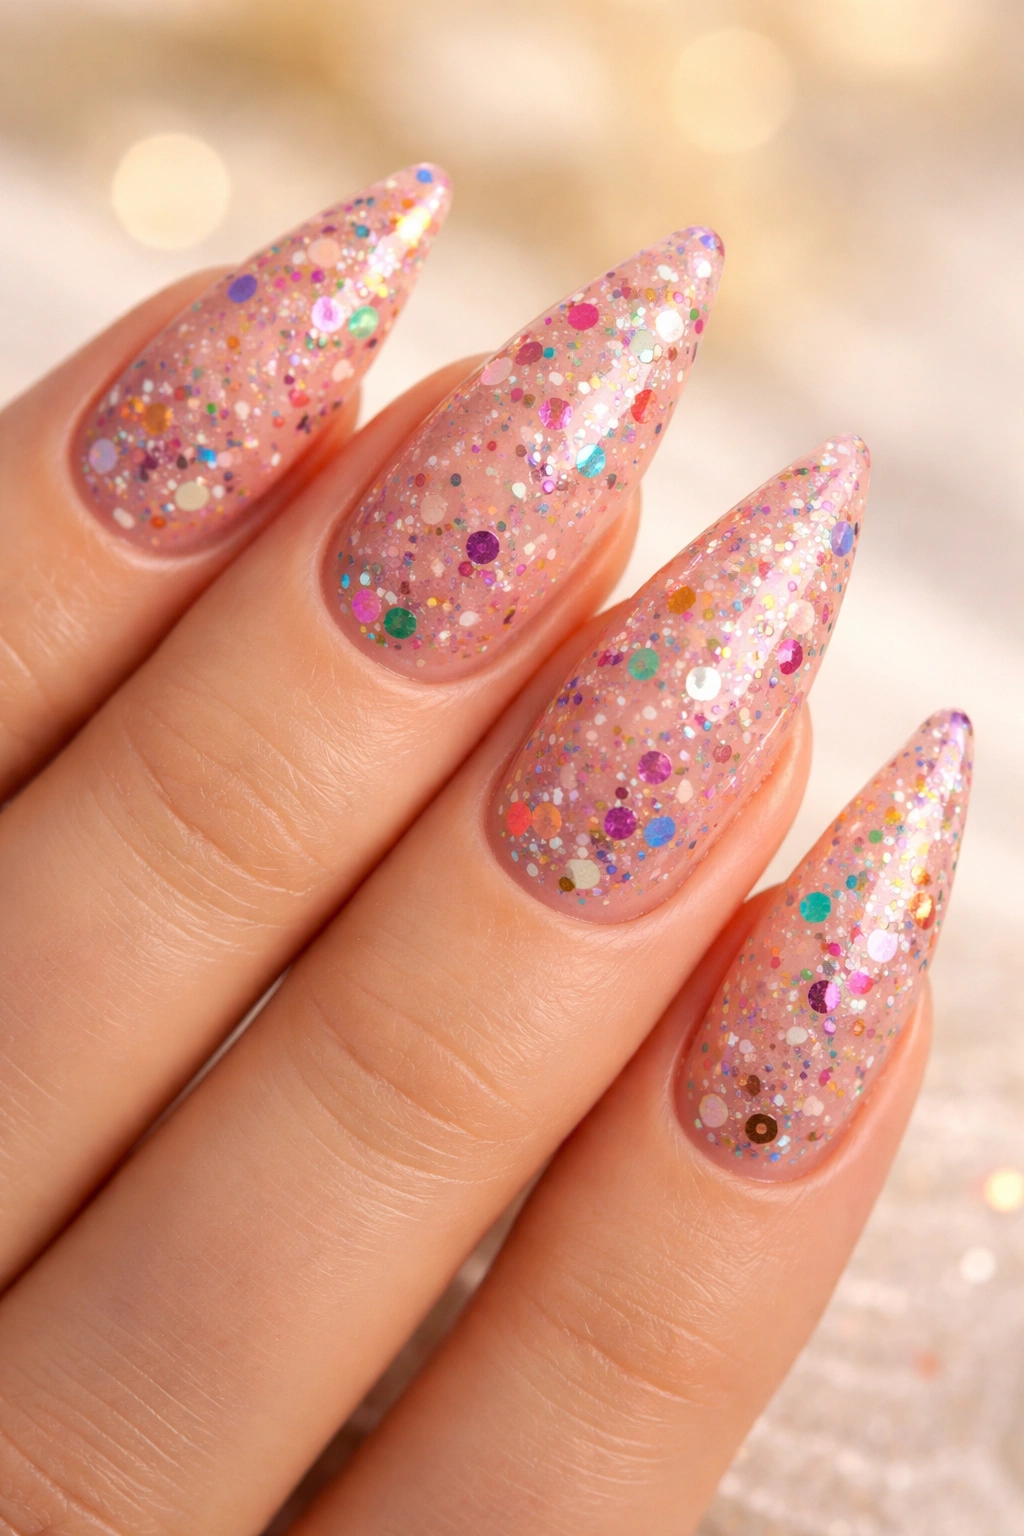
Imagine tiny bursts of celebration right on your nails. This design uses a nude or soft pink base as the canvas, then layers scattered confetti-style elements across each nail in multiple colors: gold, silver, holographic, and bright pops of color. Some elements are tiny dots, others are small dashes, and some are micro sparkles. The pattern isn’t organized—it’s joyfully chaotic and celebratory, like an actual confetti cannon has gone off right on your manicure.
Why Confetti Feels Right for Birthdays
Confetti is literally the visual symbol of celebration. It’s cheerful, unapologetic, and instantly festive. This design works because it’s detailed enough to be interesting but abstract enough that slight variations don’t matter—each nail can be slightly different and it only adds to the charm. Medium stilettos give you enough surface area to include multiple confetti elements without the nails feeling crowded or chaotic.
Creating the Confetti Effect
- Start with a sheer nude or pale pink base—this keeps the confetti elements visible and prevents the design from looking muddled
- Use ultra-thin brushes and dotting tools to create confetti elements in various colors
- Don’t aim for perfection; intentional imperfection is part of the charm
- Mix matte glitter, chrome dust, and metallic accents for dimension and texture variation
- Seal with a glossy top coat to make everything shine and feel cohesive
4. Champagne and Pearls Elegance
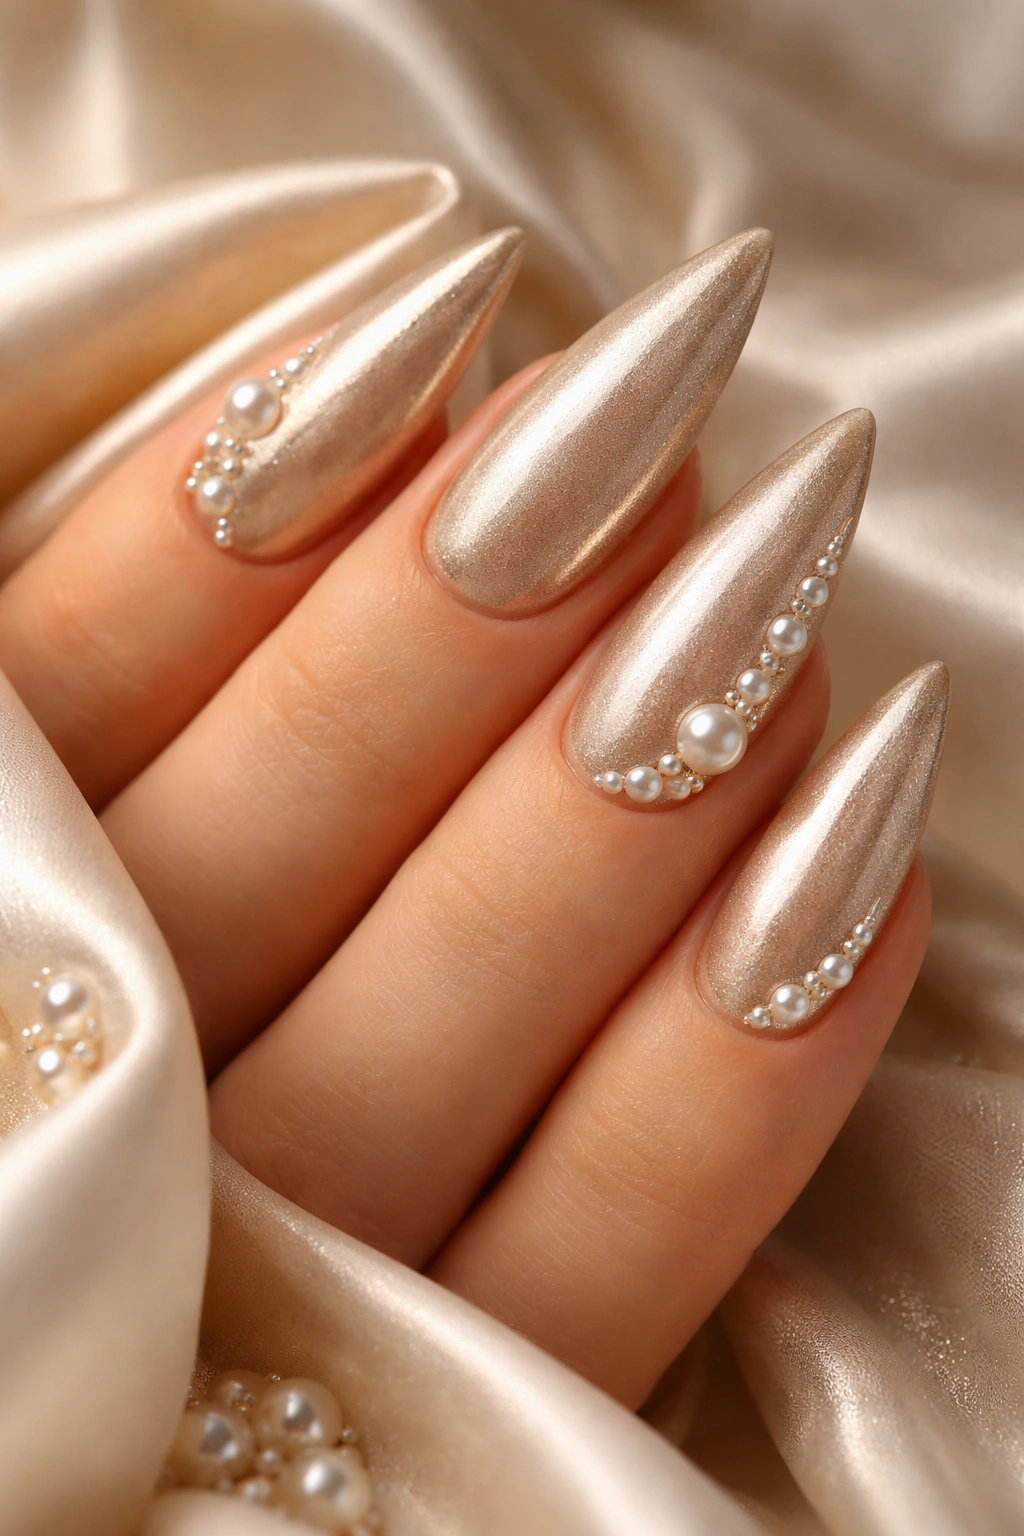
This design is sophisticated luxury distilled into a nail. A warm champagne metallic base forms the foundation, and then delicate white or pearl-toned nail gems are strategically placed—typically along the sides of the nail or clustered near the cuticle in an asymmetrical arrangement. Some versions include tiny pearl accents embedded into the polish, creating a 3D effect that catches light beautifully. The overall look is understated glamour; it doesn’t scream for attention but rather glows quietly with refined elegance.
What Makes This Birthday-Worthy
Champagne and pearls evoke celebration, toasts, and special occasions. The design feels expensive and intentional without being overdone. It’s the kind of manicure that works equally well at a fancy restaurant, a wedding reception, or an intimate gathering. The gems add just enough dimension to keep your nails looking interesting without the design feeling heavy or complicated to maintain.
Gem Placement and Adhesive Tips
- Use nail-grade gems or Swarovski crystals—they’re designed to stay put and won’t feel rough against skin
- Apply gems with nail glue or a clear gel base for the strongest hold
- Place larger gems along the sides or clustered at the accent nail, with smaller gems scattered asymmetrically
- Avoid placing gems on the tips where they’ll snag constantly; focus on the nail bed
- A glossy top coat sealed over gems (if you’re using a gel system) creates a seamless, polished look
5. Sunset Gradient with Cloud Design
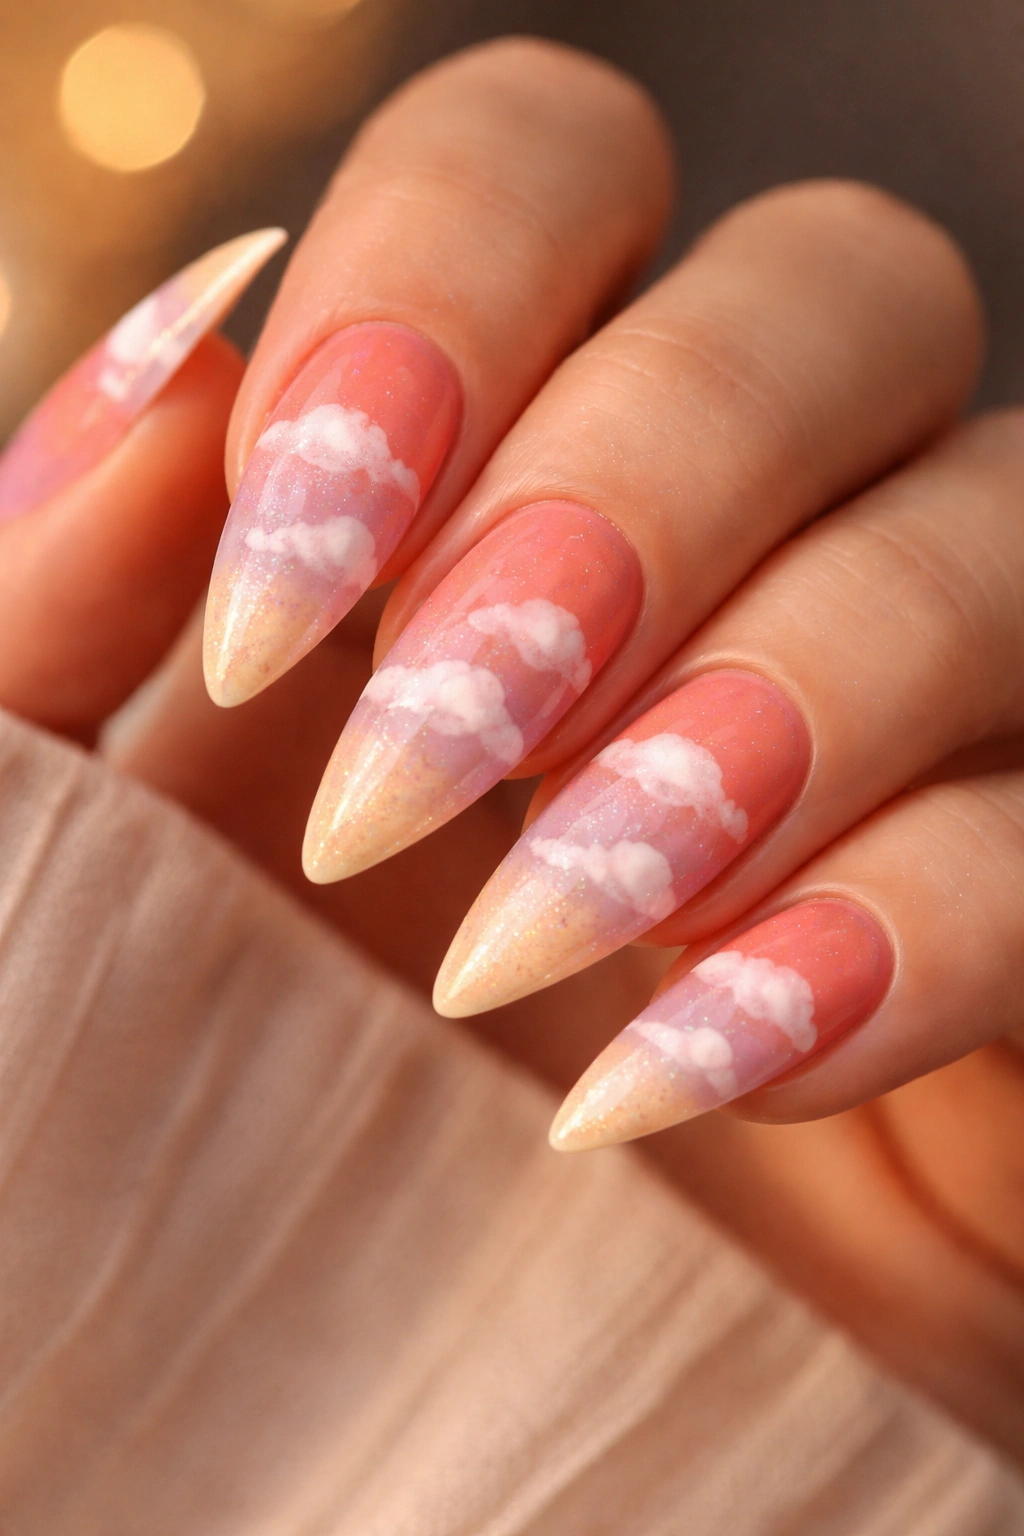
Picture the exact moment the sun begins its descent, painting the sky in shades of orange, pink, purple, and gold. That’s this manicure. A gradient transitions from warm coral-orange at the cuticle through pink and purple, ending in a peachy gold at the tip. Floating across this gradient are tiny white or pale cloud shapes, creating depth and a dreamy quality. The clouds make the gradient feel like an actual landscape rather than just a color transition, which elevates the whole design.
Why Sunsets Feel Celebratory
Sunsets naturally evoke beauty, transition, and the magic of watching something special unfold. This design is romantic and optimistic—perfect for someone celebrating something important. The clouds add whimsy and personality, preventing the design from feeling like something everyone else already has. Medium stilettos give you enough room for the gradient to flow beautifully without looking cramped or hard to execute.
Creating the Sunset Effect
- Sponge the gradient using multiple shades to create smooth color transitions
- Paint tiny clouds using white or pale nude polish with an ultra-thin brush
- The clouds should feel scattered and organic, not perfectly placed
- Use a glossy top coat to blend everything together and create an ombre effect
- Optional: add tiny gold glitter along the tips to enhance the “sunset light” effect
6. Deep Burgundy with Gold Leaf Accents
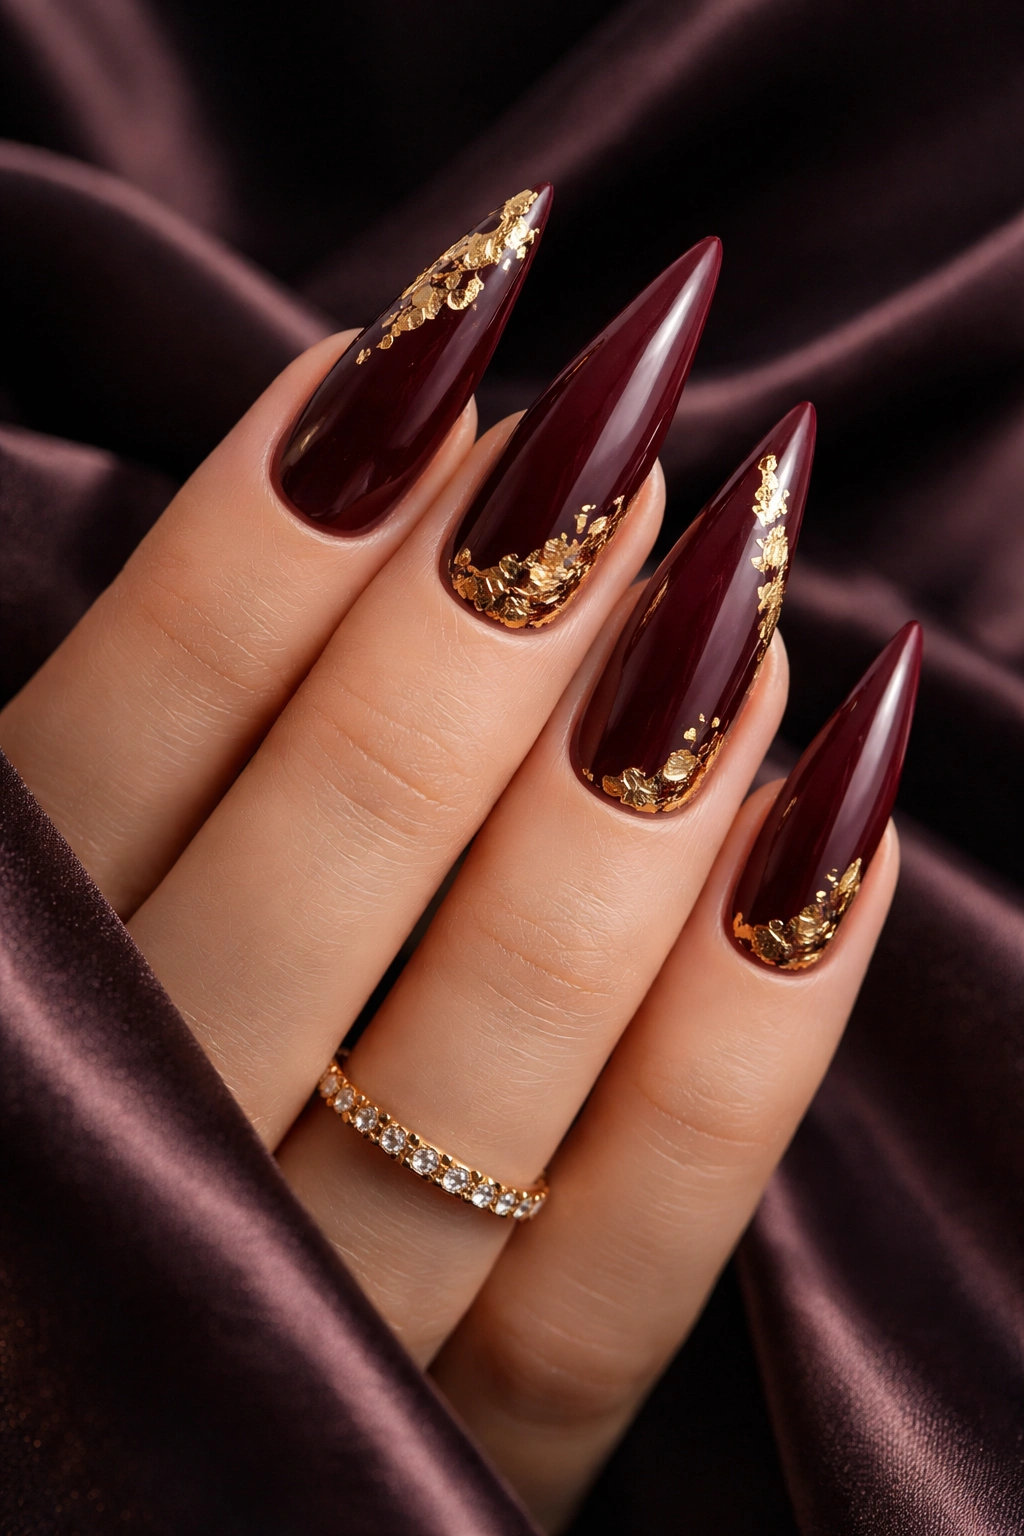
Burgundy is deeply sophisticated and unexpected for a birthday design, which is exactly why it’s brilliant. A rich, deep burgundy base serves as the stage for delicate gold leaf accents scattered across the nail surface like autumn leaves caught mid-fall. The gold isn’t covering the whole nail—just strategic placements that create movement and catch light. This design feels luxurious and slightly mysterious, perfect for someone who celebrates with style and subtlety.
The Appeal of Burgundy for Birthdays
Burgundy signals maturity, confidence, and understated luxury. It’s a color that makes your hands look elegant and intentional. Paired with gold, it becomes almost jewel-like. This is the manicure for someone who doesn’t need to shout about their celebration—they simply show up looking impeccable. The color also photographs beautifully and works with virtually any outfit you might wear to a celebration.
Applying Gold Leaf Technique
- Paint the burgundy base with two coats for full opacity and richness
- Use genuine gold leaf (it’s affordable and creates a far better effect than gold paint)
- Apply a thin layer of tacky gel base or special leaf adhesive to the areas where you want the gold to stick
- Press gold leaf onto the sticky surface, letting it crinkle and fracture naturally
- Brush away excess gently and seal with a gel top coat or clear polish
- The crinkled, organic look of gold leaf is actually more beautiful than perfect coverage
7. Holographic Rainbow Chrome
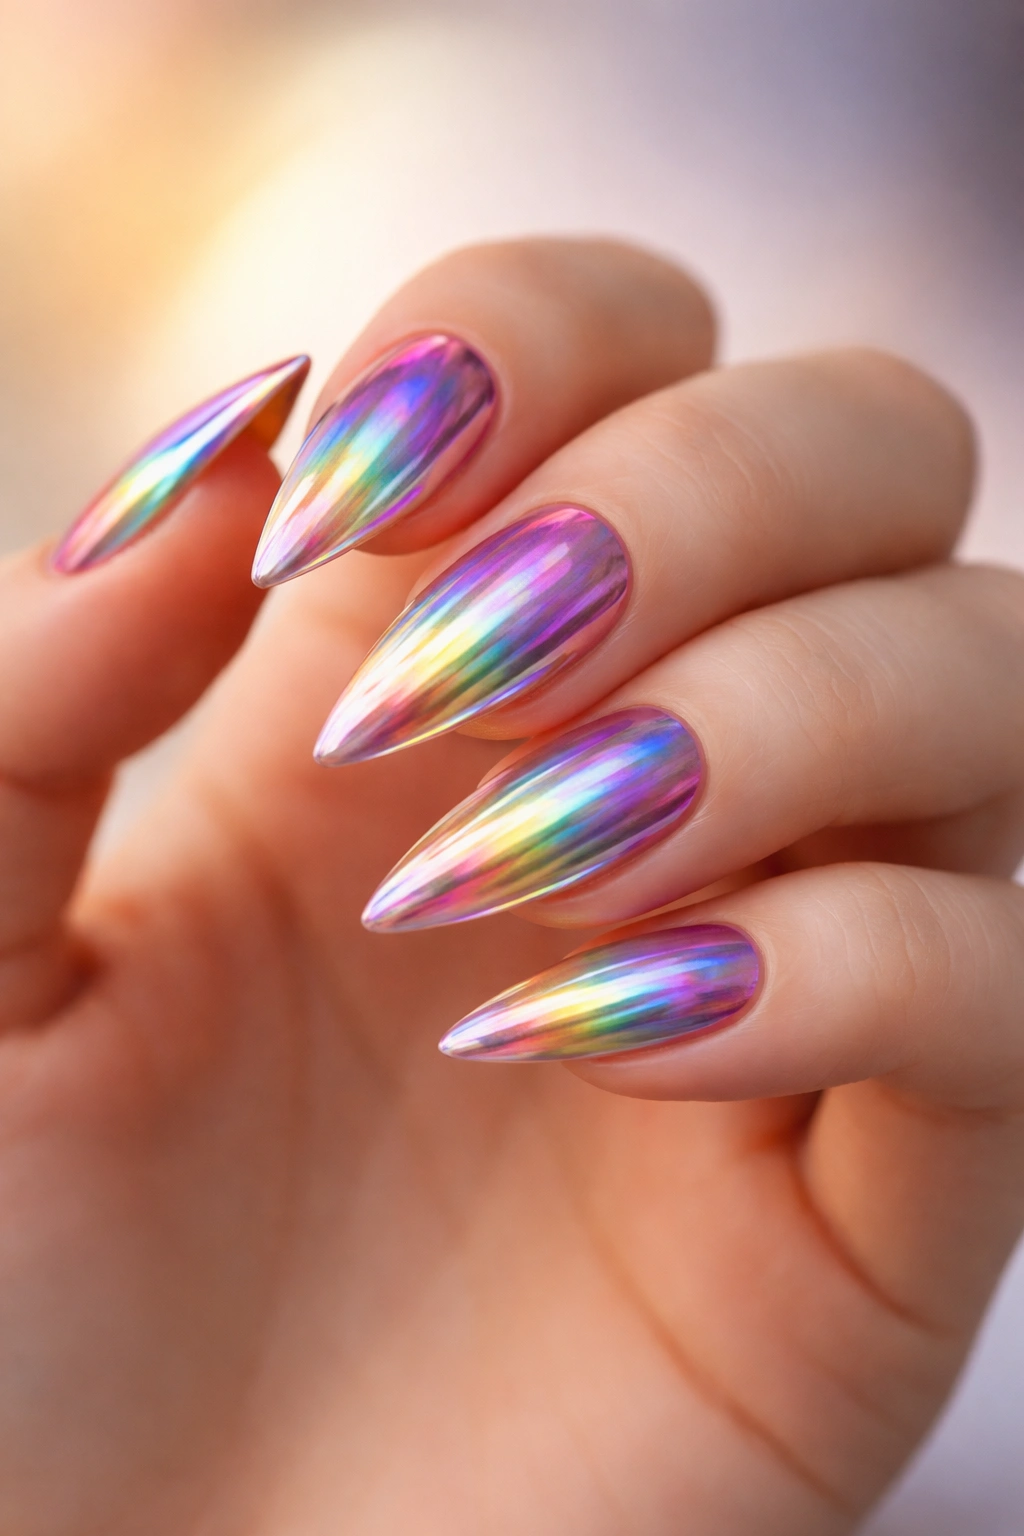
Chrome is having a major moment in nail design, and holographic chrome takes it to another level entirely. This design uses a rainbow-shifting holographic chrome powder that changes color depending on the angle and lighting. In some light it’s blue and green, in other light it’s purple and pink. The effect is otherworldly and magical—your nails become a moving color palette. Applied over a stiletto medium nail, the chrome creates a dimensional, almost liquid-metal appearance that’s absolutely mesmerizing.
Why Holographic Is Birthday-Perfect
Holographic designs are inherently celebratory and youthful. They’re eye-catching without being loud, and they make a statement about someone who’s confident enough to wear something bold. The color-shifting effect means your nails will look different and beautiful in every lighting situation. It’s the kind of design that makes you constantly want to look at your hands and admire the effect, which is exactly the confidence boost a birthday deserves.
Achieving the Holographic Chrome Finish
- Start with a base gel application to give the chrome powder something to stick to
- Use specialized chrome powder applicator tools (usually included with the powder) for the best application
- Apply the chrome in circular motions, building the effect gradually until you achieve full opacity
- Work in sections rather than trying to cover all five nails at once
- Seal with a thick, clear gel top coat to protect the chrome and keep it looking liquid and dimensional
- The top coat is essential—without it, chrome powder can rub off and look patchy
8. Nude with 3D Floral Design
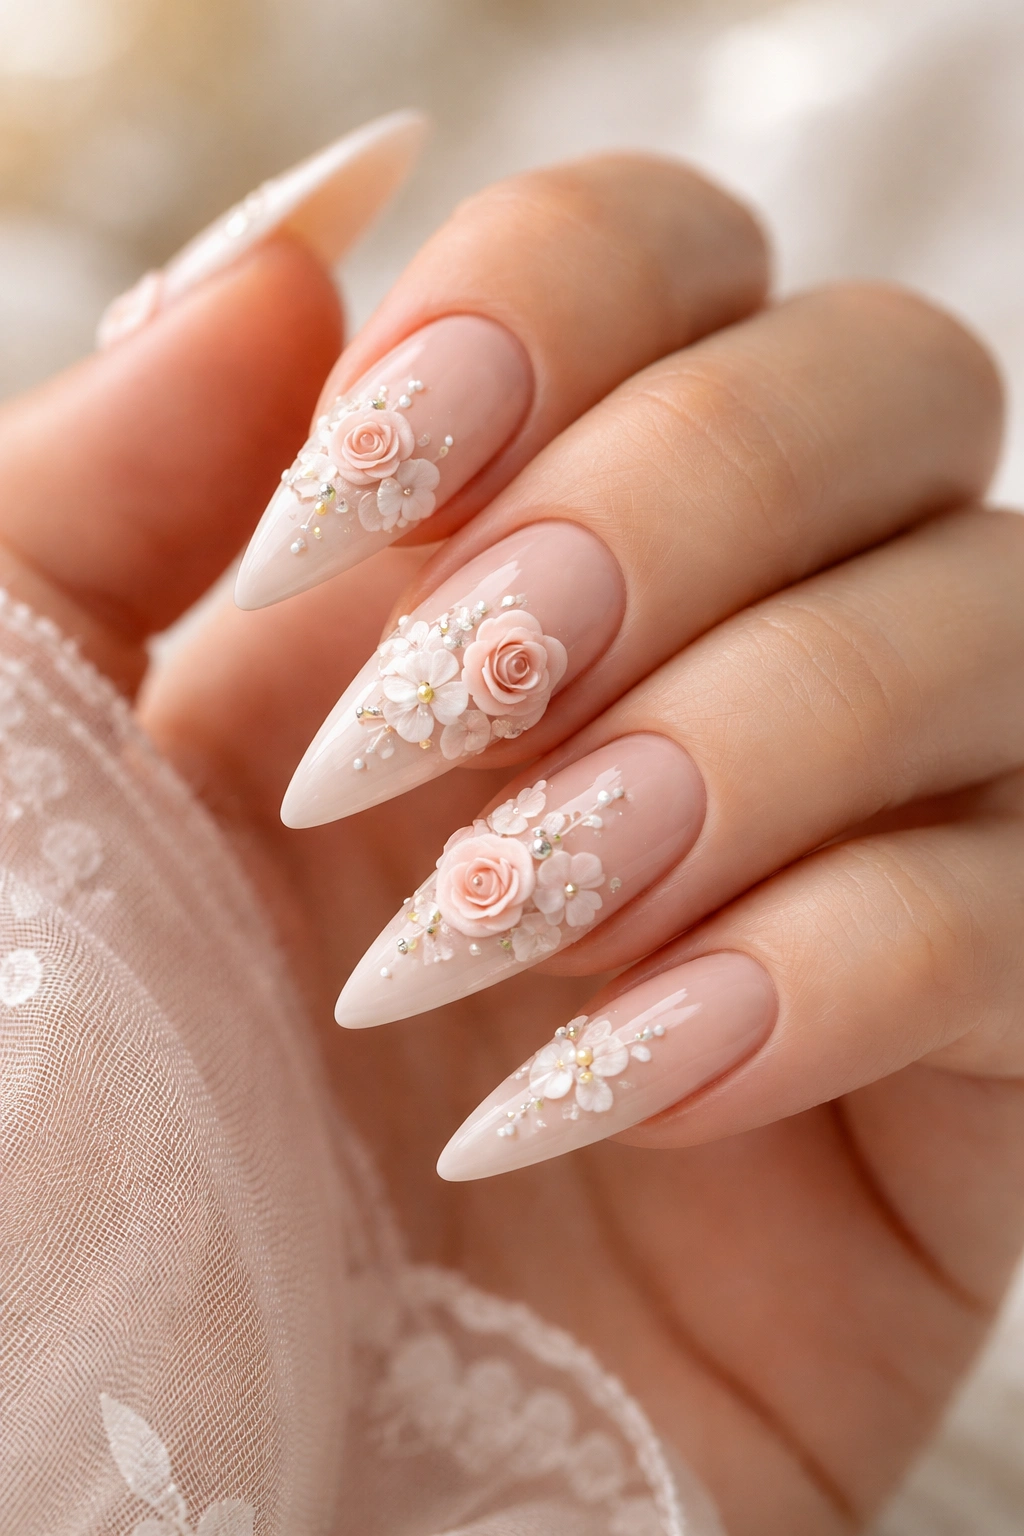
Floral designs might seem delicate and dainty, but when executed with 3D technique, they become utterly luxurious. This design features a soft nude base that lets the florals take center stage. Using gel or acrylic, tiny 3D flowers are sculpted directly onto the nail—a small rose on one nail, tiny wildflowers on another, each with dimension and depth. The flowers aren’t flat; they have visible petals, height, and texture. Combined with a nude base, the effect is romantic, sophisticated, and garden-inspired.
The Romance of 3D Florals for Birthdays
Three-dimensional nail art signals that you’ve invested real time and skill into your appearance. Floral designs feel celebratory and special without being obviously “party nails,” so you can wear them to work, to casual gatherings, or to a formal event. The 3D element transforms what could be a simple design into wearable art. Medium nails give you enough space to sculpt flowers without the nails feeling crowded or oversized.
Creating 3D Floral Elements
- Use builder gel or acrylic to sculpt flowers—regular polish won’t hold dimensional shapes
- Start with small dots or beads of gel as the flower base, then add individual petals using a tiny brush or sculpting tool
- Create variation in flower size and type—large roses on accent nails, smaller wildflowers on others
- Paint the flowers realistically with shadows and dimension; pale pink roses with slightly darker centers look far more sophisticated than flat colors
- Add tiny leaves in sage or olive green for fullness and botanical authenticity
- Seal everything with a thick, glossy top coat to protect the detailed work
9. Ombré from Black to Sheer Pink
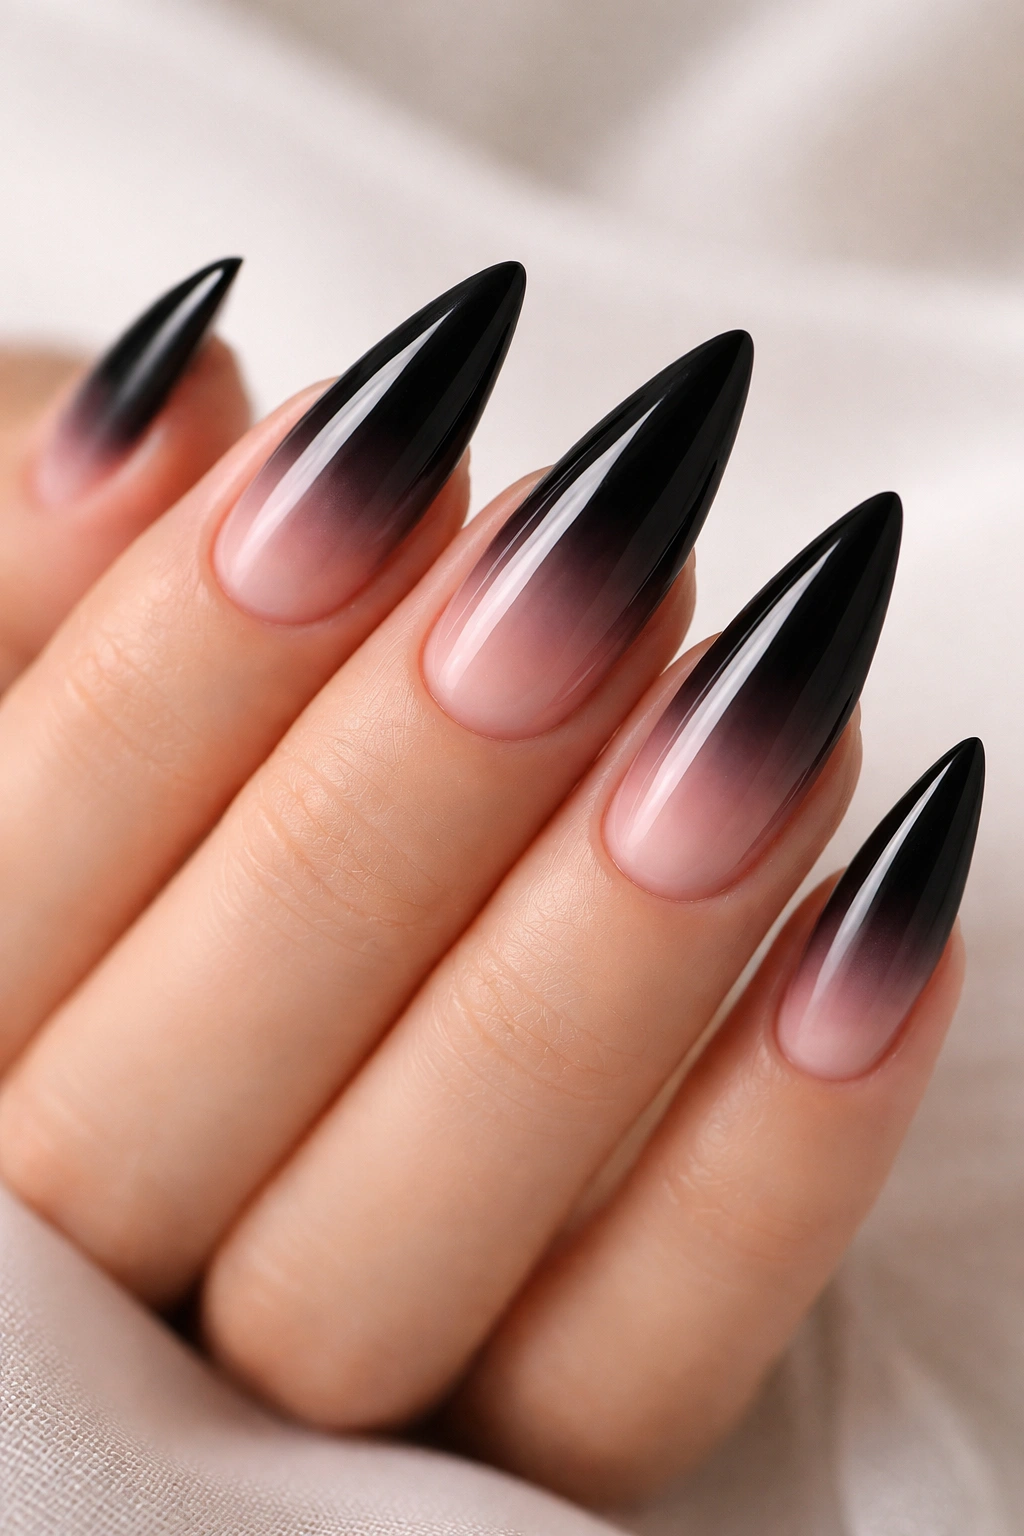
This design plays with transparency and darkness in a way that’s both modern and ethereal. The base starts solid black at the tip, then gradually fades through darker translucent pink in the middle, finally becoming barely-there sheer pink near the cuticle. The gradient is smooth and intentional, created by layering sheer pink polish over black in decreasing amounts. The effect is sophisticated and dreamy—it looks like sunset is emerging from darkness, or shadow turning to light.
Why This Gradient Design Celebrates
This ombré represents transition and transformation, which ties beautifully into the idea of celebrating a birthday and moving into a new year. The color journey from dark to light feels meaningful and symbolic. Technically, the design is harder than it looks, which signals you’ve put effort and thought into your appearance. It’s subtle enough to be appropriate anywhere, but sophisticated enough that people notice and compliment the thoughtfulness of the design.
Executing the Gradient
- Paint a full black base using two or three coats for opacity
- Mix sheer pink polish (or dilute regular pink with clear base) to varying degrees of opacity
- Use a sponge to gently stipple the sheer pink over the black, building opacity as you move toward the tips
- Work in small sections—building gradients takes patience, and rushing creates muddy colors
- The key is layering thin applications rather than trying to create the gradient in one or two swipes
- Seal with a glossy top coat to blend all the layers together and create a seamless effect
10. Gold Dust with Diamond Accents
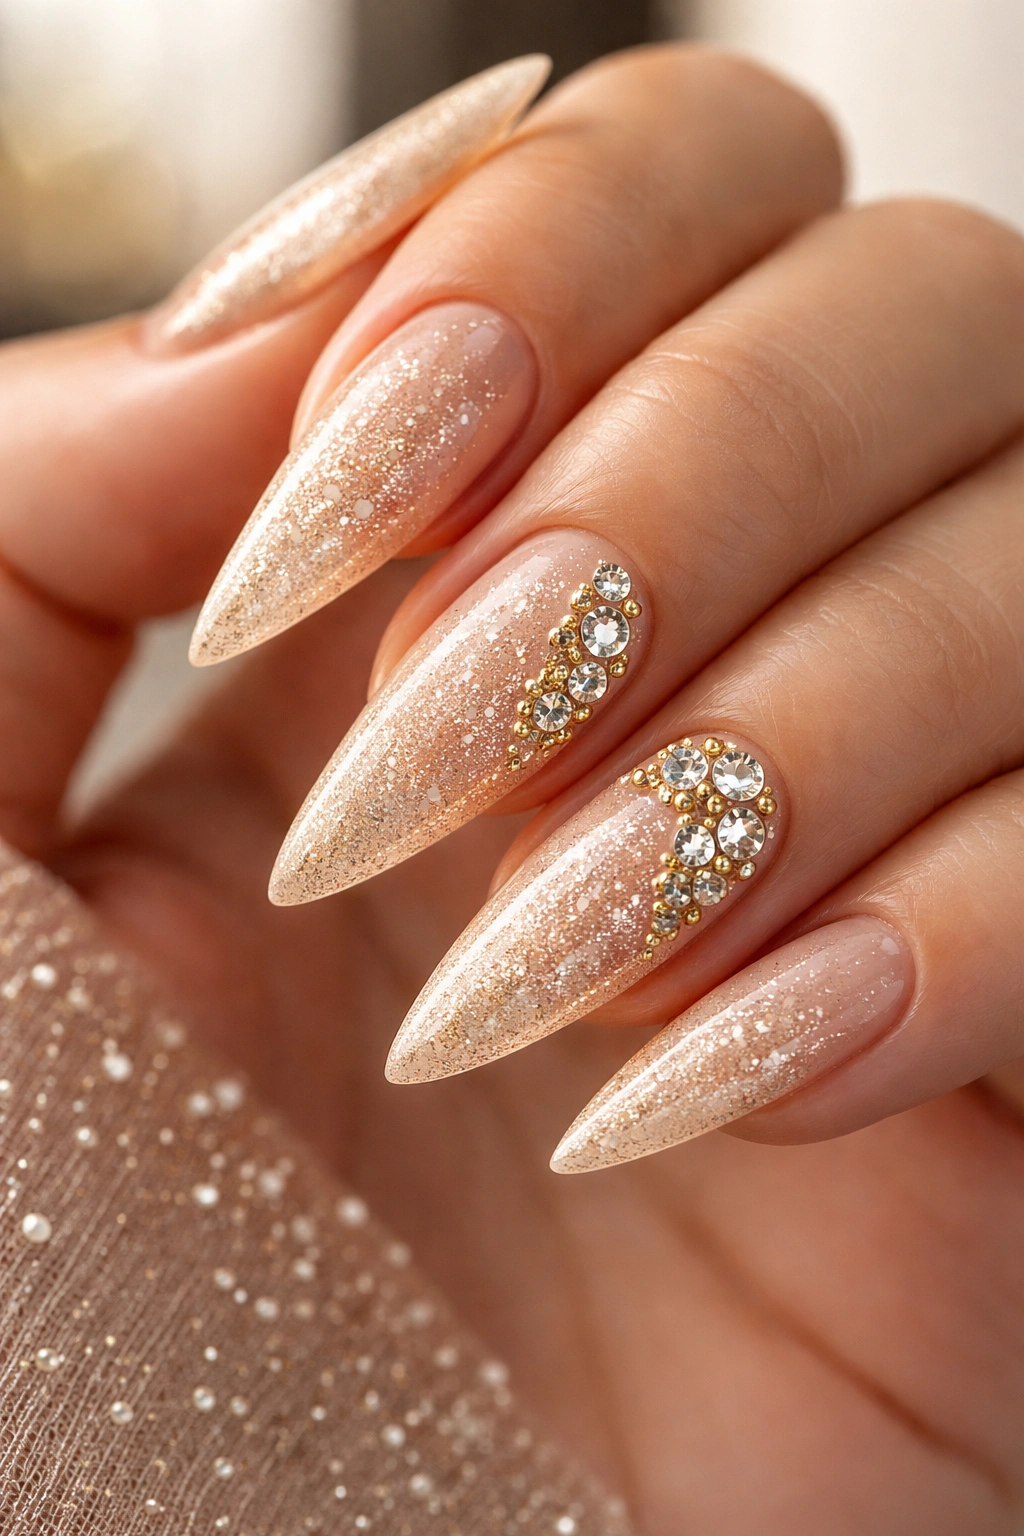
This design combines sparkle with sophistication in exactly the right proportions. A sheer nude or champagne base serves as the foundation. Over this, fine gold dust or glitter is applied, creating a subtle shimmer across the entire nail. Then, on select areas—typically one or two accent nails, or scattered across all nails—small diamond-shaped gems are carefully placed, creating points of brilliant sparkle that draw light. The overall effect is luxurious, celebratory, and somehow both understated and glamorous simultaneously.
Why Gold Dust Reads as Birthday Celebration
Gold dust creates an almost invisible shimmer from a distance but becomes obviously sparkly up close—it’s the kind of detail that makes people say “wait, are your nails glittery?” and then becomes obsessed with how you achieved it. Combined with diamond accents, the design feels expensive and intentional. It works for any celebration setting because it’s elegant enough for formal events but fun enough for casual parties.
Applying Gold Dust and Gems
- Paint a shimmer or sheer base in champagne or nude—this gives glitter something to cling to
- Apply loose gold dust by sprinkling it onto wet polish or sticky gel base, then sealing it
- Alternatively, use pre-mixed glitter polish in a gold dust finish for more reliability
- Place diamond gems strategically using a strong nail glue or gel base
- Focus gems on accent nails or along the lower nail bed where they won’t snag on things
- Seal everything with a thick, clear top coat to protect the dust and keep gems secure
11. Metallic Silver with Black Striping

Silver is criminally underused in birthday nail designs, and this is the perfect way to make a statement with it. A bright, reflective silver metallic base forms the canvas. Over this, thin black stripes are painted in various directions and widths—some thin and precise, others slightly thicker, creating a pattern that feels modern and intentional without being overly geometric. The contrast between the bright metallic silver and matte or semi-glossy black stripes is striking and visually sophisticated.
The Strength of Silver for Celebrations
Silver feels futuristic and celebratory without being pink or gold. It’s a color that works beautifully on all skin tones and reads as sophisticated rather than party-specific. The black striping adds visual interest and prevents the design from feeling plain or one-dimensional. This is the manicure choice for someone who wants something special and eye-catching but isn’t interested in traditional girly or sparkly designs.
Creating Precise Black Stripes
- Apply the silver metallic base in two coats for full brightness and opacity
- Use a thin striping brush or liner to create the black lines—precision matters here
- Paint stripes in various directions to create visual movement and avoid a rigid, uniform appearance
- Vary stripe width and length—some should be full-nail length, others shorter and more playful
- Don’t stress about perfect straightness; slight imperfections actually add charm
- Seal with a glossy top coat to make the silver shine and the contrast pop
12. Millennial Pink with Micro Rhinestones
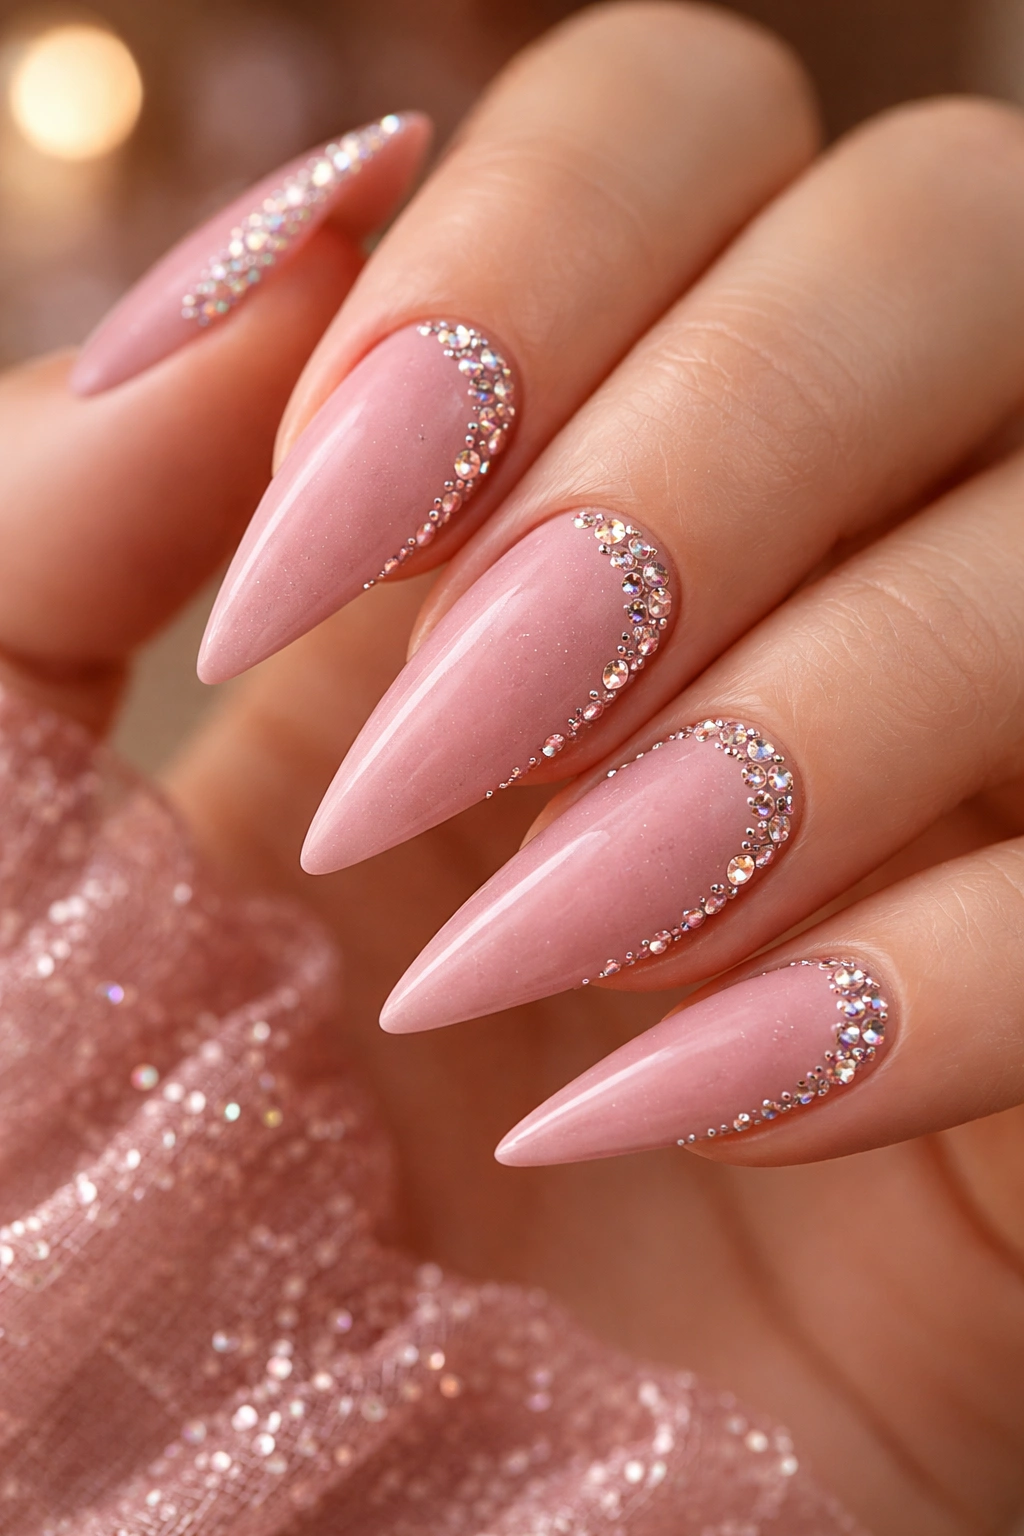
Millennial pink is the color that defined a generation, and it’s perfect for a birthday. This design features a dusty, warm pink base that’s flattering and nostalgic without feeling dated. Scattered across the nail surface are tiny micro rhinestones in clusters, creating areas of concentrated sparkle. The stones aren’t covering the entire nail—they’re strategically placed, typically along the edges or in small groupings, allowing plenty of the beautiful pink base to show through.
Why Millennial Pink Feels Celebratory
Millennial pink is inherently joyful and associated with celebration. It’s flattering on most skin tones and feels youthful without being childish. The micro rhinestones add just enough sparkle to make the design feel special and intentional. This is the design for someone who loves color, loves sparkle, and celebrates with unironic enthusiasm. It photographs beautifully and makes a statement without feeling over-the-top.
Placing Micro Rhinestones Effectively
- Paint the pink base with two coats for full, even coverage
- Use extremely strong nail glue specifically designed for gems—weaker adhesives will fail
- Place stones while the base is still slightly sticky for better adhesion
- Create small clusters rather than scattering single stones; clusters look more intentional and professional
- Focus clusters on accent nails or along the side and lower edges where they won’t snag constantly
- Seal with a thick top coat to protect the stones and keep them shiny
13. Deep Navy with Star Details
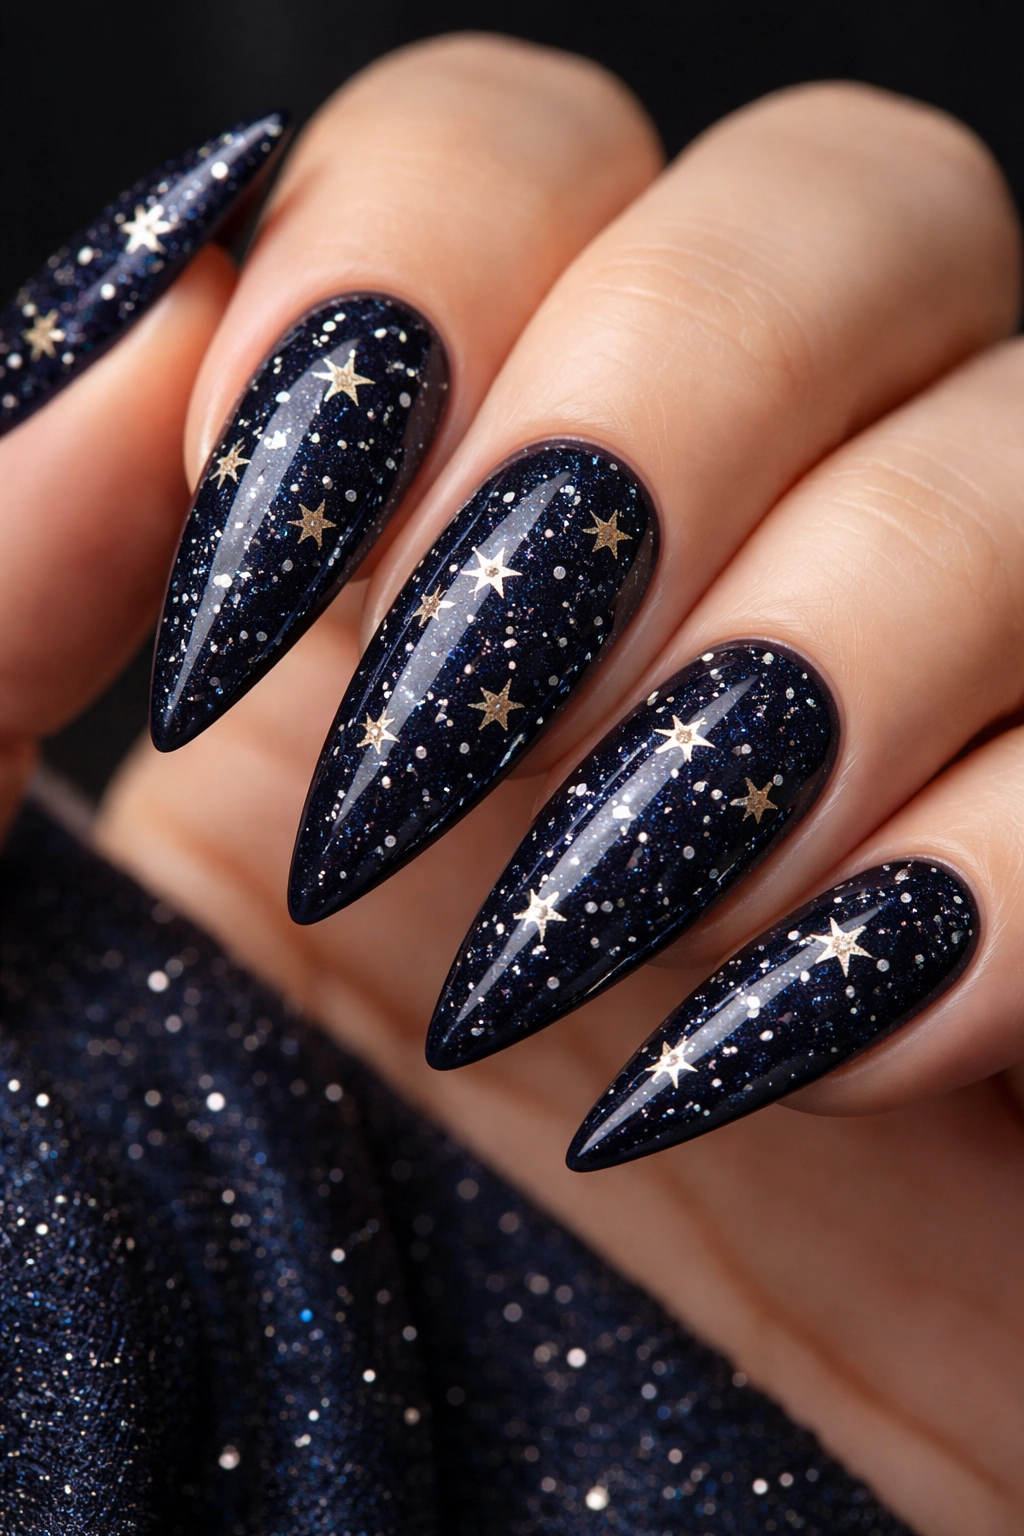
Navy blue is sophisticated and works beautifully for celebrations because it’s celebratory without being screaming-at-you obvious. This design features a rich, deep navy base that’s almost black but has unmistakable blue undertones. Scattered across the nails are tiny stars in silver or pale gold, creating a night-sky effect. Some stars are very small—barely visible—while others are slightly larger, creating depth and variation. The effect is dreamy, sophisticated, and perfect for an evening celebration.
Why Navy Stars Feel Right
Navy blue signals sophistication and confidence. The star details create a poetic, dreamy quality that elevates a simple colored base into something meaningful. Stars are often associated with wishes and special occasions—perfect for a birthday. The design is subtle enough to work in professional settings but beautiful and intentional enough that everyone notices it’s special.
Creating Star Details
- Paint a navy base with two coats for opacity and depth
- Use a tiny round brush or dotting tool to create stars in silver or pale gold
- Create stars at varying sizes—this creates depth and prevents the design from looking like a uniform pattern
- Stars should be scattered organically across the nail surface, not in straight lines or perfect grids
- Some nails can have more stars, others fewer; variation is key
- Seal with a glossy top coat to make the metallic stars pop
14. Peachy-Pink with Glitter Gradient
This design is pure sweetness without being overly cute. A warm peachy-pink base forms the foundation—this color is flattering on all skin tones and evokes warmth and celebration. At the tips, rose gold or champagne glitter creates a gradient, becoming denser and more concentrated toward the very edge of the nail. The glitter gradient creates dimension and draws attention to the shape of the stiletto, emphasizing the gorgeous taper.
Why This Design Celebrates Without Being Obvious
Peachy-pink is sophisticated enough for a brunch, business meeting, or casual day, but the glitter gradient elevates it into obvious celebration territory. The gradient also creates visual movement and makes your nails look longer and more tapered. It’s a design that says “I’m happy to celebrate” without requiring bold colors or extreme embellishments.
Creating the Glitter Gradient
- Paint a solid peachy-pink base with two coats for full coverage
- Create a glitter gradient by mixing clear gel or polish with rose gold glitter in varying ratios
- Apply full glitter mixture at the tips, then blend into less-glittery mixture in the middle, ending with solid color near the cuticle
- Use a sponge to blend the transitions between glitter density—this creates the gradient effect
- Work in layers, building the glitter intensity gradually rather than trying to do it in one step
- Seal with a thick glossy top coat to protect the glitter and enhance shine
15. Sheer White with Gold Line Details
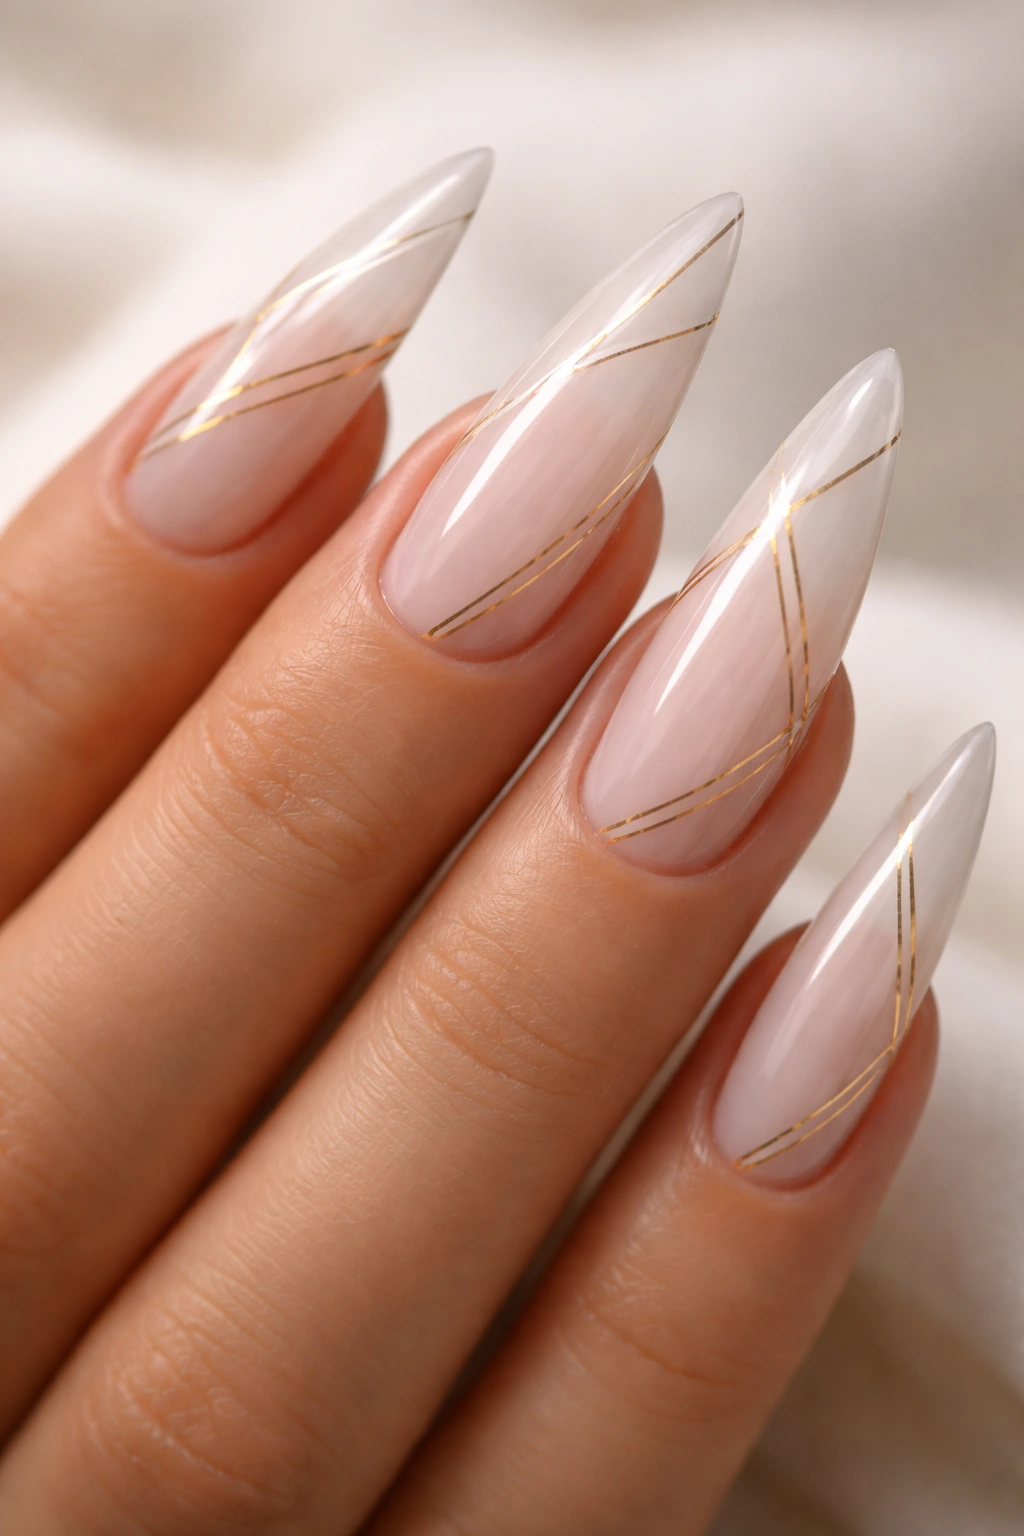
Sometimes minimalism is the ultimate celebration. This design uses a barely-there sheer white or opalescent base that lets your actual nail shine through slightly. Over this, thin, precise gold lines create geometric patterns—perhaps a single clean line down the center, or an angular pattern near the tips. The lines are delicate and refined, creating visual interest without overwhelming the nail. The overall effect is sophisticated, modern, and subtly luxurious.
Why Minimalism Can Be Celebratory
Not every celebration requires excess. This design signals confidence, taste, and understated luxury. It’s appropriate for literally any occasion, but the gold details make it special and intentional. The design is easy to maintain, works beautifully with any outfit, and lets the beauty of your natural nail enhance the overall look. It’s perfect for someone who celebrates through confidence and presence rather than volume.
Creating Clean Gold Lines
- Paint a sheer white or opalescent base—just one coat, since you want the nail to show through
- Use a thin striping brush or nail art pen to create gold lines
- Plan your design on one nail first, then replicate on others for consistency
- Keep lines thin and precise—this precision is what makes the design feel luxurious
- Don’t stress about absolute perfection; slight variations actually add organic charm
- Seal with matte or glossy top coat depending on the mood you prefer—matte reads as more modern and minimalist
16. Vibrant Coral with Rhinestone Tips

Coral is joyful, celebratory, and flattering on nearly every skin tone. This design features a bright, warm coral base as the foundation. The tips of the stilettos are completely covered in rhinestones in coordinating or contrasting colors—perhaps crystal-clear stones for a classic look, or a mix of coral, gold, and clear for added dimension. The stones create a literal sparkle at the tip of your nail, emphasizing the length and elegance of the stiletto shape. The overall effect is celebratory, glamorous, and undeniably festive.
Why Coral Rhinestone Tips Make Statements
Coral is an inherently optimistic color that communicates joy and energy. Rhinestone-covered tips read as intentionally glamorous and celebratory. The sparkle at the tips draws attention to the beautiful shape you’ve chosen, which is the whole point of a stiletto design. This is the manicure for someone who shows up to their birthday ready to sparkle and celebrate unabashedly.
Covering Nail Tips with Rhinestones
- Paint the coral base with two coats for even, bright coverage
- Use a strong-hold nail glue and apply stones to the tip area in rows
- Start at the very edge of the nail and work toward the nail bed, ensuring complete coverage
- Mix stone sizes and finishes (some crystal clear, some tinted coral) for dimensional sparkle
- Apply stones while the glue is still slightly tacky for better adhesion
- Seal the entire nail with a thick clear top coat to protect stones and seal them permanently
- The top coat is crucial—without it, stones can catch on hair, clothing, and surfaces
17. Blush Pink with Delicate Lace Pattern
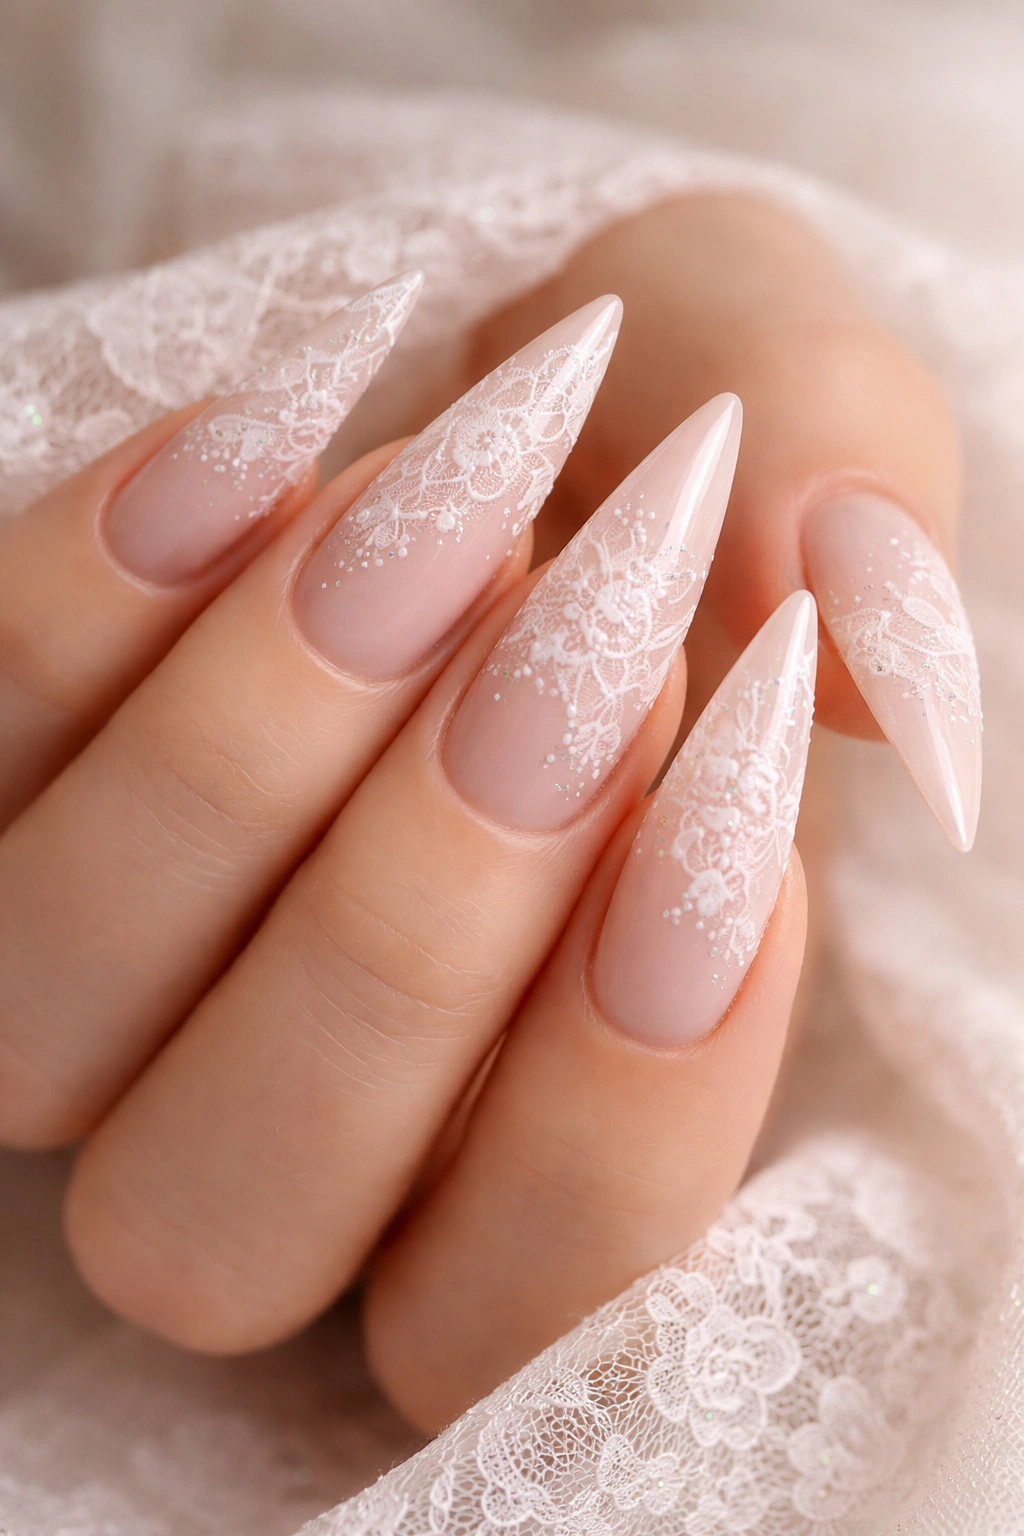
Lace is romantic without being frilly, and this design proves it. A soft blush pink base serves as the canvas for delicate white lace pattern that covers the entire nail or appears as an accent along one or two fingers. The lace pattern resembles actual lace—with tiny loops, curves, and organic details—created using specialized lace brushes or stamping. The overall effect is romantic, sophisticated, and perfect for someone who loves feminine design without wanting something young or overly cute.
The Romance of Lace for Birthday Celebrations
Lace evokes elegance, tradition, and beauty. It’s a pattern that works for weddings and celebrations equally well. Combined with blush pink, it becomes universally flattering and inherently feminine. The design says you celebrate with grace and elegance. It works beautifully in photographs and photographs as genuinely romantic rather than saccharine.
Creating Lace Pattern
- Paint a blush pink base with two coats for opacity
- Use specialized lace nail art brushes with fine, thin bristles to create lace details
- Work slowly and deliberately, creating the intricate loops and curves of lace
- Alternatively, use lace stamper plates if hand-painting feels intimidating—stamping creates perfect lace every time
- White polish applied with a thin brush creates the cleanest, most visible lace details
- Keep the pattern delicate and airy rather than dense and heavy
- Seal with a glossy top coat to make everything blend smoothly
18. Wine Red with Gold Geometric Overlays
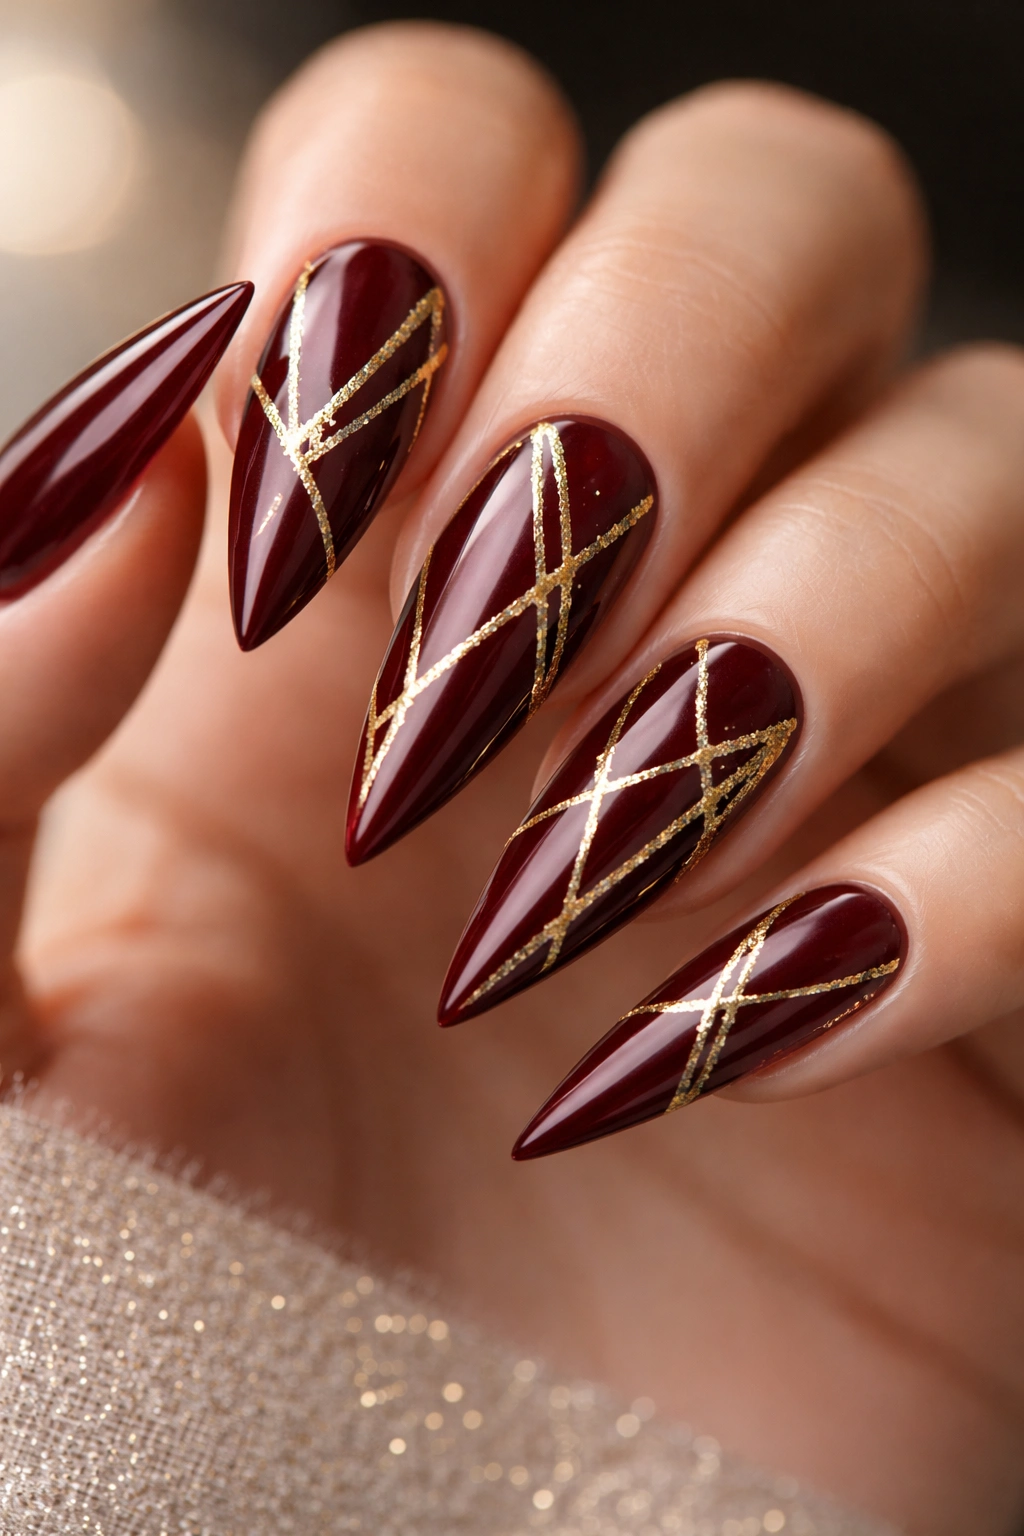
Wine red is deeply luxurious and perfect for someone celebrating with sophistication. This design pairs a rich, deep wine-red base with geometric gold overlays—perhaps triangles, hexagons, or angular lines that create a modern, architectural feel. The gold isn’t random; it’s placed strategically to create visual movement and structure. The contrast between the deep, warm wine color and bright gold creates a look that’s simultaneously elegant and contemporary.
Why Wine Red Feels Celebratory and Sophisticated
Wine red is the color of luxury, celebration, and confidence. It’s deeper and more interesting than basic red but equally impactful. The geometric gold overlays prevent the design from feeling heavy or dated, keeping it firmly contemporary. This is the manicure for someone who celebrates with sophistication and presence. It works beautifully on all skin tones and reads as intentional and polished in any context.
Creating Geometric Gold Overlays
- Paint the wine-red base with two coats for full opacity and richness
- Plan geometric shapes on one nail using light pencil or a makeup brush
- Use a thin striping brush to outline shapes in gold, or fill them completely depending on your vision
- Create geometric variation across the five nails so it doesn’t feel too uniform or pattern-based
- Some nails could be heavily overlaid with geometry, others with just subtle gold accents
- Seal with a glossy top coat to make the gold stand out and protect the design
19. Nude Base with Scattered Pearl Accents
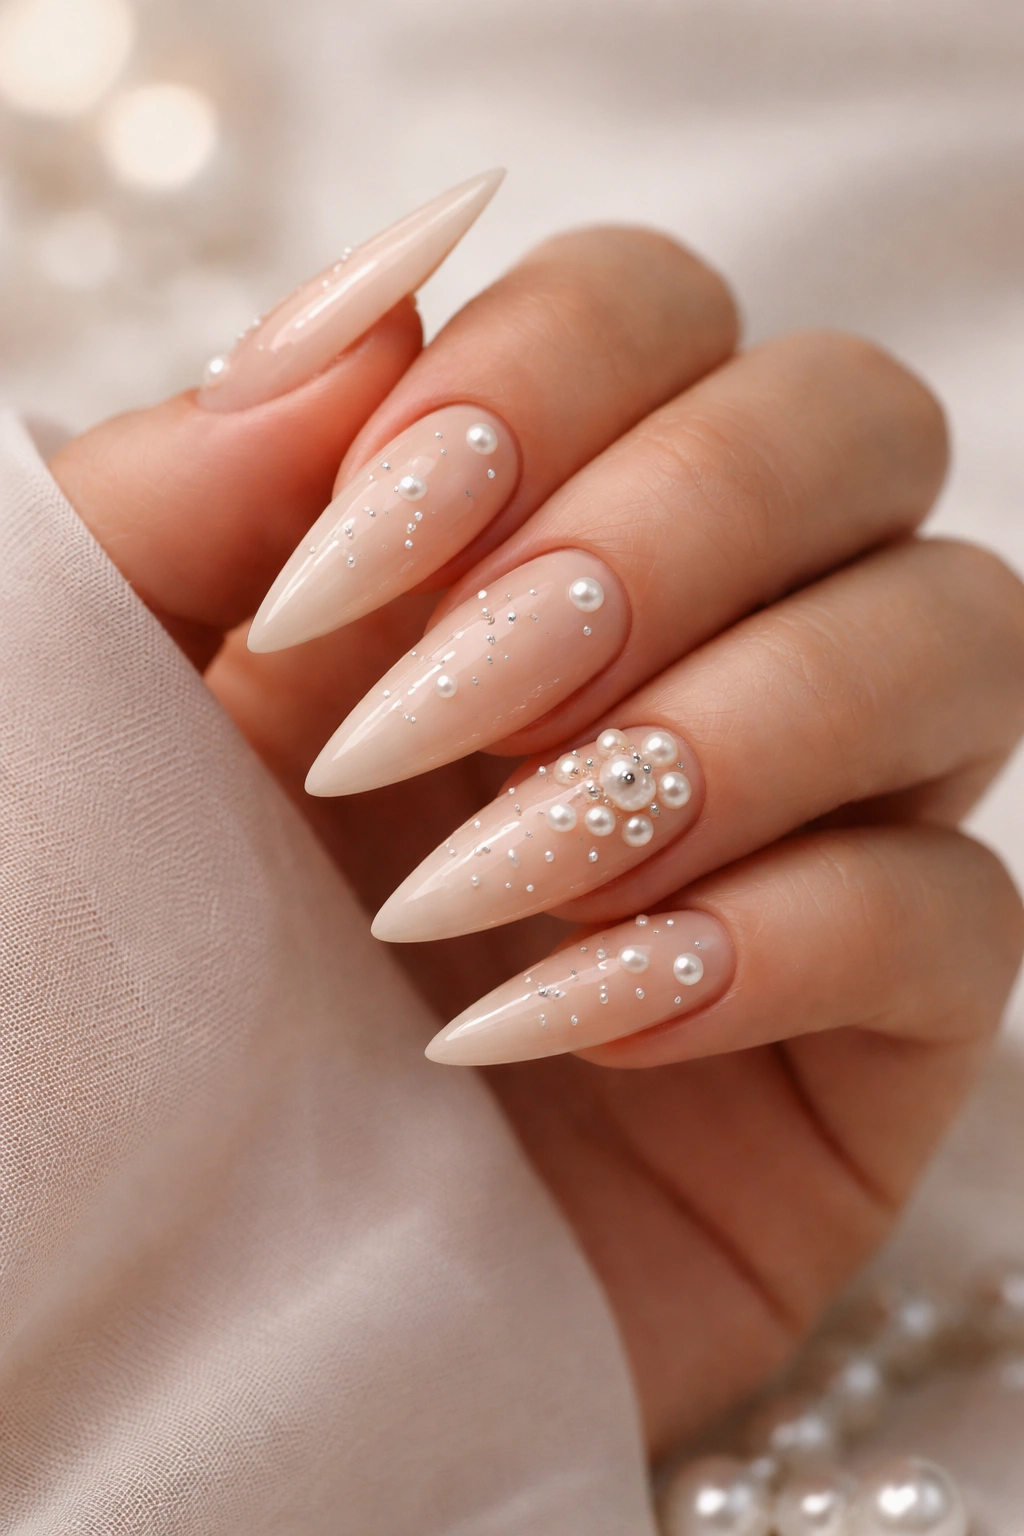
Pearls are inherently celebratory and associated with special occasions and luxury. This design features a soft, nude or beige base that lets pearls take center stage. Rather than being placed in organized rows or patterns, pearl beads and pearl-effect decorations are scattered organically across the nail surface—some clustered on accent nails, others spaced throughout. The effect is luxurious, feminine, and sophisticated without feeling overdone or costume-like.
Why Scattered Pearls Work for Birthdays
Pearls evoke special occasions, elegance, and timeless beauty. Scattered placement makes them feel organic and intentional rather than structured or formal. The pearls catch light and create visual interest without the nails feeling heavy. This is the design for someone who appreciates quiet luxury and doesn’t need screaming statements to feel celebrated. It works equally well for formal events and casual celebrations.
Placing Pearl Accents
- Paint a nude or beige base with two coats for smooth, even coverage
- Use pearl-effect beads or pearls designed for nails—they’re sized appropriately for nail art
- Apply using strong nail glue specifically designed for gems
- Scatter pearls across nail beds in organic, non-pattern arrangements
- Focus heavier clustering on one or two accent nails to draw attention without overwhelming
- Use varying pearl sizes to create dimension and visual interest
- Seal with a thick clear top coat to protect and secure every pearl permanently
20. Rainbow Glitter with Holographic Accent Nails
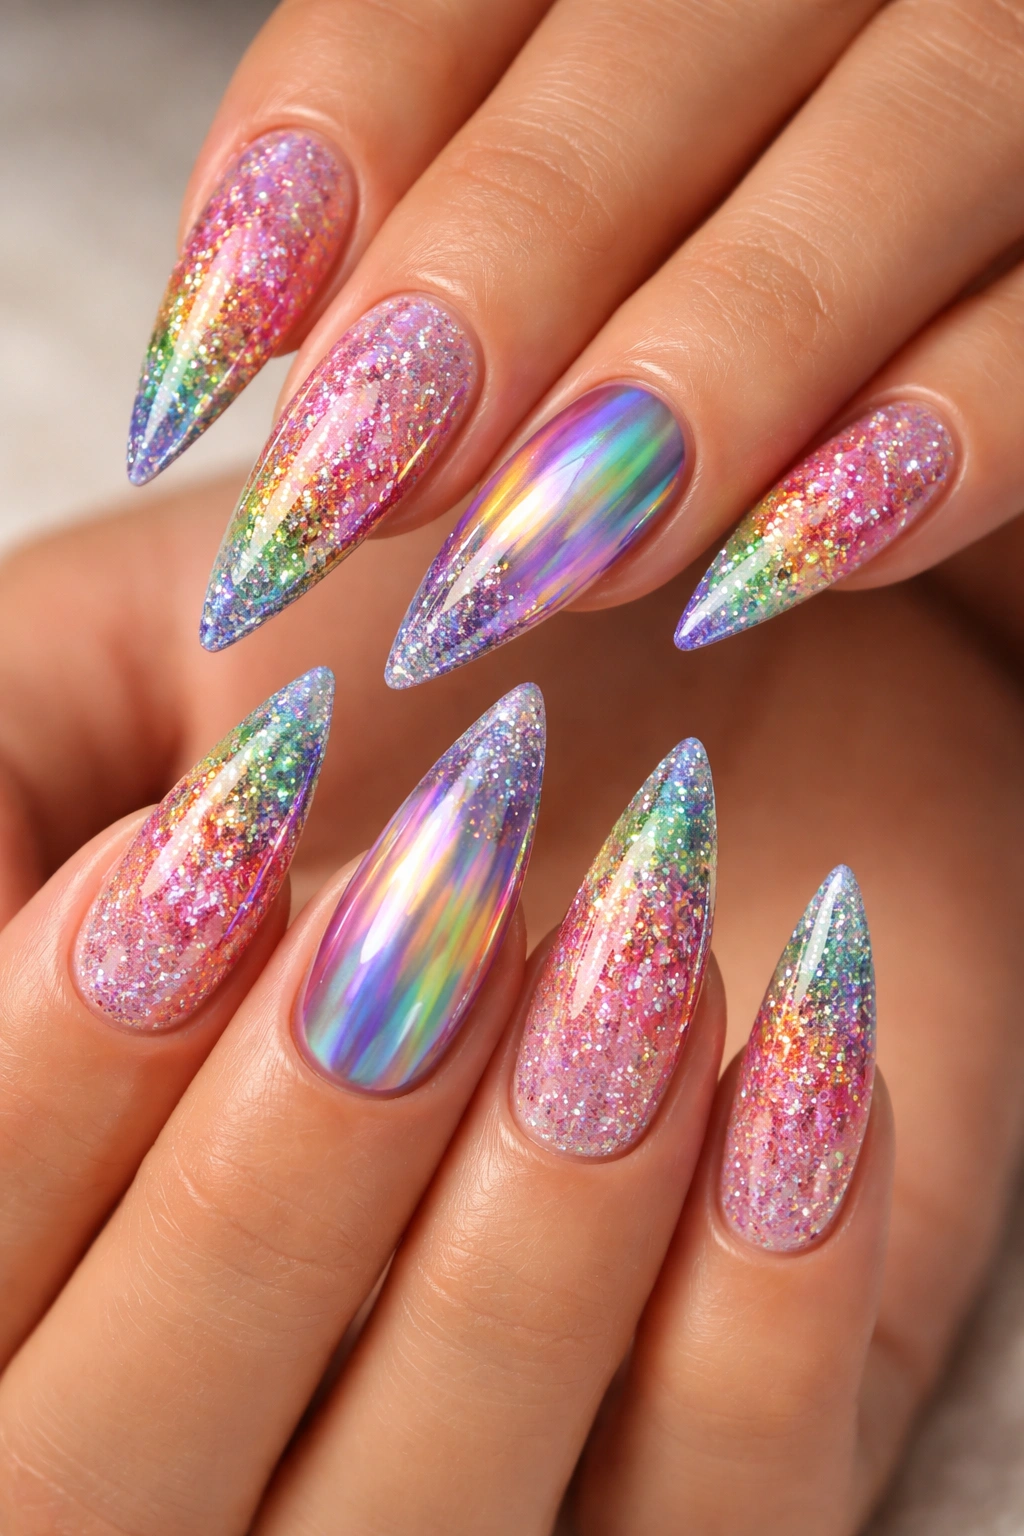
End on pure celebration with this design. Most nails feature a nude or sheer base covered in rainbow glitter in varying sizes and textures—some fine, some chunky, creating visible sparkle and dimension. Two or three accent nails shift to holographic chrome in rainbow shades that shift and change depending on lighting. The combination of glitter and chrome creates maximum sparkle and visual interest, perfect for someone who absolutely wants to celebrate in every way possible.
Why Rainbow Glitter Celebrates Everything
Rainbow is the ultimate celebration color—it’s joyful, optimistic, inclusive, and impossible to ignore. This design is boldly celebratory without being childish. The mix of glitter and chrome creates dimension and keeps the nails interesting from every angle. It’s the perfect choice for someone who shows up to their birthday ready to sparkle, celebrate, and let their light shine.
Creating Rainbow Glitter and Chrome Combination
- Paint a clear or nude base to make glitter colors pop
- Apply rainbow glitter mix (or layer individual glitter colors) onto sticky gel base
- Build glitter density gradually to avoid muddy, murky coverage
- For accent nails, apply chrome powder according to package directions (holographic chrome has specific application instructions)
- Chrome requires a special brush or applicator tool—don’t use regular brushes
- Work in smaller sections to prevent chrome from drying before proper application
- Seal everything with a thick, clear glossy gel top coat that seals over both glitter and chrome
- The top coat is essential for protecting loose glitter and keeping chrome brilliant
Final Thoughts
Your birthday nails are a small, incredibly visible way to celebrate yourself and signal to the world that something special is happening. Whether you choose understated elegance or full-on sparkle, the confidence you feel wearing something you’ve chosen specifically for your celebration matters just as much as the design itself.
Medium stiletto nails are the perfect length for birthday designs because they give you enough canvas to express personality while staying practical for actual living. You don’t need extreme length to make a statement; you need intentionality, quality execution, and a design that reflects who you actually are when you’re feeling celebratory.
The most important thing isn’t whether you choose romantic, geometric, sparkly, or minimalist—it’s that your birthday nails make you feel amazing. When you look down at your hands and feel a little glow of celebration every single time, you’ve chosen the perfect design. So pick the one that made you pause while scrolling, book that appointment, and get ready to celebrate in style.
