

Pastel stiletto nails on medium-length nails hit that perfect sweet spot between bold and wearable. You get the dramatic elongated point that makes your hands look more elegant, but the medium length keeps things practical enough for everyday life — no constantly breaking tips or struggling with keyboard work. Pair that with soft, dreamy pastel colors, and you’ve got a nail aesthetic that feels both sophisticated and surprisingly versatile.
The magic of pastels on stilettos is that they soften what could otherwise feel edgy. A stiletto shape in deep burgundy or black reads very formal, very statement-making. But take that same shape and coat it in whisper-soft lavender, blush, or minty cream, and suddenly you’ve got something that works for brunch, the office, date night, or just existing in the world with prettier hands. Medium-length stilettos give you enough nail real estate to play with designs, gradients, and finishes without the inconvenience of extra-long nails.
Whether you’re drawn to pure solid pastels, delicate patterns, shimmery finishes, or decorative details, there’s a pastel stiletto style waiting for you. Here are fourteen specific designs that prove pastels are anything but boring on stiletto nails.
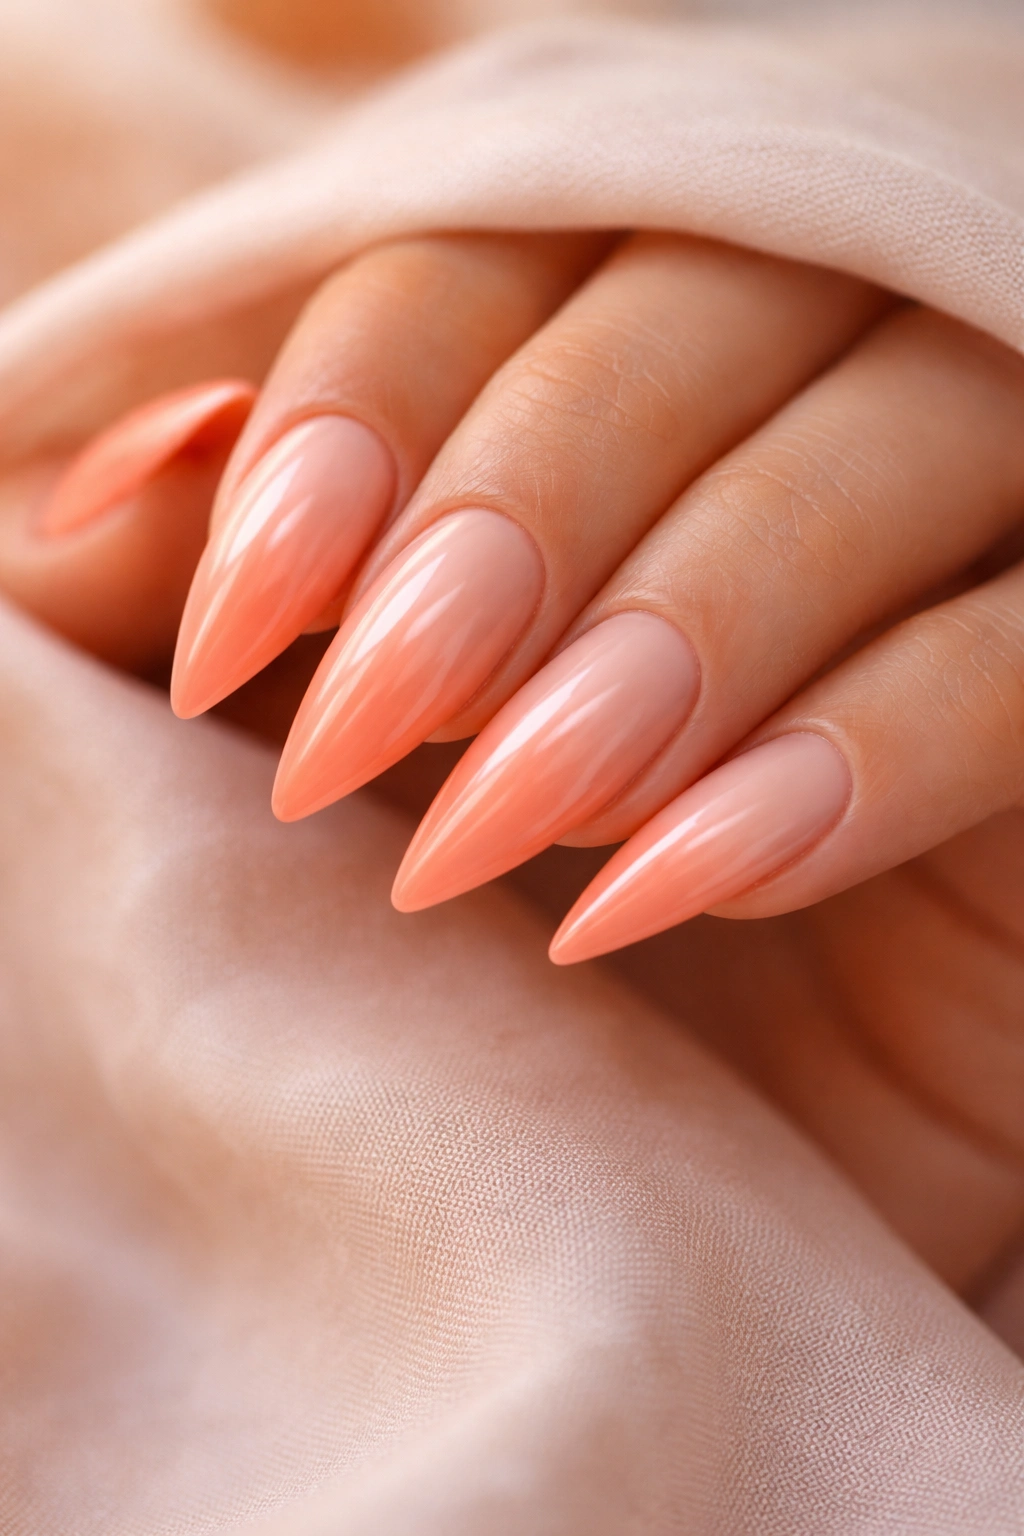
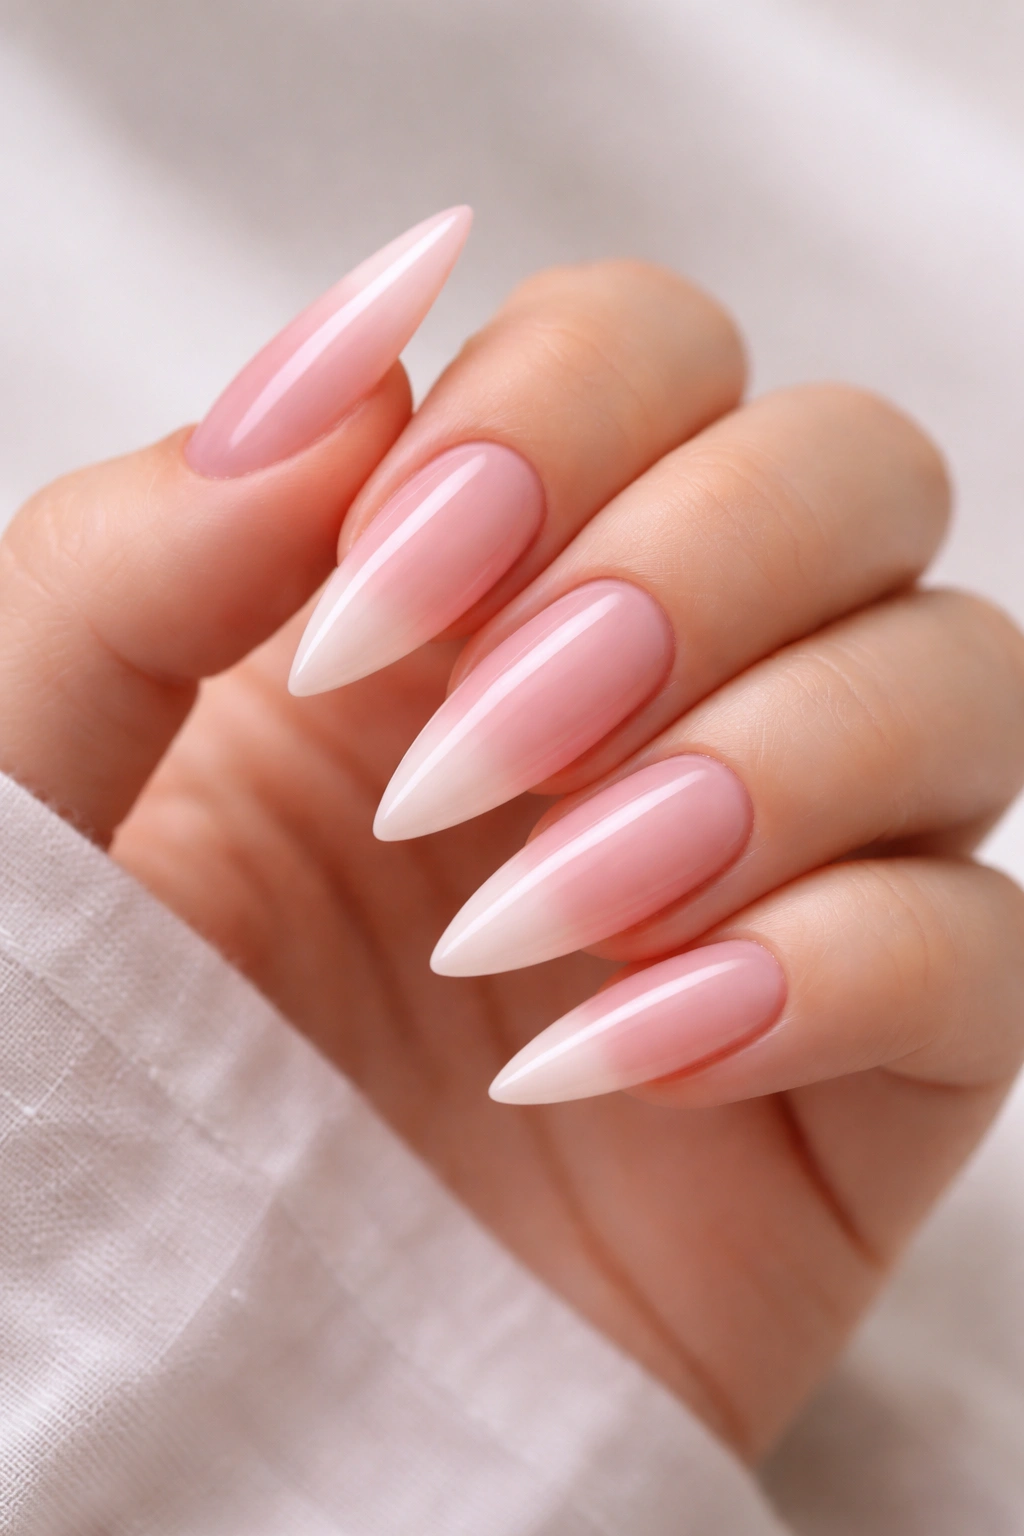
1. Soft Pink Gradient Ombre
A gradient that flows from pale nude-pink at the base to a creamy rose at the tips is a masterclass in understated elegance. This design works because it’s not flat — the color transition gives the nails depth and dimension, making them visually interesting without being loud. The gradient creates an illusion of length, which is exactly what you want on a stiletto that’s already extending your nail bed.
Why This Design Works So Well
The nude-to-rose gradient flatters almost every skin tone and works across every season and occasion. It’s the kind of manicure that looks expensive and intentional even though it’s actually relatively straightforward to execute. The soft color story reads as refined rather than playful, making it perfect if you prefer your nail aesthetic to be more subtle.
How to Achieve This Look
- Use a white or nude base coat as your starting point — this ensures the gradient shows up clearly
- Apply two to three thin layers of your palest pink polish, building up coverage without creating thickness
- Using a makeup sponge, dab progressively darker rose pink onto the tips, blending slightly where the colors meet
- Seal everything with a high-shine top coat to enhance the gradient effect and make it last longer
- A matte top coat instead creates a more sophisticated, almost powdered effect if you prefer
Pro tip: The key to a seamless gradient is using a slightly damp sponge and making multiple light passes rather than trying to achieve perfect blending in one swipe.
2. Lavender and White Marble
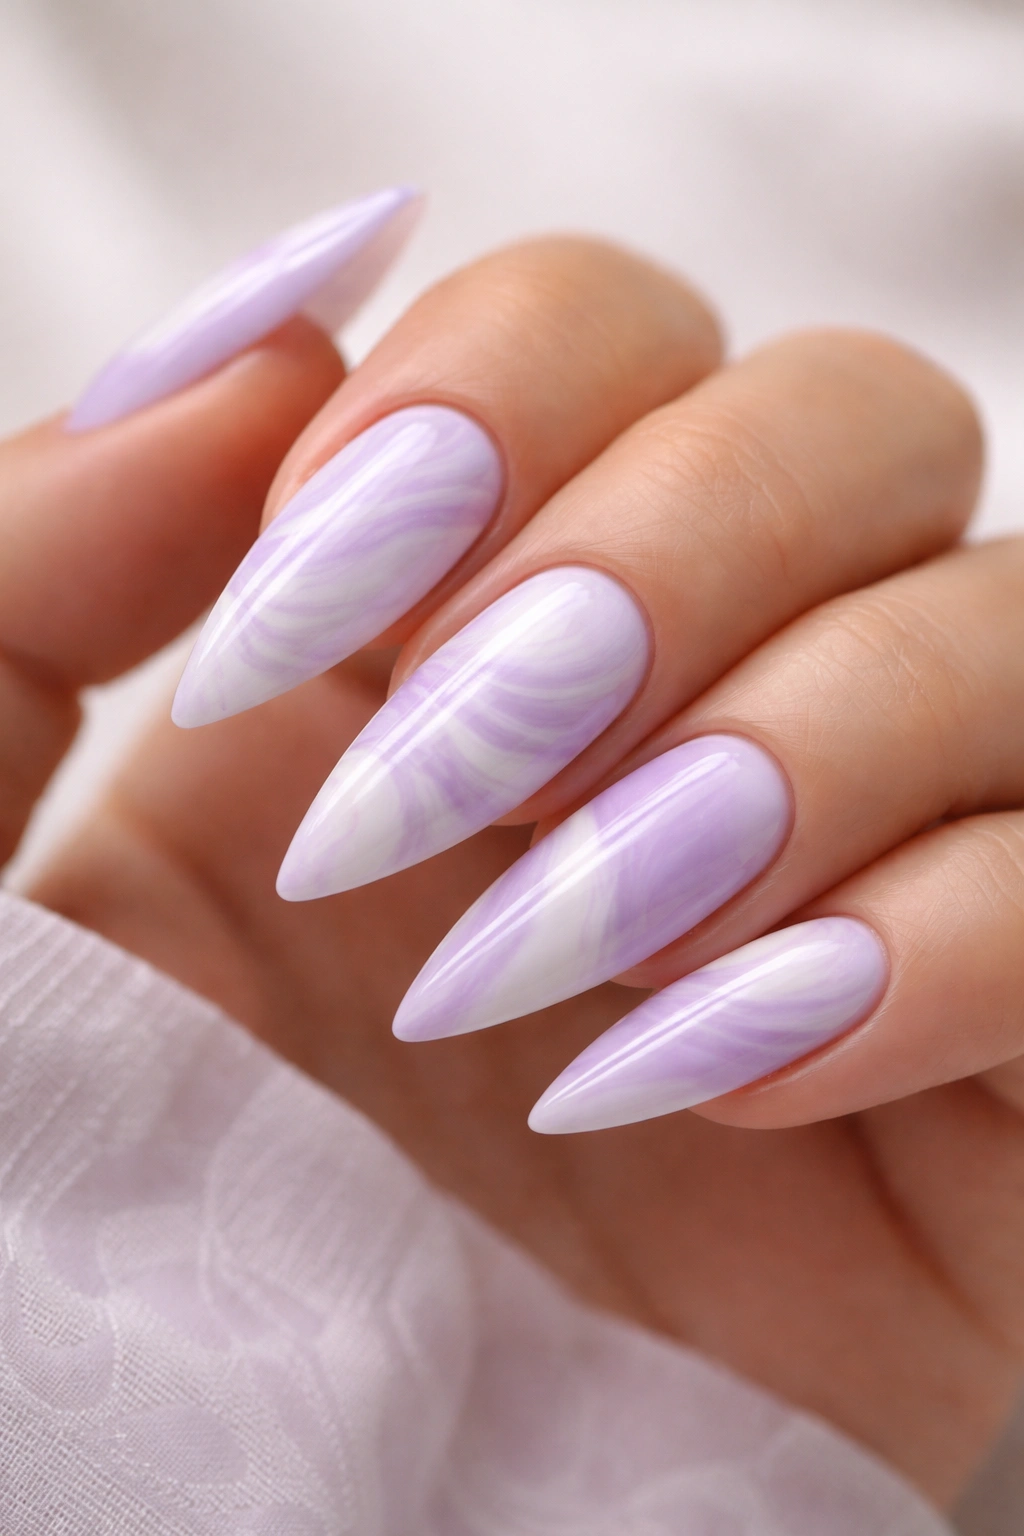
Swirled white and lavender creates that organic, stone-inspired look that feels both modern and timeless. The marble pattern gives you visual interest without feeling cutesy — it’s sophisticated enough to pair with professional outfits while still being undeniably pretty. On medium stilettos, the marble pattern is large enough to see the design clearly without looking cramped.
The Science Behind Marble Designs
Marble nails work beautifully on stilettos because the irregular pattern actually helps disguise any minor imperfections in your manicure application. The swirled design draws the eye around the nail rather than down its length, which creates a different visual effect than a solid color. The combination of lavender and white is particularly timeless — lavender was trendy years ago and remains effortlessly wearable because it’s genuinely flattering.
Steps to Create Marble Effect
- Paint a base coat of white or very pale lavender as your foundation
- While the base is still wet or slightly tacky, drop small amounts of lavender polish randomly across the nail
- Using a thin nail art brush or toothpick, drag the lavender through the white in loose, organic swirls — think rock formations rather than precise patterns
- Seal with a glossy top coat to unify the design and create that polished stone appearance
- If your first attempt looks too chaotic, you can paint over it and try again — practice makes this easier
Worth knowing: Thinner polish works better for marble effects than thick formulas, which don’t swirl as smoothly.
3. Minty Fresh Geometric
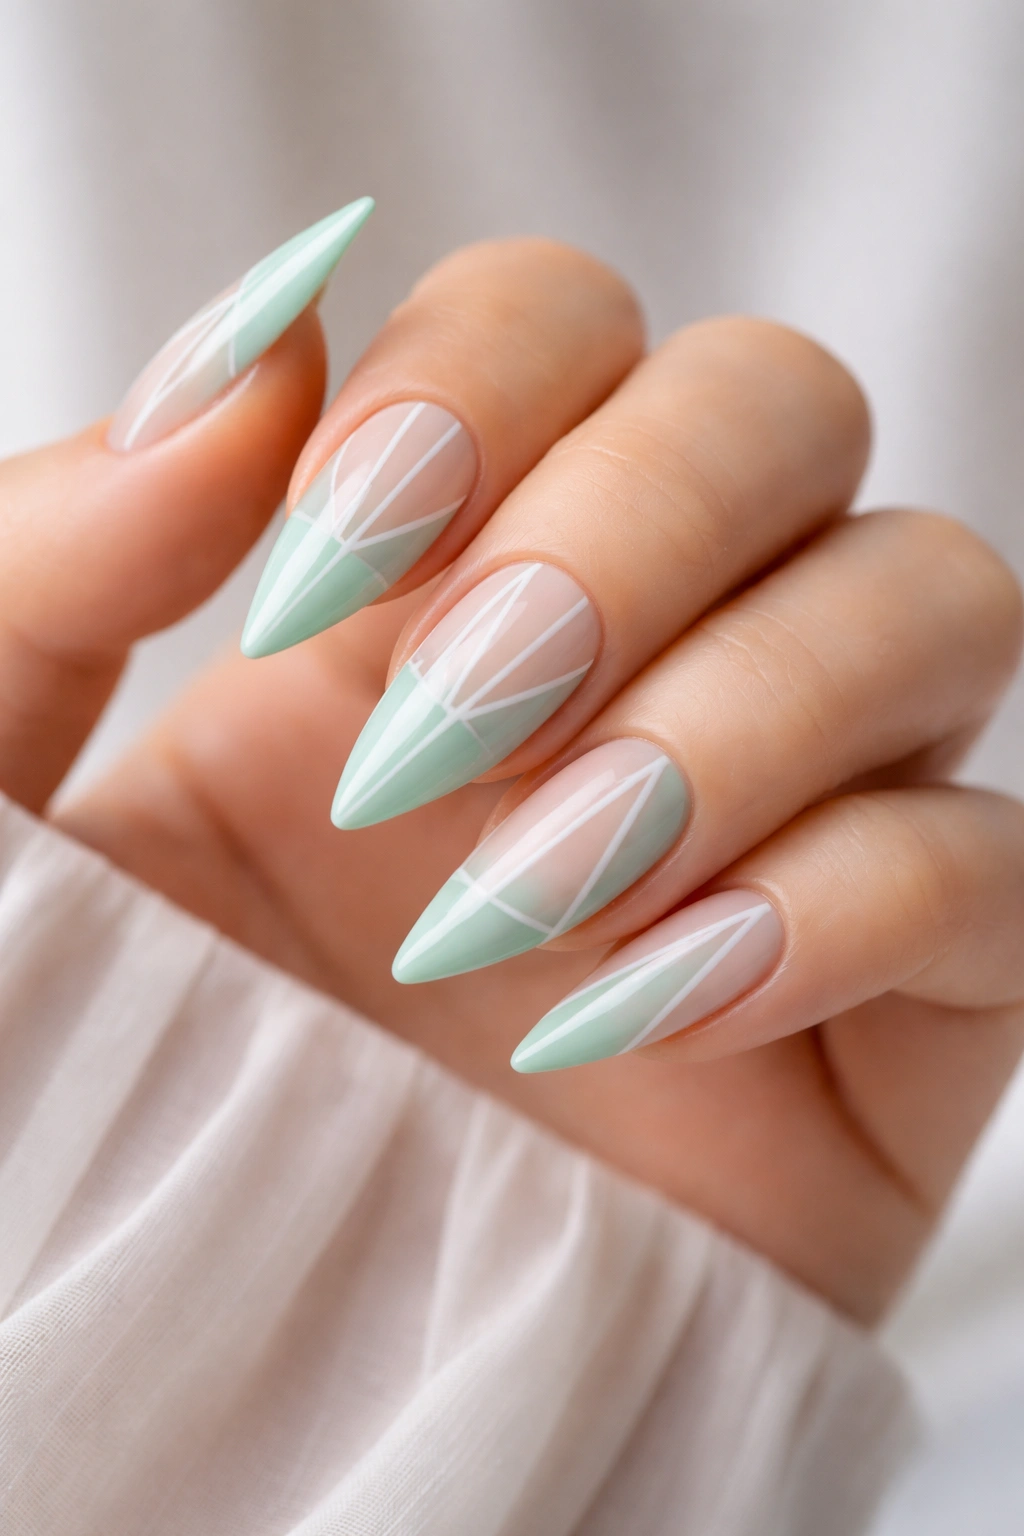
Sharp lines in soft mint green create a design that feels current without being trendy. Geometric designs — whether stripes, triangles, or color-blocking — appeal to people who like structure and precision in their nail art. Mint is cool and fresh-feeling year-round, making this design work from January through December without feeling seasonal.
Why Geometric Designs Work on Stilettos
Geometric patterns actually enhance the elongated shape of a stiletto nail rather than competing with it. Vertical stripes make the nail appear even longer. Color-blocking in geometric sections can be easier to execute at home than freehand designs. The angular nature of geometry contrasts beautifully with the curved softness of pastel colors, creating visual interest through that contrast.
Geometric Design Options for Mint
- Vertical stripes in alternating mint and white — clean, simple, and visually lengthening
- Color-blocking with mint, cream, and pale gray creating distinct sections across the nail
- Triangle accent nails, where mint triangles point downward from the tip
- Diagonal stripes using two shades of mint for subtle dimension
- Half-moon designs with mint on top and white or pale gray on the bottom
Quick application tip: Tape is your friend for geometric designs — use thin striping tape or regular painter’s tape to get clean lines, then remove it immediately after painting before the polish fully dries.
4. Blush with Gold Accents
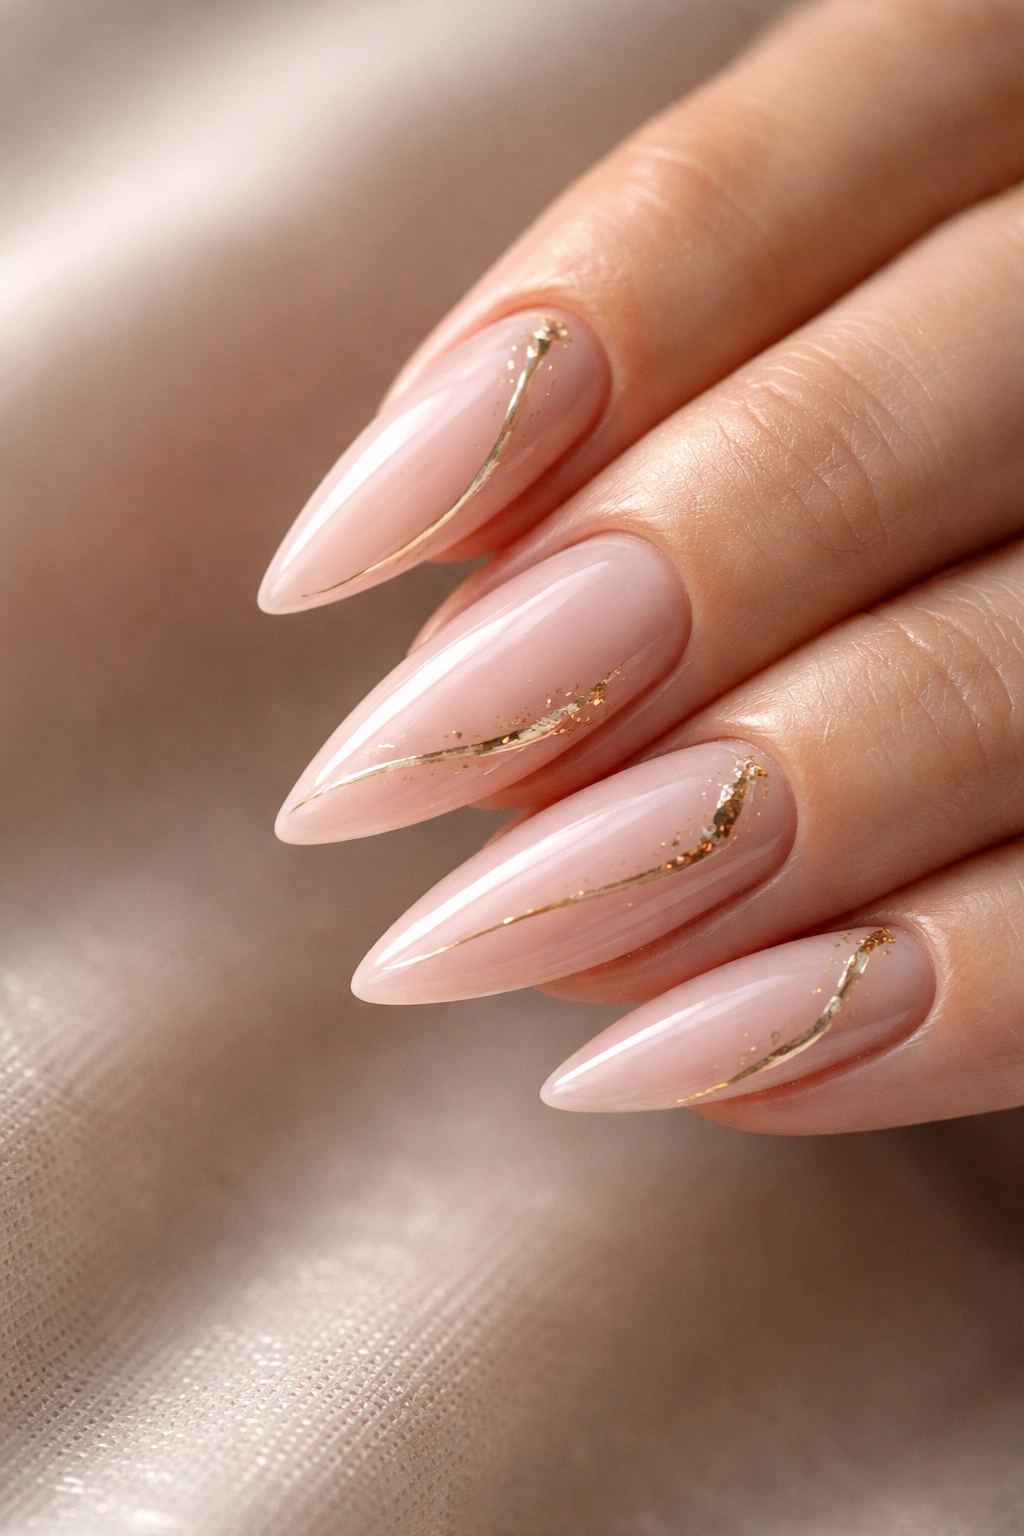
A soft blush base with delicate gold detailing is where pastel nails get genuinely luxe. The combination of warm pink and warm gold feels cohesive and intentional, never clashing. Gold catches light beautifully and adds a touch of glamour without the design feeling overdone. On medium stilettos, you have just enough real estate to incorporate gold detailing meaningfully.
How Gold Accents Elevate a Simple Design
Gold is one of the few metallic accents that actually makes pastels look more refined rather than more casual. Where silver can sometimes feel a bit stark against soft pastels, gold feels warm and integrated. Even thin gold lines, small gold dots, or a gold accent nail mixed into a full blush set reads as intentional and elevated.
Gold Detail Ideas for Blush Nails
- Thin gold striping along the sides of each nail, creating a frame effect
- Small gold dots in a scattered pattern across the blush base
- One solid gold accent nail among blush nails for asymmetrical interest
- Gold flake mixed into the top coat for a subtle sparkle without a full glitter manicure
- Gold leaf applied to the tips, creating an ombre effect from blush to gold
- A delicate gold line following the shape of the nail tip, emphasizing the stiletto point
Pro insight: Gel-based gold polish or gel polish in gold lasts longer than regular polish for detailing, especially if you’re using fine, thin accent lines that chip more easily.
5. Lilac Silk Effect
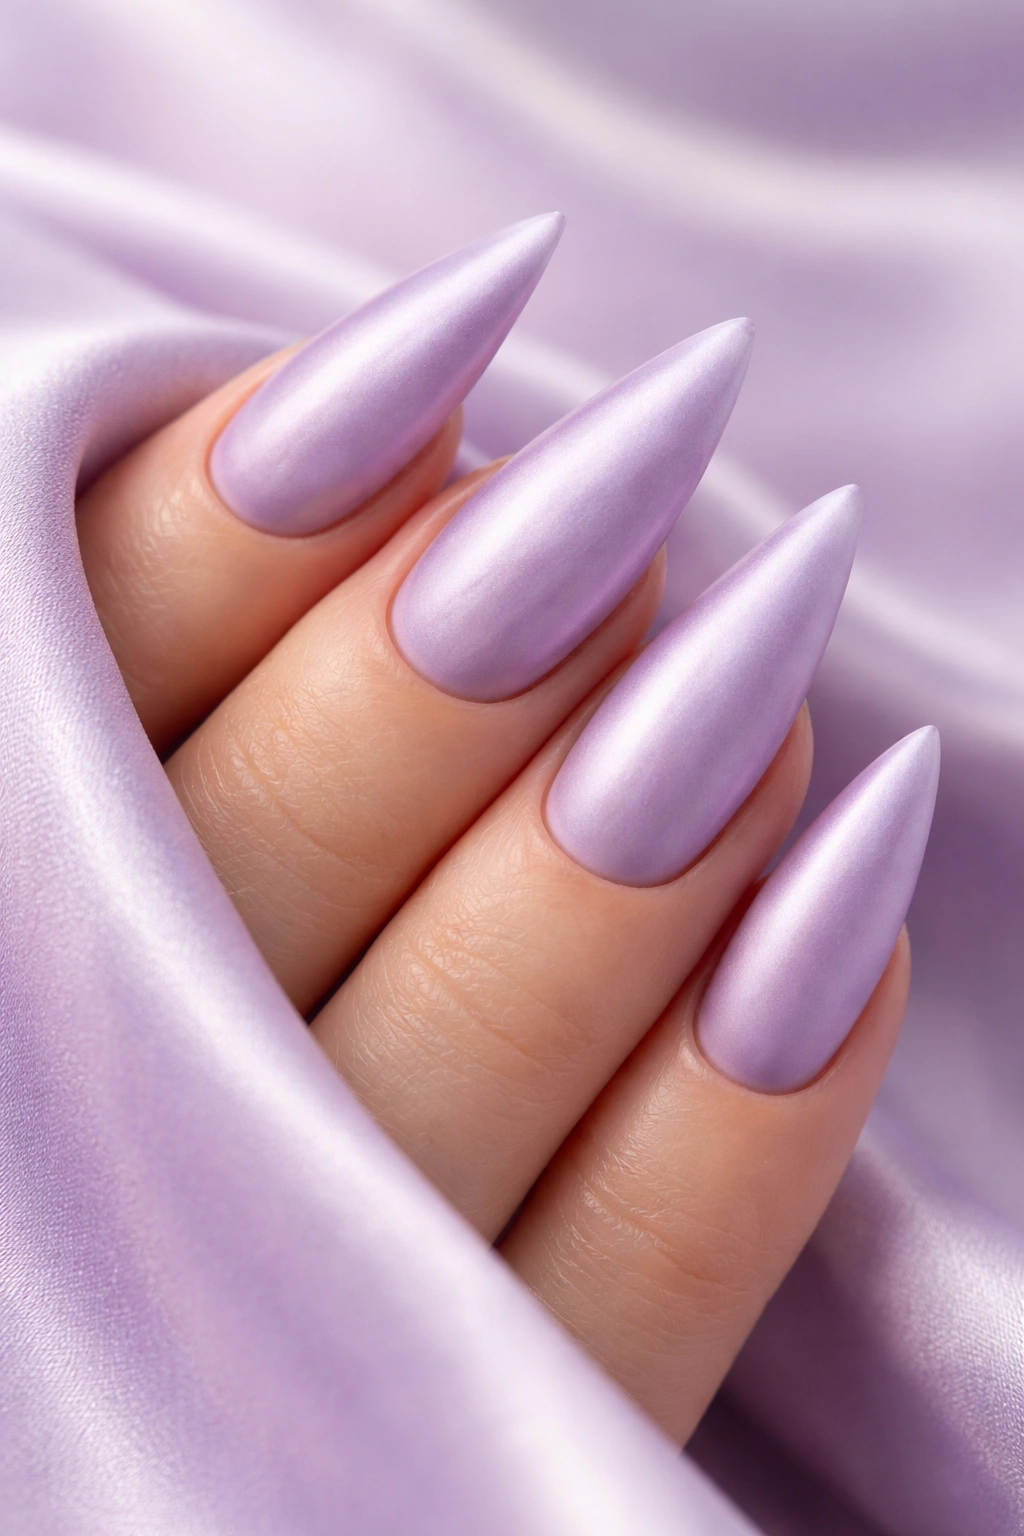
A creamy lilac with a silk matte finish creates an almost fabric-like appearance that’s inherently sophisticated. Silk matte finishes gained popularity because they genuinely look different from both glossy and traditional matte — there’s a soft, subtle sheen that catches light without being shiny. Lilac is the perfect color for this effect because it’s soft and cool-toned, which plays beautifully with the matte texture.
The Psychology of Matte Finishes
Matte finishes read as more expensive and intentional than glossy — it’s the opposite of what most people expect from nail polish. A matte stiletto nail feels modern and deliberate. The texture interacts with light differently, creating a unique visual effect that photographs beautifully. Lilac in matte is particularly flattering because it feels contemporary without trying too hard.
Achieving a True Silk Matte Finish
- Apply two to three coats of your chosen lilac polish, allowing each coat to dry completely
- Use a dedicated matte top coat — this is essential; don’t rely on matte polish alone
- Brands like CND Shellac matte top coat or similar professional-grade products create the truest silk effect
- The key is the top coat quality — cheaper matte top coats can look chalky or uneven
- If you prefer a slightly less intense matte, use a matte top coat over a glossy lilac polish, which creates a more subtle effect
Important note: Matte finishes require slightly more diligent maintenance — they show fingerprints and dust more easily than glossy nails, but the visual payoff is worth the extra care.
6. Peach Gradient Fade
Peach is the warmest of the pastels, and a gradient that fades from pale peach at the base to a slightly deeper, more saturated peach at the tips creates a design that feels almost like a sunset on your nails. This gradient is easier to achieve than some others because you’re working within the same color family, so blending imperfections are much more forgiving. The warm tones of peach flatter deeper skin tones particularly beautifully.
Why Peach Deserves Its Own Moment
Peach often gets overlooked in favor of pink, but it’s genuinely one of the most universally flattering pastel shades. Peach feels warmer and softer than coral, less predictable than standard pink, and has a sweetness that pure orange lacks. On stiletto nails, a peach gradient reads as thoughtful rather than simple because the color work is so intentional.
Creating a Perfect Peach Gradient
- Start with a nude or ivory base coat to make the peach colors appear more vibrant
- Apply your palest peach as your full-nail foundation color — this should be barely there, almost translucent
- Using a makeup sponge, sponge a slightly deeper peachy tone onto the tip area, blending where the two tones meet
- Add one more layer of even deeper peach to just the very tip for dimension and depth
- Seal with a glossy top coat — the shine plays beautifully with gradient designs
- If you want extra dimension, add a tiny hint of gold glitter just to the very tip for warmth and sparkle
Blending secret: A barely-damp sponge makes blending easier than a dry sponge, which can pick up too much polish and create harsh lines.
7. Baby Blue with Rhinestones
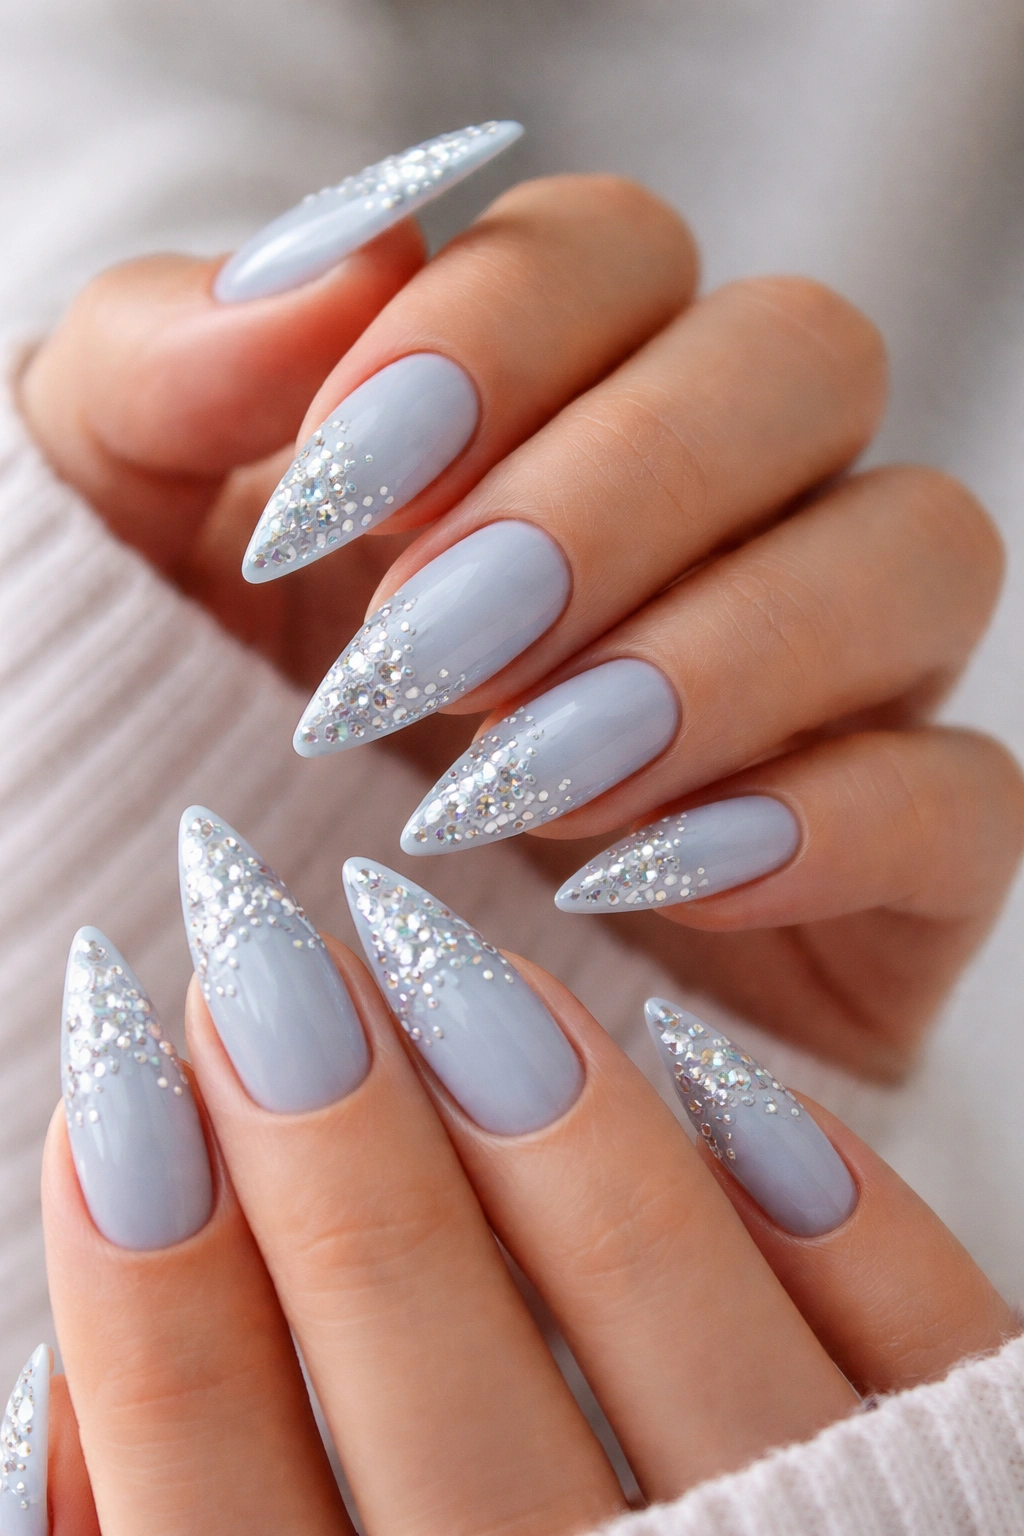
A pale, icy blue base studded with rhinestones creates instant glamour without feeling over-the-top. The key is restraint — this isn’t about covering the entire nail in stones, but rather placing them strategically to create a design that catches light and feels special. Baby blue is cool and calming, which makes the sparkle feel elegant rather than costume-y.
The Art of Rhinestone Placement
Rhinestones on stiletto nails work best when placed with intention rather than scattered randomly. A line of stones following the curvature of the stiletto point, stones concentrated at the tip with fewer toward the base, or a asymmetrical scatter that emphasizes the elongated shape all work beautifully. The spacing between stones matters — too crowded feels cheap; too sparse feels unfinished.
Rhinestone Application Tips
- Use a sticky or gel base coat to help rhinestones adhere better
- Pick up each stone with a small nail art brush handle, toothpick, or rhinestone picker tool to maintain control
- Press stones into the base coat while it’s still slightly tacky, not completely wet
- Seal stones under a thick layer of top coat to protect them and keep them from falling off
- Use high-quality rhinestones with good sparkle — cheap stones look dull and flat
Pro technique: Place rhinestones before your top coat fully cures, then seal them with a glossy top coat, which magnifies their sparkle significantly.
8. Cream and Sage Two-Tone
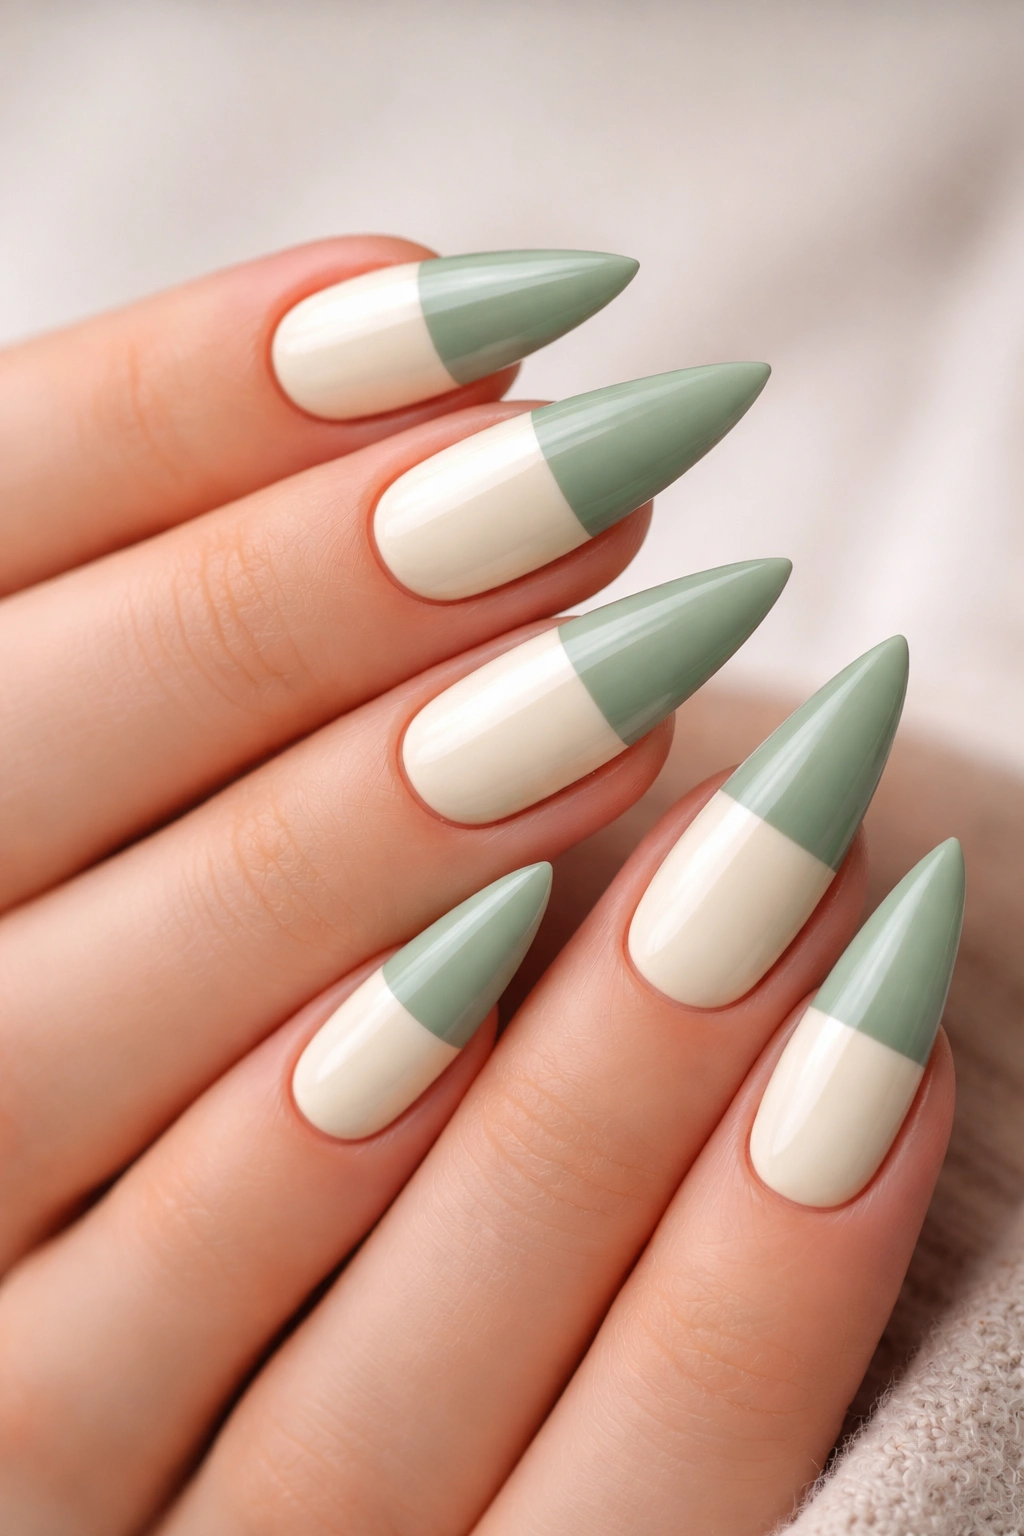
Splitting the nail horizontally or vertically between cream and soft sage green creates a sophisticated color-blocking effect that feels intentional. Two-tone designs work beautifully on stilettos because the geometric division complements the elongated shape. Cream and sage is a particularly peaceful color pairing — soft, natural, and surprisingly wearable across different seasons and settings.
Why This Color Combination Works
Cream is a universal neutral that works on every skin tone. Sage green adds interest and personality without being loud or trendy. Together, they feel botanical and calm — like being outside in a peaceful garden. The combination has a timeless quality that doesn’t feel dated or overly trendy, which means this design remains relevant indefinitely.
Two-Tone Design Layout Options
- Horizontal split with cream on bottom, sage on top — creates a sunrise effect
- Vertical split down the middle with cream on one side and sage on the other — very geometric and precise
- Diagonal split that goes from cream at one corner to sage at the opposite corner — more dynamic than horizontal
- Cream base with sage tips and a sharp line across the middle — clean and contemporary
- Asymmetrical two-tone where one or two accent nails are fully sage while others are fully cream
Application method: Use painter’s tape placed precisely across the nail to create a clean division line, paint the first color, remove tape, paint the second color once the first is dry.
9. Pale Yellow Butterfly Wings
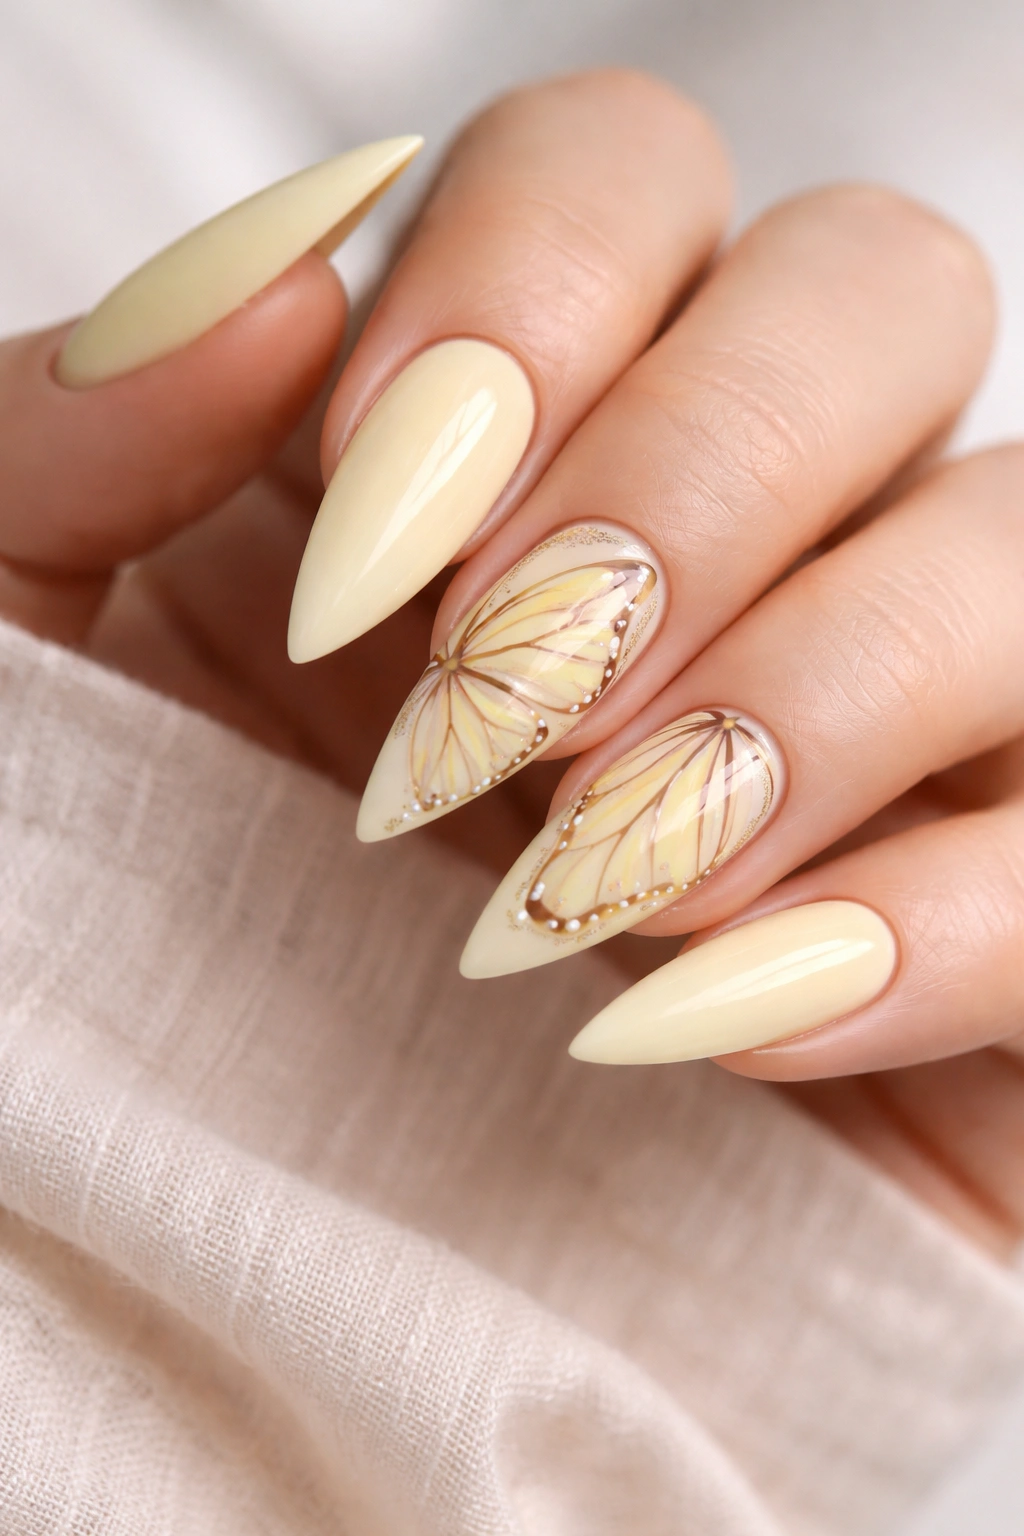
Pale yellow as a base with hand-painted or stamped butterfly wings in slightly deeper yellow and cream creates a design that’s delicate without being overly feminine. Butterflies are a design that can feel nostalgic or cliché if done wrong, but on stiletto nails in pale pastels, they look modern and artistic. The butterfly shape actually complements the verticality of the stiletto by creating a focal point toward the tip.
Why Butterflies on Stilettos Feel Fresh
The elongated shape of stiletto nails actually mirrors the vertical extension of a butterfly’s wings, so the design feels naturally proportional. Pale yellow is cheerful and warm without being juvenile. Butterflies in delicate pastels feel artistic and intentional rather than playful, which is why they work so well on sophisticated nail shapes.
Butterfly Design Execution
- Paint a pale butter-yellow base on all nails, using two coats for opacity
- Using a fine nail art brush, hand-paint butterfly wings in a slightly deeper golden yellow on one or two nails, positioning the butterflies near the tips
- Add cream or white details to wings — stripes, spots, or patterns within the wings
- Use an even finer brush to add tiny antennae extending from the butterfly body
- Alternatively, use butterfly nail stamps for more uniform designs if freehand painting feels intimidating
- Seal with a glossy top coat to protect the artwork
For non-artists: Butterfly nail stamper plates are inexpensive and create perfect designs without requiring any artistic skill — you simply apply polish to the stamper plate and transfer it to your nail.
10. Soft Purple Glitter
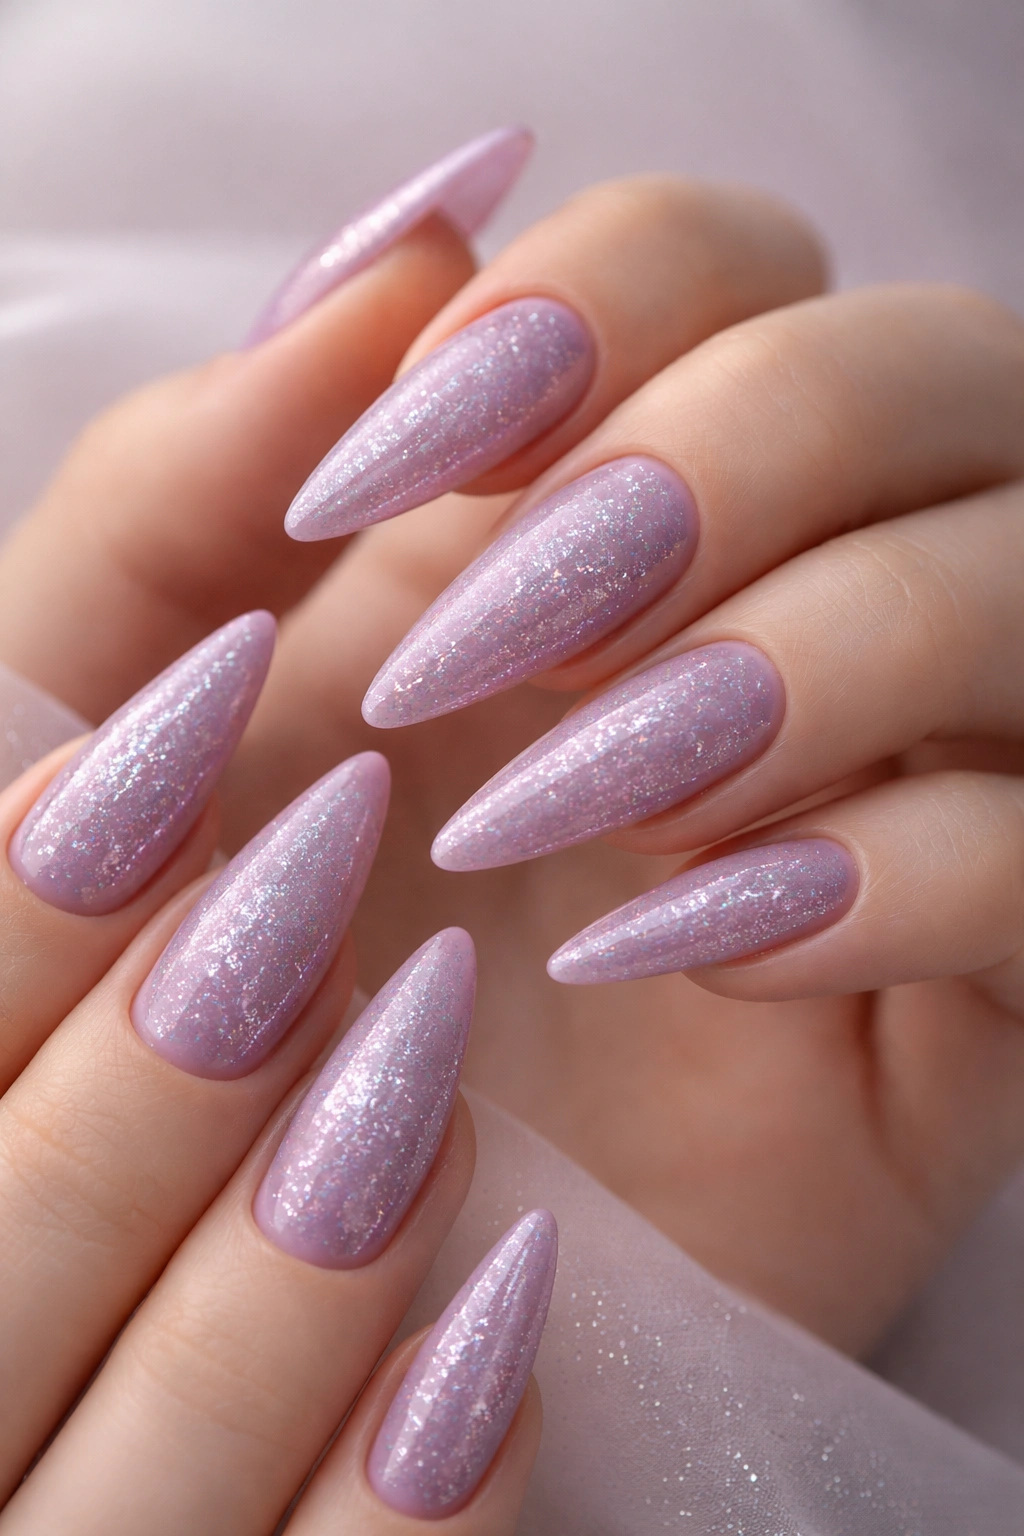
A soft, almost dusty purple base generously scattered with glitter creates a design that feels celebratory without being costume-y. Glitter on pastels has a different energy than glitter on brights — it feels more sophisticated, almost like the nail is gently sparkling rather than loudly shimmering. The purple is cool-toned enough to feel refined, and the glitter adds the sparkle without compromising the softness.
Glitter Placement Strategies
Glitter can cover the entire nail for maximum shimmer, concentrate at the tips for a gradient effect, or scatter across the base in an asymmetrical pattern. The size of the glitter particles matters — fine, tiny glitter feels more elegant; large, chunky glitter feels more playful. Mixing two sizes of glitter, with finer glitter as a base and larger sparkles scattered on top, creates layered visual interest.
Applying Glitter Without It Looking Messy
- Apply your purple base coat and allow it to dry completely
- Using a sticky or tacky top coat (many brands make a specific “glitter base” top coat), apply a layer and work quickly
- Using a small brush or applying directly from the glitter pot, sprinkle glitter onto the tacky top coat
- Press gently to set the glitter into the sticky base
- Once the glitter is placed and the top coat partially dries, seal everything with a regular glossy top coat
- Use a top coat designed for glitter — it should have enough viscosity to hold the particles without making them shift
Cleanup tip: Apply a thin layer of base coat around the cuticle area before you start — this makes cleanup easier and prevents glitter from getting embedded in your skin.
11. Pastel Rainbow Gradient
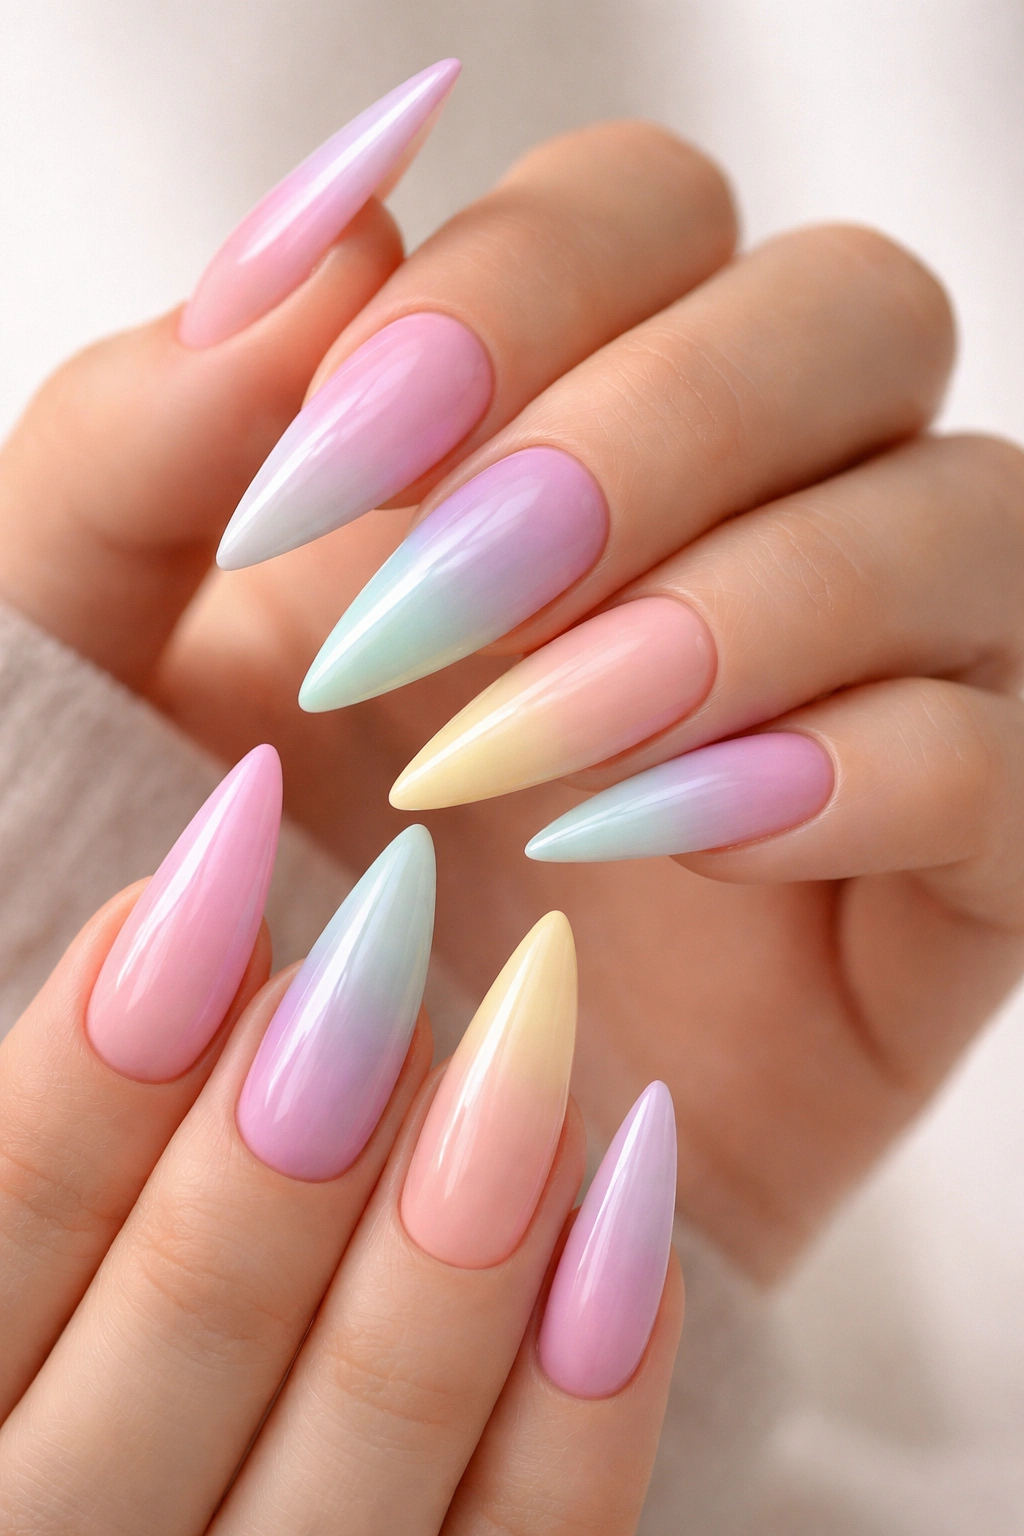
A gradient that flows through multiple pastel shades — pale pink, lavender, mint, pale yellow, and pale peach — creates a soft, spectrum effect that’s uniquely playful. This design requires more skill than a single-color gradient, but the impact is worth the effort. On medium stilettos, there’s enough surface area for the gradient to show multiple distinct color zones before reaching the tip.
The Challenge and Appeal of Multi-Color Gradients
Multi-color gradients require either a lot of careful sponging with multiple colors or specific ombré tools, which makes them more advanced than single-color versions. The payoff is a design that’s eye-catching and unique without any additional embellishments. This design photographs beautifully and feels special while remaining wearable because each individual color in the gradient is still a soft pastel.
Technique for Rainbow Gradient
- Choose three to five pastel shades that will transition smoothly together — arrange them in an order that flows
- Apply each color as a thin band across the nail, starting with the lightest at the base
- Using a makeup sponge slightly dampened with a bit of water or setting spray, gently bounce the sponge over the color boundaries to blend them
- Work slowly and make multiple passes — one aggressive swipe will destroy the gradient
- Seal with a high-shine top coat, which makes gradients look even more polished and intentional
- If the gradient looks too chaotic, you can paint over it and try again — there’s no commitment
Pro approach: Practice the gradient on a wheel or practice nail first — you’ll develop a feel for how much pressure to use and how to blend effectively.
12. Nude Pink with Pearl
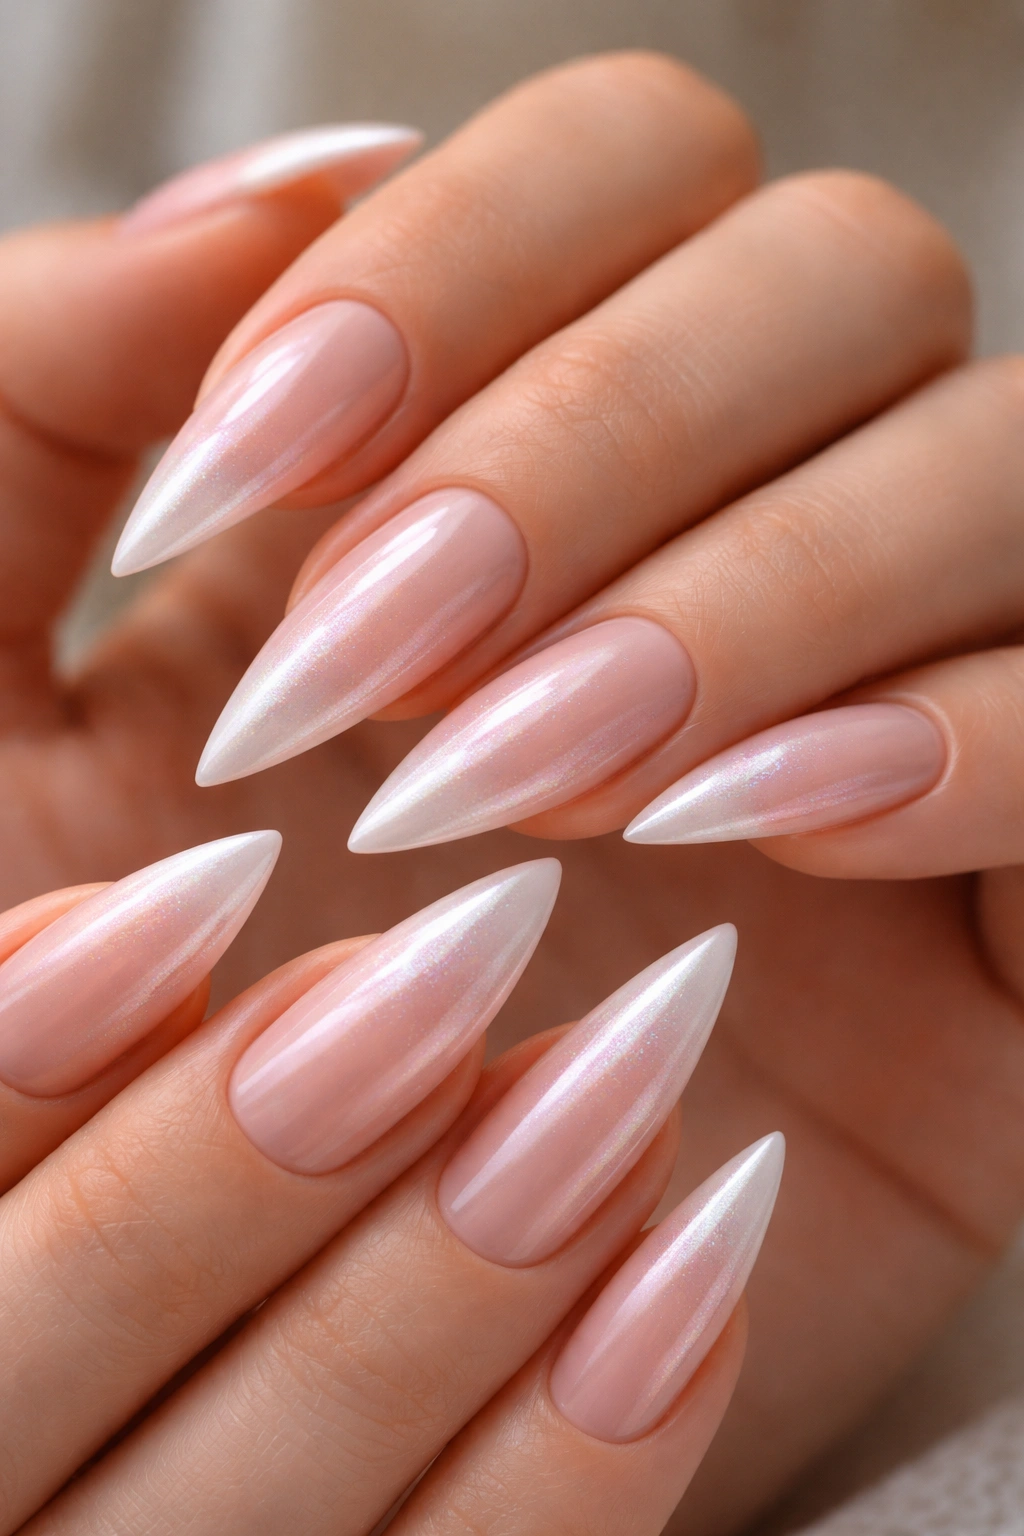
A nude-pink that’s just barely pinker than your own skin tone, topped with pearl shimmer, creates a look that’s subtly glamorous. The pearl effect (different from glitter) creates a soft iridescent sheen that shifts slightly in different lighting. This design is understated enough for professional settings while still looking intentionally polished and put-together.
The Difference Between Pearl and Glitter
Pearl shimmer is much more subtle than glitter — it’s built into the polish formula as tiny mica particles rather than being loose sparkles you apply on top. This makes pearl finishes look more integrated and less textured than glitter. Pearl also tends to be more durable since it’s not sitting on top of the base color where it can catch and chip. Pearl feels more sophisticated and less party-appropriate than glitter.
Achieving a Perfect Pearl Effect
- Apply two coats of a pearl-finish polish in your chosen nude-pink shade
- Pearl polishes generally have good opacity, so two coats is usually sufficient
- A glossy top coat isn’t strictly necessary with pearl finish since the pearl adds its own sheen, but one coat of top coat will extend the wear time
- The iridescent effect shows up best in natural light — the shift in color is part of what makes pearl so visually interesting
- Different pearl finishes create different effects — some are more pink, some more champagne, some with a slight lavender shift
Quality matters: High-quality pearl polishes have much better shimmer and durability than budget versions, which can look dull and flat.
13. Mint with Matte Finish
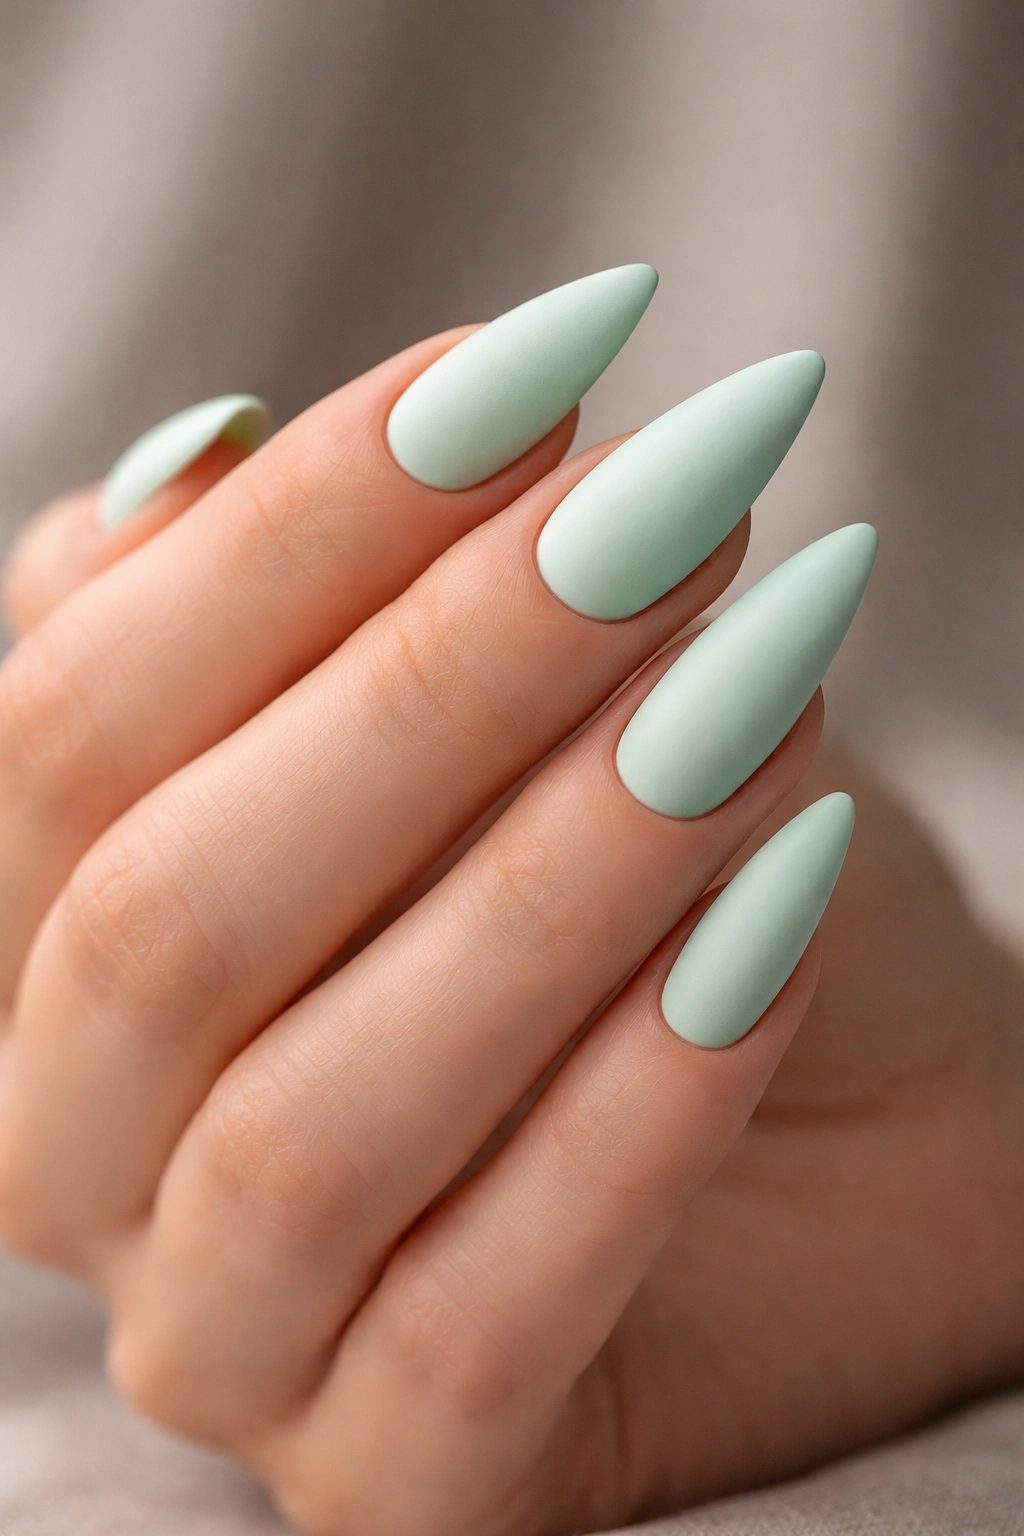
Pale mint green in a matte finish is a design that feels effortlessly cool and contemporary. Matte finishes have become sophisticated rather than basic, and mint is the perfect color to showcase this finish. The lack of shine makes the color appear softer and more velvety, which complements the gentle pastel tone beautifully. This is a design that requires zero embellishment and still looks intentional.
Why Matte Mint Feels So Modern
The matte finish removes the “typical nail polish” shine, which immediately makes the design feel more artistic and deliberate. Mint is cool and fresh without being juvenile. Together, they create a look that feels understated and design-forward. This design photographs beautifully because the texture reads clearly in images, creating visual interest without added elements.
Application for Flawless Matte Finish
- Apply two to three thin, even coats of mint polish, allowing each coat to dry completely
- Use a dedicated matte top coat rather than relying on matte polish alone
- Professional-grade matte top coats create much truer finishes than budget versions
- Apply the matte top coat in a single, even layer — too much creates a chalky appearance
- Allow the matte top coat to cure fully before touching your nails
- Avoid touching your nails for at least an hour after application, as matte finishes are slightly more delicate while curing
Maintenance note: Matte nails require slightly more careful handling than glossy ones — the texture shows fingerprints more readily and can feel less protected, so being mindful of what you’re doing with your hands helps extend the manicure.
14. Champagne Sparkle
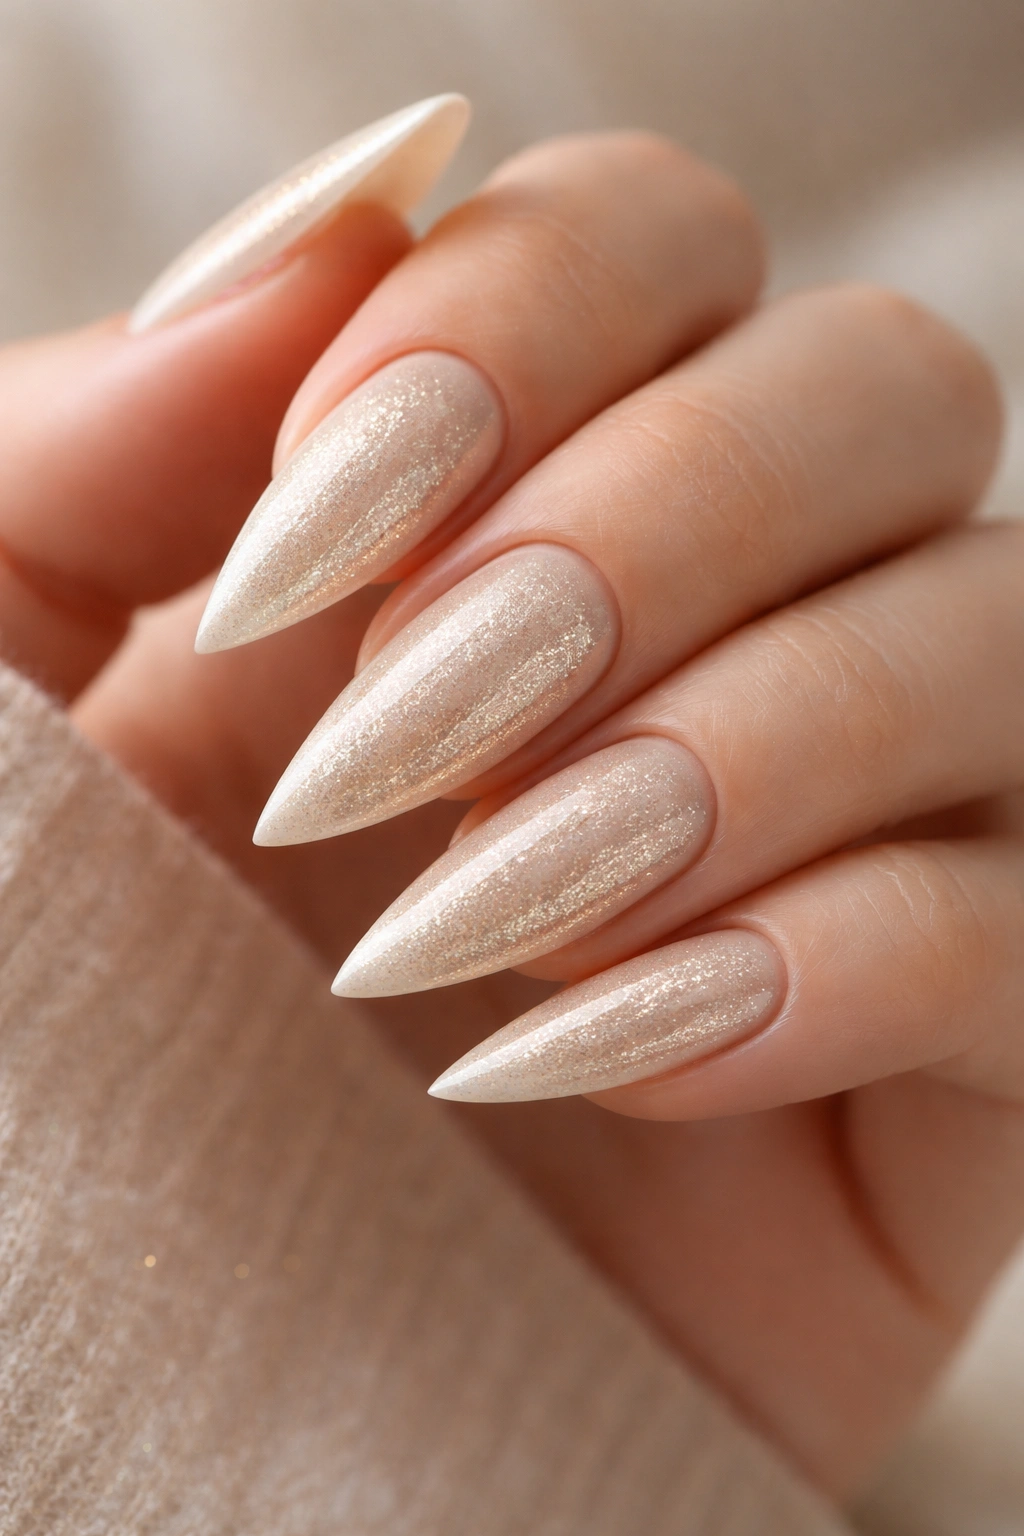
Pale champagne as a base with light-catching sparkle throughout creates a design that feels celebratory and elegant simultaneously. Champagne is that perfect shade that’s almost nude but with just enough warm gold undertone to read as intentional. The sparkle can be glitter, shimmer, or a combination, but the effect is a nail that catches light beautifully without looking overdone.
Why Champagne Feels Inherently Luxe
Champagne is a shade associated with celebration and elegance — there’s psychology built into the color itself. Unlike pure nude, which can feel boring, champagne has warmth and personality. The sparkle makes champagne feel elevated and special rather than basic. This is a design that works across occasions from everyday wear to special events without feeling out of place.
Champagne Sparkle Variations
- Fine shimmer throughout the base polish for subtle, integrated sparkle
- Glitter scattered strategically for more pronounced shine
- Champagne base with gold glitter concentrated at the tips for a gradient sparkle effect
- Two-tone champagne and gold with sparkle throughout both shades
- Champagne with pearl shimmer for an iridescent luxe effect
- Champagne with tiny diamond-shaped sparkles creating a more geometric, intentional pattern
Application choice: Shimmer built into the polish applies more easily and wears more durably than loose glitter on top, so consider a champagne shimmer polish first before adding additional glitter elements.
Final Thoughts
Pastel stiletto nails for medium-length nails sit in that sweet spot where you get the drama of an extended point with enough practicality to actually live your life. These fourteen designs prove that pastels aren’t about soft and boring — they’re about sophisticated color choices, intentional finishes, and designs that work harder than they first appear. Whether you’re drawn to solid colors with special finishes like matte and pearl, gradient effects that showcase color flow, or designs with subtle embellishments like gold accents or rhinestones, there’s a pastel stiletto look that matches your aesthetic.
The beauty of pastel nails is that they complement rather than compete. Your hands look elegant and groomed without demanding attention in a way that deeper colors or bold patterns might. You can wear pastels to professional settings, casual outings, or celebrations without feeling like the nail choice is mismatched to the occasion. Medium stilettos give you just enough surface area to execute designs with confidence while keeping the practical benefits that come with not having extremely long nails.
Choose colors and finishes that genuinely appeal to you rather than following trends — a soft pink that makes you happy will look better and feel better than a trendy shade you’re lukewarm about. Pay attention to what finishes you prefer, whether that’s high-shine gloss, soft matte, subtle shimmer, or sparkle with purpose. The most successful manicure is one you feel confident and happy wearing, and these designs all have that potential in abundance.
