

Coquette nails have taken over the beauty world, and stiletto shapes are the perfect canvas for bringing this playful, romantic aesthetic to life. The elongated silhouette of a stiletto nail provides enough surface area to showcase intricate designs—delicate bows, subtle pearls, soft ombre gradients, and romantic floral patterns—that define the coquette style. If you’ve been scrolling through nail inspiration and wondering how to capture that charming, feminine energy on your own nails, you’re in the right place. This style celebrates elegance with a whimsical twist, combining soft color palettes with refined details that feel both sophisticated and fun. Whether you prefer minimalist elegance or elaborate embellishments, there’s a coquette stiletto design that matches your personality and aesthetic.
The beauty of the coquette nail trend is its adaptability. You can go ultra-feminine with soft pastels and delicate bows, lean into luxury with champagne and pearls, or create something uniquely yours by mixing and matching elements that speak to you. The stiletto shape naturally elongates the hand and commands attention, making even the simplest design feel impactful. The secret to nailing the coquette look—no pun intended—is balancing refinement with playfulness. Too much detail can feel overwhelming, while too little might miss the mark entirely. Strategic use of negative space, thoughtful color combinations, and quality embellishments are what separate a truly stunning coquette stiletto nail from an ordinary manicure.
What makes this aesthetic so appealing is that it works across different occasions and seasons. Wear a soft pink stiletto with tiny bows to brunch with friends, transition a pearly champagne design from day to evening, or layer rhinestones and glitter for a special event. The coquette style is forgiving—it celebrates femininity without requiring perfection, encourages creativity, and works beautifully whether you’re a nail art beginner or an experienced enthusiast. Each design idea below includes specific color recommendations, technique tips, and variations so you can recreate these looks at home or bring them to your nail technician for professional execution.
1. Soft Pink Bow Details
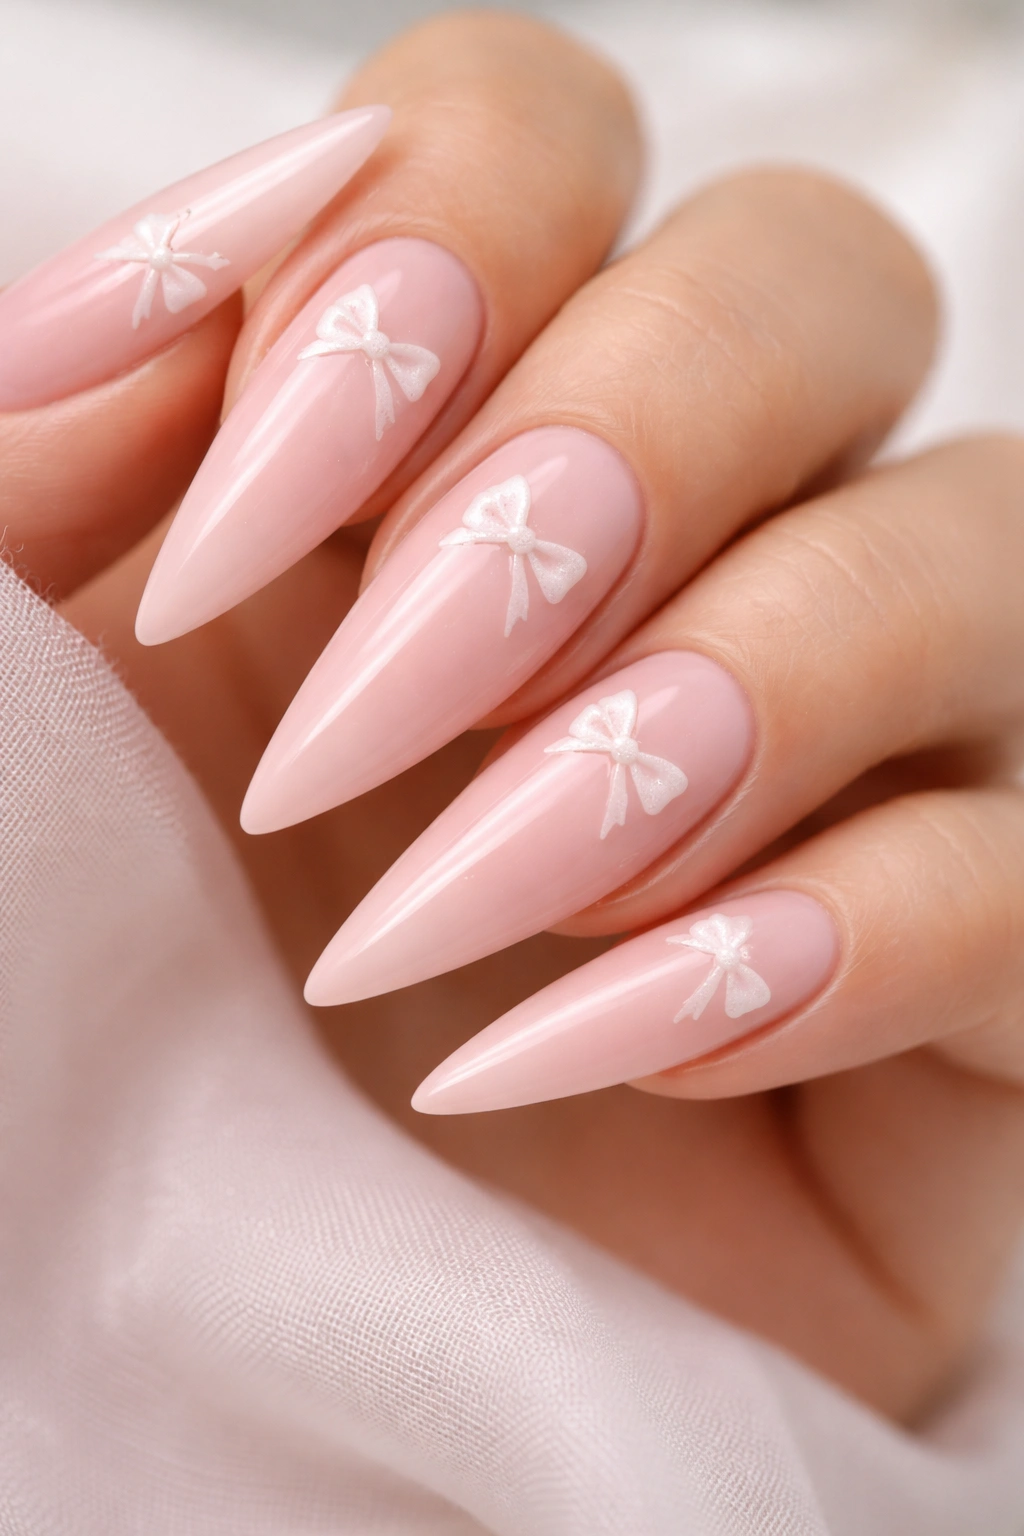
A classic soft pink base with tiny delicate bows scattered across the nails is the quintessential coquette stiletto look. Choose a pale, creamy pink—think blush or ballet slipper tones—that feels romantic without being overly sweet. The bows work best as hand-painted designs in white or nude using a thin liner brush, or you can use tiny adhesive bow decals if you prefer a foolproof application.
Design Breakdown and Placement
Place bows on the accent nail (typically the ring finger), along the side of two or three nails, or even create one larger bow as the focal point. The bows should be delicate and small—roughly the size of a grain of rice to a small seed pearl. Layer them strategically so the eye travels across the nail without feeling cluttered. A single bow near the cuticle can frame the nail beautifully, while multiple scattered bows create a playful, cohesive look.
How to Execute This Look
If you’re painting bows by hand, use a ultra-thin liner brush (size 00 or smaller) and white gel or acrylic paint. Practice on a makeup sponge first to build confidence with the two-loop bow shape. For added dimension, create an ombré background by blending the pale pink deeper toward the tip, or add a subtle glitter accent at the base. Seal everything with a glossy top coat for a polished finish that makes the bows pop.
Pro tip: If hand-painting bows feels intimidating, use adhesive bow charms or tiny bow stickers. They’re foolproof and create an instantly elegant focal point. You can also experiment with hot pink or coral bows against a soft pink base for a subtle color-blocking effect that keeps the design feeling fresh.
2. Pearl Ombre Gradient
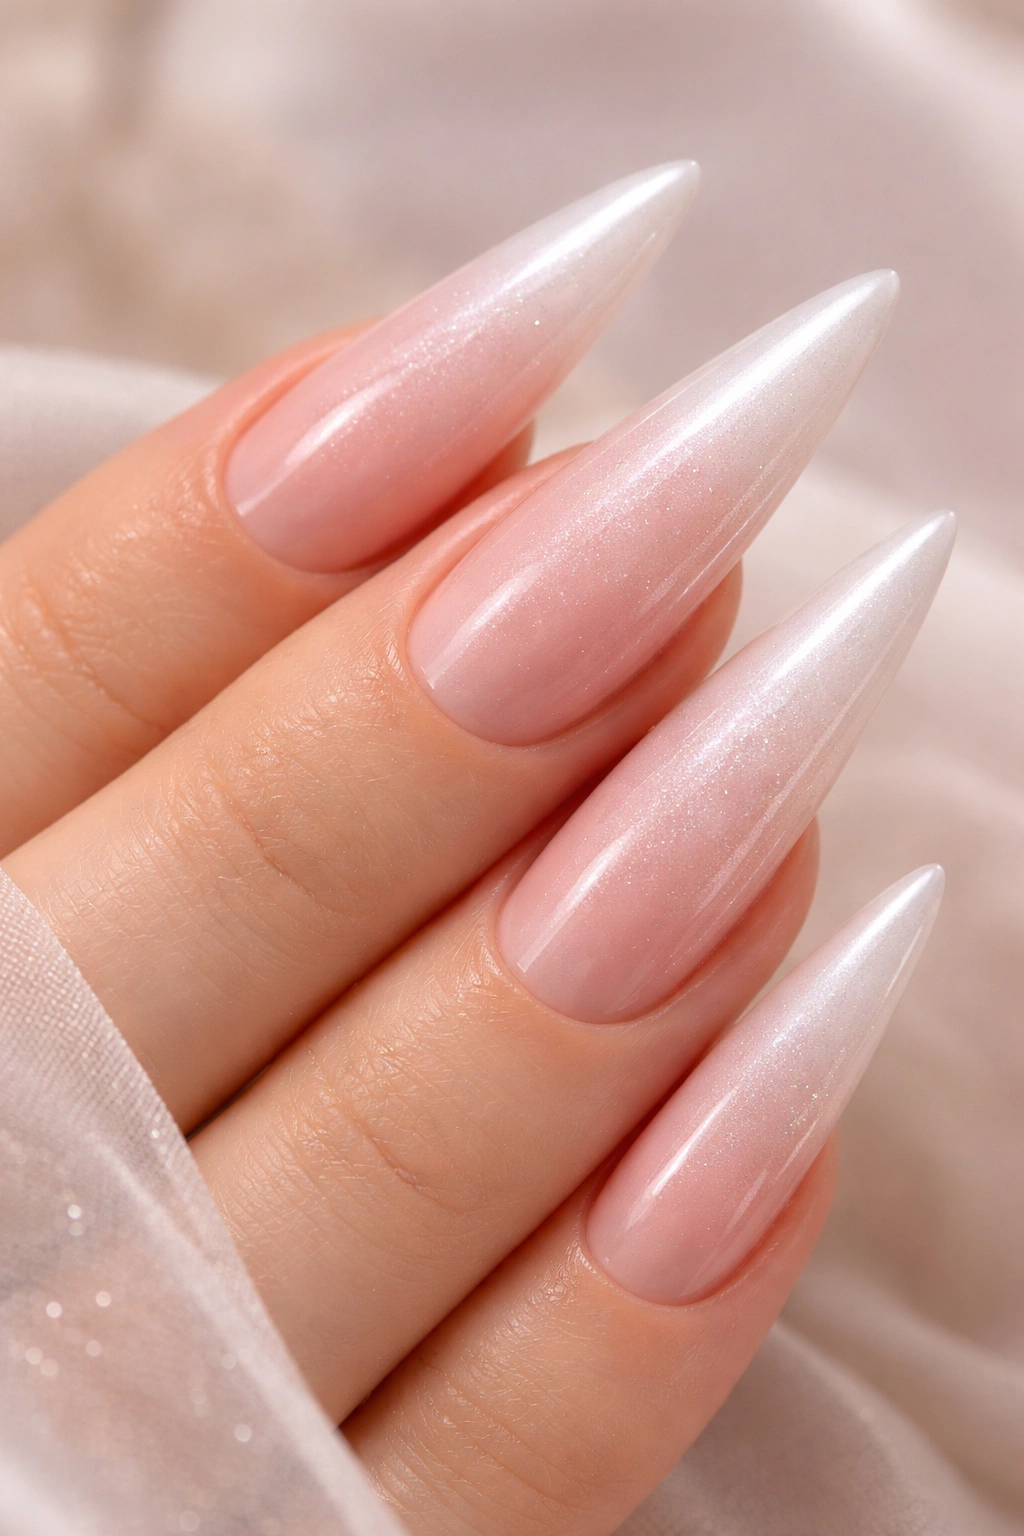
Create a mesmerizing ombre effect that transitions from soft blush or champagne at the cuticle to near-white or pale pearl at the tip. This design feels luxurious and romantic while remaining subtly sophisticated. The gradient technique uses a sponge to blend two or more shades seamlessly, creating depth without any hard color lines.
Technique for Seamless Blending
Load two complementary nail polish shades onto a makeup sponge—one at each end—then dab the sponge across the nail surface in a stippling motion. The sponge creates a naturally blended, airbrushed effect that looks expensive and professional. Use thin, strategic taps to build the gradient gradually rather than one heavy application. Layer the sponging 2-3 times until the transition feels smooth and the coverage is opaque.
Adding Pearl Dimension
Once the ombre base is complete and dry, add pearl dust or light-reflecting shimmer to the tip area. Mix pearl powder with clear gel, or apply a pearl-finish topcoat that catches light and gives the nails an luminous quality. For extra glamour, add a single line of micro pearls or rhinestones along the smile line (the white tip of the nail), creating a subtle sophisticated accent without overwhelming the design.
Worth knowing: Ombre designs show imperfections less than solid colors, making them forgiving for home application. Choose shades within the same color family—soft pink to white, champagne to nude, or blush to cream—for a cohesive, elegant result that feels intentional rather than accidental.
3. Champagne With Rhinestones
An understated champagne base with strategically placed rhinestones creates instant luxury and glamour. This design works for everyday wear or special occasions, depending on how densely you apply the stones. Champagne is that perfect neutral-warm shade that complements every skin tone and pairs beautifully with the coquette aesthetic’s emphasis on refined femininity.
Stone Placement Strategy
Create a gradient of rhinestones by clustering them densely near the tip and gradually spacing them out toward the cuticle, or place them in a vertical line down the center of the nail for an elongating effect. You can also create a decorative frame by placing stones around the perimeter of the nail or forming abstract shapes. The key is balance—enough sparkle to feel festive, but not so much that the design becomes costume-like.
Application and Adhesion
Apply rhinestones using a dotting tool or tweezers and a strong nail glue designed specifically for embellishments. Place each stone individually, pressing firmly for 3-5 seconds to ensure proper adhesion. Seal everything with a glossy topcoat that encapsulates the stones, protecting them and adding shine. Quality rhinestones make a noticeable difference—investment-grade gems catch light more brilliantly than cheap alternatives.
Pro tip: Mix rhinestone sizes for visual interest—use larger stones as focal points and smaller ones to fill around them. Alternatively, choose champagne polish with built-in shimmer or glitter, then add just a few accent stones on the accent nail for a more subtle, wearable version of this look.
4. Blush Pink and Gold Accents
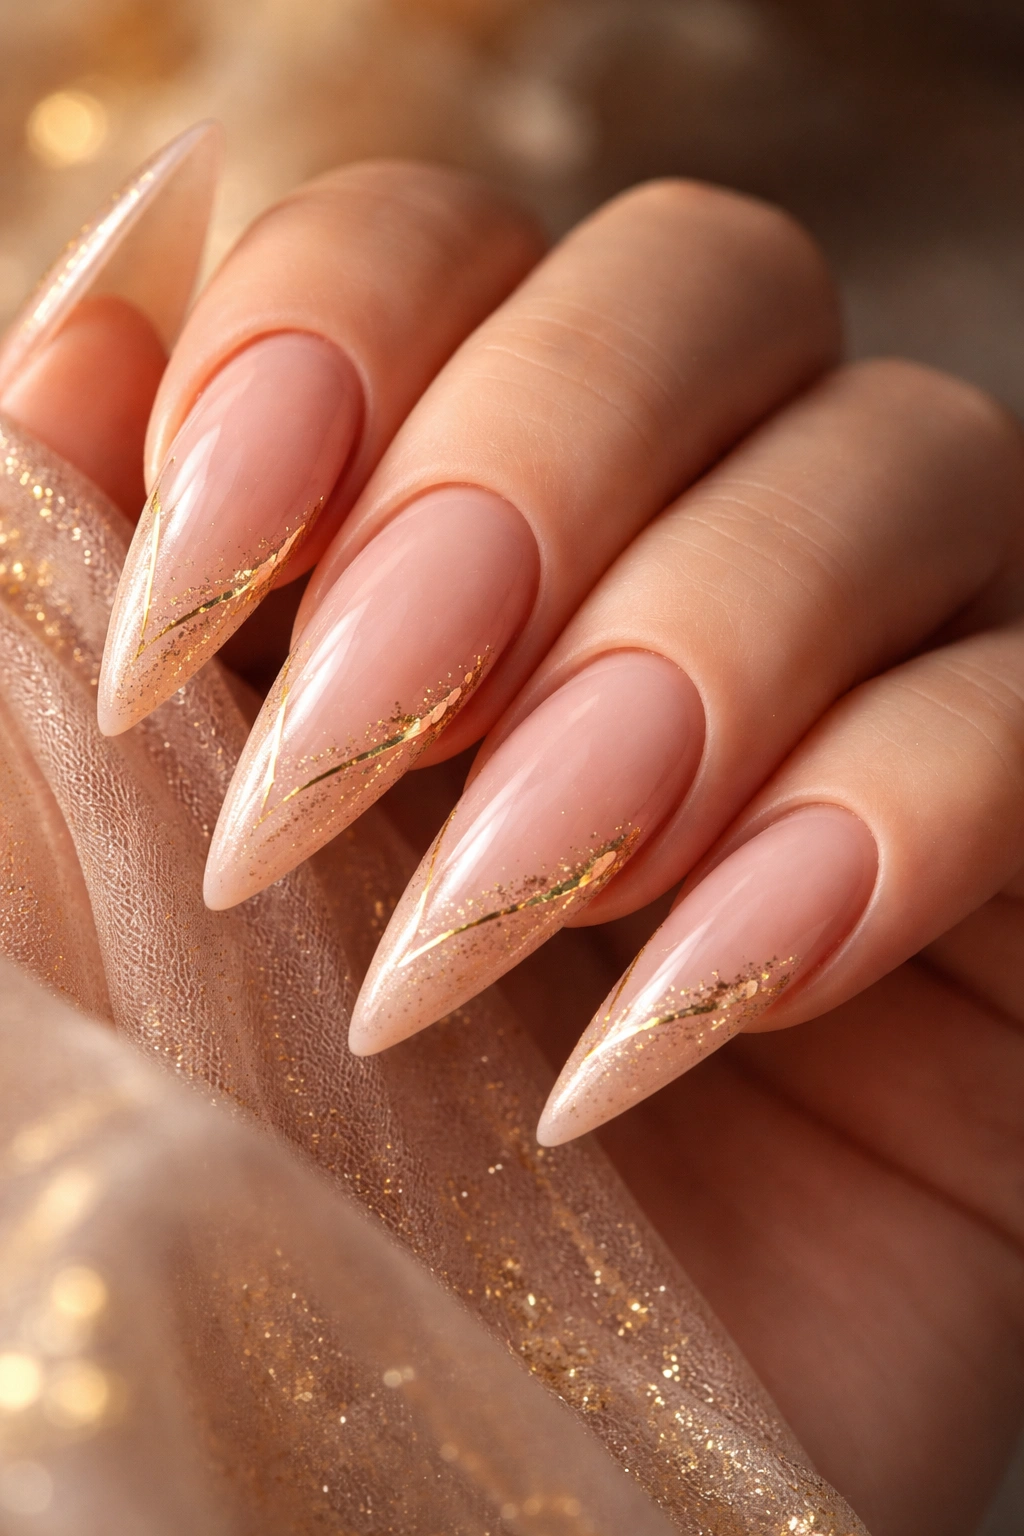
Pair a soft blush pink with warm gold accents for a design that feels both romantic and slightly vintage. Gold works beautifully with coquette aesthetics because it suggests luxury and timelessness. Use fine gold lines, small gold geometric shapes, or delicate gold leaf accents to add dimension and sophistication.
Design Variations
Create thin gold stripes using a liner brush, forming vertical lines that emphasize the nail’s length. Alternatively, paint small geometric shapes—triangles, squares, or abstract lines—in gold near the tip or along the sides. Gold leaf application creates an organic, artistic effect; apply a thin layer of gel adhesive to specific areas and press gold leaf onto the sticky surface, then seal with topcoat.
Color Pairing Dynamics
Blush pink and warm gold create a harmonious pairing because both are warm-toned and traditionally feminine. The contrast between the soft pink and metallic gold creates visual interest without feeling harsh or mismatched. Consider adding tiny white or cream details alongside the gold for a tri-color design that feels more complex and custom.
Styling note: This combination works particularly well for brides, bridal showers, or any event celebrating femininity and elegance. It’s also wonderfully wearable for everyday life—professional enough for work environments, yet clearly intentional and thoughtfully designed.
5. Romantic Floral Print

Hand-paint or apply floral decals featuring delicate flowers like cherry blossoms, peonies, roses, or wildflowers across a nude or pale pink background. Florals are central to coquette aesthetics, representing nature’s feminine beauty. Choose a botanical print that feels romantic—think watercolor-style florals rather than bold, graphic flowers.
Floral Design Execution
If using decals, select high-quality nail stickers that feature detailed, realistic florals. Apply them to fully cured base polish, then seal with topcoat. For hand-painting, use a thin brush and multiple thin layers of color rather than one thick application. Start with lighter shades (whites, pale pinks, creams) and layer darker tones (forest green leaves, deep rose centers) on top.
Creating Cohesion
Extend the floral theme by choosing an accent nail with a denser floral arrangement while keeping other nails more minimal. This creates visual hierarchy and prevents the design from feeling overwhelming. Alternatively, scatter small flowers across all nails in a balanced, organic pattern that feels intentionally placed rather than random.
Creative variation: Combine florals with other coquette elements—add a delicate gold line around each flower’s edge, scatter tiny pearls among the petals, or create a gradient background that transitions from one floral color to another. These additions elevate a simple floral design into something uniquely personal and sophisticated.
6. Nude With Delicate Lace
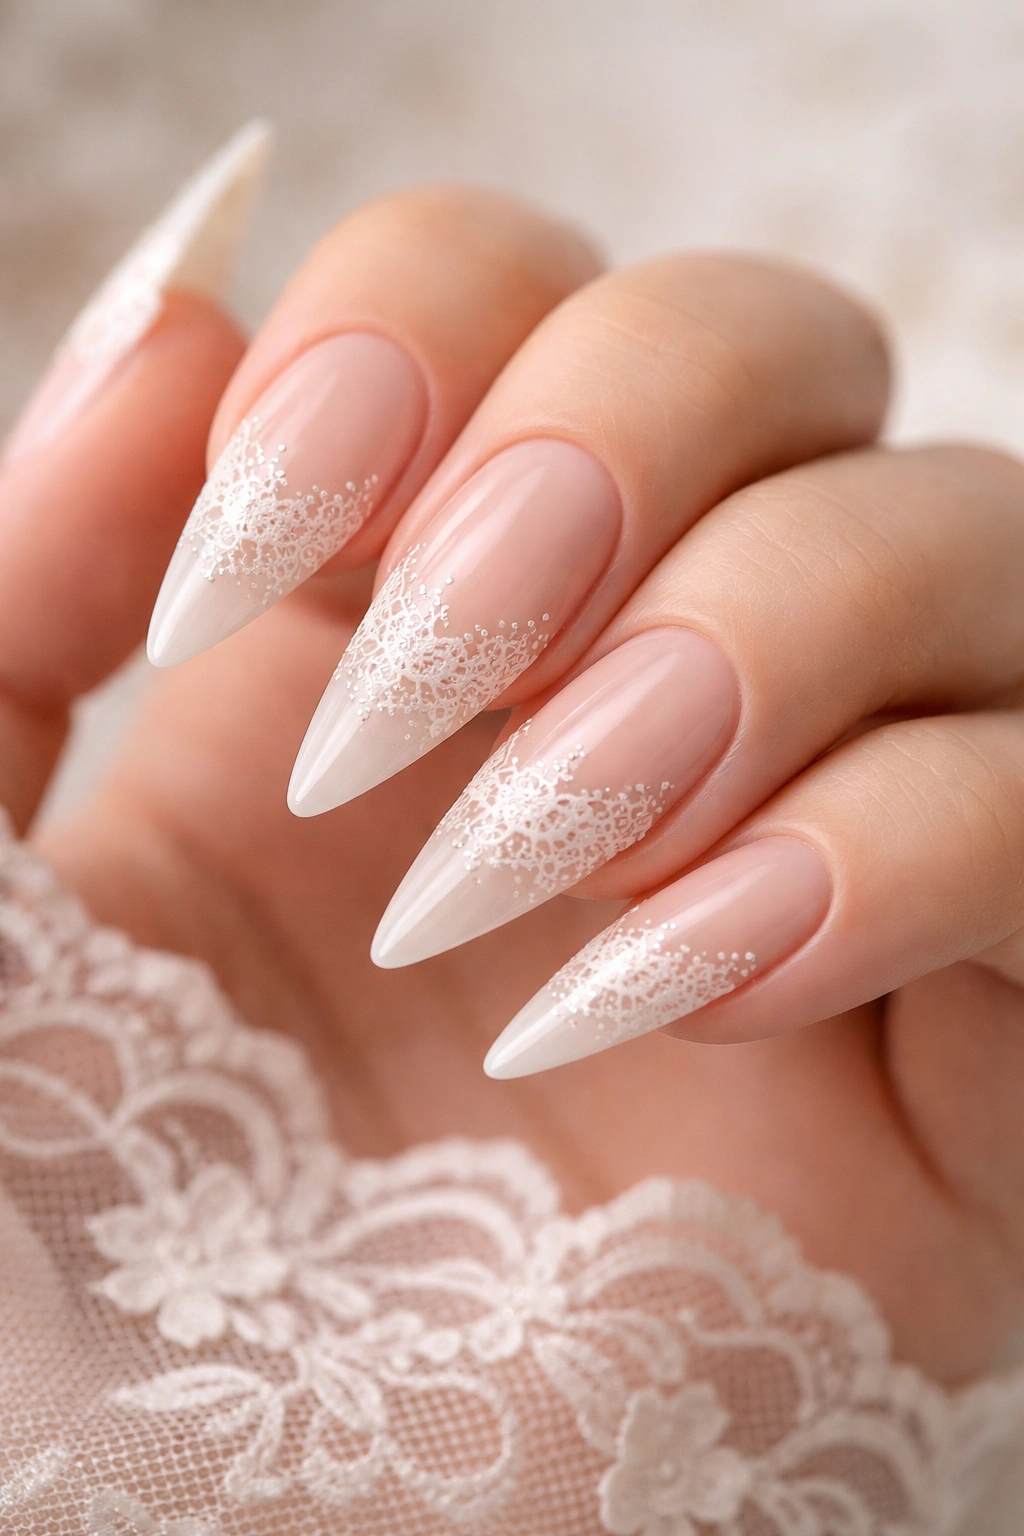
Recreate the appearance of fine lace across a neutral nude base using intricate line work or lace-pattern decals. Lace is inherently romantic and represents delicate femininity—the essence of coquette aesthetics. A clean nude shade allows the lace detail to shine without competing colors or visual noise.
Lace Application Methods
Hand-paint lace using a very thin liner brush and white, cream, or metallic polish. Start with a simple pattern of interconnected loops and dots, building complexity as you gain confidence. Alternatively, use lace-pattern nail stickers or water-slide decals designed specifically for nail art. These transfer smoothly onto polish and create detailed, professional-looking results without requiring artistic skill.
Design Depth
Lace looks most sophisticated when concentrated in specific areas—along the edges, framing the nail, or creating a decorative cuff near the tip. Full-coverage lace across the entire nail can feel busy; strategic placement ensures elegance and readability. Layer lace details by creating one pattern in cream, allowing it to dry, then adding a second more delicate pattern in white or pale pink on top.
Pro tip: Pair lace with other feminine details like a tiny bow at the cuticle, a pearl accent at the tip, or a gradient background that enhances the vintage-romantic mood of lace detailing.
7. Pastel Rainbow Gradient
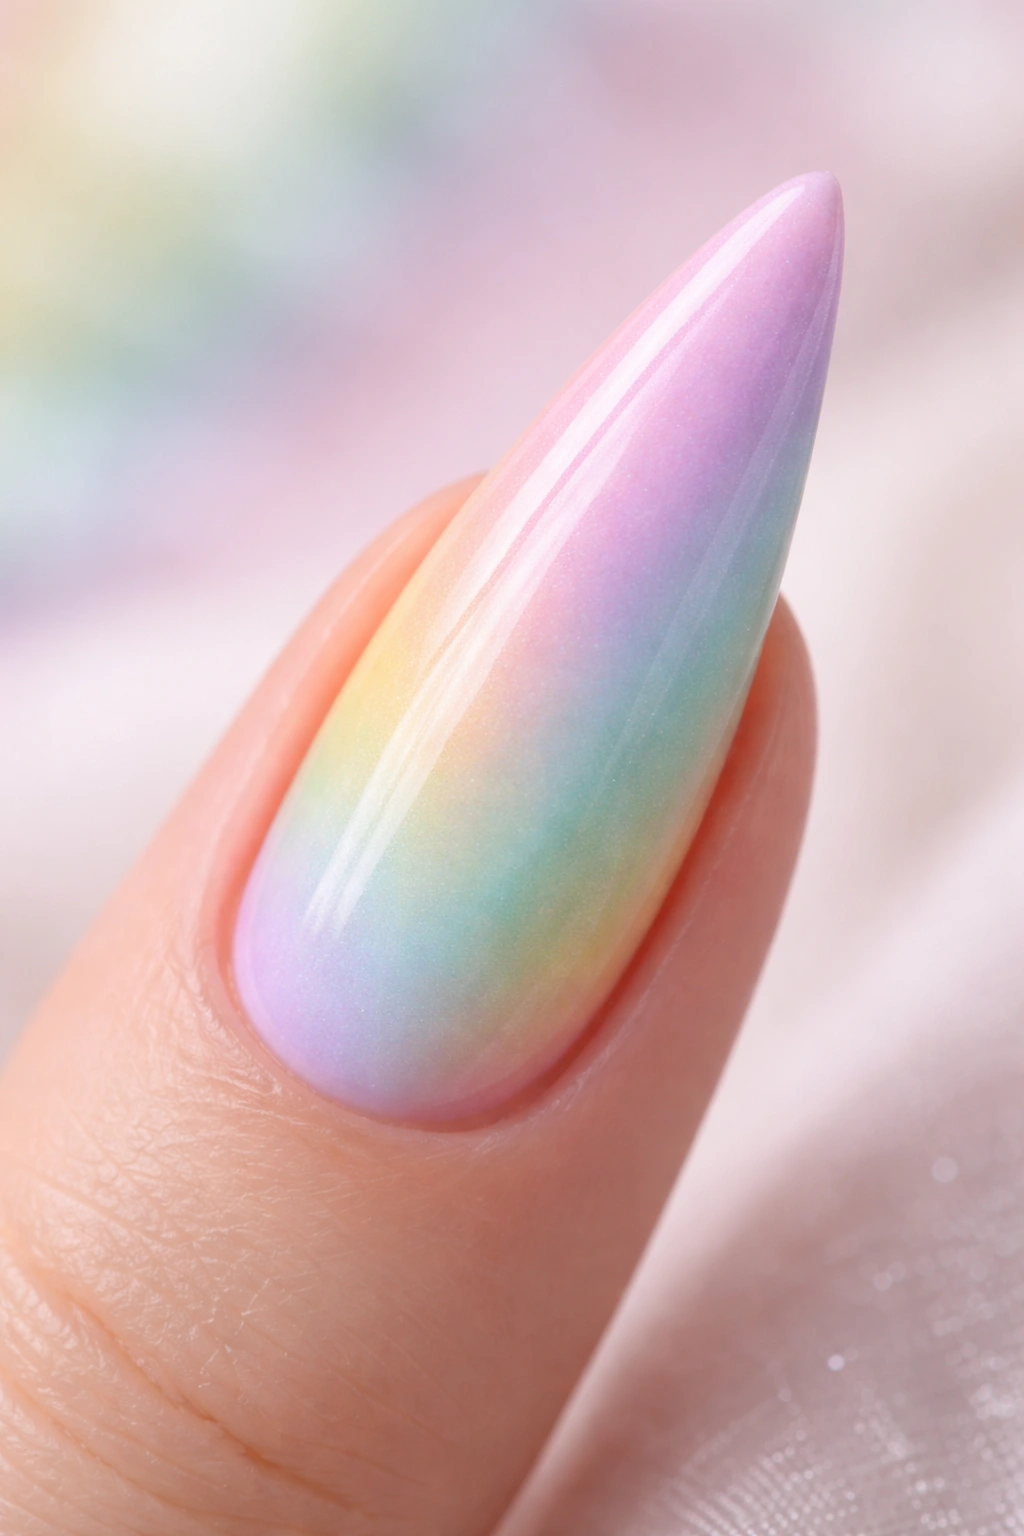
Create a soft, dreamy ombre that transitions through pastel shades—pale pink, lavender, pale yellow, mint green, and baby blue—from cuticle to tip. This design celebrates the playful side of coquette aesthetics while maintaining sophistication through its soft, muted color palette. Pastels are inherently feminine and whimsical.
Gradient Technique for Multiple Colors
Use the sponge method, but apply each pastel shade to different areas of the sponge, then dab across the nail in overlapping motions. The overlapping creates natural blending and prevents harsh color lines. Build the gradient gradually over 2-3 applications, allowing each layer to set before adding the next. The result is a soft, almost watercolor-like transition through multiple colors.
Maintaining Clarity
Pastel rainbow designs can look muddled if colors blend too heavily. To keep each shade distinct, apply them to separate sections of the sponge and dab in directional motions that create some separation. Alternatively, use thin linear stripes of each pastel color rather than an ombre blend, creating a more structured rainbow effect.
Variation: Add a layer of holographic or opalescent topcoat over the pastel rainbow to catch light and create an ethereal, shimmering effect. This enhancement makes the design feel magical and playful—perfectly aligned with coquette sensibilities.
8. Vintage Cameo Design
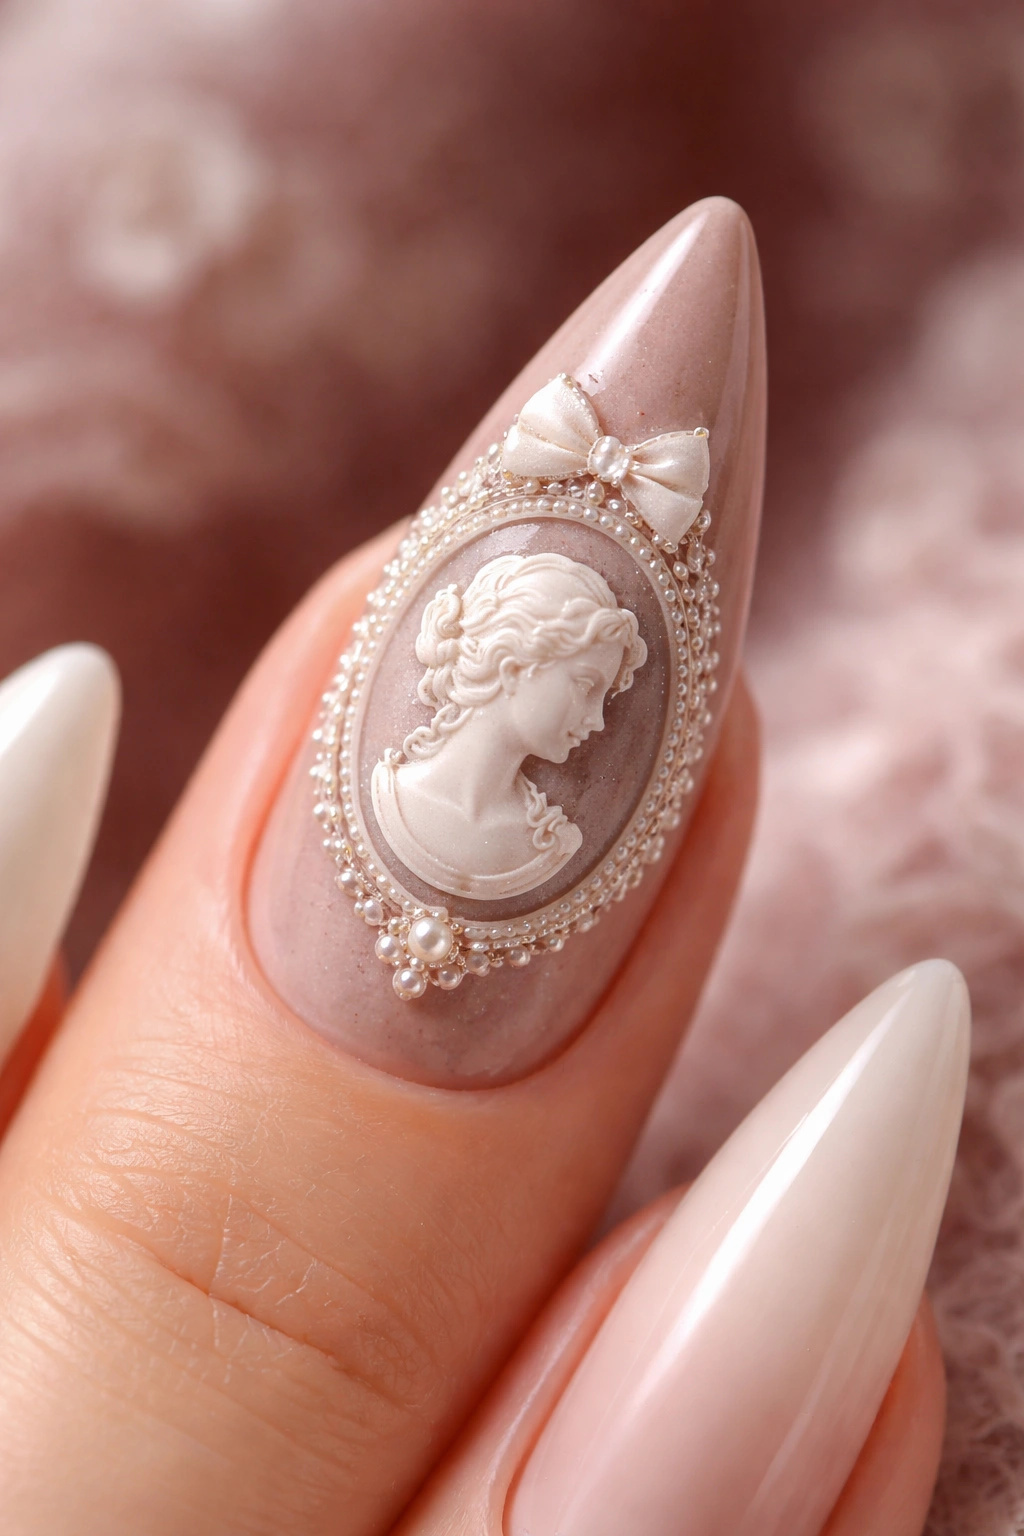
Hand-paint or apply a cameo decal—a profile silhouette in white or cream against a darker neutral background like mauve, taupe, or dusty rose. Cameos evoke vintage romance and are quintessentially feminine. This design works beautifully as a focal point on an accent nail while keeping other nails solid or subtly detailed.
Cameo Painting or Application
If painting by hand, use a very thin liner brush to outline a profile shape, then fill it in with white or cream polish. The silhouette doesn’t need to be photorealistic; a simple, stylized profile is more charming and easier to execute. For a foolproof result, use vintage cameo nail stickers or custom decals that feature detailed, ornate cameo designs.
Background Color Selection
Choose background colors that create subtle contrast with the cameo—not stark black and white, but softer neutrals that feel vintage and romantic. Dusty rose, warm taupe, soft mauve, or warm beige all provide beautiful backdrops. Add subtle texture by layering a fine shimmer or matte topcoat, creating depth without drawing attention away from the cameo itself.
Styling suggestion: Cameo designs feel particularly elegant for special occasions, tea parties, or any event celebrating vintage romance. Pair with vintage-inspired clothing and accessories for a fully coordinated, thoughtful aesthetic.
9. Milky White With Pearl Inlays
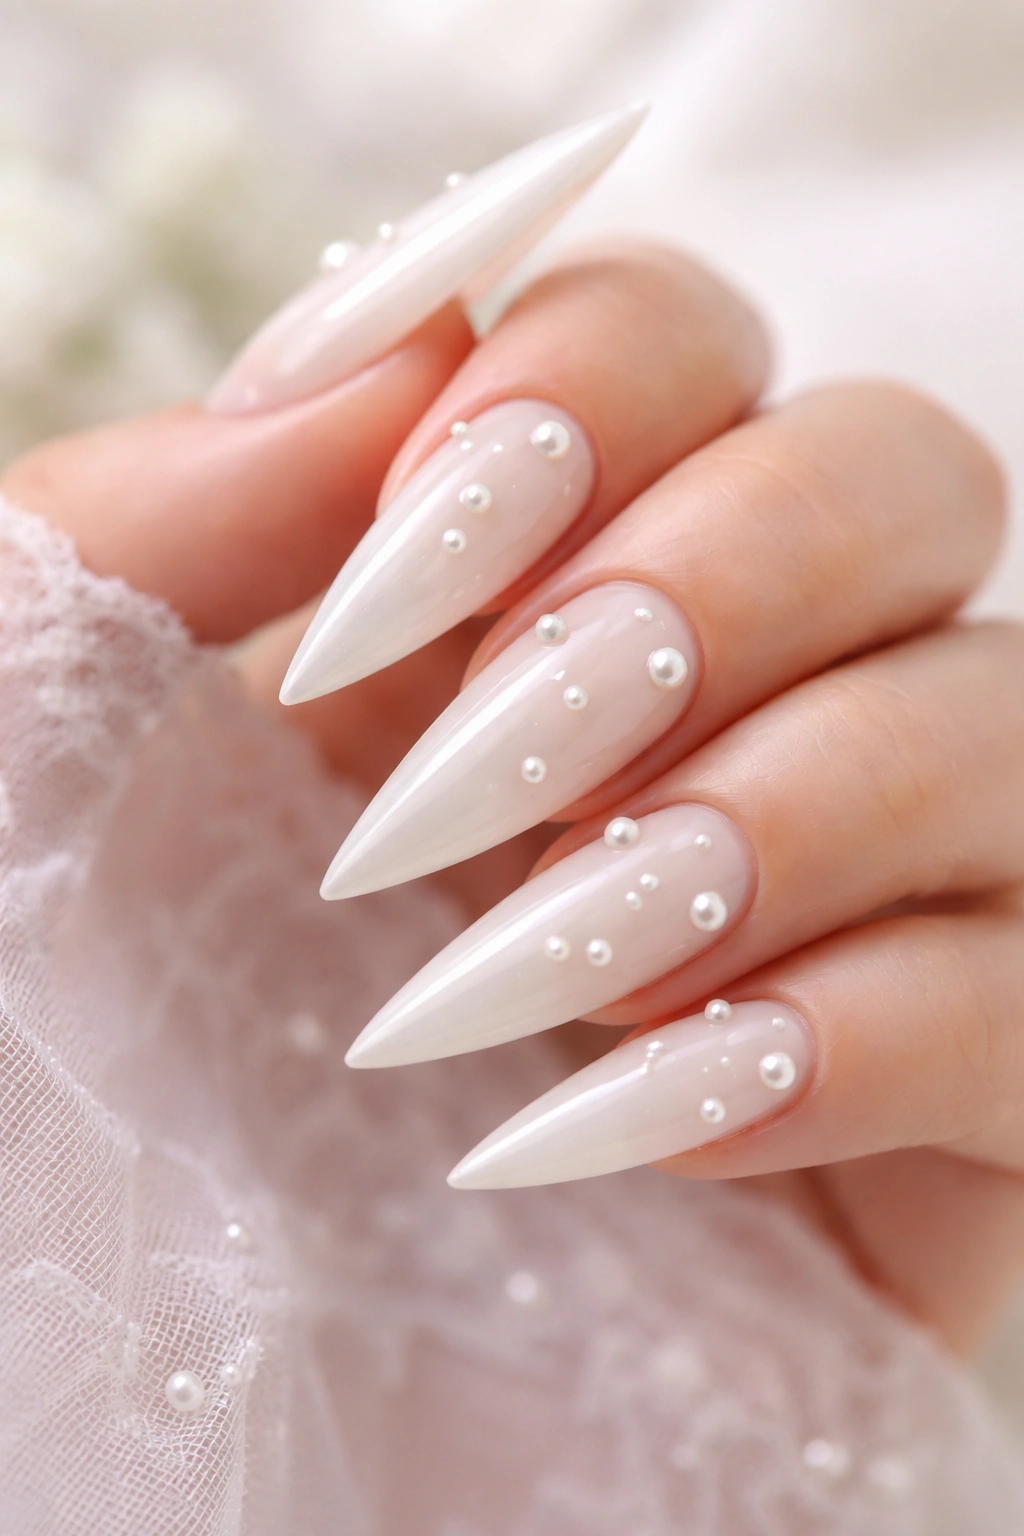
Apply a creamy, milky white base—opaque but soft, not stark white—then embed small pearls or pearl-like rhinestones into the wet polish before it sets. The result is a sophisticated, bridal-inspired design that feels luxurious and romantic. Milky white serves as a perfect canvas for pearl accents.
Pearl Placement and Embedding
Apply thin layers of milky white polish, allowing each to partially set before adding the next. Once you’ve achieved opaque coverage with a thin outer layer still slightly tacky, use a dotting tool or toothpick to place individual pearls into the polish. Press gently but firmly to ensure they’re fully embedded. Once set, seal with a glossy topcoat that encapsulates the pearls.
Pearl Density Options
Create a minimalist version with just 3-5 pearls positioned strategically, or create a more ornate design with densely clustered pearls near the tip. You can also create a gradient effect by concentrating pearls at the tip and gradually spacing them out toward the cuticle. This gradual density creates visual movement and sophistication.
Quality matters: Investment-quality pearls have genuine luster and dimension. Budget pearl alternatives sometimes appear flat or plastic-looking. The difference is noticeable and worth the extra cost for a manicure that feels truly luxurious.
10. Rose Gold Glitter Ombre
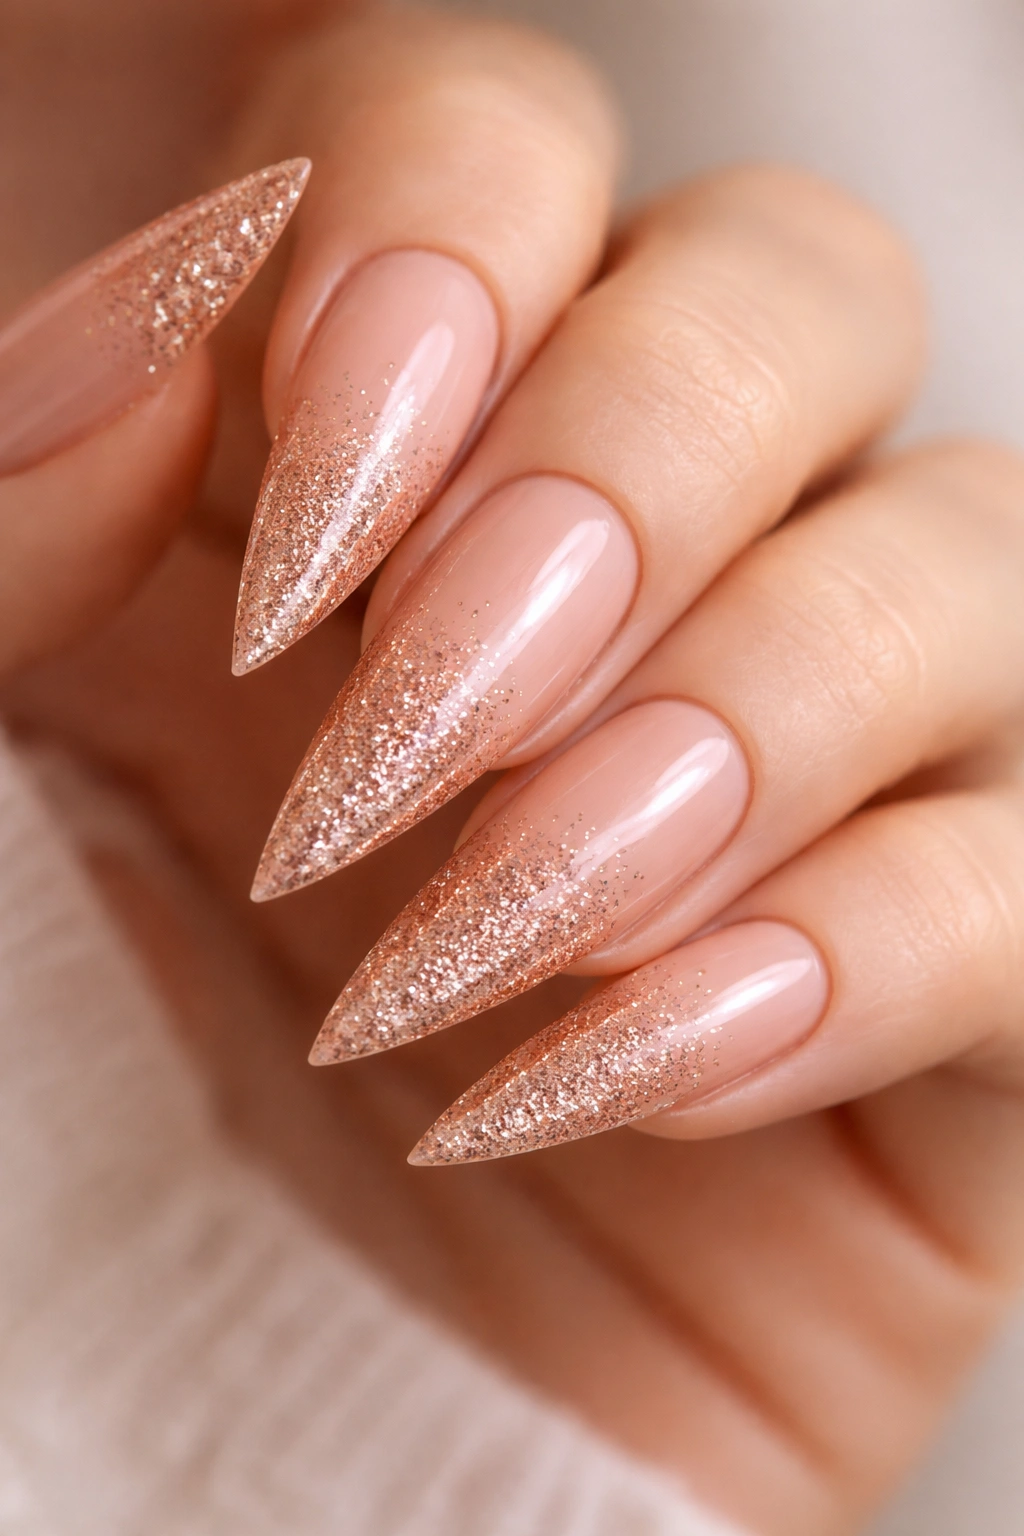
Create an ombre that transitions from a soft nude or blush base at the cuticle to increasingly concentrated rose gold glitter toward the tip. Rose gold glitter embodies coquette femininity—warm, sparkly, and subtly luxurious. This design bridges the gap between understated elegance and eye-catching glamour.
Glitter Gradient Application
Apply a solid base color, then use a makeup sponge to apply rose gold glitter polish in increasing concentrations toward the tip. For smoother blending, apply a glitter-gradient topcoat that already has the concentration built in. Alternatively, mix rose gold glitter into clear gel in varying ratios—less glitter near the cuticle, more toward the tip—and apply in thin layers, building gradually.
Finish and Shine
A glossy topcoat enhances the sparkle and creates a polished, professional appearance. Some glitter ombres benefit from a slight matte topcoat applied only to the base section, creating textural contrast with the glossy glitter tip—this adds sophistication and prevents the entire nail from feeling shiny.
Pro tip: Rose gold glitter works beautifully with any undertone—warm, cool, or neutral. The pinkish warmth of rose gold is universally flattering and naturally complements the coquette aesthetic of soft femininity.
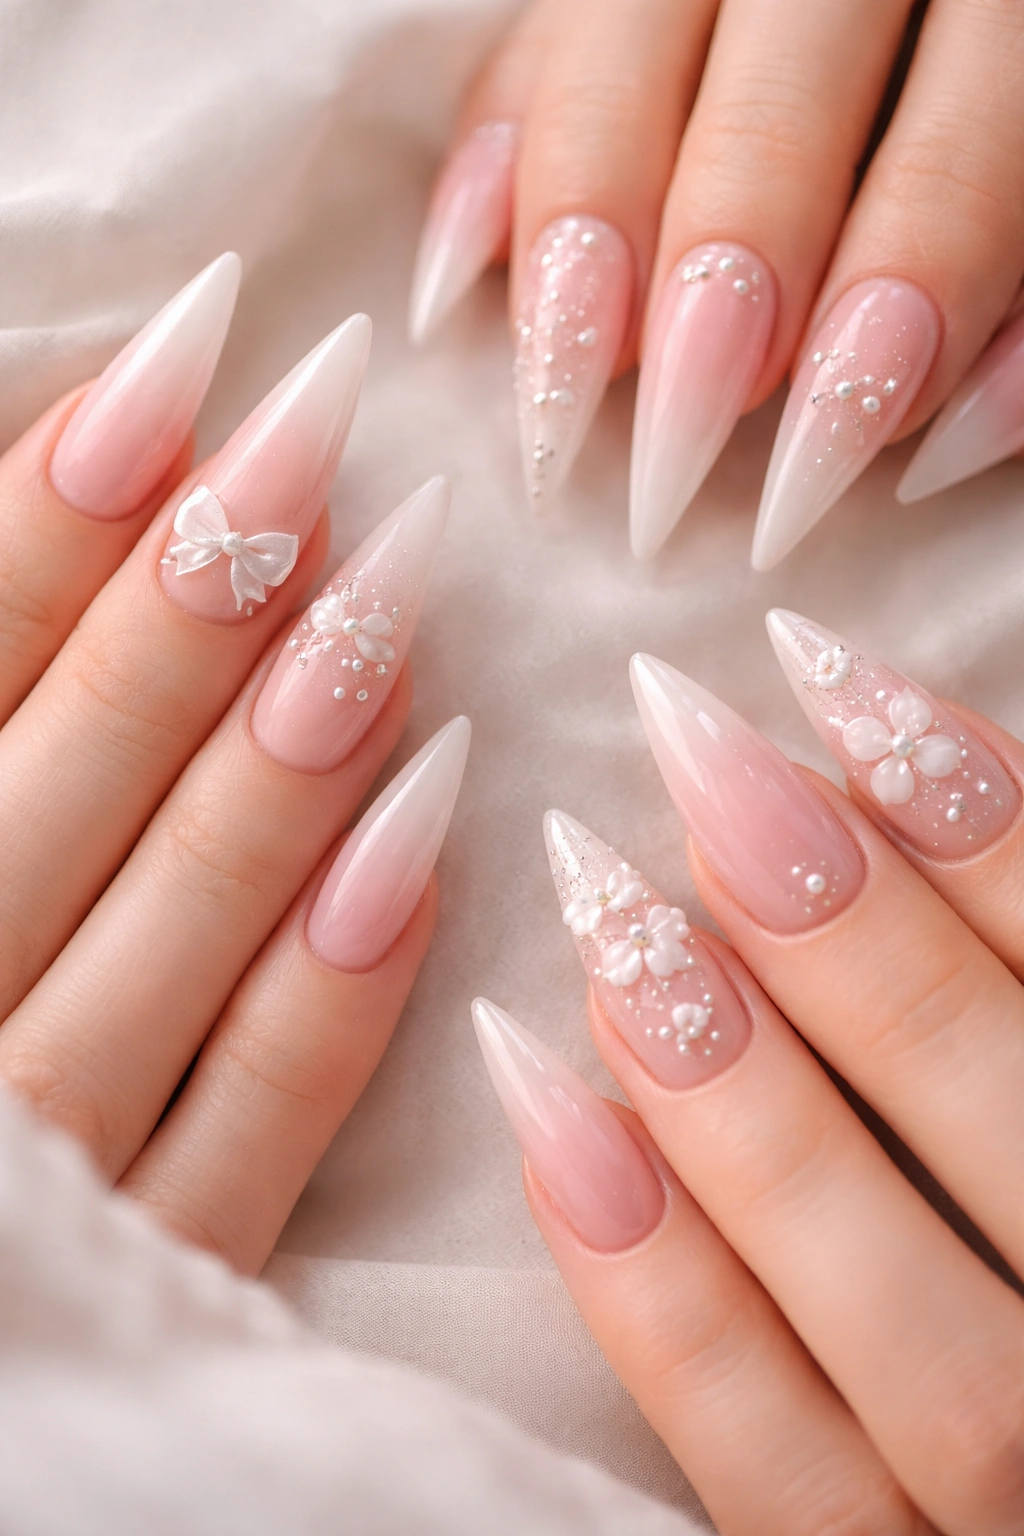
11. Sheer Pink With 3D Bows
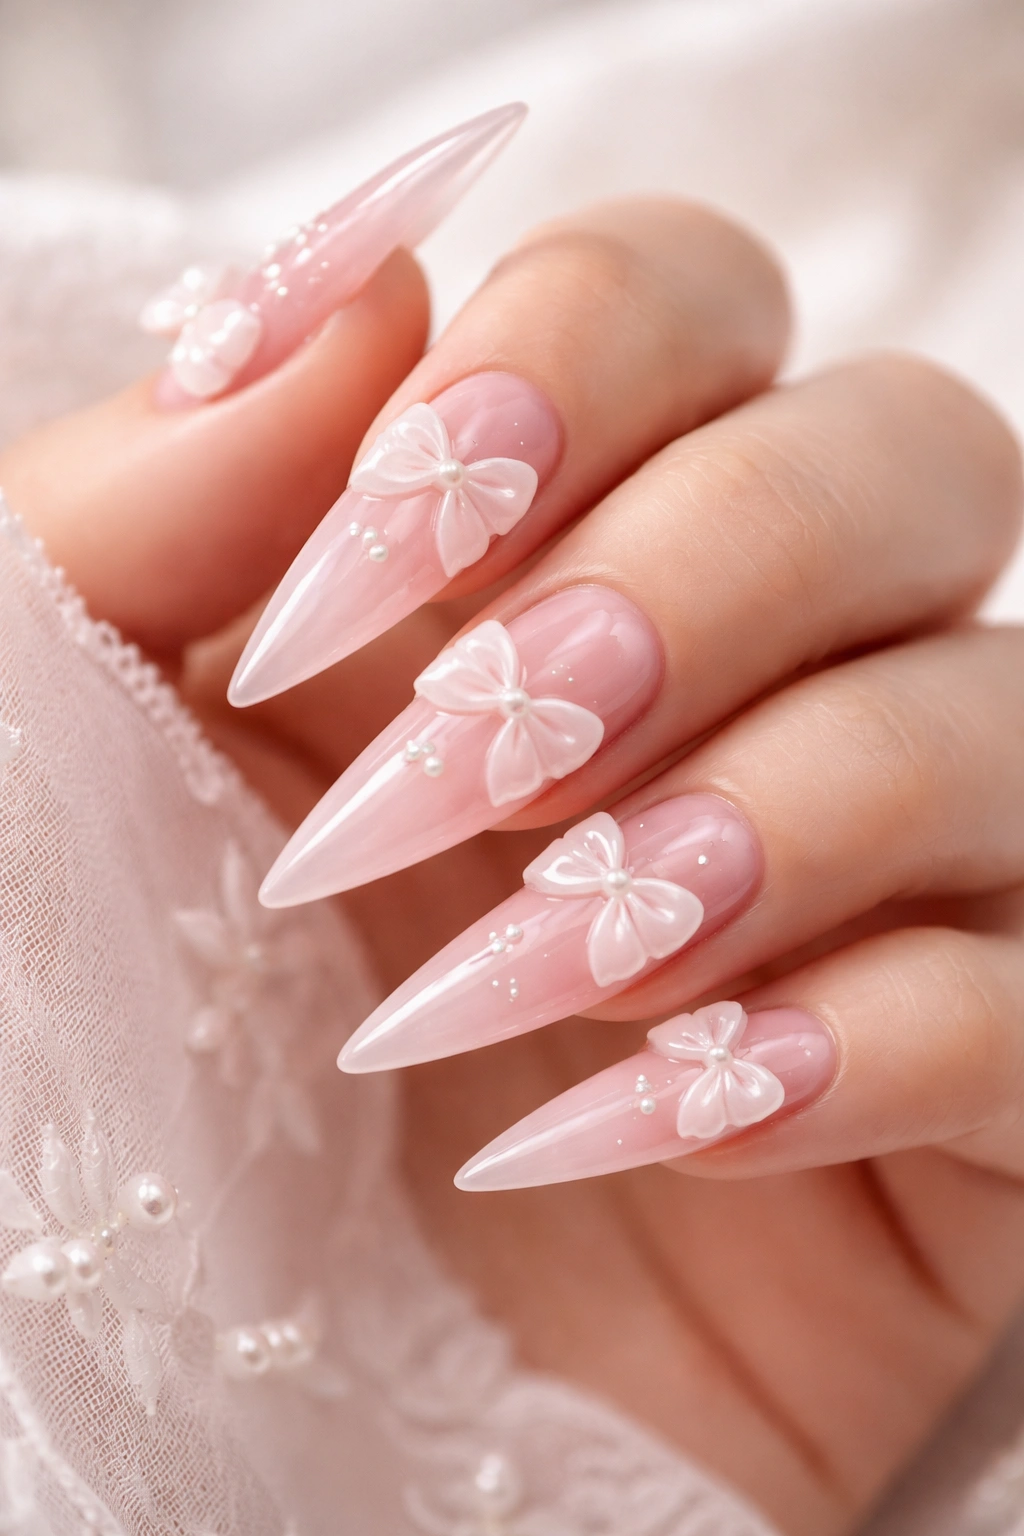
Use a sheer, barely-there pink polish that shows the nail bed while maintaining visible color, then top with dimensional 3D bow embellishments. Sheer pink feels romantic and lightweight, while 3D bows add architectural interest and obvious intentionality. This design celebrates playfulness while maintaining sophistication.
Sheer Pink Selection and Application
Look for nail polishes specifically formulated as “sheer” or “jelly” finishes—these are translucent and show the natural nail underneath while still providing noticeable color. Apply 2-3 thin layers to achieve the perfect balance of opacity and sheerness. The natural nail showing through creates a fresh, youthful quality that feels very coquette.
3D Bow Application
Attach pre-made 3D bow embellishments using nail glue designed for heavy embellishments. Choose bows in complementary colors—white, nude, rose gold, or metallic. Position them on the accent nail or scattered across multiple nails in a balanced arrangement. The dimensional quality of 3D bows creates movement and interest that flat designs cannot achieve.
Variation idea: Create a gradient sheer pink (darker toward the tip) and position the bow at the base or side for an elegant, asymmetrical arrangement. The gradient adds depth while the bow creates a clear focal point.
12. Ivory Lace and Pearls
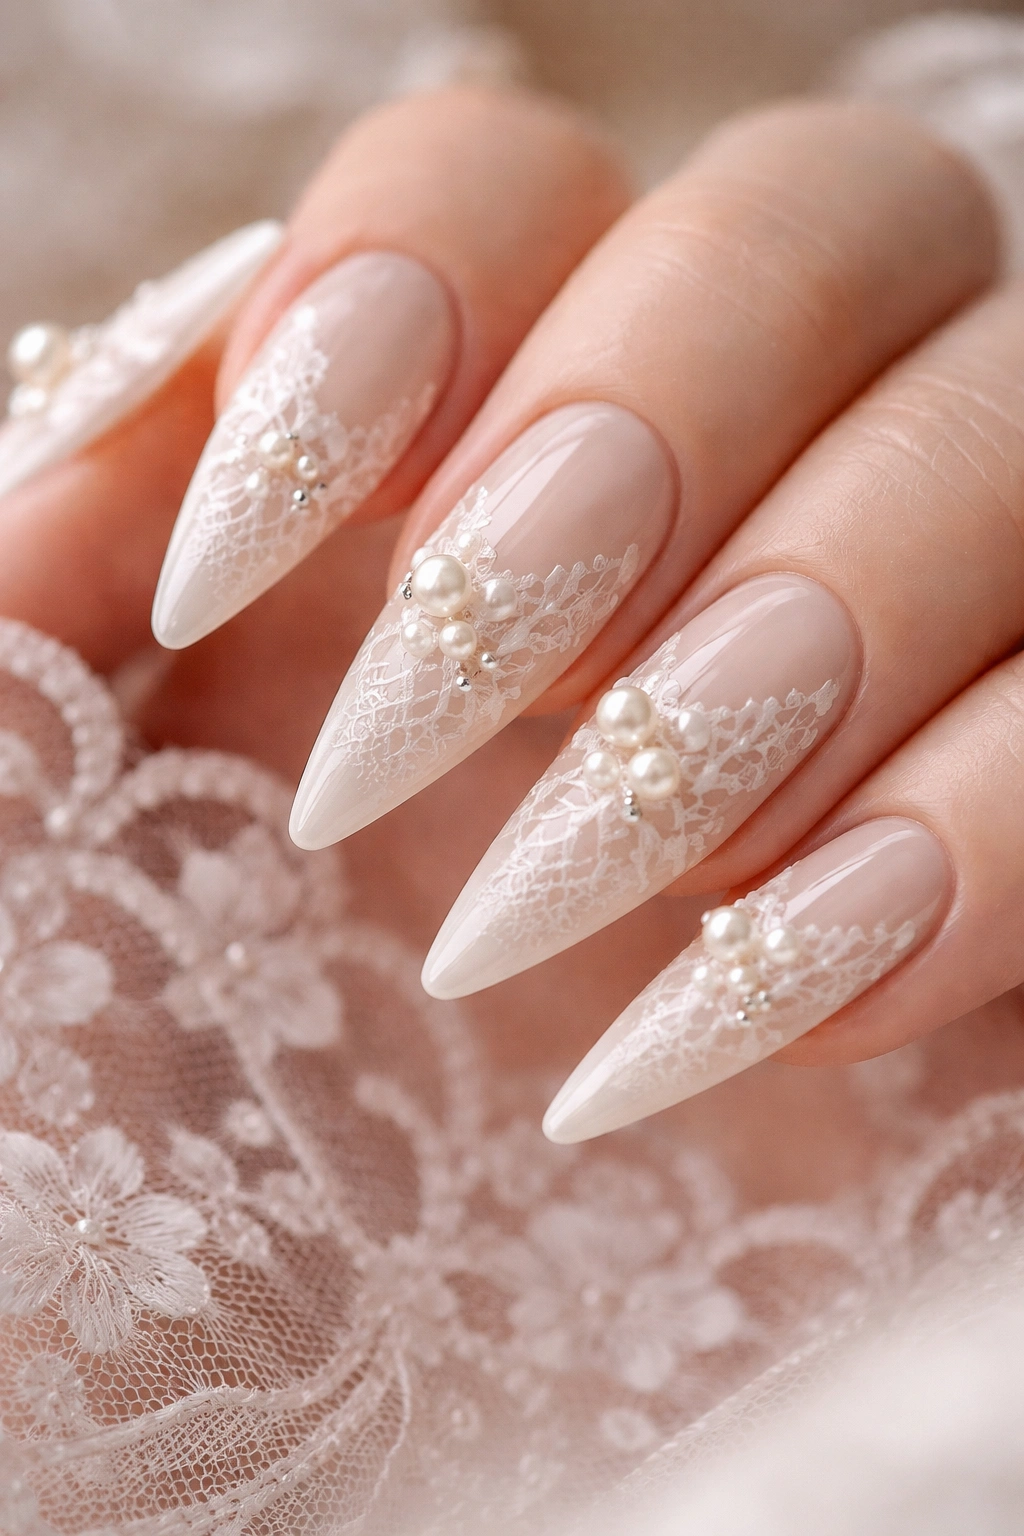
Combine delicate white lace detail work with strategically placed pearl accents on an ivory base. This design feels bridal, sophisticated, and unmistakably feminine. Ivory is warmer and more romantic than pure white while still maintaining the crisp, clean aesthetic of lace and pearls.
Layering Lace and Pearls
Start with an ivory base (2-3 thin layers for smooth coverage), then hand-paint white lace using a thin liner brush. Once the lace is completely dry, add pearls using nail glue and a dotting tool. Position pearls where they naturally complement the lace—at intersection points, along the edges, or scattered throughout. The combination of delicate line work and dimensional pearls creates visual depth and luxury.
Design Hierarchy
Create visual focal points by clustering pearls in one area while keeping lace detail more distributed. This prevents the design from feeling chaotic and ensures the eye has a clear place to rest. The accent nail can feature dense lace and pearls while other nails have lighter, more minimalist versions of the same design elements.
Perfect for: Engagement parties, bridal showers, weddings, anniversaries, or any event celebrating romantic love and commitment. This design exudes elegance and intentionality.
13. Soft Lilac With Florals
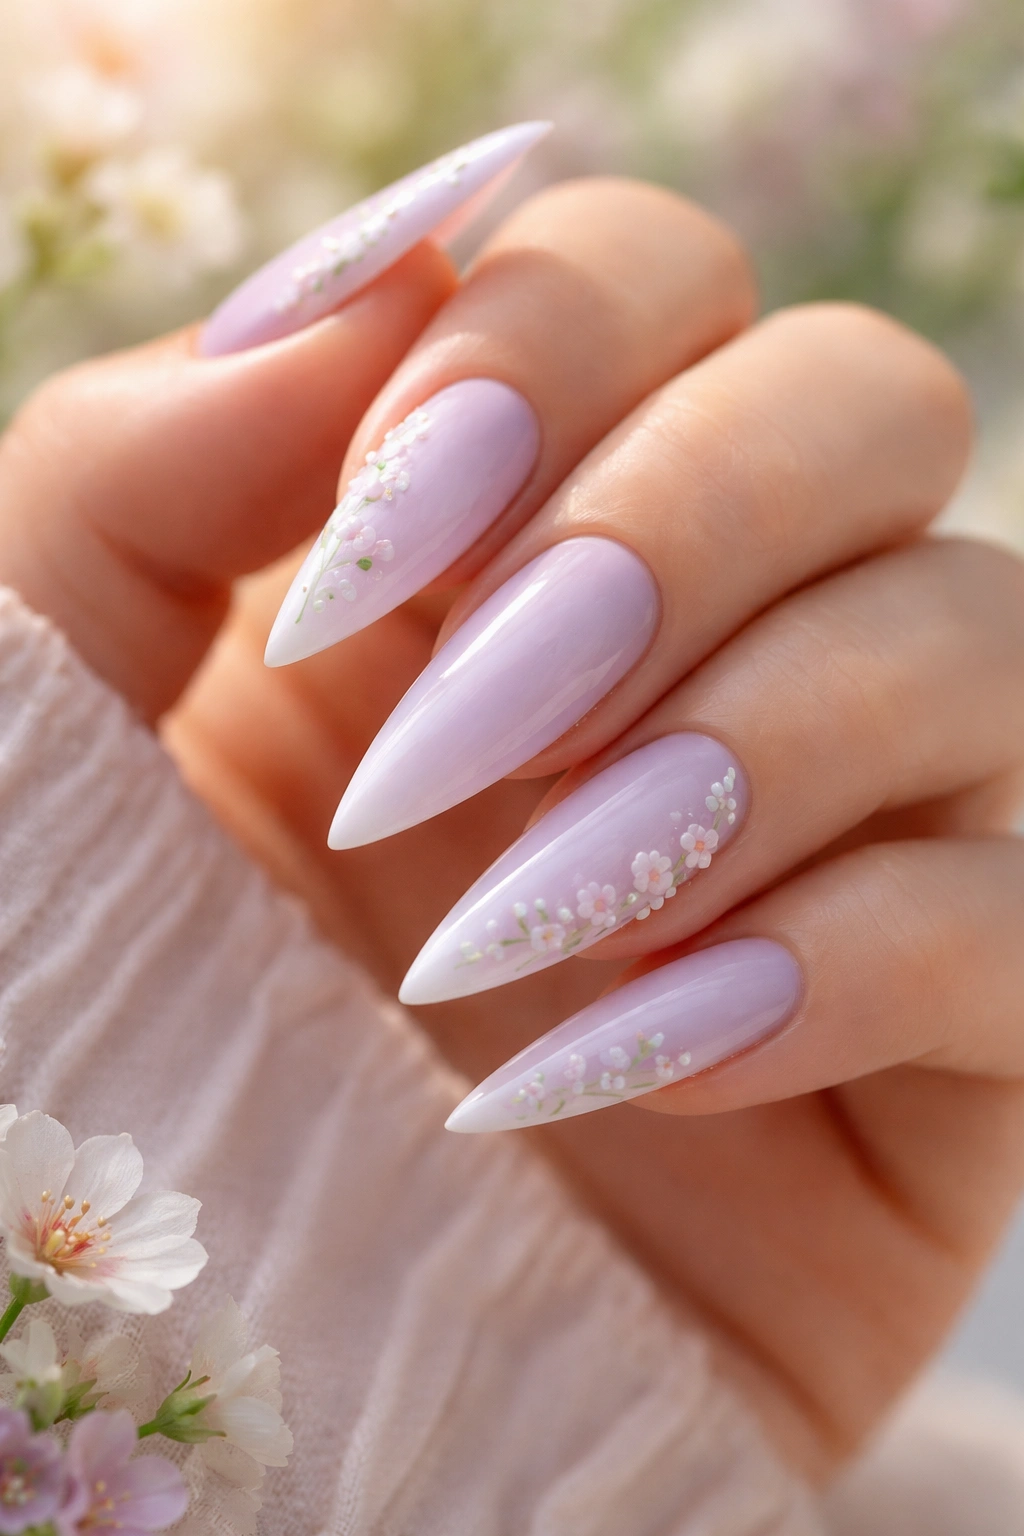
Apply a soft, muted lilac base—pale enough to feel romantic but clearly purple-toned—then add delicate floral details in white, pink, or deeper purple. Lilac is inherently romantic and pairs beautifully with botanical elements. This color combination feels fresh, spring-like, and unmistakably coquette.
Lilac Shade Selection
Choose a lilac that leans toward gray or mauve rather than bright, saturated purple. These softer tones feel more romantic and sophisticated. Test the shade in natural light to ensure it’s the muted, feminine tone you’re envisioning—some lilacs read too bright or blue-toned for coquette aesthetics.
Floral Execution
Paint tiny wildflowers, lilies, or lavender sprigs using a thin brush and white or darker purple polish. Keep florals small and delicate—they should feel like accents rather than the focal point. Concentrate florals on the accent nail or along one edge of each nail, creating a cohesive design that feels intentional. Add green stems and leaves using a fine liner and pale green polish.
Seasonal variation: This design feels perfect for spring and summer but works year-round for anyone drawn to botanical themes. Swap florals with snowflakes for winter, autumn leaves for fall, or cherry blossoms for spring.
14. Champagne and Nude Marble
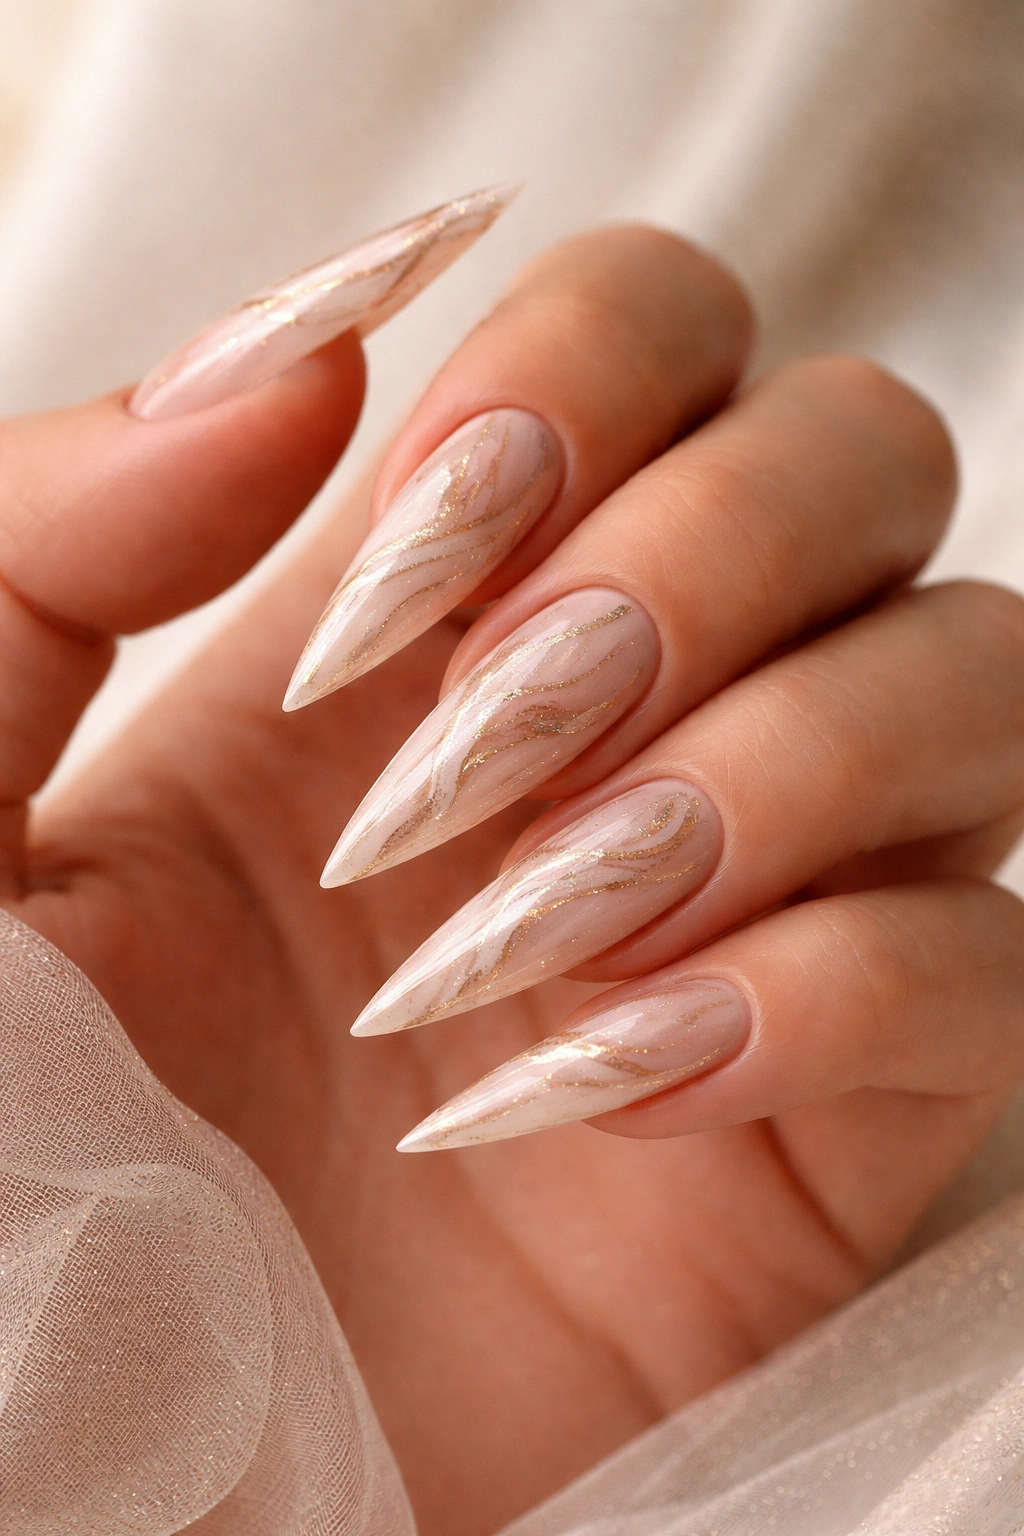
Create a swirled, marbled effect using champagne and nude polish, blending the shades together in organic, flowing patterns. Marble designs feel artistic, sophisticated, and luxurious. The warm metallic champagne against neutral nude creates a design that’s eye-catching without being overwhelming.
Marble Technique
Apply a nude base, then use a thin brush or toothpick to drag thin lines of champagne polish across the nail in organic swirls and curves. Immediately blend the lines by dragging the brush perpendicular to the lines, creating a feathered, marbled effect. This technique requires practice but becomes easier with repetition. Alternatively, use marble-effect decals or water-slide transfers for a foolproof, professional result.
Color Blending
The key to beautiful marble is allowing the two shades to show distinctly while blending at their edges. This creates visual interest and the appearance of natural stone. Avoid over-blending, which can result in a muddy, undefined appearance. Instead, embrace the organic, imperfect quality of natural marble—no two applications need to look identical.
Pro tip: Seal marble designs with a glossy topcoat to enhance shine and protect the intricate detail work. The glossy finish makes the marbling appear more refined and luxurious.
15. Nude With Minimalist Bow
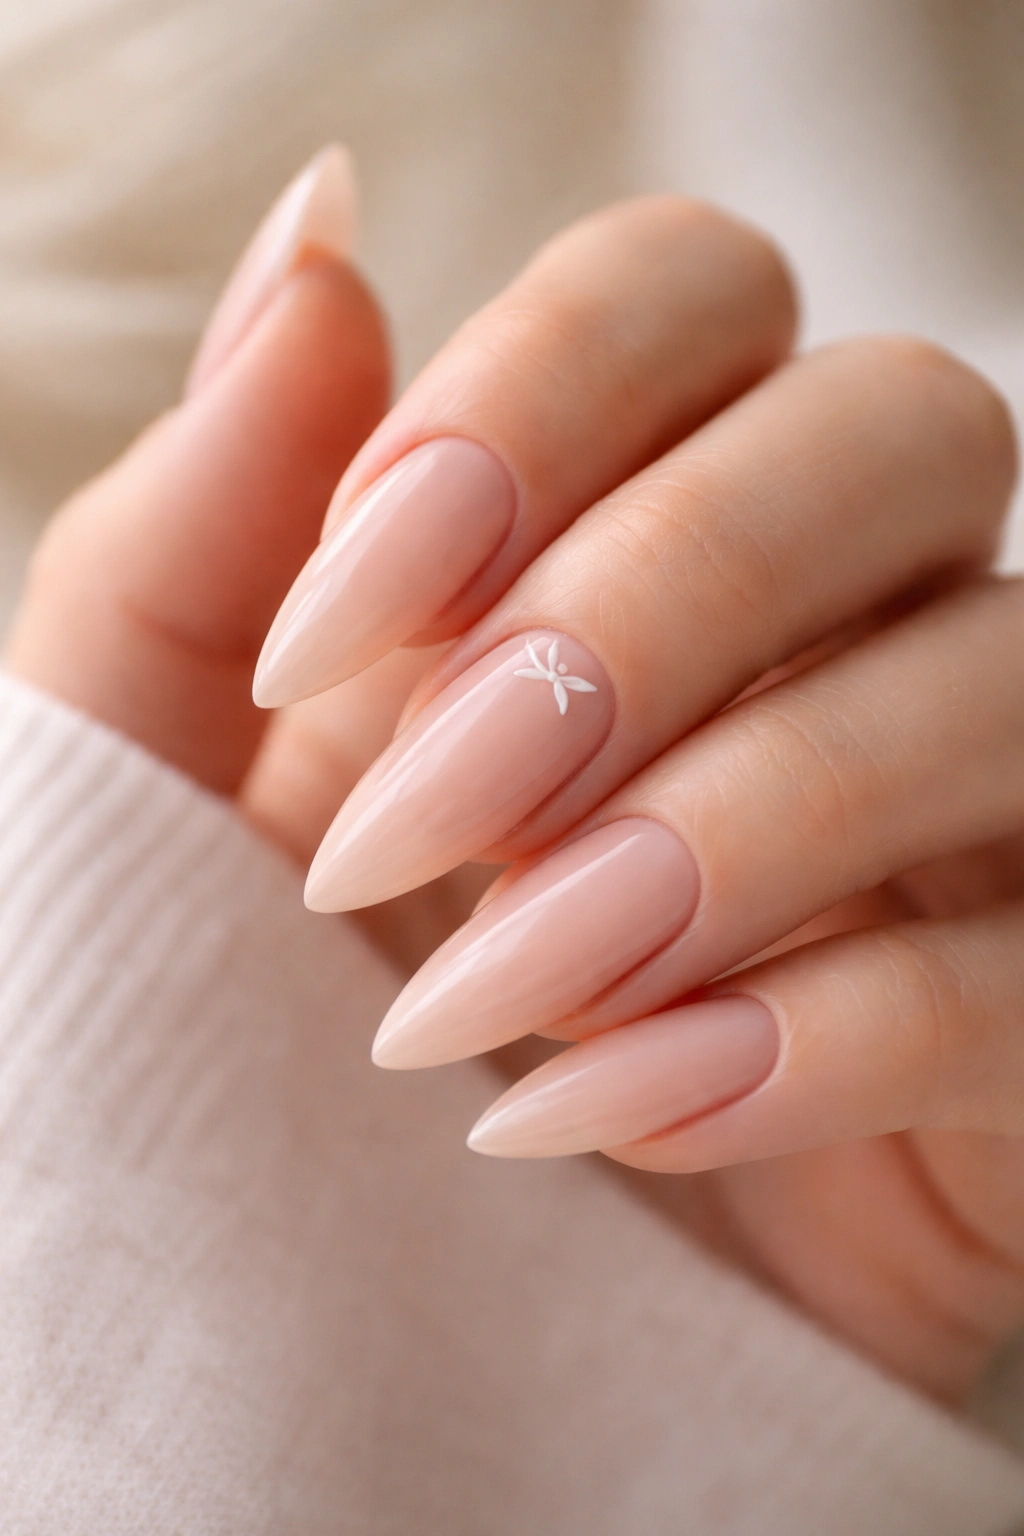
Apply a clean, flattering nude base color, then add a single minimalist bow element using thin line work near the cuticle. This ultra-refined version of the bow design emphasizes sophistication and simplicity. One carefully placed bow can be more impactful than multiple scattered details.
Nude Shade Selection
Choose a nude that matches your undertone—warm nudes for warm undertones, cool nudes for cool undertones, or a universally flattering warm beige. The perfect nude should elongate the finger visually and feel like a natural extension of your skin. Apply 2-3 thin layers for full, opaque coverage with a smooth finish.
Bow Execution
Create a single, delicate bow near the base of the nail using white, pale pink, or metallic polish and an ultra-thin liner brush. The bow should be small and refined—roughly the size of a seed pearl. Alternatively, use a single tiny adhesive bow accent for perfection without requiring hand-painting skill.
Minimalist appeal: This design is wearable for everyday life, professional environments, and any setting where you want to signal style without obvious statement nails. It’s also perfect for nail art beginners seeking a manageable, high-impact design.
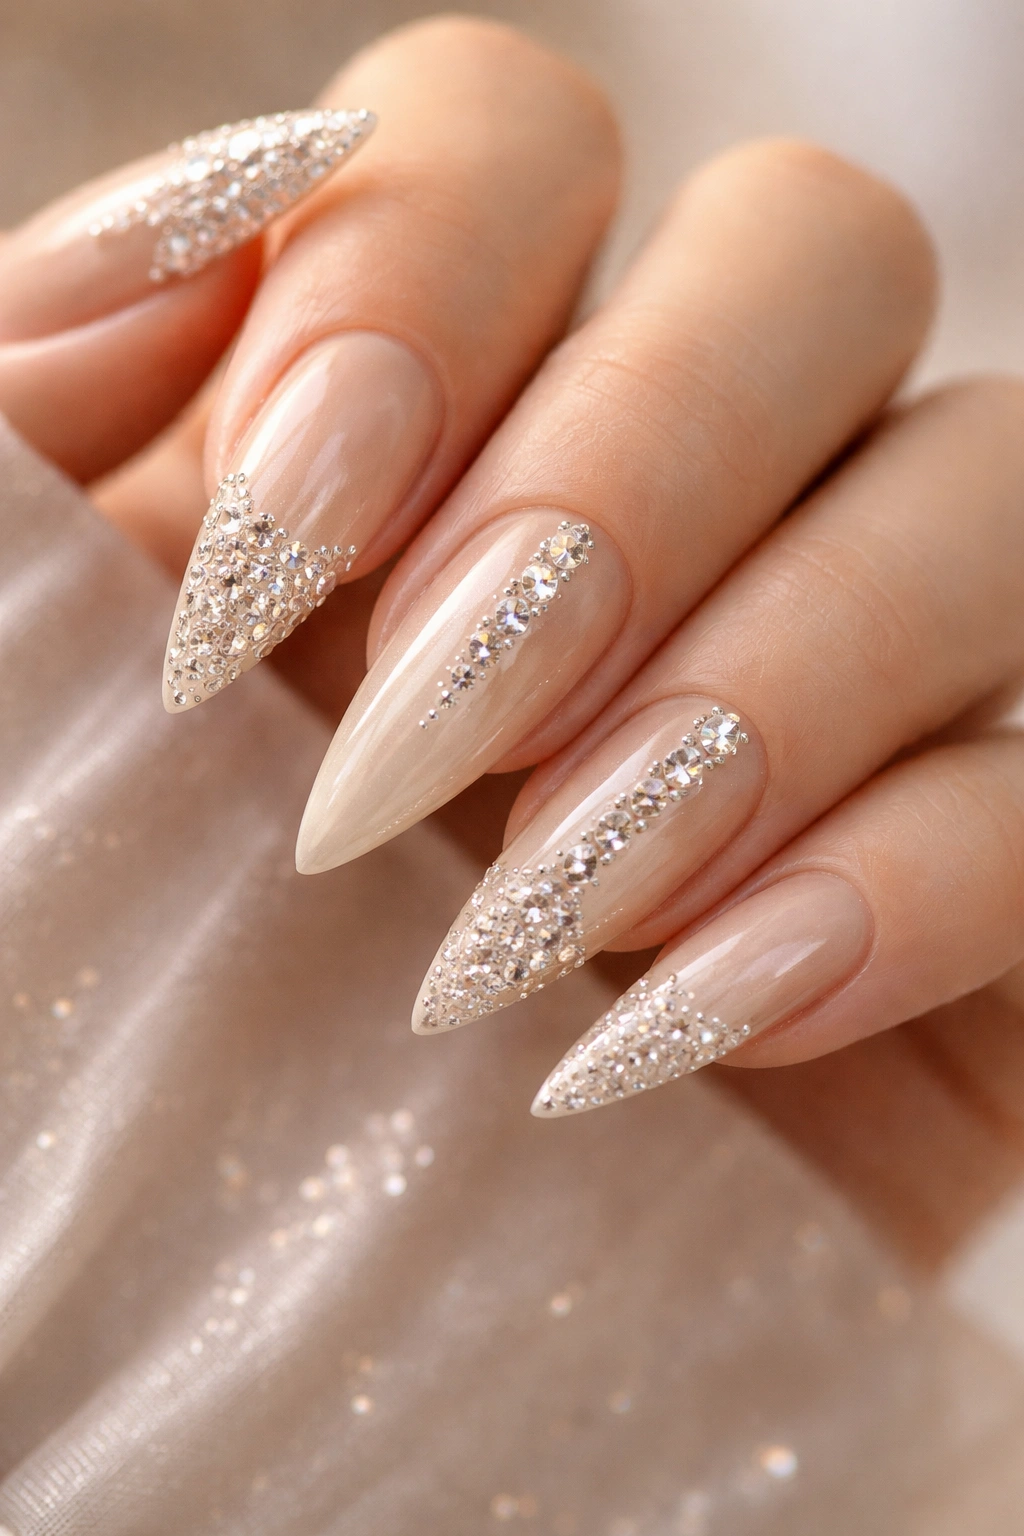
16. Pearl and Crystal Stilettos
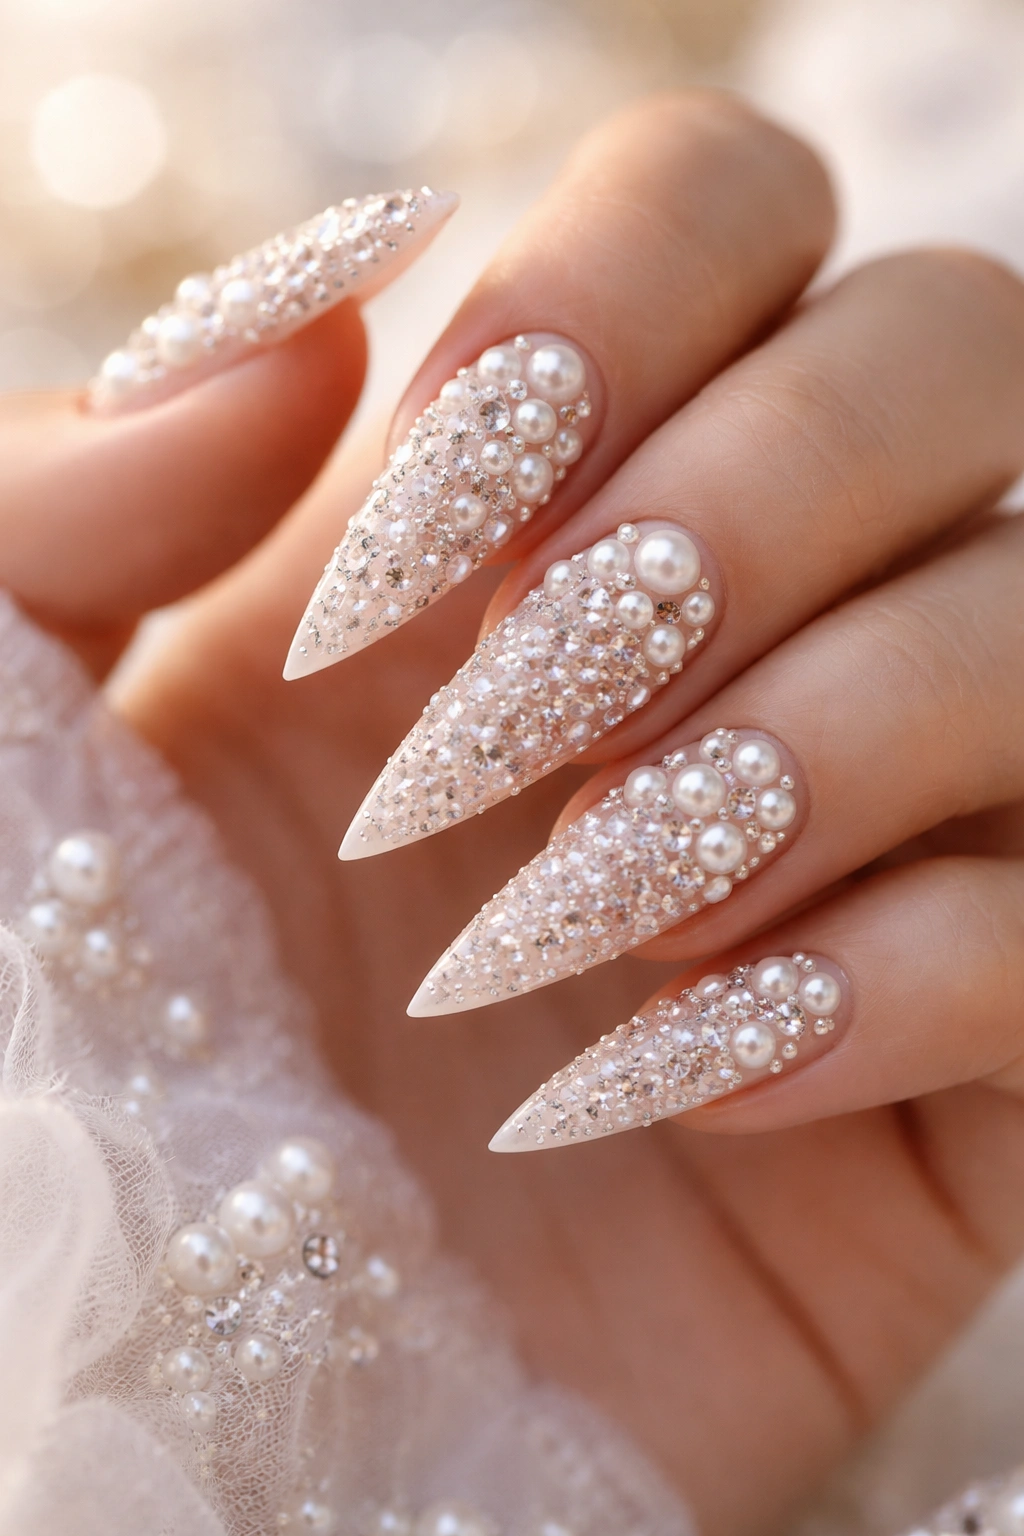
Cover the entire nail surface with a densely clustered arrangement of pearls and small rhinestones in varying sizes and finishes—matte pearls, glossy rhinestones, opalescent gems. Start with a nude or champagne base, then apply gems in a gradient or all-over pattern. This design is unabashedly glamorous and perfect for special occasions.
Gem Selection and Variety
Choose quality pearls and rhinestones in complementary finishes—combining matte and glossy gems creates visual depth and sophistication. Round pearls in sizes ranging from micro to medium-sized add organic dimension. Mix pearl tones—white, cream, champagne—for subtle variety that reads as intentional luxury rather than costume jewelry.
Application and Adhesion
Apply gems using a strong-hold nail adhesive and a dotting tool or tweezers. Work systematically from one corner of the nail toward the opposite corner, placing each gem individually and pressing firmly for several seconds. Build up gem density gradually, stepping back frequently to evaluate the overall design. Once complete, encapsulate everything with a glossy topcoat that protects the gems and adds final shine.
Investment note: This design requires more gems and higher-quality materials, making it more expensive than simpler designs. However, the result is a truly special, statement-making manicure that feels luxurious and intentionally crafted.
17. Blush Pink Tortoiseshell

Create a tortoiseshell pattern using blush pink, coral, gold, and cream, blending the shades together in organic, overlapping patterns reminiscent of actual tortoiseshell. Tortoiseshell feels retro, artistic, and sophisticated while maintaining the warmth and femininity of the coquette aesthetic.
Tortoiseshell Color Palette
Use warm, muted tones rather than bright, saturated colors. Blush pink, warm coral, soft gold, warm cream, and touches of deeper rose or burnt sienna create an authentic-looking tortoiseshell effect. Avoid cool-toned colors or bright, primary shades—they don’t translate to realistic tortoiseshell aesthetics.
Creating the Pattern
Apply a cream or pale pink base, then use multiple thin brushes to apply the darker tones in overlapping, organic patches. Blend edges where colors meet using a dry brush or sponge, creating soft transitions rather than harsh lines. The goal is a naturally occurring pattern that looks like genuine tortoiseshell rather than a geometric design.
Versatility: Tortoiseshell works beautifully with various coquette elements—add a tiny gold bow, layer a subtle sparkle topcoat, or keep it pure and simple. The pattern is complex enough to feel special without additional embellishments.
18. White With Gold Filigree
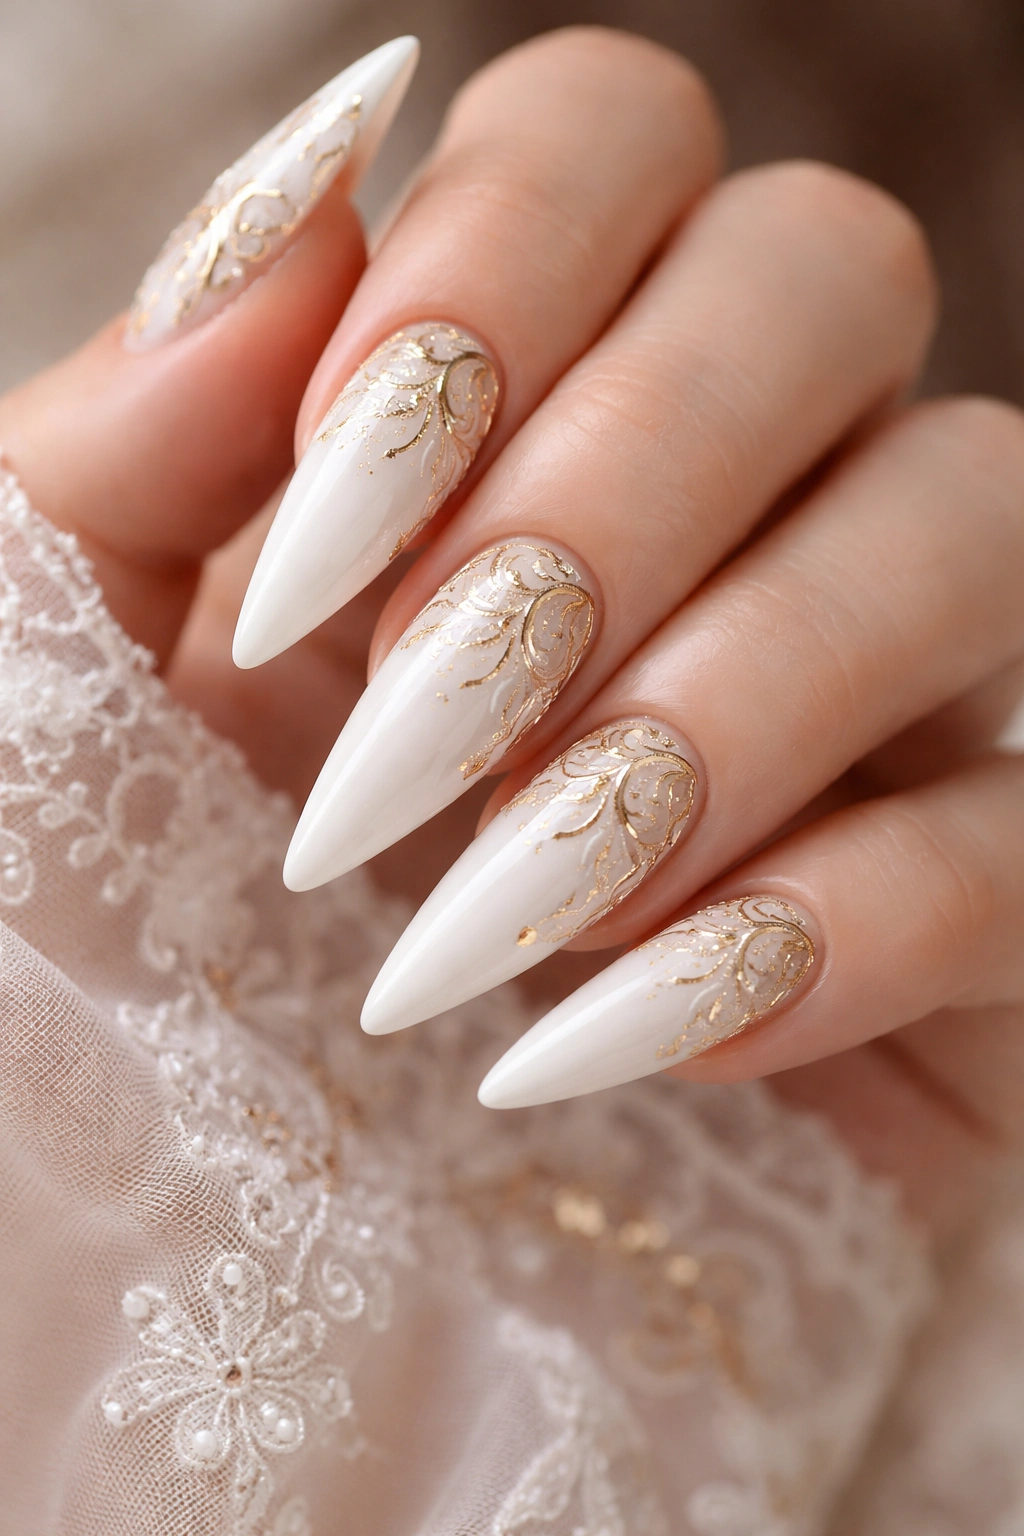
Apply a crisp white base, then add delicate gold filigree detail work using a thin brush and metallic gold polish. Filigree—ornate, lacy metalwork detail—is inherently romantic and sophisticated. Gold against white is classic, timeless, and perfectly on-brand for coquette aesthetics.
Filigree Design Elements
Create intricate line patterns inspired by vintage jewelry—delicate swirls, interconnected loops, decorative frames, or abstract geometric patterns. Keep the gold lines thin and refined; thick filigree appears heavy and costume-like rather than elegant. Concentrate filigree on specific areas—framing the tip, creating a cuff near the smile line, or forming a decorative border—rather than covering the entire nail.
Execution Tips
Use a very thin liner brush (size 00 or smaller) and apply gold polish in slow, controlled motions. Build the pattern gradually, allowing each section to dry before adding adjacent details. Some nail artists find it helpful to sketch the filigree pattern lightly in pencil before painting in gold. Once complete, seal with a glossy topcoat that makes the gold shimmer and protects the detailed work.
Styling suggestion: This design feels particularly elegant for formal events, romantic occasions, or sophisticated everyday wear. Pair it with clothing featuring metallic accents or delicate details for a fully coordinated aesthetic.
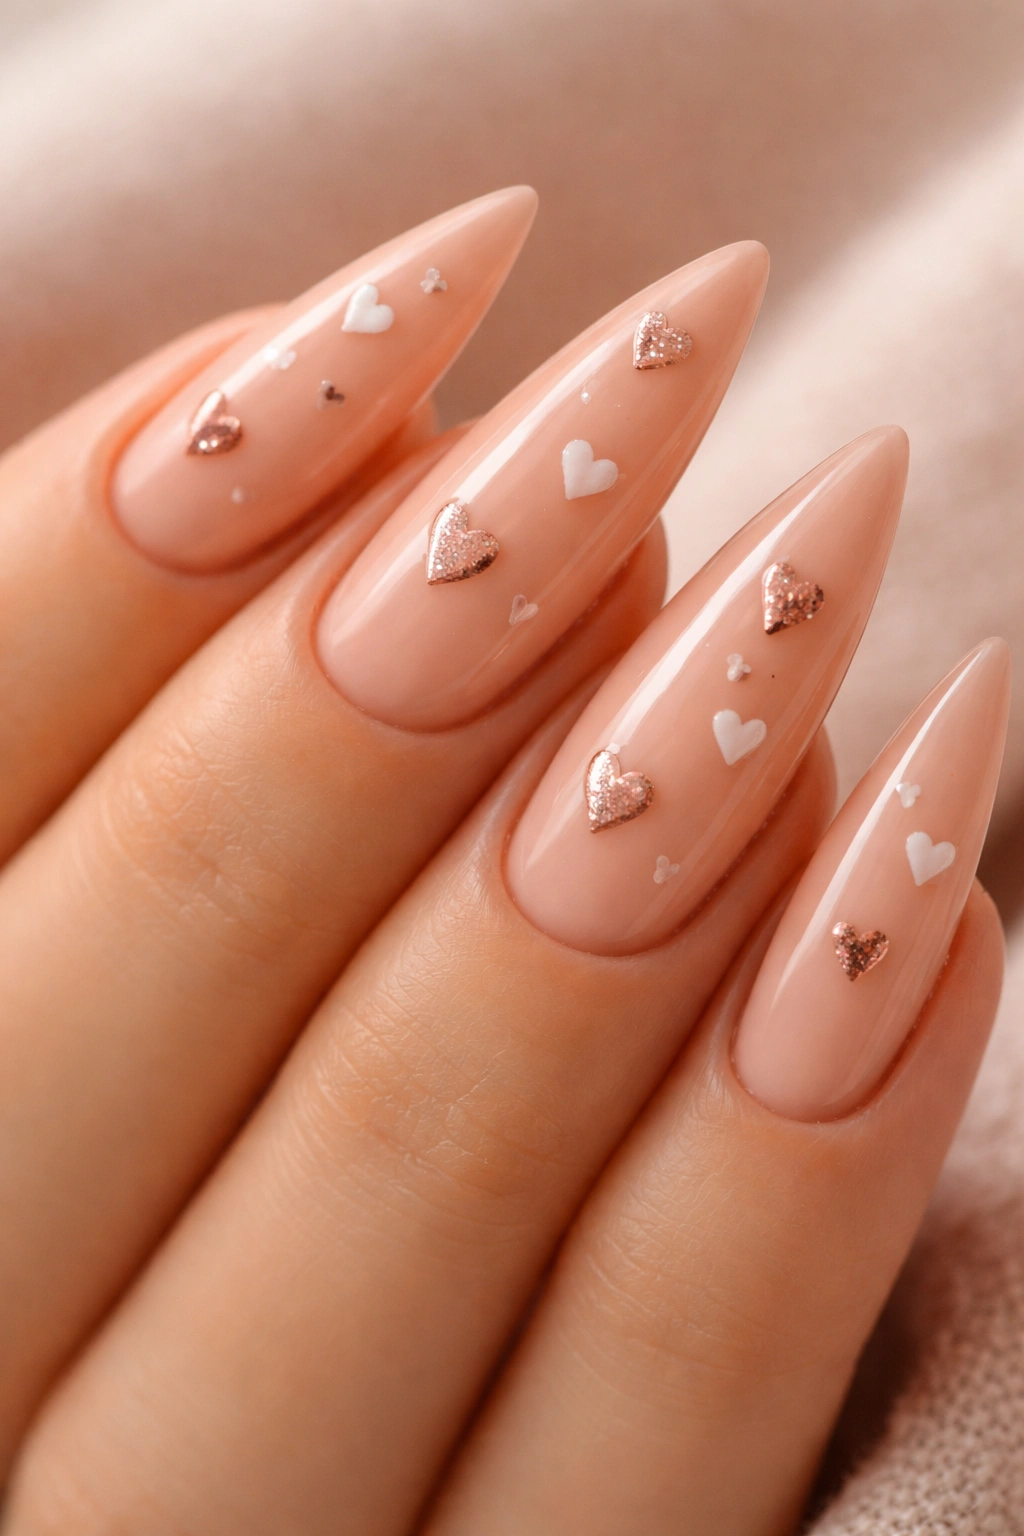
19. Peachy Nude With Heart Details
Use a warm, flattering peachy-nude base, then add tiny heart details—either hand-painted or adhesive accents—in white, rose gold, or deeper coral. Hearts are quintessentially romantic and coquette. Peachy-nude is warm, flattering, and subtly romantic—a perfect canvas for heart detailing.
Peachy-Nude Base
Choose a peachy-nude that feels warm and flattering against your skin tone. This shade should feel like a natural extension of your hand, not stark or ashy. Apply 2-3 thin layers for opaque, smooth coverage. The warmth of peachy-nude complements most undertones and pairs beautifully with delicate heart accents.
Heart Application
Paint tiny hearts using a thin brush, or use adhesive heart decals and stickers. Vary the size of hearts from tiny seeds to small seed pearls for visual interest. Scatter hearts across multiple nails in balanced arrangements, or concentrate them on the accent nail as a focal point. Hearts near the tips, along the edges, or at the cuticle all create different visual effects.
Variation: Create a gradient of heart density—many hearts near the tips, fewer toward the cuticles—for a flowing, intentional design. Or create one large, prominent heart on the accent nail with smaller hearts scattered on other nails.
20. Metallic Rose Gold Drip
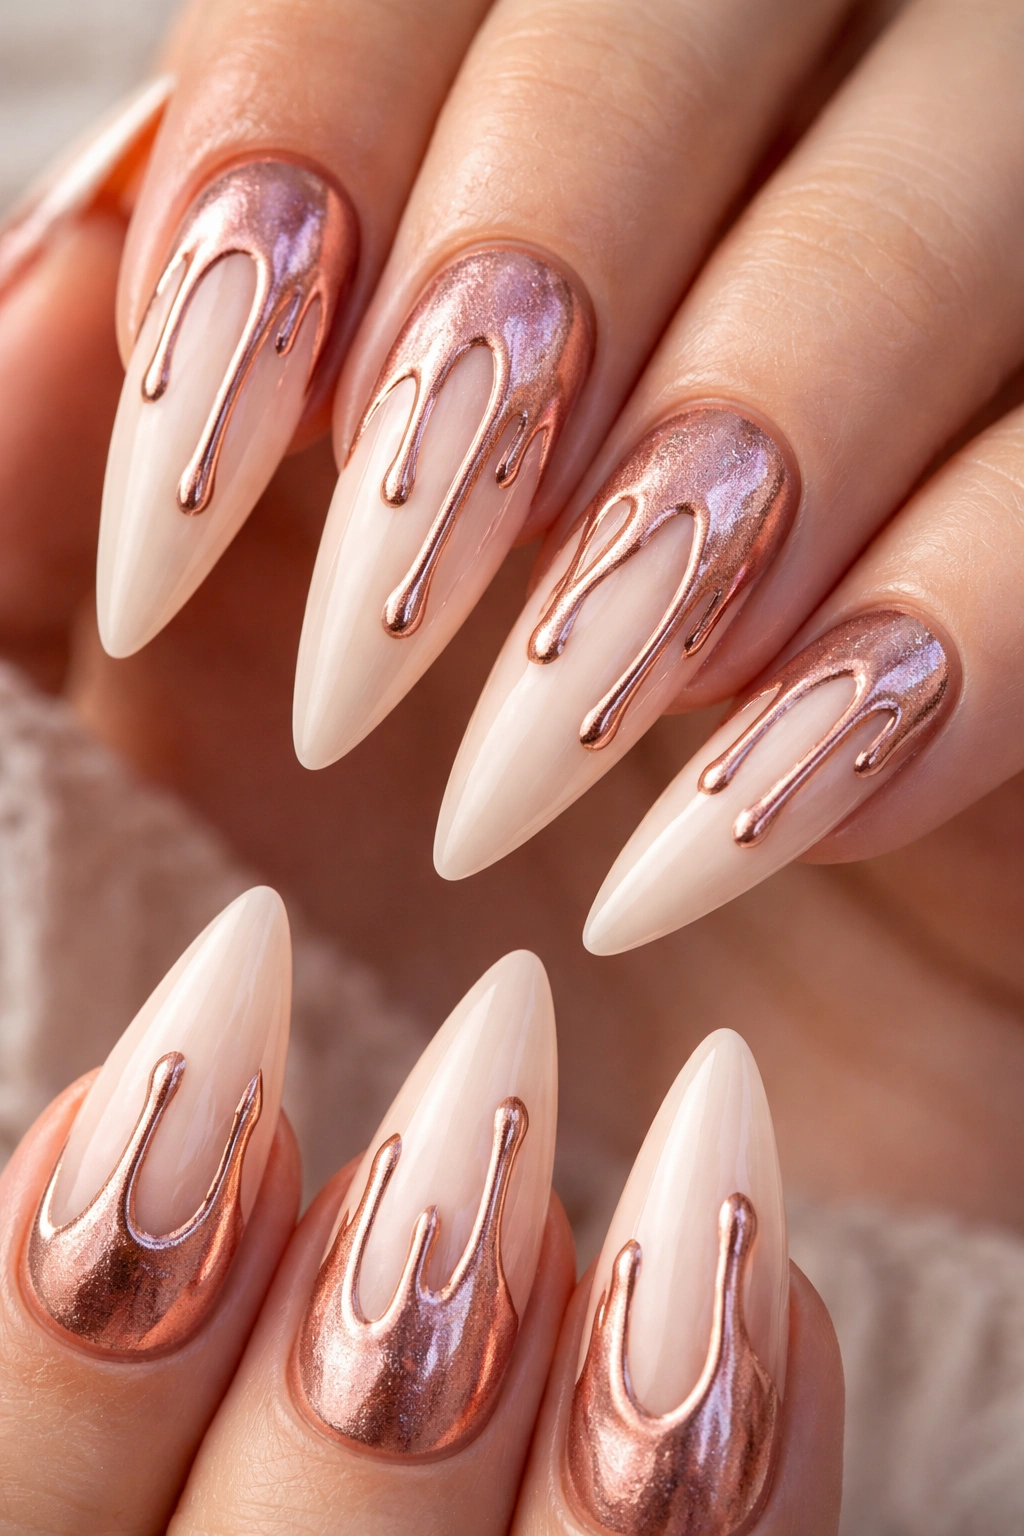
Create the illusion of rose gold paint dripping from the tip of the nail downward, using metallic rose gold polish against a contrasting base like ivory, soft pink, or pale champagne. Drip designs feel artistic, modern, and playful—a sophisticated take on the drip aesthetic.
Drip Technique
Apply a solid base color, allowing it to fully cure. Using rose gold metallic polish and a thin brush, create downward-flowing lines from the tip that taper as they move toward the nail bed. Create multiple drips of varying lengths, spacing them evenly across the nail width. The drips should appear organic and slightly irregular rather than perfectly symmetrical—this makes the design feel more artistic and intentional.
Metallic Polish Selection
Choose a rose gold polish with genuine metallic shimmer rather than flat metallic finish. High-quality rose gold catches light beautifully and creates the illusion of genuine liquid dripping. Apply thin layers to prevent the metallic from appearing muddy or heavy.
Design Variations
Create a subtle version with just 2-3 delicate drips per nail, or a more dramatic version with densely clustered drips. You can also create a reverse drip design with the metallic drips appearing to flow upward from the base toward the tip. Each variation creates a different mood while maintaining the playful, artistic coquette aesthetic.
Pro tip: This design works beautifully on shorter stiletto nails or longer ultra-stilettos—the elongated shape of a stiletto naturally complements the downward-flowing lines of the drip design.
Final Thoughts
The versatility of coquette stiletto nails is what makes this aesthetic so compelling. Whether you prefer minimalist elegance, romantic detail work, or glamorous embellishment, there’s a design that captures your personal take on femininity and style. The common thread connecting these twenty ideas is intentionality—each design celebrates delicate details, soft color palettes, and refined touches that signal thoughtful self-expression.
The beauty of creating coquette stiletto nails is that you don’t need to choose just one design. Rotate through different styles based on your mood, occasion, or season. A minimalist bow-accented nude is perfect for Tuesday morning meetings, while pearls and crystals are ideal for Friday night celebrations. Mix and match elements across designs—add bows to different backgrounds, apply pearls to various base colors, or layer elements to create something uniquely yours. This flexibility means your coquette nail aesthetic will never feel stale or repetitive.
Remember that the most important element of any manicure is confidence. Wear your coquette stiletto nails with the knowledge that you’ve chosen a design that reflects your personality, celebrates feminine beauty, and demonstrates thoughtful attention to detail. Whether you’re creating these designs yourself at home or trusting a skilled nail technician with your vision, the result should make you feel polished, beautiful, and authentically yourself. The coquette aesthetic is about celebrating femininity without apology, and your nails are the perfect canvas for that celebration.
