

Stiletto nails are the ultimate canvas for bold, artistic design — and when you combine that dramatic shape with butterfly motifs, you get something truly stunning. Butterflies represent transformation, beauty, and freedom, making them a perfect symbol to showcase on elongated nails that already command attention.
The appeal of butterfly stiletto nails goes beyond simple aesthetics. Butterflies can be rendered in countless ways — from delicate and minimalist to bold and colorful, from realistic with detailed wings to abstract geometric interpretations. On stiletto nails specifically, the elongated surface area gives you more space to create intricate designs without them feeling cramped. The sharp pointed tip naturally draws the eye, making it an ideal focal point for a butterfly’s body or the center of a wing pattern.
Whether you’re drawn to nature-inspired nail art or you want something that makes a statement at events, there’s a butterfly stiletto nail design for every style and skill level. Below are ten distinctive approaches to bringing butterfly designs to life on stiletto nails — each offering different color palettes, techniques, and levels of complexity. Some focus on realistic detail, others embrace bold, abstract interpretations, and a few blend butterflies with other trendy elements like ombre gradients and metallic accents. Let’s explore the possibilities.
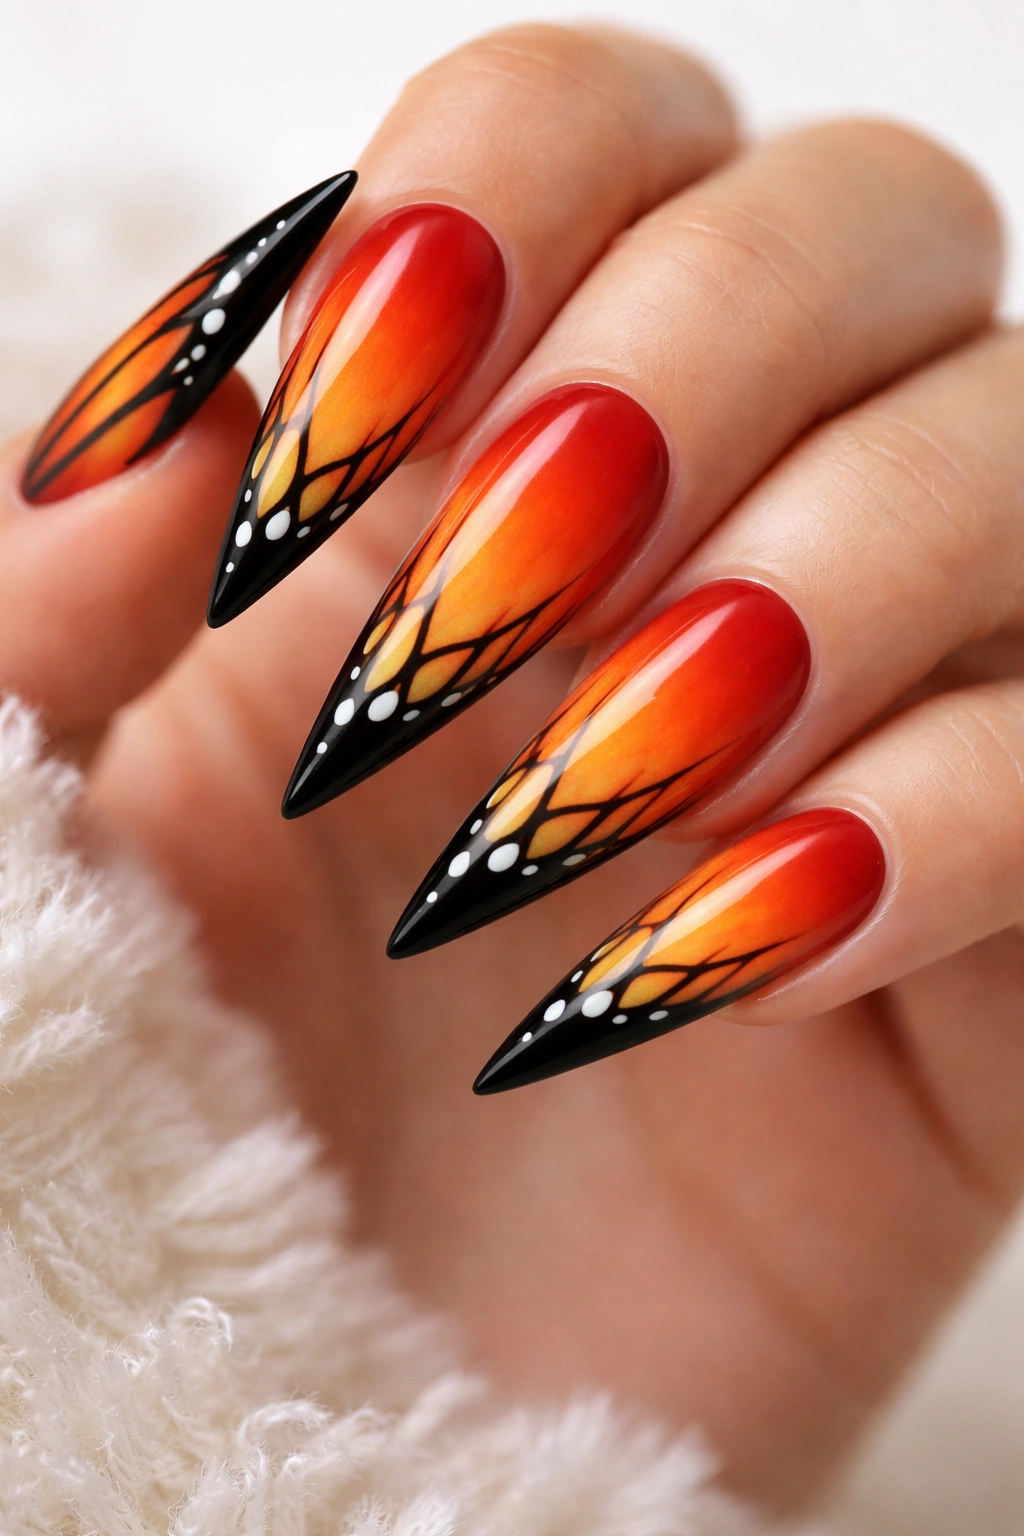
1. Classic Monarch Wing Gradient
The monarch butterfly is iconic for its bold orange and black coloring, and this design translates beautifully onto stiletto nails through a gradient technique. The base of each nail features a deep orange or burnt sienna shade that gradually transitions to a brighter tangerine or warm peachy tone toward the tip, mimicking the natural gradient of a monarch’s wings.
Why This Design Works So Well
Monarch wings are instantly recognizable, which means this design reads as a butterfly immediately — there’s no ambiguity. The warm orange tones photograph beautifully and complement a wide range of skin tones. The gradient technique is forgiving because slight color variations actually enhance the natural look of real butterfly wings, which don’t have perfectly uniform color distribution across the surface.
Execution Steps and Tips
- Apply a base coat, then use a sponge to dab the darkest shade (black or deep brown) only on the tips of the nails — this creates the bordered effect monarch wings naturally have
- Sponge the bright orange in the middle section, then blend with a slightly lighter orange toward the cuticle
- Once dry, use a thin brush to paint black lines across the nail in a slight wave pattern — these represent the veins in the monarch’s wings
- Add white dots along the edges with a dotting tool to create the signature white spots monarchs have
- Seal with a glossy topcoat for shine that mimics the natural iridescence of real butterfly wings
Pro tip: The key to a convincing monarch gradient is keeping the transition smooth. If the color change looks too harsh, use a clean damp sponge to gently blend the seams between shades before the polish fully sets.
2. Crystallized Butterfly with Gems and Rhinestones
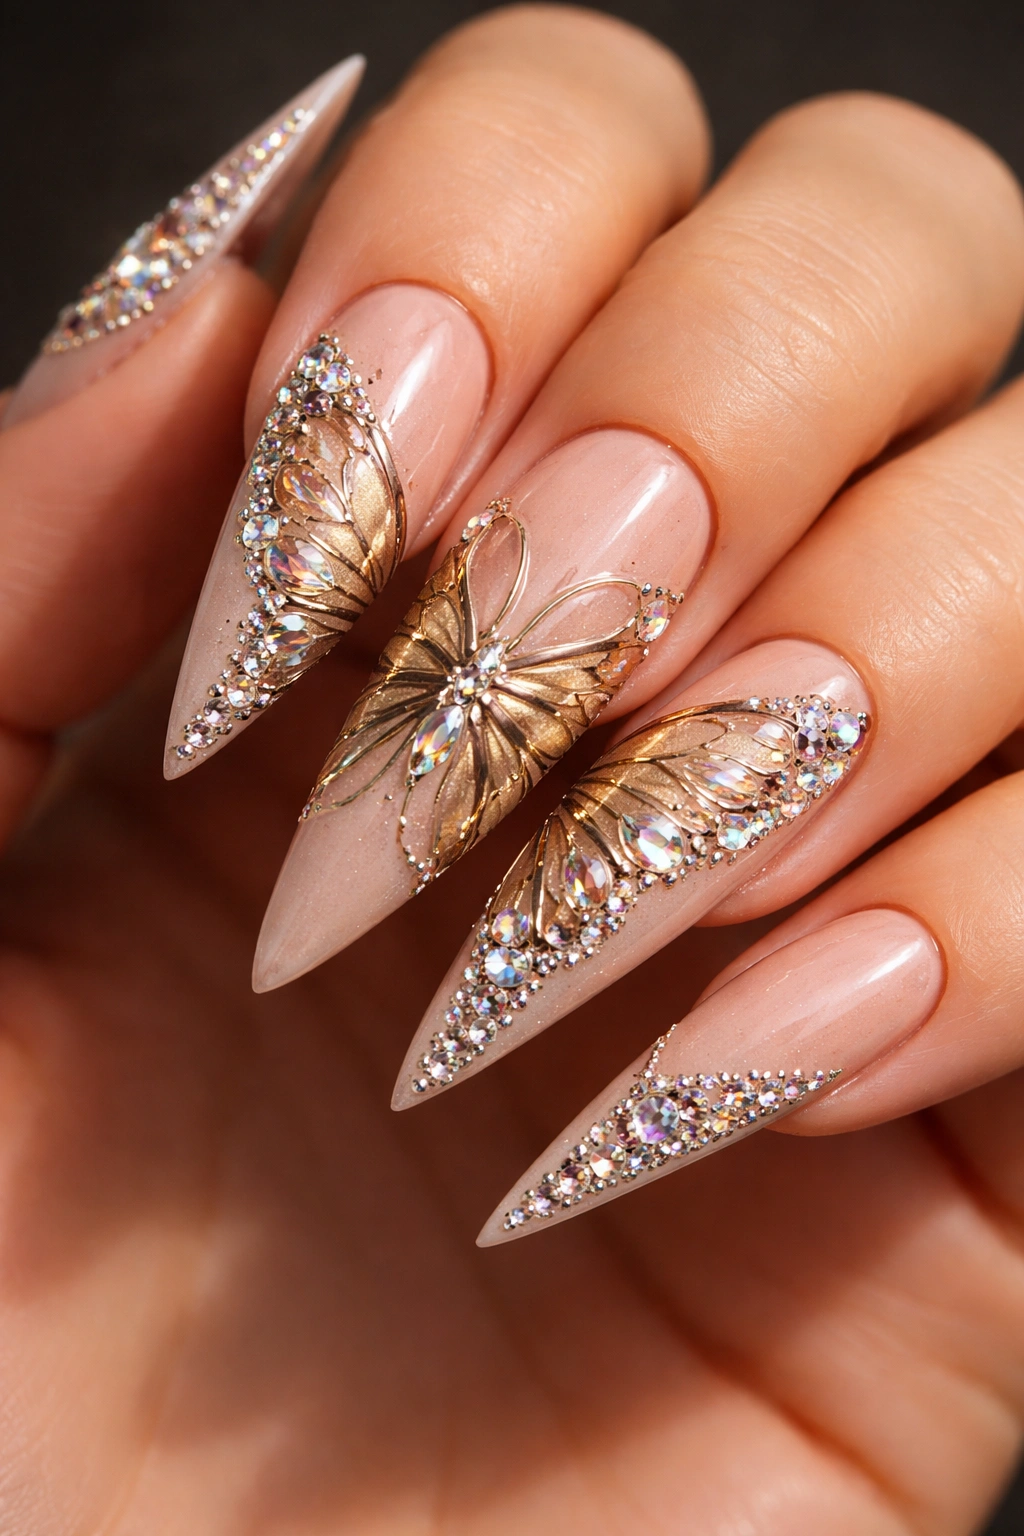
This design elevates butterfly nail art into luxury territory by combining hand-painted butterfly silhouettes with strategically placed crystals and gemstones. The butterfly itself is typically painted in metallic gold or silver on a neutral or dark background, with tiny crystals embedded along the edges of the wings and clustered around the butterfly’s body.
The Luxury Touch That Transforms the Look
Rhinestones and gems immediately make nails feel more special and occasion-ready. They catch light from every angle, creating dimension that a flat design simply can’t achieve. The crystallized effect also works beautifully on stiletto tips because the sharp point becomes a natural gathering place for smaller gems, drawing focus to that highlighted area.
How to Achieve This Design
- Paint a base color — nude, black, champagne, or deep burgundy all work beautifully as backgrounds for this design
- Using a thin brush and metallic polish, paint a large butterfly silhouette centered on the nail, with the wings spread wide
- Before the polish dries completely, use a crystal picker or tweezers to place small rhinestones along the wing edges
- Add a cluster of slightly larger crystals around where the butterfly’s body would be, and scatter a few larger gems down the center of the nail or at the very tip
- Apply a clear topcoat to seal everything in place, ensuring gems are fully secured
Worth knowing: Choose gems in colors that complement your base — gold or amber crystals on warm tones, clear or silver crystals on cool tones. The butterfly doesn’t need to be detailed; a simple outline works beautifully when gems provide the visual interest.
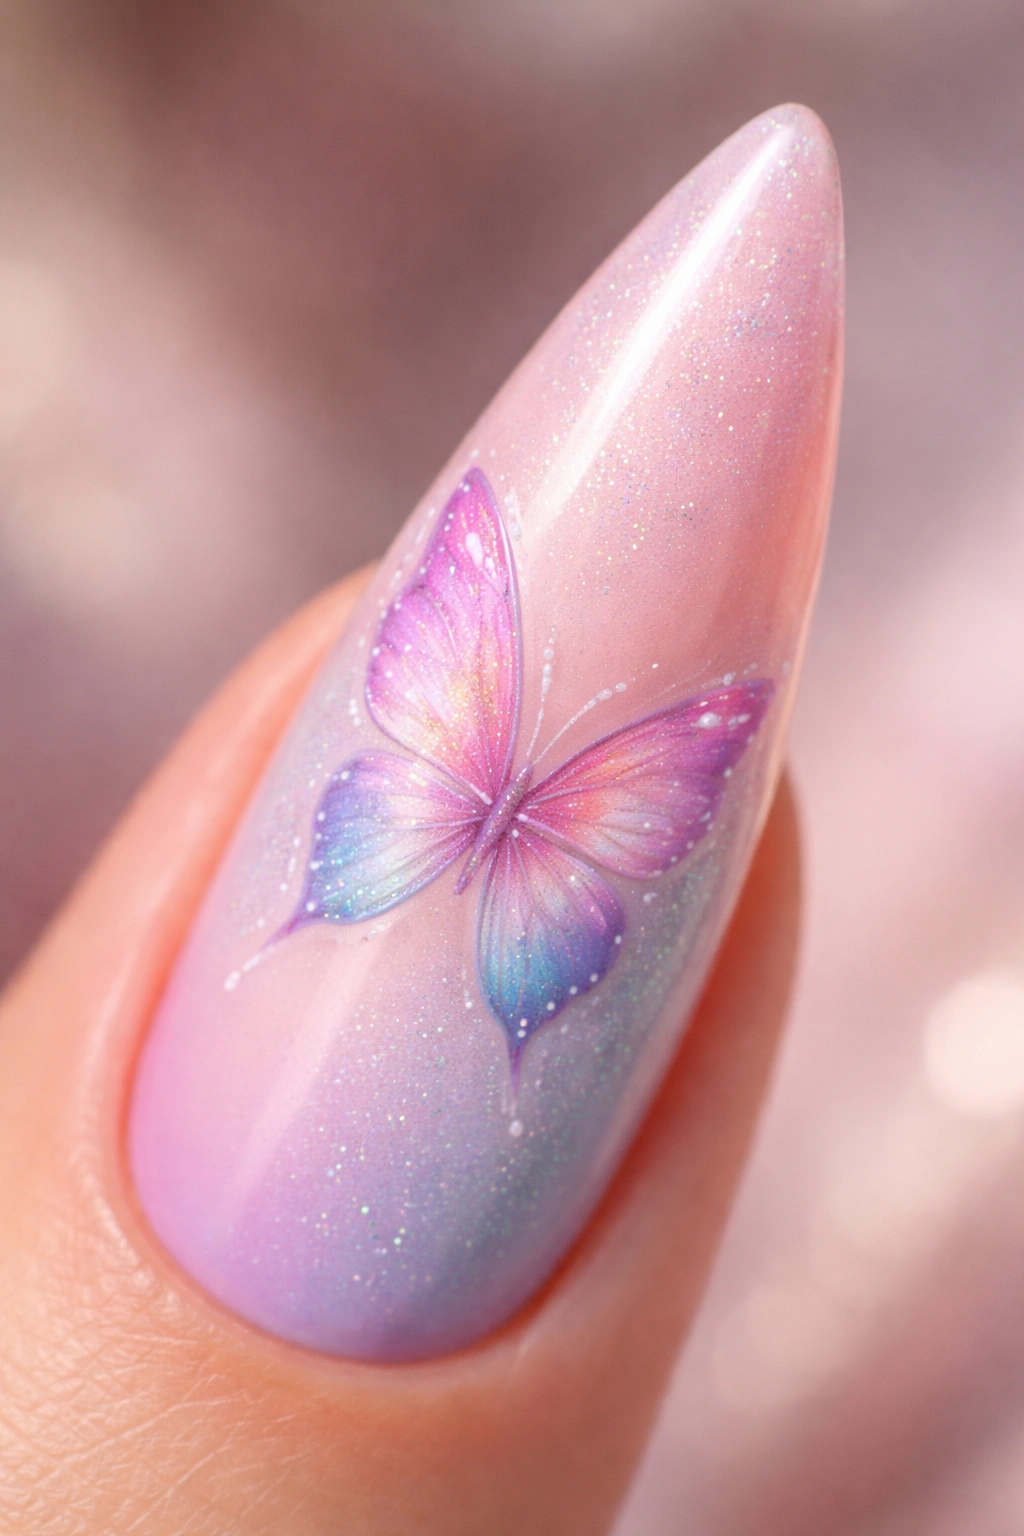
3. Watercolor Butterfly with Soft Blended Colors
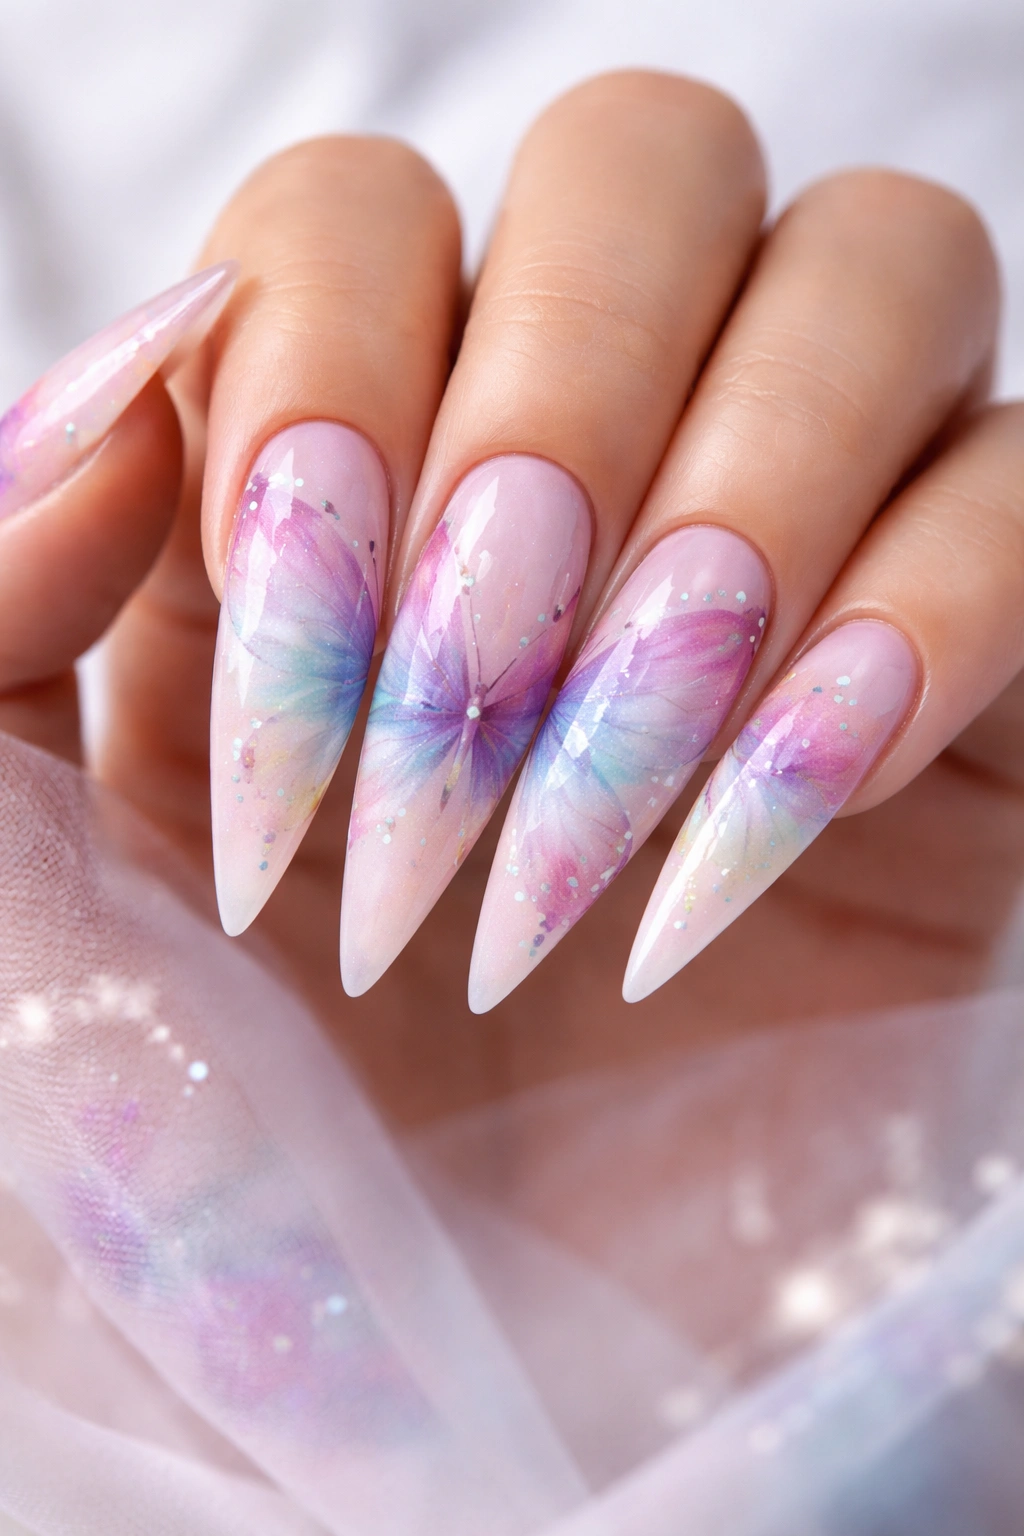
Watercolor nail art mimics the soft, diffused aesthetic of actual watercolor paintings, and butterflies are a perfect subject for this technique. Soft blues, purples, pinks, and greens blend into one another across the nail, creating a dreamy butterfly shape without harsh lines or defined edges.
The Appeal of Soft, Blended Aesthetics
Watercolor designs feel artistic and sophisticated without being overly technical. They work on stiletto nails because the elongated shape gives you enough surface area to create nuanced color blending. The soft aesthetic also feels less formal than detailed designs, making it versatile for everyday wear or special occasions depending on your color choices.
Creating the Watercolor Effect
- Start with a white or very pale base coat — watercolor designs need a light background to show their true colors
- Using watercolor nail polish or thinned regular polish with a drop of nail thinner, apply loose brushstrokes in your chosen colors (perhaps soft pink at the top, lavender in the middle, and pale blue-green at the bottom)
- While the colors are still wet, use a slightly damp brush to blend where colors meet, creating soft gradual transitions
- Paint a simple butterfly outline in a darker shade once the base watercolor is fully dry — keep the outline minimal, allowing the blended colors to do most of the visual work
- Add fine details like antennae and wing veins with a very thin brush
Insider note: The secret to convincing watercolor nails is working with thin polish. If you’re using regular polish, add one small drop of nail thinner to make it more workable. Regular polish is thicker than actual watercolor and won’t blend as smoothly without thinning.
4. Black and White Negative Space Butterfly
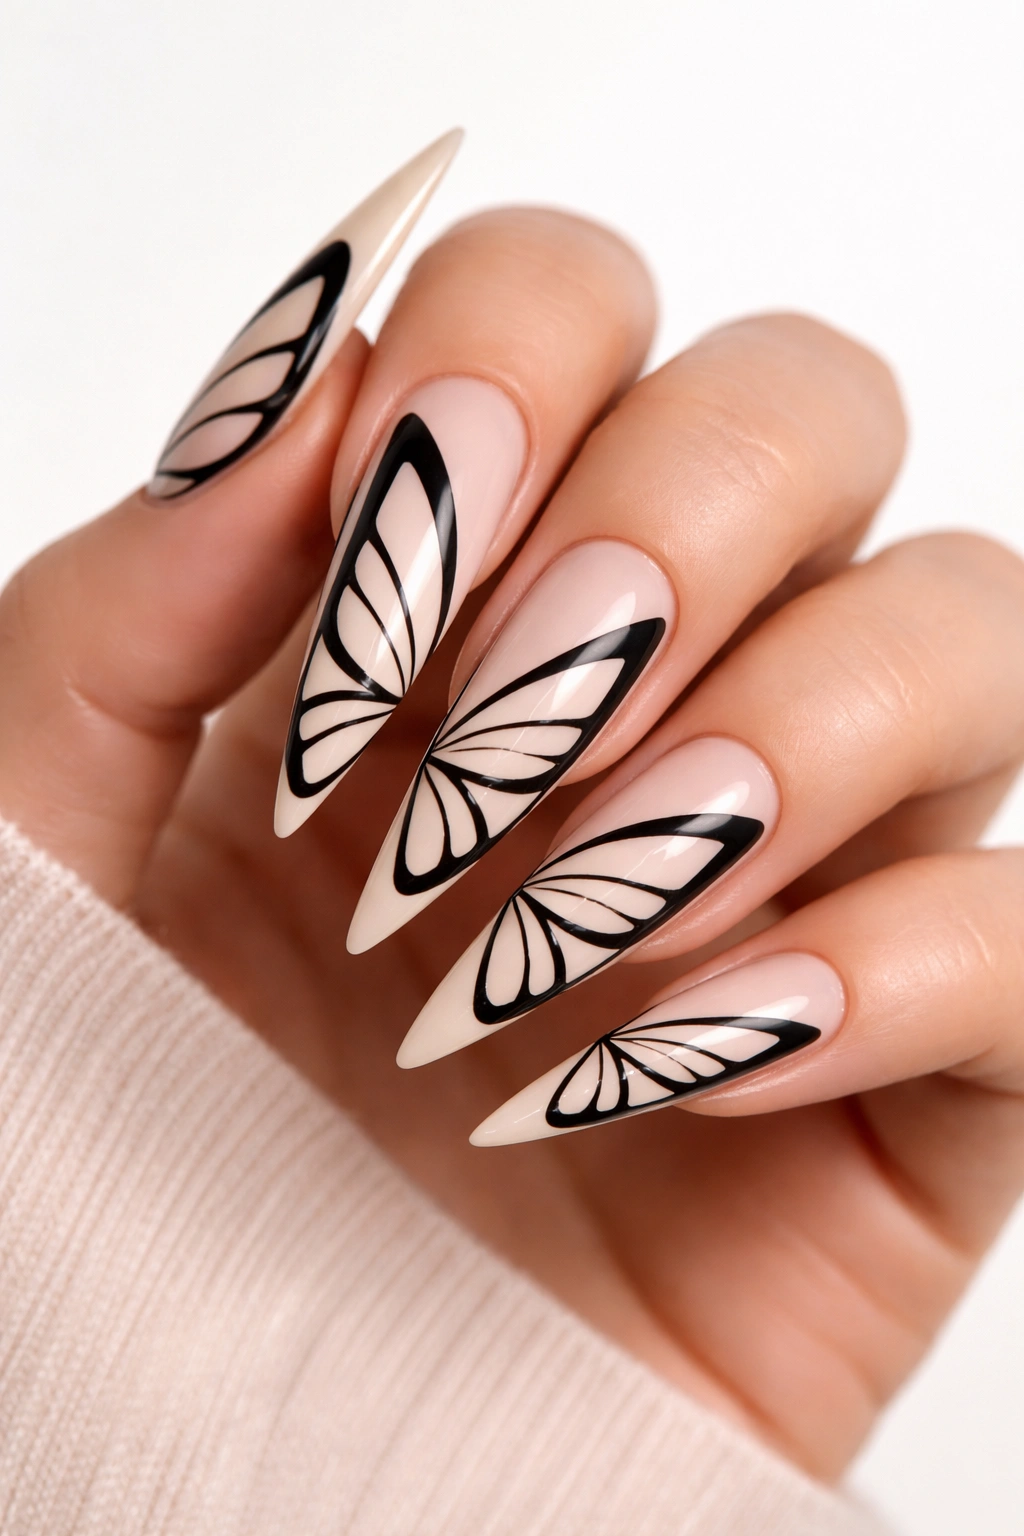
This design uses the nail’s natural color (or a nude base) as part of the artwork, with black polish creating a bold butterfly outline and leaving significant negative space inside the wings. This modern, minimalist approach is surprisingly striking and works beautifully on stiletto nails because the shape naturally supports clean lines.
Why Negative Space Works on Stilettos
The pointed tip and elongated shape of stiletto nails create strong visual lines. A negative space design emphasizes these natural lines rather than fighting against them. The technique also requires less polish application, making it more practical for anyone concerned about weight or thickness on their nails.
Painting Negative Space Butterflies
- Apply a base coat and either keep the natural nail color or apply a nude, pale pink, or soft beige base
- Using a very thin brush and black gel or regular polish, draw a butterfly outline — make the lines clean and confident, not shaky
- Create wing details with thin black lines: veins, segment divisions, or scalloped patterns along the edges
- Leave the interior of the wings mostly empty, showing the base color or nail underneath
- Add a small black circle or oval for the butterfly’s body
- Consider adding fine antennae that extend up toward the tip for extra elegance
Pro tip: Use a thin liner brush designed for nail art — these have much better control than regular brushes. Test your line thickness on a practice wheel or nail swatch first to make sure your black lines are the width you want before committing to your actual nails.
5. Ombre Butterfly with Gradient Wings

This design features a full gradient background (perhaps transitioning from deep purple at the base through pink to pale peach at the tip) with a butterfly silhouette painted in a contrasting color that stands out against the ombre. The butterfly itself often features internal gradient or shading to add dimension.
Creating Depth Through Layered Gradients
An ombre background plus a detailed butterfly creates sophisticated visual depth. The stiletto shape is ideal for ombre techniques because you can create a really dramatic color shift from base to tip across the elongated surface. The butterfly silhouette then reads clearly against this colorful background.
The Technique Broken Down
- Create your ombre base using either the sponge method (dabbing colors onto a sponge and pressing gently onto the nail to blend) or the direct sponging method (applying polish directly to a sponge and dabbing it onto the nail)
- Use complementary colors for the strongest impact — purple to pink, blue to purple, coral to orange, or even a complete rainbow gradient
- Once the ombre is completely dry, paint a large butterfly silhouette in a contrasting shade (white, gold, black, or a dark shade of a different hue)
- Add shading or gradient within the butterfly itself using a slightly lighter or darker version of the silhouette color
- Include fine details like wing patterns, antennae, and body segments in a complementary accent color
Worth knowing: The ombre base will be thick from the sponging process. Allow extra drying time before painting the butterfly on top, or the layers may drag and blend together in unwanted ways.
6. Tropical Butterfly with Layered Wing Patterns

Inspired by tropical butterfly species like swallowtails and morphos, this design features butterflies with intricately patterned wings — stripes, dots, scallops, and color blocking that mimic the complex wing patterns of real tropical species. Each wing section can feature a different pattern or color combination.
The Visual Impact of Intricate Patterning
Tropical butterflies are nature’s way of showcasing complex geometry. Translating those patterns onto stiletto nails requires a bit more precision, but the payoff is a design that feels artistic and collected. The layered patterns create visual interest that keeps the eye moving across the nail.
Building the Tropical Design
- Paint a base color — perhaps a warm coral, turquoise, or warm cream — that will complement your butterfly colors
- Divide your nail mentally into sections for the butterfly’s wings (you might imagine a butterfly shape split into four quadrants)
- In one wing section, paint diagonal stripes in two contrasting colors (perhaps teal and gold)
- In another section, create a geometric pattern using dots or small triangles in a different color combination (maybe hot pink and purple)
- Fill the remaining sections with color blocking (solid blocks of contrasting colors) or scalloped patterns painted in fine lines
- Paint the butterfly’s body down the center and add antennae
- Create a thin dark outline around the butterfly to make it pop against the patterned background
Insider note: Start by lightly sketching your butterfly outline with a pencil on the nail (it wipes off completely) so you have guides for where to place each section’s pattern.
7. Holographic Butterfly with Iridescent Chrome
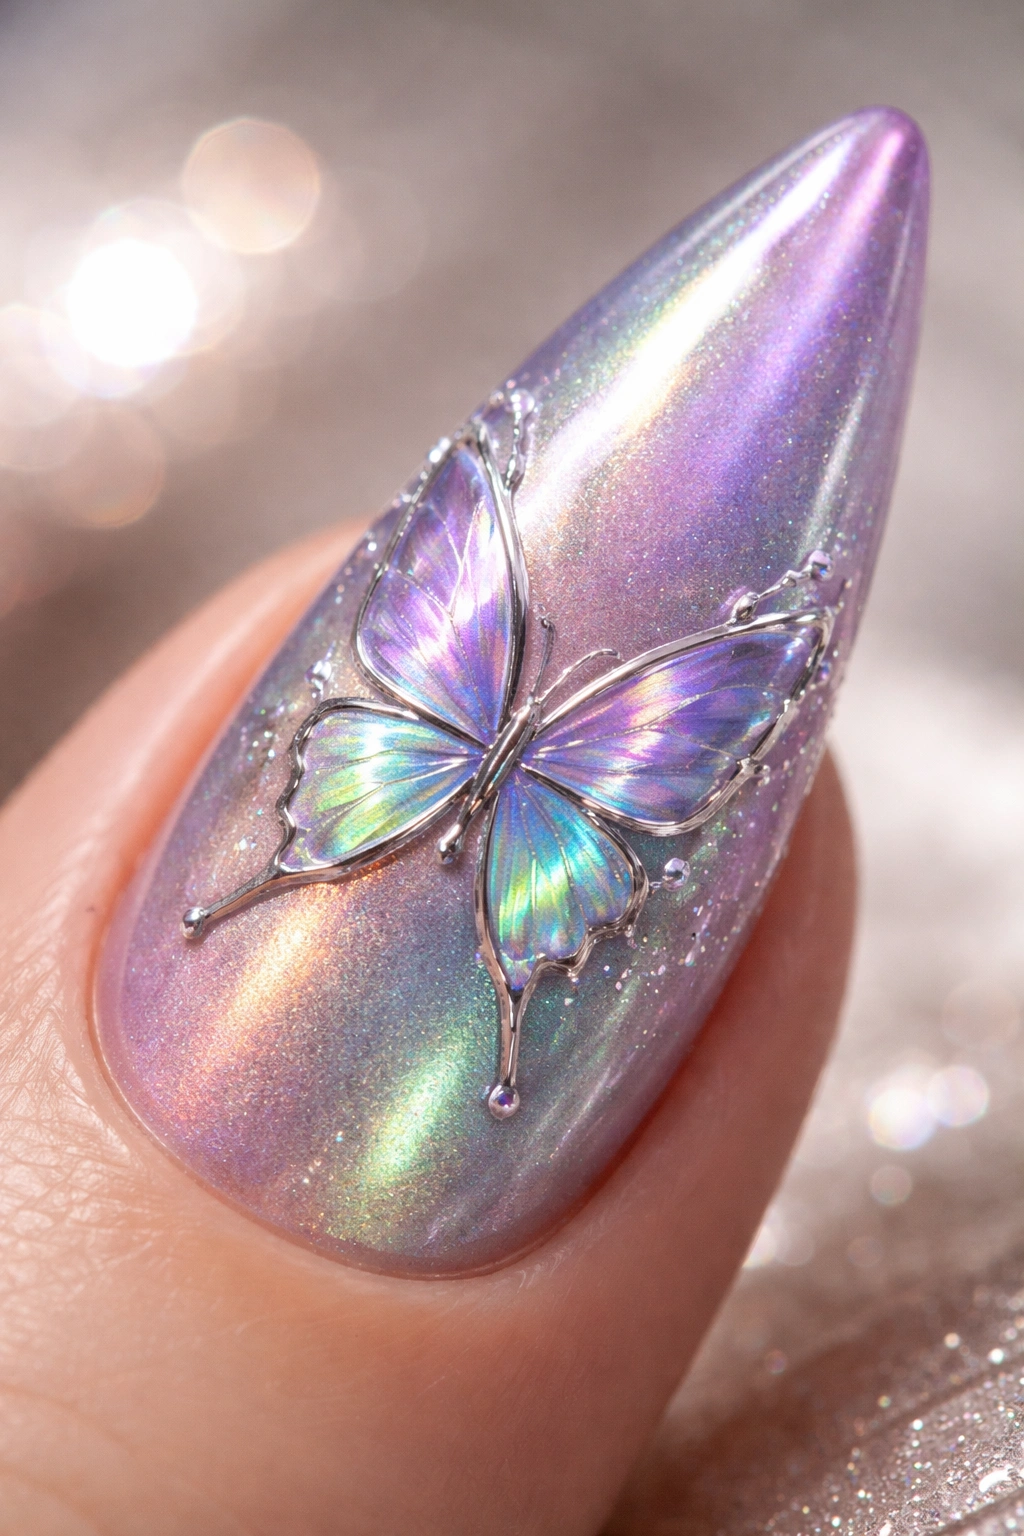
This futuristic take on butterfly nails uses holographic polish and chrome powder to create a butterfly that shifts color depending on the light and angle. The butterfly appears to shimmer and change — perhaps purple-to-green-to-pink — creating a dynamic, multi-dimensional effect that’s impossible to capture in a single photo.
The Wow Factor of Shifting Colors
Iridescent and holographic effects are inherently attention-grabbing because they move and change as you move. On stiletto nails, this creates an especially dramatic effect because every gesture and hand movement makes the butterfly seem to shift and dance.
Achieving the Holographic Effect
- Paint a smooth base coat (preferably a light shade like nude, white, or pale pink) as a foundation
- Apply a holographic polish over the entire nail, or use a sponging technique to apply it in a butterfly silhouette shape over a contrasting base color
- Once the holographic layer is completely dry, apply a very thin topcoat
- Optional: use chrome powder on select parts of the design (along the wing edges or the tip) for an extra shimmer boost — apply powder while a thin layer of gel or tacky topcoat is still wet, then seal it
- Use a glossy topcoat to protect the holographic finish and maintain its shift effect
Pro tip: Holographic polishes show their best effect in natural light. If most of your time is spent indoors under artificial lighting, the effect won’t be as dramatic, but it will still add beautiful shimmer and dimension.
8. Gold Foil Butterfly with Glitter Accents
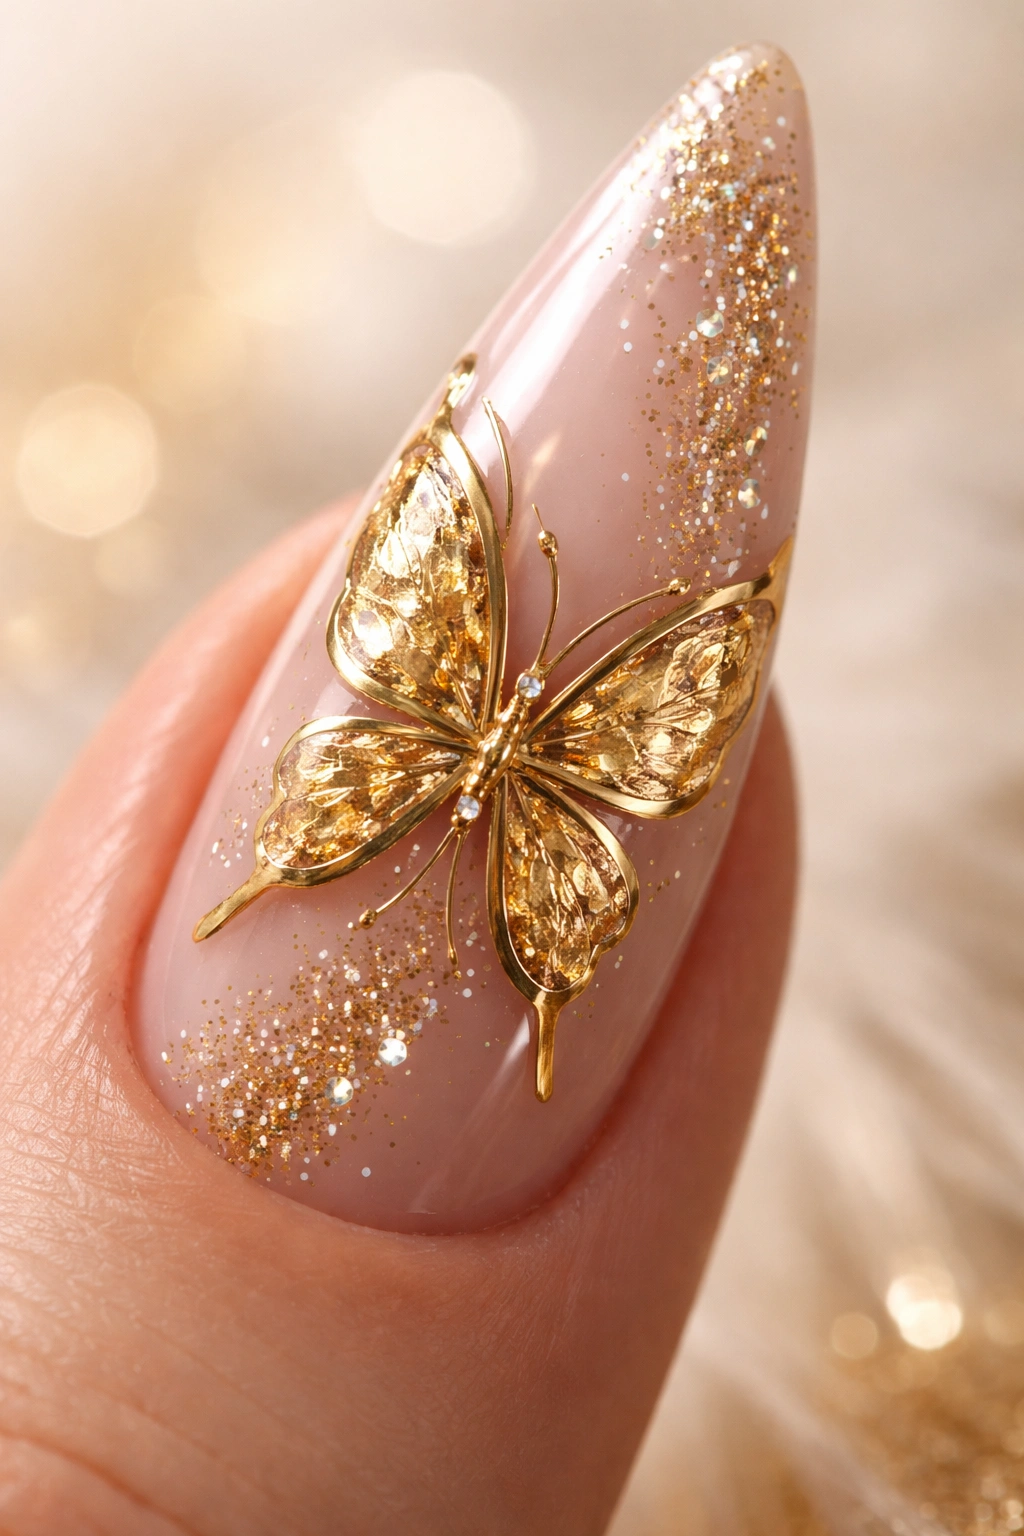
This design combines metallic gold foil embedded in the nail polish with scattered glitter, creating a luxe, celebratory aesthetic. The butterfly is typically outlined or filled with gold foil, and glitter particles cluster around it or form a trail effect flowing from the wings.
Elegance Through Metallic Textures
Gold foil and glitter create immediate visual richness. The combination feels upscale and festive without being over-the-top when executed with restraint. Stiletto nails are the perfect shape to showcase these premium materials because the pointed shape becomes a natural focal point for the sparkling details.
Applying Foil and Glitter Correctly
- Paint a base color — nude, blush, pale pink, or champagne work beautifully with gold, or go bold with emerald green, sapphire blue, or burgundy
- Paint your butterfly outline or silhouette using a regular base polish
- Cut a small piece of gold foil (special nail foil designed for nails works best) and place it carefully on the wet butterfly section
- Gently press down with a slightly damp brush or tool, then carefully peel away the foil backing — the metallic layer will stay adhered to the polish
- While the base is still slightly tacky, sprinkle fine glitter or micro-glitter around the butterfly or in a decorative trail pattern
- Add a layer of topcoat to seal everything and prevent glitter fallout
Worth knowing: Use topcoat designed to work with glitter — regular topcoat can sometimes cause glitter to shift. If glitter placement matters for your design, use a thick, viscous topcoat that sets quickly to lock pieces in place.
9. Minimalist Line-Art Butterfly
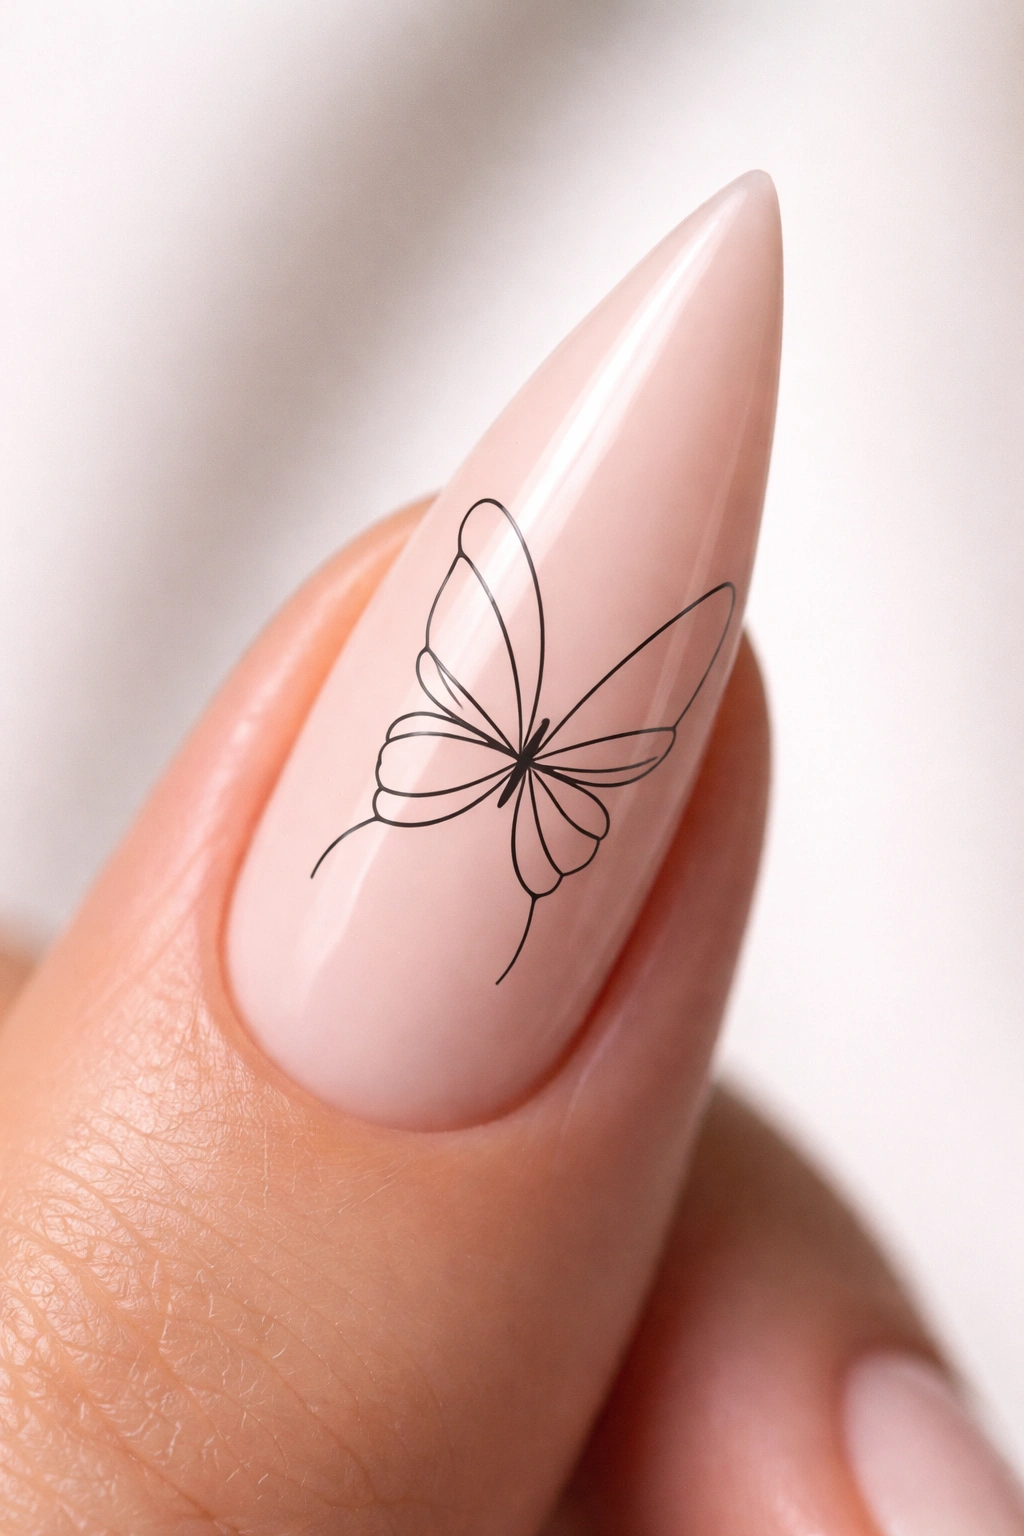
This sophisticated design uses a single continuous line or simple outline to create a butterfly shape, executed in a thin, precise manner. The line might be in black, dark navy, deep plum, or metallic gold — the simplicity is the entire point. The rest of the nail remains clean and uncluttered.
Less Is More: The Power of Simplicity
A single-line butterfly design reads as artistic and intentional rather than rushed or unfinished. On stiletto nails, this minimalist approach creates elegance through restraint. It’s also quick to execute and easy to maintain, making it practical for anyone who loves nail art but doesn’t want high-maintenance designs.
Creating Clean Minimalist Lines
- Apply a base color or keep the natural nail if you prefer — any neutral shade works beautifully with a minimalist design
- Using a very fine brush (a liner brush or even a nail art pen), draw a butterfly outline in one continuous flowing line, or use several clean lines to create the silhouette
- Keep the design positioned off-center or centered depending on your preference — an off-center placement can feel more sophisticated and artistic
- Add thin antennae extending from the butterfly’s head
- Consider adding a tiny dot or small curve inside the wings as a single detail element
- Seal with a matte or glossy topcoat depending on the vibe you want (matte feels more editorial and artistic; glossy feels more polished and finished)
Insider note: The fewer elements in a design, the more important precision becomes. A wobbly line in a detailed design gets lost in the visual complexity, but a wobbly line in a minimalist design is immediately noticeable. Practice your line on a nail wheel first, or use a nail pen with a steady tip.
10. Gradient Ombre Butterfly with Shimmer
This final design combines soft gradient foundations with a butterfly that features internal gradient and shimmer, creating a cohesive, harmonious look where the butterfly blends seamlessly into the ombre background. Shimmer topcoats or sparkly polishes add subtle glitter throughout without being costume-like.
Harmony Through Coordinated Gradients
When the butterfly’s gradient coordinates with or mirrors the nail’s background gradient, the overall effect feels intentional and sophisticated. The butterfly reads clearly because of its distinct shape, but the coordinated colors create a unified, gallery-quality appearance.
Building This Layered Gradient
- Create a smooth ombre base using your chosen color gradient — perhaps soft pink to peach to warm yellow, or light purple to lavender to pale pink
- Once the ombre is completely dry, paint a butterfly silhouette using a slightly darker or more saturated version of one of your ombre colors
- Within the butterfly, create a subtle internal gradient by blending a slightly different shade within the wings
- Add a shimmer or sparkle topcoat that contains fine glitter particles — this should be applied over the entire nail, adding a unified sparkly effect
- Use a thin brush to add minimal details like antennae or wing vein patterns in a complementary shade
- Seal with a clear glossy topcoat to protect and enhance shine
Pro tip: If your shimmer topcoat is too glittery or opaque, apply it only to certain areas — perhaps concentrating sparkle at the tip or around the butterfly — for a more understated effect.
Final Thoughts
Butterfly stiletto nail designs offer remarkable versatility. Whether you’re drawn to realistic monarch wings, abstract watercolor aesthetics, luxurious rhinestone embellishments, or bold minimalist lines, there’s an approach that matches your style and skill level.
The key to nailing any of these designs is choosing colors and techniques that feel authentic to you. These aren’t designs you need to copy exactly — think of them as jumping-off points. A tropical butterfly doesn’t have to feature those specific colors; it can be rendered in navy and gold, or emerald and copper, or any palette that speaks to you.
Remember that stiletto nails are already a statement shape. You don’t need an overly complicated design to create impact. Sometimes the most striking butterfly nails are the simplest ones — a clean line-art butterfly on a neutral base, or a monochromatic monarch gradient with minimal additional detail. Let the shape of your nails work for you, and let your chosen design enhance rather than fight against that natural elegance.
