

Burgundy stiletto nails represent the perfect intersection of elegance and drama—a nail style that commands attention without ever feeling overdone. When you add rhinestones to this already striking combination, you unlock a world of possibilities that ranges from understated luxury to full-blown glamour. The deep, wine-toned burgundy base acts as an ideal canvas for rhinestone embellishments, allowing these sparkly accents to catch light and create dimension that transforms an already gorgeous manicure into something truly memorable.
What makes burgundy such a versatile choice for stiletto nails is its sophisticated neutrality. Unlike bright reds that can feel costume-like or pale pinks that read more casual, burgundy sits in that luxurious sweet spot where it works for evening events, professional settings, casual outings, and everything in between. The addition of rhinestones elevates the entire look, signaling that you’ve put thought and intention into your appearance. These nail designs aren’t just decorative—they’re a statement about who you are and what you value aesthetically.
Stiletto nails themselves have made a major comeback in recent years, becoming a symbol of confidence and bold self-expression. The elongated, pointed shape commands space and draws the eye, making them the ideal foundation for intricate nail art. Pair that shape with the richness of burgundy and the sparkle of strategically placed rhinestones, and you’ve got nail designs that are impossible to ignore. Whether you’re drawn to subtle elegance or maximalist glam, there’s a burgundy stiletto rhinestone design waiting to become your signature look.
Why Burgundy Stiletto Nails Are Timeless
Burgundy has been a staple in fashion and beauty for decades, and there’s a good reason—it’s flattering on virtually every skin tone and works across every season. Unlike trend-dependent colors that feel dated within a year or two, burgundy maintains its relevance and prestige year after year. This is the color of luxury wines, silk evening gowns, and classic velvet—it carries inherent sophistication just in its name.
When you apply burgundy to stiletto nails, you’re instantly elevating your grooming game. The elongated shape naturally commands attention, and the deep color ensures that attention feels intentional and polished rather than accidental. Burgundy stiletto nails photograph beautifully, which has made them a favorite among people who care about their visual presence on social media and in professional contexts alike.
The psychology of burgundy also plays a role in its enduring appeal. This color communicates confidence, luxury, and refinement. It’s bold enough to feel contemporary but classic enough to transcend trends. For anyone wearing burgundy stiletto nails, there’s an implied message: “I know what I like, I’m secure in my aesthetic choices, and I have excellent taste.”
The Staying Power of Burgundy Across Seasons
Burgundy adapts brilliantly to seasonal palettes without ever feeling out of place. In fall and winter, it’s the obvious choice alongside deep purples, forest greens, and rich blacks. But burgundy also transitions seamlessly into spring and summer—just pair it with lighter makeup and clothing, and it reads fresh rather than heavy.
How Burgundy Complements Every Skin Tone
Fair skin tones make burgundy look regal and jewel-like. Medium skin tones enjoy maximum richness with burgundy, as the contrast between skin and nail creates striking visual impact. Deep skin tones absolutely glow when wearing burgundy—the color creates a luminous quality that makes both the nails and the skin appear more radiant. Olive undertones, golden undertones, cool undertones—burgundy finds its perfect match with all of them.
The Art of Choosing the Right Rhinestone Details
Rhinestones are not created equal, and choosing the right ones makes the difference between nails that sparkle beautifully and nails that look cheap or cluttered. Understanding rhinestone quality, size, and placement transforms burgundy stiletto nails from pretty to genuinely stunning. The goal is to create visual interest without overwhelming the design or making the nails feel heavy or uncomfortable to wear.
Swarovski crystals are the gold standard in rhinestone quality. These Austrian crystals are precision-cut with more facets than standard rhinestones, which means they refract light more dramatically and create that signature brilliant sparkle. They’re noticeably more expensive than basic rhinestones, but they’re worth the investment if you want a manicure that feels as premium as it looks. When you wear Swarovski-embellished nails, you’ll notice people can see the sparkle from across the room.
Standard glass rhinestones are the more budget-friendly option, and they still offer plenty of visual impact. These work beautifully when used in larger quantities or in areas of the design where they’ll catch movement and light consistently. The key is buying from reputable beauty suppliers rather than ultra-cheap alternatives—a small upgrade in price nets a significant upgrade in how the stones catch and reflect light.
Understanding Rhinestone Size and Placement Strategy
Rhinestones come in various sizes, typically measured in millimeters (2mm, 3mm, 4mm, 5mm, and larger). Smaller stones work beautifully scattered across the nail for a more delicate, scattered-light effect. Medium stones create focal points and work well in grouped designs. Larger stones make a bold statement and work best used sparingly—one large statement stone per nail, or perhaps a few across the entire manicure.
Placement strategy determines whether your rhinestones enhance or overwhelm the design. Concentrating them along the tip or in a specific area (like forming a shape or gradient) creates a more polished, intentional look. Random scattering can work if executed with thought—aim for asymmetrical balance rather than true randomness, which can read as chaotic.
Adhesive and Application Techniques
Professional nail technicians typically use specialized rhinestone glue or nail gel to secure stones. If you’re applying rhinestones at home, nail glue works, but gel provides better adhesion and durability. The key is applying just enough adhesive to secure the stone without creating a visible buildup around it. Some designs call for stones to be set during the gel curing process, which creates the most durable application.
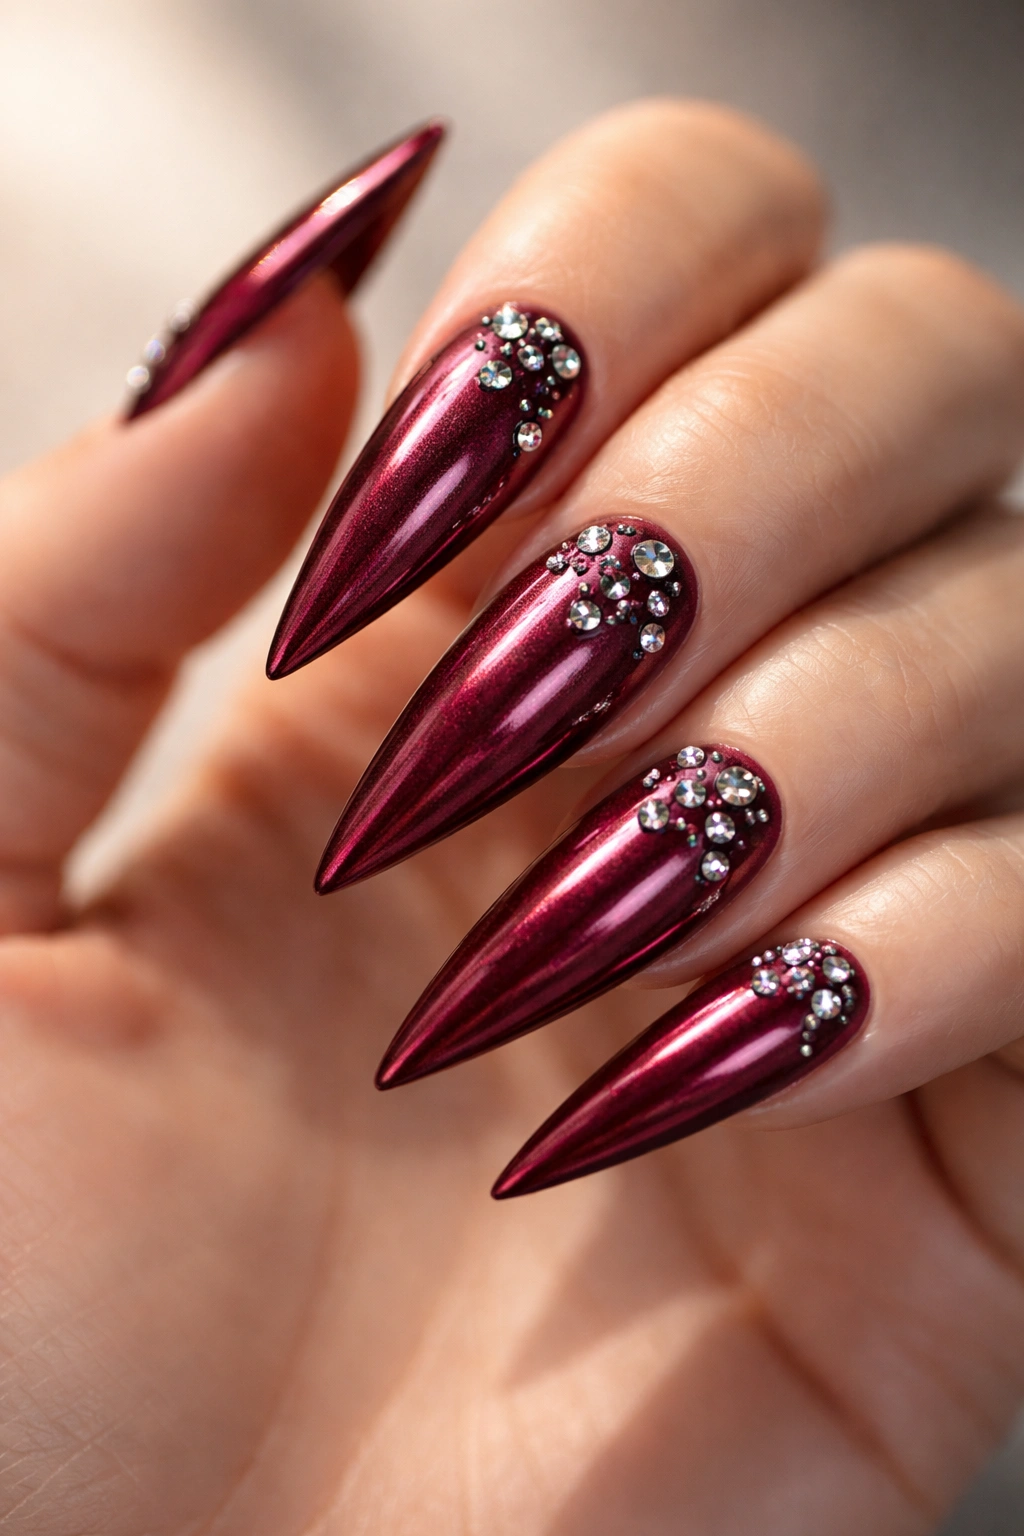
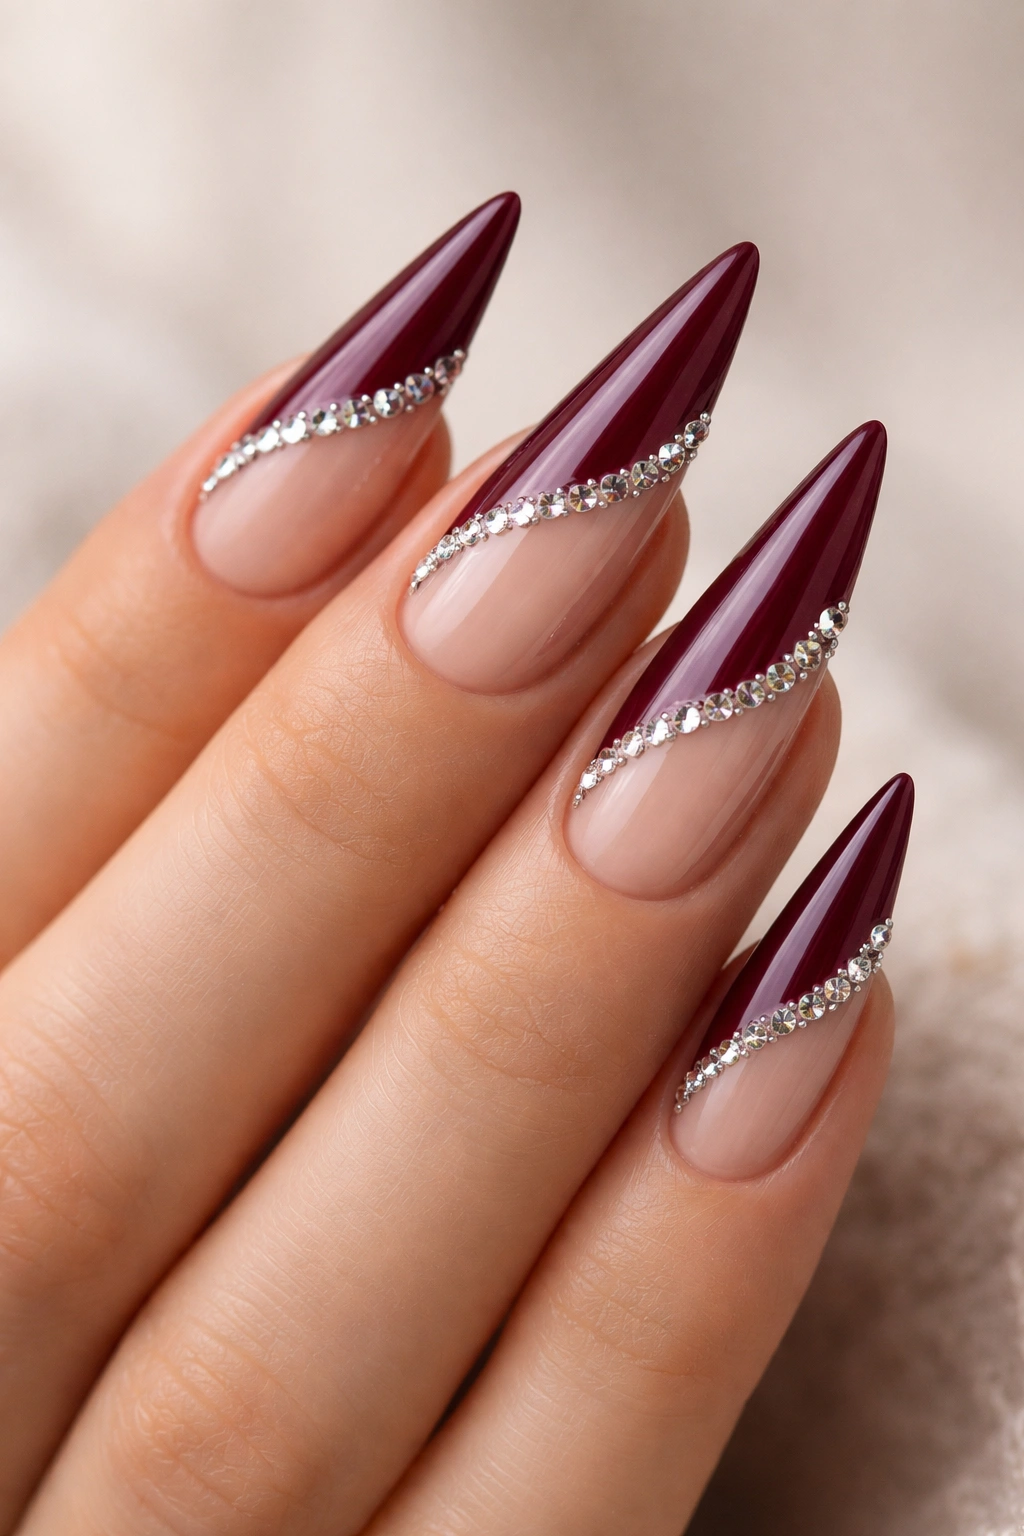
1. Classic Burgundy With Scattered Diamond Rhinestones
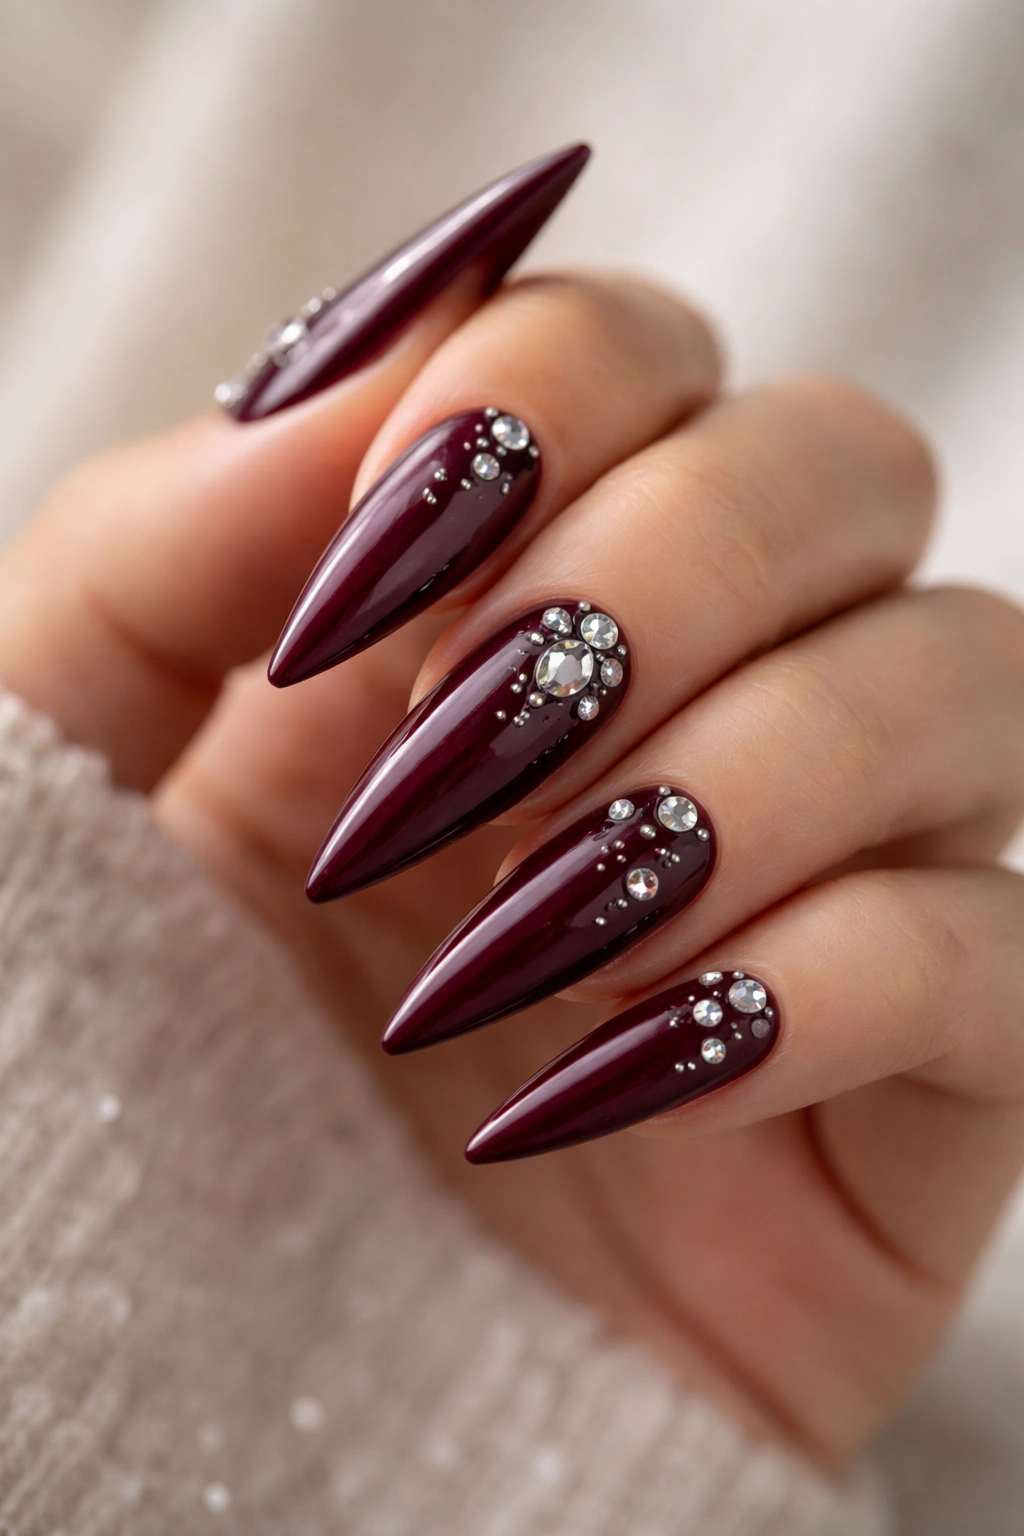
This is the design that never fails to impress—a clean, perfectly-manicured burgundy base with precisely scattered diamond-shaped or round rhinestones catching light across all the nails. The beauty of this design lies in its simplicity and its undeniable sophistication. It reads as effortlessly elegant, like someone who just naturally has perfect nails without trying too hard (even though the reality is quite the opposite).
Start with a rich, true burgundy gel polish—not too dark, not too light, but that perfect wine-tone that complements every undertone. Two coats ensure opacity and depth. Once the color is set and cured, place medium-sized rhinestones (3mm to 4mm) in a scattered pattern across each nail. The key to making this work is avoiding perfect symmetry—place stones slightly higher on one nail, lower on the next, clustered on one nail and more spread out on another. This variation creates visual interest while maintaining the sophisticated feel.
Why This Design Works for Every Occasion
The scattered rhinestone approach is versatile enough for professional settings (it doesn’t read as overly flashy) while still delivering enough sparkle for evening events and celebrations. This is the design you can confidently wear to job interviews, business meetings, dinner dates, and nights out dancing. The clean burgundy base keeps it professional; the rhinestones add just enough personality to signal style and confidence.
Application Tips for Longevity
After placing your rhinestones, allow the adhesive to cure fully—typically 24 hours if using nail glue, or you can cure it along with the gel if working in gel. Once cured, seal the entire nail with a shiny top coat, making sure to encapsulate the rhinestones so they’re protected from water and daily wear. This top coat application is what extends the life of your rhinestones dramatically.
Pro tip: Place rhinestones on all five fingers rather than just the accent nails. It creates a more cohesive, expensive-looking design than limiting them to one or two nails.
2. Ombre Burgundy Fade With Rhinestone Gradient
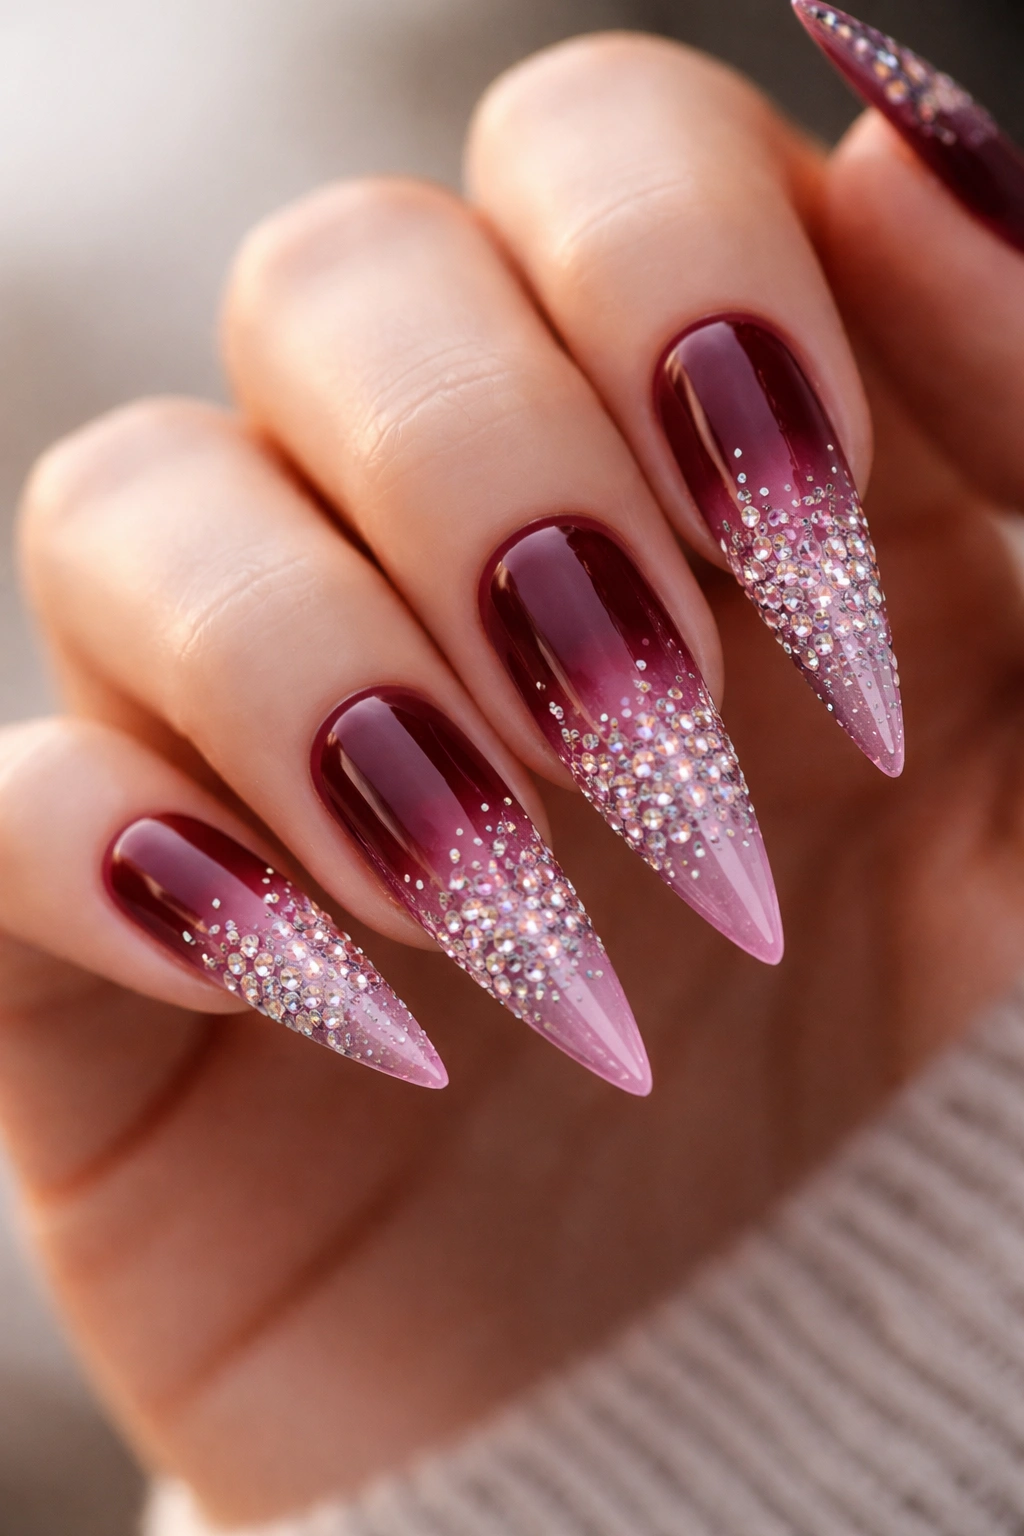
This design takes burgundy from deep maroon at the base to a much lighter mauve or pink at the tip, creating an ombre effect that feels modern and dimensional. The addition of rhinestones placed progressively (more dense at the tip, fading out toward the base) creates a gradient of sparkle that mirrors the color gradient. This design is particularly stunning on stiletto nails because the elongated shape allows room for the gradient to really develop and shine.
Creating an ombre effect requires either a sponge-dabbing technique with multiple shades of burgundy-toned polish, or using an ombre powder system if you’re working with gel. The sponge method gives you more control and creates softer transitions. Cut a small piece of makeup sponge and dab different burgundy shades—starting with the deepest shade at the base, a medium burgundy in the middle, and a lighter mauve or dusty rose at the tip. Blend between shades with a clear polish to create smooth transitions.
Rhinestone Placement for Maximum Impact
For the rhinestone gradient, concentrate the majority of your stones at the tip where the color is lightest—perhaps 8 to 10 stones per nail. Move to 4 to 6 stones in the middle section, and just 1 to 2 stones near the base where the color is darkest. This creates a visual weight that moves toward the tip, making the ombre effect even more pronounced. Use smaller rhinestones (2mm to 3mm) for a more refined, less chunky appearance.
Why Ombre Reads as High-End
Ombre designs inherently feel more complex and intentional than solid colors, which signals that whoever’s wearing them has invested time and expertise in their manicure. Combined with stiletto nails and rhinestones, an ombre design automatically reads as premium and professionally done. Even if you’re doing this at home, it looks like you’ve paid for a professional manicure.
3. Burgundy With Gold Rhinestone French Tips
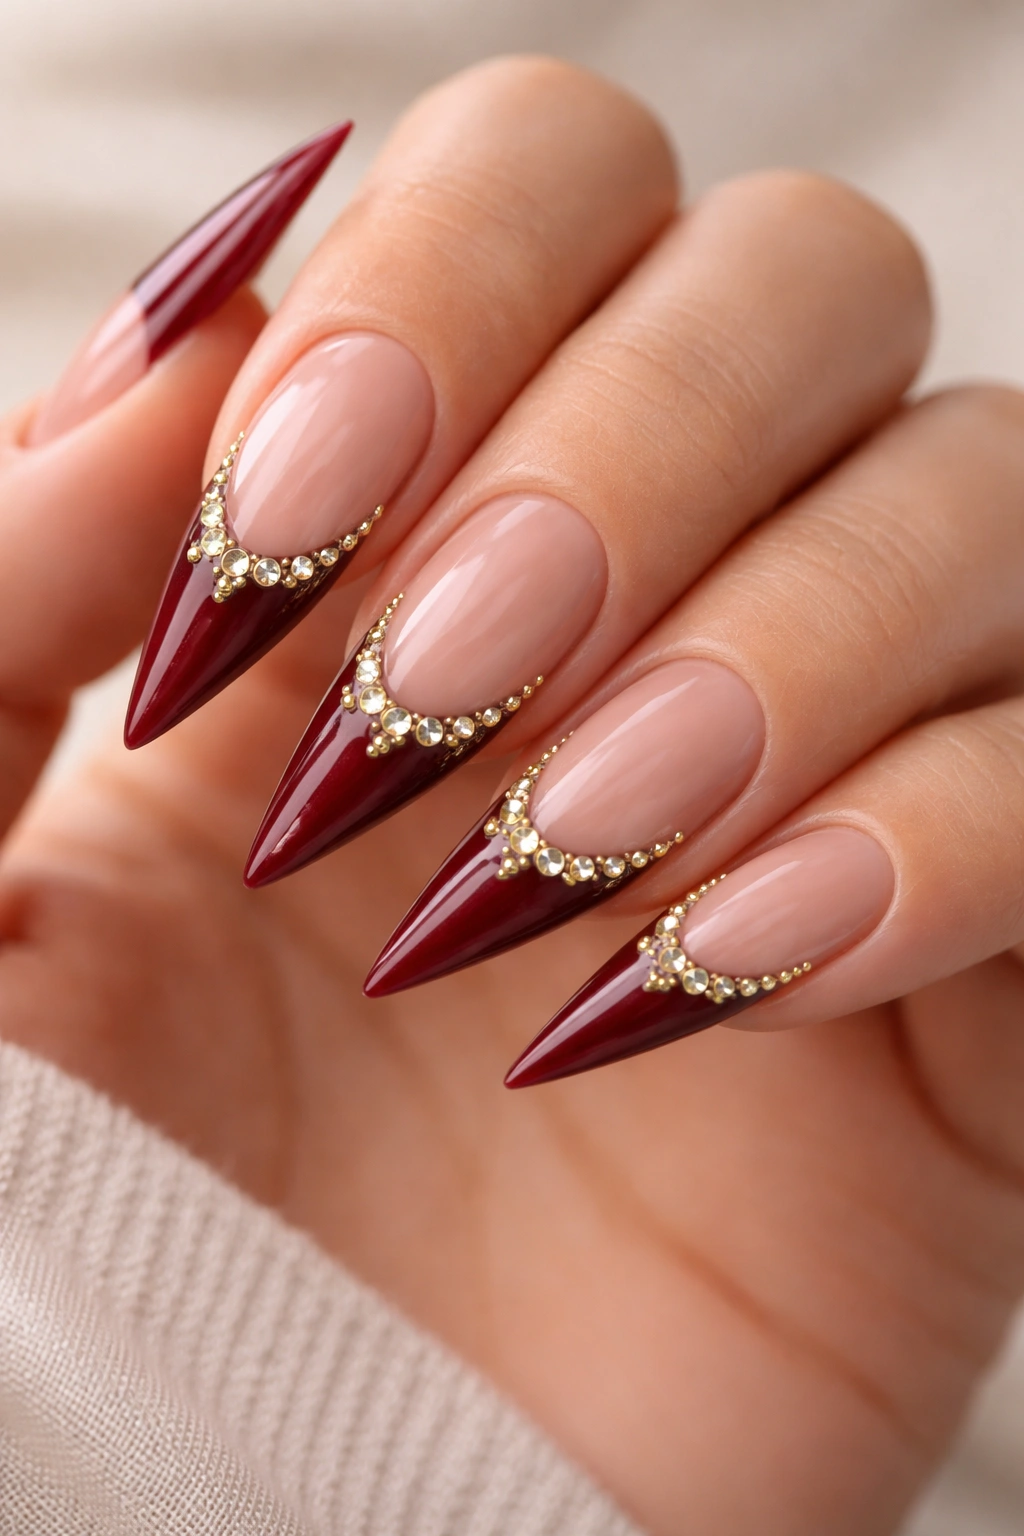
Put a glitzy spin on the timeless French manicure by replacing the white tip with burgundy and adding gold rhinestones along the smile line and scattered across the tip. This design is playful while maintaining elegance, offering the best of both worlds—the classic polish of a French manicure with the modern glamour of rhinestone embellishment.
Begin with a sheer nude or clear base to mimic the classic French look. Paint the tips with your burgundy polish, creating a clean smile line. The key to making this look polished is keeping that smile line crisp and straight—if you’re not confident with freehand application, use striping tape to create a perfect line. Once the burgundy tip is cured, create a horizontal line of gold rhinestones (or champagne-toned stones that read as gold against the burgundy) right along the smile line. Add a few additional scattered rhinestones across the burgundy-tipped area for extra dimension.
Choosing Your Gold Tone
Not all gold rhinestones are created equal. Champagne-colored stones with warm undertones create a sophisticated look that feels refined rather than costume-like. True gold stones work beautifully too, especially if you’re choosing jewelry and accessories with similar warm gold tones. Avoid overly bright or neon-gold stones, which can feel cheap and dated. Swarovski makes gorgeous crystal coated stones in champagne and gold—these are worth the investment for this design.
The Strategic Rhinestone Placement
A clean line of rhinestones along the smile line is the anchor of this design. Aim for stones that are evenly spaced and uniform in size—typically 2mm to 3mm works best. After creating this line, add perhaps 3 to 5 additional rhinestones scattered across the burgundy tip, smaller in size and less frequent than the smile line stones. This balance creates visual interest without appearing overworked.
Worth knowing: This design photographs beautifully and makes your hands look feminine and polished in photos, which is why it’s become popular among people who care about their visual presence.
4. Deep Maroon With Delicate Rhinestone Accents
When burgundy leans toward deep maroon—almost black-burgundy territory—it becomes even more dramatic and sophisticated. This design keeps burgundy accents minimal and refined, using them only on specific nails as true accent pieces rather than spreading them across all ten nails. Choose perhaps three nails (such as ring finger, middle finger, and pinky on each hand) to carry the rhinestone details, leaving the others with clean, solid maroon color.
On your accent nails, create a focal point of rhinestones rather than scattered stones. This might be a small cluster at the base of the nail, or a delicate spray pattern emanating from the inner corner, or even a single vertical line of stones running up the center of the nail. The constraint of using fewer rhinestones on fewer nails paradoxically makes the design feel more luxurious and intentional.
The Psychology of Negative Space
By leaving some nails completely bare of rhinestones, you’re using negative space strategically. The eye is drawn to the embellished nails because of the contrast, making the rhinestones feel like precious accents rather than decoration. This approach reads as more sophisticated than covering every nail with stones, and it’s actually what high-end nail designers do when creating truly premium-looking designs.
Color Grading From Burgundy to Maroon
If you want to add subtle dimension without applying ombre, grade your maroon color slightly. Paint some nails a true maroon, others a slightly lighter burgundy-maroon, and keep one or two at a very deep near-black maroon. This subtle variation creates visual interest while maintaining the cohesive maroon-focused color story. Rhinestones placed on the lightest of these maroon nails will catch more light and feel more prominent.
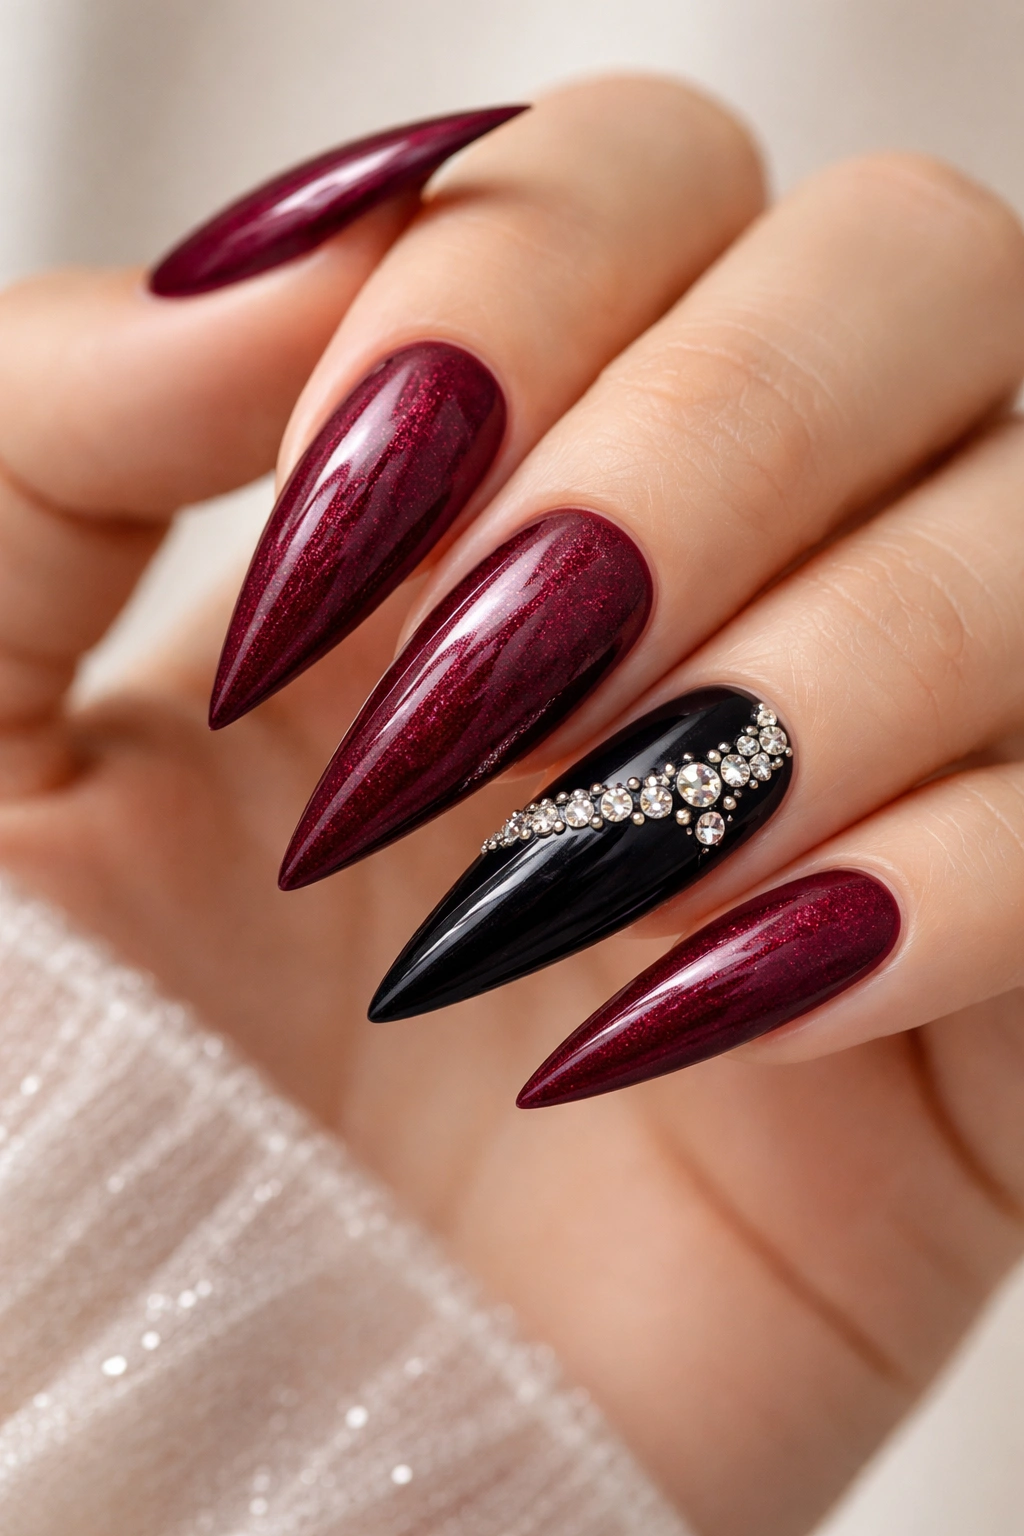
5. Burgundy And Black With Rhinestone Glitter
This design pairs the sophistication of burgundy with the edginess of black, creating a dramatic, high-fashion look that works beautifully for evening events, nights out, and anyone with bold personal style. The rhinestone embellishments bridge the two colors, creating sparkle that catches light and adds dimension to what could otherwise feel stark.
One approach is painting four nails burgundy and one accent nail black (or vice versa), then adding rhinestones to create a visual connection between the colors. Another approach creates stripes or blocks of burgundy and black on each nail, with rhinestones placed where the colors meet or in the black sections for maximum contrast and sparkle. A third option is a burgundy base with black tips instead of the traditional white or nude, then rhinestones placed along the tip area in a gradient or line.
Making the Burgundy-Black Combination Feel Intentional
The key to pulling off this color combination without it feeling like a costume is choosing your burgundy carefully—it should be rich and full-bodied, not bright or orange-toned. The black should be a true, pure black, not a very dark navy or brown. These two colors have a bit of edge to them together, which pairs beautifully with the luxury of rhinestones. The overall effect is sophisticated rather than Halloween-themed.
Rhinestone Placement for Maximum Drama
In designs that pair contrasting colors, rhinestones feel most impactful when placed in the darker color section. If you have black tips and burgundy bases, place rhinestones in the black for maximum visibility and sparkle. If you have burgundy and black stripes, concentrate stones in the black stripes to create visual cohesion. You might also place a line of rhinestones where the two colors meet, creating a transition that feels intentional and designed.
Insider note: This design is absolutely stunning in indoor lighting where rhinestones truly sparkle, making it ideal for evening events and nighttime outings.
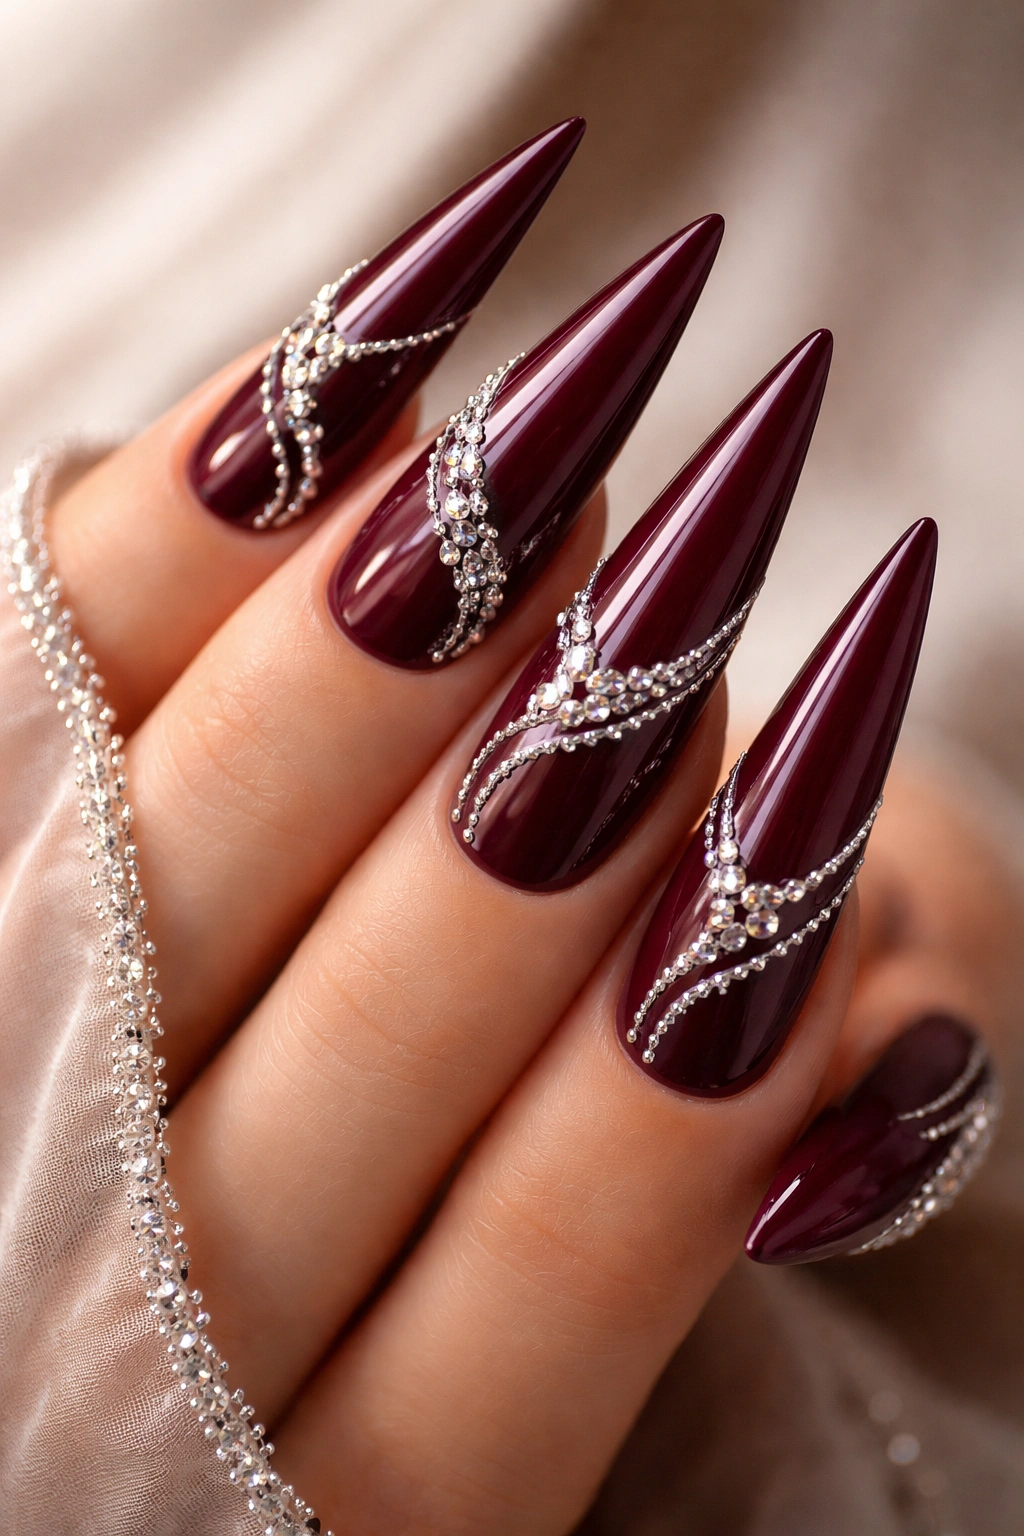
6. Wine-Toned Burgundy With Rhinestone Pinstripes
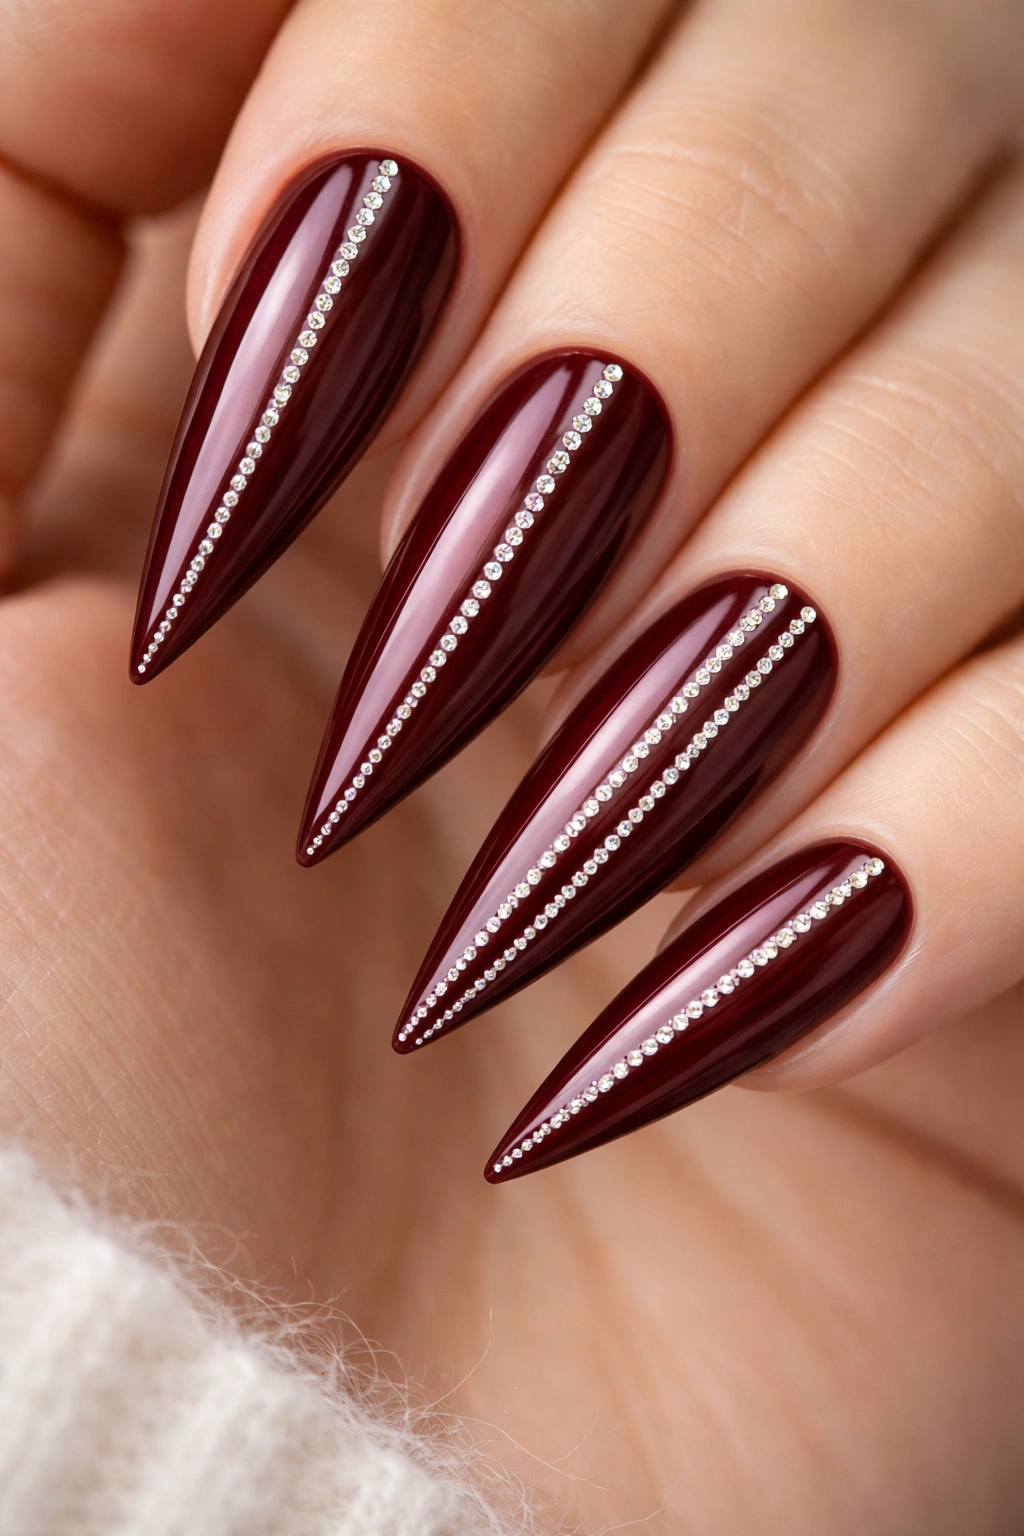
Pinstripes are having a moment in nail design, and when you apply them in rhinestones across a wine-toned burgundy base, you get a design that feels both current and timeless. This is a more linear, structured approach to rhinestone embellishment compared to scattered or gradient placements, and it appeals to people who love geometric design elements.
Using thin tweezers and careful application, create vertical pinstripes of small rhinestones (1.5mm to 2mm) running up each nail from base to tip. You might place one pinstripe down the center of each nail, or offset them for visual interest. Alternatively, create multiple thin pinstripes on each nail, spaced perhaps 2-3mm apart. The repetition of the pattern is what creates visual sophistication—it reads as intentional and designed rather than randomly embellished.
The Technical Challenge of Pinstripes
Creating perfectly straight rhinestone lines requires patience and the right tools. A thin tweezers is essential for picking up and placing individual stones. Pre-planning your placement helps—you might even lightly draw a guide line in pencil on the nail before applying stones. The patience required in creating this design is part of what makes it feel premium and worth your time.
Why Vertical Lines Elongate and Flatter
Vertical pinstripes create an optical illusion that makes nails appear longer and more slender. Since you’re already working with the elongating shape of stiletto nails, rhinestone pinstripes enhance this effect even further. The eye follows the vertical lines, making the entire nail appear more extended. This is particularly flattering if you have shorter hands or want to emphasize length.
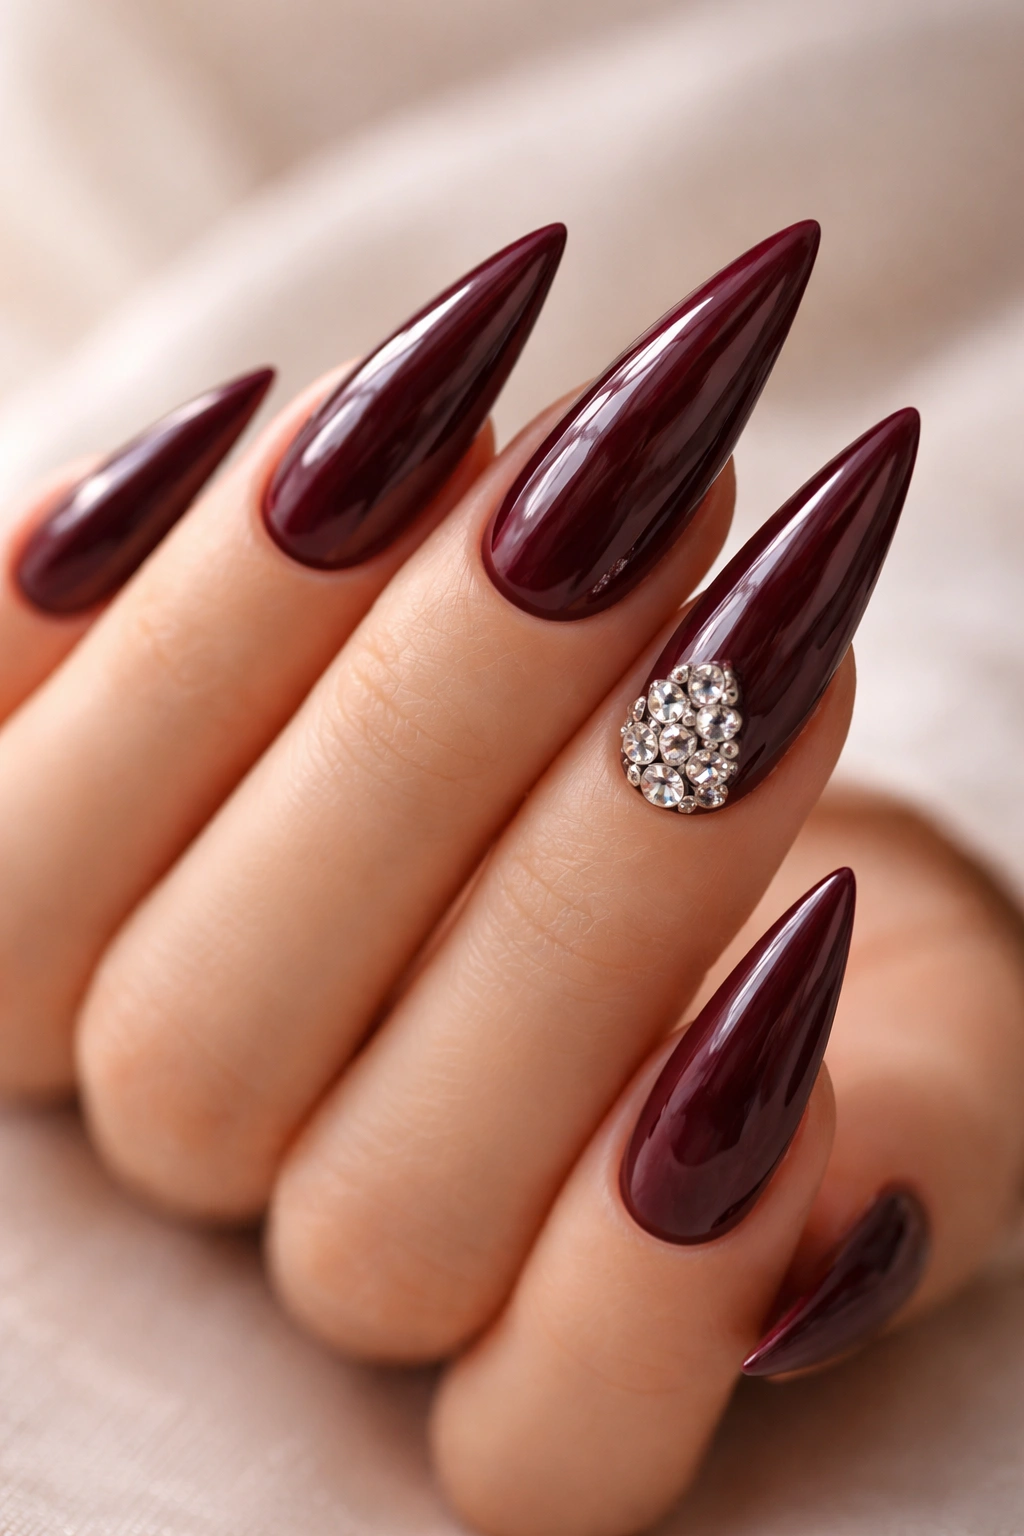
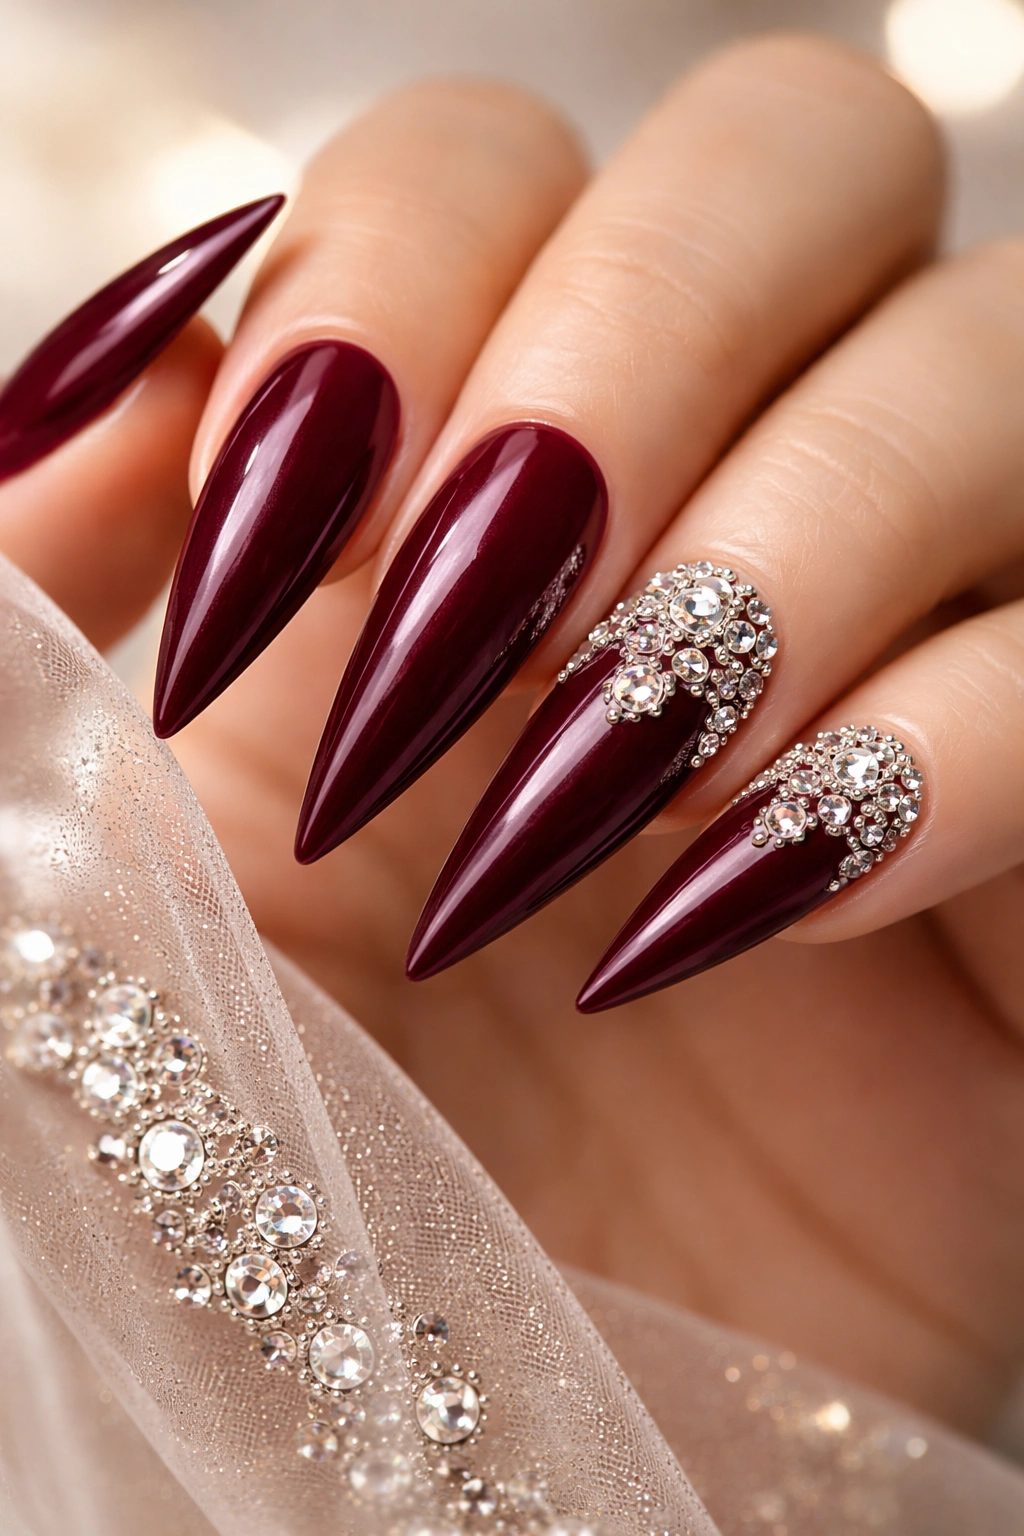
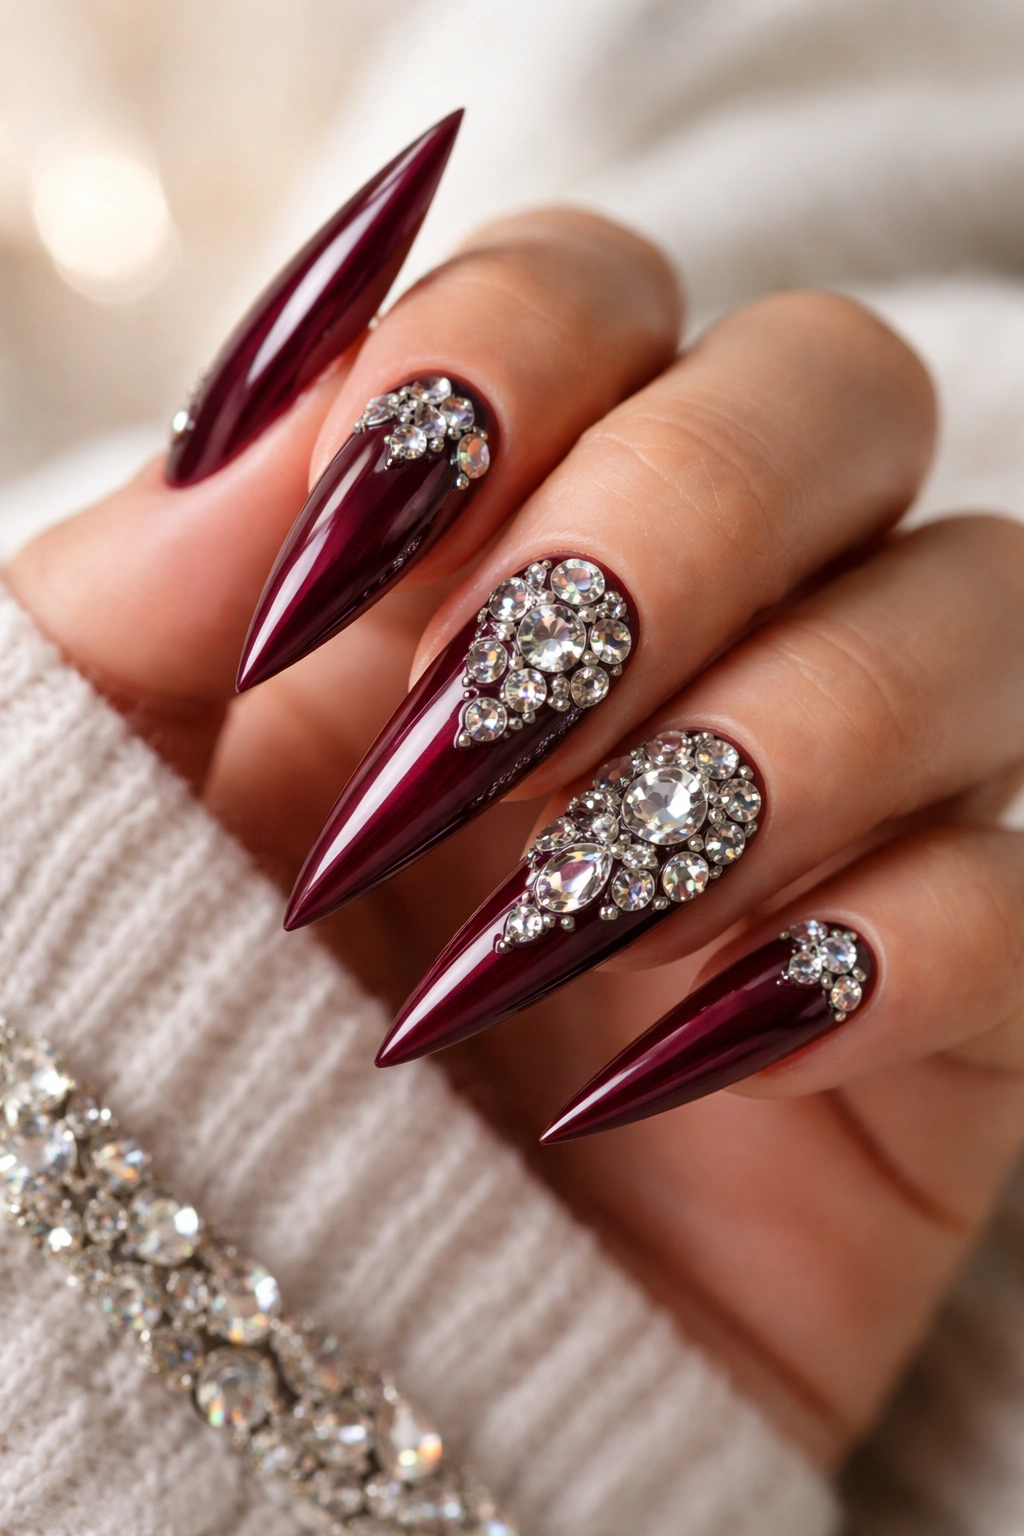
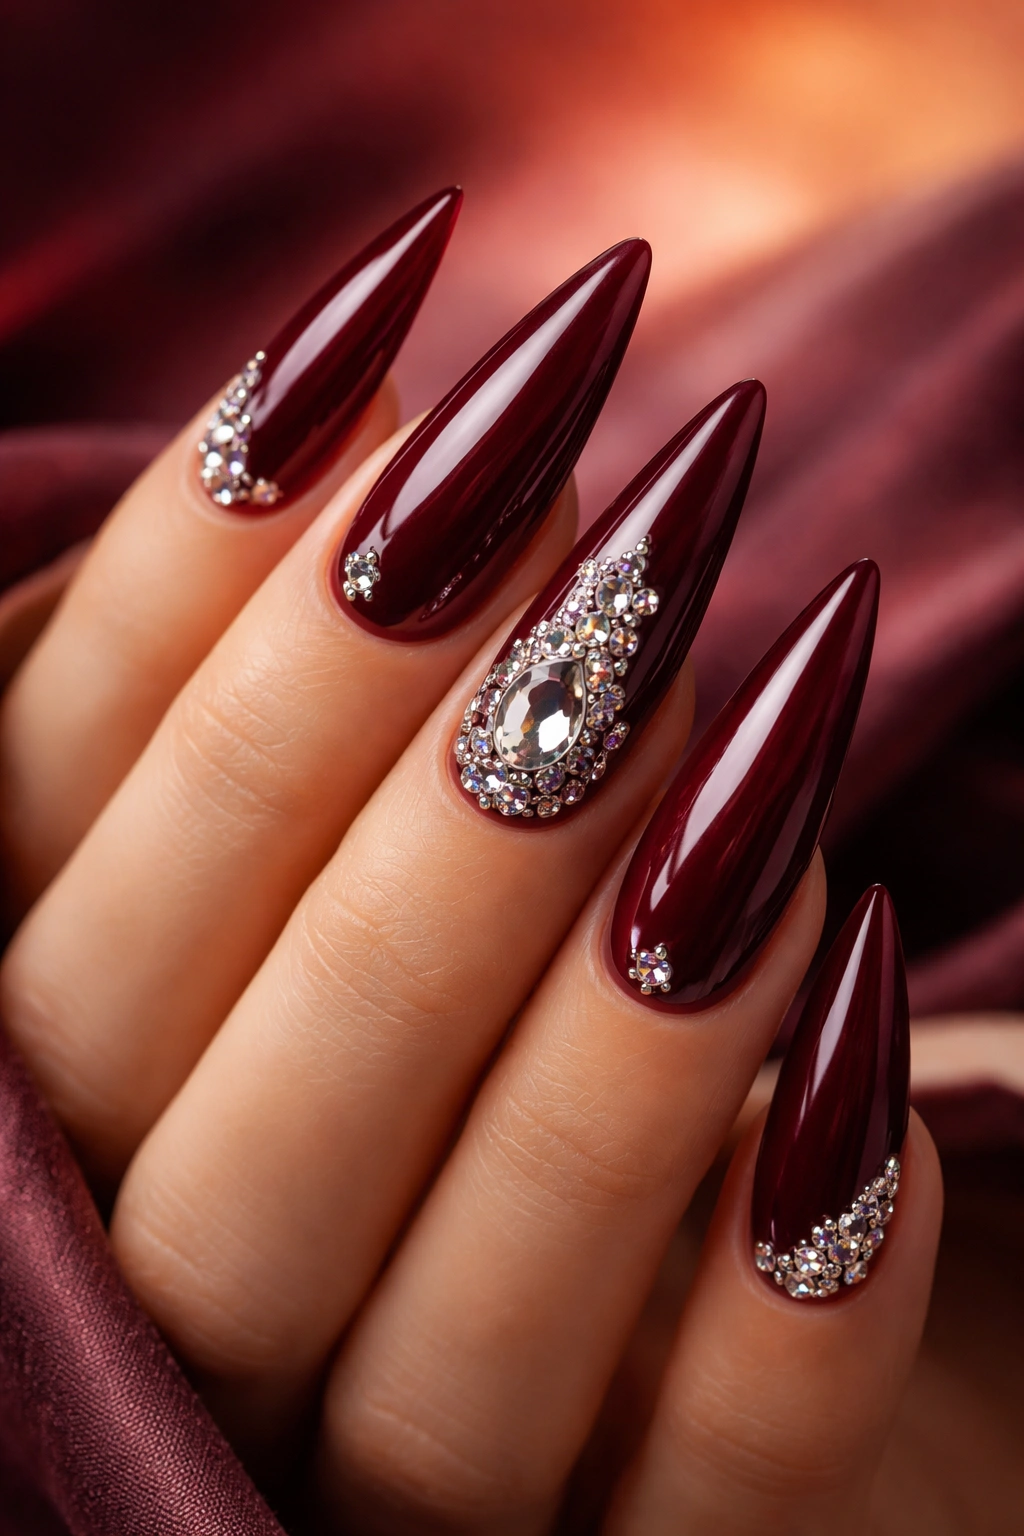
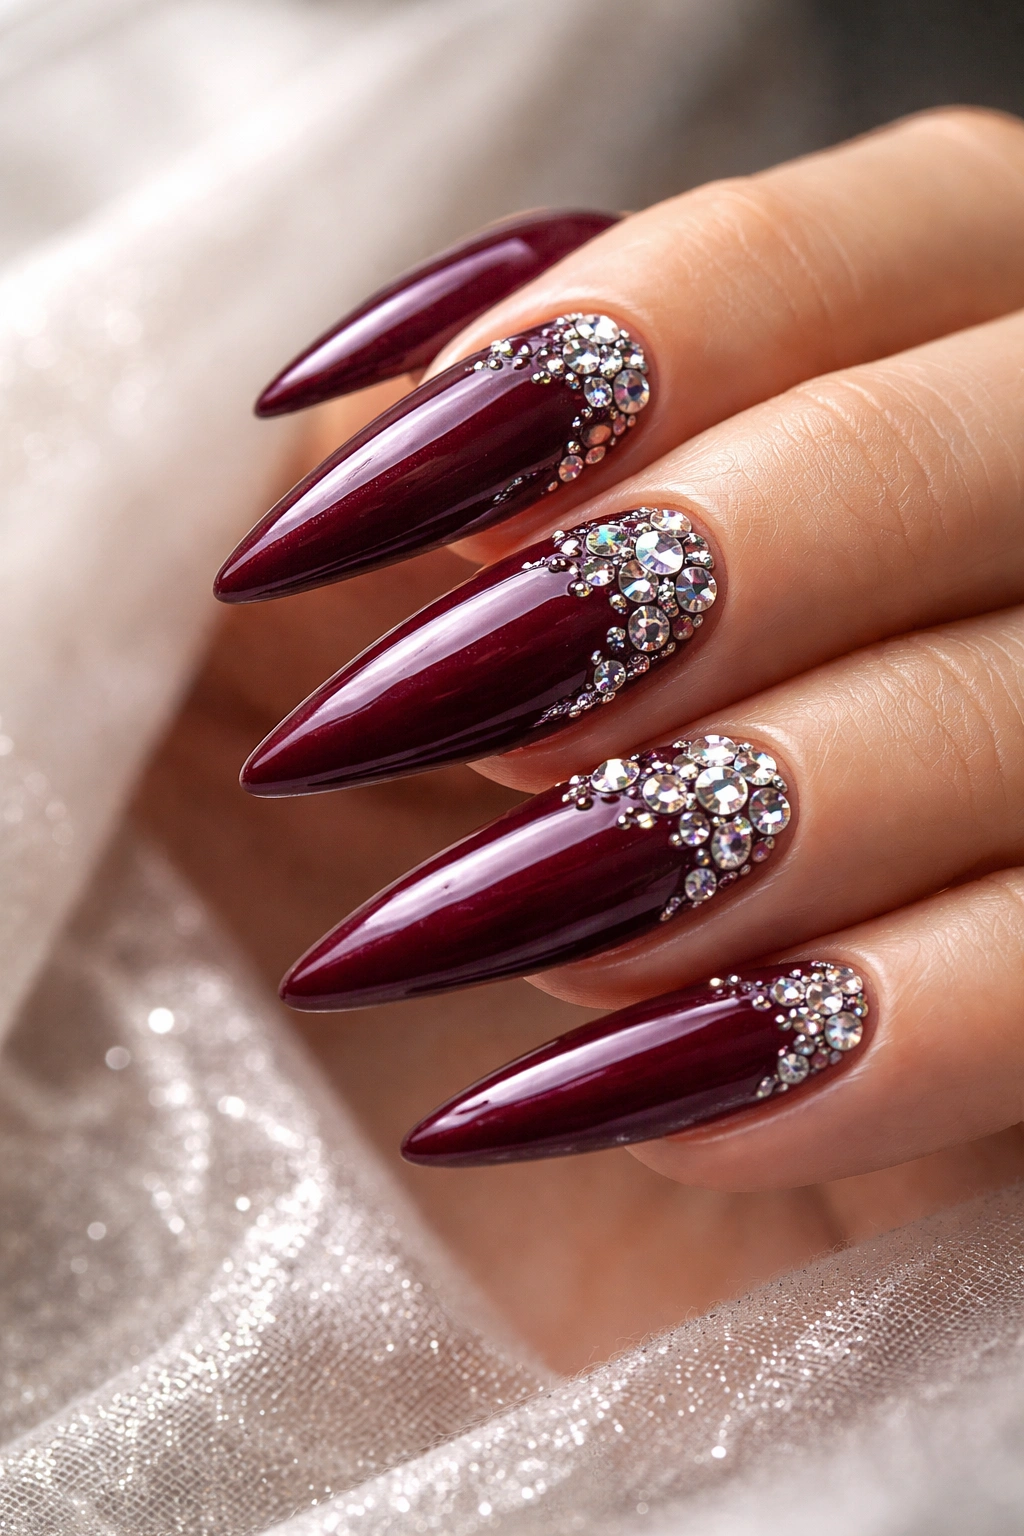
7. Burgundy With Swarovski Crystal Accent Nails
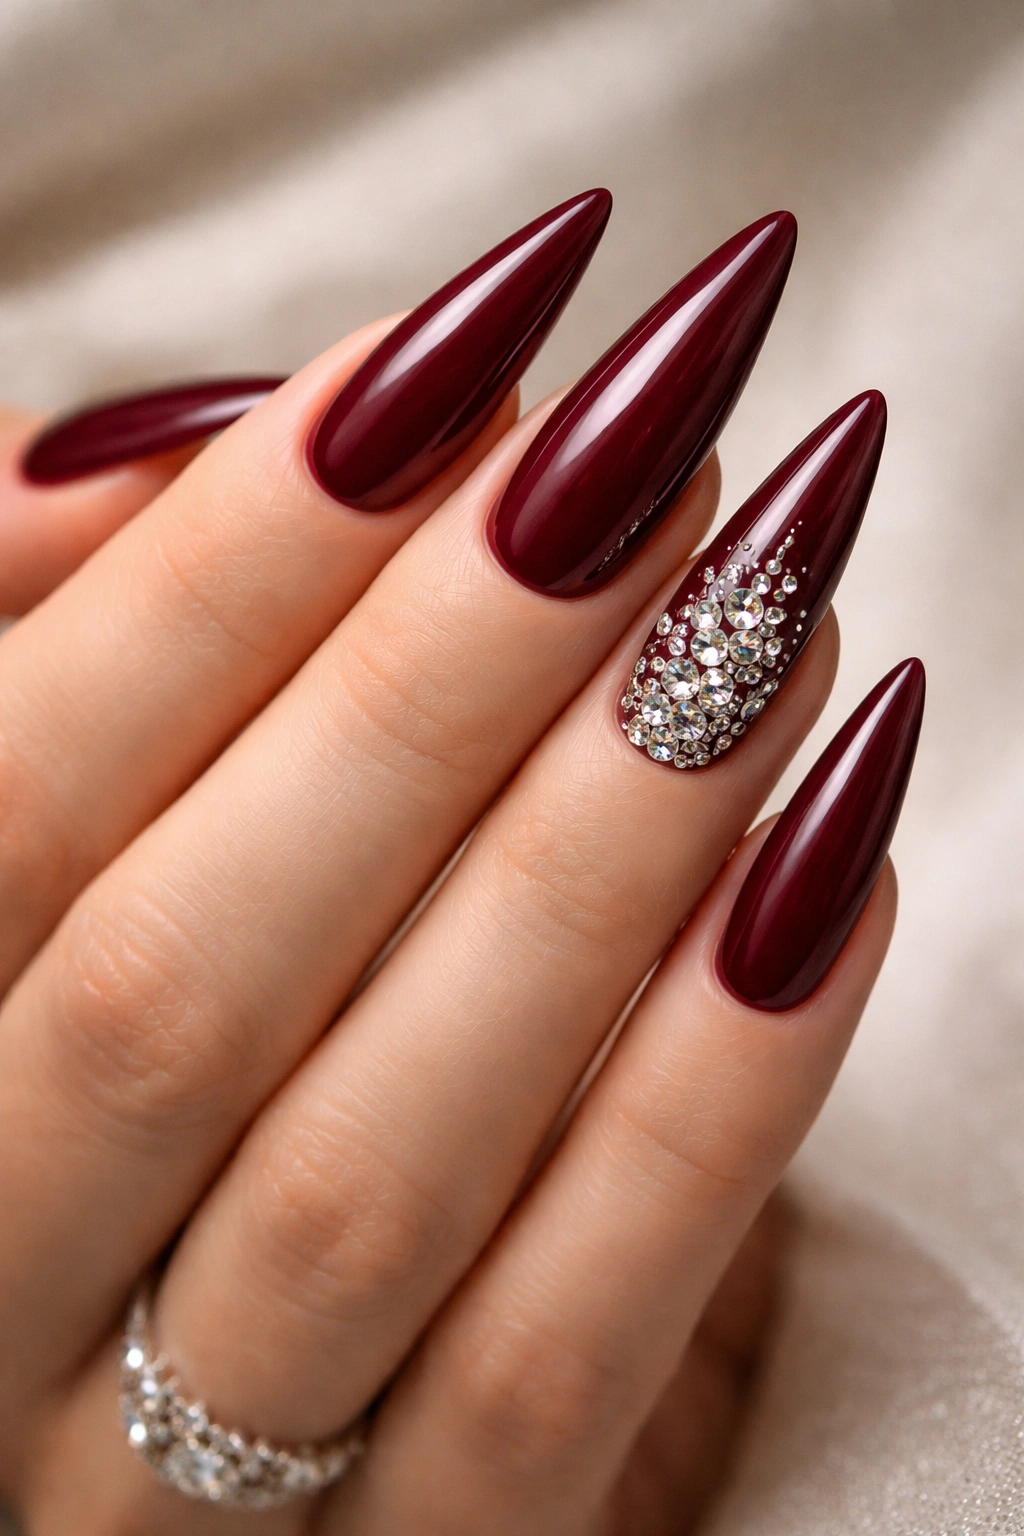
Invest in genuine Swarovski crystals and make them the undisputed star of this design by using them on just one or two accent nails while keeping the other nails clean and simple. This approach celebrates the genuine brilliance and sparkle of premium stones by not overcrowding them. Each crystal catches light with stunning clarity, and the limited placement ensures they remain the focal point.
Select your accent nails (typically the ring finger and middle finger work beautifully) and plan a design around Swarovski crystals. This might be a spray pattern of stones emanating from the cuticle area, a scattered placement creating visual movement, or even a single large crystal anchored by smaller ones creating a focal point. The beauty of Swarovski stones is that they sparkle even in indirect lighting, so every movement of your hands creates visual interest.
Understanding Swarovski Quality and Cost
Swarovski crystals are significantly more expensive than standard rhinestones, often two to three times the cost. However, the difference in light refraction is immediately apparent—Swarovski stones create a rainbow sparkle effect with exceptional brilliance. If budget is a concern, using Swarovski stones on just one or two accent nails allows you to experience their premium quality while being realistic about expense.
Creating Visual Hierarchy With Crystal Sizing
Using multiple sizes of Swarovski crystals (4mm, 5mm, and 6mm) on a single accent nail creates visual hierarchy and depth. Place the largest crystal as your focal point, then surround it with medium-sized crystals, finishing with the smallest stones to fill in gaps and create transitions. This creates a design that feels high-end and expertly executed.
Worth knowing: Swarovski crystals are often sought out specifically for important events—engagements, weddings, proms, and any occasion where you want your nails to shine with unmistakable luxury.
8. Metallic Burgundy With Scattered Rhinestone Details
When you add metallic pigment or sheen to your burgundy base, you create a finish that is inherently more eye-catching than a flat, cream finish. Burgundy with a metallic sheen catches light beautifully and creates dimension even before you add rhinestones. The stones then add another layer of sparkle and texture, making the overall design incredibly dimensional and dynamic.
Choose a burgundy polish with a metallic or pearl finish—these are increasingly available from mainstream brands. Apply two coats for full coverage and vibrancy. The metallic finish will have subtle color-shifting qualities depending on how the light hits it. Once cured, add scattered rhinestones across the nails, focusing on placement that works with the natural light-catching properties of the metallic finish. Stones placed where the metallic finish is most reflective will appear to glow.
The Magic of Metallic Plus Rhinestone Combination
Metallics and rhinestones are genuinely better together than apart. The metallic finish provides a shimmering base that makes rhinestones appear to float rather than sit on top. The rhinestones add geometric sparkle that complements the fluid shimmer of the metallic finish. The combination reads as far more expensive and intentional than either element alone.
Choosing Your Metallic Finish
Champagne and rose gold metallics pair beautifully with burgundy, creating a warm, luxurious aesthetic. Cool-toned metallics like silver or platinum work too, creating a more modern, edgy feel. Avoid overly bright metallics or holographic finishes in this design—they compete with the burgundy rather than complement it. Aim for a sophisticated metallic sheen that’s noticeable but not garish.
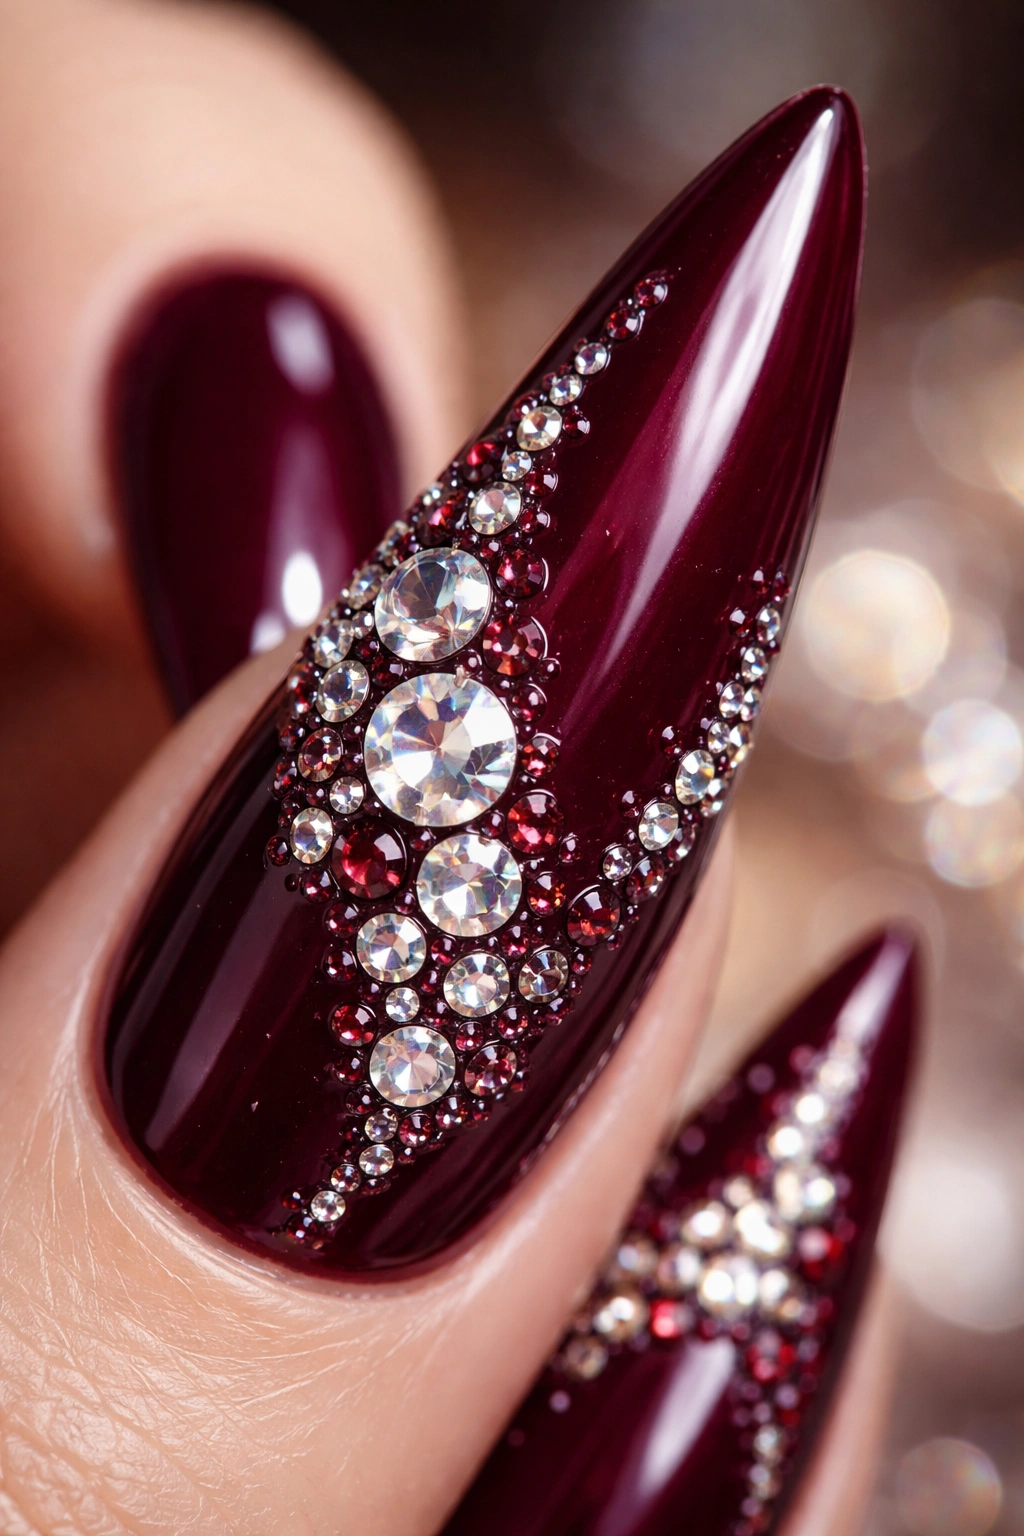
9. Burgundy With 3D Rhinestone Embellishments
Taking rhinestone nail art to the next level, 3D rhinestone embellishments create actual texture and dimension on the nail. This might involve stacking stones, using rhinestone charms or pendants attached to the nail, or creating raised designs using decorative caviar beads and stones together. This design is not for the faint of heart—it’s bold, it’s statement-making, and it says something definitive about your aesthetic.
3D embellishments work particularly beautifully on stiletto nails because the shape provides enough surface area to carry more dimension without appearing unwieldy. A burgundy base allows the 3D elements to read as jewelry rather than costume. You might create a small pyramidal stack of rhinestones on one accent nail, attach tiny metallic charms to another, or use a combination of different textured elements across your nails.
Practical Considerations for 3D Designs
3D nail designs require careful consideration of daily activities. Anything that sticks up off the nail—particularly charms or heavily stacked elements—is more prone to catching on hair, clothing, or bumping into things. If you’re considering a 3D design, think about your lifestyle and whether this will be annoying during daily activities. Many people reserve these designs for special events rather than everyday wear.
Securing 3D Elements Permanently
Using specialized nail glue rated for heavy items, or embedding elements in thick gel, is essential for 3D designs. Encapsulating everything in hard gel creates the most secure and durable result. Some nail designers use both glue and gel for maximum security. The more secure your 3D elements, the longer they’ll last and the less likely they are to catch on things.
Pro tip: If you’re new to 3D designs, start with stacked rhinestones rather than charms or pendants—they’re more secure and create beautiful dimension without the additional weight of hanging elements.
10. Deep Burgundy With Rhinestone Swirl Design
A swirling design created with rhinestones creates fluid movement and visual interest on what could otherwise be a static nail. This design works beautifully on stiletto nails because the elongated shape provides room for the swirl pattern to develop and flow. Place small rhinestones in a spiraling or swirling pattern starting from the cuticle or corner of the nail and moving toward the tip, creating the optical illusion of movement.
Creating a swirl pattern requires either lightly drawing a guide in pencil or simply carefully placing stones to approximate the desired curve. Working with smaller rhinestones (2mm) gives you more precision and prevents the design from appearing too heavy or bulky. The swirl might spiral around the nail like a nautilus shell, or it might curve from one corner to the opposite corner creating an S-curve movement.
The Elegance of Curved Lines
Curved, swirling lines are inherently more elegant and flattering than angular lines. They soften the sharp point of the stiletto nail slightly while maintaining its dramatic shape. Swirling rhinestones guide the eye across the nail in a specific direction, creating visual flow that feels intentional and designed. This design particularly appeals to people who like organic, flowing aesthetics rather than geometric, angular designs.
Color Contrast for Maximum Visibility
Deep burgundy provides excellent contrast for rhinestones, allowing them to really pop against the dark background. If you’re concerned about stones being visible enough, consider using champagne or light-reflecting stones rather than clear ones. The warm metallics catch light beautifully against deep burgundy.
11. Burgundy Velvet Effect With Rhinestone Accents
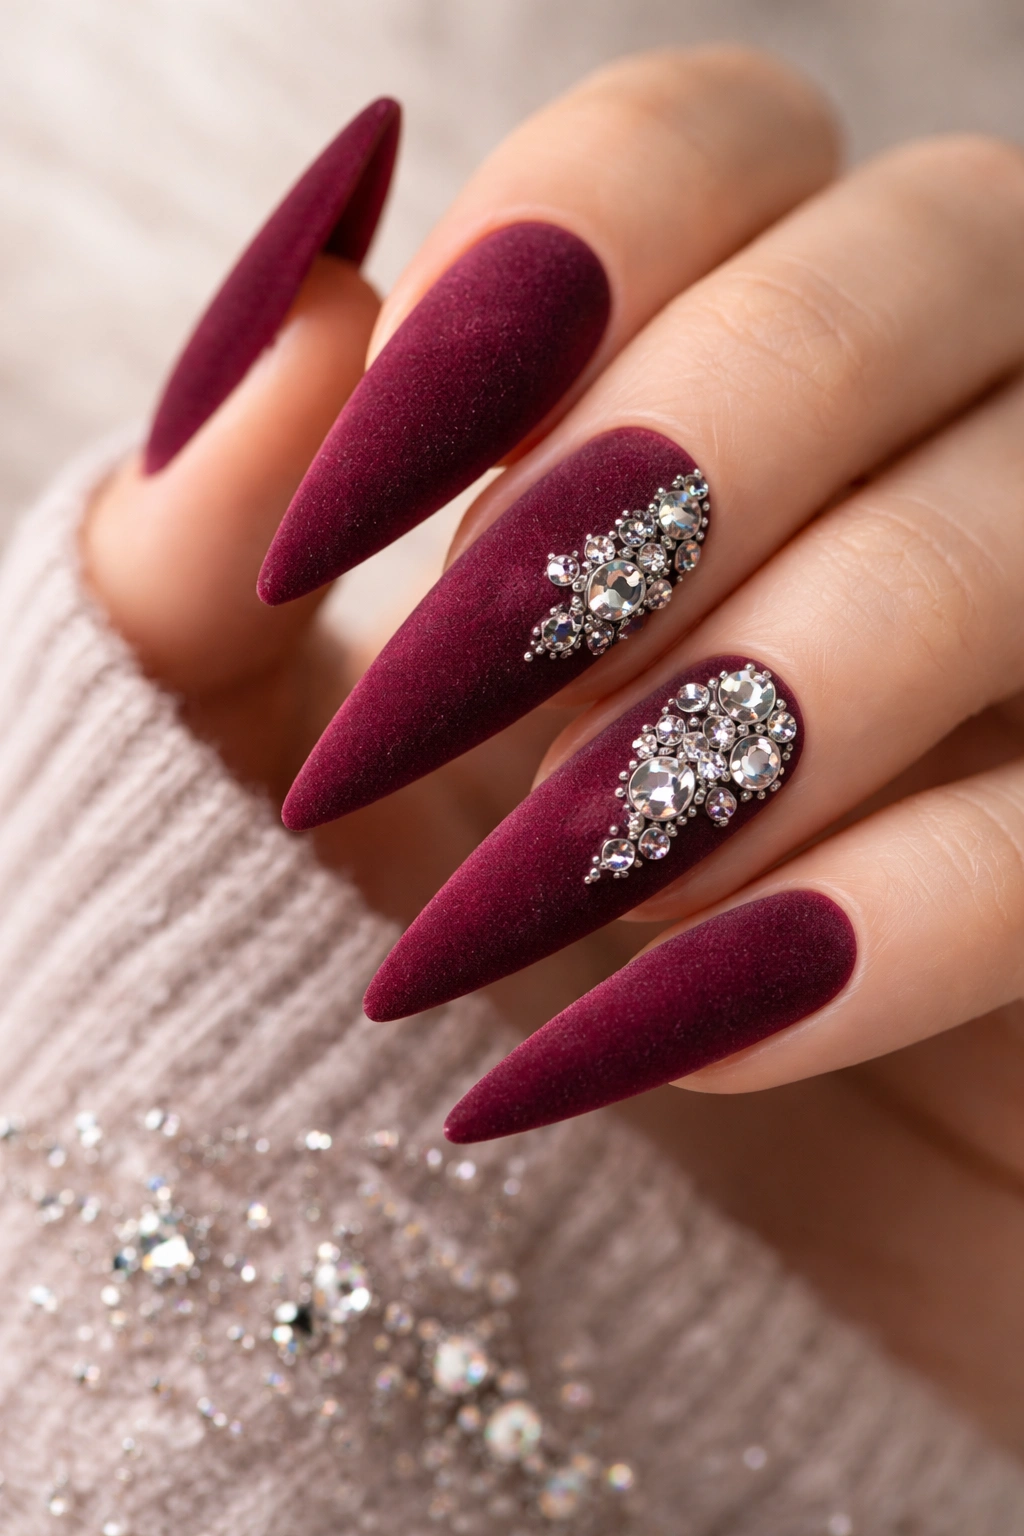
Velvet or velour nail finishes have become incredibly popular, and when you combine this textured, matte finish with rhinestone embellishments, you create a design with serious tactile and visual appeal. The contrast between the soft, velvety matte finish and the hard sparkle of rhinestones is genuinely luxurious-feeling.
Velvet powder is applied over sticky gel—after applying your burgundy gel and curing it, you use a sticky top coat (do not wipe off the tacky residue), then dip your nails into velvet powder or brush it on while the sticky surface is still wet. The powder adheres permanently, creating that soft, touchable matte finish. Once the velvet powder is set, add rhinestones strategically—perhaps in a line along the tip or scattered across specific nails.
The Sensory Experience of Velvet Nails
There’s something incredibly satisfying about the velvet texture. Your clients (or you yourself) will want to touch them. They feel luxurious and expensive, like actual velvet fabric. Combined with the sparkle of rhinestones, they create an unusual and memorable design that people will genuinely want to interact with and ask about.
Placement Strategy for Velvet Plus Rhinestones
Since the velvet finish is so visually striking on its own, you don’t need many rhinestones to create impact. Consider placing stones only on one or two accent nails, or creating just a small focal point. Let the velvet be the star, with rhinestones playing a supporting role. This restraint creates a more sophisticated, expensive-looking design.
12. Burgundy With Negative Space And Rhinestone Details
Negative space (areas of the nail left bare or unpainted) has become a major design trend, and it pairs beautifully with burgundy and rhinestones. By painting or embellishing only portions of the nail and leaving the natural nail (or a sheer base) visible, you create designs that feel modern, minimalist, and incredibly sophisticated. Rhinestones placed strategically around the negative space areas create emphasis and visual interest.
Create a design where perhaps half of the nail is buried, the other half is natural or sheer, and rhinestones are placed along the boundary between the two, creating a clean line of sparkle. Alternatively, create geometric shapes (triangles, half-moons, lines) with burgundy while leaving other areas negative, then place rhinestones in or around these shapes. The restraint of negative space combined with strategic rhinestone placement creates an unexpectedly striking design.
Why Negative Space Feels Modern
Negative space inherently feels contemporary and design-forward. It’s the opposite of maximalism—instead of covering every inch of the nail with color or embellishment, you’re being intentional about what you show and hide. This restraint signals confidence and good design sense. Negative space designs appeal to people with more minimalist, modern aesthetics who still want to express personality through their nails.
Precision and Geometric Perfection
Negative space designs require precision in your polish application or shape. Crisp lines and clean edges are essential—negative space designs with sloppy borders look unfinished rather than intentional. Take extra time creating clean demarcation lines between painted and unpainted areas. If you’re not confident freehanding these shapes, use nail stencils or striping tape to create perfect geometric edges.
Color Theory: Why Burgundy Works for Any Occasion
Understanding why burgundy is such a universally flattering and versatile choice helps you appreciate why it pairs so perfectly with rhinestones. Burgundy sits at a unique intersection of red, brown, and purple tones. It has warmth from its red undertones but sophistication from its depth and slight browning. This makes it wearable in contexts where a true bright red might feel too bold or costume-like.
In color theory, burgundy is considered a tertiary color—a blend of primary and secondary colors that creates something more nuanced and subtle than the foundational colors. This complexity makes it flattering on every skin tone, work-appropriate in professional settings, and still interesting enough to feel stylish and intentional. The color reads as chosen with thought rather than picked randomly.
Burgundy has cultural associations with luxury, wine, evening wear, and formal occasions. These associations live in our collective consciousness, which is why wearing burgundy—even on something as small as fingernails—triggers these associations of sophistication and quality. Combined with the clear signal of intentionality that rhinestones provide, burgundy stiletto nails immediately communicate that you care about aesthetics and presentation.
How to Make Your Burgundy Rhinestone Nails Last
Creating beautiful burgundy rhinestone nails is only half the battle—the other half is keeping them looking gorgeous for as long as possible. With proper care, a professional gel manicure lasts two to three weeks, and your rhinestones can remain secure and sparkly throughout that entire period with attention to a few key practices.
The most important step in rhinestone longevity is the top coat sealing process. After placing your rhinestones and allowing adhesive to fully cure, apply a clear gel top coat over the entire nail, making sure to encapsulate the rhinestones completely. This layer of protective gel keeps stones secure and prevents water from getting underneath them, which would eventually loosen them. A thick top coat layer is better than a thin one—it provides more protection and makes rhinestones feel more integrated into the overall nail structure.
Daily Care Practices That Extend Manicure Life
Avoid prolonged soaking in water, which softens gel and loosens adhesive. Wear gloves when doing dishes, gardening, or cleaning. These activities aren’t nail-hostile if you protect them, but repeated or prolonged water exposure without protection significantly shortens manicure lifespan. Keep your hands moisturized—dry skin around the cuticles can actually create stress on the nail that causes lifting and separation.
Be mindful of activities that put stress directly on your nails. Stiletto nails are stronger than they look, but they’re not indestructible. Avoid using them as tools to open things, scrape off stickers, or pick at anything. These habits both damage the nail and risk popping off stones. This is where rhinestones differ from simpler matte finishes—you have additional incentive to protect your nails since you’ve invested more effort and potentially more money into them.
Refreshing Rhinestones Mid-Manicure
If you’re at the two-week mark and your polish is still looking mostly good but a few rhinestones have loosened or fallen off, you can strategically add new stones without removing your entire manicure. Use fresh adhesive and carefully place new stones to refresh your design. This often extends the life of your manicure by another week or more.
Final Thoughts
Burgundy stiletto nails with rhinestones represent a marriage of elegance and statement-making that few other nail designs can match. Whether you gravitate toward scattered-stone designs that feel sophisticated and understated or you love 3D embellishments that announce your bold aesthetic, there’s a burgundy-and-rhinestone style that feels authentically you. The key is choosing a design that aligns with your personal taste and lifestyle, then committing to the care and maintenance that keeps it looking as gorgeous as the day you first had it applied.
The beauty of stiletto nails as a shape is that they’re unapologetically bold—they don’t attempt to blend in or be subtle. When you pair that shape with the richness of burgundy and the luxury of rhinestones, you’re creating a nail design that is genuinely difficult to ignore. That might be exactly what you want. And if you occasionally wear them for special events, you’ve got a go-to design that instantly elevates your entire appearance and makes you feel polished, confident, and undeniably stylish. Whatever draws you to burgundy rhinestone stiletto nails, they’re a choice that never fails to deliver.
