

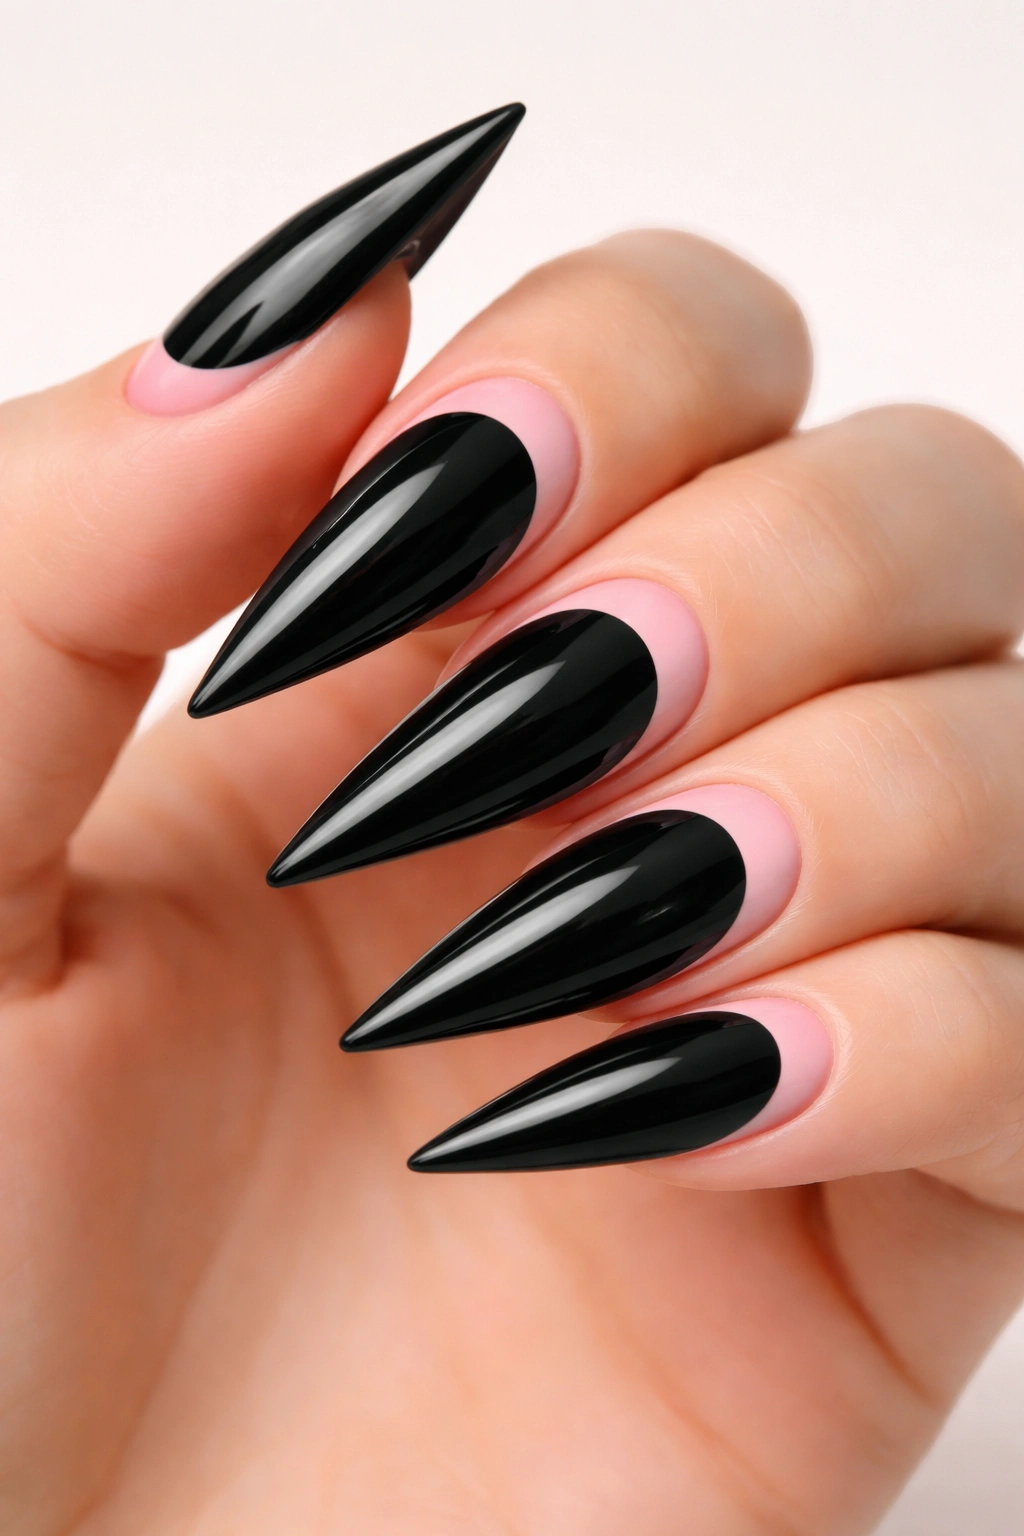
Black and pink nail designs have become a staple in the world of glamorous manicures, and when you pair them with the sharp, elongated elegance of stiletto nails, you’re looking at a combination that turns heads everywhere you go. The contrast between these two classic colors creates a visual impact that’s both sophisticated and bold — whether you’re going for minimalist chic, high-fashion drama, or something playfully edgy in between.
What makes black and pink stiletto nails so versatile is that they work across countless aesthetics and occasions. You can dress them up for evening events, make them office-appropriate with subtle designs, or lean into creative nail art that becomes a conversation piece. The color combination itself speaks to a particular kind of confidence — it’s not trying too hard, yet it’s undeniably striking. Pink brings warmth and femininity while black adds edge and intensity, and together they create this perfect balance that suits nearly every skin tone and personal style.
The beauty of stiletto nails as a canvas is that they give you extra real estate to work with intricate designs, ombre gradients, and detailed nail art. The pointed shape naturally draws attention to your fingertips, making even simple color-blocking look intentional and curated. Whether you’re a minimalist who loves clean lines or someone who goes all-out with embellishments and 3D effects, the black and pink palette offers endless possibilities to express yourself through your nails.
If you’ve been scrolling through inspiration or sitting in the nail salon trying to pick your next design, here are eighteen stunning black and pink stiletto nail ideas that range from timeless elegance to modern artistic expression.
1. Classic Half-Moon Black and Pink
The half-moon design is a retro-modern hybrid that brings sophistication to stiletto nails without requiring intricate freehand work. This look features a deep black base covering most of the nail, with a bold pink curved line creating a half-moon shape at the tip, or alternatively, a pink base with black creating the accent.
Why This Design Works So Well
The half-moon design is forgiving because the curved dividing line can be created with a nail art brush, stencil, or even nail tape for crisp edges. The geometric simplicity means it photographs beautifully and reads as intentional rather than accidental. This design works on both natural and heavily enhanced stiletto nails because the shape itself is what carries the visual interest, not complexity.
How to Get It Right
- Use a high-quality base coat to protect your nails from staining
- Apply two thin coats of your chosen base color for even coverage
- Use a curved striping brush or nail art brush to paint the half-moon line in your contrasting color
- Seal with a glossy top coat to create that polished, professional finish
- The curved line should sit approximately 1/4 to 1/3 of the way down from the tip for balanced proportions
Pro tip: If freehand painting intimidates you, nail tape designed specifically for curved lines can help you achieve salon-level precision at home.
2. Ombre Gradient from Pink to Black
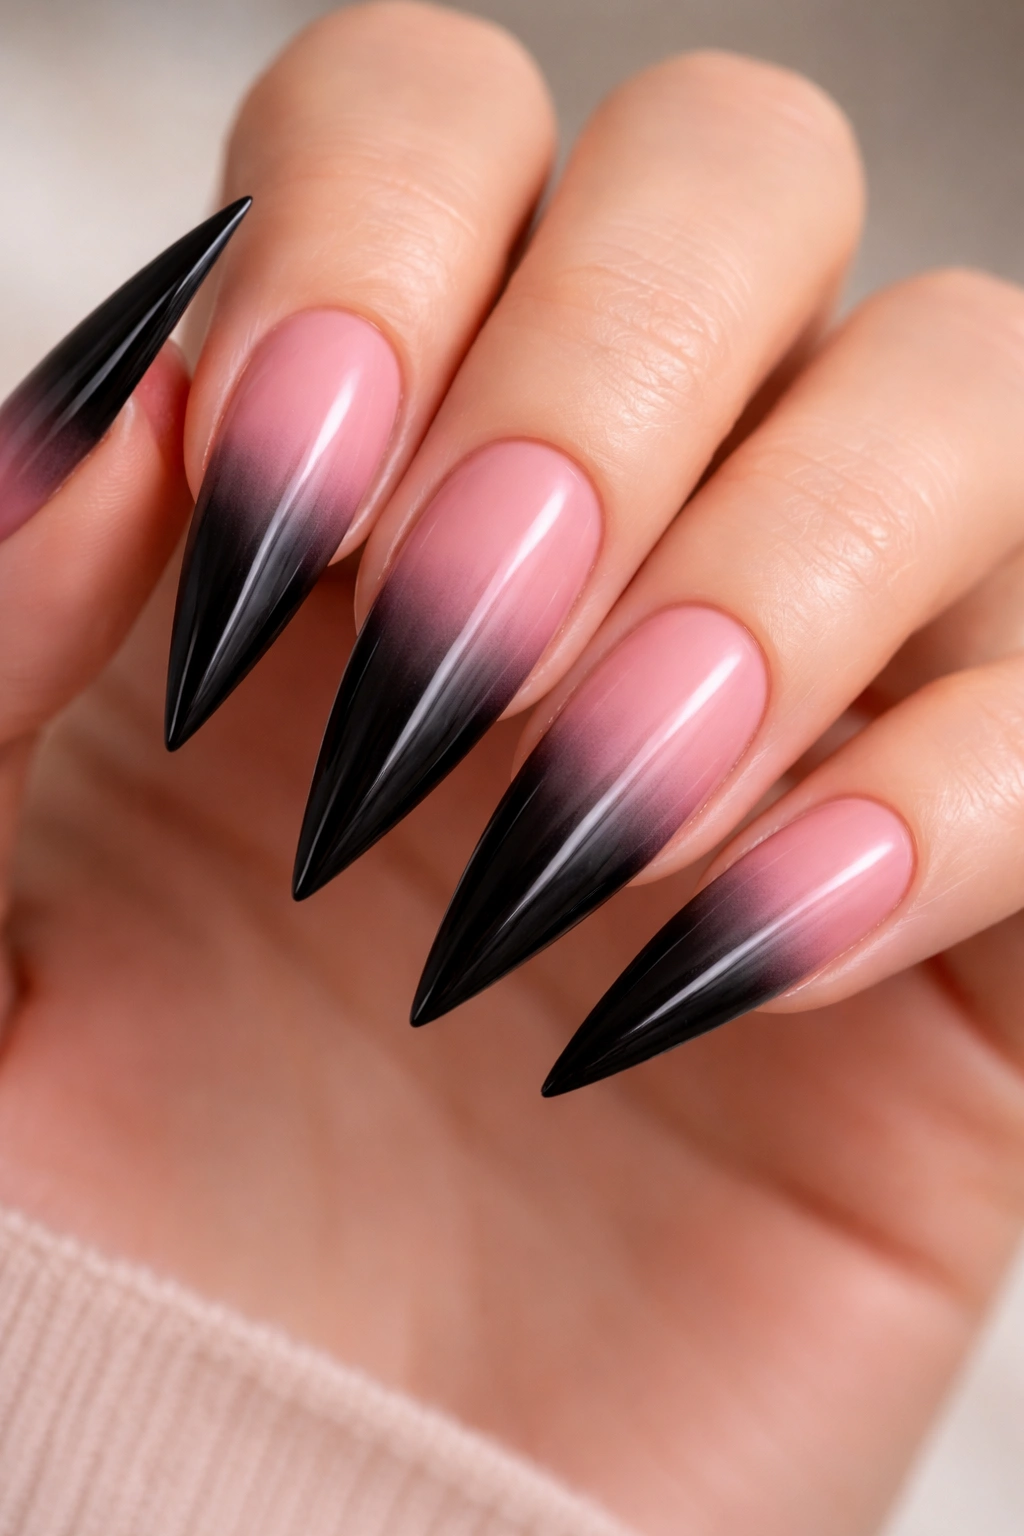
An ombre effect on stiletto nails creates the illusion of depth and dimension, with the color transitioning smoothly from soft pink at the base to deep black at the tip. This gradient approach feels modern, wearable, and endlessly elegant whether you choose matte or glossy finishes.
Creating Smooth Color Transitions
The ombre gradient works best when created with a sponge technique — using a damp makeup sponge to blend two or more colors directly on the nail for a seamless fade. The key to avoiding a muddy middle zone is to use colors with enough contrast that they read as distinct even when blended. Pink and black have natural contrast, making them ideal candidates for this technique.
Application Steps for Perfect Blending
- Paint your base coat and let it cure completely
- Apply thin horizontal stripes of pink and black directly onto a makeup sponge
- Dampen the sponge slightly with water to activate the blend
- Gently stipple the sponge onto the nail multiple times, allowing colors to merge gradually
- Use a thin cleanup brush dipped in gel or polish remover to perfect the edges around the nail perimeter
- Apply a glossy or matte top coat depending on your preferred aesthetic
Worth knowing: The sponge technique works on both gel and traditional polish, though gel versions last noticeably longer on stiletto nails that endure more friction.
3. Black Stilettos with Pink Rose Details
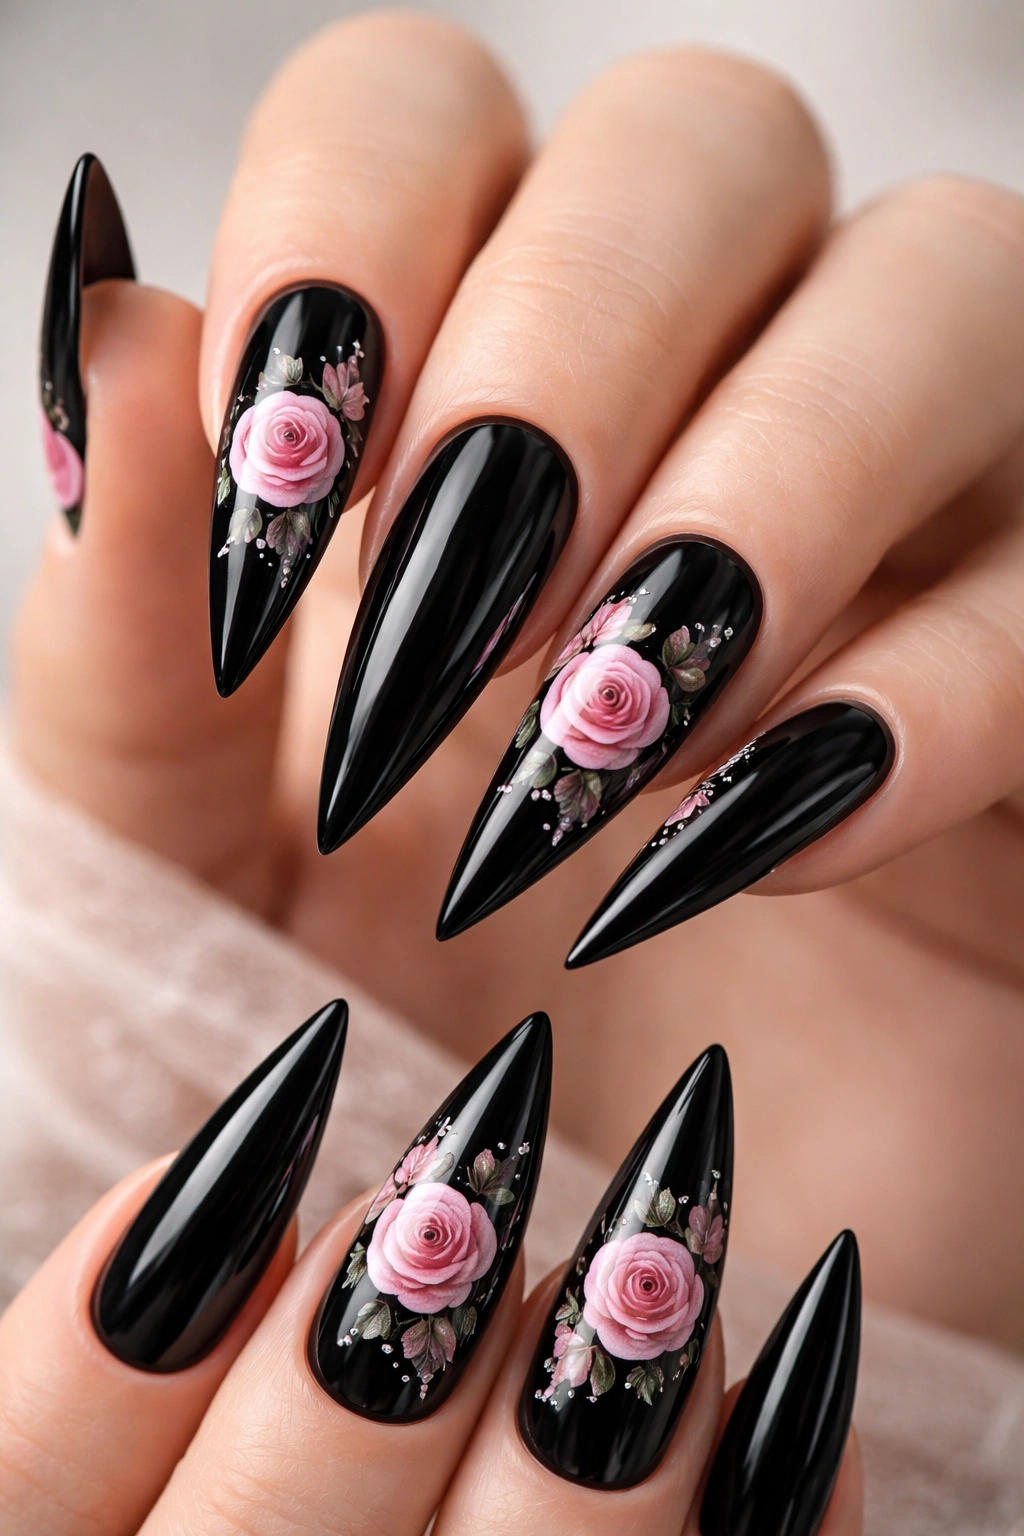
Delicate rose designs painted or stamped onto a solid black base bring romantic elegance to bold stiletto nails. This design bridges the gap between edgy (black) and feminine (roses and pink), creating something that feels both tough and beautiful simultaneously.
Rose Design Variations
Roses can be rendered in a few different ways on stiletto nails. You might go with realistic, detailed roses concentrated on a single accent nail, or smaller rose silhouettes scattered across multiple nails. Some people prefer abstract rose shapes that suggest flowers without literal detail, while others embrace fully dimensional 3D rose designs using sculptured gel.
Technique and Precision
- Start with a perfectly smooth black base — any imperfections will be magnified by the glossy finish
- For painted roses, invest in a thin detail brush and quality nail art polish that has good pigmentation in pink shades
- Roses on stiletto nails look best when positioned toward the tip area where there’s more nail real estate to showcase the detail
- Consider using metallic gold or rose gold accents to outline roses or add shading depth
- Seal everything under a glass-like top coat that makes the roses pop against the black background
Insider note: If you’re not confident in your painting skills, nail stamping plates with rose designs offer a faster alternative that still delivers professional-looking results.
4. Geometric Black and Pink Blocked Sections
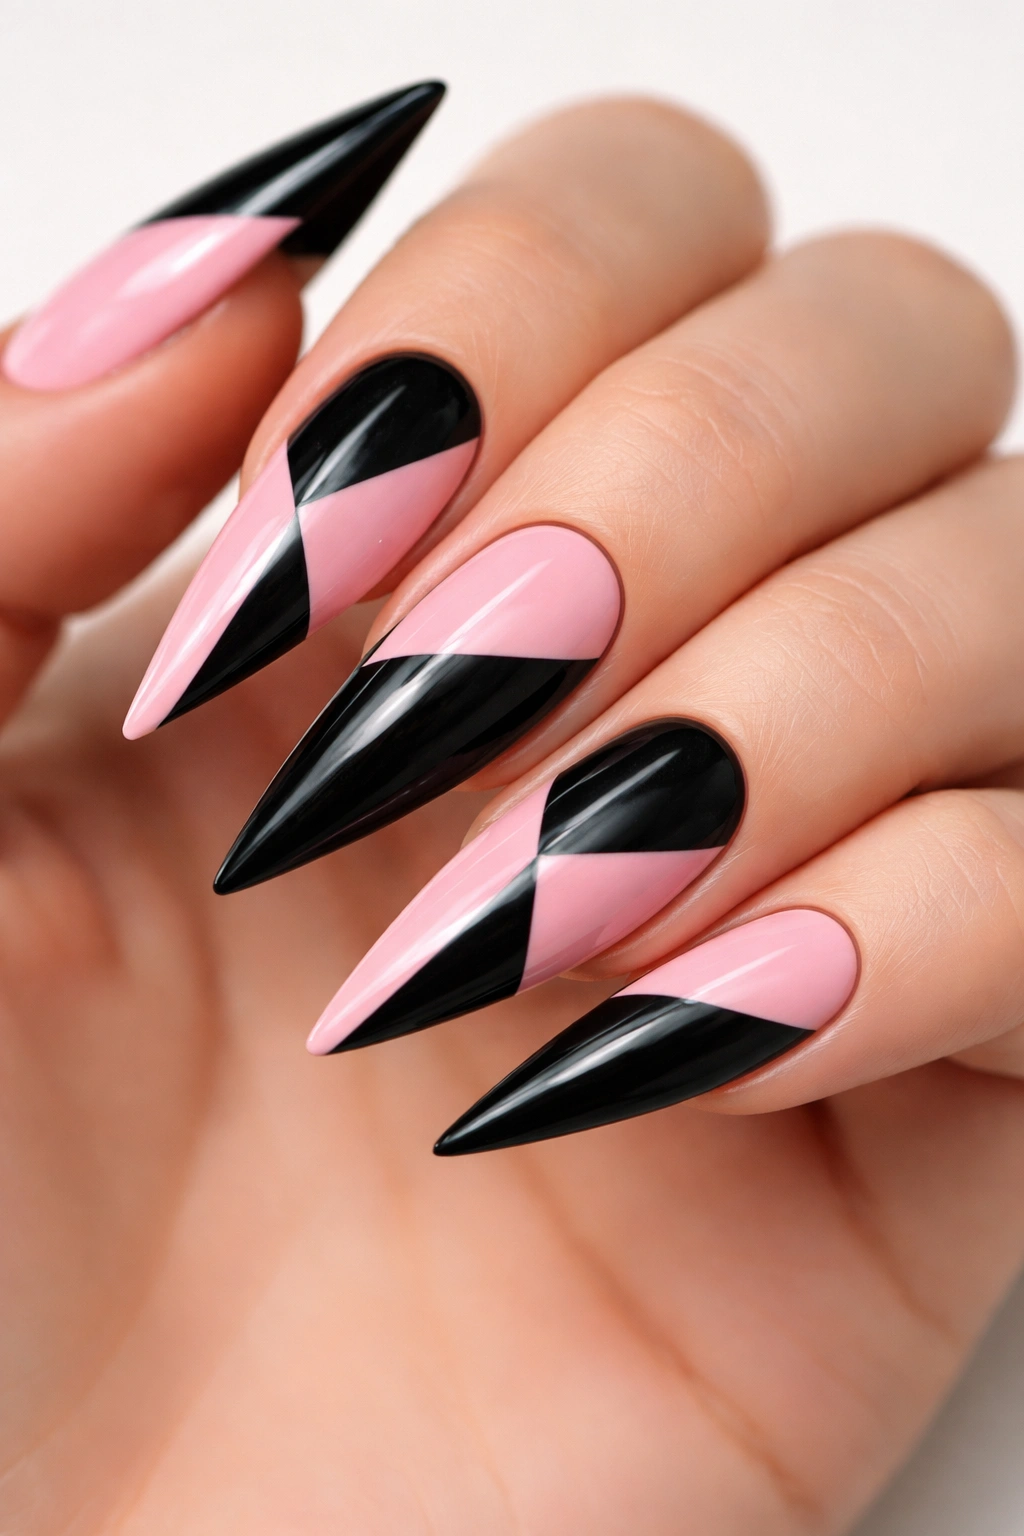
Color-blocking is a graphic design technique that divides the nail into distinct sections of solid color — perhaps half pink and half black, or diagonal splits, or interlocking angular shapes. On stiletto nails, geometric sections feel architectural and intentionally designed rather than random.
Design Layout Options
Geometric blocking works beautifully in multiple configurations: a vertical split down the center, horizontal bands, diagonal sections that create a modern asymmetrical look, or even chevron patterns. The key is keeping edges as clean and sharp as possible, which makes your design read as intentional rather than rushed.
Execution for Crisp, Clean Lines
- Use nail tape or stencils to create your dividing lines and protect areas you’re not painting
- Apply your base color and let it dry completely
- Place your tape carefully along where you want the color division to occur
- Paint your contrasting color in the exposed area with 2-3 thin coats
- Remove the tape slowly and gently while the final coat is still slightly tacky for the crisest edges
- Finish with a top coat that seals everything in place
Quick facts:
- Gel polish holds geometric designs better than traditional polish on stiletto nails due to its durability
- Matte top coats can add extra visual interest to geometric designs by creating subtle texture contrast
- Thin tape designed for nail art is easier to remove without damage than regular painter’s tape
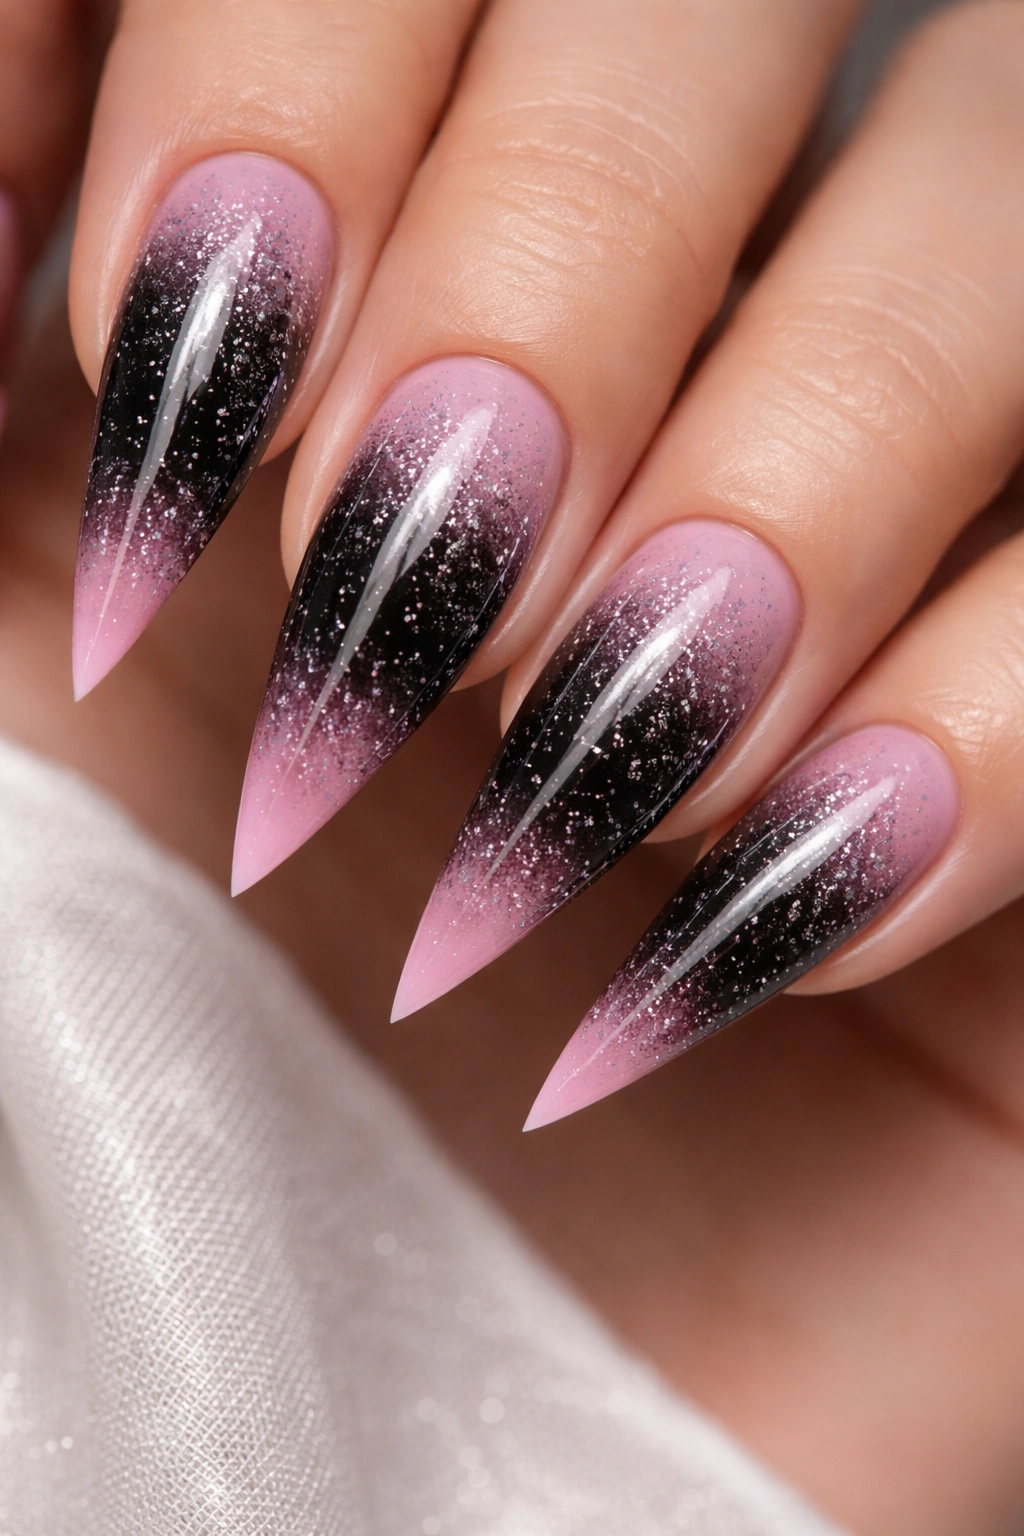
5. Black Base with Pink Glitter Gradient Tips
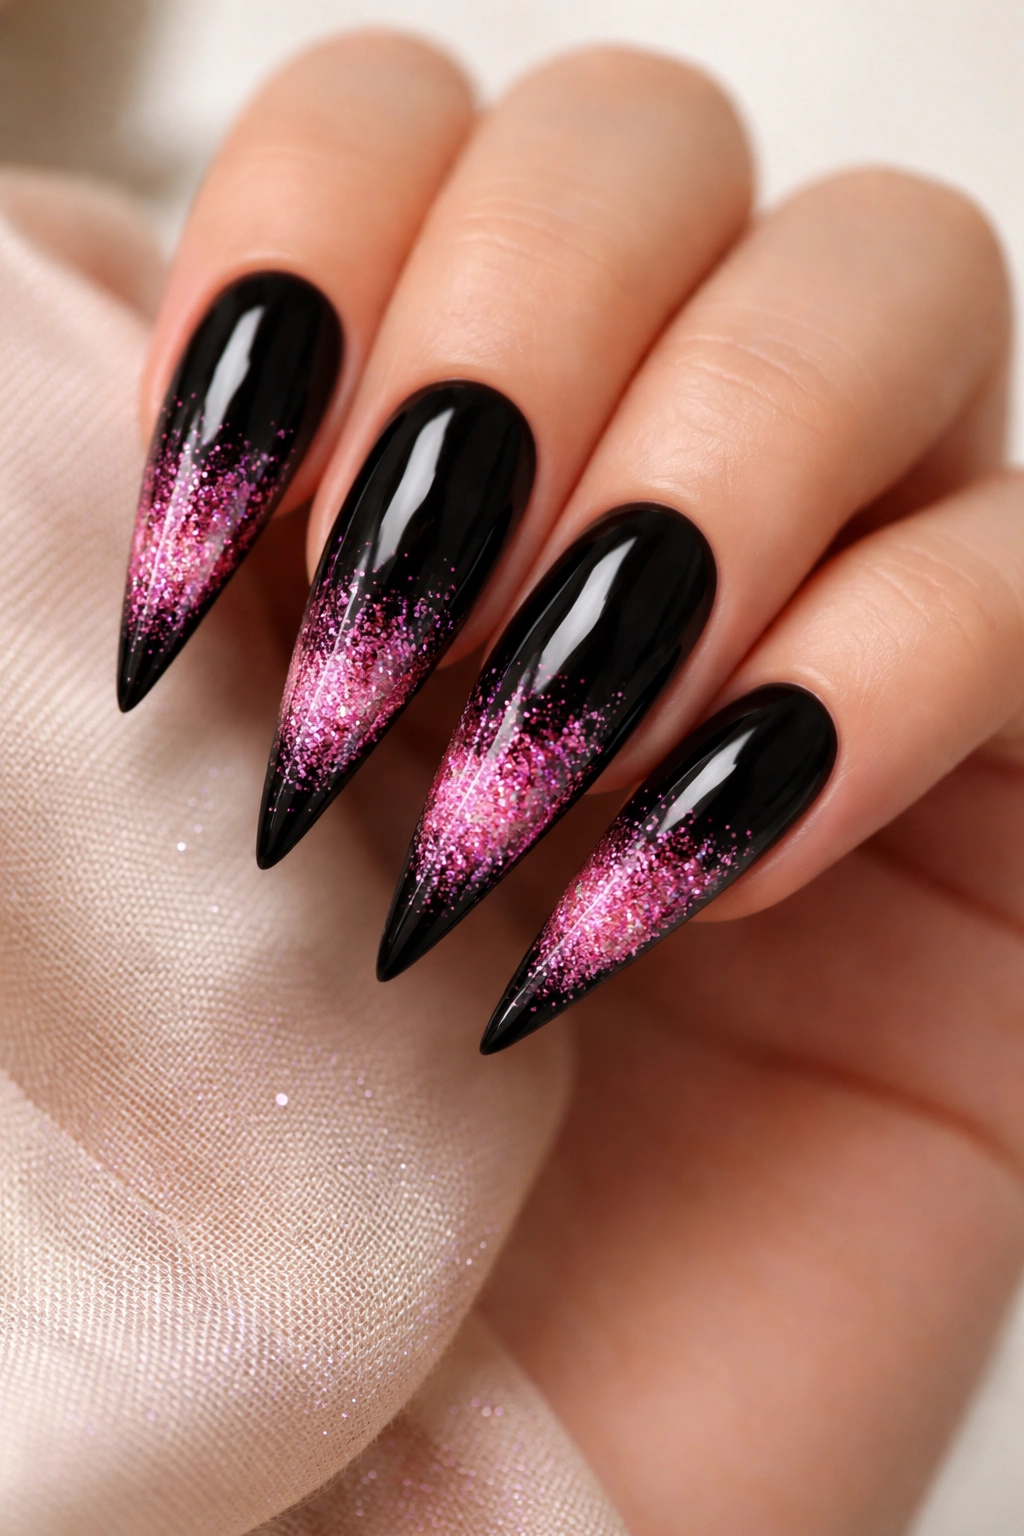
A glitter gradient combines sparkle with the black and pink color story, creating nails that shift from understated to glamorous depending on the angle. This design works especially well for evening events, date nights, or whenever you want that extra touch of shimmer on your stiletto nails.
Glitter Application Methods
You can apply glitter in a few ways: brush loose glitter particles suspended in gel over the tip area for a loose, scattered effect; use pre-made glitter gradient gels that already have the particles suspended in the product; or apply solid glitter polish to just the nail tips and fade it back with a sponge. Pink and holographic glitters create the most striking contrast against a black base.
Achieving a Seamless Gradient
- Apply your black base and cure if using gel, or let dry if using regular polish
- If using loose glitter, paint a thin layer of clear or colored gel over the tip area where you want the glitter to sit
- Sprinkle glitter while the layer is still tacky, allowing particles to stick unevenly for that graduated effect
- Tap away excess and apply another thin clear layer to seal everything down
- If using a pre-made glitter gel, apply it heavily at the tip and blend it backwards with a sponge for a fade effect
- Finish with a glossy top coat that encapsulates everything and creates a smooth, wearable surface
Worth knowing: Glitter on stiletto nails requires a quality top coat and regular touch-ups, as the extended nail length means more movement and potential wear at the tips.
6. Pink Nails with Black Negative Space Designs
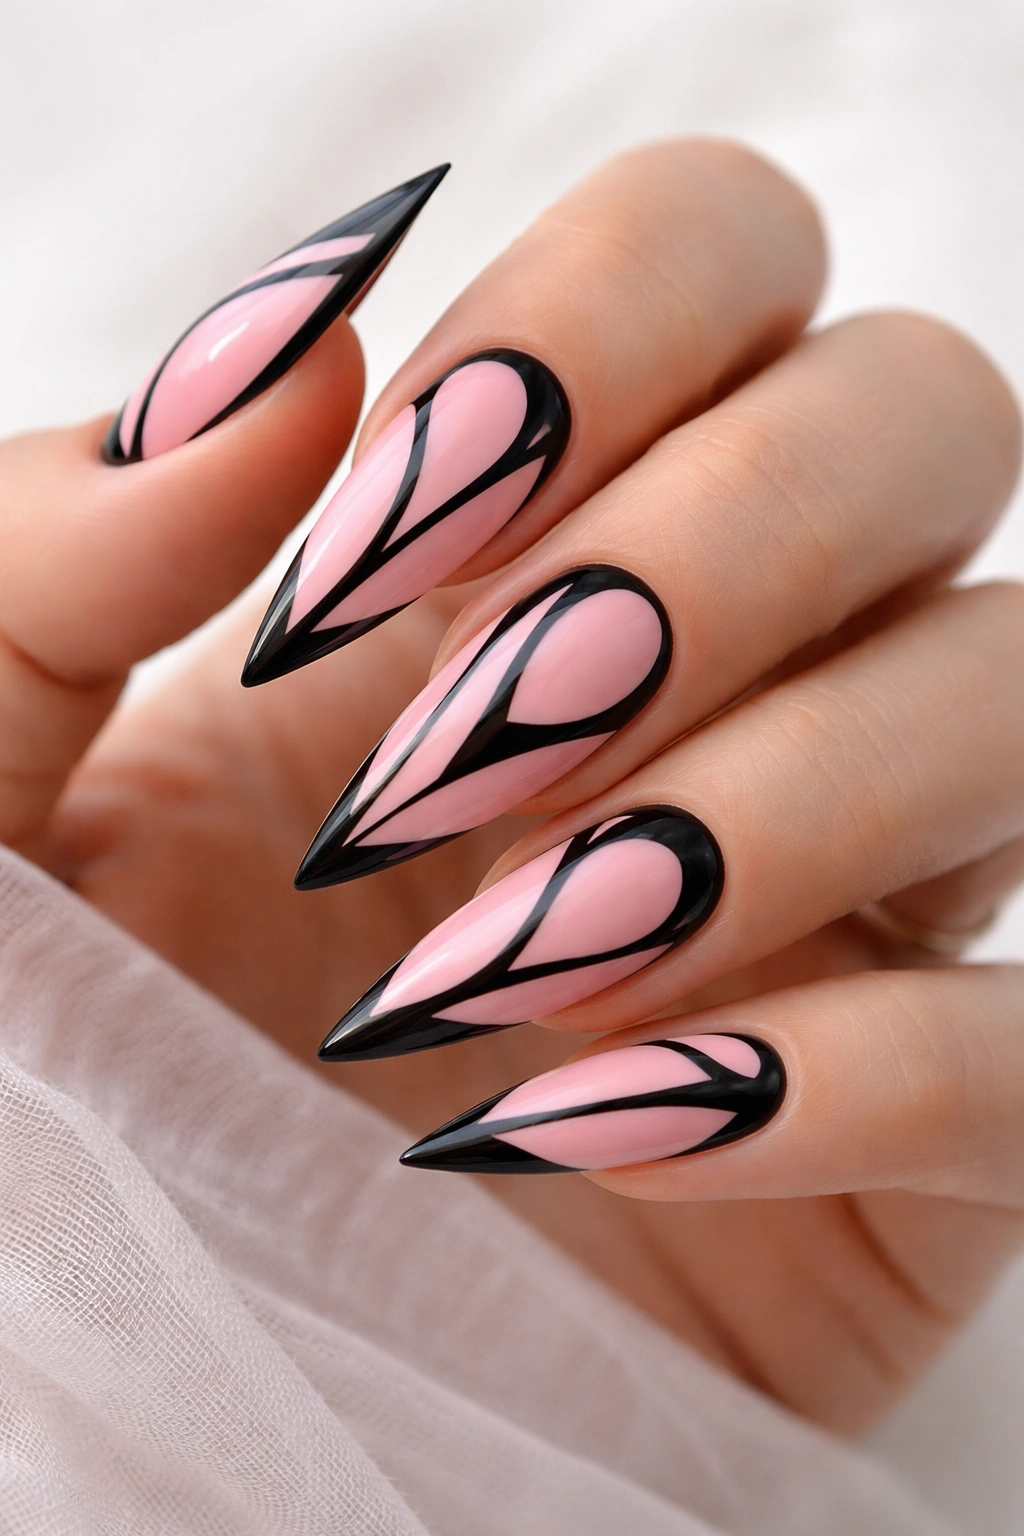
Negative space designs strategically leave parts of your natural nail (or a base color beneath) visible, creating outline-based art that feels modern and intentional. On pink stiletto nails, black negative space designs might feature geometric shapes, abstract lines, or decorative outlines that frame sections of the color.
What Makes Negative Space Work
The beauty of negative space is that it doesn’t require flawless painting — the unpainted areas ARE the design. Creating clean negative space shapes requires nail tape, stencils, or a steady hand with a thin brush to paint the outlines. The contrast between your colored nail and the exposed areas underneath creates visual depth that makes simple designs look sophisticated.
Creating Precise Negative Space
- Start with your pink base color applied smoothly across all nails
- Decide on your negative space pattern — geometric shapes, lines, or organic forms all work beautifully
- Use thin nail tape or stencils to protect the areas you want to stay pink
- Paint your black outline or design in the exposed areas with precision
- Remove tape carefully while the black is still slightly wet for the cleanest line
- Apply a glossy top coat that makes the negative space pop by highlighting the contrast
Pro tip: The most striking negative space designs on stiletto nails involve symmetrical or repeating patterns rather than random cutouts.
7. Marble Effect in Black and Pink Swirls
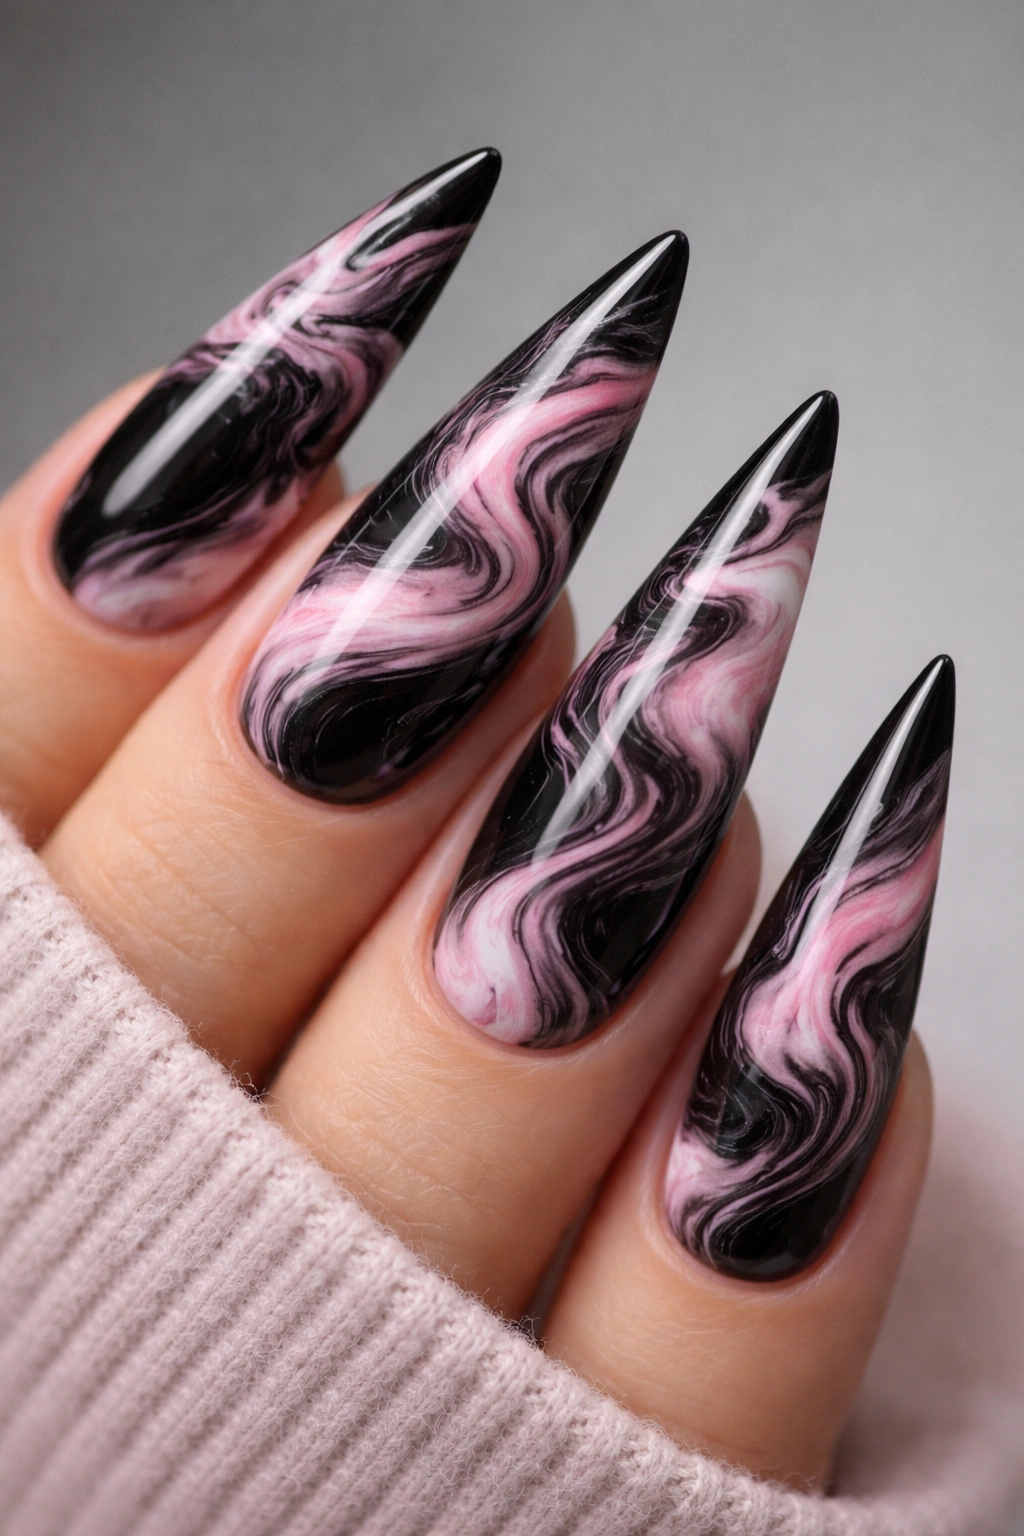
Marble designs create an organic, artistic look that feels expensive and sophisticated. When you combine black and pink marble on stiletto nails, you get an effect that looks like natural stone — each nail becomes a unique pattern that can’t be replicated exactly, which adds to the appeal.
Creating Authentic Marble Patterns
True nail marble involves creating swirls either through water marbling (dropping polish into water and swirling it, then dipping your nail) or through wet-on-wet painting where you blend colors directly on the nail surface while they’re still wet. The key to beautiful marble is allowing colors to merge organically while maintaining some color separation so the pattern is visible.
Water Marbling Technique
- Fill a small cup with room-temperature water
- Drop black polish into the water, then drop pink into the center of the black drop
- Use a thin tool to swirl the colors through the water in whatever pattern appeals to you
- Dip your nail at a slight angle into the pattern, allowing the design to stick to the nail surface
- Carefully remove your nail and allow the water to drip away
- Use a thin cleanup brush to remove any stray polish around the cuticle and edges
- Seal with a top coat that preserves the swirled design
Worth knowing: Water marbling takes practice, and not every attempt will be gallery-worthy — but that’s part of the charm. Each nail becomes a one-of-a-kind piece of wearable art.
8. Black French Tips with Pink Base
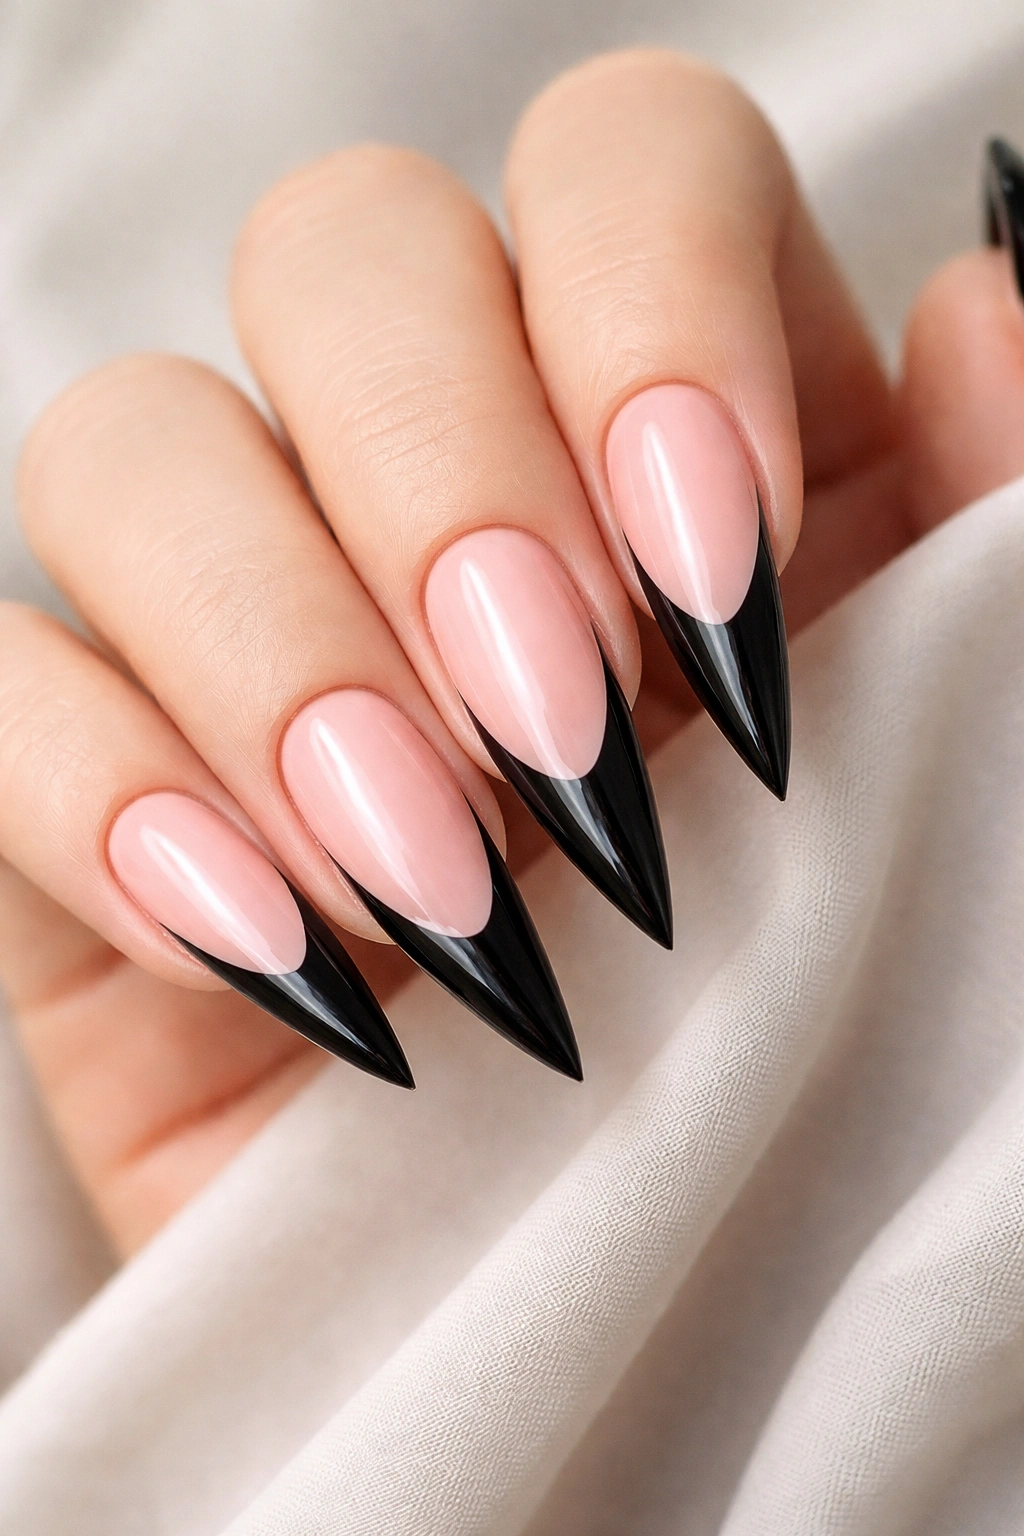
The French tip is a classic nail design elevated by reversing the traditional color story. Instead of a white tip on a nude base, this design features bold black tips against a soft or vibrant pink nail bed, creating a modern twist on a timeless look.
Why Reversed French Tips Feel Fresh
Pink and black in French tip form reads as edgy and updated compared to traditional French manicures. The black creates a sharp frame at the tip of each stiletto nail, drawing the eye to the point and creating an elongated silhouette. This design works beautifully on both pale pink bases and deeper rose or hot pink shades.
Perfecting the French Tip Line
- Apply your chosen pink color as a smooth base across all nails and let dry or cure completely
- Use a curved French tip guide or thin nail brush to paint the black tip area
- The tip line should start approximately where the smile line naturally occurs on your nail — about 1/4 inch from the very tip
- Paint with 2-3 thin, smooth coats of black to avoid streaking
- Use a makeup sponge or lint-free cloth lightly damped with polish remover to soften the line slightly if you prefer a gradient effect
- Finish with a glossy top coat for that polished, intentional look
Pro tip: If straight lines challenge you, nail guides or stickers make creating perfect French tips dramatically easier and faster.
9. Pink Ombré with Black Geometric Accent Nail
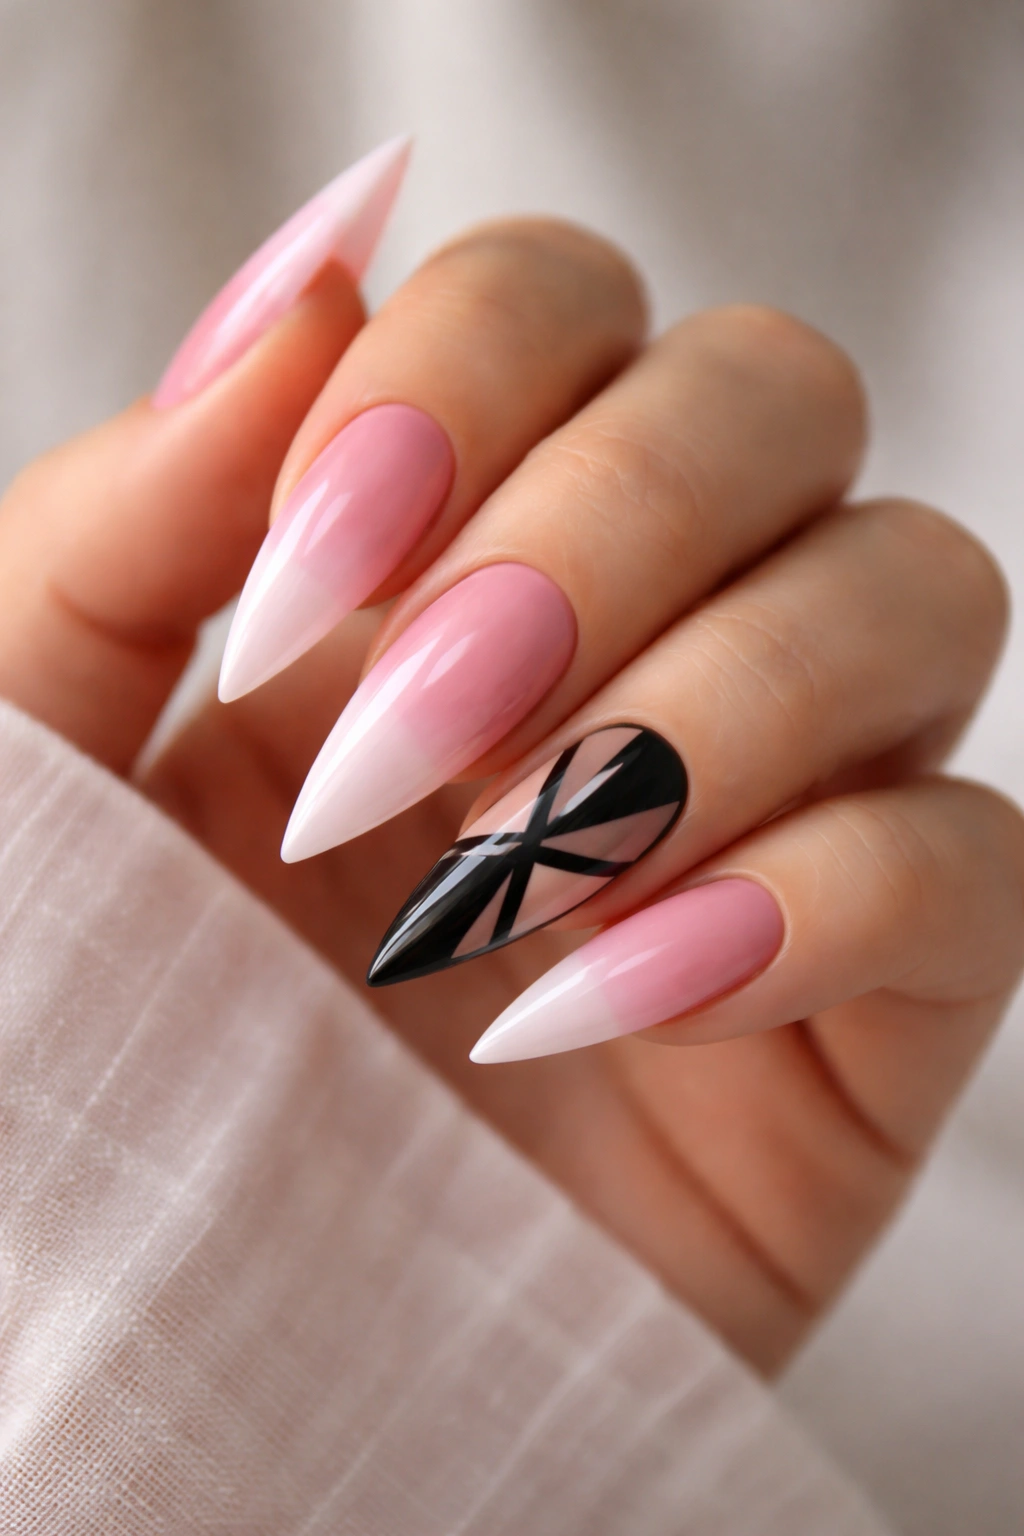
Ombré on most nails paired with a bold geometric accent nail on one creates visual hierarchy and makes a statement. Your gradient pink-to-black ombré nails draw attention, then that one nail featuring black geometric shapes — perhaps a triangle, diagonal stripe, or abstract shape — becomes the true focal point that people notice and comment on.
Designing the Accent Nail
The accent nail should be visually distinct enough from your ombré gradient to stand out without looking out of place. Some options include: a single large geometric shape centered on the nail, multiple smaller geometric shapes arranged asymmetrically, or a bold stripe that contrasts with the gradient background. The accent nail typically goes on your ring finger or middle finger, wherever feels most natural on your hand.
Execution Strategy
- Create your ombré gradient effect on 4 nails using the sponge blending technique described earlier
- For the accent nail, apply the same pink base to start
- Design your geometric shapes using thin nail tape, stencils, or careful freehand painting
- Paint or fill your geometric elements in solid black with precision
- Ensure your accent nail still carries some of the pink tones so it visually connects to your other nails
- Seal everything with a matte or glossy top coat depending on your preference
Worth knowing: The accent nail doesn’t have to perfectly match the ombré gradient on your other fingers — slight variations actually look more intentional and artistic.
10. Chrome Black with Pink Rose Gold Details
Chrome polish creates a mirror-like, reflective finish that photographs beautifully and feels incredibly luxe. Combining chrome black nails with delicate rose gold metallic details (stripes, dots, or foil accents) creates an upscale, high-fashion aesthetic on stiletto nails.
Working with Chrome Polish
Chrome polish requires a specific technique: you apply the base color, then use a buffing tool or applicator to activate the chrome effect, creating that reflective metallic finish. Once you’ve achieved the chrome effect, you can layer other colors or metallic accents on top for added dimension and visual interest.
Adding Rose Gold Accents
- Apply and cure your black chrome base
- Use thin rose gold striping or metallic paint to add accent details — perhaps vertical stripes, geometric shapes, or delicate lines
- Alternatively, use rose gold chrome powder on just the accent nail or the tip area for a partial chrome effect in a warmer metallic shade
- Layer metallic foil stickers or metallic gel paint designs for extra dimension
- Seal with a glossy top coat that maintains the reflective quality of the chrome
Pro tip: Chrome black with rose gold details feels especially striking under natural sunlight or in photos, as the reflective quality creates obvious visual depth and luxury.
11. All-Black Stilettos with Pink Rhinestone Embellishments
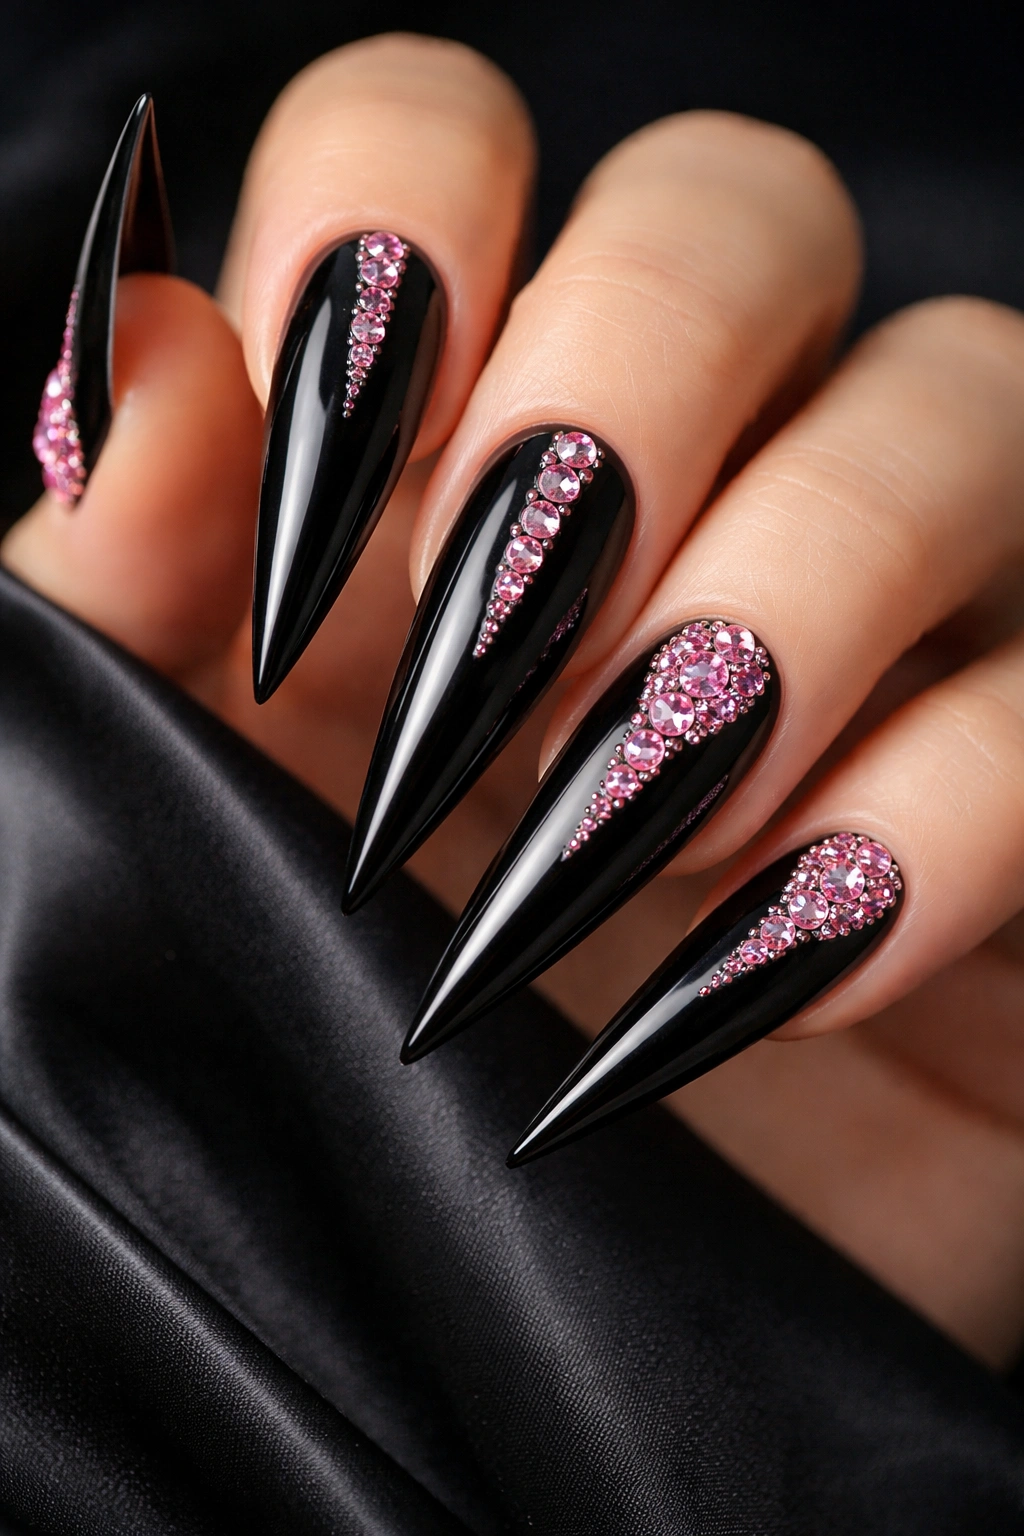
Sometimes the most glamorous designs involve minimal color but maximum sparkle. All-black stiletto nails studded with pink rhinestones create an inherently luxurious, evening-ready aesthetic that feels expensive and attention-grabbing without being loud or over-the-top.
Strategic Rhinestone Placement
Rhinestones look most intentional when arranged in patterns rather than scattered randomly. Consider placing them along the tip edge creating a glittery frame, in a vertical line down the center of each nail, clustered on one accent nail, or arranged in geometric patterns. Pink rhinestones against black create color contrast that makes the sparkle even more noticeable.
Application and Longevity
- Apply your black gel or polish base and cure or dry completely
- Use a rhinestone picker tool (a small stick with a sticky tip designed for picking up tiny stones)
- Dip the picker into a small amount of clear gel or nail glue
- Pick up your rhinestone and place it exactly where you want it on the nail
- Continue placing stones in your chosen pattern
- Once all stones are placed, seal everything under a thick layer of clear top coat
- For gel nails, cure thoroughly to ensure the top coat encapsulates and protects each stone
Worth knowing: Rhinestones on stiletto nails occasionally catch on fabric or hair, so position them carefully and make sure they’re sealed completely under your top coat to prevent snagging.
12. Black Matte Base with Pink Glossy Tips
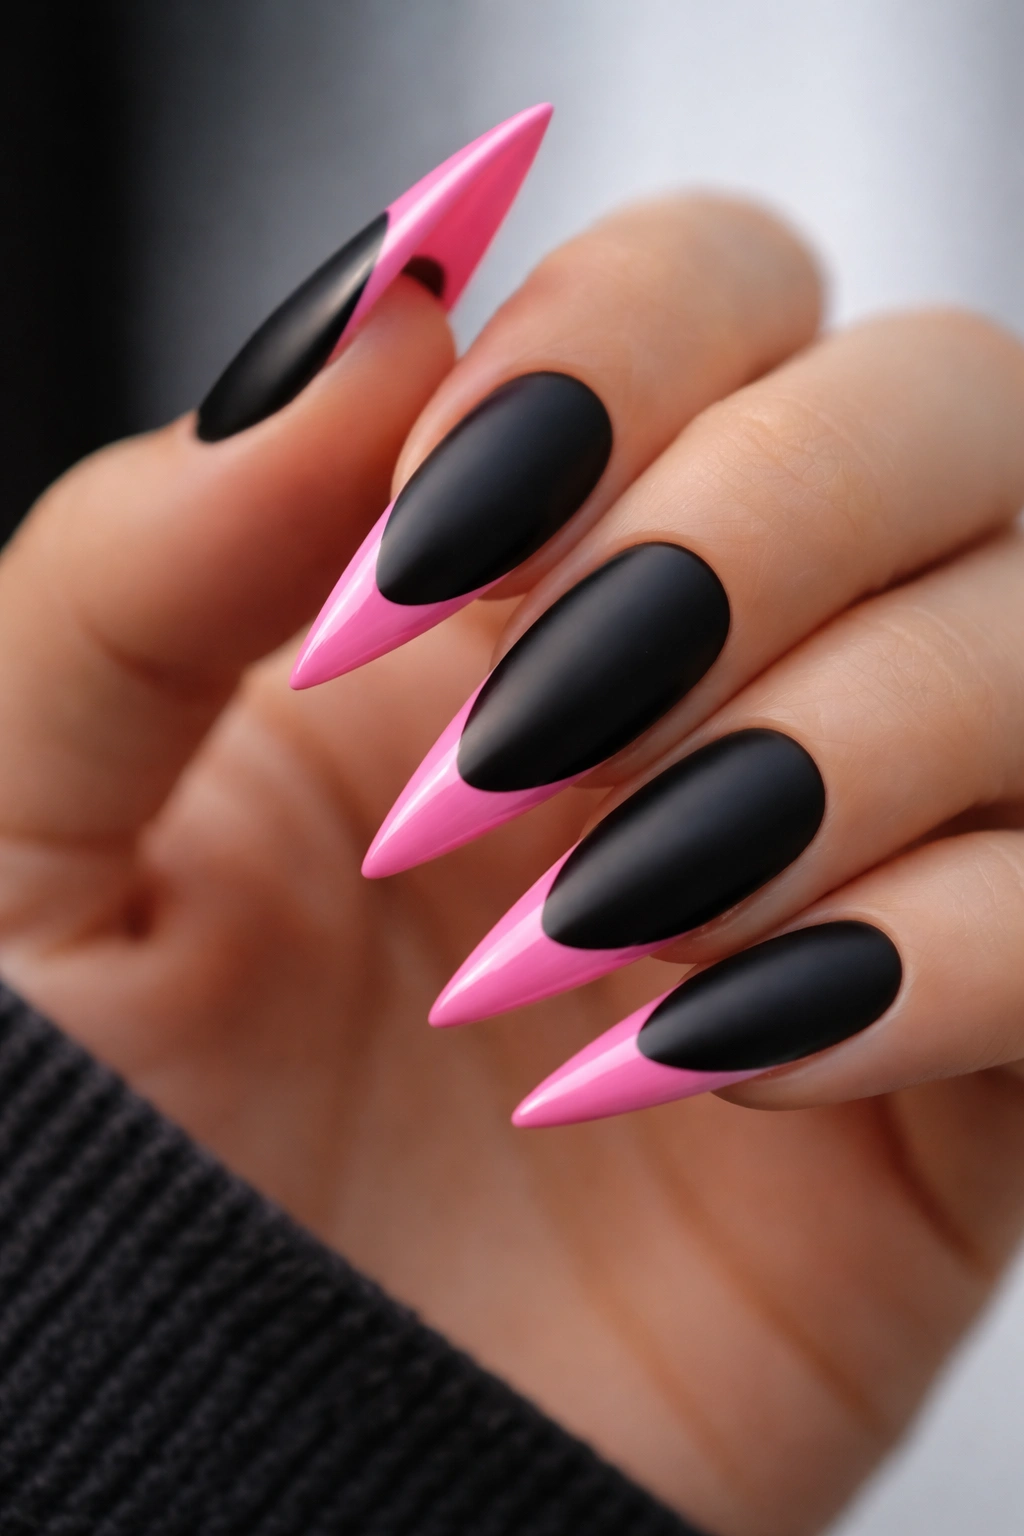
Playing with finish contrasts creates visual interest without requiring complex designs. Matte and glossy finishes together create texture that catches the light differently on different parts of your nail, making even a simple color split feel sophisticated and deliberate.
Achieving Matte and Glossy Contrast
- Apply your black base color with a matte top coat, curing it completely
- Create a clear dividing line where you want your glossy section to begin (typically at the tip)
- Apply pink color to just the tip area
- Instead of a matte top coat on the pink, use a high-gloss, ultra-shine top coat
- The contrast between the matte black and glossy pink creates an immediate visual distinction
Why This Simple Technique Works
The matte finish photographs differently than glossy, creating shadows and depth that makes the design read as intentional. This technique works beautifully on stiletto nails because the pointed shape naturally separates the matte base from the glossy tip, making the transition feel natural rather than arbitrary.
Pro tip: Matte finishes show fingerprints and dust more visibly than glossy, so this design requires slightly more frequent touch-ups to maintain its polished appearance.
13. Pink Nail Art with Black Line Designs and Minimalist Art
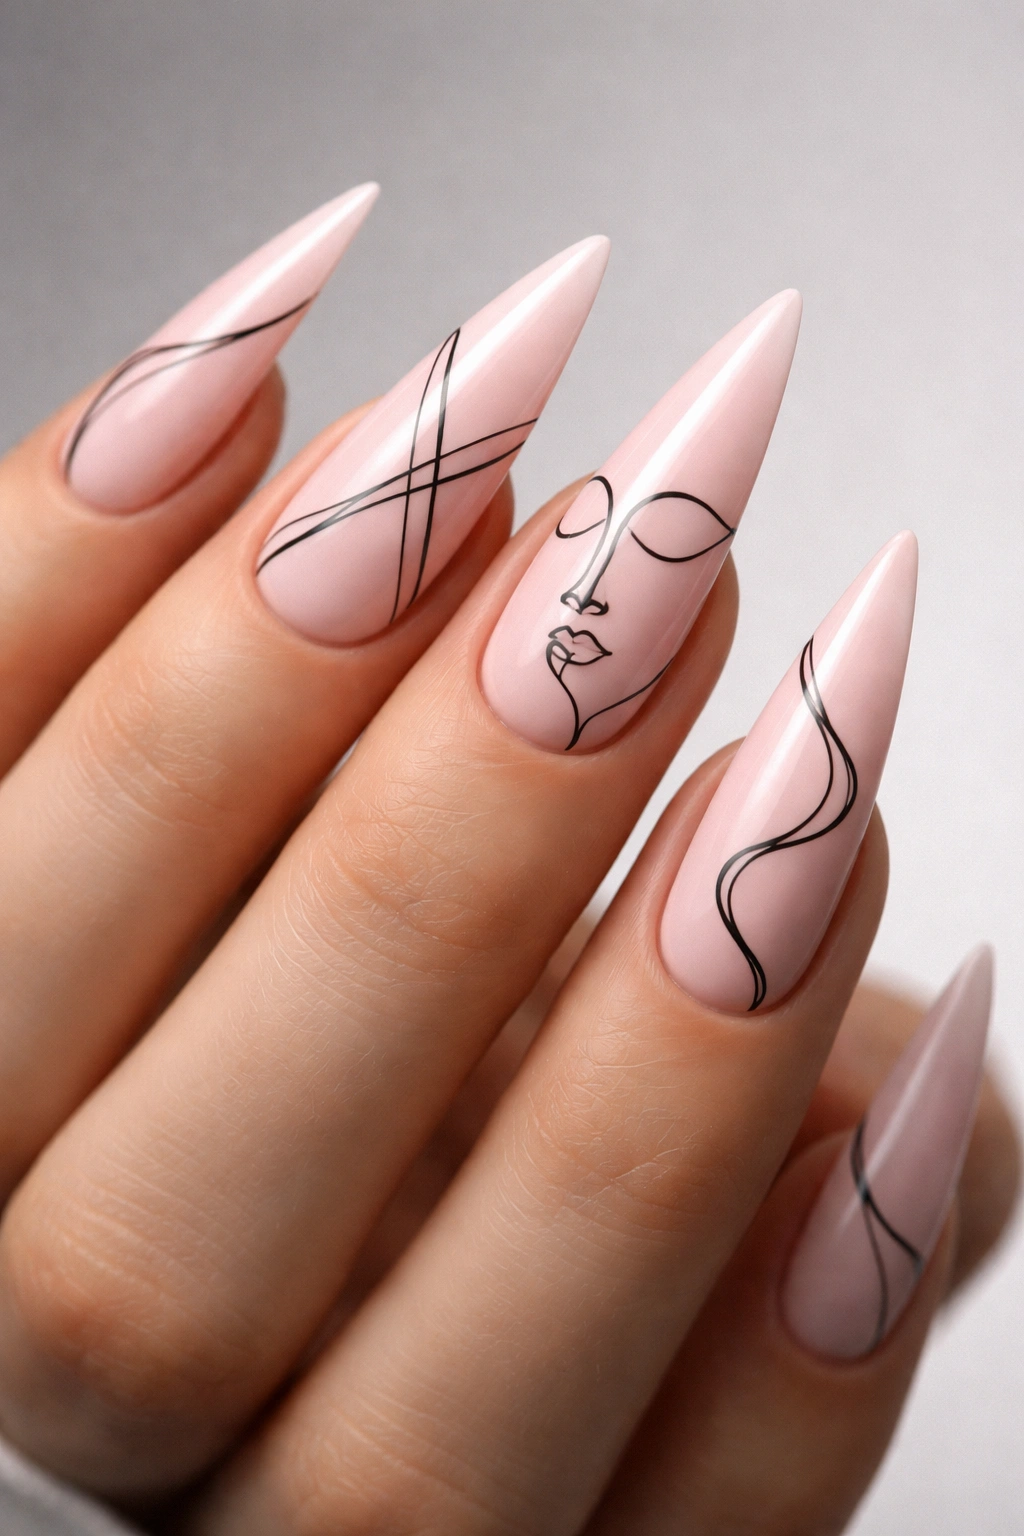
Thin black line drawings over a pink base create sophisticated, artistic nails that feel personal and creative without being overly complicated. This might include line drawings of faces, abstract line art, geometric patterns, or decorative motifs rendered in precise black lines.
Executing Fine Line Art
Line-based designs are forgiving because they don’t require flawless color filling — imperfect lines actually contribute to the handmade artistic quality. The key is having a very thin detail brush and black nail art polish with good opacity so your lines are visible and crisp.
Design Ideas for Pink Bases
- Minimalist face profiles or abstract face line art
- Geometric line patterns creating shapes or optical illusions
- Botanical line drawings of leaves, flowers, or stems
- Abstract swirls and waves in flowing patterns
- Repeating geometric motifs or tile-like patterns
- Simple dot and line combinations creating texture
Worth knowing: The thinner your lines, the more delicate and refined your design appears. Practice with very thin brushes to develop control and precision.
14. Houndstooth Pattern in Black and Pink
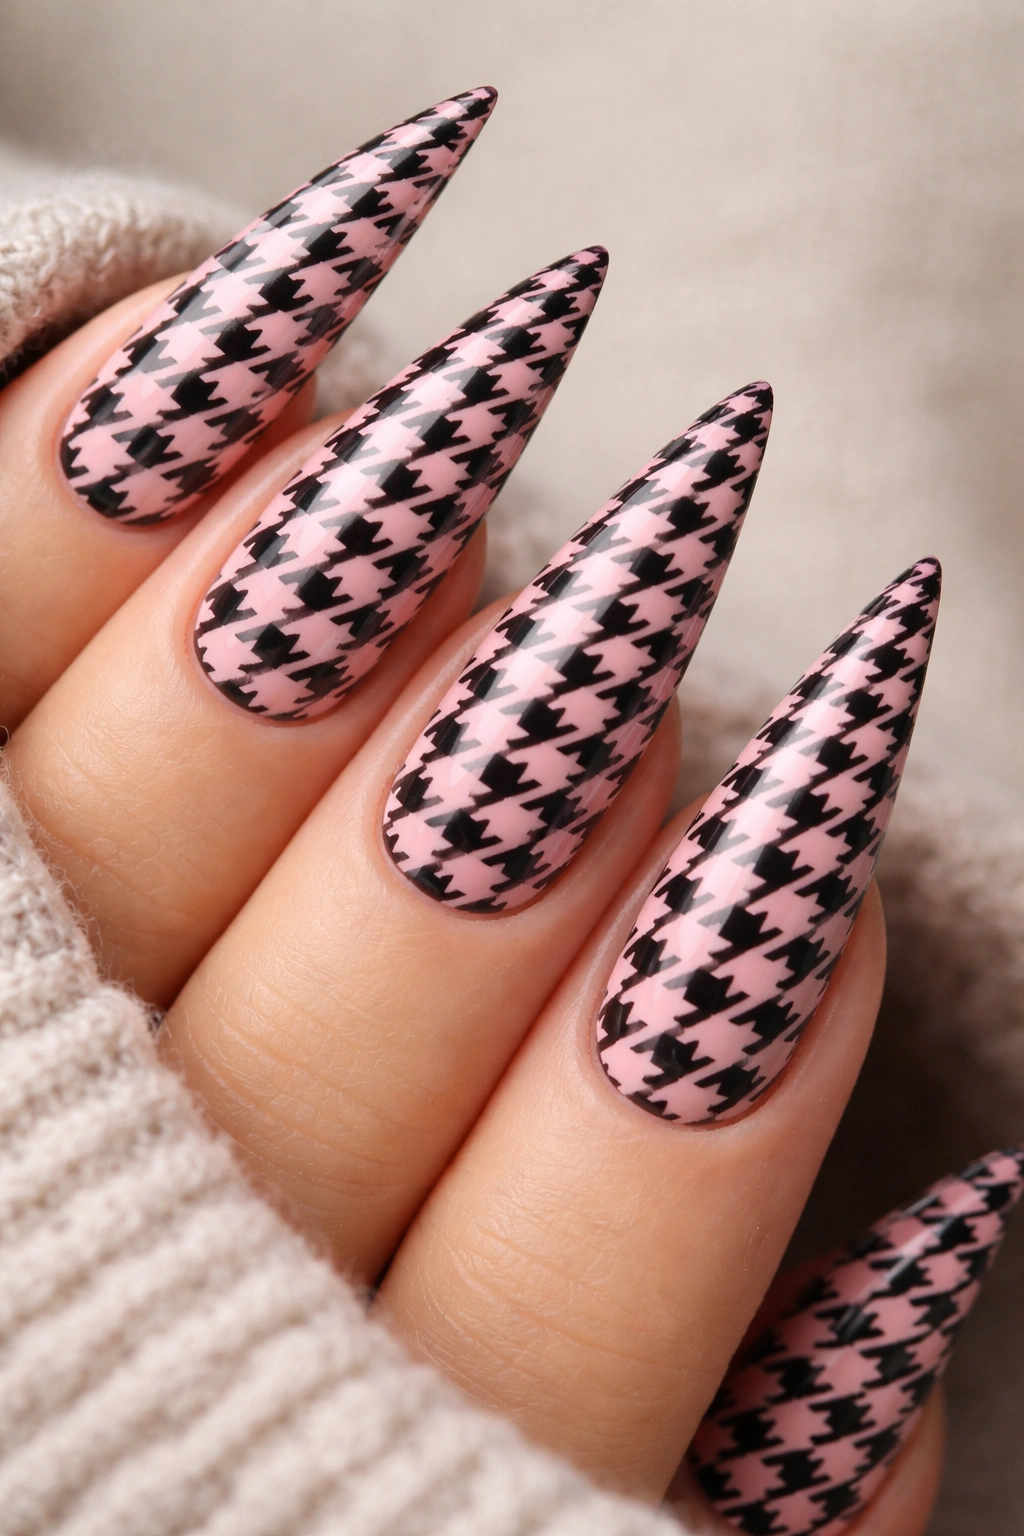
Houndstooth is a classic pattern that translates beautifully to nail art when scaled appropriately for small nail surfaces. The alternating black and pink broken checks create a sophisticated, preppy aesthetic that’s endlessly wearable while feeling distinctly patterned and intentional.
Creating Houndstooth on Stiletto Nails
True houndstooth involves creating precise angled squares in alternating colors. On small nail surfaces like stilettos, the pattern needs to be scaled small enough that several repeats fit on each nail without appearing cramped or chaotic. This pattern works best with either gel and stamping or hand-painting with great precision.
Application Techniques
- Use a houndstooth nail stamping plate (the easiest method) to transfer the pattern directly onto your nail
- If painting by hand, use thin nail tape to create guidelines for your angled squares
- Paint one color in the exposed areas, let dry, reposition tape, and paint the alternate color
- Alternatively, paint the pattern freehand using a thin brush with steady, controlled strokes
- Seal with a glossy top coat that makes the pattern definition crisp and clear
Pro tip: Nail stamping plates with houndstooth patterns deliver consistent results much faster than freehand painting, which is why many nail professionals prefer them for pattern work.
15. Black Gradient to Pink with White Speckle Details
Adding white speckling or splatter details over a black-to-pink gradient creates texture and visual interest that catches the light. The white speckles create a sense of movement and playfulness while the gradient underneath provides the color story and elegance.
Creating Speckle and Splatter Effects
White speckles can be applied using several methods: a dry brush technique where you drag a brush loaded with white polish across the surface for fine speckling, flicking a brush to create splatter effect, or using a toothbrush for more organic splatter patterns. The key is controlling the size and density of specks so they enhance rather than overwhelm your gradient.
Technique for Controlled Speckles
- Create your black-to-pink ombré gradient as your base layer and seal it with top coat
- Load a thin detail brush or old toothbrush with white polish
- For fine speckles, drag the brush across the nail surface in quick motions
- For splatter, hold the brush a few inches away and flick it toward the nail
- Apply speckles more densely near one end (typically the tip) and more sparsely near the base for a graduated effect
- Allow the white polish to dry completely before applying a final top coat
- The final top coat seals everything and creates a smooth, wearable surface
Worth knowing: White speckling can appear chalky or dusty if applied too thickly, so build up the effect gradually with thin layers rather than applying too much white at once.
16. Hot Pink Stilettos with Black Animal Print Accent Nail
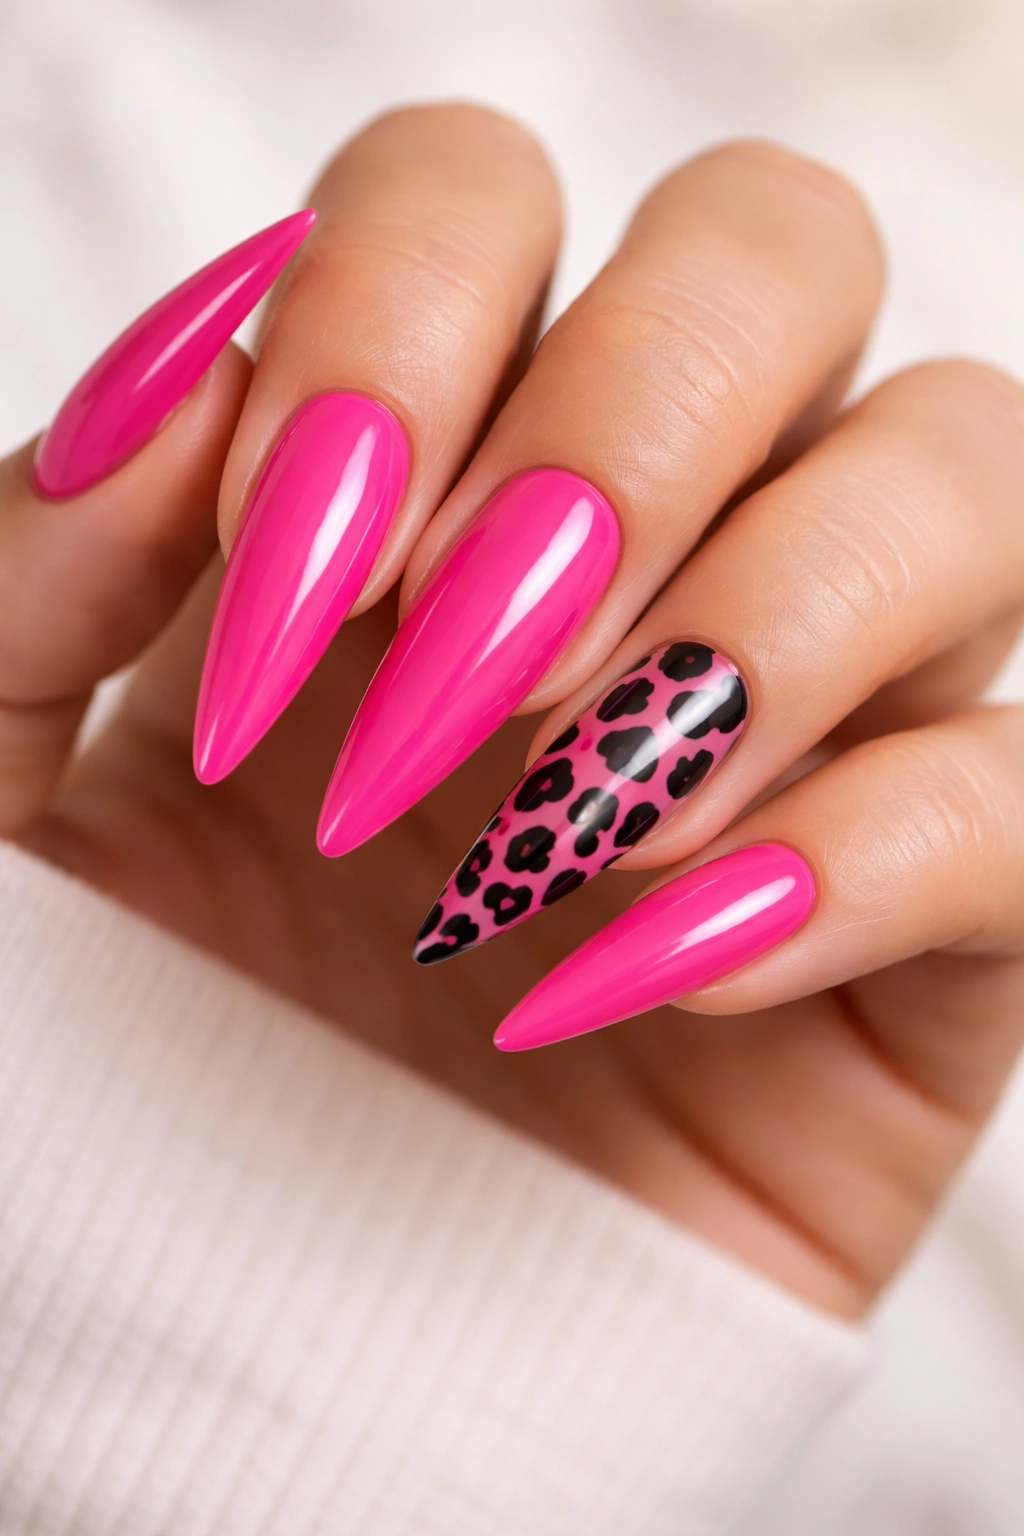
Animal prints bring wild, edgy energy to nail designs, and when you create an animal print accent nail against solid hot pink, you get maximum visual impact with excellent wearability. Black animal print on one or two nails creates a focal point while the solid pink nails keep the overall look balanced and not overwhelming.
Creating Animal Print Designs
Leopard print, zebra stripes, and snakeskin patterns all work beautifully as accent nail designs. Leopard print involves creating irregular black spots and rings with open centers; zebra uses flowing black stripes across the nail surface; snakeskin creates interlocking curved lines. Each pattern requires slightly different technique but all are achievable with practice or nail stamping.
Techniques for Animal Prints
- Design your base color (hot pink on most nails, potentially white or nude on the accent nail)
- If using stamps, select your animal print stamping plate and follow stamping instructions
- If painting freehand, use a thin brush and steady hand to create your pattern
- Start with lighter hand pressure to build up darker areas gradually
- Seal your animal print under a top coat that protects the design and creates shine
- The accent nail should be visually different enough to stand out but still coordinate with your pink nails
Pro tip: Animal print looks best when the pattern has some variation and imperfection rather than being perfectly identical on each nail — this mimics nature and feels more authentic.
17. Pink with Black Striped Chevron Details
Chevron patterns create directional visual movement that makes nails feel dynamic and modern. Black chevron stripes over pink bases create a graphic, geometric aesthetic that’s contemporary and intentionally designed without requiring extensive artistic skill.
Chevron Pattern Variations
Chevrons can be created as thin striped patterns covering the entire nail, a single bold chevron shape centered on the nail, or as a pointed pattern that frames the tip. Varying the width of your chevron stripes changes how the design reads — thin stripes create a busier, more textured look while thick chevrons feel bolder and more graphic.
Execution Method
- Apply your pink base color and let dry or cure completely
- Use thin nail tape to create angled guides for your chevron stripes
- Position the tape at opposing angles to create the characteristic V-shape or pointed direction of chevrons
- Paint black polish in the exposed areas between tape lines
- Remove tape carefully while the black is still slightly wet for clean edges
- Apply a glossy top coat to seal and protect your chevron design
Worth knowing: The angle of your chevrons affects the overall feel — steeper angles create more dramatic movement while gentler angles feel more subtle and sophisticated.
18. Crystalline Black Base with Pink Holographic Foil Accents
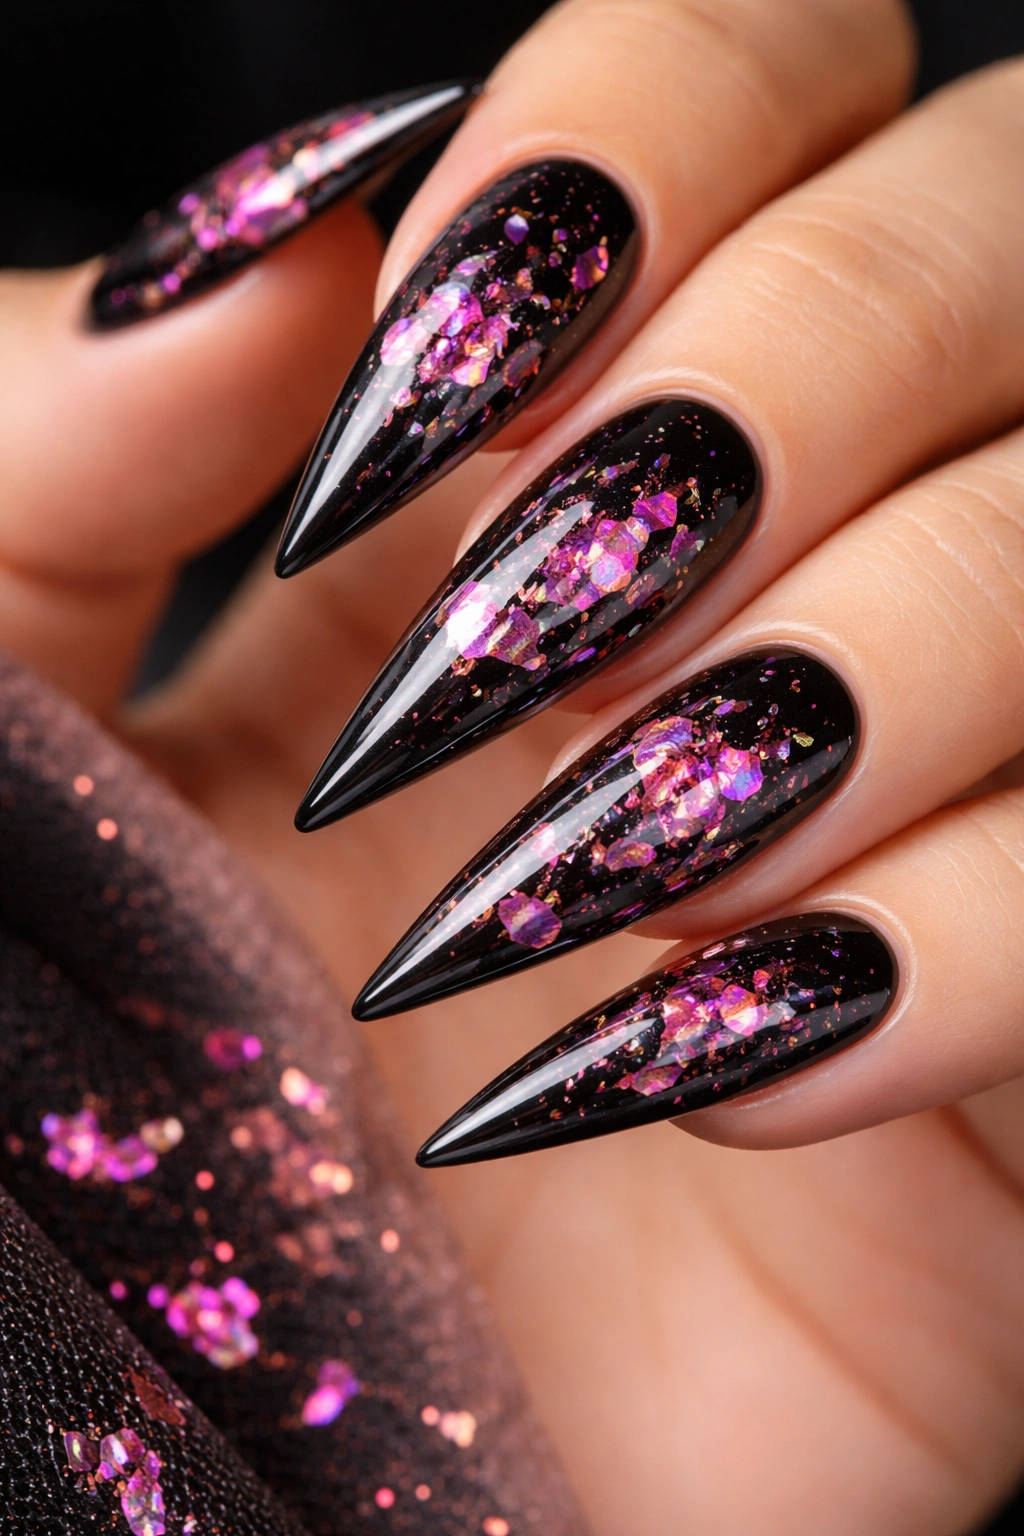
Holographic foil brings dimensional sparkle and rainbow iridescence to nail designs. Combined with a dark black base and positioned as accent details, holographic foils create a futuristic, eye-catching aesthetic that stands out under any lighting condition.
Working with Holographic Foil
Holographic foil comes in sheet form and adheres to gel or special gel adhesive. You cut small pieces, place them onto your nail adhesive or tacky gel layer, and press them down securely before sealing under top coat. The resulting effect is dimensional, reflective, and constantly changing as light hits it from different angles.
Application and Positioning
- Apply and cure your black gel base
- Create a sticky base layer (typically a thin gel top coat or special foil adhesive)
- Cut holographic foil into your desired shapes — perhaps geometric pieces, strips, or geometric accents
- Press foil pieces firmly onto the sticky layer, smoothing out any air bubbles
- Seal everything under a thick layer of clear gel top coat, making sure it completely encapsulates the foil
- Cure thoroughly to ensure the foil won’t lift or peel
Pro tip: Holographic foil looks most striking when used sparingly as accent details rather than covering the entire nail, allowing the black base to frame and showcase the sparkle.
Final Thoughts
Black and pink stiletto nails offer the perfect balance of sophistication and edge, elegance and attitude. Whether you choose intricate nail art, geometric designs, or simple color-blocking, this color combination works across every personal style and occasion. The extended surface area of stiletto nails gives you room to experiment with techniques and designs you might not attempt on shorter nails, making this the ideal shape for truly creative nail expression.
The designs covered here represent just a fraction of what’s possible when you combine these two complementary colors with the dramatic canvas of stiletto nails. Start with whichever design resonates most with your aesthetic, and don’t hesitate to mix and match elements from different ideas to create something uniquely yours. The best nail design is ultimately the one that makes you feel confident and excited when you look down at your hands.
