

Green stiletto nails are having a moment—and honestly, it makes sense. Whether you’re drawn to emerald glamour, sage minimalism, or lime-bright playfulness, there’s a shade of green that fits your personal style perfectly. Stilettos are the nail shape that commands attention, and pairing them with green gives you sophistication without screaming for every ounce of attention in the room. The beauty of green is that it works across seasons, skin tones, and occasions in ways that feel fresher than the usual go-to colors.
What makes green stilettos particularly compelling is their versatility. You can lean into high-fashion elegance with a deep forest shade, go bold with neon or lime, or choose something refined like a dusty sage or soft pistachio. The elongated nail shape stretches the color across more surface area, which means even subtle shades make a real statement. Plus, green has that rare quality of feeling both timeless and contemporary—it won’t look out of place next season or five years from now.
The challenge isn’t finding a reason to wear green stilettos; it’s deciding which of the dozens of possibilities suits you best. That’s where we come in. We’ve gathered twenty distinct green nail ideas that range from minimalist chic to over-the-top glamorous, from nature-inspired designs to abstract art. Each one here is genuinely wearable, meaning you won’t need a specialty nail tech to pull it off—though many of these designs definitely justify booking that appointment if you love the look.
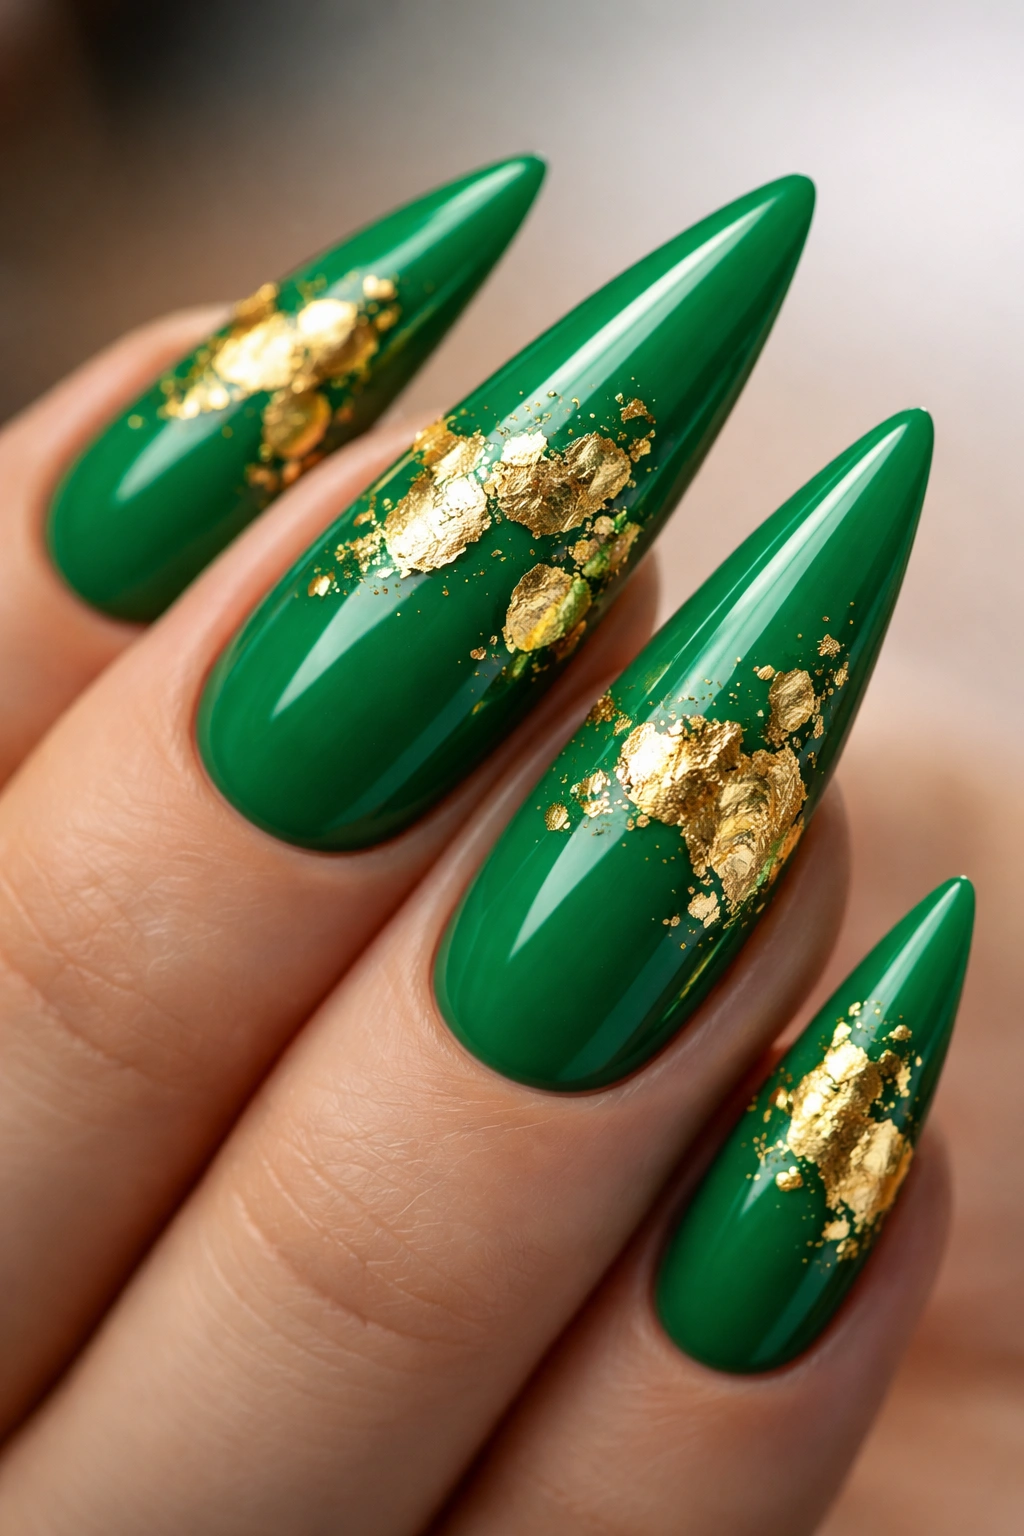
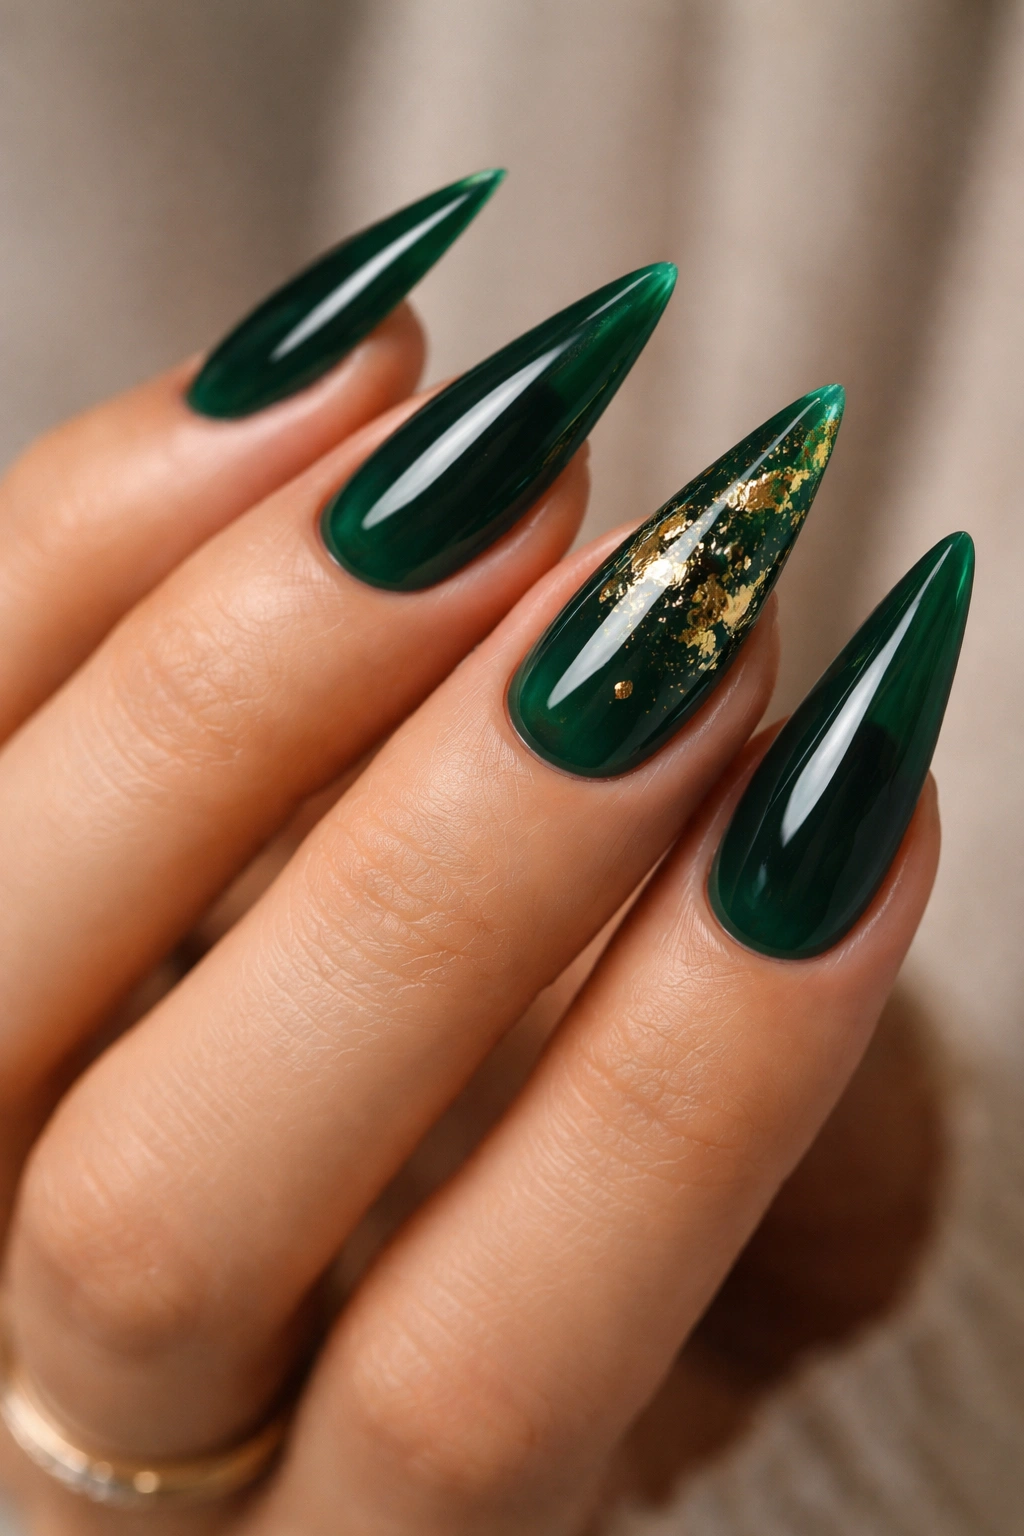
1. Emerald Green Lacquer with Gold Foil
Deep emerald green is luxury incarnate on a stiletto nail. When you choose a true emerald shade—rich, jewel-toned, and almost translucent at its edges—you’re working with a color that reads expensive even before you add any embellishment. The depth of emerald makes your nails look three-dimensional, like you’re wearing gemstones on your fingertips.
Why This Works
Emerald pairs spectacularly with gold accents because both colors have that warm, luxurious quality. Gold foil catches light in a way that simple metallic polish never quite does—it creates texture and movement. The foil works best when you apply it to one accent nail (usually the ring finger) or scattered across a few nails in asymmetrical patterns. This prevents the design from feeling matchy-matchy, which keeps it feeling curated rather than costume-y.
How to Get This Look
You’ll need a high-quality emerald green base (a gel formula holds the depth better than regular polish), gold foil sheets, and a gel adhesive or clear gel to set the foil in place. Paint your base color on all ten nails, cure if using gel, then cut small pieces of foil and press them onto your tacky gel layer before curing again. The foil creates an instant sense of occasion without requiring detailed art skills.
Pro tip: Don’t cover the entire nail with foil—leave at least 60% emerald showing so the color itself remains the star.
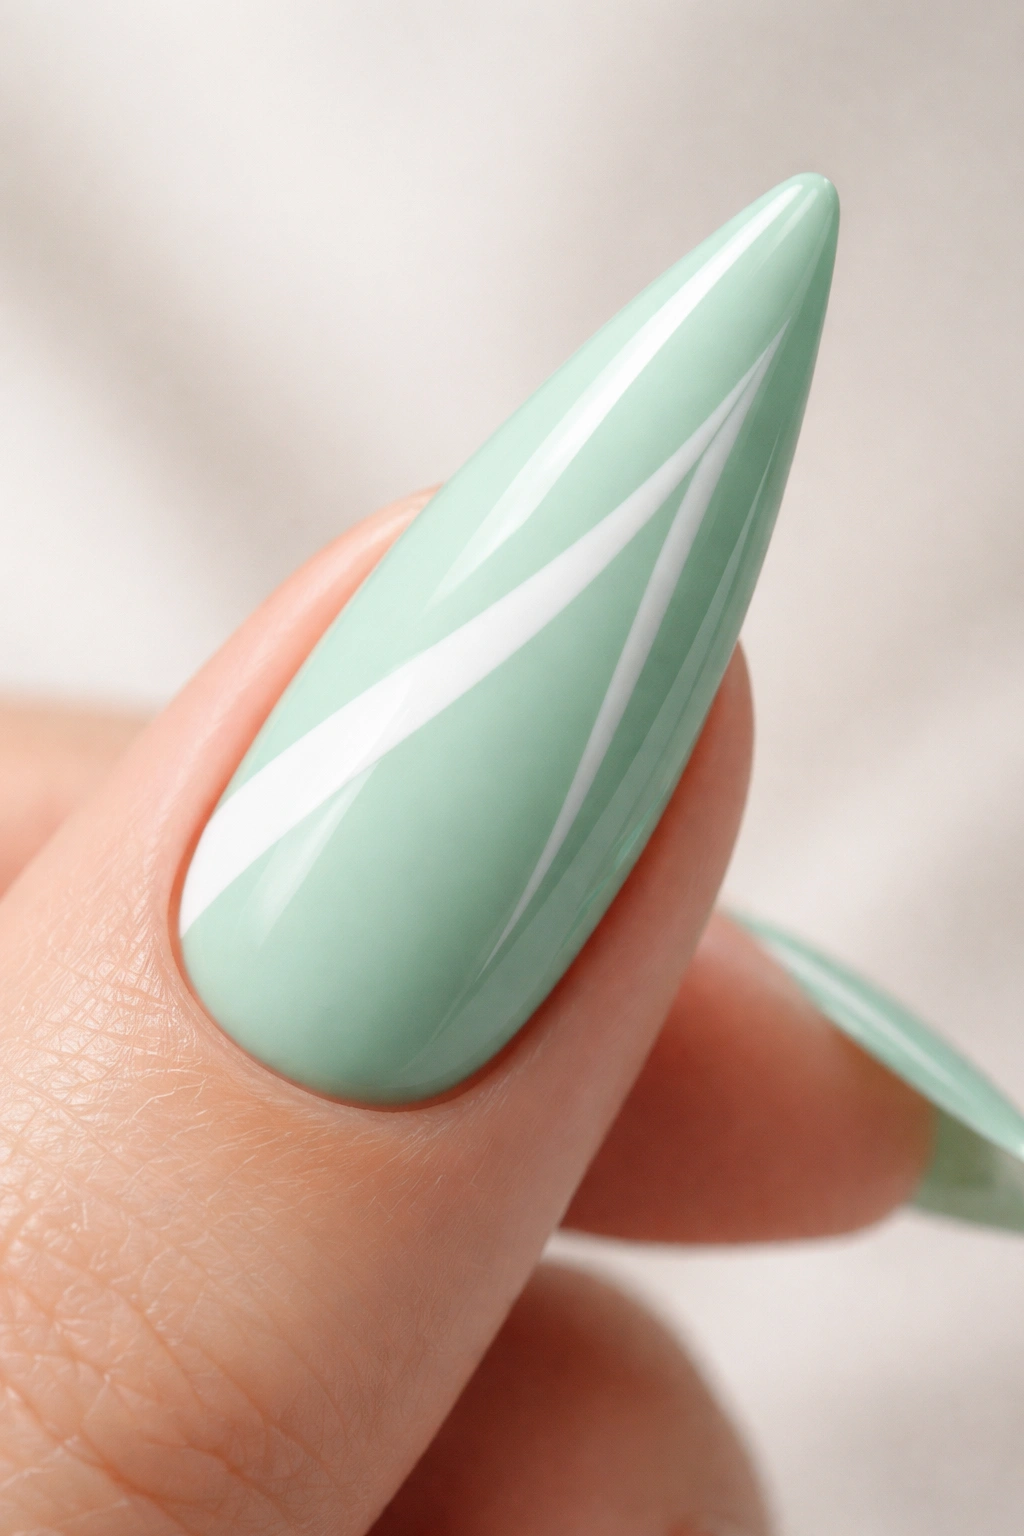
2. Sage Green with Minimalist White Lines
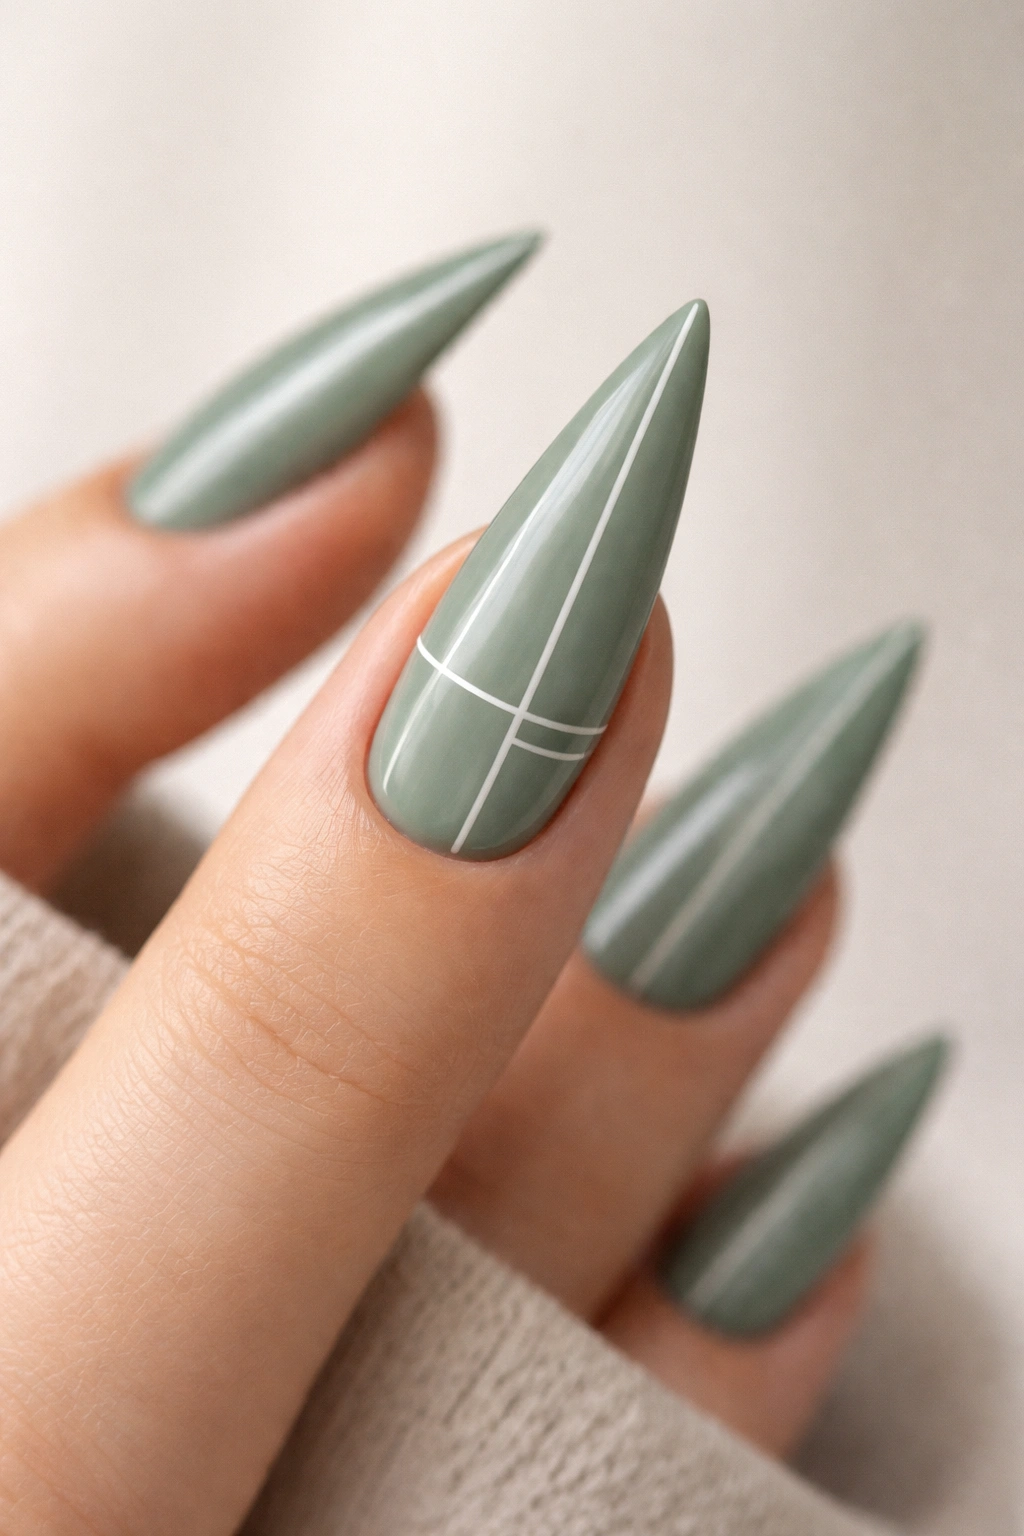
Sage green is calming without being boring, especially when you add geometric precision through clean white lines. This is the nail design equivalent of Scandinavian interior design—intentional, restrained, and somehow more sophisticated for all its simplicity. The soft, muted tone of sage works beautifully with the clean contrast of white, creating visual interest without visual clutter.
The Minimalist Appeal
Minimalist designs work particularly well on stilettos because the length of the nail gives you room to play with line placement and spacing. A single thin white line running vertically down the center creates a lengthening effect, while horizontal lines or asymmetrical placement feel more modern and fashion-forward. The key is precision—wobbly lines read as unintentional, while crisp lines read as intentional art.
Execution Tips
Use a thin detail brush or a striping tool to create your white lines. If you’re not confident in your hand-steadiness, use white striping tape instead—apply it to your base color before it fully sets, and remove it once the base is dry. This gives you perfectly straight lines every time. White gel polish works better than regular white polish for this design because it dries faster and creates cleaner edges.
Worth knowing: Sage green and white need high contrast to be visually interesting, so choose a pure, bright white rather than cream or off-white.
3. Lime Green Neon with Black Splatter
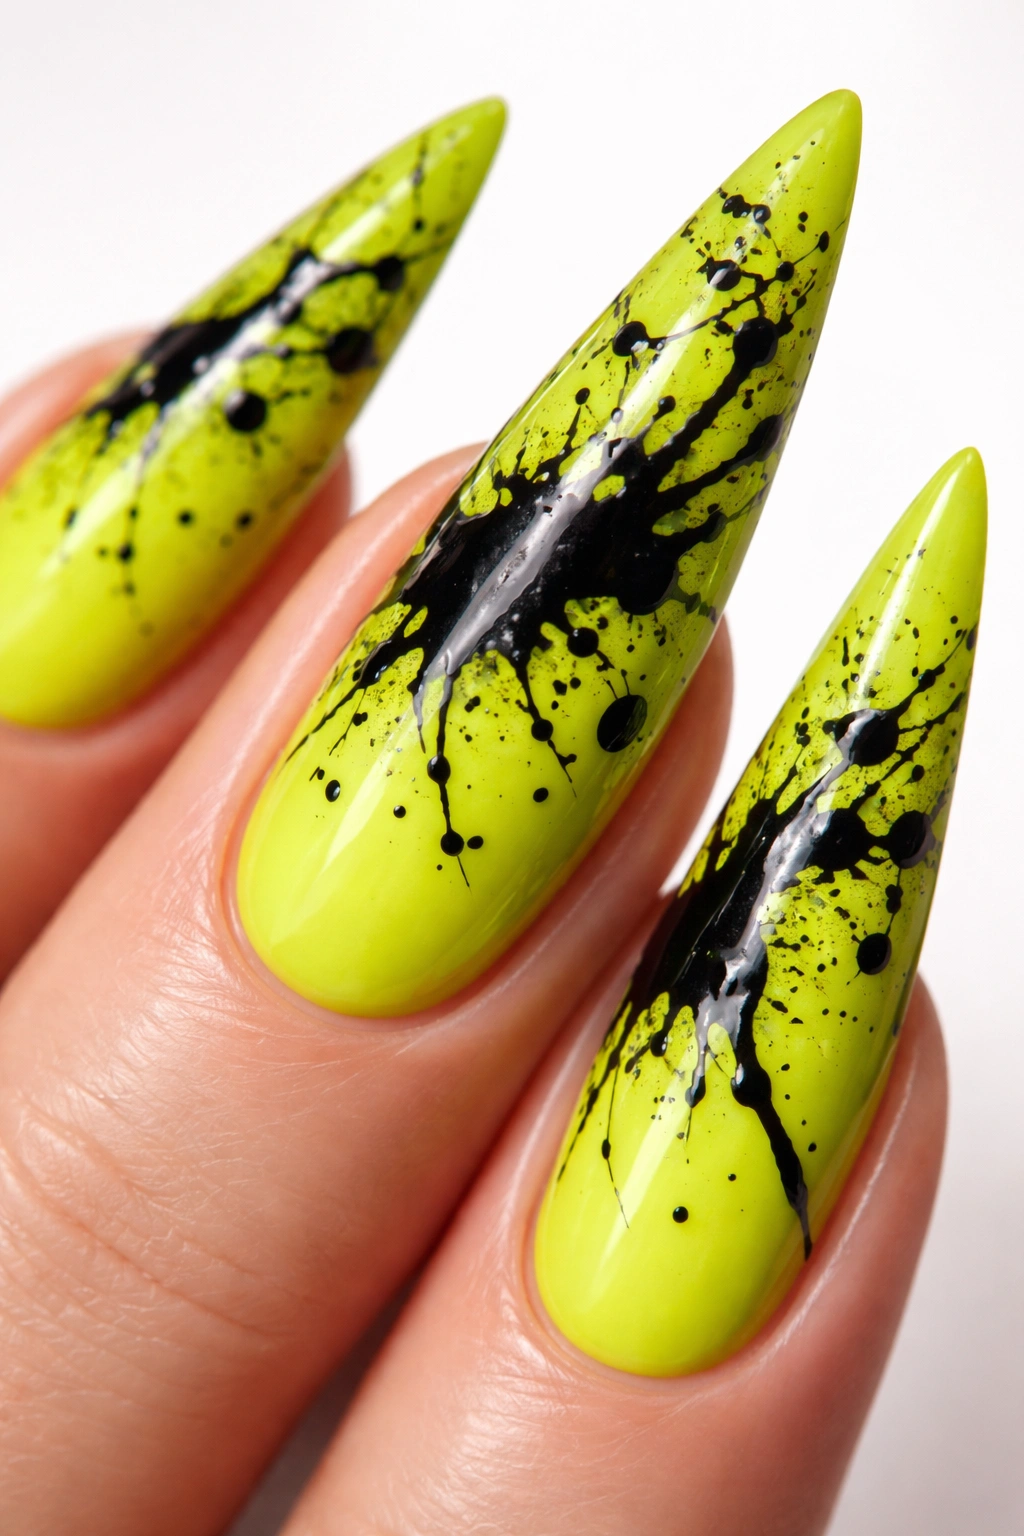
Neon lime green is unafraid, and when you add black splatter on top, you’re creating a design that reads as artistic rather than loud. The black spatters provide visual anchor points and break up the brightness of the neon into digestible moments. This combination works on stilettos because the nail length can absorb the visual energy without feeling cramped or chaotic.
Bold Without Being Costumey
Neon colors often get a bad reputation for feeling cheap or costume-like, but the reality is that neon looks expensive when it’s properly executed. A true neon pigment (not just a very bright regular polish) paired with clean black accents reads as intentional, creative design work. The splatter pattern should look deliberate and artistic, with varying sizes of droplets distributed across the nail rather than randomly flung.
Creating the Splatter Effect
Load a thin detail brush with black gel or regular polish thinned with a mixing medium, then flick or splatter it onto your dried lime base. Practice on a test nail first because you only get one chance to get it looking natural rather than accidental. Alternatively, use a toothpick or thin liner to create intentional splatter marks in a planned pattern.
Pro tip: Create splatter on just 2-3 accent nails rather than all ten—this keeps the design feeling editorial rather than experimental.
4. Forest Green with Silver Glitter Gradient
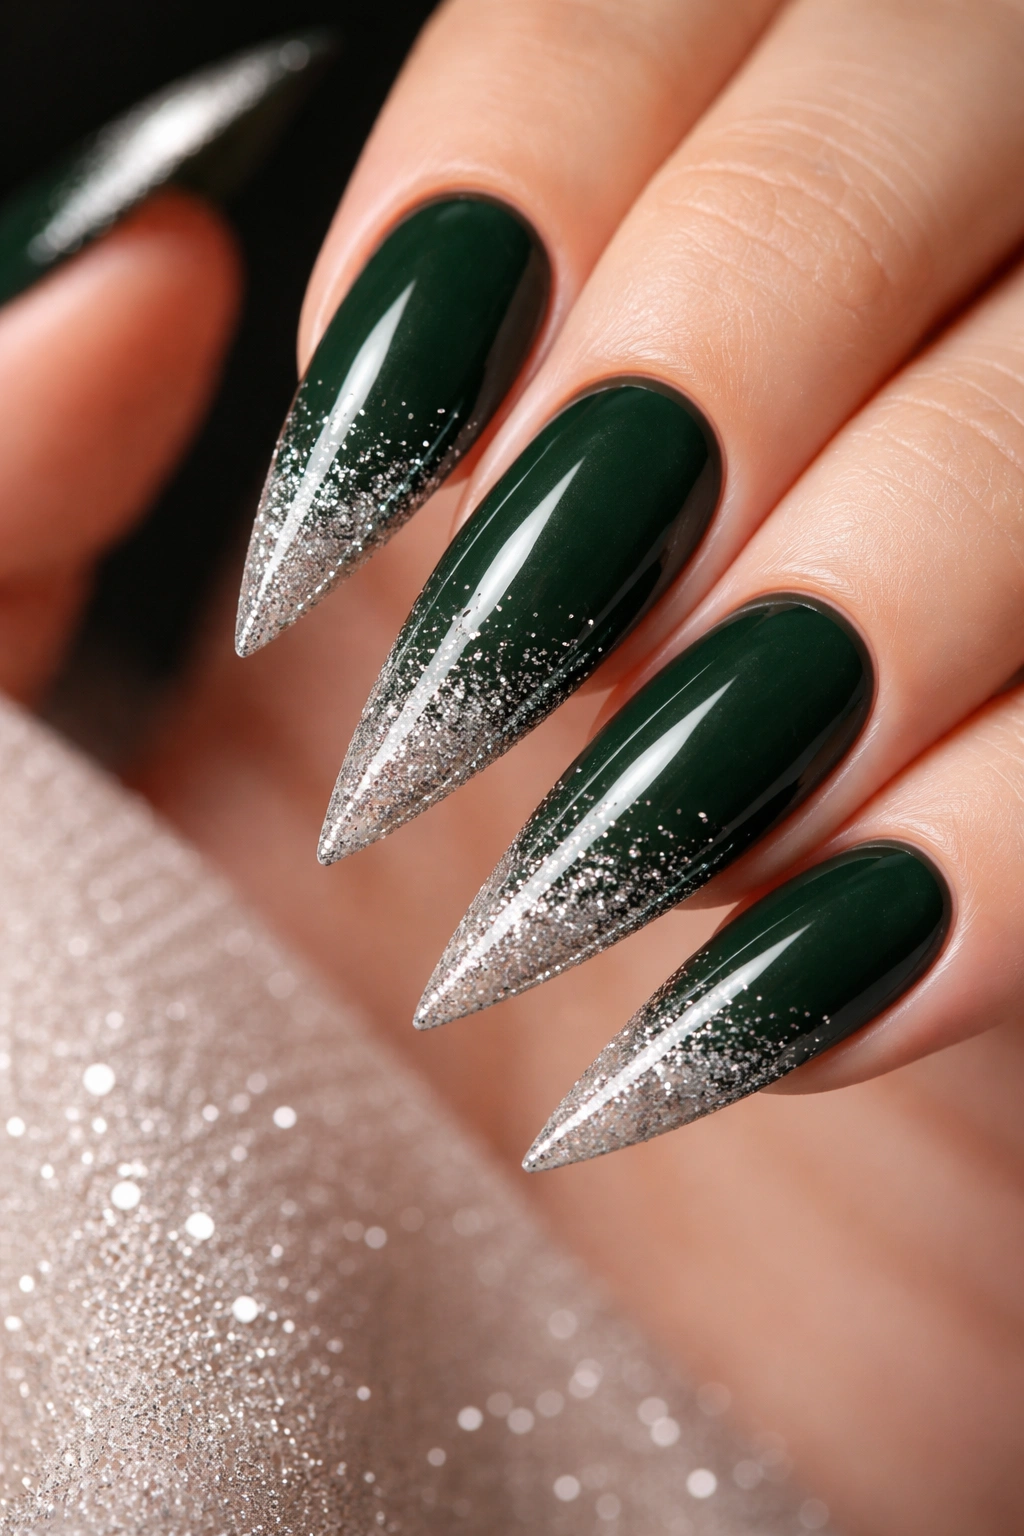
Forest green creates automatic elegance because the depth and richness of the color feel inherently sophisticated. When you add a silver glitter gradient—concentrated glitter at the tip fading to none at the cuticle—you introduce sparkle without overwhelming the forest tone. This design speaks “special occasion” without requiring you to actually wear it only for special occasions.
Gradient Theory
A glitter gradient works on stilettos in a way it doesn’t on shorter nails because the length gives the gradient room to actually transition. You want heavy glitter concentration at the tip, moderate glitter in the middle third, and clean, glitter-free color at the base. This creates the visual illusion that your nail is catching light and translating it into sparkle—rather than looking like you just sprinkled glitter randomly onto the nail.
Application Method
Paint your full forest green base first, then while it’s still wet, apply glitter-heavy polish to just the bottom third of the nail. Use a separate brush (or natural hair applies glitter better than synthetic) and dab rather than swipe. Once dry, blend the seam between glittery and non-glittery sections using a lighter-handed application or a clear polish layer. Seal with a glossy topcoat to smooth everything into one cohesive surface.
Insider note: Press glitter pieces individually with a detail brush for precise placement rather than trying to dab glitter polish—you get better control and a more refined result.
5. Pistachio Green Ombre to White
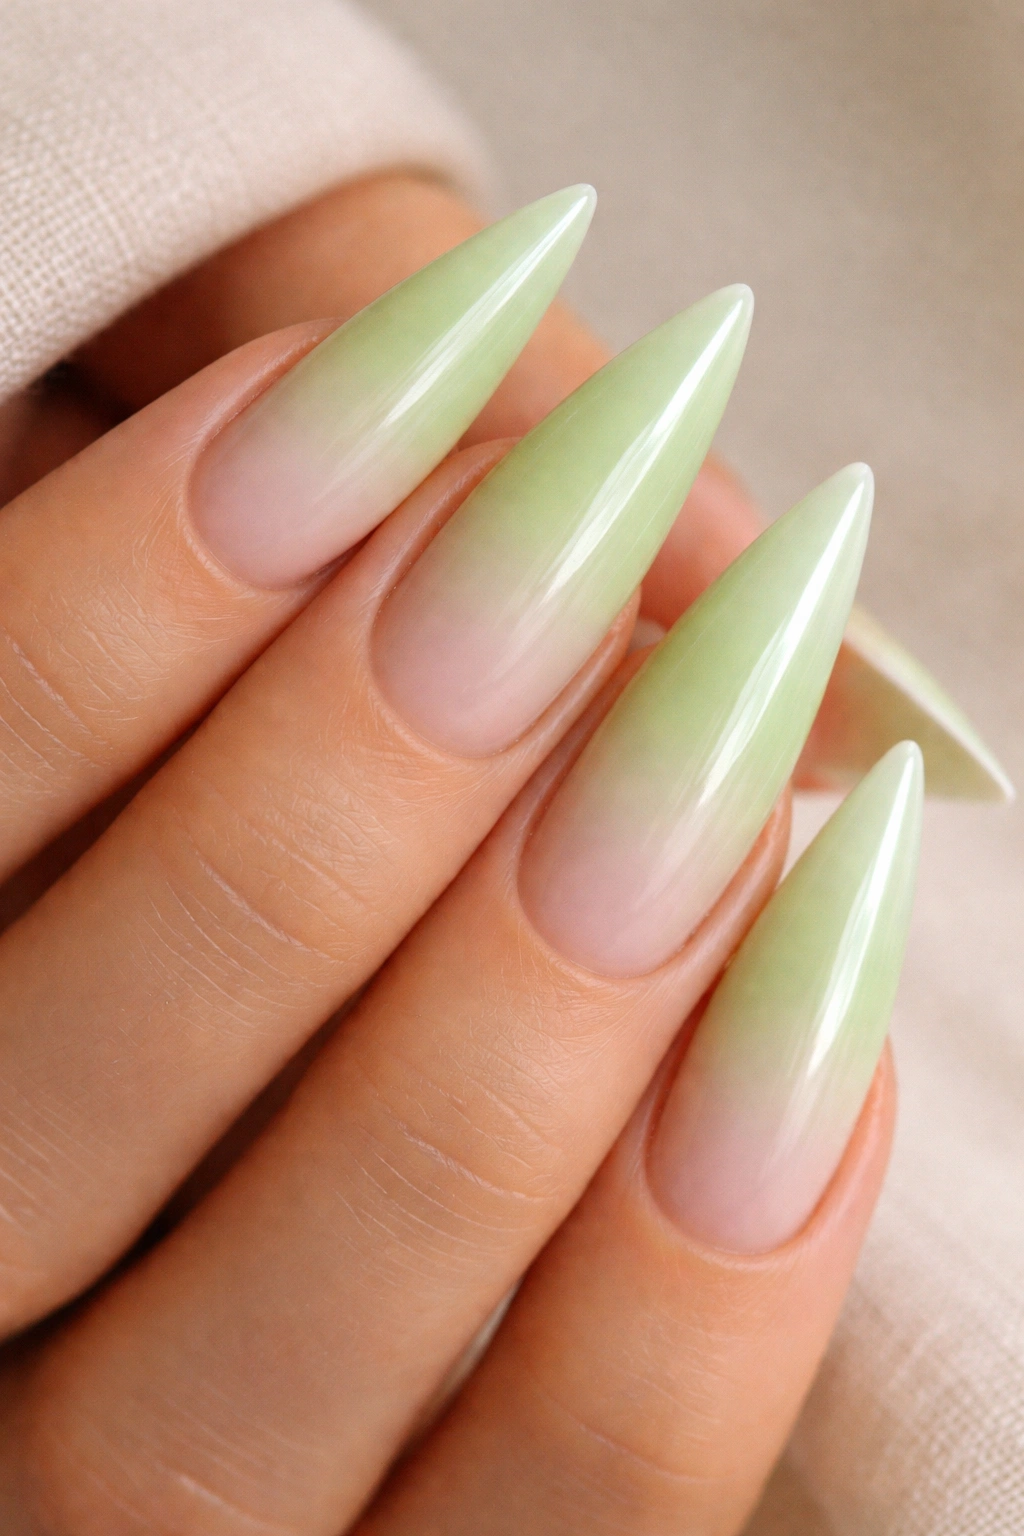
Pistachio is one of those colors that doesn’t immediately read as green—it reads as soft, sophisticated, and slightly unexpected. When you create an ombre that transitions from pistachio to white, you’re building a gradient that feels ethereal and modern while maintaining the green undertone. On stilettos, this creates a nail that elongates and catches light with subtle color shifts.
The Ombre Gradient
True ombre requires blending, which means you’ll need a makeup sponge, a white polish, and your pistachio shade. Sponge dabbing creates softer transitions than brush blending because the porous texture diffuses the color edges. The gradient should fade gradually from the cuticle area in pistachio green through the middle in a blend, and arrive at white at the tip—or reverse it, with white at the base and pistachio at the tip for a different visual effect.
Making It Look Seamless
Ombre designs can look blotchy if the colors don’t actually blend well together—pistachio and white have enough contrast that they might need an intermediate shade. Consider adding a very pale mint or even a thin layer of nude polish to bridge the gap and create a smoother transition. The sponge should be damp but not wet, and you’ll need 3-4 passes to build the gradient evenly.
Pro tip: Seal your ombre with a clear glossy topcoat and use a cleanup brush dipped in acetone to sharpen the transition line at the tip if needed.
6. Kelly Green with Gold Leaf Details
Kelly green is deeper than lime but brighter than forest—it’s the goldilocks of green nail colors, hitting that sweet spot between bold and wearable. Gold leaf accents add texture and opulence without requiring you to paint detailed designs. This is a design that looks handcrafted and expensive but doesn’t demand advanced nail art skills.
Gold Leaf Application
Gold leaf is real metal foil shaped into delicate, irregular shapes that you apply to your nail surface. It requires a slightly tacky surface (either wet polish or a specific adhesive layer), and once applied, it adheres permanently when sealed with topcoat. Scattered gold leaf across the nail mimics the look of crackled, antique gold, while strategically placed leaf at the corners or edges feels more curated and modern.
Positioning for Maximum Impact
Place gold leaf asymmetrically—maybe concentrated on one side of the nail or along the free edge—rather than evenly distributed. This approach feels more intentional and artistic than randomly scattered leaf. On accent nails (typically ring finger or pinky), you can be bolder with gold coverage, while on other nails, a few delicate pieces create visual continuity without looking overdone.
Worth knowing: Gold leaf adheres better to gel polish than regular polish, and the topcoat sealing it creates an entirely smooth surface—the nail won’t feel textured or raised.
7. Seafoam Green with Pearl Finish
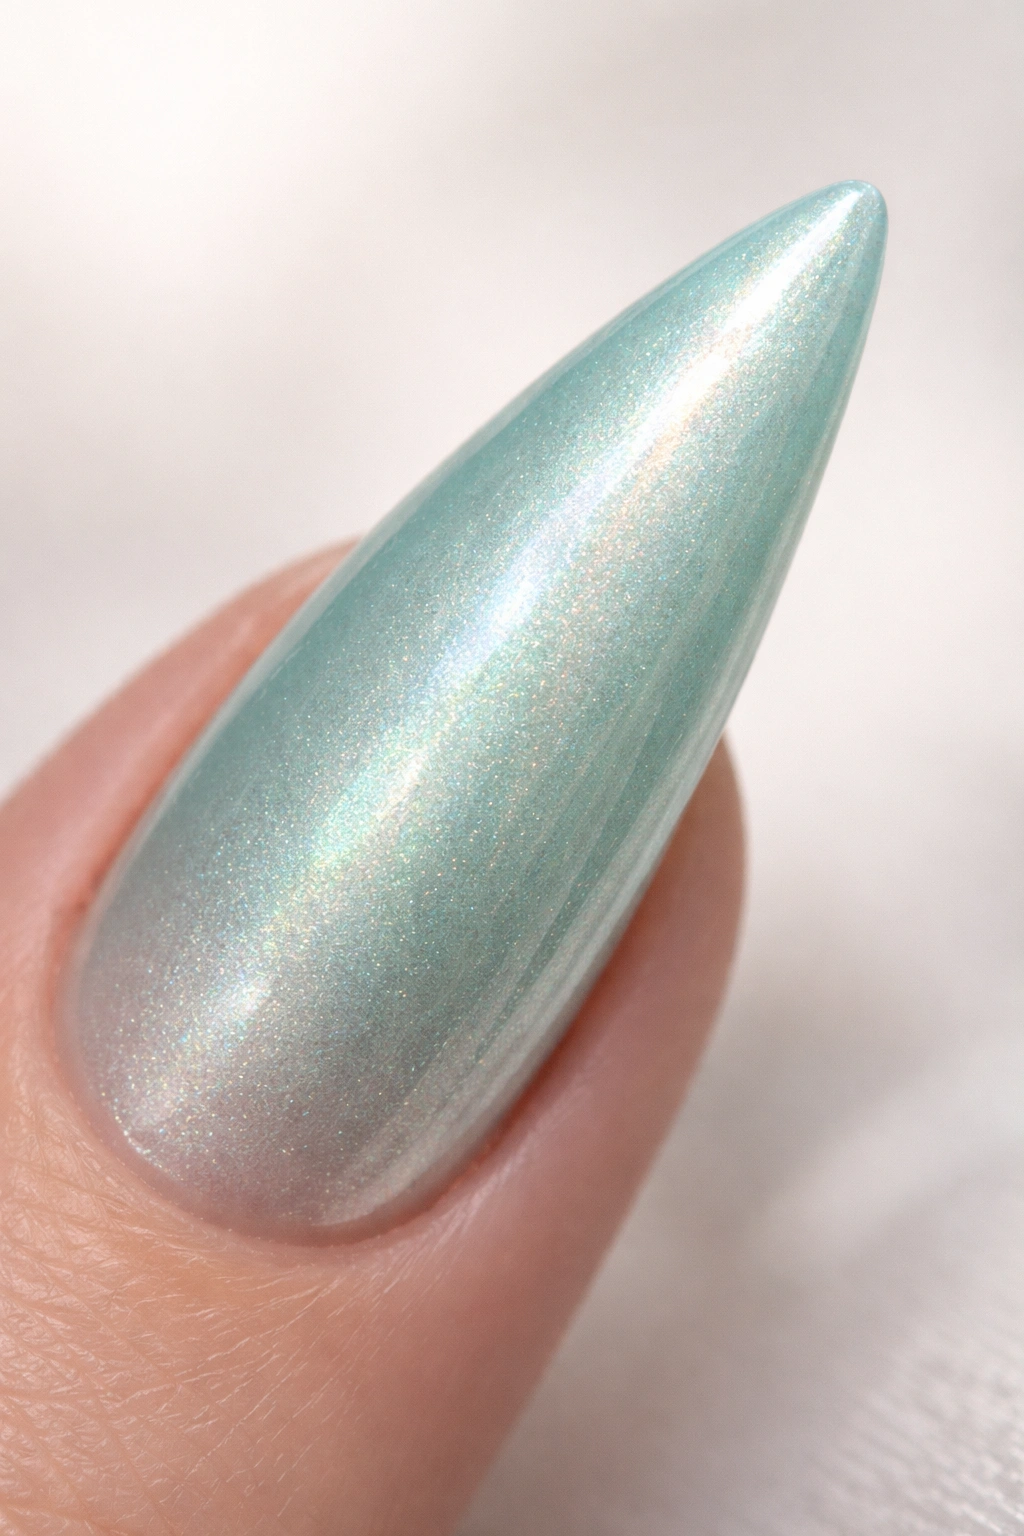
Seafoam green sits at the intersection of green and blue, creating a color that feels simultaneously calm and energetic. When you choose a pearl finish rather than a standard glossy one, the color gains depth and complexity—it shifts slightly in different lighting rather than appearing flat. Pearled seafoam on stilettos creates an otherworldly, mermaid-like aesthetic without requiring any additional design work.
Pearl Polish Chemistry
Pearl polish contains suspended mica particles that reflect light differently than regular pigment. This is what creates that subtle shimmer and color-shift effect—the nail appears to change tone depending on the angle and light source. The effect is more sophisticated than glitter because it’s built into the polish itself rather than additional embellishment, making the nail feel like a finished product rather than a nail plus decorations.
Choosing Quality
Not all pearl polishes are created equal—cheap ones can look chalky or dull. Invest in a quality brand with actual mica content rather than a basic glossy polish that’s been labeled “pearl.” The difference is immediately visible once applied. Two thin coats create better color and shimmer than one thick coat, so build the color gradually rather than trying to achieve coverage in a single application.
Pro tip: Apply a clear base coat before your pearl polish to prevent any staining of the natural nail, since mica particles can tint the keratin.
8. Olive Green with Matte Topcoat
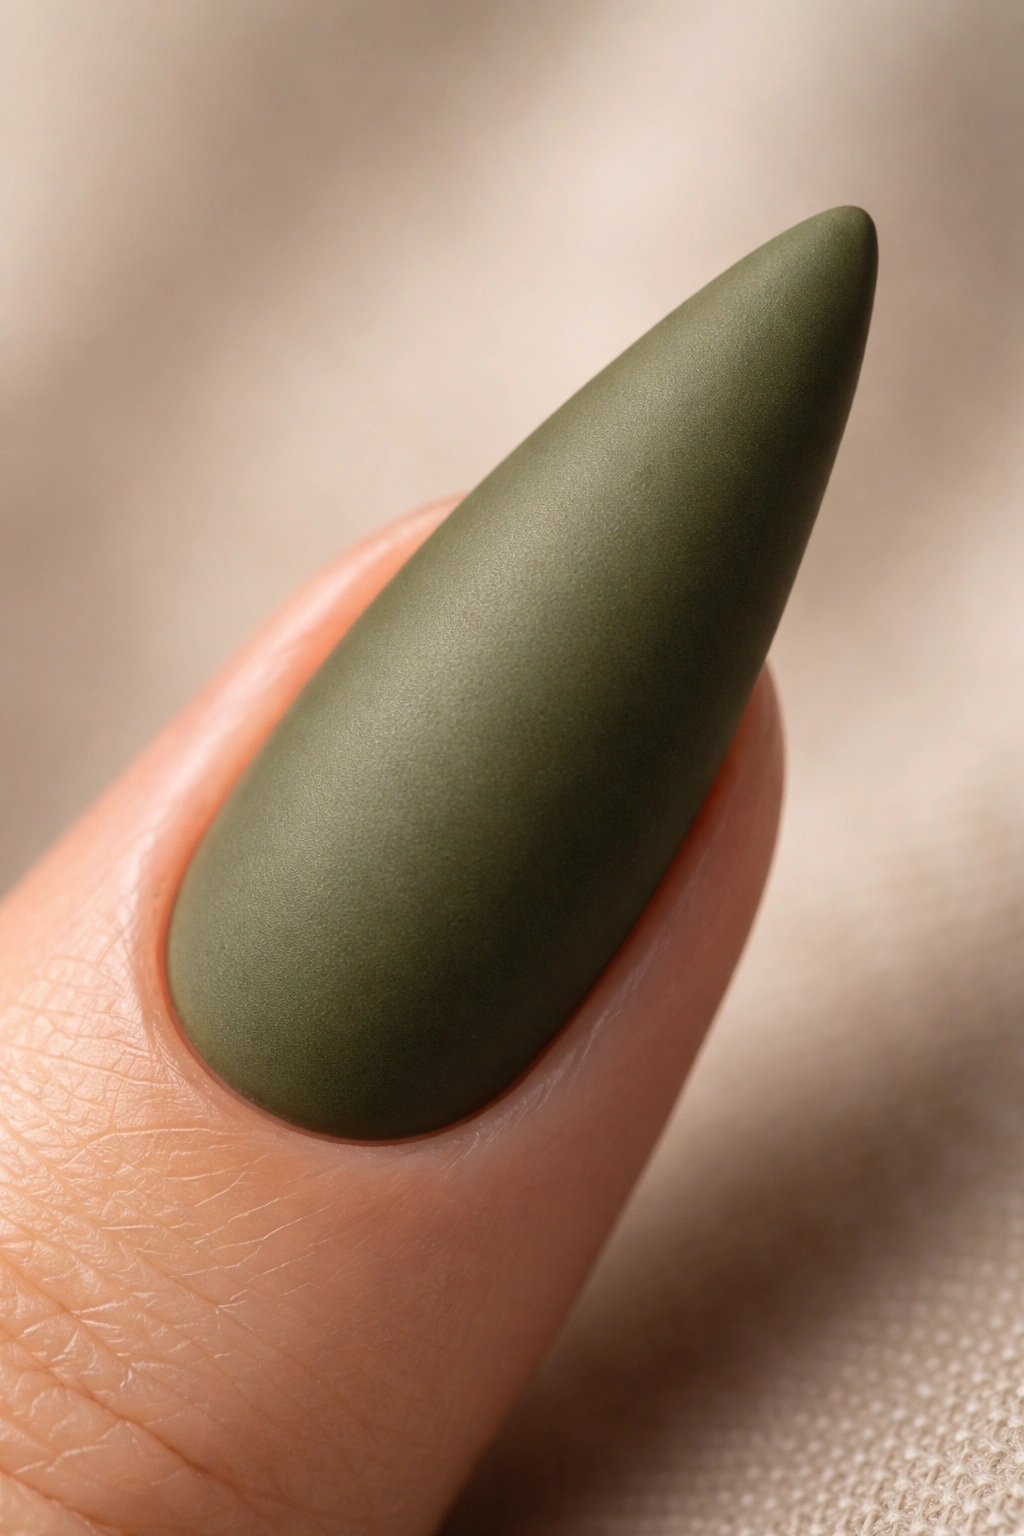
Olive green is earthy, somewhat unexpected, and undeniably sophisticated—it’s a color that reads as intentional rather than default. When you seal it with a matte topcoat instead of glossy, you eliminate shine and create a velvety, almost fabric-like appearance. This matte finish makes olive feel contemporary and editorial rather than traditionally glamorous.
Matte vs. Glossy
Matte finishes change how a color reads—the same olive shade looks softer and more sophisticated in matte than it does in glossy. The lack of shine makes the color appear more substantial and less reflective, which can make even simple nails feel curated and intentional. Matte works particularly well on deeper, more muted shades like olive because the finish complements the color’s natural subdued quality.
Matte Maintenance
Matte topcoat can feel slightly grippy compared to glossy (which is why manicurists often caution against it on nails you’ll be typing with constantly), but the aesthetic impact is worth considering. If you’re concerned about wear or texture, apply matte to just your accent nails while keeping the others glossy—this gives you the matte aesthetic statement while maintaining practical glossy protection on your dominant hand.
Insider note: Matte topcoat shows fingerprints and dust more than glossy, so budget extra time for cleaning your nails between polish sessions if you go full matte.
9. Hunter Green with Nude Glitter Tips
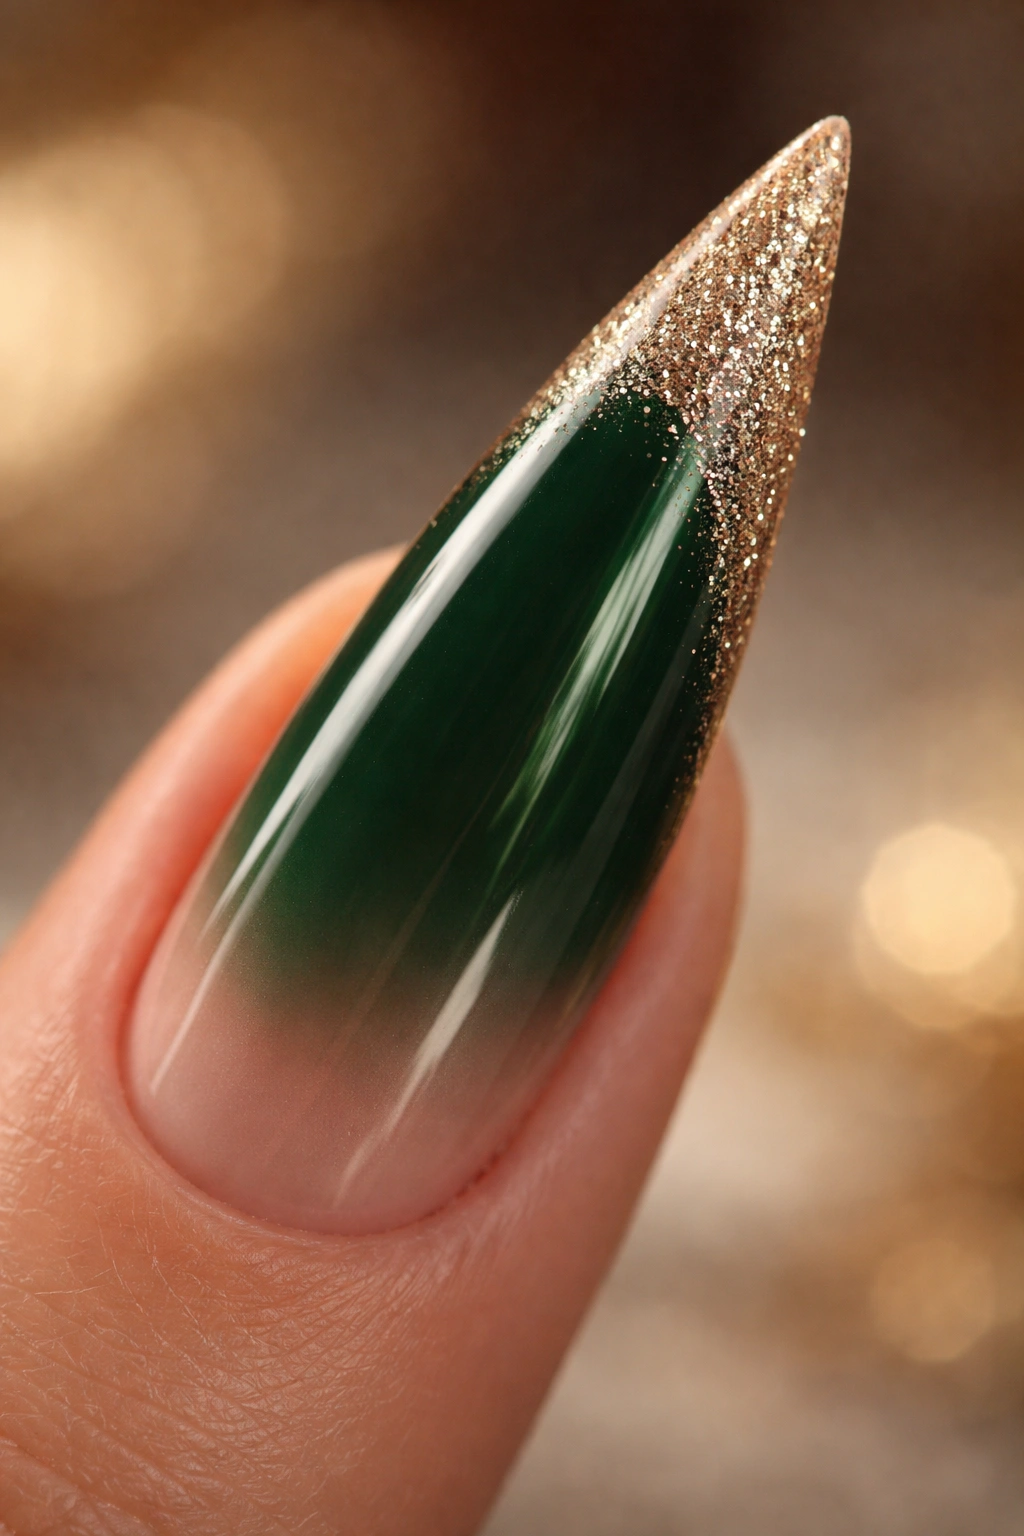
Hunter green is the color of luxury leather and evergreen forests—it’s inherently expensive-looking. Nude glitter at the tips creates a sophisticated contrast, suggesting luxury without looking overly festive. The nude acts as a bridge between the deep hunter green and lighter skin tone, elongating the nail visually while the glitter catches light.
Balancing Bold and Subtle
Hunter green is already a statement color, so your accent needs to complement rather than compete. Nude glitter is ideal because it adds dimension without introducing a contrasting color that might fight with the hunter green. The glitter reflects light in warm tones that actually enhance the richness of the green rather than clashing with it.
Two-Tone Technique
Paint your full hunter green base on all nails, then once dry, apply nude glitter polish to just the bottom third of each nail. Use a makeup sponge to blend where the hunter meets the nude, creating a subtle gradient rather than a harsh line. This blending step is what elevates the design from “two colors on a nail” to “thoughtfully executed two-tone gradient.”
Pro tip: Choose a sparkly nude rather than a regular nude polish—the glitter creates the visual interest while the nude base keeps it sophisticated.
10. Mint Green with Geometric White Accent
Mint green is cheerful without being loud, making it appropriate for virtually any setting while still feeling fresh and contemporary. A geometric white accent—perhaps a triangular negative space design or clean architectural lines—adds visual sophistication. The contrast between soft mint and crisp white creates a modern, design-forward aesthetic.
Geometric Design Principles
Geometric designs work beautifully on stilettos because the elongated shape provides space for angular designs to look intentional rather than cramped. Clean lines, precise angles, and balanced asymmetry all read as editorial choices rather than random art. A single geometric accent on your ring finger or a matching design on multiple nails can both work beautifully depending on your preference.
Creating Precision
Use striping tape or a thin detail brush with white gel polish to create your geometric patterns. If you’re hand-painting, practice the design on a nail wheel or test nail first—geometric designs look intentional or amateurish based almost entirely on line precision. Once your white design is dry, seal with topcoat to protect your lines.
Worth knowing: Negative space designs (where you remove color to reveal the natural nail) actually photograph better than painted designs if you’re planning to share photos—the contrast is more dramatic.
11. Moss Green with Bronze Metallic Accents
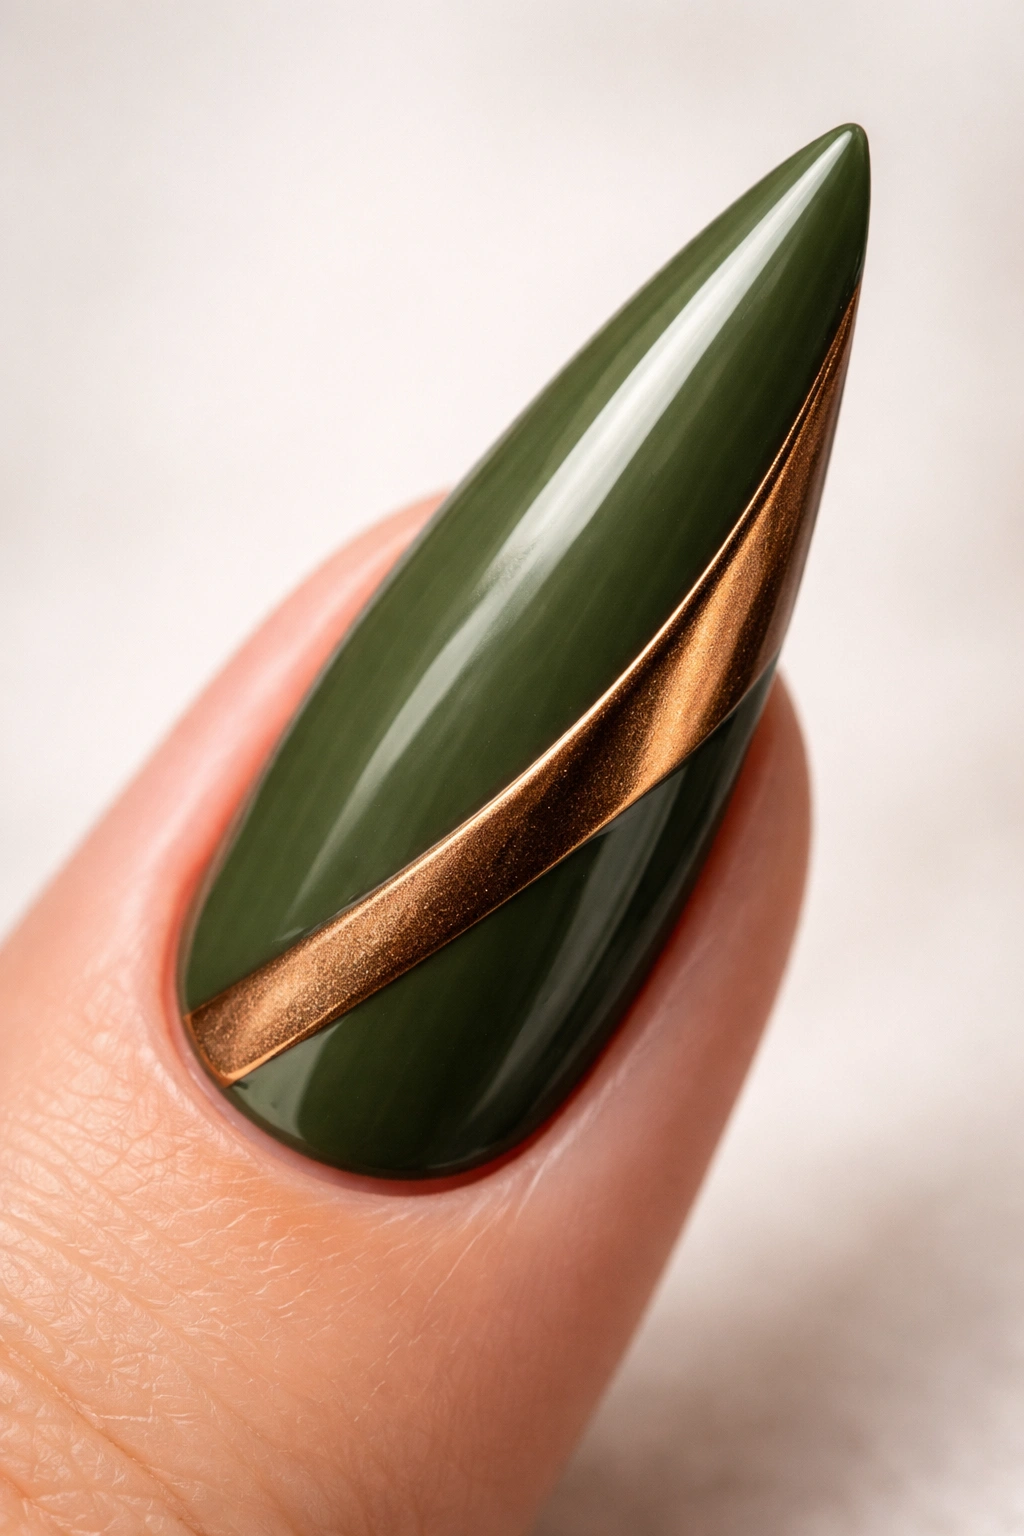
Moss green is nature-inspired without being literal—it’s sophisticated, slightly earthy, and undeniably wearable. Bronze metallic accents add warmth without introducing an entirely different color. This combination creates a design that feels intentional and curated, like something you’d see in a high-end nail studio.
Metallics That Complement Green
Bronze works with moss green because both colors sit in the warm family of the color spectrum—they don’t clash or feel discordant. Gold can sometimes feel too bright against moss green, while bronze’s warmth and slight depth create visual harmony. The metallic catches light differently than the matte green, creating dimension and interest.
Application Approaches
You can apply bronze as an accent stripe (a vertical or diagonal line), as splatter details, or as a gradient from the base or tip. For a more refined look, apply bronze metallic to just your accent nails while keeping the others solid moss green. This distribution prevents the design from feeling busy while still delivering visual interest and intentionality.
Pro tip: Metallic polishes apply best in thin layers—one coat of metallic is often more visually striking than two thick coats that start to look muddy.
12. Pistachio with Gloss and Matte Mix
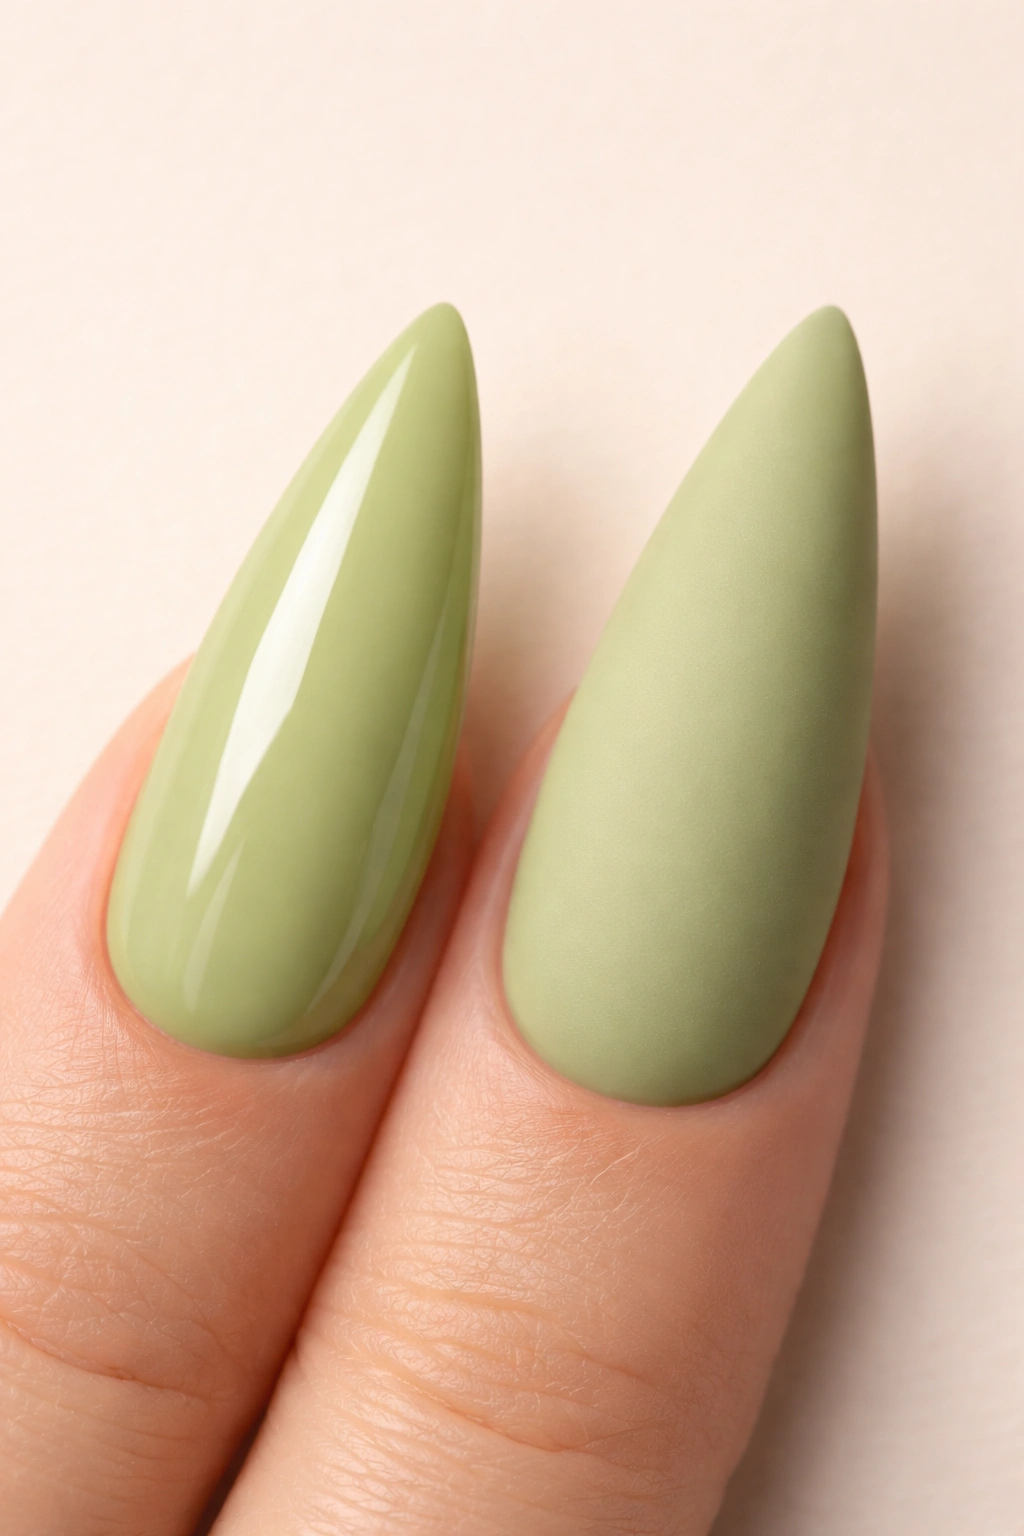
This design uses the same pistachio shade in two finishes—glossy on some nails, matte on others—to create visual variety without introducing additional colors. The contrast between finishes reads as intentional design work, and the monochromatic approach feels sophisticated and modern. It’s minimal, but the finish variation prevents it from feeling flat or boring.
Mixing Finishes
Alternate glossy and matte nails, or create a pattern like all fingers glossy, all thumbs matte—whatever appeals to your design sense. The visual effect is surprisingly striking because our brains expect nails to have consistent finishes, so the variation creates interest. This approach is perfect if you love a color but want more visual impact than a single finish provides.
Finish Application Order
Apply your pistachio base to all nails, seal half with matte topcoat, and half with glossy topcoat. The matte nails will appear slightly darker or more muted due to the lack of shine, creating automatic contrast. This creates a design that’s minimal (single color) but visually engaging (finish variation).
Insider note: This mixed-finish approach works on virtually any nail shape and color, making it a versatile technique to experiment with once you understand the visual principle.
13. Neon Green with Black Stiletto Outline
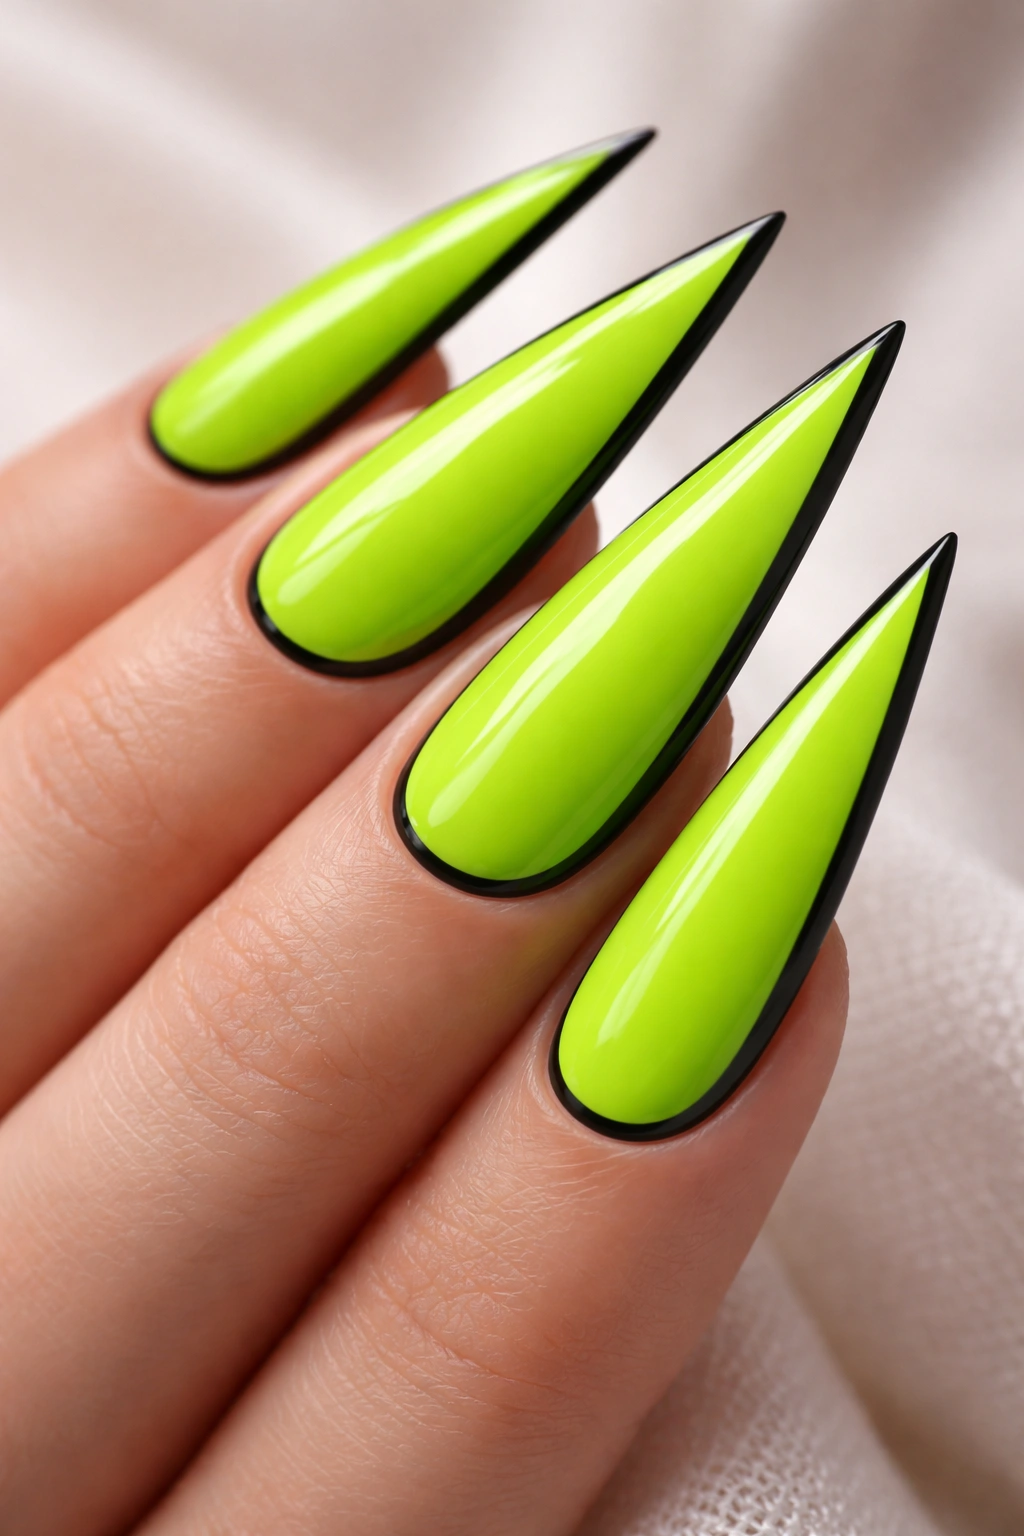
Push the boundaries with a bright neon green base outlined in stark black. The black outline mimics the stiletto shape itself, creating a self-referential design that’s cleverly meta. This works because the black provides definition and prevents the neon from bleeding into surrounding skin, making the nail pop against your skin tone.
Outline Technique
Once your neon base is completely dry, use a thin detail brush or striping tool with black gel or regular polish to trace the outer edge of your nail—the perimeter and especially the pointed tip. The outline should be 1-2mm thick, thick enough to see clearly but thin enough that it reads as intentional detail rather than sloppy application. You can outline all nails or just your accent nails depending on the visual intensity you want.
High Contrast Design
Neon and black create maximum contrast, which is visually striking but can feel costume-y if not executed cleanly. The key to preventing this is precision—messy outlines feel like a costume, while clean, defined outlines feel intentional. Once your outline is dry, seal everything with a clear glossy topcoat.
Pro tip: If outlining all ten nails feels overwhelming, outline just your accent nails and keep the others solid neon—this gives you the design impact with easier application.
14. Sage Green with Minimalist Gold Dot Pattern
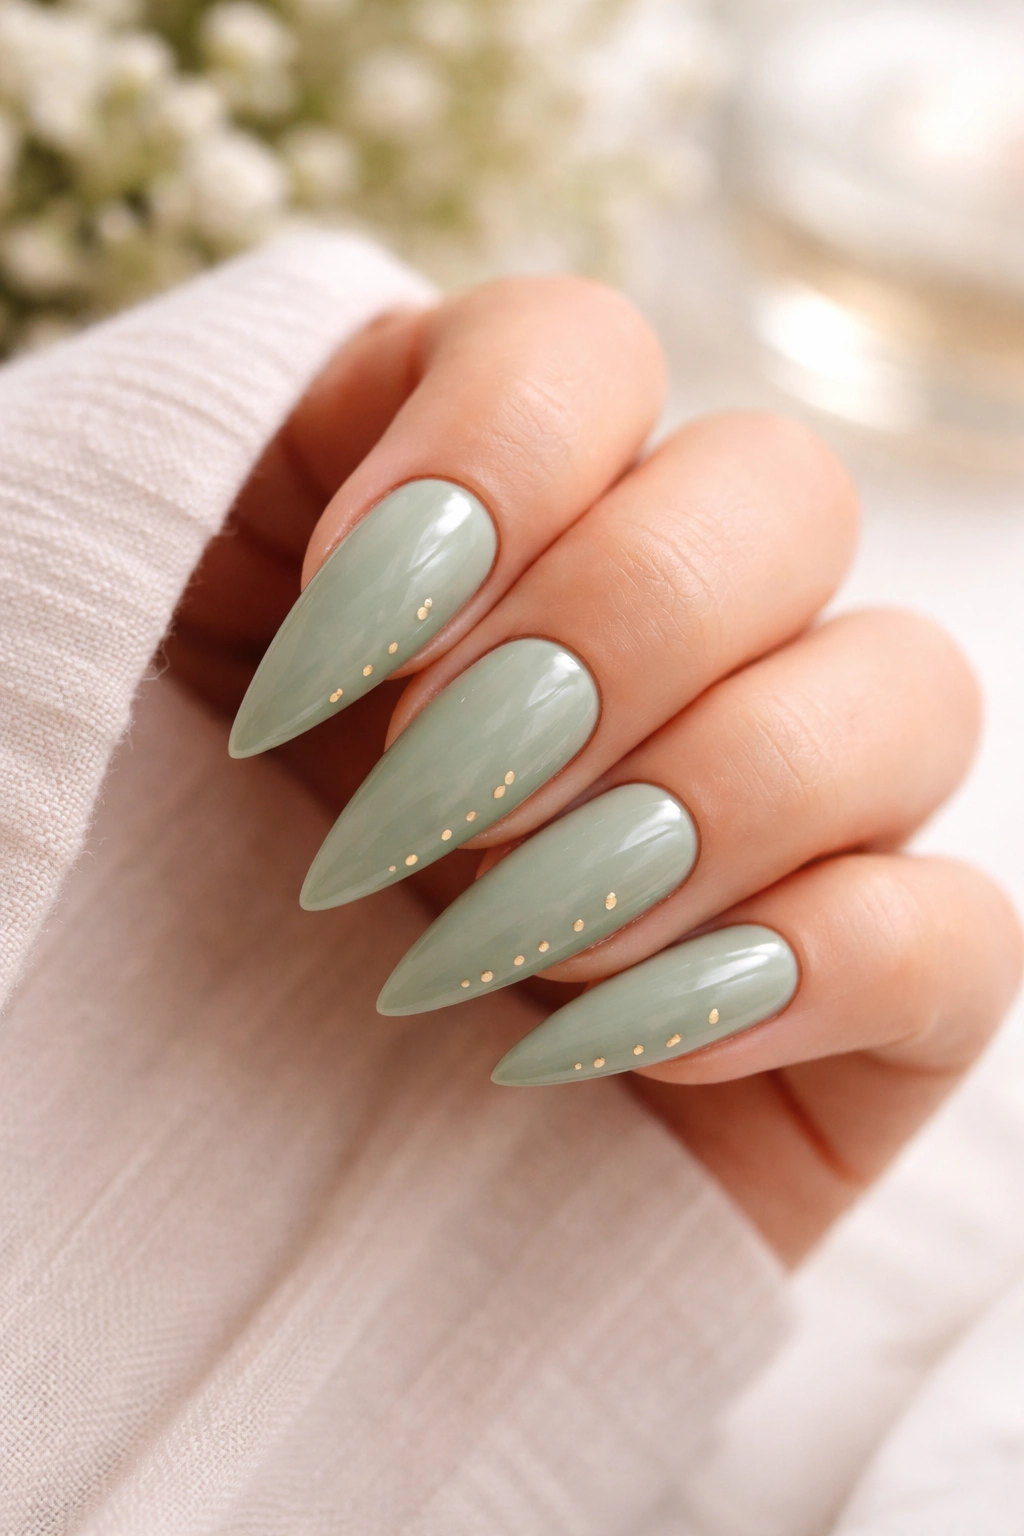
Simple dots in gold across a soft sage green base create a sophisticated, almost polka-dot aesthetic without feeling childish or overly playful. The dots should be small and intentionally spaced—this restraint is what makes the design feel refined rather than frivolous. Stiletto length accommodates this spaced pattern beautifully, with room for 3-5 strategically placed dots per nail.
Dot Placement Strategy
Create an asymmetrical dot pattern—maybe concentrated on the lower half of the nail or distributed around the edges rather than evenly across the entire nail surface. Asymmetry reads as intentional and artistic, while even grids of dots can feel more generic. Vary the dot sizes slightly (some slightly larger, some smaller) to create visual interest and organic feel.
Gold Dot Application
Use the end of a thin detail brush or a dotting tool dipped in gold polish to create your dots. The tool should just barely touch the nail surface to deposit a small amount of polish in dot form. Let each dot dry before moving to the next nail to prevent smudging. You can also use gold gel and cure between nails for more precision.
Worth knowing: Fewer dots placed with intention looks more expensive than many densely packed dots.
15. Seafoam Green Gel with Holographic Flakes
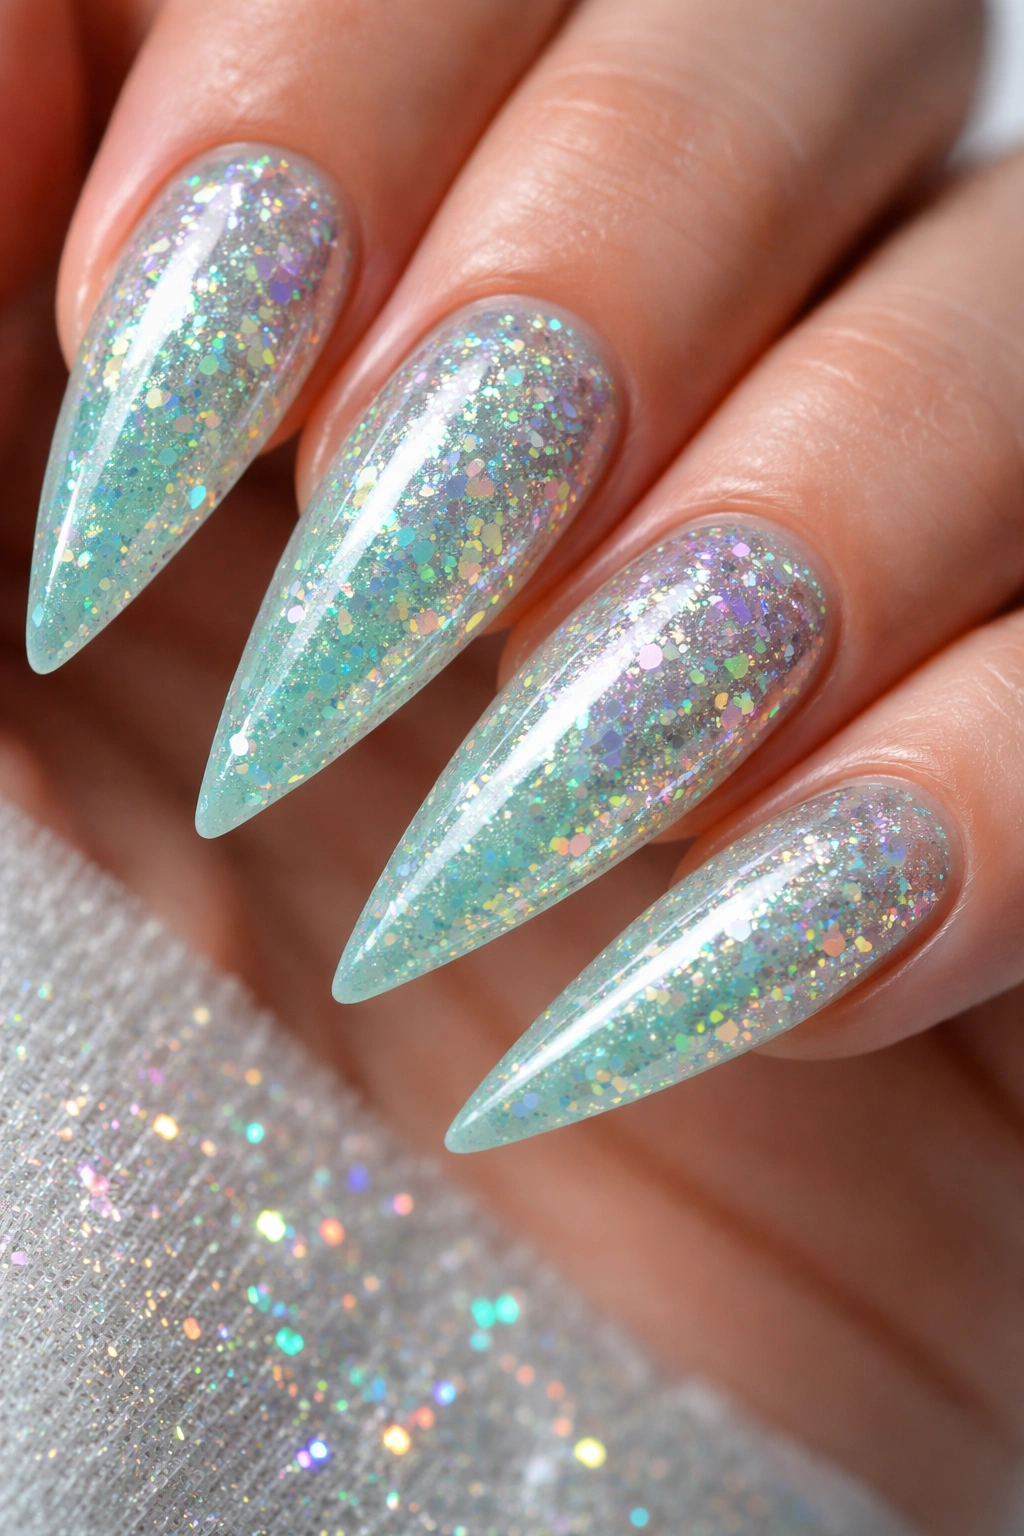
Holographic flakes suspended in a seafoam green gel base create a design that’s visually dynamic and color-shifting. Unlike standard glitter, holographic flakes refract light into spectrum colors, making the nail appear to change colors depending on the angle and light source. This creates a rainbow-effect manicure that reads as deeply contemporary and somewhat futuristic.
Holographic Effect Technology
Holographic flakes are created from materials that refract light across the visible spectrum, creating the characteristic rainbow shimmer. They’re more sophisticated than standard glitter because the effect is inherently more complex. Applying them in a green base means they’re grounded in a specific color family while still displaying their spectrum qualities.
Application for Maximum Effect
Apply your seafoam gel base first and cure. Then, while it’s still tacky, sprinkle holographic flakes across the nail surface or apply them with a detail brush. Cure again to lock them in place. The thickness of flakes affects the visual effect—more flakes create maximum sparkle, while fewer flakes create a more subtle, scattered effect.
Pro tip: Holographic flakes show their full spectrum effect in direct natural light or sunlight; they’re less visually dramatic in indoor artificial lighting, so consider your typical environment when choosing how heavy to apply them.
16. Dark Green with Nude Foil Transfer Strips
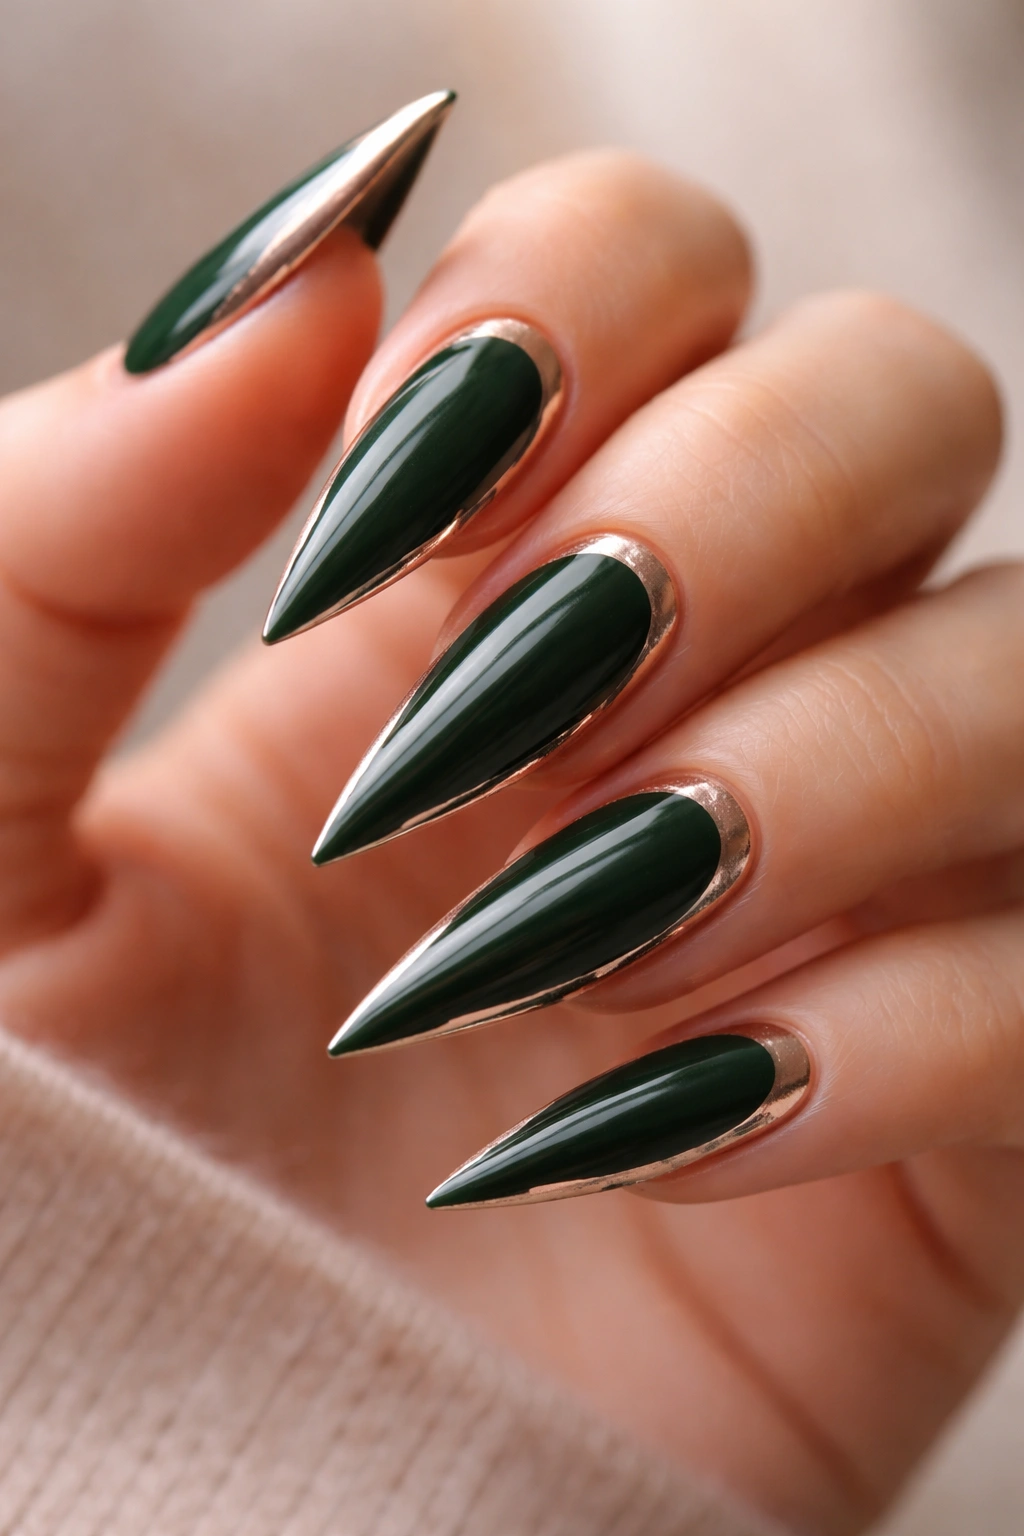
Foil transfer strips are pre-printed metallic designs that adhere to your nails in seconds—they skip the application effort while delivering professional results. Pairing dark green with nude metallic foil creates a design that’s both bold and elegant. The foil’s metallic quality bridges the gap between the dark green and your skin tone.
Foil Transfer Application
Once your dark green base is completely dry, apply a thin layer of foil adhesive (or a tacky gel layer) to the area where you want the foil to stick. Press the foil design onto the adhesive, rubbing gently with a soft cloth or brush to ensure full contact. Peel the foil backing away and seal with topcoat. The entire process takes minutes and delivers magazine-quality results.
Design Placement Options
Apply foil transfers as a full nail wrap (covering the entire nail surface), as a tip design (just the bottom third), or as an accent strip. Nude foil on dark green gives you the option to be subtle or bold depending on placement. Full coverage creates maximum impact, while accent placement feels more refined.
Insider note: Foil transfers last longer when sealed with at least two topcoat layers, protecting the metallic surface from chipping and peeling.
17. Lime Green with White Negative Space Triangles
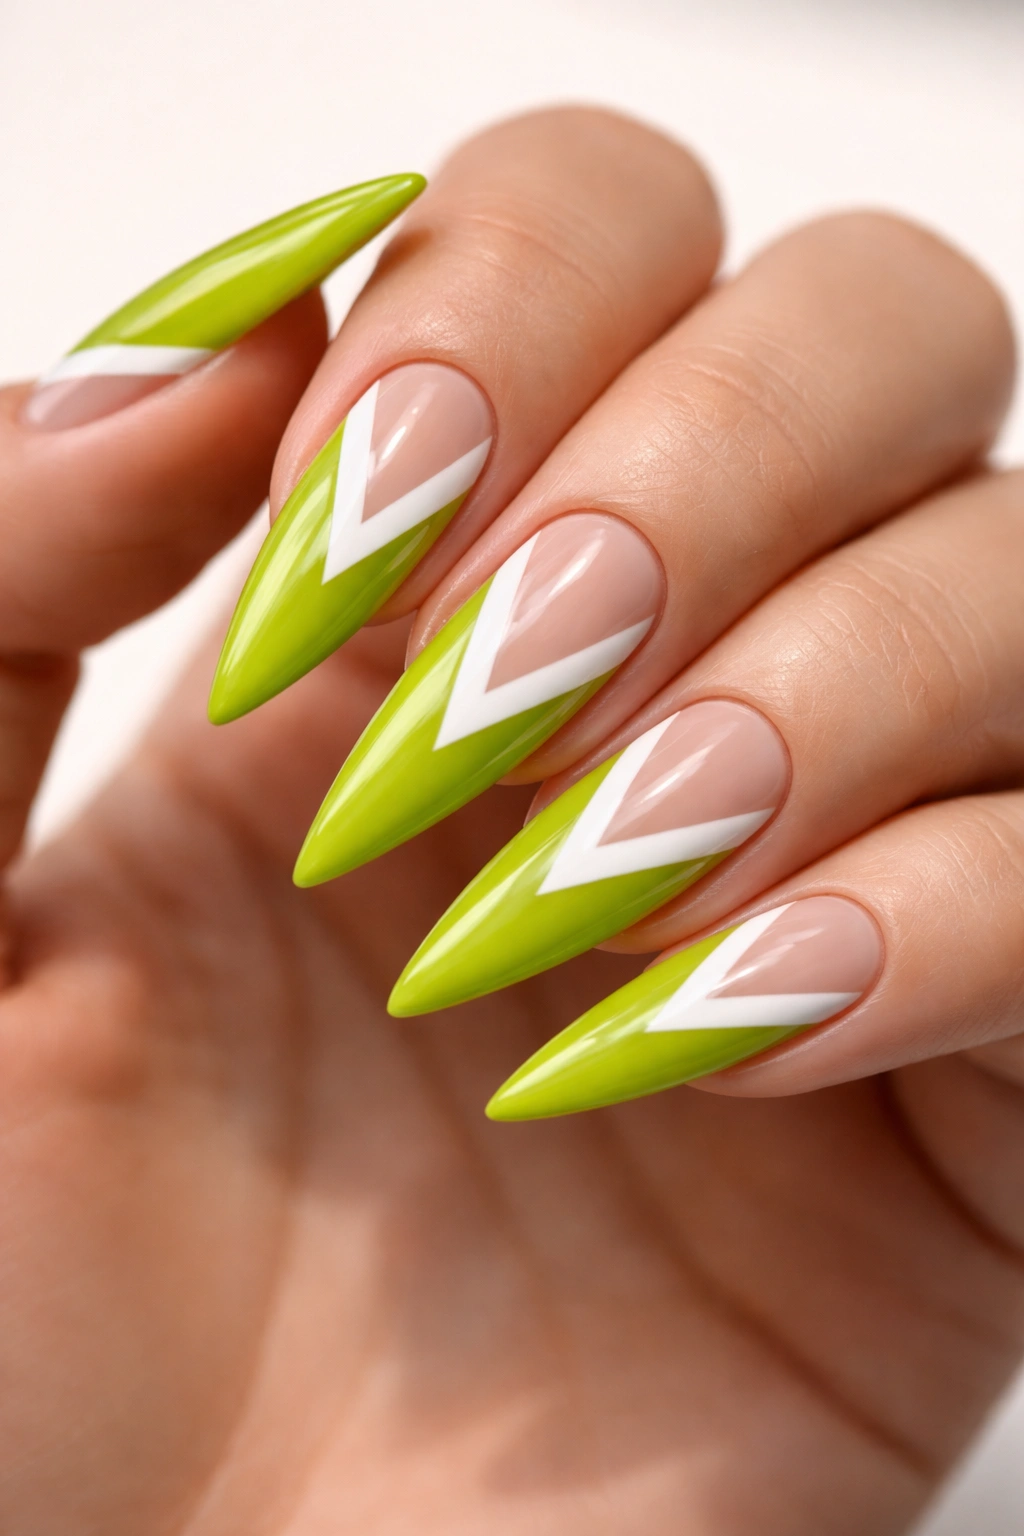
Negative space designs create visual impact by strategically revealing the natural nail beneath the polish. White triangles carved into a lime green base create a geometric, high-contrast design that reads as artistic and intentional. The combination of bright lime and natural nail tone creates a striking visual effect.
Negative Space Technique
Paint your full lime base on all nails. Once dry, use a thin detail brush with white polish or a correction pen to outline the triangular shapes you want to create. Once the white outlines are dry, carefully use a non-acetone nail file or acetone on a very thin brush to gently remove the lime polish from within the white-outlined triangles, revealing the natural nail beneath. This requires a delicate touch to avoid enlarging the shapes or damaging the nail.
Design Variations
Create a single large triangle per nail, multiple small triangles scattered across the nail, or a pattern of triangles working down from the cuticle to the tip. The geometric nature of triangles means even a simple scattered pattern reads as intentional and designed rather than accidental.
Worth knowing: Negative space designs photograph exceptionally well because the stark contrast between polish, natural nail, and white outline creates dramatic visual impact.
18. Forest Green with Glitter Ombré to Clear

This design transitions from dense glitter concentration at the tip to completely clear at the base, creating a gradient that suggests the nail is fading into transparency. Forest green glitter polish creates the base, and clear gel on top creates the ombré effect. The result is an ethereal, almost glass-like appearance.
Ombré-Through-Density Technique
Instead of blending two different polishes, create ombré by varying the density of glitter application across the nail. Apply heavy glitter polish to the bottom third (tip area), moderate application to the middle third, and light or no application to the top third (cuticle area). This creates the illusion of gradient without requiring difficult blending.
Securing the Glitter
Glitter can shift and slide on the nail surface without proper sealing. Apply your glitter in layers—a base coat of forest green, then glitter-heavy polish on the tip, then clear polish over the entire nail to lock everything in place and create that smooth, glass-like finish. The clear layer is what transforms separate layers into a unified ombré effect.
Pro tip: Build your glitter application in thin layers rather than one thick layer—multiple thin layers integrate better and look more refined.
19. Celadon Green with Silver Leaf on One Accent Nail
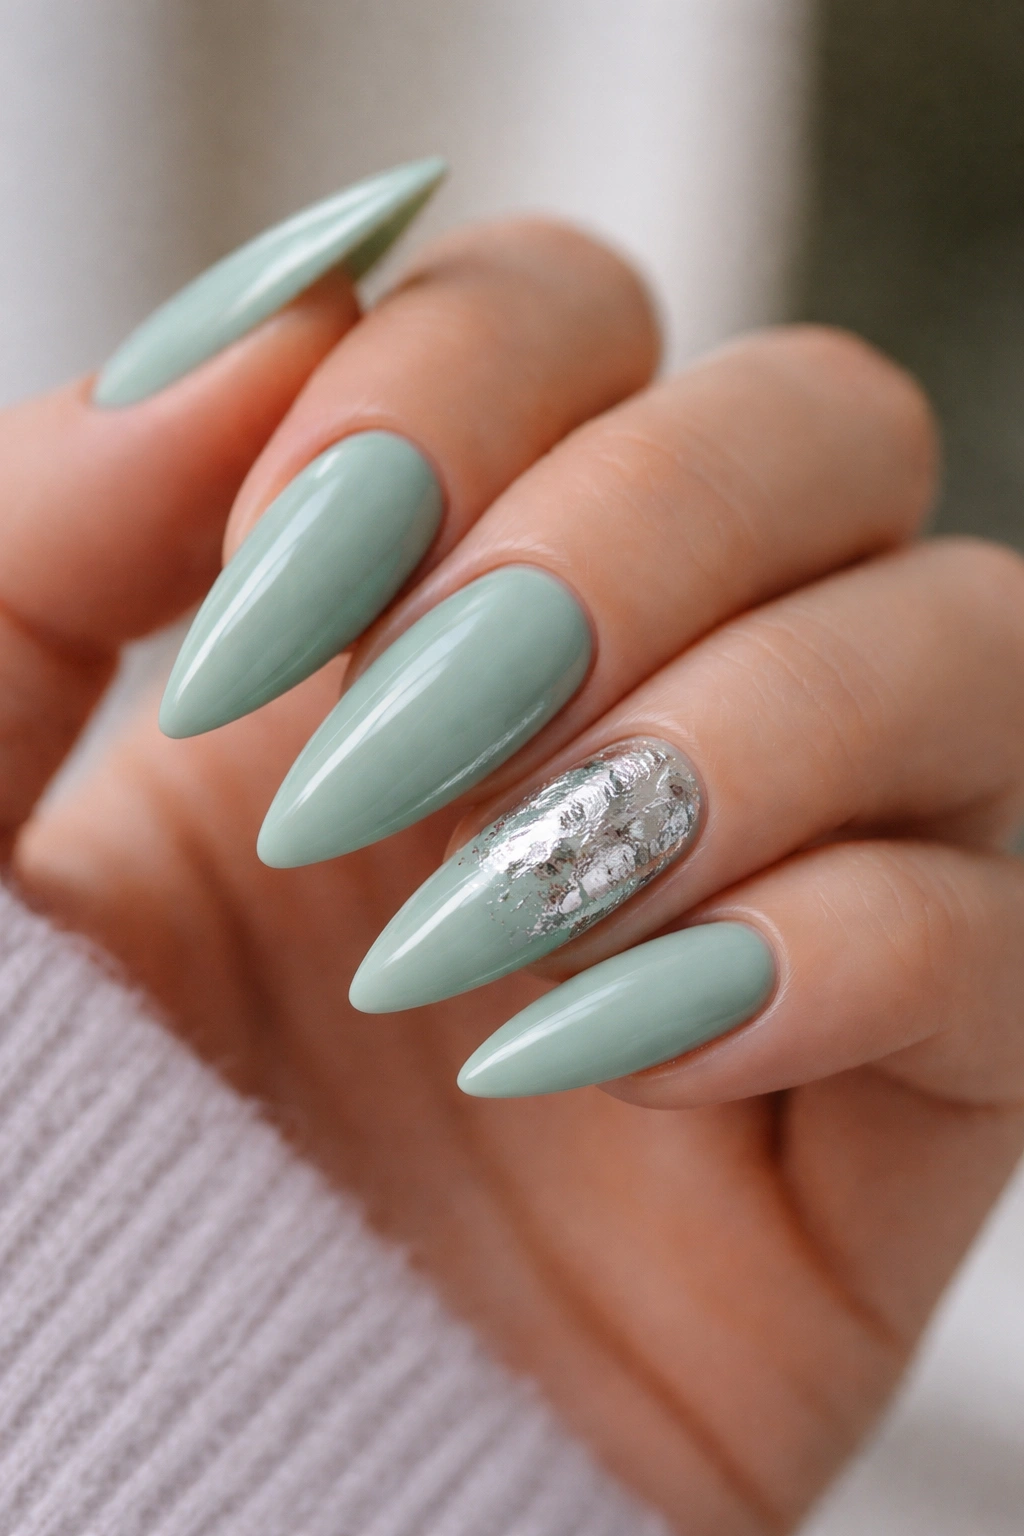
Celadon is a soft, sophisticated grayish-green that evokes calm and understated elegance. Keeping this color on nine nails and reserving silver leaf for just one accent nail (usually the ring finger) creates a design that’s minimal but impactful. The silver leaf catches light and draws attention while the celadon base keeps everything grounded and elegant.
Celadon Color Theory
Celadon green is historically inspired by Chinese pottery and carries connotations of tranquility, nature, and refinement. This makes it perfect for designs that prioritize elegance over loudness. Pairing it with a metallic on a single nail creates a design that feels curated and intentional—like you consciously selected which nail deserved the accent rather than automatically decorating all ten.
Strategic Accent Placement
Apply silver leaf only to your accent nail (ring finger is traditional, but pinky or middle finger work beautifully too). The single accent creates visual interest and an intentional focal point without diluting the power of the celadon base color. This approach works because it creates contrast while respecting the understated nature of the celadon shade.
Worth knowing: Celadon appears different in various lighting—indoors it reads as soft and muted, while in natural light it gains more visible green tone. This subtle variation is part of its appeal.
20. Bright Green with Mixed Metallic Accents
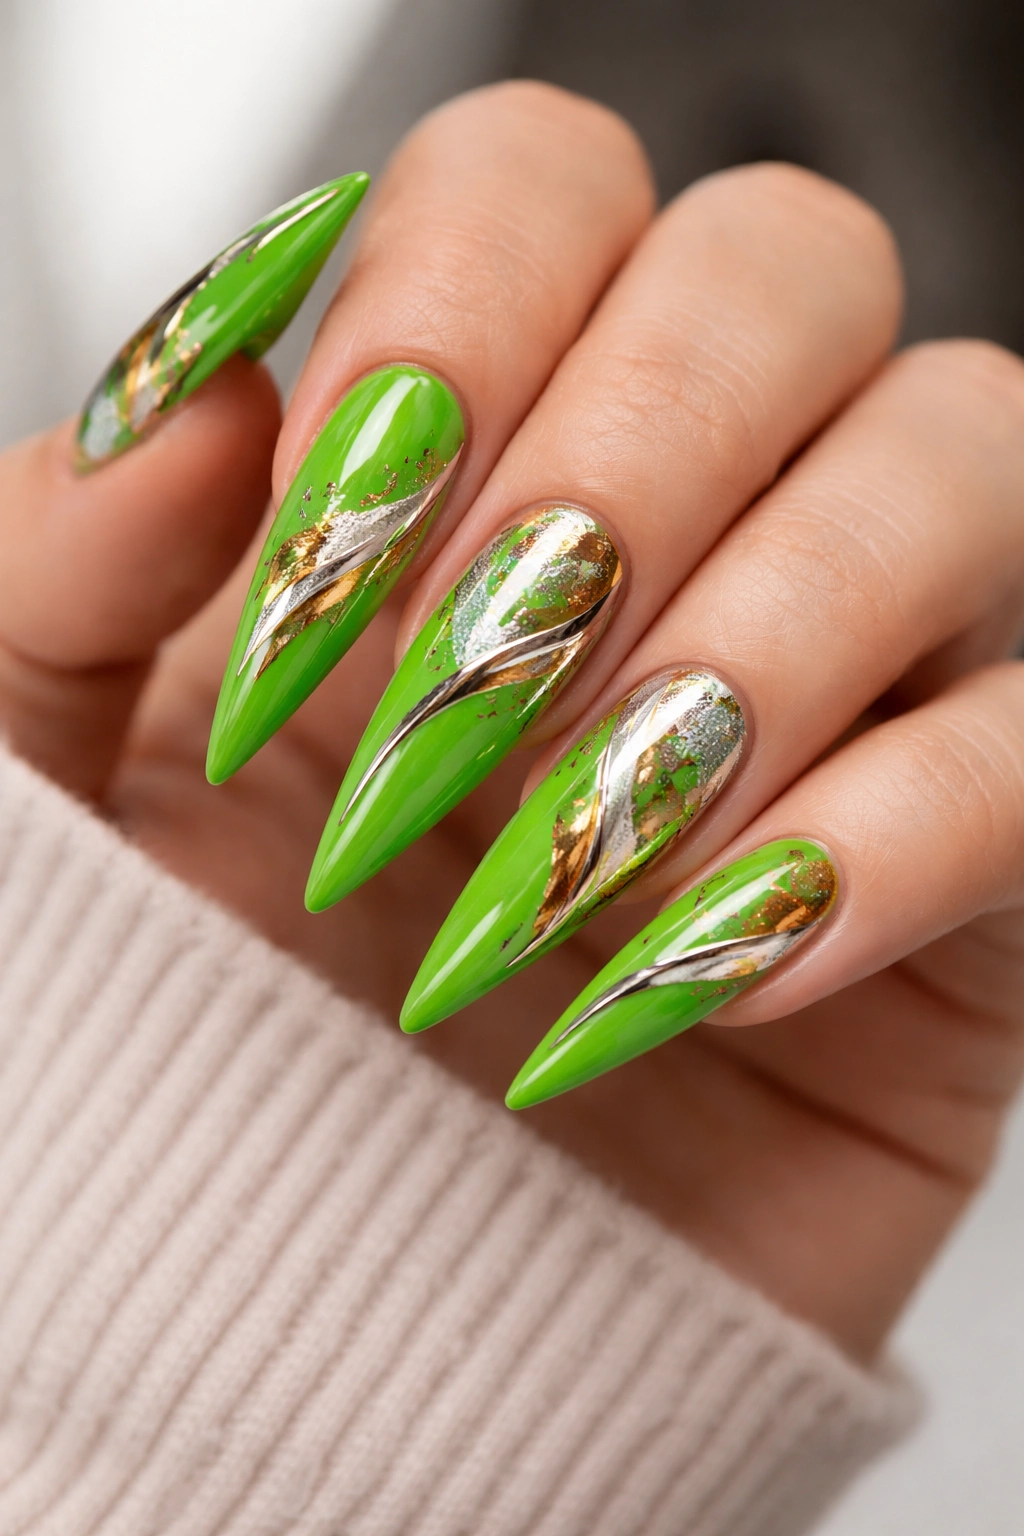
End with a design that combines multiple metallic finishes—gold, silver, and possibly copper—scattered across a bright green base. This approach sounds like it could be overwhelming, but when the metallics are applied with intention and restraint, they create an eclectic, artistic aesthetic that reads as intentionally maximalist rather than chaotic.
Mixing Metallics Successfully
The key to combining multiple metallics is asymmetry and restraint. Rather than evenly distributing gold, silver, and copper across all nails, concentrate different metallics on different nails. Maybe all your gold accents appear on your index and middle fingers, silver on your ring and pinky, and copper scattered as connecting details. This creates visual flow while preventing any single nail from feeling cluttered.
Application Methods
You can apply metallics as splatter, geometric shapes, stripes, or dots—mixing application methods across nails keeps the design feeling curated. Apply each metallic individually and allow it to fully dry before applying the next metallic. Seal everything with a clear topcoat to create a unified, finished surface and protect all the metallic details from chipping.
Pro tip: Metallics show their true color best on a glossy topcoat rather than matte—glossy reflects light in ways that make metallics shimmer and shine, while matte dulls their visual impact.
Final Thoughts
Green stiletto nails offer incredible range, from understated elegance to bold artistic statements. Whether you’re drawn to jewel tones like emerald and forest green, soft pastels like pistachio and sage, or neon brights that demand attention, there’s a green shade and design approach that expresses your personal aesthetic. The beauty of stiletto length is that it transforms even simple, single-color designs into something inherently sophisticated and magazine-worthy.
The designs above range in complexity from “apply one color and seal it” to “this requires some detail work,” so you can choose based on your comfort level and available time. Many of these look equally stunning whether you execute them at home or book a professional manicurist—sometimes the value of professional application is having someone else handle the precision work while you enjoy the final result without the effort. Either way, you’re not limited to one approach or one shade of green. Green is versatile enough to become a genuine staple in your regular rotation, rotating through different shades and designs based on your mood, outfit, or occasion.
