

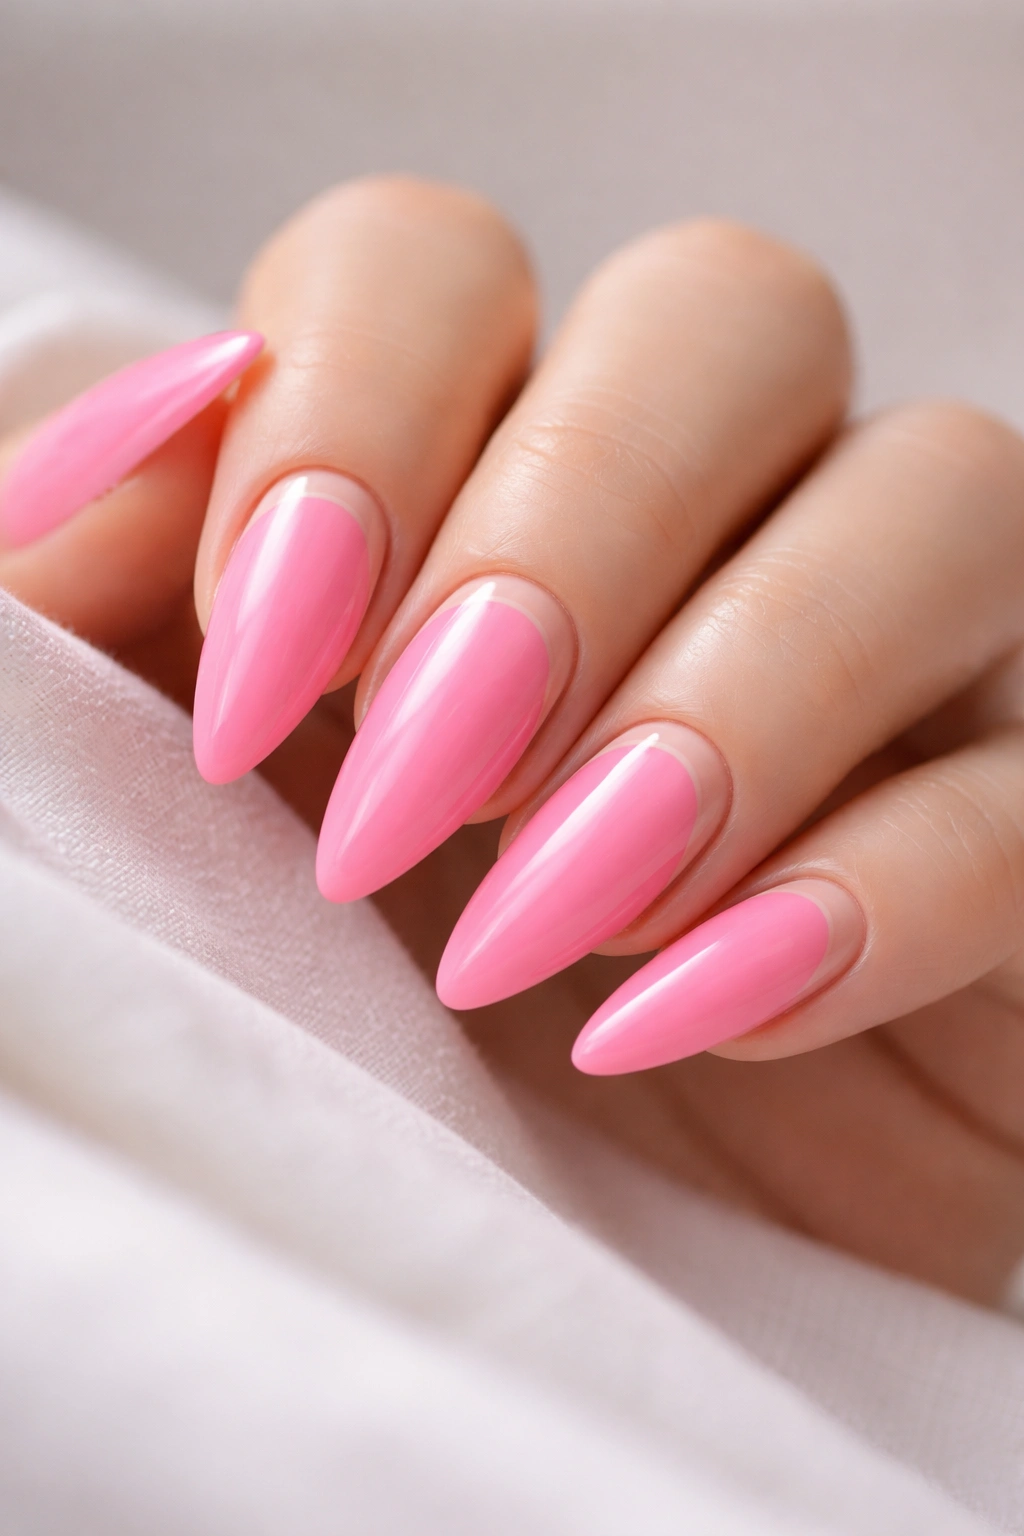
Pink stiletto nails have dominated the fashion and beauty landscape for good reason — they’re elegant, versatile, and instantly elevate any look. But here’s what many people don’t realize: not every stiletto nail design works equally well on medium-length nails. The proportions matter more than you’d think. A design that looks stunning on long nails might overwhelm a medium length, while the right design can make medium nails look longer, more dramatic, and infinitely more sophisticated than they actually are.
Medium-length nails sit in that sweet spot where you get real design real estate without the fragility and daily hassle of extra-long stilettos. They’re practical enough for everyday wear, yet long enough to showcase intricate details, gradients, and artistic elements that make people stop and ask “where did you get those done?” Whether you’re drawn to minimalist elegance, bold statement designs, or something in between, there’s a pink stiletto style that’ll make your nails the focal point of your entire aesthetic.
The designs we’re breaking down here range from soft, barely-there pink pastels to rich, jewel-toned magentas — each one engineered to look absolutely flawless on medium-length stiletto shapes. Some lean into maximalist glam with crystals and metallic accents, while others prove that sometimes the most striking nail design is one that knows how to whisper instead of shout. Let’s explore the designs that deserve a permanent spot in your nail inspo folder.
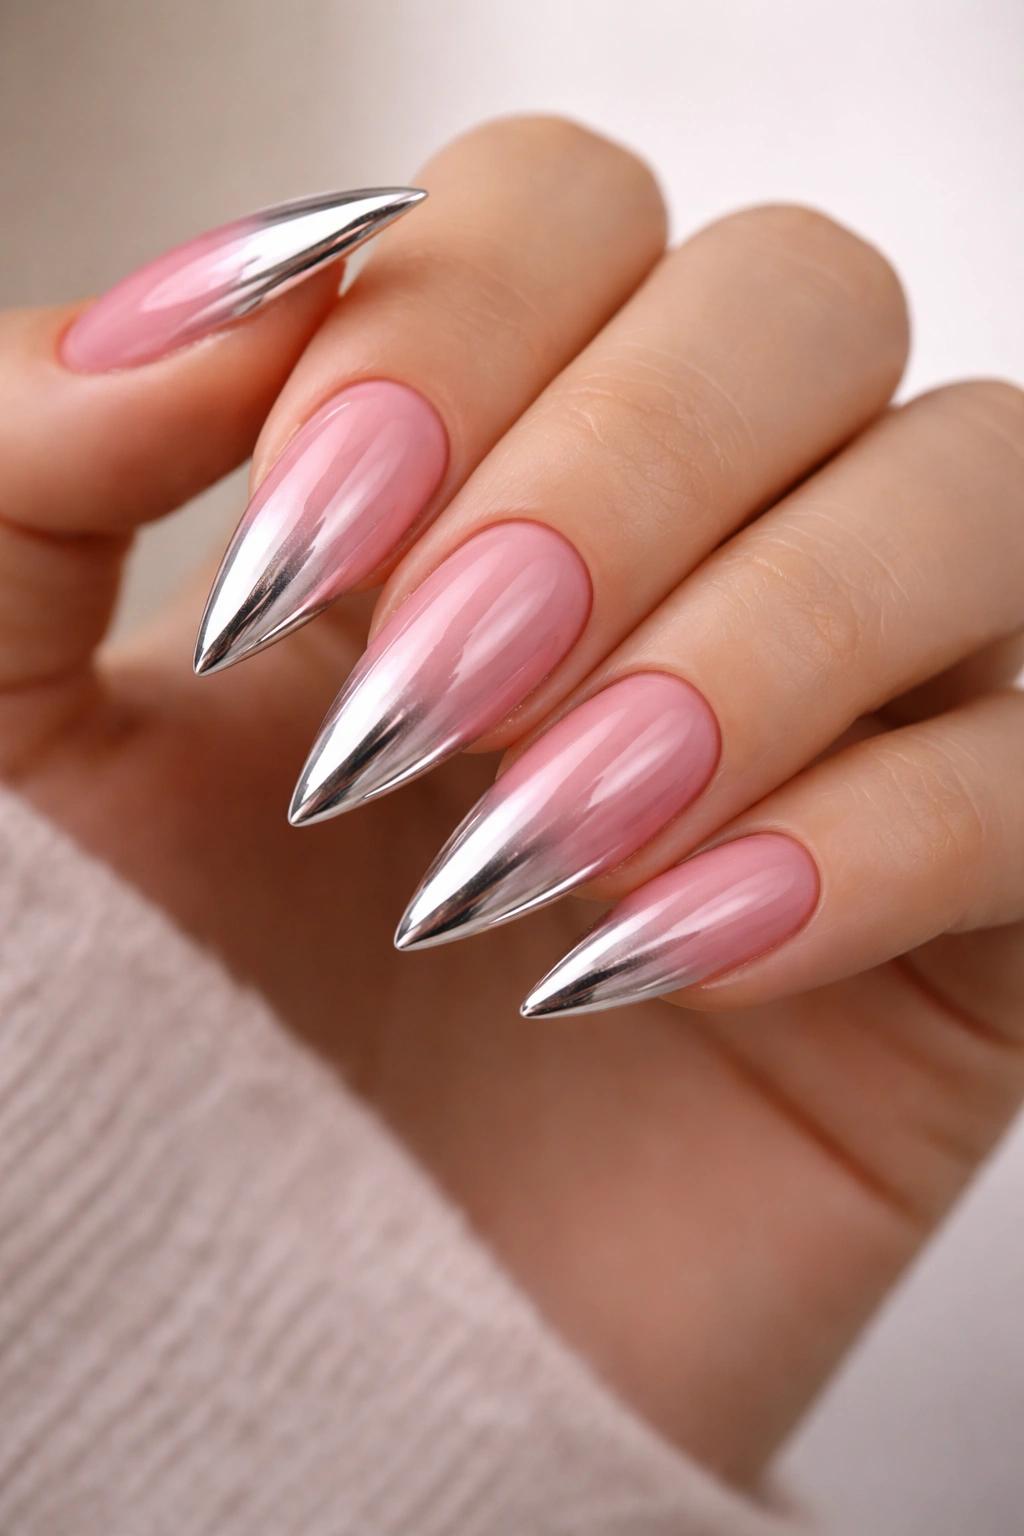
1. Soft Blush Gradient with Chrome Tips
This design takes advantage of the gradient technique that’s been refined to an art form over the last few years. Start with a creamy blush pink base that sits somewhere between ballet shoe and dusty rose, then blend it into an ivory or pearl white at the tips. The real magic happens when you apply that ultra-reflective chrome powder to just the very edge of the nail, creating a mirror-like finish that catches light from every angle.
Why This Design Wins on Medium Nails
Medium-length nails give you just enough surface area to show off the gradient without it looking cramped or overly busy. The soft color progression reads as elegant rather than playful, making it work equally well for a professional office setting or a weekend dinner out. The chrome tips add visual length without being heavy or complicated.
Application and Longevity Tips
- Use a high-quality ombre sponge to blend the two colors seamlessly — the key is feathering, not a harsh line
- Apply the chrome powder with a dry brush in gentle circular motions after the base color is completely set
- This design typically lasts 3 to 4 weeks without chipping if you seal it properly with a thick topcoat
- Chrome can sometimes show fingerprints and dust more visibly than solid colors, so plan for regular maintenance
Pro tip: If you have a slightly warm undertone in your skin, lean toward peachy-blush rather than cool pink for this gradient — it’ll look more custom to you and less “generic salon design.”
2. Classic Hot Pink with Gold Foil Accents
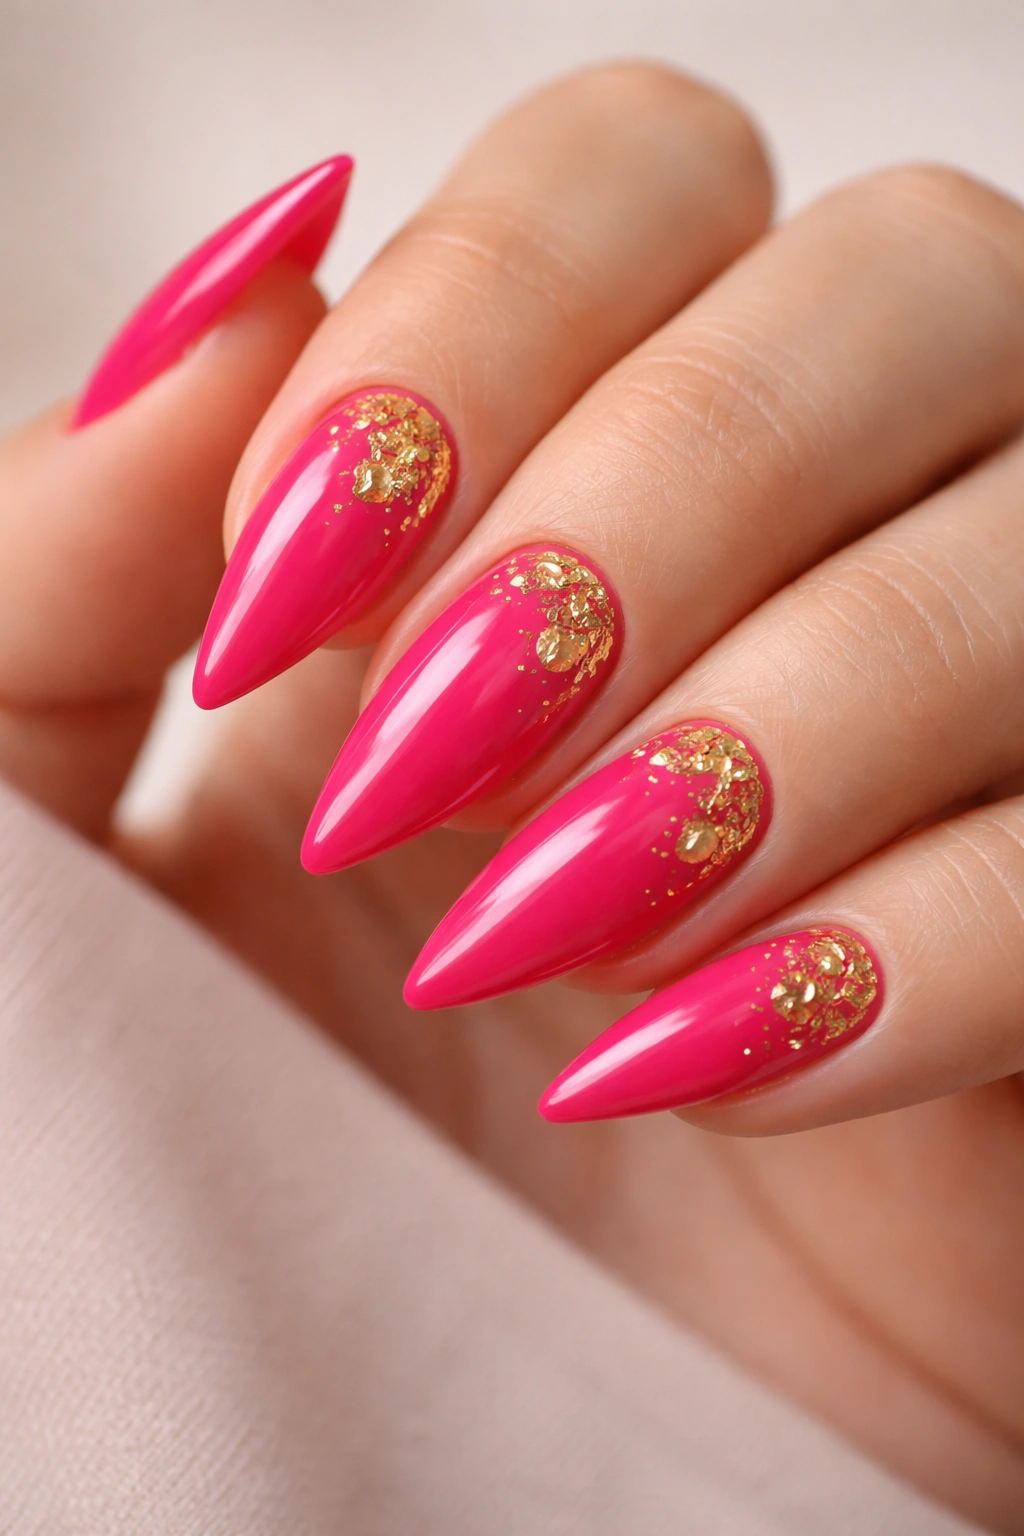
Sometimes the most stunning designs are the simplest ones executed with absolute precision. A rich, saturated hot pink base provides the perfect canvas for delicate gold foil flakes scattered across the nail in a slightly asymmetrical pattern. Think less “random glitter explosion” and more “thoughtfully placed modern art installation.”
What Makes This Combination Timeless
Hot pink is the ultimate power color — it’s confident, feminine, and reads as deliberate rather than accidental. The gold foil adds luxury and catches light beautifully under fluorescent office lighting or natural sunlight. On medium nails, this combo reads as refined rather than overdone because there’s breathing room between the accent elements.
Getting the Look Right
- Choose a hot pink with warm undertones rather than cool, neon-leaning pinks — deeper saturation looks more sophisticated
- Apply foil flakes while the topcoat is still slightly tacky; if you wait until it’s fully set, they won’t adhere properly
- Use tweezers to place individual flakes rather than sprinkling them — this gives you control and prevents the “accident” look
- Seal everything under multiple layers of glossy topcoat to protect the foil and create depth
Worth knowing: Gold foil tends to show surface scratches more than other finishes, so this design is best for people who aren’t doing a lot of hand-intensive work during the wear period.
3. Millennial Pink Marble Effect
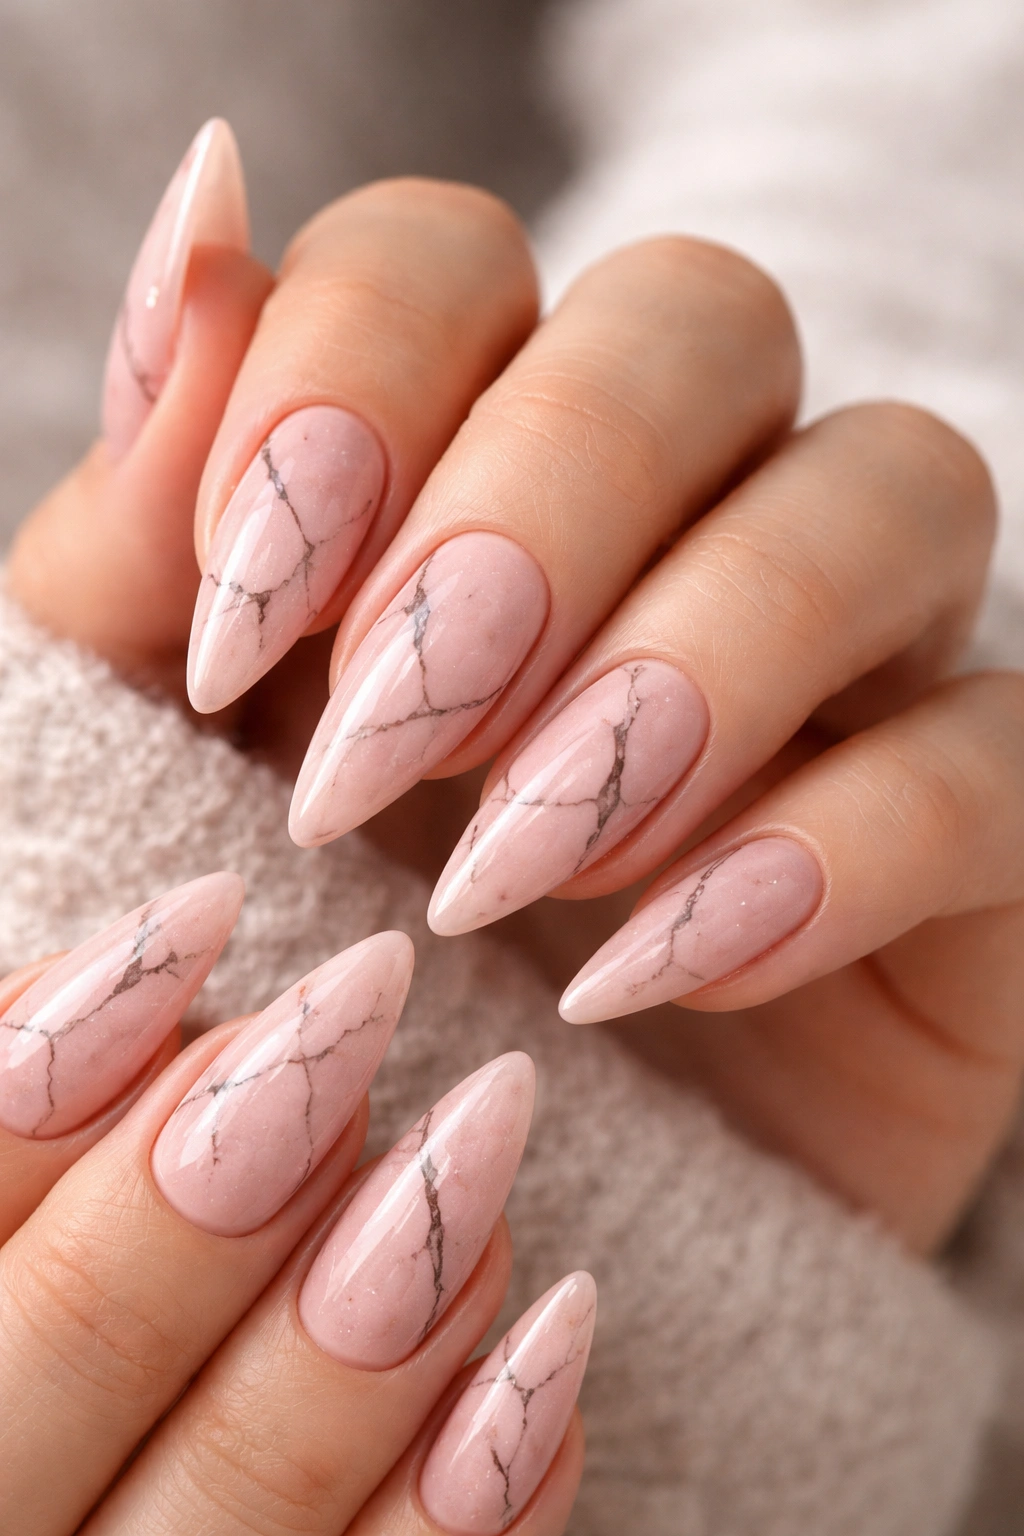
Marble has been the go-to sophisticated pattern for years, and there’s a reason — it looks expensive, artistic, and intentional. For this version, use a base of soft millennial pink (that in-between shade that’s neither peachy nor cool), then layer it with thin black or charcoal gray lines to create the marble vein effect. Finish with a glossy topcoat that makes the pattern look three-dimensional.
The Psychology of Marble on Medium Nails
Marble patterns create the illusion of more surface area because your eye tracks the lines rather than seeing the nail as a solid shape. On medium nails, this visual trick actually makes your nails appear longer and more dramatic than they are. The pattern also gives you an excuse to keep the rest of your hand minimal — marble designs absolutely stand alone without needing additional jewelry or embellishments.
Technique Breakdown
- Use a thin striping brush or the edge of a toothpick to draw the marble veins; these tools give you much better control than a regular polish brush
- Vary the thickness of your lines — some thick, some thin — so it looks naturally organic rather than geometric
- Don’t fill every space with lines; let some of the pink base show through for balance and movement
- Seal with a high-shine topcoat to give the effect depth and make the pattern look like it’s beneath layers of glass
Pro tip: If freehand marble intimidates you, buy a marble nail stamp; the results are essentially identical to hand-painted and take a fraction of the time.
4. Dusty Rose with Negative Space Lines
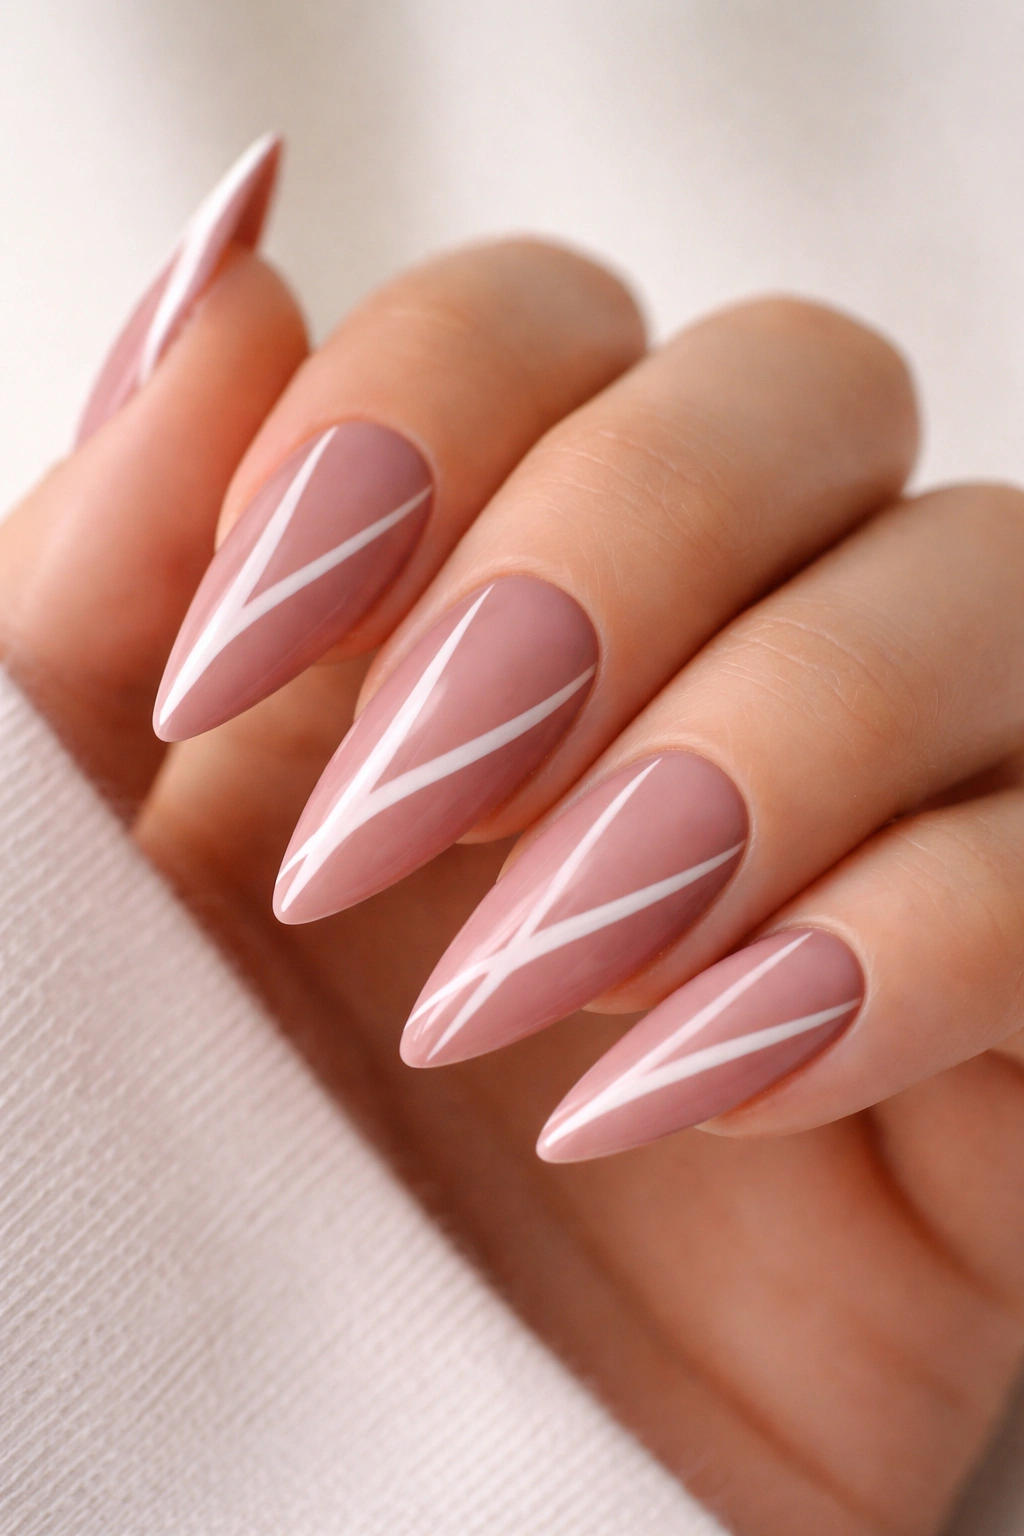
This is where minimalism meets sophistication. Paint your nails in a muted dusty rose, then use a thin striping brush to create geometric negative space lines — typically thin vertical or diagonal lines where you remove the color entirely to show the natural nail underneath. The contrast between the soft pink and the clean white of your natural nail creates a striking modern look.
Why Negative Space Works on Medium Nails
Negative space designs make medium nails look intentionally designed rather than simply short. The technique draws focus upward and creates visual interest without adding bulk or complexity. It’s the design equivalent of a minimalist outfit that somehow costs more than it looks like it should.
Execution Tips
- Invest in a thin striping brush — 0.5mm or smaller — for clean, precise lines
- Plan your line placement before you start; lightly sketch with a white pencil if it helps
- Remove the polish in clean, controlled motions with a brush dipped in acetone if you make a mistake
- Keep lines evenly spaced for maximum impact; random placement looks accidental rather than artistic
Worth knowing: This design shows any dust, debris, or minor imperfections more visibly than solid colors, so keep your hands clean during the wear period.
5. Soft Pink with 3D Rose Flower Detail
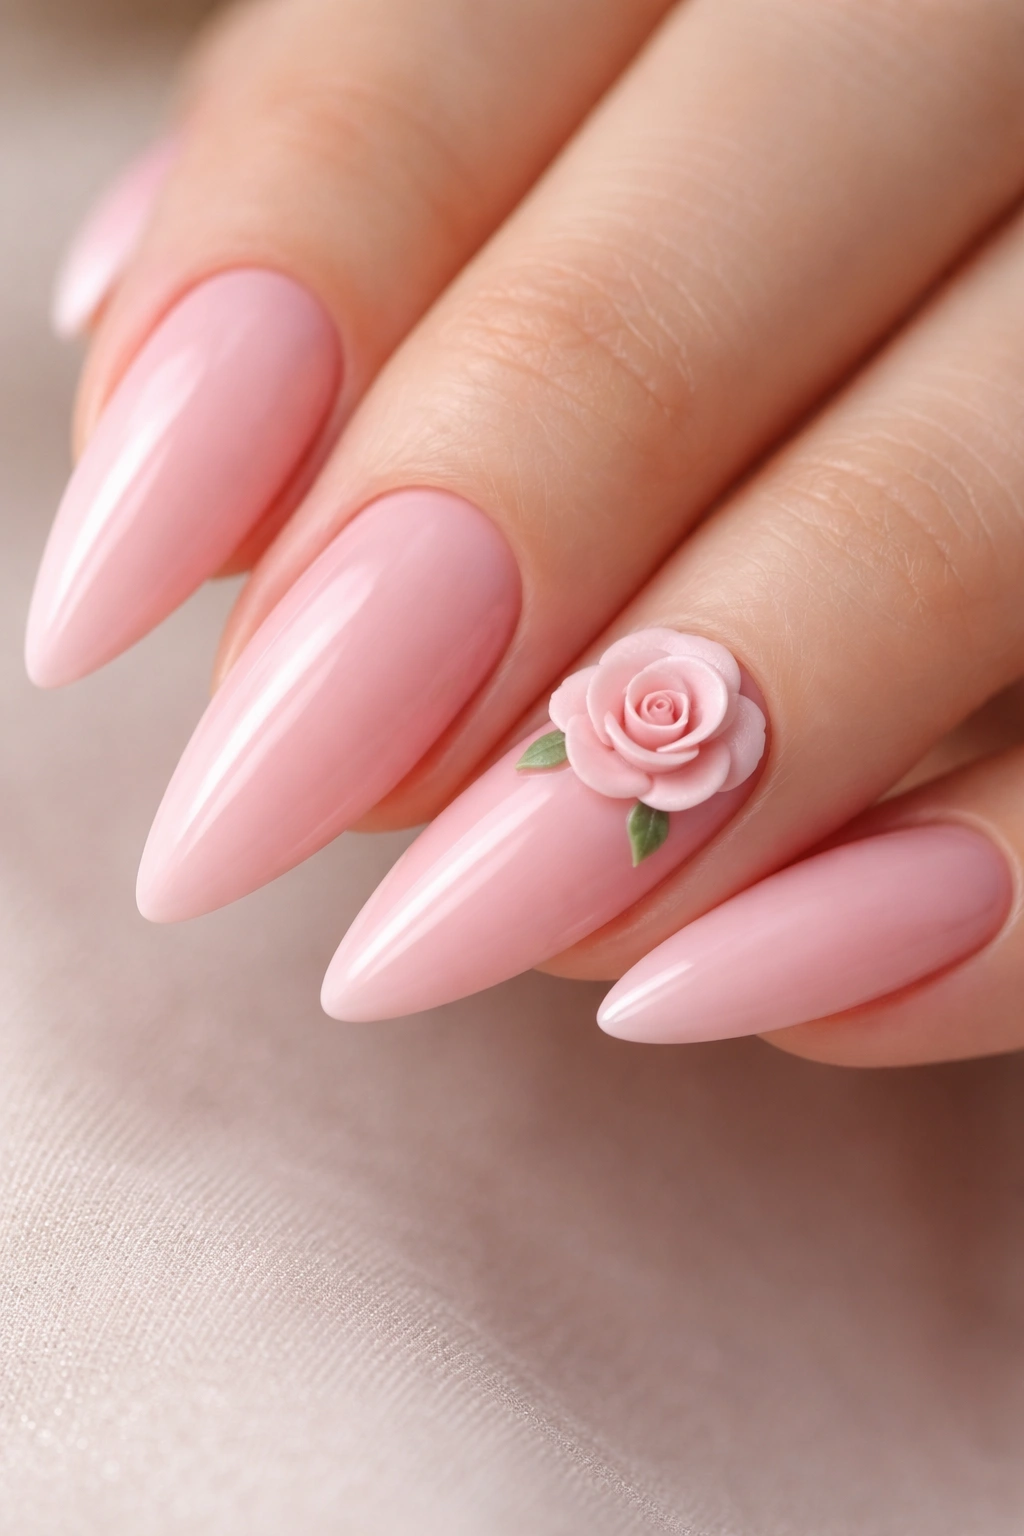
If you want nail art that makes people do a genuine double-take, this is the design. Use a pale pink base, then apply a single tiny 3D rose flower on the ring finger using acrylic or gel sculpting techniques. The flower should be approximately the size of a small pearl — delicate enough to look refined, substantial enough to be the clear focal point.
The Appeal of Dimension on Medium Nails
Three-dimensional nail art on medium nails reads as intentional luxury rather than over-the-top. The medium length gives you enough space to showcase the detail without it looking crowded or disproportionate. Most people will assume you paid a premium nail artist for this look — and you might have — but the impact is absolutely worth it.
Creating the 3D Effect
- If using acrylic, build the rose with multiple thin layers rather than one thick layer; it’ll look more realistic and delicate
- Use gel paints or acrylics in slightly deeper shades of pink to add shadow and dimension to the petals
- Seal the 3D element under a thick layer of topcoat or clear builder gel to protect it during wear
- This design typically requires professional application unless you have advanced nail art skills
Pro tip: Ask your nail artist to place the flower slightly off-center rather than dead center on the nail — it creates more visual movement and looks more deliberately artistic.
6. Baby Pink Ombre with Pearl Embellishments

Start with an ivory or near-white base and gradually deepen it to a baby pink at the tips. Once that gradient is set, add tiny pearl beads along the gradient line — just 2 or 3 pearls per nail, not a full row. The pearls catch light and add just enough texture to elevate the design from simple to special.
Why Pearls Elevate a Simple Design
Pearls are inherently luxurious and read as intentional rather than random. They add dimension without weight, and they work with virtually any outfit because of their neutral-leaning quality. On medium nails, pearls scattered along the gradient line create a balance between decoration and restraint.
Pearl Application Best Practices
- Use small seed pearls or tiny pearl beads rather than large ones; oversized embellishments overwhelm medium nails
- Apply pearls using a dab of thick topcoat or a nail gem adhesive while your ombre is still wet
- Position pearls in a slightly staggered line along the color transition rather than in a perfectly straight row
- Seal everything with a clear builder gel or thick topcoat to protect the pearls and prevent snagging
Worth knowing: Pearls can sometimes catch and snag on fabric more than flat nail art, so be mindful when pulling on sweaters or getting dressed.
7. Ballet Pink with French Tips in Rose Gold
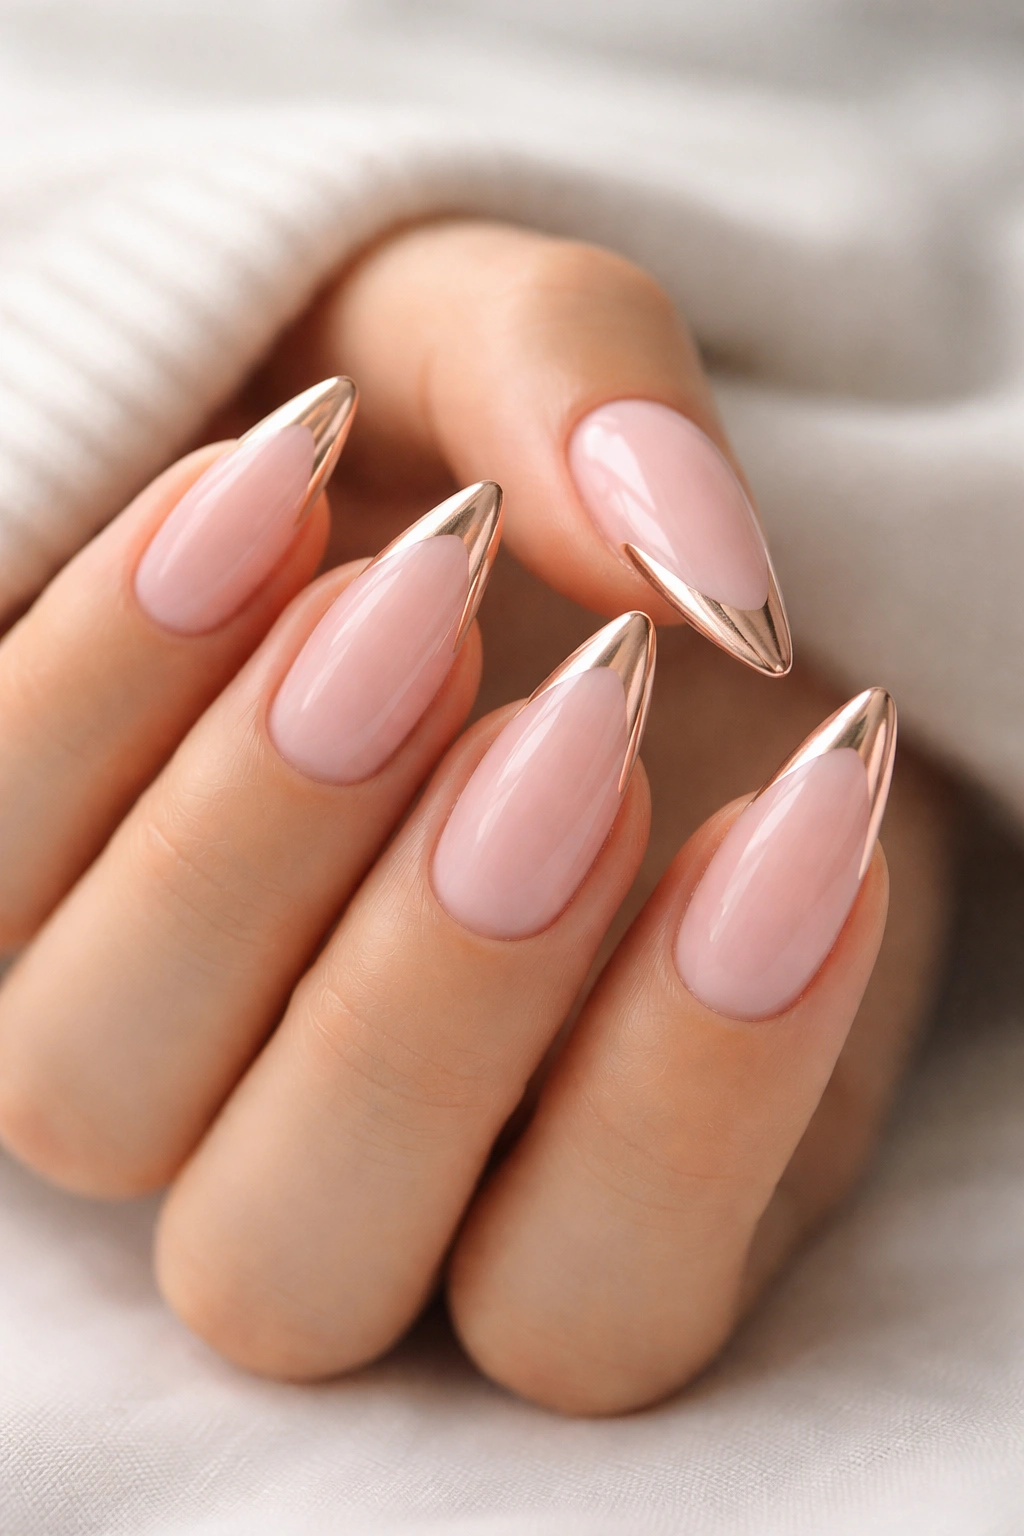
This is a modern spin on the classic French manicure. Use a ballet pink as your base — that soft, skin-tone-adjacent pink that’s been a professional favorite for decades. Instead of white tips, use a rose gold metallic for a contemporary, fashion-forward feel that’s still office-appropriate.
The Timeless Appeal of Updated French Manicure
French manicures work on medium nails because they don’t rely on extra length to look sophisticated. The rose gold tip update makes a familiar design feel fresh and current without being trendy in a way that dates itself. This is the design you can wear to literally anywhere and look polished.
Perfect Execution
- The tip line should be thin and clean — practice on a nail wheel before committing to your natural nails
- Rose gold metallic works best when applied with a brush rather than as a powder; it gives cleaner edges
- Keep the tip line slightly higher than a traditional white French tip — this creates a more modern proportion
- Seal with a glossy topcoat and avoid topcoats with too much shine if you want a more matte rose gold finish
Pro tip: If your hand shape is wider or your nails are naturally short-looking, keep the rose gold tip slightly wider than you normally would; it visually elongates the nail.
8. Pink with Black Geometric Shapes
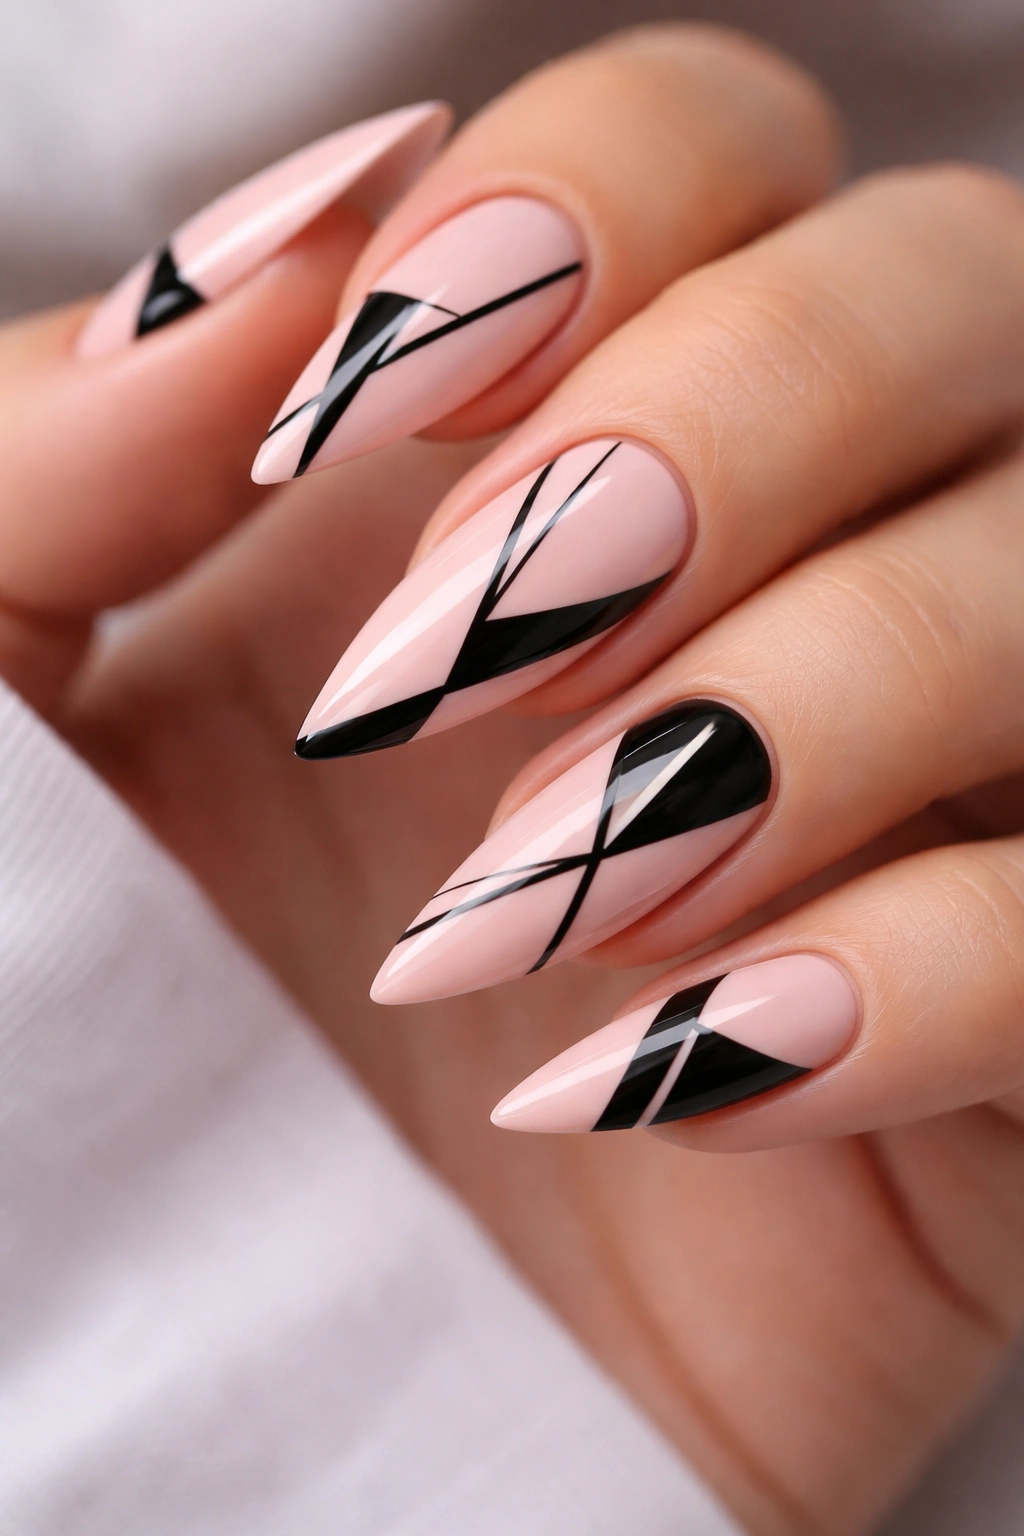
Combine a soft or medium pink base with bold black geometric shapes — think triangles, thick lines, or angular shapes scattered across the nail. Keep the geometry clean and intentional rather than random; each shape should look deliberately placed. This design bridges the gap between artistic and wearable.
The Visual Impact of Geometry on Medium Nails
Geometric patterns create movement and draw the eye. On medium nails, well-executed geometric designs read as deliberately artistic rather than busy or cluttered. The contrast between the soft pink and crisp black creates drama without being loud.
Creating Clean Geometric Shapes
- Use a thin striping brush for lines and a dotting tool for circles; these tools give you the control you need
- Plan your layout mentally before you start — whether your shapes will be mirrored, staggered, or scattered
- Keep shapes the same thickness for a more cohesive, intentional look
- Let some negative space (empty pink) show between shapes; don’t fill every inch
Worth knowing: Black lines can sometimes show as slightly transparent under certain lighting conditions if you only apply one coat, so always double-coat geometric designs.
9. Bubble Gum Pink with Nude Reverse French
This is playful but sophisticated. Use a bright, fun bubble gum pink as your base, then create a reverse French manicure — instead of color on the tips, create a thin nude or beige line at the base of the nail where it meets your cuticle. It’s unexpected and modern.
Why Reverse French Works on Medium Nails
Reverse French lines look more current than traditional French and work beautifully on medium nails because the proportion feels modern rather than disproportionate. The nude base line adds definition without making your nails look shorter.
Application Technique
- The line at the base should be thin — approximately 1.5 to 2mm — and perfectly straight
- Use a nude that’s slightly warmer or cooler than your skin tone depending on your undertones
- Apply it as your final step, over the topcoat if necessary (using a thin striping brush)
- Keep the rest of the nail in solid bubble gum pink for maximum contrast and visual impact
Pro tip: This design actually looks better if the base line isn’t perfectly symmetrical across all ten nails — slight variation makes it look more intentionally artistic.
10. Dusty Pink with Thin Gold Striping
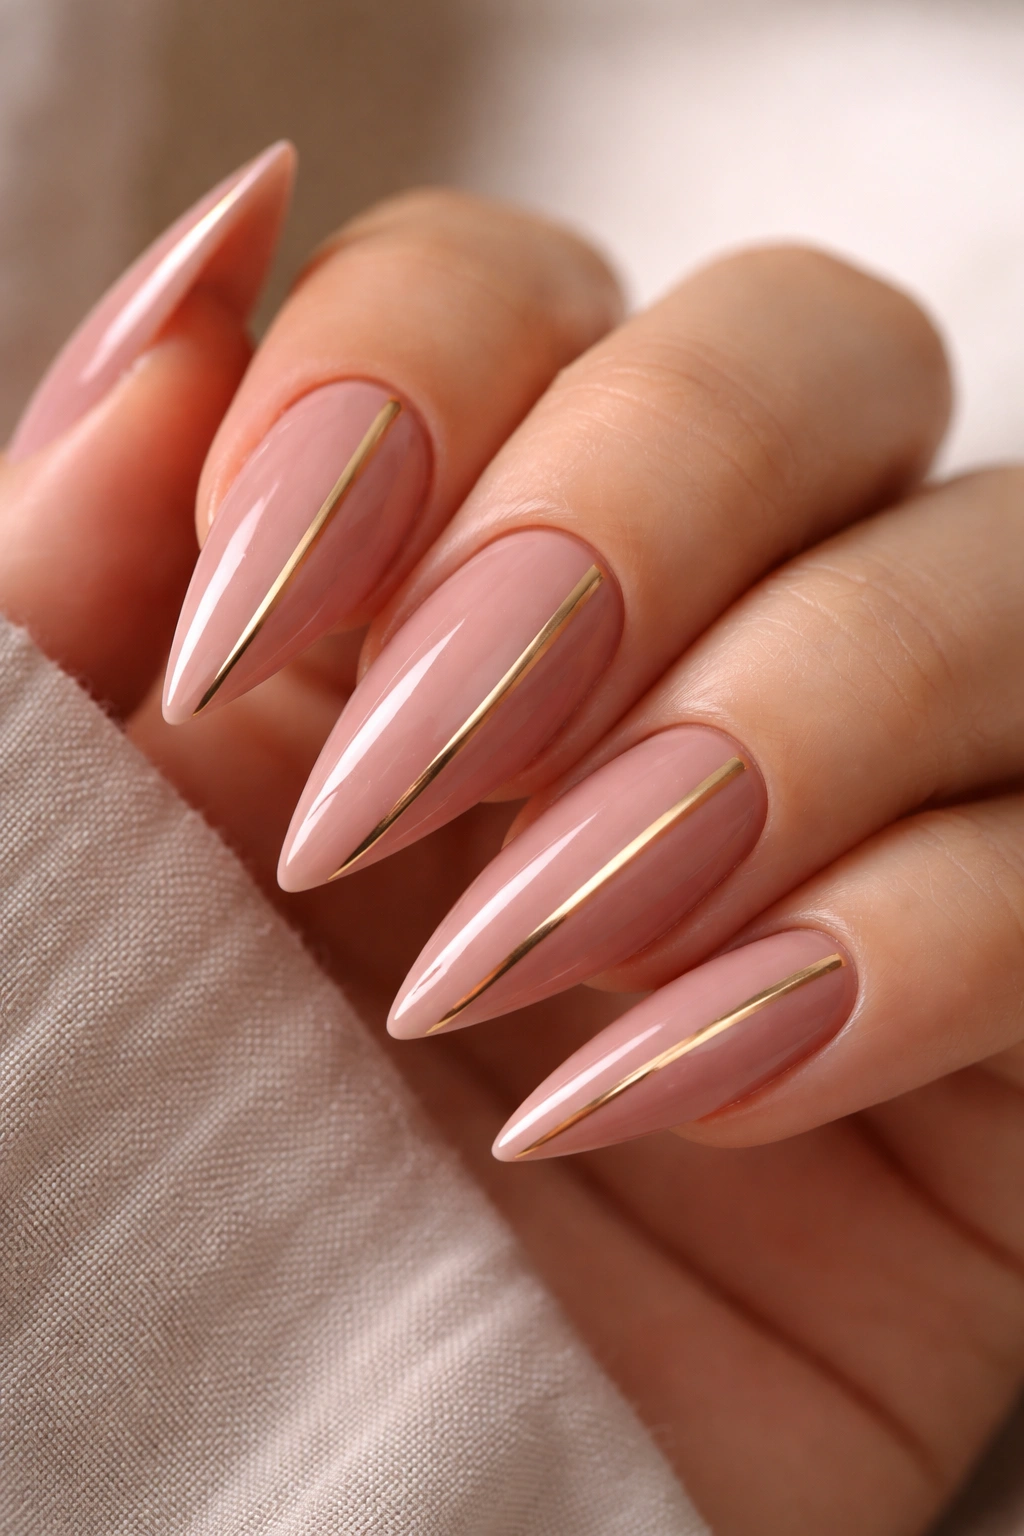
Sometimes elegance is about restraint. Paint your nails in a dusty, muted pink, then add one or two thin gold stripes running vertically down the center or diagonally across the nail. That’s it. No embellishments, no complexity — just sophisticated color and a touch of precious metal.
The Power of Simplicity on Medium Nails
This design proves that you don’t need elaborate detail to make an impact. The thin gold lines create just enough interest to make the design feel intentional while maintaining an elegant, understated vibe. On medium nails, this reads as refined rather than boring.
Getting the Details Right
- Use a thin striping brush (0.5mm or smaller) for clean, precise gold lines
- Choose a true gold rather than yellow; gold has more warmth and works better with dusty pink
- Keep lines perfectly straight by using a guide or tape if you’re not confident in your freehand work
- Apply gold lines while your topcoat is still slightly tacky so they adhere better
Worth knowing: Thin gold lines can sometimes crack or peel slightly faster than solid color, so plan for this design to last 3 weeks rather than the full 4 weeks.
11. Mauve Pink with Vintage Floral Pattern
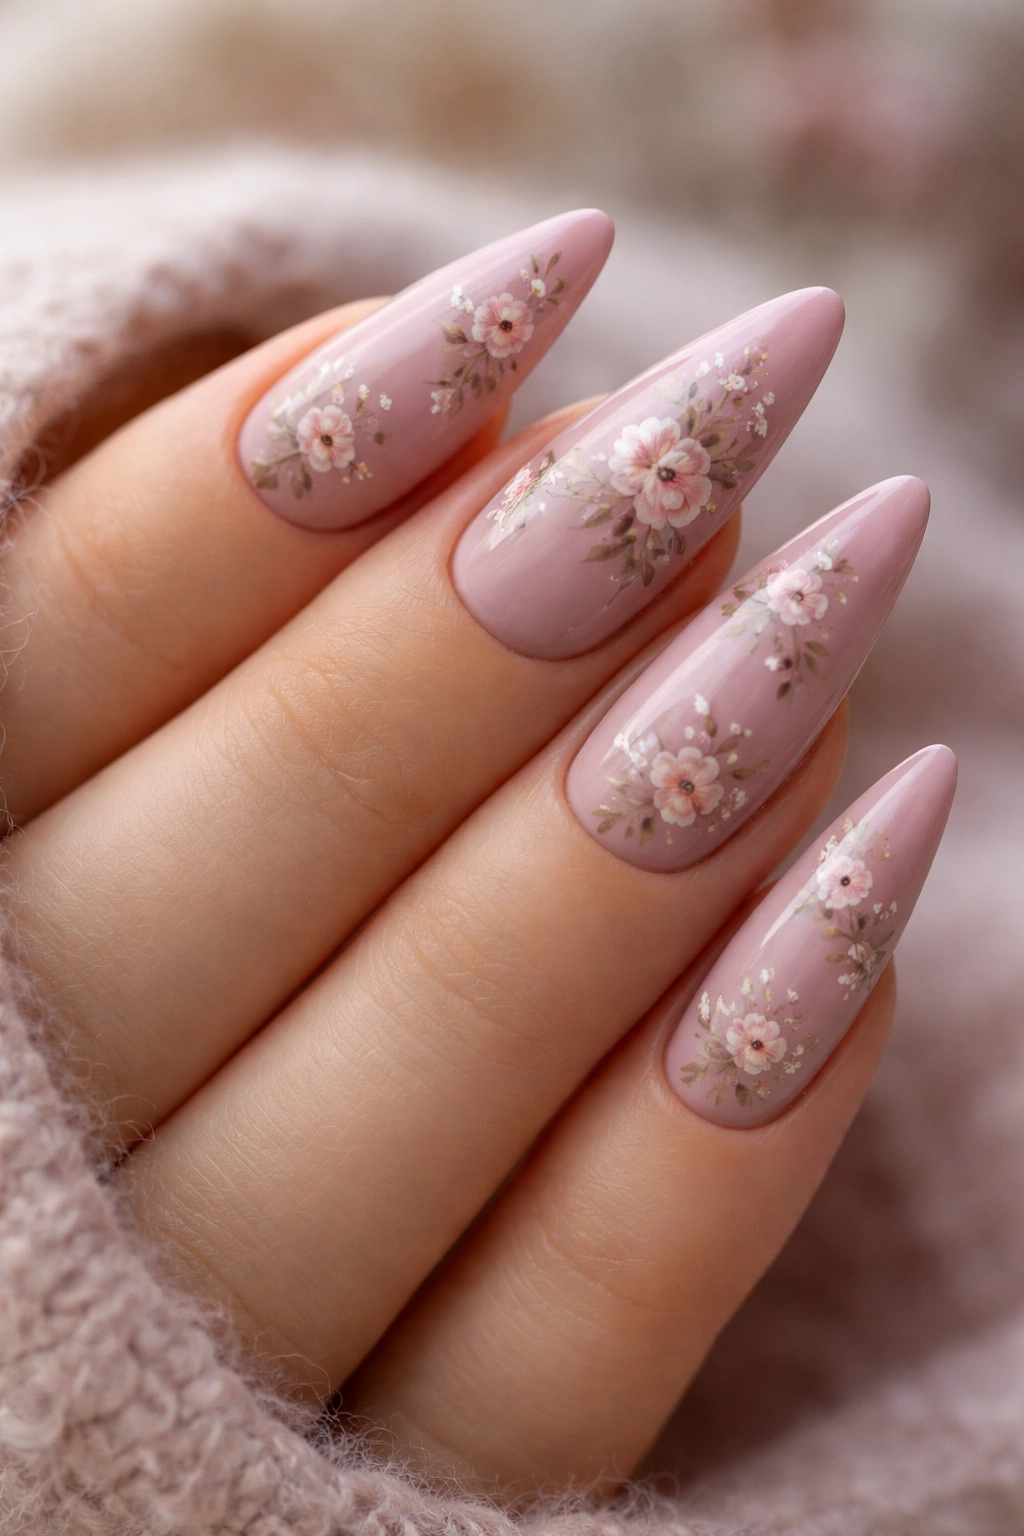
Create a mauve-pink base — that sophisticated purplish-pink that reads as mature and intentional — then add a delicate vintage floral pattern using tiny flowers. Think forget-me-nots or small roses scattered across the nail in muted tones. This design walks the line between romantic and contemporary.
The Timelessness of Vintage Florals
Vintage floral patterns never look dated because they’re rooted in classic design principles rather than current trends. On medium nails, vintage florals read as thoughtfully curated art rather than trend-chasing. The mauve base elevates the design from sweet to sophisticated.
Painting Tiny Flowers
- Use the tiniest brushes available — nail art brushes are ideal
- Paint petals as small dots or curved strokes in colors slightly different from your base
- Add a tiny dot in a contrasting color in the center of each flower
- Keep flowers loosely scattered; don’t create a perfectly symmetrical pattern
- Seal under multiple coats of topcoat to protect the detail work
Pro tip: If freehand flowers intimidate you, use nail art stickers or stamping plates; they deliver the same visual effect with zero artistic skill required.
12. Coral-Pink with White Lace Detail
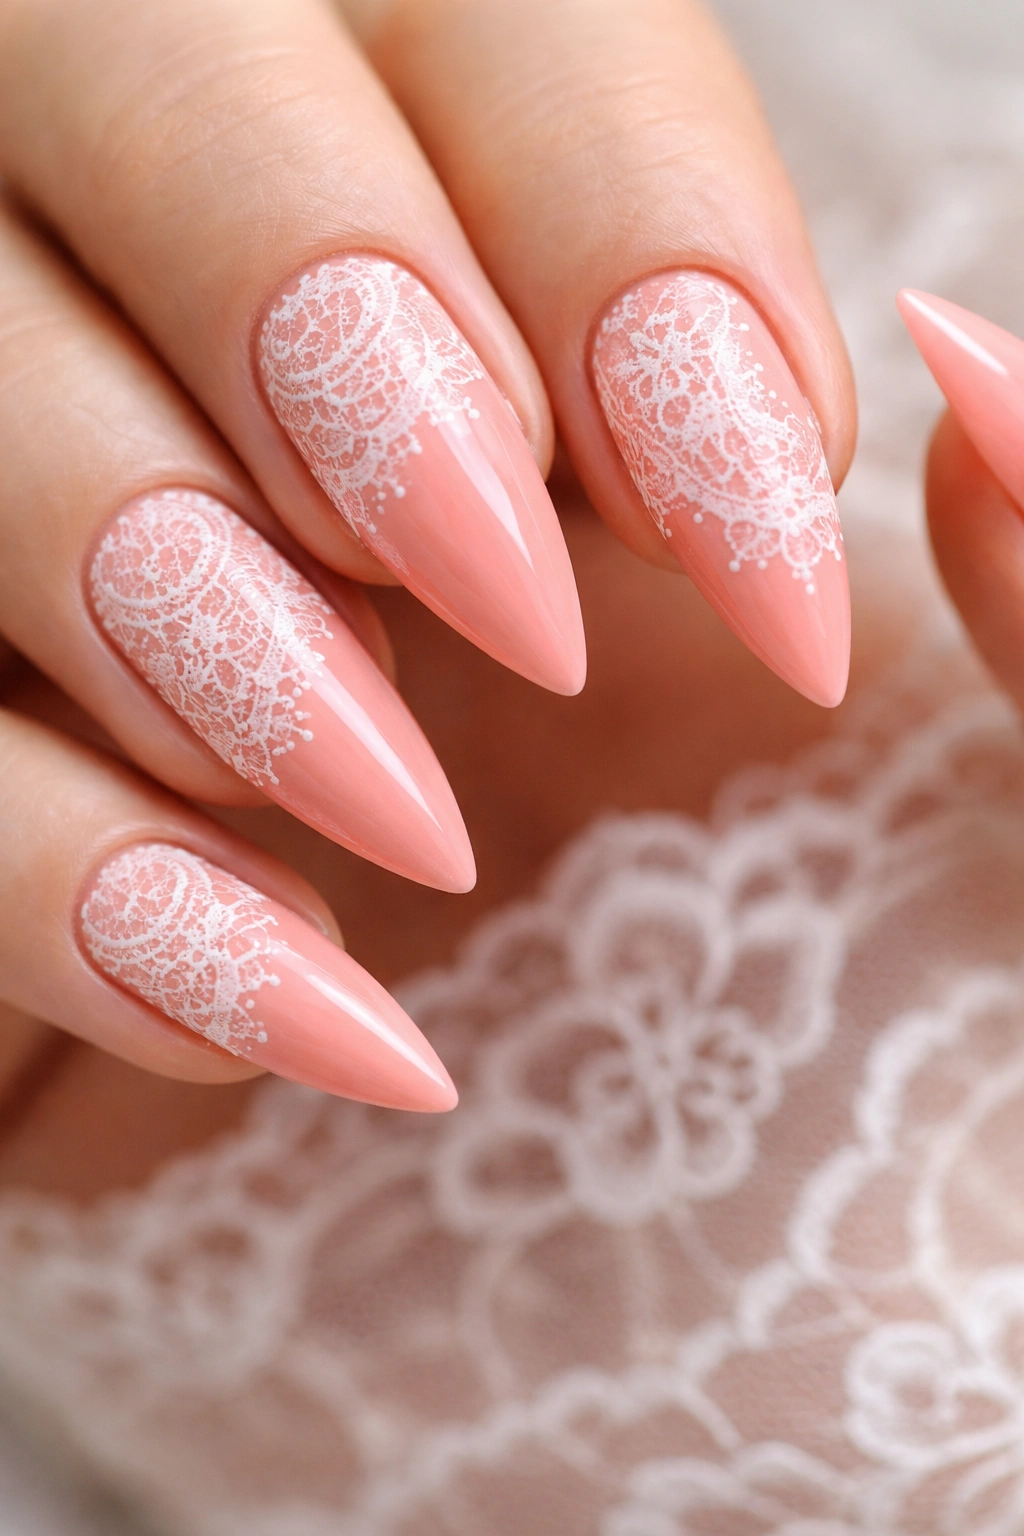
Combine a warm, coral-leaning pink with an intricate white lace pattern applied using a nail stamper or thin brush. The white lace creates a delicate, detailed look that’s more intricate than your average nail design. It’s feminine, artistic, and absolutely eye-catching.
Why Coral-Pink Reads as Contemporary
Coral-pink sits between warm and cool, making it work with a wider range of skin tones and color palettes than pure pink or pure coral. The white lace detail on a coral-pink base reads as intentionally sophisticated rather than saccharine or overly romantic.
Creating or Applying Lace Detail
- If using a stamp, look for designs labeled “lace” or “doily” — these translate beautifully to nails
- If hand-painting, use a very thin brush and create delicate, connected lines rather than solid shapes
- White lace shows up beautifully on coral-pink without needing any extra enhancement
- Seal under clear topcoat and the white lace will remain crisp and defined throughout wear
Worth knowing: Intricate lace detail requires a steady hand or good stamping technique, so if precision isn’t your strength, nail stickers are a legitimate shortcut.
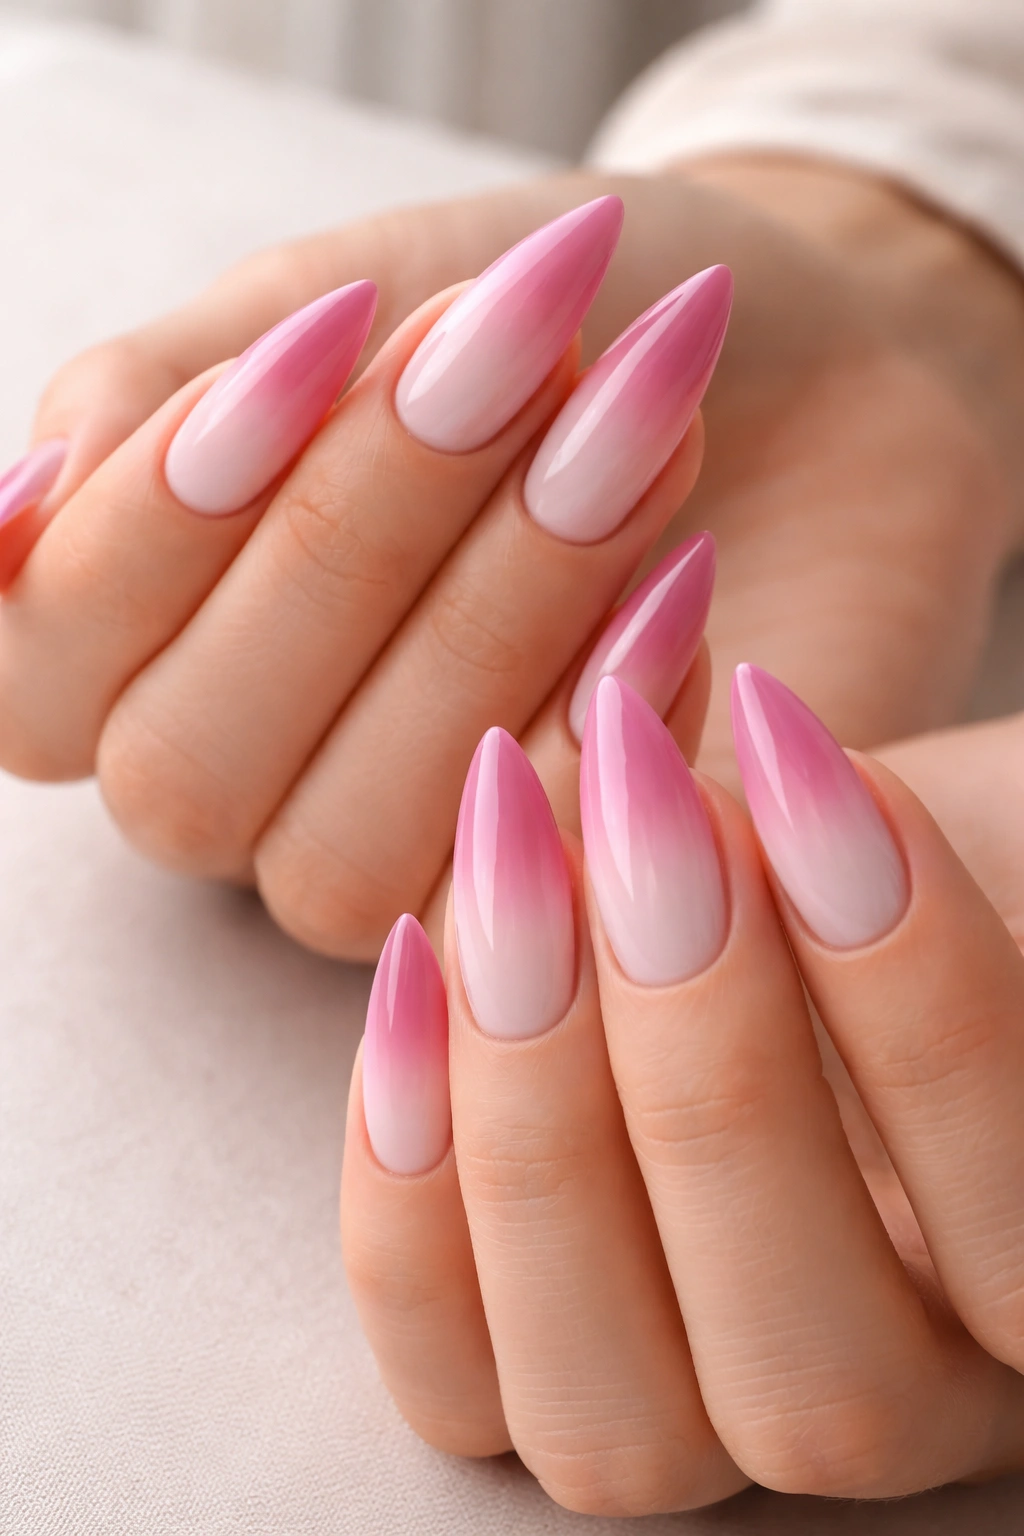
13. Soft Pink Ombre with Glitter Gradient
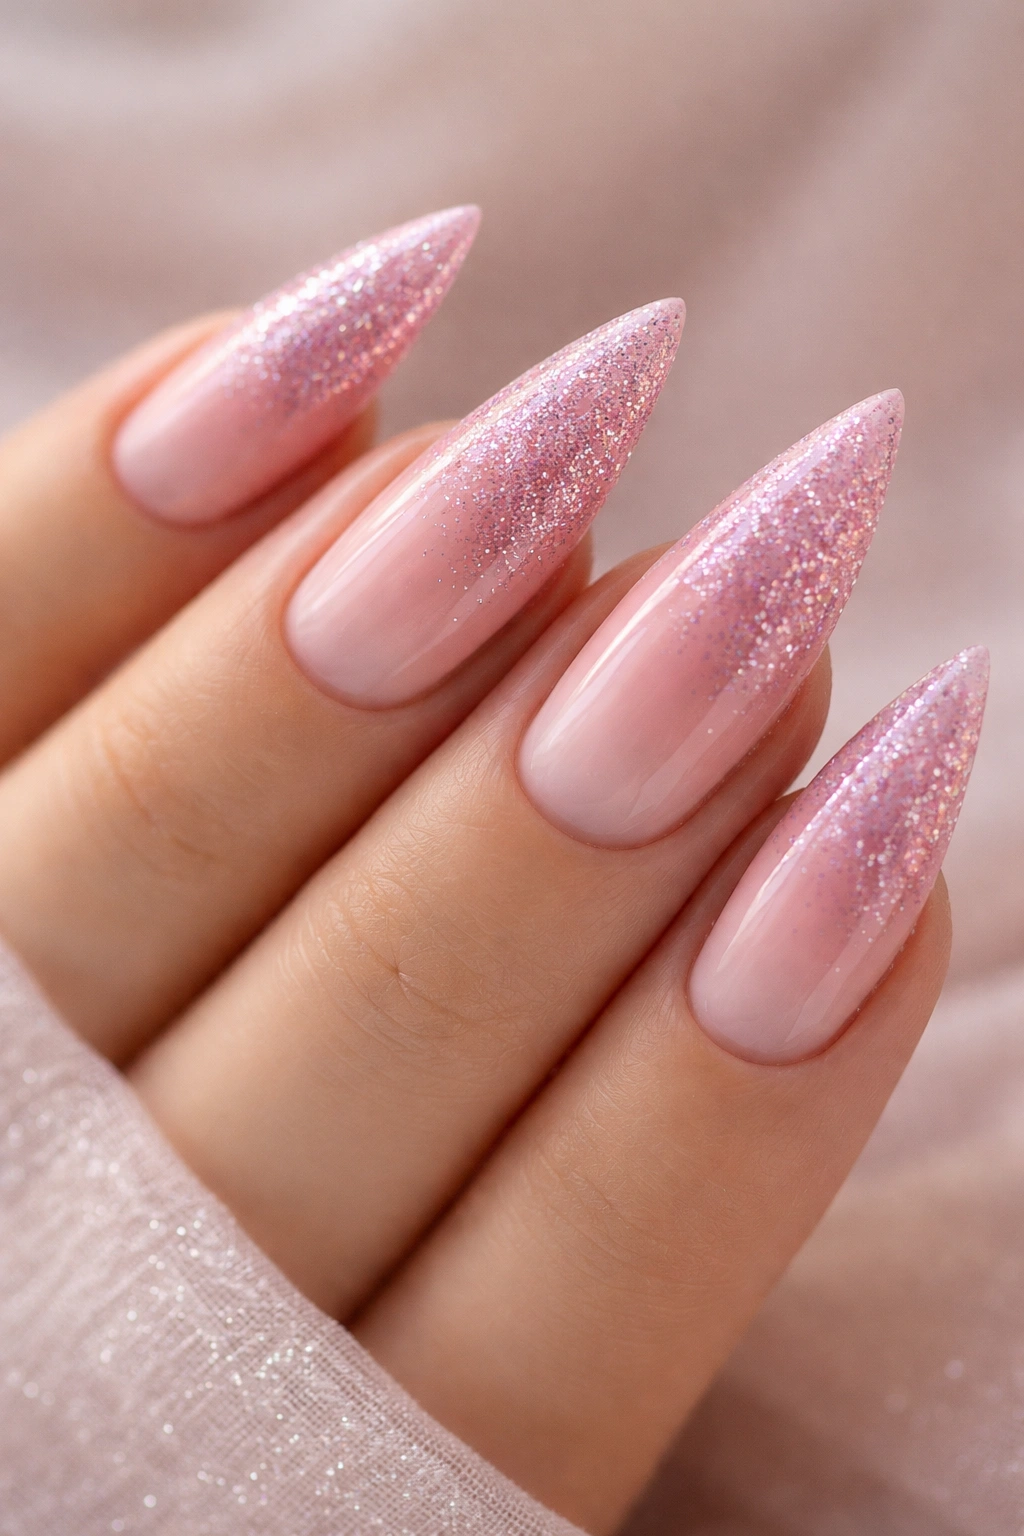
Build an ombre from light pink at the base to a deeper rose at the tips, then layer in a glitter gradient that matches the color progression — subtle glitter at the base that gets progressively denser toward the tip. This creates a multidimensional effect that catches light beautifully.
The Visual Depth of Layered Ombre and Glitter
Ombre plus glitter creates an illusion of dimension that makes even medium nails look sophisticated and artistic. The gradual increase in glitter density guides the eye toward the tips, making your nails appear longer. This is a design where the detail work genuinely enhances the overall effect rather than distracting from it.
Layering Ombre and Glitter Successfully
- Complete your full ombre base first, blending thoroughly with a sponge
- Apply glitter in very light density at the base using a brush or applicator
- Increase glitter density gradually as you move toward the tip
- Use glitter in shades that echo your ombre colors — pink glitter on pink ombre, not contrasting colors
- Seal everything under thick builder gel or multiple topcoats
Pro tip: Use fine, cosmetic-grade glitter rather than craft glitter; it applies more smoothly and looks more professional.
14. Blush Pink with Tiny Geometric Gold Negative Space
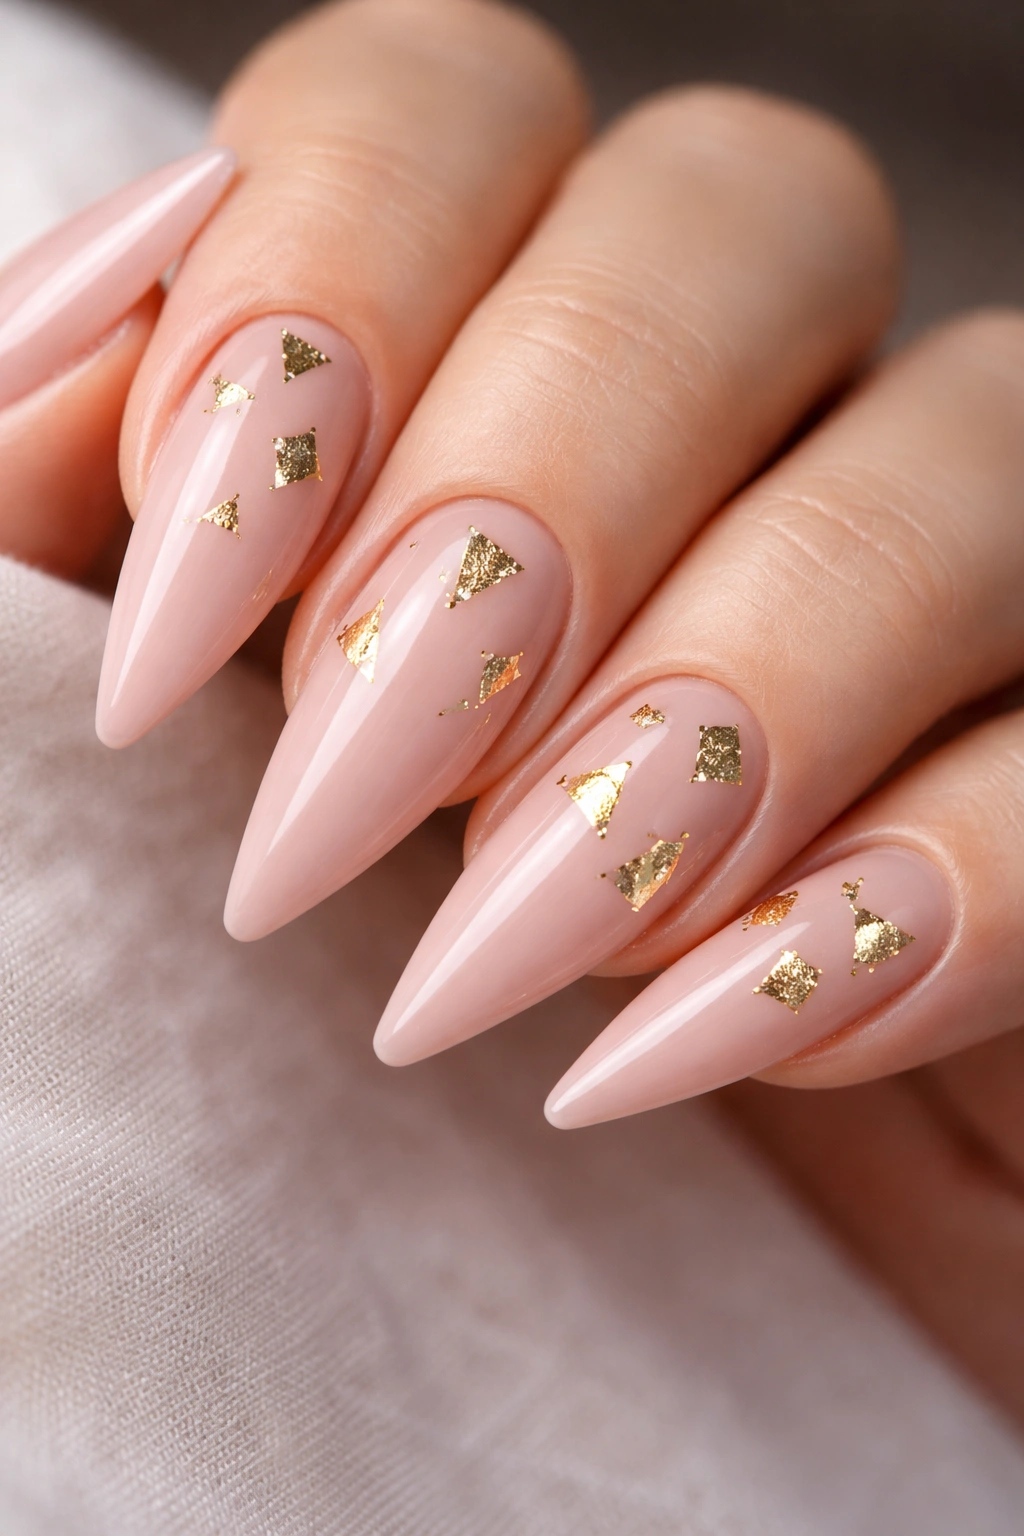
Take a blush pink base and cut out small geometric negative space shapes filled with gold leaf or gold foil. Think tiny triangles or squares scattered across the nail, each filled with gleaming gold. The negative space pulls focus and adds visual drama to an otherwise subtle color.
The Impact of Negative Space with Metallic Fill
Negative space combined with metallic fill creates an almost 3D effect — the gold seems to float on top of or recede beneath the pink depending on the light. On medium nails, this technique adds sophisticated detail work without making the design look cluttered.
Creating Negative Space with Fill
- Lightly sketch your shape outlines using a white pencil or light marker
- Use a thin brush or toothpick to remove the polish within those shapes, creating the negative space
- Carefully apply gold leaf or gold foil within the space using tweezers
- Seal with clear topcoat, making sure no edges of the foil are exposed
Worth knowing: This design requires a steady hand and patience; rushing the execution shows immediately and undermines the sophisticated effect you’re going for.
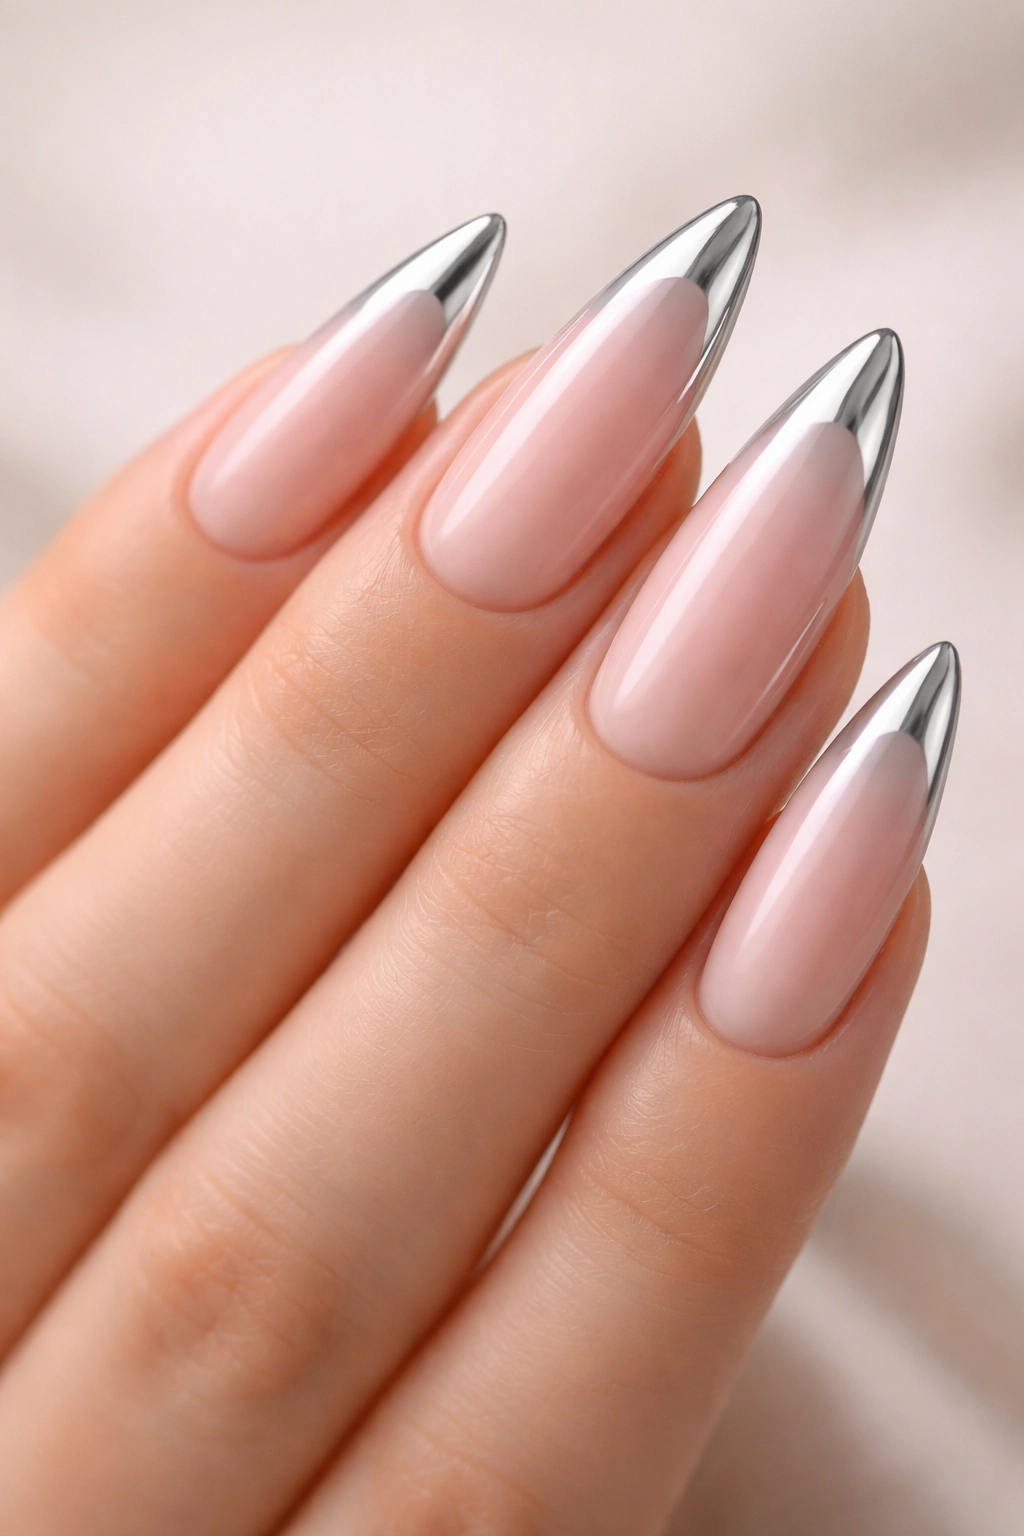
15. Rose Pink with Chrome Ombre Fade
Start with a rose pink base that gradually fades into a silver chrome finish toward the tips. It’s like your nails are transforming into liquid metal as they extend. This design is contemporary, eye-catching, and absolutely photograph-worthy.
The Contemporary Appeal of Chrome Ombre
Chrome finishes catch light in ways that regular polish simply cannot. When combined with a soft pink, the contrast between organic color and reflective metallic creates a modern, forward-thinking aesthetic. On medium nails, this design doesn’t overwhelm — it enhances.
Creating Chrome Ombre Successfully
- Paint your full rose pink base and let it cure completely
- Apply chrome powder to just the tips and use a dry, soft brush to blend it gradually into the pink
- The blend line should be feathered and invisible; work slowly and in gentle circular motions
- Layer the chrome building it gradually rather than applying it all at once
- Seal with clear topcoat, applying it carefully so you don’t disrupt the delicate blend
Pro tip: Chrome powder can be tricky to work with; if blending feels difficult, apply a layer of clear builder gel over your pink base before adding chrome — the gel gives you a slightly tackier surface to work with.
16. Nude-Pink with Thin Black Outline
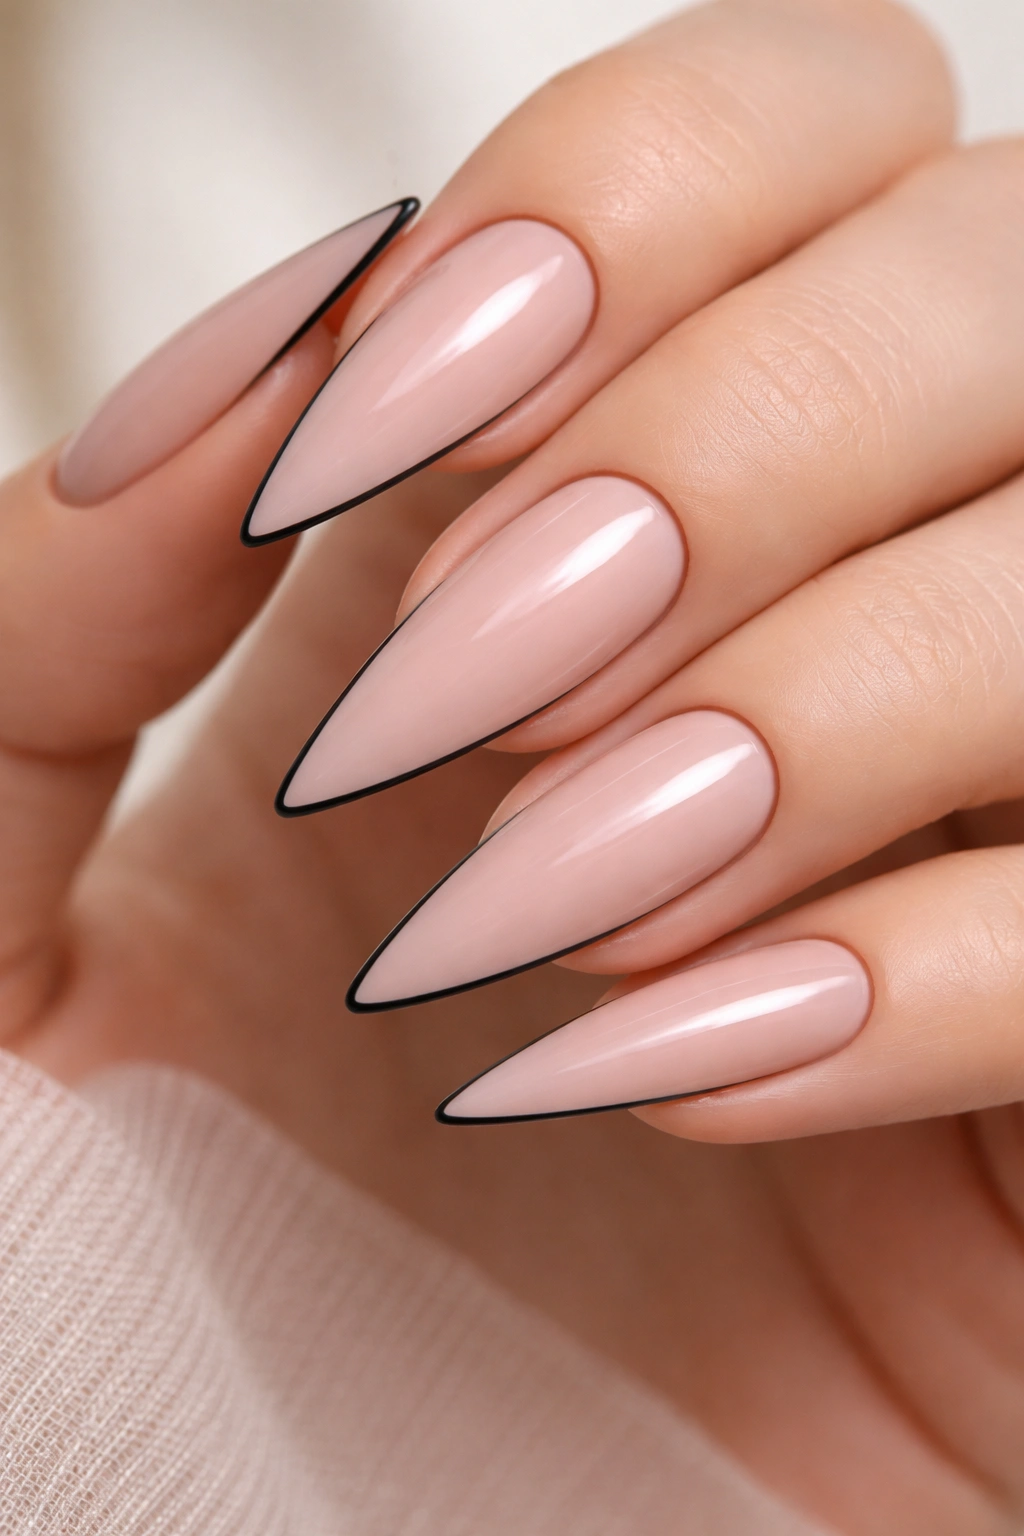
Paint your nails a nude-pink that’s close to your skin tone, then create a crisp black outline around the entire perimeter of the nail. It sounds simple, but the contrast creates a sculptural, defined look that makes medium nails appear longer and more intentional.
Why Outline Design Works on Medium Nails
The outline creates a visual frame that draws attention to the nail shape and makes the nail appear to be an intentional design element rather than an afterthought. On medium nails, this relatively simple design reads as deliberately artistic and sophisticated.
Perfecting the Outline
- Use a very thin striping brush — the outline should be no thicker than 0.5mm
- Create the outline while your topcoat is still slightly tacky; this helps it adhere better
- The outline should follow the natural edge of your nail shape; don’t try to correct or reshape your nail with the outline
- Apply at least two thin coats of black for full opacity and coverage
Worth knowing: Black outlines can sometimes look slightly harsh, so consider softening the effect by using a very dark gray or charcoal instead of pure black.
17. Hot Pink with Subtle Holographic Shimmer
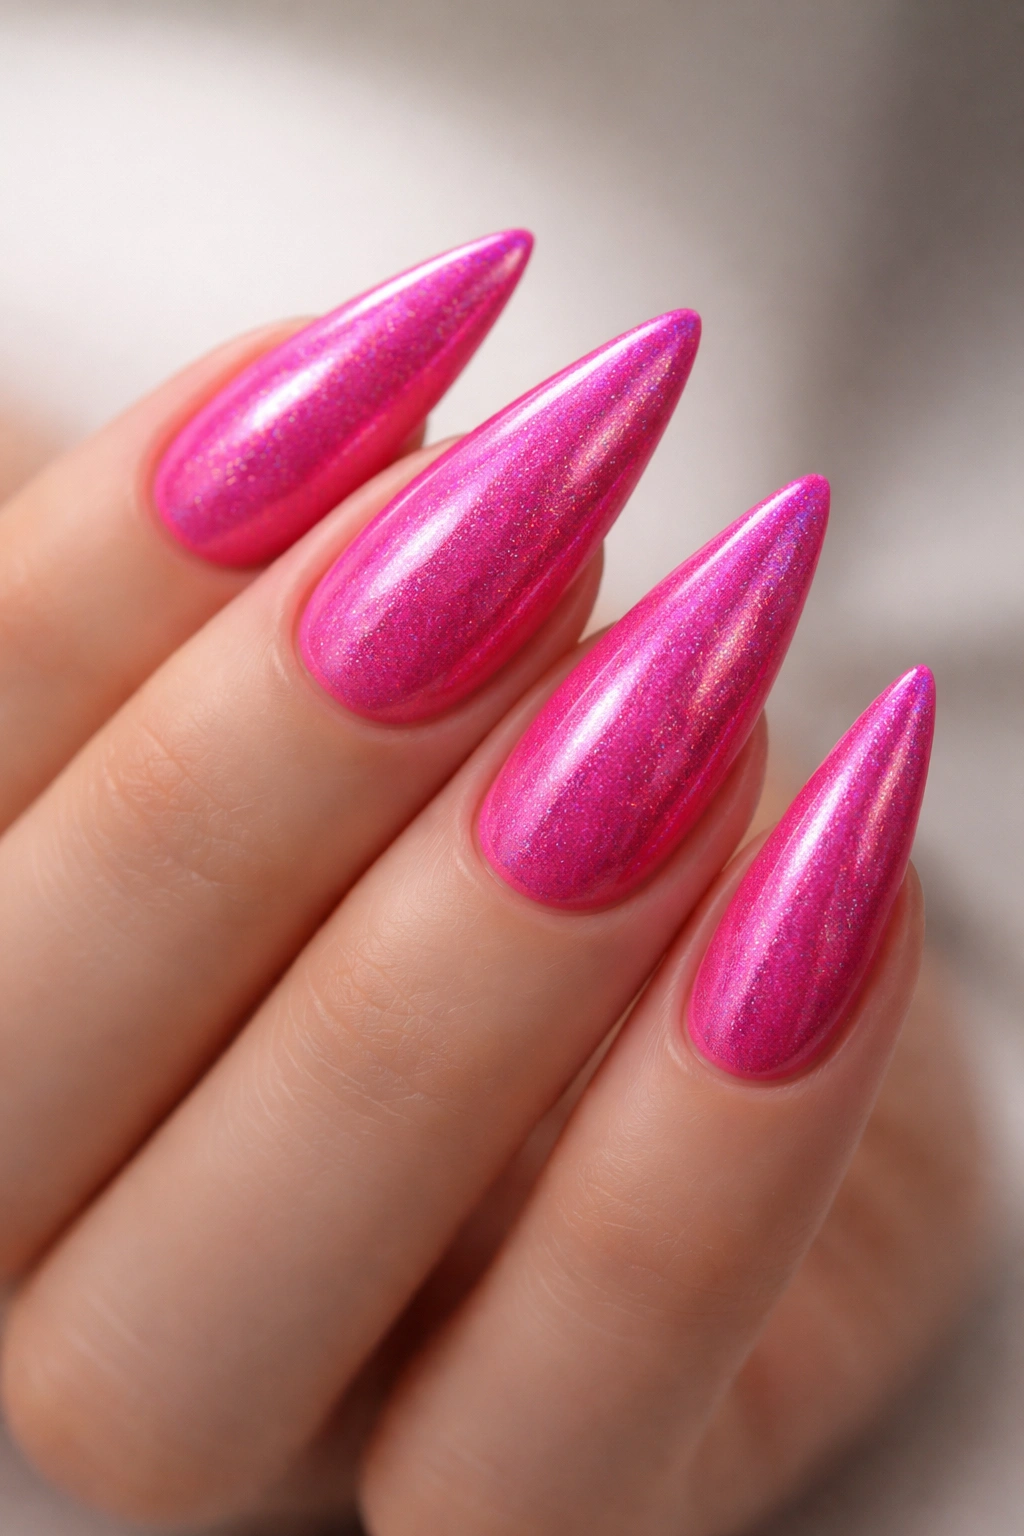
Paint your nails in a true hot pink, then add a holographic shimmer that shifts slightly depending on the angle and light. The shimmer should be subtle enough that it’s not the first thing people notice, but noticeable enough that it adds depth and movement to a solid color.
The Complexity Hiding in Simplicity
This design looks simple, but the holographic shimmer transforms it into something much more interesting. On medium nails, the shimmer adds visual interest without complexity, making it wearable for professional settings while still being statement-making.
Applying Holographic Shimmer
- Apply your hot pink base completely and let it cure
- Use a shimmer polish or add holographic flakes in a very light hand — less is more
- Apply in a thin, even layer rather than trying to create patterns or concentration
- Seal with topcoat; the topcoat will give the shimmer additional depth and dimension
Pro tip: Holographic finishes look best under natural light and under ring lights; fluorescent office lighting sometimes mutes the effect slightly.
18. Soft Pink with Hand-Painted Watercolor Wash
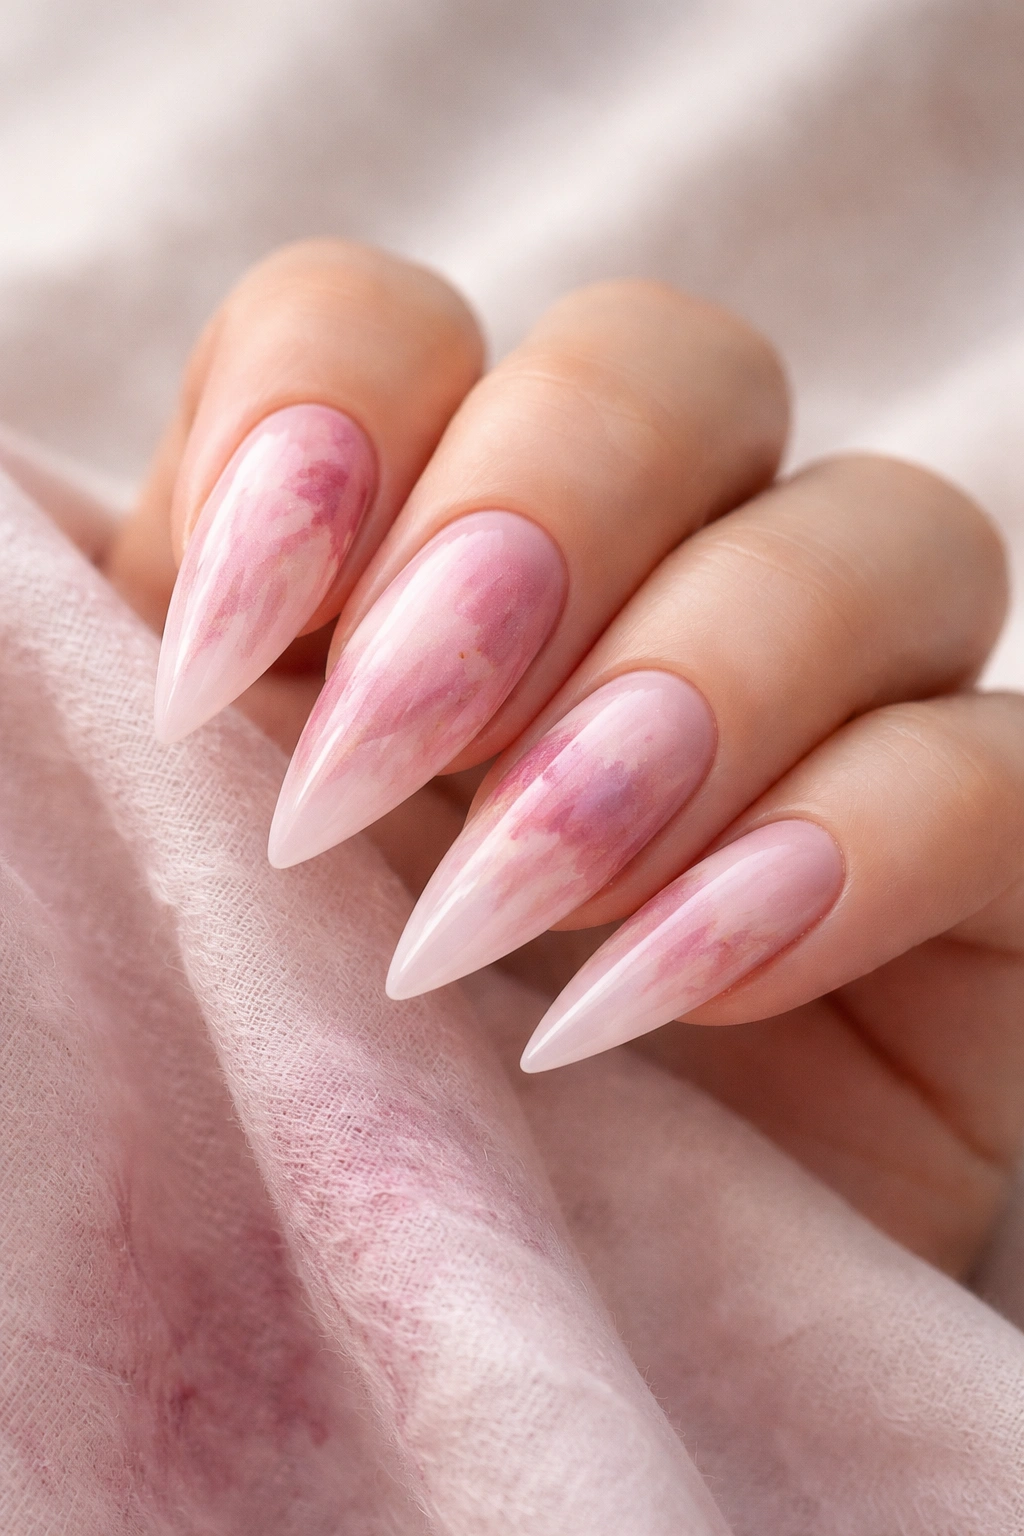
Create a soft pink base, then add a watercolor effect using diluted pink, mauve, and nude polishes applied with a damp sponge or brush. The result is an organic, artistic look where colors blend and fade into each other without harsh lines. It’s romantic without being overly feminine.
The Artistic Appeal of Watercolor Effect
Watercolor effects read as intentionally artistic and handmade in a way that commercial nail designs sometimes don’t. Each nail is slightly different, which adds to the artistic appeal. On medium nails, watercolor effects showcase your individuality without overwhelming the nail shape.
Creating Watercolor Effect
- Paint your base pink and let it dry completely
- Dilute your secondary polish colors with a special polish thinner or with drops of clear polish
- Use a damp sponge or thin brush to apply the diluted colors in loose, organic strokes
- Let colors blend naturally where they overlap; don’t try to control the effect too much
- Seal with topcoat once completely dry
Worth knowing: Watercolor effects work best when you have a light touch and let gravity and moisture do some of the work for you — over-working the effect makes it look muddy rather than artistic.
19. Pale Pink with Thin Vertical Crystal Line
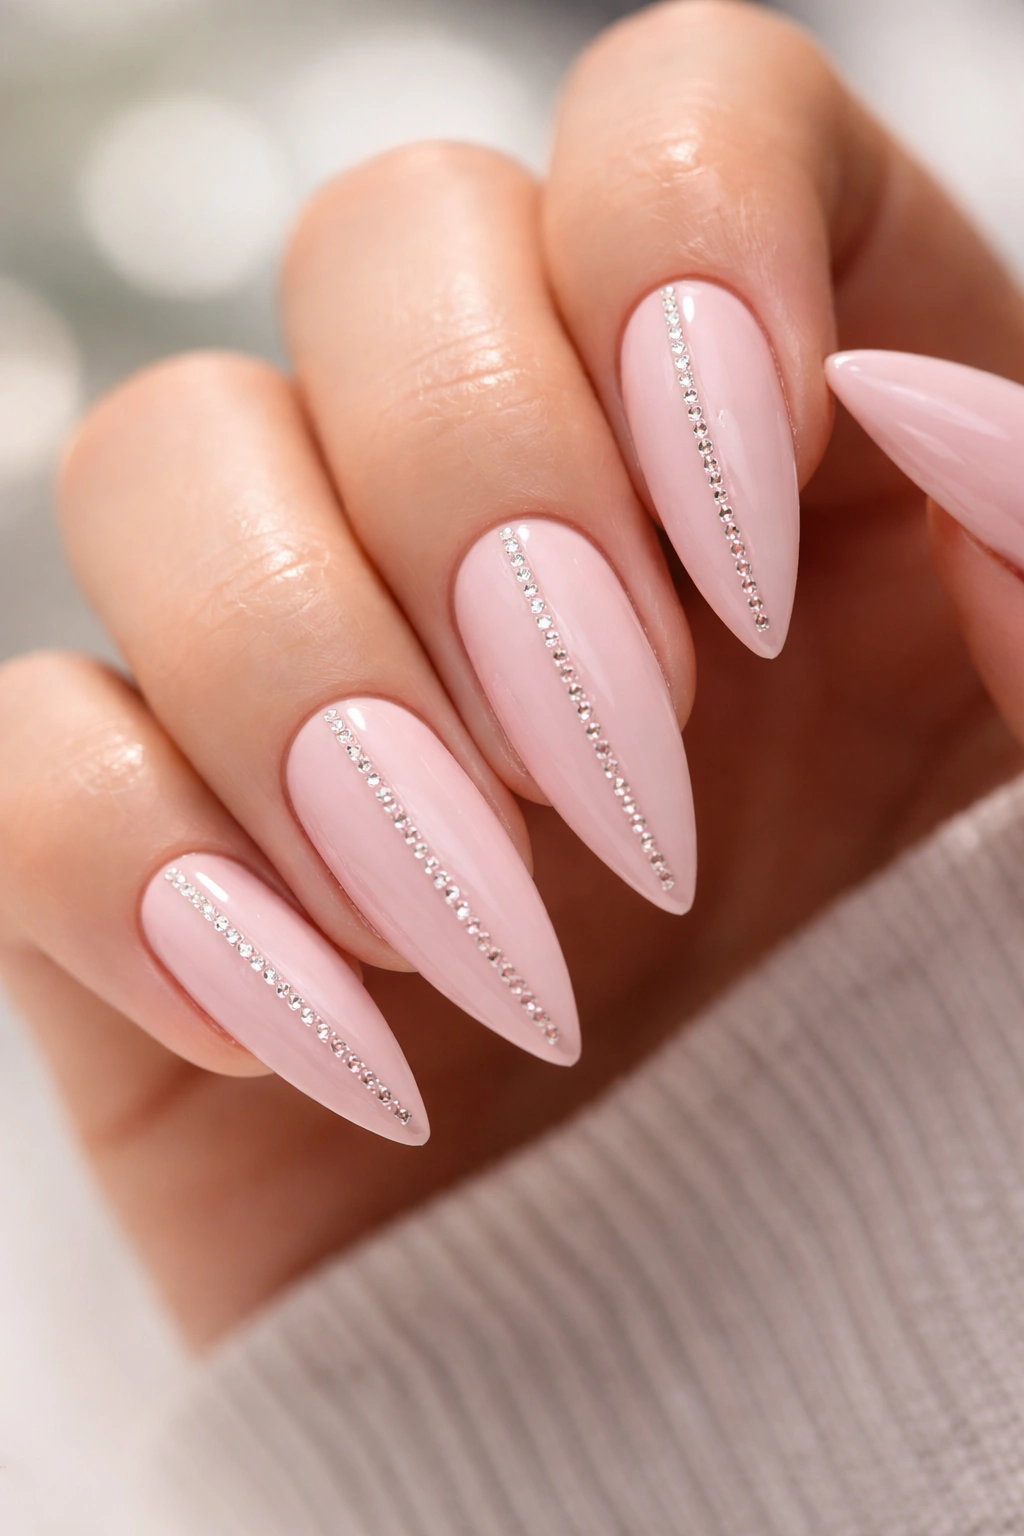
Paint your nails a pale, almost flesh-toned pink, then apply a vertical line of tiny crystals or rhinestones down the center of each nail. The crystals should be very small and spaced closely together to create an almost continuous line of sparkle. It’s minimal, elegant, and catches light beautifully.
The Luxury Factor of Strategic Crystals
Crystals immediately read as luxury and intentional design. When applied strategically rather than scattered, they look curated rather than overdone. On medium nails, a single line of crystals creates visual drama and length illusion without looking over-the-top.
Applying Crystals in a Line
- Use tweezers to position each individual crystal
- Apply them to a base of thick topcoat or gel that’s still slightly tacky
- Space them closely enough that they read as a line but not so close they look clumped
- Seal with clear topcoat once all crystals are in place and set
Pro tip: Choose crystals in clear, champagne, or pale pink rather than colored stones; they’ll read more elegantly and work with more outfits.
20. Gradient Pink from Nearly White to Deep Mauve
This is an extended gradient that spans the entire color spectrum from nearly white at the base to a rich, deep mauve-pink at the tips. It requires excellent blending technique, but the result is a nail that looks like expensive ombré work from a high-end salon.
The Sophistication of Subtle Color Progression
When a gradient spans a wide range of closely related colors, the effect is subtle and sophisticated rather than bold and obvious. The transition from nearly white to deep mauve is so gradual that it reads as intentional and artistic. On medium nails, this design showcases your commitment to detail and quality.
Mastering Extended Gradient
- You’ll need at least 3 to 4 polish colors ranging from white to mauve
- Blend each color transition using a sponge dabbing technique
- Go slowly and blend multiple times; each additional blend makes the transition smoother
- The key is feathering — each color should fade gradually into the next rather than creating distinct layers
- Seal with topcoat and the gradient will look like it’s been painted by a professional artist
Pro tip: Practice your gradient on nail wheels first; it’s a technique that improves significantly with repetition, and you’ll feel more confident when you move to your natural nails.
Final Thoughts
The beauty of these twenty designs is that they prove pink stiletto nails on medium-length nails don’t require compromise. You get enough surface area for genuine artistic detail work, enough visual drama to make a statement, and enough practicality that you’re not fighting your nail length throughout your daily life.
Each of these designs works because it respects the proportion of medium nails rather than pretending they’re longer than they are. Some designs use negative space to create illusion of length, others use dimension and dimension to add visual interest, and still others rely on color theory and the way our eyes process contrast to make an impact.
The right pink stiletto design for you depends on your lifestyle, your personal aesthetic, and how much maintenance you’re willing to do. Whether you gravitate toward minimalist elegance or artistic complexity, toward bold statement colors or soft, barely-there tones, there’s absolutely a design here that’ll make your nails look effortlessly expensive and intentionally beautiful.
Book your appointment, show your nail artist these designs, and let your medium-length pink stilettos do the talking.
