

Ombre nails have become the go-to choice for anyone seeking a sophisticated, gradient-rich nail look that works for both everyday wear and special occasions. The beauty of ombre stiletto nails lies in their ability to transform short to medium nail beds into something dramatic and elegant without requiring an extreme length commitment. If you’re drawn to the sharp, pointed aesthetic of stiletto nails but worried they might look too severe or overwhelming on a medium canvas, you’ll be pleased to discover that ombre techniques actually soften the dramatic geometry while amplifying the visual impact through color blending.
Medium-length stiletto nails strike the perfect balance between wearability and statement-making style. They’re long enough to showcase intricate ombre gradients and color transitions, yet short enough for daily life—whether that’s typing, cooking, or handling your phone without the constant worry of breaking or snagging. The stiletto shape naturally elongates the finger, so even at a modest length, you get that coveted runway look. Add an ombre effect into the mix, and suddenly you have a nail design that appears far more complex and professional than its medium dimensions might suggest.
The ombre gradient works particularly well on stiletto nails because the pointed tip draws the eye directly to where your ombre gradient ends, creating a visual focal point that makes the color transition feel intentional and curated rather than random. Whether you’re drawn to soft peachy fades, bold jewel-tone transitions, or subtle monochromatic shifts, there’s an ombre stiletto design that matches your personal style and skin tone.
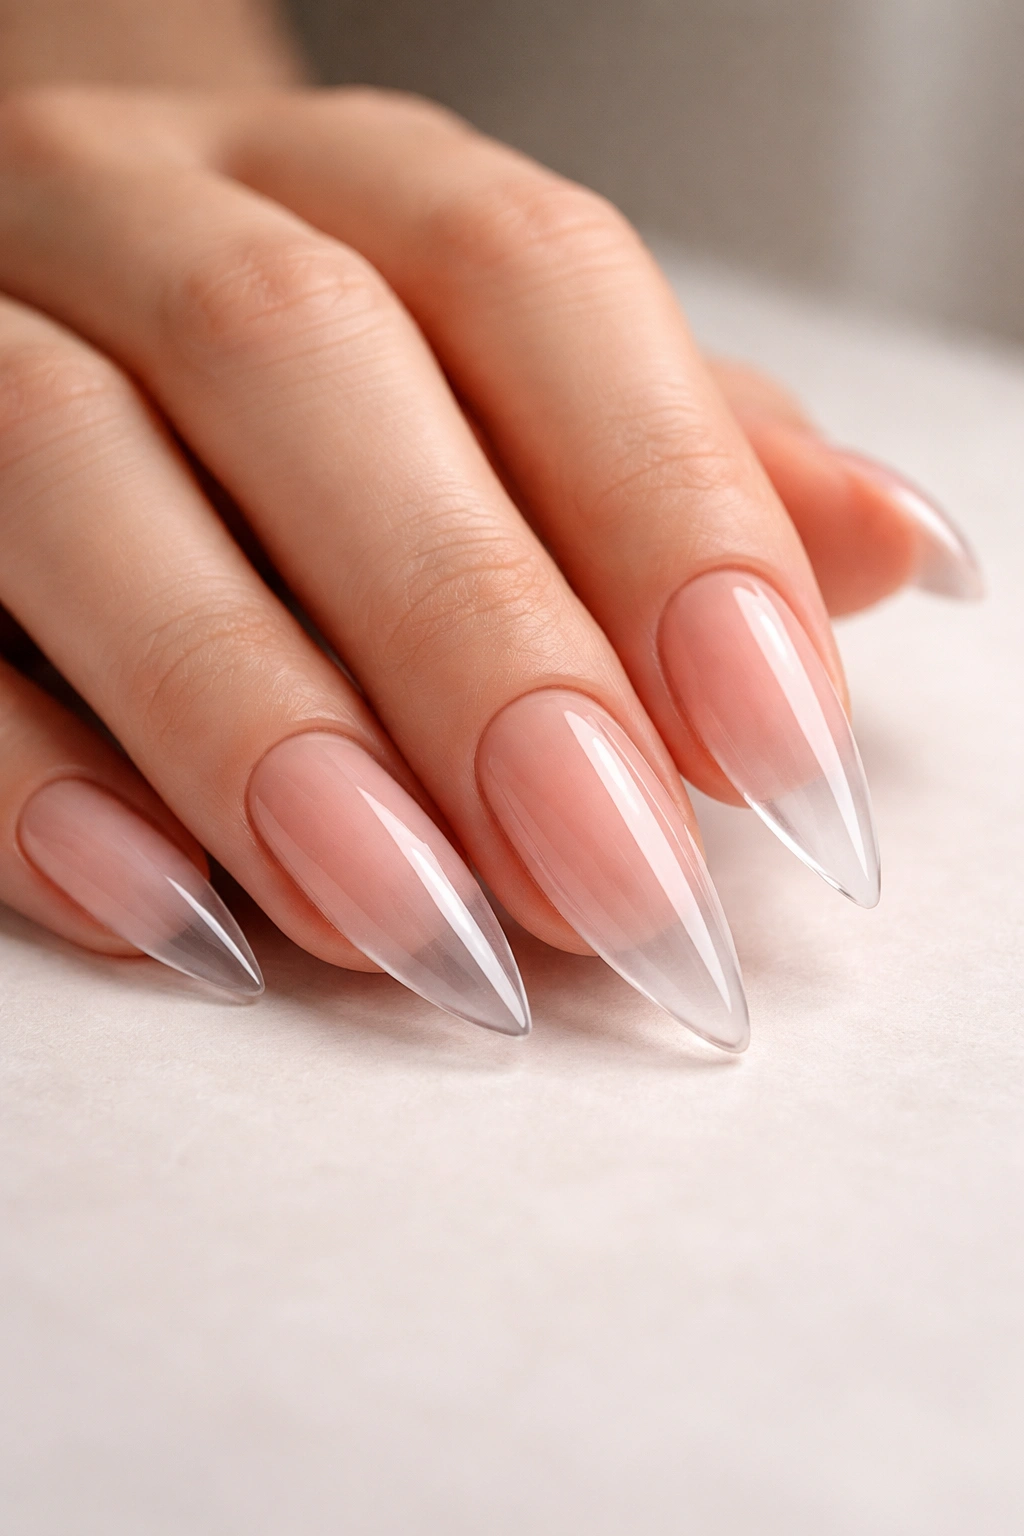
1. Soft Blush to Clear Gradient
This timeless ombre design begins with a warm, dusty blush pink at the base and gradually fades to pure crystal clear at the stiletto tip. The effect creates an elongated, elegant appearance while remaining subtle enough for professional settings and formal occasions. The beauty of this design lies in its versatility—it complements virtually every skin tone and works equally well for spring bridal looks or everyday sophisticated style.
Why This Design Works for Medium Stilettos
The soft blush-to-clear gradient is forgiving on medium-length nails because the color concentration at the base gives visual weight to the nail bed, while the clear tip prevents the overall look from feeling heavy. This ratio works perfectly with the stiletto’s natural elongation, creating an illusion of even greater length without requiring actual nail growth. The transparency at the tip also shows off nail health, which adds to the overall polished appearance.
Application and Maintenance Tips
- Start with a proper base coat to prevent staining—blush tones can sometimes transfer onto the nail if not sealed properly
- Use a damp sponge technique, dabbing blush polish near the base and gradually building the fade toward the clear section
- The gradient should transition somewhere around the mid-to-upper third of the nail, giving the clear section breathing room
- Seal everything with a glossy top coat to enhance the blended effect and hide any harsh lines
- This design typically lasts 2-3 weeks without noticeable fading, especially if you’re careful around cuticle areas
Pro tip: Apply the blush tone in thin layers rather than one thick coat—this gives you better control over the fade and prevents a muddy appearance.
2. Rose Gold to Champagne Luxury Fade
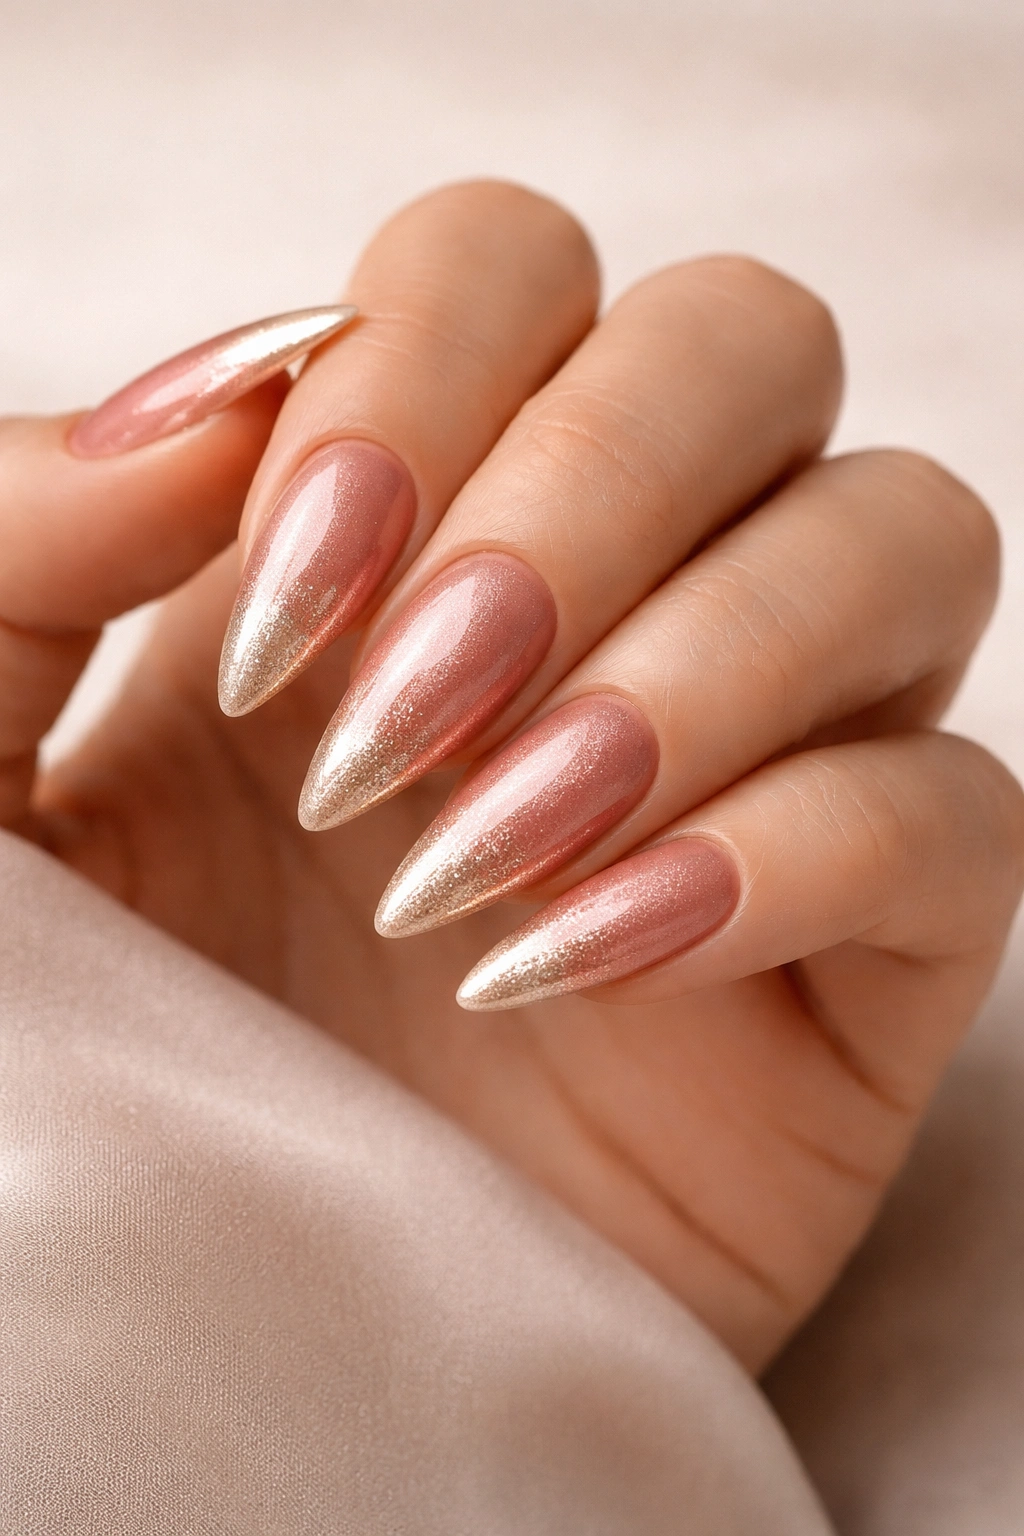
Rose gold and champagne ombre nails deliver pure luxury with warm, metallic undertones that catch the light beautifully. The design transitions from a deeper rose gold at the base to a shimmering champagne at the stiletto tip, creating a warm, dimensional effect that photographs stunning and feels incredibly glamorous to wear. This combination works beautifully for date nights, evening events, or whenever you want your nails to feel extra special.
What Makes This Combination Special
The rose gold base provides color depth and richness, while the champagne tip adds shimmer and reflective brightness that lifts the entire design. On medium stiletto nails, this warm metallic transition feels luxurious without being over-the-top—it’s elegant rather than gaudy. The warm undertones in both colors mean they harmonize beautifully rather than creating color shock, resulting in a seamless, professional-looking gradient that still feels indulgent.
Creating the Perfect Metallic Blend
- Invest in quality metallic polishes; budget versions often look flat and dusty rather than luminous
- The rose gold base works best applied full coverage to the nail bed, then blended upward
- Layer the champagne over the upper portion, feathering edges with a damp sponge for a soft transition
- A chrome or mirror top coat can enhance the metallic quality, though a standard glossy top coat works perfectly fine
- These metallics show fingerprints more readily, so consider matte top coat if smudges bother you
- Expect slight fading after 2-3 weeks, particularly on the champagne tip where wear is greatest
Worth knowing: Rose gold shades can appear orange on some skin tones or peachy on others—test on a practice nail first to ensure it complements your undertone.
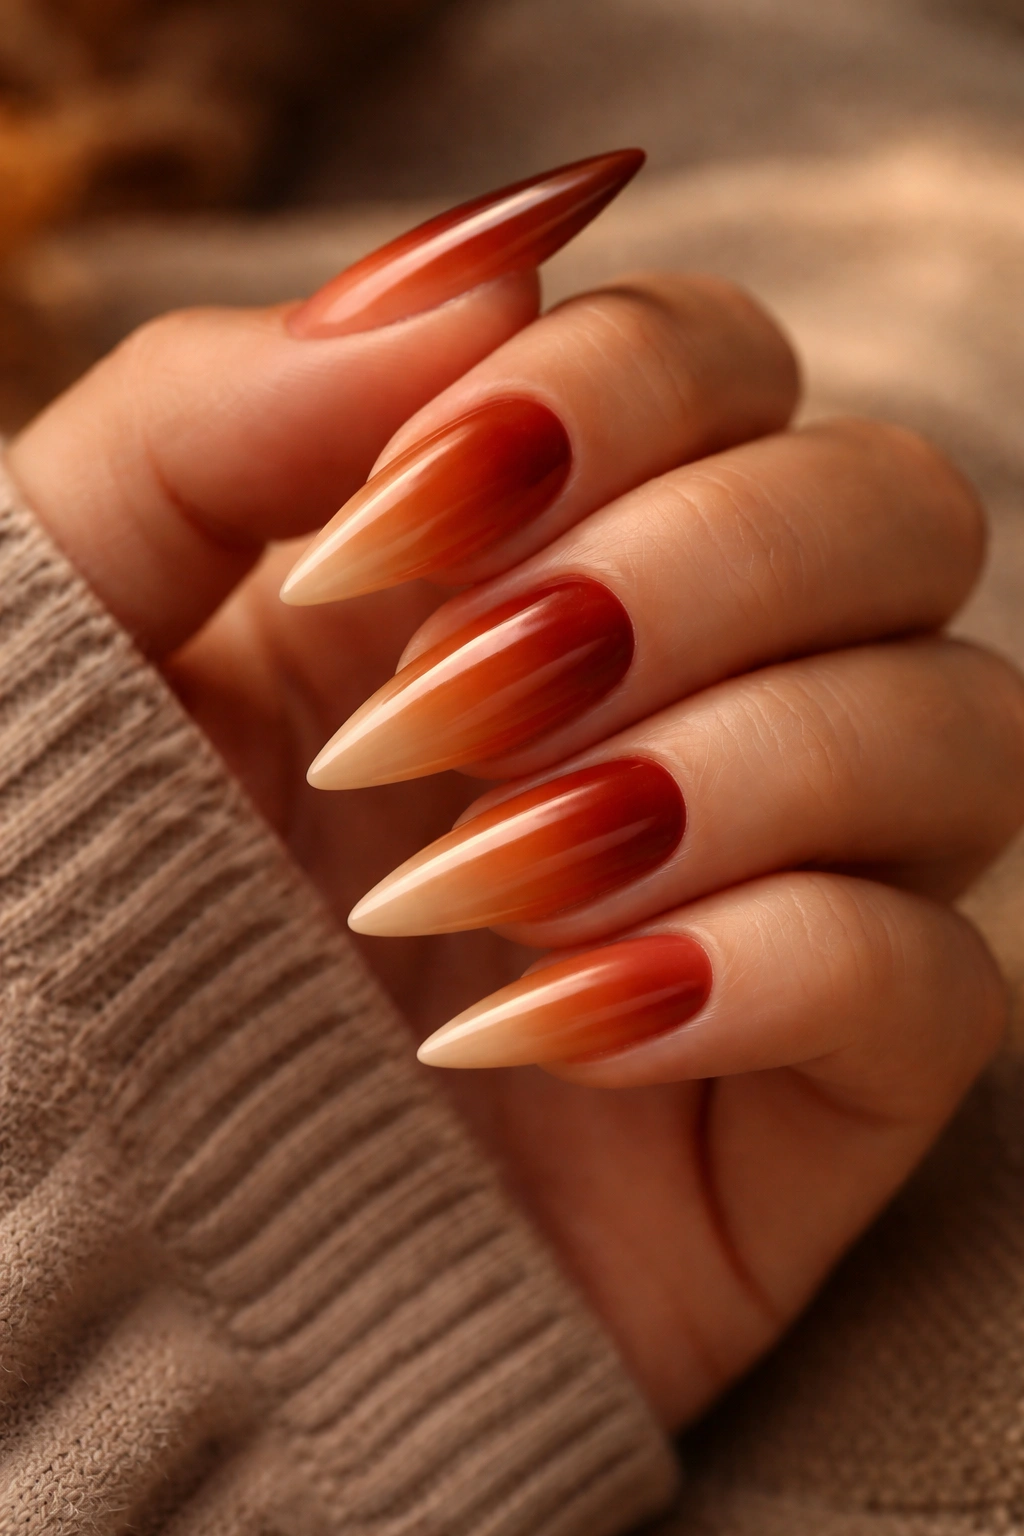
3. Burgundy to Nude Sophisticated Ombre
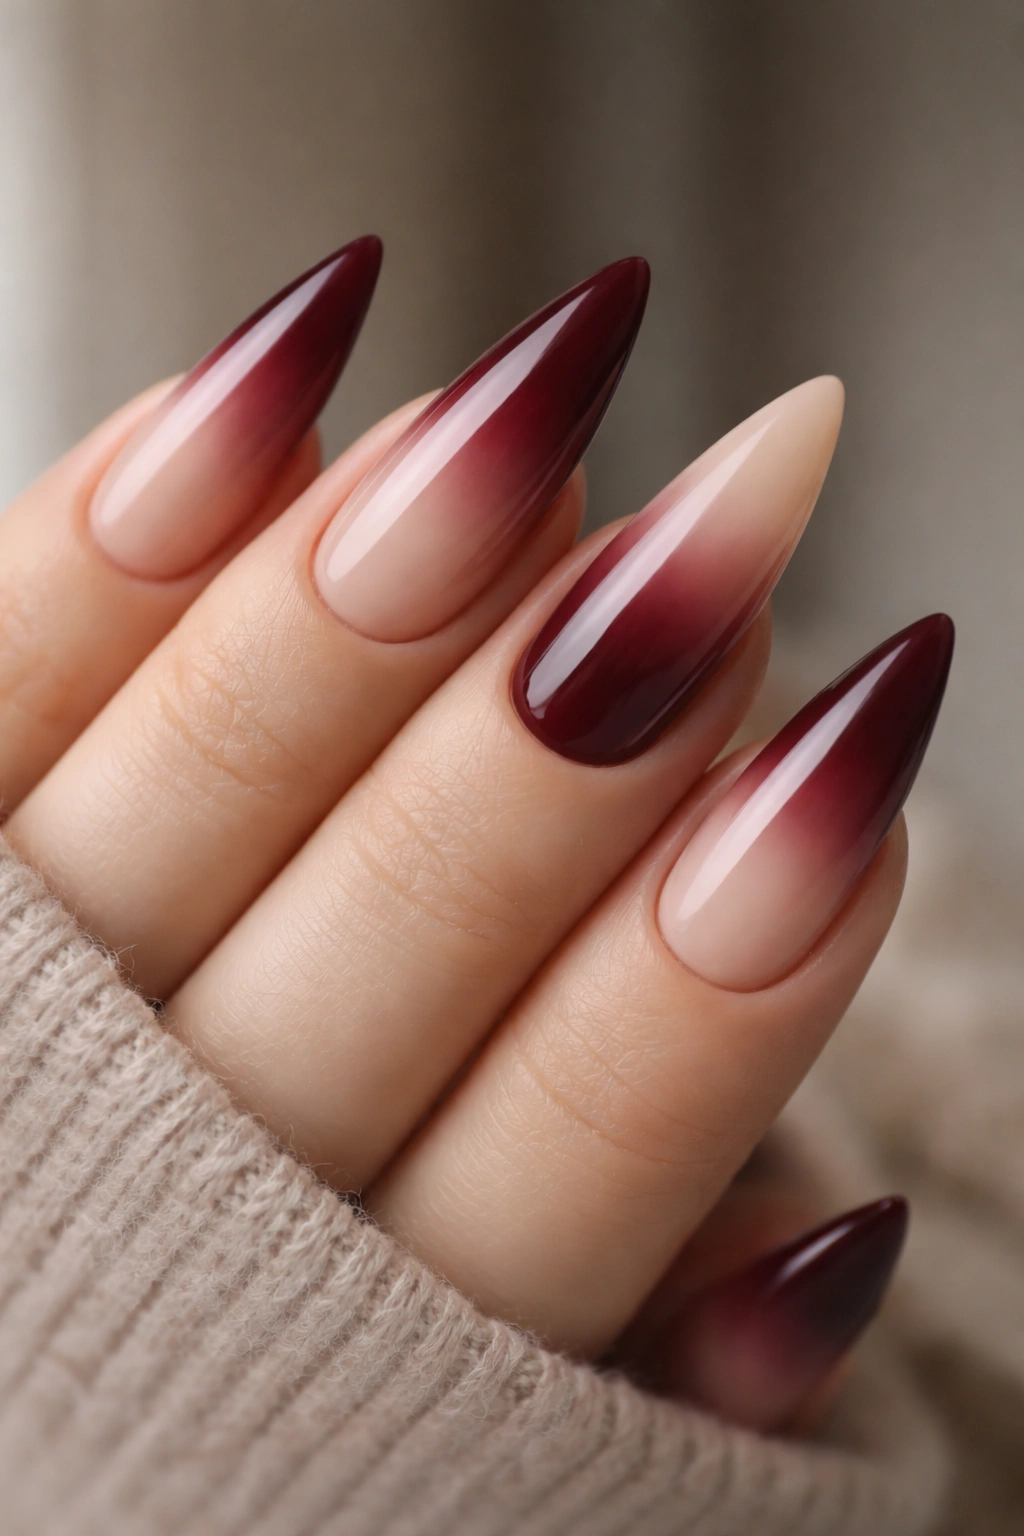
This classic professional ombre pairs a deep burgundy at the base with a creamy nude at the tip, creating an understated but distinctly polished appearance. The depth of the burgundy provides structure and formality, while the nude transition softens the effect and creates visual interest through the gradient itself. This design reads as intentional and curated rather than a color mismatch, making it perfect for anyone who wants drama without obvious flash.
The Psychology of This Color Combination
Burgundy evokes sophistication, power, and autumn elegance, while nude tones suggest neutrality and approachability. Combined in an ombre format on medium stiletto nails, they create a design that’s both confident and accessible—professional enough for law offices and boardrooms, yet stylish enough to turn heads at social events. The gradient draws attention to the transition itself rather than any single color, making the nails feel like a complete artistic statement rather than a bold color choice.
Achieving Flawless Blending
- Start with the burgundy at full opacity on the lower half of the nail
- Feather the edges as you move upward with a barely-pigmented sponge to create gradual fading
- The nude shade should sit mostly on the upper half and tip, getting progressively lighter
- Use a light hand with the sponge—this prevents muddy transitional zones and maintains color clarity
- Apply 2-3 seal coats of glossy top coat to ensure a professional finish
- This color combination hides wear well, making it ideal if you want a longer-lasting mani
Insider note: The point where burgundy meets nude should land roughly at your nail’s middle third—this creates the most flattering proportion on medium-length stilettos.
4. Sunset Peach to Orange Gradient
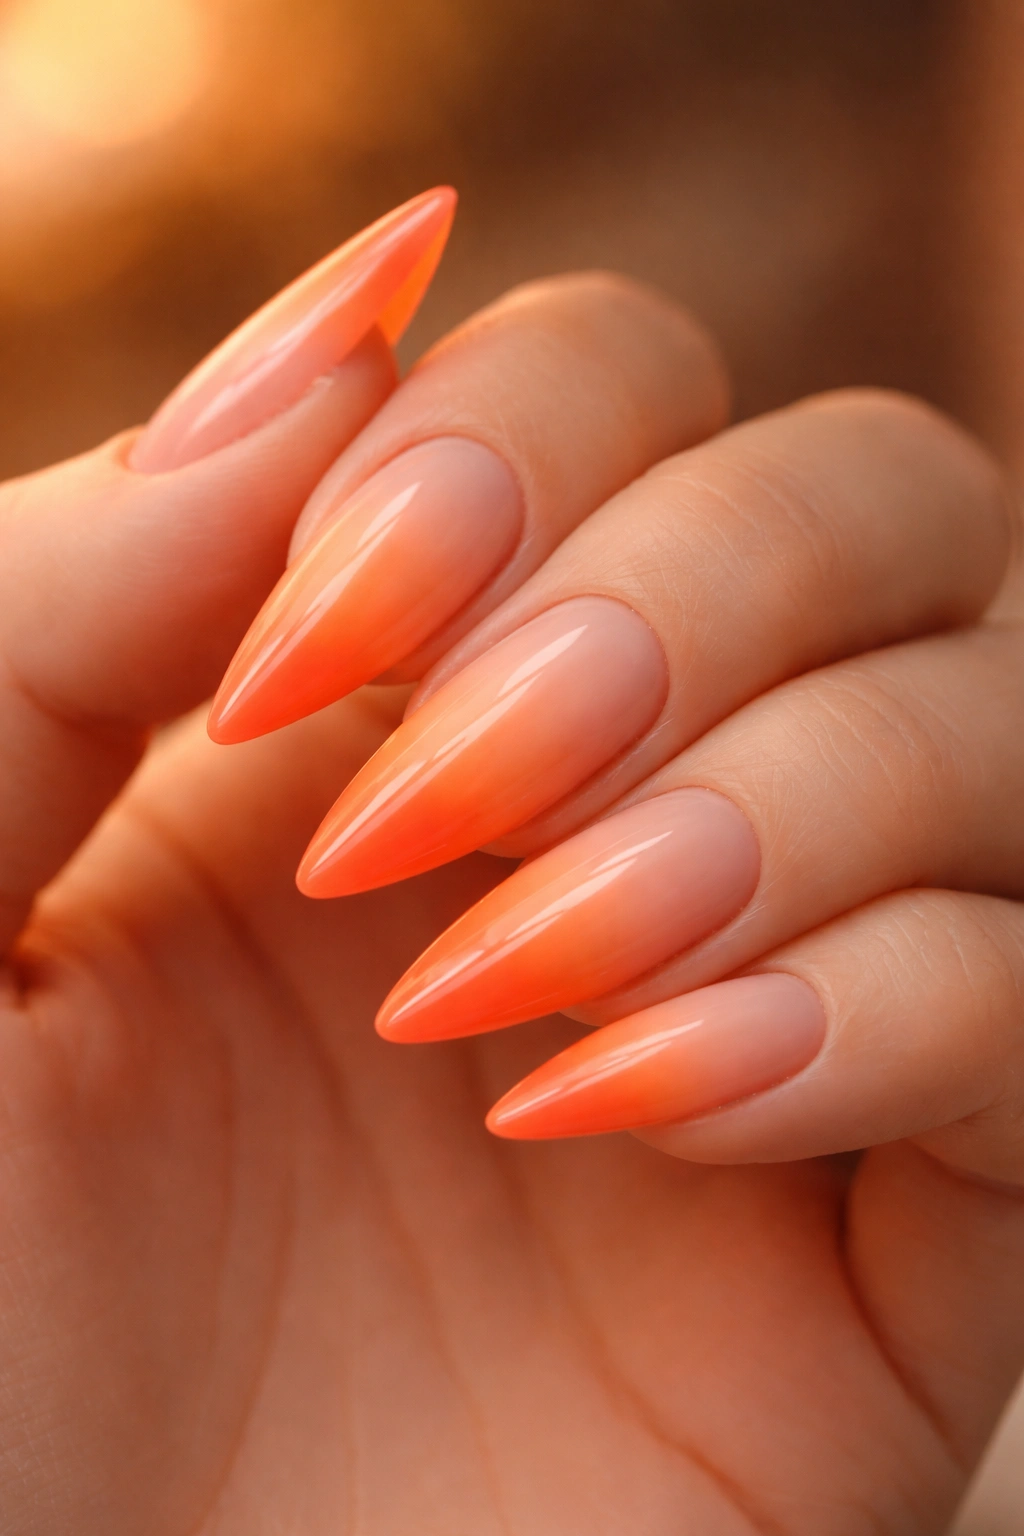
Bring warmth and vibrancy to your medium stiletto nails with this dynamic sunset-inspired ombre that transitions from soft peach to vibrant orange. The design captures the essence of golden hour, with colors that seem to glow from within. This is the go-to choice for anyone who loves warm tones, wants their nails to feel summery year-round, or enjoys designs that naturally complement warm undertone skin.
Why Sunset Ombre Feels So Versatile
Despite the boldness of the colors, this ombre actually works for multiple seasons and occasions. The peach base keeps it soft and approachable, while the orange transition adds energy without feeling Halloween-specific or costume-like. On medium stiletto nails, the pointed shape actually enhances the “sunset” metaphor—the tip becomes the focal point where the sun would be setting, creating intentional visual storytelling.
Technique Secrets for Vibrant Gradients
- Use vibrant, saturated orange and peach polishes rather than muted versions—pale versions of these colors can look washed-out or muddy
- Start with the peach as your full base, applied evenly across the entire nail
- Apply orange to roughly the upper half, using a sponge to blend the junction between colors
- The transition zone should be soft enough that you can’t point to one specific line where the color changes
- Build the orange gradually with multiple light passes rather than one heavy application
- Seal with a glossy top coat that enhances the warm, glowing quality of the colors
- This design lasts well for 2-3 weeks, though the orange tip shows wear first
Pro tip: These warm tones show the nail bed through slightly translucent layers, which can appear yellowed if you use too-sheer polish. Use full-coverage formulas for the most stunning result.
5. Lavender to White Dreamy Pastel
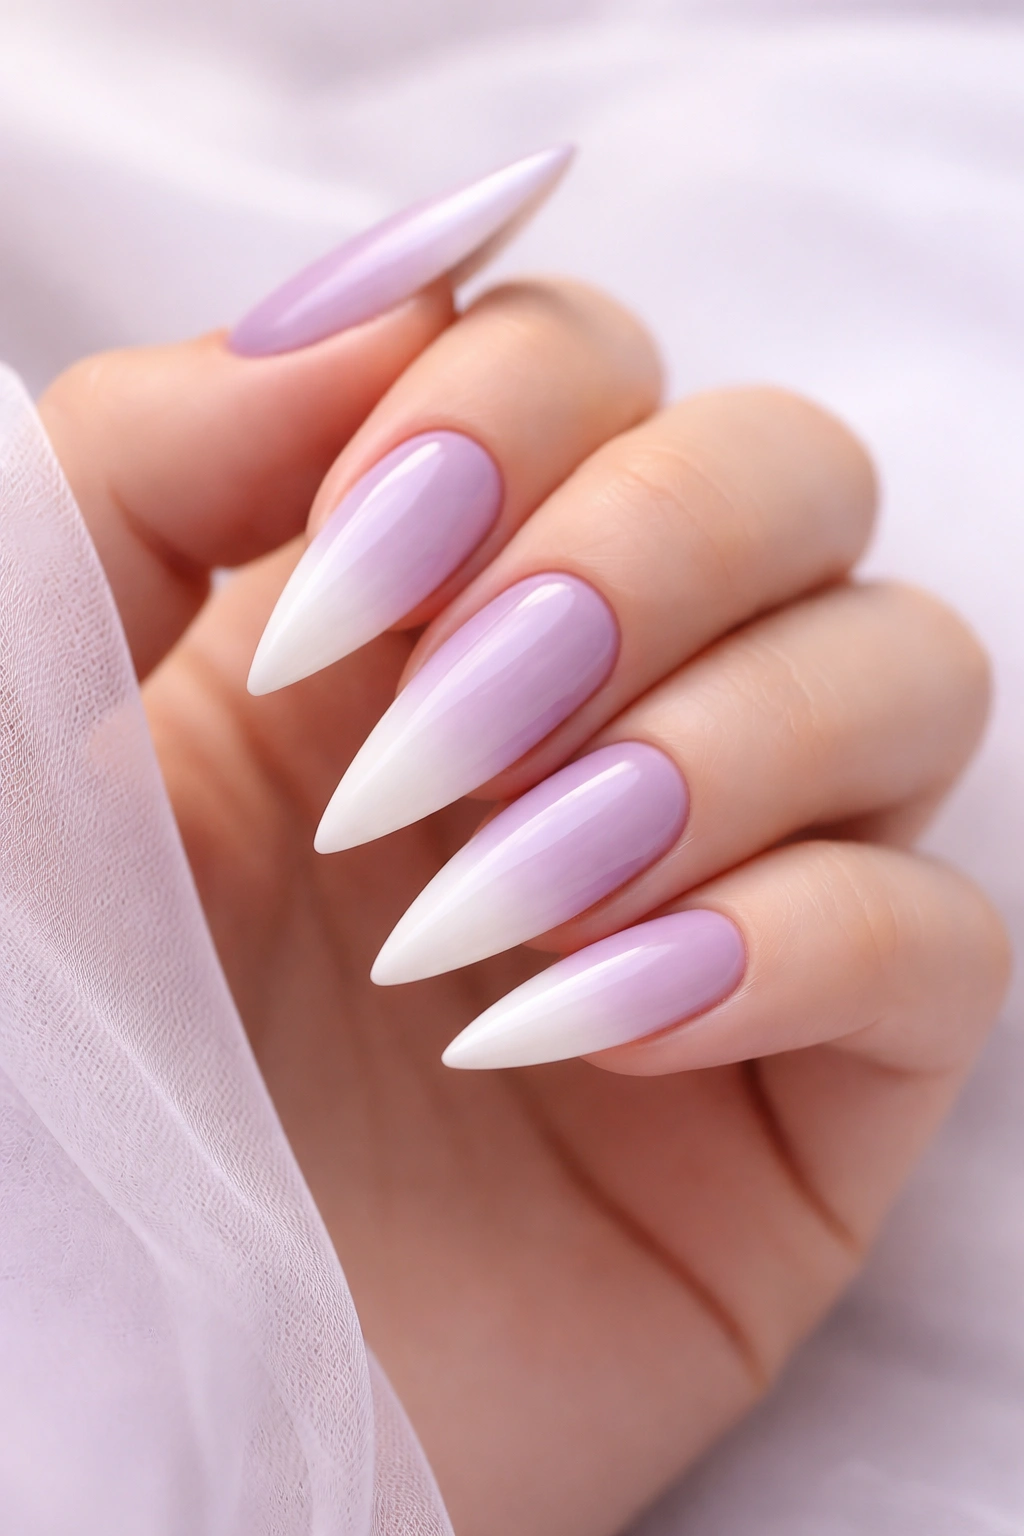
Create an ethereal, dreamy aesthetic with lavender fading to pristine white on your medium stiletto nails. This soft, romantic design works beautifully for spring events, gentle aesthetic enthusiasts, or anyone seeking nails that feel calming and intentionally beautiful. The combination feels inherently feminine without being juvenile, and the whitened tip provides visual length extension that amplifies the stiletto’s natural elongating effect.
The Magic of Pastel Ombre on Stilettos
Pastel colors can sometimes feel fragile or washed-out on nails, but when applied to stiletto nails with an ombre technique, they suddenly feel intentional and sophisticated. The pointed shape transforms pastels from “soft and delicate” into “artfully designed.” The lavender-to-white transition particularly works because white is clean and finishing-focused, making the overall design feel complete rather than in-progress.
Gentle Application for Pastel Success
- Lavender works best in a true lavender shade rather than purple or mauve—stick to colors with gray undertones for a softer, more sophisticated appearance
- Apply lavender at full coverage to the base and nail bed
- White should gradually appear starting around the middle of the nail, becoming the dominant color by the tip
- Use a very light sponge touch with pastels—they blend easily and can become muddy with heavy-handed technique
- The transition should feel soft and almost cloud-like, not a harsh line
- White at the tip should be nearly opaque and pure white for maximum impact
- These delicate colors benefit from extra top coat layers for protection against yellowing
Worth knowing: Lavender can sometimes appear bluish or grayish depending on lighting and undertone. Test on a swatch first to ensure it matches your vision.
6. Navy to Silver Starlit Ombre
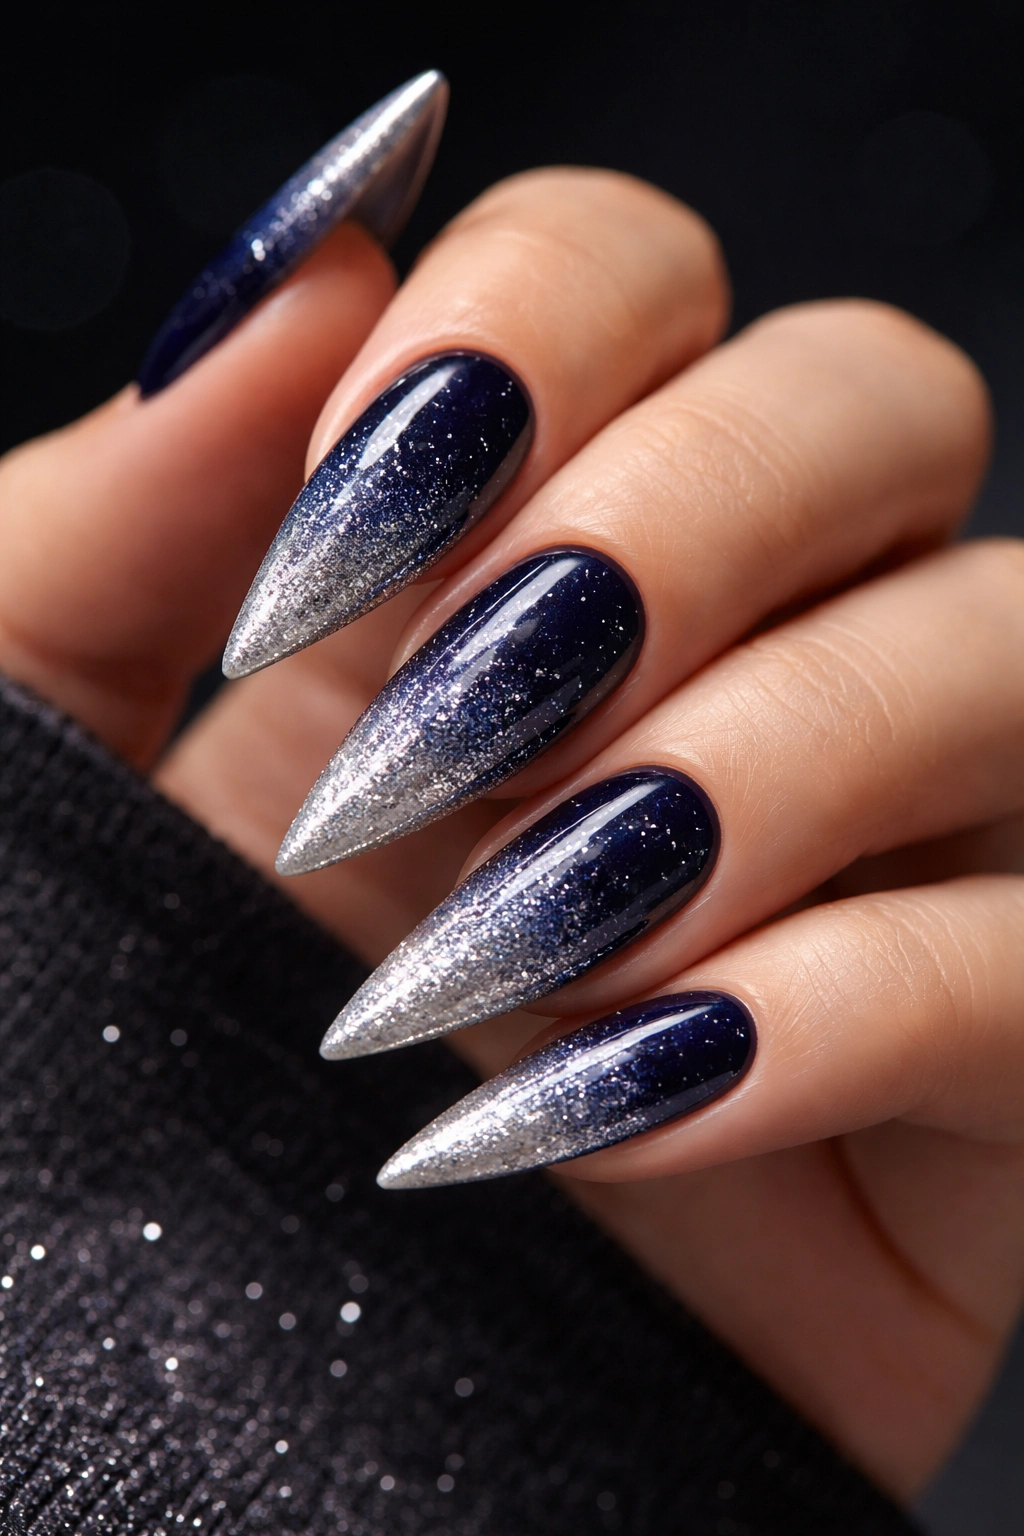
Transform your medium stiletto nails into a starlit night sky with deep navy transitioning to shimmering silver. This design feels glamorous and modern while maintaining sophistication that works for evening wear, special events, or anyone who gravitates toward jewel-tone palettes. The navy base grounds the design with depth, while the silver tip adds sophisticated sparkle without feeling costume-y.
Creating Nighttime Elegance
Navy is one of the most flattering colors on medium nails because it creates visual depth without the heaviness of black, making the nails appear longer and more refined. When paired with silver, the effect becomes almost magical—the shift from cool-toned dark to cool-toned bright creates movement and visual interest. This color combination works across all skin tones and seasons, making it endlessly versatile.
Technique for Jewel-Tone Gradients
- Use a true navy rather than black or very dark blue—this maintains the elegance while preventing the look from feeling harsh or severe
- Apply navy as full coverage on the nail bed and lower half
- Introduce silver starting around the middle section, gradually increasing coverage toward the tip
- For extra dimension, consider using a navy with subtle shimmer alongside the silver
- Blend the colors where they meet using a slightly damp sponge with a gentle dabbing motion
- The silver tip should be noticeably more reflective than the navy base, creating clear visual distinction
- Seal with glossy top coat to maximize the sparkly quality of the silver
- This design hides imperfections well and lasts 3+ weeks with minimal fading
Pro tip: Layer a matte top coat over just the navy portion and glossy over the silver for a mixed-finish look that adds extra dimension.
7. Coral to Peach Sunset Dream
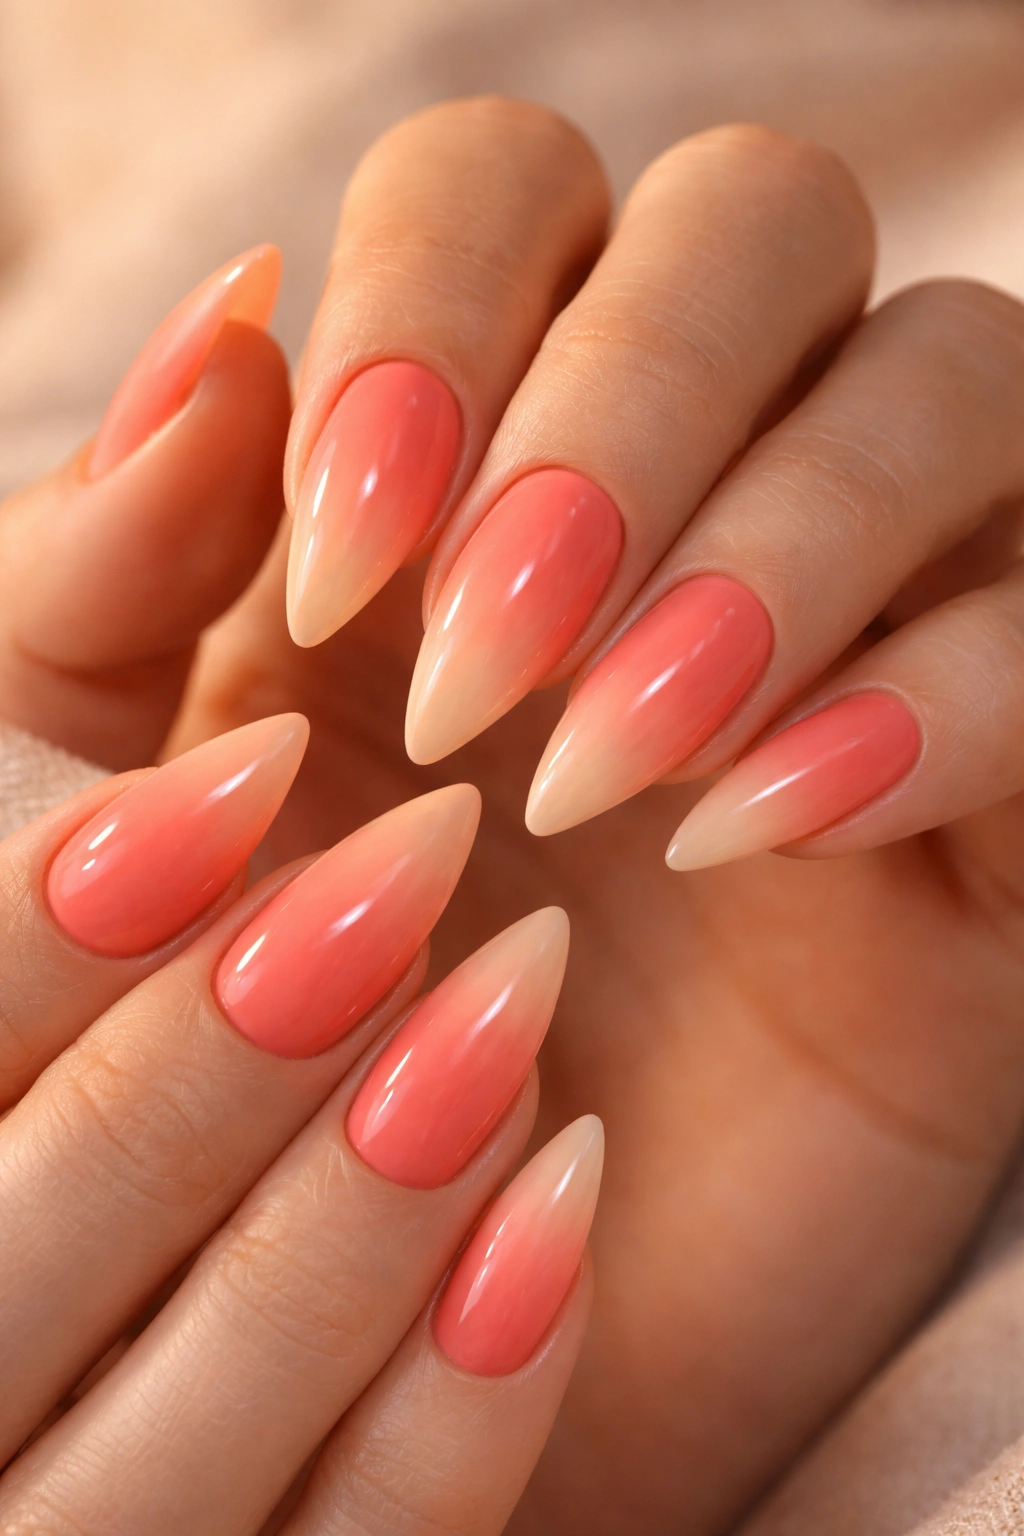
Capture warm, sunset energy with coral melting into soft peach on medium stiletto nails. This design feels youthful without being immature, bright without being neon, and flattering across most skin tones. The coral provides vibrancy and modern appeal, while the peach transition creates softness and approachability. Perfect for anyone who loves warm tones and wants nails that feel both fun and intentional.
Why Coral-to-Peach Reads as Intentional
These adjacent colors on the warm spectrum create a subtle, sophisticated gradient that feels like a conscious artistic choice rather than mismatched tones. On medium stiletto nails, the soft transition prevents the look from feeling unfinished while the color intensity keeps it from feeling too delicate. This is an ombre design that appeals to people who might shy away from ombre as a concept but want gradient effect benefits.
Achieving the Perfect Warm Fade
- Coral works best in a true coral shade with orange undertones rather than pink-coral or salmon-coral
- Apply coral at full opacity to the nail bed and lower two-thirds
- Peach should appear starting around the middle-upper third, becoming dominant at the tip
- Use a light sponge with barely-pigmented edge to blend the junction between colors
- The transition zone (roughly 1/4 of the nail) should be so soft you question whether it’s one color or two
- Peach at the tip should be nearly translucent for a soft, glowing appearance
- Apply 2-3 coats of glossy top coat to seal and enhance the warm glow
- Expect this design to show visible wear after 2-3 weeks, with peach fading most noticeably
Worth knowing: Coral can sometimes look orange or red-orange depending on your undertone. Peach can appear yellow or pink on different skin. Test both shades on a practice nail to ensure they feel right for your skin.
8. Emerald to Gold Luxe Gradient
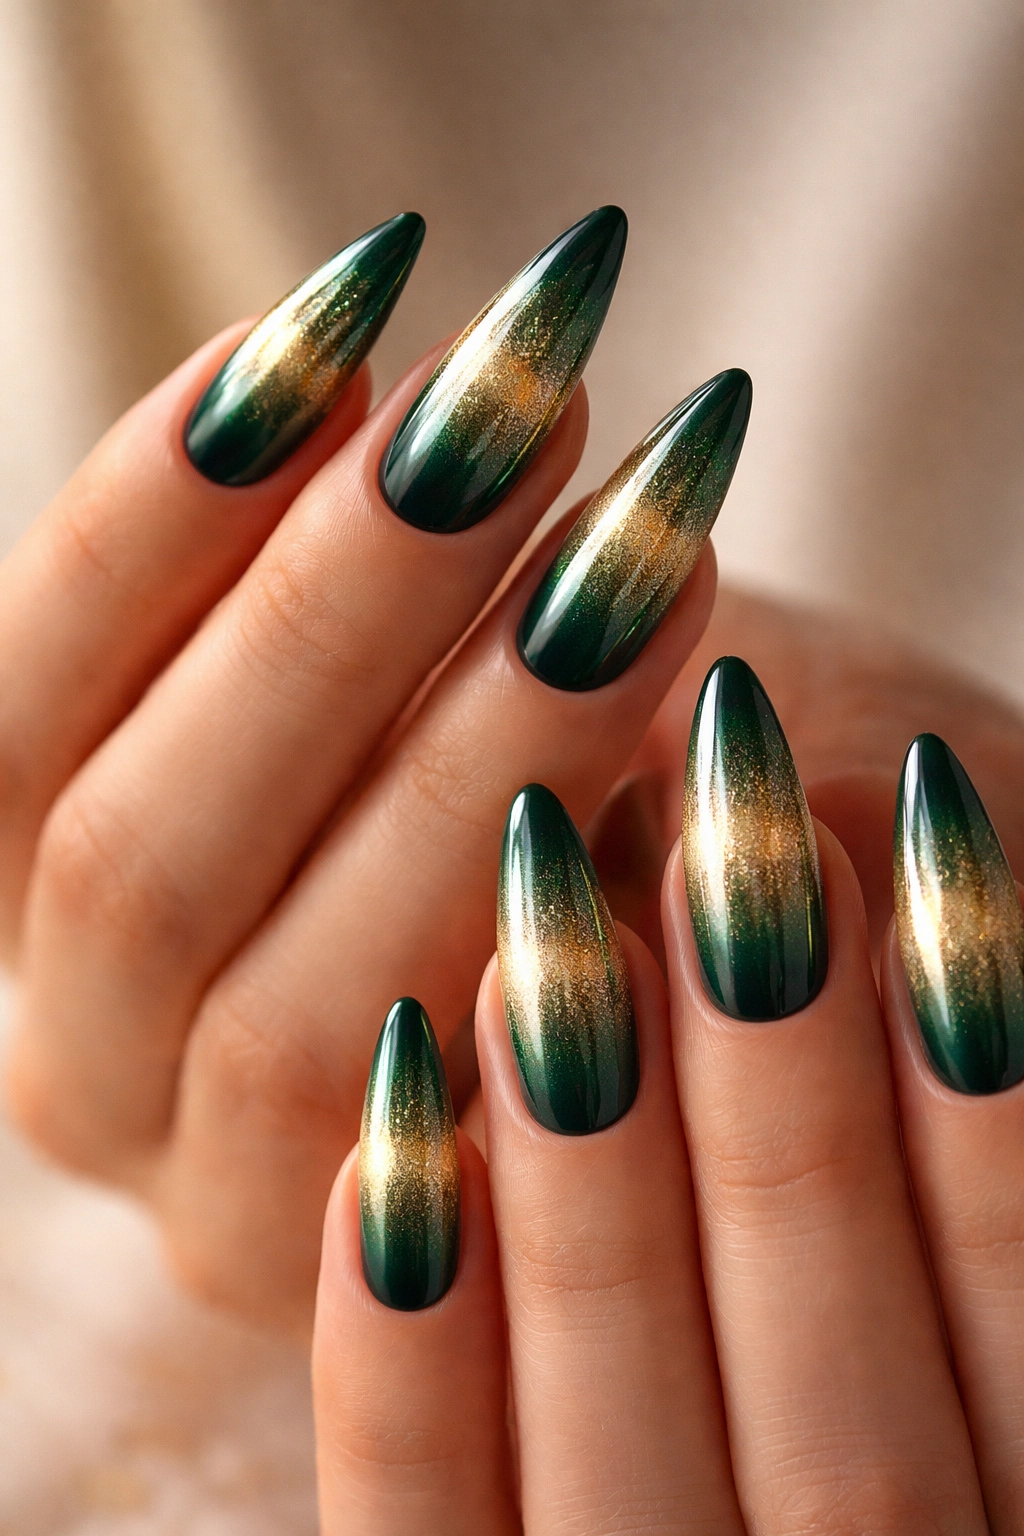
Pair deep emerald green with warm gold for a truly luxurious ombre that feels both jewel-toned and high-end. This design evokes luxury watches, precious gemstones, and carefully curated wealth. Emerald provides sophisticated depth and complexity, while gold adds warmth and reflective brightness. Perfect for evening events, holiday celebrations, or anyone who gravitates toward rich, jewel-tone palettes.
The Luxury Factor
Emerald green has long been associated with luxury, sophistication, and subtle confidence—it’s a color that whispers money rather than shouting it. When paired with warm gold in an ombre format, the effect becomes even more refined. On medium stiletto nails, this emerald-to-gold gradient transforms simple nails into statement jewelry, creating an impression of intentional, educated style choices.
Creating High-End Gradient Precision
- Invest in a true emerald green with good pigmentation—budget versions often appear muddy or grayish
- Apply emerald as full coverage to the entire nail bed and most of the nail length
- Gold should introduce itself around the middle-upper third, becoming the dominant color at the tip
- Use a sponge that’s barely touched with gold polish to create ultra-soft blending
- The transition zone should be approximately 1/4 of the nail length, creating gradual color shift
- Gold at the tip should be distinctly reflective and warm, creating clear visual contrast with the emerald base
- Apply 2-3 seal coats to ensure the colors don’t dull and the gradient remains crisp
- This design lasts exceptionally well, often 3-4 weeks with minimal fading
Pro tip: Use a warm, honey-gold rather than yellow-gold for the best harmony with emerald’s cool undertones.
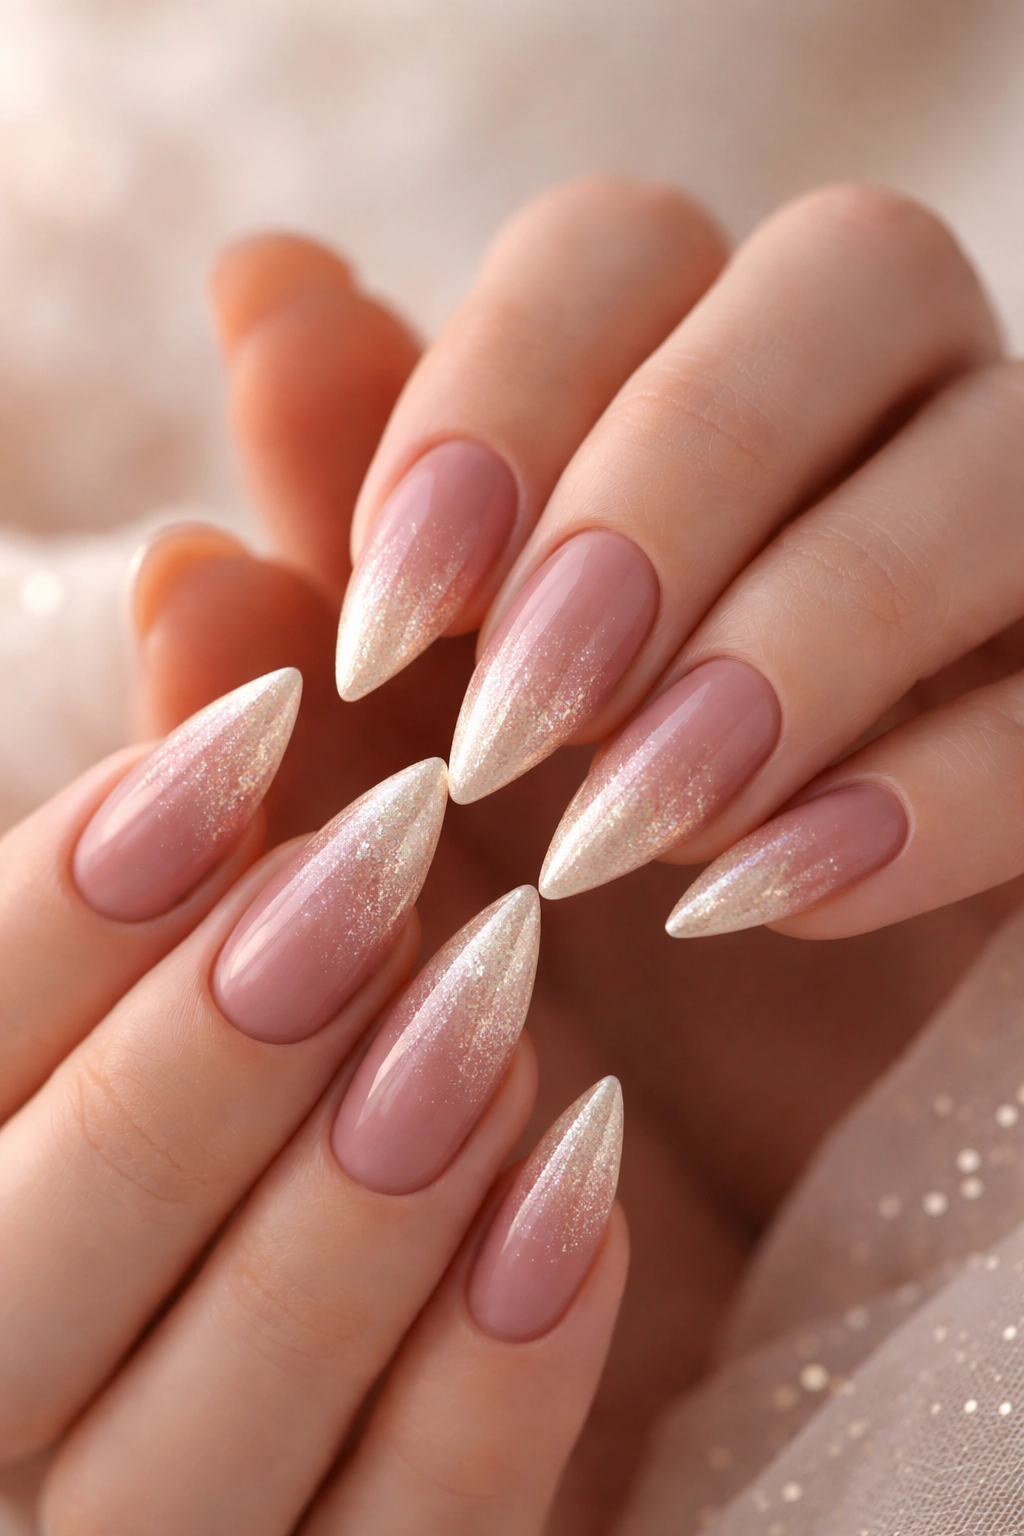
9. Blush Pink to White Clean Ombre

Create a fresh, clean ombre with soft blush pink fading to bright white on your medium stiletto nails. This design feels modern, minimalist, and intentionally curated while remaining soft and approachable. The white tip provides maximum length extension visually, while the blush base adds warmth and femininity. Perfect for anyone seeking understated elegance or those who want an ombre that works in professional and casual settings equally well.
Why Clean Ombre Feels Sophisticated
When ombre design is executed with true cleanliness—minimal fading into white rather than elaborate color transitions—it can feel more sophisticated than complex multi-color gradients. The blush-to-white combination specifically reads as “carefully designed” rather than “trendy” because the white finish gives visual closure and completion. On medium stiletto nails, the clean white tip emphasizes the pointed shape’s inherent elegance.
Achieving Crystal-Clear Clean Ombre
- Blush pink should be a soft, warm pink with good coverage but not heavy application
- Apply blush pink to the nail bed and lower half at full opacity
- White should be bright, pure white (not cream or off-white) for maximum clean effect
- Introduce white around the middle section, feathering with a barely-damp sponge
- The transition zone should be extremely soft and gradual, almost cloud-like in appearance
- White at the tip should be opaque and striking, creating definite visual end point
- Clean ombre requires multiple thin seal coats rather than one heavy top coat for a professional finish
- Expect this design to last 2-3 weeks; white shows wear first and may require touching up
Worth knowing: Blush pink and white together can read as very bridal or engagement-ring-adjacent. If that’s your vibe, fantastic. If not, consider whether a slightly deeper pink might feel more personally authentic.
10. Purple to Pink Gradient Dream
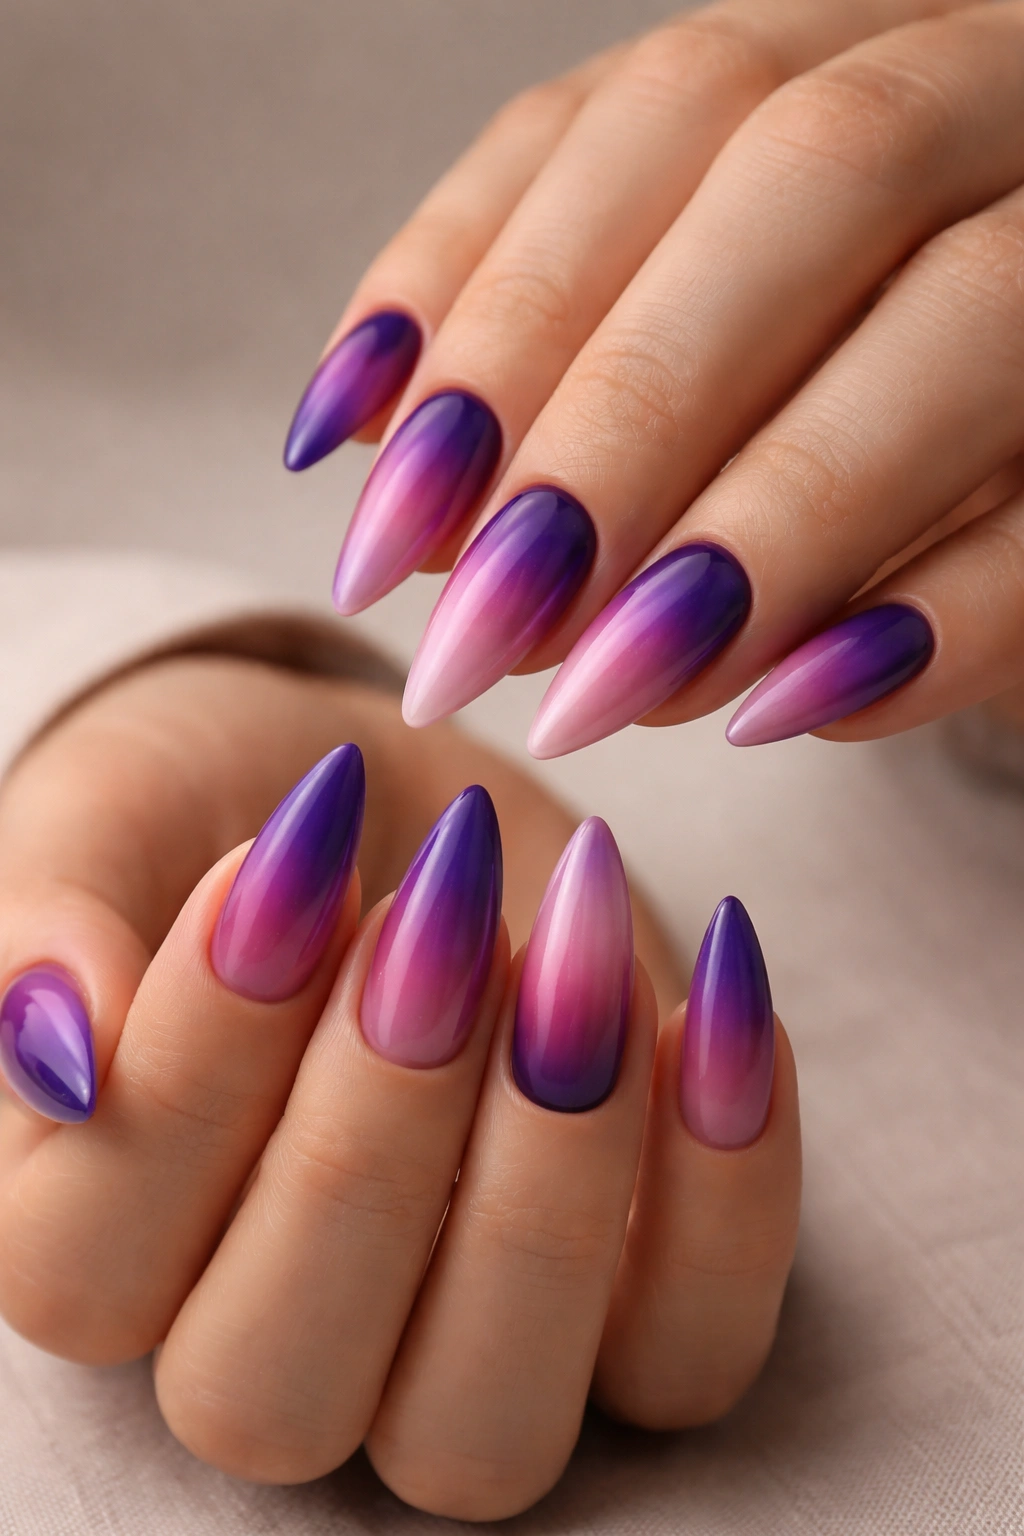
Blend deep purple with soft pink for a whimsical yet sophisticated ombre that feels both bold and refined. This design bridges cool and warm tones, creating a transition that’s visually interesting from every angle. Perfect for creative professionals, anyone with an artistic sensibility, or those seeking an ombre that stands out without feeling costume-like or theatrical.
The Art of Purple-to-Pink Balance
Purple and pink exist on opposite sides of the color wheel, which means their combination could feel jarring—unless executed intentionally as ombre. The gradient format allows the colors to meet and blend gradually, creating harmony rather than contrast. On medium stiletto nails, this balance feels mature and artistic rather than juvenile or over-decorated.
Technical Approach to Cool-Warm Transitions
- Use a deep purple with blue undertones rather than red-purple to ensure smooth transition into pink
- Apply purple at full coverage to the nail bed and lower two-thirds
- Pink should be a medium pink with warm undertones for best color harmony
- Introduce pink around the upper-middle section, gradually increasing toward the tip
- The transition zone (roughly 1/3 of the nail) is where the magic happens—this is where purple and pink actually blend
- Use a sponge technique with extremely light pressure to create soft, undulating edges rather than one defined line
- The pink tip should be clearly visible and distinct from the purple base, but with a seamless journey between them
- Apply 2-3 glossy top coats to seal and enhance the gradient
- This design typically lasts 2-3 weeks with gradual fading
Pro tip: Look for a pink shade that contains slight purple undertones (like mauve-pink) to bridge the color gap more elegantly.
11. Dusty Rose to Champagne Wedding Ombre
Create bridal or wedding-appropriate elegance with dusty rose transitioning to shimmering champagne on your medium stiletto nails. This design feels romantic, intentional, and appropriately formal for celebrations while remaining wearable for everyday occasions. The dusty rose base provides warmth and sophistication, while the champagne shimmer adds celebratory sparkle without feeling costume-y.
Perfect for Formal Occasions
Dusty rose is one of the most flattering colors for fair and medium skin tones, creating warmth without intensity. When paired with champagne, it becomes undeniably elegant and celebration-ready. The ombre format means you get both color and gradient interest, making medium-length nails feel polished and intentionally styled rather than simply short. This design works equally well for weddings, engagements, formal dinners, or anyone seeking consistently elegant nails.
Champagne Shimmer Technique
- Dusty rose should have gray undertones that prevent it from appearing too pink or salmon
- Apply dusty rose at full coverage to the nail bed and lower half
- Champagne is introduced around the middle section, becoming dominant toward the tip
- Use a sponge with ultra-light pressure—these delicate, warm colors blend easily and can become muddy
- The transition should feel soft and organic, like colors naturally shifting rather than layered application
- Champagne should be noticeably shimmer-forward and reflective, catching light beautifully
- Multiple thin seal coats create better results than one heavy top coat for these delicate colors
- This design lasts 2-3 weeks; champagne tip may need touching up first
- The combination photographs beautifully, making these nails perfect if you’re planning a photo-heavy event
Worth knowing: Champagne can sometimes appear too yellow or too pink depending on the specific shade. Test on practice nails to ensure it complements both your skin tone and the dusty rose base.
12. Teal to Silver Ocean Ombre

Capture ocean-inspired elegance with teal fading to shimmering silver on your medium stiletto nails. This design feels sophisticated and cool-toned, perfect for anyone with cooler undertones or those seeking an ombre that stands out while remaining wearable. The teal provides depth and substance, while the silver adds brightness and reflective interest without overwhelming the overall aesthetic.
The Appeal of Jewel-Tone to Shimmer
Teal represents sophistication, calm, and depth—it’s a color that suggests intention and thoughtful style choices. When paired with silver shimmer, the combination becomes even more refined and elegant. On medium stiletto nails, this ombre reads as genuinely high-end nail design work rather than a trendy or temporary choice. The colors work across all undertones, though they’re particularly stunning on cooler-skinned individuals.
Creating Seamless Jewel-Tone Ombre
- Use a teal with true blue-green undertones rather than blue-leaning or green-leaning versions
- Apply teal at full opacity to the nail bed and majority of the nail length
- Silver should be introduced around the upper-middle section, gradually increasing toward the tip
- The blending zone should be soft and gradual—use a barely-pigmented sponge with light pressure
- Silver at the tip should be clearly more reflective and bright than the teal base
- Build the silver gradually with multiple light sponge passes rather than one heavy application
- Glossy top coat maximizes the silver shimmer and overall professional appearance
- This design lasts 3+ weeks with minimal fading, as teal is forgiving color
- The cool tones mean this ombre works beautifully year-round regardless of season
Pro tip: These cool tones can sometimes appear slightly muddy if the transition zone isn’t properly blended. Practice your sponge pressure on test nails first.
13. Burnt Orange to Caramel Autumn Ombre
Embrace warm, autumnal tones with burnt orange transitioning to creamy caramel on medium stiletto nails. This design feels sophisticated, season-appropriate, and flattering on warm-toned skin. The burnt orange provides depth and richness, while the caramel adds sweetness and approachability. Perfect for fall celebrations, anyone seeking nails that feel warm and inviting, or those wanting an ombre that photographs beautifully.
Autumn Warmth Year-Round
While this color combination evokes fall specifically, it’s flattering enough to wear year-round without appearing costume-y or theme-specific. Burnt orange and caramel are colors that suggest comfort, sophistication, and warmth without being over-the-top or theatrical. On medium stiletto nails, this ombre feels intentionally curated and celebrates warm undertone skin beautifully.
Achieving Smooth Warm Transitions
- Burnt orange should be a true burnt orange with brown undertones rather than pure orange or rusty-red
- Apply burnt orange at full coverage to the nail bed and lower two-thirds
- Caramel should be warm, creamy, and rich (not pale or tan)
- Introduce caramel around the upper-middle section, blending gradually toward the tip
- Use a light sponge touch to create soft, undulating transition rather than distinct line
- The caramel tip should be noticeably lighter and warmer than the burnt orange base
- These warm colors blend readily, so light pressure is essential to avoid muddy transition zones
- Apply 2-3 seal coats to maintain color vibrancy
- Expect this design to last 2-3 weeks with gradual fading; caramel shows wear most noticeably
Worth knowing: Warm-toned individuals will find this ombre particularly flattering, though it can work for all skin tones if the specific shades are chosen to complement individual undertones.
14. Nude to Glitter Gradual Sparkle
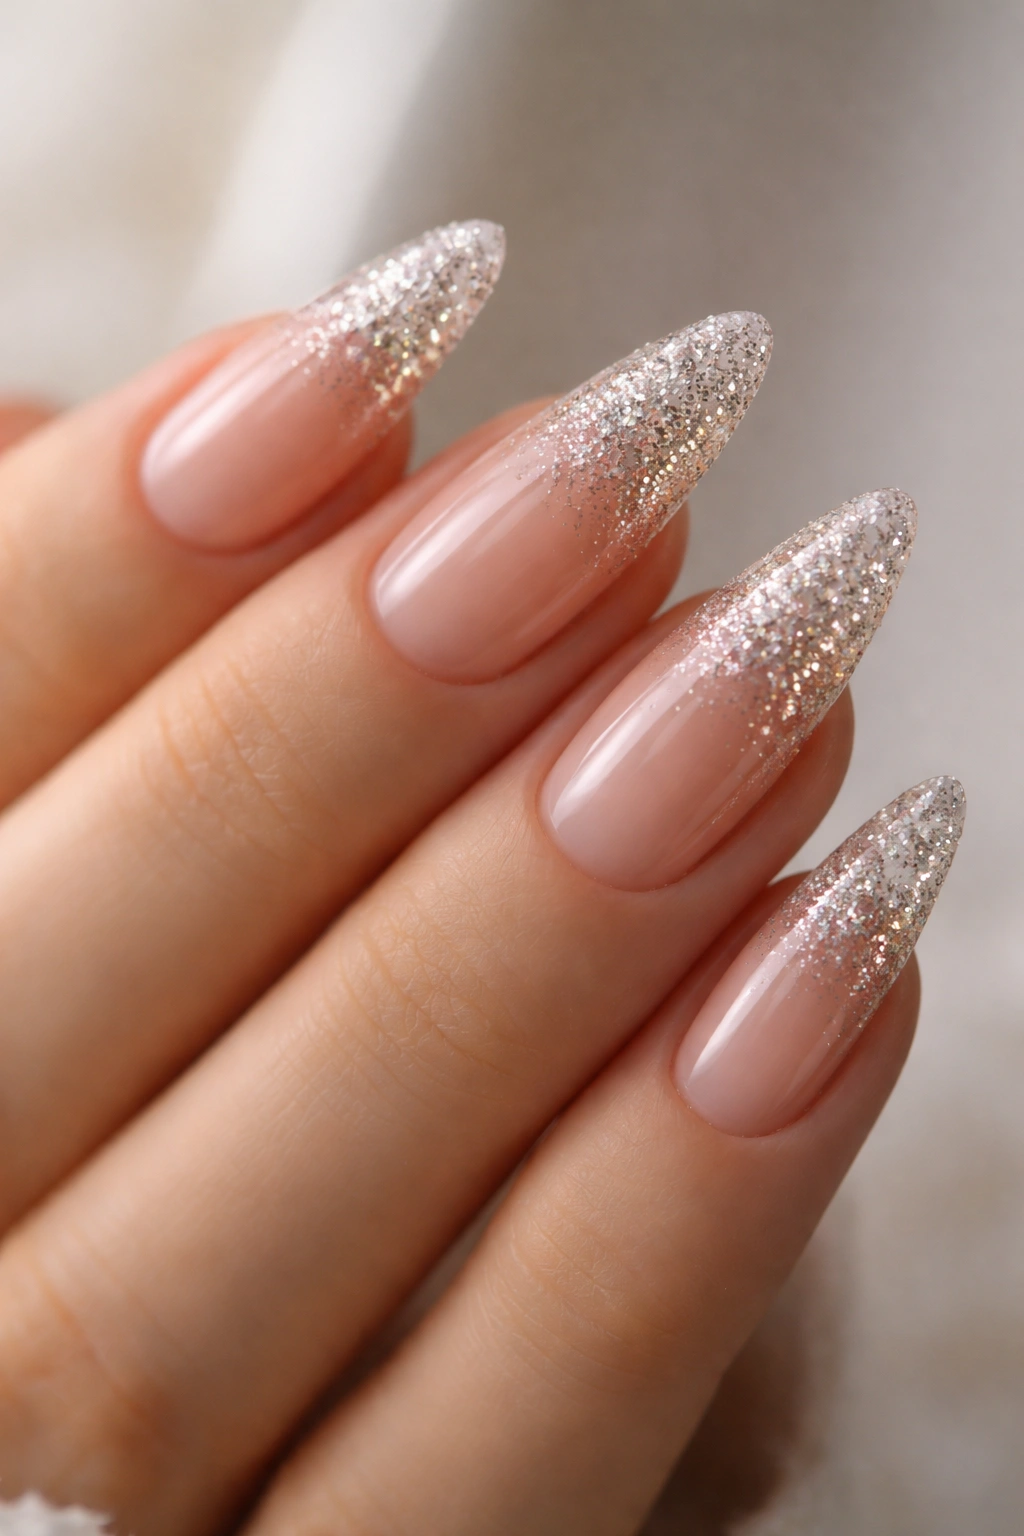
Create a sophisticated gradient that builds from subtle nude to glitter-forward shimmer on your medium stiletto nails. This design allows you to gradually introduce sparkle rather than committing fully to glitter, making it perfect for those who love subtle shine or want to test their comfort with more dramatic nail designs. The nude base grounds the design in wearability, while the glitter tip adds celebratory energy and visual interest.
Building Glitter Gradually
Nude-to-glitter is genuinely one of the most versatile ombre combinations because it works for professional settings (when worn with minimal glitter) or celebration settings (when worn with prominent sparkle). The medium-length stiletto canvas is perfect for this design—long enough to showcase glitter gradient without making the nails feel overly decorated or costume-y, yet short enough for everyday functionality.
Technique for Glitter Gradient
- Start with a sheer or opaque nude base applied to the entire nail for color foundation
- Instead of traditional sponge blending, use a thin brush or sponge to apply fine glitter polish starting around the middle section
- Build glitter gradually, increasing density toward the tip—lower sections have barely-there sparkle, tip is fully glittered
- Use fine micro-glitter rather than chunky glitter for a refined, sophisticated appearance
- Layer glitter polish in 2-3 thin passes rather than one heavy application for controlled gradient
- Seal with clear top coat that won’t muddy the glitter (avoid milky or colored top coats)
- Alternatively, use glitter dust applied with a brush for even more precise gradient control
- This design lasts 2-3 weeks; glitter remains visible even as nude base may fade slightly
- The combination photographs beautifully and suits both day and evening wear
Pro tip: If traditional glitter feels too heavy, use chrome or mirror powder for the sparkle element—it creates similar light-catching effect with a more refined appearance.
15. Deep Plum to Rose Gold Luxe Fade
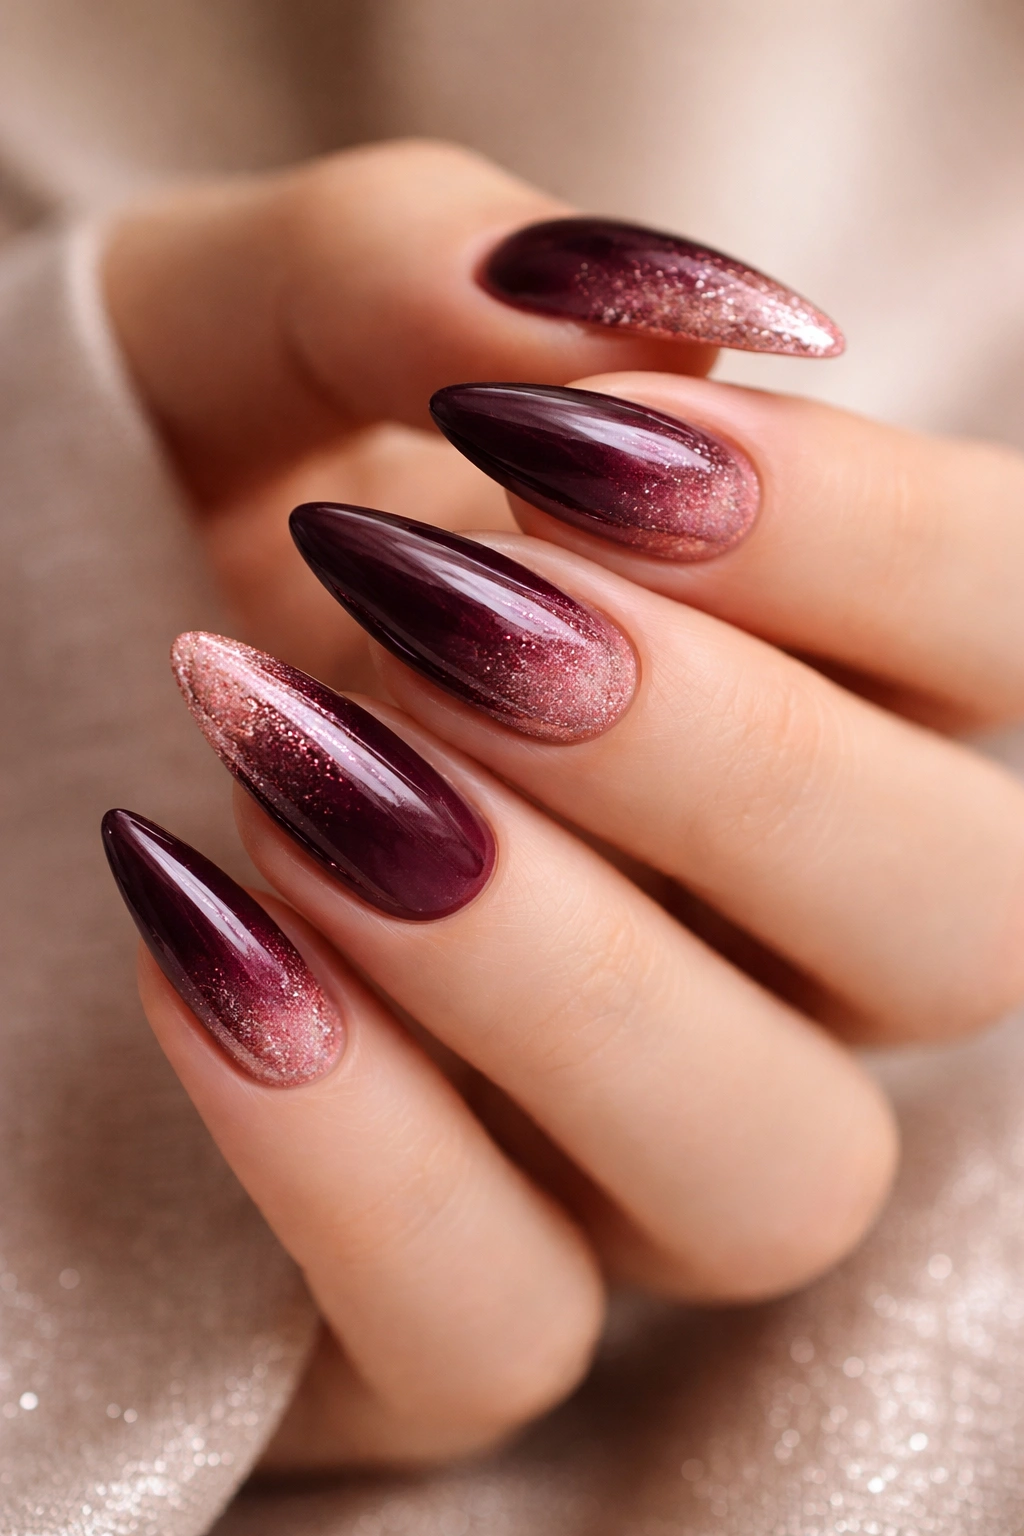
Complete the collection with a truly luxe ombre that transitions from deep plum to warm rose gold on your medium stiletto nails. This design feels sophisticated, rich, and distinctly upscale—perfect for anyone seeking an ombre that reads as intentionally high-end nail design. Deep plum provides depth and complexity, while rose gold adds warmth, shimmer, and premium feel.
The Ultimate Luxury Combination
Plum is a color that automatically suggests luxury and sophistication—it’s the color of velvet, jewels, and high-end beauty products. When paired with rose gold shimmer, the effect becomes even more refined and premium. On medium stiletto nails, this ombre genuinely reads as salon-quality design work, making simple nails feel like intentional, curated style statements. This design works beautifully across most skin tones, though it’s particularly stunning on warm-toned and olive skin.
Creating Premium Gradient Precision
- Use a true deep plum with blue-undertones rather than burgundy-plum or red-plum
- Apply plum at full opacity to the nail bed and lower section for visual weight and richness
- Rose gold should be used at medium shimmer level (not too subtle, not overpowering)
- Introduce rose gold around the middle section, gradually increasing coverage toward the tip
- The transition zone should be soft and gradual, creating seamless color flow
- Use a barely-pigmented sponge with gentle pressure to blend the metallic rose gold into the matte plum
- Rose gold at the tip should be clearly visible and distinctly more reflective than the plum base
- Apply 2-3 seal coats to ensure professional finish and color longevity
- This design is durable and lasts 3+ weeks with minimal fading
- The combination feels timeless and appropriate for any season or occasion
Pro tip: Layer a barely-there coat of rose gold dust over the upper-middle section before applying rose gold polish for extra dimension and premium appearance.
Final Thoughts
Ombre stiletto nails on a medium canvas offer the best of both worlds—the dramatic visual impact of gradient nail design paired with the elegant, elongating geometry of the stiletto shape, without requiring extreme length or daily maintenance sacrifice. Each of these 15 designs provides a different aesthetic entry point, whether you’re drawn to soft pastels, rich jewel tones, warm metallics, or bold color transitions.
The true advantage of medium-length stiletto nails is their versatility across life circumstances. You can wear the burgundy-to-nude design to a business presentation, switch to the sunset peach-to-orange for weekend adventure, and rock the emerald-to-gold for evening celebrations—all on the same nail length. Your medium canvas becomes a palette for expression rather than a limitation.
When selecting your ombre stiletto design, consider your natural undertone, lifestyle requirements, and the occasions you’re dressing for most frequently. A design that flatters your skin and matches your daily life will be a design you actually enjoy wearing. Whether you’re working with a professional nail technician or attempting at-home application, remember that ombre mastery comes from light sponge pressure, multiple thin layers, and patience with the blending process. Your nails deserve the time it takes to create something genuinely beautiful.
