

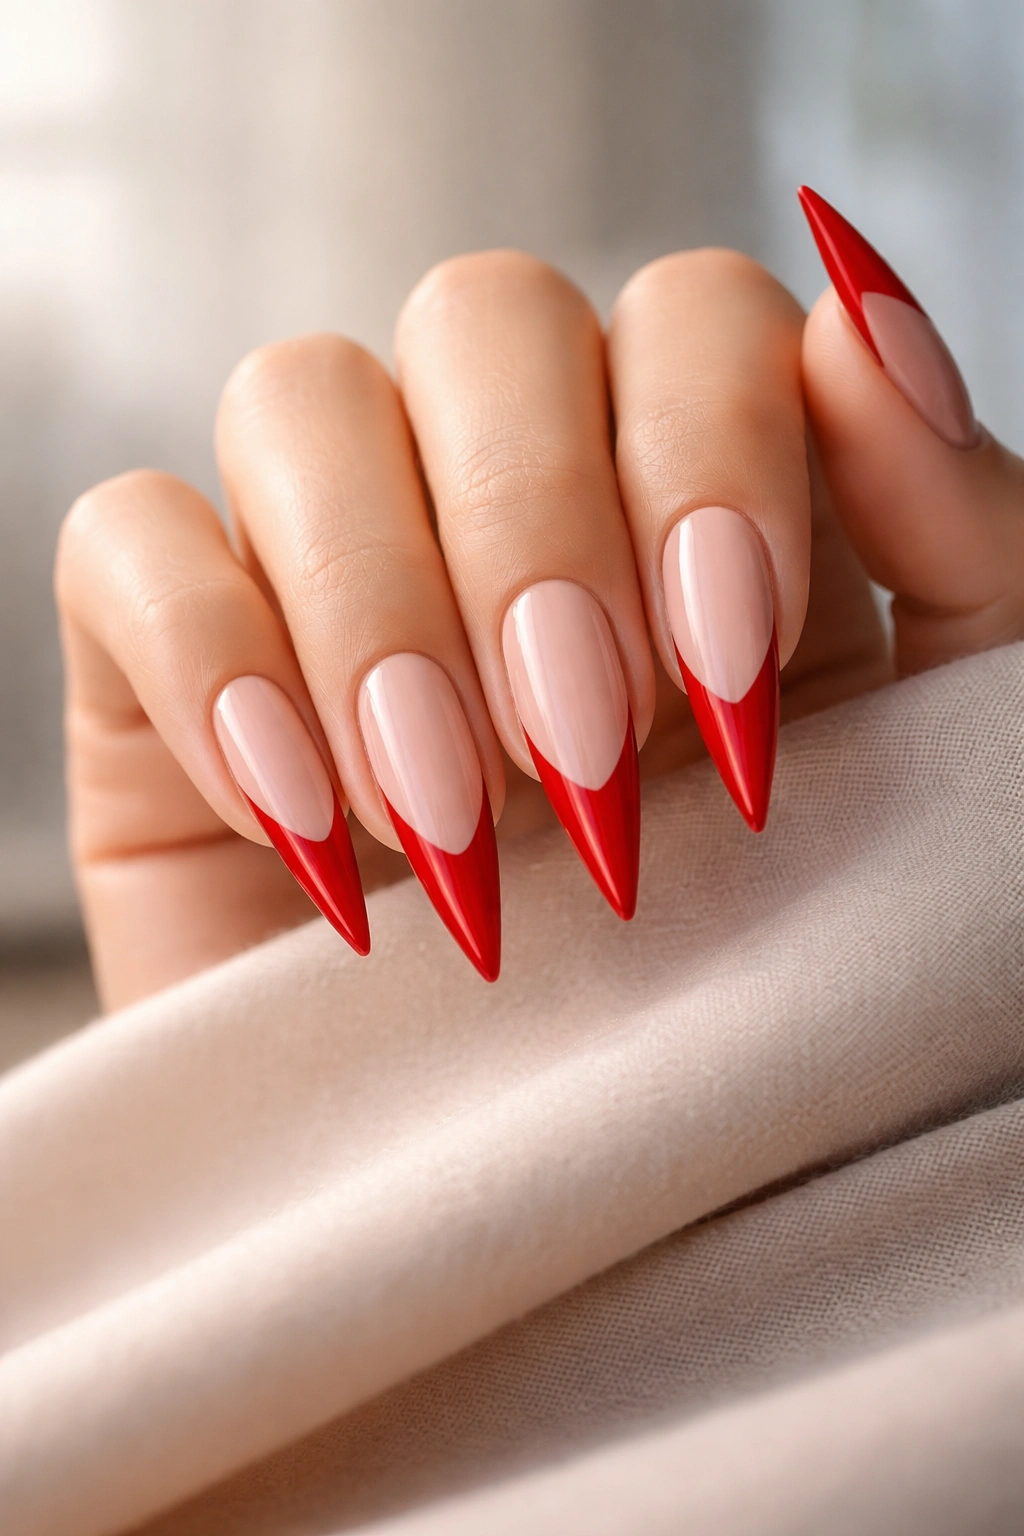
Red French tip stiletto nails represent the ultimate combination of glamour, sophistication, and bold attitude. The sharp, elongated silhouette of stilettos demands a nail design that commands attention, and red French tips deliver exactly that. This striking manicure style merges the timeless elegance of French tips—with their clean, contrasting color blocks—with the edgy, confident statement that only true stiletto nails can make. Whether you’re drawn to classic crimson, deep burgundy, or modern metallic finishes, red French tips work across virtually every aesthetic and occasion, from red carpet events to everyday confidence boosters.
The versatility of red French tip stilettos lies in their ability to bridge traditional and contemporary nail art. A perfectly executed French tip relies on sharp, precise lines and intentional contrast, and when you layer that onto the dramatic canvas of stiletto-shaped nails, the impact becomes undeniable. The elongated nail bed stretches the visual space, making the color gradient more pronounced and giving you endless room to experiment with textures, embellishments, and finishes. Whether you prefer minimal elegance or maximalist sparkle, the red French tip formula adapts beautifully.
Understanding the different approaches to this classic design helps you choose the version that genuinely fits your personal style and lifestyle needs. Some interpretations stay true to traditional French tip geometry, while others reimagine the concept entirely with gradients, geometric patterns, and mixed finishes. The nail designs that follow showcase the full spectrum of what’s possible when you combine red tones with French tip techniques on stiletto-shaped nails.
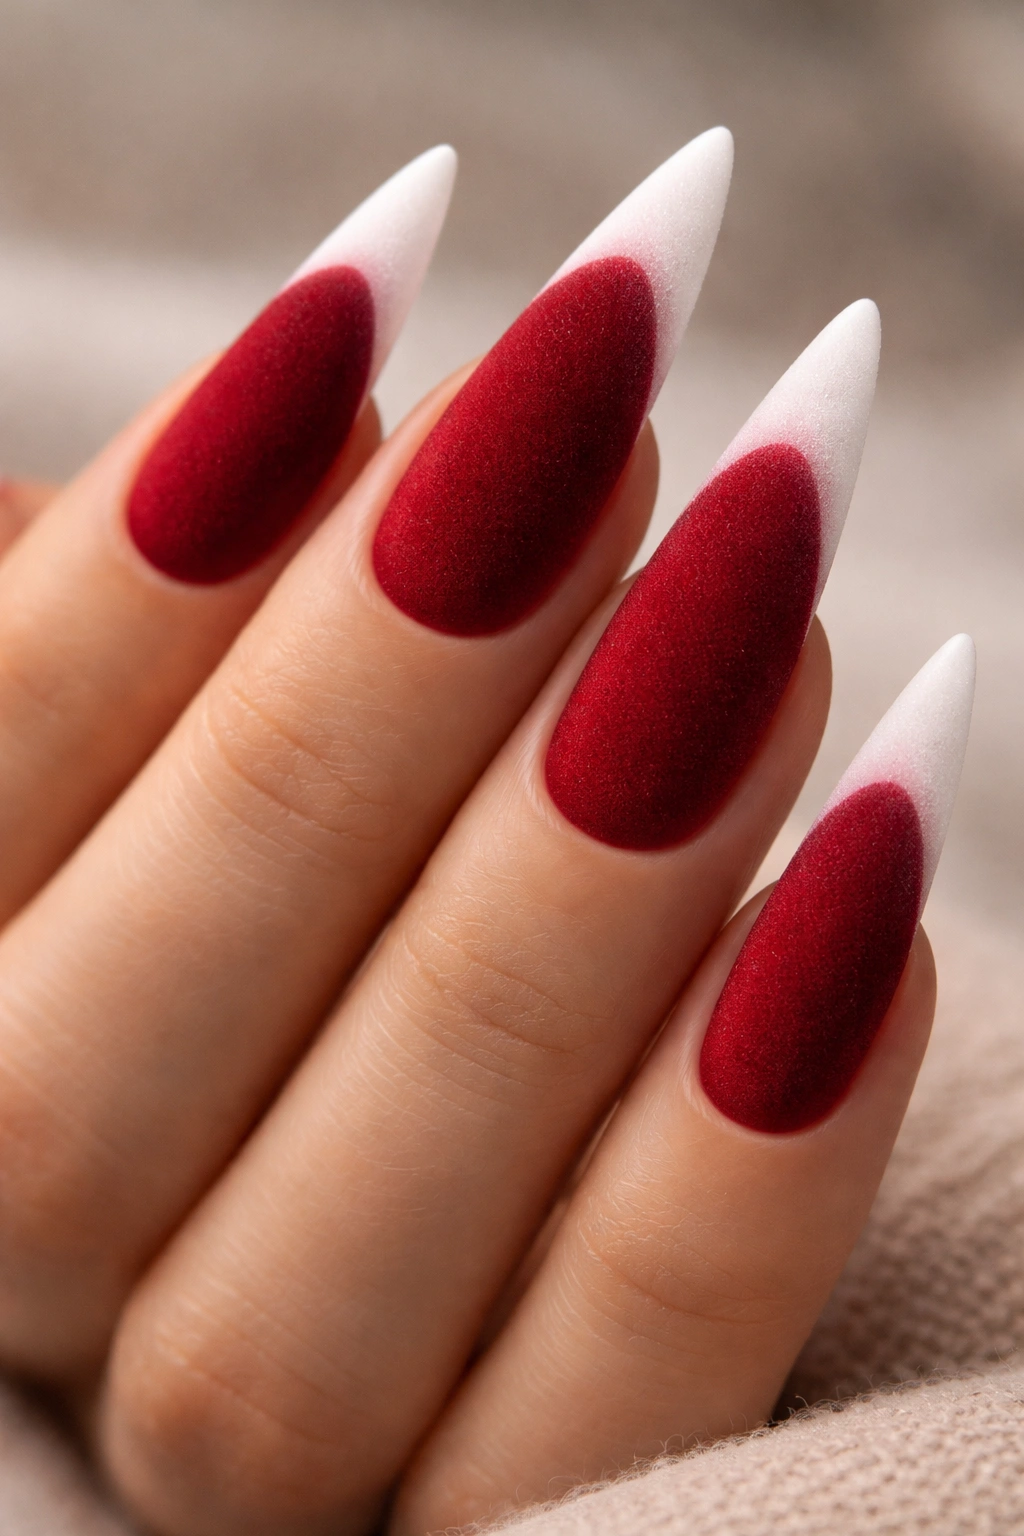
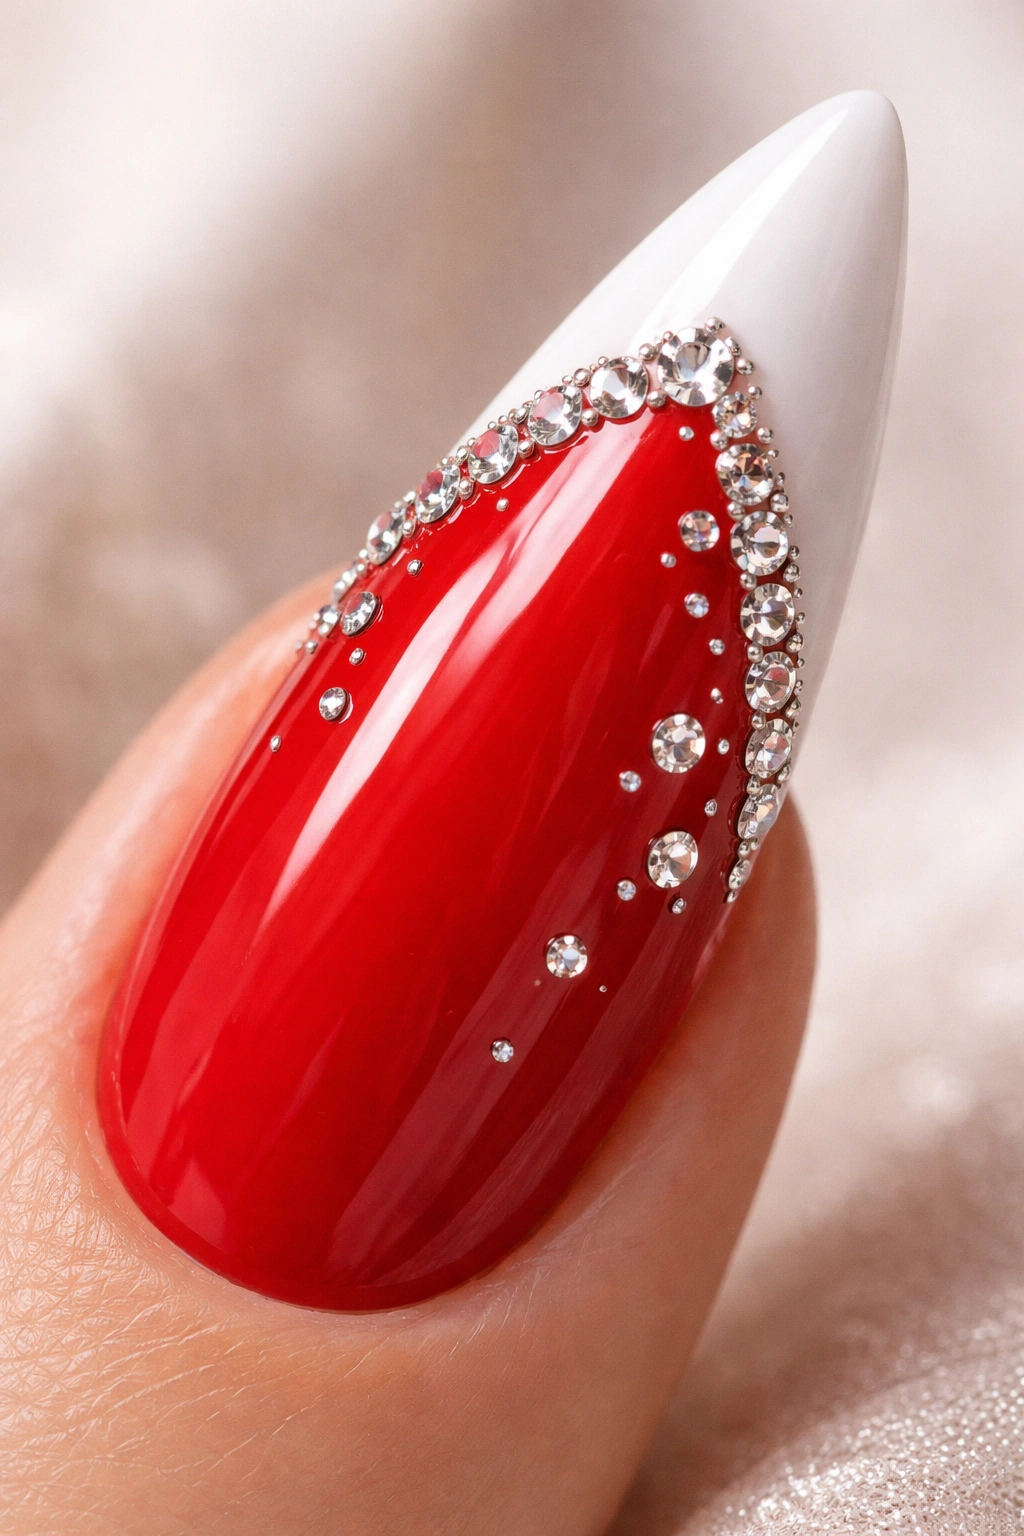
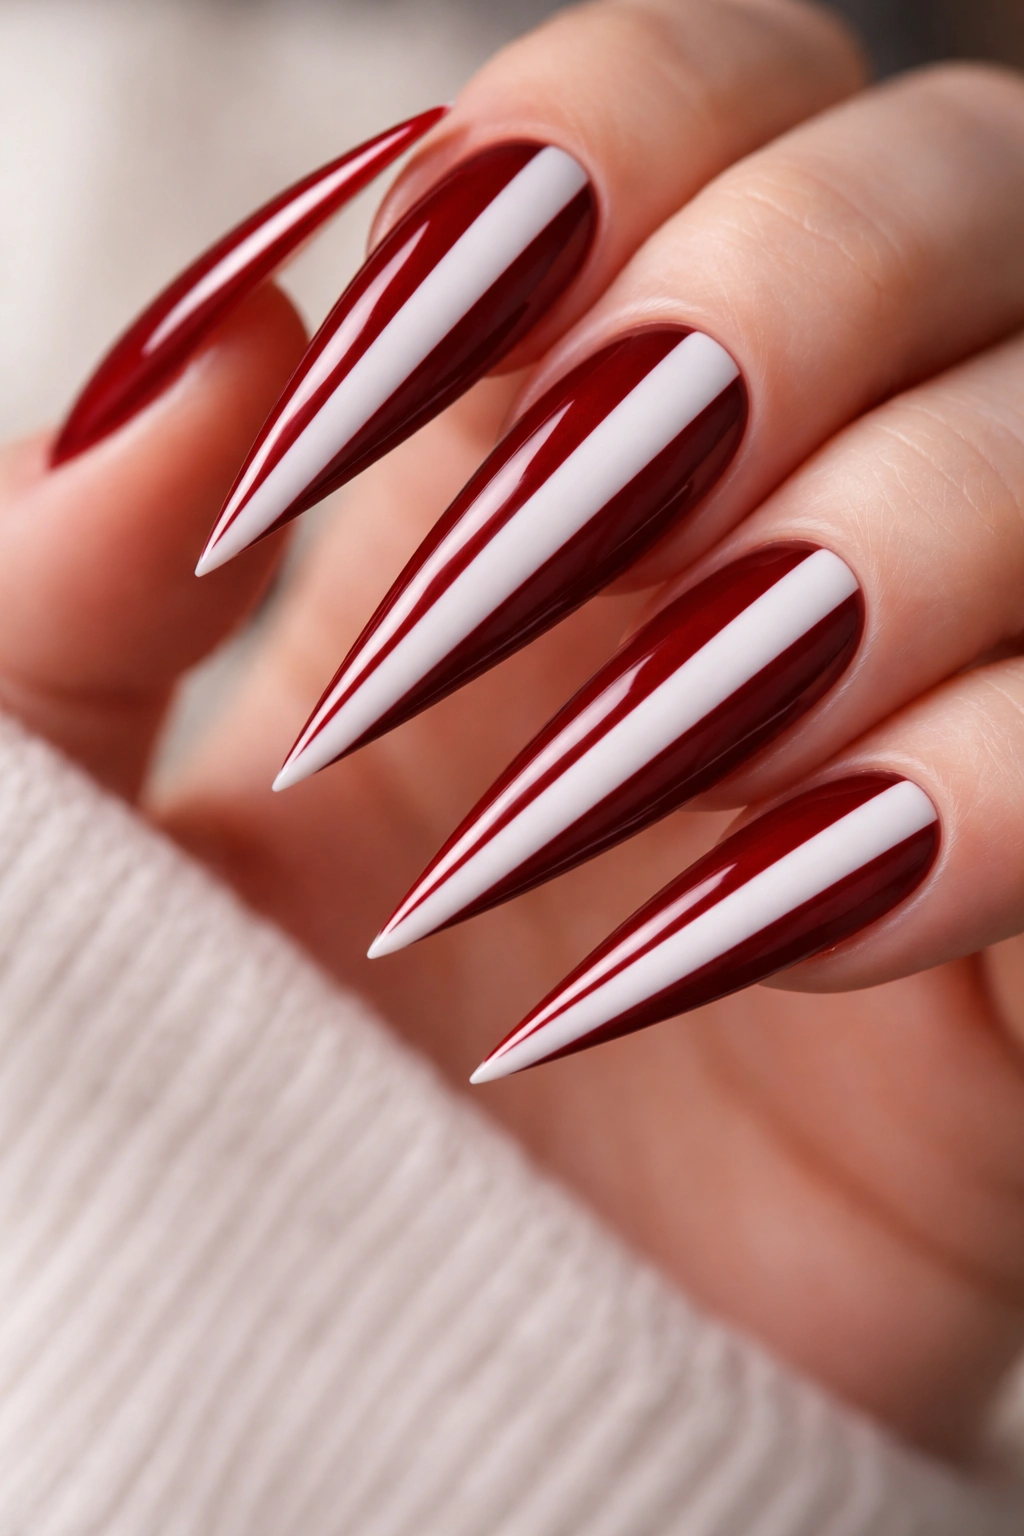
1. Classic Crimson and White
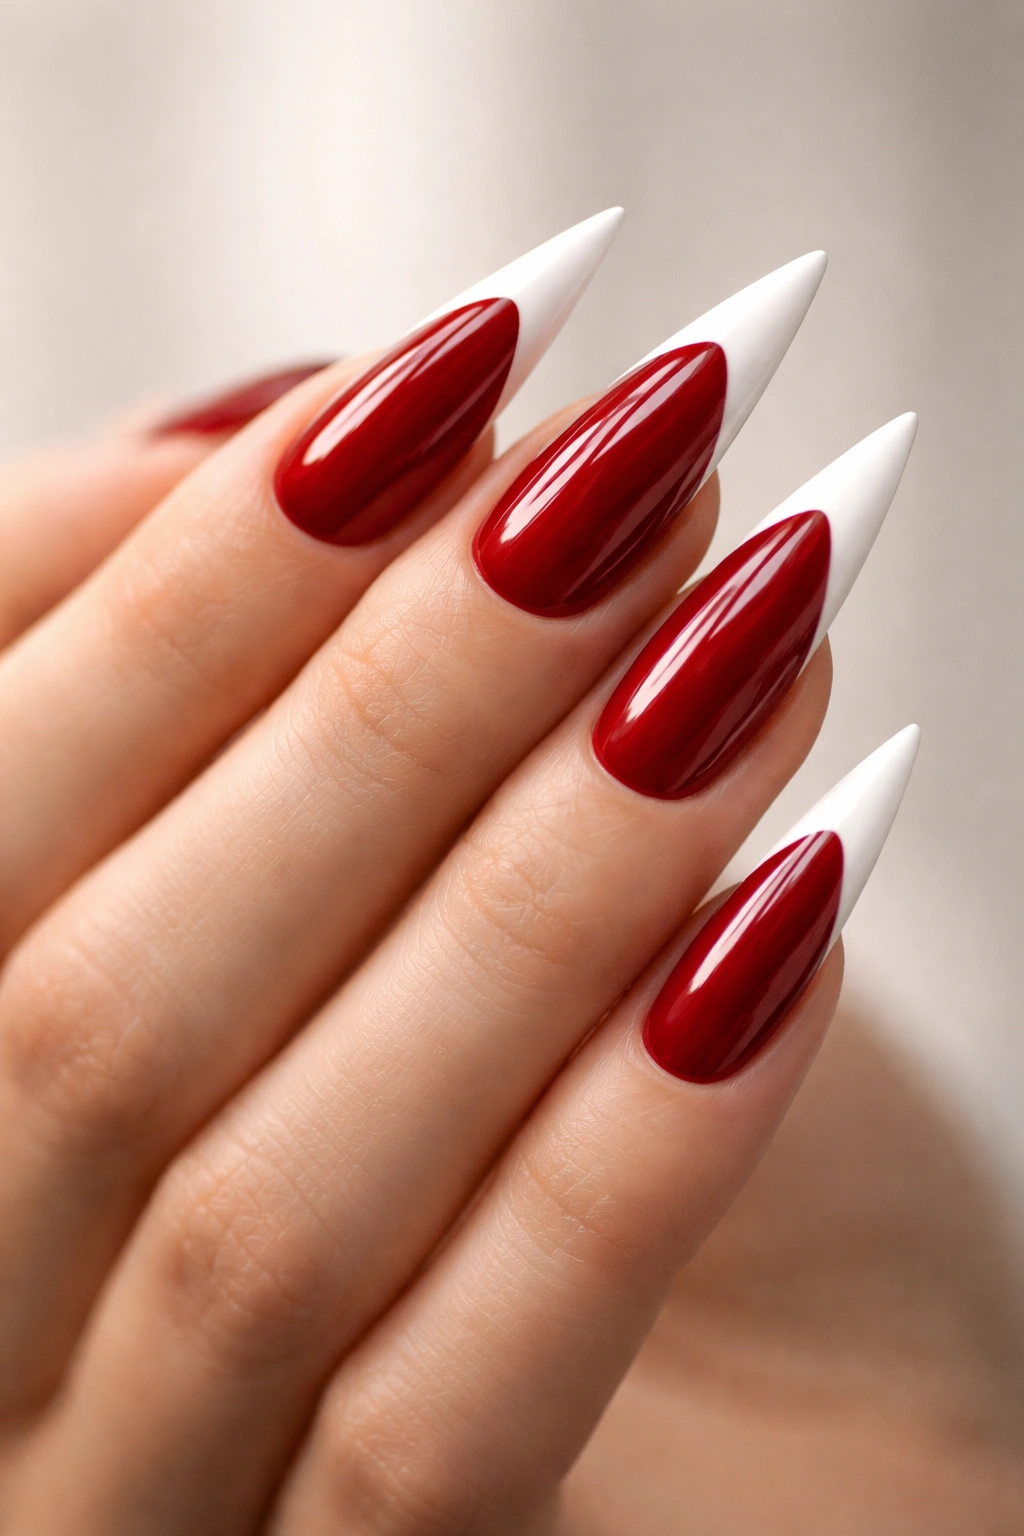
The timeless foundation of French tip elegance, this design pairs a deep crimson base with a bright white tip line. This is the design that started the red French tip revolution and remains the gold standard for formal events, professional settings, and anyone who wants instant sophistication. The high contrast between the rich red and pure white creates a clean, sharp visual that photographs beautifully and never looks dated.
What Makes This Design Essential
The classic approach works because of its pure geometry. A perfectly executed white line sits at a precise 45-degree angle at the tip of the nail, creating the illusion of elongation while maintaining impeccable refinement. The white should be opaque enough to command attention but not so thick that it overwhelms the nail’s proportions. On stiletto nails, this design becomes even more striking—the extended shape gives you more canvas to work with while keeping the focus on those signature clean lines.
How to Get It Right
- Use a high-quality, long-wearing crimson polish with excellent opacity to minimize streaking
- Invest in a thin, precise angled brush for the white tip line, or use a nail guide sticker if freehand feels intimidating
- The white line works best when it’s 2-3mm thick at the nail’s widest point, tapering slightly toward the edges
- Finish with a glossy top coat for maximum shine and that signature reflective quality
- Plan for touch-ups every two weeks, as the white tips can show wear first
Pro tip: If creating a precise white line intimidates you, a professional manicurist can execute this far faster and with more precision than you’d manage at home. It’s worth the investment for special occasions.
2. Ombré Red to Black
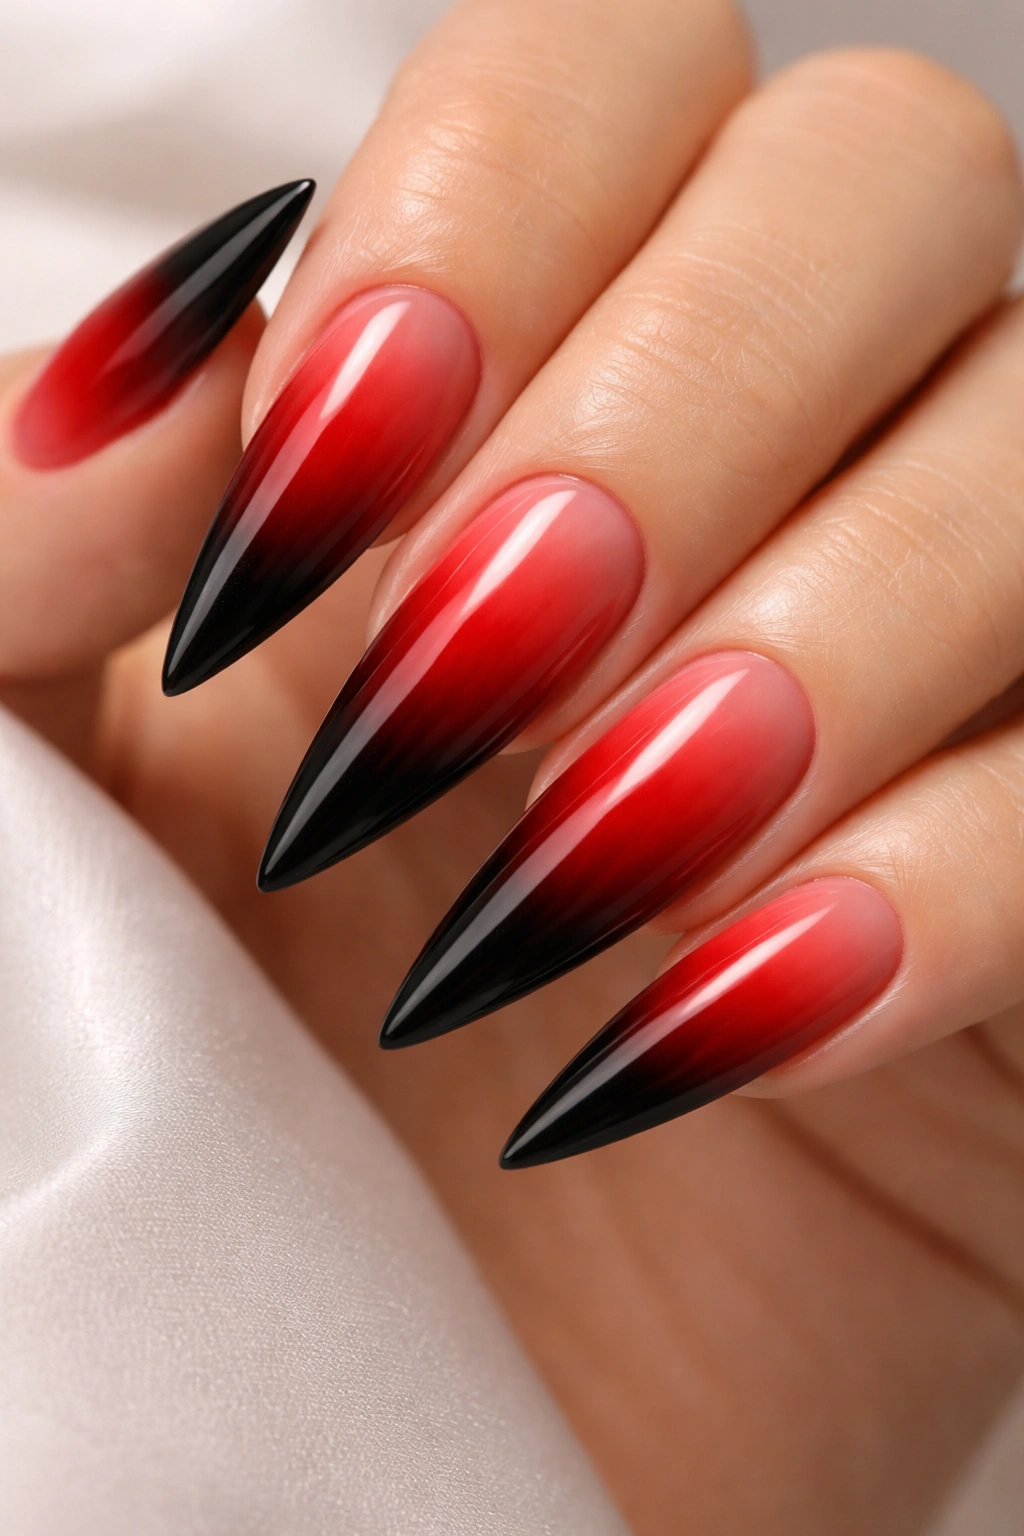
This dramatic gradient design transitions from deep red at the base through burgundy and crimson to near-black at the stiletto tips, creating an intense, almost mysterious effect. The ombré technique allows colors to blend seamlessly rather than stopping abruptly, giving the nail a sculptural, almost three-dimensional quality. This design appeals to anyone who wants boldness without losing the sophistication of red tones.
The Gradient Technique That Makes It Work
Ombré nails require a slightly different approach than traditional French tips. Instead of a defined line, you’re creating a smooth color transition using a makeup sponge and multiple polish shades. The base starts as a bright, pure red, gradually shifting toward deeper burgundy, then oxblood red, and finally black at the very tip. The beauty of this design lies in the seamless blending—no harsh lines, just a natural progression of color intensity.
Application Steps
- Select three complementary shades: a true red, a deeper burgundy or oxblood, and black
- Apply your brightest red as the base coat across the entire nail
- Using a makeup sponge, dab the burgundy shade onto the sponge and gently press it onto the middle-to-upper portion of the nail, creating an irregular edge
- Repeat with the black, concentrating the darkest shade at the very tip
- Blend the transitions by gently dabbing with the sponge again to soften hard lines
- Seal with a glossy or matte top coat depending on your preference
- Cleanup around the edges is essential, as this technique can leave polish beyond the nail line
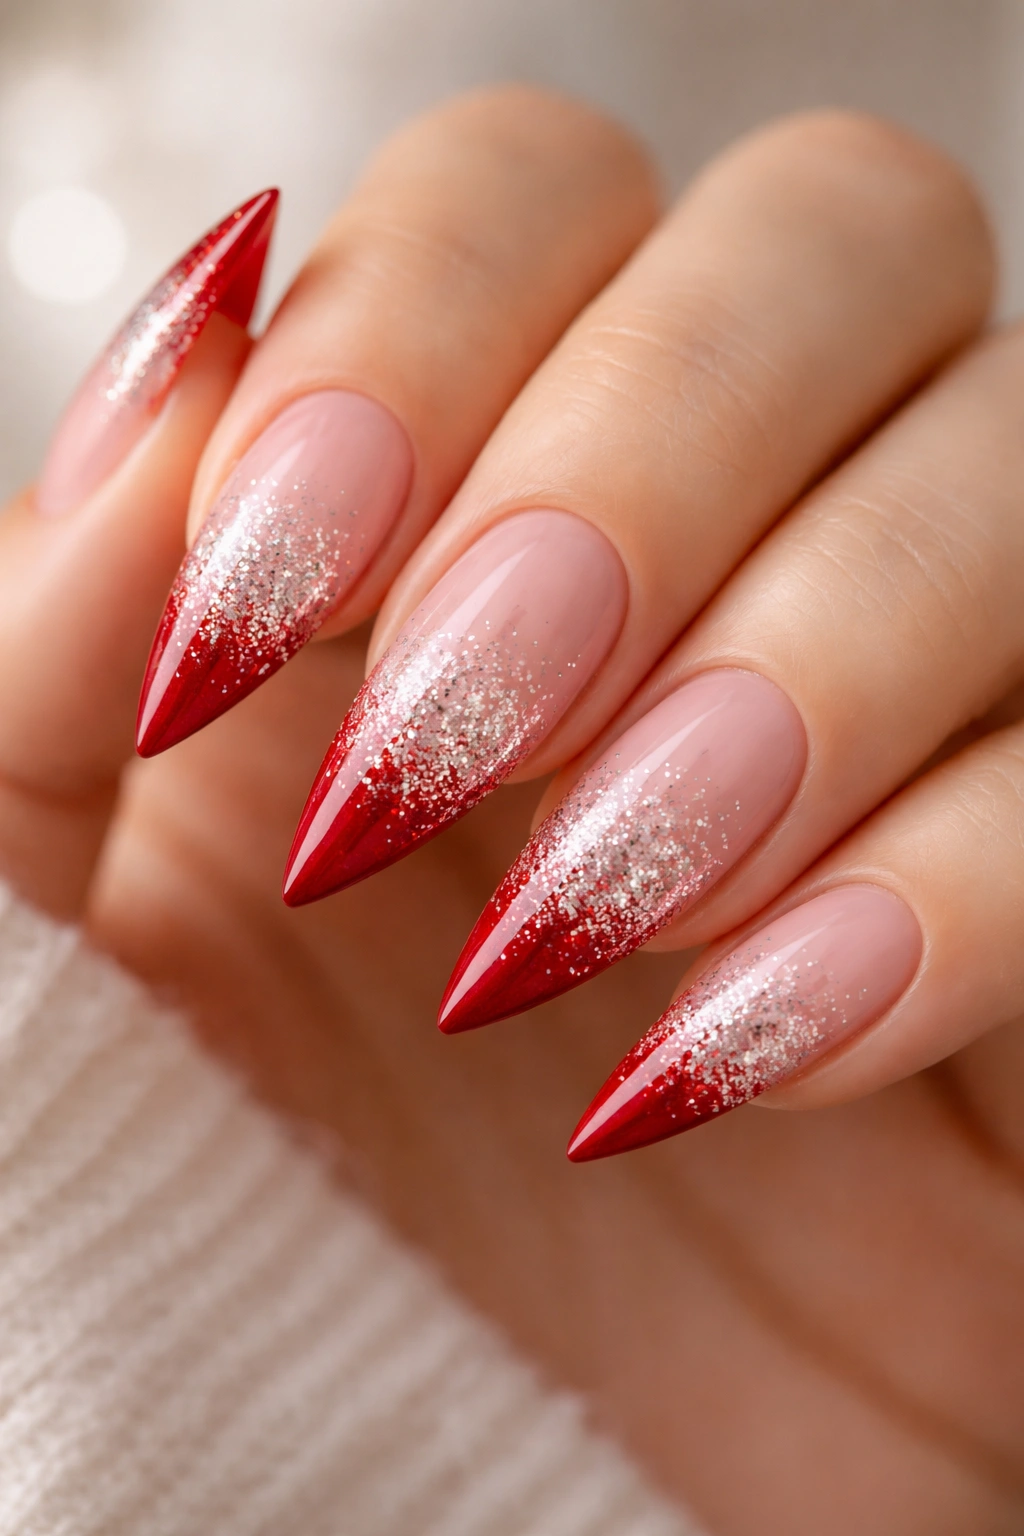
3. Glitter Fade French Tips
Combine the elegance of a red French tip with the eye-catching sparkle of glitter that gradually fades from concentrated at the tip to barely visible at the color line. This design gives you both sophistication and celebration—perfect for night events, parties, or whenever you want your nails to catch light with every gesture. The glitter fade creates movement and dimension that solid colors simply can’t achieve.
Creating the Fade Effect
Rather than applying glitter uniformly across the white (or colored) tip, the glitter fade technique concentrates the sparkle where it has maximum impact. Start with densely packed glitter at the very tip of the nail, then gradually reduce the glitter density as you move toward the color transition line. This creates a gradient of sparkle that draws the eye to the nail’s point while maintaining overall elegance.
Glitter Selection Matters
- Fine, ultra-thin glitter particles create a refined, sophisticated effect that reads as intentional rather than overdone
- Mixed-sized glitter (combining fine and medium particles) creates more visual depth and catches light at different angles
- Holographic or iridescent glitter shifts color as you move, adding complexity that solid glitter can’t match
- Red, burgundy, and copper glitter coordinate beautifully with red French tips, creating tonal cohesion
- Gold and rose gold glitter add warmth and luxury without competing with the red base
Worth knowing: Glitter can be stubborn to remove. Use glitter-specific removal techniques like soaking nails in acetone-soaked foil wraps for 10-15 minutes to make cleanup easier than traditional polish removal.
4. Red with Gold Accents
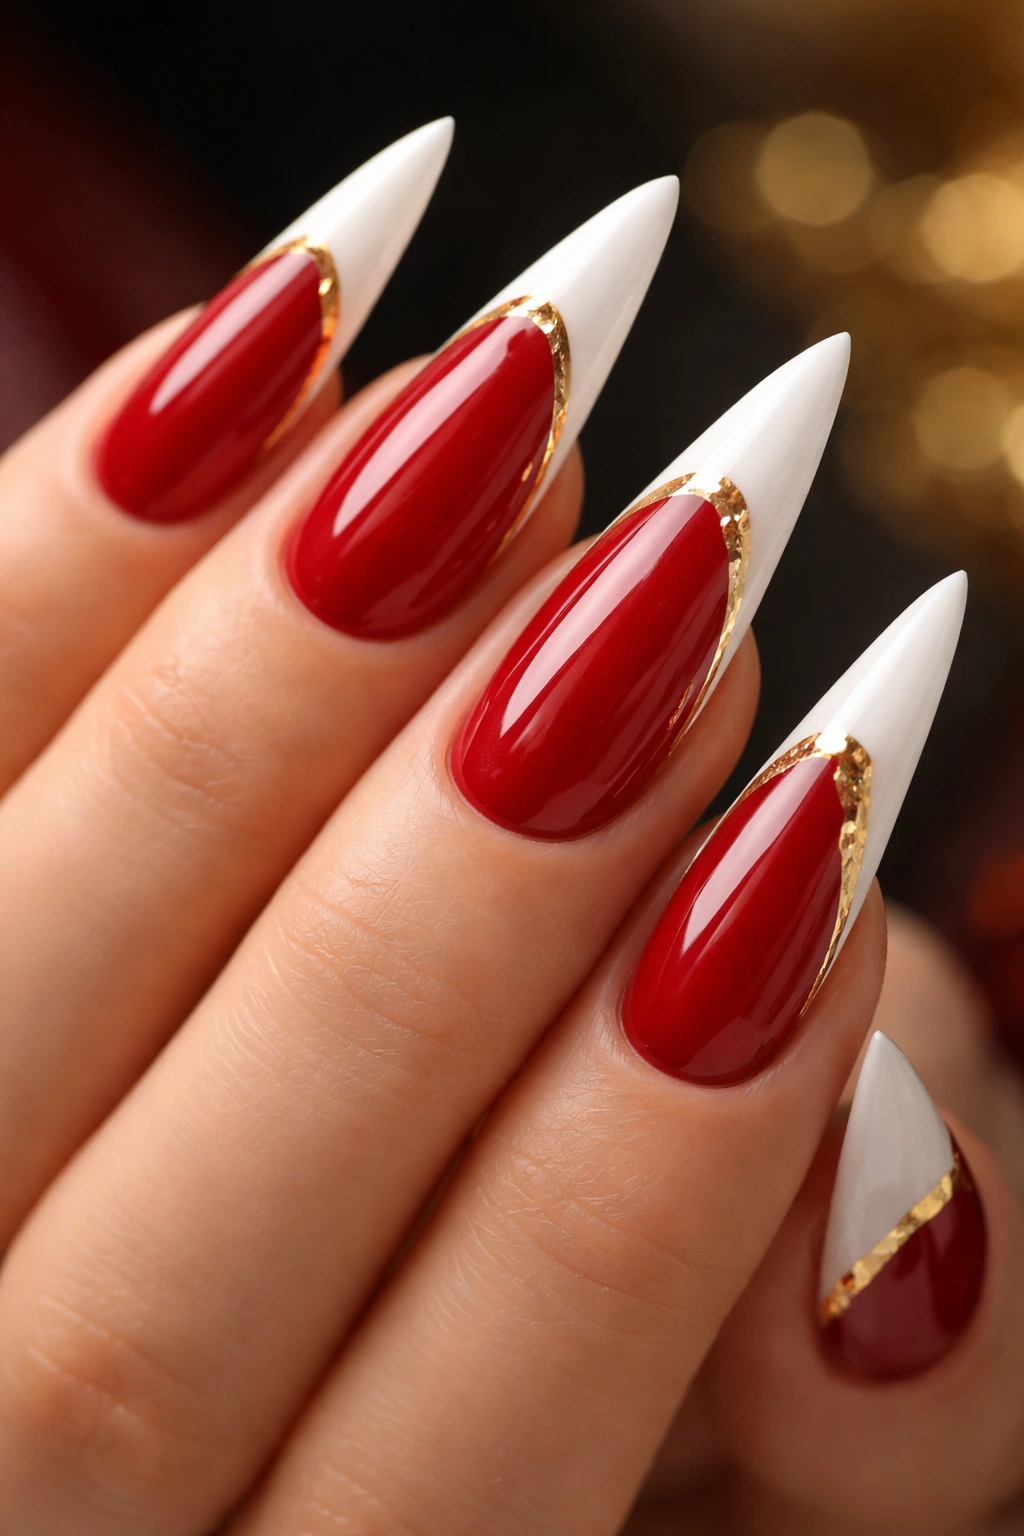
Pair a classic red base and white French tip with strategic gold detailing that adds luxury and warmth. Gold accents might appear as a thin line running parallel to the white tip, tiny gold leaf shapes along the color transition, or delicate gold striping that connects the base color to the tip. This design works beautifully for festive occasions, holiday events, or any time you want elevated elegance with a touch of opulence.
Where Gold Details Work Best
The most striking placements for gold accents include: a thin gold line running just inside the white tip line, creating a layered effect; scattered gold leaf pieces along the cuticle area for a luxury aesthetic; fine gold striping that radiates from the nail’s center point like light rays; or a delicate gold frame around the white tip area. Each placement changes the overall feel—gold at the tip brings focus to the nail’s point, while gold near the cuticle grounds the design and adds sophistication.
Application Techniques
- Use gold nail striping tape for precise, clean lines that stay put
- Apply thin-consistency gold polish with a fine detail brush for hand-drawn accents
- Gold leaf (genuine or faux) requires a thin base of adhesive or clear polish, pressed gently onto the nail surface
- Set all gold elements with a top coat to prevent chipping and maintain brilliance
- Matte top coat over glossy gold creates sophisticated contrast; glossy over everything creates maximum shine
5. Rose Gold and Red French Tips
Soften the intensity of true red with rose gold tones that bridge warm and cool undertones beautifully. A rose gold base paired with a rose gold or champagne-tinted white tip creates a more romantic, subtle version of the classic French tip. Add rose gold shimmer or metallic accents for dimension. This design appeals to anyone who loves red’s boldness but prefers a warmer, more delicate aesthetic.
Why Rose Gold Complements Red
Rose gold contains both red and gold elements, making it a natural companion to red French tips. The warm pink undertones in rose gold soften red’s intensity while the gold component adds luxury and shimmer. On stiletto nails, this combination creates a flowing, elongated look that feels less severe than pure red and white but retains plenty of drama and presence.
Variations on the Theme
- Solid rose gold base with a rose gold shimmer tip creates a monochromatic look with tonal interest
- Rose gold base with a cream or champagne-tinted white tip softens the contrast while keeping the French tip structure
- Rose gold with rose gold glitter fade combines metallic shimmer with sparkle for maximum light-catching ability
- Red base with rose gold tips creates unexpected color play that’s modern and sophisticated
- Rose gold and white with rose gold striping details adds geometric interest to the classic formula
6. Red Marble Stilettos
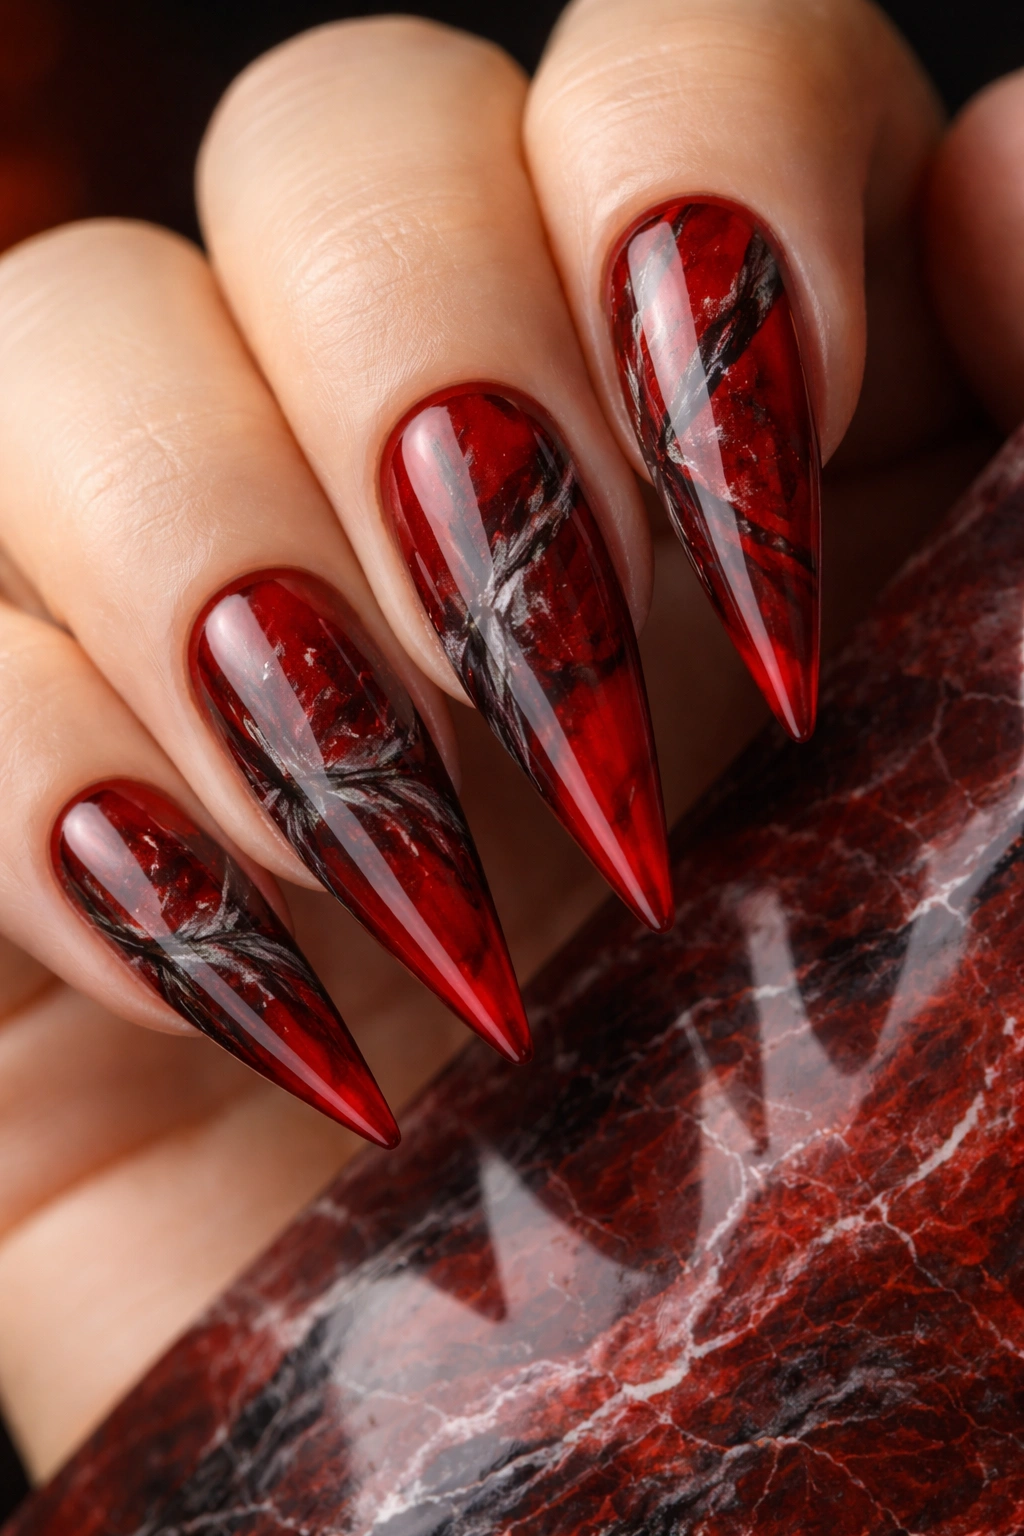
Transform solid color into artistic expression by adding marble veining to your red base, creating a natural-stone aesthetic that’s both elegant and visually complex. Black, white, or gray veining swirled across a red base mimics real marble stone, giving nails a high-fashion, art-gallery feel. The veining can extend into the French tip area or remain concentrated on the base, depending on your preference for subtlety versus statement.
Creating Marble Effect
Marble nails require a water-marbling technique or hand-painted detail work. Water marbling involves dropping multiple polish colors into a cup of room-temperature water, swirling them with a toothpick, and pressing your nail into the pattern. Hand-painted marble uses thin brushes and black or gray polish to draw irregular veining lines that mimic natural stone. Neither technique is foolproof, but the organic imperfection is part of the design’s appeal.
Design Variations
- Black veining on a true red base creates the highest contrast and most dramatic effect
- Gray or charcoal veining on red softens the look slightly while maintaining sophistication
- White veining combined with both black creates a multi-toned marble effect with more complexity
- Concentrate marble effect on the base only, keeping the French tip clean for balanced elegance
- Extend marble veining across the entire nail including the tip for a completely integrated design
- Add a top coat with subtle shimmer for dimension without overwhelming the marble pattern
7. Ruby with Diamond Effects
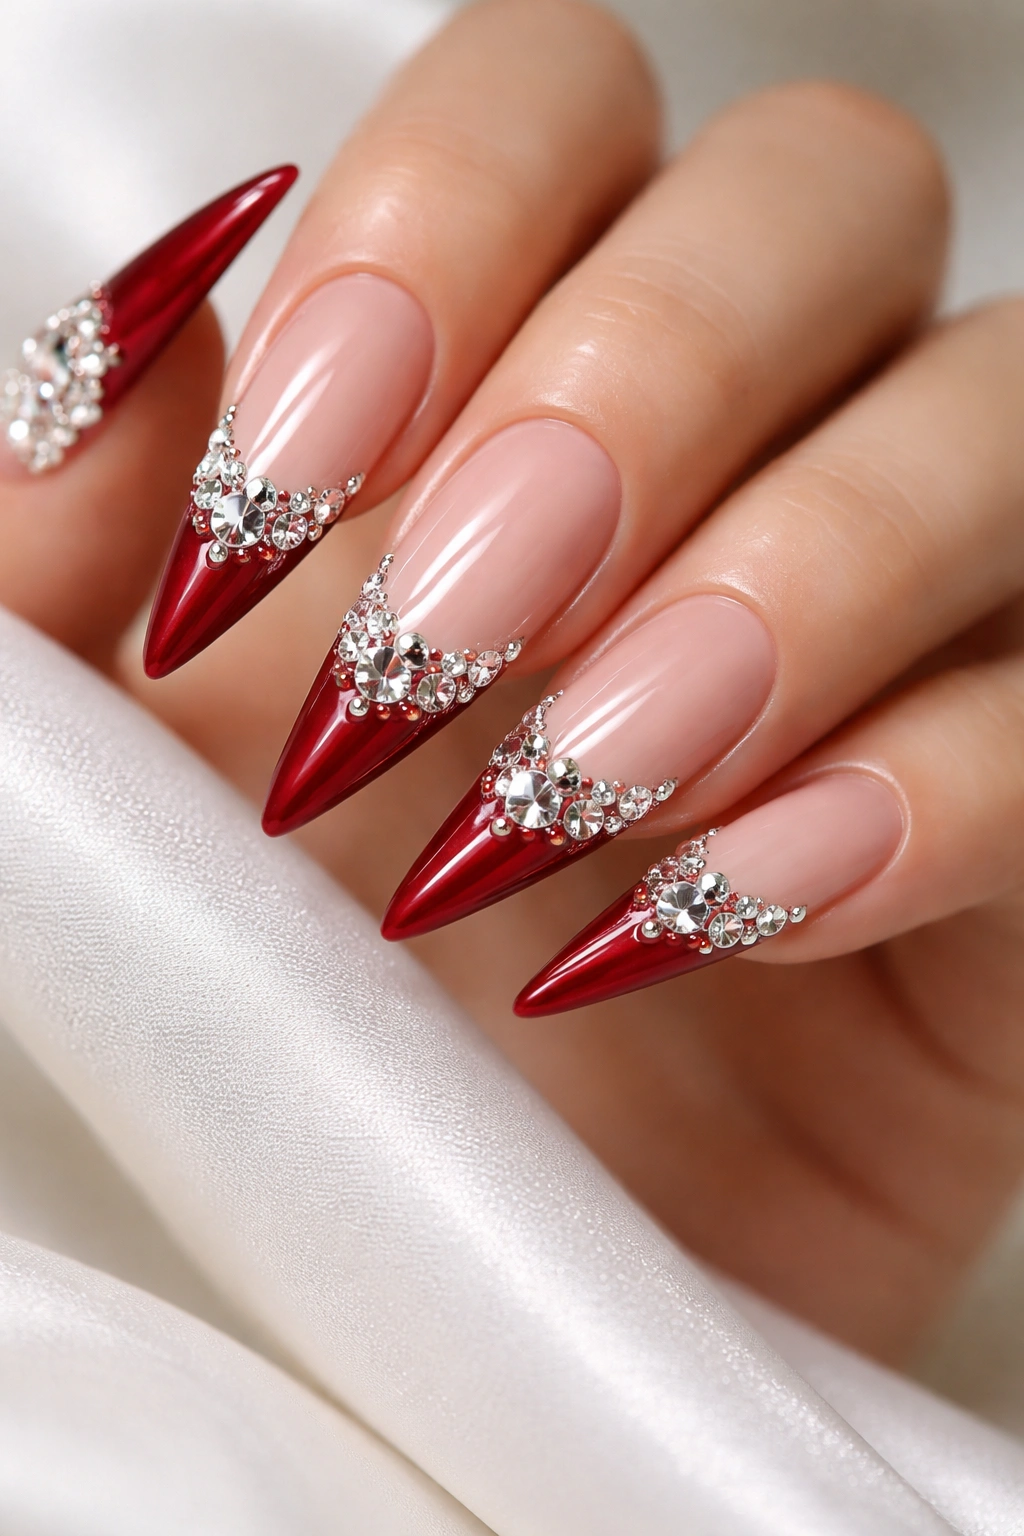
Capture luxury and sparkle by adding diamond-like rhinestone or crystal embellishments to red French tips, creating a design that’s unapologetically glamorous. Large statement rhinestones clustered at the nail tips command attention, while scattered smaller crystals create a more subtle, sophisticated effect. This design reads as formal wear—perfect for galas, weddings, celebrations, and any occasion where you want nails that announce your arrival.
Rhinestone Placement Strategies
Strategic placement determines whether diamond effects feel elegant or overdone. Concentrate larger rhinestones along the white tip line itself, creating a glittering border; cluster them at the very point of the stiletto for maximum drama; scatter smaller crystals across the red base with larger stones at the tips for gradient interest; or create geometric patterns (lines, shapes, or frames) using rhinestone placement as your guide.
Application and Durability
- Use adhesive specifically formulated for nail art—regular rhinestone glue or top coat won’t hold under daily wear
- Apply rhinestones after your base polish is completely dry but before your final top coat
- Seal rhinestones with a glossy top coat, being careful not to dislodge them during application
- Expect some rhinestone loss over time, especially on nails you use for typing or manual tasks
- Plan for maintenance touch-ups to replace lost stones, or embrace the gradual reduction as part of the design’s evolution
- For maximum durability, concentrate embellishments on the upper portion of the nail where they’re less likely to experience impact
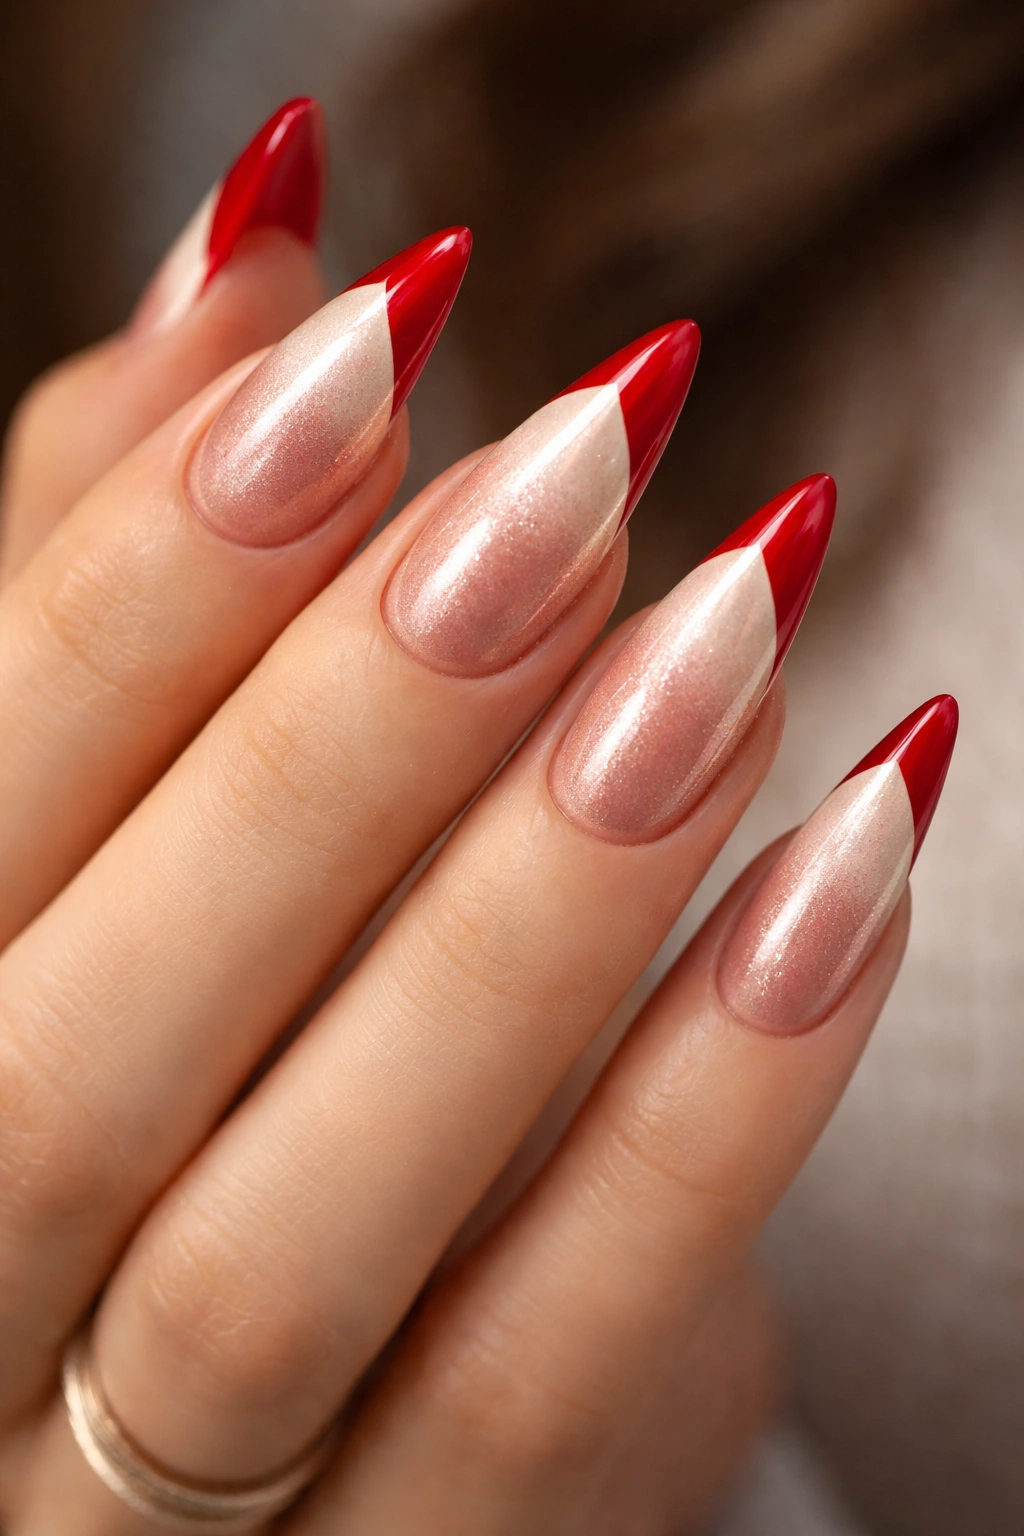
8. Crimson with Nude Base
Replace the traditional white tip with a nude, beige, or skin-tone polish, creating a more subtle, blended French tip effect. A deep crimson or burgundy base transitions to a nude tip, elongating the nail while maintaining understated elegance. This design works beautifully for professional settings, everyday wear, or anyone who loves red’s richness but prefers a more neutral, less contrasting aesthetic.
Why Nude Tips Change the Effect
While white tips create sharp, defined contrast, nude tips create visual extension and sophistication through subtlety. The nude color bridges your actual nail tip and skin tone, creating an elongated illusion that makes stiletto nails appear even more extended. This approach maintains the French tip structure—clear color demarcation—while using a softer color palette. It’s equally polished but reads as more refined and less statement-making than bright white.
Shade Matching for Harmony
- Select a nude shade that closely matches your actual skin tone for maximum elongation effect
- Slightly warmer nude shades (with peachy or golden undertones) complement warm red and burgundy bases beautifully
- Cooler nude shades (with pink or taupe undertones) work better with deeper, cooler-toned crimsons
- Creamy beige provides a middle ground that works with most red variations
- Test the nude shade on your nail bed before committing to a full manicure
- The contrast between crimson and nude should be visible but not jarring—you want the effect to feel intentional rather than undefined
9. Red Velvet Texture Nails
Add tactile dimension by using velvet or suede nail powder to create a matte, velvety texture that transforms glossy polish into something touchable and luxurious. A red or burgundy velvet base with a white velvet tip, or contrasting glossy French tips against a velvet base, creates visual interest and sophistication. The texture catches light differently than polish alone, making nails appear almost soft despite their hard surface.
Creating Velvet Texture
Velvet powder is applied to uncured (wet) gel or polish base, where the powder particles adhere to the sticky surface. Once cured or dried, the texture sets permanently. You can apply velvet to the entire nail or selectively—perhaps velvet on the base with glossy on the tips, or vice versa. The contrast between matte velvet and glossy finishes creates dynamic visual interest and emphasizes nail shape and design.
Design Approaches with Velvet
- Velvet base with glossy white French tips creates elegant contrast between textures
- Entirely velvet nails in red with a glossy top coat over specific accent areas adds selective shine
- Reverse approach: glossy red base with velvet white tips creates unexpected texture play
- Combine velvet with other textures (glitter, rhinestones) for multi-dimensional luxury
- Matte velvet texture photographs differently than glossy—it creates softer shadows and less reflection
- Velvet requires extra care during wear and removal; be gentler with these nails as the texture can catch on fabric
10. Metallic Red French Tips
Trade traditional matte or glossy finishes for metallic shimmer that transforms red into something luminous and modern. Metallic red polish with metallic white tips creates a futuristic take on the classic design, while metallic finishes applied selectively (perhaps the tips only) add shine without overwhelming. Metallic polishes catch light and shift subtly depending on viewing angle, adding complexity that solid colors can’t match.
Metallic Polish Selection
High-quality metallic polishes contain fine metal particles that create smooth, reflective surfaces without the grainy appearance of poorly formulated shimmer polishes. True metallics have a liquid, mirror-like quality quite different from regular shimmer. They work beautifully on stiletto nails because the extended shape amplifies the reflective quality—as you move your hands, the metallic sheen catches light from multiple angles.
Application and Finish
- Metallic polishes often require 2-3 thin coats rather than one thick coat for optimal opacity and smooth finish
- Application technique matters more with metallics—brush strokes show more clearly than with traditional polish
- Use a steady hand and move the brush in one direction for uniform metallic effect
- Pair metallic red with white, cream, or nude tips for varying levels of contrast
- Gloss top coat over metallics amplifies their reflective quality; matte top coat creates subtle, sophisticated tone-on-tone effect
- Metallic finishes can show fingerprints and dust more readily than traditional polish
11. Red and Silver Geometric
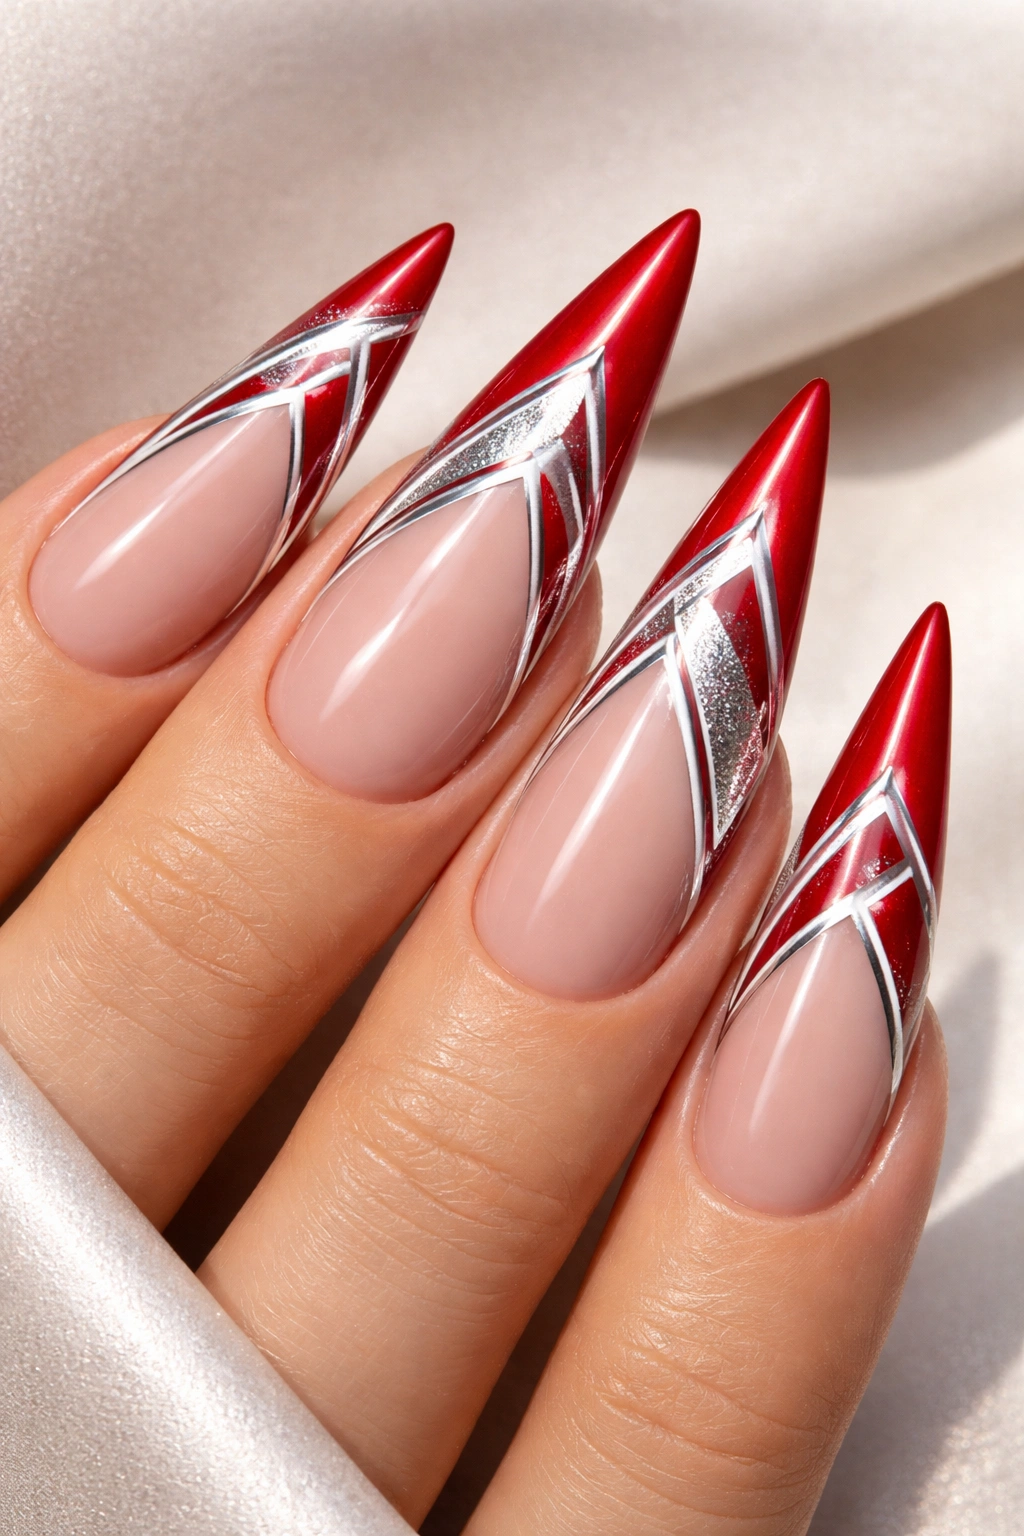
Layer red and white French tips with geometric patterns—sharp lines, triangles, or abstract shapes—in silver or gray, creating a modern, artistic interpretation of the classic design. Geometric elements can frame the French tip, create angular accents along the color transition line, or add striping and angular shapes across the entire nail. This design appeals to anyone who loves clean lines, contemporary aesthetics, and nail art that reads as intentional artwork.
Geometric Pattern Ideas
Linear patterns work beautifully on the extended canvas of stiletto nails—vertical lines that emphasize length, diagonal stripes that create dynamic movement, or horizontal blocks that layer colors. Angular patterns like triangles, chevrons, or abstract shapes add complexity and sophistication. You might concentrate geometric elements at the tips, distribute them across the entire nail, or use geometry to create a frame or border effect around traditional French tip structure.
Execution Techniques
- Use nail striping tape for precise geometric lines that stay clean and sharp
- Hand-paint geometric shapes using thin detail brushes and steady brush control
- Negative space (leaving portions of the nail unpainted) can be as important as painted areas in geometric design
- Pair geometric elements with either glossy or matte finish—both work beautifully depending on the overall aesthetic you’re creating
- Test geometric patterns on a nail wheel or practice nail before committing to your manicure
- Remember that geometric patterns with too many colors or shapes can feel busy; strategic simplicity often reads as more sophisticated
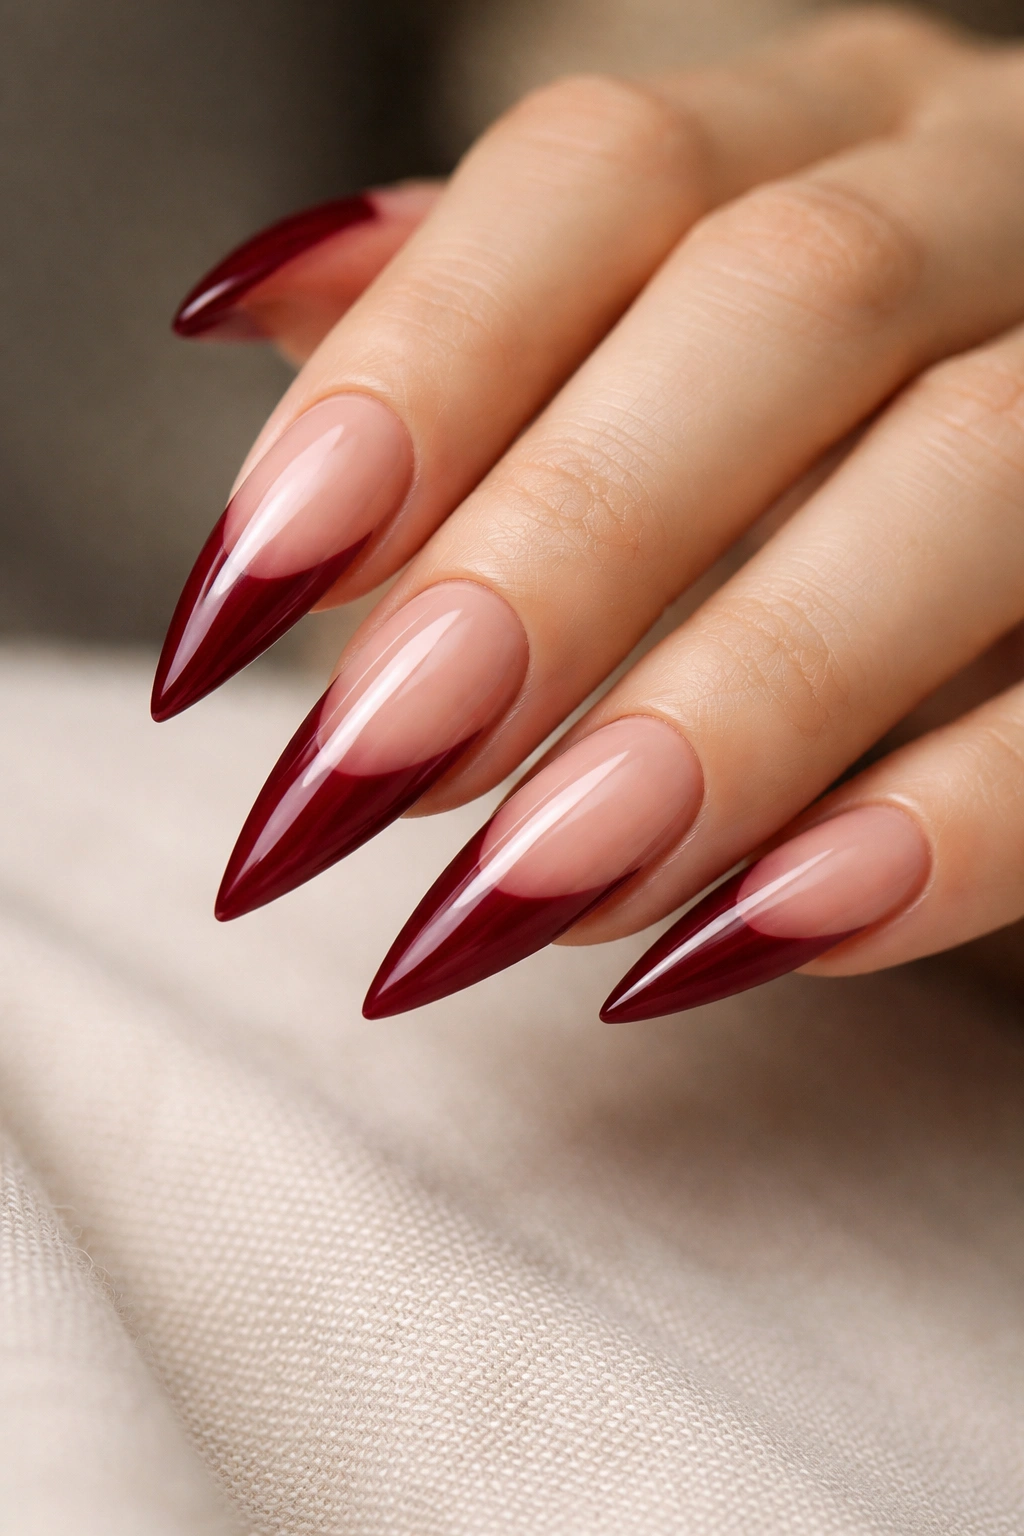
12. Deep Burgundy French Tips
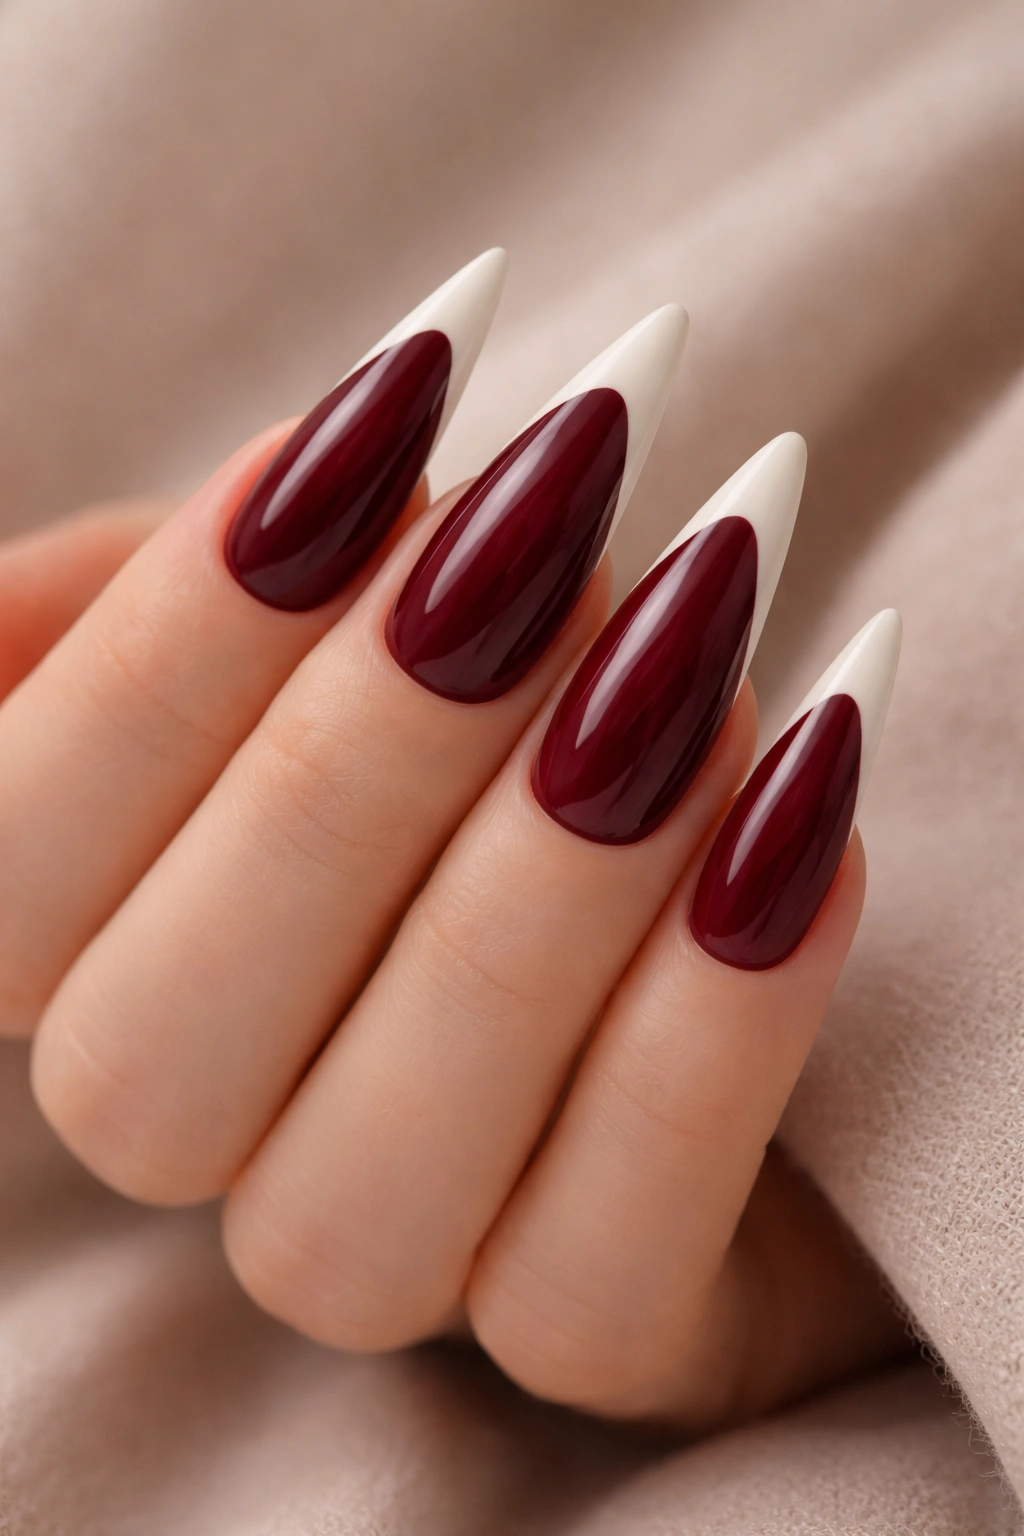
Go deeper than classic red by using rich, wine-toned burgundy as your base color with either traditional white tips or cream-toned tips, creating a more elegant, sophisticated aesthetic. Deep burgundy has serious luxury appeal—it reads as formal, thoughtful, and intentional in a way that bright red sometimes doesn’t. Pair it with white for contrast or shift to nude, champagne, or even metallic gold tips for different moods.
Why Burgundy Feels More Refined
Burgundy contains equal parts red and purple or brown, giving it more complexity and depth than pure red. It photographs differently too—while bright red can sometimes overexpose in certain lighting, burgundy maintains visual depth and richness. On stiletto nails, deep burgundy creates an immediate impression of formality and taste. It’s the color choice of someone who’s thought carefully about their aesthetic rather than defaulting to the obvious choice.
Complementary Tip Colors
- Classic white tips create the expected contrast—clean and sophisticated
- Cream or champagne tips soften the contrast while maintaining the French tip structure
- Nude tips that match your skin tone create elongated elegance with minimal contrast
- Gold or rose gold tips add luxury and warmth
- Deep burgundy tips create a monochromatic look with tonal variation rather than color contrast
- Black tips deepen the drama and create extreme contrast for bold statements
13. Red with Rhinestone Details
Elevate a basic red and white French tip with carefully placed rhinestones that add sparkle without complete coverage. A simple line of rhinestones along the color transition creates elegant definition, scattered crystals across the red base add sophisticated texture, or clustered stones at the nail’s point create focal interest. Unlike the more dramatic diamond effects design, rhinestone details work on everyday nails while still feeling special.
Rhinestone Detail Placements
- A single line of rhinestones following the French tip line creates elegant emphasis and draws the eye to nail tips
- Scattered rhinestones across the red base in a random pattern add texture and light-catching interest
- Vertical column of rhinestones down the center of the nail emphasizes length and creates a focal point
- V-shaped or asymmetrical placement of rhinestones creates modern, unexpected visual interest
- Corner clusters at the base and tip create bookend emphasis
- Minimal approach: 3-5 strategically placed rhinestones that create maximum impact with restraint
Durability and Maintenance
- Rhinestones require proper adhesive and sealing to last beyond a few days of wear
- Avoid using hands for tasks that create heavy pressure on nails—rhinestone-covered nails are less forgiving during manual work
- Water exposure degrades adhesive over time, so keep nails dry when possible
- Regular touch-ups replace lost rhinestones and maintain the design’s appearance
- Removal requires patience and gentle care to avoid damaging the nail surface
14. Matte Red French Stilettos

Replace glossy finish with matte or satin coating for a completely different aesthetic—sophisticated, modern, and intentionally un-shiny. Matte red French tips create softer visual contrast than glossy versions; the lack of shine makes the design feel more editorial and less immediately attention-grabbing, which appeals to anyone who wants boldness with restraint. Matte finishes also hide minor imperfections better than glossy equivalents.
The Visual Effect of Matte Finish
Matte polish absorbs light rather than reflecting it, creating subtle shadows and softer edges. On stiletto nails, matte finish creates an almost architectural quality—the extended shape is defined more by form than by shine. Red appears deeper and richer in matte finish, while the transition to white (or other tip colors) reads as a clear design choice rather than a reflective contrast. The overall effect is often more sophisticated and less playful than glossy versions.
Creating Matte Finishes
- Use matte top coat over regular glossy polish for matte effect with easier removal
- Use matte polish formulas for intentional matte texture throughout wear
- Combine matte and glossy—perhaps matte red base with glossy white tips—for textural contrast
- Matte finishes require different maintenance; they show fingerprints less but may become dull-looking faster than glossy finishes
- Regular touch-ups with matte top coat maintain the desired finish as glossy polish naturally grows out
- Some people find matte nail polish texture feels less smooth than glossy; test before committing to a full set
15. Red Gradient with Black Tips
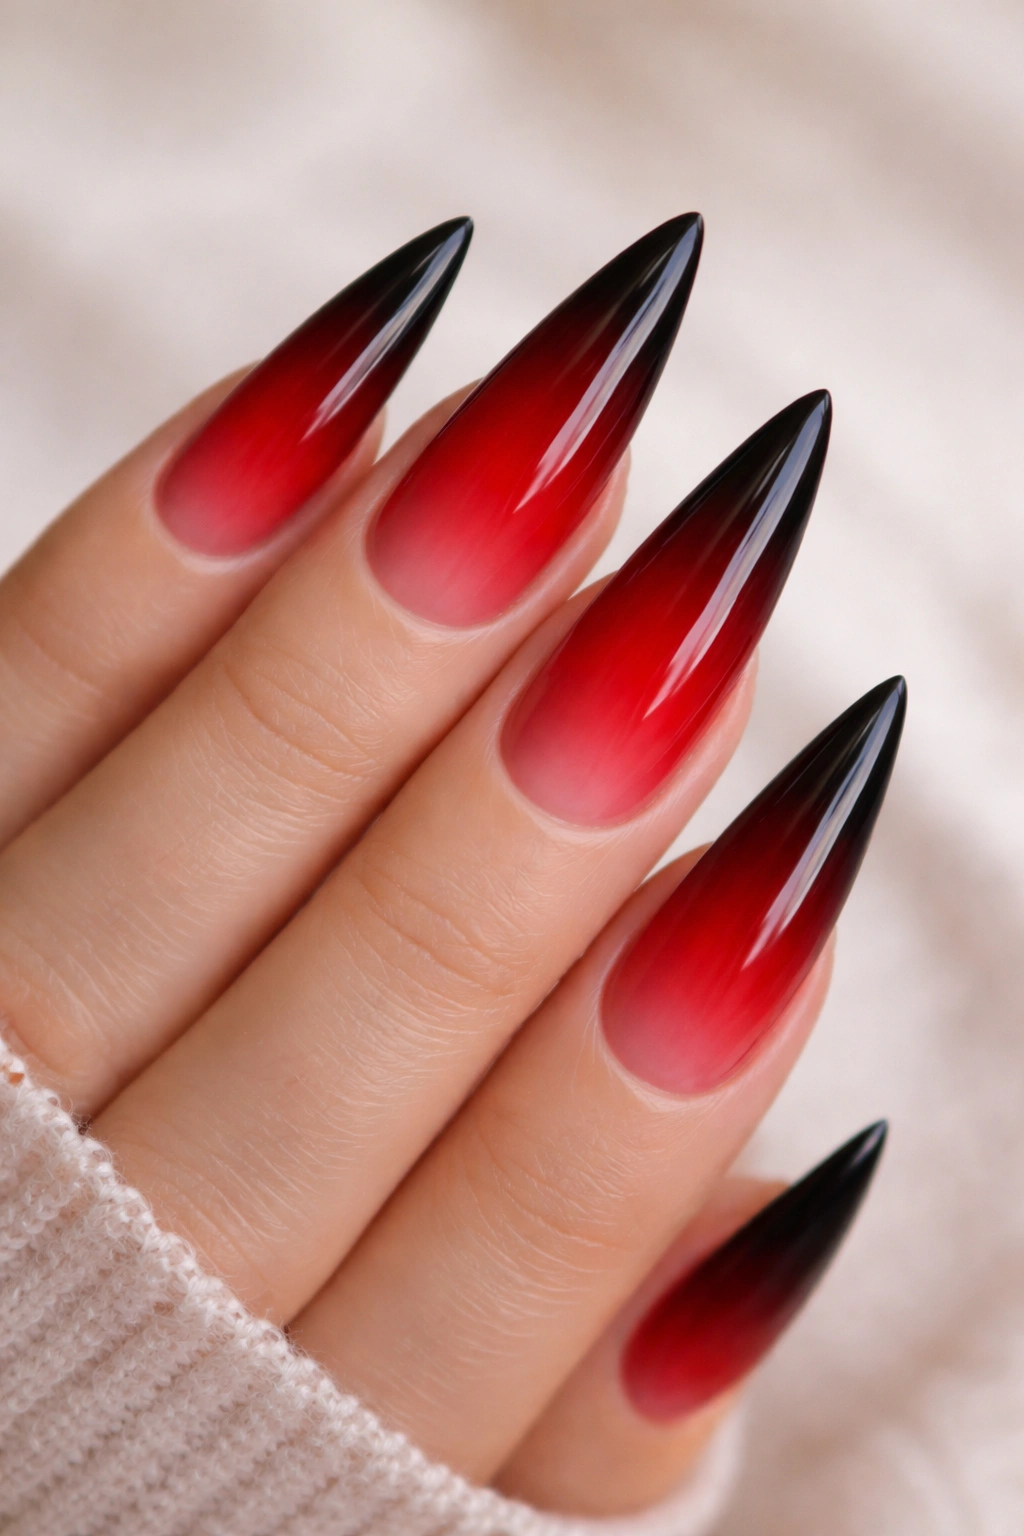
Create an ombré effect that flows from bright red at the nail bed through darker shades of burgundy and oxblood to near-black at the tips, establishing a smooth color transition that’s more sophisticated than a traditional French tip line. Unlike the ombré-to-black design mentioned earlier, this version emphasizes the gradient throughout the nail rather than starting from a base color. The result is a nail that shifts in intensity, creating depth and visual movement.
Gradient Application Technique
Gradient nails use multiple shades of similar color families to create smooth transitions. This technique requires patience and careful color selection—you need at least three shades that transition smoothly without jarring jumps in darkness or saturation. A makeup sponge works better than a brush for creating soft transitions; you’ll dab rather than paint, allowing colors to blend where they meet.
Color Progression for Red-to-Black Gradient
- Shade 1 (nail bed): True, bright red
- Shade 2 (middle): Deep burgundy or oxblood
- Shade 3 (tip): Black or very dark burgundy
Apply the brightest shade across the entire nail first, then sponge the darker shade over the middle and upper portions, finally adding black at the very tip. Each application should have soft, irregular edges that allow the previous color to show through slightly, creating that seamless gradient effect.
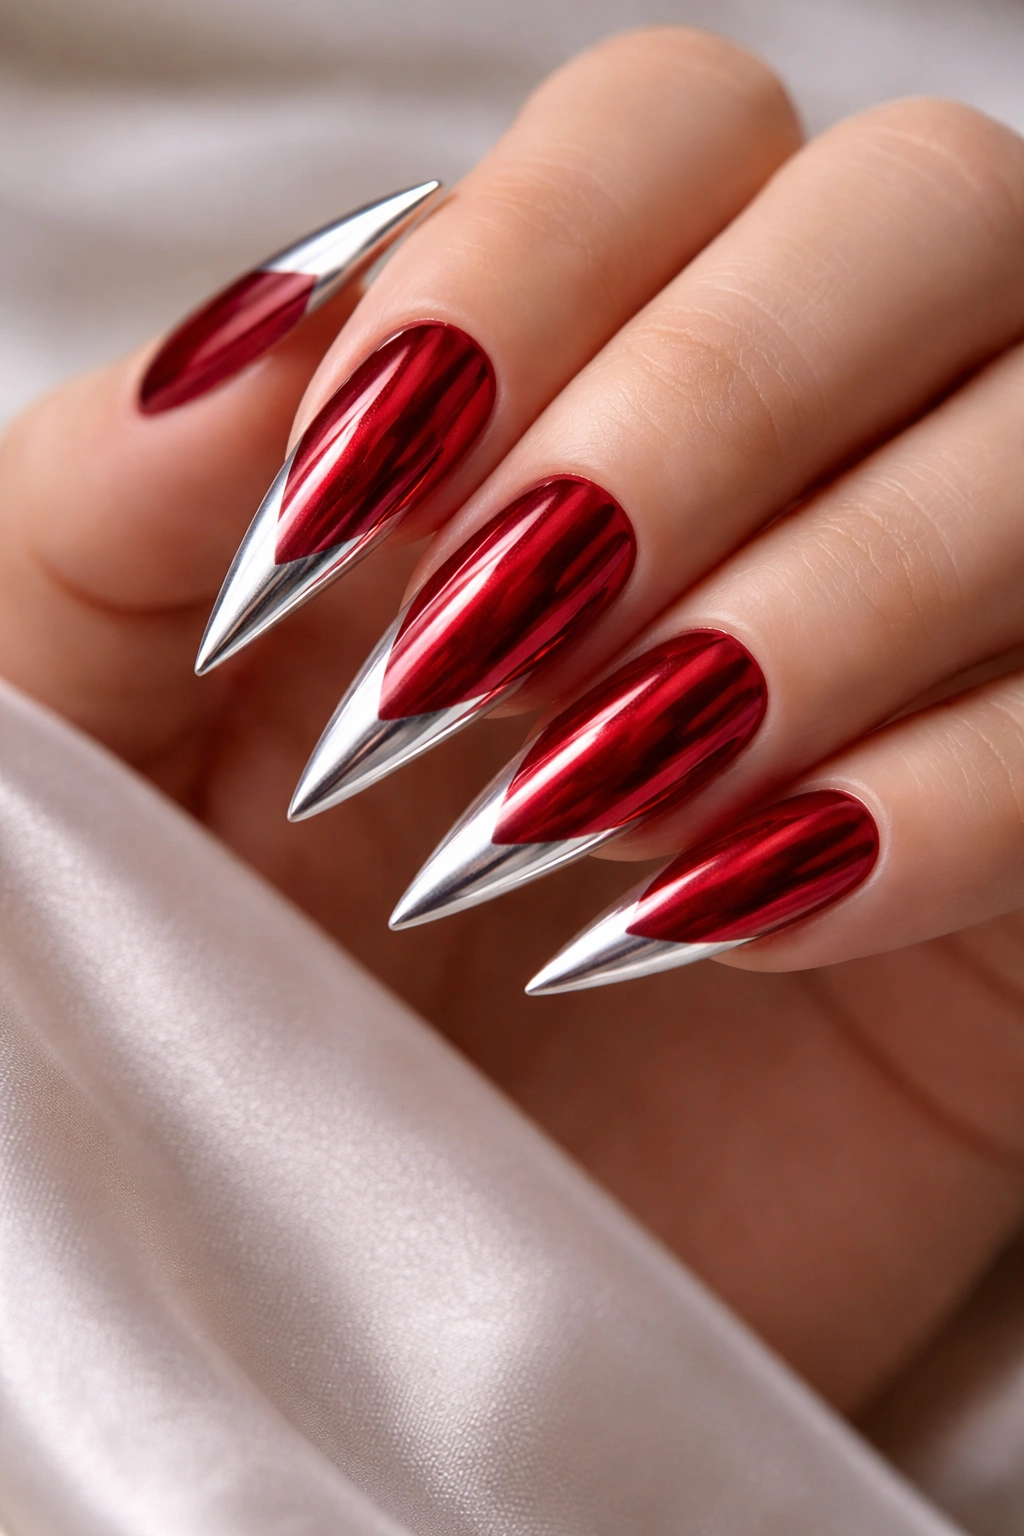
16. Crimson with Chrome Accents
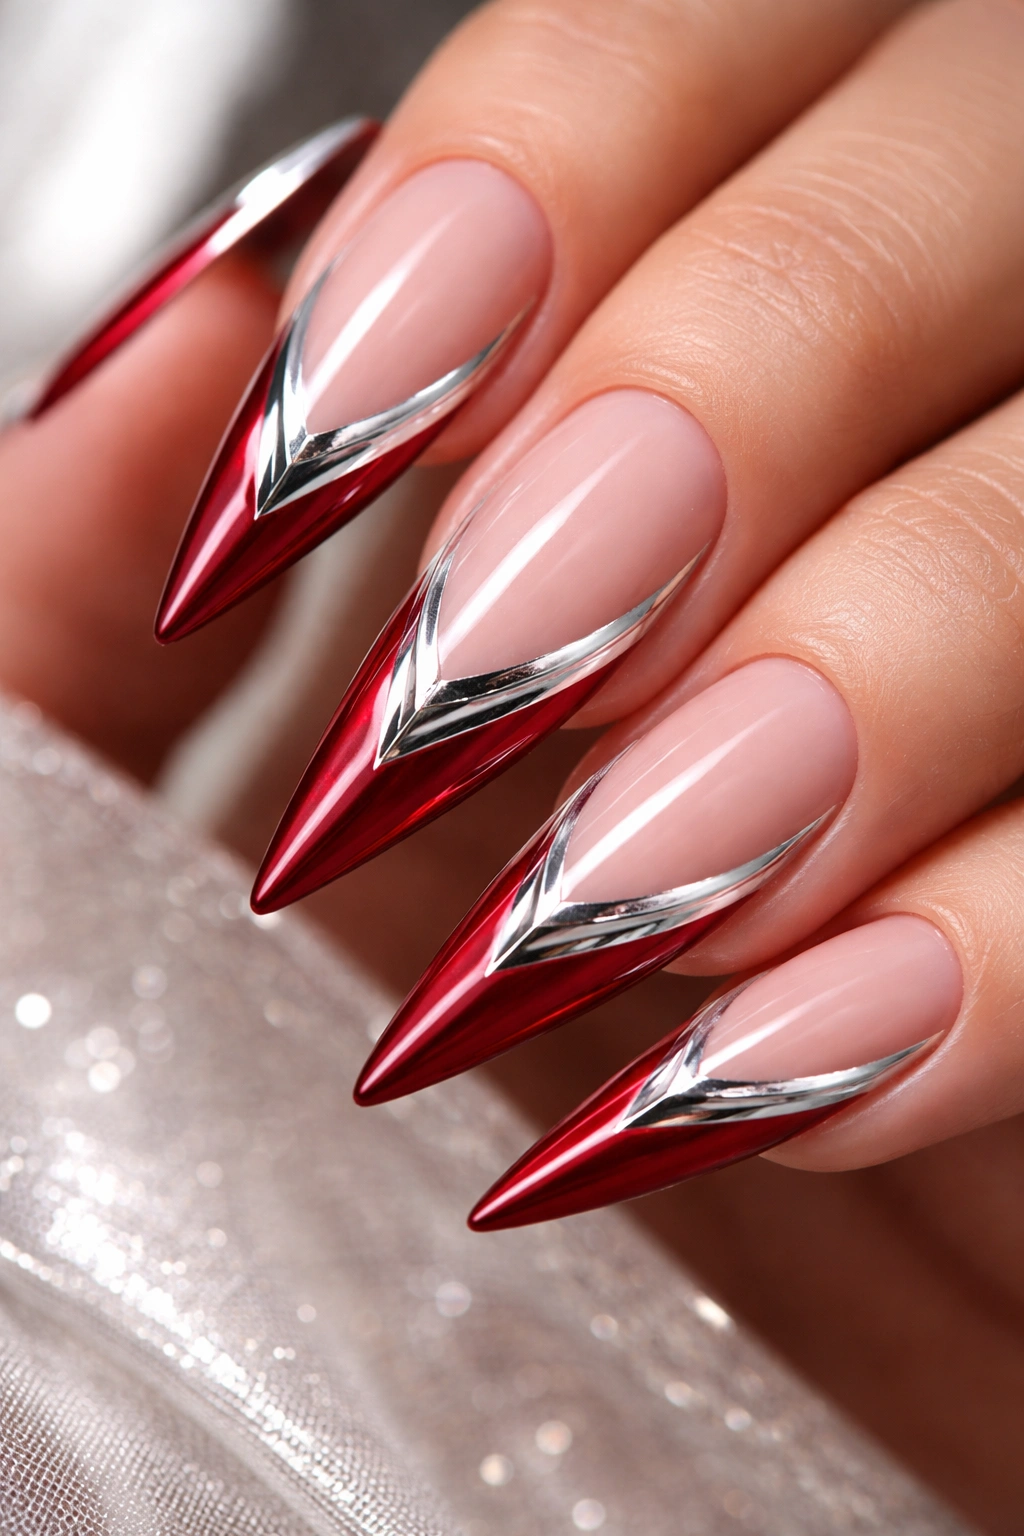
Combine traditional red French tips with chrome or mirror-finish accents that add futuristic shimmer and luxury. Chrome accents might appear as thin mirrored lines, geometric chrome shapes, or selective chrome placement on white tips that creates unexpected metallicness. Chrome effects are highly reflective and catch light dramatically, making any accent feel bold and present even when used minimally.
Chrome and Mirror Finishes
Chrome powders create highly reflective surfaces that nearly replicate actual mirrors. Applied to gel base and sealed with clear top coat, chrome powder creates permanent, durable shine that’s more dramatic than standard metallic polish. Chrome works beautifully over white tips, creating almost holographic effects, or as accent lines and shapes against red bases.
Chrome Placement Strategies
- Fine chrome lines parallel to the French tip line create elegant, modern definition
- Chrome on white tips only creates contrast while keeping the base traditional
- Geometric chrome shapes (triangles, stripes, or abstract forms) add artistic interest
- Chrome dust along the cuticle area creates subtle luxury
- Chrome accents concentrated at the nail’s point emphasize stiletto shape
- Mixed chrome with glitter or rhinestones creates multi-dimensional luxury effects
17. Red with 3D Embellishments
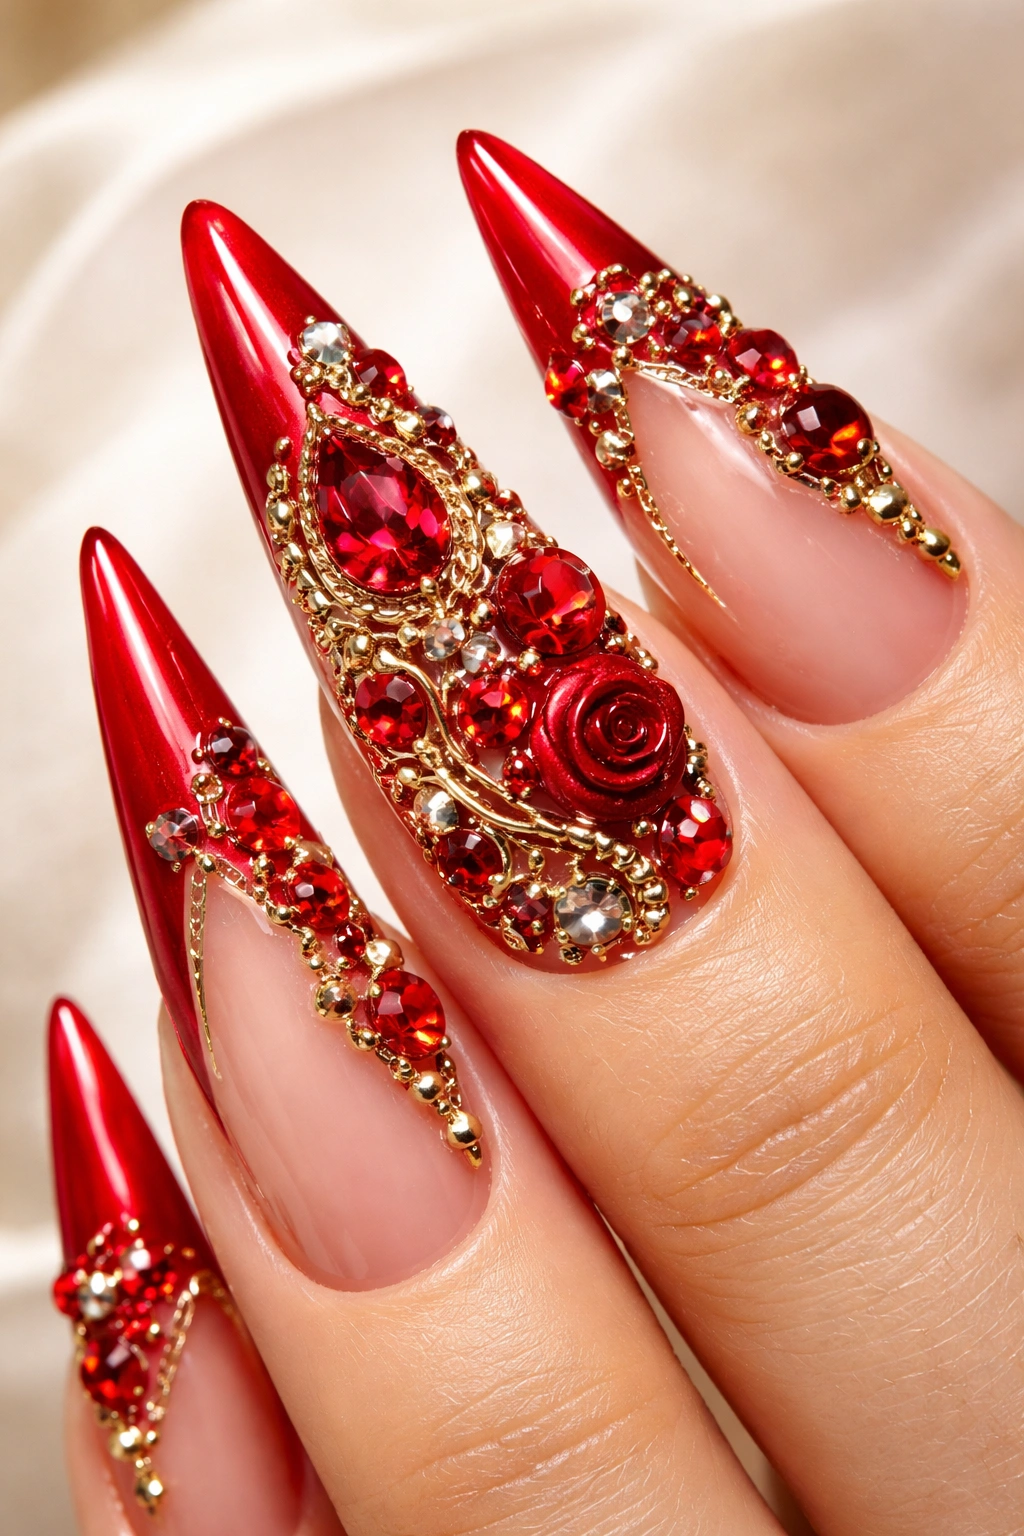
Move beyond flat nail art by adding three-dimensional elements like studs, charms, or sculptural details that rise from the nail surface, creating art that’s literally dimensional. 3D embellishments might include metallic studs arranged in patterns, sculpted flowers or shapes in relief, or tiny charms attached to the nail bed. This design is maximalist, attention-commanding, and purely decorative—reserved for special events rather than everyday wear.
3D Element Options
- Metal studs in various sizes create punk-rock or fashion-forward effects
- Sculpted nail art—designs hand-sculpted from acrylic or builder gel—create custom artistic pieces
- Charms and dangles attached to the nail add movement and playfulness
- Imitation or real gemstones create luxury effects beyond what flat rhinestones achieve
- Hand-painted 3D effects create the appearance of dimension without physical protrusion
- Combination approaches mix flat design elements with strategic 3D details
Practical Considerations
- 3D elements catch on fabric, hair, and surfaces—daily wear becomes challenging
- Durability depends entirely on how well embellishments are sealed and adhered
- Removal can be destructive if 3D elements are glued directly to natural nails
- Best suited for special occasions where hands will be seen rather than heavily used
- Maintenance and touch-ups are frequent if any element dislodges
- Weight and balance matter—heavier embellishments can create nail strain
18. Dark Red and White Stripes
Create a striking pattern by combining dark red and white in striped or linear patterns across stiletto nails, moving beyond traditional French tip geometry into pattern-based design. Stripes might run vertically to emphasize nail length, horizontally for a bolder graphic effect, or diagonally for dynamic movement. Striped designs read as modern, bold, and intentionally artistic rather than traditional or formal.
Striping Pattern Variations
- Vertical stripes (running along the nail’s length) emphasize elongation and create a sleek, lined effect
- Horizontal stripes (running across the nail) create geometric boldness and draw attention to nail width
- Diagonal stripes create movement and a sense of dynamic energy
- Alternating pattern (red stripe, white stripe, red stripe) creates rhythm
- Varied stripe widths (thin and thick alternating) create visual interest and sophistication
- Concentration of stripes at tips only keeps the base solid for more balanced composition
Execution and Design Details
- Nail striping tape ensures perfectly clean, sharp lines without requiring steady freehand painting
- Hand-painted stripes create organic, slightly imperfect lines that can feel more artistic and intentional
- Consider stripe width relative to nail width—stripes that are too wide can make nails appear shorter; too narrow reads as timid
- Glossy finish amplifies the graphic quality of stripes; matte finish creates sophistication
- Seal stripes with clear or colored top coat depending on whether you want shine or matte effect
- Ensure stripes extend fully from cuticle to tip without gaps or unintended white space
- Test pattern on a practice nail before committing to your full manicure set
Final Thoughts
Red French tip stiletto nails offer remarkable versatility within a cohesive aesthetic framework. Whether you choose the timeless elegance of classic crimson and white, the romantic softness of rose gold tones, or the maximalist drama of 3D embellishments and metallic accents, the core principle remains the same—you’re creating nails that demand attention while maintaining intentional sophistication.
The key to choosing a design that works for your life lies in honest assessment of your daily activities, personal aesthetic, and how much maintenance you’re genuinely willing to commit to. A busy professional might find matte burgundy French tips perfect for that intersection of bold and professional. Someone attending back-to-back social events might embrace rhinestone details or chrome accents that celebrate the occasion. Everyday wearers often gravitate toward designs that photograph well but won’t snag on fabrics or complicate routine tasks.
Stiletto nails themselves require commitment—they’re undeniably beautiful but less forgiving than shorter, rounder shapes. Combine that commitment with a French tip design you genuinely love, and you’ve got nails that function as a personal style statement. The designs above represent just the beginning of what’s possible when you blend classic French tip structure with the edge and drama that only stiletto shapes can deliver. Your ideal design is the one that makes you feel confident, beautiful, and authentically yourself every time you catch your hands in your line of sight.
