

Black and silver is one of those color combinations that never stops working. Whether you’re dressing for an evening out, heading to the office, or just want your nails to command attention, these two shades create instantly elegant, sophisticated nails that work across virtually every setting. The beauty of black and silver together lies in their flexibility — they’re equally at home on a dramatic stiletto coffin nail or a sleek almond shape, and they photograph beautifully no matter the lighting.
Stiletto nails in particular amplify this combination’s dramatic appeal. The elongated shape naturally draws the eye, and when paired with black and silver’s striking contrast, you get nails that feel polished, edgy, and undeniably bold. The good news is that these colors are forgiving — they hide imperfections, they work with virtually every skin tone, and they don’t require constant touch-ups the way pastels or nude shades do.
What makes black and silver truly special is how versatile these designs can be. You can lean into glamorous, over-the-top nail art with intricate silver detailing and geometric patterns. You can keep things minimal and chic with simple color blocking. You can add texture with matte finishes, glossy topcoats, or even foil effects. Every approach works, and every approach feels intentional and elevated.
If you’ve been thinking about upgrading your nail game or you’re simply looking for inspiration for your next salon appointment, these fourteen black and silver stiletto nail designs offer something for every style and occasion. From understated elegance to full-on statement nails, each design teaches you something about how these two colors can work together in completely different ways.
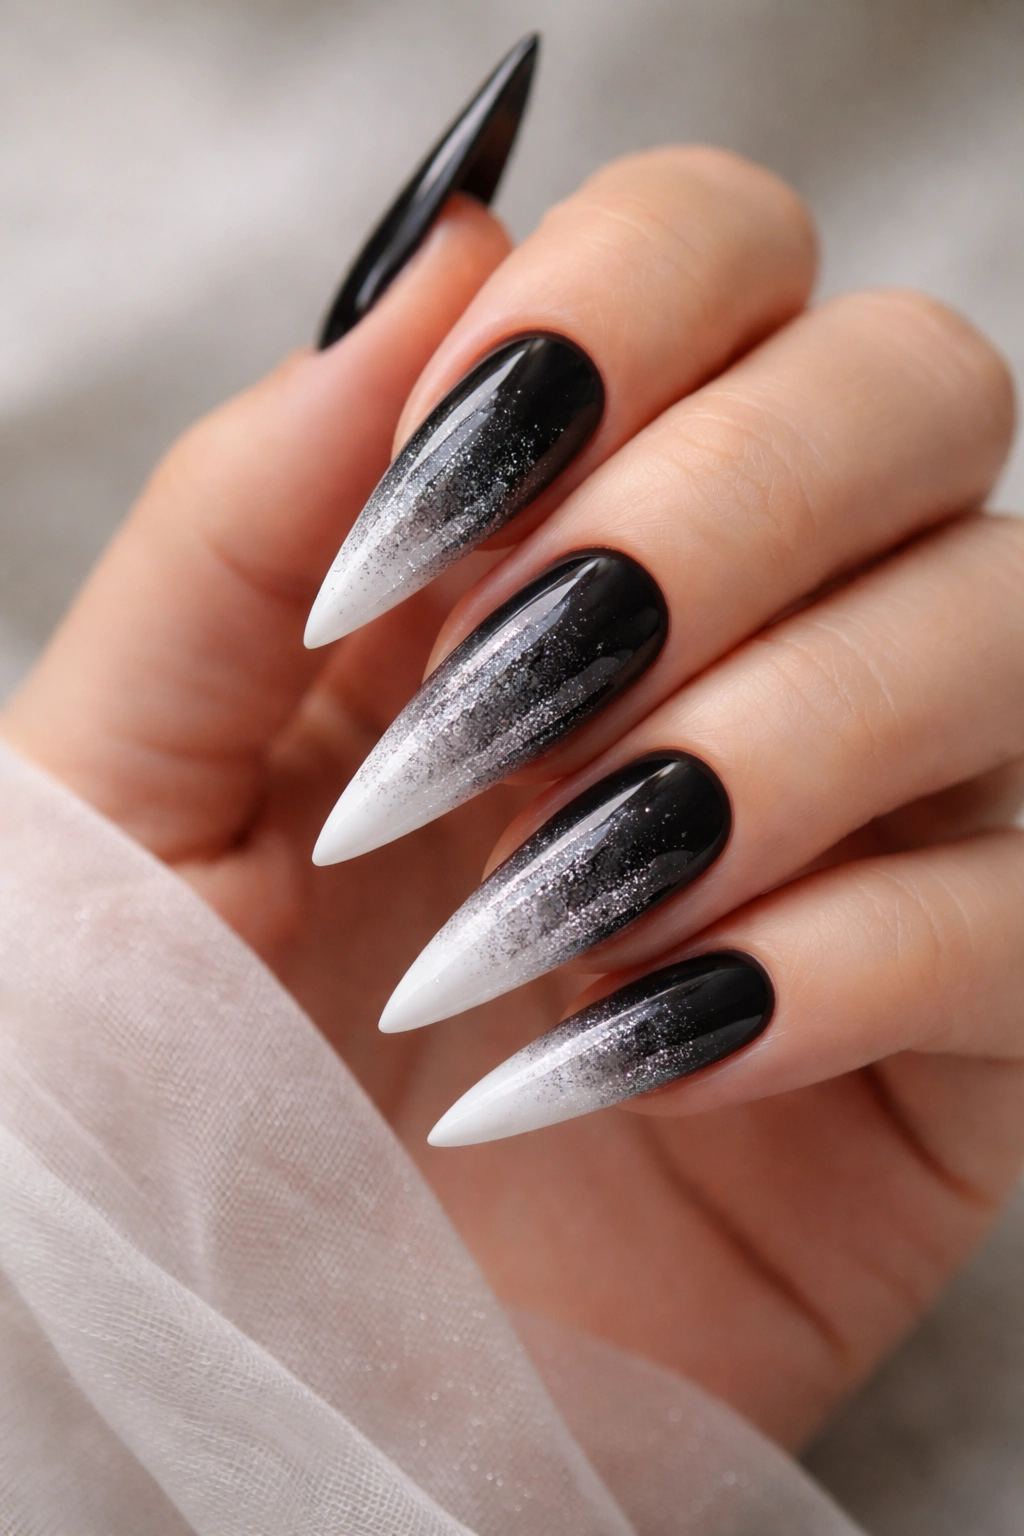
1. Classic Black and Silver Ombre Gradient
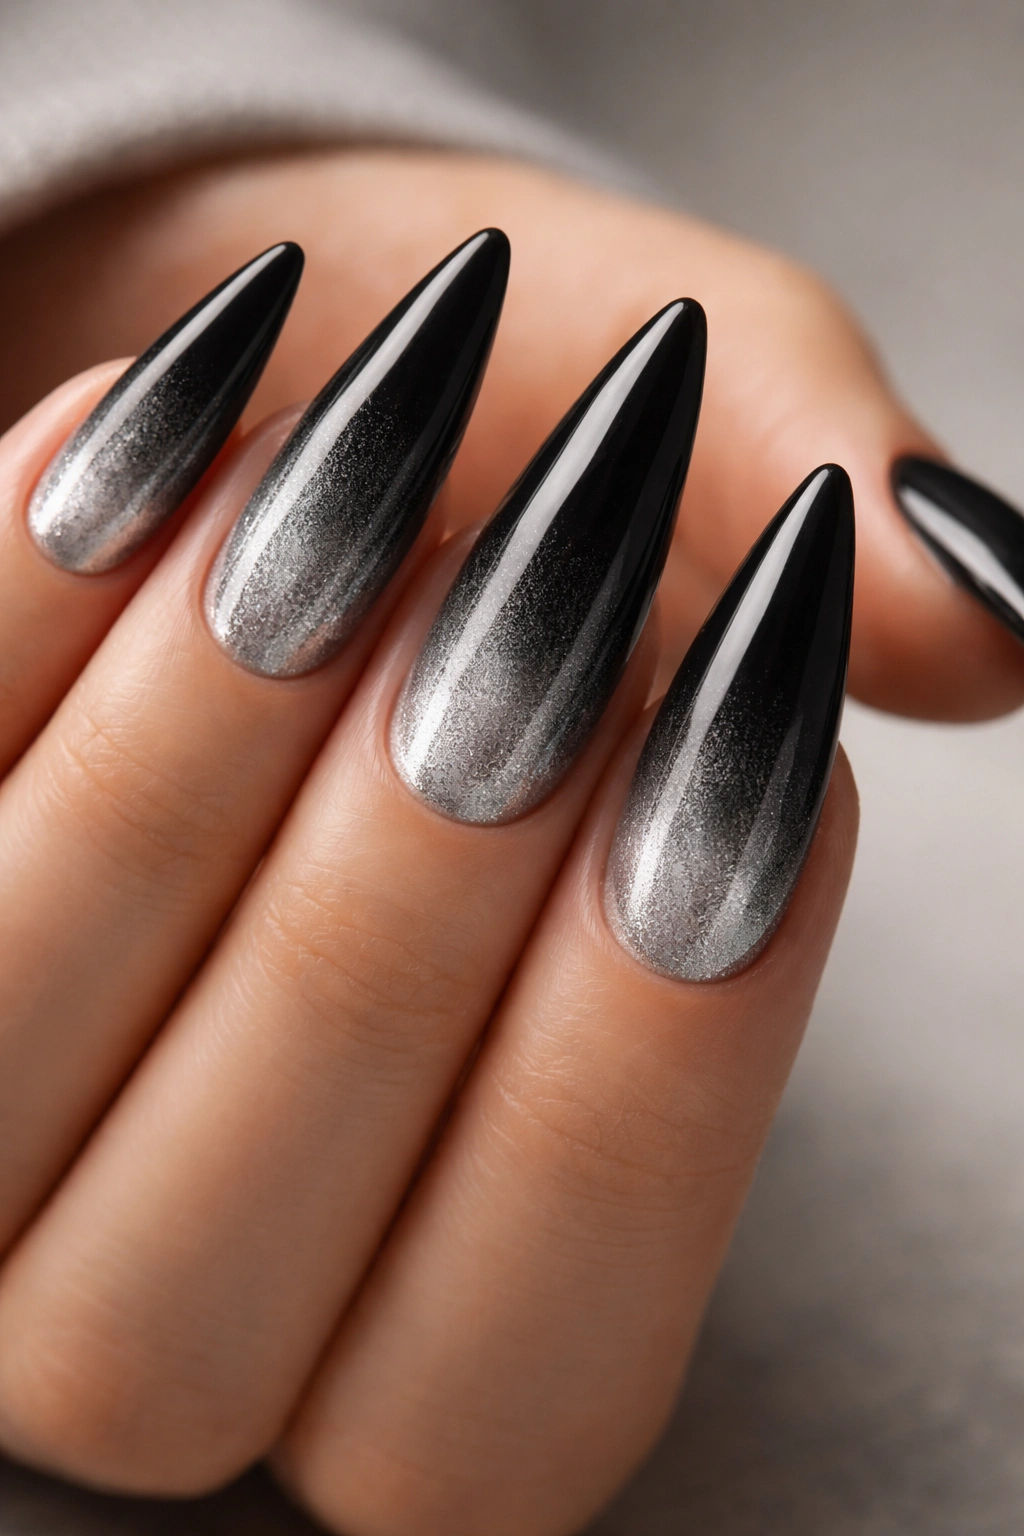
The ombre approach is the gateway design for anyone new to two-color nail art — and it remains gorgeous no matter how many times you see it done well. This design features black at the cuticle gradually fading through deeper grays into pure silver at the nail tip, creating an illusion of infinite depth and movement.
Why This Design Works So Well
The ombre gradient creates a sense of flow and elegance that feels more sophisticated than a hard color block. Because the transition is gradual, the eye follows the design naturally across the entire nail. The black grounds the design in elegance, while the silver catch catches light beautifully, especially in low lighting or evening settings. This is the design that makes people ask you for your nail artist’s contact information.
How to Create and Wear It
- Best suited to slightly longer stiletto nails where the gradient has enough space to show its full range
- Works beautifully as an all-ten-fingers design or as a coordinated set with subtle variations
- Pairs perfectly with simple silver jewelry — let the nails be the statement piece
- Holds up well for 3-4 weeks with a quality gel base and topcoat
- Can be done with a sponge technique or airbrushed for a truly seamless blend
Pro tip: Request a matte topcoat over the gradient instead of glossy for a ultra-modern, high-fashion vibe that feels less traditional.
2. Silver Mirror with Black Matte Base
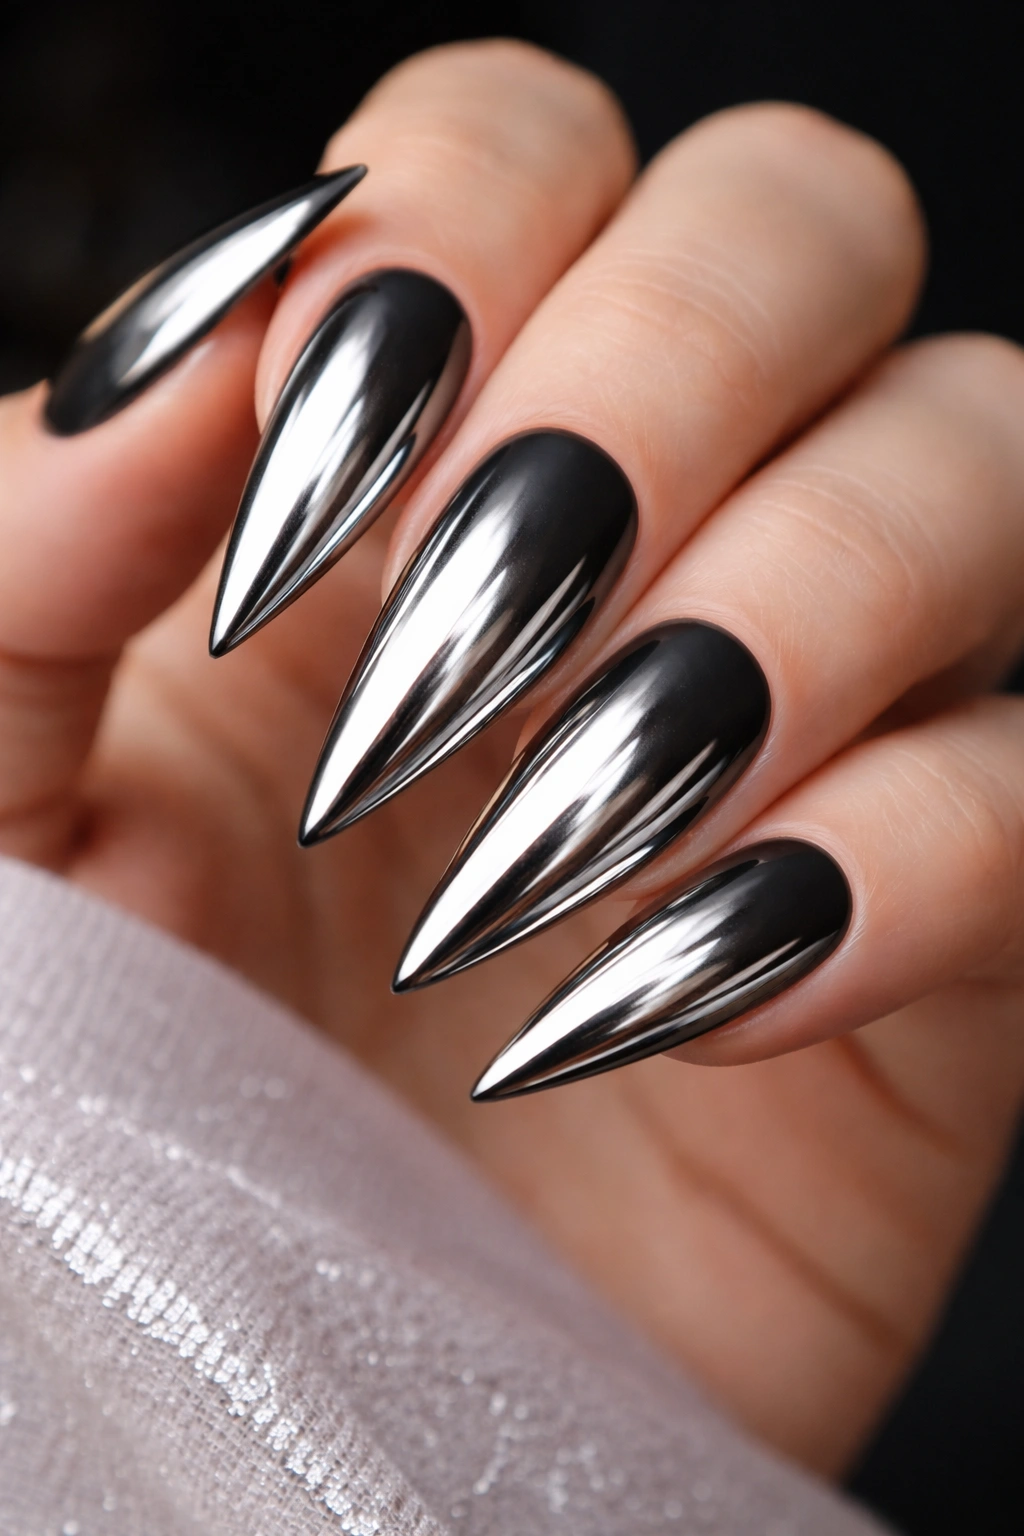
Mirror nails are having a moment, and for good reason — they create an eye-catching chrome effect that catches light in unexpected ways. Pair a silvery, reflective mirror powder over a black matte base, and you’ve created nails that literally look like liquid metal.
The Wow Factor of Mirror Effects
The mirror powder creates an almost 3D appearance that photographs spectacularly and makes your nails the absolute centerpiece of any look. The black matte base underneath keeps the design grounded and sophisticated rather than costume-like. The contrast between the matte black and the reflective silver creates depth that feels intentional and fashion-forward. You’re not just wearing nail polish — you’re wearing wearable art.
Application Tips and Best Practices
- Mirror powder requires a base coat underneath — don’t skip this step or the effect won’t stick properly
- Use a latex-free top coat to seal the powder, as some topcoats can dull the reflective finish
- Application requires a steady hand and patience; rushing this design shows immediately
- These nails are durable but the mirror finish can gradually dull if you’re doing lots of hand washing or dishwashing
- Plan to refresh the mirror powder every 2-3 weeks to maintain maximum shine
Worth knowing: Mirror nails show fingerprints more noticeably than traditional finishes, so keep a microfiber cloth handy if you’re appearance-conscious.
3. Black with Silver Geometric Accent Nail
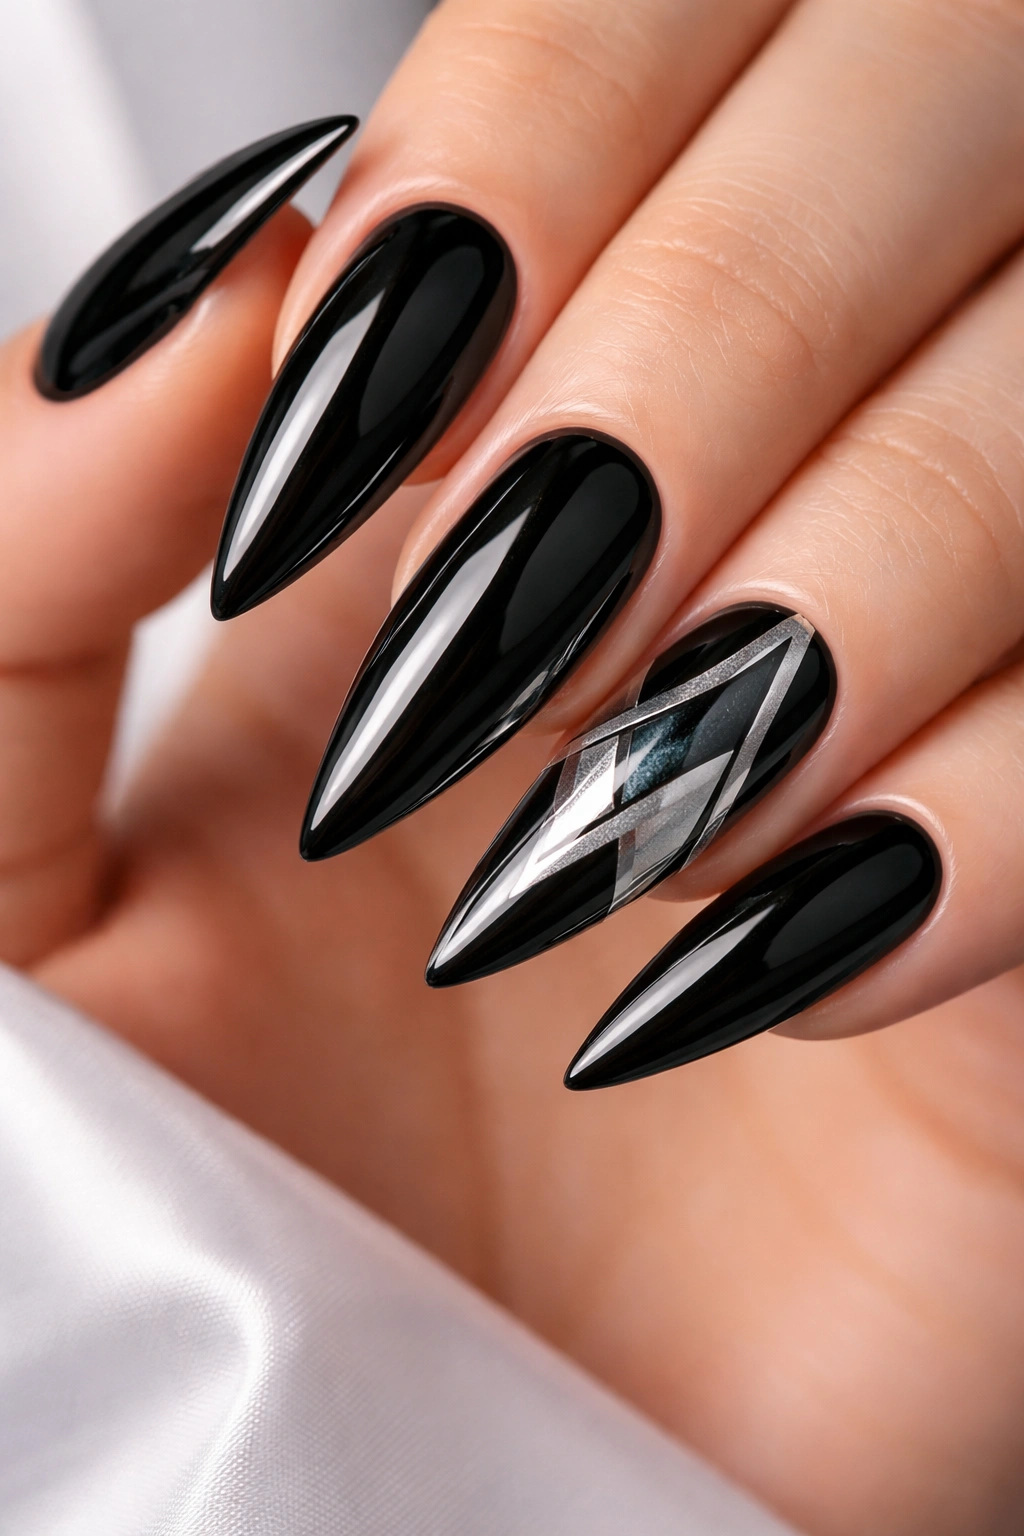
Sometimes the most striking design is the simplest one. Take a full set of sleek black stiletto nails and designate one or two accent nails with bold silver geometric patterns — sharp lines, triangles, or minimalist shapes that command attention without overwhelming.
Why Accent Nails Create Visual Impact
An accent nail draws the viewer’s eye exactly where you want it to go. By keeping most nails solid black, you establish a clean, polished baseline. Then the silver geometric pattern on just one or two nails pops against that background with dramatic contrast. This is the approach that feels intentional without being over the top — sophisticated people recognize this as a deliberate design choice, not an accident.
Design Pattern Ideas and Execution
- Thin silver lines creating a lightning bolt or angular pattern across the accent nail
- A simple white and silver geometric triangle, trapezoid, or diamond shape in the center or corner
- Negative space designs where you use the black as part of the geometric pattern
- Stripe designs with precise, perfectly straight lines
- Perfect for people who want statement nails but need to keep their look professional
Pro tip: Use a thin nail art brush or a striping tool to create clean lines. Cheap tools splatter polish or create wobbly edges — the investment in quality tools absolutely shows in the final result.
4. Black Stiletto with Silver Foil Flakes
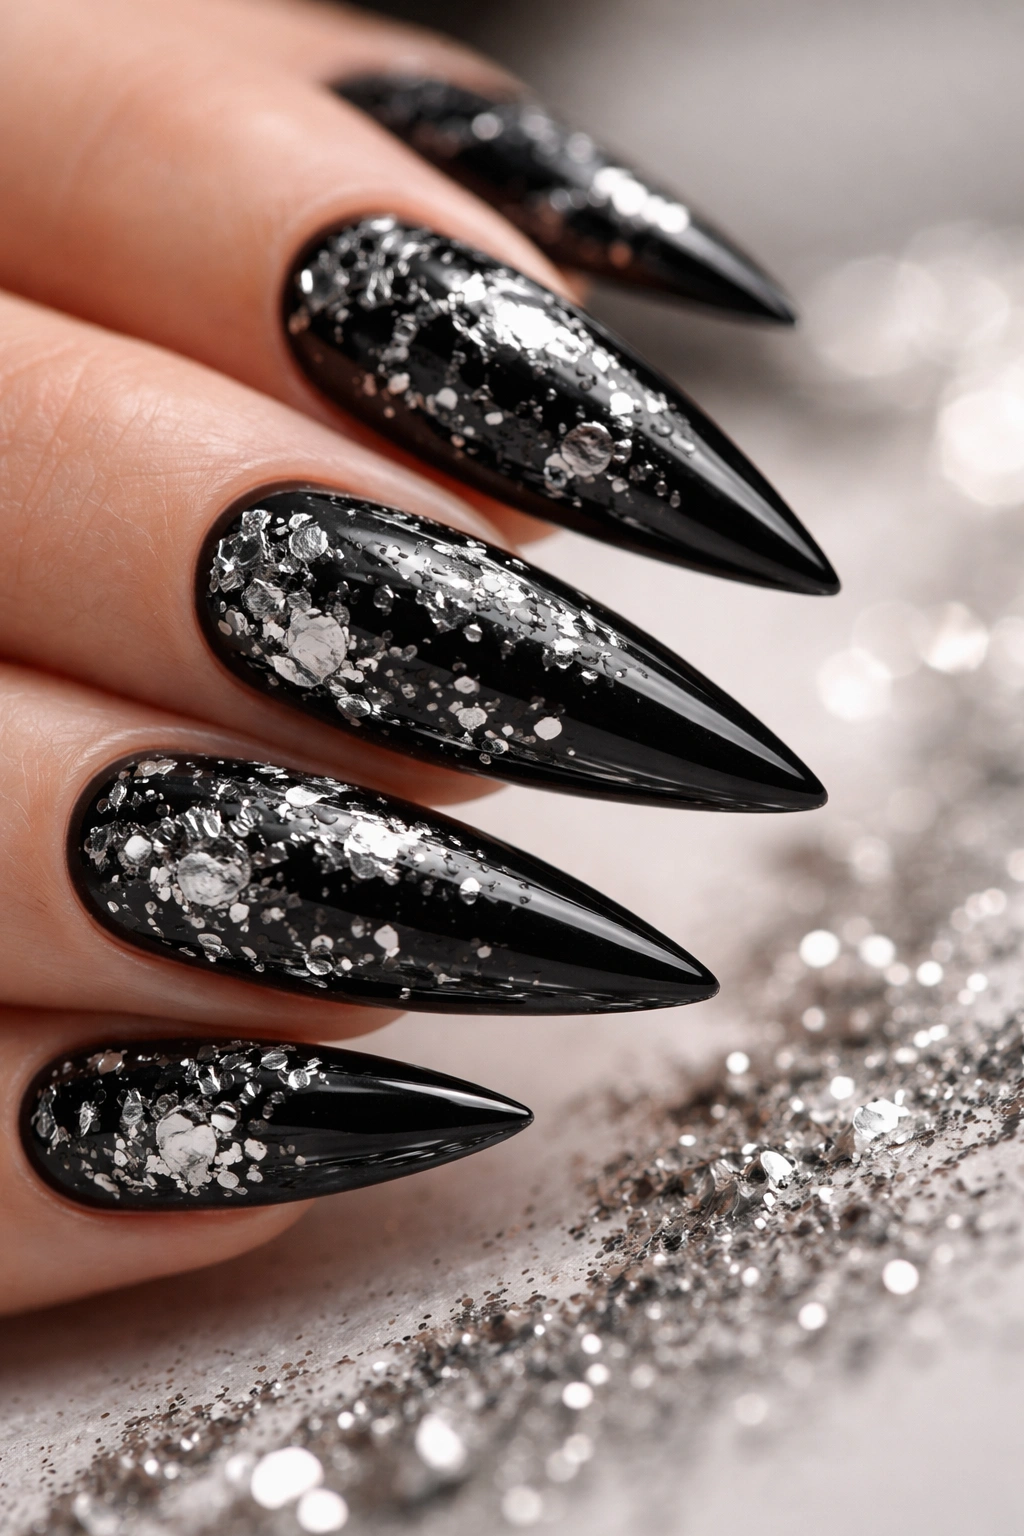
Foil flakes create texture and dimension that catches light in multiple directions at once. Rather than a smooth mirror finish, foil flakes are irregular, multifaceted pieces of metallic material that scatter randomly or in intentional patterns across the black base, creating a shattered-glass or glitter effect that feels luxe and tactile.
The Texture and Dimension Story
Foil flakes are different from traditional glitter — they’re larger, more metallic, and more premium-looking. When applied over a glossy black base, the contrast between matte foil and glossy black creates visual depth. The irregularity of the flakes means light hits them at different angles, creating a constantly shifting, multidimensional appearance. These nails look different depending on your lighting and angle of view — they’re never boring.
How to Apply and Maintain Foil Flakes
- Foil flakes work best over a wet or tacky base coat — apply your black gel, then press foil pieces into the wet surface
- You can cover the entire nail or create a gradient effect (more foil at the tips, less toward the cuticle)
- Seal with a thick, quality topcoat to protect the foil and prevent pieces from lifting
- These nails are surprisingly durable — the foil doesn’t chip more easily than regular polish
- The tactile texture is part of the appeal, though some people prefer smoother nail surfaces
Worth noting: Foil flakes can occasionally catch on fabric when you’re reaching into bags or pockets. Some people love this texture element; others find it slightly annoying.
5. Glossy Black with Silver Marble Swirl
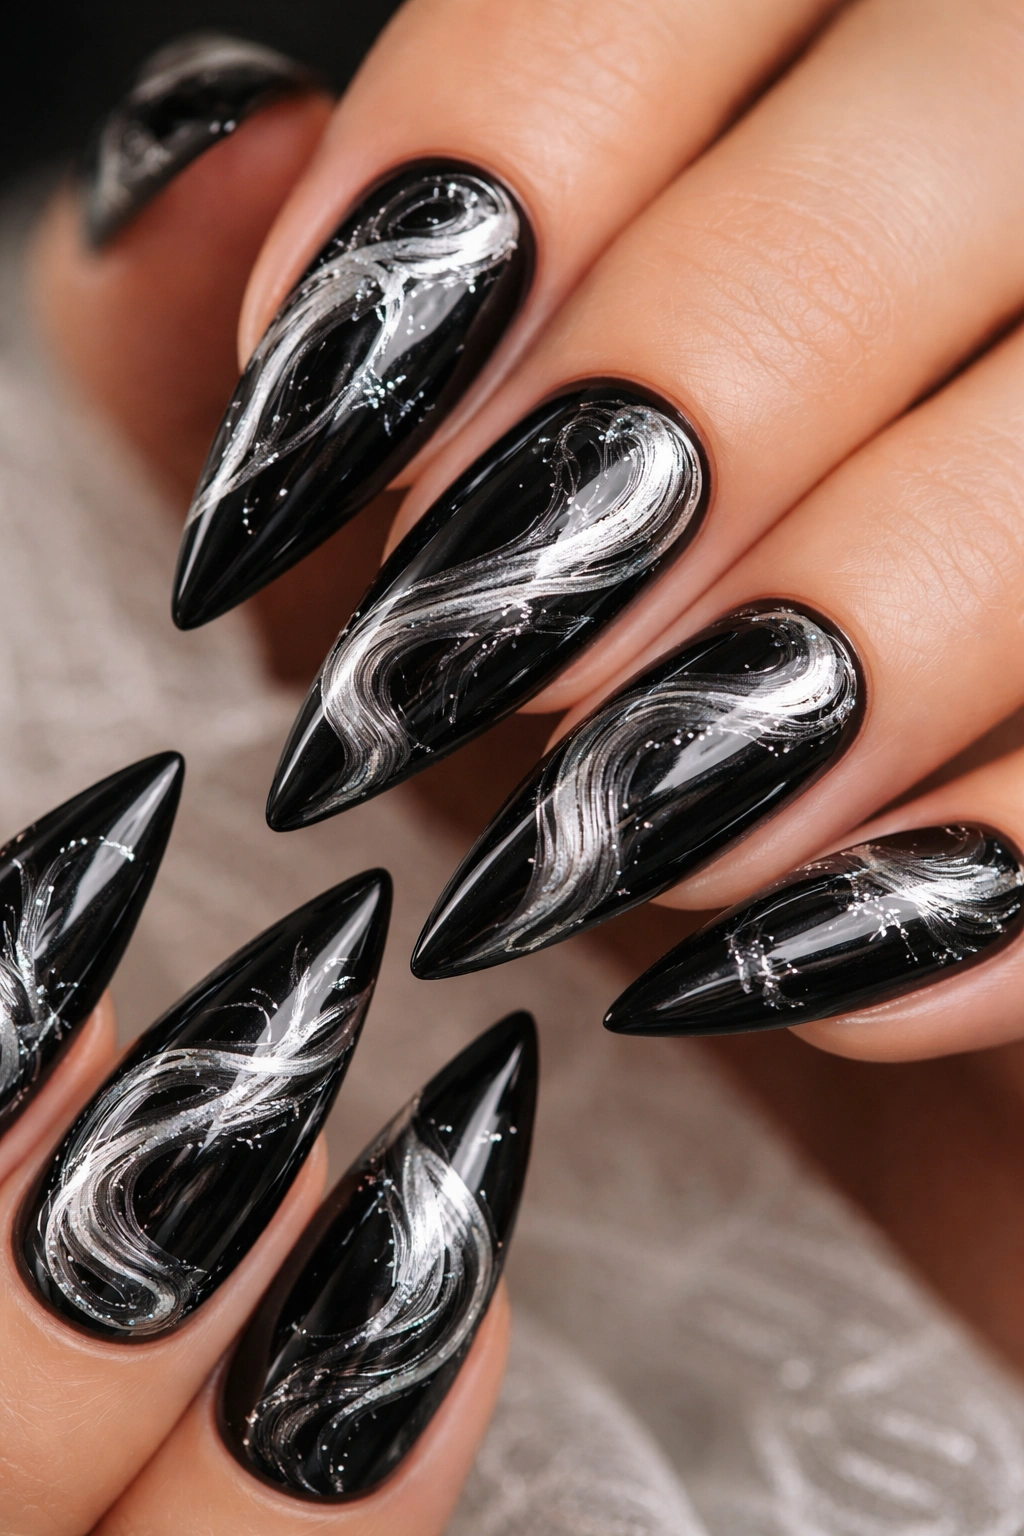
Marble effects have a naturally luxurious, slightly chaotic aesthetic that feels artistic and intentional. Create the effect by dropping silver polish into wet black base, then using a toothpick or thin brush to swirl the colors together, creating organic, one-of-a-kind patterns on each nail.
The Artistic Appeal of Marble Nails
Marble is inherently beautiful because it’s unique on every nail — no two nails will look identical, and that unpredictability is part of the charm. The effect is sophisticated enough for formal events but artistic enough to feel like a creative expression. Black and silver marble specifically creates high contrast that reads clearly even from a distance, so people can actually see and appreciate your nail art.
Creating Marble Effects Successfully
- Use a glossy black base and metallic silver polish for maximum contrast
- Drop silver polish into the black while it’s still wet — timing is critical
- Swirl gently with a thin brush, toothpick, or specialized marble tool
- The more you manipulate the colors, the more diffused the pattern becomes — sometimes less is more
- If the first attempt doesn’t satisfy you, start over — once topcoat goes on, you’re committed
- Each nail will be slightly different, which is part of the beauty of this design
Pro tip: Practice marble techniques on fake nail tips at home before committing to a salon appointment. Once you understand how the colors move and blend, you’ll be able to request the exact effect you want from your nail artist.
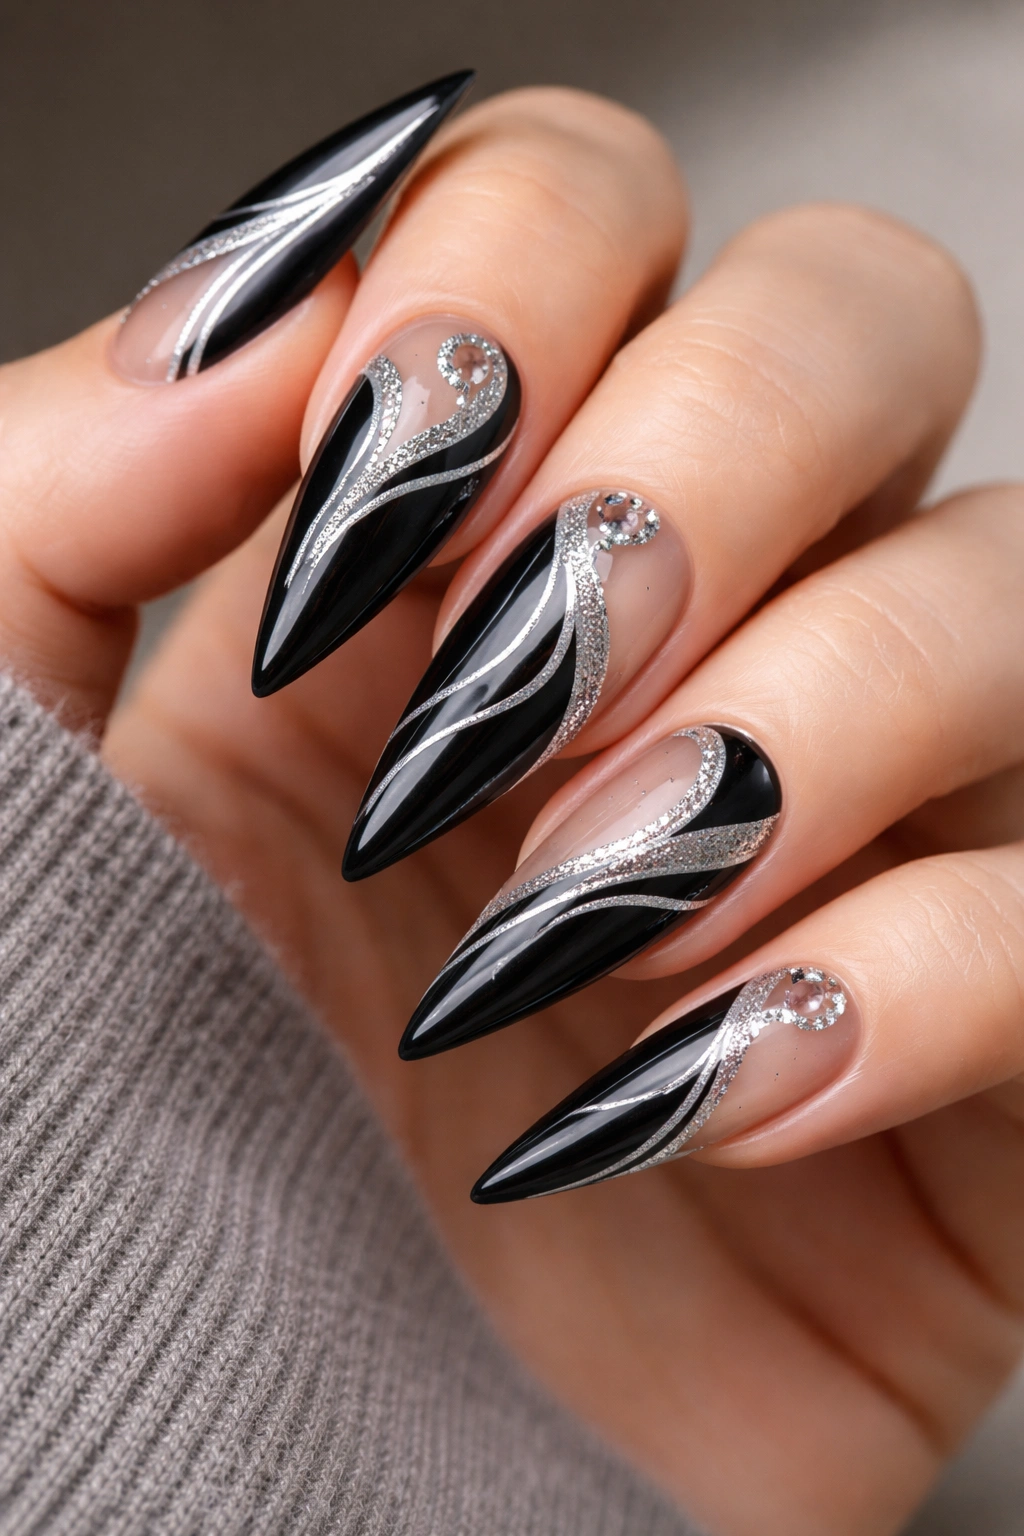
6. Black Base with Thin Silver Striping and Negative Space
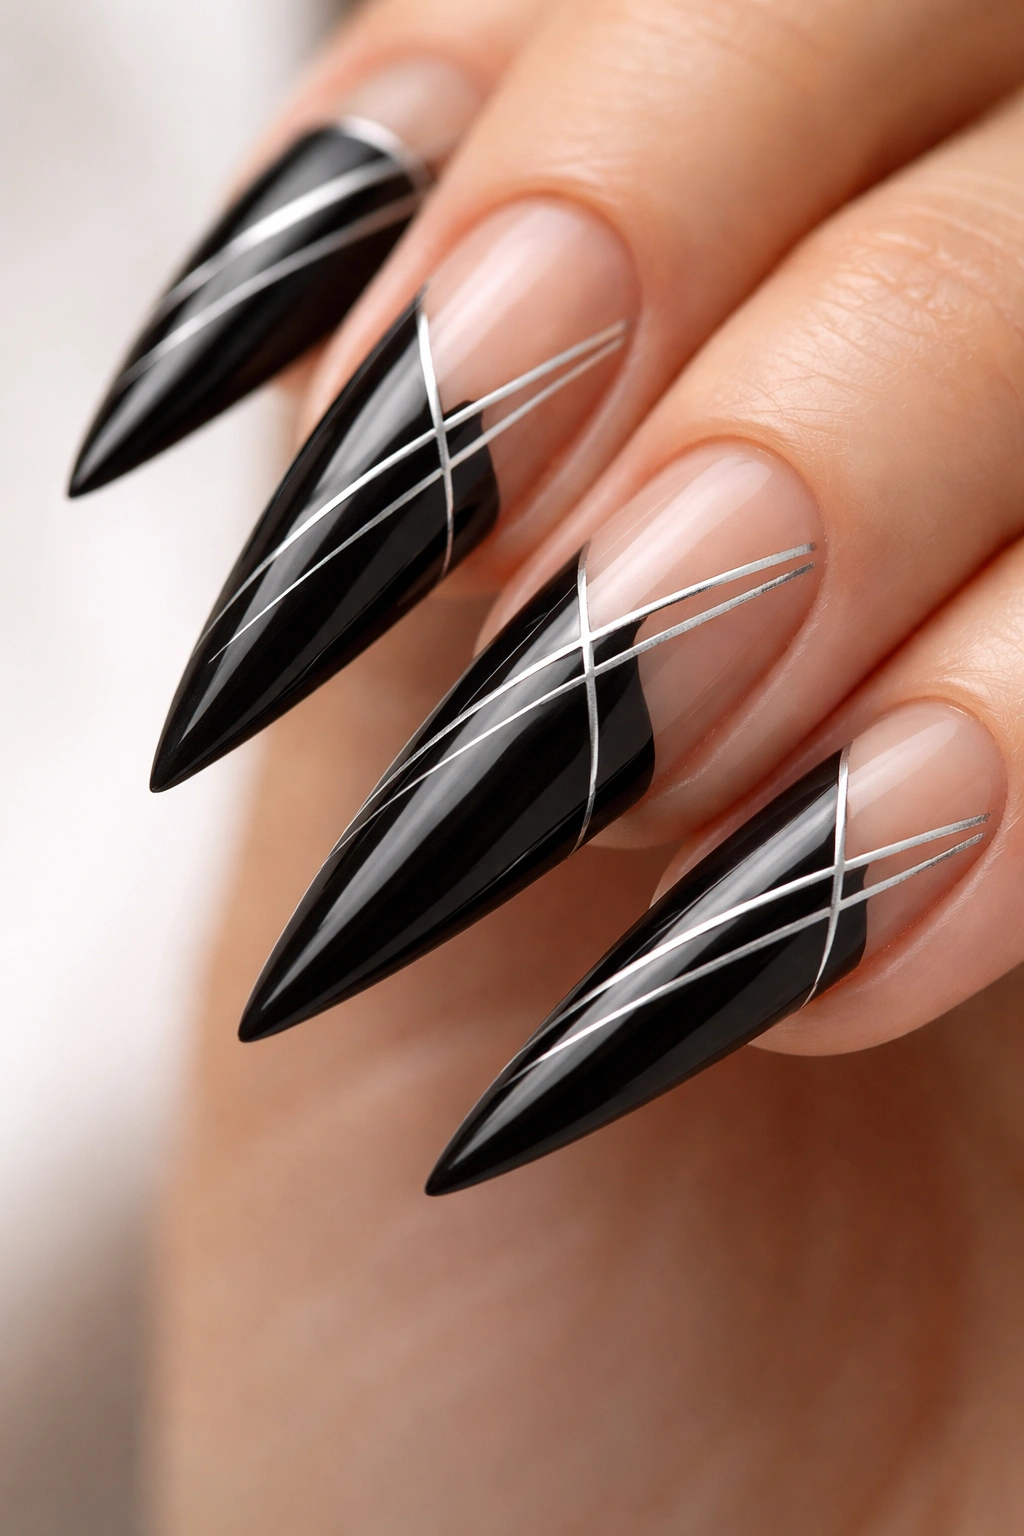
Precision striping requires skill, but the payoff is nails that look architectural and intentional. This design uses thin, perfectly straight silver lines across a black stiletto base, potentially combined with negative space (areas where no polish exists, showing your natural nail) to create rhythm and visual movement.
The Power of Precision in Nail Art
Thin lines and negative space force the eye to follow the design across the nail. There’s nowhere to hide with precision work — every line either looks perfect or it doesn’t. That’s why nails with this design command attention and respect. When executed perfectly, striping creates an illusion of sophistication that feels expensive and intentional, even though the design itself is relatively simple.
Tools and Techniques for Perfect Striping
- A quality striping brush is essential — cheap brushes create uneven, wobbly lines
- Use a long striping nail art brush (not a regular thin brush) for the smoothest application
- Drag the brush slowly and steadily rather than rushing — speed creates mistakes
- Multiple thin layers are better than one thick layer for even coverage
- Practice on a palette first to get the motion and pressure right
- Negative space requires painters’ tape or a steady hand — don’t apologize for imperfection; own it as artistic
Worth knowing: Striping designs can feel very fashion-forward and editorial, so they’re perfect if you want nails that feel like they came from a high-fashion magazine layout.
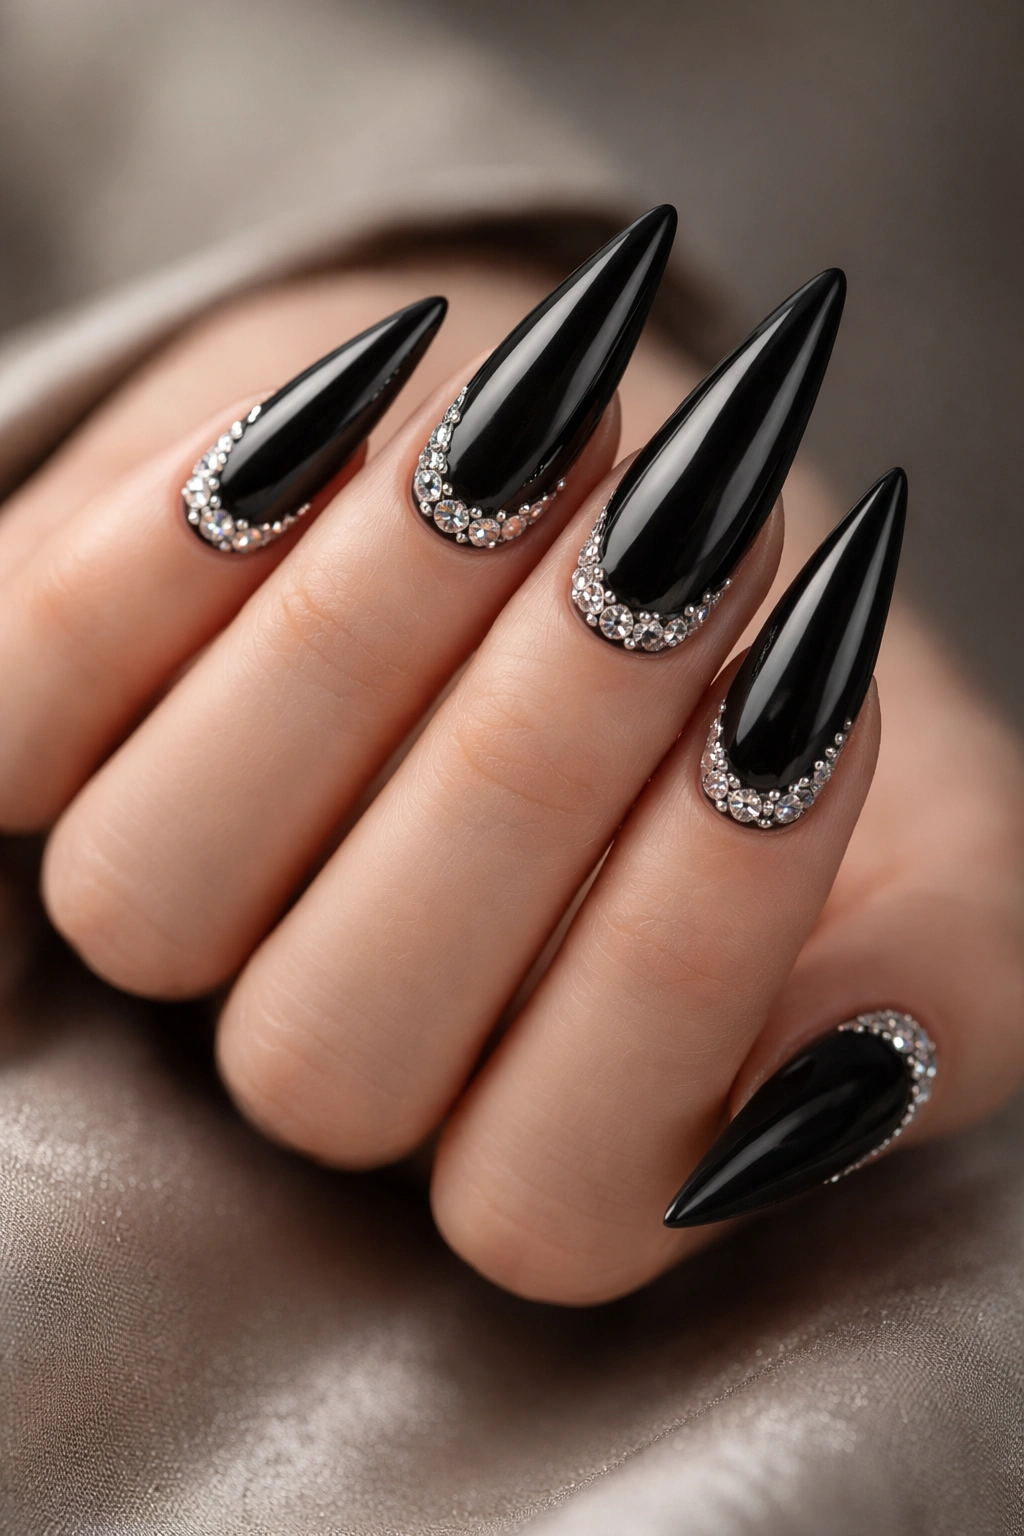
7. All-Black Stilettos with Silver Rhinestone Embellishments
Sometimes you want glamour without complexity. Solid black stiletto nails paired with carefully placed silver or white rhinestones create immediate luxury and shimmer. This is the design that genuinely looks like you spent serious money at a high-end salon.
When Rhinestones Elevate a Simple Design
Black is a perfect backdrop for sparkle — the stones stand out clearly and catch light beautifully against the dark background. You can place stones along the cuticle area for a delicate accent, scatter them across the nail tip, or create a specific pattern. Rhinestones add a tactile element that glossy polish alone can’t achieve. This design reads as intentional luxury, not accidental glitter.
Rhinestone Application and Longevity
- Rhinestones are applied with special adhesive onto a sticky base coat or directly into wet topcoat
- Quality matters — cheap rhinestones look dull; invest in higher-quality stones with good faceting
- Placement is permanent until you remove the nails, so think carefully about placement before applying
- Rhinestones last longer on gel nails than on regular polish because they’re sealed with a topcoat
- Removal sometimes requires soaking or professional help, so plan accordingly
- Rhinestones can catch on hair and fabric, which some people love and others find annoying
Pro tip: Choose silver or crystal rhinestones rather than colored stones for the most versatile, wearable look with black and silver nails.
8. Silver Chrome with Black Matte Details
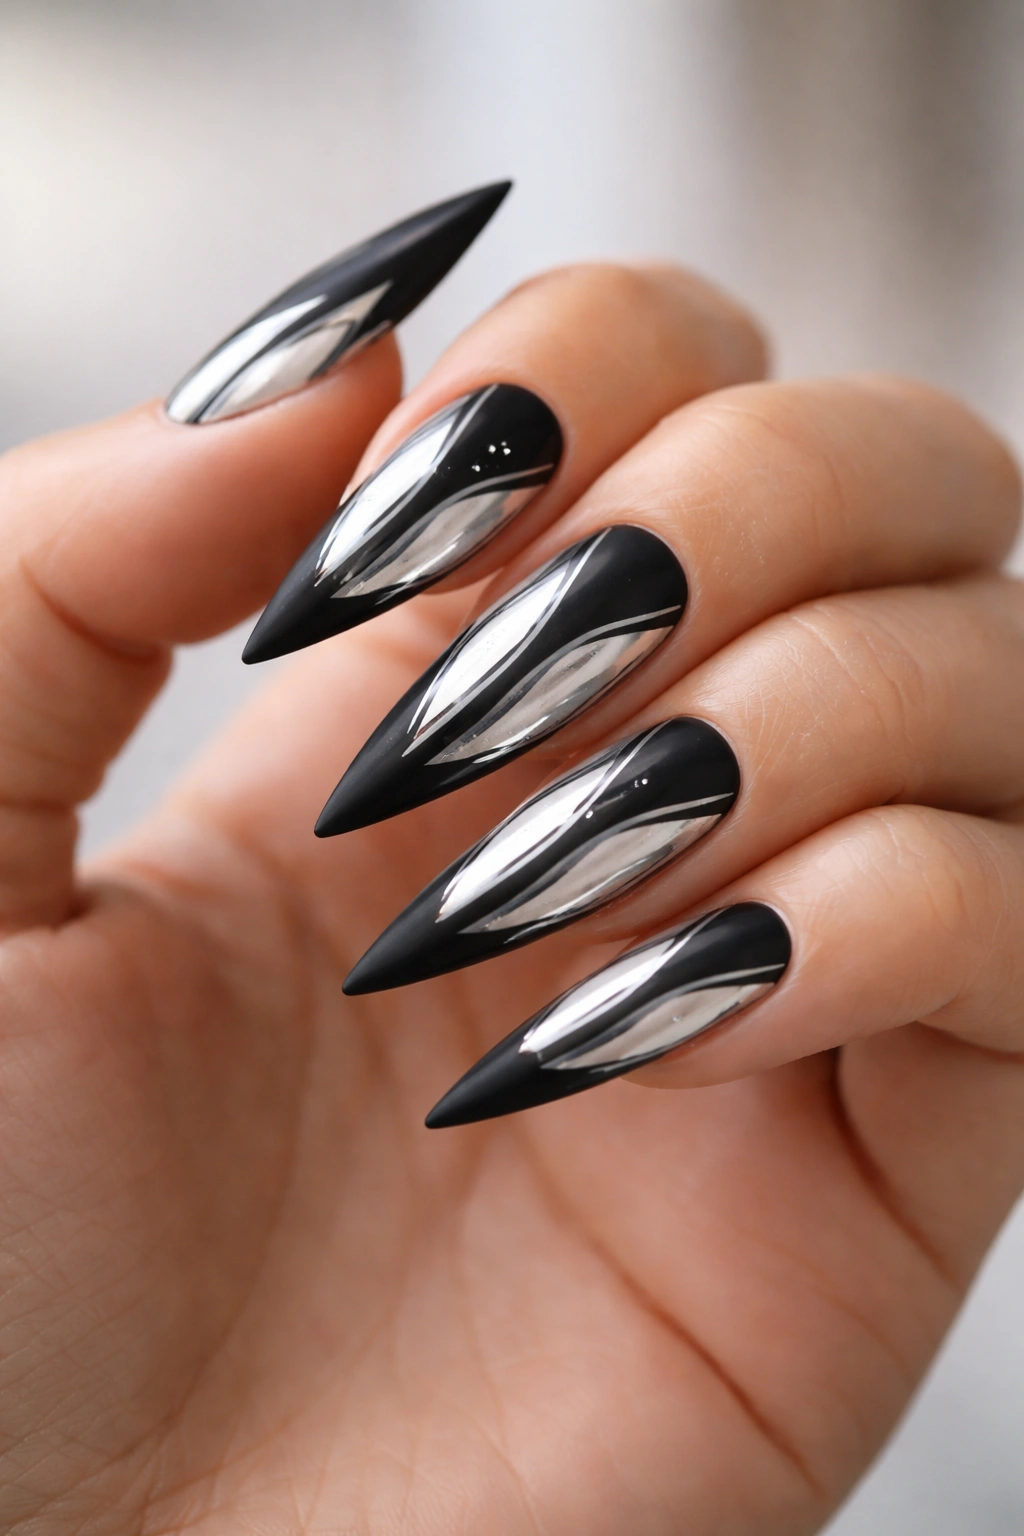
Reverse the balance from the mirror design — start with a silver chrome base and add black matte accents. This creates a modern, gender-neutral aesthetic that feels current and editorial. The black details ground the reflective silver, preventing the design from feeling overly flashy.
Modern Aesthetics Through Color Reversal
When you flip the dominant colors, you change the entire feeling of a design. A silver base with black accents feels fresher and more contemporary than the reverse. Black matte details against a glossy mirror silver create gorgeous contrast. This design appeals to people who want shine and pizzazz but don’t want to feel over-the-top or overly feminine.
Design Detail Options
- Black matte tips with silver chrome on the base and sides (reverse French)
- Black geometric shapes or lines over a full silver chrome base
- A base-coat gradient effect with black matte at the cuticle fading to silver chrome at the tip
- Black accent stripes or patterns running vertically across the chrome
- Perfectly suited to shorter stiletto nails, almond nails, or even coffin shapes
Worth knowing: Chrome finishes require maintenance — they’re durable, but they can gradually dull and may need refreshing every 2-3 weeks for maximum impact.
9. Black and Silver Marble with Metallic Gold Accents
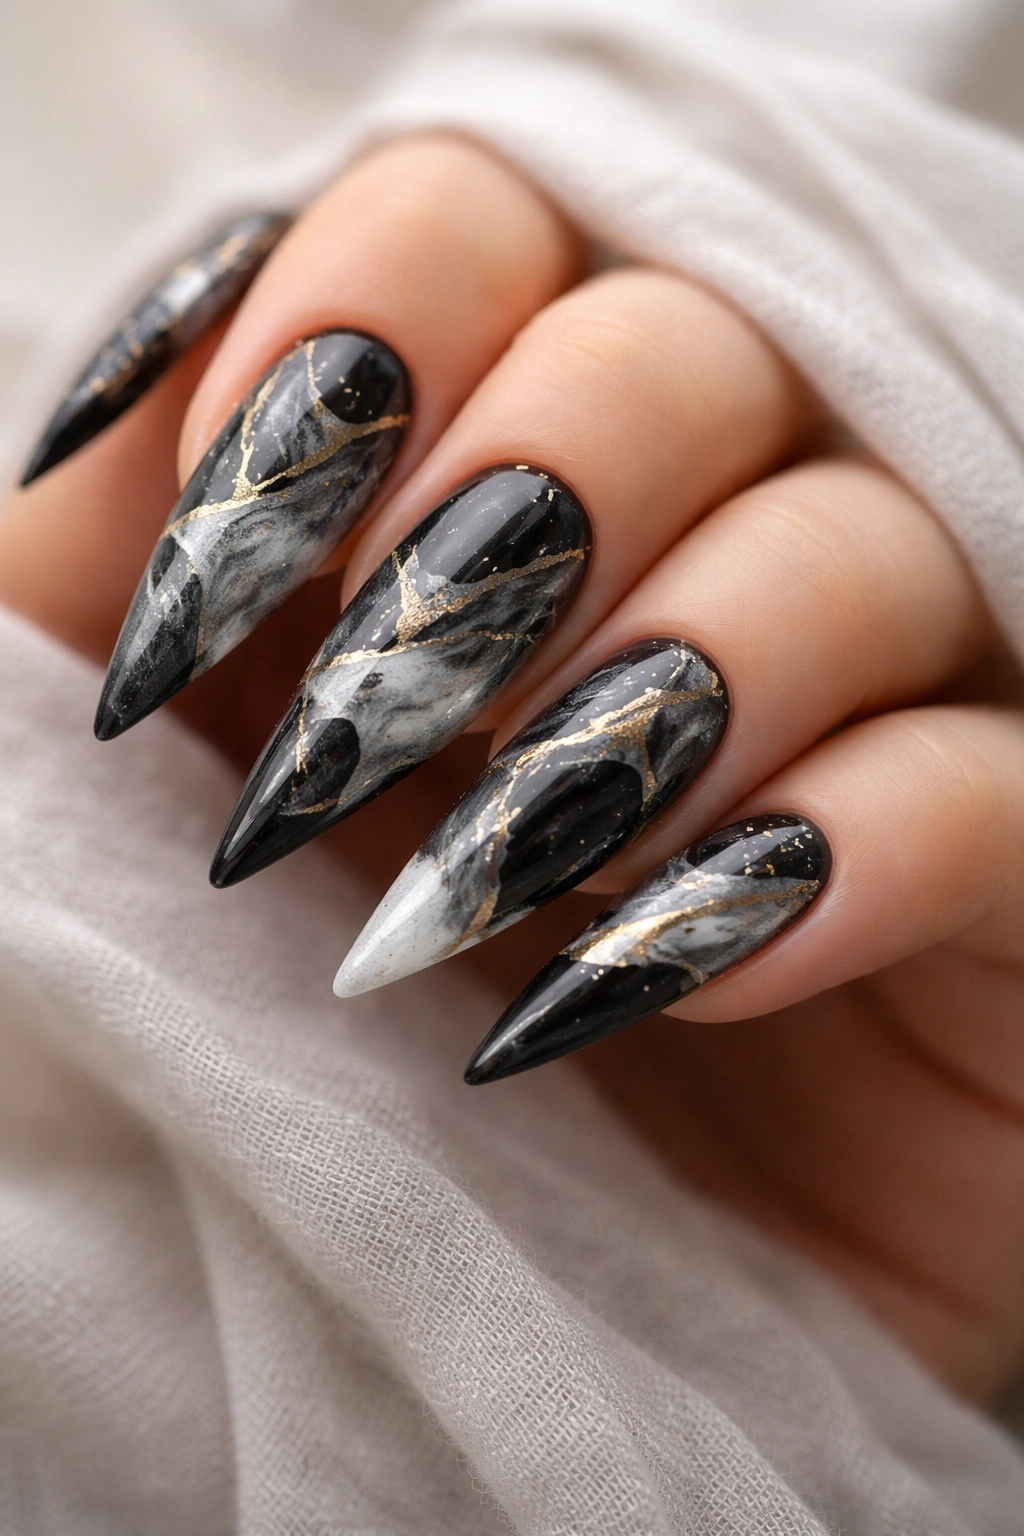
If you want to break the black-and-silver rule slightly, introducing a touch of metallic gold or rose gold into a marble design adds warmth and richness. The black and silver create the main pattern, while gold acts as a subtle accent that elevates the entire composition.
How a Third Color Creates Depth
Adding even a small amount of metallic gold doesn’t complicate the design — it enhances it. Gold catches light differently than silver, creating multiple points of visual interest. Black grounds the entire design, silver provides the primary pattern, and gold becomes the detail that elevates the whole thing from two-color to three-color luxury without feeling chaotic.
Creating Marble with Three-Color Balance
- Create the black and silver marble base as you normally would
- Once the main marble effect is set, add thin gold accents — lines, dots, or small swirls
- Gold works best as an accent rather than equal player with black and silver
- A thin gold line along the cuticle area or gold details in the negative space work beautifully
- Keep gold subtle; the design should still read primarily as black and silver
- This design suits people with warm undertones in their skin and those who love jewelry
Pro tip: Use metallic gold polish or foil rather than glitter gold — metallics integrate with the design more elegantly than sparkly textures.
10. Black Stiletto Nails with Silver Ombre to White
Push the silver ombre concept further by extending the gradient all the way to white, creating a subtle transition from black through silver to nearly white at the tip. This creates an almost dimensional effect, as though the nail is catching light and fading in intensity.
The Sophisticated Fade Effect
This gradient is less obvious than a black-to-silver ombre but arguably more elegant. The subtlety of the color shift is what makes it sophisticated. You’re not slapping two colors against each other — you’re creating a seamless fade that shows nuance and attention to detail. This is the design that makes people lean in for a closer look because something about the nail is captivating them but they can’t quite pinpoint what.
Creating a Seamless Three-Tone Gradient
- You’ll need three polish shades: true black, silver, and white (or near-white)
- A sponge technique works best for blending multiple colors smoothly
- Blend between black and silver first, then between silver and white
- Each transition should be so smooth you can barely see where one shade ends and another begins
- The nail tip should almost glow white against your skin
- Works beautifully on almond, stiletto, and coffin shapes
Worth knowing: This gradient requires more precision than a simple two-color ombre, so it might not be the best choice if you’re getting nails done by someone you haven’t worked with before.
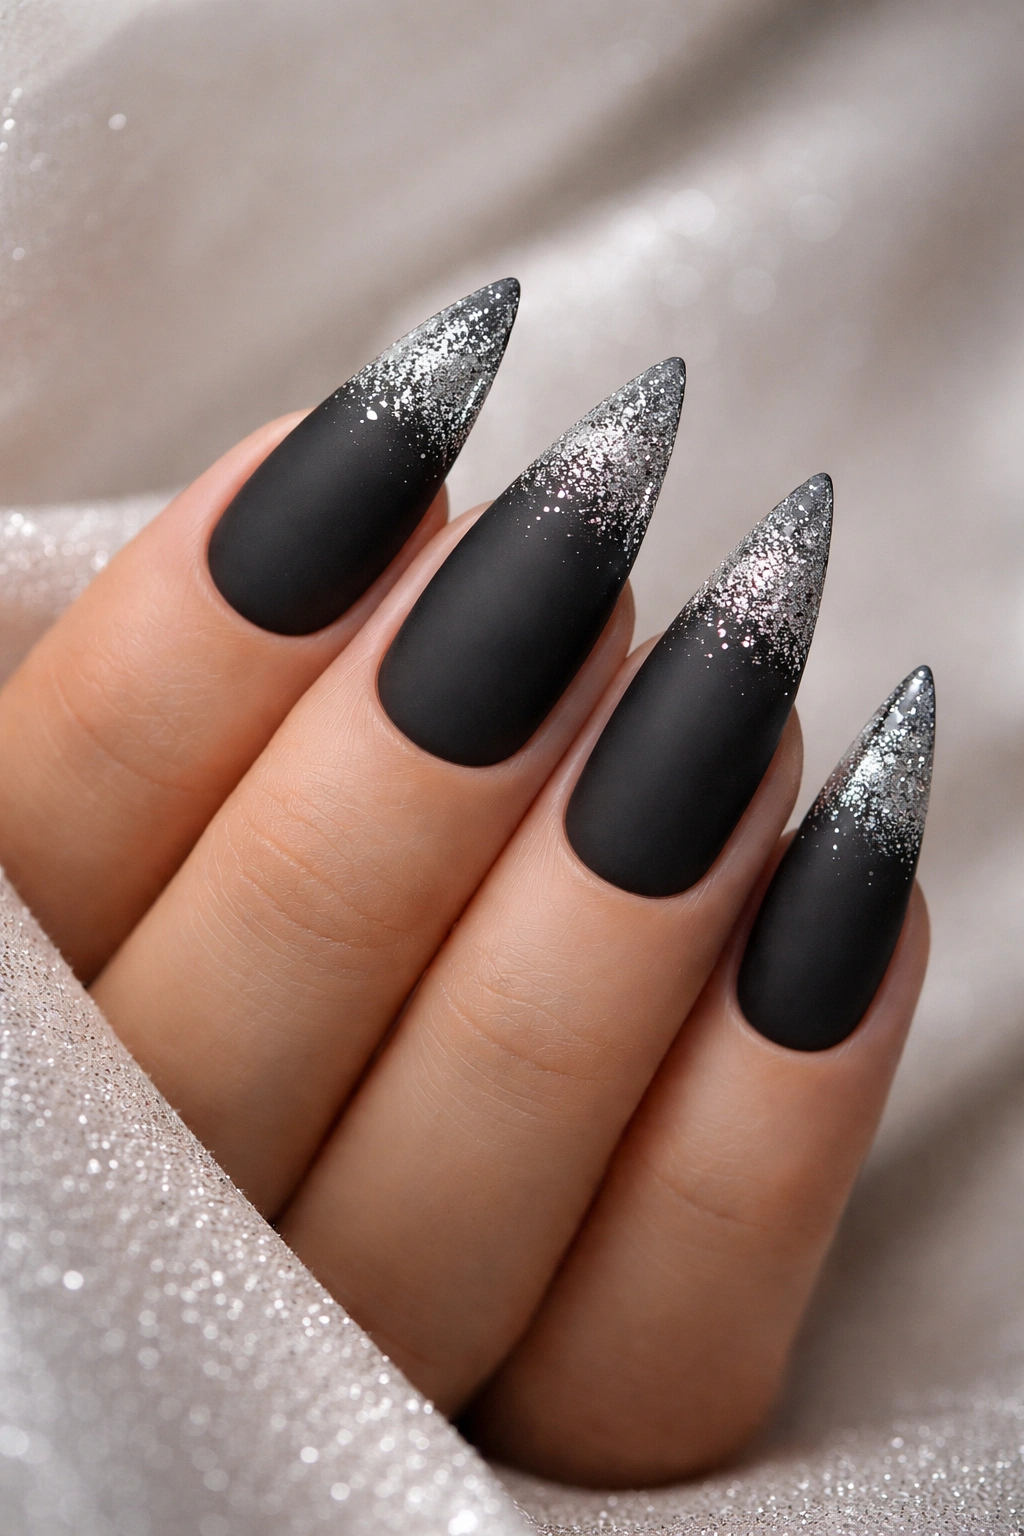
11. Matte Black with Silver Glitter Gradient
For people who want a bit of sparkle without full-on mirror or foil effects, a glitter gradient bridges the gap perfectly. Start with matte black at the cuticle and gradually transition to silver or clear polish packed with fine or chunky glitter at the tip, creating a subtle shift from understated to sparkly.
The Glitter Gradient Sweet Spot
A glitter gradient gives you the best of both worlds — sophisticated matte black near the hand, festive sparkle at the tips. The matte finish near the cuticle keeps the look wearable and professional, while the glitter tips allow for personality and shimmer. This is an excellent design for people who love a bit of sparkle but don’t want their entire nail to be reflective.
Layering Glitter for the Perfect Gradient
- Start with matte black as your base on all nails
- Mix clear or silver polish with fine silver glitter for the gradient layer
- On the first nail, apply glitter only at the very tip (last quarter inch)
- On each subsequent nail, extend the glitter coverage slightly further down (second nail: last half inch; third nail: bottom two-thirds, etc.)
- End with your fifth nail fully covered in glitter for a gradient effect across the entire hand
- Seal everything with a glossy topcoat to blend the glitter sections
Pro tip: Use a sponge to apply the glitter sections for a gradual blend rather than a hard line — feather the edges slightly for a more natural transition.
12. Black Negative Space Design with Silver Details
Negative space designs use your natural nail as part of the art. Paint silver details and patterns on black, but intentionally leave areas unpainted to show your natural nail underneath. This creates a sophisticated, modern aesthetic that breaks the typical “full coverage” rule of nail design.
Why Negative Space Feels Contemporary
Negative space in art and design reads as intentional, bold, and current. On nails, it creates visual breathing room — your eye travels across the nail, hitting the silver details and the natural nail background in an intentional rhythm. This design is perfect for people who want statement nails but also appreciate minimalism. It’s the intersection of bold and understated.
Negative Space Pattern Ideas
- A silver geometric shape (triangle, hexagon, or star) in the center with black surrounding it and bare nail at the edges
- Black cuticle area with bare middle and silver tip (a reverse of traditional French tips)
- Silver lines creating a frame with bare nail in the center
- Scattered silver dots on black with patches of bare nail showing through
- Requires a steady hand or excellent nail art skills, but the payoff is undeniably cool
Worth knowing: Negative space designs can feel very fashion-forward and editorial, so they’re perfect for people who want nails that feel like they belong in a high-fashion magazine.
13. Black and Silver Checkerboard with Stiletto Shape
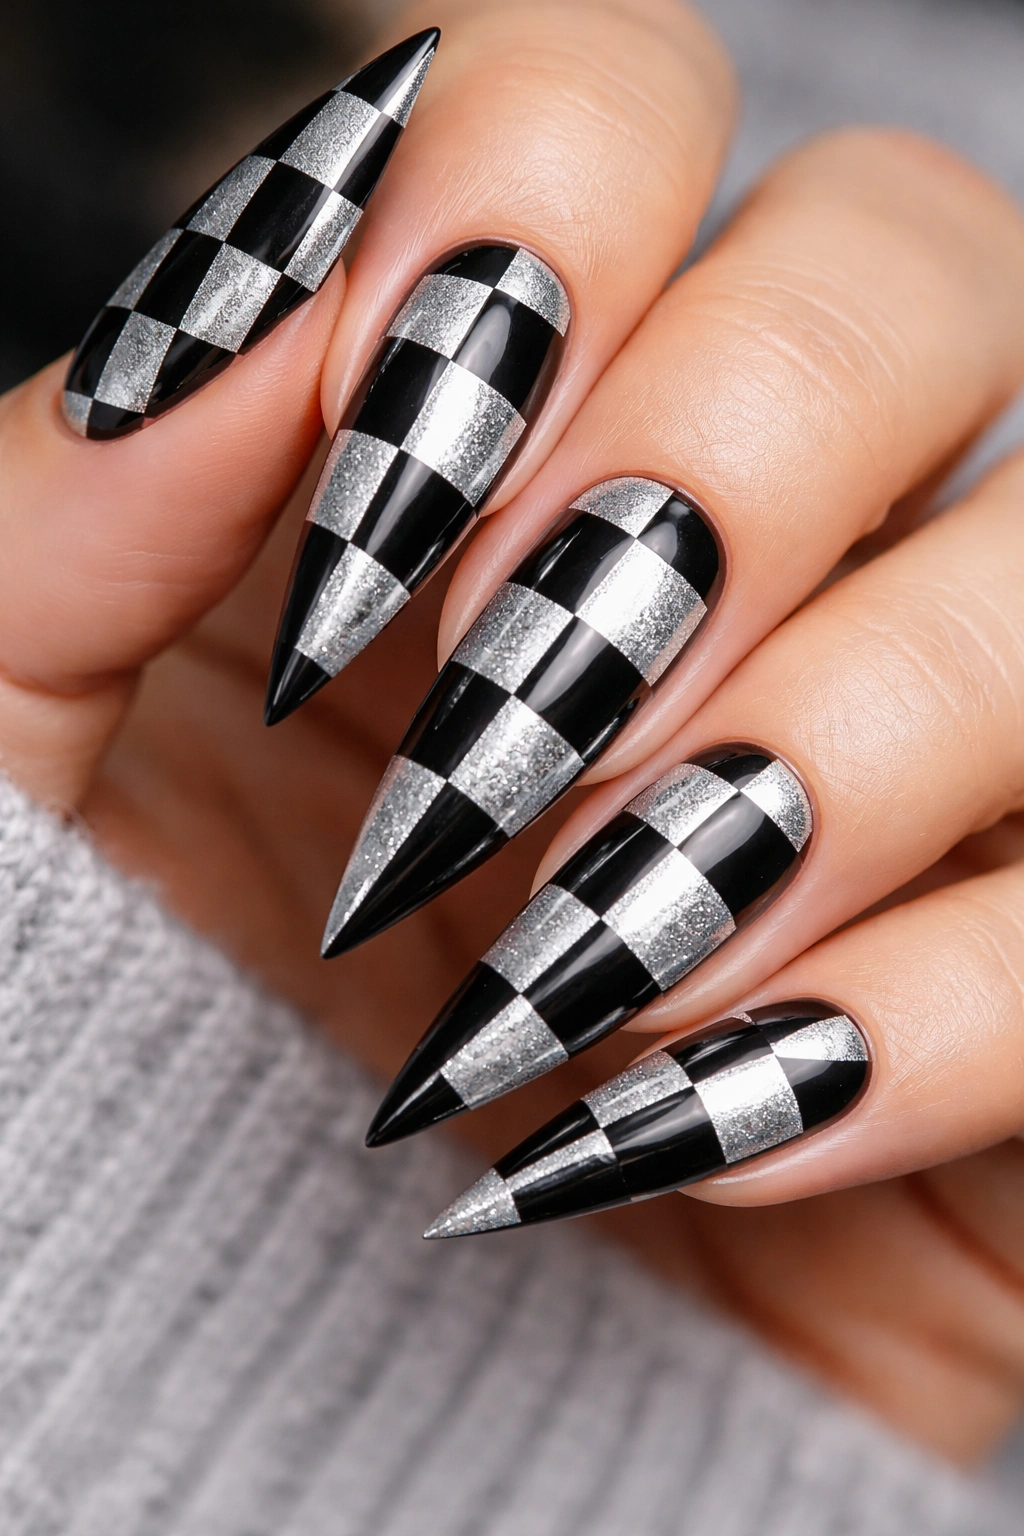
A checkerboard pattern is bold, graphic, and instantly fun while remaining sophisticated when executed in black and silver. The alternating squares create movement and visual interest that makes this design impossible to ignore. The graphic nature of the pattern actually makes imperfect lines feel intentional rather than sloppy.
The Visual Power of Geometric Repetition
Checkerboard patterns work because your eye naturally follows the repeating shape, tracing an invisible grid across the nail. The pattern guides your gaze in a specific direction, which makes the design feel ordered and intentional. Black and silver checkerboard is bold enough that it reads clearly from a distance, making this perfect for situations where you want your nails to make an impression.
Creating a Perfect Checkerboard
- Decide on your square size (larger squares are easier to execute; smaller squares are more intricate)
- Use a striping brush or thin nail art brush to create straight lines
- Create a grid pattern, then fill in alternating squares with black or silver
- Start with a base color (silver), then add black squares for efficiency
- Multiple thin layers are better than one thick layer for even coverage
- This design requires patience but rewards you with high-impact nails
Pro tip: Use nail guides or striping tape to create perfectly straight lines if your hand isn’t steady. There’s no shame in using tools — the result is what matters.
14. Silver Base with Black Lace Detail and French Tips
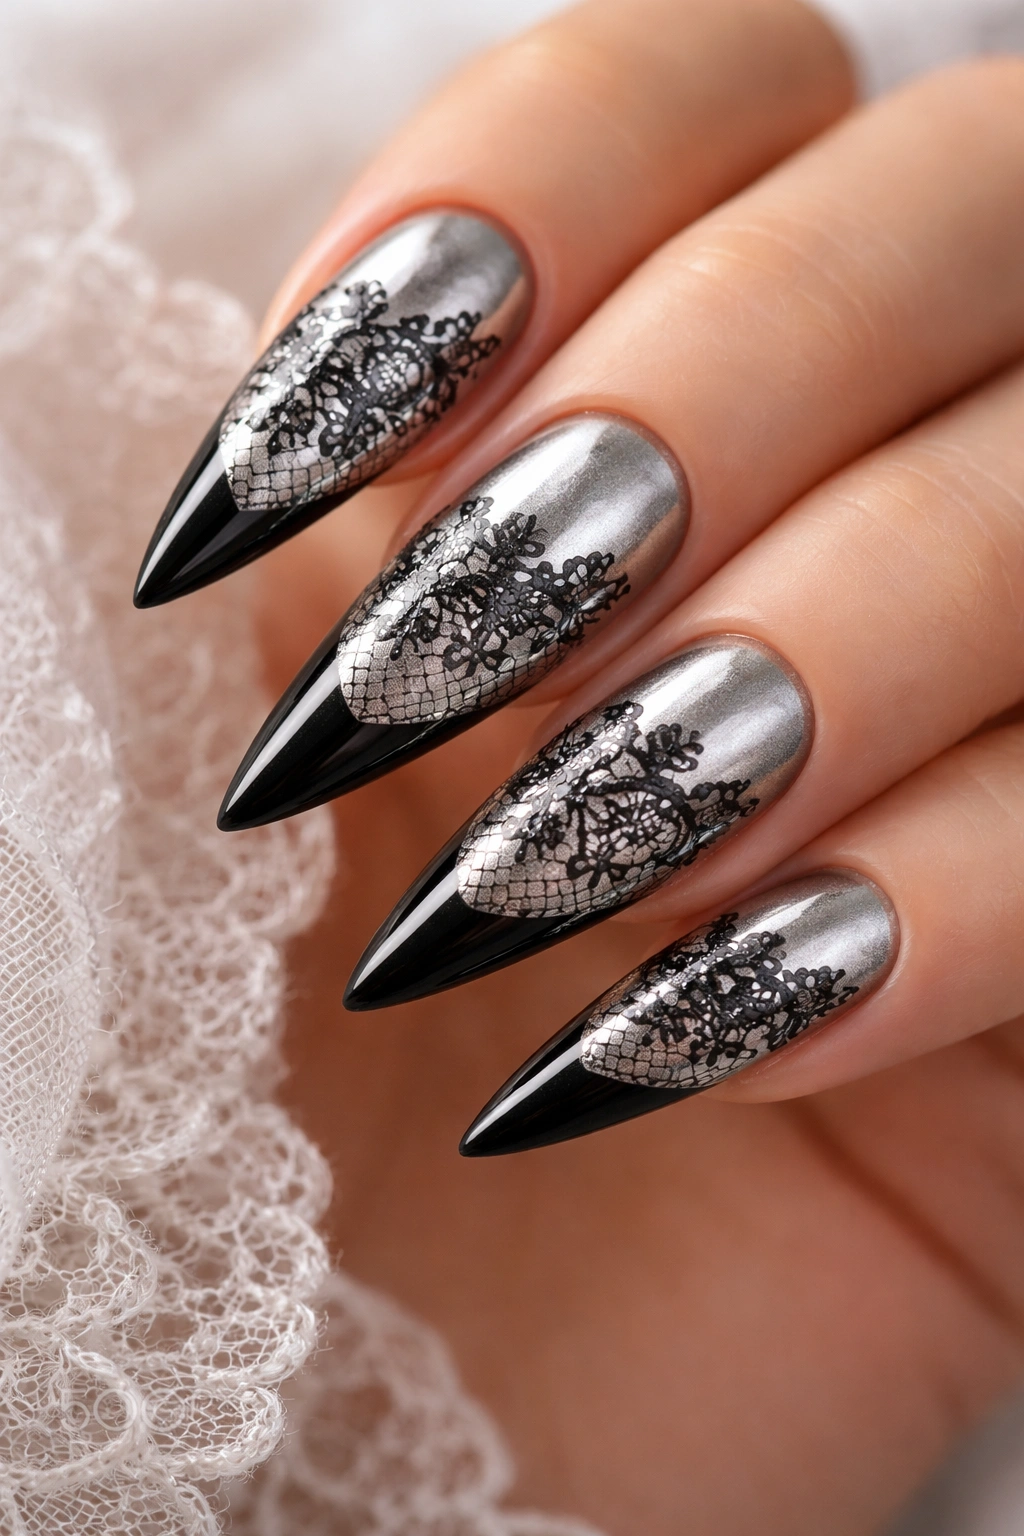
Delicate black lace patterns over a silvery base, finished with a black French tip, create nails that feel wedding-day elegant. This design is intricate and romantic, proving that black and silver can absolutely be dainty and feminine rather than edgy and bold.
Romance Meets Modern Sophistication
Lace is inherently romantic and elegant, but in black and silver, it avoids looking too costume-like or overly bridal. The lace detail adds intricacy without overwhelming — it’s a design that rewards close inspection but also looks beautiful from a distance. This is sophisticated nail art that bridges delicate and dramatic.
Executing Lace Detail and French Tips
- Apply a silvery or chrome base to all nails
- Using a very thin brush or specialized nail art lace tool, paint delicate black lace patterns across the nail
- Lace patterns typically feature delicate curves, swirls, and openwork designs
- Add a clean black French tip to frame the lace detail beautifully
- The contrast between the metallic silver, delicate black lace, and clean black tip creates balance
- Requires significant nail art skill or a very talented nail artist
- Perfect for special occasions, formal events, or people who love intricate design
Worth knowing: Lace designs are stunning but time-consuming to create, so plan for a longer appointment and potentially higher cost than simpler designs.
Final Thoughts
Black and silver stiletto nails offer an incredible range of possibilities — from minimalist and understated to maximalist and dramatically glamorous. The beauty of this color combination is that it works for virtually every skin tone, complements every outfit, and reads as intentional and elevated regardless of your chosen design.
Whether you’re drawn to the simplicity of a classic ombre, the high-impact shimmer of mirror finishes, the artistic appeal of marble effects, or the delicate elegance of lace details, these designs show just how versatile black and silver truly are. The stiletto shape amplifies whatever design you choose, giving you nails that command attention without apology.
Start by identifying which design resonates most with your personal style. Do you prefer understated elegance or dramatic impact? Are you drawn to geometric precision or organic, artistic effects? Once you know what appeals to you, bring these ideas to a talented nail artist and let them guide you toward the version that works perfectly for your hands, your lifestyle, and your vision. Your nails can absolutely be as bold and beautiful as you are.
