

Red and black is the ultimate power-couple color combination, and when you translate that bold aesthetic onto stiletto nails, you get a nail design that commands attention the moment you walk into a room. The sharp, elongated shape of stilettos already makes a statement on their own—they’re confident, editorial, and unapologetically glamorous. But add the dynamic contrast of deep reds paired with sleek blacks, and you’ve created something that works for everything from a night out with friends to a high-stakes business presentation where you want to exude authority and sophistication.
What makes red and black stiletto nails so endlessly appealing is how versatile the combination actually is, despite its bold appearance. You can play this color pairing in a hundred different ways: think minimalist geometry, intricate patterns, metallic accents, marble textures, or classic French tips with a twist. The red can range from cherry to burgundy to bright crimson, and the black can be matte, glossy, or embedded with glitter and gems. Whether you’re drawn to high-contrast designs that really pop or more subtle blends where the two colors work in harmony, there’s a red and black stiletto nail style that fits your personal aesthetic perfectly.
The longevity and practicality of stiletto nails—especially when done in these rich, forgiving colors—is another reason they’ve become such a favorite among nail enthusiasts. Red and black hide growth lines beautifully, which means your manicure looks freshly done for weeks. These colors also work with virtually any skin tone, any season, and any outfit in your closet, making them a genuinely smart investment in a nail design that you’ll wear repeatedly.
1. Classic Red and Black French Tips

The timeless French tip gets a dramatic makeover when you flip the traditional white edge for a bold two-tone design: a sharp red line across the tip paired with a black stripe running just underneath, all sitting on a nude or pale pink base. This design respects the classic French tip silhouette that’s been beloved for decades while injecting serious edge and modernity into it. The contrast between the warm red and cool black creates visual interest without feeling chaotic, and the clean lines give off an almost architectural elegance.
Why This Design Never Goes Out of Style
This version of the French tip works because it maintains the sophistication of the original while adding personality and depth. The nude base elongates your fingers visually, while the red-and-black combo at the tip gives you that striking focal point that red and black stilettos are known for. It’s formal enough for professional settings but distinctive enough that people will definitely notice and compliment your nails.
How to Wear It
- Pairs beautifully with minimalist jewelry—let your nails be the statement
- Works for any occasion from casual to black-tie events
- Keeps your overall look polished rather than edgy, making it perfect for workplaces
- The length of the color stripe at the tip can be adjusted for a more or less dramatic effect
Pro tip: Ask your nail artist to apply a high-shine top coat just on the red and black portions—this creates dimension and makes the colors appear even more saturated and rich.
2. 50/50 Split Stilettos in Red and Black
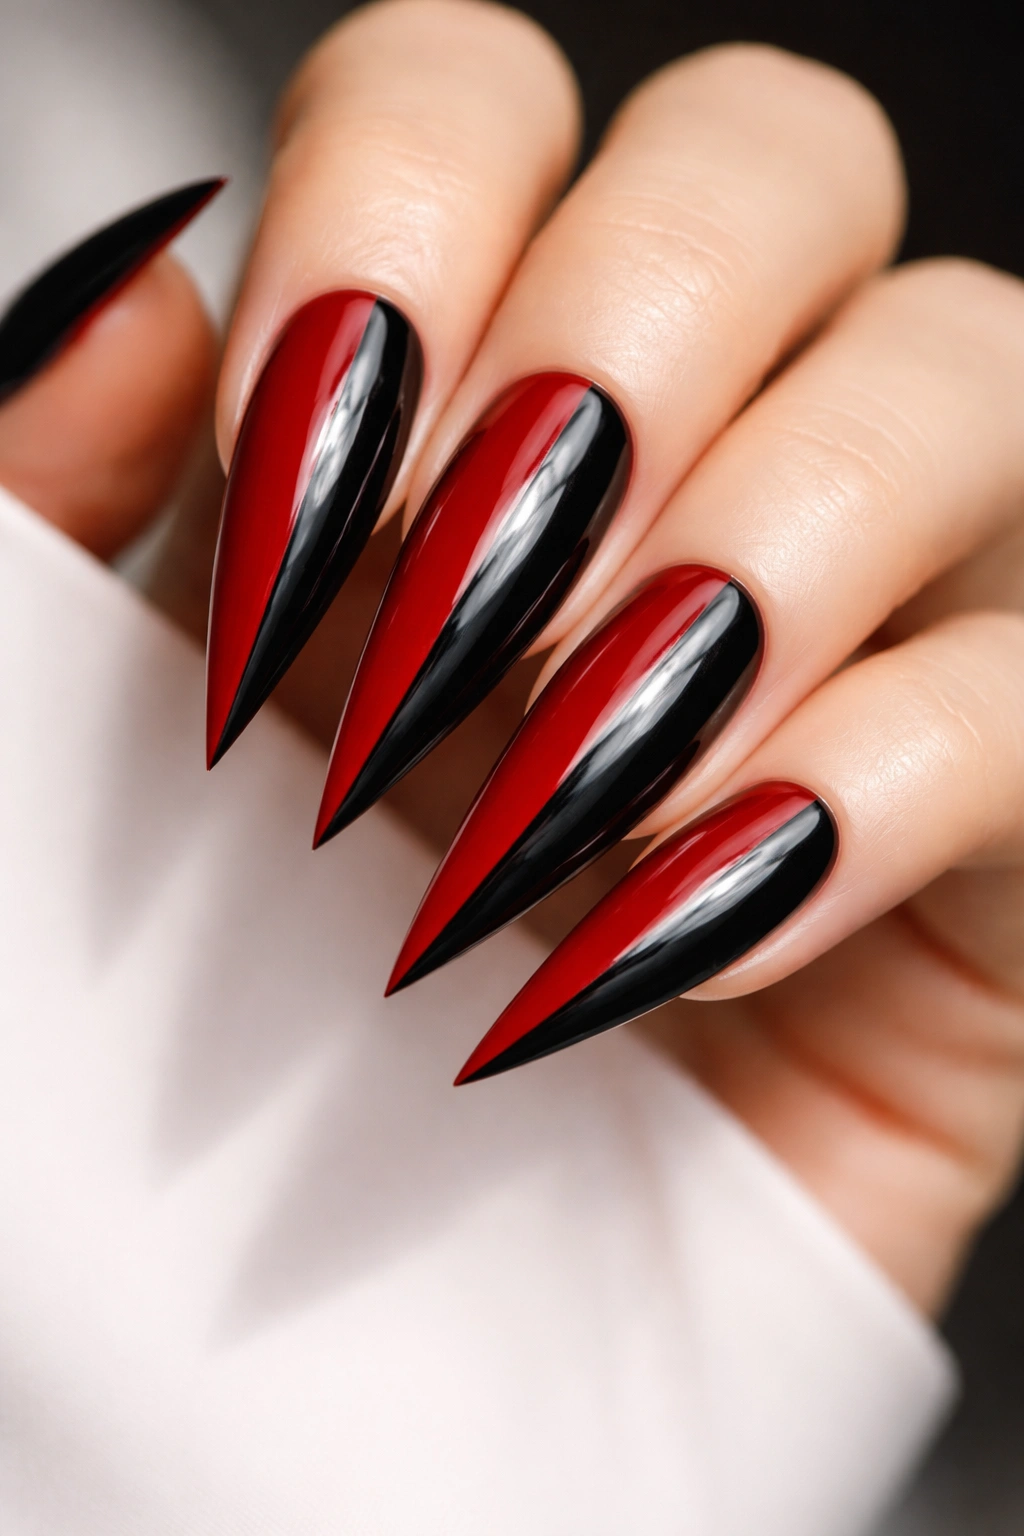
Imagine a vertical line running straight down the center of each nail, with one half glowing in deep red and the other half in jet black. This is geometric design at its most striking, and it’s surprisingly easier to execute than you might think. The 50/50 split creates perfect symmetry and forces both colors to share equal visual real estate, which means neither one overpowers the other—they’re in dialogue, creating balance through contrast.
The Visual Psychology Behind the Split
The split-down-the-middle design works on stilettos because the elongated nail shape allows each color to have plenty of space to breathe. Your eye travels down the length of the nail and reads both colors simultaneously, which creates a dynamic, almost hypnotic effect. This design is particularly striking on longer stilettos where the split line becomes a prominent vertical accent that adds to the already lengthening effect of the shape.
Best Ways to Style It
- Keep the rest of your nails minimal—plain red or plain black on other nails if you want color variation
- Pair with clothing that echoes one of the two colors to tie your look together
- The design works with any finish: glossy, matte, or a mix of both on each side
- Consider adding a thin gold or silver stripe exactly down the center of the split for extra polish
This design is for anyone who loves bold, graphic aesthetics and isn’t afraid to let their nails speak for themselves.
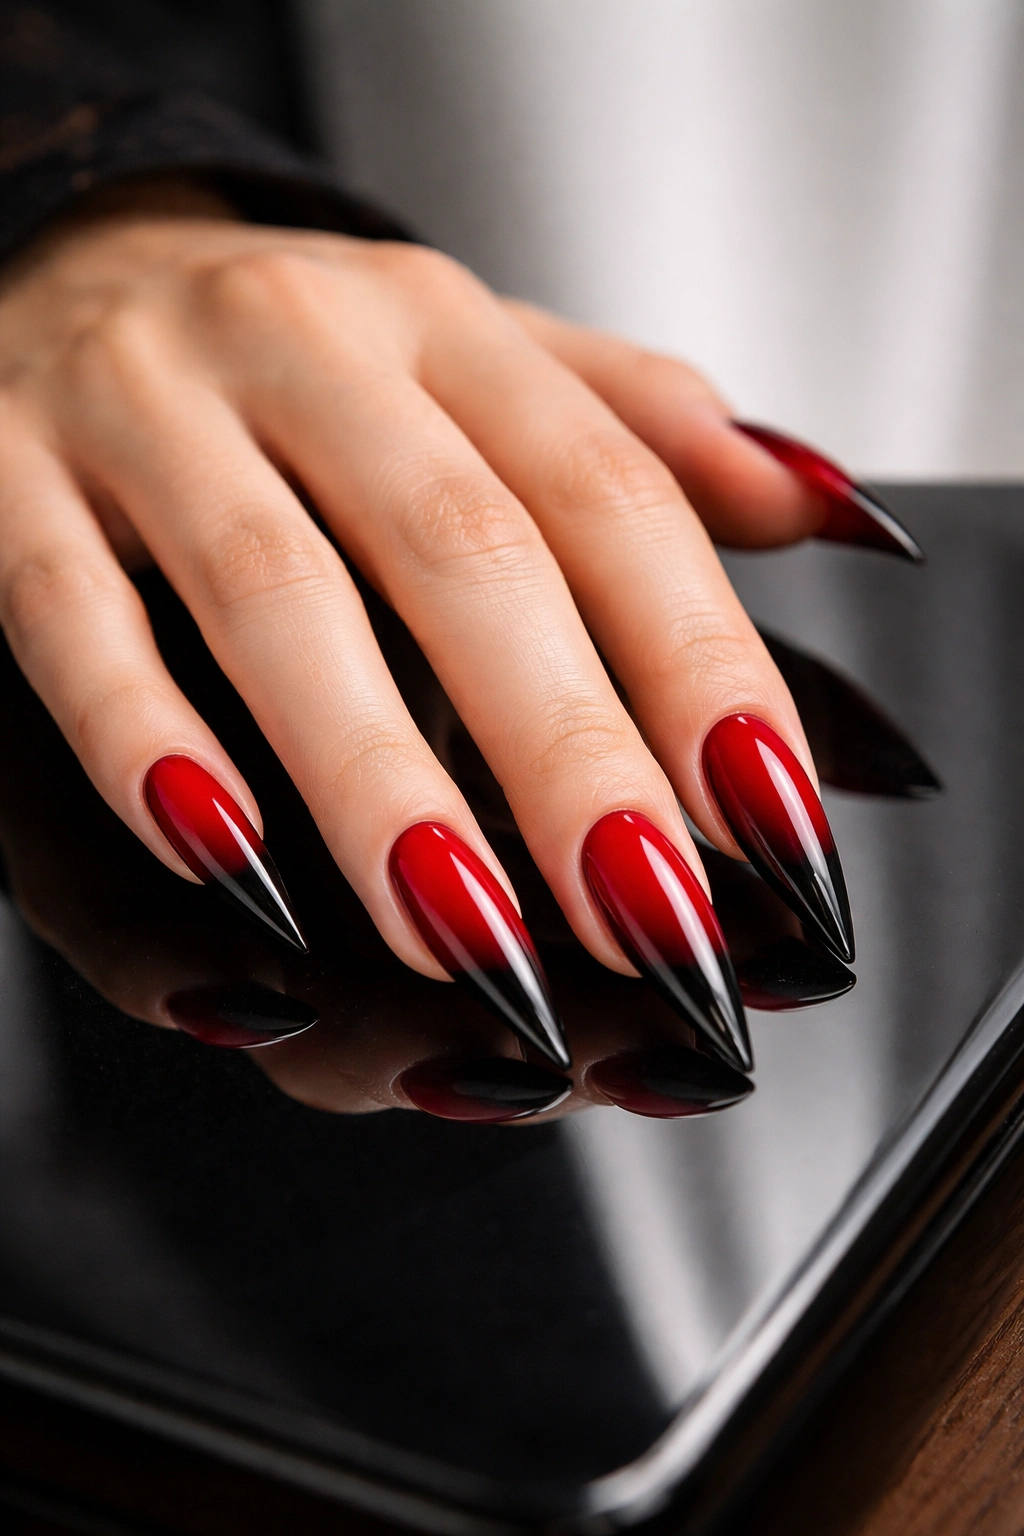
3. Ombré Gradient From Black to Red
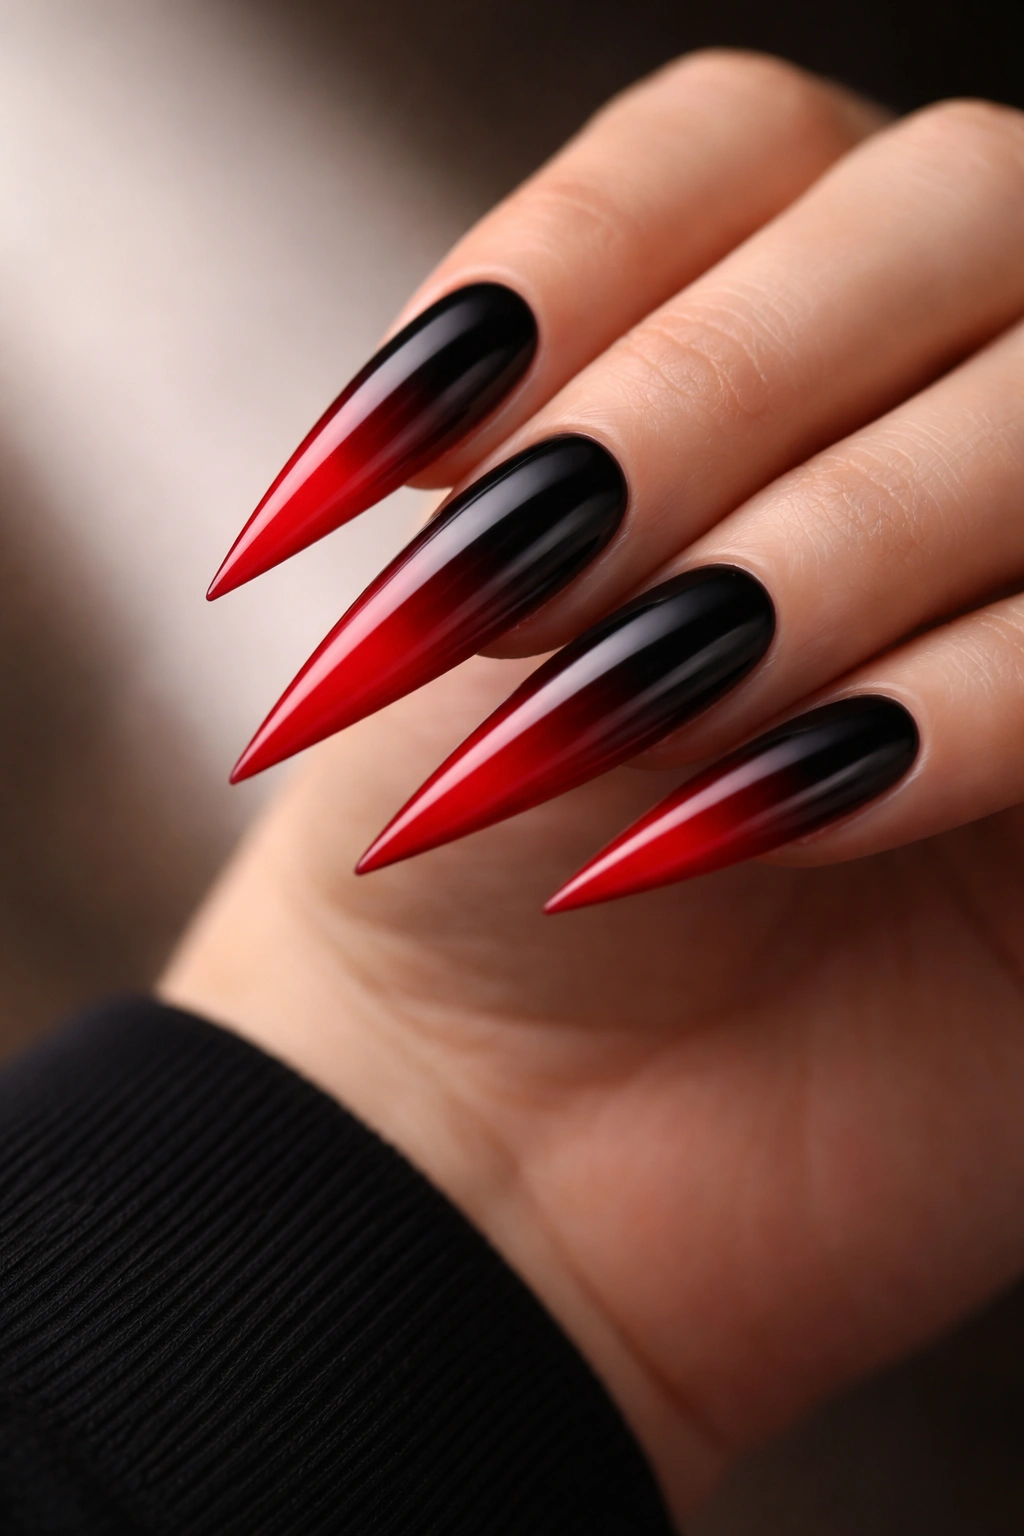
A sophisticated ombré that melts seamlessly from deep black at the base of the nail into a vibrant red at the tip creates a nail design that feels almost liquid, like you’ve dipped each finger into red paint while wearing a black glove. The gradient effect softens the stark contrast of red and black, replacing it with a continuous flow of color that catches the light differently as it transitions. On stilettos, this gradient has an especially elongated, elegant appearance because your eye follows the color transformation across the length of the nail.
The Technique That Makes This Work
Achieving a flawless ombré requires patience and layering—your nail artist will apply the black first, then gradually introduce red closer to the tip, building and blending until the transition is smooth and seamless. Some artists use a dry brush technique, while others use a sponge method. The result, when done well, is a nail design that looks professionally painted and incredibly polished. The ombré effect also creates the illusion of an even longer nail because your eye is drawn to follow the gradient rather than stopping at a defined line.
What to Expect and How to Care for It
- Ombré designs typically hold up beautifully for 3-4 weeks before needing a touch-up
- The black base is particularly forgiving and won’t show chips as quickly as lighter colors might
- High-shine top coats work best with ombré, as they emphasize the gradient effect
- This design pairs well with minimalist jewelry since the ombré itself is the statement
Insider note: An ombré using the red-to-black gradient photographs beautifully—the color transition is even more striking in photos than it appears in person.
4. Red Stilettos With Black Marble Veining
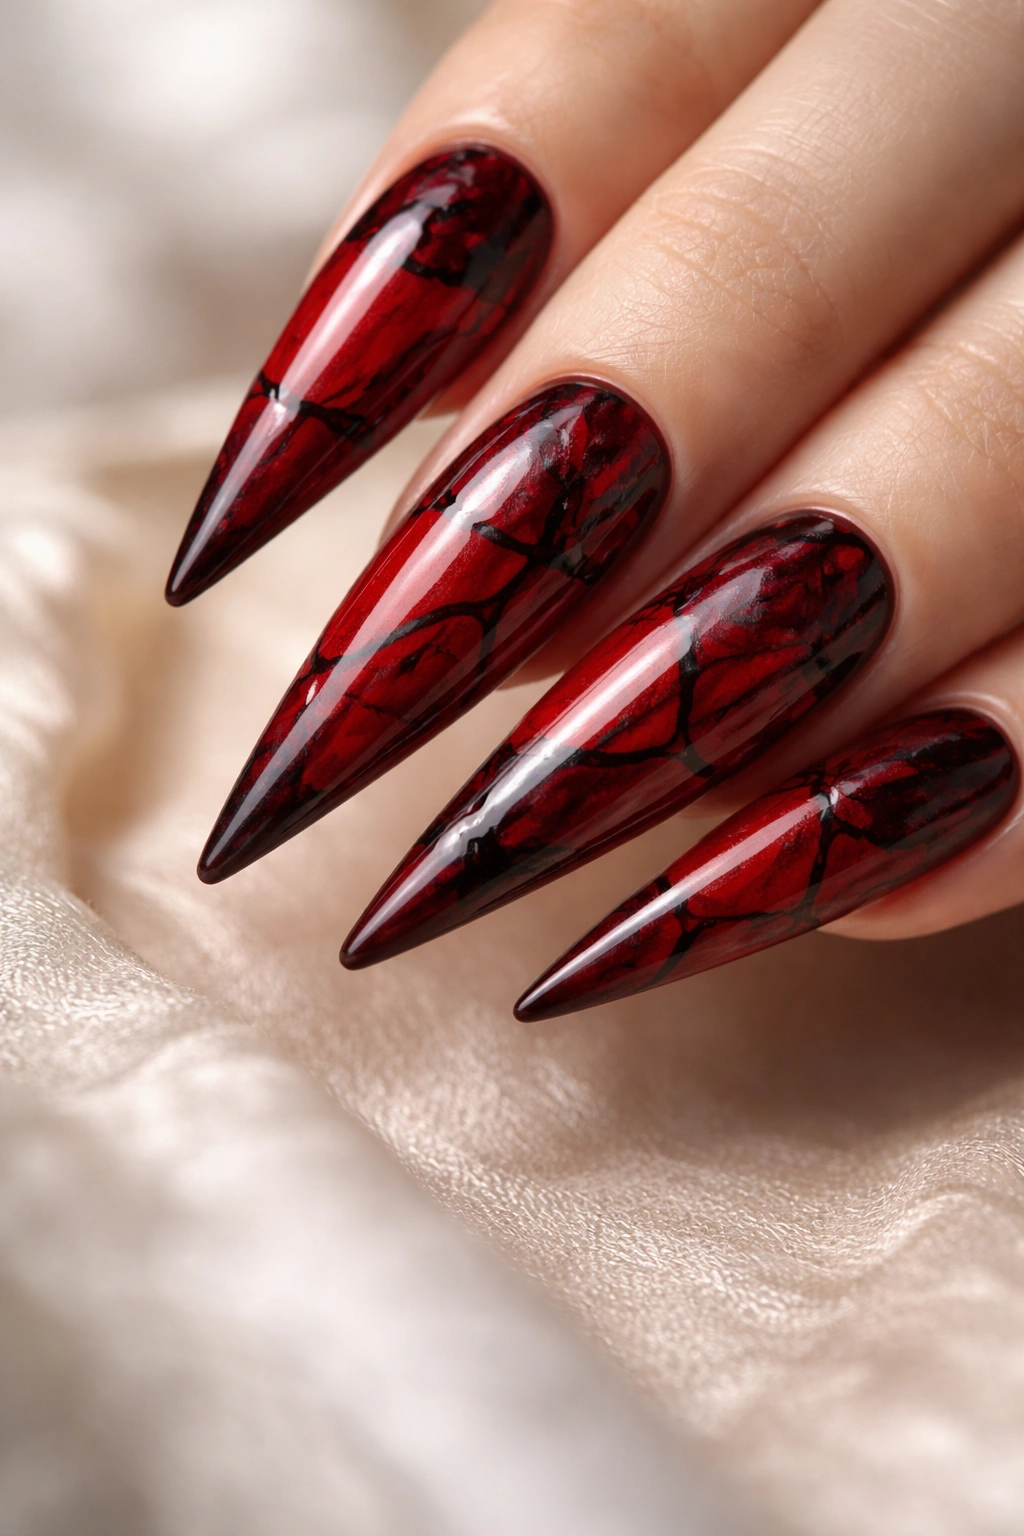
Picture a base of true red covering the entire nail, then delicate black lines creating an organic marble vein pattern across the surface, as if you’ve captured actual marble stone in nail form. The marble effect gives the simple red base an unexpected artisanal quality—it transforms the design from straightforward to sophisticated and textured. Black veining on red creates enough visual complexity that the design feels curated and intentional, but the veins are subtle enough that the red still reads as the dominant color.
Creating a Marble Effect That Looks Intentional
The marble veining technique requires a steady hand or a skilled nail artist who understands how to create organic-looking lines rather than harsh scratches. The black lines should vary in thickness and placement, mimicking the randomness of natural marble. When you apply this over a vibrant red base on elongated stilettos, the veining becomes a focal point that gives depth and dimension to each nail. The effect is reminiscent of luxury materials and high-end design.
Styling Suggestions
- Works particularly well with upscale or formal occasions
- Pairs beautifully with rose gold or gold jewelry
- The design is interesting enough to stand alone without additional nail art
- A glossy top coat emphasizes the marble effect and makes it look even more refined
The marble vein approach is perfect if you want red and black sophistication without making it overtly graphic or geometric.
5. Black Base With Red Accent Nails
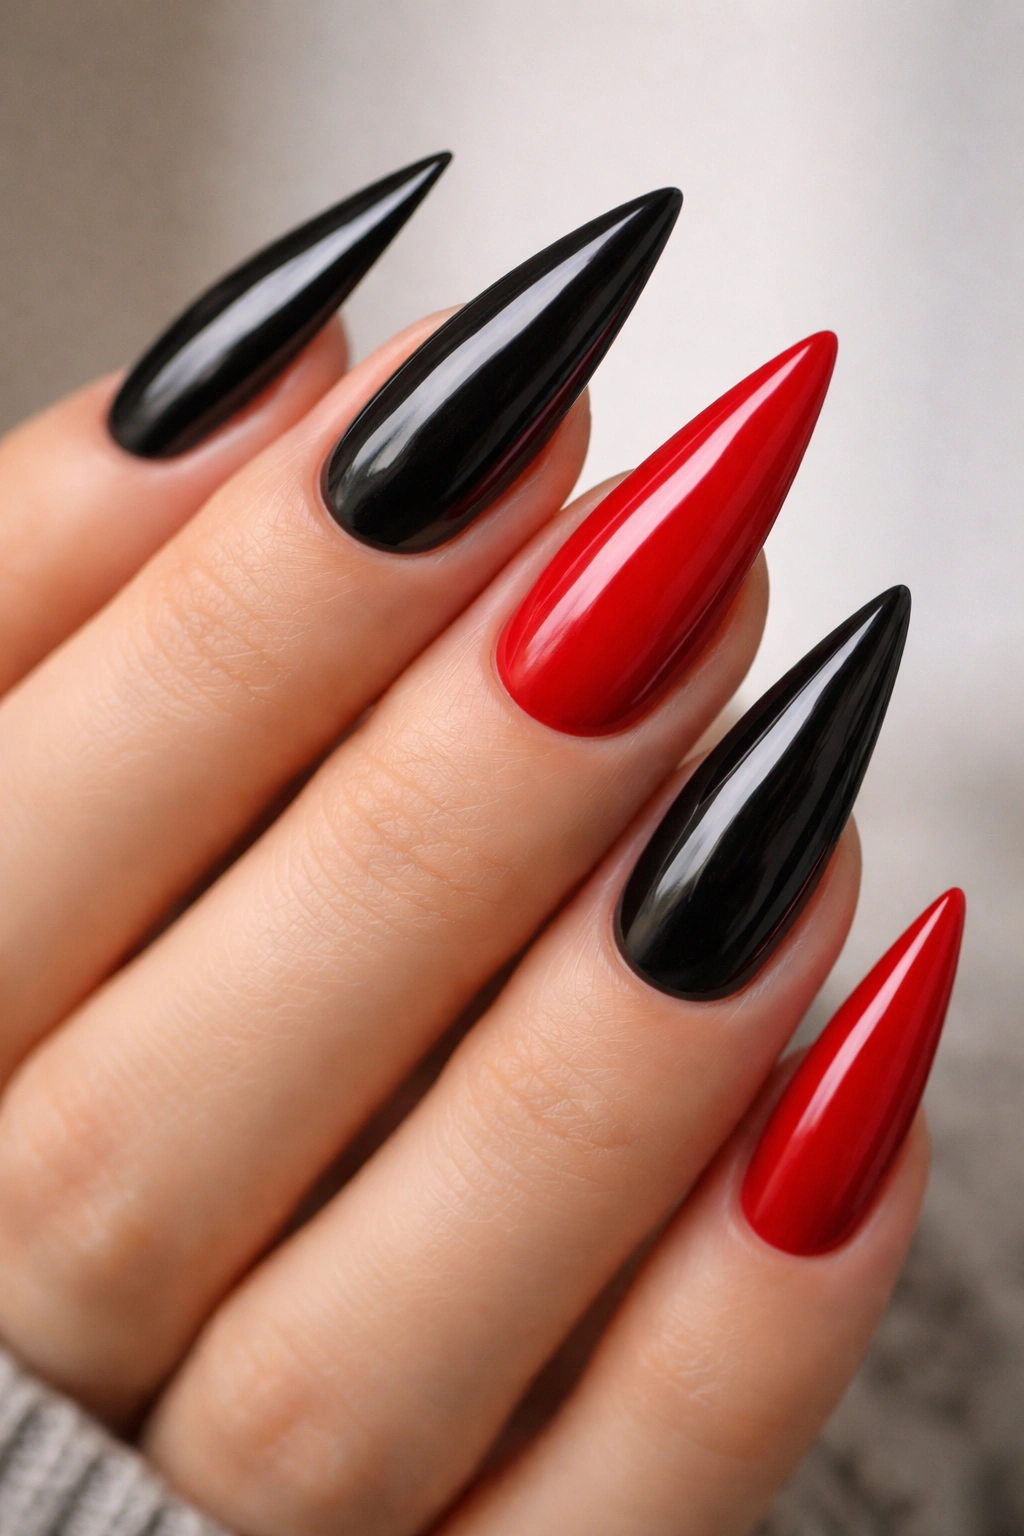
Here’s a more subtle approach: paint most of your nails a sleek jet black, then designate one or two nails (often the ring finger or pinky) as your accent nails and cover them entirely in bright red. This creates a visual hierarchy where the black is your dominant color and the red becomes a strategic focal point. On stilettos, this design is especially striking because the contrast between the black nails and the red accent nail is absolutely undeniable—your eyes are naturally drawn to the color pop.
Why the Accent Nail Strategy Works
The accent nail method is a smart design choice if you want red and black without it feeling overly intense or aggressive. By limiting the red to just one or two nails, you create balance and allow the dramatic colors to feel intentional rather than overwhelming. Your hand reads as polished and put-together, and the accent nails feel like a deliberate design choice rather than a random splash of color. This approach also gives you flexibility—you can switch which nails are accents depending on your mood or outfit.
How to Execute This Design
- Choose either the ring finger or pinky (or both) as your accent nails
- Keep the black base on all other nails in a high-gloss finish
- The red accent nails can be matte, glossy, or even textured (like a glitter top)
- This design looks clean and modern, perfect for professional or casual settings
An accent nail approach is ideal if you’re new to bold nail designs and want to dip your toes into red and black without committing fully.
6. Red Stilettos With Black Tips and Gold Foil Detail
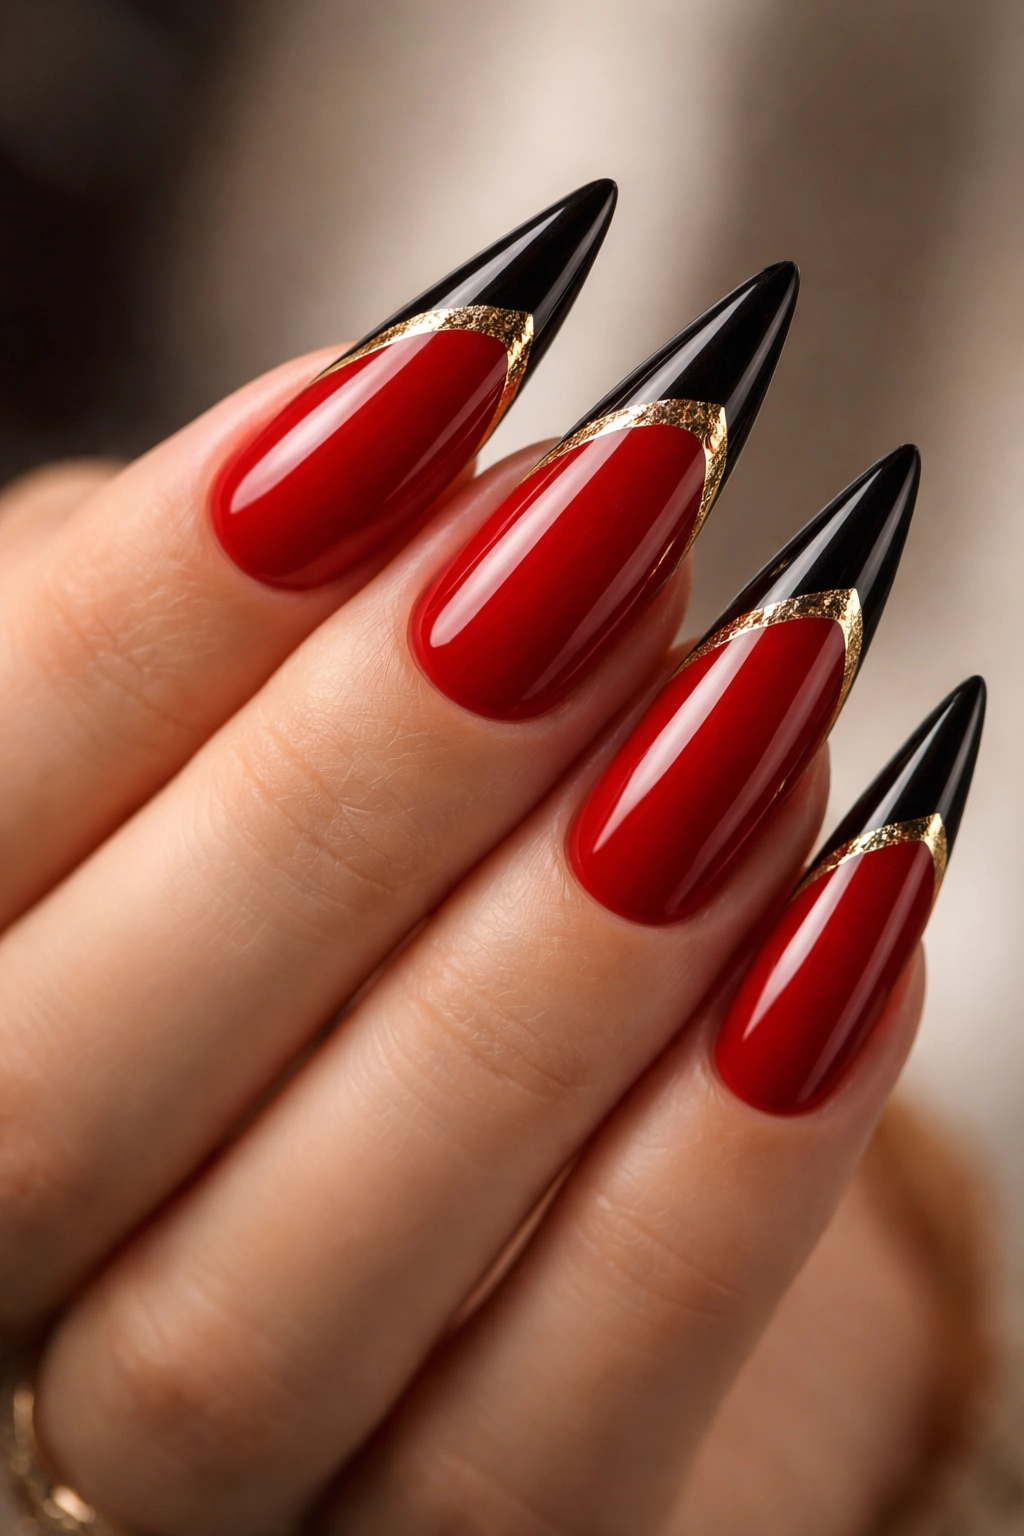
Start with a true, rich red covering the entire nail, then create a sharp black tip using the traditional French manicure technique, and finally add a delicate line of gold foil or metallic leaf just where the red meets the black. The gold acts as a separator and a bridge, turning what would be a simple two-color design into something with three-dimensional depth and luxury. The foil catches light and draws the eye to the precise point where the two colors meet, creating a focal point that feels intentional and high-end.
The Luxury Factor of Adding Metallic Details
Metallic accents elevate red and black from bold to glamorous, signaling that someone put thought and care into the design. Gold foil, in particular, pairs beautifully with both warm reds and cool blacks, creating harmony across the entire nail. On elongated stilettos, the gold line at the tip becomes a delicate detail that adds sophistication without overwhelming the base design. It’s the kind of detail that looks incredible in person and photographs like a luxury manicure.
Ways to Incorporate Metallic Elements
- Gold foil is classic, but rose gold adds warmth and chrome silver adds modernity
- The foil line can be thick for impact or thin for elegance—adjust based on your preference
- You can extend the foil up the sides of the nail for a more elaborate design
- Pair with nude or gold-toned jewelry to echo the metallic detail
This design strikes the perfect balance between bold and refined, making it ideal for anyone who wants their nails to feel genuinely special.
7. Black Stilettos With Red Glitter Ombre

Begin with a pure black base on the entire nail, then apply a red glitter or sparkle finish starting about halfway down the nail and graduating toward the tip, so the bottom half is solid black and the top half transitions into increasingly dense red glitter. The sparkle catches the light and creates movement and energy, while the solid black base keeps the design grounded and elegant. This combination of matte and glitter gives you the best of both worlds: sophisticated darkness paired with festive sparkle.
The Impact of Glitter Ombre on Length
On stilettos, a glitter ombre is particularly effective because the extended nail length gives the glitter more space to catch light and shine. When you move your hands—typing, gesturing, reaching—the glitter flashes and sparkles in a way that feels celebratory and fun. The black base prevents the glitter from feeling overwhelming or costume-like; instead, it grounds the sparkle and makes it feel intentional and chic. This design works equally well for day or night events.
Application Tips for Maximum Sparkle
- Use a high-quality gel glitter or hybrid formula that will maintain shine throughout wear
- Build the glitter density gradually to create a smooth ombre transition
- A thick top coat will protect the glitter and keep it from shedding
- The black base makes the red glitter appear more saturated and vivid
Pro tip: This design photographs beautifully under any lighting, but it’s especially stunning under the glow of evening or artificial light when the glitter really comes alive.
8. Geometric Red and Black Pattern (Chevrons or Stripes)
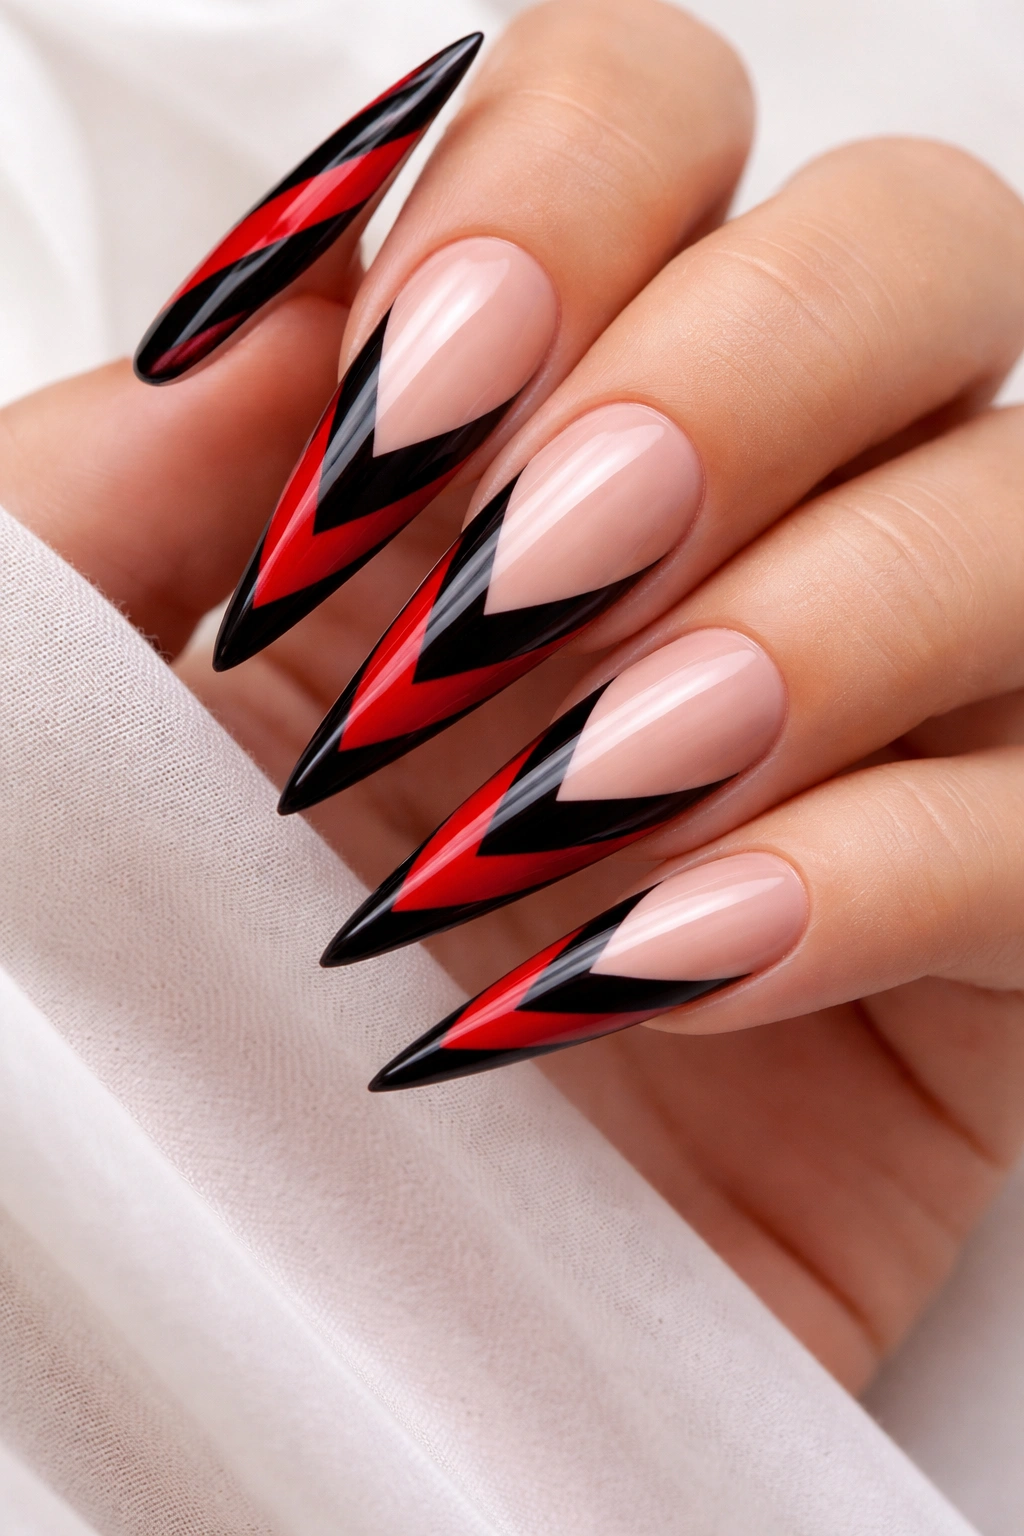
Create a repeating pattern using red and black stripes, chevrons, or geometric shapes that run across the nail horizontally, vertically, or diagonally. A chevron pattern (those arrow-like V-shapes pointing downward) is particularly striking on stilettos because it accentuates the length and movement of the nail. Each stripe or shape is a deliberate choice, and when you’re using just two colors, the simplicity of the design actually makes it feel more artisanal and intentional. The geometric approach appeals to people who love clean lines and visual interest without fussiness.
Designing Patterns That Feel Balanced
The key to successful geometric design is ensuring that the red and black appear in roughly equal proportions, so the eye doesn’t feel pulled toward one color over the other. Chevrons work beautifully because they create a sense of movement and direction—your eyes follow the pattern down the nail. Stripes can be thin and delicate or thick and bold, depending on your preference. The graphic nature of these patterns means they work best with minimal other nail art—let the geometry speak for itself.
Pattern Variations to Consider
- Chevrons pointing downward create an elegant, flowing look
- Diagonal stripes add dynamic energy to the design
- Alternating thick and thin stripes create rhythm and visual interest
- Negative space (leaving areas of nude or white showing through) can add sophistication to geometric designs
Geometric designs appeal to people who appreciate modern art, architecture, and clean design aesthetics.
9. Red Matte With Black Matte and High-Gloss Contrast

Paint the entire nail with a luxurious matte red, then add black matte elements (a stripe, a shape, or a detail) and finish with one area of high-gloss top coat—perhaps just the tip or a geometric accent—to create a striking contrast between matte and glossy finishes. The matte finish feels velvety and sophisticated, while the glossy accent creates a focal point that draws light and attention. This finish play is a clever design trick that makes a two-color design feel more complex and considered than the colors alone might suggest.
Why Texture Matters as Much as Color
Finish variations are an underrated element of nail design. By combining matte and glossy finishes on the same nail, you’re adding a tactile and visual dimension that makes the design more interesting to look at and more sophisticated overall. The matte red evokes luxury and modern aesthetics, while the glossy black accent feels crisp and polished. Together, they create a design that’s greater than the sum of its parts. On stilettos, this finish contrast is particularly noticeable because the length of the nail gives both finishes room to express themselves.
How to Layer Finishes Effectively
- Apply your matte base first and allow it to dry completely
- Add your black matte accent in whatever shape or placement you prefer
- Apply a matte top coat to set the matte finish
- Carefully apply glossy top coat only to your designated accent area, using a thin brush to avoid overlap
- The contrast between matte and glossy becomes a design element in itself
This technique is for anyone who loves nail art but prefers subtlety and texture over additional decorative elements.
10. Red Stilettos With Black Negative Space Design
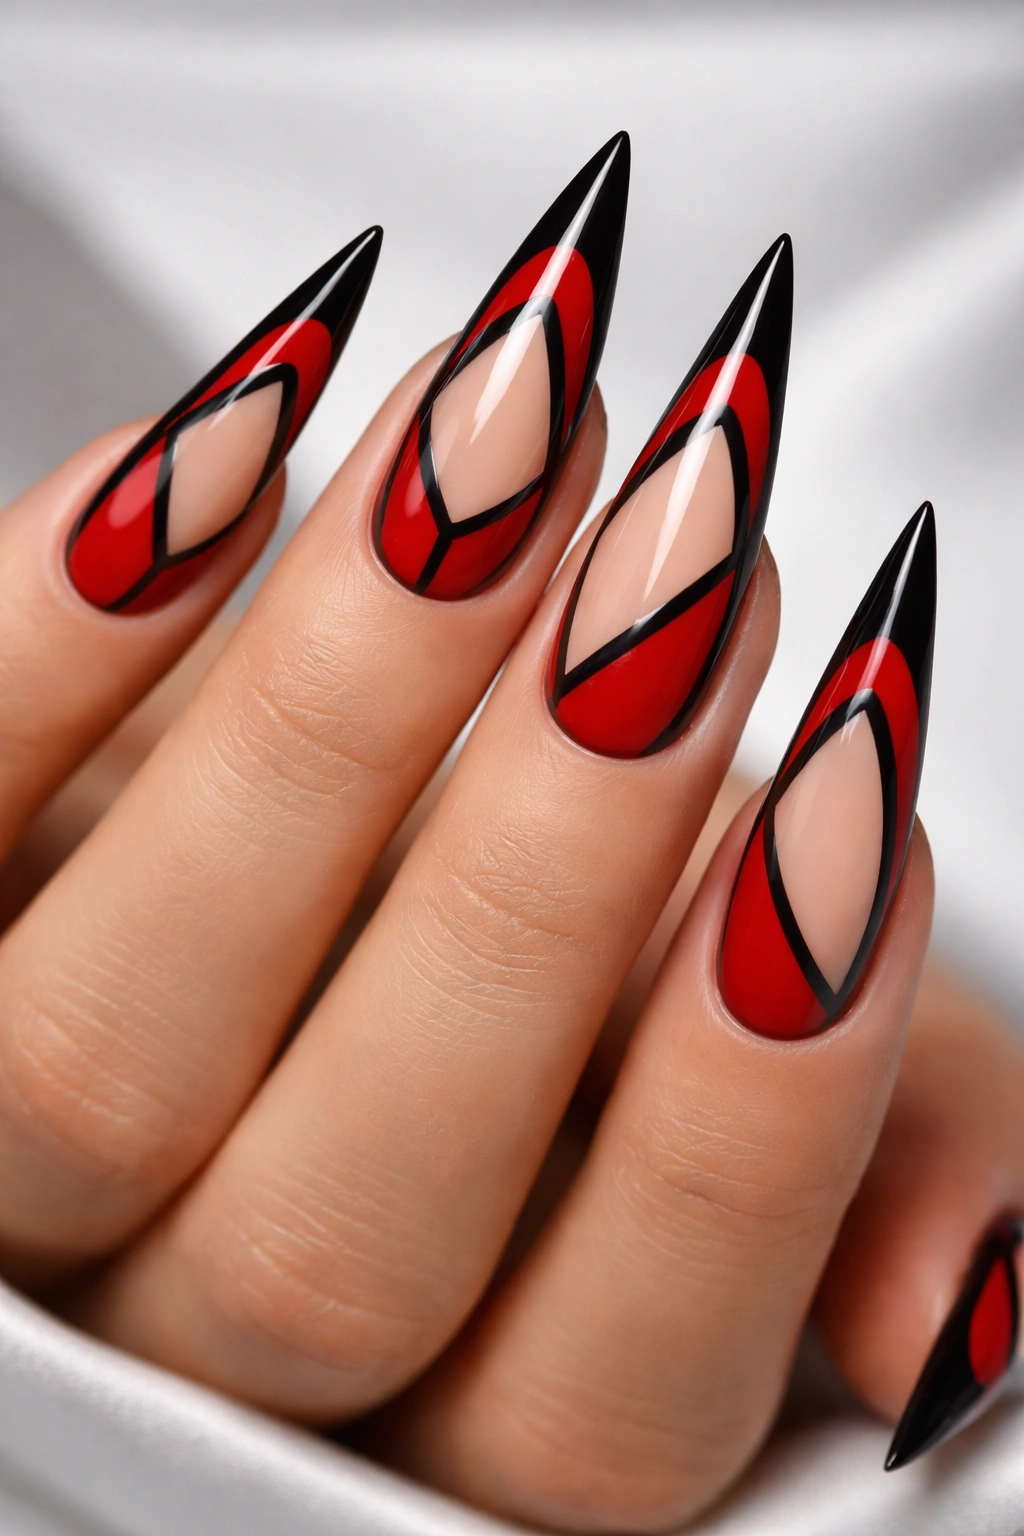
Start with red as your base color, then use negative space (the natural nail or a nude base showing through) to create shapes and patterns. Black lines frame these negative space areas, creating a design that’s modern and minimalist. Common negative space designs include geometric shapes, cutouts, or framing—for instance, leaving the very center of the nail bare with red on the sides and black outlining the bare space creates an optical illusion of depth. This approach is particularly clever on stilettos because the elongated shape allows for interesting vertical or horizontal negative space patterns.
The Psychology of Negative Space Design
Negative space designs feel more sophisticated than fully painted nails because they require intentional planning and execution. By strategically showing the nail (or a neutral base) beneath the color, you’re creating visual breathing room and directing the viewer’s attention precisely where you want it. The black outlines frame the negative spaces, making them feel deliberate and designed rather than accidental. This approach appeals to people who love minimalism, modern art, and thoughtful design choices.
Examples of Striking Negative Space Patterns
- A centered oval or circle of negative space framed by red and black
- Vertical stripes of negative space alternating with red and black stripes
- Geometric shapes (triangles, rectangles, diamonds) cut out from the color
- A frame border in red and black with the center nail showing through
Negative space designs work beautifully with minimalist jewelry and clean, modern fashion aesthetics.
11. Black Base With Red Rhinestone or Crystal Accent
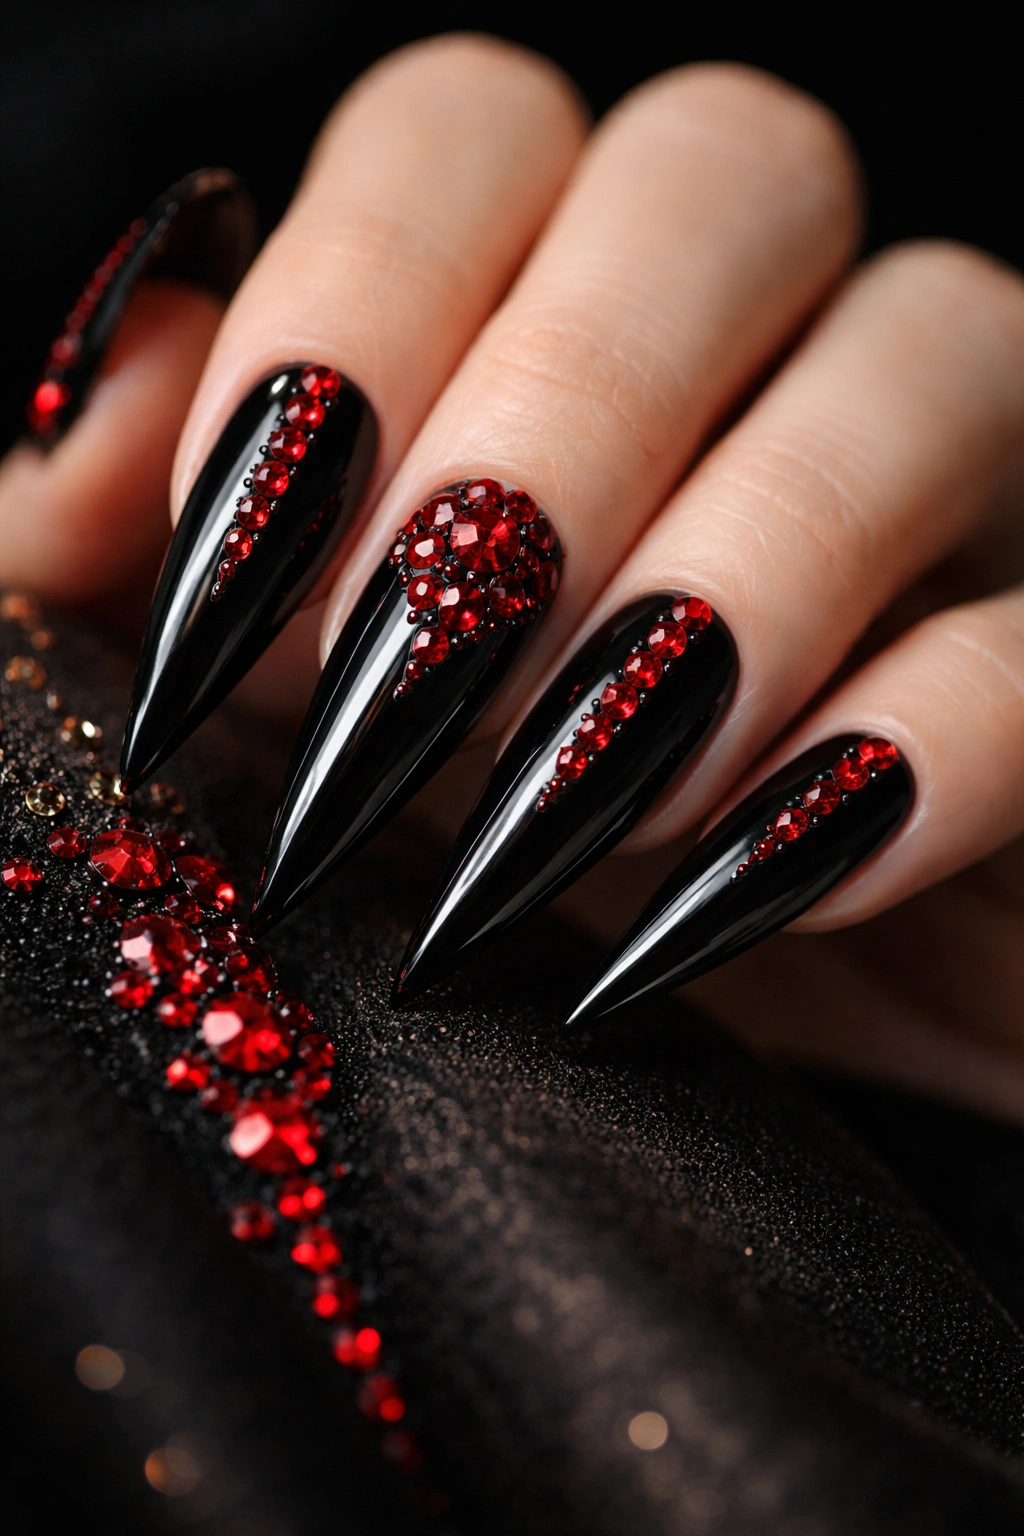
Begin with a solid black base covering the entire stiletto nail—sleek, elegant, timeless. Then apply a series of red rhinestones or crystals in a pattern: a vertical line down the center, a cluster near the tip, or scattered across the nail in a seemingly random but actually deliberate arrangement. The crystals catch light and sparkle, while the black base keeps the design from feeling over-the-top. This combination of dark sophistication with glittering glamour is ideal for evening events, celebrations, or any time you want your nails to feel genuinely special and dressed up.
Choosing the Right Rhinestones for Longevity
High-quality crystals and rhinestones are essential—cheap stones can fall off quickly and look obviously fake. Look for Swarovski crystals or comparable high-grade stones that will stay put and sparkle brilliantly. Red rhinestones coordinate beautifully with the black base, and they can be arranged in patterns that feel intentional: perhaps a vertical line, a clustered design, or even an ombre effect where they graduate from large near the tip to small near the cuticle. When applied over a black matte base, the stones really pop and become the undeniable focal point of the nail.
Design Arrangements for Maximum Impact
- A single vertical line of rhinestones creates an elegant, elongating effect
- A cluster of stones near the tip creates a focal point that draws the eye upward
- Alternating sizes of stones can create movement and visual interest
- Stones positioned on only one or two accent nails keeps the overall look balanced
Worth knowing: This design is perfect for occasions where you want to feel extra glamorous, but it requires more maintenance as rhinestones can shift or loosen over time.
12. Striped Stilettos With Alternating Red and Black
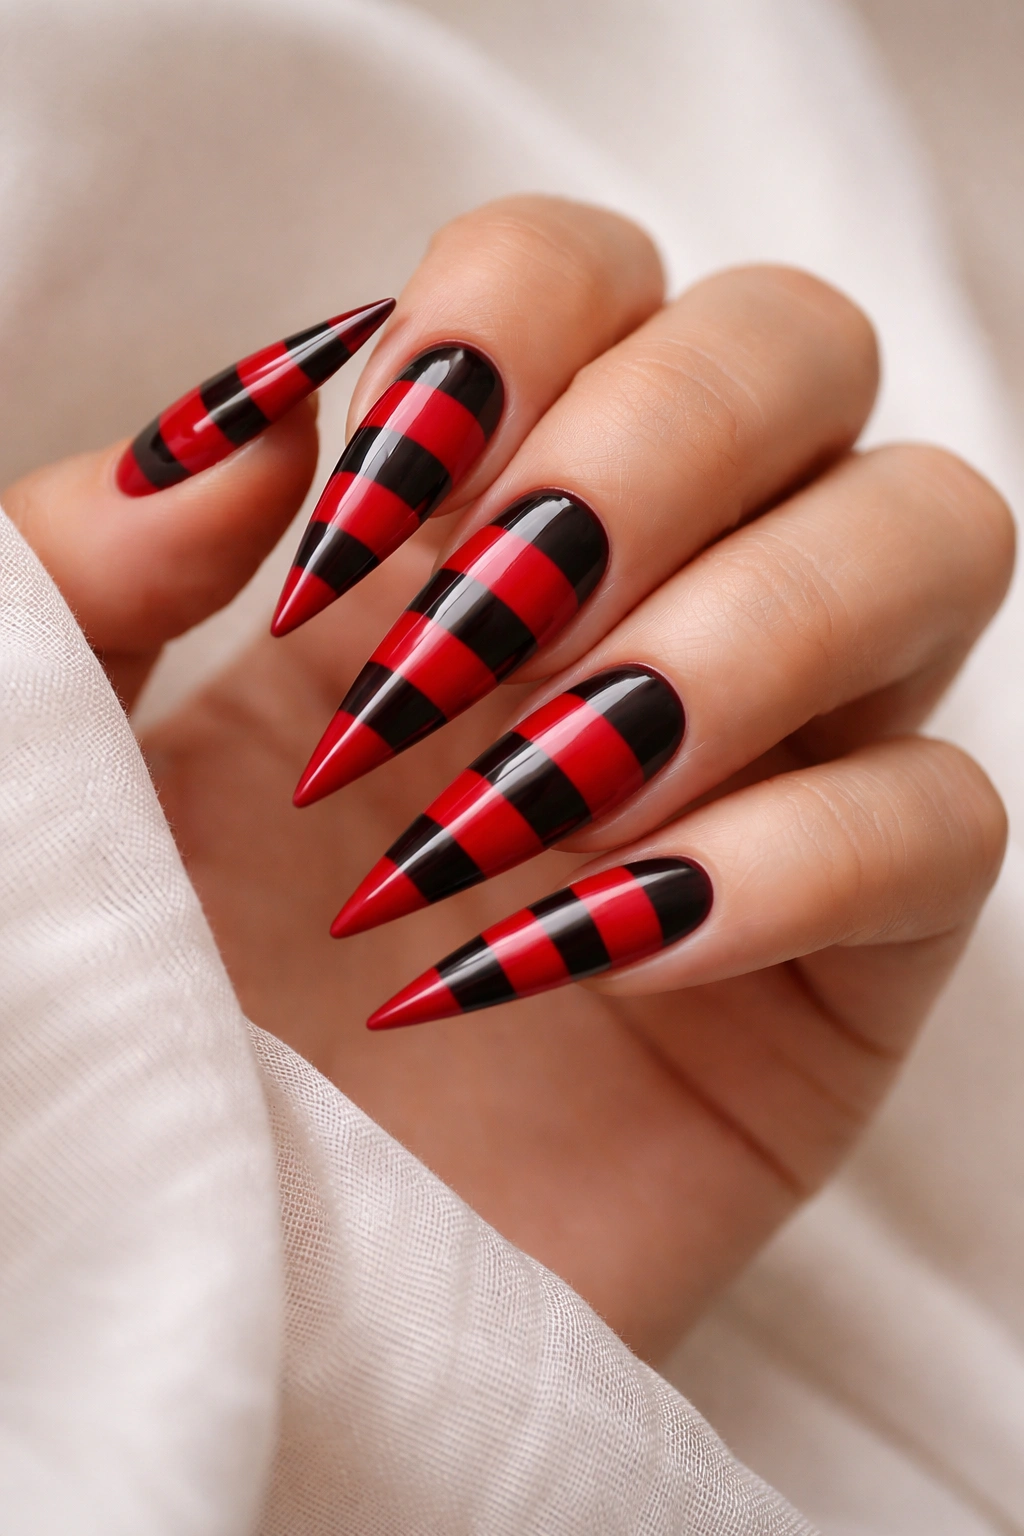
Create thin or thick horizontal stripes that alternate perfectly between red and black across the entire nail, from base to tip. The striped pattern is clean, graphic, and visually interesting without being complicated. Because red and black stripes alternate with perfect consistency, the eye travels across the nail and reads the pattern immediately—it’s simple, effective, and looks intentional. Striped designs work especially well on stilettos because the length of the nail allows for several stripes, creating rhythm and repetition that feels satisfying and complete.
Stripe Width and Visual Effects
The width of your stripes dramatically changes how the design reads. Thin, delicate stripes create a more sophisticated, subtle look and appear almost like texture from a distance. Thick, bold stripes create a more graphic, statement-making design that’s impossible to miss. The choice depends on your personal preference and the occasion. Thin stripes pair well with professional settings, while thick stripes lean into the bold, fashion-forward aesthetic. On stilettos, any stripe width looks elongated and elegant simply because of the nail shape itself.
Variation Ideas for Striped Designs
- Alternate thick and thin stripes for visual rhythm
- Create diagonal stripes instead of horizontal for a dynamic, flowing look
- Vary the stripe width as the nail progresses (wider at the base, narrower at the tip)
- Add metallic stripes (gold or silver) between red and black for a three-tone effect
Striped designs are straightforward to execute but look undeniably polished and intentional, making them perfect for anyone who loves clear, graphic design.
13. Red Stilettos With Black Lace or Filigree Detail
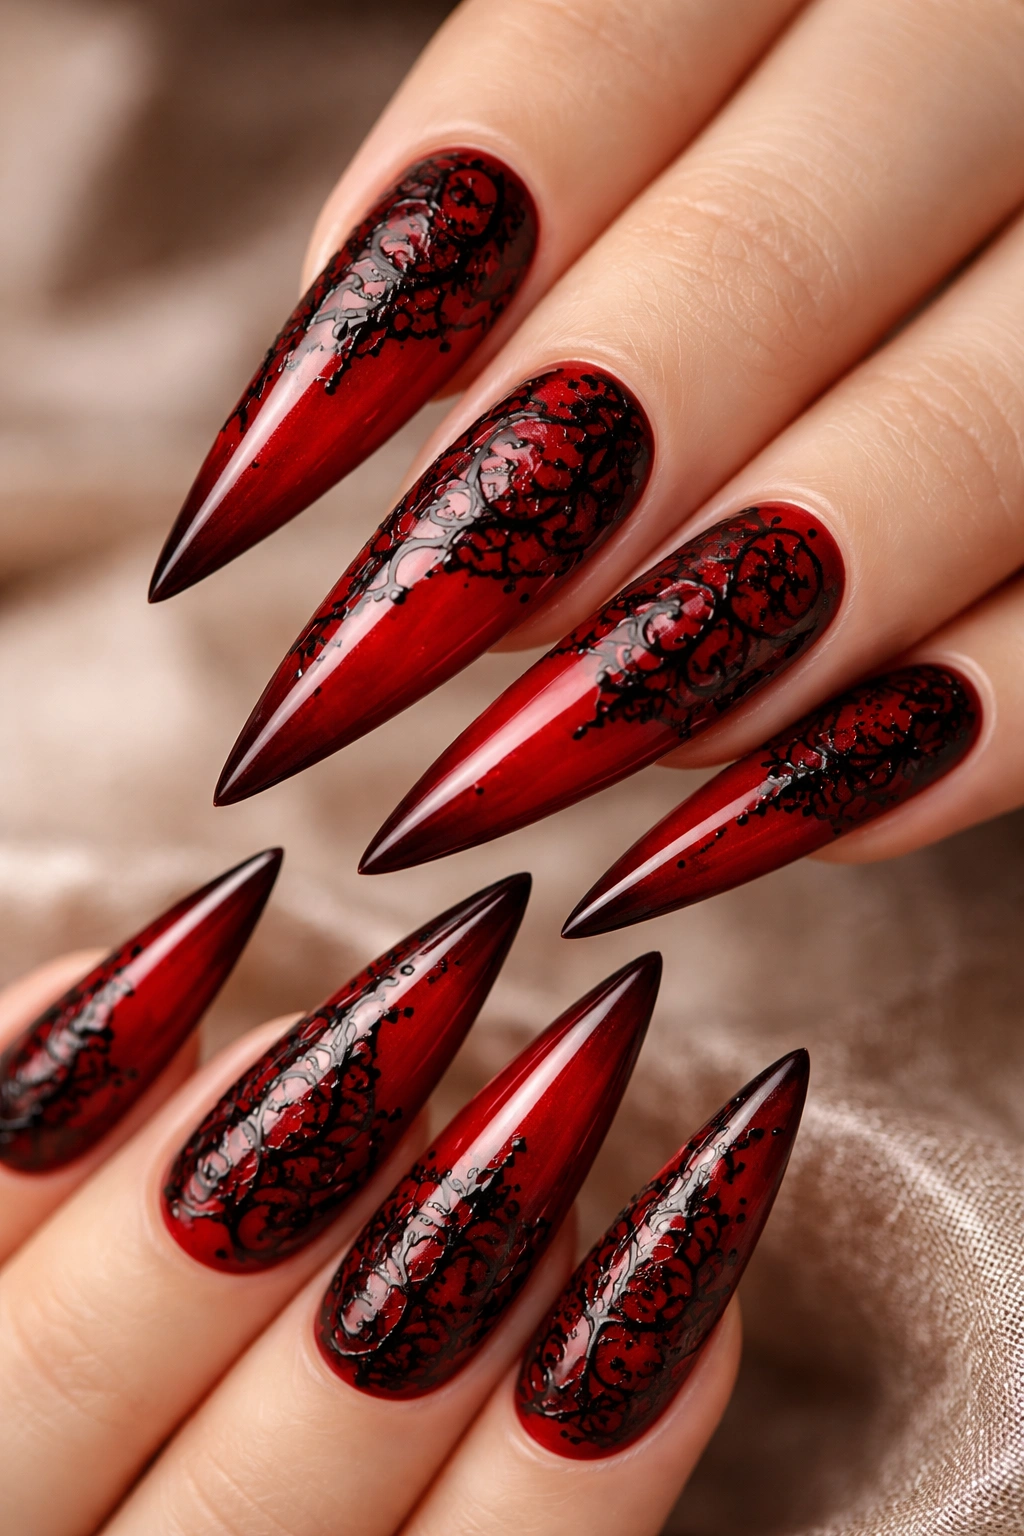
Begin with a deep, rich red as your base color, then add an intricate black lace or filigree pattern across the nail using a fine detail brush or stencil. The delicate black lines create lacework that feels vintage, romantic, and unexpectedly sophisticated. Lace details paired with red evoke imagery of elegant lingerie, classic fashion, and refined femininity—it’s a combination that feels both edgy and romantic. On the sharp, modern silhouette of a stiletto nail, lace detailing becomes a beautiful juxtaposition: modern shape with classical, ornate decoration.
Creating Convincing Lace Patterns
Lace and filigree details require a steady hand, though many nail artists use small stencils or hand-drawn lace patterns that have been refined through practice. The black lines should feel delicate and organic, mimicking the intricate patterns of actual lace. When applied over red, the black lace really stands out and creates visual interest that makes the entire nail feel like a wearable piece of art. The contrast between the bold color and delicate detail is what makes this design work so effectively.
Where to Place Lace Details
- A border of lace along the entire edge of the nail creates a frame effect
- Lace concentrated at the tip (like a French tip made of lace) is particularly elegant
- All-over lace covering the entire nail creates maximum intricacy
- Lace on one accent nail paired with solid red on others keeps the look balanced
Insider note: Lace designs photograph beautifully and look especially sophisticated in close-up photos, making them perfect if you enjoy sharing your nails on social media.
14. Yin-Yang Symbol in Red and Black
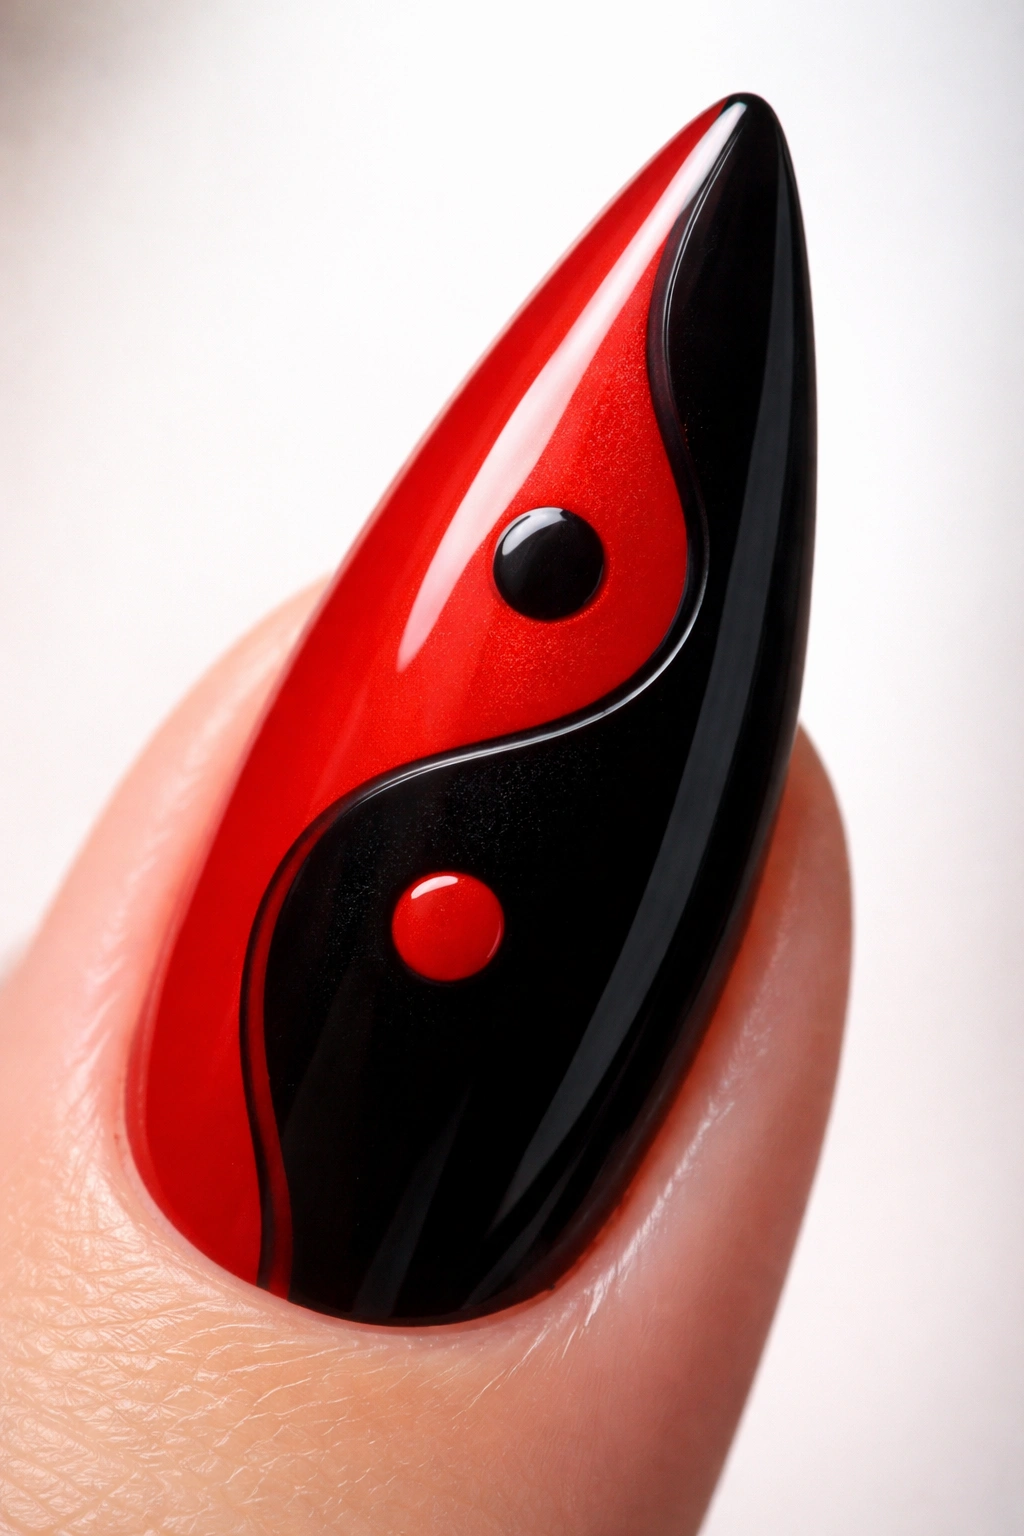
Design a classic yin-yang symbol using red and black on your nail, with one side in red and the opposite side in black, separated by the signature S-curve. The yin-yang is an instantly recognizable symbol with thousands of years of meaning, and translating it onto a stiletto nail creates a nail design that’s not only visually striking but conceptually interesting. The curved divisions of the yin-yang complement the elongated, pointed shape of a stiletto—the curves and the point create visual balance. This design works beautifully as a focal point on a single accent nail, or you could mirror the design across multiple nails.
The Symbolism Behind Yin-Yang on Your Nails
The yin-yang represents balance and harmony between opposing forces—it’s a symbol of duality, complementarity, and wholeness. When applied to red and black nails, it becomes a statement about how different, seemingly opposing elements can coexist beautifully. The design is sophisticated enough for someone who appreciates Eastern philosophy, modern aesthetics, and thoughtful symbolism. It’s a conversation starter that signals depth and intentionality in your personal style.
Design Variations on the Classic Symbol
- Keep the symbol clean and simple for a minimalist look
- Add gold or silver outlines to the symbol for extra definition
- Create the yin-yang only on accent nails while keeping other nails solid red or black
- Reverse colors on different nails (one nail with red yin and black yang, the next with black yin and red yang) for visual variety
This design works beautifully for anyone who wants nails that mean something beyond pure aesthetics.
15. Holographic or Chrome Black With Red Foil Accents

Create a base using holographic or chrome black—these finishes shift and shimmer across the color spectrum, creating an iridescent effect that’s modern and eye-catching. Then add accents of red foil (or chrome red) strategically placed across the nail: perhaps along the edges, in geometric shapes, or as a gradient that intensifies toward the tip. The combination of the shifting holographic black with the rich saturation of red foil creates a nail design that feels truly next-level and fashion-forward. The different textures and finishes mean the nails look different depending on the lighting and angle from which they’re viewed.
Understanding Holographic and Chrome Finishes
Holographic and chrome finishes are among the most modern nail art techniques available. A holographic finish displays multiple colors simultaneously as light bounces across the surface, creating a constantly shifting rainbow effect. When the holographic base is black, it becomes a sophisticated, multidimensional version of black that catches light in unexpected ways. Adding red foil accents on top creates focal points and areas of deep color saturation that contrast beautifully with the shimmering finish. This design is unquestionably bold and modern—it’s for people who want their nails to be visibly special and notably fashionable.
How to Style This Ultra-Modern Design
- Let these nails be your statement accessory—keep jewelry and clothing more neutral
- The design works best with modern, minimalist fashion or bold, fashion-forward aesthetics
- These finishes photograph incredibly well, especially in varied lighting
- The shifting colors mean the nails will look different throughout the day as lighting changes
Pro tip: Holographic and chrome nails require careful application and a quality top coat to maximize the shifting effect and longevity—this is a design worth investing in with a skilled nail artist.
Final Thoughts
Red and black stiletto nails have earned their place as one of the most versatile, endlessly reinterpretable color combinations in nail art. Whether you’re drawn to the timeless elegance of a French tip twist, the bold geometry of a 50/50 split, the glamorous sparkle of rhinestones over black, or the artistic complexity of lace and filigree details, there’s a red and black design that perfectly matches your aesthetic and personality.
The beauty of this color pairing is that it genuinely works for every season, every mood, and every occasion. Red and black read as equally appropriate for a high-powered board meeting, a night out dancing, a casual coffee date, or a formal celebration. The colors are forgiving in terms of showing wear, which means your manicure looks freshly done for longer—a practical advantage that pairs well with the aesthetic one. Your nails become an extension of your personal style, a small declaration that you understand the power of color, contrast, and intentional design choices.
The next time you’re in the chair at your nail salon, consider one of these designs as your starting point. Your nail artist can adjust, adapt, and personalize any of these styles to match your specific vision, hand shape, and lifestyle needs. Red and black stilettos aren’t just a manicure—they’re an attitude, a aesthetic choice, and a way of showing the world that you know exactly what you want and you’re not afraid to make a statement about it.
