

Reverse stiletto nails flip the script on traditional pointed manicures—instead of coming to a sharp point at the tip, they’re squared off at the end with a dramatic, sculpted angle that angles inward rather than outward. The effect is edgy, modern, and completely unexpected. If you’ve ever scrolled through nail inspiration feeds and felt like traditional almond nails were too safe and regular stilettos were a bit much, reverse stilettos might be the sweet spot you’ve been looking for.
What makes reverse stilettos so captivating is their architectural quality. They’re angular and geometric without being quite as extreme as full-length stilettos, and they photograph beautifully from every angle. The design creates an inherent visual interest just from the shape alone—throw a design or color onto that canvas and you’ve got something genuinely striking.
The nail shape itself flatters most hand types because it elongates the finger without the commitment of an ultra-pointed tip that can be fragile in everyday life. Whether you’re drawn to minimalist elegance, bold graphic designs, or intricate nail art, reverse stilettos provide the perfect platform. Let’s explore 11 compelling reverse stiletto nail ideas that showcase just how versatile and stunning this shape can be.
1. Sleek Chrome Mirror with Geometric Cutouts
Chrome powder creates an almost liquid metallic finish that catches light from every angle, and when combined with negative space cutouts, it becomes something architectural and futuristic. Start with a nude or soft pink base coat, then apply chrome powder to most of the nail surface—typically the nail bed and outer edges—and leave strategic geometric shapes bare (think triangles, rectangles, or abstract angular shapes that echo the reverse stiletto silhouette itself).
The Technique That Makes This Work
This design relies on precision masking to keep the chrome from covering your intentional negative space. You can use nail tape, stencils, or freehand the shapes if you’re confident. The key is applying the chrome powder while the topcoat is tacky but not fully set—it adheres to the sticky surface and creates that liquid-mirror effect. Seal everything with a shiny topcoat to make the chrome pop and protect the design.
What You Need to Know
- Chrome powder comes in gold, silver, rose gold, and holographic varieties—pick whichever complements your base color
- The geometric cutouts should follow the angle of your reverse stiletto for maximum visual cohesion
- This design is modern and works especially well for professional settings when done in neutral tones
- The chrome finish can be delicate, so a quality top coat and careful handling are essential
Pro tip: Apply chrome powder with a soft velvet applicator (usually included) rather than pressing it on with your fingers—you’ll get better coverage and a more even metallic finish.
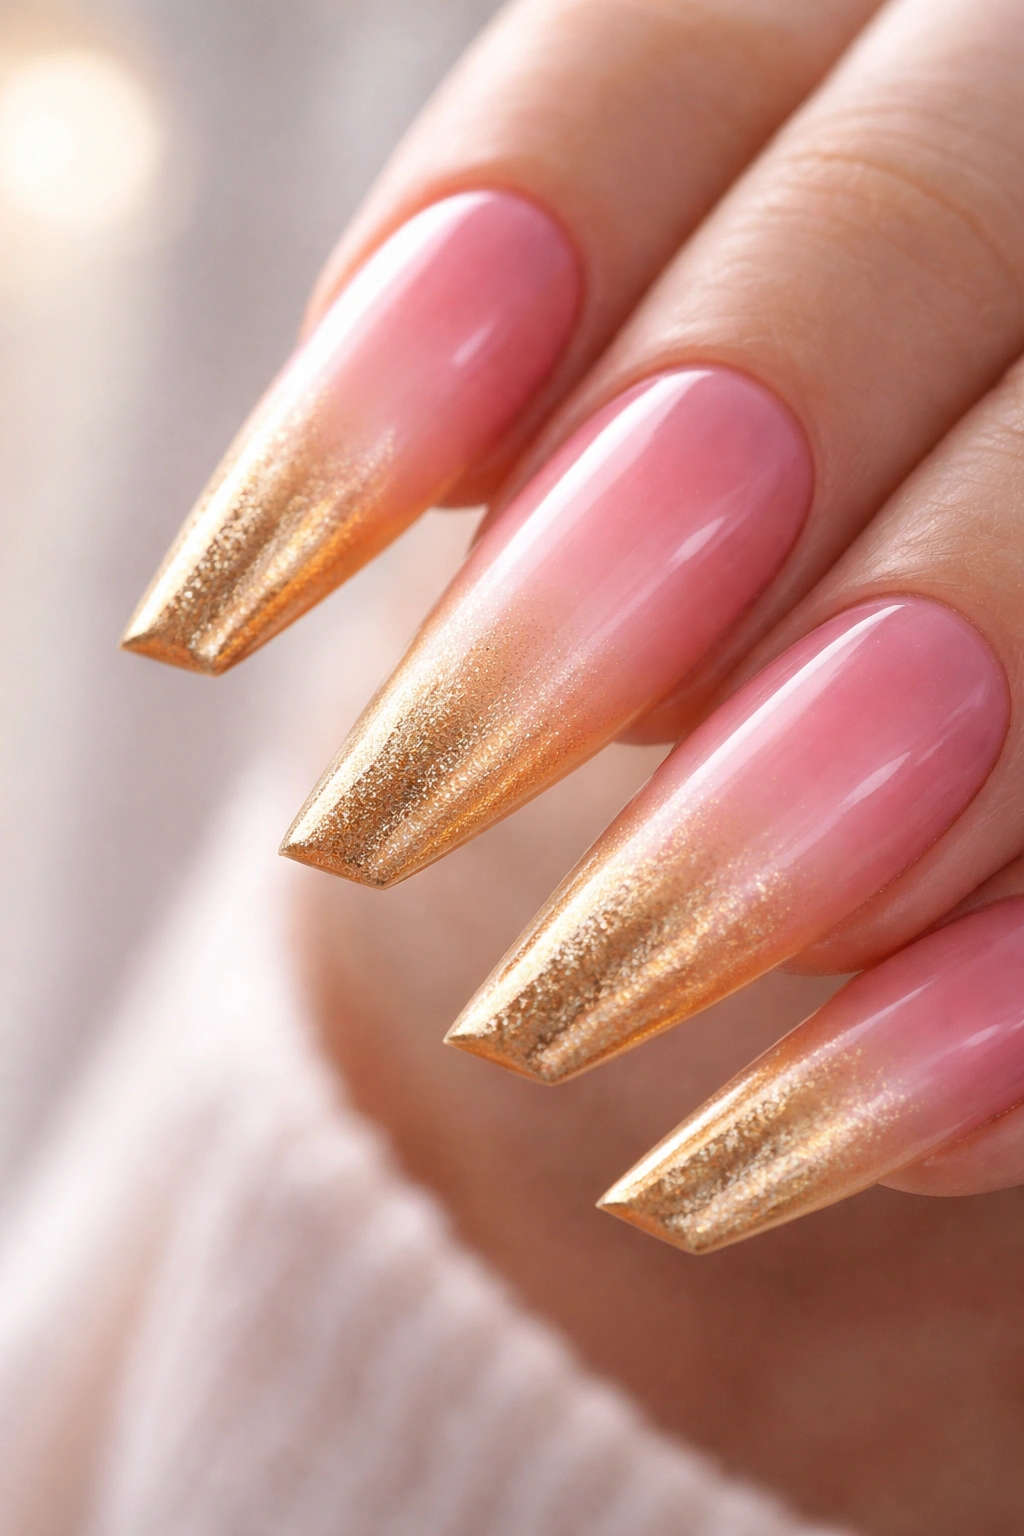
2. Gradient Ombré Fade with Holographic Dust
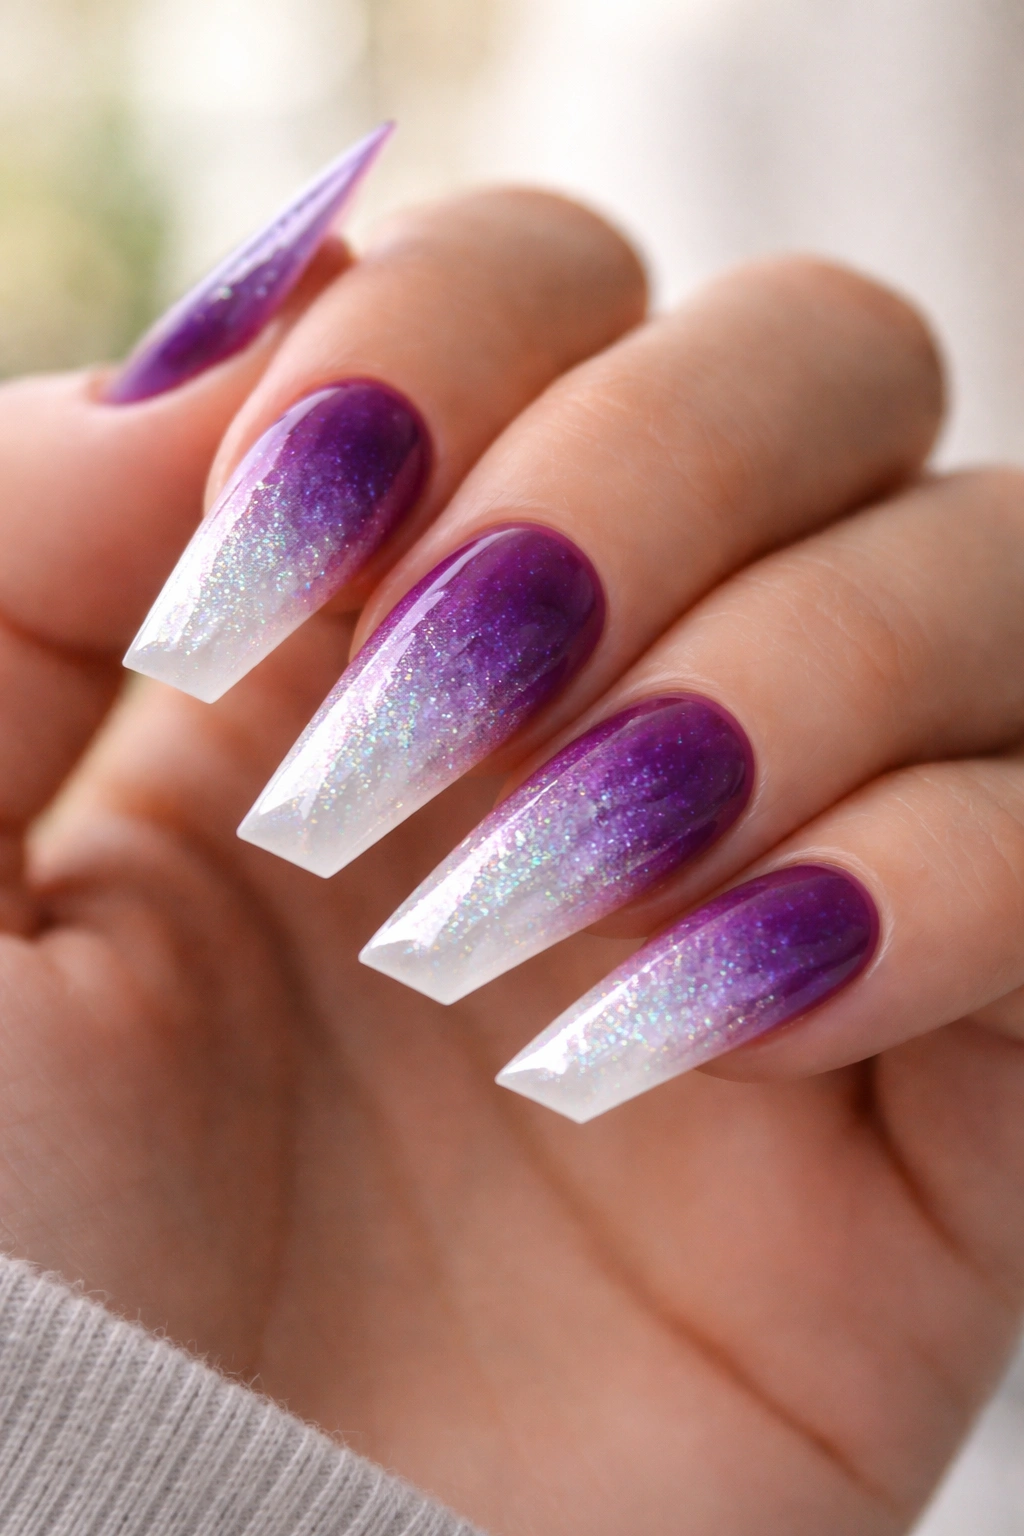
An ombré gradient that flows from deep jewel tones at the base to shimmery light tones at the tip creates depth and dimension that makes reverse stilettos feel almost 3D. Choose two contrasting colors—perhaps deep emerald fading to pale mint, or rich burgundy fading to champagne—and blend them seamlessly across the nail using a sponge.
Building the Gradient Technique
Load a makeup sponge with thin layers of both colors, overlapping them slightly in the middle where you want the transition. Dab (don’t swipe) the sponge onto the nail in short, quick motions—this blending technique prevents harsh lines and creates a soft, flowing transition. Once the gradient is set, add holographic dust or flakes to the lighter tip area and seal with topcoat.
Design Considerations
- Ombré gradients photograph beautifully and photograph even better when you position your hands against natural light
- Choose colors that complement each other’s undertones for a cohesive fade rather than a jarring contrast
- The holographic element adds subtle sparkle without making the design feel costume-like
- Reverse stilettos actually showcase ombré gradients better than traditional shapes because the angle creates visual interest
Worth knowing: Sponge your gradient in vertical motions along the length of the nail rather than horizontal—you’ll achieve a more seamless transition because you’re following the natural direction of the nail’s growth.
3. Matte Black with Gold Linear Minimalism
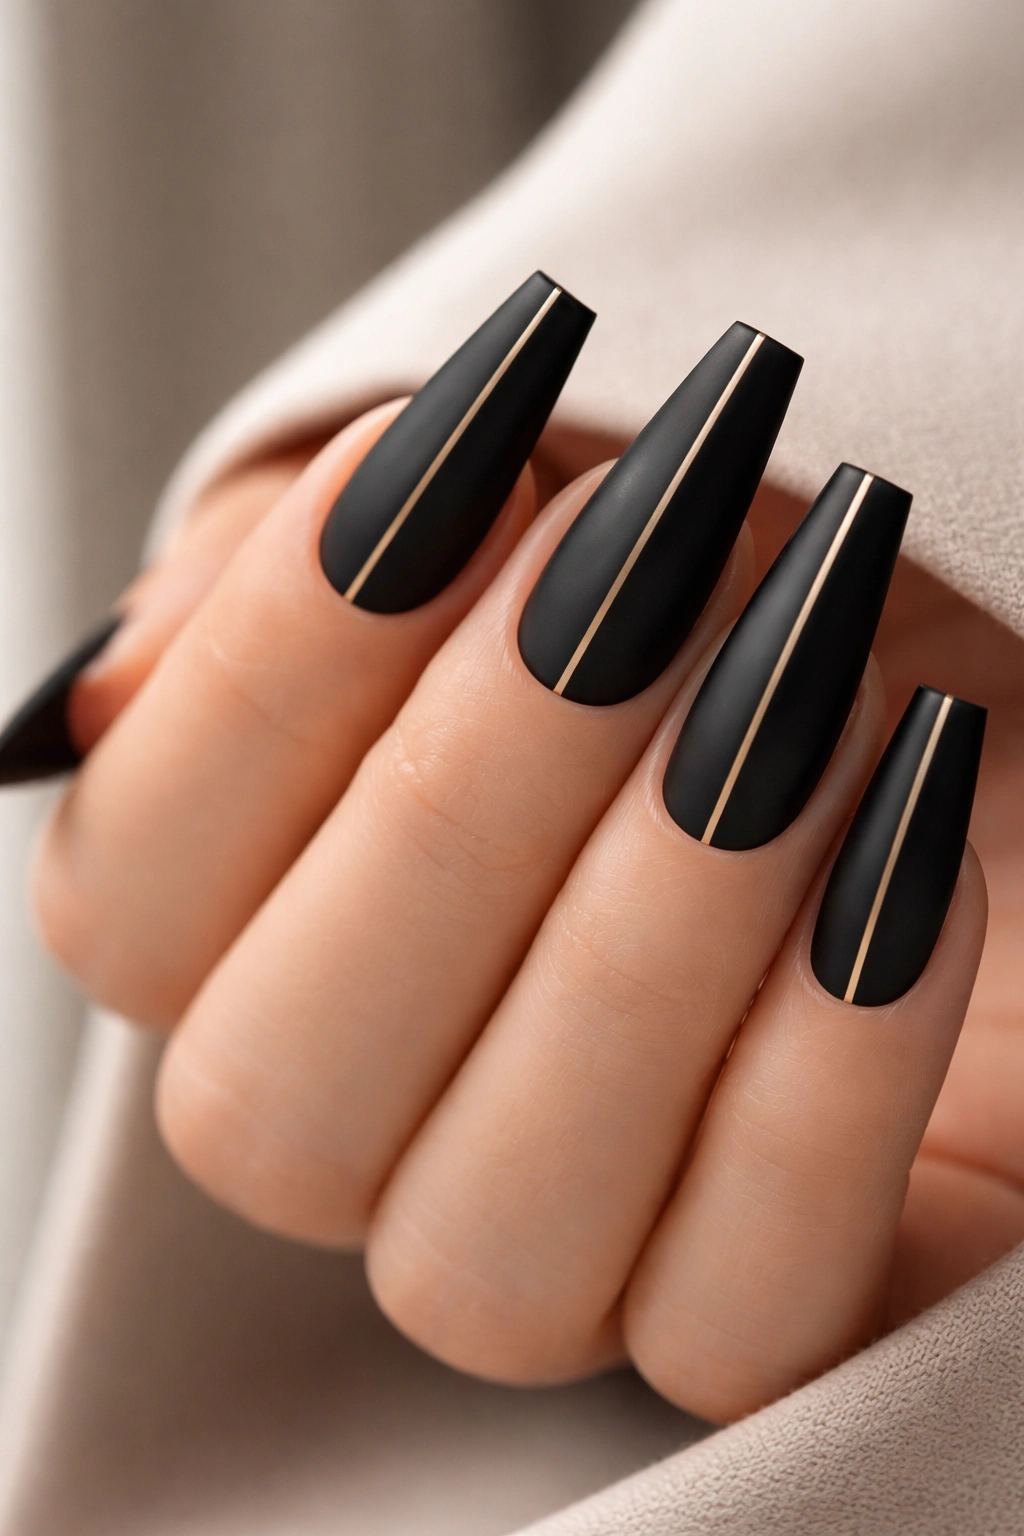
Sometimes less is genuinely more, and matte black reverse stilettos with a single gold line running down the center or along the edge hits a sophisticated, architectural sweet spot. The matte finish absorbs light rather than reflecting it, which makes the nail shape itself become the focus—that dramatic reverse stiletto angle is the real star here.
Achieving the Minimalist Effect
Start with two coats of matte black gel or polish (matte topcoats work if you’re using regular polish). Once fully cured and set, use a fine striping brush or thin gold gel pen to create a perfectly straight line from base to tip—either centered or running along one edge. The line should be thin enough to feel delicate but visible enough that it reads clearly and intentionally.
Why This Design Endures
- Matte finishes on reverse stilettos create a sharp, almost architectural appearance that feels contemporary
- Gold lines against matte black evoke luxury and precision without being ornate
- This design works for any setting—professional, casual, or evening
- Maintenance is straightforward because imperfections in a minimalist design are more noticeable, so precision matters, but there’s nothing overly complicated here
Pro tip: If you’re concerned about the line being perfectly straight, use a gold striping tape instead of hand-painting—apply it once your base is fully set, then seal the edges with a tiny bit of topcoat to prevent peeling.
4. Pastel Marble Effect with Irregular Veining
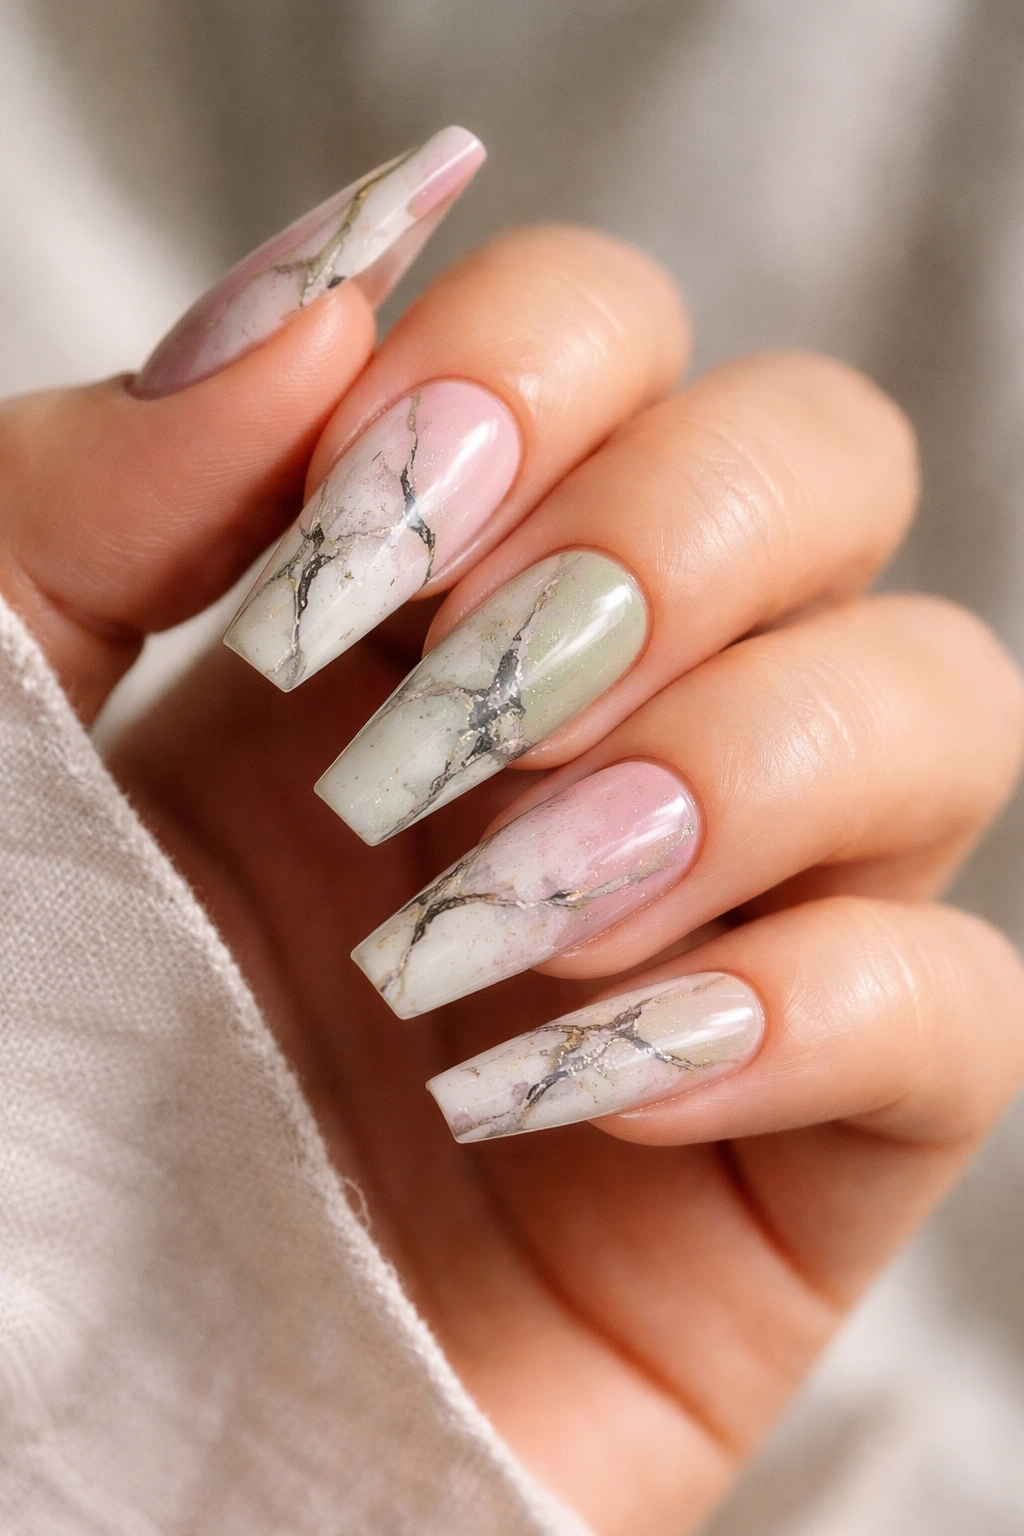
Marble nails bring an organic, natural-yet-luxe quality to any shape, and on reverse stilettos, that marbled pattern creates flow and movement that feels artistic. Mix soft pastels—blush pink, sage green, pale lavender, soft cream—directly onto the nail or on a sponge, then create irregular veining with a thin brush dipped in black, gray, or a darker shade of your base colors.
Creating Believable Marble Veining
True marble doesn’t have perfectly symmetrical lines—the veining is organic and flows across the surface unpredictably. Paint your base colors loosely on the nail, then use a thin brush to create irregular lines that flow naturally. Don’t overthink the pattern; the more relaxed and organic your approach, the more realistic the marble effect becomes. Seal with a glossy topcoat to catch light and enhance that marble-like sheen.
Practical Details
- Pastel marble works especially well in spring and summer but looks beautiful year-round
- The reverse stiletto shape actually helps marble designs look more intentional—the squared-off tip prevents the design from feeling too busy
- Each nail will be slightly different, which is actually what makes hand-painted marble feel artisanal and beautiful
- This design is intermediate in difficulty but feels elevated and refined
Insider note: Don’t seal your black veining lines until you’re completely satisfied—if you make a mistake early on, you can wipe off uncured product with a brush dampened in acetone and start that section again.
5. Glazed Donut Nails with Sprinkle Details
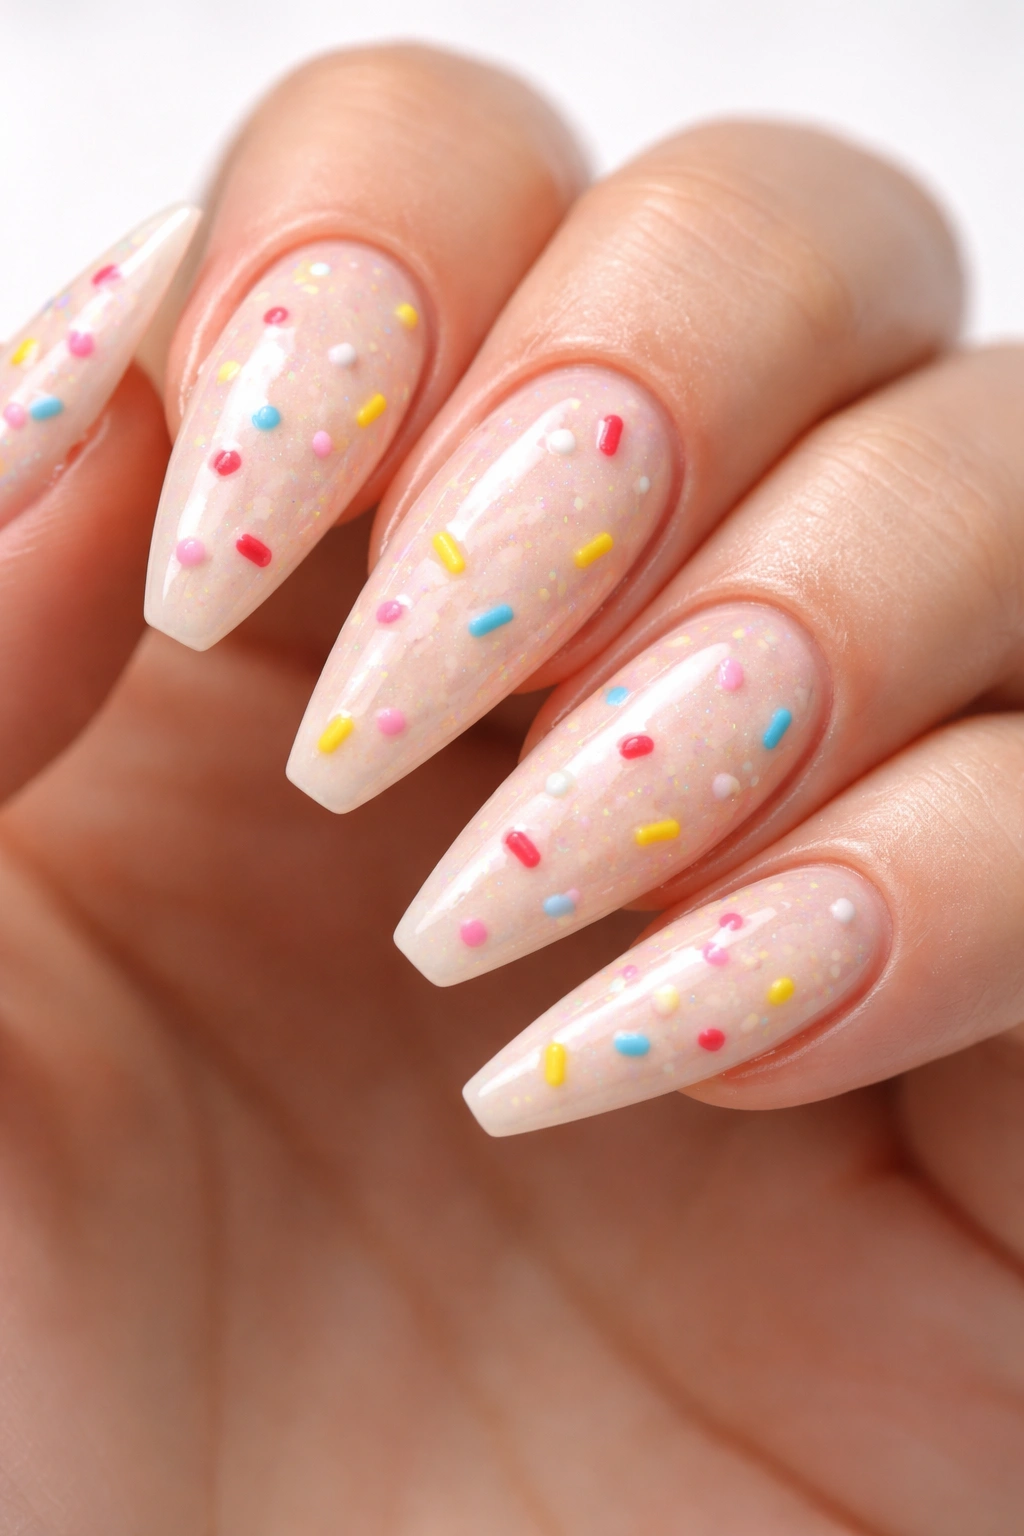
Glazed donut nails are playful and whimsical—imagine your nail is a glaze-covered pastry with colorful sprinkle details scattered across the surface. Create this with a creamy nude or white base that mimics glaze, then add tiny painted sprinkles in multiple bright colors (red, yellow, pink, blue) along with optional small dots to mimic toppings.
Making Sprinkles Look Right
Sprinkles need to be small, slightly irregular, and scattered naturally across the surface—not perfectly evenly placed. Use a thin striping brush to create tiny dashes about 2-3mm long, varying the colors and changing direction so they don’t all align the same way. Add occasional tiny dots in contrasting colors to suggest pearl sprinkles or other pastry decorations. The overall effect should feel playful, not perfectly geometric.
Why This Works on Reverse Stilettos
- The squared-off tip and angled silhouette feel modern enough to balance the playful, cutesy glazed donut concept
- Sprinkle details are small enough that they don’t overwhelm the architectural shape of the nail
- This design works beautifully for those who like statement nails without pure darkness or heaviness
- It photographs brilliantly because the bright colors and small details create visual interest
Worth knowing: This is a design best done by a professional or practiced DIY nail artist—the small details require steady hands and a fine brush. Even imperfect sprinkles have charm, though, so don’t let perfectionism stop you from trying it.
6. Deep Jewel Tones with Encapsulated Gold Flakes
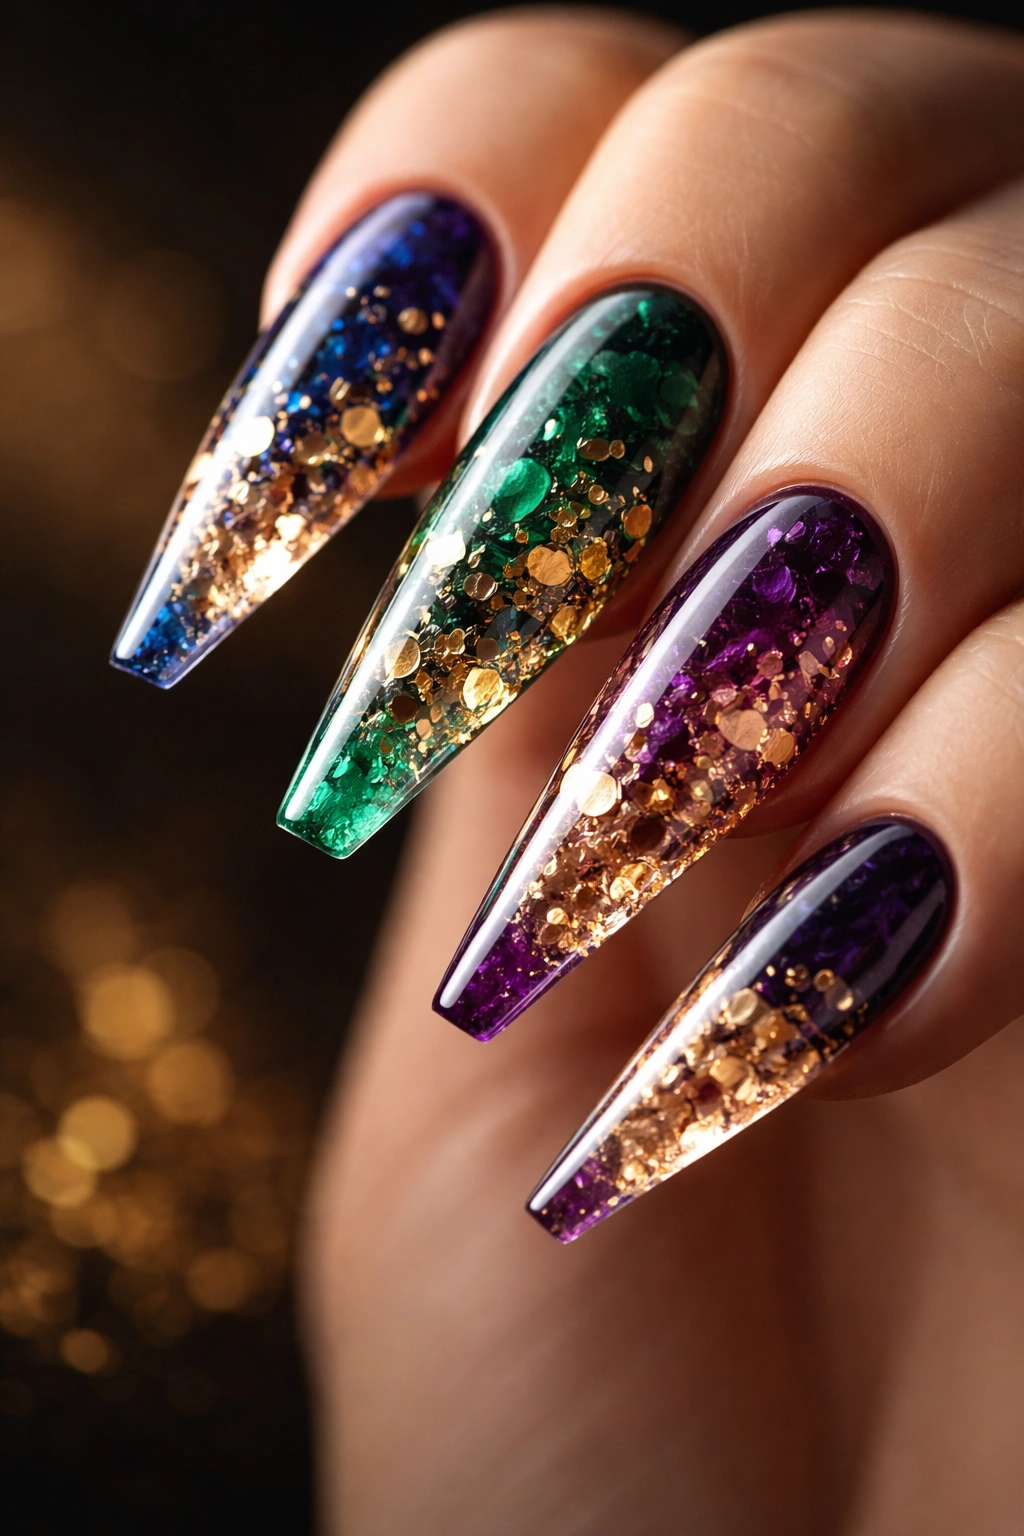
Rich jewel-tone reverse stilettos—deep sapphire, emerald, or amethyst—paired with encapsulated gold flakes create an opulent, gemstone aesthetic. Encapsulated flakes are gold particles suspended between layers of topcoat, creating dimension and sparkle that feels three-dimensional and luxurious without being glittery or overly sparkly.
The Encapsulation Process
Apply your jewel-tone base color and allow it to cure completely. Next, apply a thin layer of clear gel or topcoat, then sprinkle gold flakes or dust onto the tacky surface. Apply another thin layer of clear topcoat over those flakes, sealing them between two layers. This creates the encapsulated effect where the gold appears to float within the nail rather than sitting on top of it.
Design Depth and Dimension
- Jewel tones absorb light beautifully on matte or satin finishes, so consider a semi-glossy topcoat rather than high-shine gloss
- Encapsulated elements add genuine dimension and sophistication—they catch light differently than surface-applied glitter
- This design transitions beautifully between seasons and works for evening wear, special occasions, or elevated everyday looks
- The reverse stiletto shape allows the eye to focus on the gem-like appearance without excessive visual weight
Pro tip: Use metal flakes rather than holographic glitter for this design—they read more luxe and less party-costume.
7. Negative Space Grid with Minimalist Shapes
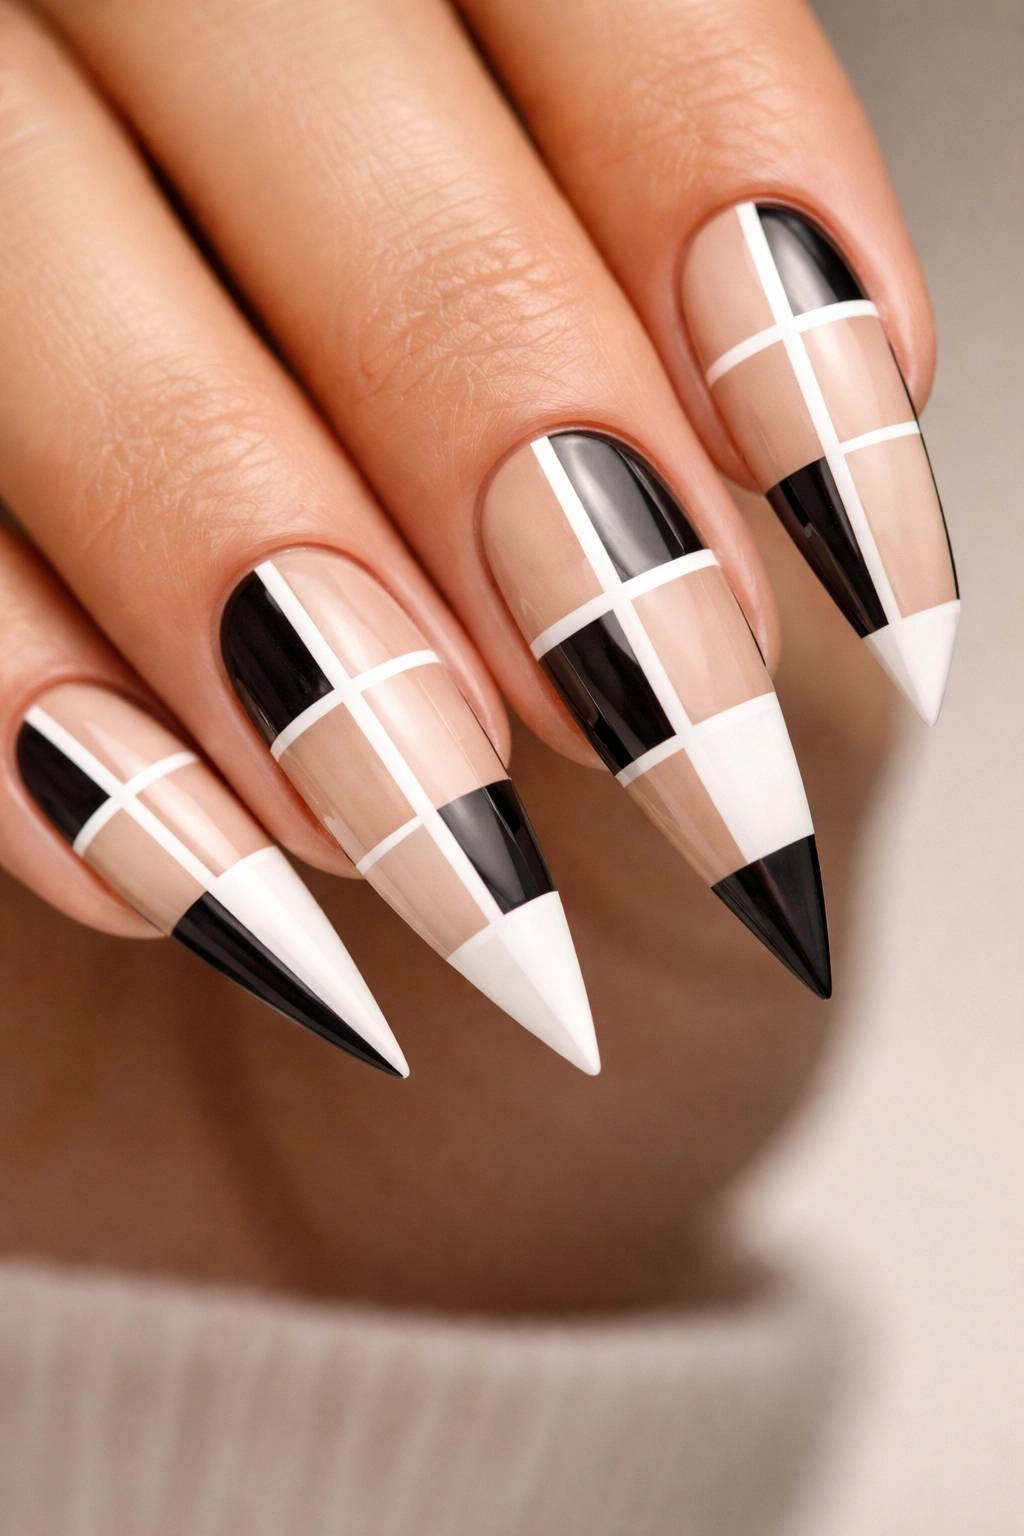
Negative space designs deliberately leave portions of the nail unpainted, creating visual interest through what’s not there rather than what is. Create a grid pattern by leaving thin unpainted lines running vertically and horizontally, dividing the nail into small rectangles, and fill alternating spaces with colors—perhaps white, black, and nude alternating in a checkerboard effect.
Executing Grid Precision
Use thin striping tape placed in vertical and horizontal lines to create your grid, then paint your chosen colors into alternating sections. Remove the tape carefully to reveal clean lines. The more precise your tape placement and the cleaner your lines, the more intentional and designed the look appears. This design rewards careful, methodical application.
Why Reverse Stilettos Enhance Grid Designs
- The architectural angle of a reverse stiletto pairs perfectly with geometric grid patterns
- The squared-off tip naturally aligns with grid lines, creating visual harmony
- Grid designs feel modern and sophisticated without requiring complex color skills
- Each nail is almost like a tiny piece of abstract art
Worth knowing: If you’re nervous about perfect lines, practice your grid pattern on a piece of paper first—actually draw out exactly where your lines will go, then reference that drawing as you apply tape to your nails.
8. Soft Blurred Ombre with Gradient Polish
This design uses specially formulated gradient polishes (usually sold in sets) that blend directly into each other on the nail. Rather than hand-sponging an ombré, you apply the polishes and they naturally fade into one another, creating a soft, almost watercolor-like effect. Choose a gradient set in complementary colors—rose to gold, teal to purple, peach to coral.
Application Made Simple
Apply the first color to the base half of the nail, the second color to the tip half, leaving a 1-2mm overlap in the middle. Before the polish dries completely, the colors naturally blend into a soft gradient. If you want to encourage the blend, lightly tap the overlapping area with your brush. The polish itself is designed to do most of the blending work for you.
The Ease Factor
- Gradient polishes are actually easier than hand-sponged ombré because you don’t need to be great at blending
- The soft, blurred transition feels modern and works for any occasion
- The reverse stiletto shape showcases the gradient beautifully because the angle means light hits different sections of the design differently
- Maintenance is simple—you’re just applying polish, not managing complex nail art
Pro tip: Don’t apply these gradient polishes too thickly or they won’t blend properly—use thin coats and allow the formula to do its work.
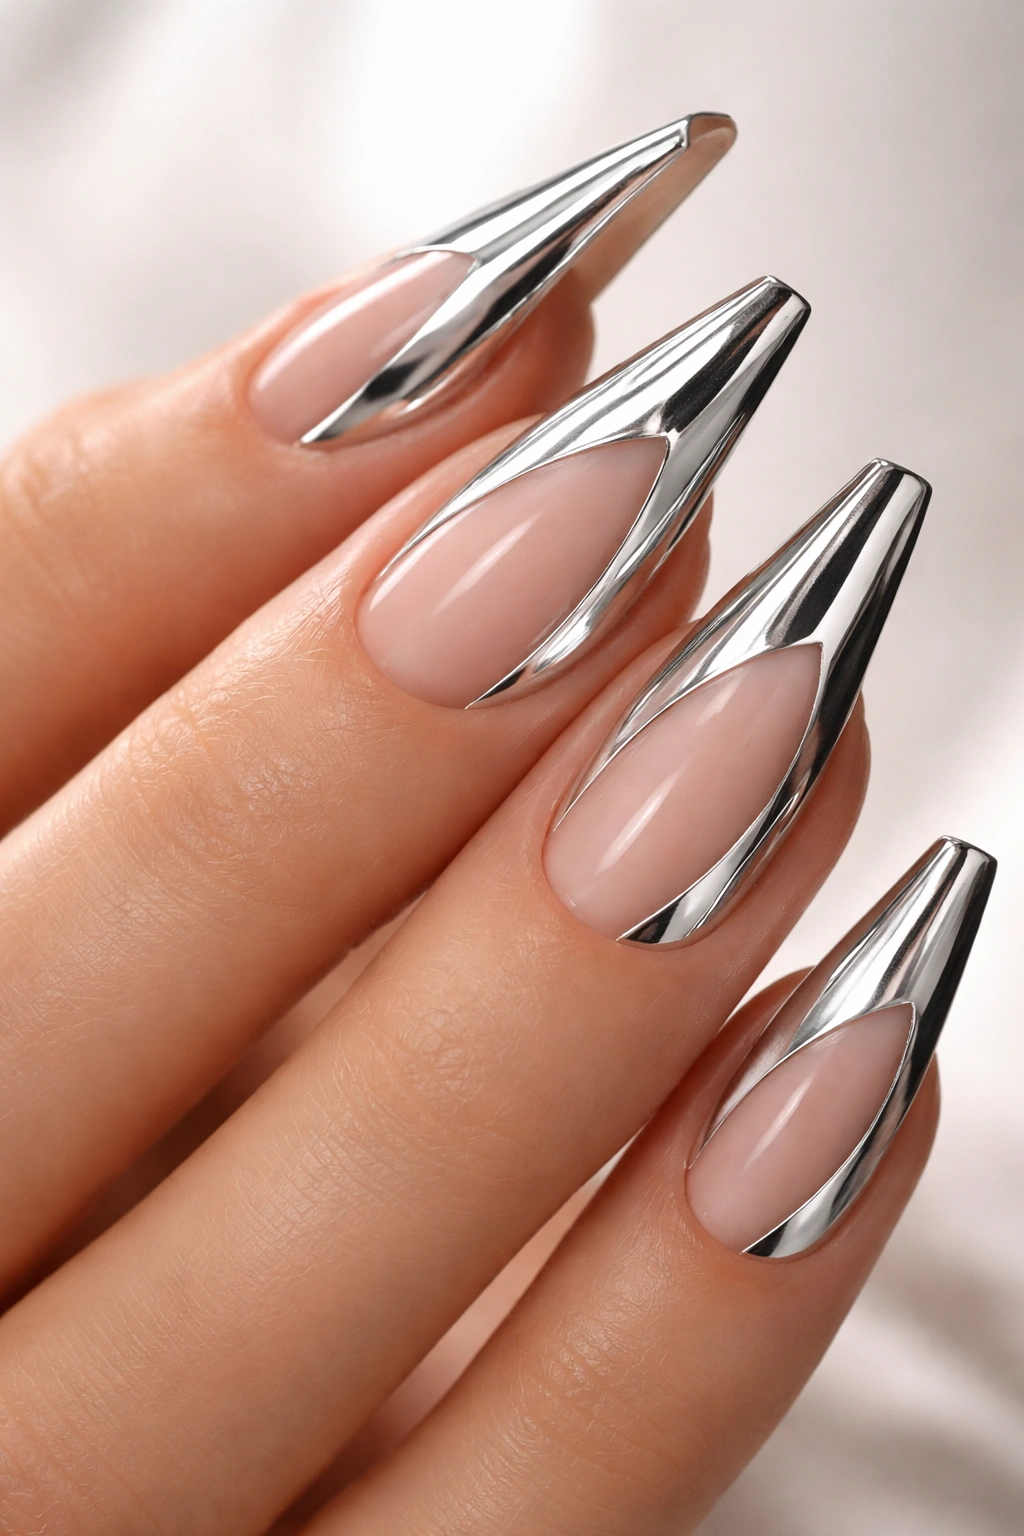
9. Sculpted French Tip with Curved Color Block
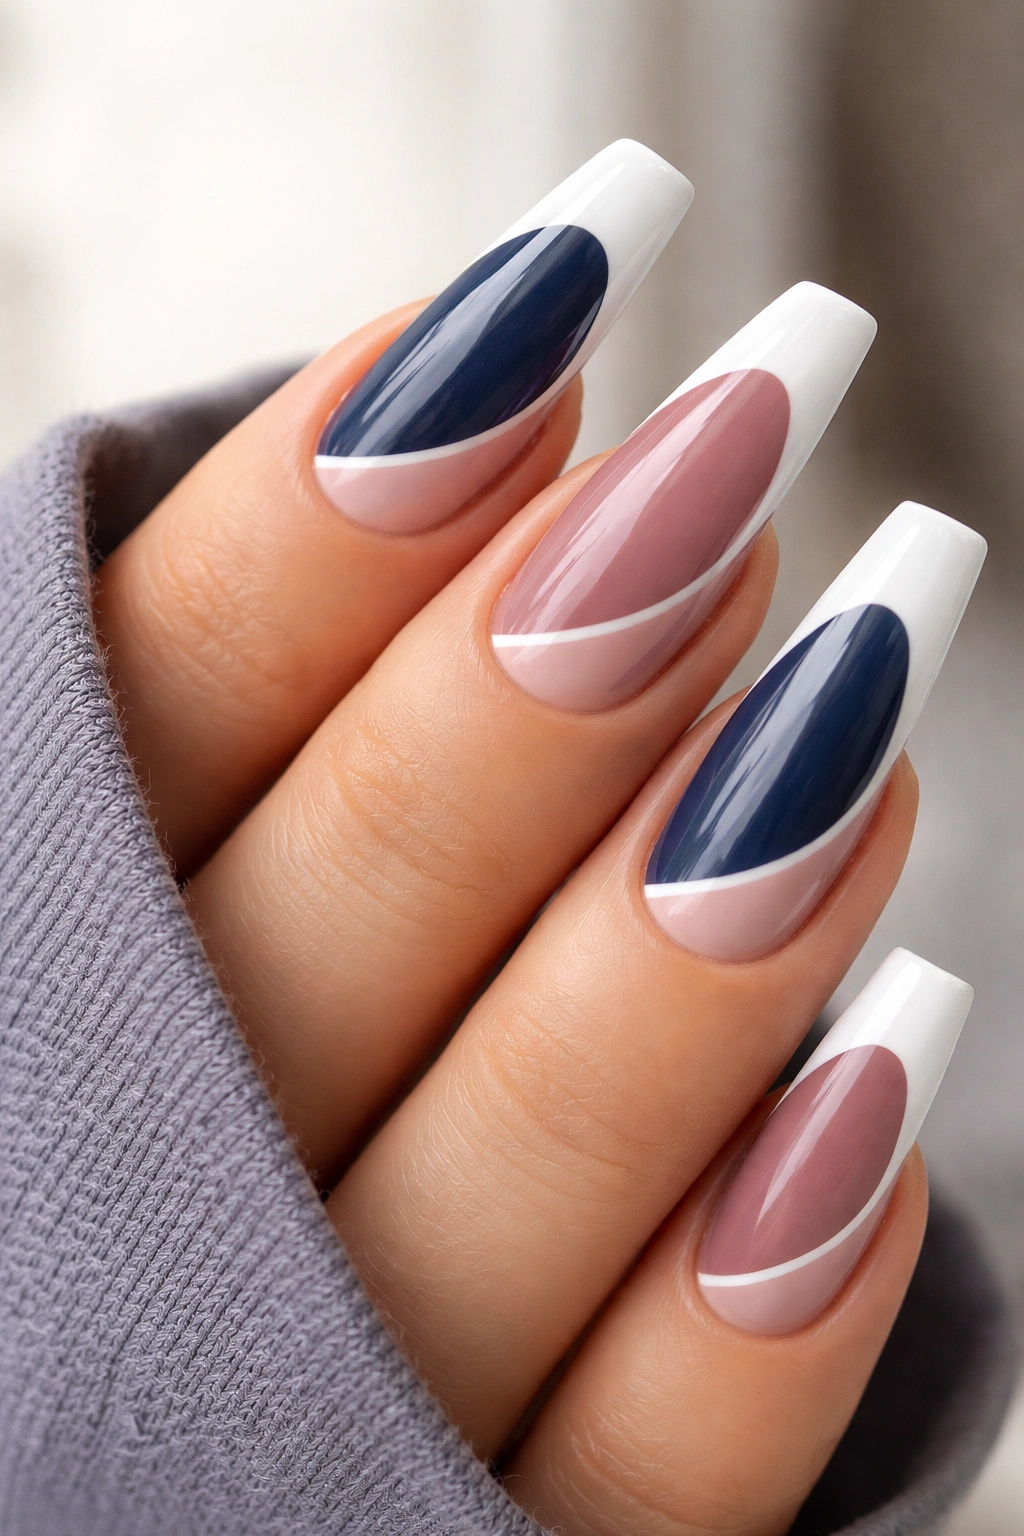
A modern twist on the French manicure, this design keeps the white or cream tip but breaks from the traditional straight line by following a curved color block that dips into the center of the nail. Imagine a soft curved line creating a U-shape of white, with the rest of the nail in a darker shade—perhaps a rich navy, warm caramel, or dusty rose.
Creating the Curved Line
Use a thin striping brush or thin nail art pen to paint your curved line freehand, or use curved nail tape to guide your design. The curve should be gentle and elegant, not exaggerated—it’s meant to feel like a modern update to the classic French tip, not a dramatically different design. Fill the curved white section carefully, making sure the line is smooth and even.
Why This Design Feels Elevated
- It nods to classic French manicure elegance while feeling contemporary and unexpected
- The reverse stiletto shape provides the perfect canvas—the squared-off tip actually serves as the boundary for your white curved section
- This works beautifully in professional settings and pairs well with any outfit
- The design is subtle enough to wear anytime but distinctive enough to feel intentional
Worth knowing: If freehand curves make you nervous, practice drawing curved lines on a piece of paper first to build confidence and muscle memory.
10. Holographic Rainbow Gradient Spectrum
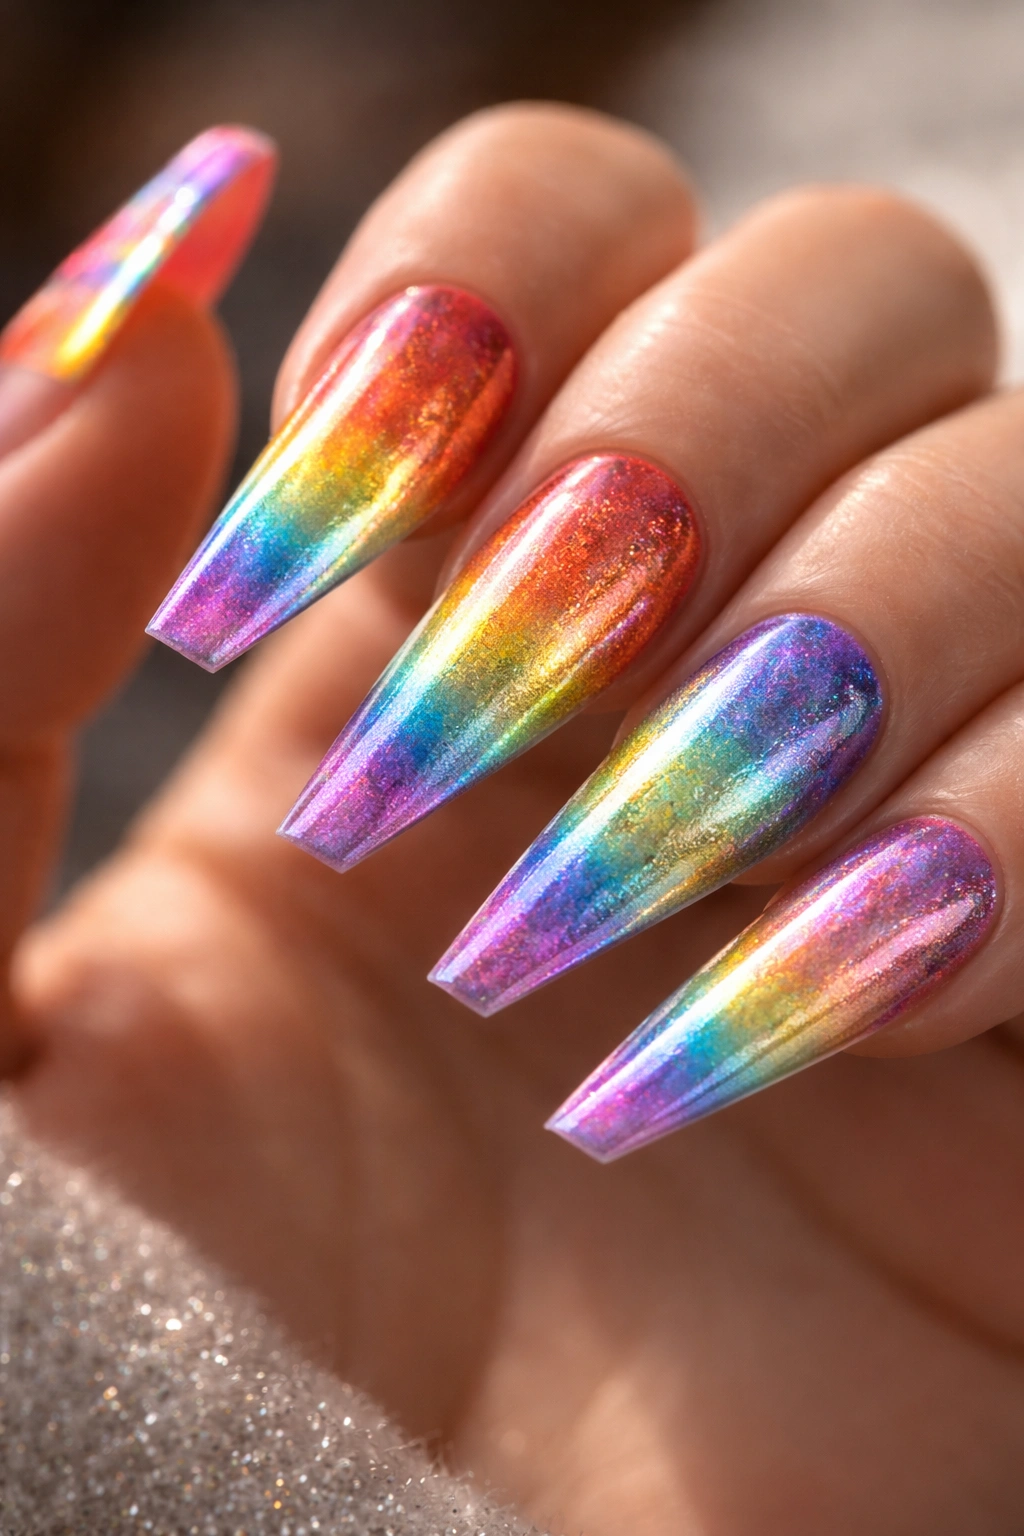
A full spectrum gradient that flows from red through orange, yellow, green, blue, and purple creates a visually stunning effect that’s almost impossible not to notice. On reverse stilettos, a rainbow gradient reads as modern and artistic rather than costume-like because the shape itself is so intentional and architectural.
Building a Rainbow Without It Looking Cartoonish
Use thin layers of gradient polish in each color, building the spectrum gradually from base to tip. Apply the polishes in bands—red at the base, orange, yellow, green, blue, and purple at the tip—with very slight overlap at each transition. The key is using colors that flow naturally into each other rather than harsh contrasts. Semi-transparent polishes work better than opaque ones for creating a cohesive rainbow feel.
Aesthetic Considerations
- The reverse stiletto shape feels contemporary enough to carry off a bold, multicolored design
- Holographic rainbow gradients photograph beautifully and catch light in dramatic ways
- This design is fun and expressive without being overly cute or juvenile
- Pair this with minimal jewelry and neutral clothing to let your nails be the statement
Pro tip: If you’re using multiple polish bottles, have them all opened and ready before you start applying—you want to work quickly so each color is still slightly tacky when you apply the next one, which helps the blending happen naturally.
11. Matte Black with 3D Rhinestone Placement
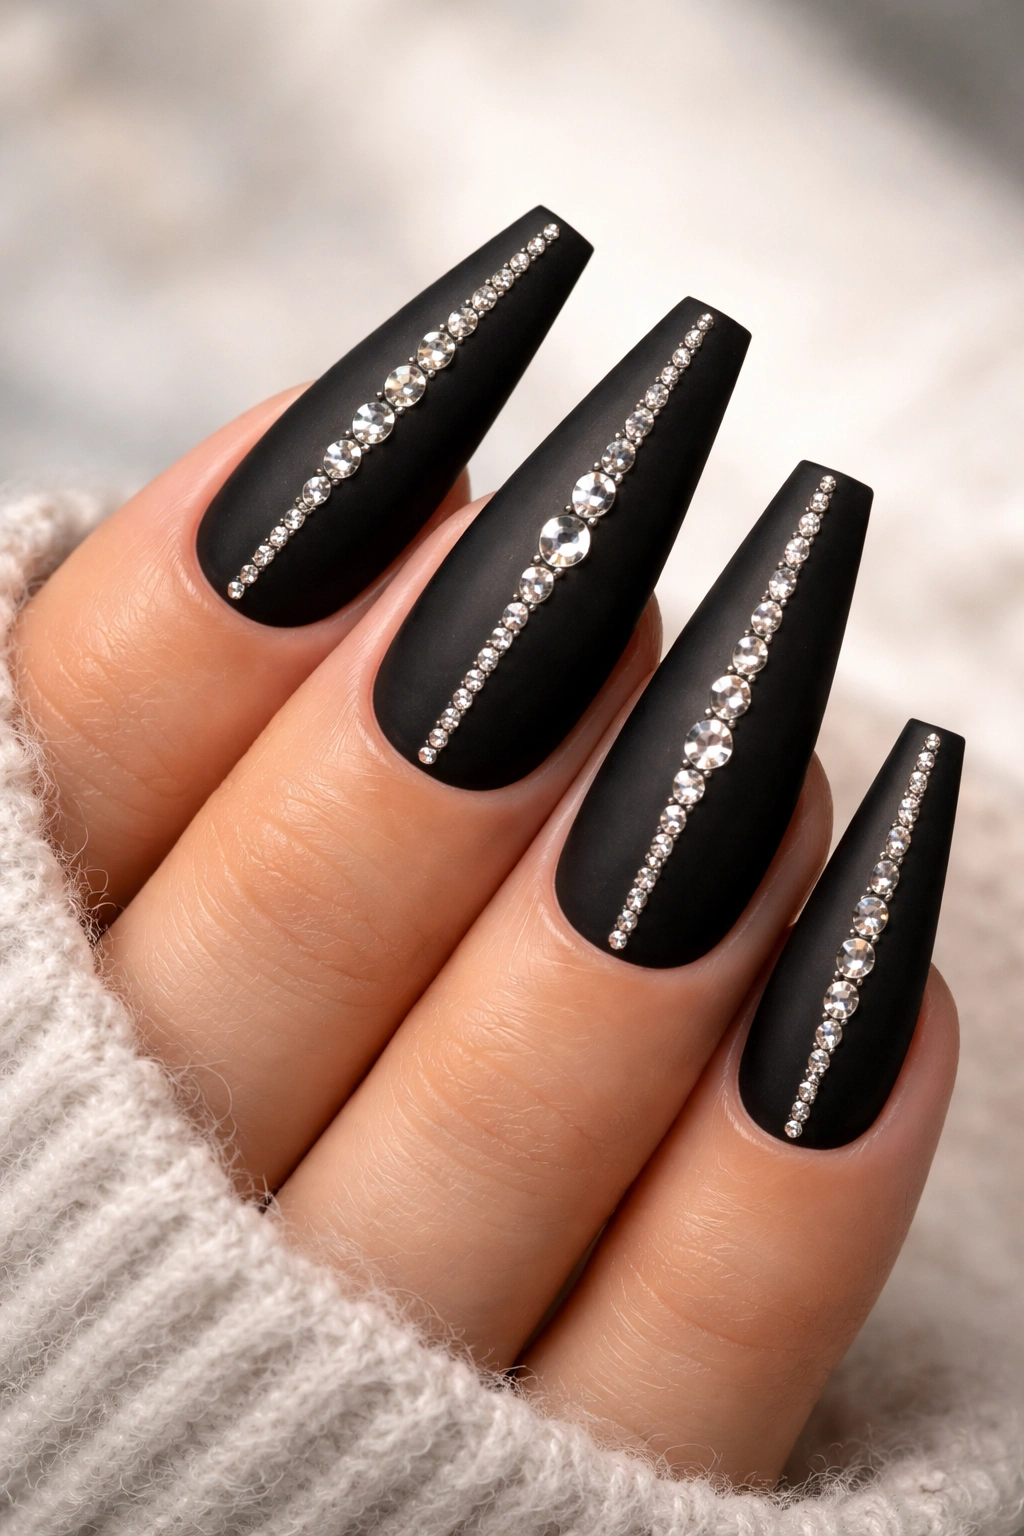
This design combines the architectural sophistication of matte black reverse stilettos with the glamorous dimension of strategically placed 3D rhinestones. Apply matte black as your base, then add small rhinestones in a linear pattern down the center or along the side edge—perhaps starting at the cuticle and trailing toward the tip.
Applying Rhinestones That Last
Use a clear gel or adhesive specifically designed for nail rhinestones—regular topcoat won’t hold them securely enough for daily wear. Apply tiny dots of adhesive on your fully cured matte base, then use a rhinestone picker tool to place each stone, pressing gently to ensure it adheres. Once all stones are placed, apply a layer of clear topcoat over and around them (but not directly over the top of the stones) to seal and protect them.
The Impact Factor
- Matte black with rhinestones feels equal parts edgy and glamorous
- The 3D dimension adds luxury and catches light beautifully
- Rhinestone placement on the angle of a reverse stiletto creates visual flow and enhances the shape
- This design works for special occasions, evenings out, or anyone who loves a little extra sparkle
Insider note: Invest in a quality rhinestone picker tool—it makes precise placement infinitely easier and prevents you from accidentally gluing your fingers together, which is always a risk when you’re fumbling with tiny stones.
Final Thoughts
Reverse stiletto nails offer a sophisticated, modern alternative to traditional nail shapes without requiring the daily caution that ultra-pointed stilettos demand. The squared-off, angled silhouette is inherently interesting, which means it can carry everything from minimalist single-line designs to complex artistic nail art.
The beauty of reverse stilettos is their versatility. They work beautifully with nearly any color, finish, or design approach—whether you’re drawn to understated elegance, bold geometric patterns, or intricate artistic details. The shape itself does visual work for you, creating dimension and architectural interest that simpler nail shapes can’t quite achieve.
When choosing your reverse stiletto design, think about your lifestyle, personal style, and the occasions you’ll be wearing them for. A chrome mirror design might feel perfect for date night, while a soft pastel marble keeps things refined for the office. The glazed donut nails read playful for casual hangs with friends, and the jewel-tone encapsulated flakes transition seamlessly from day to evening events.
The key to loving your reverse stiletto nails is choosing a design that genuinely reflects what excites you, not just what’s popular. Whether you opt for a professional nail technician or test your own skills at home, invest in quality products and take your time with application—these nails deserve the effort, and the results will absolutely reflect that care.
